


3-758-937-11 (1)
FM/AM Cassette Car Stereo
XR-6030
XRS-300
Operating Instructions |
page 2 |
Before operating the unit, please read this manual thoroughly and |
|
retain it for future reference. |
|
Manual de Instrucciones |
página 12 |
Antes de utilizar la unidad lea este manual detenidamente, consérvelo para futuras referencias.
|
EJECT |
|
|
DIR |
PUSH |
|
VOLUME BALANCE |
|
|
SEEK/MANU |
HI-FILTER |
||
|
|
|
|
|||
|
DSPL BASS |
1 |
2 |
3 |
|
|
|
|
|
|
|||
|
|
|
MANU |
|
|
|
|
FM/AM 4 |
5 |
6 |
|
|
|
POWER OFF
For installation and connections, see the supplied installation/ connections manual.
Con respecto a la instalación y a las conexiones, consulte el manual de Instalación/Conexiones suministrado.
1994 by Sony Corporation

English
Features
General
•With the built-in high power amplifier (max. output: 25 W × 2 ch) enables you to enjoy a 2-speaker system.
•Provided with a digital 12-hour clock
(page 6).
Cassette player section
•The auto-reverse function changes the tape direction automatically.
Tuner section
•SSIR (Sony Super Interference Rejection) PLL synthesizer tuner
•The quartz-locked digital synthesizer system enables easy and accurate tuning.
•Up to 18 stations can be preset, 12 stations on FM, 6 stations on AM.
Precautions
•If your car was parked in direct sunlight resulting in a considerable rise in temperature inside the car, allow the unit to cool off before operating it.
•If no power is being supplied to the unit, check the connections first. If everything is in order, check the fuse.
If you have any questions or problems conceming your unit that are not covered in this manual, please consult your nearest Sony dealer.
Protection circuit
The built-in power amplifier employs a protection circuit to protect the speakers if the amplifier malfunctions. When the protection circuit activates, there will be an abrupt loss of sound from the speakers. Particularly, when speakers with a low input impedance (less than 4 ohms) are connected to the unit, the sound will be discontinued. This, however, is not a problem. If this happens, turn the volume down a little.
Notes on Cassettes
Cassette care
•Avoid touching the tape surface of a cassette, as any dirt or dust will contaminate the heads.
•Keep cassettes away from equipment with built-in magnets such as speakers and amplifiers, as erasure or distortion on the recorded tape could occur.
•Do not expose cassettes to direct sunlight, extremely cold temperatures or moisture.
•The cassette shell may become warm when the tape is played back for a long period of time because of the built-in power amplifier. However, this is not a sign of a malfunction.
Note on cassettes longer than 90 minutes
The use of cassettes longer then 90 minutes is not recommended except for long continuous play. The tapes used for these cassettes are very thin and tends to be stretched easily. Frequent playing and stopping operation for these tapes may cause them to be pulled into the cassette deck mechanism.
2
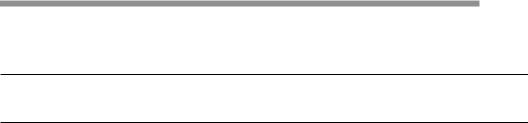
Table of Contents |
|
Location and Function of Controls ....................................................... |
4 |
Setting the Clock ...................................................................................... |
6 |
Cassette Player Operation |
|
Listening to the Tape Playback .............................................................. |
7 |
Radio Reception |
|
Tuning in a Station .................................................................................. |
8 |
Using the Memory Preset Tuning ......................................................... |
9 |
Specifications .......................................................................................... |
10 |
Troubleshooting Guide ......................................................................... |
11 |
3
Location and Function of Controls
|
EJECT |
|
|
DIR |
PUSH |
|
VOLUME BALANCE |
|
|
SEEK/MANU |
HI-FILTER |
||
|
|
|
|
|||
|
DSPL BASS |
1 |
2 |
3 |
|
|
|
|
|
|
|||
|
|
|
MANU |
|
|
|
|
FM/AM 4 |
5 |
6 |
|
|
|
POWER OFF
Refer to the pages in r for details.
1BALANCE control
Turn to adjust the balance of the left and right speakers.
2 POWER OFF (power on/off) switch/VOLUME control
POWER OFF switch |
Turn clockwise to turn on the unit and counterclockwise to turn off. |
VOLUME control |
Turn clockwise to increase volume and counterclockwise to decrease. |
|
|
3EJECT button
Press to stop the tape and take out the cassette.
4 Cassette insertion door
5 0/)(fast winding)/DIR (tape transport direction change) buttons 7
During playback, press 0or )for fast winding, or press both 0and )simultaneously to listen to the other side of the cassette.
6HI-FILTER (high-cut filter)
Turn counterclockwise to reduce the high frequency and produce a easy sound.
7Frequency select switch (located on the bottom of the unit)
See “Frequency Select Switch” in the installation/connections manual.
4
|
EJECT |
|
|
DIR |
PUSH |
|
VOLUME BALANCE |
|
|
SEEK/MANU |
HI-FILTER |
||
|
|
|
|
|||
|
DSPL BASS |
1 |
2 |
3 |
|
|
|
|
|
|
|||
|
|
|
MANU |
|
|
|
|
FM/AM 4 |
5 |
6 |
|
|
|
POWER OFF
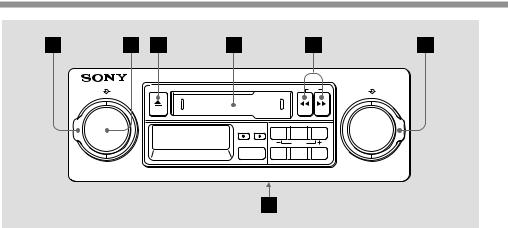
8DSPL (display change) button 6
Each time you press the button, the display modes change as follows:
During Tape playback |
Clock |
During Radio reception |
Frequency ˜Clock |
9BASS (bass boost) button
Press to reinforce bass especially when listening at low volume. To disengage the button, press it again.
!º PUSH SEEK/MANU button 8
PUSH SEEK button |
Press for automatic tuning. |
|||
PUSH MANU button |
Press the button for more than two seconds to enter the manual |
|||
|
tuning mode, then adjust the frequencies using the preset number |
|||
|
button 1 or 3 . |
|||
|
|
|
|
|
|
|
|
|
|
!¡ Display window
!™ FM/AM (band select) button 8
Each time you press the button, the band changes as follows: nFM1 nFM2 nAM
!£ Preset number buttons 6 8 9
Use the 1 and 3 buttons also for manual tuning and clock setting.
5

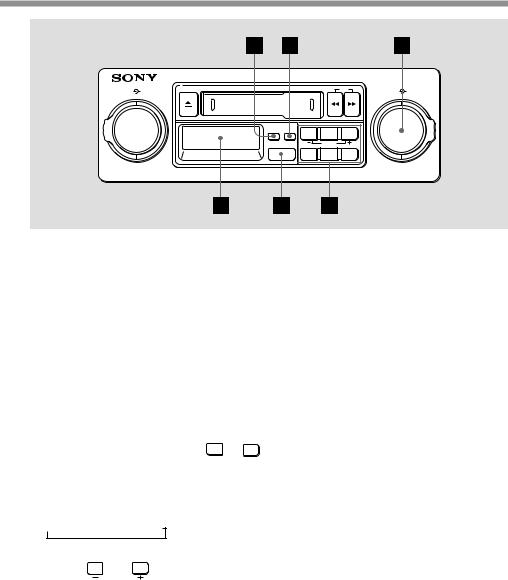
Setting the Clock
1 |
|
|
2 |
|
|
|
|
|
EJECT |
|
|
|
DIR |
PUSH |
|
VOLUME BALANCE |
|
|
|
SEEK/MANU |
HI-FILTER |
||
|
|
|
|
|
|||
|
|
DSPL BASS |
1 |
2 |
3 |
|
|
|
|
|
|
|

 MANU
MANU

FM/AM 4 5 6
The clock has a 12-hour digital indication.
POWER OFF
For example, to set it to 10:08.
1 Turn clockwise to turn the power on.
POWER OFF
2 Press the DSPL button and hold it down.
The indication starts to blink after two seconds.
DSPL
With the DSPL button hold down, proceed with the following:
Press the 1 button to set the hour digits.
When you set minute digits “00” comes after “59”. Setting the hour digits will not affect the minute digits.
When setting the minute digits, the second digits will change to “00”.
Press the 3 button to set the minute digits.
3 The clock starts activating when you take your finger off the DSPL button.
6

Listening to the Tape Playback
1 6 |
2 |
|
0/) |
|
|
|
|
|
|
|
|
|
Before inserting a cassette, |
VOLUME BALANCE EJECT |
|
|
|
DIR |
SEEK/MANU HI-FILTER |
take up any slack in the tape |
|
|
|
|
|
PUSH |
|
|
|
|
|
|
|
with a thick pencil. |
|
DSPL BASS |
1 |
2 |
3 |
|
|
|
|
|
|
|||
|
|
|
MANU |
|
|
|
|
FM/AM 4 |
5 |
6 |
|
|
|
POWER OFF
1 Turn clockwise to turn the power on.
2 Insert a cassette.
Playback starts automatically.
To listen to the reverse side of the cassette,
 DIR
DIR
press 
 simultaneously.
To Eject the Cassette and Listen to the Radio
Press the 6button.
To Wind the Tape Rapidly
Direction |
To advance |
To rewind |
|
indicator |
|||
|
|
||
( |
press ). |
press 0. |
|
9 |
press 0. |
press ). |
To resume playback, press 0or )(that one which is not depressed) lightly.
Note
Before turning off the unit; eject the tape to avoid tape damage.
Tape transport direction indication.
The side facing up is being played back.
The side facing down is being played back.
Operation Player Cassette
7
 Loading...