


4-278-421-21(1)
Navigation AV
AV Navigation
|
Operating Instructions |
|
|
GB |
|
|
Manual de instrucciones |
|
|
||
|
|
ES |
|||
|
|
||||
|
Istruzioni per l’uso |
|
|
||
|
|
|
IT |
||
XNV-L77BT XNV-770BT
XNV-L66BT XNV-660BT
©2011 Sony Corporation

Be sure to install this unit in the dashboard of the car for safety. For installation and connections, refer to the supplied “Installation/Connections” guide.
About this manual
•This manual contains instructions for XNVL77BT, 770BT, L66BT and 660BT.
•XNV-L77BT is the model representatively used for illustration purposes.
•For details on the navigation function, refer to the leaflet (supplied by TomTom) for the navigation module.
Warning
To prevent fire or shock hazard, do not expose the unit to rain or moisture.
To avoid electrical shock, do not open the cabinet. Refer servicing to qualified personnel only.
CAUTION
The use of optical instruments with this product will increase eye hazard. As the laser beam used in this CD/DVD player is harmful to eyes, do not attempt to disassemble the cabinet. Refer servicing to qualified personnel only.
This label is located on the bottom of the chassis.
The nameplate indicating operating voltage, etc., is located on the bottom of the chassis.
Hereby, Sony Corp., declares that this XNVL77BT/770BT/L66BT/660BT is in compliance with the essential requirements and other relevant provisions of Directive 1999/5/EC. For details, please access the following URL: http://www.compliance.sony.de/
Italy: Use of the RLAN network is governed:
–with respect to private use, by the Legislative Decree of 1.8.2003, no. 259 (“Code of Electronic Communications”). In particular Article 104 indicates when the prior obtainment of a general authorization is required and Art. 105 indicates when free use is permitted;
–with respect to the supply to the public of the RLAN access to telecom networks and services, by the Ministerial Decree 28.5.2003, as amended, and Art. 25 (general authorization for electronic communications networks and services) of the Code of electronic communications.
Norway: Use of this radio equipment is not allowed in the geographical area within a radius of 20 km from the centre of Ny-Alesund, Svalbard.
Notice for customers: the following information is only applicable to equipment sold in countries applying EU directives.
The manufacturer of this product is Sony Corporation, 1-7-1 Konan Minato-ku Tokyo, 108-0075 Japan. The Authorized Representative for EMC and product safety is Sony Deutschland GmbH, Hedelfinger Strasse 61, 70327 Stuttgart, Germany. For any service or guarantee matters please refer to the addresses given in separate service or guarantee documents.
2
Disposal of Old Electrical & Electronic Equipment (Applicable in the European
Union and other European countries with separate collection systems)
This symbol on the product or on its packaging indicates that this product shall not be treated as household waste. Instead it shall be handed over to the applicable collection point for the recycling of electrical and electronic equipment. By ensuring this product is disposed of correctly, you will help prevent potential negative consequences for the environment and human health, which could otherwise be caused by inappropriate waste handling of this product. The recycling of materials will help to conserve natural resources. For more detailed information about recycling of this product, please contact your local Civic Office, your household waste disposal service or the shop where you purchased the product.
Applicable accessories: Remote Commander, Microphone, GPS antenna (aerial)
Disposal of waste batteries (applicable in the European Union and other European countries with separate collection systems)
This symbol on the battery or on the packaging indicates that the battery provided with this product shall not be treated as household waste. On certain batteries this symbol might be used in combination with a chemical symbol. The chemical symbols for mercury (Hg) or lead (Pb) are added if the battery contains more than 0.0005% mercury or 0.004% lead. By ensuring these batteries are disposed of correctly, you will help prevent potentially negative consequences for the environment and human health which could otherwise be caused by inappropriate waste handling of the battery. The recycling of the materials will help to conserve natural resources. In case of products that for safety, performance or data integrity reasons require a permanent connection with an incorporated battery, this battery should be replaced by qualified service staff only. To ensure that the battery will be treated properly, hand over the product at end-of- life to the applicable collection point for the recycling of electrical and electronic equipment. For all other batteries, please view the section on how to remove the battery from the product safely. Hand the battery over to the applicable collection point for the recycling of waste
batteries. For more detailed information about recycling of this product or battery, please contact your local Civic Office, your household waste disposal service or the shop where you purchased the product.
Note on the lithium battery
Do not expose the battery to excessive heat such as direct sunlight, fire or the like.
Warning if your car’s ignition has no ACC position
Be sure to set the Auto Off function (page 54).
The unit will turn off automatically in the set time when no source is selected, which prevents battery drainage.
If you do not set the Auto Off function, press and hold (SOURCE/OFF) until the display disappears each time you turn the ignition off.
To cancel the demonstration (Demo) display, see page 58.
3

Table of Contents
Notes on safety. . . . . . . . . . . . . . . . . . . . . . . . . .8
Notes on installation. . . . . . . . . . . . . . . . . . . . . .8
Copyrights . . . . . . . . . . . . . . . . . . . . . . . . . . . . .9
Notes on Bluetooth. . . . . . . . . . . . . . . . . . . . . .10
Playable discs and symbols used in these Operating Instructions . . . . . . . . . . . . . . . . . . .11
Location and function of controls . . . . . . . . . .12 Main unit . . . . . . . . . . . . . . . . . . . . . . . . . . .12 RM-X170 Remote Commander . . . . . . . . .15
Getting Started
Resetting the unit . . . . . . . . . . . . . . . . . . . . . . .17
Performing initial settings . . . . . . . . . . . . . . . .17
Preparing the remote commander . . . . . . . . . .17
Navigation
Using the navigation function . . . . . . . . . . . . .18
Radio
Listening to the radio . . . . . . . . . . . . . . . . . . . .19 Reception controls . . . . . . . . . . . . . . . . . . . .19 Reception indications . . . . . . . . . . . . . . . . .20
Storing and receiving stations . . . . . . . . . . . . .20 Storing automatically — BTM . . . . . . . . . .20 Storing manually . . . . . . . . . . . . . . . . . . . . .20 Receiving stored stations. . . . . . . . . . . . . . .20
RDS . . . . . . . . . . . . . . . . . . . . . . . . . . . . . . . . .21
Overview . . . . . . . . . . . . . . . . . . . . . . . . . . .21
Setting AF and TA. . . . . . . . . . . . . . . . . . . .21
Selecting PTY . . . . . . . . . . . . . . . . . . . . . . .22
Setting CT . . . . . . . . . . . . . . . . . . . . . . . . . .22
Discs
Playing discs . . . . . . . . . . . . . . . . . . . . . . . . . . 22 Playback controls . . . . . . . . . . . . . . . . . . . . 23 Playback indications . . . . . . . . . . . . . . . . . . 24
Using PBC (playback control) functions. . . . . 25
Configuring audio settings . . . . . . . . . . . . . . . 25 Changing the audio language/format . . . . . 25 Changing the audio channel . . . . . . . . . . . . 26 Adjusting the audio output level
— Dolby D level. . . . . . . . . . . . . . . . . . . . . 26
Locking discs — Parental control . . . . . . . . . . 26 Activating parental control . . . . . . . . . . . . . 26 Changing the area and its movie rating
level. . . . . . . . . . . . . . . . . . . . . . . . . . . . . . . 27
Repeat and shuffle play . . . . . . . . . . . . . . . . . . 27
Direct search play . . . . . . . . . . . . . . . . . . . . . . 28
USB Device Operations
Playing from a USB device . . . . . . . . . . . . . . . 29
Repeat and shuffle play . . . . . . . . . . . . . . . . . . 29
Enjoying music according to your mood
— SensMe™ . . . . . . . . . . . . . . . . . . . . . . . . . . 30 Before using the SensMe™ function . . . . . 30 Installing “SensMe™ Setup” and “Content Transfer” on your computer . . . . . . . . . . . . 30 Registering a USB device using “SensMe™ Setup” . . . . . . . . . . . . . . . . . . . . . . . . . . . . . 31 Transferring tracks to the USB device using “Content Transfer” . . . . . . . . . . . . . . . . . . . 31 Playing tracks in channels
— SensMe™ channels . . . . . . . . . . . . . . . . 31 Playing tracks in mood maps
— SensMe™ mood. . . . . . . . . . . . . . . . . . . 33
4

iPod Operations
Playing an iPod . . . . . . . . . . . . . . . . . . . . . . . . 34
Setting the play mode . . . . . . . . . . . . . . . . . . . 34
Repeat and shuffle play . . . . . . . . . . . . . . . . . . 35
Operating an iPod directly
— Passenger control . . . . . . . . . . . . . . . . . . . . 35
Useful Functions
Listing up tracks/images/video files
— List . . . . . . . . . . . . . . . . . . . . . . . . . . . . . . . 36 Selecting a track/image/video file. . . . . . . . 36 Selecting a file type. . . . . . . . . . . . . . . . . . . 36
Searching for a track by listening to track passages — ZAPPIN™ . . . . . . . . . . . . . . . . . . 36
Using Gesture Command . . . . . . . . . . . . . . . . 37
Handsfree Calling and Audio
Streaming — Bluetooth
Before using the Bluetooth function. . . . . . . . 37 Basic procedure of the Bluetooth
function . . . . . . . . . . . . . . . . . . . . . . . . . . . 37 Bluetooth status indications . . . . . . . . . . . . 38 Installing the microphone. . . . . . . . . . . . . . 38
Pairing. . . . . . . . . . . . . . . . . . . . . . . . . . . . . . . 38 Searching from this unit . . . . . . . . . . . . . . . 38 Searching from the Bluetooth device. . . . . 39
Connecting . . . . . . . . . . . . . . . . . . . . . . . . . . . 40
Handsfree calling . . . . . . . . . . . . . . . . . . . . . . 40 Making calls . . . . . . . . . . . . . . . . . . . . . . . . 40 Receiving calls . . . . . . . . . . . . . . . . . . . . . . 42 Operations during a call . . . . . . . . . . . . . . . 42
Phonebook management . . . . . . . . . . . . . . . . . 43 Storing phonebook data . . . . . . . . . . . . . . . 43 Browsing a phonebook in a cellular
phone . . . . . . . . . . . . . . . . . . . . . . . . . . . . . 44 Deleting phonebook data . . . . . . . . . . . . . . 44 Editing a contact. . . . . . . . . . . . . . . . . . . . . 44
Call data management. . . . . . . . . . . . . . . . . . . 45 Call history . . . . . . . . . . . . . . . . . . . . . . . . . 45 Preset dial . . . . . . . . . . . . . . . . . . . . . . . . . . 45 Locking personal information . . . . . . . . . . 46
Audio streaming . . . . . . . . . . . . . . . . . . . . . . . 46 Listening to a Bluetooth device via
this unit. . . . . . . . . . . . . . . . . . . . . . . . . . . . 46 Operating a Bluetooth device with
this unit. . . . . . . . . . . . . . . . . . . . . . . . . . . . 46
Bluetooth settings . . . . . . . . . . . . . . . . . . . . . . 47
continue to next page t
5

Sound Adjustment
Selecting the sound quality — EQ7 . . . . . . . . .48 Customizing the equalizer curve
— EQ7 Tune . . . . . . . . . . . . . . . . . . . . . . . .48
Adjusting the sound characteristics . . . . . . . . .48
Optimizing sound for the listening position
— Intelligent Time Alignment. . . . . . . . . . . . .49 Calibrating the listening position
— Intelligent Time Alignment Tune. . . . . .49
Speaker configuration and volume setup . . . . .50 Creating a virtual center speaker
— CSO . . . . . . . . . . . . . . . . . . . . . . . . . . . .50 Using rear speakers like subwoofers
— Rear Bass Enhancer . . . . . . . . . . . . . . . .50 Adjusting the speaker volume . . . . . . . . . . .50
Monitor Adjustment
Adjusting the monitor angle (XNV-L77BT/770BT only) . . . . . . . . . . . . . . .51
Touch panel calibration . . . . . . . . . . . . . . . . . .51
Setting the background screen . . . . . . . . . . . . .51
Adjusting the picture — Picture EQ . . . . . . . .51 Customizing the picture. . . . . . . . . . . . . . . .52
Selecting the aspect ratio . . . . . . . . . . . . . . . . .52
Settings
Basic setting operation . . . . . . . . . . . . . . . . . . .53
General settings . . . . . . . . . . . . . . . . . . . . . . . .54
Sound settings . . . . . . . . . . . . . . . . . . . . . . . . .56
Screen settings . . . . . . . . . . . . . . . . . . . . . . . . .58
DVD and other playback settings. . . . . . . . . . .59
Setting the security code . . . . . . . . . . . . . . . . .61
Setting the clock . . . . . . . . . . . . . . . . . . . . . . . .61
Using Optional Equipment
Auxiliary audio/video equipment . . . . . . . . . . 62
Rear view camera . . . . . . . . . . . . . . . . . . . . . . 62 Rear view camera settings . . . . . . . . . . . . . 62
Additional Information
Precautions . . . . . . . . . . . . . . . . . . . . . . . . . . . 63 Notes on LCD panel . . . . . . . . . . . . . . . . . . 63 Notes on discs . . . . . . . . . . . . . . . . . . . . . . . 64 Playback order of MP3/WMA/AAC/JPEG/ Xvid/MPEG-4 files . . . . . . . . . . . . . . . . . . . 65 About MP3 files . . . . . . . . . . . . . . . . . . . . . 65 About WMA files . . . . . . . . . . . . . . . . . . . . 65 About AAC files . . . . . . . . . . . . . . . . . . . . . 65 About JPEG files . . . . . . . . . . . . . . . . . . . . 65 About MPEG-4 files . . . . . . . . . . . . . . . . . . 65 About iPod . . . . . . . . . . . . . . . . . . . . . . . . . 65 About Bluetooth function . . . . . . . . . . . . . . 66
Maintenance . . . . . . . . . . . . . . . . . . . . . . . . . . 66
Removing the unit . . . . . . . . . . . . . . . . . . . . . . 67
Specifications . . . . . . . . . . . . . . . . . . . . . . . . . 67
Troubleshooting. . . . . . . . . . . . . . . . . . . . . . . . 69
Error displays/messages . . . . . . . . . . . . . . . 72
Language code/area code list. . . . . . . . . . . . . . 74
Index . . . . . . . . . . . . . . . . . . . . . . . . . . . . . . . . 75
6

Support site
If you have any questions or for the latest support information on this product, please visit the web site below:
http://support.sony-europe.com/
Provides information on:
•Models and manufacturers of compatible digital audio players
•Models and manufacturers of compatible cellular phones and the FAQ about Bluetooth function
7

Notes on safety
•Comply with your local traffic rules, laws and regulations.
•While driving
–Do not watch or operate the unit, as it may lead to distraction and cause an accident. Park your car in a safe place to watch or operate the unit.
–Do not use the setup feature or any other function which could divert your attention from the road.
–When backing up your car, be sure to look back and watch the surroundings carefully for your safety, even if the rear view camera is connected. Do not depend on the rear view camera exclusively.
•While operating
–Do not insert your hands, fingers or foreign object into the unit, as it may cause injury or damage to the unit.
–Keep small articles out of the reach of children.
–Be sure to fasten seatbelts to avoid injury in the event of a sudden movement of the car.
Preventing an accident
Pictures appear only after you park the car and set the parking brake.
If the car starts moving during video playback, the picture is automatically switched to the background screen after displaying the caution below.
“Video blocked for your safety.”
The monitor connected to the REAR VIDEO OUT is active while the car is in motion. The picture on the display is switched to the background screen, but audio source can be heard.
Do not operate the unit or watch the monitor while driving.
Notes on installation
•We recommend this unit should be installed by a qualified technician or service personnel.
–If you try to install this unit by yourself, refer to the supplied “Installation/Connections” guide and install the unit properly.
–Improper installation may cause battery drain or a short circuit.
•If the unit does not work properly, check the connections first, referring to the supplied “Installation/Connections” guide. If everything is in order, check the fuse.
•Protect the unit surface from damage.
–Do not expose the unit surface to chemicals, such as insecticide, hair spray, insect repellent, etc.
–Do not leave rubber or plastic materials in contact with the unit for a long time. Otherwise, the finish of the unit may be impaired, or deformation may occur.
•When installing, be sure to fix securely.
•When installing, be sure to turn the ignition off. Installing the unit with the ignition on may cause battery drain or a short circuit.
•When installing, be sure not to damage any car parts such as pipes, tubes, fuel tank or wiring by using a drill, as it may cause a fire or an accident.
•The communication functions of the navigation module emit radio waves in the same manner as a cellular phone. Install the navigation module away from other electronic devices, etc., in the car to avoid any kind of interference (XNV-L77BT/ L66BT only).
8

Copyrights
Manufactured under license from Dolby Laboratories. “Dolby” and the double-D
symbol are trademarks of Dolby Laboratories.
Microsoft, Windows, Windows Vista and Windows Media and logos are trademarks or registered trademarks of Microsoft Corporation in the United States and/or other countries.
This product contains technology subject to certain intellectual property rights of Microsoft. Use or distribution of this technology outside of this product is prohibited without the appropriate license(s) from Microsoft.
“DVD VIDEO,” “DVD-R,” “DVD-RW,” “DVD+R,” and “DVD+RW” are trademarks.
The Bluetooth word mark and logos are owned by the Bluetooth SIG, Inc. and any use of such marks by Sony Corporation is under license. Other trademarks and trade names are those of their respective owners.
ZAPPIN is a trademark of Sony Corporation.
12 TONE ANALYSIS and its logo are trademarks of Sony Corporation.
“WALKMAN” and “WALKMAN” logo are registered trademarks of Sony Corporation.
SensMe and the SensMe logo are trademarks or registered trademarks of Sony Ericsson Mobile Communications AB.
Music recognition technology and related data are provided by Gracenote®. Gracenote is the industry standard in music recognition technology and related content delivery. For more information, please visit www.gracenote.com.
CD, DVD, Blu-ray Disc, and music and videorelated data from Gracenote, Inc., copyright © 2000 to present Gracenote. Gracenote Software, copyright © 2000 to present Gracenote. One or more patents owned by Gracenote apply to this product and service. See the Gracenote website for a non-exhaustive list of applicable Gracenote patents.
Gracenote, CDDB, MusicID, MediaVOCS, the Gracenote logo and logotype, and the “Powered by Gracenote” logo are either registered trademarks or trademarks of Gracenote in the United States and/or other countries.
This product uses font data which is licensed to Sony by Monotype Imaging Inc. or its affiliates.
iPhone, iPod, iPod classic, iPod nano, and
iPod touch are trademarks of Apple Inc., registered in the U.S. and other countries.
Apple, Macintosh and iTunes are trademarks of Apple Inc., registered in the U.S. and other countries.
TomTom is a trademark of TomTom N.V.
THIS PRODUCT IS LICENSED UNDER THE MPEG-4 VISUAL PATENT PORTFOLIO LICENSE FOR THE PERSONAL AND NONCOMMERCIAL USE OF A CONSUMER FOR DECODING MPEG-4 VIDEO THAT WAS ENCODED BY A CONSUMER ENGAGED IN A PERSONAL AND NON-COMMERCIAL ACTIVITY AND/OR WAS OBTAINED FROM A VIDEO PROVIDER LICENSED BY MPEG LA TO PROVIDE MPEG-4 VIDEO. NO LICENSE IS GRANTED OR SHALL BE IMPLIED FOR ANY OTHER USE. ADDITIONAL INFORMATION INCLUDING THAT RELATING TO PROMOTIONAL, INTERNAL AND COMMERCIAL USES AND LICENSING MAY BE OBTAINED FROM MPEG LA, LLC. SEE HTTP://WWW.MPEGLA.COM
All other trademarks are trademarks of their respective owners.
9

Notes on Bluetooth
Caution
IN NO EVENT SHALL SONY BE LIABLE FOR ANY INCIDENTAL, INDIRECT OR CONSEQUENTIAL DAMAGES OR OTHER DAMAGES INCLUDING, WITHOUT LIMITATION, LOSS OF PROFITS, LOSS OF REVENUE, LOSS OF DATA, LOSS OF USE OF THE PRODUCT OR ANY ASSOCIATED EQUIPMENT, DOWNTIME, AND PURCHASER’S TIME RELATED TO OR ARISING OUT OF THE USE OF THIS PRODUCT, ITS HARDWARE AND/OR ITS SOFTWARE.
IMPORTANT NOTICE!
Safe and efficient use
Changes or modifications to this unit not expressly approved by Sony may void the user’s authority to operate the equipment.
Please check for exceptions, due to national requirement or limitations, in usage of Bluetooth equipment before using this product.
Driving
Check the laws and regulations on the use of cellular phones and handsfree equipment in the areas where you drive.
Always give full attention to driving and pull off the road and park before making or answering a call if driving conditions so require.
Connecting to other devices
When connecting to any other device, please read its user guide for detailed safety instructions.
Radio frequency exposure
RF signals may affect improperly installed or inadequately shielded electronic systems in cars, such as electronic fuel injection systems, electronic antiskid (antilock) braking systems, electronic speed control systems or air bag systems. For installation or service of this device, please consult with the manufacturer or its representative of your car. Faulty installation or service may be dangerous and may invalidate any warranty that may apply to this device.
Consult with the manufacturer of your car to ensure that the use of your cellular phone in the car will not affect its electronic system.
Check regularly that all wireless device equipment in your car is mounted and operating properly.
Emergency calls
This Bluetooth car handsfree and the electronic device connected to the handsfree operate using radio signals, cellular, and landline networks as well as user-programmed function, which cannot guarantee connection under all conditions. Therefore do not rely solely upon any electronic device for essential communications (such as medical emergencies).
Remember, in order to make or receive calls, the handsfree and the electronic device connected to the handsfree must be switched on in a service area with adequate cellular signal strength.
Emergency calls may not be possible on all cellular phone networks or when certain network services and/or phone features are in use.
Check with your local service provider.
10
Playable discs and symbols used in these Operating Instructions
This unit can play various video/audio discs.
The following chart helps you to check if a disc is supported by this unit, as well as what functions are available for a given disc type.
AUDIO VIDEO
Disc symbol in manual |
Disc format |
|
|
DVD VIDEO
DVD-R*1/DVD-R DL*1/DVD-RW*1
(Video mode/VR mode)
DVD+R*1/DVD+R DL*1/DVD+RW*1
Video CD (Ver. 1.0/1.1/2.0)
Audio CD
CD-ROM*2/CD-R*2/CD-RW*2
*1 Audio files can also be stored.
*2 Video/image files can also be stored.
Note
“DVD” may be used in these Operating Instructions as a general term for DVD VIDEOs, DVD-Rs/DVD-RWs, and DVD+Rs/DVD+RWs.
The following chart shows the supported file types and their symbols.
Available functions differ depending on the format, regardless of disc type. The format symbols below appear in these Operating Instructions next to the description of functions available for their corresponding file types.
Format symbol in manual |
File type |
|
|
|
MP3 audio file |
|
|
|
WMA audio file |
|
|
|
AAC audio file |
|
|
|
JPEG image file |
|
|
|
Xvid video file |
|
|
MPEG-4 |
MPEG-4 video file |
|
|
Tip
For details on compression formats, see page 65.
Note
Even compatible discs may not be playable on this unit, depending on their recording condition.
11
Location and function of controls
Main unit
XNV-L77BT/770BT
1
VOL |
TOP |
SOURCE OFF |
2 3 4 56 7 8 9
Refer to the pages listed for details.
ADisc slot (located behind the front panel) page 22
B VOL (Volume) –/+* buttons
C Receptor for the remote commander
D Display/touch panel
E Reset button page 17
F (Bluetooth) signal indicator page 38
GTOP button
Press to open the top menu.
HSOURCE/OFF button
Press to turn on the power/change the source: “Tuner” (Radio), “Disc,” “iPod/USB,” “AUX” (Auxiliary equipment), “BT Audio” (Bluetooth Audio).
Press and hold for 1 second to exit the source.
Press and hold for more than 2 seconds to turn off.
I Z (Open/Close) button page 22
* There is a tactile dot to the right of the VOL + button.
12

XNV-L66BT/660BT
Refer to the pages listed for details.
A Z (Eject) button page 23
B Reset button page 17
CReceptor for the card remote commander
D Disc slot page 22
ETOP button
Press to open the source list.
F (Bluetooth) signal indicator page 38
G Volume control dial
HSOURCE/OFF button
Press to turn on the power/change the source: “Tuner” (Radio), “Disc,” “AUX” (Auxiliary equipment), “iPod/USB,” “BT Audio” (Bluetooth Audio).
Press for 1 second to turn off the power. Press for more than 2 seconds to shut off completely.
I Display/touch panel
continue to next page t
13
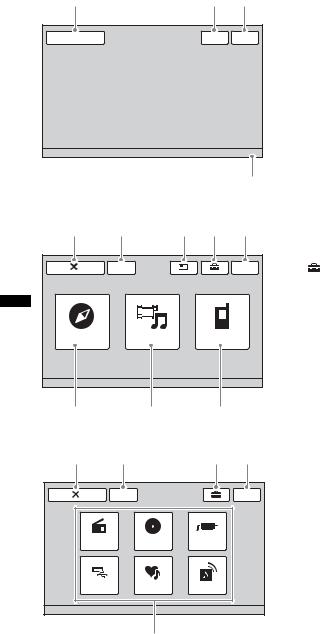
Screen displays |
A “Source List” key |
When no source is selected: |
Touch to open the source list. |
|
1 |
2 3 |
Source List |
Navi |
Top |
12:00 |
4
Top menu:
5 |
6 |
7 8 9 |
B“Navi”/“Navigation” key
Touch to enter the navigation mode.
C“Top” key
Touch to open the top menu.
D Clock page 58, 61
E (Close) key
Touch to close the menu.
F“ATT” (Attenuate) key*
Touch to attenuate the sound. To cancel, touch again.
G  (Switch view) key
Touch to select the view mode: “Navigation Only,” “Dual Screen Navi + A/V (Large),” “Dual Screen Navi + A/V (Small).”
|
ATT |
M.OFF |
H |
(Setting) key |
|
|
|
|
Touch to open the setting menu. |
|
|
|
I “M.OFF” (Monitor off) key |
|
|
|
|
|
Touch to turn off the monitor and the button |
Navigation |
AV Source |
BT Phone |
|
illumination. To turn back on, touch |
|
anywhere on the display. |
|||
|
|
|
|
|
|
|
|
J “AV Source” key |
|
|
|
|
|
Touch to open the source list. |
2 |
0 |
qa |
K “BT Phone” key |
|
Source list: |
Touch to enter Bluetooth Phone mode. |
|
5 |
6 |
|
8 3 |
|
ATT |
|
Top |
|
Tuner |
Disc |
AUX |
iPod/USB |
SensMe™ |
BT Audio |
|
|
|
qs |
|
LSource select keys
Touch to change the source: “Tuner” (Radio), “Disc,” “AUX” (Auxiliary equipment), “iPod/USB,” “SensMe™,” “BT Audio” (Bluetooth Audio).
* Appears only when a source is selected.
14
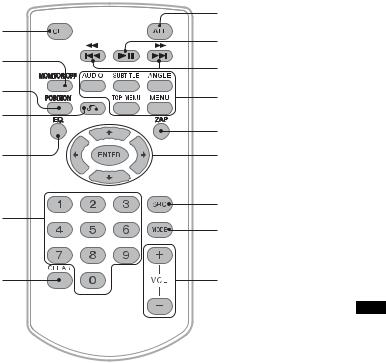
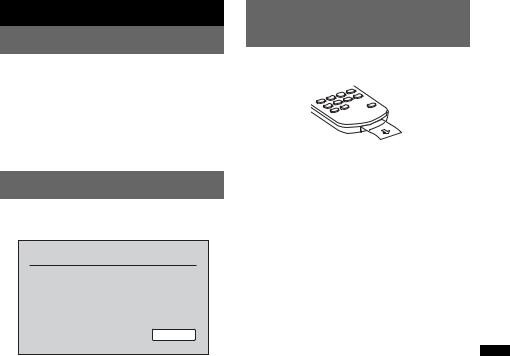
RM-X170 Remote Commander |
|
|
|
8 |
|
1 |
9 |
|
|
||
2 |
q; |
|
|
||
3 |
qa |
|
|
||
4 |
qs |
|
|
||
5 |
qd |
|
6 |
qf |
|
qg |
||
|
||
7 |
qh |
•The remote commander can be used to operate the audio controls. For menu operations, use the touch panel.
•For details, see the pages listed below.
•Remove the insulation film before use (page 17).
AOFF button
Press to exit the source/stop the source. Press and hold to turn off.
BMONITOR OFF button
Press to turn off the monitor and the button illumination. To turn back on, press again.
C POSITION button
EEQ (Equalizer) button
Press to select an equalizer curve from 7 music types (“Xplod”/“Vocal”/“Edge”/ “Cruise”/“Space”/“Gravity”/“Custom”/ “OFF”).
FNumber buttons page 28
Radio:
Press to receive stored stations. Press and hold to store stations.
Disc/USB:
Press to locate a title/chapter/track.
GCLEAR button
Press to delete an entered number.
Press to switch the listening position (“Front L”/“Front R”/“Front”/“All”/“Custom”/ “OFF”).
DO (Return) button
Press to return to the previous display/return to the menu on a VCD*1.
HATT (Attenuate) button
Press to attenuate the sound. To cancel, press again.
continue to next page t
15

I u (Play/Pause) button
J.m/M> buttons
Radio:
Press to tune to stations automatically. Press and hold to find a station manually.
Disc*2/USB:
Press to skip a chapter/track/scene/file. Press and hold momentarily to reverse/ fast-forward video.
Press and hold to reverse/fast-forward a track.
Bluetooth Audio*3:
Press to skip a track.
Press and hold to reverse/fast-forward a track.
KDVD playback setting buttons
(AUDIO):
Press to change the audio language/format. (For a VCD/CD/MP3/WMA/AAC/MPEG- 4, to change the audio channel.)
(SUBTITLE):
Press to change the subtitle language.
(ANGLE):
Press to change the viewing angle.
(TOP MENU):
Press to open the top menu on a DVD.
(MENU):
Press to open the menu on a disc.
LZAP button
Press to enter ZAPPIN™ mode.
M</M/m/, (Cursor)/ENTER buttons page 22
Press to control the menu on a DVD.
NSRC (Source) button
Press to turn on/change the source: “Tuner” (Radio), “Disc,” “iPod/USB,” “AUX” (Auxiliary equipment), “BT Audio” (Bluetooth Audio).
OMODE button
Press to select the radio band (FM/MW/LW)/ select an auxiliary device (AUX1/AUX2)*4.
P VOL (Volume) +/– buttons
*1 When playing with PBC functions.
*2 Operation differs depending on the disc (page 24). *3 Operation differs depending on the connected
Bluetooth device.
*4 When two auxiliary devices are used.
Note
The remote commander will not operate when the unit is turned off and the display has disappeared. Press (SOURCE/OFF) on the main unit, or insert a disc to activate the unit and enable operation via the remote commander.
16
Getting Started
Resetting the unit
Before operating the unit for the first time, or after replacing the car battery or changing the connections, you must reset the unit.
Press the reset button (page 12) with a pointed object, such as a ballpoint pen.
Note
Pressing the reset button will erase the clock setting and some stored contents.
Performing initial settings
After resetting, the display for the initial settings appears.
Initial Setting
Subwoofer |
|
OFF / ON |
Listening Position |
|
Front L / Front R |
|
||
|
|
|
Language |
|
English |
|
|
|
OK
1Touch “Subwoofer” to set the subwoofer connection status.
Set to “ON” if a subwoofer is connected, or “OFF” if not.
2Touch “Listening Position” to set the listening position.
Set to “Front L” if your listening position is front left, or “Front R” if front right.
3Touch “Language” to set the display language.
Touch repeatedly until the desired language (English/Spanish/Russian) appears.
4Touch “OK.”
The setting is complete.
This setting can then be further configured in the setting menu.
•For details on setting the subwoofer connection status, see page 57.
•For details on setting the listening position, see “Optimizing sound for the listening position — Intelligent Time Alignment” on page 49.
•For details on setting the display language, see page 54.
Preparing the remote commander
Before using the remote commander for the first time, remove the insulation film.
17
Navigation
Using the navigation function
1Connect the navigation module to the car dock.
For details, see the supplied installation/ connection manual.
2Press (TOP), then touch  in the top menu.
The display to select the view mode appears. The view mode options are as follows.
“Navigation Only”: Shows the navigation display only.
“Dual Screen Navi + A/V (Large)”:
Shows the current audio/video source on the navigation display.
“Dual Screen Navi + A/V (Small)”:
Shows the key of the current audio/video source on the navigation display.
|
ATT |
Top |
Navigation |
Dual Screen |
Dual Screen |
Only |
Navi + A/V |
Navi + A/V |
|
(Large) |
(Small) |
3Touch the desired view mode.
When selecting “Navigation only”
The navigation display appears, and you can then use the navigation function.
When selecting “Dual Screen Navi + A/ V (Large)” or “Dual Screen Navi + A/V (Small)”
The display to select the position of the audio/ video source and keys appears.
1Touch the desired position.
2Touch the display in the navigation area. The audio/video source and keys disappear, and you can then use the navigation function.
|
Upper Left |
|
Upper Right |
|
|
|
|
|
|
|
|
|
|
|
|
Back |
Select screen position. |
||
|
|
|
|
|
|
Lower Left |
|
Lower Right |
|
18
For further details on navigation operation, refer to the leaflet (supplied by TomTom) for the navigation module.
Notes
•During navigation operation, operation sound is not output even if “Beep” is set to “ON.”
•The navigation operation cannot be performed by the remote commander.
•The voice guidance is output only from the front speakers, and the volume of the voice guidance is independent of the regular volume.
To switch to the current audio/video source
Press and hold (TOP).
To switch back to the navigation mode, press and hold (TOP).
When “Dual Screen Navi + A/V (Large)” or “Dual Screen Navi + A/V (Small)” is selected as a view mode
You can also switch to the current audio/video source by the following method.
For “Dual Screen Navi + A/V (Large),” touch the audio/video source area.
For “Dual Screen Navi + A/V (Small),” touch
 .
.
To switch back to the navigation mode, touch “Navi” in the reception/playback display.
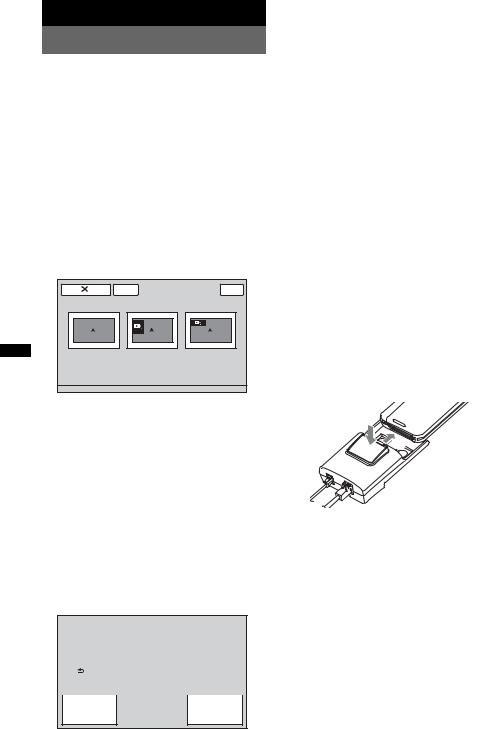
To disconnect the navigation module
Press the button on the car dock to release the navigation module, then remove.
2
1
Note
Only connect and disconnect the navigation module while the car’s ignition is off and its power indicator is turned off.
Radio
Listening to the radio
1Touch “Source List,” then “Tuner.”
From the top menu, touch “AV Source,” then “Tuner.”
The radio reception display appears, and the preset list is displayed automatically.
Source List |
ATT |
TA |
AF |
Navi |
Top |
P1 |
|
P2 |
P3 |
|
BTM |
|
|
|
|
|
|
P4 |
|
P5 |
P6 |
|
Memory |
|
|
|
|
|
|
|
|
Band |
Receive |
Preset |
PTY |
|
|
Menu |
List |
List |
|
|
|
|
2Touch “Band.”
The band list appears.
Source List |
ATT |
TA |
AF |
Navi |
Top |
FM1 |
FM2 |
FM3 |
MW |
|
LW |
|
|
Band |
Receive |
Preset |
PTY |
|
|
Menu |
List |
List |
|
|
|
|
3Touch the desired band (“FM1,” “FM2,” “FM3,” “MW,” or “LW”).
Touch “Band” again to close the band list.
4Perform tuning.
To tune automatically
Touch ./>.
Scanning stops when the unit receives a station. Repeat this procedure until the desired station is received.
To tune manually
Touch m/M repeatedly until the desired frequency is received.
To skip frequencies continuously, touch and hold m/M.
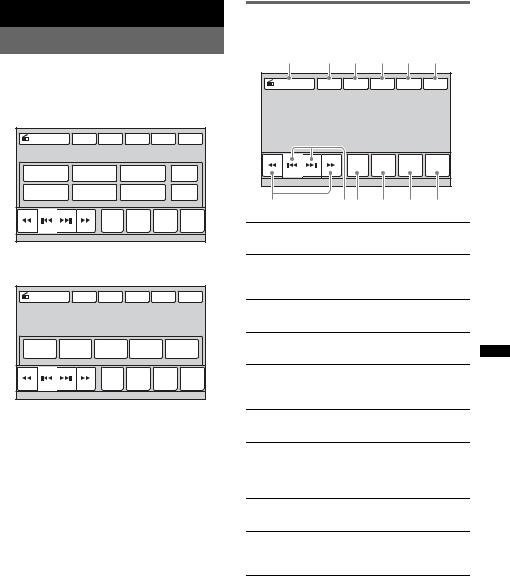
Reception controls
Touch the display if the reception controls are not displayed.
1 |
2 |
3 |
4 |
5 |
6 |
Source List |
ATT |
TA |
AF |
Navi |
Top |
|
|
Band |
Receive |
Preset |
PTY |
|
|
Menu |
List |
List |
|
|
|
|
|||
7 |
|
89 |
0 |
qa |
qs |
1“Source List”
Touch to open the source list. (page 14)
2“ATT”
Touch to attenuate the sound. To cancel, touch again.
3“TA”
Touch to set TA in RDS. (page 21)
4“AF”
Touch to set AF in RDS. (page 21)
5“Navi”
Touch to enter the navigation mode. (page 18)
6“Top”
Touch to open the top menu. (page 14)
7m/M
Touch to tune manually.
Touch and hold to continuously skip frequencies.
8./>
Touch to tune automatically.
9“Band”
Touch to open the band list and change the band.
continue to next page t
19
0“Receive Menu”
Touch to open the receive menu, which contains the following items.
•“Mono”: Touch to activate monaural mode if FM reception is poor. To restore stereo reception, select “OFF.”
•“Local”: Touch to tune only to stations with strong signals. To tune normally, select “OFF.”
•“Regional” (page 21)
qa “Preset List”
Touch to list up stored stations, or store stations. (page 20)
qs “PTY List”
Touch to open the PTY list. (page 22)
Storing and receiving stations
Caution
When tuning to stations while driving, use Best Tuning Memory (BTM) to prevent an accident.
Storing automatically — BTM
1Touch “Source List,” then “Tuner.”
To change the band, touch “Band,” then select the desired band (“FM1,” “FM2,” “FM3,” “MW,” or “LW”).
2Touch “Preset List,” then “BTM.”
The unit stores the first six available stations in the preset list (“P1” to “P6”).
A beep sounds when the setting is stored.
Reception indications
A |
|
B |
|
|
|
Source List |
ATT |
TA |
AF |
Navi |
Top |
|
|
Band |
Receive |
Preset |
PTY |
|
|
Menu |
List |
List |
|
|
|
|
|||
|
15 |
|
|
|
|
|
C |
|
D |
|
|
A Current source icon*1
BBand name, preset number*2, frequency*3/ status
C Volume level*4
D Setting status (EQ7, RBE)
*1 Appears only when the controls are displayed.
*2 Appears only when a preset station is received.
*3 While receiving an RDS station, the program service name appears. For details, see “RDS” on page 21.
*4 When ATT is activated,  appears.
Storing manually
1While receiving the station that you want to store, touch “Preset List.”
2Touch “Memory,” then touch a number in the list (“P1” to “P6”).
The number and the confirmation display appear.
3Touch “Yes.”
The station is stored.
Note
If you try to store another station to the same number, the previously stored station will be replaced.
Tip
When an RDS station is stored, the AF/TA setting is also stored (page 21).
Receiving stored stations
1Select the band, then touch “Preset List.”
2Touch the desired number (“P1” to “P6”).
20
RDS
Overview
FM stations with Radio Data System (RDS) service send inaudible digital information along with the regular radio program signal.
Display items
|
|
A |
|
|
|
Source List |
ATT |
TA |
AF |
Navi |
Top |
|
|
Band |
Receive |
Preset |
PTY |
|
|
Menu |
List |
List |
|
|
|
|
|||
|
|
|
|
|
12:00 |
B |
|
|
|
|
C |
ABand name, preset number, frequency (program service name), RDS data, TA*1
B Stereo*2, RDS*3, TP*4
C Clock
*1 During traffic information.
*2 During FM reception.
*3 During RDS reception.
*4 During traffic program reception.
RDS services
This unit automatically provides RDS services as follows:
AF (Alternative Frequencies)
Selects and retunes the station with the strongest signal in a network. By using this function, you can continuously listen to the same program during a long-distance drive without having to retune the same station manually.
TA (Traffic Announcement)/TP (Traffic Program)
Provides current traffic information/programs. Any information/program received will interrupt the currently selected source.
PTY (Program Types)
Displays the currently received program type. Also searches for a designated program type.
CT (Clock Time)
The CT data from the RDS transmission sets the clock.
Notes
•Depending on the country/region, not all RDS functions may be available.
•RDS will not work if the signal strength is too weak, or if the station you are tuned to is not transmitting RDS data.
Setting AF and TA
1During reception/playback, touch “AF” or “TA” to activate either function.
When activated, the key color changes. To deactivate, touch again.
Storing RDS stations with the AF and TA setting
You can preset RDS stations along with the AF/ TA setting. If you use the BTM function, only RDS stations are stored using the same AF/TA setting.
If you preset manually, you can preset both RDS and non-RDS stations with the AF/TA setting for each.
1Set AF/TA, then store the station with BTM or manually.
Receiving emergency announcements
With AF or TA on, emergency announcements will automatically interrupt the currently selected source.
Tip
If you adjust the volume level during a traffic announcement, that level will be stored into memory for subsequent traffic announcements, independently from the regular volume level.
Staying with one regional program
— Regional
When the AF function is on, this unit’s factory setting restricts reception to a specific region, so you will not be switched to another regional station with a stronger frequency.
If you leave this regional program’s reception area, deactivate the regional function during FM reception.
Touch “Receive Menu,” then the “Regional” box to set to “OFF.”
Note
This function does not work in the UK and in some other areas.
Local Link function (UK only)
This function enables you to select other local stations in the area, even if they are not stored on numbers.
continue to next page t 21

1During FM reception, touch “Preset List,” then a number (“P1” to “P6”) to which a local station is stored.
2Within 5 seconds, touch the number of the local station again.
Repeat this procedure until the local station is received.
Selecting PTY
1During FM reception, touch “PTY List.”
The PTY list appears if the station is transmitting PTY data.
To scroll the list, touch v/V.
2Touch the desired program type.
The unit searches for a station broadcasting the selected program type.
To close the PTY list, touch “PTY List.”
Type of programs
“News” (News), “Current Affairs” (Current Affairs), “Information” (Information), “Sport” (Sports), “Education” (Education), “Drama” (Drama), “Cultures” (Culture),
“Science” (Science), “Varied Speech”
(Varied), “Pop Music” (Pop Music), “Rock Music” (Rock Music), “Easy Listening”
(M.O.R. Music), “Light Classics M” (Light classical), “Serious Classics” (Serious classical), “Other Music” (Other Music),
“Weather & Metr” (Weather), “Finance”
(Finance), “Children’s Progs” (Children’s program), “Social Affairs” (Social Affairs),
“Religion” (Religion), “Phone In” (Phone In), “Travel & Touring” (Travel), “Leisure & Hobby” (Leisure), “Jazz Music” (Jazz Music), “Country Music” (Country Music),
“National Music” (National Music), “Oldies Music” (Oldies Music), “Folk Music” (Folk Music), “Documentary” (Documentary)
Note
You cannot use this function in countries/regions where no PTY data is available.
Setting CT
1 Set “CT” to “ON” in setting (page 54).
Notes
•The CT function may not work even though an RDS station is being received.
•There may be a difference between the time set by the CT function and the actual time.
Discs
Playing discs
Depending on the disc, some operations may be different or restricted.
Refer to the operating instructions supplied with your disc.
XNV-L77BT/770BT
1Press Z on the main unit.
The front panel opens automatically.
2Insert the disc (label side up).
The front panel closes automatically, then playback starts.
XNV-L66BT/660BT
1Insert the disc (label side up).
Playback starts automatically.
If the DVD menu appears
Touch the item in the DVD menu.
You can also use the menu control panel, which can be displayed by touching outside of the DVD menu. Touch b/v/V/B to move the cursor, then touch “Enter” to confirm.
If the menu control panel does not appear by touching the display, use the remote commander.
About the DVD menu
A DVD is divided into several sections, which make up a picture or music feature. These sections are called “titles.” When you play a DVD that contains several titles, you can select a desired title using the DVD’s top menu. For DVDs that allow you to select items such as subtitle/sound language(s), select these items using the DVD menu.
If the disc contains JPEG files
The slide show starts automatically.
To stop playback
Press and hold (SOURCE/OFF) for 1 second.
Note
Discs in DTS format are not supported. The sound is not output if the DTS format is selected.
To eject the disc
XNV-L77BT/770BT
1Press Z on the main unit.
The front panel opens automatically, then the disc is ejected.
2Press Z on the main unit to close the front panel.
Note
The front panel closes automatically after the caution
alarm sounds.
22

XNV-L66BT/660BT
Press Z on the main unit.
Playback controls
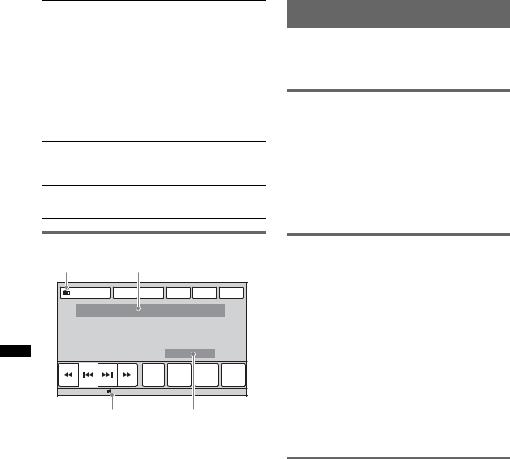
Touch the display if the playback controls are not displayed.
Common to all discs/formats
1 |
2 |
3 |
4 |
5 |
6 |
Source List |
ATT |
TA |
AF |
Navi |
Top |
|
|
|
DVD |
|
Play Menu |
|
|
|
Control |
|
SHUF |
7 |
8 |
|
|
|
9 |
Source List |
ATT |
TA |
AF |
Navi |
Top |
|
|
|
DVD |
|
Play Menu |
|
|
|
Control |
|
SHUF |
|
|
|
0 |
|
|
Source List |
ATT |
TA |
AF |
Navi |
Top |
|
|
|
PBC Panel |
|
Play Menu |
|
|
|
|
SHUF |
|
|
|
|
|
|
|
|
|
|
qa |
|
|
|
|
MPEG-4 |
|
|
|
Source List |
ATT |
TA |
AF |
Navi |
Top |
|
|
|
List |
|
Play Menu |
|
|
|
|
SHUF |
|
|
Album |
|
|
||
|
|
|
|
||
|
qs |
|
qd |
|
|
|
qs |
|
qd |
|
|
Source List |
ATT |
TA |
AF |
Navi |
Top |
|
|
|
ZAP |
List |
Play Menu |
|
|
|
SHUF |
||
|
|
Album |
|
|
|
|
|
|
|
|
|
|
|
|
qf |
|
|
1“Source List”
Touch to open the source list. (page 14)
2“ATT”
Touch to attenuate the sound. To cancel, touch again.
3“TA”
Touch to set TA in RDS. (page 21)
4“AF”
Touch to set AF in RDS. (page 21)
5“Navi”
Touch to enter the navigation mode. (page 18)
6“Top”
Touch to open the top menu. (page 14)
continue to next page t
23
7./>
Touch to skip a chapter/track/scene/ image/file.
Touch and hold momentarily to reverse/ fast-forward the video; and then repeatedly to switch the speed (× 2 t × 12 t × 120 t × 2 …)*1. To cancel, touch u.
Touch and hold to reverse/fast-forward the audio track.
During pause, touch and hold down > to play the video in slow motion. To cancel, release the key.
8u
Touch to pause/resume play after pause.
9“Play Menu”
Touch to open the play menu, which contains the following items.
•“Repeat”/“Shuffle” (page 27)
•“Dolby D Level” (DVD VIDEO playback only) (page 26)
•“Stereo” (VCD/CD/MP3/WMA/AAC playback only) (page 26)
•“Image Turn” (JPEG playback only):
Touch to rotate an image left/right.
•“Audio” (Xvid/MPEG-4 playback only) (page 26)
0“DVD Control”
Touch to open the DVD control menu, which contains the following items.
•“Audio”: Touch repeatedly to select the audio language/format. (page 25)*2
•“Subtitle”: Touch repeatedly to turn off/select the subtitle language.*2*3
•“Angle”: Touch repeatedly to change the viewing angle.*2
•“Top Menu”: Touch to open the top menu on the DVD.*2
•“Menu”: Touch to open the menu on the disc.*2
|
qa |
“PBC Panel” |
|
|
Touch to display the control panel for the |
|
|
PBC menu. (page 25) |
|
|
|
|
qs |
“Album” –/+ |
|
|
Touch to skip an MP3/WMA/AAC/JPEG/ |
|
|
Xvid/MPEG-4 album (folder). |
|
|
|
|
qd |
“List” |
|
|
Touch to list up tracks/images/video files. |
|
|
(page 36) |
|
|
|
24 |
qf |
“ZAP” |
|
Touch to enter ZAPPIN mode. (page 36) |
|
|
|
|
|
|
*1 The speed depends on the format or the recording method.
*2 Availability depends on the disc.
*3 When the 4-digit input prompt appears, input the language code (page 74) for the desired language.
Note
If the disc contains multiple file types, only the selected file type (audio/video/image) can be played. For details on how to select the file type, see “Selecting a file type” on page 36.
Notes on JPEG playback
•If a large-sized image is rotated, it may take longer to display.
•Progressive JPEG files cannot be displayed.
Playback indications
Touch the display if the indications are not displayed.
For audio discs, some indications are always displayed during playback.
|
|
|
|
|
MPEG-4 |
A |
|
|
|
|
|
Source List |
ATT |
TA |
AF |
Navi |
Top |
|
|
|
DVD |
|
Play Menu |
|
|
|
Control |
|
SHUF |
|
15 |
|
|
|
|
|
B |
C |
|
|
|
|
D |
E |
F |
|
|
Source List |
ATT |
TA |
AF |
Navi |
Top |
ZAP |
Play Menu |
List |
|
Album |
SHUF |
|
G
A Current source icon
B Volume level*1
CFormat, playback status, elapsed playback time*2, chapter/title/album (folder)/track
number*3*4, audio format*5, setting status (CSO, EQ7, RBE)
D Playback status, elapsed playback time*2 E Track name, album name, artist name F Album artwork display*6
GFormat, track number, album number*7, setting status (CSO, EQ7, RBE)
*1 |
When ATT is activated, |
|
appears. |
|
|||
|
|||
*2 |
During JPEG playback or VCD playback with PBC |
||
|
functions, no indication appears. |
||
*3 |
Indications differ depending on the disc/format. |
||
*4 |
When playing a VCD with PBC functions |
||
|
(page 25), no indication appears. |
||
*5 |
DVD only. |
|
|
*6 |
The recommended size is from 240 × 240 to 960 × |
||
|
960 pixels. |
|
|
*7 |
MP3/WMA/AAC only. |
|
|
Using PBC (playback control) functions
The PBC menu interactively assists with operations while a PBC-compatible VCD is played.
1Start playing a PBC-compatible VCD.
The PBC menu appears.
2Touch “PBC Panel.”
The menu control panel appears.
3Touch the number keys to select the desired item, then touch “Enter.”
4Follow the instructions in the menu for interactive operations.
To return to the previous display, press O. To hide the controls, touch “Close.”
Playing without PBC functions
1While no source is selected, touch “Source List,” then  .
.
2Touch “Visual.”
The visual setting menu appears.
3Touch v/V to scroll, then touch “Video
CD PBC” to set to “OFF.”
4Start playing a VCD.
The PBC menu does not appear during playback.
Notes
•The items on the menu, and operation procedures differ depending on the disc.
•During PBC playback, the track number, playback item, etc., do not appear on the playback display.
•Resume playback is unavailable during playback without PBC.
Configuring audio settings
Note
Discs in DTS format are not supported. The sound is not output if the DTS format is selected.
Changing the audio language/ format 
The audio language can be changed if the disc is recorded with multilingual tracks. You can also change the audio format when playing a disc recorded in multiple audio formats (e.g., Dolby Digital).
1During playback, touch “DVD Control.”
2Touch “Audio” repeatedly until the desired audio language/format appears.
Audio language
Source List |
ATT |
TA |
AF |
Navi |
Top |
Audio |
1: English |
|
|
Dolby D 3/2.1 |
|
Audio |
Subtitle |
Angle |
Top Menu |
|
Menu |
|
|
|
DVD |
|
Play Menu |
|
|
|
Control |
|
SHUF |
Audio format/channel numbers*
The audio language switches among the available languages.
When the 4-digit input prompt appears, input the language code (page 74) for the desired language.
When the same language is displayed two or more times, the disc is recorded in multiple audio formats.
*The format name and channel numbers appear as follows:
Example: Dolby Digital 5.1 ch
Rear channel × 2
Dolby D 3 / 2 . 1
Front channel × 2 + |
LFE channel × 1 |
Center channel × 1 |
|
To close the DVD control menu, touch “DVD Control.”
25

Changing the audio channel
MPEG-4
When playing a VCD/CD/MP3/WMA/AAC/ Xvid/MPEG-4, you can listen to both the right and left channel, only the right channel, or only the left channel via both the right and left speakers.
The options are indicated below.
“2-Ch”: Standard stereo sound (default) “L-Ch”: Left channel sound (monaural) “R-Ch”: Right channel sound (monaural)
For VCD/CD/MP3/WMA/AAC
1During playback, touch “Play Menu,” then “Stereo” repeatedly until the desired audio channel appears.
For Xvid/MPEG-4
1During playback, touch “Play Menu,” then “Audio” repeatedly until the desired audio channel appears.
To close the play menu, touch “Play Menu.”
Note
You may not be able to change the audio setting depending on the disc.
Tip
Operation via the remote commander by pressing (AUDIO) repeatedly is also available.
Locking discs
— Parental control
 *
*
* Excluding DVD-R/DVD-R DL/DVD-RW in VR mode.
You can lock a disc, or set playback restrictions according to a predetermined level such as viewer age. Restricted scenes can be blocked or replaced with different scenes when a parental control-compatible DVD is played.
Activating parental control
1While no source is selected, touch “Source List,” then  .
.
2Touch “Visual.”
The visual setting menu appears.
3Touch v/V to scroll, then touch “DVD
Parental Control.”
The password setting display appears.
4Touch the number keys to enter your password, then touch “OK.”
5To confirm, touch the number keys to reenter your password, then touch “OK.”
The setting is complete.
To delete an entered number, touch “Clear.” To return to the previous display, touch “Back.”
Adjusting the audio output level
— Dolby D level 
You can adjust the audio output level for a DVD recorded in Dolby Digital format, to reduce the volume level differences between discs.
1During playback, touch “Play Menu.”
2Touch the “Adjust” box to set to “ON.”
3Touch –/+ repeatedly to adjust the output level.
The output level is adjustable in single steps, between –10 and +10.
To close the play menu, touch “Play Menu.”
Deactivating parental control
1Follow steps 1 to 3 above.
The parental unlock display appears.
2Touch the number keys to enter your current password.
“Parental Unlocked” appears, and the parental control is deactivated.
Changing the password
Deactivate the parental control, then activate again using the new password.
26
Changing the area and its movie rating level
The restriction levels can be set based on the area and its movie ratings.
1While no source is selected, touch “Source List,” then  .
.
2Touch “Visual.”
The visual setting menu appears.
3Touch v/V to scroll, then touch “DVD
Parental Area.”
When parental control is already activated, the display to enter your password appears. To change the setting, enter your password. The options appear.
4Touch the desired area to apply its movie ratings.
When you select “Other,” enter the area code by selecting from “Area code list” on page 74 using the number keys.
5Touch “DVD Parental Rating.”
The options appear.
The lower the number, the stricter the restriction level.
6Touch the desired rating.
The setting is complete.
To return to the previous display, touch “Back.”
Repeat and shuffle play
MPEG-4
1During playback, touch “Play Menu,” then the “Repeat” or “Shuffle” box repeatedly until the desired option appears.
Source List |
ATT |
TA |
AF |
Navi |
Top |
Chapter |
OFF |
ON |
|
|
|
Repeat |
Shuffle |
Adjust |
Dolby D Level 0 |
||
|
|
|
DVD |
|
Play Menu |
|
|
|
Control |
|
SHUF |
Repeat or shuffle play starts.
To close the play menu, touch “Play Menu.”
The repeat options and switching order of each disc/format are indicated below.
Disc/format Options
“OFF”: Returns to normal play mode.
“Chapter”: Repeats the current chapter.
“Title”: Repeats the current title.
“OFF”: Returns to normal play  *1 mode.
“Track”: Repeats the current track.
“OFF”: Returns to normal play mode.
“Track”: Repeats the current track.
“Album”: Repeats the current album (folder).
“OFF”: Returns to normal play mode.
“Image”: Repeats the current image.
“Album”: Repeats the current album.
“OFF”: Returns to normal play mode.
|
“Movie”: Repeats the current |
MPEG-4 |
video file. |
|
“Album”: Repeats the current album (folder).
continue to next page t 27
The shuffle options and switching order of each disc/format are indicated below.
Disc/format |
Options |
||||
|
|
|
|
|
“OFF”: Returns to normal play |
|
|
|
*2 |
mode. |
|
|
|
||||
|
|
|
|
|
“Title”: Plays chapters in the |
|
|
|
|
|
|
|
|
|
|
|
current title in random order. |
|
|
|
|
|
|
|
|
|
*1 |
“OFF”: Returns to normal play |
|
|
|
||||
|
|
|
|
|
mode. |
|
|
|
|
|
|
|
|
|
|
|
“Disc”: Plays tracks in the |
|
|
|
|
|
|
|
|
|
|
|
current disc in random order. |
|
|
|
|
|
|
|
|
|
|
|
“OFF”: Returns to normal play |
|
|
|
|
|
mode. |
|
|
|
|
|
“Album”: Plays tracks/images/ |
|
|
|
|
|
video files in the current album |
|
|
|
|
|
(folder) in random order. |
MPEG-4
*1 Available only when playing a version 1.0/1.1 VCD, or a version 2.0 VCD without PBC functions.
*2 Excluding a DVD-R/DVD-R DL/DVD-RW in VR mode.
Direct search play
MPEG-4
You can directly locate a desired point by specifying the title number, chapter number, etc.
1During playback, press the number buttons on the remote commander to enter an item (track, title, etc.) number, then press (ENTER).
Playback starts from the beginning of the selected point.
The search items for a disc/format are as follows:
DVD: Title or chapter*1
VCD*2/CD/MP3/WMA/AAC: Track JPEG: Image
Xvid/MPEG-4: Movie
*1 The search item depends on the setting.
*2 Available only when playing a VCD without PBC functions.
Setting the search item (DVD only)
You can set the search item (title or chapter) for DVD playback.
1Touch “Source List,” then touch  .
.
2Touch “Visual.”
The visual setting menu appears.
3Touch v/V to scroll, then touch “DVD
Direct Search” to set to “Chapter” or “Title.”
The setting is complete.
To return to the previous display, touch “Back.”
28

USB Device Operations
For details on the compatibility of your USB device, visit the support site.
Support site
http://support.sony-europe.com/
•MSC (Mass Storage Class) and MTP (Media Transfer Protocol) type USB devices compliant with the USB standard can be used.
•Compatible codecs are MP3 (.mp3), WMA (.wma), AAC (.m4a), JPEG (.jpg), Xvid (.avi), and MPEG-4 (.mp4).
•Backup of data in a USB device is recommended.
Notes
•Connect the USB device after starting the engine. Depending on the USB device, malfunction or damage may occur if it is connected before starting the engine.
•A large-sized file may take time to start playing.
Playing from a USB device
1Remove the cap from the USB connector, and connect the USB device to the USB connector.
Playback starts automatically.
If a USB device is already connected, touch “Source List,” then “iPod/USB” to start playback.
For details on the location of the USB connector, refer to the supplied “Installation/Connections” guide.
About the playback controls and indications
You can control USB playback in the same way as disc playback. For details, see “Playback controls” on page 23.
For details on playback indications, see “Playback indications” on page 24.
To stop playback
Press and hold (SOURCE/OFF) for 1 second.
To disconnect the USB device
Stop playback, then disconnect.
Do not disconnect during playback, as data in the USB device may be damaged.
Notes on use
•Do not use USB devices so large or heavy that they may fall down due to vibration, or cause a loose connection.
•Do not leave a USB device in a parked car, as malfunction may result.
•This unit cannot recognize USB devices via a USB hub.
•Be sure to use the USB cable supplied with the device if a cable is needed when making a USB connection.
Notes on playback
•If a USB device contains multiple file types, only the selected file type (audio/video/image) can be played. For details on how to select the file type, see “Selecting a file type” on page 36.
•Displayed indications will differ, depending on the USB device, recorded format and settings. For details, visit the support site.
•The maximum number of displayable data is as follows:
–folders (albums): 256
–files (tracks): 2,000
•It may take time for playback to begin, depending on the amount of recorded data.
•DRM (Digital Rights Management) files may not be played.
•During playback or reverse/fast-forward of a VBR (Variable Bit Rate) MP3/WMA/AAC file, elapsed playing time may not display accurately.
•Playback of a lossless compression file is not supported.
Repeat and shuffle play
1During playback, touch “Play Menu,” then the “Repeat” or “Shuffle” box repeatedly until the desired option appears.
Repeat or shuffle play starts.
The repeat options are as follows:
“OFF”: Returns to normal play mode.
“Track”/“Image”/“Movie”*1: Repeats the current track/image/video file.
“Album”: Repeats the current album (folder). “Drive”*2: Repeats the current drive.
The shuffle options are as follows:
“OFF”: Returns to normal play mode. “Album”: Plays tracks/images/video files in the current album (folder) in random order.
*1 Options depend on the file type.
*2 When two or more drives exist on the USB device.
To close the play menu, touch “Play Menu.”
29

Enjoying music according to your mood — SensMe™
Sony’s unique “SensMe™ channels” and “SensMe™ mood” features automatically group tracks by channel or mood, and allow you to enjoy music intuitively.
Before using the SensMe™ function
The following is the basic procedure required to enjoy the SensMe™ function on the unit.
1Installing “SensMe™ Setup” and “Content Transfer” to your computer
First install “SensMe™ Setup” and “Content Transfer” from the supplied CD-ROM.
SensMe™ Content
Setup Transfer
2Registering a USB device using “SensMe™ Setup”
Connect a USB device to your computer, and perform registration using “SensMe™ Setup” to enable the SensMe™ function on this unit.
SensMe™
Setup
Tip
Registration can be performed either along with the installation procedure or after installation.
3Transferring tracks to the USB device using “Content Transfer”
In order to group tracks by channel or mood, track sound patterns need to be analyzed by 12 TONE ANALYSIS, which is loaded with “Content Transfer.”
With the USB device connected to your computer, drag and drop tracks from Windows Explorer or iTunes, etc., to “Content Transfer.”
Both analysis and transfer of tracks will be performed by “Content Transfer.”
Content |
Transfer |
4Connecting the USB device and enjoying the SensMe™ function on the unit
Connect the set up USB device. You can then enjoy “SensMe™ channels” or “SensMe™ mood” on this unit.
SensMe™
Installing “SensMe™ Setup” and “Content Transfer” on your computer
Use of the supplied software (“SensMe™ Setup” and “Content Transfer”) is required to enable the SensMe™ function on this unit.
Install the software to your computer from the supplied CD-ROM.
1Insert the supplied CD-ROM into your computer.
The Installation Wizard runs automatically.
2Follow the on-screen instructions to complete the installation.
30
 Loading...