Sony HCD-LCD7Di, HCD-GZR33D, MHC-GZR33Di, MHC-GZRDi User Manual

WARNING
To reduce the risk of fire or electric shock, do not expose this apparatus to rain or moisture.
To reduce the risk of fire, do not cover the ventilation opening of the apparatus with newspapers, tablecloths, curtains, etc.
Do not place the naked flame sources such as lighted candles on the apparatus.
To reduce the risk of fire or electric shock, do not expose this apparatus to dripping or splashing, and do not place objects filled with liquids, such as vases, on the apparatus.
As the main plug is used to disconnect the unit from the mains, connect the unit to an easily accessible AC outlet. Should you notice an abnormality in the unit, disconnect the main plug from the AC outlet immediately.
Do not install the appliance in a confined space, such as a bookcase or built-in cabinet.
Do not expose batteries or apparatus with battery-installed to excessive heat such as sunshine, fire or the like.
The unit is not disconnected from the mains as long as it is connected to the AC outlet, even if the unit itself has been turned off.
Excessive sound pressure from earphones and headphones can cause hearing loss.
CAUTION
The use of optical instruments with this product will increase eye hazard.
This appliance is classified as a CLASS 1 LASER product. This marking is located on the rear exterior.
Notice for customers: the following information is only applicable
to equipment sold in countries applying EU directives.
The manufacturer of this product is Sony Corporation, 1-7-1 Konan Minato-ku, Tokyo, 108-0075 Japan. The Authorized Representative for EMC and product safety is Sony Deutschland GmbH, Hedelfinger Strasse 61, 70327 Stuttgart, Germany. For any service or guarantee matters, please
given in separate documents.
This symbol is intended to alert the user to the presence of uninsulated “dangerous voltage” within the product’s enclosure that may be of sufficient magnitude to constitute a risk
of electric shock to persons.
This symbol is intended to alert the user to the presence of important operating and maintenance (servicing) instructions in the literature accompanying the appliance.
GB

Owner’s Record
The model and serial numbers are located on the rear of the unit. Record these numbers in the space provided below. Refer to them whenever you call upon your Sony dealer regarding this product.
Model No.
Serial No.
Important Safety Instructions
1)Read these instructions.
2)Keep these instructions.
3)Heed all warnings.
4)Follow all instructions.
5)Do not use this apparatus near water.
6)Clean only with dry cloth.
7)Do not block any ventilation openings. Install in accordance with the manufacturer’s instructions.
8)Do not install near any heat sources such as radiators, heat registers, stoves, or other apparatus (including amplifiers) that produce heat.
9)Do not defeat the safety purpose of the polarized or grounding-type plug. A polarized plug has two blades with one wider than the other. A grounding type plug has two blades and a third grounding prong. The wide blade or the third prong are provided for your safety. If the provided plug does not fit into your outlet, consult an electrician for replacement of the obsolete outlet.
10)Protect the power cord from being walked on or pinched particularly at plugs, convenience receptacles, and the point where they exit from the apparatus.
11)Only use attachments/accessories specified by the manufacturer.
12) Use only with the cart, stand, tripod, bracket, or table specified by the manufacturer,
or sold with the apparatus. When a cart is used, use
caution when moving the cart/apparatus combination to avoid injury from tip-over.
13)Unplug this apparatus during lightning storms or when unused for long periods of time.
14)Refer all servicing to qualified service personnel. Servicing is required when the apparatus has been damaged in any way, such as power-supply cord or plug is damaged, liquid has been spilled or objects have fallen into the apparatus, the apparatus has been exposed to rain or moisture, does not operate normally, or has been dropped.
GB
The following FCC statement applies only to the version of this model manufactured for sale in the U.S.A. Other versions may not comply with FCC technical regulations.
NOTE:
This equipment has been tested and found to comply with the limits for a Class B digital device, pursuant to Part 15 of the FCC Rules. These limits are designed to provide reasonable protection against harmful interference in a residential installation. This equipment generates, uses and can radiate radio frequency energy and, if not installed and used
in accordance with the instructions, may cause harmful interference to radio communications. However, there is no guarantee that interference will not occur in a particular installation. If this equipment does cause harmful interference to radio or television reception, which can be determined by turning the equipment off and on, the user is encouraged to try to correct the interference by one or more of the following measures:
Reorient or relocate the receiving antenna.
Increase the separation between the equipment and receiver.
Connect the equipment into an outlet on a circuit different from that to which the receiver is connected.
Consult the dealer or an experienced radio/TV technician for help.
CAUTION
You are cautioned that any changes or modifications not expressly approved in this manual could void your authority to operate this equipment.
GB

About this manual
The instructions in this manual are for models MHC-GZR33Di and LBTLCD7Di. Each model consists of the following components.
MHC-GZR33Di
Main unit: HCD-GZR33D
Speaker system:
SS-GZR77D (Front speakers)
LBT-LCD7Di
Main unit: HCD-LCD7Di
Speaker system:
SS-LCD7Di (Front speakers)
In this manual, the MHC-GZR33Di is used for illustration purposes unless stated otherwise.
Icons, such as  , listed at the top of each explanation indicate what kind of media can be used with the function being explained.
The Control Menu items may be different depending on the disc.
The Control Menu items may vary depending on the area.
The Setup Menu items may be different depending on the area.
The order of the displayed items may be different from the actual display.
DivX video files can only be played back on MHC-GZR33Di.
MPEG4 video files can only be played back on MHC-GZR33Di. However, you can view any video files (including MPEG4 video files) on LBT-LCD7Di, when files are stored in your iPod.
GB

Table of Contents |
|
About this manual................................ |
5 |
Playable discs......................................... |
8 |
Guide to parts and controls............ |
11 |
iPod
Playing the iPod.................................. |
67 |
Getting Started |
|
Hooking up the system |
|
securely.................................................. |
23 |
Hooking up the TV............................. |
27 |
Setting the LCD................................... |
31 |
Setting the clock................................. |
32 |
Performing “QUICK” setup............... |
33 |
Using the “THEATRE SYNC” |
|
function.................................................. |
35 |
Disc |
|
Playing a disc........................................ |
36 |
Using play mode................................. |
44 |
Restricting playback of the disc |
|
(PARENTAL CONTROL)....................... |
56 |
Using the Setup Menu...................... |
58 |
Tuner |
|
Listening to the radio........................ |
64 |
Using the Radio Data System (RDS) |
|
(European model only)..................... |
66 |
USB Device |
|
Before using the USB device with |
|
this system............................................ |
74 |
Transferring music from a disc to a |
|
USB device............................................ |
75 |
Recording analog audio to a USB |
|
device...................................................... |
80 |
Playing a file of the USB device..... |
81 |
Sound Adjustment |
|
Adjusting the sound.......................... |
89 |
Singing along: Karaoke..................... |
92 |
Other Operations |
|
Using the timers.................................. |
97 |
Changing the display........................ |
99 |
Hooking up optional |
|
components...................................... |
104 |
GB

Additional Information |
|
Troubleshooting.............................. |
107 |
Precautions........................................ |
124 |
Specifications.................................... |
126 |
Compatible devices with this |
|
system.................................................. |
130 |
Compatible iPod models with this |
|
system.................................................. |
132 |
Guide to the Control Menu |
|
display.................................................. |
133 |
Playback priority of file types...... |
137 |
Language code list.......................... |
138 |
Glossary............................................... |
140 |
Index.................................................... |
144 |
License and Trademark Notice.... |
146 |
GB
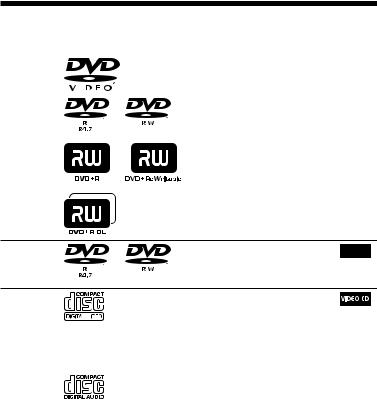
Playable discs
Type |
Disc logo |
Characteristics |
Icon |
||
DVD VIDEO |
|
|
DVD VIDEO |
|
|
|
|
|
|
||
|
|
|
DVD-R/DVD-RW in DVD |
|
|
|
|
|
VIDEO format or video mode |
|
|
|
|
|
|
|
|
|
|
|
|
|
|
|
|
|
DVD+R/DVD+RW in DVD |
|
|
|
|
|
VIDEO format |
|
|
VR (Video Recording) mode
VIDEO CD
DVD-R/DVD-RW in VR (Video 

 Recording) mode (except for
DVD-R DL)
VIDEO CD (Ver. 1.1 and 2.0
discs)
Super VCD
CD-R/CD-RW/CD-ROM in video CD format or Super VCD format
CD |
Audio CD |
|
|
|
CD-R/CD-RW in audio CD |
|
|
|
format |
||
|
|
|
|
GB

Type |
Disc logo |
Characteristics |
Icon |
|
DATA CD |
|
CD-R/CD-RW/CD-ROM in |
|
|
|
|
|
||
|
|
DATA CD format, containing |
|
|
|
|
MP3 files, JPEG image files, |
|
|
|
|
DivX video files and MPEG4 |
|
|
|
|
video files, and conforming to |
|
|
|
|
ISO 9660 Level 1/Level 2, or |
|
|
|
|
Joliet (extended format) |
|
|
DATA DVD |
|
DVD-ROM/DVD-R/DVD-RW/ |
|
|
|
|
|
||
|
|
DVD+R/DVD+RW in DATA |
|
|
|
|
DVD format, containing MP3 |
|
|
|
|
files, JPEG image files, DivX |
|
|
|
|
video files and MPEG4 video |
|
|
|
|
files, and conforming to UDF |
|
|
|
|
(Universal Disk Format) |
|
|
MP3 files: MP3 (MPEG 1 Audio Layer 3) is a standard format defined by ISO/MPEG which compresses audio data. MP3 files must be in MPEG 1 Audio Layer 3 format.
JPEG image files: JPEG image files must conform to the DCF image file format (DCF “Design rule for Camera File System”: Image standards for digital cameras regulated by “Japan Electronics and Information Technology Industries Association” (JEITA)).
DivX video files: DivX video files must be recorded in DivX format with the extension “.avi” or “.divx” (MHC-GZR33Di only).
MPEG4 video files: MPEG4 video files must be recorded in MP4 file format with the extension “.mp4” or “.m4v” (MHC-GZR33Di only).
ISO 9660: A logical format of files and folders on CD-ROMs, defined by ISO (International Organization for Standardization).
GB

Discs that cannot be played
CD-ROMs recorded in PHOTO CD format
DATA CDs recorded in MP3 PRO format
Data part of CD-Extras1)
Data part of Mixed CDs2)
Super Audio CDs
DVD Audio discs
DVD-RAMs
CPRM compatible DVD-R/RW recorded in Copy-once programs3)
Discs of non-standard shape (for example, heart, square, star)
Discs that have adhesive tape, paper, or sticker attached to them
Rental or used discs with attached seals where the glue extends beyond the seal
Discs that have labels printed using ink that feels tacky when touched
1)CD-Extra: This format records audio (AUDIO CD data) on the tracks in session 1 and data on the tracks in session 2.
2)Mixed CD: This format records data on the first track and audio (AUDIO CD data) on the second and subsequent tracks of a session.
3)CPRM: “Content Protection for Recordable Media” is a coding technology that protects copyright for Copy-Once programs.
See “Region code of DVD VIDEOs you can play back on this system” and “Notes on discs” (page 124) regarding the region code and notes on discs.
10GB
Guide to parts and controls
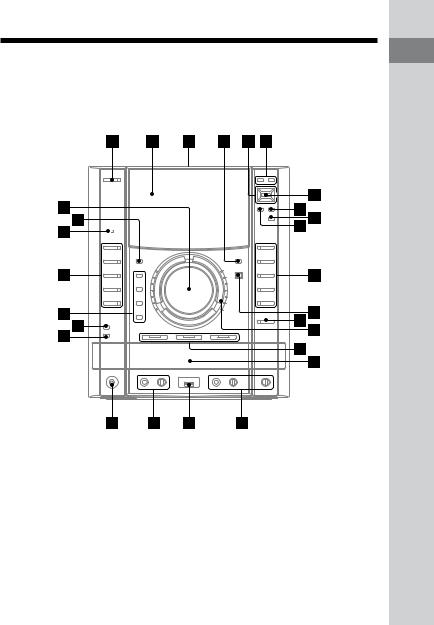
This manual mainly explains operations using the remote, but the same operations can also be performed using the buttons on the unit having the same or similar names.
Main unit
Continued
controls and parts to Guide
11GB
(on/standby) button (page 76, 80, 84, 98)
Press to turn on or off the system.
STANDBY indicator (page 107)
Lights up when the system is turned off.
Display
iPod Dock (page 26)
Place an iPod into the iPod Dock to listen to audio contents stored in the iPod.
LCD DISPLAY ON/OFF button
Press to turn on or off the front panel display.
/ / / buttons (page 37, 50, 77, 78, 83)
Press to select the menu items.
DVD TOP MENU button (page 37)
Press to display the DVD title on the TV screen.
DVD/TUNER MENU button (page 40, 49, 53, 65, 82)
Press to turn on or off the menu items on the TV screen.
Press to preset the radio station.
ENTER button (page 29, 30, 32, 33, 34, 41, 42, 43, 44, 45, 46, 47, 49, 50, 52, 53, 54, 55, 56, 57, 58, 64, 65, 68, 70, 71, 76, 77, 78, 80, 82, 83, 85, 86, 87, 90, 94, 96, 97, 98, 100)
Press to enter the settings.
 DISPLAY button (page 29, 34, 42, 43, 44, 46, 47, 49, 52, 53, 54, 55, 56, 58, 76, 82, 85, 86, 94, 95, 104)
Press to turn on or off the Control Menu on the TV screen.
The Control Menu is displayed only when the “DVD” function or “USB” function is selected.
12GB

CLEAR button (page 33, 43, 44, 45, 47, 48, 51, 63, 78, 84, 86, 87)
Press to delete a pre-programmed track or file.
Press to erase files or folders from the connected optional USB device.
RETURN button
Press to return to the previous menu on the TV screen.
* (play) button (page 26, 36, 37, 41, 42, 45, 47, 48, 49, 50, 53, 58, 82, 83, 87)
Press to start playback.
* (pause) button (page 28, 37, 68, 71)
Press to pause playback.
(stop) button (page 37, 42, 49, 50, 53, 64, 68, 71, 76, 78, 80, 82, 83, 84, 106)
Press to stop playback.
/ (rewind/fast forward) button (page 37, 68, 71)
Press to find a point in a track, file, chapter or video file.
 /
/ button (page 37)
Press to watch the slow motion play.
TUNING +/ button (page 64)
Press to tune in the desired station.
REC TO USB button (page 76, 80)
Press to transfer music from a disc or record the sound from an analog audio source to the connected USB device. Press to mark track numbers during recording.
OPEN/CLOSE button
Press to load or eject a disc.
controls and parts to Guide
Continued 13GB
OPERATION DIAL (page 37, 65)
Turn to select a track, chapter or video file.
Turn to select the preset station.
DISC 1 DISC 3* buttons (page 38, 76)
Press to select a disc.
Press to switch to the “DVD” function from other function.
Lights up when a disc is in the disc tray, and flashes when the disc tray is selected.
Disc tray
MIC 2 jack (page 92)
Connect a microphone.
MIC 2 LEVEL (page 92)
Turn to adjust the microphone volume.
ECHO LEVEL (page 93)
Turn to adjust the echo level.
 (USB) port (page 75, 78, 80, 81)
Connect an optional USB device.
 (USB) indicator
Lights up in blue when the system is turned on.
Lights up in red when transferring or recording to the connected optional USB device or when erasing audio files or folders.
MIC 1 jack (page 92)
Connect a microphone.
MIC 1 LEVEL (page 92)
Turn to adjust the microphone volume.
PHONES jack
Connect the headphones.
OPTIONS button (page 30, 100)
Press to enter the option menus.
14GB

DISC SKIP/EX-CHANGE button (page 36)
Press to select a disc.
Press to exchange a disc while playing.
GROOVE button (page 89)
Press to reinforce the bass.
PRESET EQ button (page 89)
Press to select the sound effect.
EQ BAND/MEMORY button (page 90)
Press to select the frequency band when adjusting the equalizer.
SOUND FIELD button (page 91)
Press to select the sound field for the surround sound.
DVD* button (page 26, 29, 33, 36, 76, 92)
Press to select the “DVD” function.
USB* button (page 78, 81, 92)
Press to select the “USB” function.
iPod/OPR* button (page 68, 69)
Press to select the “iPod” function. Press to switch the operating mode to iPod Display mode or Main Display mode.
TUNER/BAND* button (page 64)
Press to select the “TUNER” function. Press to switch among FM and AM band.
VIDEO/SAT* button (page 106)
Press to select the “VIDEO” or “SAT” function.
Remote sensor (page 108)
DISPLAY button (page 28, 32, 99, 100)
Press to display the disc information or clock in the front panel display.
MASTER VOLUME
Turn to adjust the volume.
* Lights up when selected.
controls and parts to Guide
Continued 15GB
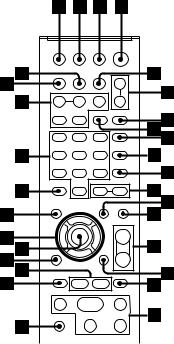
Remote |
|
|
DISC SKIP button (page 38, 76) |
|
Press to select a disc. |
|
|
|
FUNCTION +/ button (page 28, |
|
29, 33, 36, 64, 67, 68, 69, 76, 78, |
|
80, 81, 92, 106) |
|
Press to select the function. |
|
|
|
PICTURE NAVI button (page 50, |
|
83) |
|
Press to display the thumbnail pictures. |
|
|
|
REPEAT/FM MODE button |
|
(page 48) |
|
Press to listen to a disc, a USB device, a |
|
single track or file repeatedly. |
|
Press to select FM reception mode |
|
(monaural or stereo). |
|
|
|
AUDIO button (page 40, 92, 103) |
|
Press to select the desired audio signal on |
|
the TV screen. |
|
|
(on/standby) button |
|
(page 32, 76, 80, 84, 98) |
|
Press to turn on or off the system. |
|
TV 1) (on/standby) button |
|
(page 30) |
|
Press to turn on or off the TV. |
|
16GB

SUBTITLE button (page 38)
Press to switch the language of the subtitle (DVD VIDEO only).
D. TUNING button (page 64)
Press to switch to the direct tuning mode.
MEMORY SELECT button (page 87, 88)
Press to select the playback source or transferring destination on a Sony Ericsson mobile phone.
ANGLE button (page 38)
Press to change the angle (DVD VIDEO with multi-angles only).
 +/ button (page 37)
Press to select a folder.
DVD/TUNER MENU button (page 40, 49, 53, 65, 82)
Press to turn on or off the menu items on the TV screen.
Press to preset the radio station.
SOUND FIELD button (page 91)
Press to select the sound field for the surround sound.
VOLUME +/ 2) button
Press to adjust the volume.
TV VOL +/ 1)2) button
Press to adjust the TV volume.
 DISPLAY button (page 29, 34, 42, 43, 44, 46, 47, 49, 52, 53, 54, 55, 56, 58, 76, 82, 85, 86, 94, 95, 104)
Press to turn on or off the Control Menu on the TV screen.
The Control Menu is displayed only when the “DVD” function or “USB” function is selected.
PRESET + button (page 65)
Press to select the preset station.
(go forward) button (page 35, 37, 42, 51, 68, 71, 84, 100)
Press to select a track, chapter or video file.
TV CH +1) button (page 30)
Press to change the TV channels.
controls and parts to Guide
Continued 17GB
2) (play) button (page 36, 37, 41, 42, 45, 47, 48, 49, 50, 53, 58, 68, 71, 82, 83, 87)
Press to start playback.
/ (rewind/fast forward) button (page 37, 68, 71)
Press to find a point in a track, file, chapter or video file.
 SLOW/SLOW
  button (page 37)
Press to watch the slow motion play.
(pause) button (page 28, 37, 68, 71)
Press to pause playback.
(stop) button (page 37, 42, 49, 50, 53, 64, 68, 71, 76, 78, 80, 82, 83, 84, 106)
Press to stop playback.
TUNING +/ button (page 64)
Press to tune in the desired station.
TV1) button (page 30)
Press to operate the TV functions.
PRESET button (page 65)
Press to select the preset station.
(go backward) button (page 34, 37, 42, 68, 71, 100)
Press to select a track, chapter or video file.
TV CH 1) button (page 30)
Press to change the TV channels.
STEP button (page 37)
Press to play one frame at a time when playback is paused.
ADVANCE  button (page 38)
Press to advance the current scene during playback.
 REPLAY button (page 38)
Press to replay the previous scene during playback.
RETURN button (page 51, 78, 84)
Press to return to the previous menu on the TV screen.
18GB

ENTER button (page 29, 30, 32, 33, 34, 41, 42, 43, 44, 45, 46, 47, 49, 50, 52, 53, 54, 55, 56, 57, 58, 64, 65, 68, 70, 71, 76, 77, 78, 80, 82, 83, 85, 86, 87, 90, 94, 96, 97, 98, 100)
Press to enter the settings.
/ / / buttons (page 37, 50, 77, 78, 83)
Press to select the menu items.
DVD TOP MENU button (page 37)
Press to display the DVD title on the TV screen.
CLEAR button (page 33, 43, 44, 45, 47, 48, 51, 63, 78, 84, 86, 87)
Press to delete a pre-programmed track or file.
Press to erase audio files or folders from the connected optional USB device.
-/--1) button (page 30)
Press to enter a single digit or double digit number.
Numeric buttons2) (page 30, 37, 41, 42, 43, 44, 56, 57, 58, 64, 65)
Press to select a track, chapter or video file.
Press to enter a password.
10/01) button
Press to enter a double digit number.
KEY CONTROL button (page 93)
Press to change the key to suit your vocal range.
SCORE button (page 96)
Press to start or stop calculating your vocal score.
KARAOKE MODE button (page 93)
Press to select the Karaoke mode.
KARAOKE PON button (page 94)
Press to activate the “Karaoke Pon” function.
controls and parts to Guide
Continued 19GB
DISPLAY button (page 28, 32, 99, 100)
Press to display the disc information or clock in the front panel display.
TIME/TEXT button (page 100, 101, 102)
Press to change the information appearing in the front panel display or on the TV screen.
TV INPUT1) button
Press to switch the input sources.
SLEEP button (page 35, 97)
Press to set the Sleep Timer.
TIMER MENU button (page 32, 97, 98)
Press to set the clock and the timers.
THEATRE SYNC button (page 35)
Press to activate the “THEATRE SYNC” function.
1)This button is used to operate a Sony TV. For details, see “Operating a Sony TV” (page 31).
2)The numeric button 5, TV VOL +, VOLUME + and buttons on the remote have a tactile dot. Use the tactile dot as a reference when operating the system.
20GB
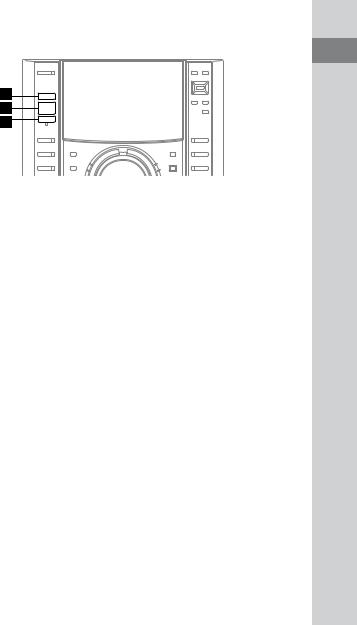
Indicators
TIMER indicator (page 97)
Lights up when the Play Timer or Rec Timer is set, and flashes when the Sleep Timer is set.
Dolby D (Dolby Digital) indicator (page 140)
DTS indicator (page 140)
Indicates the current surround format.
USB MEMORY indicator (page 75)
Lights up when the USB device is recognized.
controls and parts to Guide
Continued 21GB

Display
The front panel display for MHC-GZR33Di and LBT-LCD7Di are liquid crystal displays (LCD). You can confirm contents and the Control Menu displayed on the TV screen in the LCD.
To set the LCD, see “Setting the LCD” (page 31).
Displays the text information.
You can confirm contents and the Control Menu displayed on the TV screen.
PICTURE MODE and WIDE MODE menus are displayed when setting the LCD.
22GB
Getting Started
Hooking up the system securely
Started Getting
|
|
|
|
|
|
|
|
|
|
|
|
|
|
|
|
|
|
|
|
|
|
|
|
|
|
|
|
|
|
|
|
|
|
|
|
|
|
|
|
|
|
|
|
|
|
|
|
|
|
|
|
|
|
|
|
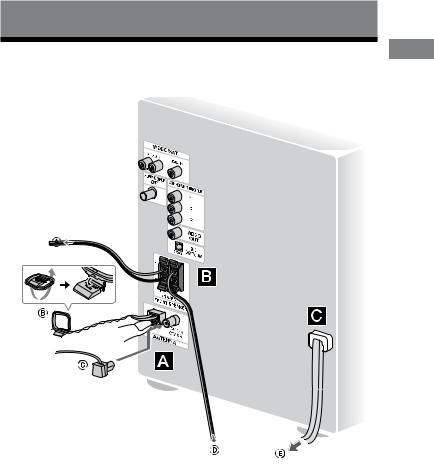
To front speaker (Right) |
To front speaker (Left) |
||||||
AM loop antenna |
To wall outlet |
||||||
FM lead antenna (Extend it horizontally.) |
|
|
|
||||
Continued 23GB

FM/AM antennas
Find a location and an orientation that provide good reception, and then set up the antenna.
Keep the antennas away from the speaker cords, the power cord and the USB cable to avoid picking up noise.
Speakers
Insert only the stripped portion of the speaker cords.
The speaker cords are color-coded with their respective speaker terminals. The type of speakers supplied varies according to the model you purchased (see “About this manual” (page 5)).
Front speakers
Insert only the stripped portion of the speaker cords
Red ( )
 Black ( )
Note
Be sure to connect the speakers securely and correctly.
Power
Connect the power cord to a wall outlet. The demonstration appears in the display. When you press / , the system turns on and the demonstration automatically ends.
If the supplied adaptor on the plug does not fit your wall outlet, detach it from the plug (only for models equipped with an adaptor).
24GB
Attaching the speaker foot
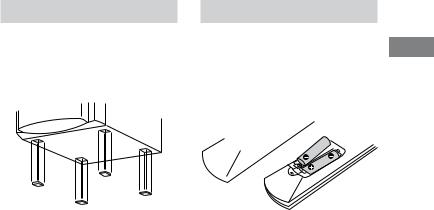
Attach the supplied speaker foot at each corner on the bottom of the speakers to prevent them from slipping.
Front speakers (Left (4)/Right (4))
Inserting batteries
Slide and remove the battery compartment lid, and insert the two
supplied R6 (size AA) batteries, side Getting first, matching the polarities shown
below. 


 Started
Note
If you do not use the remote for a long period of time, remove the batteries to avoid possible damage from battery leakage and corrosion.
Tip
With normal use, the batteries should last for about six months. When the remote no longer operates the system, replace both batteries with new ones.
Continued 25GB
When carrying this system |
Using the iPod |
Perform the following procedure to protect the DVD mechanism.
Use buttons on the unit for the operation.
1 Press / to turn on the system, then press DVD.
2 Make sure that no disc is loaded in the system and check that “NO DISC” appears.
3 Hold down , and then press/ until “STANDBY” appears in the display. Then, “LOCK” appears in the display.
4 Unplug the power cord.
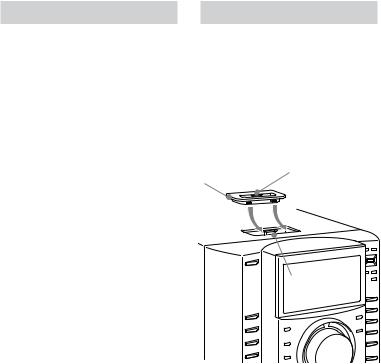
Insert an iPod Dock Adapter into the Dock before use. The iPod Dock Adapter is not supplied with the system. Use
an iPod Dock Adapter supplied with your iPod. For details on the iPod Dock Adapter, refer to the user’s guide of your iPod.
To remove the iPod Dock Adapter, pull it up with your fingernail or a flat object using
the slot inside the adapter.
iPod Dock Adapter
Connector
26GB
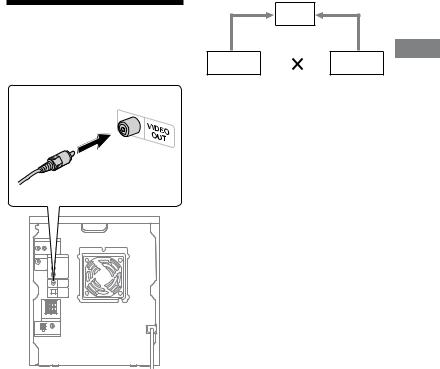
Hooking up the TV
Connect the video input jack of your TV to the VIDEO OUT jack with the supplied video cord.
When connecting a video deck
Connect the video deck to the TV using a video cord (not supplied). However, do not connect this unit to the TV through the video deck. Otherwise, you may experience video leakage when watching video images from this system. Connect this unit directly to the TV as shown below.
TV
Video deck |
|
Unit |
|
Do not connect directly
When connecting to the COMPONENT VIDEO OUT jack
For higher quality video images, use the optional component video cords to connect the COMPONENT
VIDEO input jacks on your TV to the COMPONENT VIDEO OUT jacks of this unit (page 105). If your TV is compatible with progressive format signals, use this connection and set “PROGRESSIVE (COMPONENT OUT)” to “ON” (page 30).
Notes
You cannot output the video signal from the VIDEO/SAT VIDEO IN jack through the COMPONENT VIDEO OUT jacks of this unit.
You cannot output the video signal from an iPod through the COMPONENT VIDEO OUT jacks of this unit.
Started Getting
Continued 27GB
Changing the color system
(Australian model only)
Set the color system of the DVD and your iPod to PAL or NTSC depending on the color system of your TV.
The default setting for color system is different depending on the area. Each time you perform the procedure below, the color system changes as follows:
NTSC PAL
1Press / to turn on the system.
2Select the function.
For DVD color system:
Press FUNCTION +/ repeatedly to select “DVD” (or press DVD on the unit).
For iPod color system:
Press FUNCTION +/ repeatedly to select “iPod” (or press iPod/OPR on the unit).
3Press / to turn off the system.
4Press DISPLAY repeatedly until “Sony DEMO” appears in the display.
5Press / on the unit while holding down on the unit.
The system turns on automatically and the color system is changed.
“COLOR NTSC” or “COLOR PAL” (or either “iPod COLOR NTSC” or “iPod COLOR PAL”) appears in the display.
Note
You cannot change the color system for any optional component connected to the VIDEO/ SAT VIDEO IN jack.
28GB

Changing the format of the video signal output from COMPONENT VIDEO OUT jacks
Progressive is a method for displaying TV images that reduces flickering and sharpens the image. To use this method, you need to connect to a TV that can accept progressive signals.
You can output video signals from COMPONENT VIDEO OUT jacks in Interlace or Progressive format.
1 Press FUNCTION +/ repeatedly to select “DVD” (or press DVD on the unit).
2 |
DISPLAY when playback |
|
is stopped. |
The Control Menu appears on the TV screen.
3 Press or repeatedly to select  (SETUP), then press ENTER.
The options for “SETUP” appear.
4 Press or repeatedly to select “CUSTOM,” then press ENTER.
The Setup Menu appears.
5 Press or repeatedly to select “VIDEO SETUP,” then press ENTER.
The options for “VIDEO SETUP” appear.
6 Press or repeatedly to select “PROGRESSIVE (COMPONENT OUT),” then press ENTER.
The options for “PROGRESSIVE (COMPONENT OUT)” appear.
Started Getting
Continued 29GB
7 Press or repeatedly to select the desired setting, then press ENTER.
The default setting is underlined.
OFF: Outputs interlace signals. Select this setting when:
your TV does not accept progressive signals.
your TV is connected to jacks other than the COMPONENT VIDEO OUT jacks.
ON: Outputs progressive signals. Select this setting when:
your TV accepts progressive signals.
your TV is connected to the COMPONENT VIDEO OUT jacks.
When you select “ON,” the confirmation display appears. Follow the steps below.
8 Press or repeatedly to select “START,” then press ENTER.
The system outputs the progressive signal for 5 seconds. Check that the screen is displayed correctly.
9 Press or repeatedly to select “YES.”
The system outputs the progressive signal. When you select “NO,”
the system does not output the progressive signal.
Note
There would be no image on your TV or the image is not clear if your setting does not match your TV or connection.
30GB
 Loading...