

Page 1
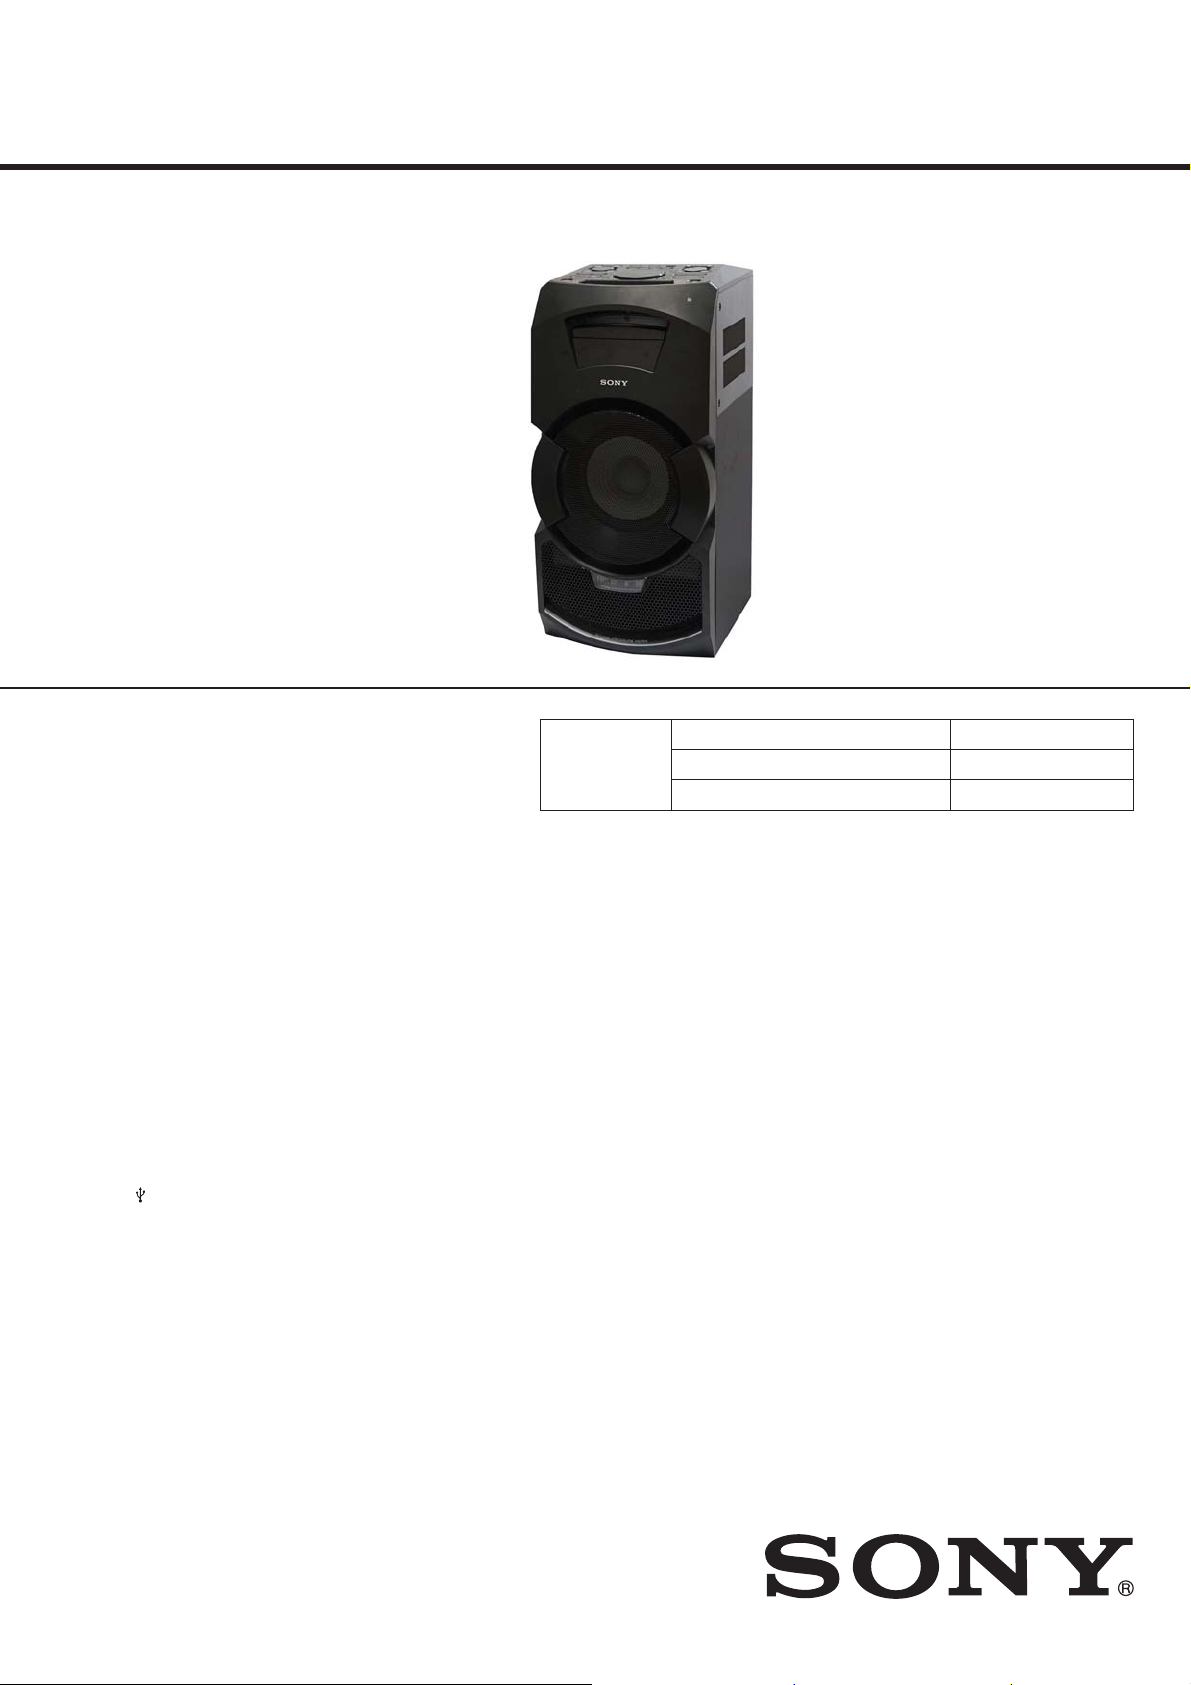
HCD-GT3D
SERVICE MANUAL
Ver. 1.2 2015.08
CD/DVD Section
Russian Model
E Model
Australian Model
Model Name Using Similar Mechanism HCD-GPX555
CD Mechanism Type CDM90-DVBU204//M
Optical Pick-up Name CMS-S76RFS7G
Amplifi er section
The following are measured at
AC 120 V – 240 V, 50/60 Hz
Power output (rated)
Left/Right Channel: 120 W + 120 W
(at 2 ohms, 1 kHz, 1% THD)
RMS output power (reference)
Left/Right Channel: 180 W + 180 W
(per channel at 2 ohms, 1 kHz)
Subwoofer: 360 W (at 4 ohms, 100 Hz)
Speaker section
Speaker system
Subwoofer, Sound Pressure Horn
Speaker unit
200 mm, cone type
Rated impedance
4 ohms
Inputs
AUDIO IN/PARTY CHAIN IN L/R
Voltage 2 V, impedance 47 kilohms
OPTICAL IN
Supported audio signal:
2-channel Linear PCM
MIC 1, MIC 2
Sensitivity 1 mV, impedance 10 kilohms
(USB) port
Type A
Outputs
AUDIO OUT/PARTY CHAIN OUT L/R
Voltage 2 V, impedance 1 kilohm
VIDEO OUT
Max. output level 1 Vp-p, unbalanced,
Sync. negative load impedance 75 ohms
USB section
Supported bit rate
WMA:
48 kbps – 192 kbps, VBR, CBR
AAC:
48 kbps – 320 kbps, VBR, CBR
Sampling frequencies
WMA: 44.1 kHz
AAC: 44.1 kHz
Supported USB device
Mass Storage Class
SPECIFICATIONS
Maximum current
1 A
Disc/USB section
Supported bit rate
MPEG1 Layer-3:
32 kbps – 320 kbps, VBR
Sampling frequencies
MPEG1 Layer-3:
32 kHz/44.1 kHz/48 kHz
Xvid
Video codec: Xvid
Bit rate: 4.854 Mbps (MAX)
Resolution/Frame rate:
720 × 480, 30 fps
720 × 576, 25 fps
Audio codec: MP3
MPEG4
File format: MP4 File Format
Video codec:
MPEG4 Simple Profile
(AVC is not compatible.)
Bit rate: 4 Mbps
Resolution/Frame rate:
720 × 576, 30 fps
Audio codec: AAC-LC
(HE-AAC is not compatible.)
DRM: Not compatible
Disc player section
System
Compact disc and digital audio and
video system
Laser Diode Properties
Emission Duration: Continuous
Laser Output*: Less than 44.6 μW
* This output is the value
measurement at a distance of
200 mm from the objective lens
surface on the Optical Pick-up
Block with 7 mm aperture.
Frequency response
20 Hz – 20 kHz
Video color system format
NTSC and PAL
FM tuner section
System
PLL quartz-locked digital synthesizer
Antenna
FM lead antenna
Tuning range
87.5 MHz – 108.0 MHz (50 kHz step)
BLUETOOTH section
Communication system
BLUETOOTH Standard version 3.0
Output
BLUETOOTH Standard Power
Class 2
Maximum communication range
Line of sight approx. 10 m
Frequency band
2.4 GHz band (2.4000 GHz –
2.4835 GHz)
Modulation method
FHSS (Freq Hopping Spread Spectrum)
Compatible BLUETOOTH profiles
A2DP (Advanced Audio Distribution
Profile)
AVRCP (Audio Video Remote
Control Profile)
SPP (Serial Port Profile)
Supported codecs
SBC (Sub Band Codec)
AAC (Advanced Audio Coding)
1)
The actual range will vary depending on
factors such as obstacles between devices,
magnetic fields around a microwave oven,
static electricity, reception sensitivity,
antenna’s performance, operating system,
software application, etc.
2)
BLUETOOTH standard profiles indicate
the purpose of BLUETOOTH communication between devices.
General
Power requirements
AC 120 V – 240 V, 50/60 Hz
Power consumption
120 W
1)
2)
Power consumption (at the Power Saving
mode)
0.5 W
(When “BT STBY” is set to “OFF”)
6 W
(When “BT STBY” is set to “ON”)
Dimensions (w/h/d) (Approx.)
DVD Receiver (subwoofer unit):
305 mm × 636 mm × 355 mm
Mass (Approx.)
DVD Receiver (subwoofer unit):
14.5 kg
Design and specifications are subject to
change without notice.
– Continued on next page –
DVD RECEIVER
9-890-669-03
2015H81-1
2015.08
©
Sony Corporation
Published by Sony EMCS (Malaysia) PG Tec
Page 2
HCD-GT3D
Ver. 1.1
License and Trademark Notice
•
is a trademark of DVD Format/Logo Licensing Corporation.
•
“DVD+RW”, “DVD-RW”, “DVD+R”, “DVD-R”,
the “CD” logos are trademarks.
• MPEG Layer-3 audio coding technology and patents licensed from
Fraunhofer IIS and Thomson.
• Windows Media is either a registered trademark or trademark of
Microsoft Corporation in the United States and/or other countries.
• This product is protected by certain intellectual property rights of
Microsoft Corporation. Use or distribution of such technology outside
of this product is prohibited without a license from Microsoft or an
authorized Microsoft subsidiary.
• “WALKMAN” and “WALKMAN” logo are registered trademarks of
Sony Corporation.
• This system incorporates Dolby* Digital.
* Manufactured under license from Dolby Laboratories. Dolby and
the double-D symbol are trademarks of Dolby Laboratories.
• The BLUETOOTH
owned by Bluetooth SIG, Inc. and any use of such marks by Sony
Corporation is under license. Other trademarks and trade names are
those of their respective owners.
• The N Mark is a trademark or registered trademark of NFC Forum,
Inc. in the United States and in other countries.
• Android™ is a trademark of Google Inc.
• Google Play™ is a trademark of Google Inc.
• Apple, the Apple logo, iPhone, and iPod touch are trademarks of
Apple Inc., registered in the U.S. and other countries. App Store is a
service mark of Apple Inc.
• “Made for iPod” and “Made for iPhone” mean that an electronic
accessory has been designed to connect specifi cally to iPod or iPhone,
respectively, and has been certifi ed by the developer to meet Apple
performance standards. Apple is not responsible for the operation of
this device or its compliance with safety and regulatory standards.
Please note that the use of this accessory with iPod or iPhone may
affect wireless performance.
• THIS PRODUCT IS LICENSED UNDER THE MPEG-4 VISUAL
PATENT PORTFOLIO LICENSE FOR THE PERSONAL AND
NON-COMMERCIAL USE OF A CONSUMER FOR
(i) ENCODING VIDEO IN COMPLIANCE WITH THE MPEG-4
VISUAL STANDARD (“MPEG-4 VIDEO”)
AND/OR
(ii) DECODING MPEG-4 VIDEO THAT WAS ENCODED BY
A CONSUMER ENGAGED IN A PERSONAL AND NON-
COMMERCIAL ACTIVITY AND/OR WAS OBTAINED FROM
A VIDEO PROVIDER LICENSED TO PROVIDE MPEG-4
VIDEO.
NO LICENSE IS GRANTED OR SHALL BE IMPLIED FOR ANY
OTHER USE. ADDITIONAL INFORMATION INCLUDING THAT
RELATING TO PROMOTIONAL, INTERNAL AND COMMERCIAL USES AND LICENSING MAY BE OBTAINED FROM MPEG
LA, L.L.C.
HTTP://WWW.MPEGLA.COM
• All other trademarks are trademarks of their respective owners.
• In this manual, ™ and ® marks are not specified.
®
word mark and logos are registered trademarks
“DVD VIDEO”, and
• Abbreviation
AR : Argentina model
AUS : Australian model
E4 : African model
EA : Saudi Arabia model
LA9 : Latin-American model
MY : Malaysia model
RU : Russian model
TH : Thai model
SAFETY CHECK-OUT
After correcting the original service problem, perform the following
safety check before releasing the set to the customer:
Check the antenna terminals, metal trim, “metallized” knobs,
screws, and all other exposed metal parts for AC leakage. Check
leakage as described below.
LEAKAGE TEST
The AC leakage from any exposed metal part to earth ground and
from all exposed metal parts to any exposed metal part having a
return to chassis, must not exceed 0.5 mA (500 microamperes).
Leakage current can be measured by any one of three methods.
1. A commercial leakage tester, such as the Simpson 229 or RCA
WT-540A. Follow the manufacturers’ instructions to use these
instruments.
2. A battery-operated AC milliammeter. The Data Precision 245
digital multimeter is suitable for this job.
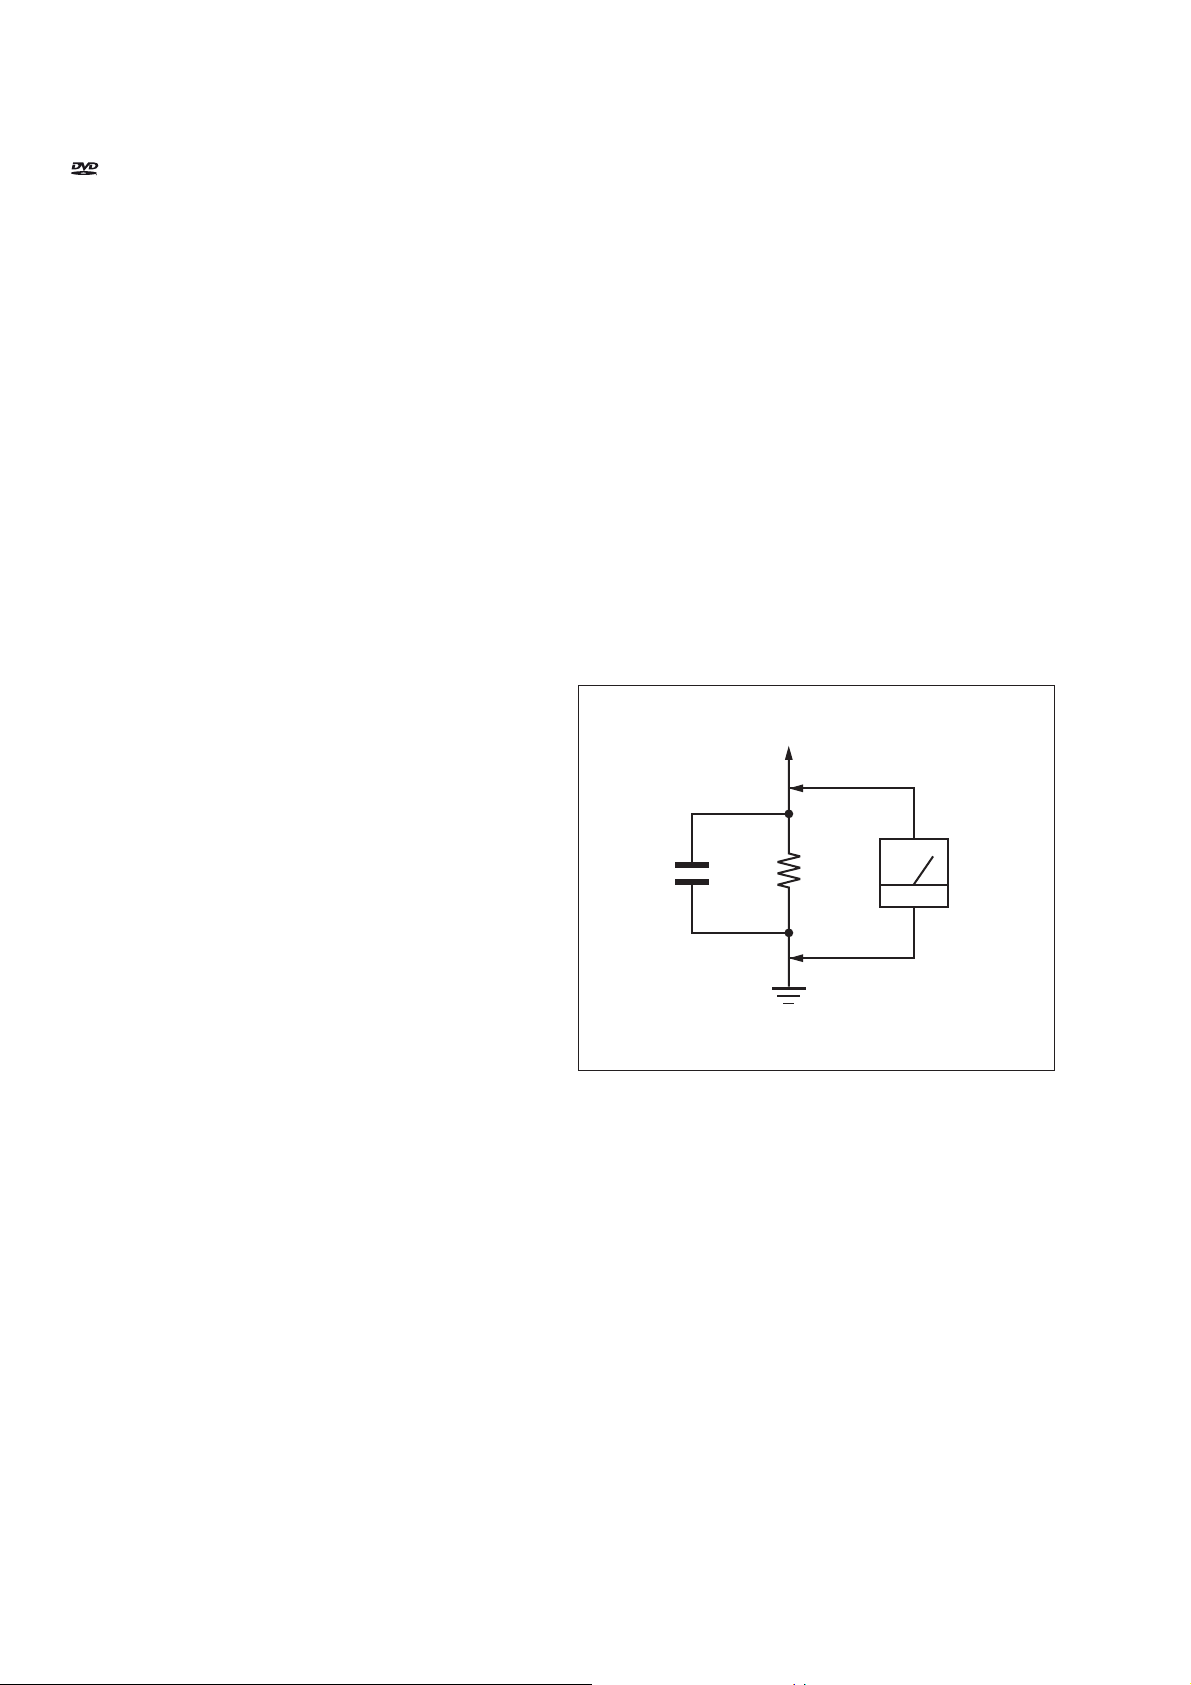
3. Measuring the voltage drop across a resistor by means of a
VOM or battery-operated AC voltmeter . The “limit” indication
is 0.75 V, so analog meters must have an accurate low-voltage
scale. The Simpson 250 and Sanwa SH-63Trd are examples
of a passive VOM that is suitable. Nearly all battery operated
digital multimeters that have a 2V AC range are suitable. (See
Fig. A)
To Exposed Metal
Parts on Set
AC
1.5 kΩ0.15 μF
voltmeter
(0.75 V)
Earth Ground
Fig. A. Using an AC voltmeter to check AC leakage.
SAFETY-RELATED COMPONENT WARNING!
COMPONENTS IDENTIFIED BY MARK 0 OR DOTTED LINE
WITH MARK 0 ON THE SCHEMATIC DIAGRAMS AND IN
THE PARTS LIST ARE CRITICAL TO SAFE OPERATION.
REPLACE THESE COMPONENTS WITH SONY PARTS
WHOSE PART NUMBERS APPEAR AS SHOWN IN THIS
MANUAL OR IN SUPPLEMENTS PUBLISHED BY SONY.
2
Page 3

TABLE OF CONTENTS
HCD-GT3D
1. SERVICING NOTES ............................................. 4
2. DISASSEMBLY
2-1. Disassembly Flow ........................................................... 9
2-2. Side (L) Panel, Side (R) Panel ........................................ 10
2-3. Top Panel Section ........................................................... 11
2-4. OPTICAL Board ............................................................. 12
2-5. Loading Panel Assy ........................................................ 12
2-6. CDM Section .................................................................. 13
2-7. Back Panel ...................................................................... 13
2-8. DAMP Board .................................................................. 14
2-9. MOTHERBOARD Board, SPLITTER Board ................ 15
2-10. Sub Chassis Section ........................................................ 16
2-11. SMPS Board ................................................................... 17
2-12. Chassis ............................................................................ 17
2-13. Front Panel Section ......................................................... 18
2-14. Loudspeaker (20cm)-087-11 ........................................... 19
2-15. Service, Optical Device(7G), Wire (Flat Type) .............. 20
3. TEST MODE ............................................................ 21
4. ELECTRICAL CHECK ......................................... 26
5. TROUBLESHOOTING .......................................... 27
6. DIAGRAMS
6-1. Block Diagram - SERVO/USB/DISPLAY Section - ...... 33
6-2. Block Diagram - AUDIO/VIDEO Section - ................... 34
6-3. Block Diagram - AMP Section - ..................................... 35
6-4. Block Diagram - POWER SUPPLY Section - ................ 36
6-5. Printed Wiring Board - MOTHERBOARD Board - ....... 39
6-6. Schematic Diagram
- MOTHERBOARD Board (1/10) - ............................... 40
6-7. Schematic Diagram
- MOTHERBOARD Board (2/10) - ............................... 41
6-8. Schematic Diagram
- MOTHERBOARD Board (3/10) - ............................... 42
6-9. Schematic Diagram
- MOTHERBOARD Board (4/10) - ............................... 43
6-10. Schematic Diagram
- MOTHERBOARD Board (5/10) - ............................... 44
6-11. Schematic Diagram
- MOTHERBOARD Board (6/10) - ............................... 45
6-12. Schematic Diagram
- MOTHERBOARD Board (7/10) - ............................... 46
6-13. Schematic Diagram
- MOTHERBOARD Board (8/10) - ............................... 47
6-14. Schematic Diagram
- MOTHERBOARD Board (9/10) - ............................... 48
6-15. Schematic Diagram
- MOTHERBOARD Board (10/10) - ............................. 49
6-16. Printed Wiring Board - DAMP Board - .......................... 50
6-17. Schematic Diagram - DAMP Board (1/2) - .................... 51
6-18. Schematic Diagram - DAMP Board (2/2) - .................... 52
6-19. Printed Wiring Board - BUTTON Board - ..................... 53
6-20. Schematic Diagram - BUTTON Board - ........................ 54
6-21. Printed Wiring Board - LCD Board - .............................. 55
6-22. Schematic Diagram - LCD Board - ................................ 55
6-23. Printed Wiring Board - OPTICAL Board - ..................... 55
6-24. Schematic Diagram - OPTICAL Board - ........................ 55
6-25. Printed Wiring Board - SPK_HLED Board - .................. 56
6-26. Schematic Diagram - SPK_HLED Board - .................... 56
6-27. Printed Wiring Board - MIC Board - .............................. 56
6-28. Schematic Diagram - MIC Board - ................................. 57
6-29. Printed Wiring Board - SPLITTER Board - ................... 58
6-30. Schematic Diagram - SPLITTER Board - ...................... 58
7. EXPLODED VIEWS
7-1. Side Panel Section .......................................................... 72
7-2. Top Panel Section ........................................................... 73
7-3. Loading Panel Section .................................................... 74
7-4. MOTHERBOARD Board Section .................................. 75
7-5. Chassis Section ............................................................... 76
7-6. Front Panel Section ......................................................... 77
7-7. CDM Section .................................................................. 78
7-8. CD Mechanism Section
(CDM90-DVBU204//M) ................................................ 79
8. ELECTRICAL PARTS LIST .............................. 80
3
Page 4
HCD-GT3D
Ver. 1.1
SECTION 1
SERVICING NOTES
Notes on chip component replacement
• Never reuse a disconnected chip component.
• Notice that the minus side of a tantalum capacitor may be
damaged by heat.
Flexible Circuit Board Repairing
• Keep the temperature of the soldering iron around 270 °C
during repairing.
• Do not touch the soldering iron on the same conductor of the
circuit board (within 3 times).
• Be careful not to apply force on the conductor when soldering
or unsoldering.
UNLEADED SOLDER
Boards requiring use of unleaded solder are printed with the
leadfree mark (LF) indicating the solder contains no lead.
(Caution: Some printed circuit boards may not come printed with
the lead free mark due to their particular size)
: LEAD FREE MARK
Unleaded solder has the following characteristics.
• Unleaded solder melts at a temperature about 40 °C higher
than ordinary solder.
Ordinary soldering irons can be used but the iron tip has to be
applied to the solder joint for a slightly longer time.
Soldering irons using a temperature regulator should be set to
about 350 °C.
Caution: The printed pattern (copper foil) may peel away if
the heated tip is applied for too long, so be careful!
• Strong viscosity
Unleaded solder is more viscous (sticky, less prone to fl ow)
than ordinary solder so use caution not to let solder bridges
occur such as on IC pins, etc.
• Usable with ordinary solder
It is best to use only unleaded solder but unleaded solder may
also be added to ordinary solder.
CAUTION
Use of controls or adjustments or performance of procedures
other than those specifi ed herein may result in hazardous radiation
exposure.
NOTES ON HANDLING THE OPTICAL PICK-UP BLOCK
OR BASE UNIT
The laser diode in the optical pick-up block may suffer electrostatic
break-down because of the potential difference generated by the
charged electrostatic load, etc. on clothing and the human body.
During repair, pay attention to electrostatic break-down and also
use the procedure in the printed matter which is included in the
repair parts.
The fl exible board is easily damaged and should be handled with
care.
NOTES ON LASER DIODE EMISSION CHECK
The laser beam on this model is concentrated so as to be focused
on the disc refl ective surface by the objective lens in the optical
pickup block. Therefore, when checking the laser diode emission,
observe from more than 30 cm away from the objective lens.
This appliance is classifi ed as
a CLASS 1 LASER product
under IEC 60825-1:2007.
This marking is located on
the rear exterior.
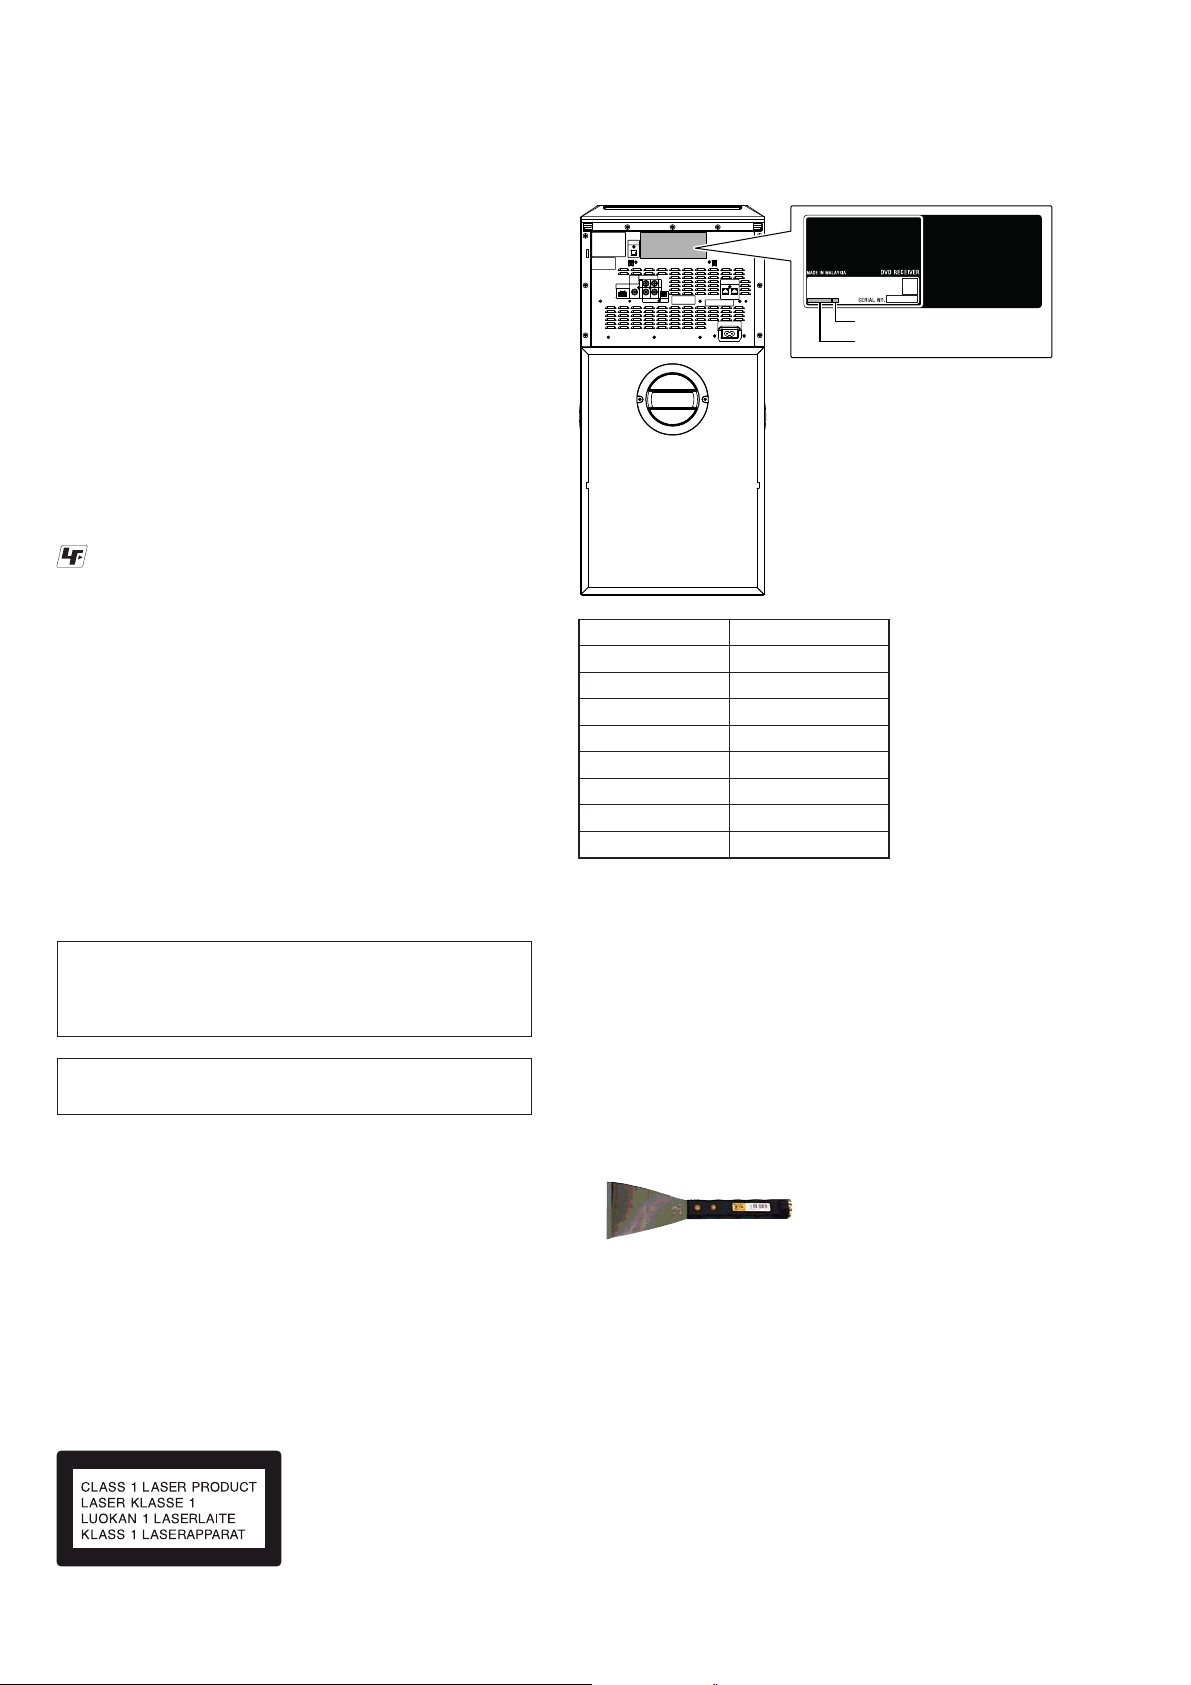
MODEL IDENTIFICATION
– Rear View –
Model Part No.
AR
LA9
TH
E4
EA
MY
RU
AUS
MODEL NUMBER LABEL
Destination Code
Part No.
4-566-431-0[]
4-567-343-0[]
4-567-344-0[]
4-567-347-0[]
4-567-349-0[]
4-567-350-0[]
4-567-352-0[]
4-567-353-0[]
• Abbreviation
AR : Argentina model
AUS : Australian model
E4 : African model
EA : Saudi Arabia model
LA9 : Latin-American model
MY : Malaysia model
RU : Russian model
TH : Thai model
• JIG
When disassembling the set, use the following jig (for front
panel removal).
Part No.: J-2501-238-A JIG FOR SPEAKER REMOVAL
PLAYABLE DISCS
• DVD+R/DVD+RW
• AUDIO CD
• CD-R/CD-RW/DVD-R/DVD-RW
– audio data
– MP3 fi les that conforms to ISO9660 Level 1/Level 2, or
Joliet (expansion format).
Notes
• MP3 (MPEG 1 Audio Layer-3) is a standard format defi ned
by ISO (International Organization for Standardization) which
compresses audio data. MP3 fi les must be in MPEG 1 Audio
Layer-3 format.
• The system can only play back MP3 fi les that have a fi le
extension of “.mp3”.
4
Page 5
HCD-GT3D
Ver. 1.1
NOTE OF REPLACING THE IC001, IC002, IC101, IC105,
IC106, IC301, IC302 AND IC303 ON THE MOTHERBOARD
BOARD
IC001, IC002, IC101, IC105, IC106, IC301, IC302 and IC303
on the MOTHERBOARD board cannot exchange with single.
When these parts on the MOTHERBOARD board are damaged,
exchange the entire mounted board.
NOTE OF REPLACEMENT OF THE MS-476 BOARD
When the MS-476 board is defective, exchange the entire
LOADING COMPLETE ASSY (T).
RELEASING THE DISC TRAY LOCK
The disc tray lock function for the antitheft of an demonstration
disc in the store is equipped.
Releasing Procedure:
1. Press [\/1] button to turn the power on.
2. Press [FUNCTION] button and turn the [MULTI CONTROL]
knob to select “DVD/CD” function, then press [ENTER]
button.
3. Press the [ENTER] button and [VOCAL FADER] button
simultaneously and hold down for around 3 seconds.
4. The message “UNLOCKED” is displayed and the disc tray is
unlocked.
Note: When “LOCKED” is displayed, the slot lock is not released by
turning power on/off with the [\/1] button.
NOTE OF REPLACING THE IC1001 ON THE DAMP
BOARD AND THE COMPLETE DAMP BOARD
When IC1001 on the DAMP board and the complete DAMP board
are replaced, it is necessary to spread the compound between parts
and heat sink.
Part No. Description
7-300-009-67 THERMAL COMPOUND (TIG2000)
Spread the compound referring to the fi gure below.
– DAMP Board (Component Side) –
NOTE OF REPLACING MOTHERBOARD BOARD OR
BLUETOOTH MODULE OR RC-S730 (WW) BOARD
When the MOTHERBOARD board or BLUETOOTH module
or RC-S730 (WW) board are replaced, please execute the below
service mode.
Pairing this system with a
1. Press the [\/1] button to turn the power on.
2. Place the Bluetooth device within 1 meter (3 feet) from the
system.
3. Press BLUETOOTH on the unit to select Bluetooth function.
“BT AUDIO” appears in the display panel.
4. Hold down BLUETOOTH on the unit for 2 seconds or more.
“PAIRING” fl ashes in the display panel.
5. Perform the pairing procedure on the Bluetooth device.
6. Select the model number of the unit on the display of the
Bluetooth device.
For example, select “SONY : MHC-GT3D”. If passkey is
required on the Bluetooth device, enter “0000”.
7. Perform the Bluetooth connection on the Bluetooth device.
8. When pairing is completed and the Bluetooth connection is
established, the Bluetooth device name appears in the display
panel.
9. To cancel pairing operation, hold down BLUETOOTH on the
unit for 2 seconds or more until “BT AUDIO” appears in the
display panel.
Bluetooth
device
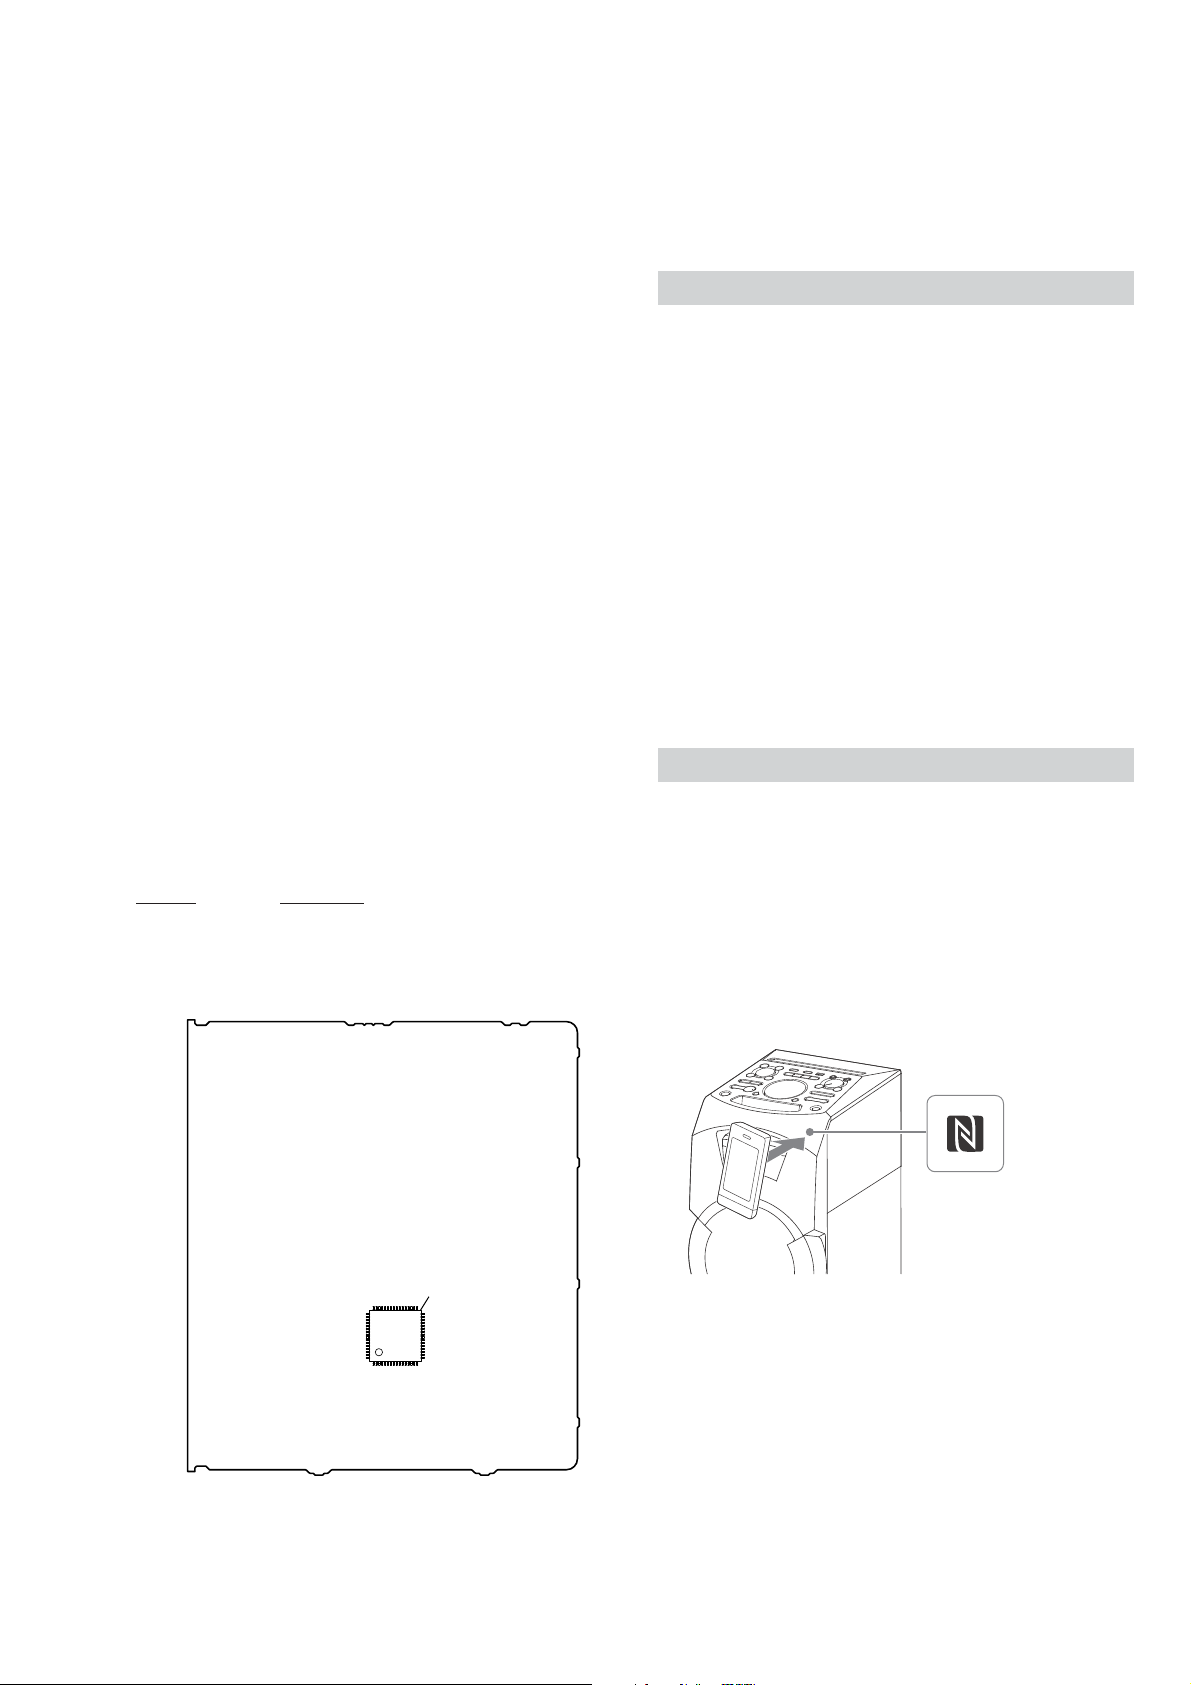
Connecting with a smartphone by one touch (NFC)
Note: The operation in this mode must use a NFC-compatible smartphone
(Smartphones with a built-in NFC function [OS: Android 2.3.3 or
later, excluding Android 3.x])
1. Press the [\/1] button to turn the power on.
2. Download and install the app “NFC Easy Connect”.
Download the free Android app from Google Play by searching
for “NFC Easy Connect”.
3. Start the app “NFC Easy Connect” on the smartphone.
Make sure that the application screen is displayed.
4. Touch the smartphone to the N-Mark on the system until the
smartphone vibrates.
thermal compound (TIG2000)
IC1001
Complete the connection by following the instructions
displayed on the smartphone.
5. When pairing is completed and the Bluetooth connection is
established, the Bluetooth device name appears in the display
panel.
5
Page 6
HCD-GT3D
Ver. 1.2
Playing music from a
Bluetooth
device
For a Bluetooth device
1. Press the [
\/1] button to turn the power on.
2. Press BLUETOOTH on the unit to select Bluetooth function.
“BT AUDIO” appears in the display panel.
3. Establish connection with the Bluetooth device.
Press BLUETOOTH on the unit to connect to the last
connected Bluetooth device.
Perform the Bluetooth connection from the Bluetooth device if
the device is not connected.
Once the connection is established, the Bluetooth device name
appears in the display panel.
4. Press N.
Depending on the Bluetooth device,
– you may have to press N twice.
– you may need to start playback of an audio source on the
Bluetooth device.
For an NFC-compatible smartphone
1. Press the [\/1] button to turn the power on.
Touch the smartphone to the N-Mark on the system to establish
the Bluetooth connection.
Start playback of an audio source on the smartphone. For
details on playback, refer to the operating instructions of your
smartphone.
To disconnect the Bluetooth device
For a Bluetooth device
Press BLUETOOTH on the unit.
“BT AUDIO” appears in the display panel.
For an NFC-compatible smartphone
Touch the smartphone to the N-Mark on the system again.
To erase all the pairing registration information perform
COLD RESET test mode (Refer to page 21).
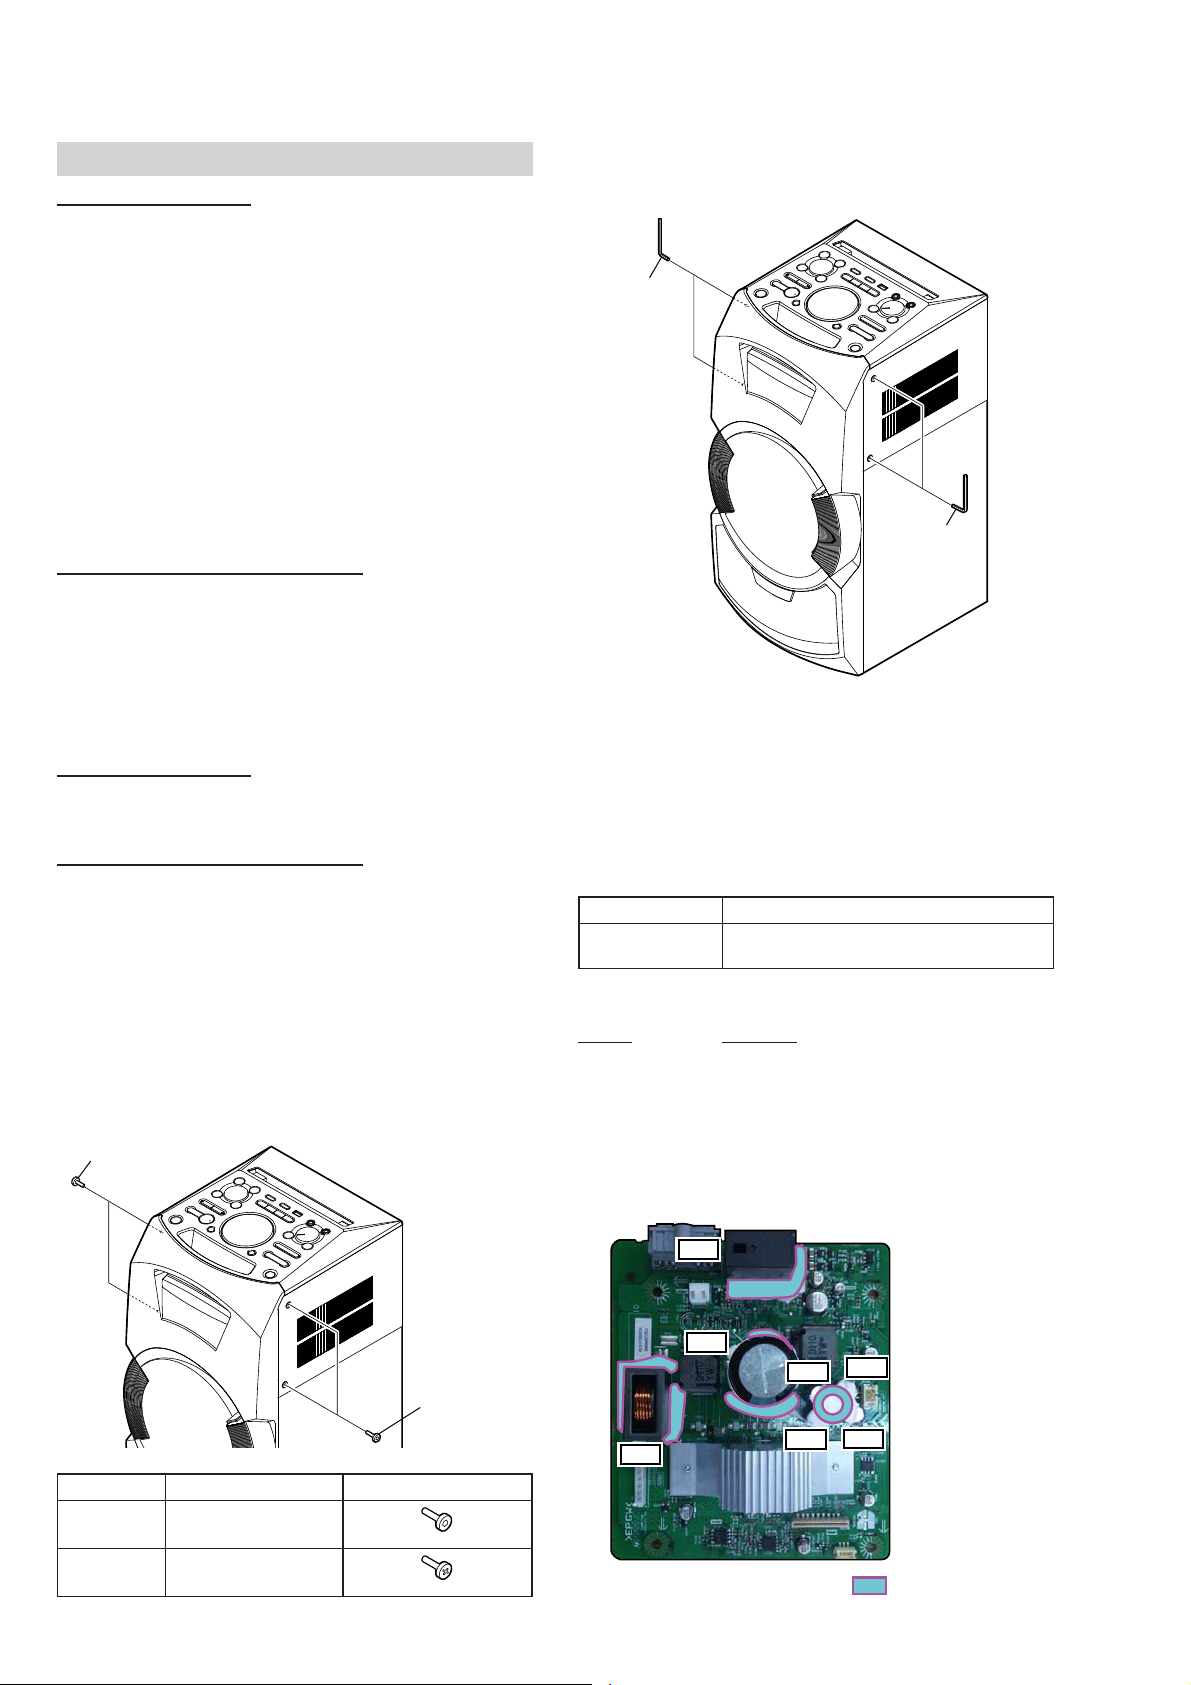
NOTE OF DISASSEMBLE THE PANEL, SIDE
To disassemble the PANEL, SIDE, hexagon key is required to
unscrew the SCREW, TAPPING (HEX) (Type A).
hexagon key
hexagon key
BOND FIXATION OF ELECTRIC PARTS
When DAMP board is replaced or the following object parts are
replaced, it is necessary to fi x parts to the boards by using a speci-
fi ed bond without fail.
• Object boards
Complete DAMP board
• Object parts
Board Ref. No.
DAMP
C1126, C1127, C1128, C1129, C1142,
L1010, RY001
SCREW TYPE DISCRIMINATION BEFORE DISASSEMBLE THE PANEL, SIDE
In this set, the screw type which screw between “PANEL, SIDE
and P ANEL, T OP” and “PANEL, SIDE and CHASSIS” have been
changed in the midway of production.
Repair after distinguishing the screw type referring to the
following.
Type A or Type B
Type A or Type B
Type Screw P/N Screw Shape
A 4-546-397-01
B 4-162-271-01
• Use bond
Part No. Description
7-600-020-70 ADHESIVE (SC608Z2) 180ML
• Parts position
Complete DAMP board (page 6)
DAMP board
– DAMP Board (Component Side) –
RY001
C1142
C1128
C1127
C1129
L1010
The portion which applies bond:
C1126
6
Page 7
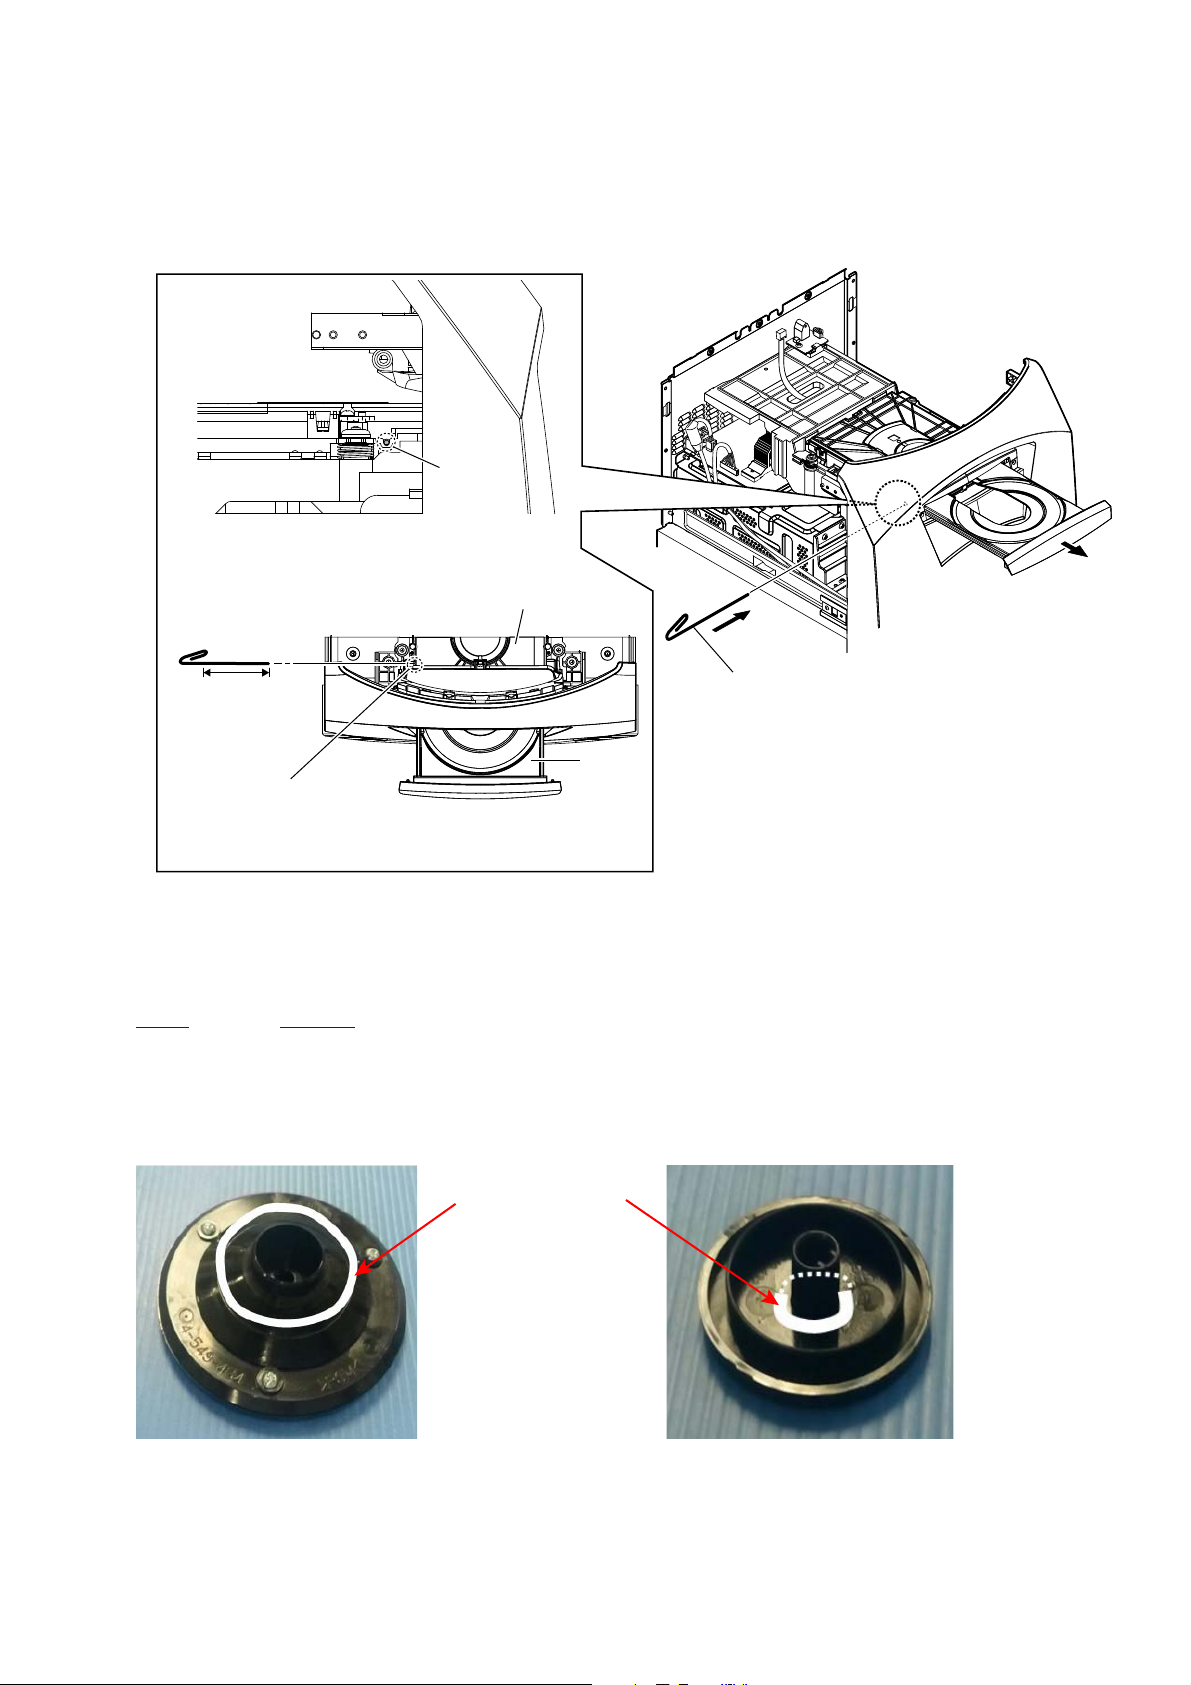
HOW TO OPEN THE TRAY WHEN POWER SWITCH TURN OFF
Note 1: After the side panel and top panel are removed, this work is done.
Note 2: Please prepare the thin wire (clip etc. processed to the length of 8 cm or more).
1 Remove the side (L) panel, side (R) panel, top panel section.
(Illustration of disassembly is omitted.)
hole
– Left view –
Insert the clip etc. processed to the
length of 8 cm or more in the hole
on the side of the chassis and push.
CD/DVD mechanism deck
HCD-GT3D
Ver. 1.2
3
8 cm or more
Note: Push after it inserts it
in this hole well.
tray
– Top view –
2 Insert the clip etc.
NOTE OF REPLACING THE VOLUME KNOB ASSY OR MIC KNOB
When VOLUME knob assy or MIC knob is replaced, it is necessary to apply lubricant on the knob.
Part No. Description
7-651-000-63 Lubricant (SFL-7A)1KG
Apply the lubricant referring to the fi gure below.
– VOLUME KNOB ASSY – – MIC KNOB ASSY –
Lubricant (SFL-7A)1KG
7
Page 8
HCD-GT3D
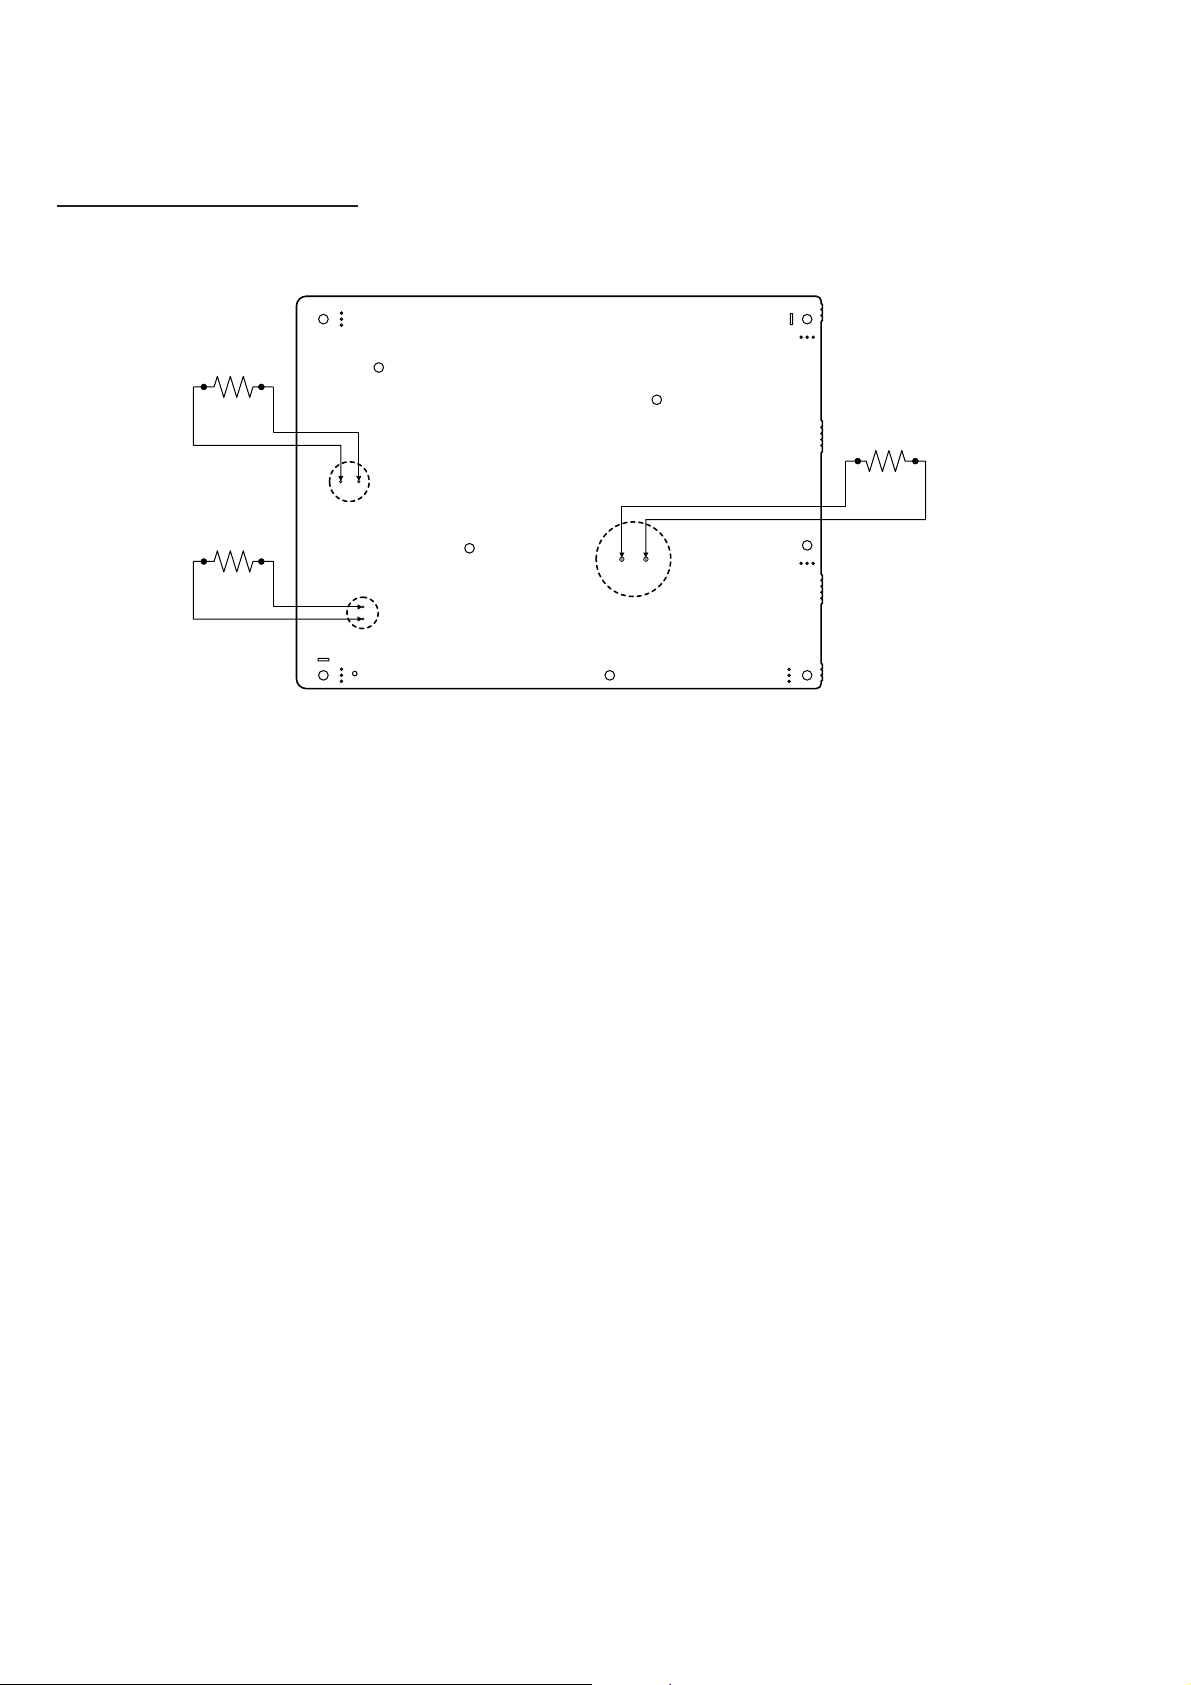
CAPACITOR DISCHARGE FOR ELECTRIC SHOCK PREVENTION
SMPS Board (Conductor side view)
In checking the SMPS board, make 3 capacitors discharge of C914, C1003 and C1006 for eletrical shock prevention.
800 :/5 W
800 :/5 W
C1003
800 :/5 W
C914
C1006
8
Page 9
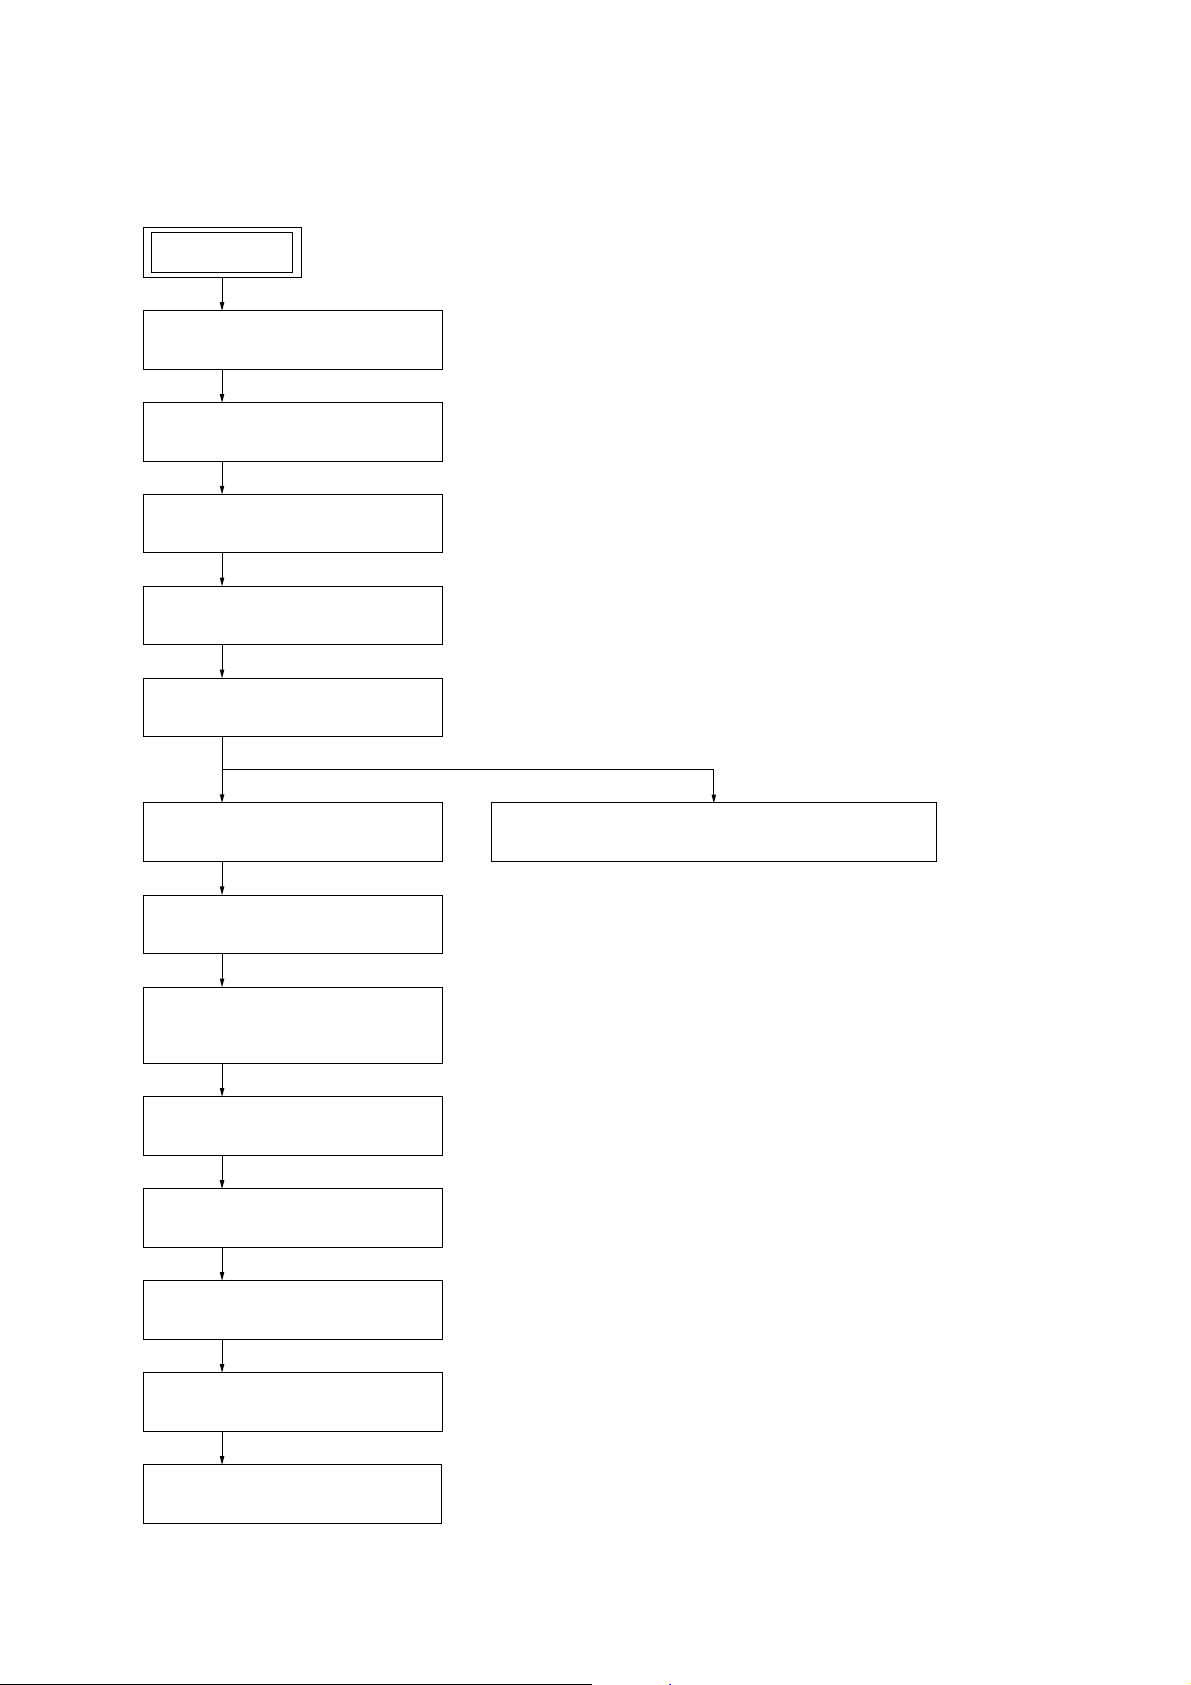
Note: Disassemble the unit in the order as shown below.
2-1. DISASSEMBLY FLOW
SET
2-2. SIDE (L) PANEL, SIDE (R) PANEL
(Page 10)
2-3. TOP PANEL SECTION
(Page 11)
2-4. OPTICAL BOARD
(Page 12)
2-5. LOADING PANEL ASSY
(Page 12)
HCD-GT3D
SECTION 2
DISASSEMBLY
2-6. CDM SECTION
(Page 13)
2-7. BACK PANEL
(Page 13)
2-8. DAMP BOARD
(Page 14)
2-9. MOTHERBOARD BOARD,
SPLITTER BOARD
(Page 15)
2-10. SUB CHASSIS SECTION
(Page 16)
2-11. SMPS BOARD
(Page 17)
2-15. SERVICE, OPTICAL DEVICE(7G), WIRE (FLAT TYPE)
(Page 20)
2-12. CHASSIS
(Page 17)
2-13. FRONT PANEL SECTION
(Page 18)
2-14. LOUDSPEAKER (20CM)-087-11
(Page 19)
9
Page 10
HCD-GT3D
Ver. 1.2
Note: Follow the disassembly procedure in the numerical order given.
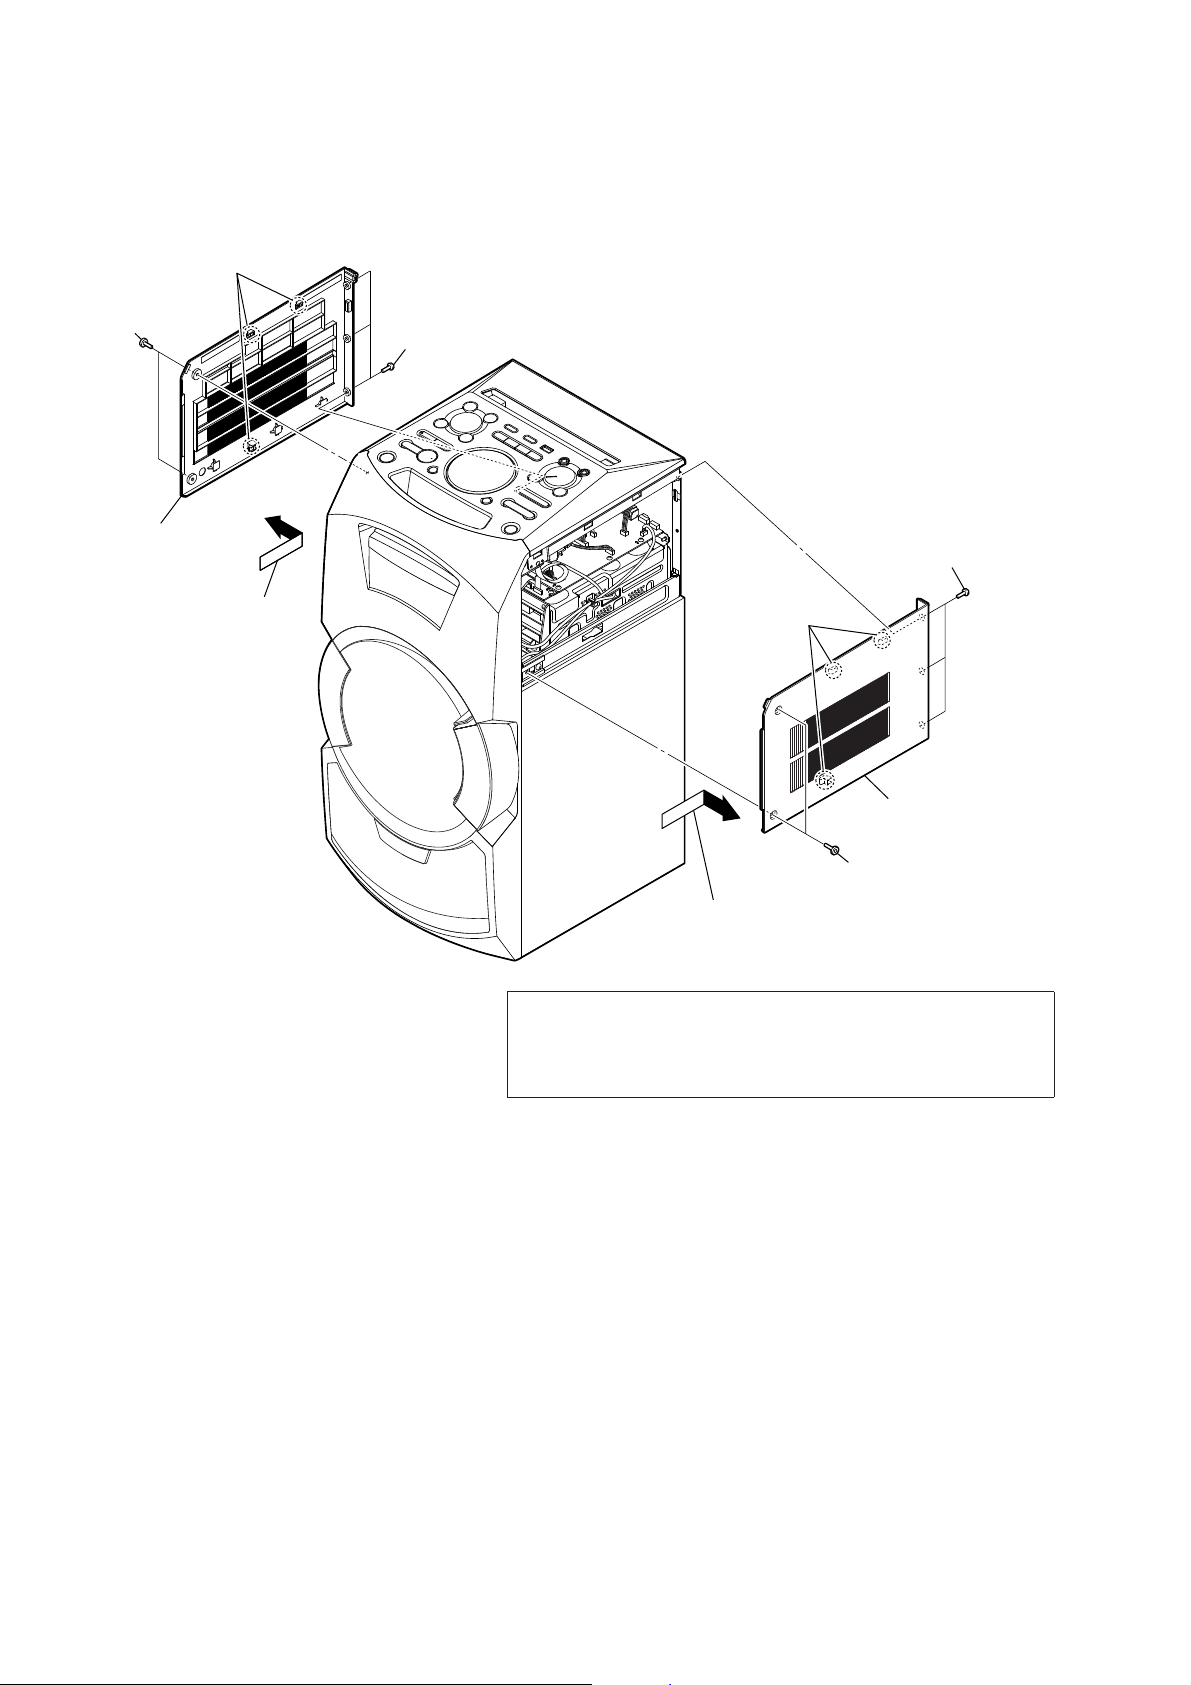
2-2. SIDE (L) PANEL, SIDE (R) PANEL
1 two screws
(TAPPING (HEX)
(Type A) or TAPPING
(Type B))
5 panel, side (L)
4 Remove the panel, side (L)
in the direction of the arrow.
3 three claws
2 three screws (+BVTP 3 × 8)
2 three screws (+BVTP 3 × 8)
3 three claws
5 panel, side (R)
1 two screws (TAPPING (HEX)
(Type A) or TAPPING (Type B))
4 Remove the panel, side (R)
in the direction of the arrow.
Note 1: The screw type which screw between “PANEL, SIDE and PANEL,
TOP” and “PANEL, SIDE and CHASSIS” for this unit have been
changed in the midway of production. About the screw type discrimination, refer to “SCREW TYPE DISCRIMINATION BEFORE
DISASSEMBLE THE PANEL, SIDE” on servicing notes (page 6).
10
Page 11
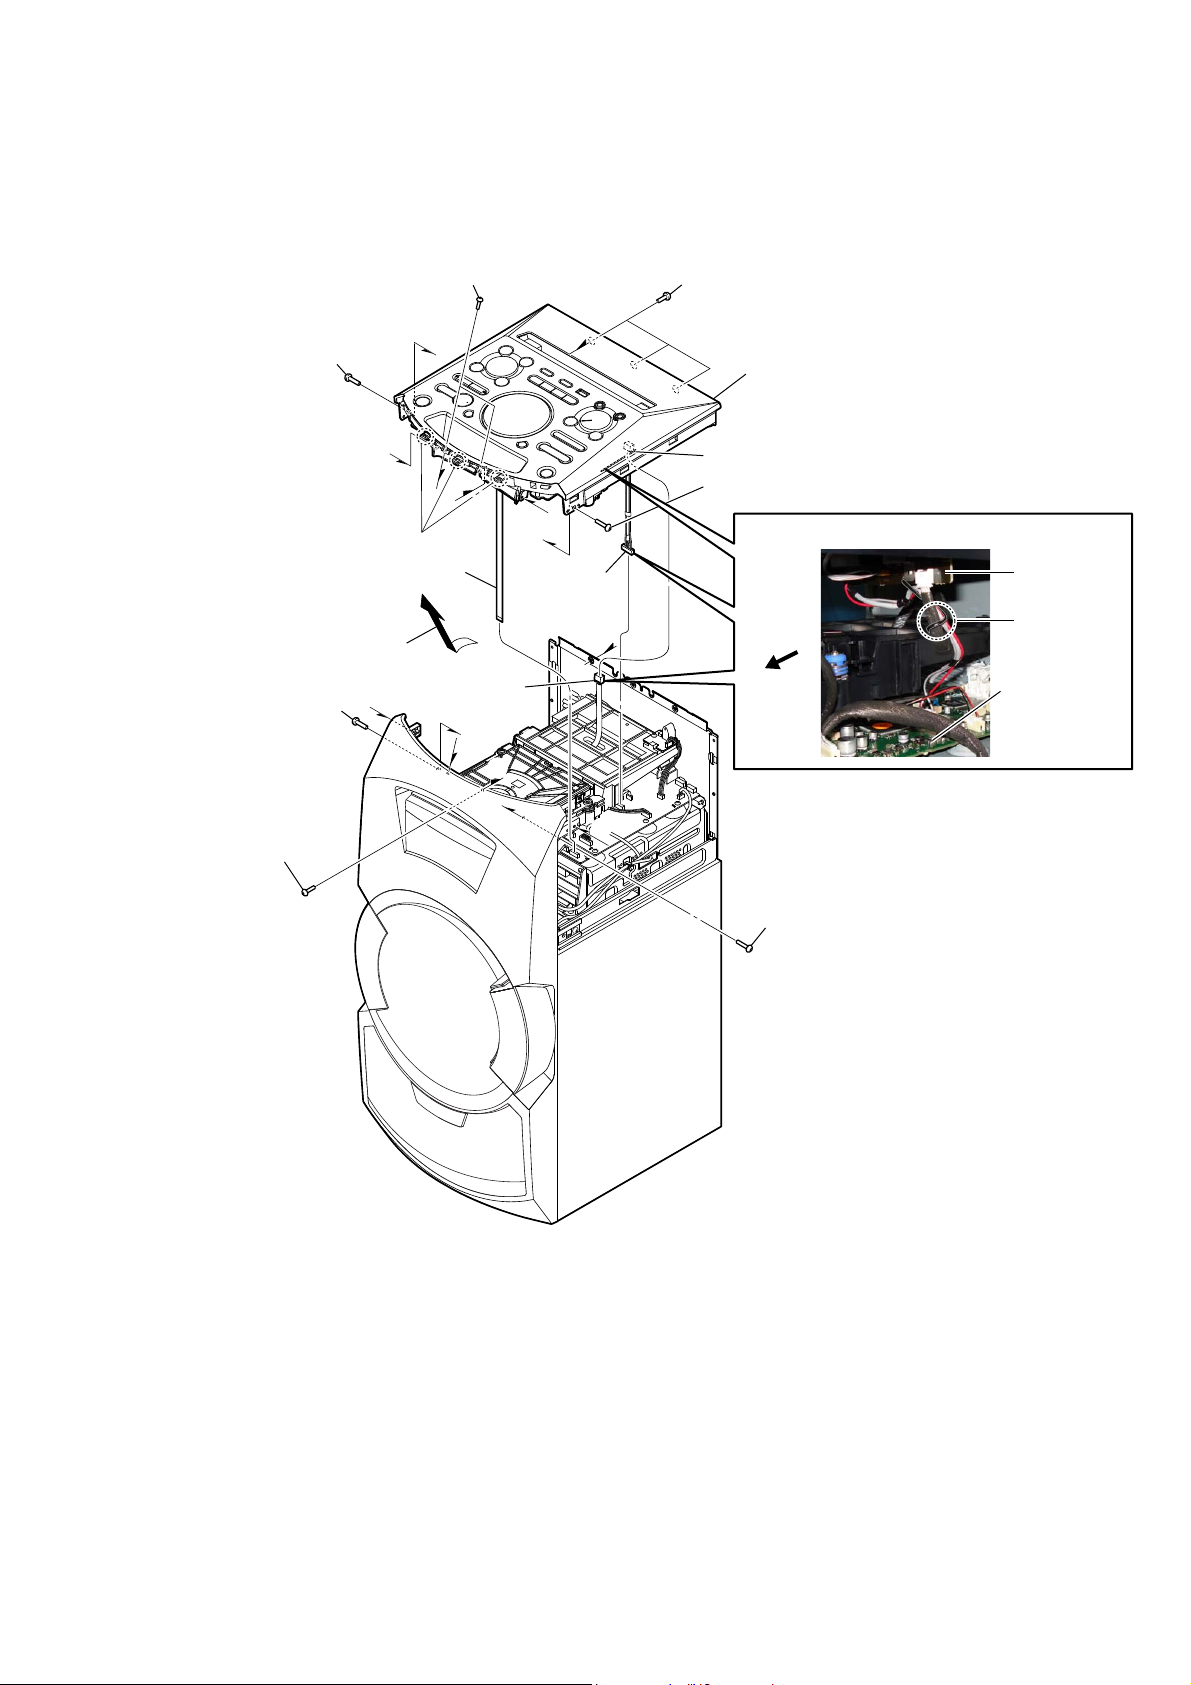
2-3. TOP PANEL SECTION
HCD-GT3D
Ver. 1.2
4 one screw (+BVTP 3 × 8)
9 wire (flat type) (11 core) (CN3402)
7 Remove the top panel section
in the direction of the arrow.
5 one screw (+BVTP 3 × 8)
2 one screw (+BVTP 3 × 8)
3 two screws (+BVTP 3 × 8)
D
F
C
B
G
6 three claws
qa CN3200 (4P)
D
F
C
B
E
0 CN451 (8P)
G
A
A
E
1 three screws (+BVTP 3 × 8)
qs top panel section
8 Remove the wires from pin, lead.
4 one screw (+BVTP 3 × 8)
:LUHVHWWLQJ
front side
MIC board
pin, lead
MOTHERBOARD
board
5 one screw (+BVTP 3 × 8)
11
Page 12
HCD-GT3D
Ver. 1.2
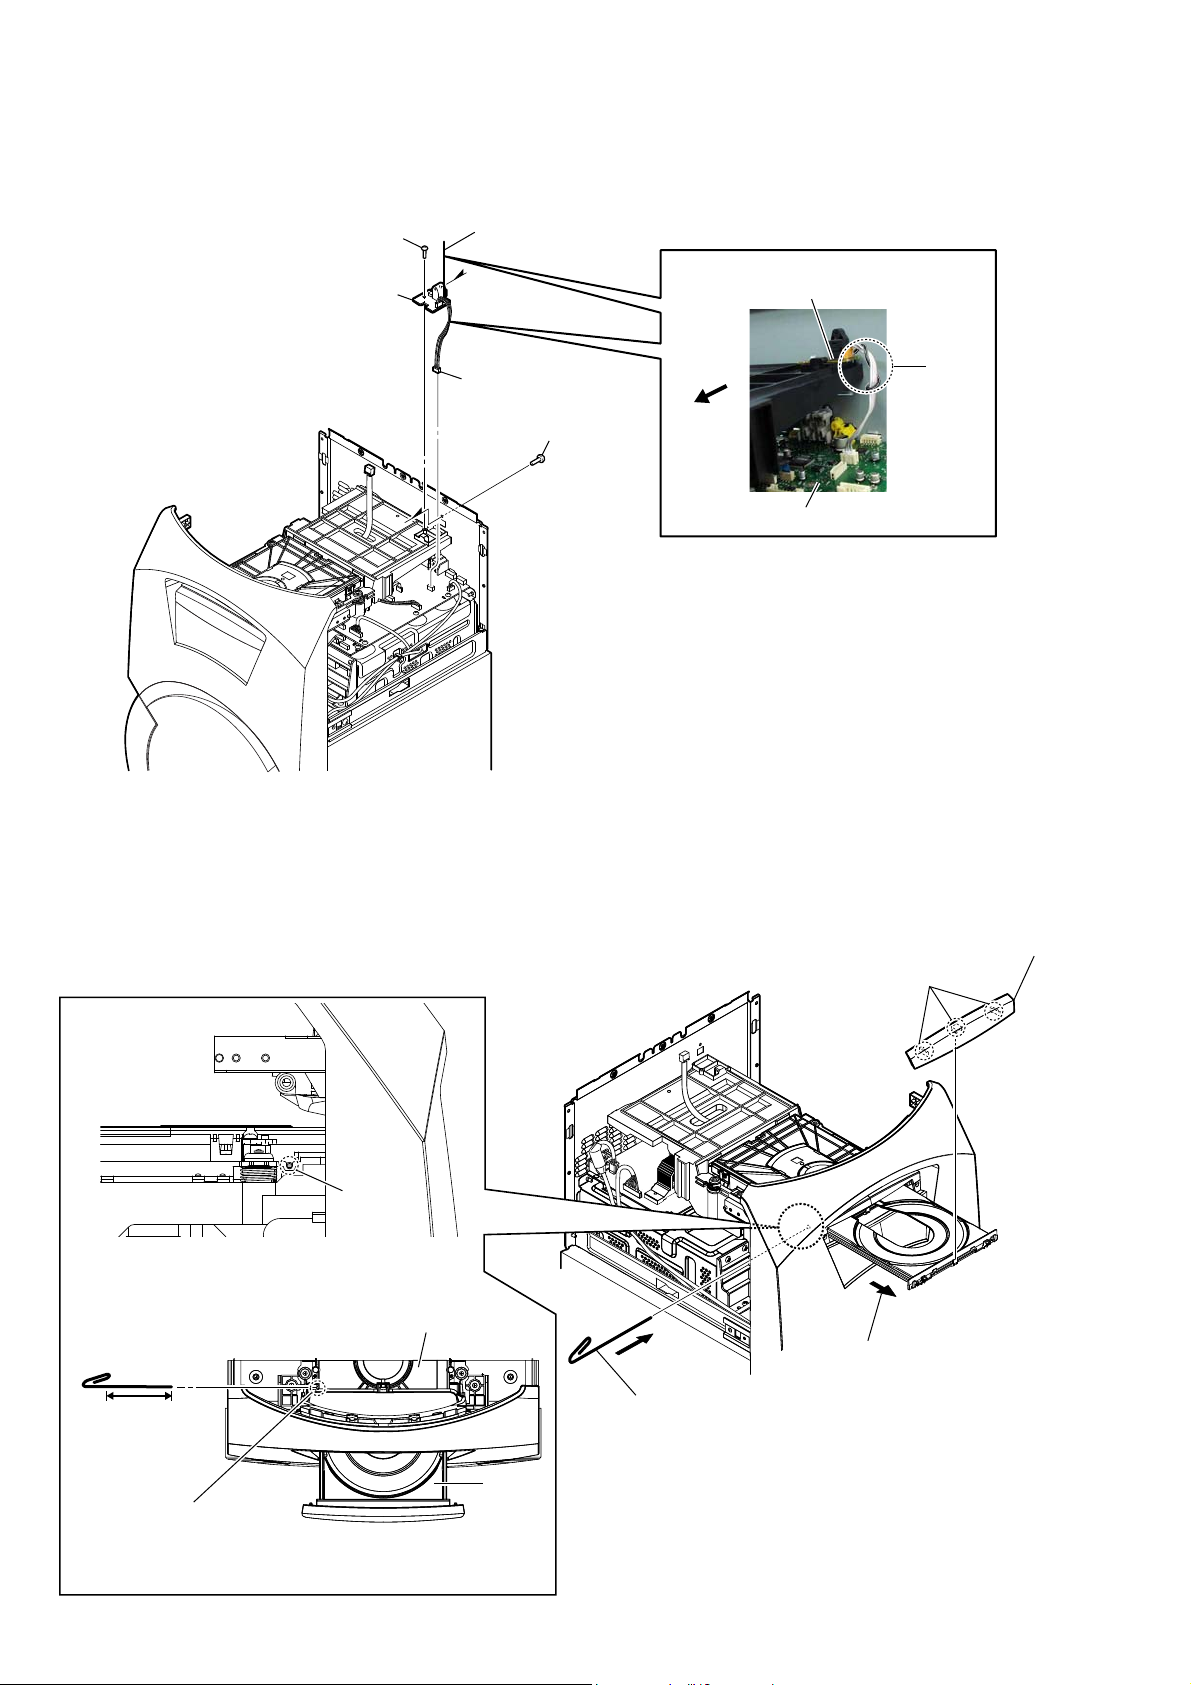
2-4. OPTICAL BOARD
4 one screw (+BVTP 3 × 8)
5 OPTICAL board
A
1 Remove the wire from pin, lead.
A
2 CN602 (3P)
3 one screw
(+BVTP 3 × 8)
:LUHVHWWLQJ
OPTICAL board
pin, lead
front side
MOTHERBOARD board
2-5. LOADING PANEL ASSY
– Left view –
Insert the clip etc. processed to the
length of 8 cm or more in the hole
on the side of the chassis and push.
8 cm or more
4 panel, loading assy
3 three claws
hole
CD/DVD mechanism deck
2 Draw out the tray.
1 Insert the clip etc.
Note: Push after it inserts it
in this hole well.
12
tray
– Top view –
Page 13
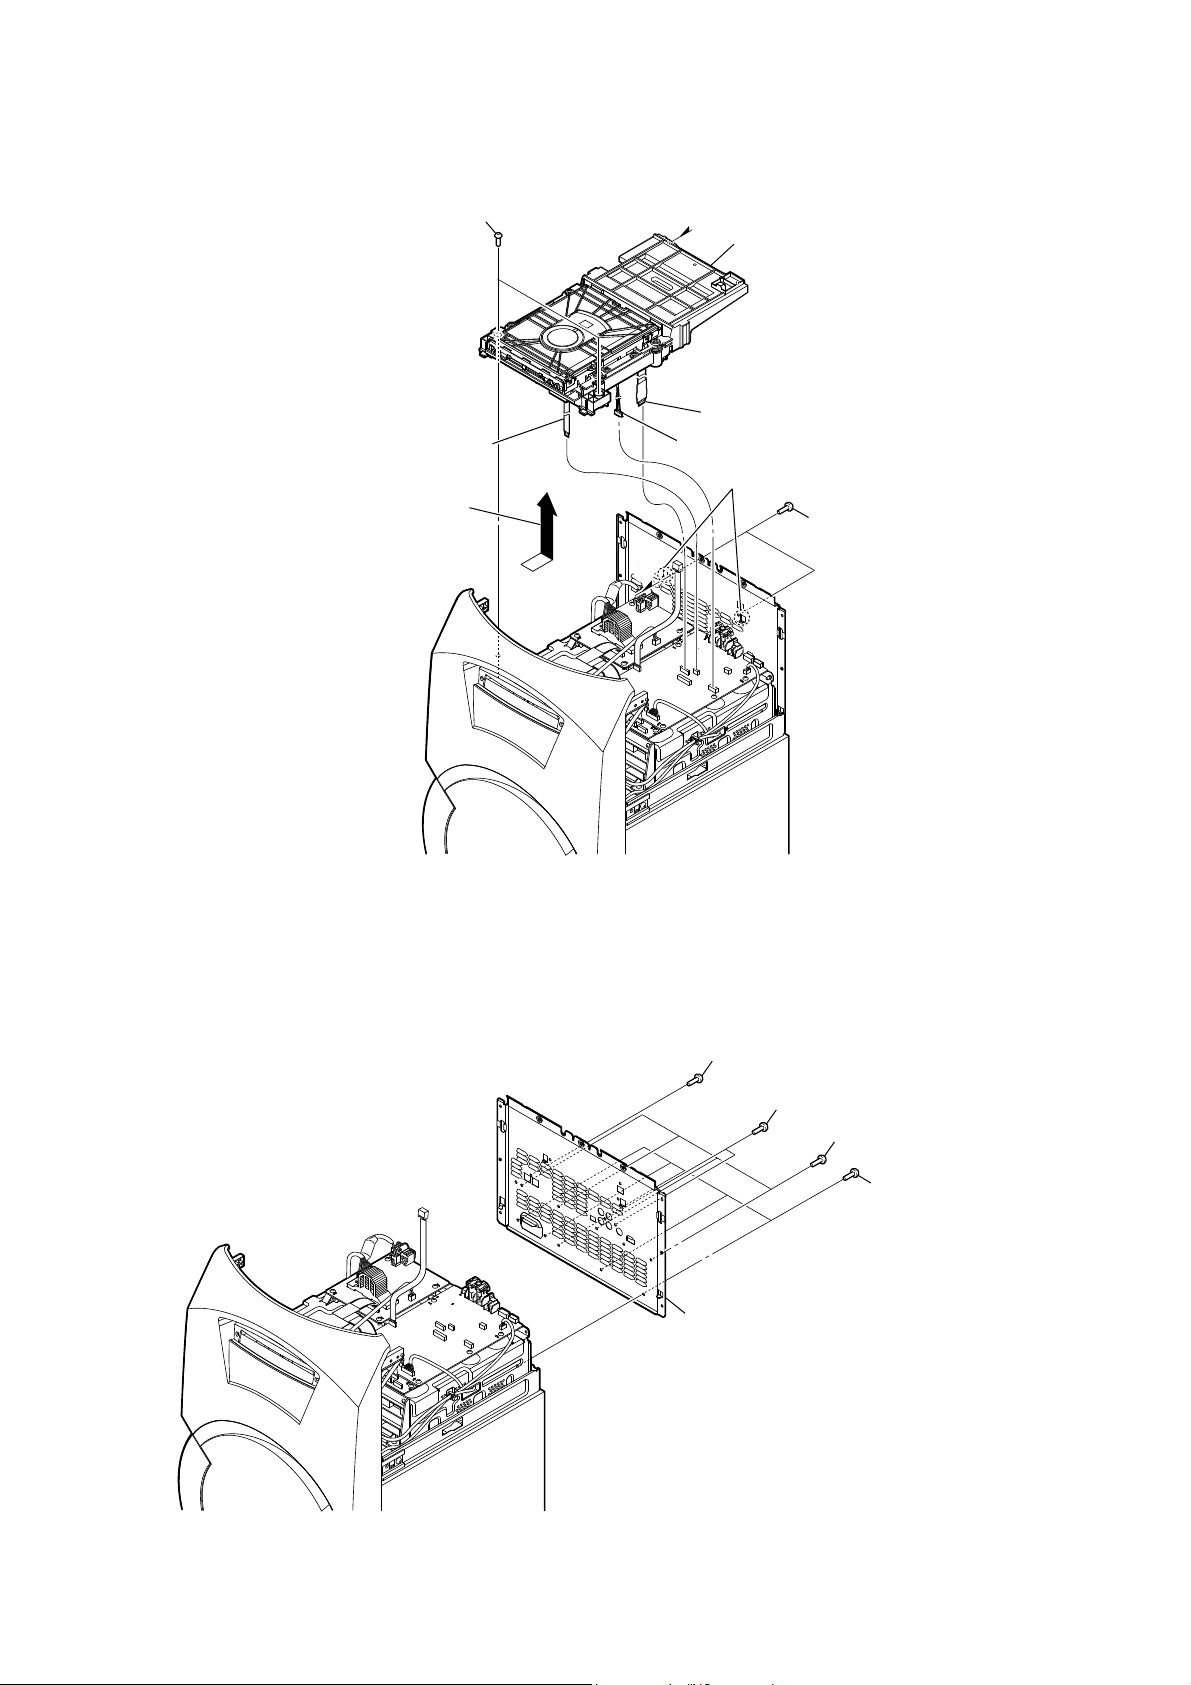
2-6. CDM SECTION
HCD-GT3D
Ver. 1.2
1 two screws (+BVTP 3 × 8)
6 wire (flat type) (5 core) (CN303)
4 Remove the CDM section
in the direction of the arrow.
A
5 CN401 (6P)
A
8 CDM section
7 wire (flat type) (24 core) (CN302)
3 two claws
2 two screws (+BVTP 3 × 8)
2-7. BACK PANEL
2 one screw (+BVTP 3 × 8)
1 two screws (+BVTP 3 × 8)
3 four screws (+BVTP 3 × 8)
4 five screws (+BVTP 3 × 8)
5 panel, back
13
Page 14
HCD-GT3D
Ver. 1.2
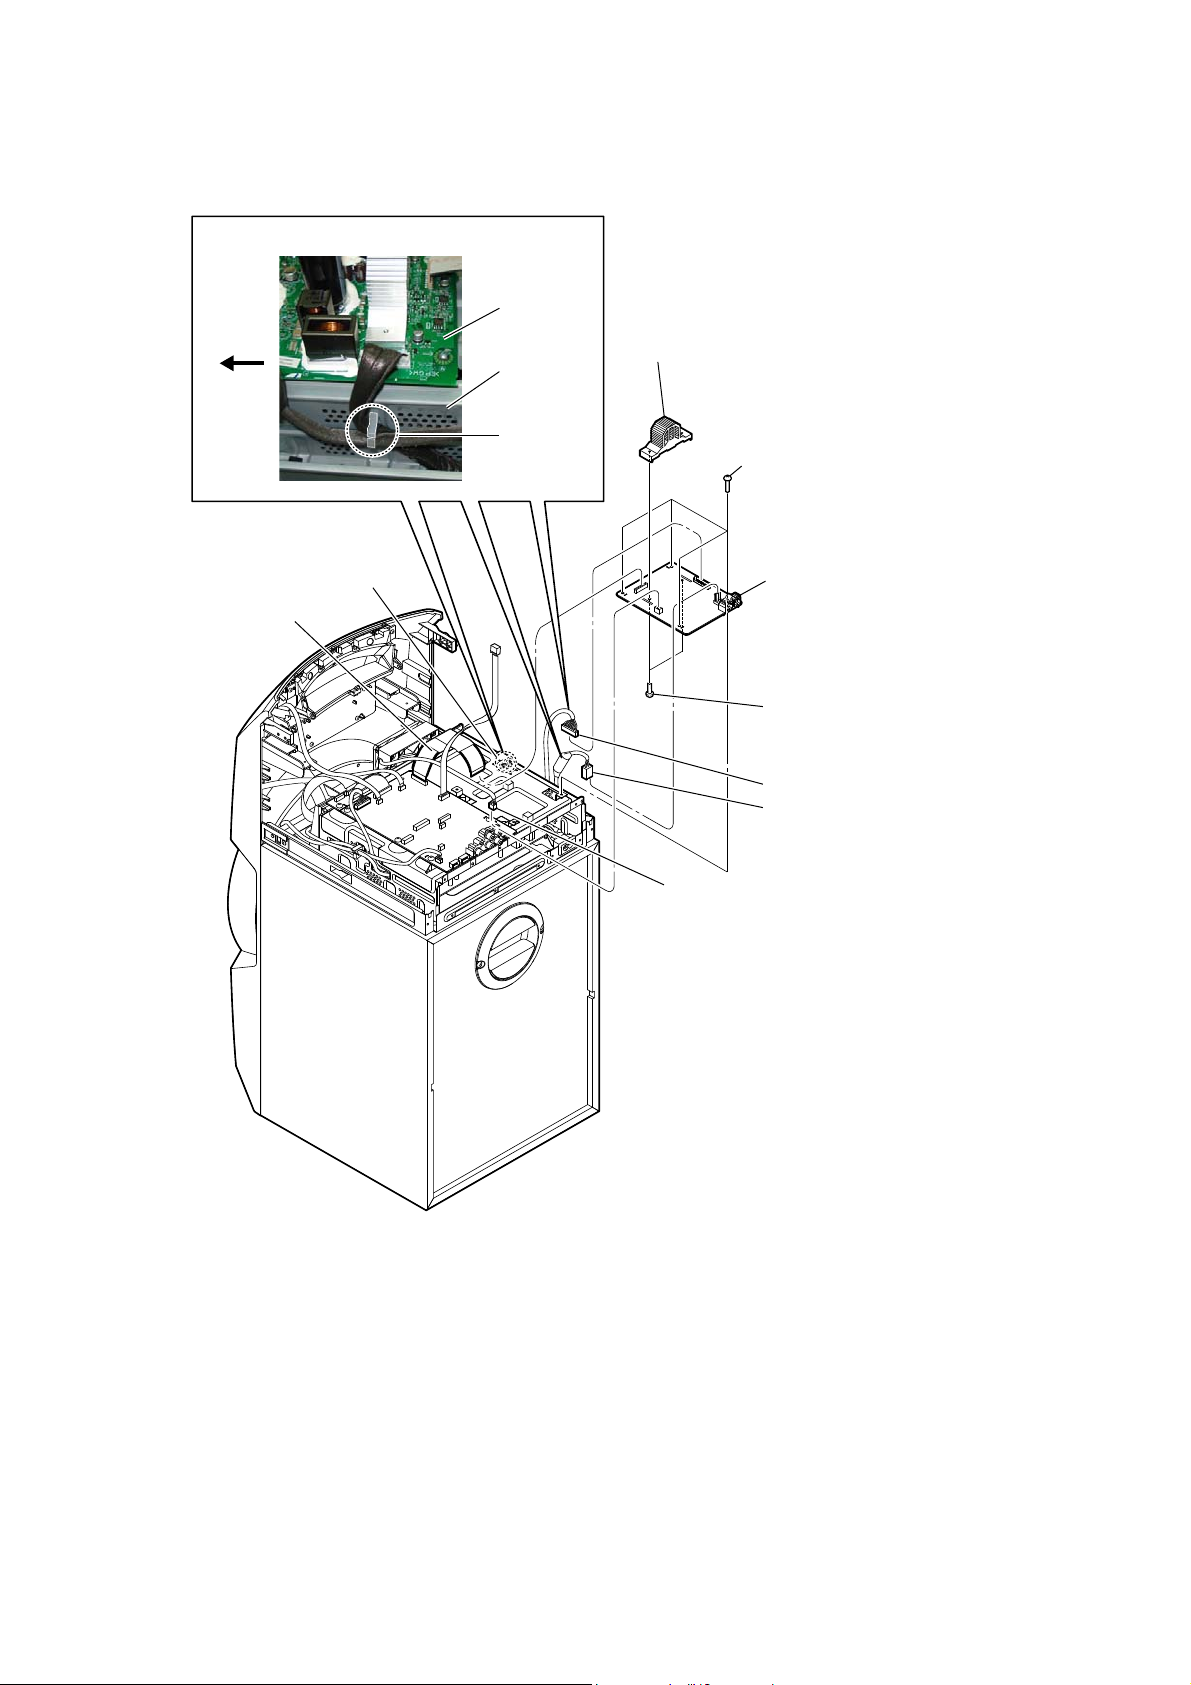
2-8. DAMP BOARD
:LUHVHWWLQJ
DAMP board
rear side
1 Remove the wires
from holder, wire.
5 wire (flat type) (19 core) (CN1001)
chassis, sub
holder, wire
8 heatsink
Note:
referring to “NOTE OF REPLACING THE IC1001
ON THE DAMP BOARD AND THE COMPLETE
DAMP BOARD” on servicing notes (page 5).
When you install the heatsink, spread the compound
6 four screws (+BVTP 3 × 8)
9 DAMP board
7 two screws (+BVTP 3 × 8)
3 CN1005 (8P)
2 CN1007 (2P)
4 CN1004 (2P)
14
– Rear view –
Page 15
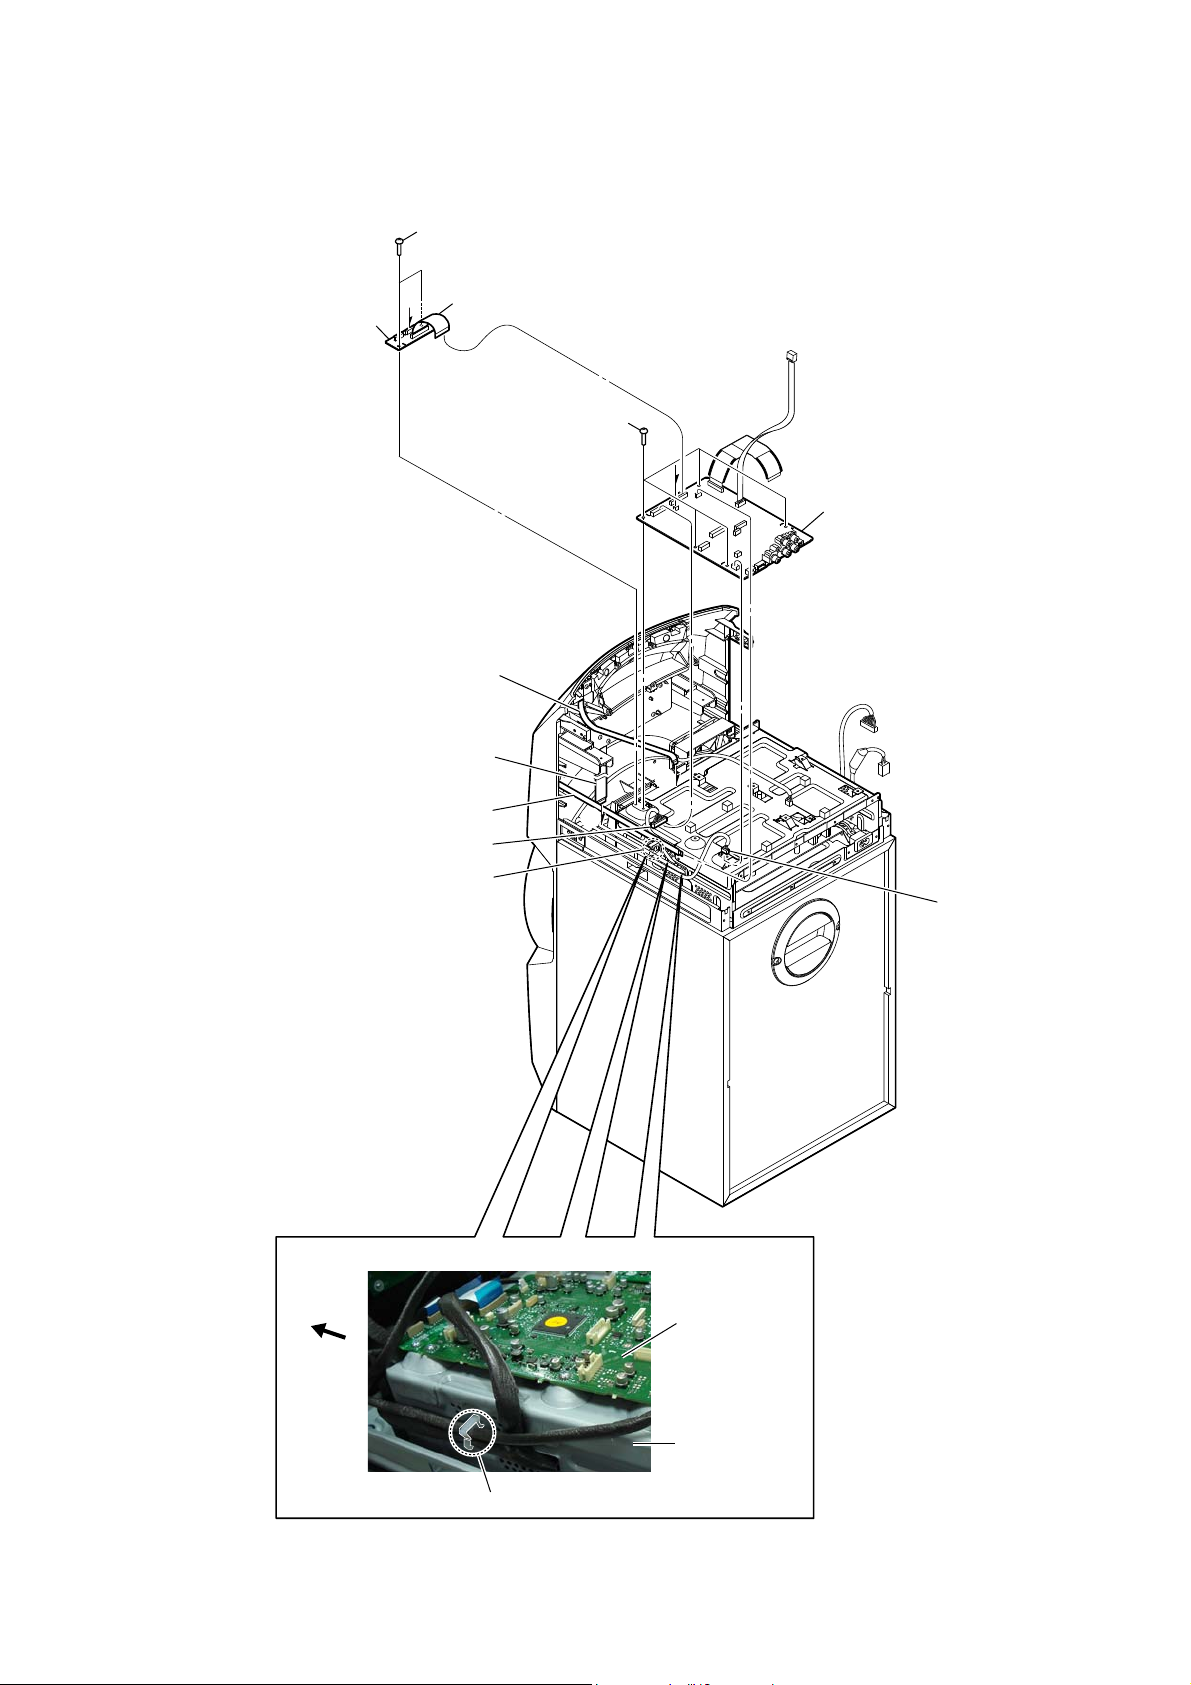
2-9. MOTHERBOARD BOARD, SPLITTER BOARD
0 two screws (+BVTP 3 × 8)
B
qa SPLITTER board
5 wire (flat type) (25 core) (CN118)
7 five screws (+BVTP 3 × 8)
HCD-GT3D
Ver. 1.2
A
8 MOTHERBOARD board
4 wire (flat type) (6 core) (CN105)
9 wire (flat type) (13 core) (CN3401)
6 wire (flat type) (10 core) (CN102)
3 CN001 (9P)
1 Remove the wires from holder, wire.
A
B
2 CN517 (4P)
– Rear view –
:LUHVHWWLQJ
front side
MOTHERBOARD
board
chassis, sub
holder, wire
15
Page 16
HCD-GT3D
Ver. 1.2
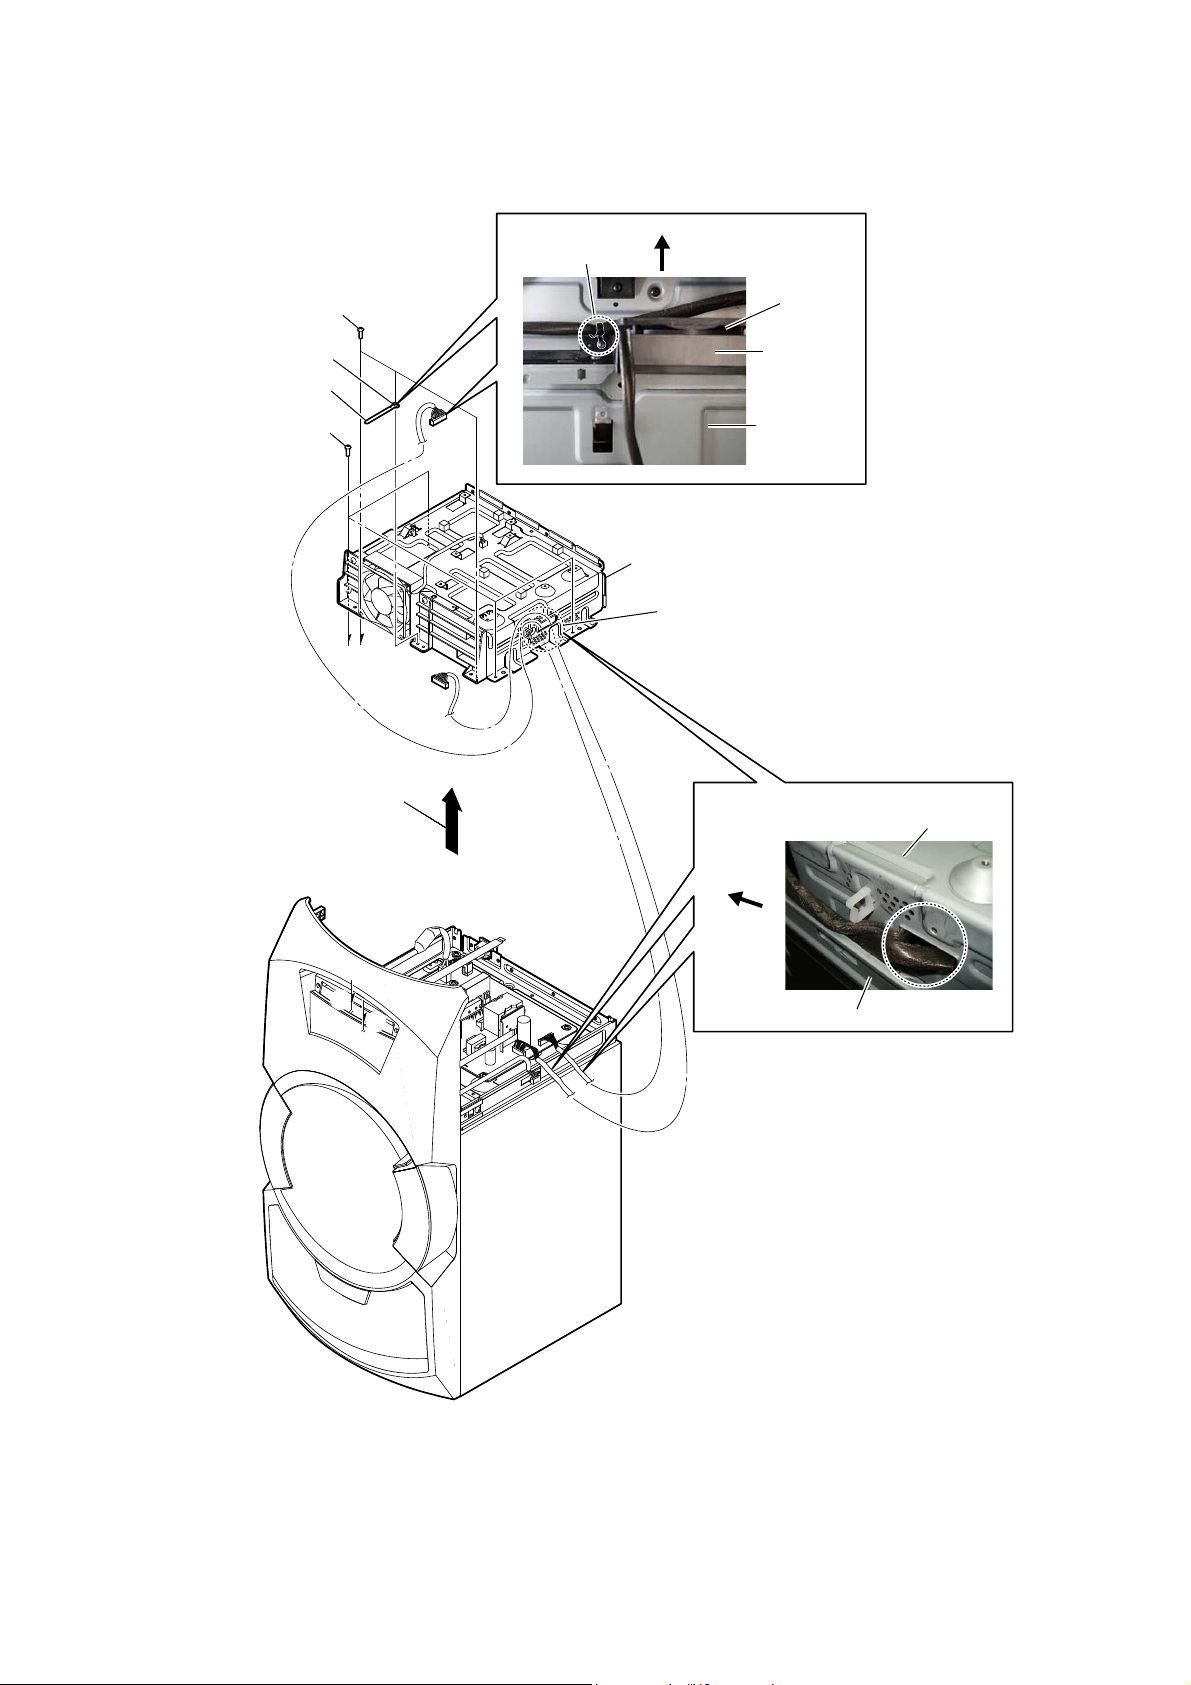
2-10. SUB CHASSIS SECTION
:LUHVHWWLQJ
clamp
front side
2 three screws (+BV3 (3-CR))
3 clamp
1 Remove the wire from clamp.
4 four screws (+BV3 (3-CR))
5 Remove the sub chassis section
in the direction of the arrow.
B
fan, DC
bracket, fan
chassis, sub
7 sub chassis section
6 Draw out the wires from chassis, sub.
A
:LUHVHWWLQJ
chassis, sub
front side
B
A
chassis
16
Page 17
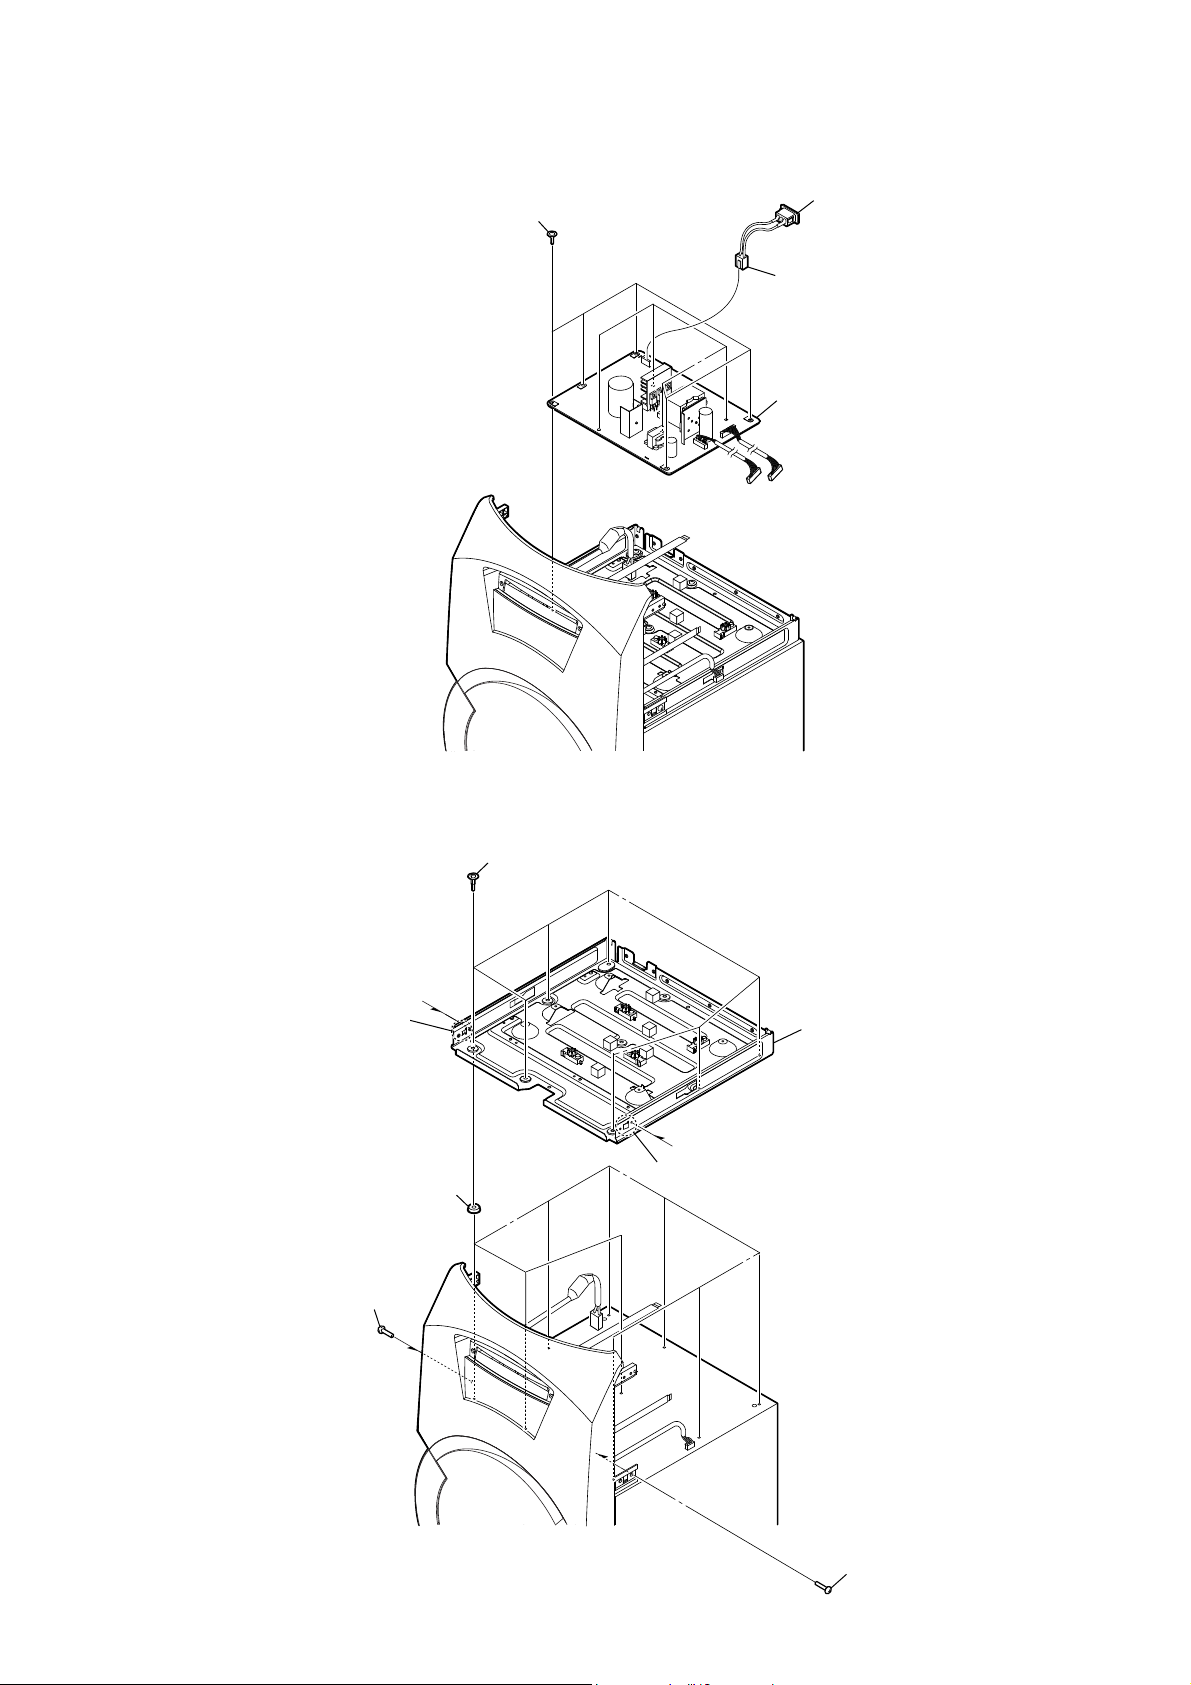
2-11. SMPS BOARD
HCD-GT3D
Ver. 1.2
3 nine screws (+PWH 3 × 8 (SUMITITE))
2 AC inlet
1 CN901 (2P)
4 SMPS board
2-12. CHASSIS
1 one screw (+BVTP 3 × 8)
3 one claw
A
4 nine damper chassis
A
2 seven step screws (M4)
5 chassis
B
3 one claw
B
1 one screw (+BVTP 3 × 8)
17
Page 18
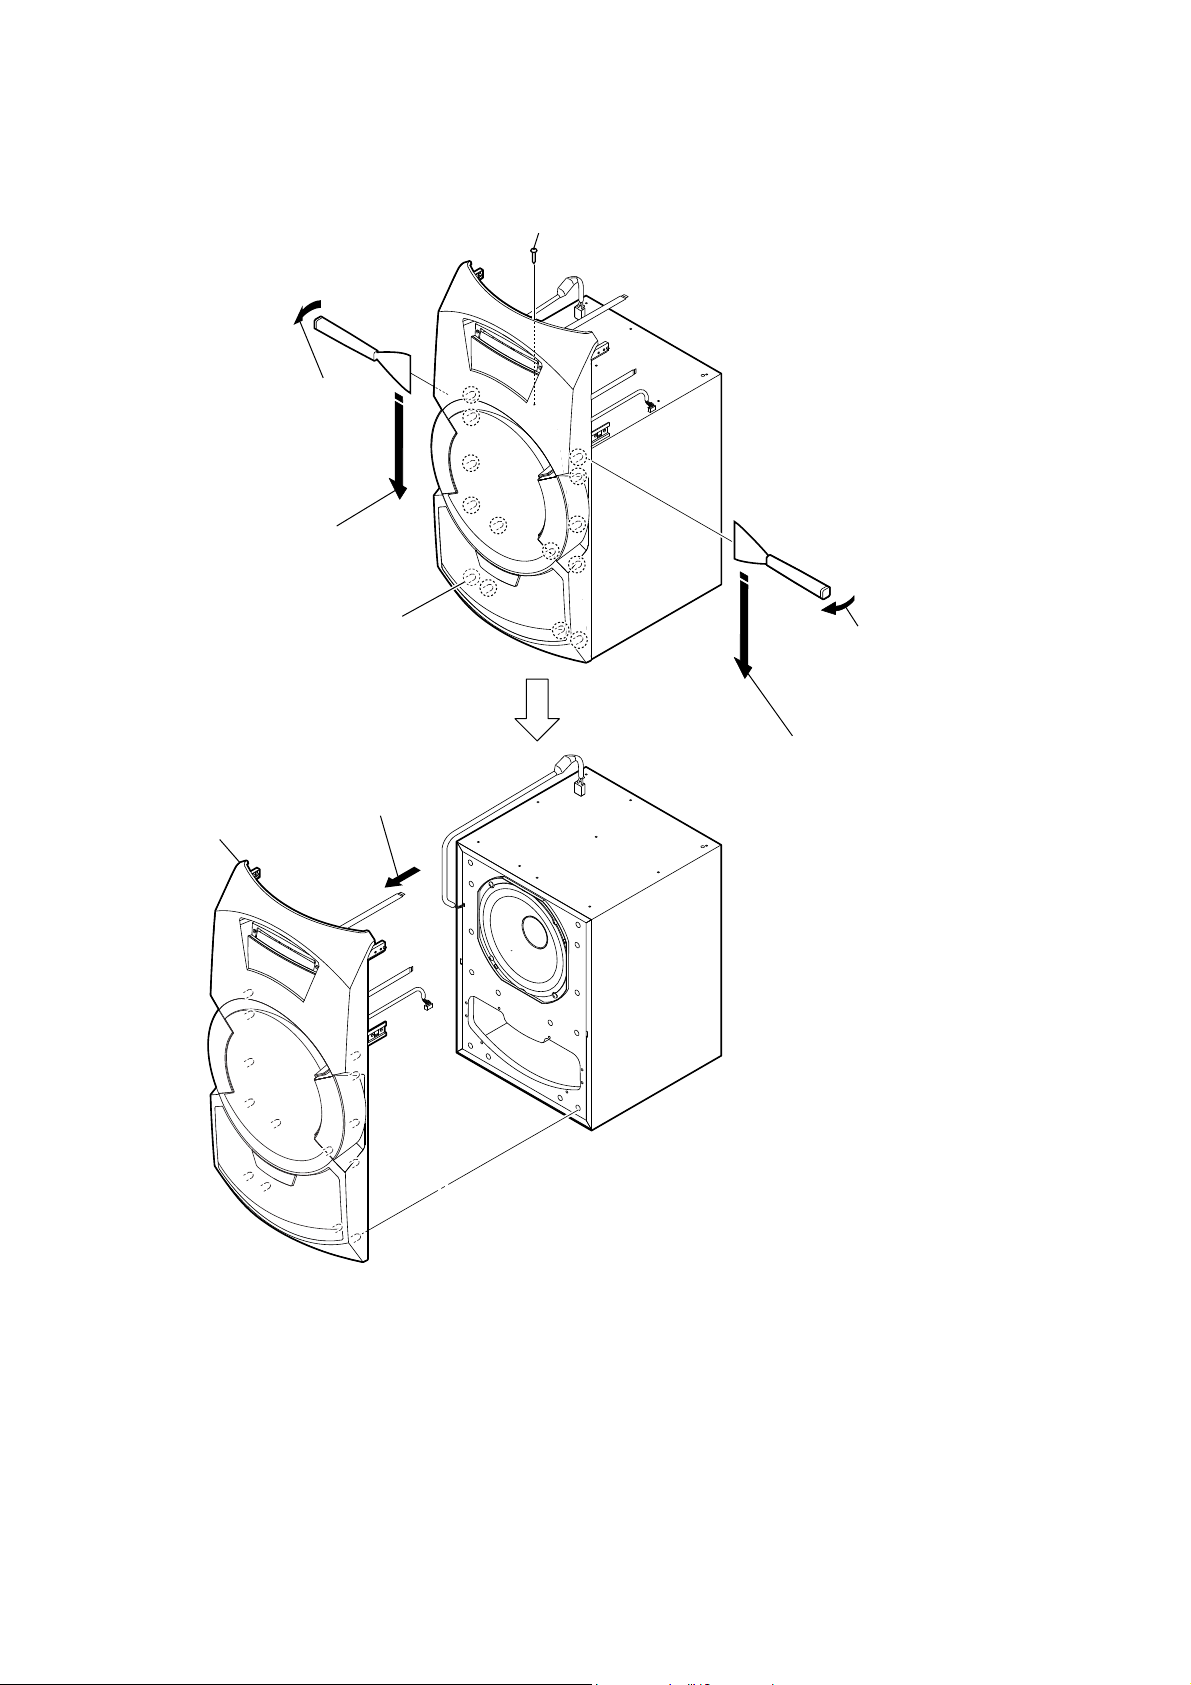
HCD-GT3D
Ver. 1.2
2-13. FRONT PANEL SECTION
2 Insert the jig into a space and slowly
remove the front panel section.
Note : When using a jig, please work
so as not to injure front panel
section and speaker cabinet.
3 All bosses are removed while moving
jig in the direction of the arrow, and
front panel section is removed.
1 one screw ((4 × 13) (TR-184A))
5 front panel section
total fourteen bosses
4 Remove the front panel section
in the direction of the arrow.
2 Insert the jig into a space and slowly
remove the front panel section.
Note : When using a jig, please work
so as not to injure front panel
section and speaker cabinet.
3 All bosses are removed while moving
jig in the direction of the arrow, and
front panel section is removed.
18
Page 19
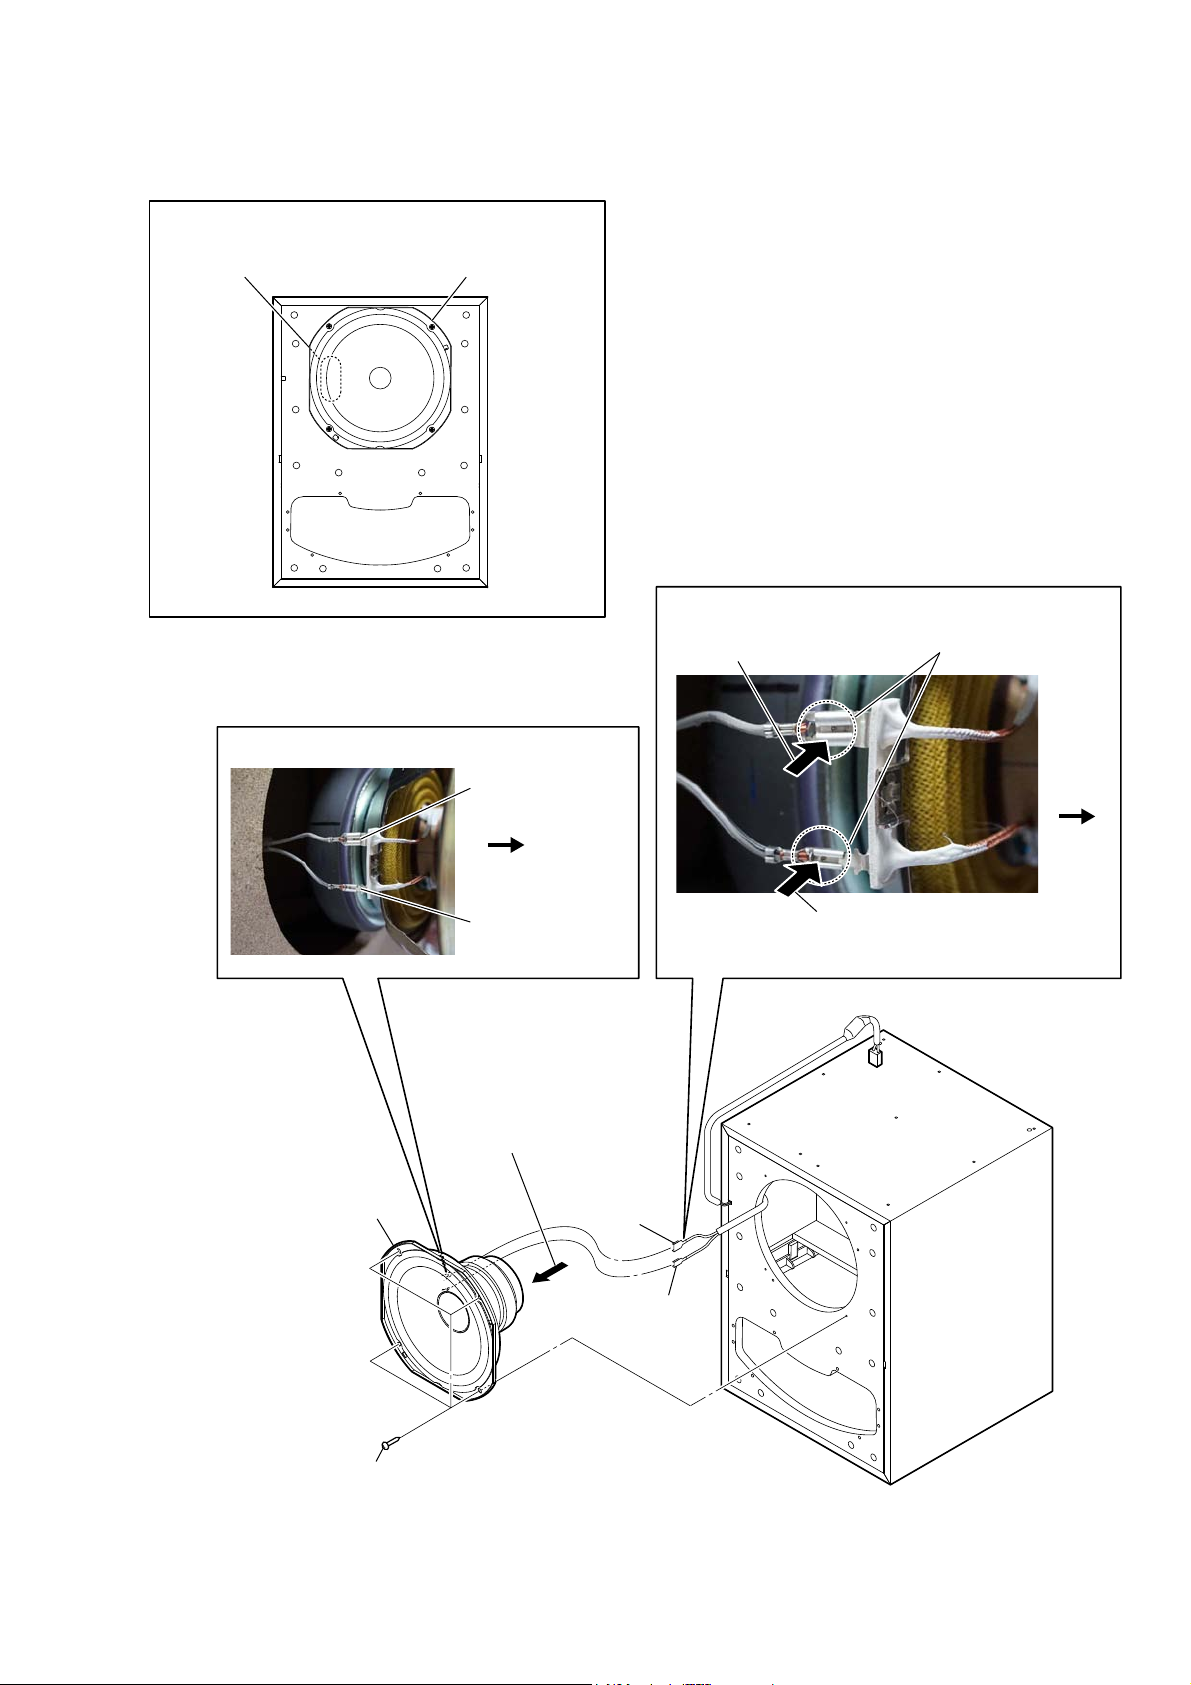
2-14. LOUDSPEAKER (20CM)-087-11
,QVWDOODWLRQGLUHFWLRQIRUWKHORXGVSHDNHUFP
loudspeaker (20cm)-087-11terminal position
3 Push the protrusion,
and remove the terminal
(wide side) [grey].
HCD-GT3D
protrusion
:LUHVHWWLQJ
4 loudspeaker (20cm)-087-11
terminal (wide side)
[grey].
front side
terminal (narrow side)
[black/grey].
2 Remove the
loudspeaker (20cm)-087-11
in the direction of the arrow.
terminal
(wide side)
[grey]
terminal
(narrow side)
[black/grey]
front side
3 Push the protrusion,
and remove the terminal
(narrow side) [black/grey].
1 four screws ((1) (4 × 20), +BV TAPPING)
19
Page 20
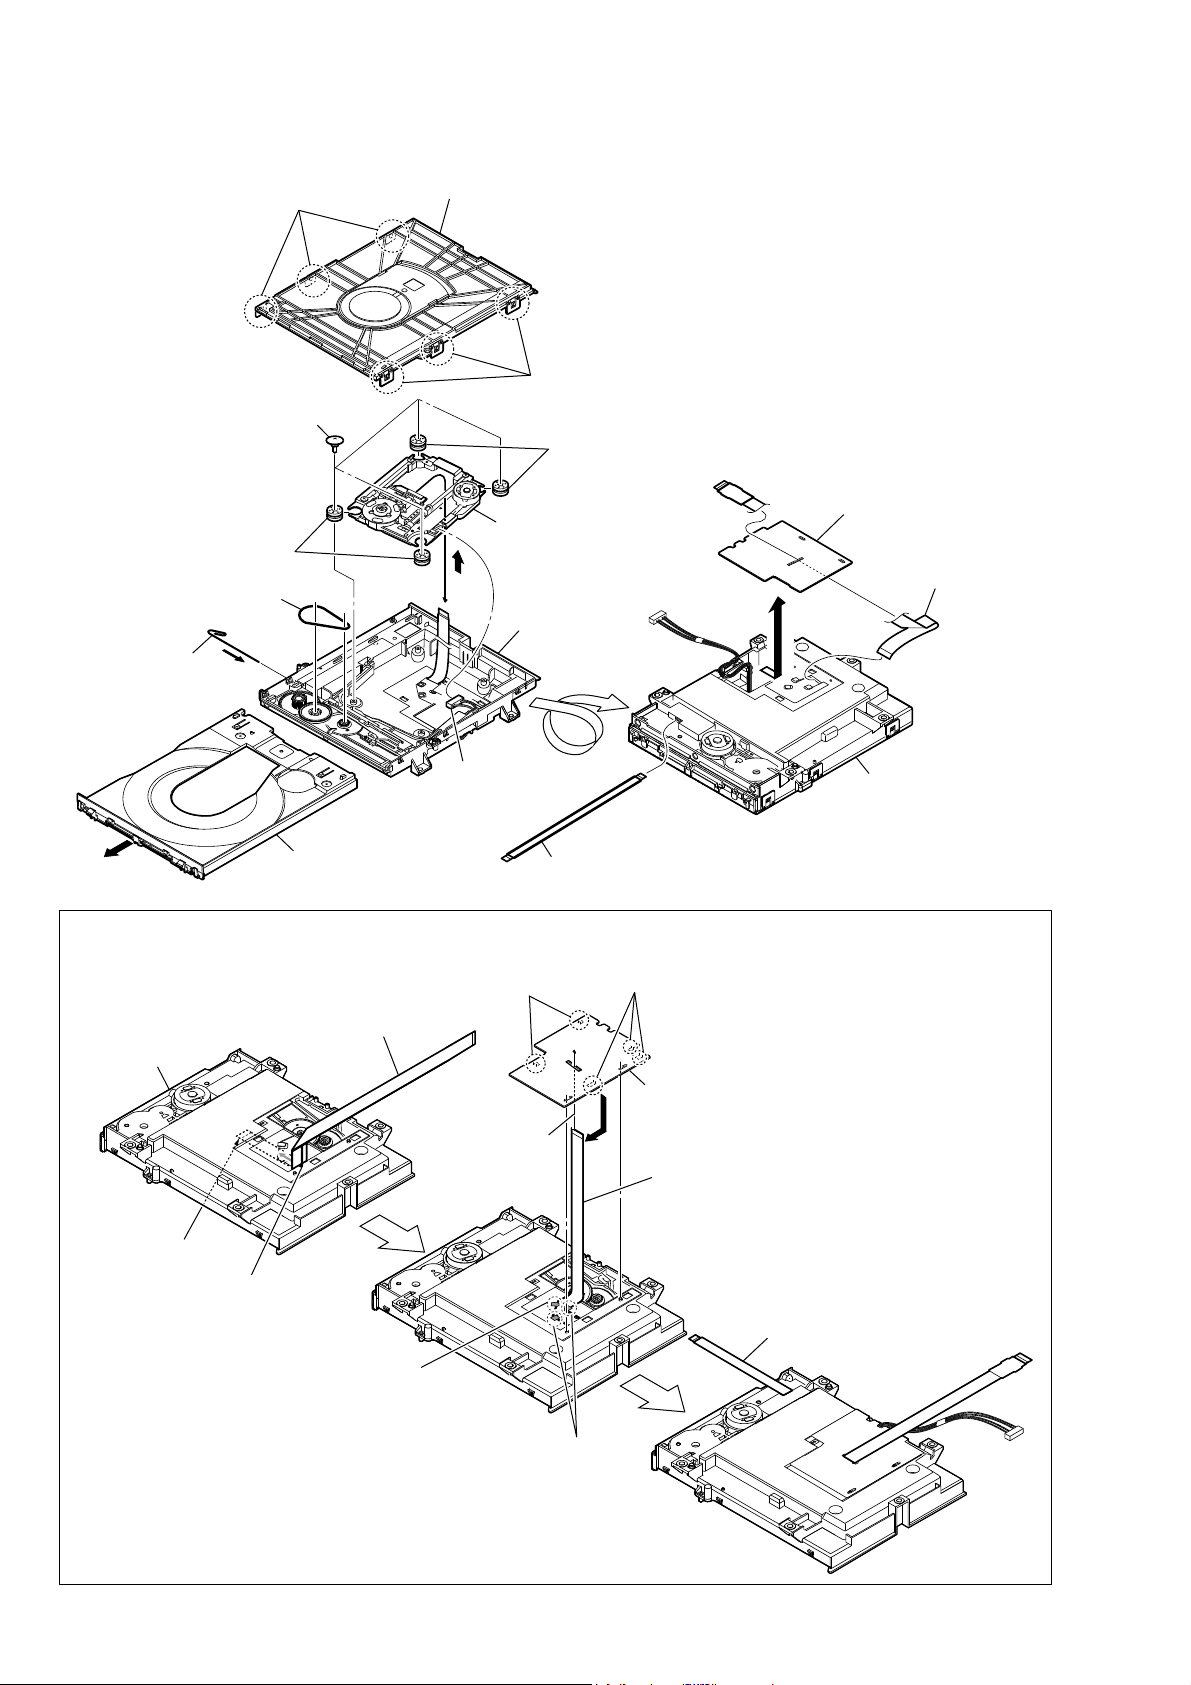
HCD-GT3D
Ver. 1.2
2-15. SERVICE, OPTICAL DEVICE(7G), WIRE (FLAT TYPE)
7 four insulator screws
3 Insert the clip etc.
1 three claws
qa insulator
6 belt
2 chuck holder assy (T)
1 three claws
qs service, optical device(7G)
9
8
qd base, lo assy
qa insulator
qh holder, FFC
qj wire (flat type) (24 core)
qg
0 connector
4
,QVWDOODWLRQRIZLUHIODWW\SHFRUHDQGZLUHIODWW\SHFRUH
Note: This illustration sees the loading assy (T) from bottom side.
loading assy (T)
terminal face
2 Through the hole
5 tray
1 wire (flat type) (24 core)
3 Through the hole
qf wire(flat type) (5 core)
5 two claws
loading assy (T)
– Bottom view –
5 three claws
6 holder, FFC
4
7 wire (flat type) (24 core)
8 wire (flat type) (5 core)
20
Under the guide
(Fold area)
Under the guide
Page 21

SECTION 3
TEST MODE
HCD-GT3D
[PANEL TEST MODE]
This mode is used to check the fl uorescent indicator tube, LEDs,
keys, [VOLUME/DJ CONTROL] jog, model, destination and
software version.
Procedure:
1. Press [] button and [S3
and hold 3 seconds.
2. All LEDs and segments in fl uorescent indicator tube are
lighted up.
3. When you want to enter to the software version display mode,
press [S2 +] button.
The model information appears on the fl uorescent indicator
tube.
Press [S2 +] button again to view the destination information.
4. During the destination information display, press [S2 +]
button. Each time [S2 +] button is pressed, the fl uorescent
indicator tube shows the version of each category software
in the following sequence: SC, MTK, OPU, UI, PF, SUB,
SYS, CD, CMA, CMB, ST, TA, TM and return back to model
information display.
5. When [] button is pressed while the version numbers are
being displayed except model and destination, the date of the
software creation appears. When [] button is pressed again,
the display returns to the software version display.
6. When [ENTER] button is pressed after all LEDs and segments
in fl uorescent indicator tube light up, alternate segments in
fl uorescent indicator tube and LEDs would light up, all Party
Light LEDs would light up in red color. If you press [ENTER]
button again, another half of alternate segments in fl uorescent
indicator tube and LEDs would light up, all Party Light LEDs
would light up in green color. Pressing [ENTER] button
again would cause all segments in fl uorescent indicator tube
and LEDs light up, all Party Light LEDs would light up in
blue color. Pressing [ENTER] button again would turn off all
segments in fl uorescent indicator tube and all LEDs including
Party Light LEDs.
7. Press [S1 –] button, the key check mode is activated.
8. In the key check mode, the fl uorescent indicator tube displays
“K0 V0E0”.
Each time a button is pressed, “K” value increases. However,
once a button has been pressed, it is no longer taken into
account. After all the buttons have been pressed, "K" value will
toggle between "OK" and "K24".
“V” value increases in the manner of 0, 1, 2, 3 ... if [VOLUME/
DJ CONTROL] knob is turned clockwise, or it decreases in the
manner of 0, 9, 8, 7 ... if [VOLUME/DJ CONTROL] knob is
turned counterclockwise.
“E” value increases in the manner of 0, 1, 2, 3 ... if [MULTI
CONTROL] knob is turned clockwise, or it decreases in the
manner of 0, 9, 8, 7 ... if [MULTI CONTROL] knob is turned
counterclockwise.
9. To release from this mode, press the buttons in the same
manner as step 1, or disconnect the power cord.
TUNING –
.] button simultaneously
[COLD RESET]
The cold reset clears all data including preset data stored in the
data fl ash to initial conditions included history mode data. Execute
this mode when returning the set to the customer.
Procedure:
1. Press [\/1] button to turn on the system.
2. Press [] button and [S4
simultaneously for 3 seconds.
3. “COLD RST” appears on the fl uorescent indicator tube.
After that, the fl uorescent indicator tube will display “SONY
DEMO”. The set will automatically Power ON and Power
OFF again, and the system is reset.
[DISC TRAY LOCK MODE]
This mode let you lock the disc tray. When this mode is activated,
the disc tray will not open when [Z] button is pressed. The message “LOCKED” will be displayed on the fl uorescent indicator
tube. This mode only applied when there is disc on the tray.
Procedure:
1. Press [\/1] button to turn on the system.
2. Press [FUNCTION] button and turn the [MULTI CONTROL]
knob to select “DVD/CD” function, then press [ENTER]
button.
3. Press [ENTER] button and [VOCAL FADER] button
simultaneously and hold down until “LOCKED” or
“UNLOCKED” displayed on the fl uorescent indicator tube
(around 3 seconds).
Bluetooth PAIRING HISTORY CLEAR
It can clear the Bluetooth pairing history.
Procedure:
1. Press [\/1] button to turn on the system.
2. Press [-PAIRING BLUETOOTH] button to turn the Bluetooth
function.
3. Press two buttons of [ENTER] and [S1 –] simultaneously
for 3 seconds.
4. The message “BT HIST” → “CLEAR” is displayed on the
fl uorescent indicator tube, and the pairing history of Bluetooth
is cleared.
TUNING +
>] button
[USER RESET]
The user reset clears all data including preset data stored in the data
fl ash to initial conditions exclude history mode data.
Procedure:
1. Press [\/1] button to turn on the system.
2. Press [ENTER] button and [S4
taneously for 3 seconds.
3. “RESET” appears on the fl uorescent indicator tube. After that,
the fl uorescent indicator tube becomes blank for a while, and
the system goes to demo mode.
TUNING +
>] button simul-
21
Page 22
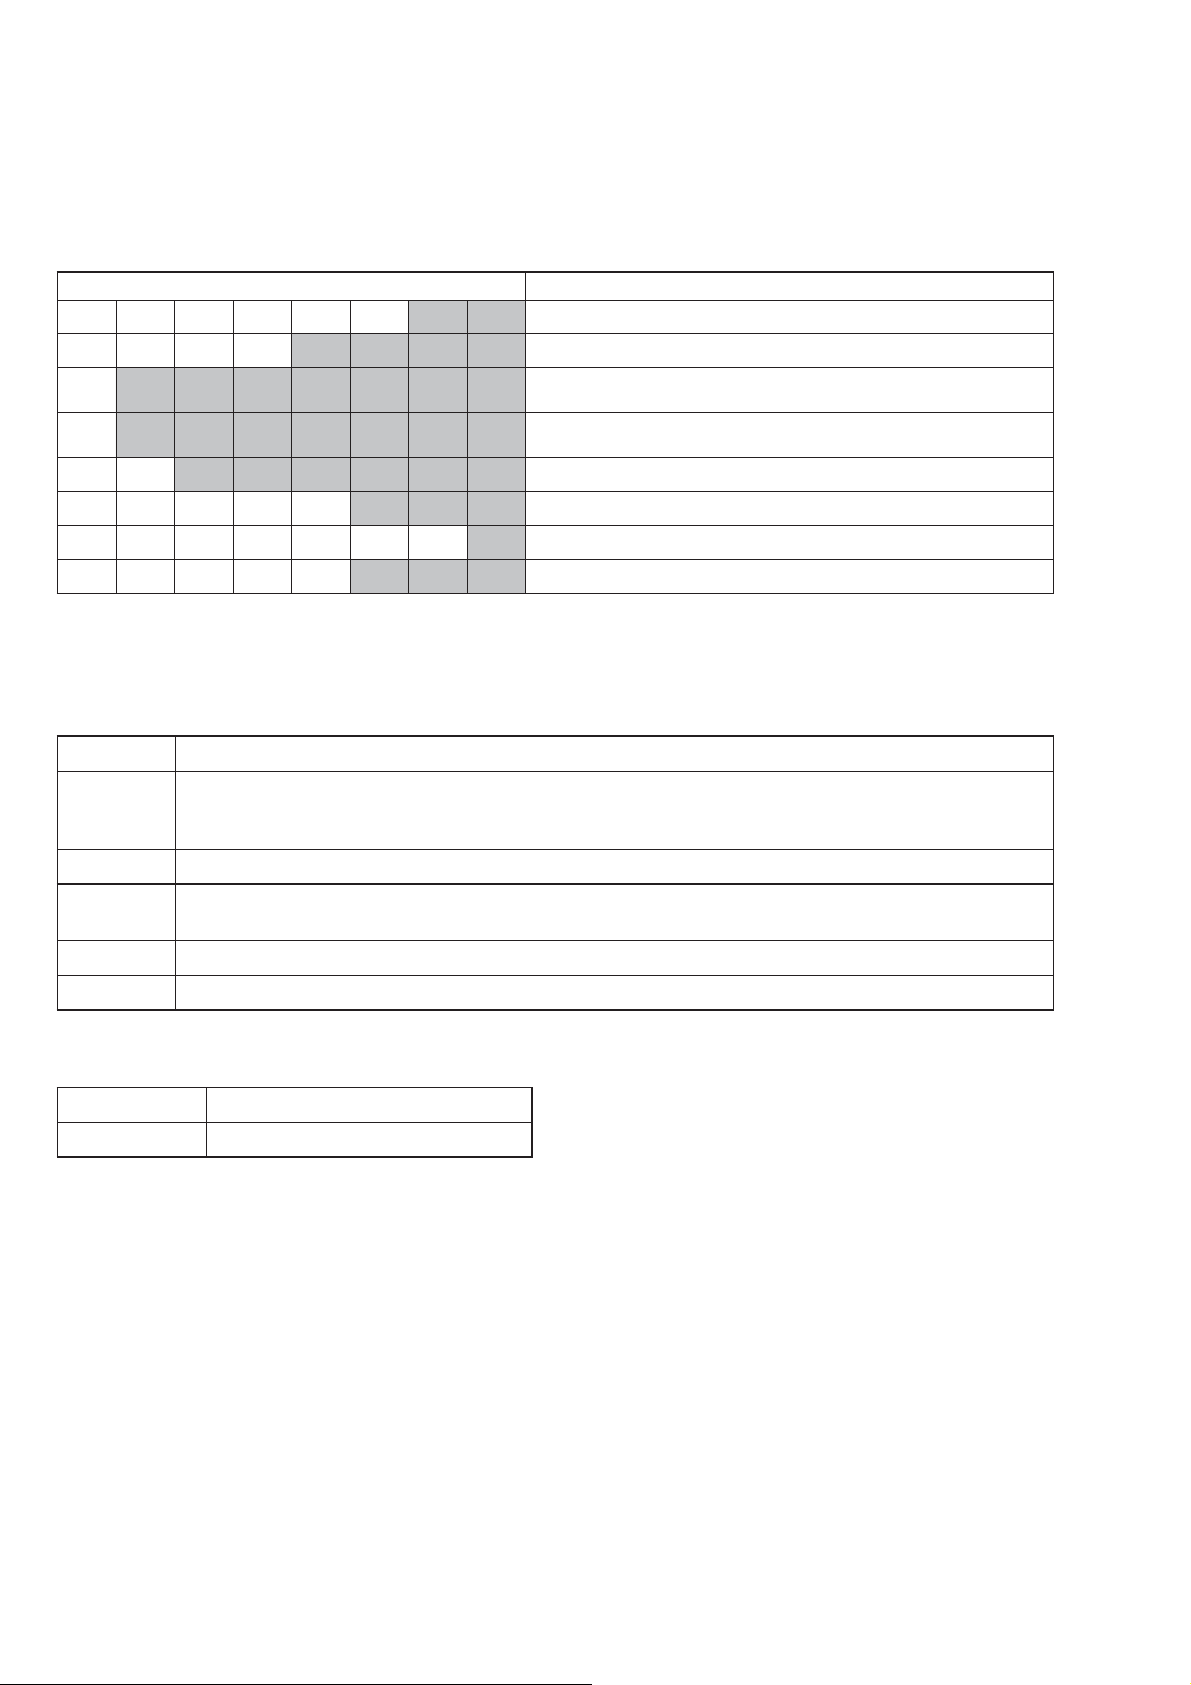
HCD-GT3D
[HISTORY MODE]
This mode is used to check important data stored in the system when PROTECTOR happened.
Procedure:
1. During demo mode, press [] button and [S2 +] button for 5 seconds to mode into history mode.
2.
Press the [S4 TUNING + >] button or [S3 TUNING – .] button to check history data stored.
Display on fl uorescent indicator tube Description
PCOUNT
PT
1 *h*h*h*h*h*m*m
2 *h*h*h*h*h*m*m
F
VOL
SW
BASS
※※※※※※
※※※※
※※
※※※
※※※
No. of time protector happened (0 ~ 99)
Refer to protect type description
Single Power On Time until protector happened (0~99999 hours,
0~99 minutes)
Total Power On Time [ no consider protector happened ]
(0~99999 hours, 0~99 minutes)
Input Function during protector happened
Volume setting (MIN / 1 - 50 / MAX)
Subwoofer setting (0 ~ 4)
※
MEGA BASS setting (OFF / ON)
To release from History Mode.
To release from this mode, press [
Protect T ype Description:
Error Code Description
01 The over current condition to MOSFET occurs by defect of MOSFET or defect of PS output line.
or
Unusual heat up of MOSFET by improper assembly of heat sink, destruction of MOSFET etc.
02 Defect of thermistor IC or charging circuit used by SPM (Sound Pressure Management) system.
03 Defect of power supply circuit to AMP. There is possibility of unusual power supply of any of the AMP IC or Pre-
amplifi er.
04 DC appears in SP terminal by defect of AMP IC and MOSFET.
06 Defect of DC FAN and DC FAN driver circuit.
If speaker does not have output even if the set status is not in PROTECT mode, the following defect might be possible:
Defects Possible cause
RESET defect Reset signal status from micom is not ‘H’.
\/1] button.
22
Page 23
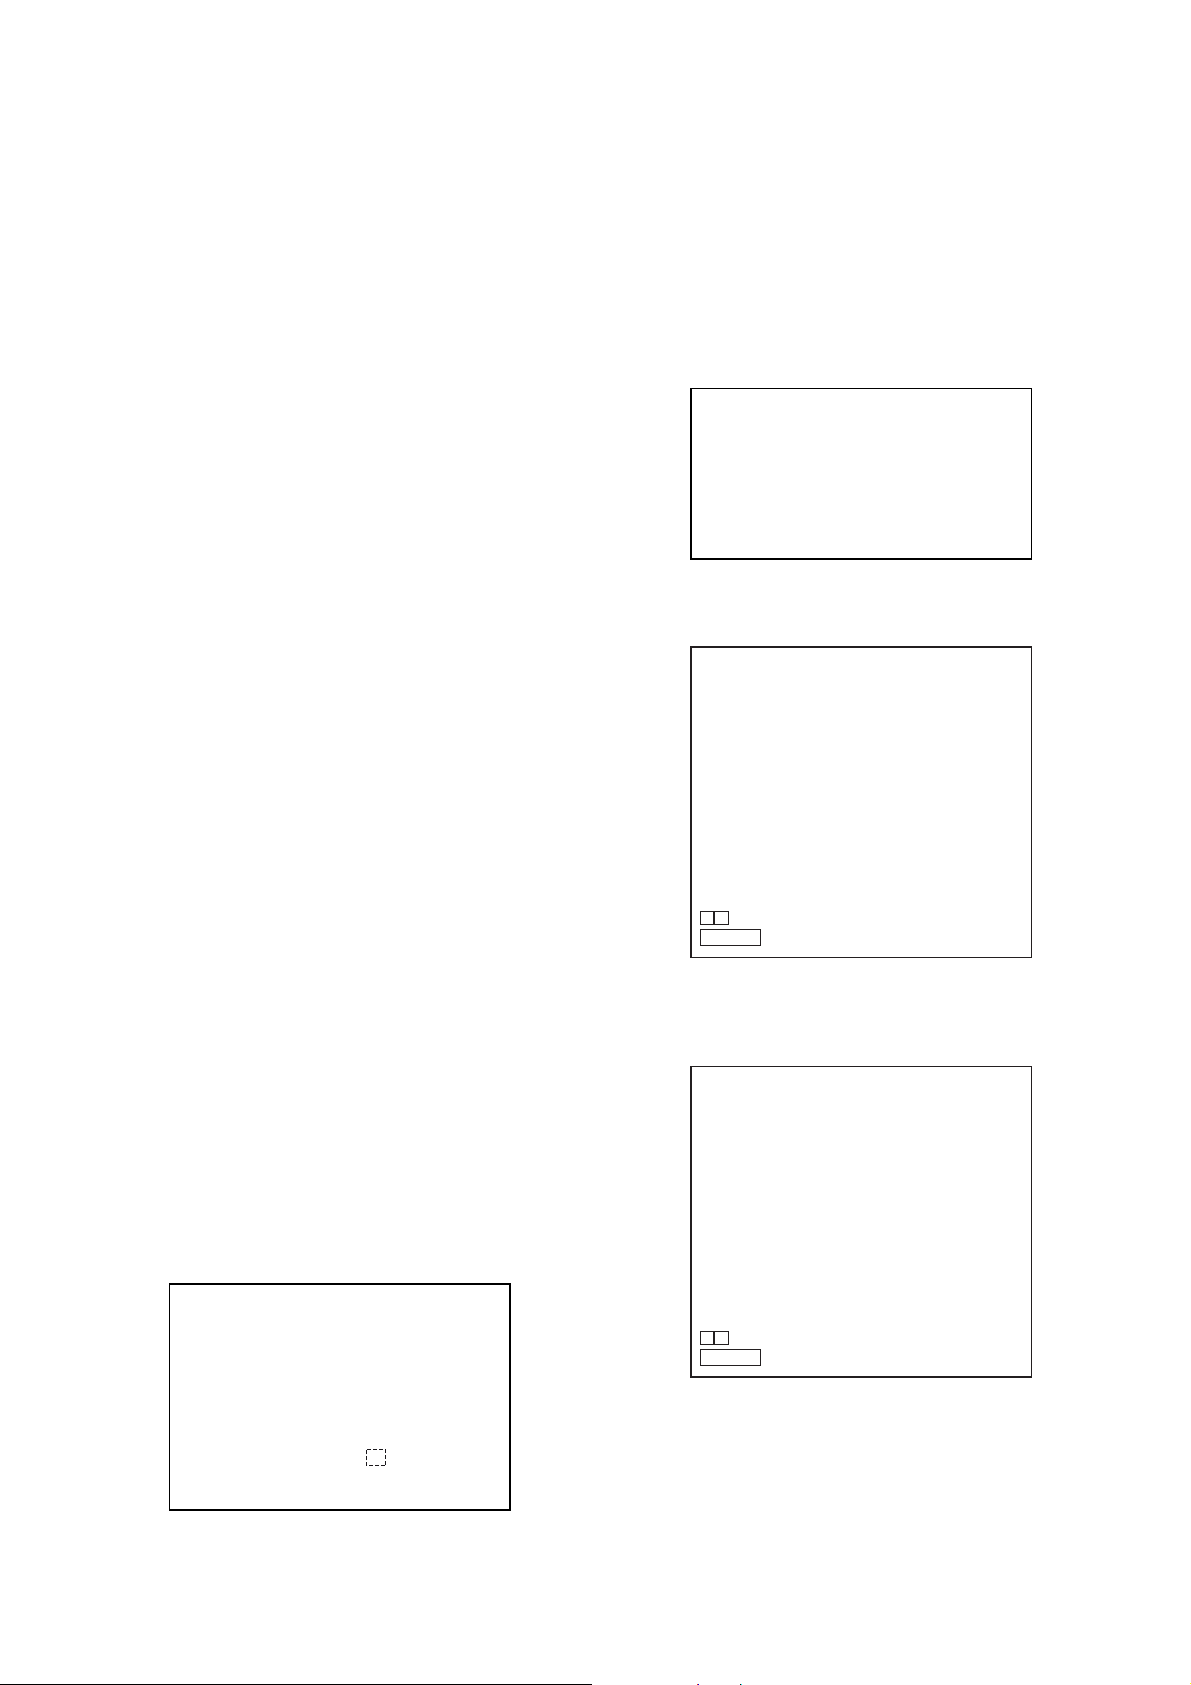
HCD-GT3D
Ver. 1.1
[DVD COLOR SYSTEM MODE]
This mode let you change the color system of the video output
from PAL to NTSC or vice-versa.
Procedure:
1. Press [\/1] button to turn on the system.
2. Press [FUNCTION] button and turn the [MULTI CONTROL]
knob to select “DVD/CD” function, then press [ENTER]
button.
3. Press [ENTER] button and [MIC ECHO] button
simultaneously and hold for 3 seconds.
4. T he message “PAL” or “NTSC” appe ars on the fl uoresce nt
indicator tube.
• To release from DVD Color System Mode
1. Once the color system h as been select ed, the mode is fi xed
there after. If you wish to change the mode again, perform the
above item 2 again.
[DVD SERVICE MODE]
This mode let you make diagnosis and adjustment easily by using
the remote commander and the TV. The instructions, diagnostic
results, etc. are given on the on-screen display.
• TEST DISC LIST
Be sure to use the DVD disc that matches the signal standards
of your region.
• CD
YEDS-18 (Part No.: 3-702-101-01)
PATD-012 (Part No.: 4-225-203-01)
HLX-A1 (Part No.: J-2501-307-A)
• DVD SL (Single Layer)
NTSC : HLX-503 (Part No.: J-6090-069-A)
HLX-504 (Part No.: J-6090-088-A)
HLX-513 (Part No.: J-2501-305-A)
PAL : HLX-506 (Part No.: J-6090-077-A)
• DVD DL (Double Layer)
NTSC : HLX-501 (Part No.: J-6090-071-A)
HLX-505 (Part No.: J-6090-089-A)
HLX-514 (Part No.: J-2501-306-A)
PAL : HLX-507 (Part No.: J-6090-078-A)
• Procedure to enter to DVD Service Mode:
1. Press [\/1] button to turn on the system.
2. Press [FUNCTION] button and turn the [MULTI CONTROL]
knob to select “DVD/CD” function, then press [ENTER]
button.
3. Press [SOUND FIELD] button and [VOCAL F ADER] button
simultaneously and hold 3 seconds.
4. The message “SERVICE IN” appears on the fl uorescent
indicator tube.
The display of the “Model Name” of the “Remocon Diagnosis
Menu” change with the model and the destination appears on
screen display. Refer to below on the model name.
MHC-GT3D: GV2
Remocon Diagnosis Menu
0. External Chip Check
1. Servo Parameter Check
2. Drive Manual Operation
3. Emergency History
4. Version Information
Model Name
IF-con
Syscon
: MHC-GT3D_ XX
: Ver. XX.XX (XXXX)
: Ver. X.XXX
*1
*1: Changes depending on destination
5. To execute each fu nct ion , pr es s its number by using nu meric
button on the remote commander.
6. To release from t his mode, press [\/1] button to turn off t he
system.
• Execute IOP Measurement
In order to execute IOP measurem ent, the following standard
procedures must be followed.
1. From the Top Menu of Remocon Diagnosis Menu, select
“2. Dr ive Manual Oper ation” by pressing t he [2] button on
the remote commander. The following sc ree n ap pea r s on the
onscreen display.
Drive Manual Operation
1. Servo Control
2. Track/Layer Jump
3. Manual Adjustment
4. Tray Aging Mode
5. MIRR time Adjust
0. Return to Top Menu
2. Select “3. Manu al Adjust me nt ” by pre ssi ng t he [3] button on
the remote commander. The following sc ree n ap pea r s on the
on-screen display.
Manual Adjust
1. Track Balance Adjust:
2. Track Gain Adjust:
3. Focus Balance Adjust:
4. Focus Gain Adjust:
5. Eq Boost Adjust:
6. Iop:
7. TRV. Level:
8. S curve (FE) Level:
9. RFL (PI) Level:
0. MIRR Time:
O o Change Value
RETURN Return to previous menu
3. Select “6. Iop:” by pressing the [6] button on the remote
commander.
4. Wait until a hexa decimal number app ears in the on-sc reen
display as below:
Manual Adjust
1. Track Balance Adjust:
2. Track Gain Adjust:
3. Focus Balance Adjust:
4. Focus Gain Adjust:
5. Eq Boost Adjust:
6. Iop. ED
7. TRV. Level:
8. S curve (FE) Level:
9. RFL (PI) Level:
0. MIRR Time:
O o Change Value
RETURN Return to previous menu
5. Convert data from hexadecimal to decimal by using
conversion table.
6. Please fi nd the label on the rear of the BU (Base Unit).
The default IOP value is written in the label.
7. Subtract between these two values.
8. If the remainder is smaller than 93 (decimal), then it is OK.
However if the value is higher than 93, then the BU is defective
and need to be change.
9. Press [RETURN] button on the remote commander to return
to previous menu.
23
Page 24
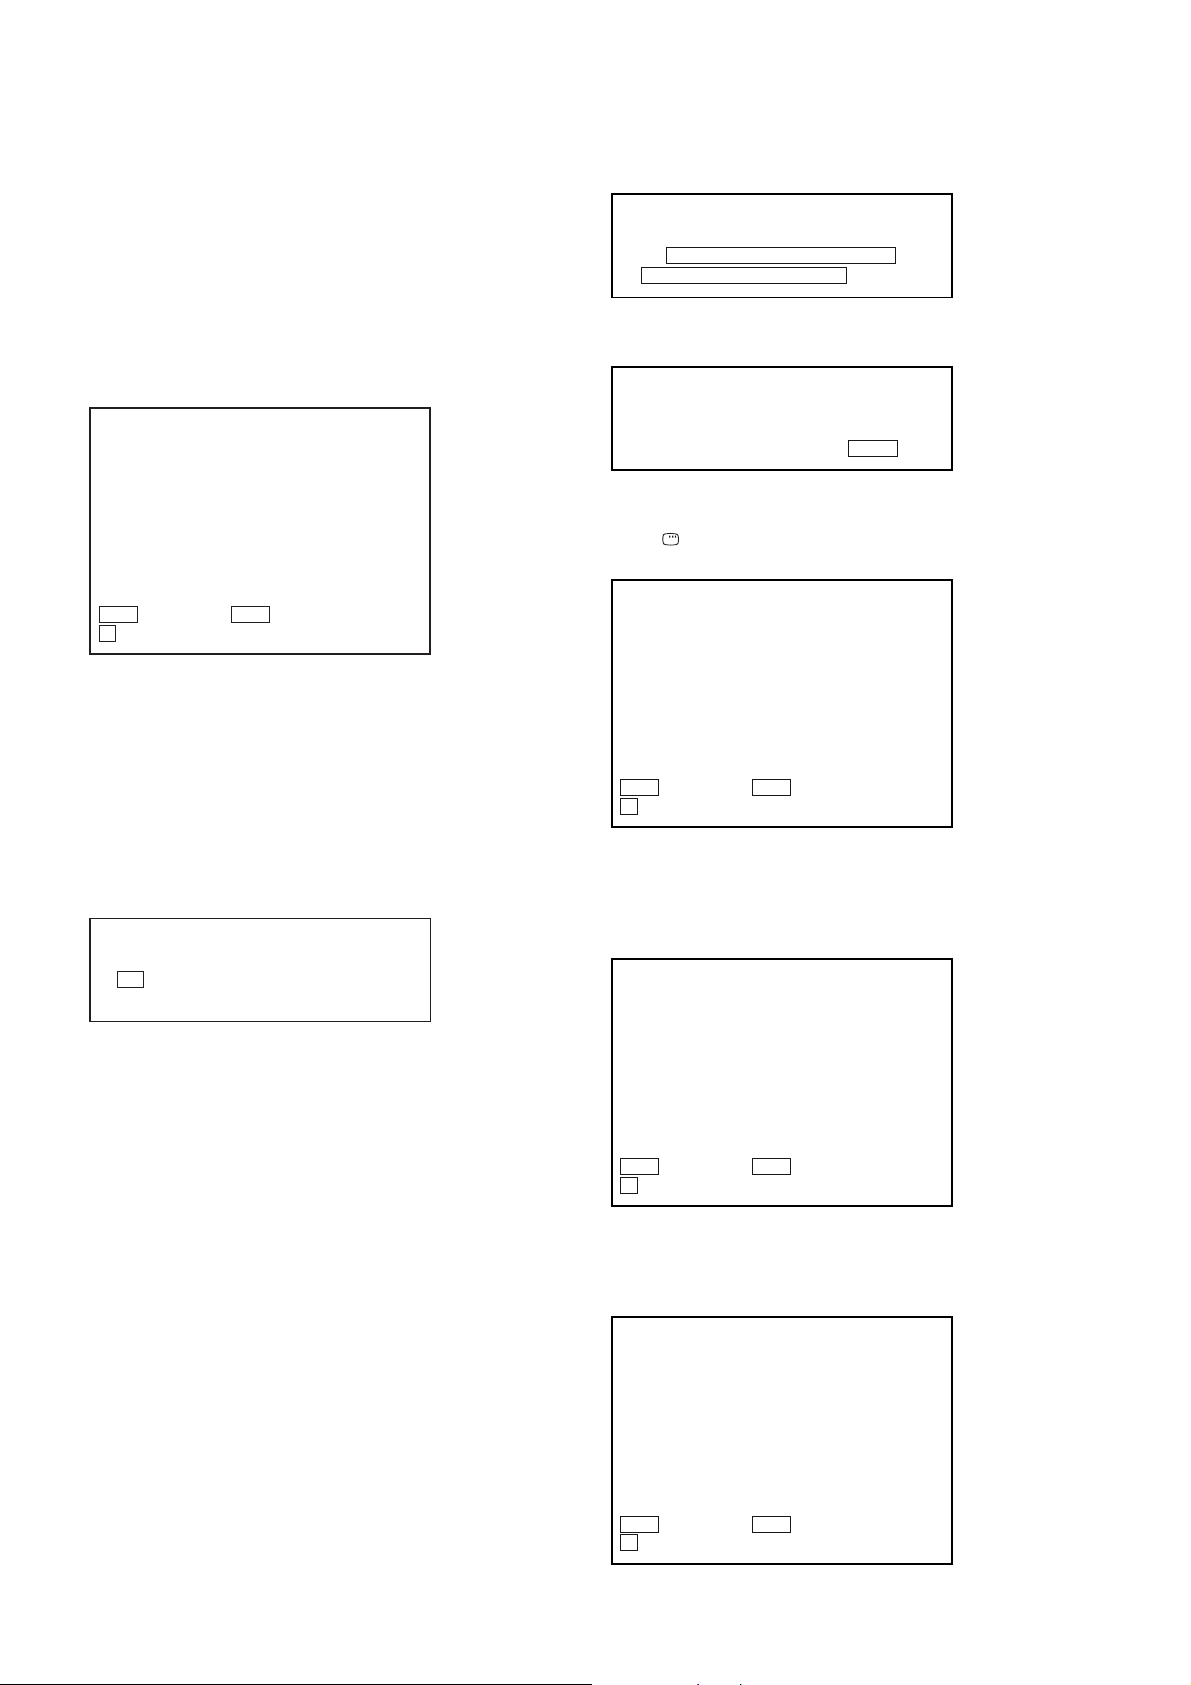
HCD-GT3D
Ver. 1.1
10. Press the [0] button on the remote commander to return to the
Top Menu of Remocon Diagnosis Menu.
11. Press [\/1] button to turn off the system.
• Check Emergency History
To check the emer gency hi stor y, please follow the following
procedure.
1. From the Top Menu of Remocon Diagnosis Menu, select
“3. Emergency History” by pressing the [3] button on the
remote com mander. The following screen app e a r s on t he onscreen display.
Emg. History Check
Laser Hours CD 999h 59min
1. 01 05 04 04
00 00 00 00
2. 02 02 01 01 00 A9 4B 00
00 00 00 00
Next Next Page Prev Prev Page
O Return to Top Menu
DVD 999h 59min
00 92 46 00
00 00 23 45
00 00 23 45
(Displayed values in the above fi gure are example)
2. You can check the total time when the laser is turned on
duri ng playba ck of DVD and CD fr om the above menu. T he
maximum time, which can be displayed are 999h 59min.
3. You can check the e r ror code of late st 10 emergency h istor y
from the ab ove menu. To view the previou s or next page of
emergency h istory, press t he [.] button or [>] butt on
on the remote com m and er. The er r or code c onsis ts of “Er ror
Code”, “Parameter of error code” and “Time of error code”.
• Error Code
Example of Error code
• Parameter of error code
This is the detail of error code.
Example of Error code
1. 01 05 04 04 00 92 46 00
00 00 00 00 00 00 23 45
• Time of error code
This is the laser time when an error occurred.
Example of Error code
1. 01 05 04 04 00 92 46 00
00 00 00 00 00 00 23 45
To clear the Laser Hours
Press the [ DISPLAY] button and then press the [CLEAR]
button. The data for both CD and DVD data are reset.
Emg. History Check
Laser Hours CD 0h 0min
1. 01 05 04 04
00 00 00 00 00 00 23 45
2. 02 02 01 01 00 A9 4B 00
00 00 00 00 00 00 23 45
Next Next Page Prev Prev Page
O Return to Top Menu
DVD 0h 0min
00 92 46 00
To clear the Emergency History
Press the [DVD TOP MENU] button and then press the [CLEAR]
button.
The error code for all emergency history would be reset.
1. 01 05 04 04 00 92 46 00
00 00 00 00 00 00 23 45
The meaning of error code is as below:
01: Communication error (No reply from syscon)
02: Syscon hung up
03: Power OFF request when syscon hung up
19: Thermal shutdown
24: MoveSledHome error
25: Mechanical move error (5 Changer)
26: Mechanical move stack error
30: DC motor adjustment error
31: DPD offset adjustment error
32: TE balance adjustment error
33: TE sensor adjustment error
34: TE loop gain adjustment error
35: FE loop gain adjustment error
36: Bad jitter after adjustment
40: Focus NG
42: Focus layer jump NG
51: Spindle stop error
52: Open kick spindle error
60: Focus on error
61: Seek fail error
62: Read Q data/ID error
70: Lead in data read fail
71: TOC read time out (CD)
80: Can’t buffering
81: Unknown media type
Emg. History Check
Laser Hours CD 999h 59min
1. 00 00 00 00
00 00 00 00
2. 00 00 00 00 00 00 00 00
00 00 00 00 00 00 00 00
Next Next Page Prev Prev Page
O Return to Top Menu
DVD 999h 59min
00 00 00 00
00 00 00 00
To clear the Initialize Setup Data
Press the [DVD/TUNER MENU] button and then press the
[CLEAR] button on the remote commander.
Emg. History Check
Laser Hours CD 999h 59min
Initialize setup data...
Next Next Page Prev Prev Page
O Return to Top Menu
DVD 999h 59min
24
Page 25
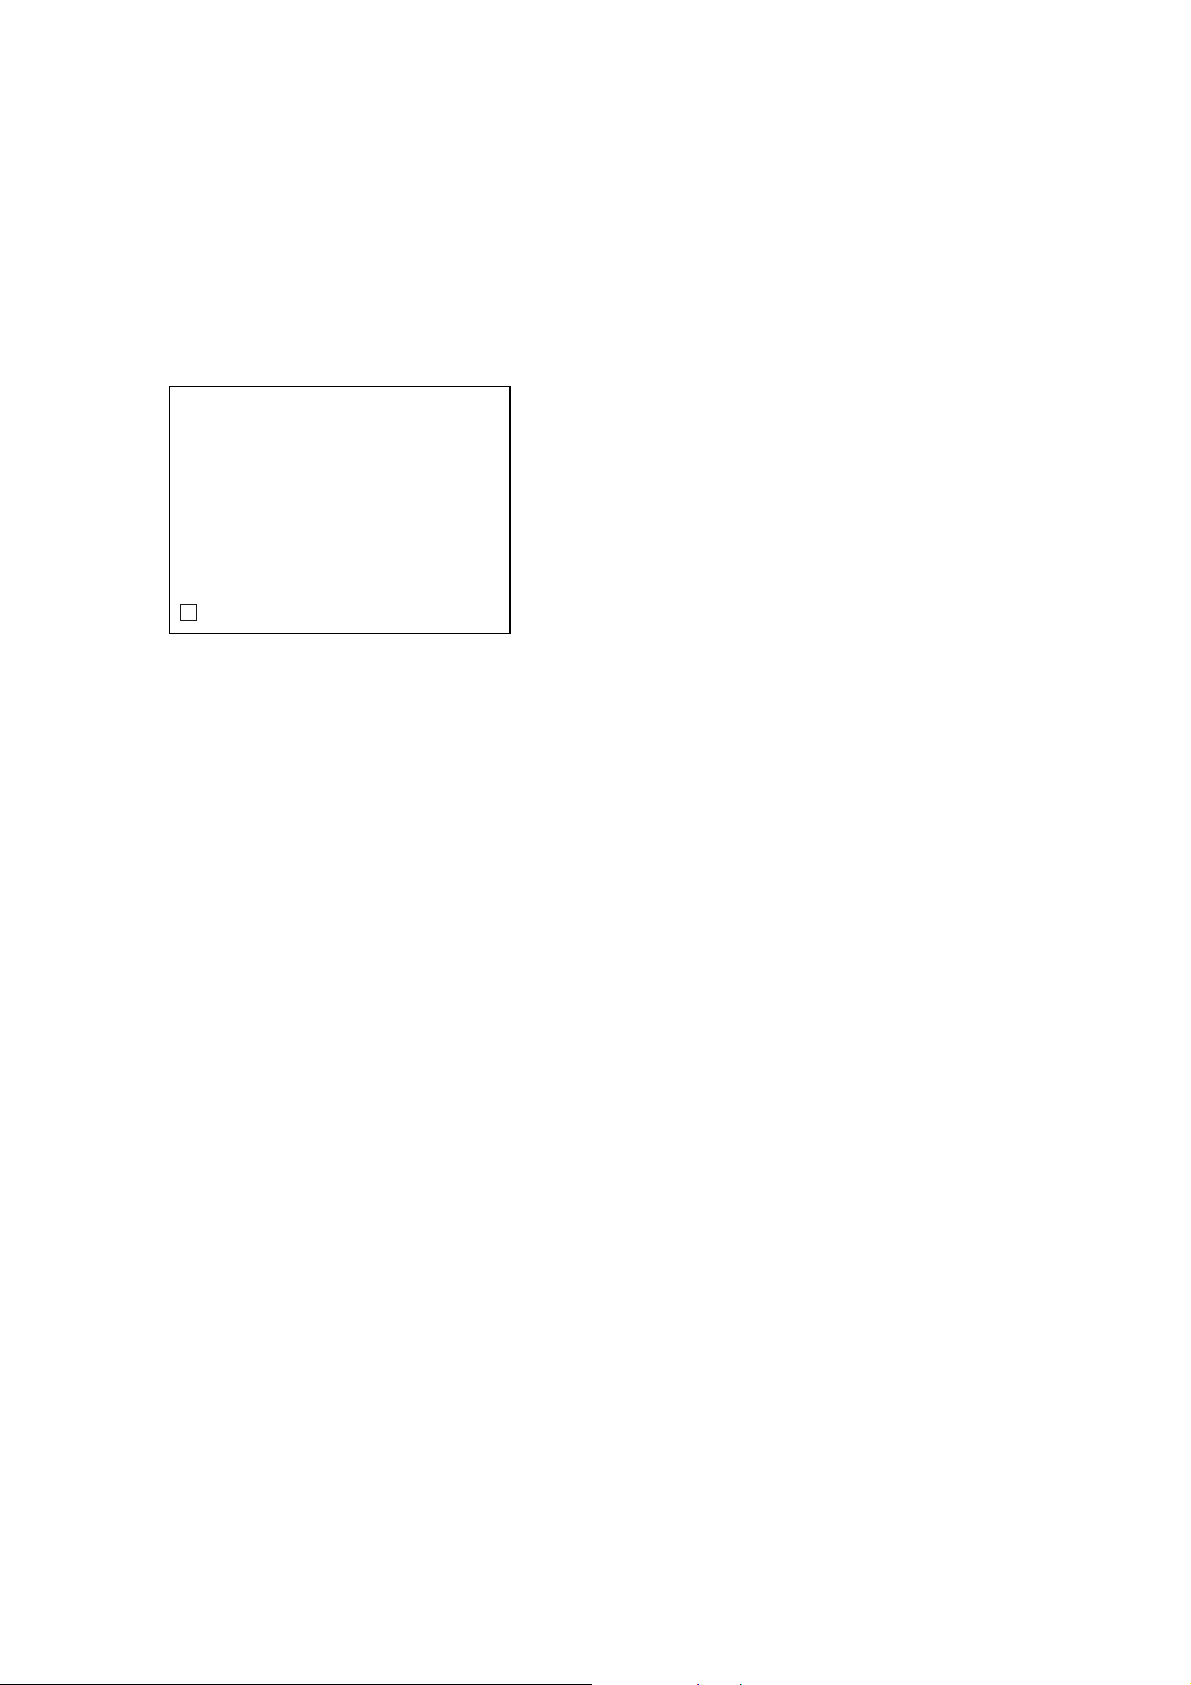
To return to the Top Menu of Remocon Diagnosis Menu
Press the [0] button on the remote commander.
• Check Version Information
To check the version information, please follow the following
procedure.
1. From the Top Menu of Remocon Diagnosis Menu , select “4.
Version information” by pressing the [4] button on the remote
comma nder. The following scree n appear s on the on-scre en
display.
Version information
Firm (Main) : Ver. xxxxx
Firm (Sub) : xxxxx
RISC : xxxxx
8032 : xxxxx
Audio DSP : xxxxx
Servo DSP : xxxxx
O Return to Top Menu
HCD-GT3D
Ver. 1.1
To return to the Top Menu of Remocon Diagnosis Menu, press
the [0] button on the remote commander.
25
Page 26
HCD-GT3D
SECTION 4
ELECTRICAL CHECK
TUNER SECTION
0 dB = 1 μV
FM AUTO STOP CHECK
signal
generator
set
+
75
–
Procedure:
1. Turn the power on.
2. Input the following signal from Signal Generator to FM
antenna input directly.
Carrier frequency : A = 87.5 MHz, B = 98 MHz, C = 108 MHz
Deviation : 75 kHz
Modulation : 1 kHz
ANT input : 35 dBu (EMF)
Note: Please use 75 ohm “coaxial cable” to connect SG and the
set. You cannot use video cable for checking.
Please use SG whose output impedance is 75 ohm.
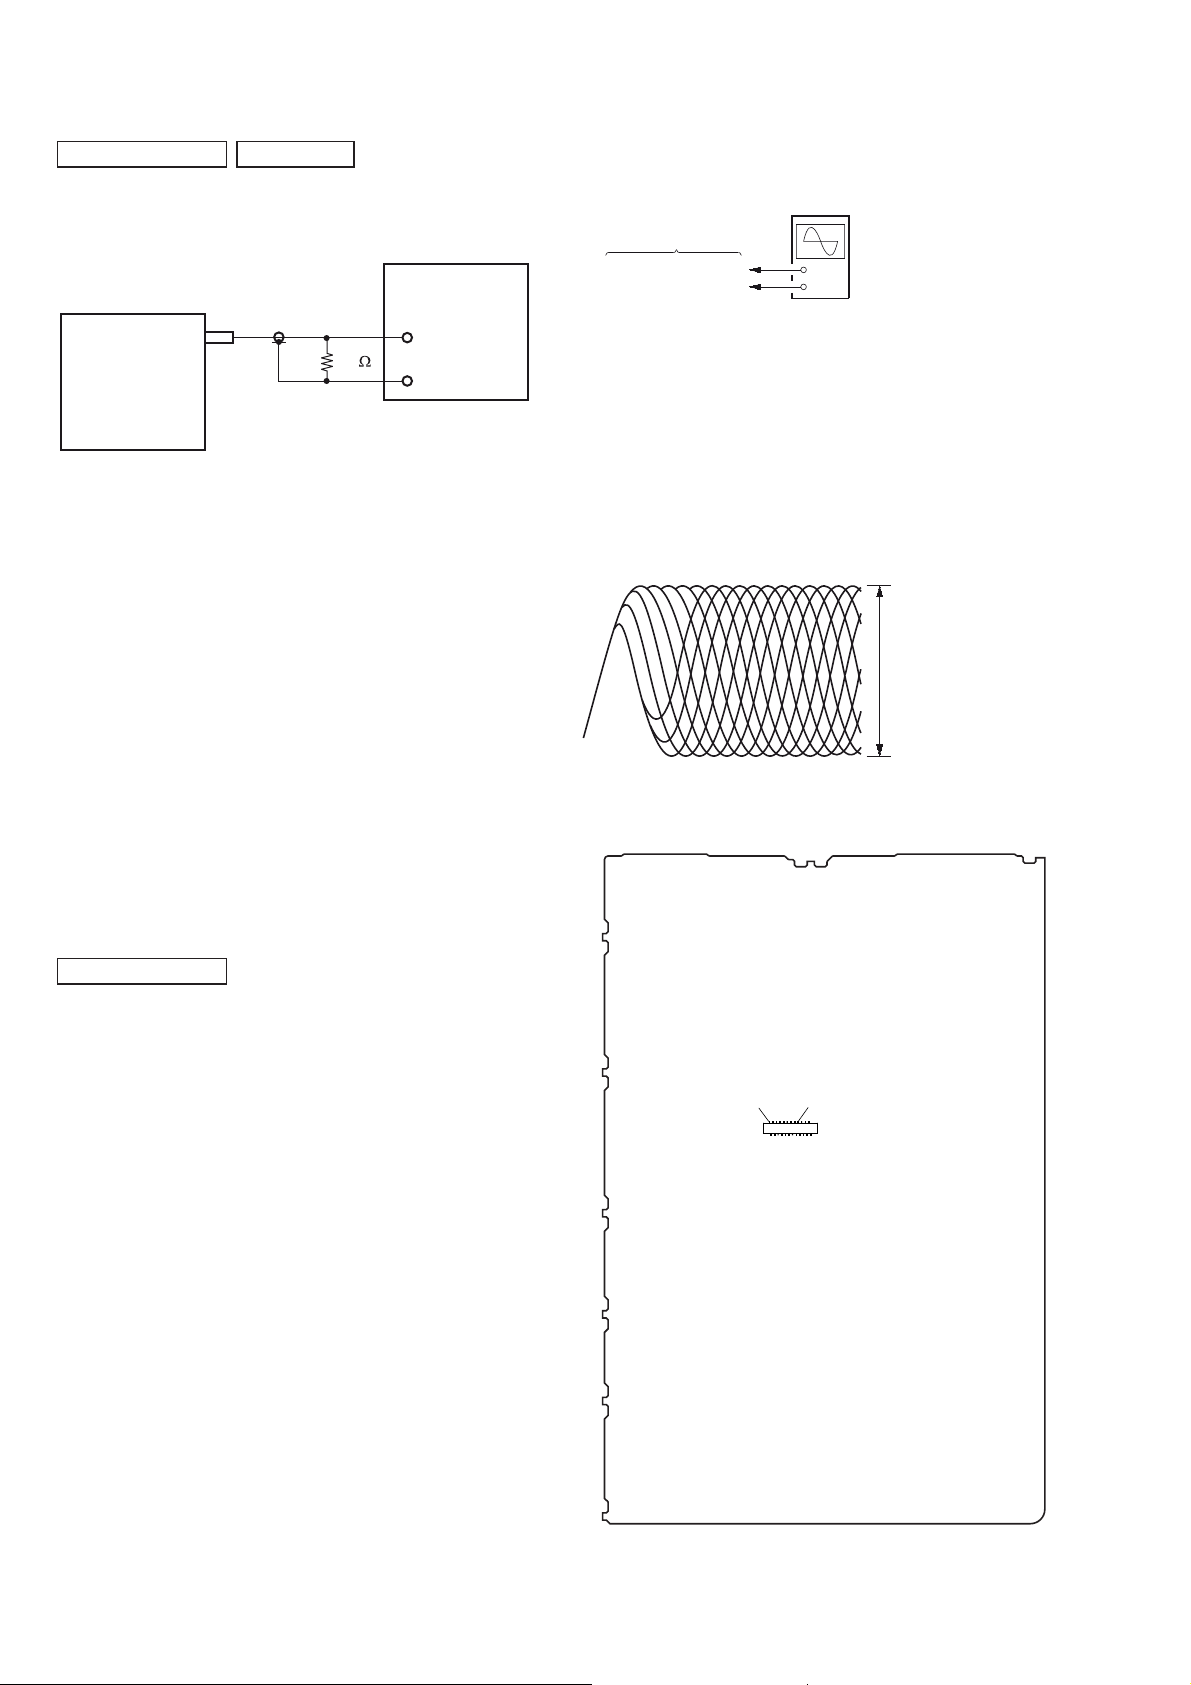
FOCUS BIAS CHECK
oscilloscope
(DC range)
MOTHERBOARD board
CN302 pin 17 (RF)
CN302 pin 1 (GND)
+
–
Procedure:
1. Connect the oscilloscope to CN302 pin 17 (RF) and CN302
pin 1 (GND) on the MOTHERBOARD board.
2. Press the [
] button to turn the power on, and press the
?/1
[FUNCTION] button to select CD function.
3. Set the test disc (CD: YEDS-18) on the tray and press [B]
button to playback.
4. Confi rm that oscilloscope waveform is as shown in the fi gure
below (eye pattern).
A good eye pattern means that the diamond shape (◊) in the
center of the waveform can be clearly distinguished.
VOLT/DIV: 200 mV
TIME/DIV: 500 ns
level:
1.1 ± 0.25 Vp-p (DVDSL)
1.0 ± 0.25 Vp-p (CD)
3. Set to FM tuner function and scan the input FM signal with
automatic scanning.
4. Confi rm that input Frequency of A, B and C detected and
automatic scanning stops.
The stop of automatic scanning means “The station signal is
received in good condition”.
CD/DVD SECTION
[TEST DISC LIST]
Use the following test disc on test mode.
• CD: YEDS-18 (PART No. 3-702-101-01)
or
PATD-012 (PART No. 4-225-203-01)
or
HLX-A1 (PART No. J-2501-307-A)
• DVD (SL)
NTSC HLX-503 (PART No. J-6090-069-A)
or
HLX-504 (PART No. J-6090-088-A)
or
HLX-513 (PART No. J-2501-305-A)
PAL HLX-506 (PART No. J-6090-077-A)
• DVD (DL)
NTSC HLX-501 (PART No. J-6090-071-A)
or
HLX-505 (PART No. J-6090-089-A)
or
HLX-514 (PART No. J-2501-306-A)
PAL HLX-507 (PART No. J-6090-078-A)
Note: When the BASE UNIT is replaced, perform the Execute
IOP measurement
(Refer to page 24).
Checking Location:
– MOTHERBOARD Board (Component Side) –
pin 17 (RF)pin 1 (GND)
CN302
26
Page 27
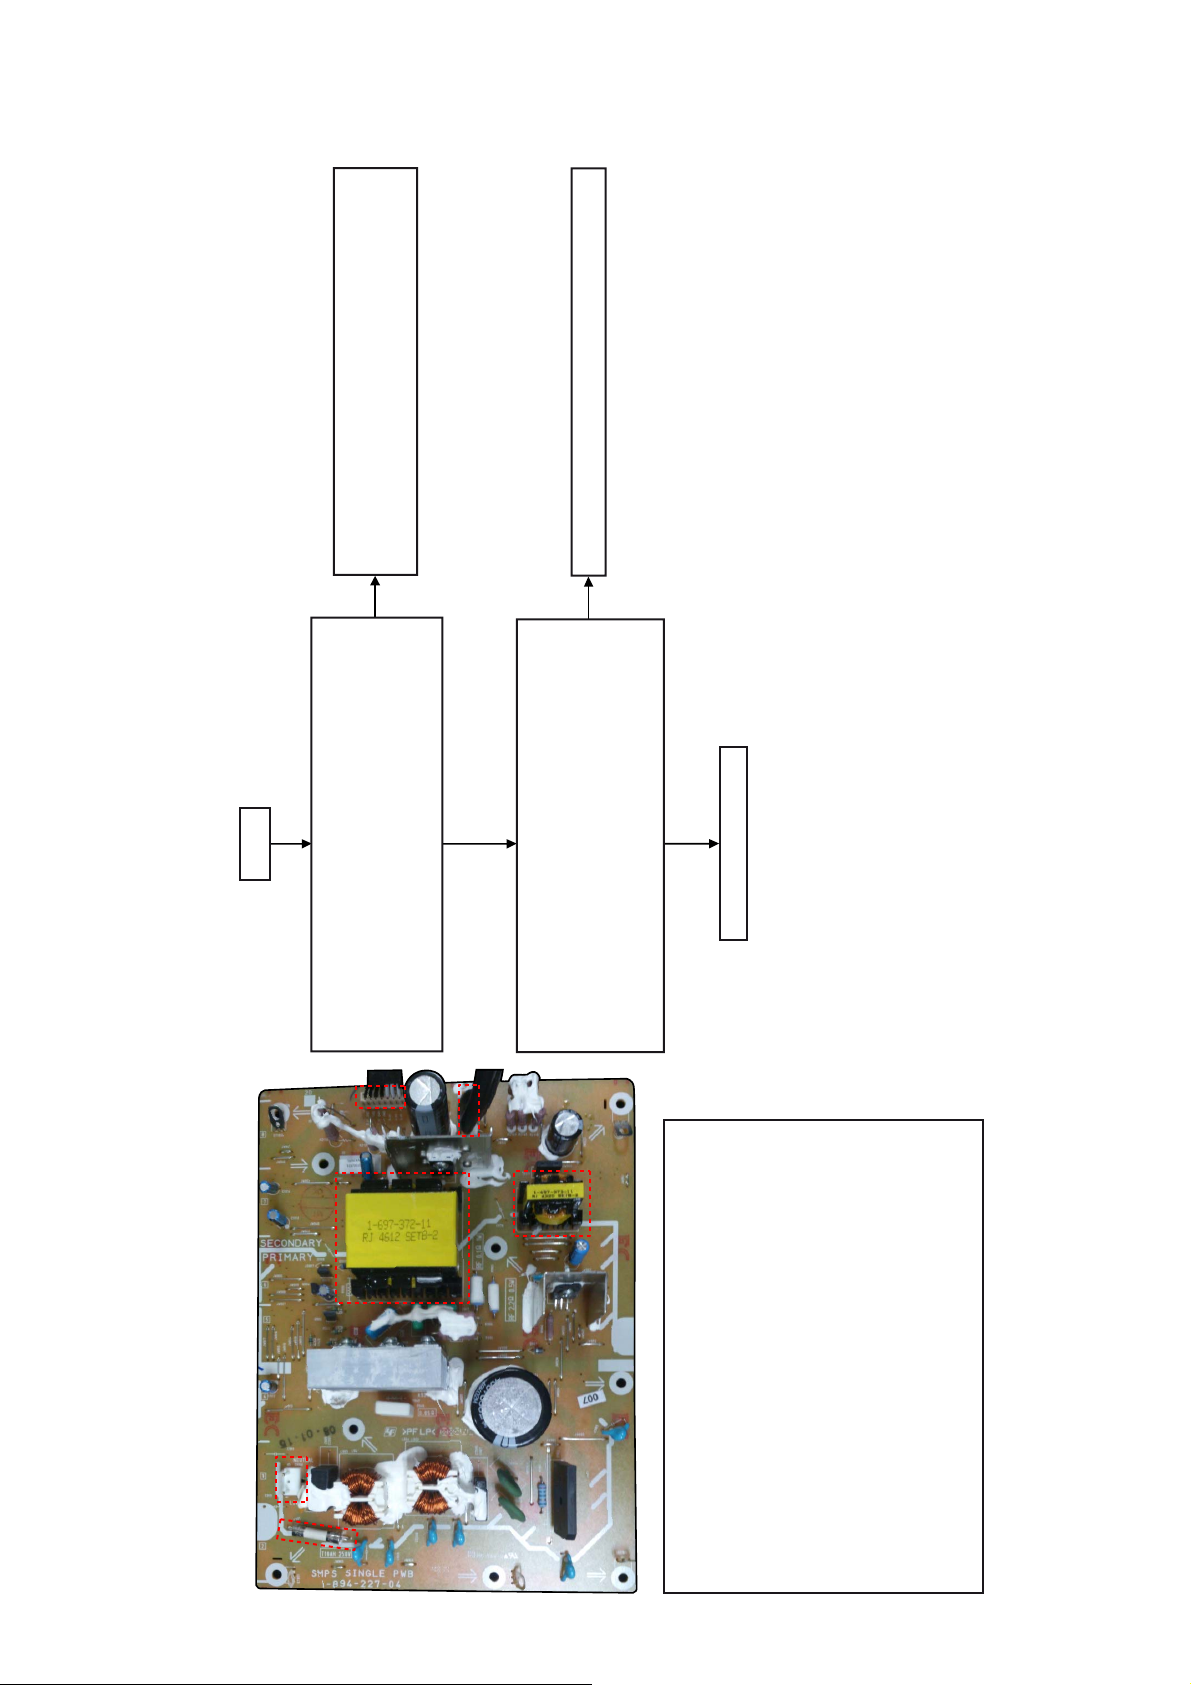
SECTION 5
TROUBLESHOOTING
Checks whether the state of a Cable and Outlet are normal.
If there are no problems, checks circumference circuit for
Main on Output of Main mount side.
Replaces SMPS Board if it is not up to standard.
HCD-GT3D
No
Hi (3.3V)
Power OnDemo mode
Low (0V)Low (0V)
Yes
AC IN
Standby
The Power Control signal to SMPS Board is checked.
Is following power voltage OK?
Main on
CN2005: pin9
(6)
(4)
(5)
(3)
No
50V±5%
Power OnDemo mode
13.5V±0.5V
13.5V±0.5V
Yes
END
0V 0V
Standby
13.5V±0.5V
The Output from SMPS Board is checked.
Is following power voltage up to standard?
CN2005 pin1,4,5
CN4 pin5
(1)
(2)
SMPS Board Diagnosis Flow
(1) AC input
(2) Fuse
(3) Sub Power transformer
(4) CN2005 Connector
pin1: 13.5V
pin3: AGND
pin4-5: 13.5V
pin6-7: M/DGND
pin8: AC-DET
pin9: MAIN-ON
(5) MAIN Power transformer
(6) CN4 Connector
pin1-5: V1 (50V)
pin6-9: V1_GND
27
Page 28
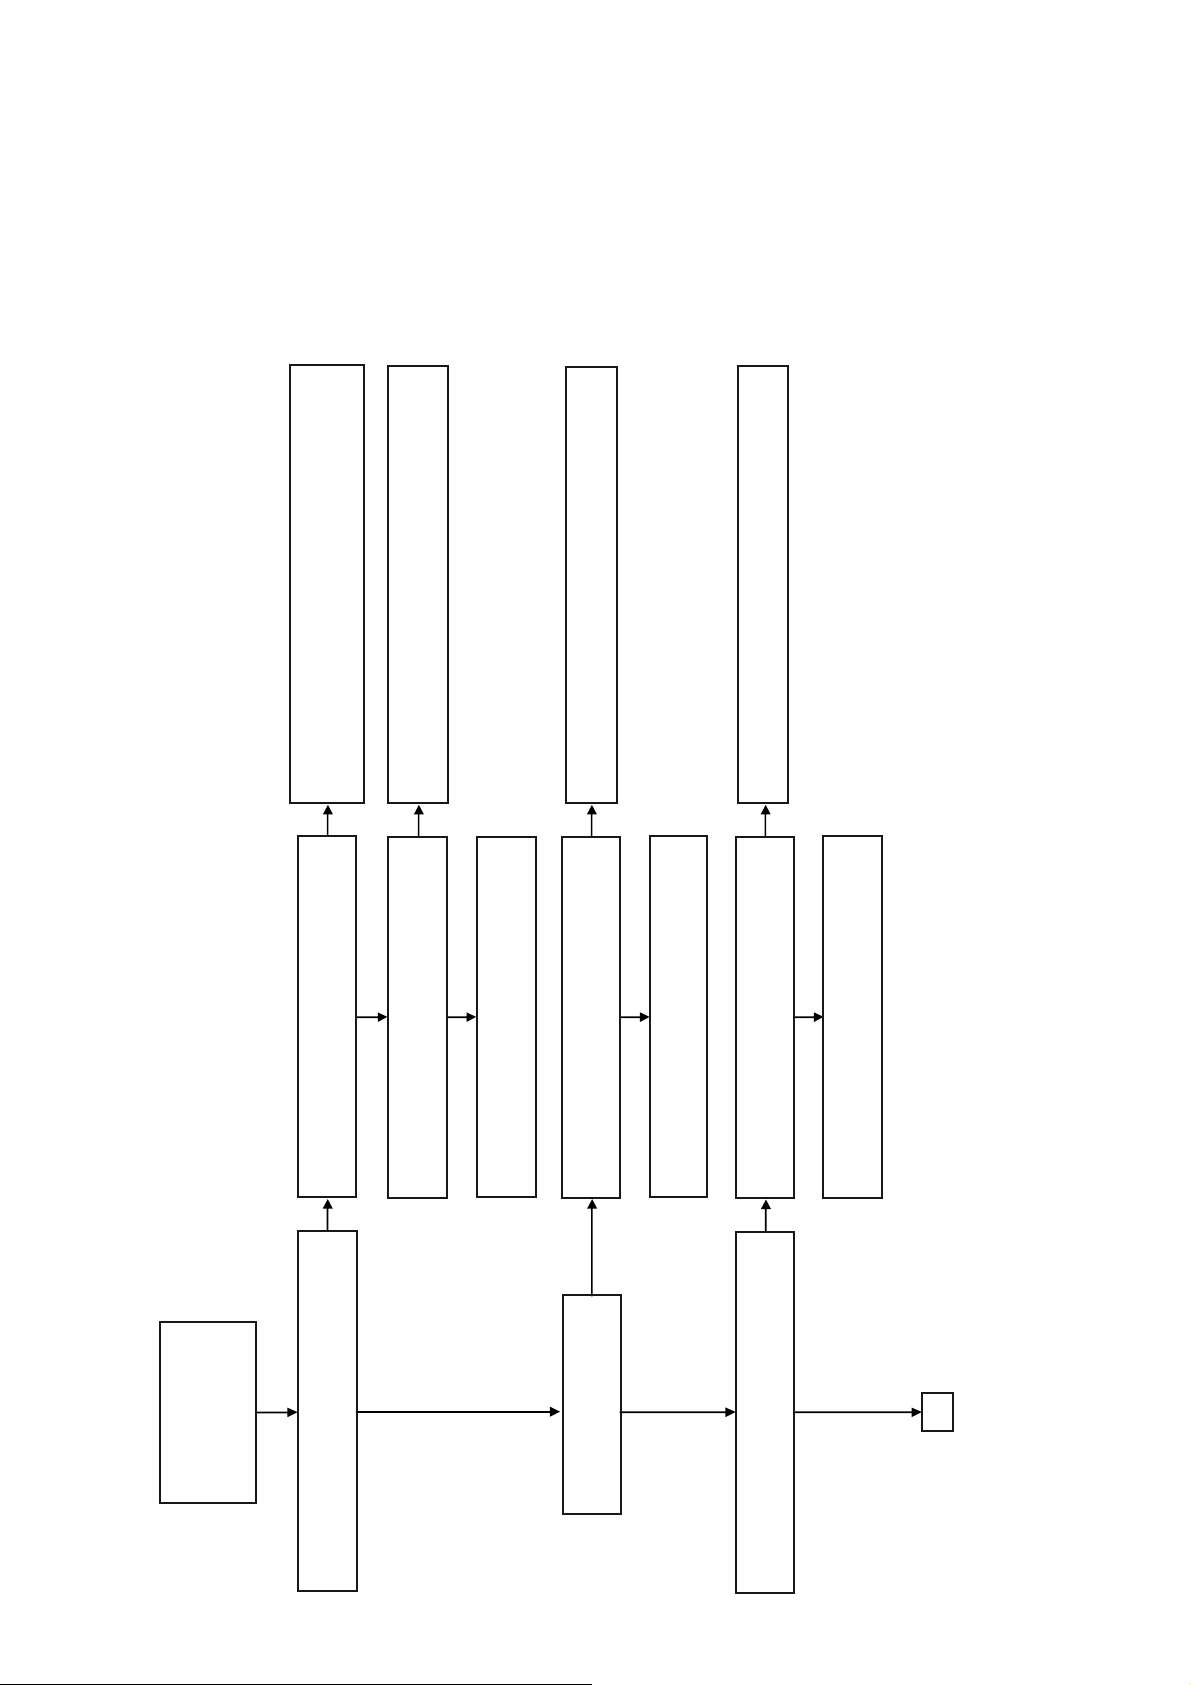
HCD-GT3D
Checks IC303 circumference circuit for +1.2V.
Checks IC002 (JL040) circumference circuit for
+3.3V.
Checks circumference circuit for SL+/SL- of IC401.
Checks circumference circuit of IC301 FMO Signal.
No
Checks CL335 for +3.3V and +1.2V REG IC303.
Does it output the power voltage of 3.3V and 1.2V?
No
No
Yes
Yes
Does it output the signal?
Checks CN401 SL+/SL- signal.
The Sled motor has a problem.
Replaces BU.
Checks circumference circuit for SP+/SP of IC401.
Checks circumference circuit of IC301 DMO Signal.
No
Does it output the signal?
Checks CN401 SP+/SP- signal.
No
Checks circumference circuit for FCS+/FCS- of IC401.
Checks circumference circuit of IC301 FOO Signal.
No
Yes
The Spindle motor has a problem.
Replaces BU.
Yes
Does it output the signal?
Checks CN302 FCS+/FCS- signal.
No
The Optical pickup has a problem.
Replaces BU.
TURN ON
TRAY IN
REMOVE TOP PANEL
REMOVE SIDE PANEL
Optical Block Diagnosis Flow (1/2)
Does Optical pickup move to inner circumference?
28
Yes
(Visual check)
Yes
Does Spindle motor rotate?
(Visual check)
Yes
Does Optical pickup do focus search?
(Visual check)
A
Page 29
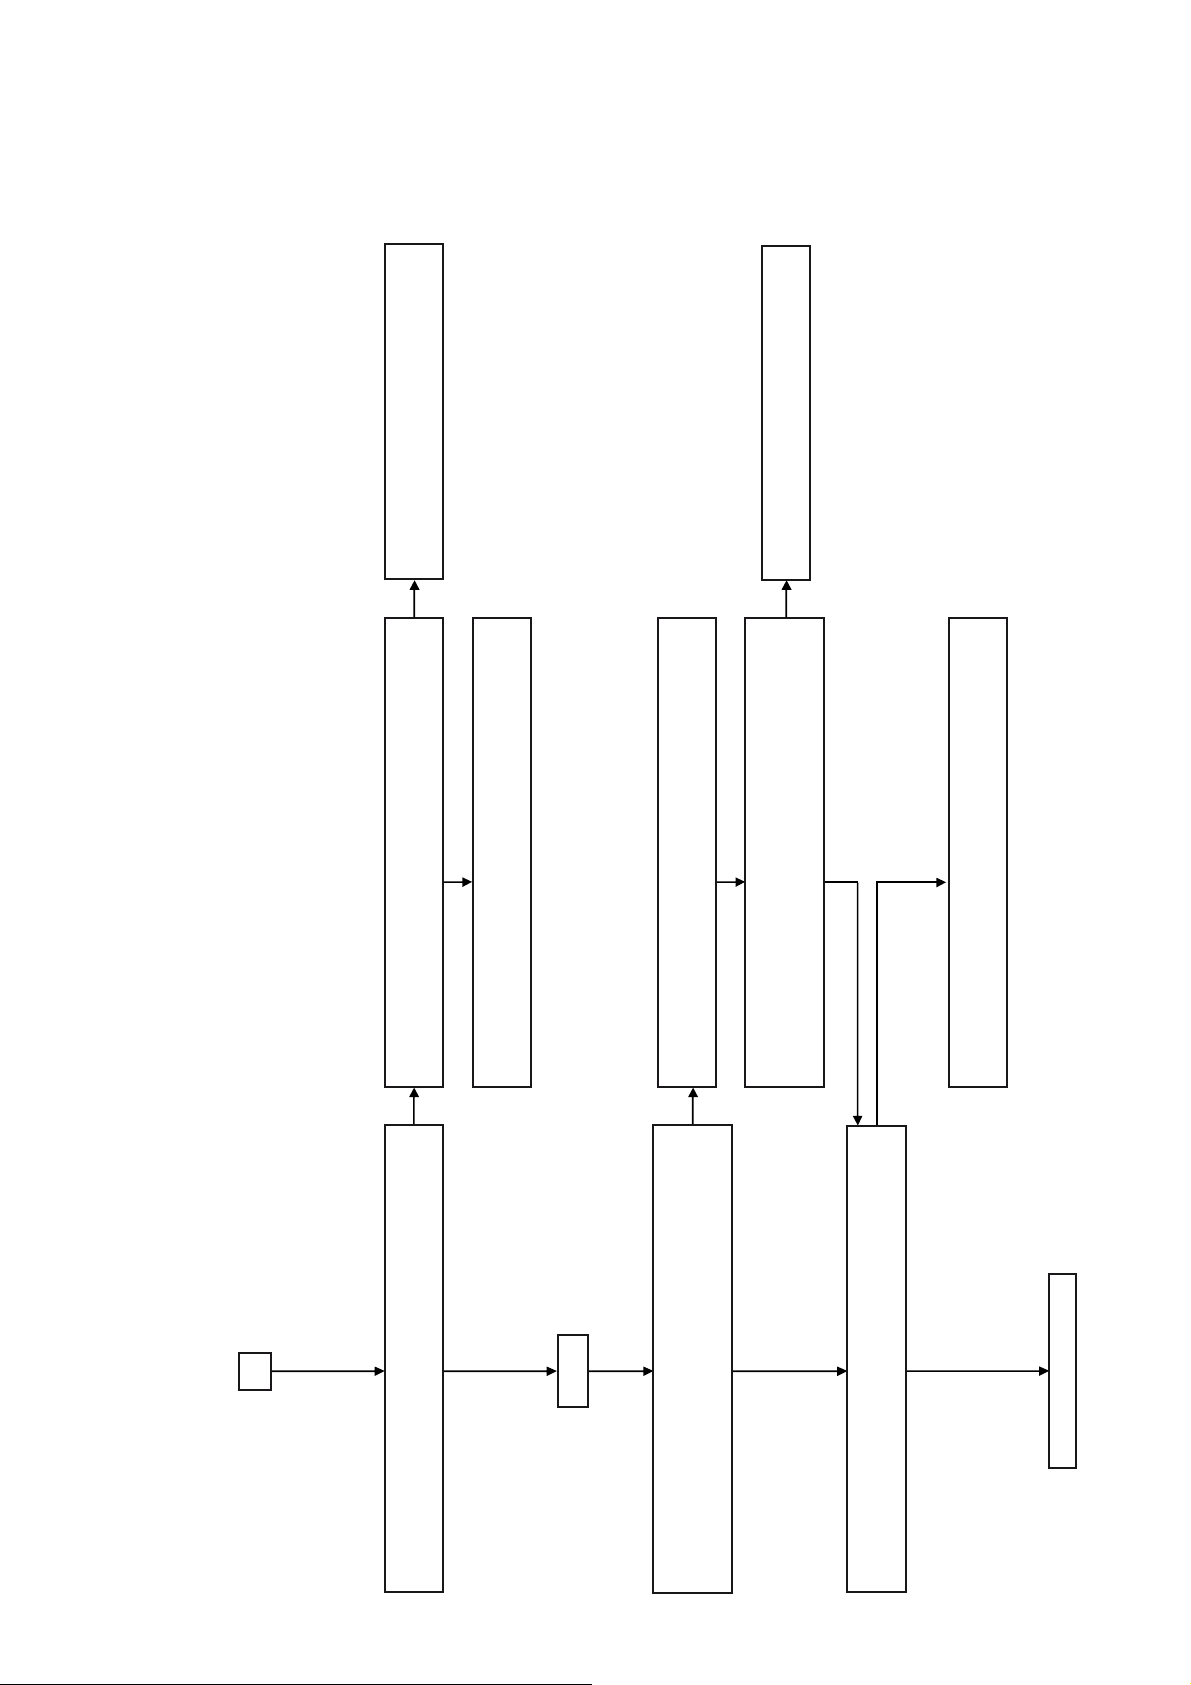
Checks circumference circuit of IC301 LD01.
Checks circumference circuit of Q402.
HCD-GT3D
Replaces BU if it is not up to standard.
No
Yes
The Optical pickup has a problem.
Does it output 2V when laser become luminous?
Checks JL306 (LD780) signal.
No
Replaces BU.
If it is not up to standard,
No
No
Yes
Lens cleaning is performed.
Is output level of RF signal (JL317) up to standard?
RF Level = 1.05 ±0.45 Vpp
Yes
Test disc (CD: YEDS-18, DVD: HLX-503 (NTSC) or HLX-504 (PAL))
No
The Optical pickup has a problem.
Replaces BU.
A
Does laser diode become luminous?
Optical Block Diagnosis Flow (2/2)
(Visual check)
Yes
Yes
DISC IN
Yes
Is output level of RF signal (JL317) up to standard?
RF Level = 1.05 ±0.45 Vpp
Test disc (CD: YEDS-18, DVD: HLX-503 (NTSC) or HLX-504 (PAL))
Yes
Is there no problem with Long term Aging Test (60min)?
Confirms that there is no sound skip.
END
29
Page 30
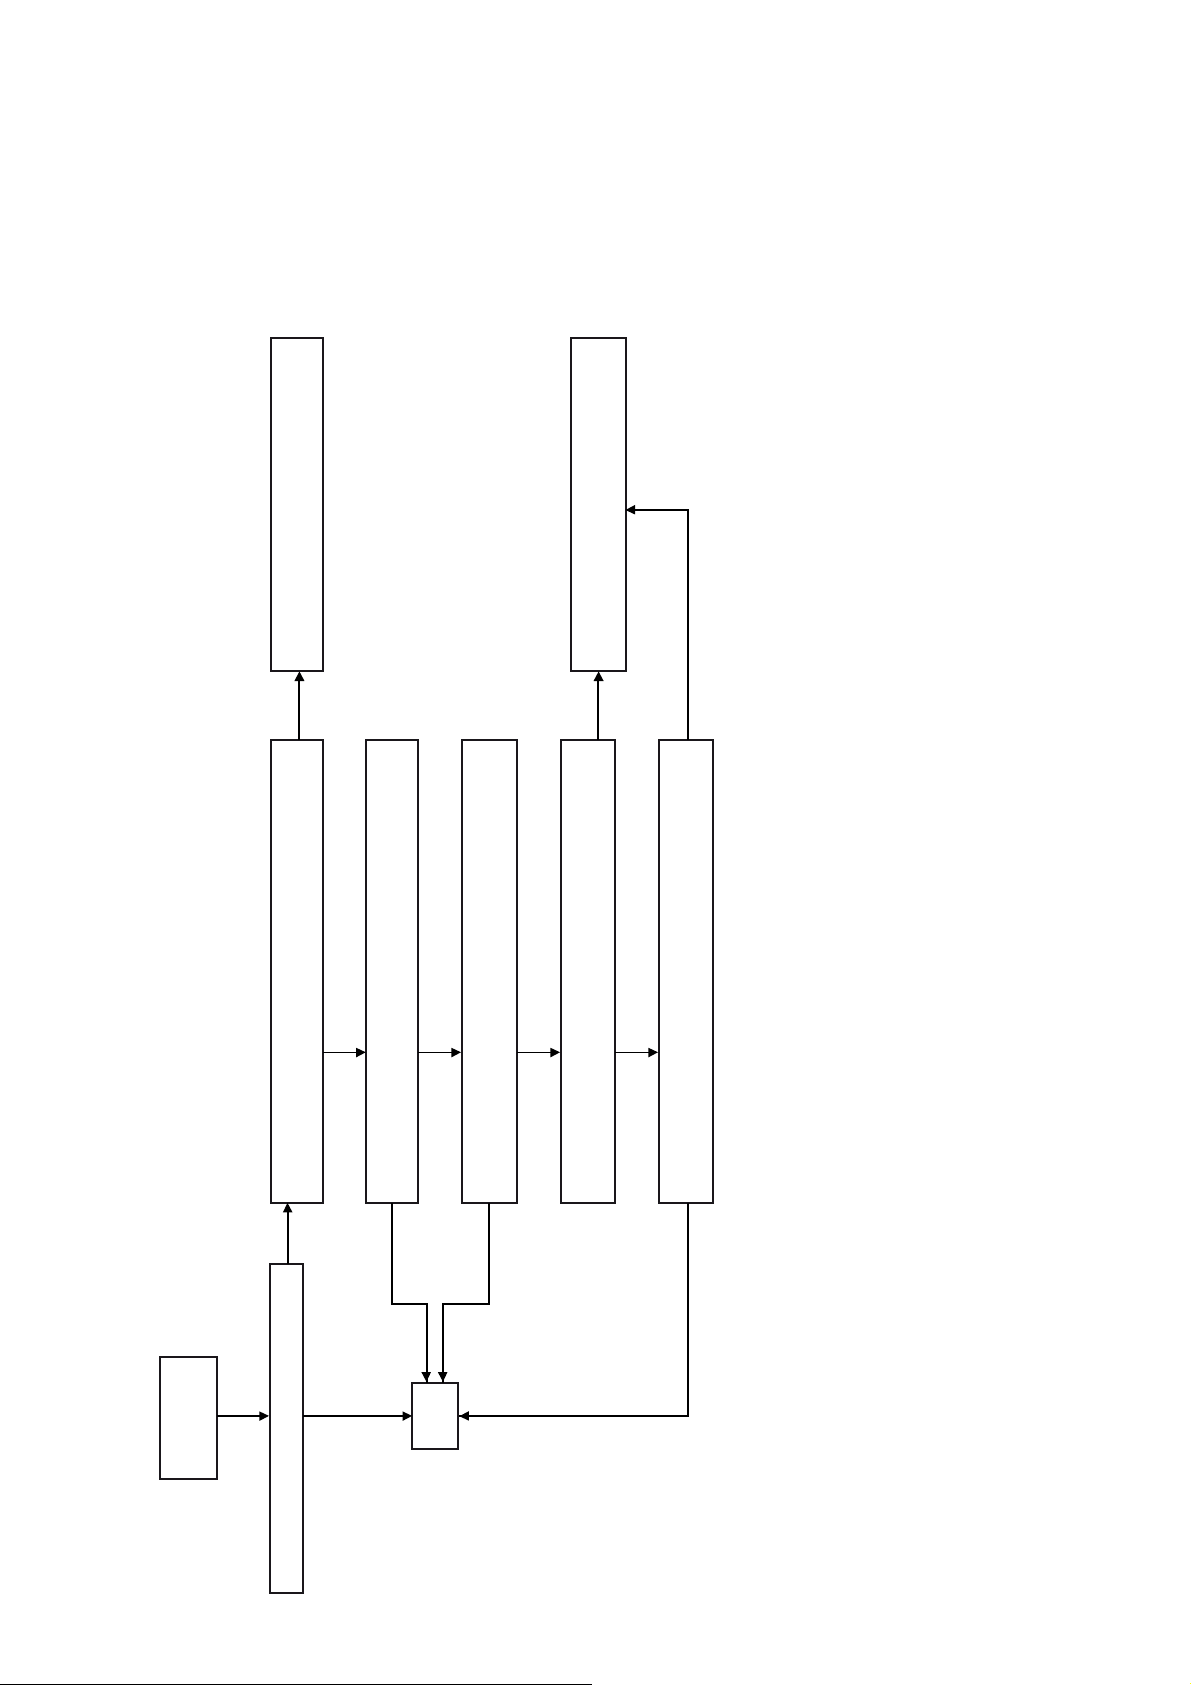
HCD-GT3D
Reinsert the wire and check again. If it is OK,
check the SMPS Board position.
No
Yes
Check CN1005 (pin1 refer to pin9).
Is the voltage = 50V?
No
Check speaker output CN1007 (for subwoofer), TB001 (for FR, FL).
Is the power voltage = 25V?
No
Check IC1003 (pin1).
Is the power voltage = 12V?
Reinsert FFC and check again. If it is OK, check
MOTHERBOARD Board position.
No
Check CN1001 (pin1).
Is the voltage = 13V (MAIN ON) ?
No
Yes
Check CN1001 (pin7).
Is the voltage = 3.3V (AMP-RESET)?
PLAY MUSIC
DAMP Mount Diagnosis Flow
30
No
Yes
Is there audio output from DAMP Board?
Yes
Yes
END
Yes
Yes
Page 31
HCD-GT3D
Ver. 1.1
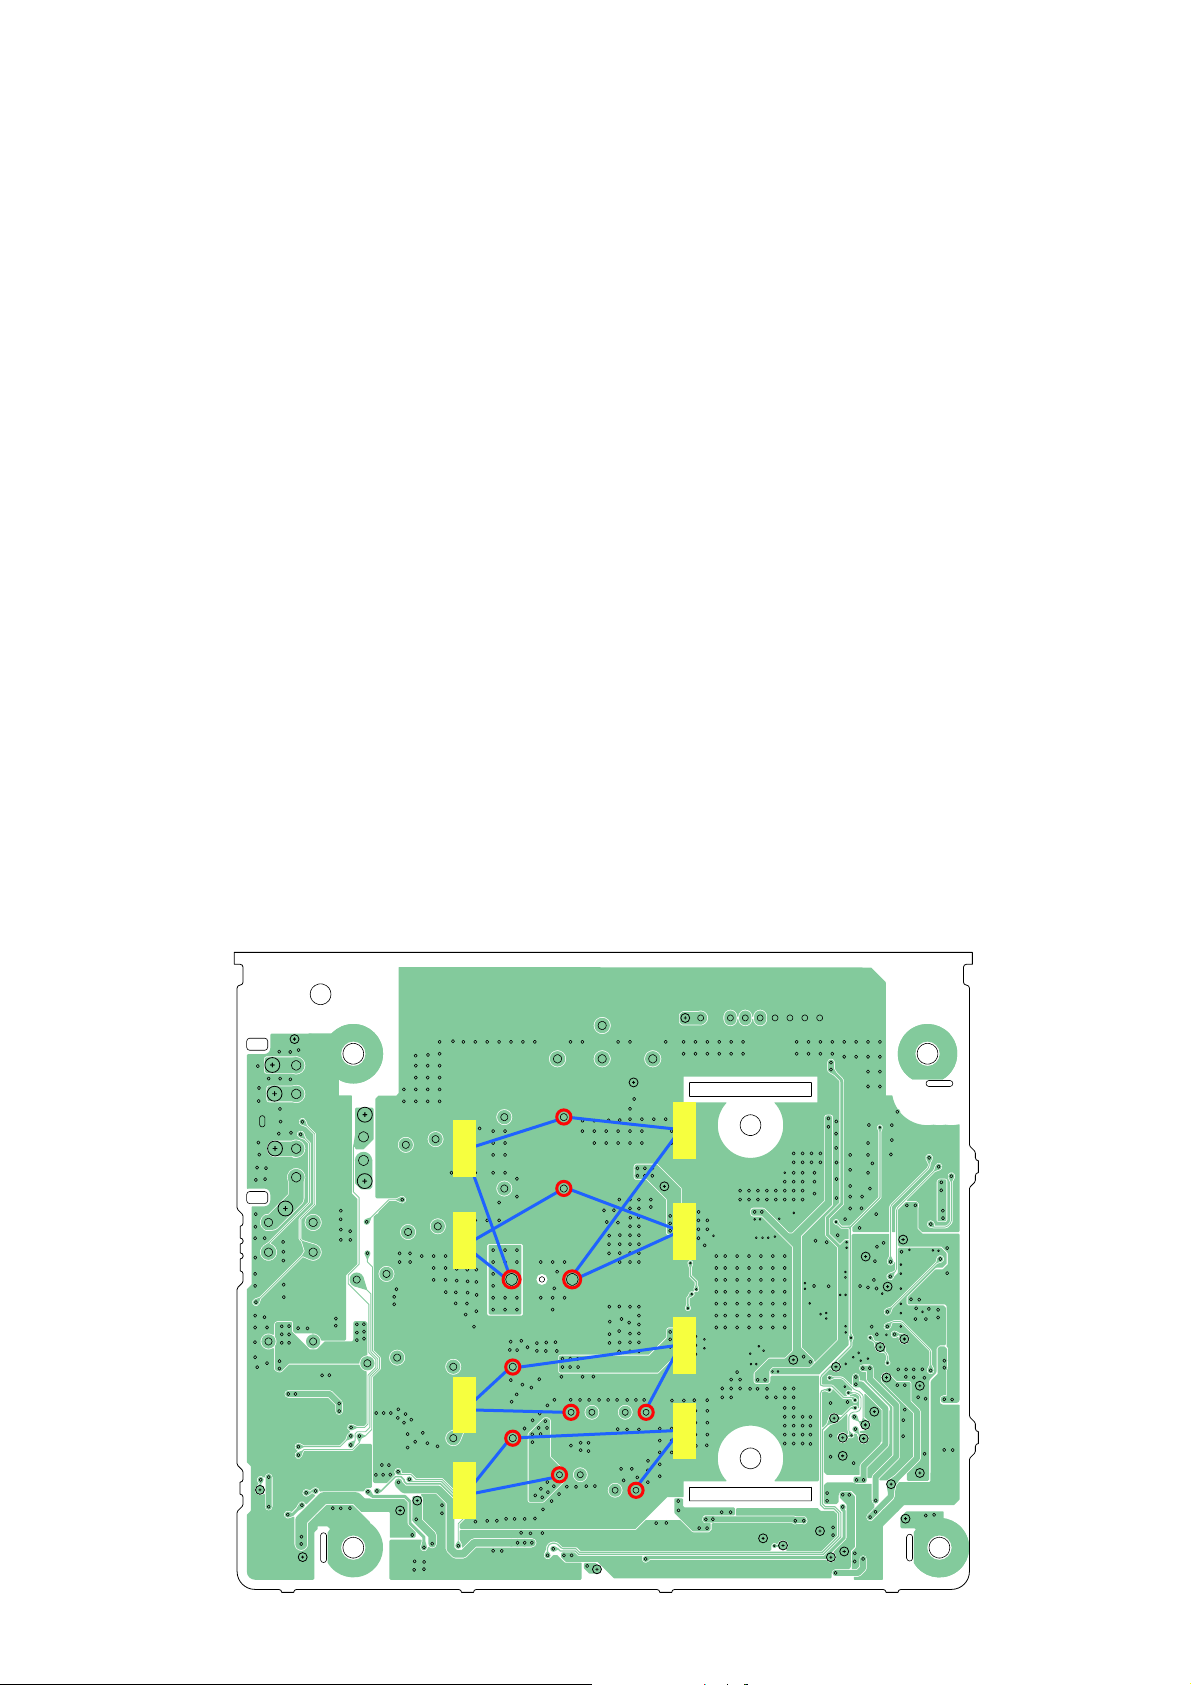
MOSFET Confi rmation for DAMP Mount
CL1054
CL1051
CL1048
CL1049
CL1061
CL1050
CL1062
CL1047
CL1046
CL1052
CL1053
CL1031
CL1032
CL1059
CL1063
CL1017
CL1019
CL1016
CL1009
CL1013
CL1014
CL1010
CL1012
CL1003
CL1015
CL1039
CL1001
CL1011
CL1018
Tes te r Tes te r Teste r
Tes te r Tes te r Tes te r
CL1023
CL1008
Tes te r
Tes te r
CL1002
CL1005
CL1038
CL1006
CL1007
CL1004
CL1060
<Note>
Please check each channel’s resistance value for the Coil’s terminal and Capacitor’s + and – terminal.
These terminal is equal to resistance value for POWER AUDIO DRIVER terminal.
31
Page 32
HCD-GT3D
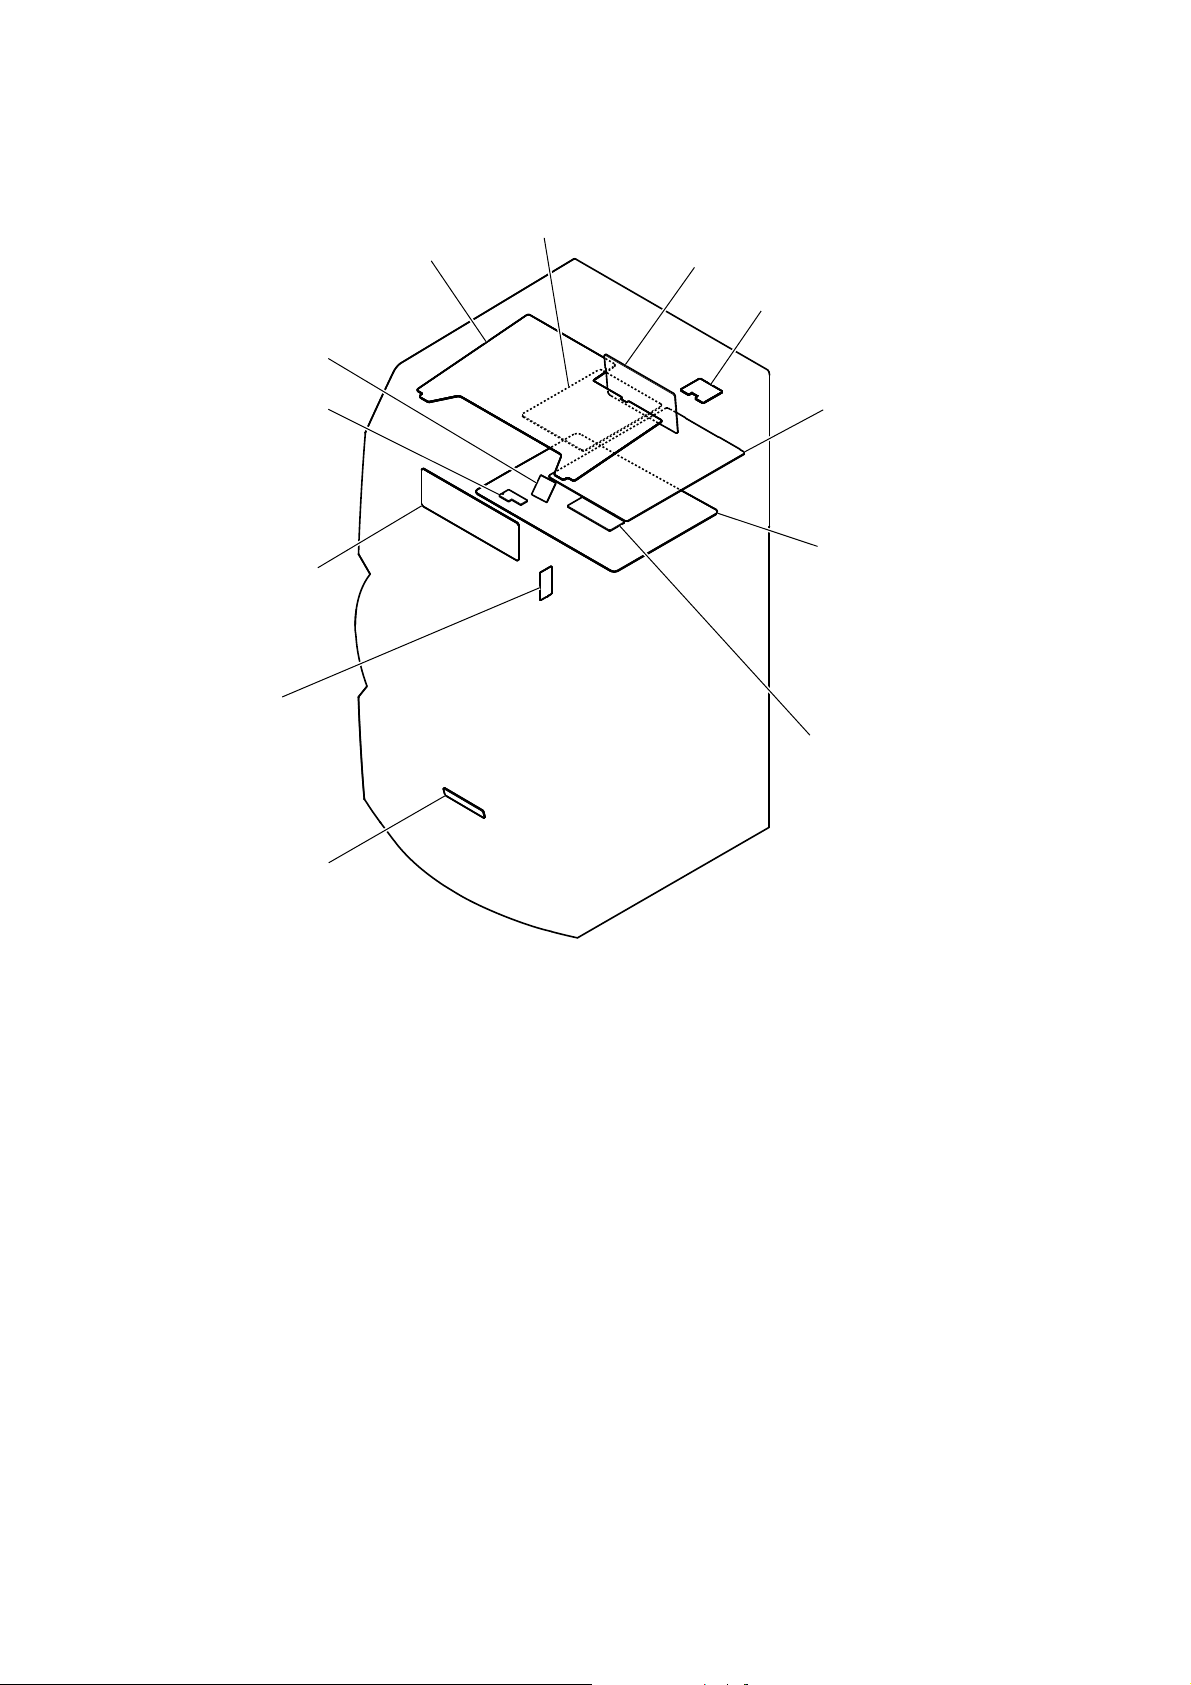
• Circuit Boards Location
RC-S730 (WW)
BUTTON board
SECTION 6
DIAGRAMS
DAMP board
MIC board
OPTICAL board
MS-476 board
LCD board
BLUETOOTH MODULE
SPK_HLED board
MOTHERBOARD board
SMPS board
SPLITTER board
32
Page 33
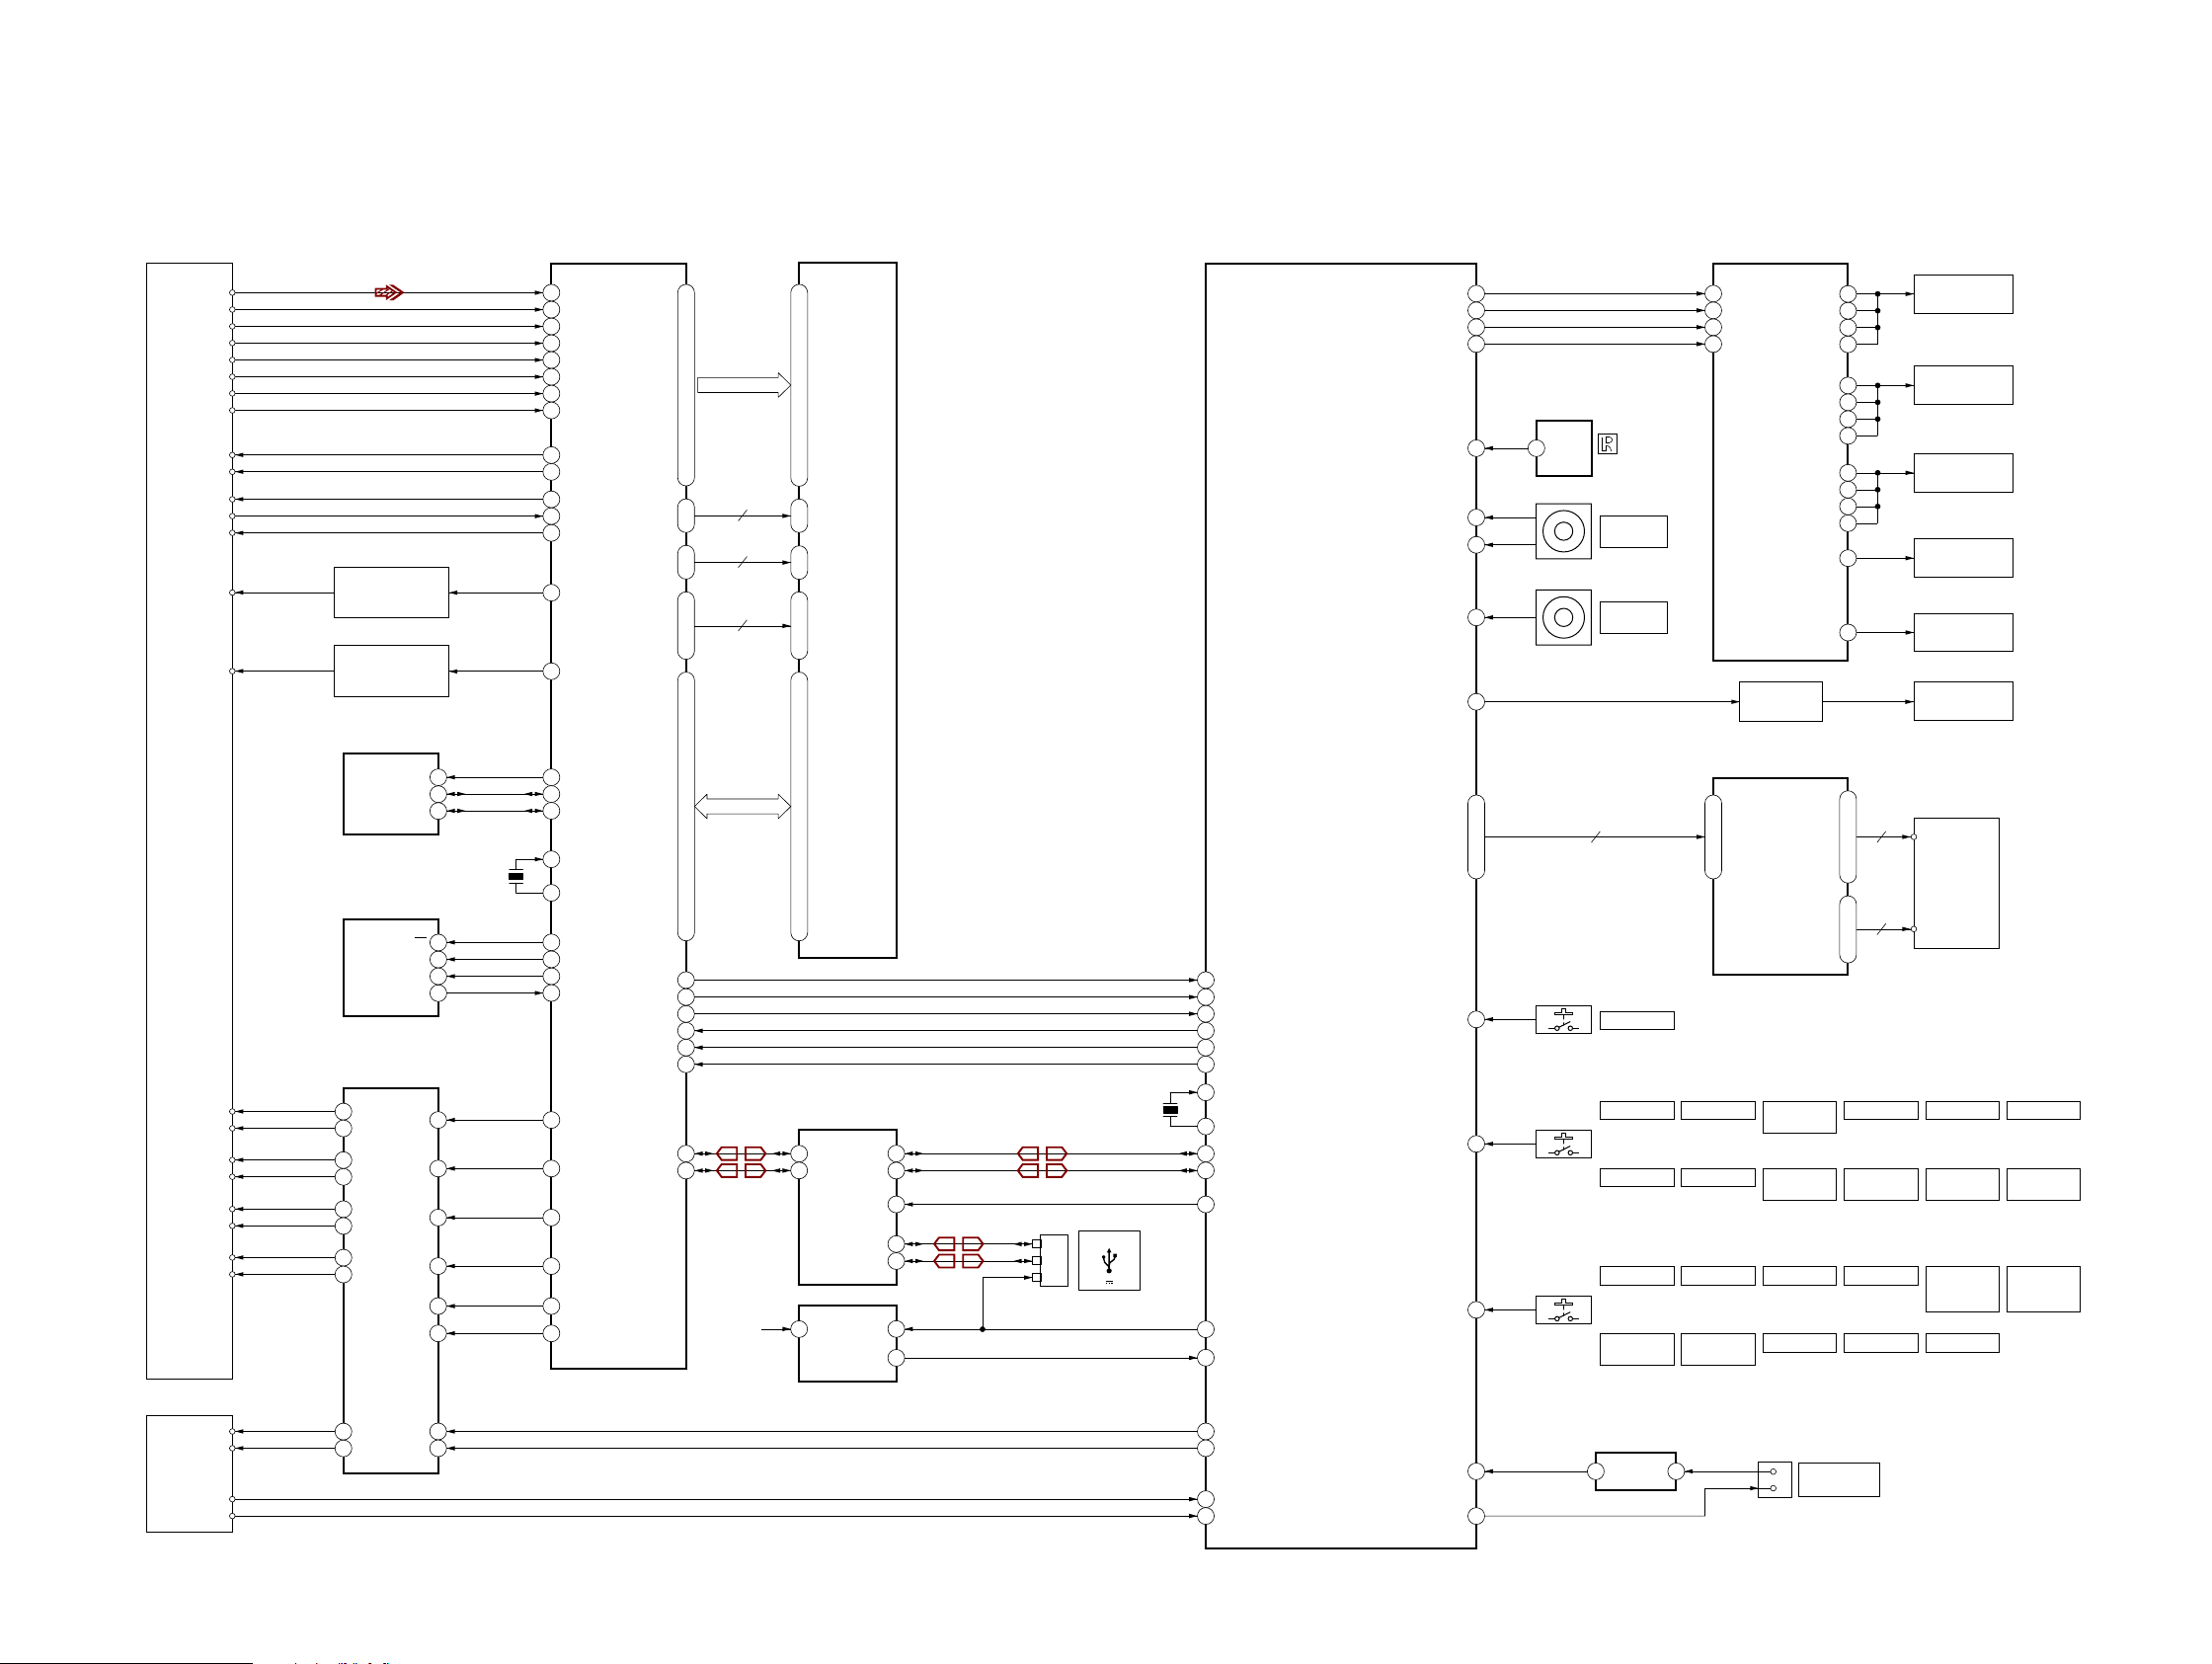
6-1. BLOCK DIAGRAM - SERVO/USB/DISPLAY Section -
CD RF AMP FOCUS/TRACKING ERROR AMP,
CD SYSTEM PROCESSOR,
SERVICE,
OPTICAL DEVICE (7G)
RF
NC
VOD/C
VOB/B
VOA/A
VOD/D
VOF/F+H
VOE/E+G
VR (780)
VR (650)
VC
PD
MSW
LD (780)
LD (650)
FCS+
FCS-
TRK-
TRK+
SP+
SP-
SL+
SL-
AUTOMATIC POWER
CONTROL (FOR CD)
Q402
AUTOMATIC POWER
CONTROL (FOR DVD)
Q401
EEPROM
IC304
7
WE
6
SCL
5
SDA
SERIAL FLASH
IC302
1
CS
6
SCLK
5
SI/SIO0
2
SO/SIO1
FOCUS/TRACKING COIL DRIVE,
SPINDLE/SLED/LOADING MOTOR DRIVE
14
13
15
16
11
12
17
18
VOFC+
VOFC-
VOTK+
VOTK-
VOSL+
VOSL-
VOLD+
VOLD-
IC401
VINFC 1
VINTK
VINSL+
VINLD
BIAS
MUTE
26
4
23
27
28
X301
27MHz
DIGITAL SERVO PROCESSOR
IC301
(1/2)
123
124
127
128
1
2
3
4
19
20
10
13
23
14
15
48
47
7
8
33
31
22
21
17
18
11
45
RFIP
OPDIST
RF_A
RF_B
RF_C
RF_D
RF_E
RF_F
CD_VR
DVD_VR
V20
MDI1
MSW
LDO1
LDO2
EEWP46
SCL
SDA
XTALI
XTALO
SF_CS#30
SF_CK
SF_DI32
SF_DO
FOO
TRO
DMO
FMO
V14/VREF0
MUTE
RA0 89 A023
RA1 90 A124
RA2 91 A225
RA3 92 A326
RA4 79 A429
RA5 78 A530
RA6 77 A631
RA7 76 A732
RA8 75
RA9 74
RA10 88
RA11 73
BA0 85
BA1 86
DQM0 61
DQM1 70
RCLK 72
RWE# 80
CAS# 82
RAS# 83
RD0 52 DQ02
RD1 53
RD2 54 DQ25
RD3 55
RD4 57 DQ48
RD5 58
RD8 69 DQ842
RD9 68
RD11 66 DQ1147
RD12 65
RD14 63 DQ1451
RD15 62 DQ1553
IFCS# 42
IFSCK
IFSDO
IFSDI
IFBSY 41
PRST# 38
USB_DP
USB_DM 24
34
35
40
25
RA0 ~ RA11
2
2
4
RD0 ~ RD15
USB+5V
A833
A934
A10/AP22
A1135
BA020
BA121
LDQM15
UDQM39
CLK38
WE16
CAS17
RAS18
DQ14
DQ37
DQ510
DQ611RD6 59
DQ713RD7 60
DQ944
DQ1045RD10 67
DQ1248
DQ1350RD13 64
11
1D+
3
1D-
6
2-IN
SD-RAM
IC306
USB SWITCH
IC453
2OUT
2D+
2D- 4
D+ 9
2+IN
S 2
D- 5
HCD-GT3D
SYSTEM CONTROLLER
IC101
(1/4)
RGB-TRANS-LED-SPK/SD_WP_0
LOW_AC_SUPPLY/LCD_BCKLED 6
LCD-INHB(LCD_BCKLED)/FL-LATCH
19
MTK-XIFCS
17
MTK-CLK
20
MTK-SDI
22
MTK-SDO
16
MTK-BUSY
15
MTK-RESET
USB-X1
X104
48MHz
10
CN3203
D+
D-
VBUS
5
7
REC/PLAY
5V 1A
139
USB-X2
140
151
DP0
150
DM0
60
USB_HOST_SEL
152
VBUSIN0
47
USB-OC
RGB-PWM-CLK
MASTER-VOLUME
LCD-CSB/TEST-MON38 38
POWER-KEY 45
RGB-SOUT 48
RGB-SCLK
SIRCS
JOG+
JOG-
LCD-OSC 10
LCD-CLK 35
LCD-SDA 40
AD-KEY0 84
AD-KEY1 85
118
112
137
135
44
49
83
134
REMOTE CONTROL
SIGNAL RECEIVER
IC3000
1
VO
5 32
EN3100
MULTI
CONTROL
EN3101
VOLUME/
DJ CONTROL
S3100
"/1
S3101
x
S3107
FUNCTION
S3113
PARTY CHAIN
S1
-
SOUND FIELD
LED DRIVER
IC502
21
PWMCLK
4
TRANS
2
SIN
3
SCK
LIQUID CRYSTAL DISPLAY DRIVER
7
OSCIN
9
SCL
10
SDA
8
CSB
13
INHB
S3102
N
S3108
S3114
Z
S3120S3119
S2
+
/OUT0 5
/OUT1 6
/OUT2 7
/OUT3 8
/OUT4 9
/OUT5 10
/OUT6 11
/OUT7
12
/OUT8 13
/OUT9 14
15
/OUT10
/OUT11
16
/OUT14 19
/OUT15 20
LED DRIVER
Q3000
IC3004
SEG0-SEG31
COM0 51
COM1 52
COM2 1
COM3 2
S3103
- PAIRING
BLUETOOTH
S3109
DJ EFFECT
FLANGER
S3115
PARTY LIGHT
S3121 S3122 S3123
BLUE HLED
D4001
GREEN HLED
D4002
RED HLED
D4000
BASS BAZUCA LED
D3100
BT LED
D3105
BACKLIGHT LED
D3001
LIQUID CRYSTAL DISPLAY
ND3000
SEG0-SEG31
14-28,30-36,38-47
4
COM0-COM3
S3104
MEGA BASS
S3110
DJ EFFECT
ISOLATOR
S3116 S3117 S3118
FOOTBALL
MIC ECHO REC TO USBVOCAL FADER
S3105
LIGHT MODE
S3111
DJ EFFECT
DJ OFF
S3
TUNING -
.
S3106
ENTER
S3112
DJ EFFECT
SAMPLER
S4
TUNING +
>
HCD-GT3D
MS-476 BOARD
LOAD+
LOAD-
TRAY-IN
TRAY-OUT
10
9
VOTR+
VOTR-
FWD 6
REV 7
USB COMPARATOR
IC452
122
CD-MOTOR+
124
CD-MOTOR-
4
CDM-LOAD-SW
3
CDM-UNLOAD-SW
3333
DEBUG-RXD(MD-BOOT1)
DEBUG-TXD
BUS BUFFER
IC102
(1/3)
64
43
8
3Y
9
3A
RXD1
TXD1
CN101
4
SERVICE USE
3
FOR
6LJQDOSDWK
c : CD/DVD PLAY
d : USB
Page 34
HCD-GT3D
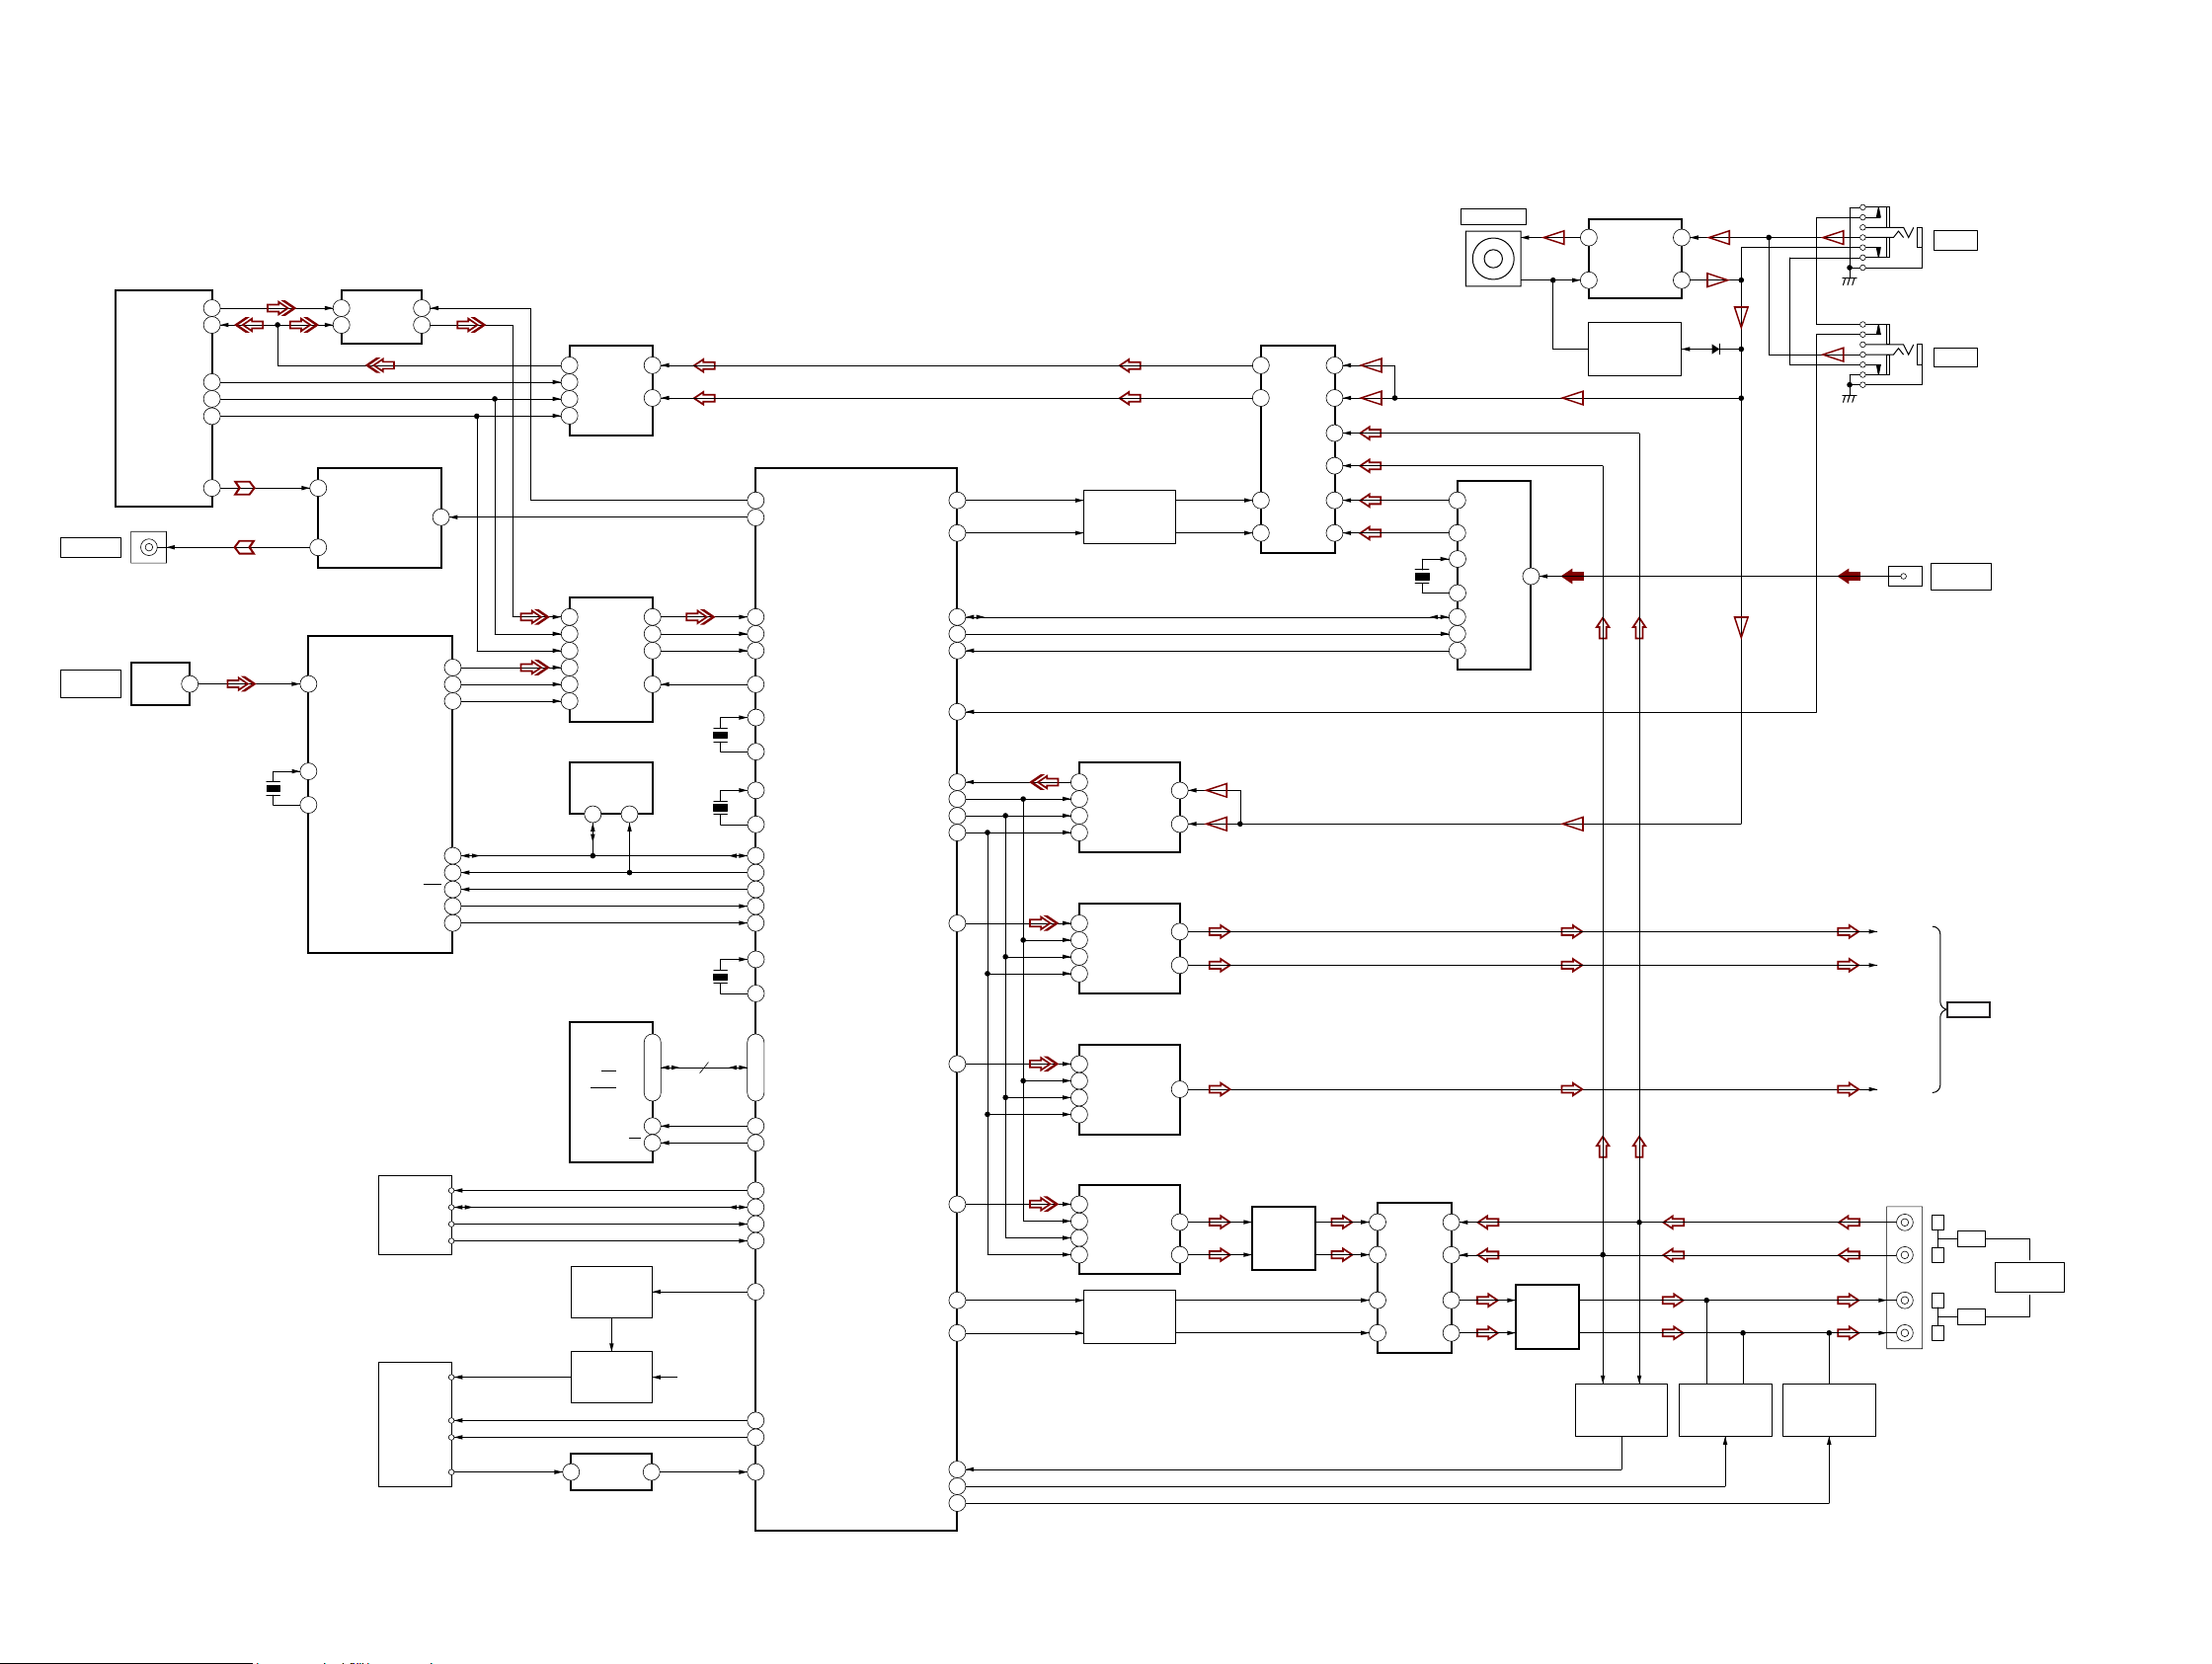
6-2. BLOCK DIAGRAM - AUDIO/VIDEO Section -
CD RF AMP FOCUS/TRACKING ERROR AMP,
CD SYSTEM PROCESSOR,
DIGITAL SERVO PROCESSOR
IC301
(2/2)
118
ASDATA0
106
ADIN
112
ACLK
117
ALRCK
113
ABCK
100
CVBS
J907
VIDEO OUT
DIGITAL
OPTICAL RECEIVER
IC3300
OPTICAL IN
TV
VOUT 1
X602
24.576MHz
SIGNAL SELECTOR
IC913
2
B
1
A
VIDEO AMP
IC901
4
VIN
POWER SAVE
2
VOUT
DIGITAL AUDIO
INTERFACE RECEIVER
IC904
31
RXIN4/ASCKI0
XTI
39
XTO40
6
SEL
5
Y
DOUT
LRCK
BCK
MDI/SDA
MC/SCL
RST
ERROR/INT0
NPCM/INT1
NFC MODULE
(RC-S730 (WW))
SCL
DATA
IRQ
RF-DET
BLUETOOTH
MODULE
3.3V
BT-RESET
BT-TXD
BT-RXD
BIAS SET
Q603
J3200
MIC 1
J3201
MIC 2
CN2002
FM
FRONT-L
FRONT-R
SW
J602
2
ANTENNA
FM
>001B
AMP
SECTION
(Page 35)
L
R
L
OUT
R
6LJQDOSDWK
f : TUNER
N : MIC
F : AUDIO (ANALOG)
L : AUDIO (DIGITAL)
IN
AUDIO
PARTY CHAIN
RV3100
MIC LEVEL
A/D CONVERTER
IC606
9
DOUT
6
SCKI
7
LRCK
8
BCK
1
SIGNAL SELECTOR
3
1B
10
3B
13
4B
17
18
19
24
25
34
1
2
2
1A
11
3A
14
4A
COPROCESSOR
SDA
SERIAL FLASH
PWR SUPPLY
PWR SUPPLY
5
2A
BUS BUFFER
VINL
VINR
IC912
SELECT
IC105
SCL
2
IC106
SI/SIO0
SO/SIO1
WP/SIO2
HOLD/SIO3
SCLK
CONTROL
Q104
+3.3V
Q103
IC102
(2/3)
6
CS
2Y
1Y
3Y
4Y
13
14
4
9
12
1
32.768kHz
12.288MHz
13.333MHz
5
2
3
7
6
1
6
X101
X103
X102
E+3.3V
SYSTEM CONTROLLER
IC101
(2/4)
ST-DATA
ST-CLK
ST-RDS
SSI1_DI
SSI0_DO
SSI1_DO
SSI2_DO
LINK-DET
LINK-SET
128
127
114
173
176
175
41
42
55
14
29
30
32
54
33
51
59
94
AUDIO SELECTOR
DRIVER
Q604
A/D CONVERTER
IC609
9
DOUT
6
SCKI
8
BCK
7
LRCK
D/A CONVERTER
IC914
14
DIN
12
SCK
13
BCK
15
LRCK
D/A CONVERTER
IC615
2
DATA
16
SCK
1
BCK
3
LRCK
D/A CONVERTER
IC604
2
DATA
16
SCK
1
BCK
3
LRCK
AUDIO SELECTOR
DRIVER
Q611
VINL
VINR
OUTL
OUTR
VOUTL
VOUTL
VOUTR
13
14
6
7
7
7
8
164
ANALOG-CSEL
2
VIDEO-MUTE
28
SSI3_DI
26
SSI3_LRCKO
24
SSI3_BCKO
111
3D-RESET_ANALOG-DSEL/SD_D1_0
RTC-X167
RTC-X268
AUDIO-X1
91
AUDIO-X292
126
DIR_CP-DATA
125
DIR_CP-CLK
165
DIR_RESET
130
DIR_INT0/EVOL_DATA
136
DIR_INT1/AMP-CLK-FR
EXTAL
70
XTAL71
170
4
Q-FLASH-SIO0
172
Q-FLASH-SIO1
166
Q-FLASH-SIO2
167
Q-FLASH-SIO3
168
Q-FLASH-CLK
169
Q-FLASH-CS
131
NFC_CLK
132
NFC_DATA
12
NFC-INT
53
NFC-RF-DET
8
BT-ON
5
BT-RESET
133
BT-TXD
65
BT-RXD(MD-CLK)
ANALOG-ASEL
ANALOG-BSEL
MIC-DETECT
AUDIO_CLK_OUT
SSI0_BCKO
SSI0_LRCKO
LINK-OUT-A
LINK-OUT-B
/LINK-MUTE
AUDIO SELECTOR
IC605
13
X0
X
3
Y0
Y
X3
Y3
10
X1
A
9
Y1
B
OP AMP
IC603
12
1
11
4
14
5
X600
12MHz
AUDIO SELECTOR
IC602
1
Y1
Y0
12
X1
X0
10
Y
A
9
X
B
13
LRCK/LOUT
12
BCLK/ROUT
X116
X217
11
DA
8
CK
6
IIC/RDSI
FM RECEIVER
5
14
3
13
IC902
FRF1
1
OP AMP
IC601
MIC AMP
IC3200
7
OUT2
3
OUT1
+IN1
GAIN CONTROL
Q3200, Q3201
BIAS DETECTION
Q605, Q607
+IN2
5
1
D3201
MUTING
Q602, Q606
E : VIDEO
HCD-GT3D
3434
Page 35
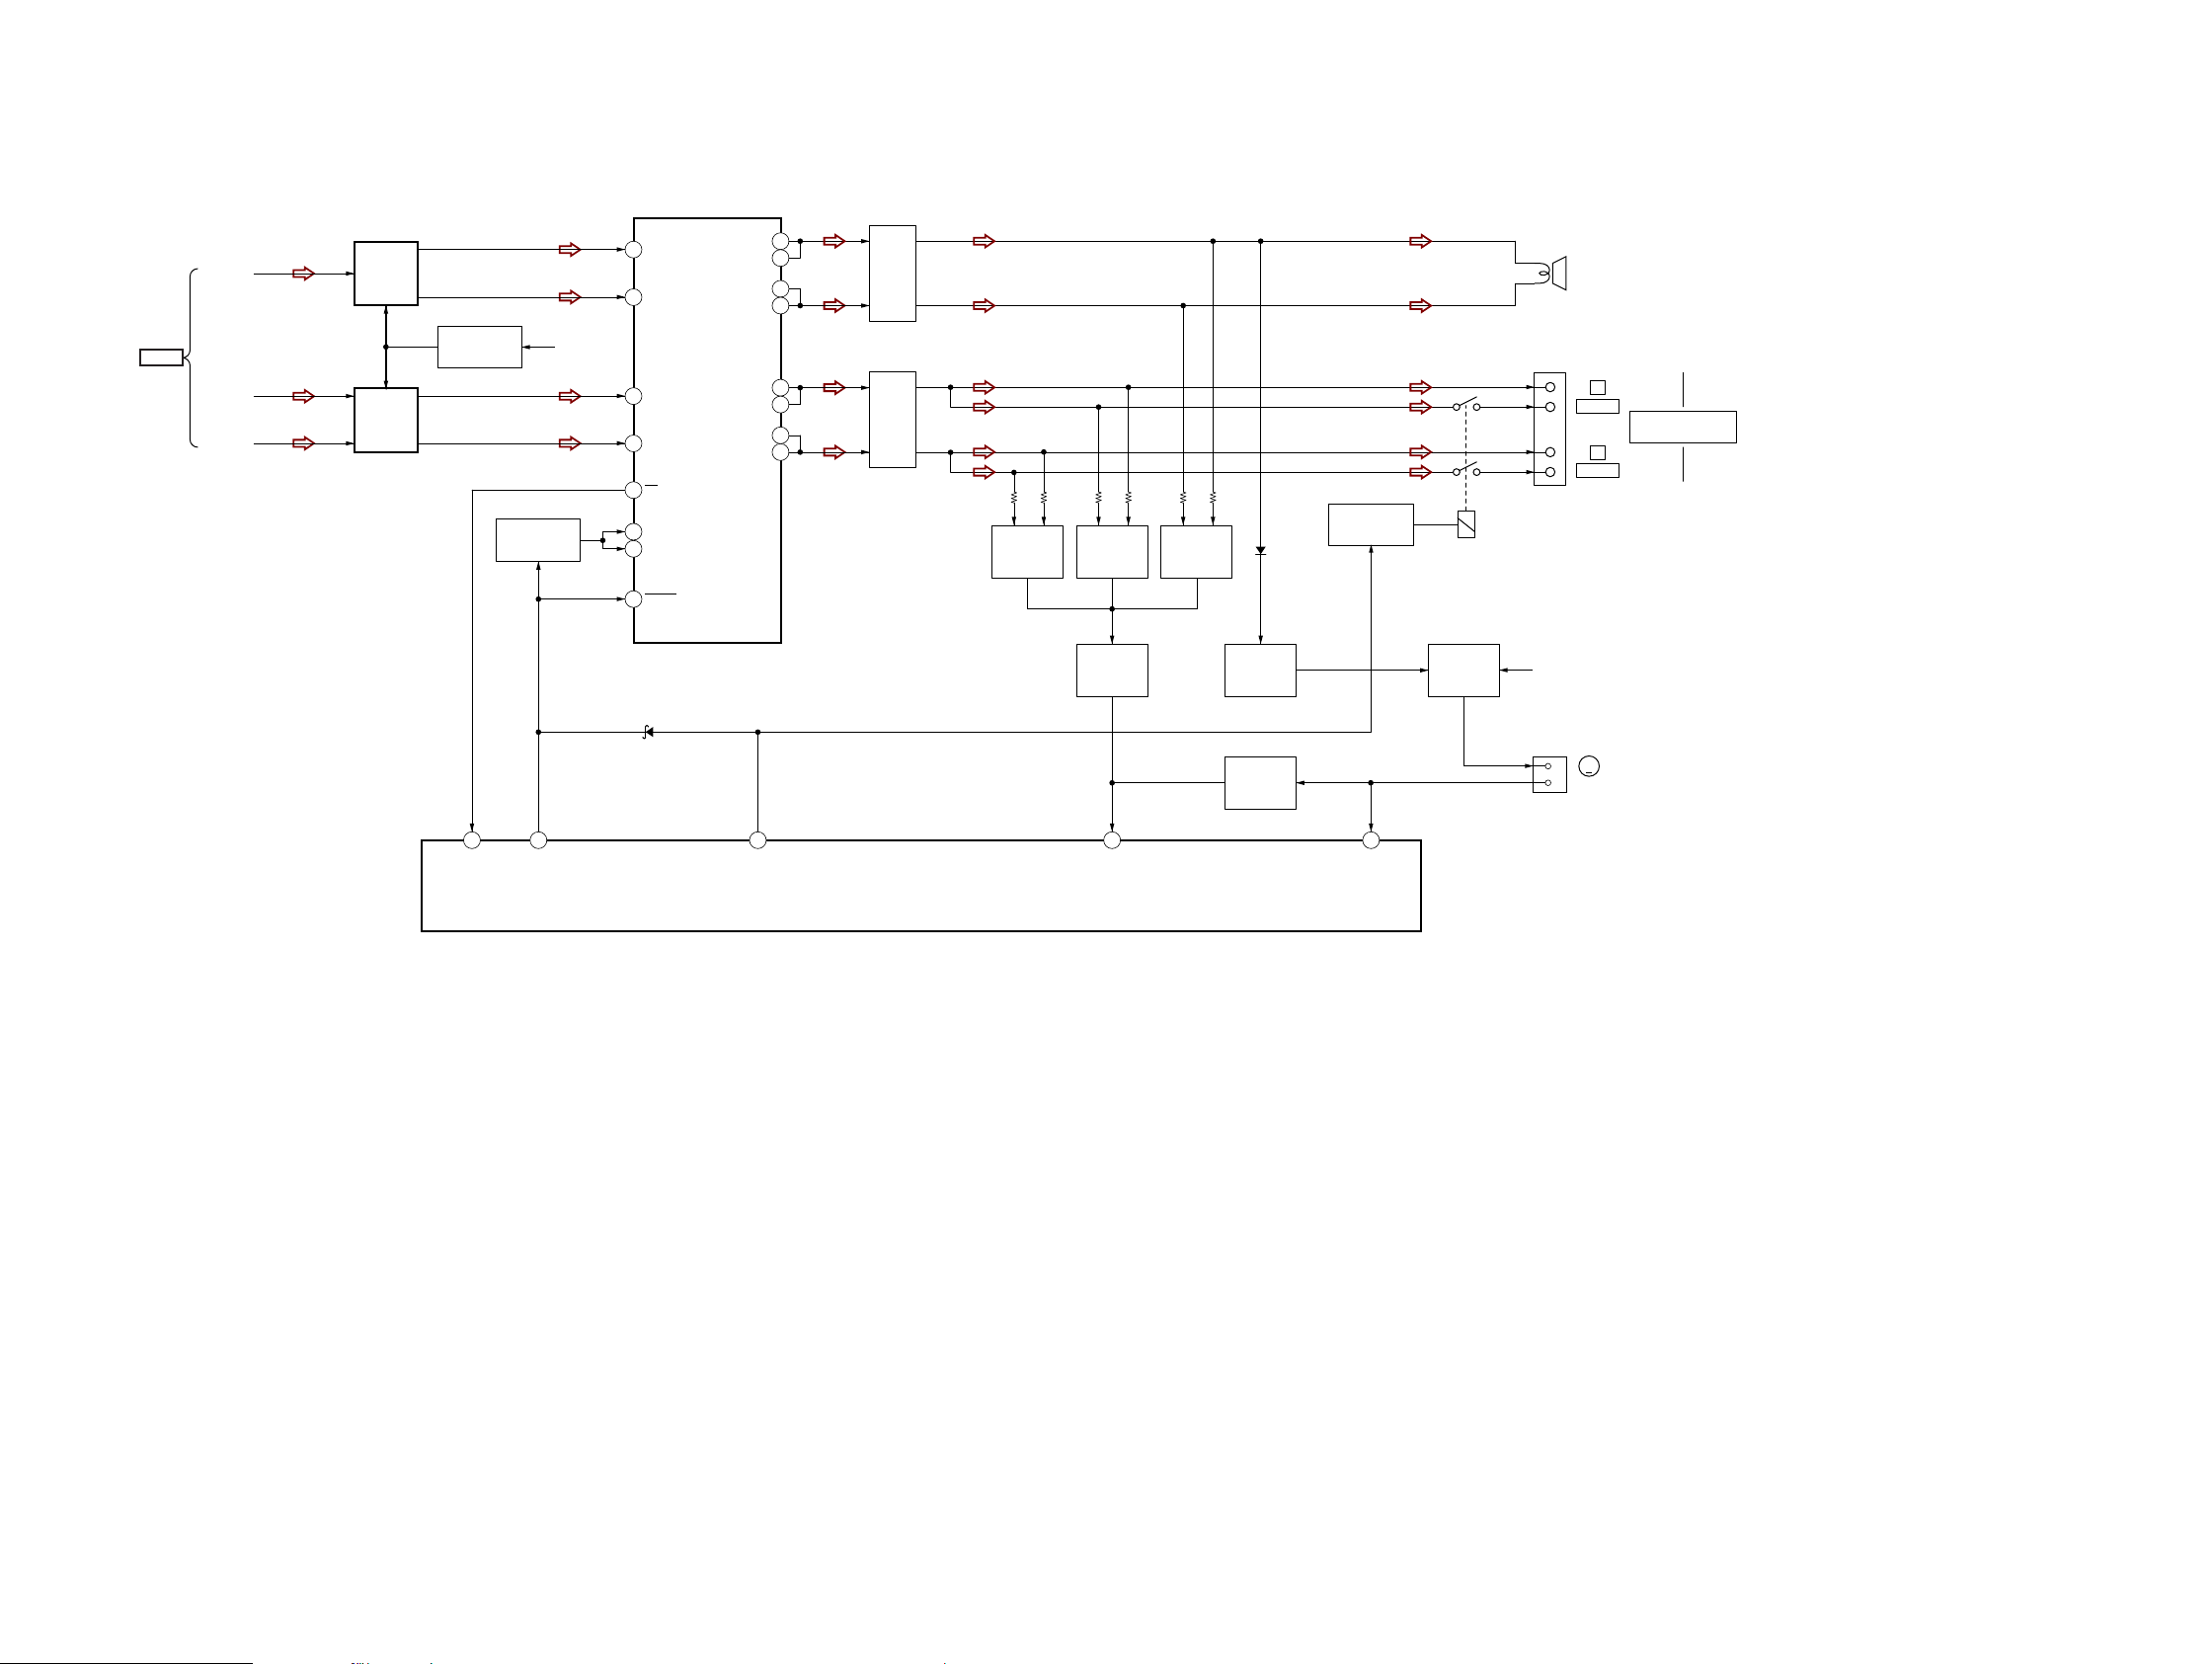
6-3. BLOCK DIAGRAM - AMP Section -
SW
PRE AMP
IC1005
4
5
INPUT_A
INPUT_B
POWER AMP
IC1001
OUT_A_52
OUT_A_53
OUT_B_44
OUT_B_45
HCD-GT3D
52
53
44
45
L1006
LOUDSPEAKER
>001B
AUDIO/VIDEO
SECTION
(Page 34)
FRONT-L
FRONT-R
PRE AMP
IC1004
BIAS
Q1022
56
SD-FAST
AMP RESET
SWITCH
Q1018, Q1019
120
/AMP-RESET
+12V
10
11
15
20
21
2
D1017
INPUT_C
INPUT_D
SD
M1
M2
RESET
OUT_C_36
OUT_C_37
OUT_D_28
OUT_D_29
EVOL_CLK/RELAY_CONTROL
129
TB001
+
36
37
28
29
L1007
SYSTEM CONTROLLER
IC101
(3/4)
OVERLOAD
DETECTION
Q1015, Q1014
OVERLOAD
DETECTION
Q1016, Q1017
DC
DETECTION
Q1006
78
AMP-PROTECT
OVERLOAD
DETECTION
Q1003, Q1004
D1008
FAN RESET
SWITCH
Q1023
FAN
PROTECTION
Q1011
RELAY DRIVER
Q1021
82
FAN_DET
RY001
FAN MOTOR
DRIVER
Q1010
CN1004
-
+
-
M+13V
1
2
PURPLE
DC FAN
L
GREY
IMPEDANCE USE 2ȍ
R
M
SLgQaO SaWK
MID/TWEETERS
F : AUDIO (ANALOG)
HCD-GT3D
3535
Page 36
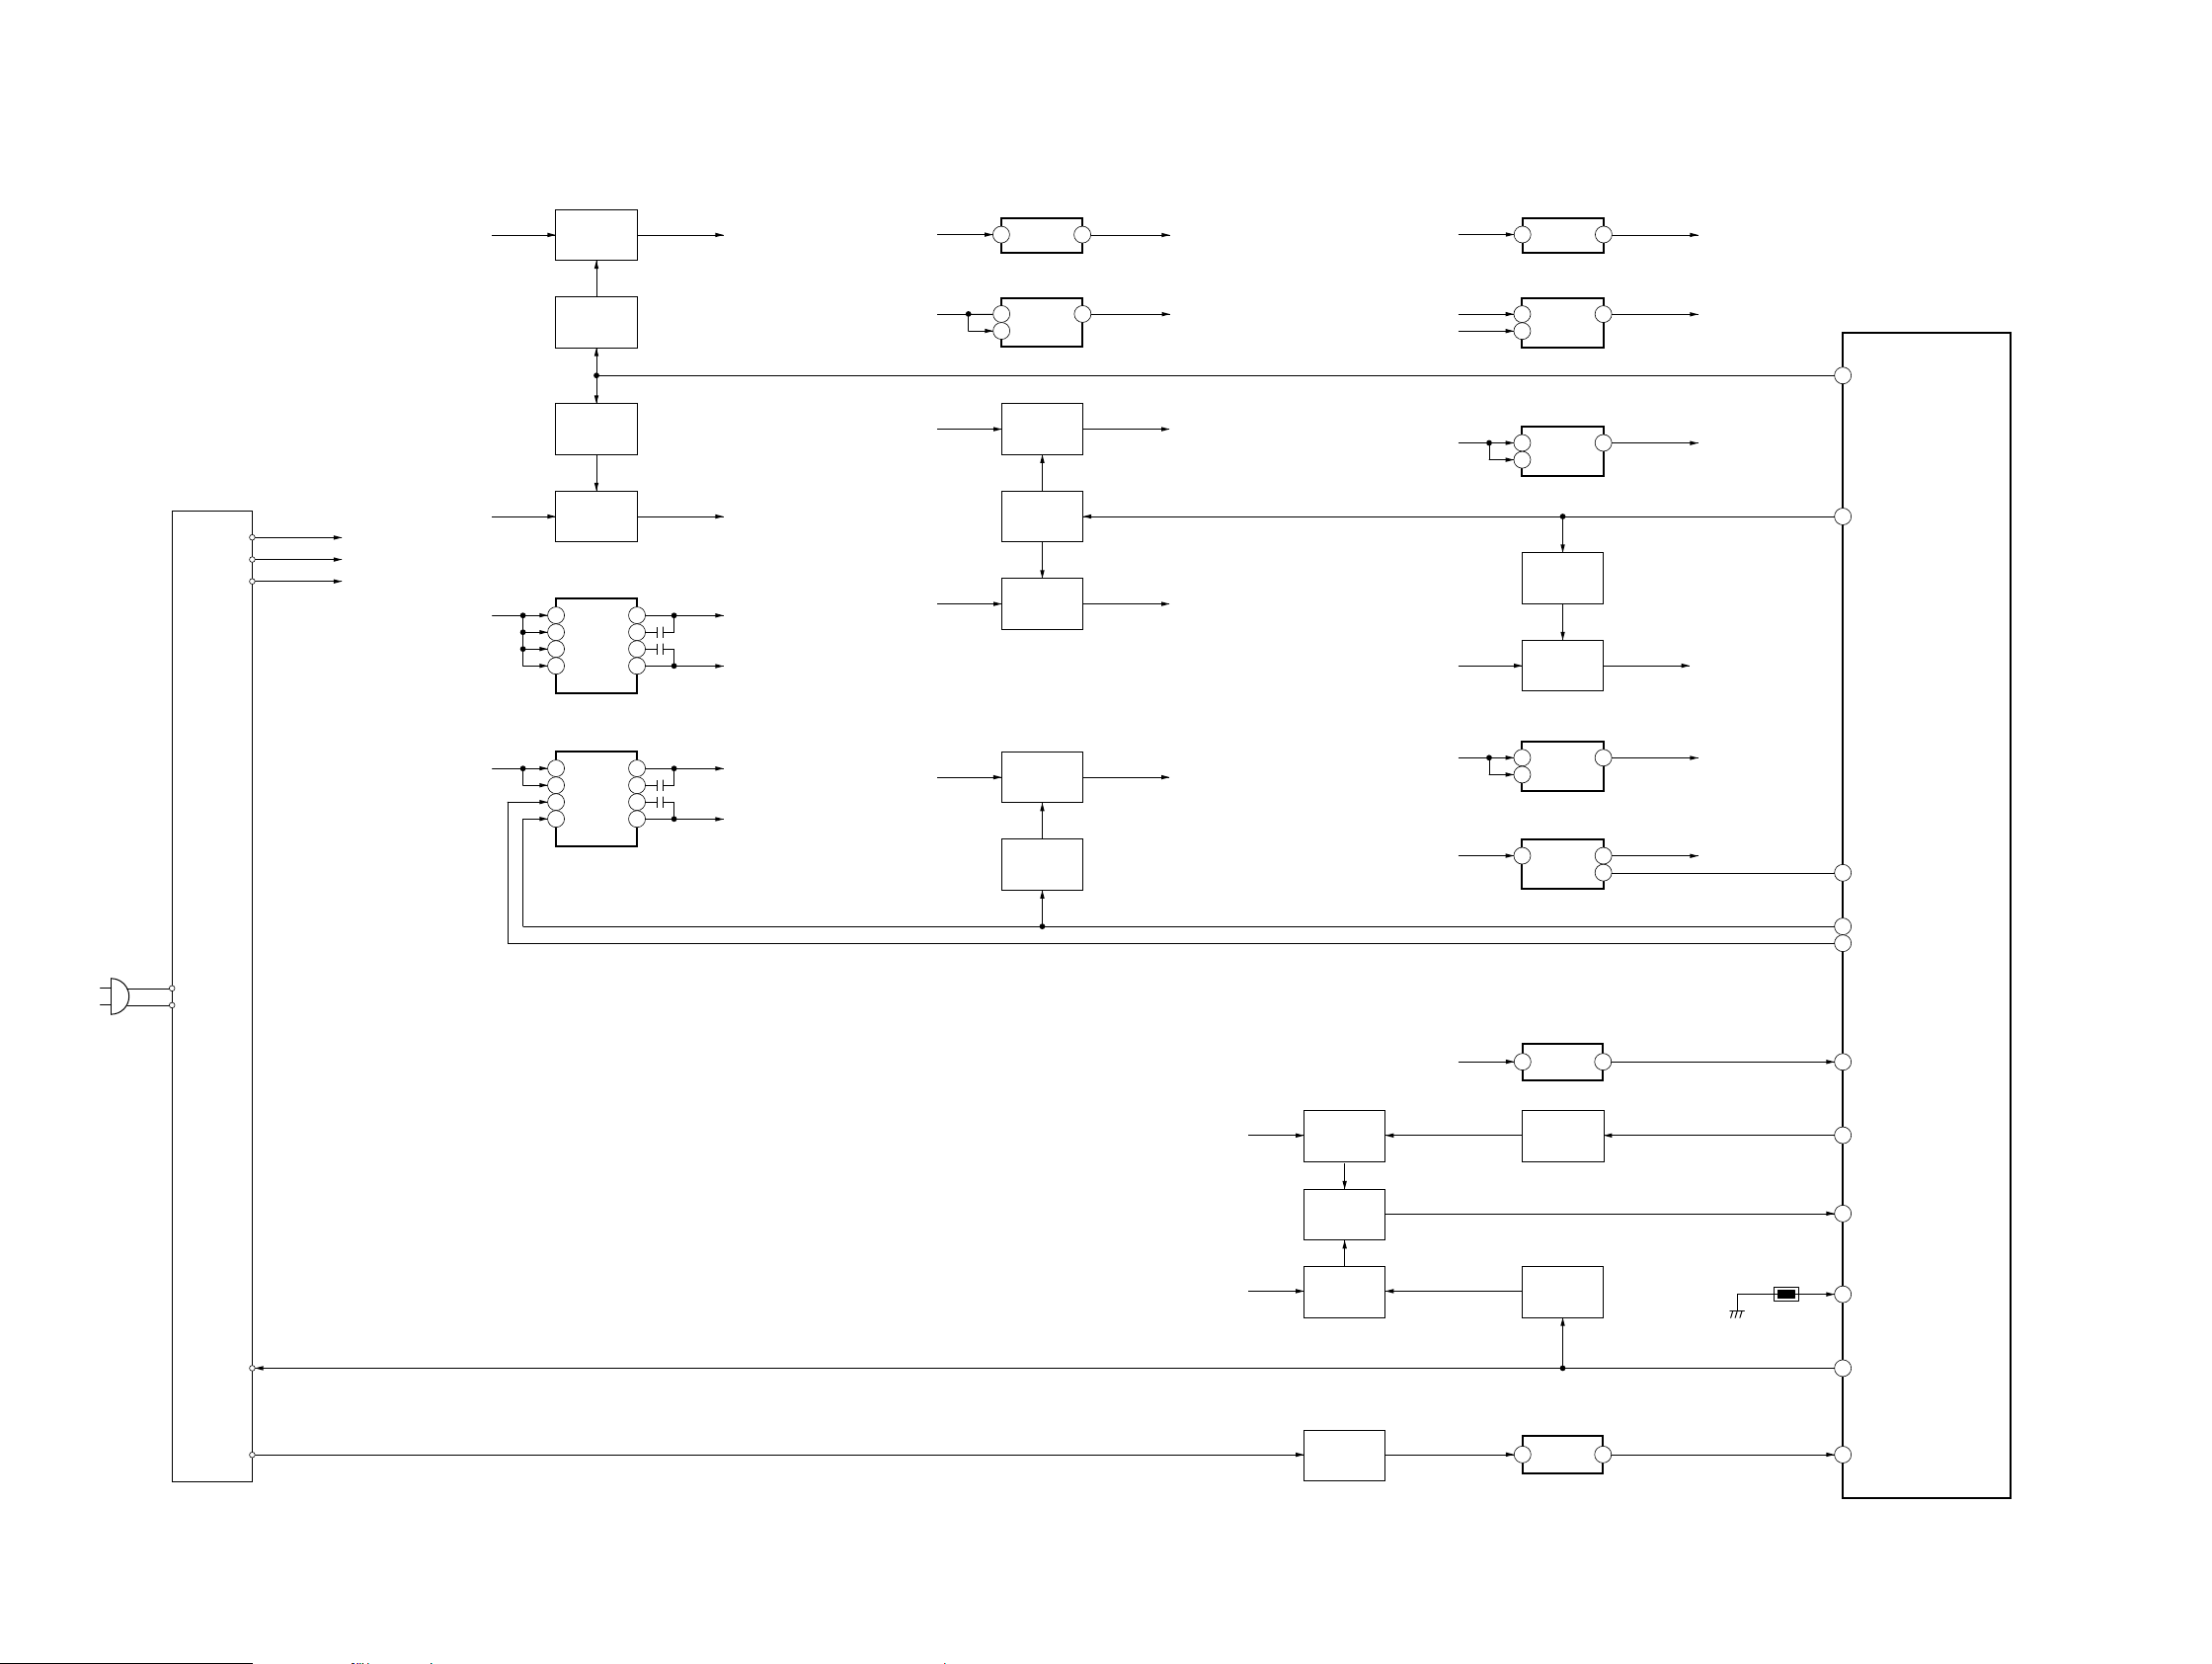
HCD-GT3D
6-4. BLOCK DIAGRAM - POWER SUPPLY Section -
SMPS BOARD
13.5V
13.5V
+9V REG
A+13V
M+13V
M+13V
A+13V
V1
PVDD
M+13V
M+13V
+13V
PWR SUPPLY
Q004
PWR SUPPLY
CONTROL
Q461
PWR SUPPLY
CONTROL
Q012
+13V
PWR SUPPLY
Q011
DC-DC CONVERTER
IC002
1
SW1
VIN1
5
VBST1
EN1
16
VIN2
VBST2
12
EN2
SW2
DC-DC CONVERTER
IC001
1
SW1
VIN1
16
VBST1
VIN2
5
EN1
VBST2
12
EN2
SW2
A+13V_GV2
SW+13V
3
2
15
14
3
2
15
14
E+1.18V
E+3.3V
USB+5V
M+5.2V, LED+5.2V
A+13V_GV2
A+13V_GV2
E+3.3V
M+5.2V
E+3.3V
IC004
1
VIN
+12V REG
IC1003
8
VCC
5
EN
+3.3V
PWR SUPPLY
Q005
PWR SUPPLY
CONTROL
Q457
+5.2V
PWR SUPPLY
Q459
+3.3V
PWR SUPPLY
Q008
PWR SUPPLY
CONTROL
Q009
VOUT
VO 1
3
AVDD+9V , A+9V
+12V
DVDD3.3V, FE_3.3V, FE_3.3V_1
FE_5.2V_M, FE_5.2V_TRAY
D+3.3V
AVDD+9V
DVDD5V
DVDD3.3V
DVDD3.3V
AVDD+5V
AVDD+5V
AVDD+5V
+9V REG
IC006
1
VIN
+3.3V REG
IC305
1
VDD
3
CE
+1.2V REG
IC303
6
VCC
4
EN
PWR SUPPLY
CONTROL
Q006
+5V
PWR SUPPLY
Q007
+3.3V REG
IC008
4
VDD
1
CE
+3.3V REG
IC903
4
VDD
VOUT
VOUT 5
VO 1
VOUT 3
VOUT 3
CE 1
3
AVDD+5V
+3.3V
+1.2V
DVDD5V, FE_5V
AVDD+3.3V
+3.3V
SYSTEM CONTROLLER
IC101
(4/4)
57
PCONT-PSAVE-PROTECT
13
MTK-POWER-CTRL
115
ST-CE
~ AC IN
MAIN ON
AC-DET
E+3.3V
M+13V
PROTECTION
CONTROL
Q572
PROTECTION
CONTROL
Q574
PROTECTION
CONTROL
Q575
AC OFF
DETECT
Q107
E+3.3V
RESET
2
VDD
PROTECTION
CONTROL
PROTECTION
CONTROL
BUS BUFFER
12
4A
IC103
Q571
Q576
IC102
(3/3)
VOUT
96
PCONT-BTSTBY
52
VBUS-OE
4
TH571
11
4Y
76
REST
27
C-CONT
79
SPM-C-MON
80
SPM-AMBIENT-TEMP
117
PCONT-DAMP
63
AC-CUT(MD-BOOT0)
HCD-GT3D
3636
Page 37
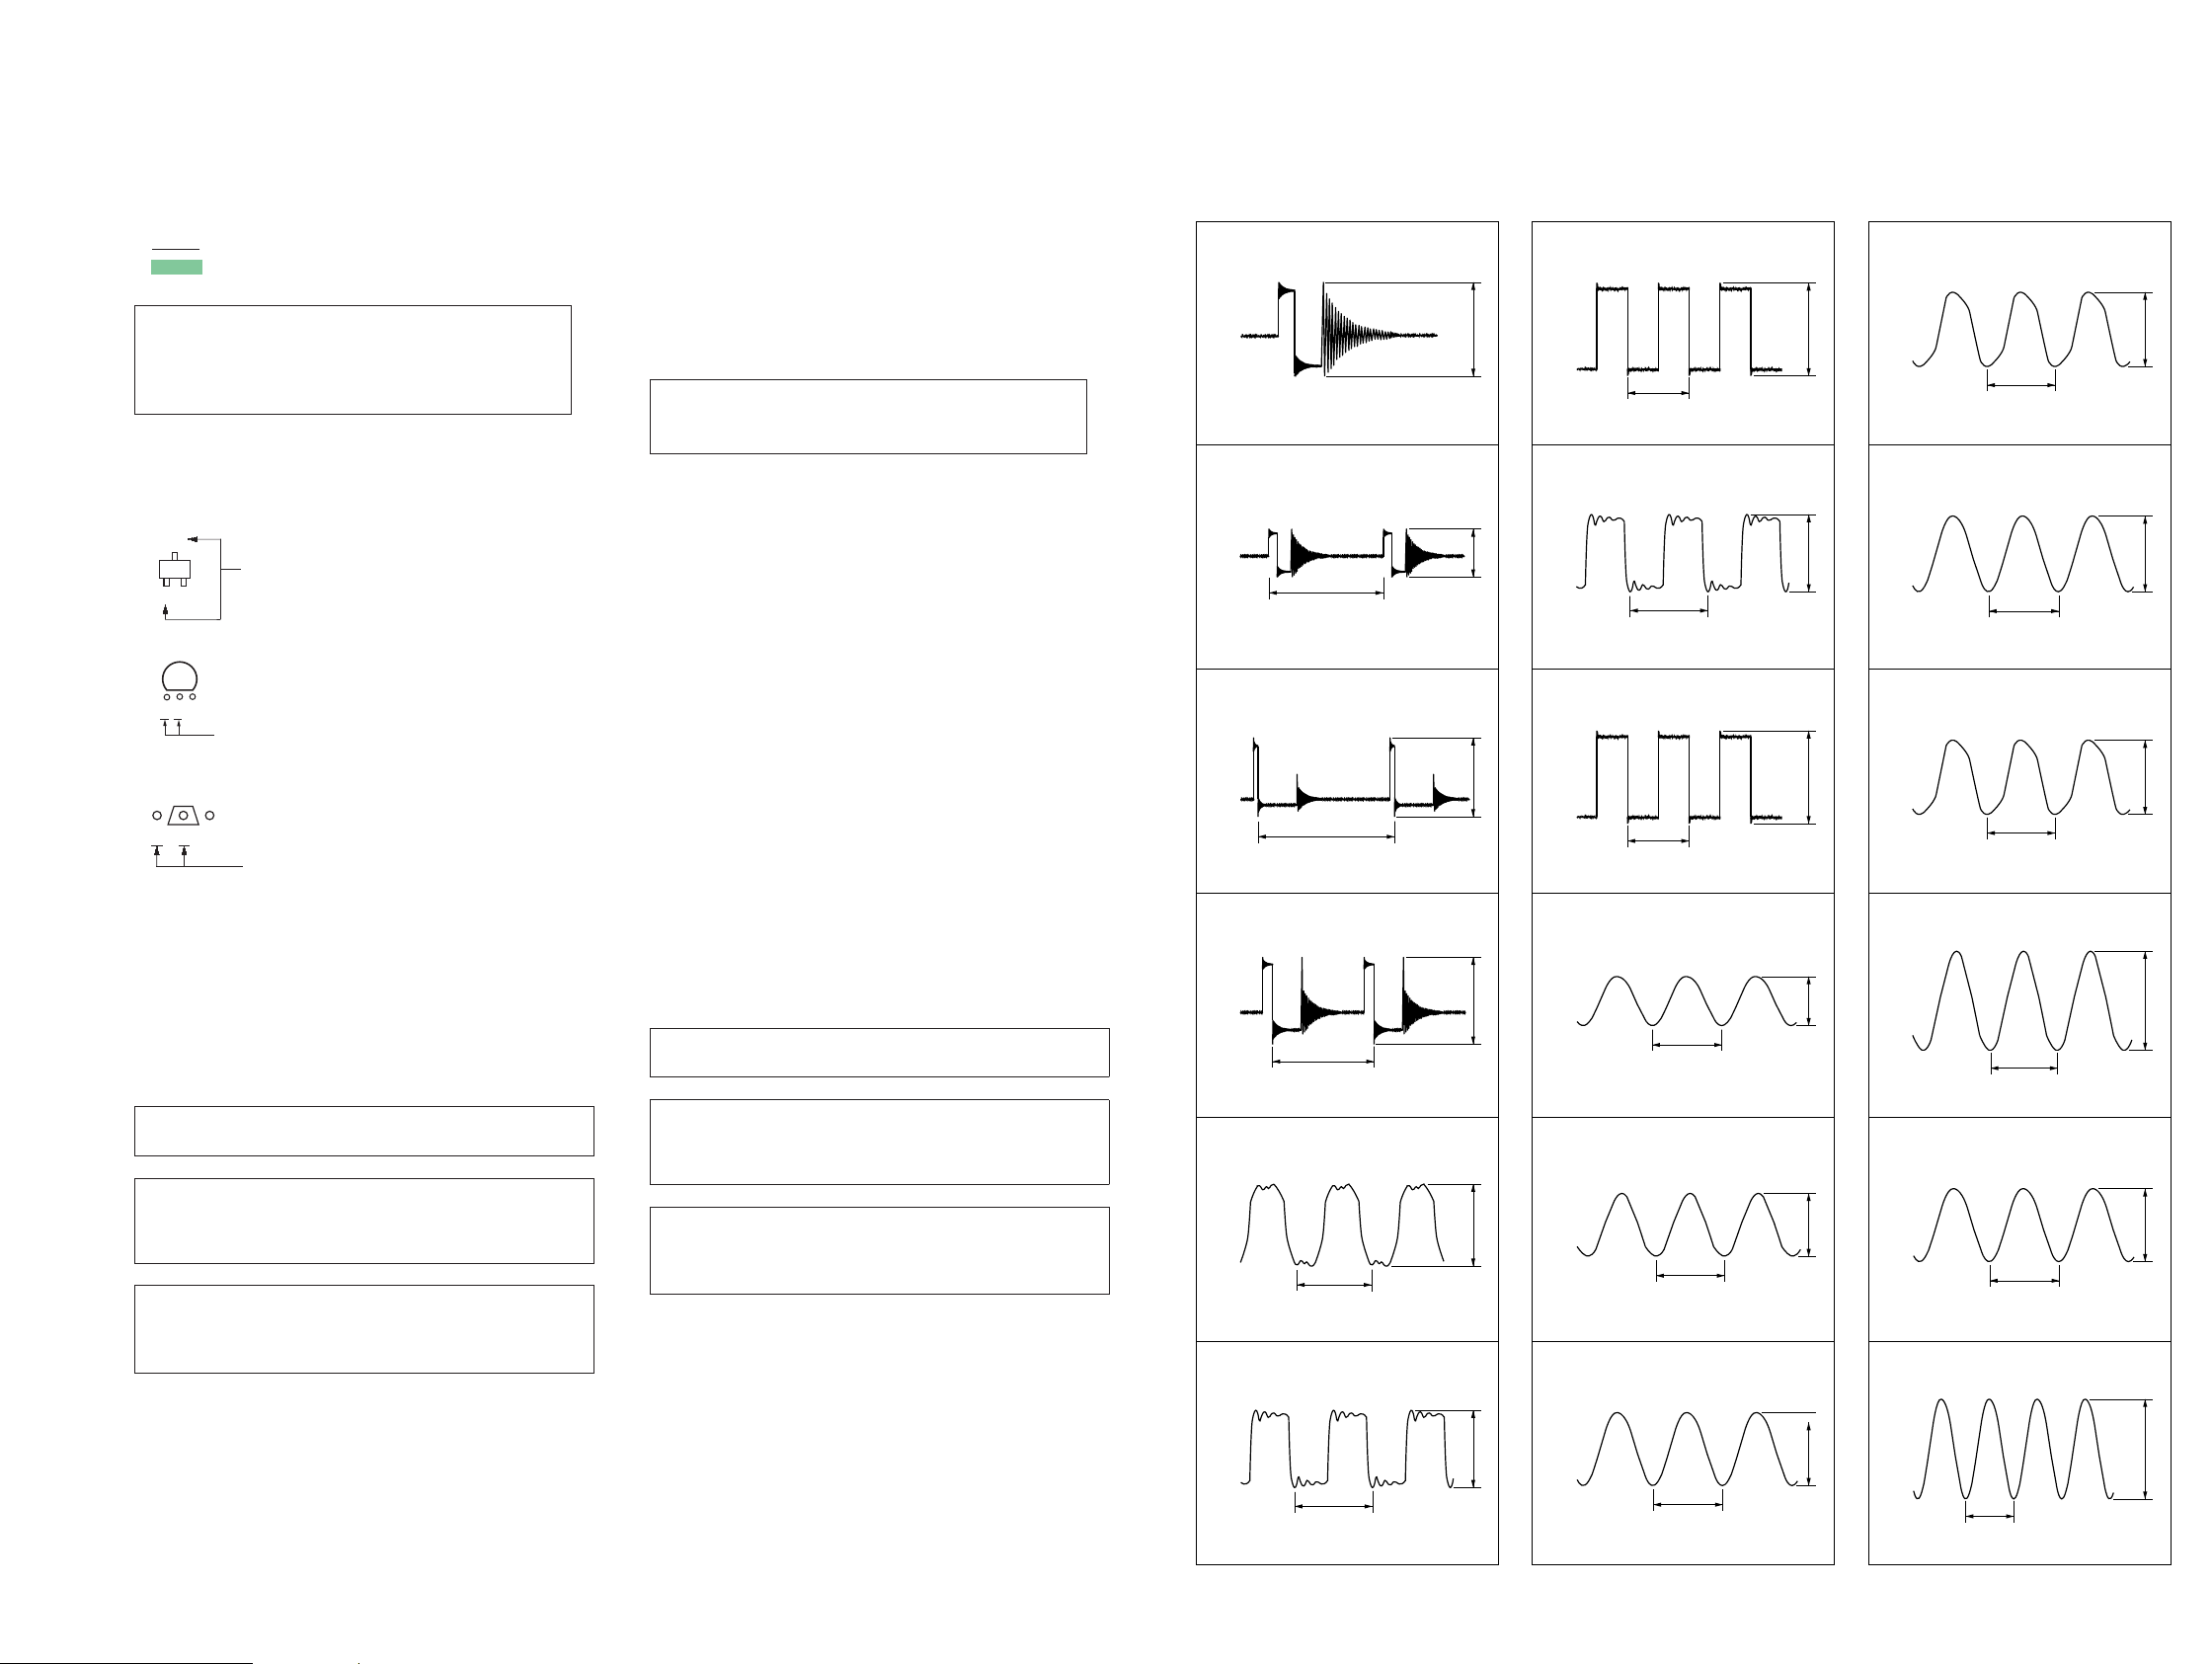
HCD-GT3D
Ver. 1.1
• Note for Printed Wiring Boards and Schematic Diagrams
Note on Printed Wiring Board:
• X : parts extracted from the component side.
• Y : Parts extracted from the conductor side.
•
(The other layer’s patterns are not indicated.)
• MOTHERBOARD board is multi-layer board.
• Indication of transistor.
• Abbreviation
AR : Argentina model
AUS : Australian model
E4 : African model
EA : Saudi Arabia model
LA9 : Latin-American model
MY : Malaysia model
RU : Russian model
TH : Thai model
: Pattern from the side which enables seeing.
Caution:
Pattern face side:
(Conductor Side)
Parts face side:
(Component Side)
However, the patterns of intermediate layers have not
been included in diagrams.
C
Q
B
E
CEB
These are omitted.
Q
B
CE
Note 1: When the MS-476 board is defective, exchange the
entire LOADING COMPLETE ASSY (T).
Note 2: When the complete DAMP board is replaced, refer to
“NOTE OF REPLACING THE IC1001 ON THE DAMP
BOARD AND THE COMPLETE DAMP BOARD” on
servicing notes (page 5).
Note 3: When the C1126, C1127, C1128, C1129, C1142,
L1010 and RY001 on the DAMP board are replaced,
spread the bond referring to “BOND FIXATION OF
ELECTRIC PARTS” on servicing notes (page 6).
Parts on the pattern face side seen
from the pattern face are indicated.
Parts on the parts face side seen from
the parts face are indicated.
These are omitted.
These are omitted.
Note on Schematic Diagram:
• All capacitors are in μF unless otherwise noted. (p: pF)
50 WV or less are not indicated except for electrolytics
and tantalums.
• All resistors are in Ω and 1/4 W or less unless otherwise
specifi ed.
• Components for right channel have same values as for
left channel. Reference numbers are coded from
• C : panel designation.
Note: The components identifi ed by mark 0 or dotted line
Replace only with part number specifi ed.
• A : B+ Line.
• Voltage and waveforms are dc with respect to ground
under no-signal (detuned) conditions.
no mark : TUNER
• Voltages are taken with a VOM (Input impedance 10 MΩ).
Voltage variations may be noted due to normal production
tolerances.
• Waveforms are taken with a oscilloscope.
Voltage variations may be noted due to normal production
tolerances.
• Circled numbers refer to waveforms.
• Signal path.
c : CD/DVD PLAY
f : TUNER
N : MIC
F : AUDIO (ANALOG)
L : AUDIO (DIGITAL)
E : VIDEO
d : USB
• Abbreviation
AR : Argentina model
AUS : Australian model
E4 : African model
EA : Saudi Arabia model
LA9 : Latin-American model
MY : Malaysia model
RU : Russian model
TH : Thai model
Note 1: When the MS-476 board is defective, exchange the
Note 2: When the complete DAMP board is replaced, refer to
Note 3: When the C1126, C1127, C1128, C1129, C1142,
with mark 0 are critical for safety.
entire LOADING COMPLETE ASSY (T).
“NOTE OF REPLACING THE IC1001 ON THE DAMP
BOARD AND THE COMPLETE DAMP BOARD” on
servicing notes (page 5).
L1010 and RY001 on the DAMP board are replaced,
spread the bond referring to “BOND FIXATION OF
ELECTRIC PARTS” on servicing notes (page 6).
• Waveforms
- MOTHERBOARD Board -
1 IC001 2 (VBST1)
15 Vp-p
5 V/DIV, 1 Ps/DIV
2 IC001 qg (VBST2)
7.4 Ps
5 V/DIV, 1 Ps/DIV
16 Vp-p
3 IC002 2 (VBST1)
5.5 Ps
5 V/DIV, 1 Ps/DIV
16 Vp-p
4 IC002 qg (VBST2)
3.8 Ps
5 V/DIV, 1 Ps/DIV
16 Vp-p
5 IC101 qf (AUDIO_CLK_OUT)
81 ns
1 V/DIV, 25 ns/DIV
3.6 Vp-p
6 IC101 wf (SSI3_BCKO)
7 IC101 wh (SSI3_LRCKO)
23 Ps
1 V/DIV, 10 Ps/DIV
3.7 Vp-p
8 IC101 wl (SSI0_BCKO)
325 ns
1 V/DIV, 100 ns/DIV
3.56 Vp-p
9 IC101 e; (SSI0_LRCKO)
21 Ps
1 V/DIV, 10 Ps/DIV
3.5 Vp-p
q; IC101 yj (RTC-X1)
30 Ps
500 mV/DIV, 10 Ps/DIV
qa IC101 yk (RTC-X2)
30 Ps
500 mV/DIV, 10 Ps/DIV
1.6 Vp-p
qs IC101 u; (EXTAL)
1 Vp-p
qd IC101 ua (XTAL)
75 ns
1 V/DIV, 25 ns/DIV
qf IC101 oa (AUDIO-X1)
81 ns
500 mV/DIV, 25 ns/DIV
qg IC101 os (AUDIO-X2)
81 ns
1 V/DIV, 25 ns/DIV
qh IC101 <zc. (USB-X1)
21 ns
200 mV/DIV, 10 ns/DIV
qj IC101 <zv/ (USB-X2)
21 ns
200 mV/DIV, 10 ns/DIV
qk IC301 7 (XTALI)
3.4 Vp-p
1.7 Vp-p
3.4 Vp-p
630 mVp-p
480 mVp-p
HCD-GT3D
1 V/DIV, 100 ns/DIV
3737
355 ns
3.6 Vp-p
500 mV/DIV, 25 ns/DIV
75 ns
1.7 Vp-p
200 mV/DIV, 25 ns/DIV
37.5 ns
640 mVp-p
Page 38
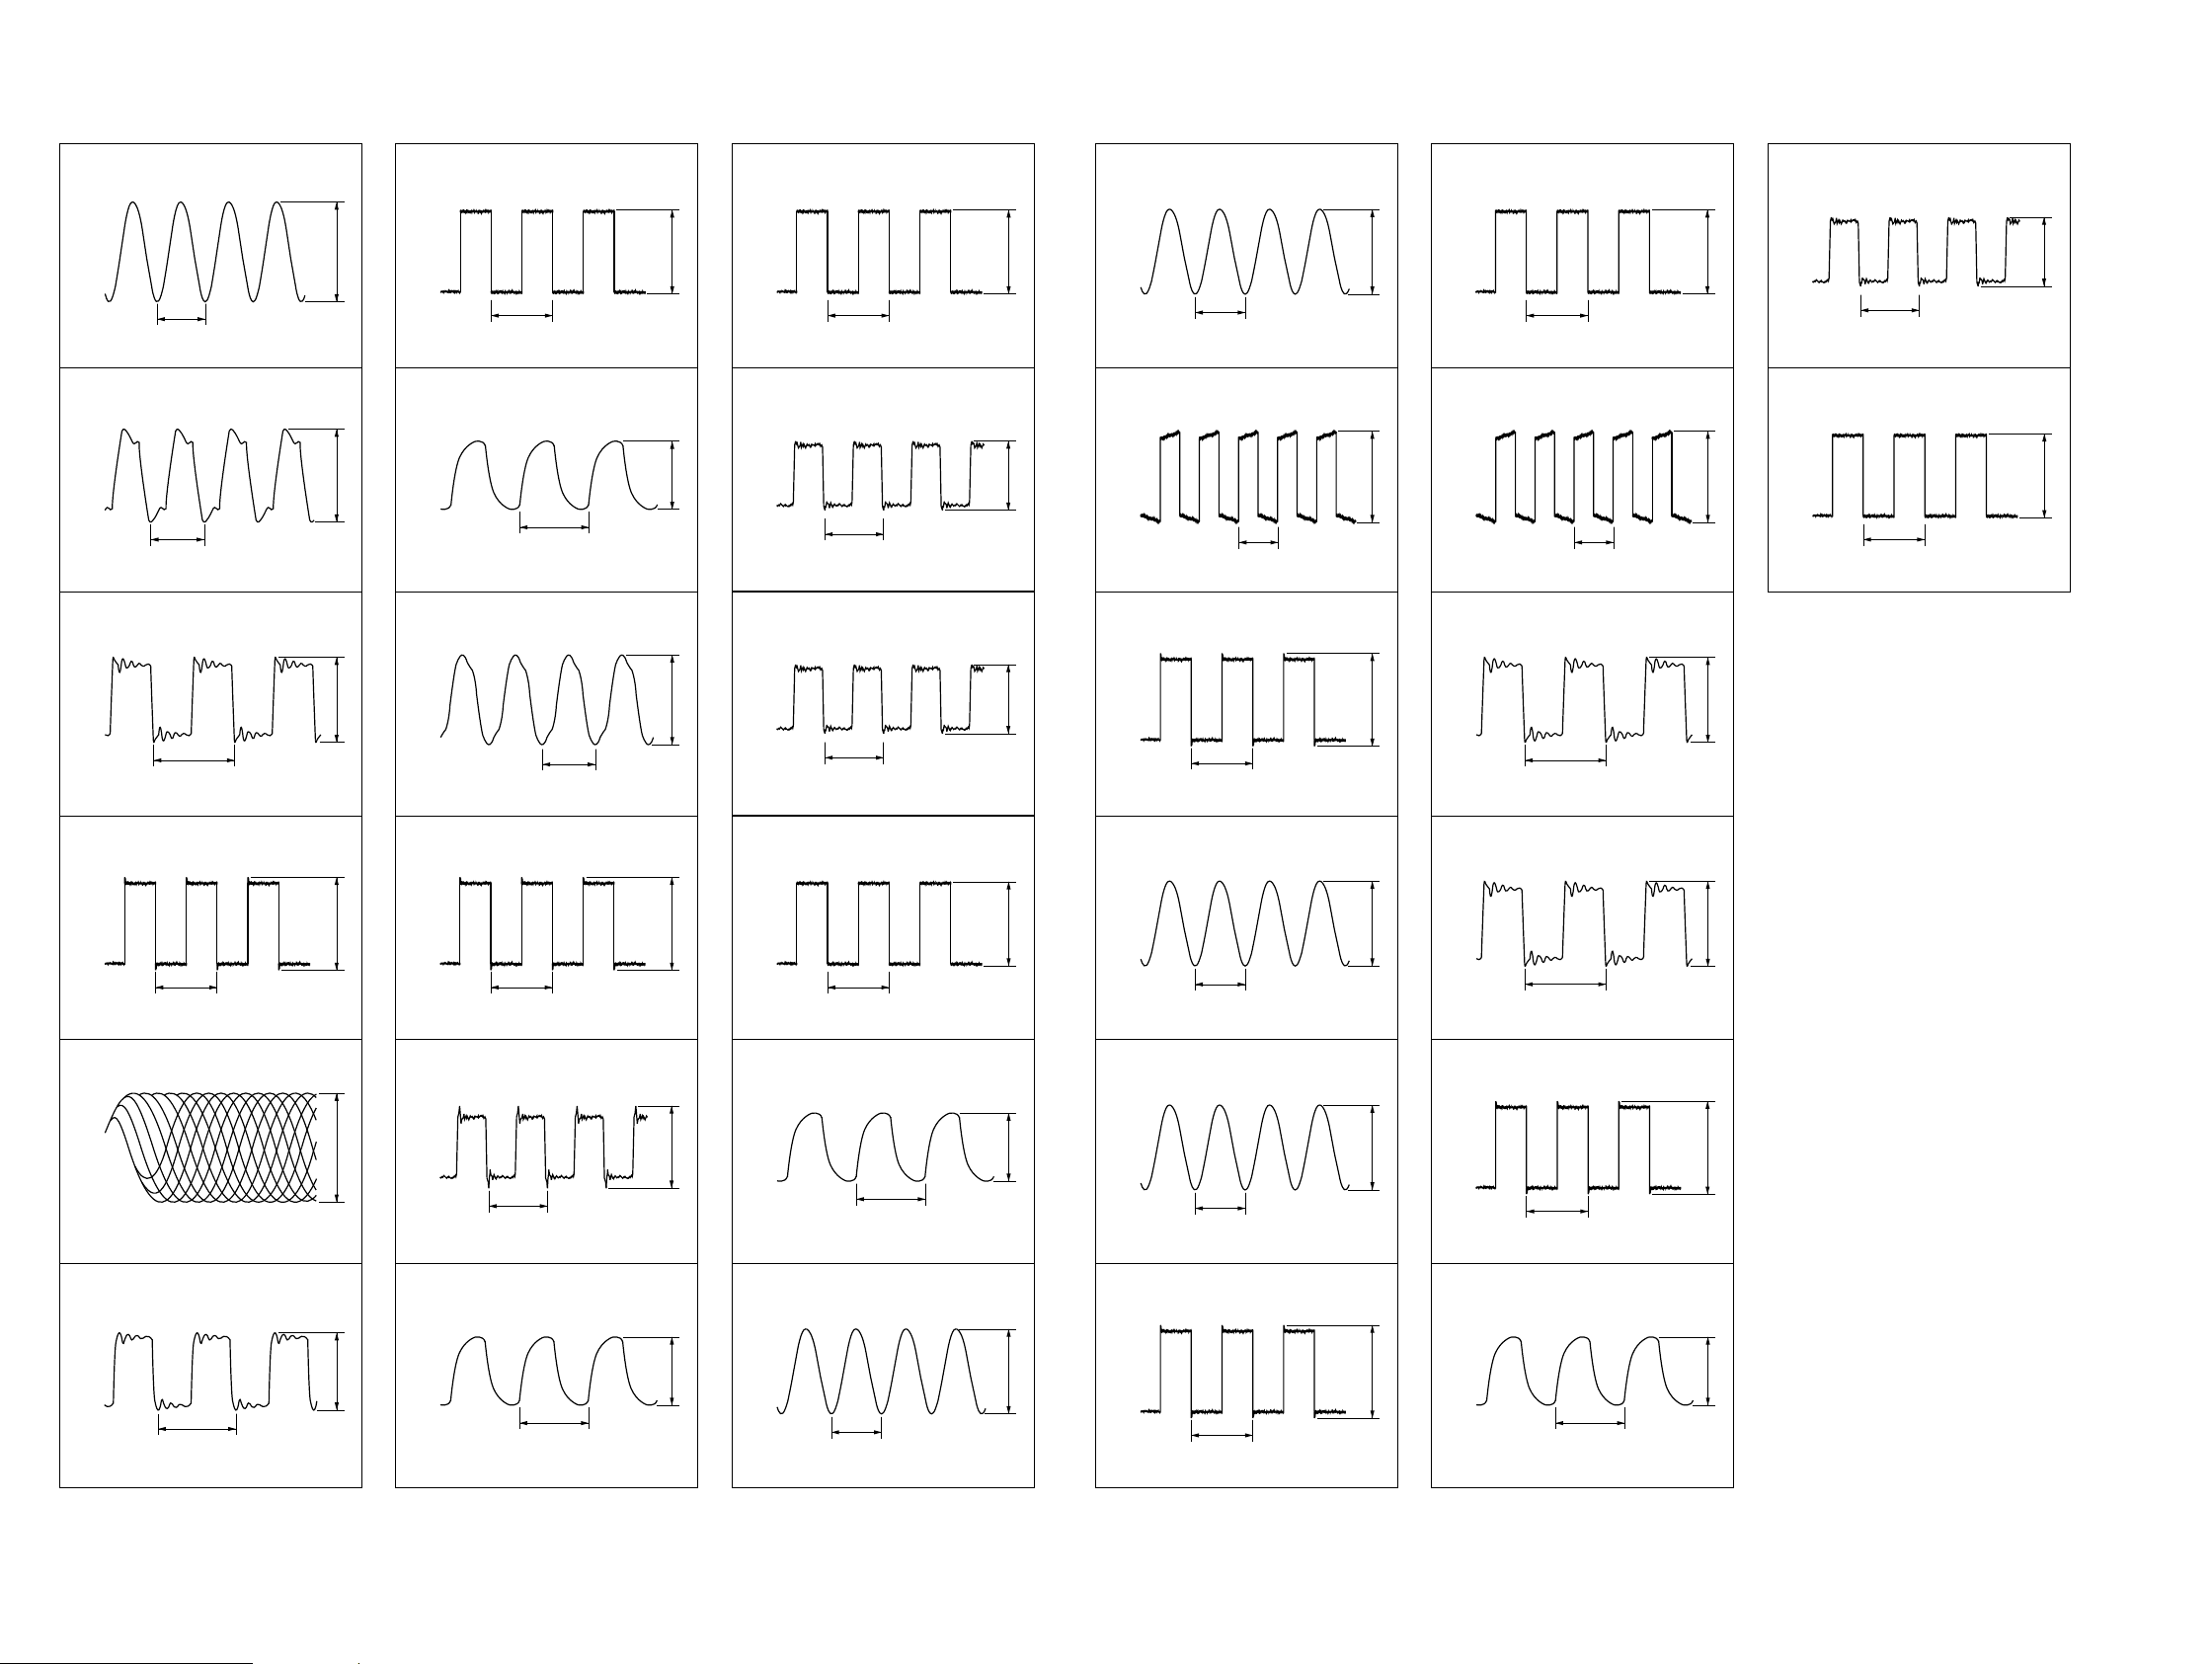
HCD-GT3D
ql IC301 8 (XTALO)
37.5 ns
200 mV/DIV, 25 ns/DIV
w; IC301 <zzx (ACLK)
60 ns
1 V/DIV, 25 ns/DIV
wa IC301 <zzc (ABCK)
740 mVp-p
4 Vp-p
wg IC604 3 (LRCK)
22 Ps
1 V/DIV, 10 Ps/DIV
wh IC604 qh (SCK)
81 ns
1 V/DIV, 25 ns/DIV
wj IC606 6 (SCKI)
3.4 Vp-p
3.3 Vp-p
ea IC609 7 (LRCK)
22 Ps
1 V/DIV, 10 Ps/DIV
es IC609 8 (BCK)
350 ns
2 V/DIV, 250 ns/DIV
ed IC615 1 (BCK)
3.4 Vp-p
3.8 Vp-p
ej IC902 qj (X2)
85 ns
100 mV/DIV, 50 ns/DIV
ek IC904 qk (LRCK)
375 Ps
1 V/DIV, 250 Ps/DIV
el IC904 ql (BCK)
290 mVp-p
3.4 Vp-p
rd IC912 0 (3B)
22 Ps
1 V/DIV, 10 Ps/DIV
rf IC912 qa (3A)
1 V/DIV, 250 Ps/DIV
rg IC912 qs (4Y)
375 Ps
3.4 Vp-p
3.4 Vp-p
rl IC914 qd (BCK)
3.8 Vp-p
350 ns
2 V/DIV, 250 ns/DIV
t; IC914 qg (LRCK)
3.4 Vp-p
22 Ps
1 V/DIV, 10 Ps/DIV
359 ns
1 V/DIV, 100 ns/DIV
ws IC301 <zzm (ALRCK)
22 Ps
1 V/DIV, 10 Ps/DIV
wd IC301 <zxc (RFIP)
200 mV/DIV, 500 ns/DIV
wf IC604 1 (BCK)
3.8 Vp-p
3.4 Vp-p
1 Vp-p
60 ns
2 V/DIV, 50 ns/DIV
wk IC606 7 (LRCK)
22 Ps
1 V/DIV, 10 Ps/DIV
wl IC606 8 (BCK)
350 ns
2 V/DIV, 250 ns/DIV
e; IC609 6 (SCKI)
4 Vp-p
3.4 Vp-p
3.9 Vp-p
350 ns
2 V/DIV, 250 ns/DIV
ef IC615 3 (LRCK)
22 Ps
1 V/DIV, 10 Ps/DIV
eg IC615 qh (SCK)
81 ns
2 V/DIV, 250 ns/DIV
eh IC902 qh (X1)
3.8 Vp-p
3.4 Vp-p
3.4 Vp-p
5.75 Ps
1 V/DIV, 2.5 Ps/DIV
r; IC904 el (XTI)
40 ns
500 mV/DIV, 25 ns/DIV
ra IC904 r; (XTO)
40 ns
1 V/DIV, 25 ns/DIV
rs IC912 9 (3Y)
3.4 Vp-p
1.75 Vp-p
3 Vp-p
359 ns
1 V/DIV, 100 ns/DIV
rh IC912 qd (4B)
359 ns
1 V/DIV, 100 ns/DIV
rj IC912 qf (4A)
5.75 Ps
1 V/DIV, 2.5 Ps/DIV
rk IC914 qs (SCK)
3.8 Vp-p
3.8 Vp-p
3.4 Vp-p
1 V/DIV, 100 ns/DIV
HCD-GT3D
320 ns
3.5 Vp-p
2 V/DIV, 50 ns/DIV
81 ns
3.4 Vp-p
85 ns
50 mV/DIV, 50 ns/DIV
140 mVp-p
1 V/DIV, 10 Ps/DIV
3838
22 Ps
3.4 Vp-p
2 V/DIV, 50 ns/DIV
81 ns
3.4 Vp-p
Page 39
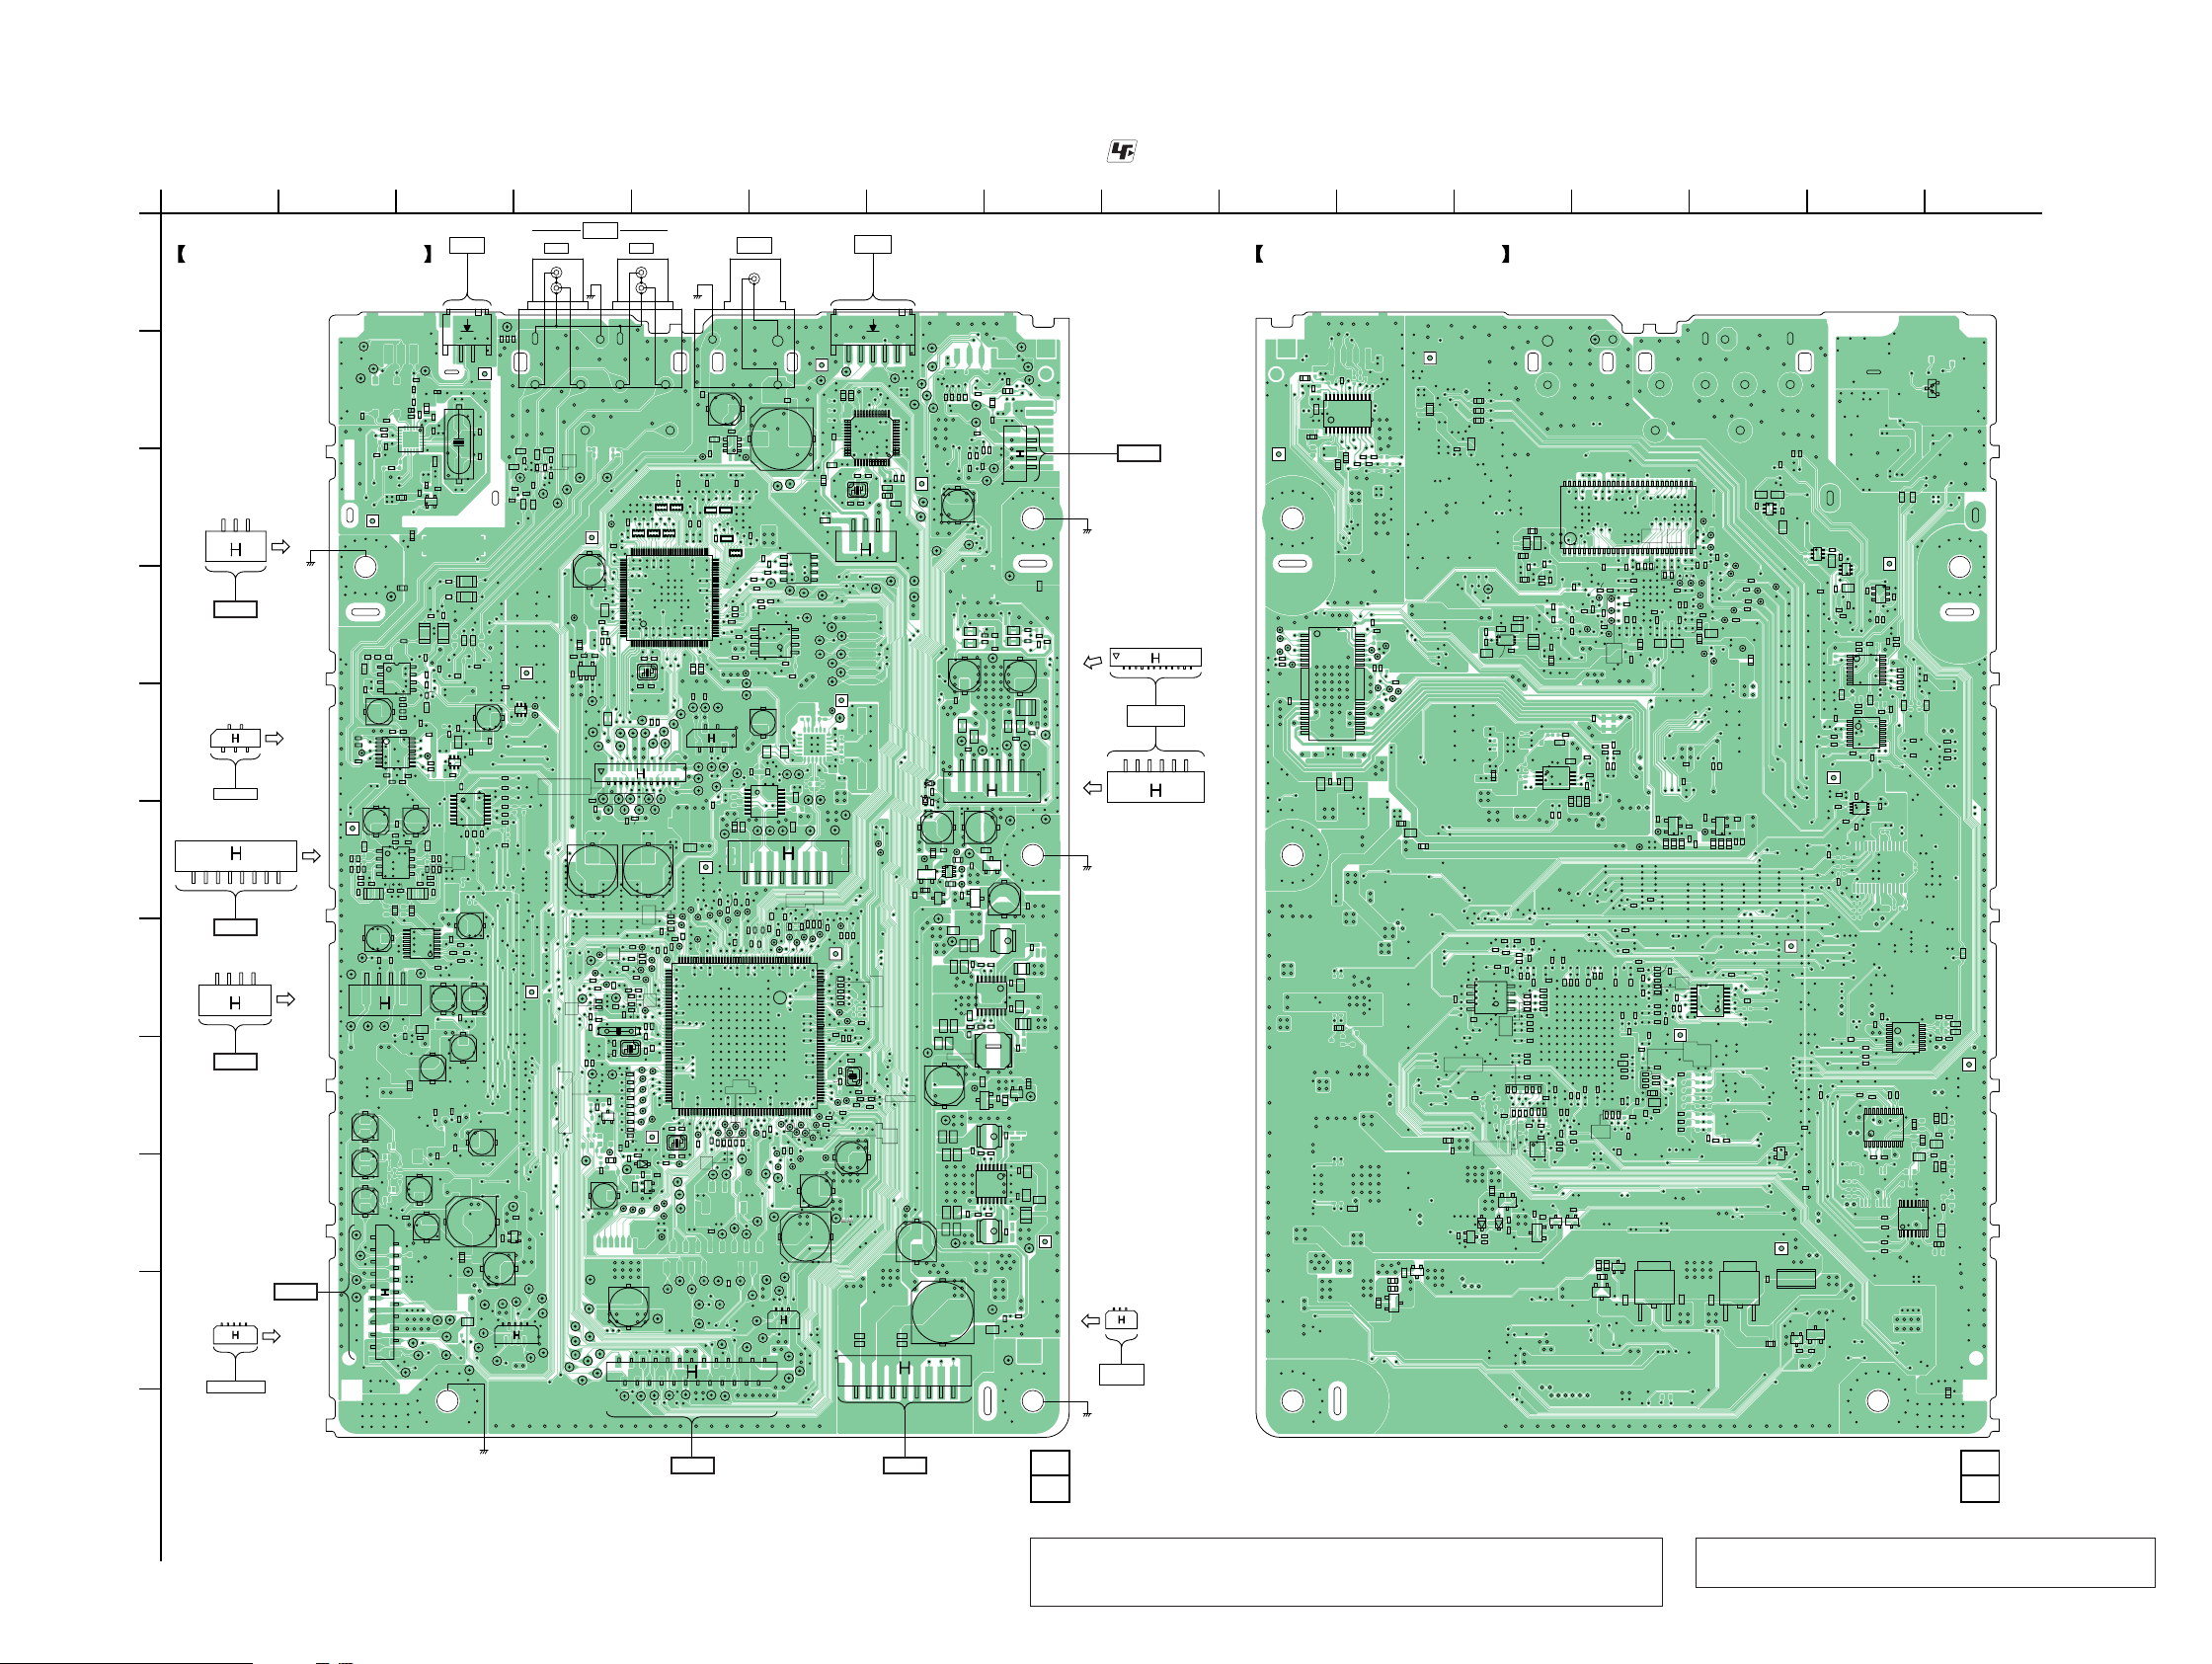
6-5. PRINTED WIRING BOARD - MOTHERBOARD Board - • See page 32 for Circuit Boards Location. • : Uses unleaded solder.
HCD-GT3D
Ver. 1.1
1
MOTHERBOARD BOARD
A
(COMPONENT SIDE)
B
C
31
CN602
(CHASSIS)
>001P
D
E
F
G
H
I
J
K
OPTICAL BOARD
CN3300
(Page 55)
CN303
1245
MS-476 BOARD
CN451
18
>002P
MIC BOARD
CN3201
(Page 56)
14
CN601
>003P
MIC BOARD
CN3200
(Page 56)
>004P
DAMP BOARD
CN1001
10
BLUETOOTH MODULE
(Page 50)
CN102
129
2 3 4 5 6 7 8 9 10 11 12 13 14 15 16
AUDIO
ANTENNA
FM
JL635
46
31
JL242
C626
C627
C653
C655
Q611
IC912
R652
C622
R630
C672
C998
C726
JL617
R142
JL053
C661
R658
R801
R802
R948
12
X600
C637
C664
16
R701
C691
C696
JL113
JL108
(CHASSIS)
C980
C1001
C1002
C935
C647
C937
C657
JL604
R686
R911
R913
C656
Q604
C645
C649
R702
R838
R835
R836
R837
R839
R840
R981
JL067
C101
32
C100
IC008
41
C072
JL106
JL107
JL114
10
CN102
JL109
JL639
JL640
JL630
L604
C931
R995
R996
R940
R939
C936
R944
R943
R859
JL057
R642
R644
R915
1
C766
IC601
45
R616
C605
C607
R634
R611
R612
JL601
IC602
R613
8
R602
R610
C614
R626
C613
R622
C610
1
R617
C608
R619
IC603
45
R618
R609
C604
C603
C624
C630
R614
C632
R620
R643
C609
JL612
R711
JL618
CN601
JL613
JL614
JL615
C690
C704
C749
JL240
1
2
JL239
JL241
JL259
CN119
18
19
JL638
R937
L603
C930
C932
15
6
20
IC902
16
10
11 15
C943
R857
R036
R750
R606
C620
8
R916
R649
R607
R615
C767
R608
C616
R646
R633
1691
JL602
R639
R647
R635
C618
C615
8
R640
C633
C619
R629
IC604
98
16 1
R716
JL616
14
C679
C678
R718
R733
C748
C744
C742
JL251
JL264
JL265
L602
R938
C933
C934
C938
L605
C941
34
IC903
21
R621
R600
R636
C625
C634
R638
C635
R655
R656
R820
C986
R978
JL247 JL248
JL249
JL252
CN2002
R752
R753
R751
C621
R693
R694
R677
R982
1
89
R654
C617
R631
R632
C1000
C695
C995
C994
C699
R794
L R
IN
OUT
C650
C652
R671
R914
R669
R662
JL620
R912
JL605
JL619
C631
C602
CL335
C353
13
JL609
JL611
64
JL302
JL306
JL269
R125
R123
R153
R154
R155
R156
R177
R178
R179
R180
JL068
JL105
JL115
129
JL141
JL112
JL145
JL104
JL291
R685
JL634
R371
C356
JL341
JL301
JL310
C366
JL632
R172
JL150
JL140
JL287
PARTY CHAIN
(CHASSIS)
C337
R372
5
1
JL303
JL314
JL293
R132
R127
JL007
JL045
JL139
C350
4
3
R500
R133
X101
R137
JL146
JL284
JL231
J602
C355
IC305
C420
JL288
JL285
C104
C103
JL606
C364
JL339
RB303
R368
C341
C334
128 33
R349
R351
R334
C322
SL301
JL305
JL309
JL311
JL307
1
2
JL308
JL304
R471
C367
JL163
R163
R197
R255
R168
JL161
R169
R170
R576
R103
JL164
JL149
C109
R102
C106
C102
C126
C127
X102
R176
JL160
JL244
JL158
R115
R117
BE
Q107
JL167
R104
C110
JL280
R126
R099
JL148
C105
JL176
JL175
C057
25
24
JL286
JL313
CN302
JL312
R579
R580
R150
R173
R120
R116
C279
R160
R128
32
41
JL173
JL174
JL232
IN
OUT
RB304
RB305
R332
C323
R301
C423
JL268
R185
R186
JL255
JL165
JL256
D102
R122
IC103
JL047
(CHASSIS)
R381
RB301
RB302
IC301
X301
JL318
R389
JL321
JL317
JL319
JL315
23
24
JL320
JL316
R386
JL182
JL282
R299
C295
R164
R181
JL292
R201
44
JL210
45
JL162
JL297
C278
R188
JL159
88
89
JL168
R200
R196
X103
C130
JL178
R203
C107
JL197
JL172
JL171
JL170
JL198
JL196
JL046
CN118
JL230
JL147
>005P
SPLITTER BOARD
CN3400
(Page 58)
JL905
R380
C132
VIDEO
OUT
J907
R935
C928
1346
JL904
JL111
JL110
C358
RB307
RB308
C363
R364
RB309
R366
R363
R321
R356
JL338
R350
R388
JL337
R347
R355
R354
IC302
54
R352
R342
R340
81
R327
CL308
R331
JL330
JL331
C462
R466
R467
JL325
JL452
R470
R472
JL454
141
JL455
IC453
7
8
FB455
JL461
C467
JL460
JL462
CN451
18
R295
R219
R218
R215
R232
JL190
JL189
R274
R229
R224
JL187
R230
R582
C139
JL222
JL193
R273
R221
R226
JL298
R335
C310
JL323
JL322
JL281
R193
C906
JL329
1245
JL183
JL179
C905
C1003
C904
IC901
R905
C357
RB306
R379
R369
6596
6497
321
R337
C309
JL326
JL328
CN303
JL327
JL324
R480
JL463
JL185
IC101
JL166
JL188
JL191
JL186
JL207
JL184
JL283
R212
R171
R217
R100
JL131
JL199
JL201
C167
JL202
JL215
JL216
JL200
JL026
JL136
JL137
JL144
JL142
R236
R238
R574
R233
JL227
JL116
R214
R220
JL134
JL228
JL004
JL169
JL270
JL132
JL194
JL135
JL203
JL204
JL152
JL005
JL235
JL205
JL153
C284
6
JL155
CN105
JL133
JL154
JL129
1
2
JL130
JL138
IC304
JL451
R198
JL294
JL278
125
JL631
JL336
JL355
JL354
JL348
JL458
C468
C464
JL459
R581
JL209
132
JL272
R241
JL224
JL225
C577
JL143
FOR
SERVICE USE
CN101
JL515
15
JL516
JL195
CN602
X104
C152
IC904
R953
C010
C011
13
48
C953
R955
JL332
JL333
JL295
R111
R293
R110
R292
R291
R279
JL208
SMPS BOARD
12
1
C954
JL296
R276
JL271
C092
C091
>006P
(Page 50)
JL519
JL520
JL217
JL521
C956
C957
JL637
JL636
JL206
JL906
JL351
D402
C406
D401
C073
R048
C071
JL032
Q007
BE
Q457
E
R040
R039
B
Q006
JL059
JL001
JC004
JL003
FB117
JL041
JL273
JC007
JL048
C088
CN001
JL103
R959
R957
24
25
C945
36
37
C958
R954
R949
X602
C951
C952
C944
31
485
1
JL334
JL350
JL349
JL347
JL346
JL353
JL352
JL470
JL464
JL457
JL469
JL456
R257
R261
R254
JL603
R270
R265
R271
R272
JL212
JL211
1
176
JL299
JL300
R590
R285
C297
C298
C151
R275
R269
JL214
JL213
133
R280
R174
R278
JL276
R189
JL275
JL274
C149
JL289
C150
JL151
19
R504
R567
R264
R260
JL523
R506
R507
R503
JL525
C541
C526
R515
R511
R510
R514
JL528
C528
C527
JL529
C532
JL290
R415
C411
SL402
C413
SL401
R418
JL404
C412
C408
SL405
C419
JL401
SL406
JL402
C418
CN401
C405
C066
JL023
C064
JL022
R030
136
B
E
R028
JL021
Q459
4
JL024
R034
B
E
R037
Q005
R538
L001
JC001
JC002
C080
R002
C005
C003
R059
8
IC001
C035
R031
C049
C052
R023
L006
JC003
C081
R024
JL049
C083
C084
E
B
R061
Q008
L007
JC008
C077
R043
R041
C050
C053
8
IC002
C004
C006
C078
R003
R006
L002
JC005
JC006
JL040
JL006
C024
R086
1-894-133-
JL514
C530
CN517
JL056
SL403
R401
SL404
C401
SL407
JL405
16
JL050
C067
L003
1
C019
C013
169
C030
C040
C079
EB
Q009
R062
C034
C039
1
C014
169
L004
C018
JL008
TH571
JL054
JL518
JL522
14
C076
R402
C402
C403
R408
R404
R409
SL408
JL403
R410
JL406
JL055
C065
C017
L008
R063
JL044
C032
R087
C021
R489
11
(11)
(CHASSIS)
(CHASSIS)
(CHASSIS)
SPK_HLED
1
2
6
CN105
NFC MODULE
(RC-S730 (WW)
>007P
BOARD
CN4000
(Page 56)
SERVICE,
OPTICAL DEVICE(7G)
CN401
125
MOTHERBOARD BOARD
(CONDUCTOR SIDE)
JL907
R543
R566
R534
1324
IC502
C511
112
R541
CL401
CL402
23
CN302
24
16
CL403
CL404
R406
R407
CL405
C404
R564
R552
R569
R555
R549
R542
C407
IC401
R411
28
CL408
CL412
CL409
22
R496
C409
R463
CL411
3029
CL407
CL406
21
CL410
1514
R051
C074
C075
R054
R433
C036
R066
R065
B
R064
E
Q011
1
7
8
R052
R020
R952
R951
R950
FL601
C960
C950
54
FB320
C362
FL301
FB321
R377
R376
C354
R373
JL335
C315
R302
136
R303
C321
IC303
R053
R251
R183
54
R575
IC106
81
C164
R253
R195
R250
R192
R167
R572
R114
R105
R248
R252
C161
R113
D571
D572
Q571
B
R571
C573
E
Q012
EB
C087
R479
R478
R267
R242
R289
R290
R288
R297
R246
Q572
EB
R374
C349
R346
C369
R343
C372
4
C373
L301
C465
1
IC452
R585
R263
R119
R237
C299
R587
R284
C146
C153
R259
C148
R112
R256
R294
R286
R287
C154
C155
C156
C157
C158
C159
C160
C144
C147
R245
R243
C165
8
1
R244
C162
4
5
C166
IC105
R483
R491
R485
B
S
Q575
G
R487
Q574
IC306
1
C365
C360
R359
R319
C344
R361
C342
CL315
R362
R357
R387
R348
R345
C326
C336
R344
CL311
CL309
CL322
C324
CL317
CL313
R329
C311
R559
R316
R317
R465
C463
C307 C308
R312
R313
R464
584
R577
C466
R583
R498
R586
R213
R210
FB115
C143
R283
C168
R216
C137
C133
C135
C140
C141
C142
R139
C118
C117
C280
C282
C138
C136
R223
R225
C134
R298
R161
E
Q576
R166
C574
EB
R194
R282
R227
R202
R204
R206
R228
R191
R033
R035
R029
Q461
BBEE
C051
Q004
28
C660
CL338
C348
R382
R330
C325
R378
C319
R339
C424
CL415
CL413
R211
FB116
R247
R300
R107
R589
C112
R143
C114
C115
R140
R175
C116
C128
C131
C129
R190
R106
IC004
13 13
CL337
C359
C346
C347
27
CL336
R370
C352
CL330
C345
CL333
CL334
C343
CL319
C340
C330
C331
C316
C303
B
R429
E
R427
R428
R430
C296
R268
R588
C111
R222
R129
R134
C113
C281
C121
C123
R149
R146
R145
R144
R367
CL329
CL332
R360
R365
CL331
CL318
C339
CL314
C338
R358
C328
R328
CL307
R326
CL312
CL310
C302
R310
R318
Q401Q402
R424
B
C421
E
CL414
R432
R421
R422
R431
R423
R425
R426
R234
IC102
8
7
14 1
R135
C120
C122
FB101
R159
R157R158
IC006
C085
C062
C641
R663
C643
C665
16
R689
R651
34
Q605
C917
Q607
R692
136
R700
4
4
Q603
136
C629
CL321
CL316
CL320
R390
R322
R131
C922
B
E
Q606
C993
C068
Q104
BE
BE
R792
Q602
C628
C966
R650
R628
R756
R653
R641
R624
R625
R659
R666
R665
1
16
IC605
9
8
C640
C648
R661
C642
R674
1
14
C646
R688
IC606
78
R691
R690
R687
C977
R963
R964
1
C989
485
IC913
R965
R966
R980
R791
C673
C674
R720
R723
R719
R722
R761
R762
R909
IC914
1
C997
C996
R819
R795
R796
R797
R085
Q103
R108R109
1-894-133-
C638
1
R627
364
C651
R696
R684
R682
R681
R698
R697
C644
C612
R645
R648
IC609
1
78
R760
R817
1120
R747
10
C982
IC615
1168
D600
C658
C606
C601
R603
R604
R605
C662
R709
C669
C667
14
C666
R708
C670
R830
C689
R829
R763
C983
R826
C692
R827
9
R831
C984
R793
R080
11
(11)
HCD-GT3D
Note 1: IC001, IC002, IC101, IC105, IC106, IC301, IC302 and IC303 on the
MOTHERBOARD board cannot exchange with single. When these parts on the
MOTHERBOARD board are damaged, exchange the entire mounted board.
3939
Note 2: When the MS-476 board is defective, exchange the
entire LOADING COMPLETE ASSY (T).
Page 40
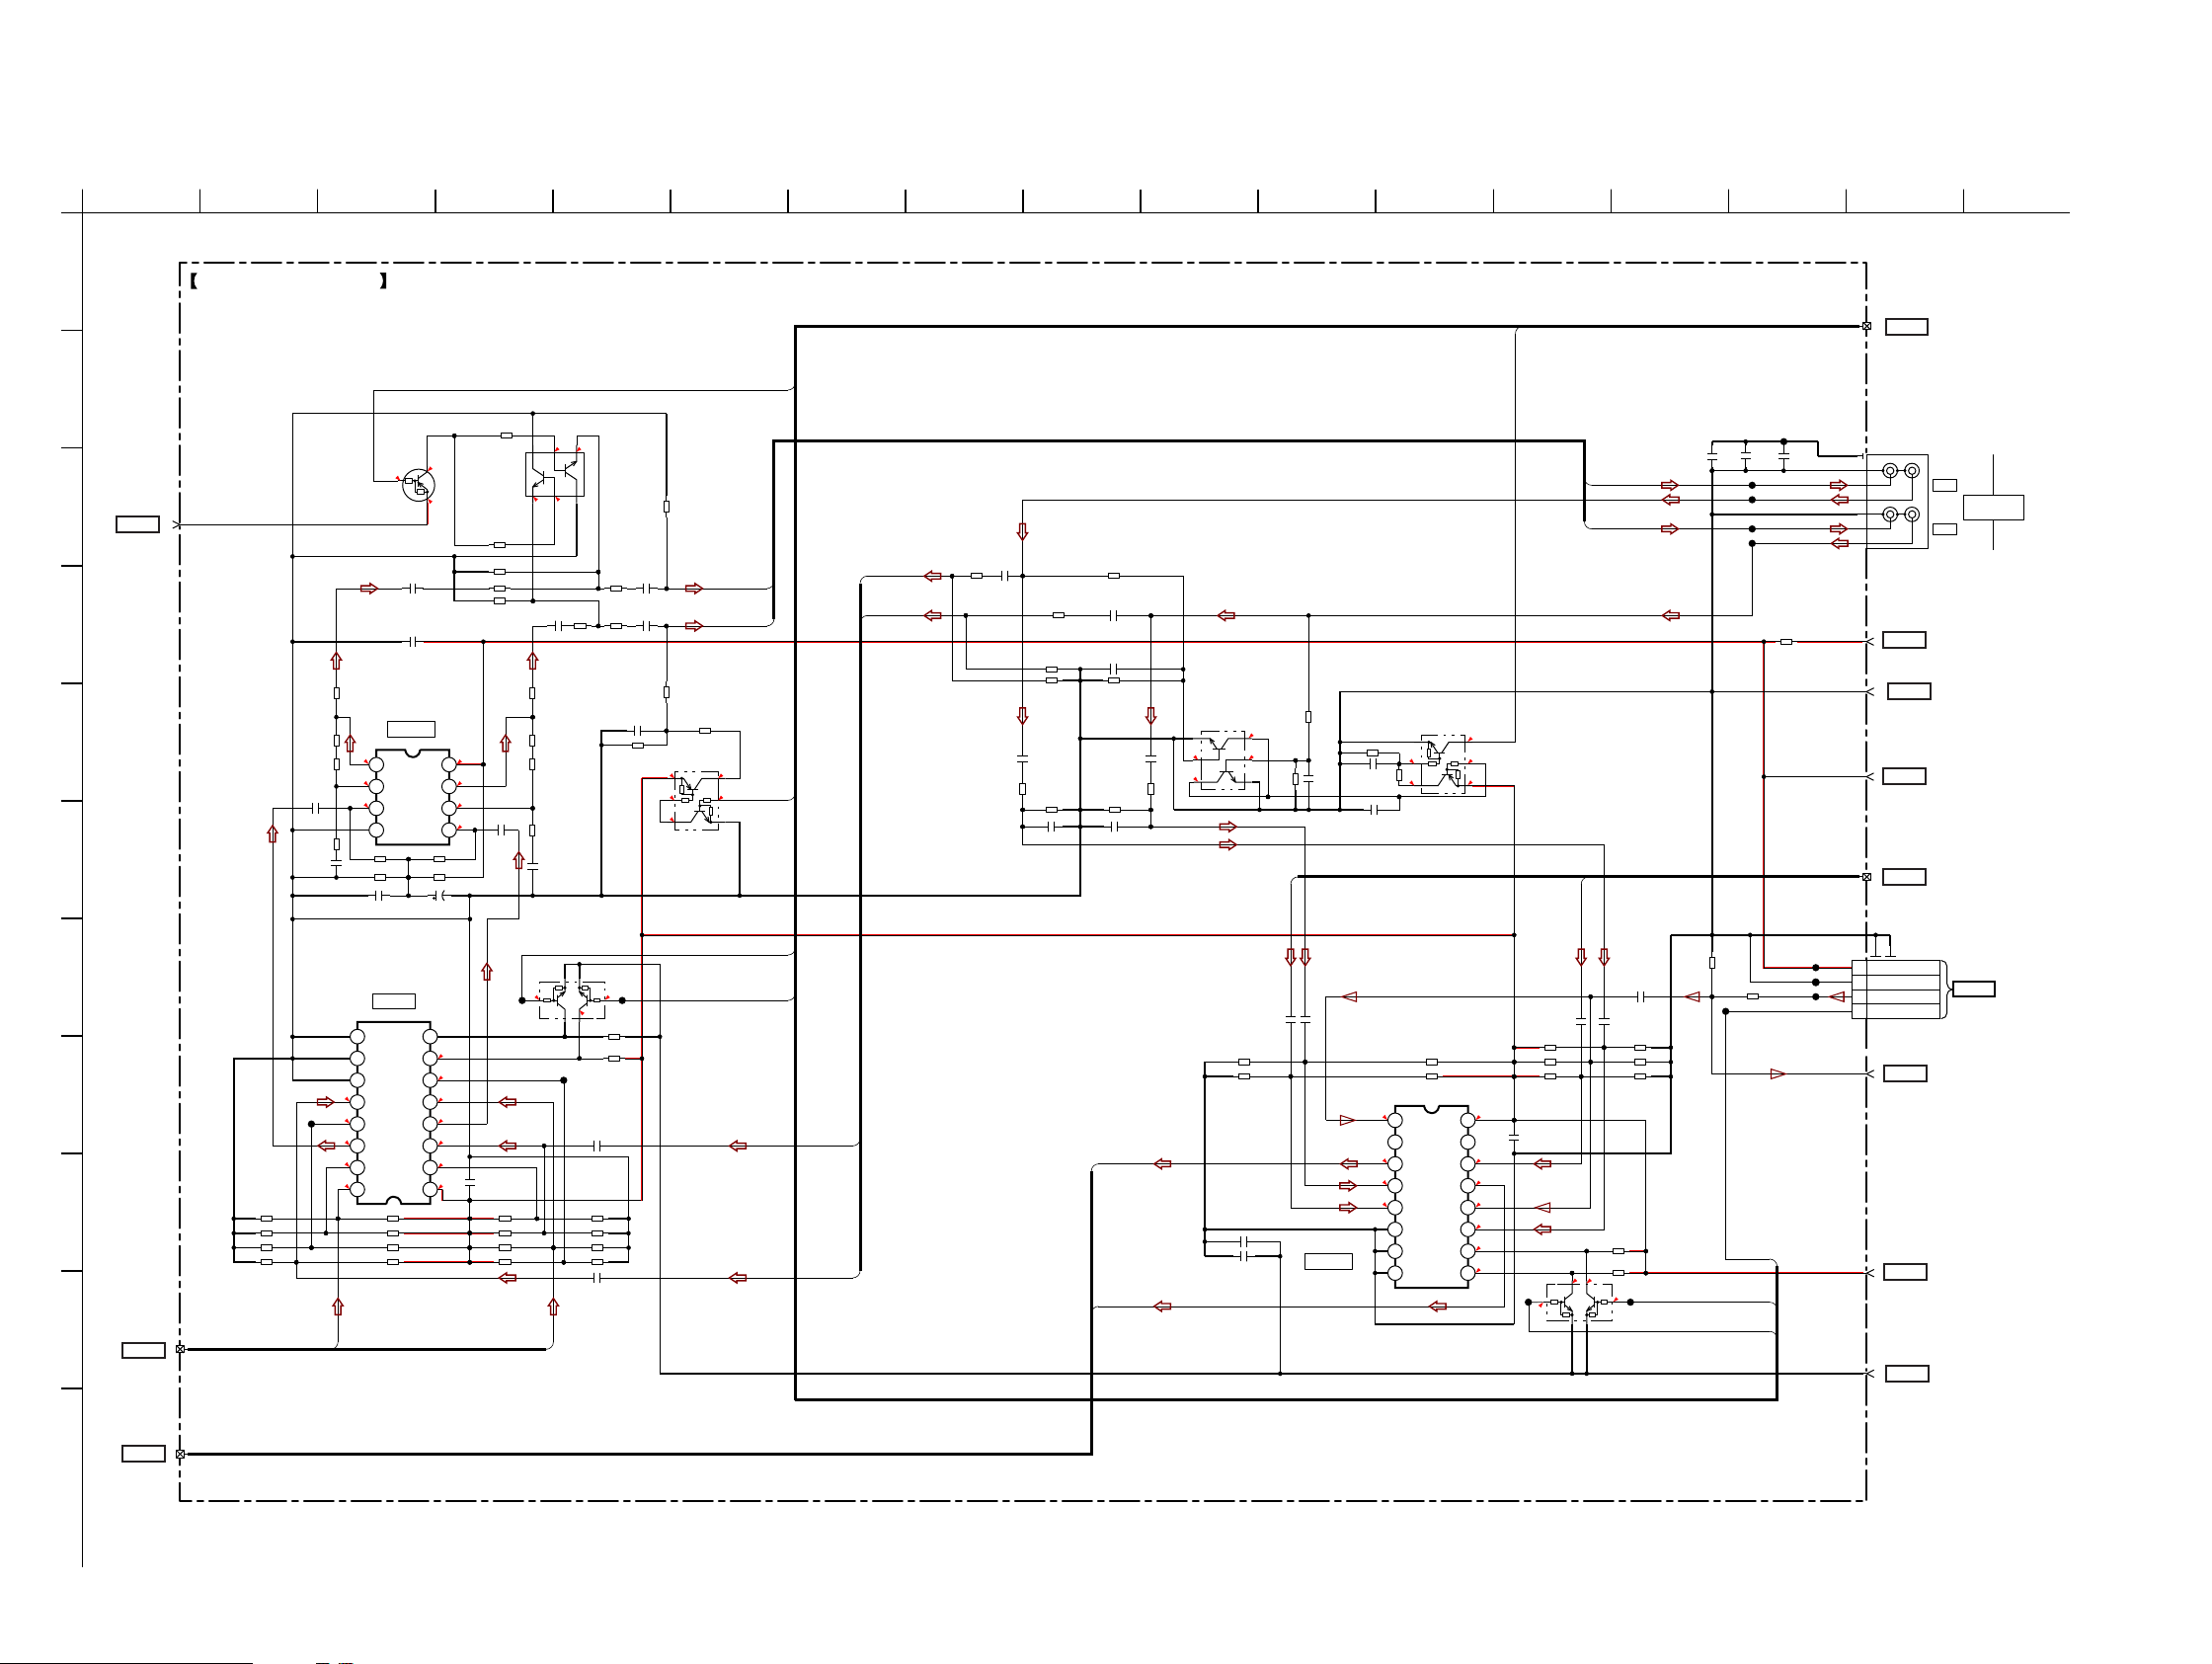
HCD-GT3D
Ver. 1.1
6-6. SCHEMATIC DIAGRAM - MOTHERBOARD Board (1/10) -
1
A
2 3 4 5 6 7 8 9 10 11 12 13 14 15 16 17
MOTHERBOARD BOARD (1/10)
B
G
C
D
E
F
H
J
K
I
>001S
MOTHERBOARD
BOARD
(2/10), (3/10),
(4/10), (8/10),
(10/10)
(Page 41), (Page 42),
(Page 43), (Page 47),
(Page 49)
>002S
MOTHERBOARD
BOARD
(3/10)
(Page 42)
>003S
MOTHERBOARD
BOARD
(4/10)
(Page 43)
2.2kR624
0.2
3.4
Q606
LTA014EUBFS8TL
JL601
C601
MUTING
R606
0
R915
4.7k
4.6
R642
1
27k
4.6
68k
4.7
4.4
R607 470k
R608 4.7k
C607 0.1
SN74LV4052APWR
AUDIO SELECTOR
8
7
6
2.6
5
2.6
4
2.6
3
2.6
2
2.6
1
Y0
2
3
4
GND9B
GND
INH
Y1
Y3
Y
Y2
Y0
R610 47k
R611 47k
R612 47k
R613 1M
4.7
R644
C766
D+3.3V
1
R602 47k
R603 47k
R604 47k
R605 1M
2
3
C620
C606
IC601
OUT
+
GND
IC602
IC602
47
0.1
IC601
BA4558F
OP AMP
R615 470k
R616 4.7k
C605 47 6.3V
A
X3
X0
X
X1
X2
VCC
3.4
VCC
OUT
+
10
11
12
13
14
15
16
Q602
IMX25T110
MUTING
2.2kR625
4.7kR628
100R750
4.7kR627
9.1
8
4.6
7
4.5
6
-
C612
4.7
4.5
5
JL632
0
2.4
2.6
2.6
2.6
2.6
C616
5.1
0.1
R633 47k
R634 1M
R635 47k
R636 47k
0 0.1
C621
47
R621
0
R916
4.7k
R649
27k
R600
68k
C767
4.7
AUDIO SELECTOR
0
JL602
X0
00.1
R751
100
Q611
RN1902
DRIVER
0
R982
R639
C631
R645 47k
R646 1M
R647 47k
R648 47k
C602
R752
100
R753
100
C628
R641
3.4
JL603
4.7
4.7
• See page 59 for IC Block Diagrams.
/LINE-MUTE
R756
6.8k
C626
10
C627
10
2.2
15k
RN4902(T5RSONY,D,F)
0
47k
5.1
5.1
5.1
R653
6.8k
BIAS SET
Q603
LINEOUT LEFT
LINEOUT RIGHT
22kR650
0
0
LINK-OUT-B
LINK-OUT-A
LINK-SET
GUEST L
GUEST R
GUEST R
GUEST L
R913
11
>011S
MOTHERBOARD
BOARD
(9/10)
AGND
A+9V
CN601
DGND
J602
4P
4P
2
(Page 48)
IN
OUT
IN
OUT
MOTHERBOARD
BOARD
(7/10)
(Page 46)
>009S
9
10
>010S
MOTHERBOARD
BOARD
(7/10)
(Page 46)
8
>008S
MOTHERBOARD
BOARD
(3/10)
(Page 42)
7
>007S
MOTHERBOARD
BOARD
(2/10)
(Page 41)
A+9V4
MIC GND3
MIC SIGNAL
MIC DET1
>006S
6
MOTHERBOARD
BOARD
(3/10)
(Page 42)
5
>005S
MOTHERBOARD
BOARD
(2/10), (3/10),
(4/10)
(Page 41), (Page 42),
(Page 43)
4
>004S
MOTHERBOARD
BOARD
(2/10), (3/10),
(4/10), (5/10),
(6/10), (7/10),
(8/10), (9/10),
(10/10),
(Page 41), (Page 42),
(Page 43), (Page 44),
(Page 45), (Page 46),
(Page 47), (Page 48),
(Page 49)
L
R
AUDIO
PARTY CHAIN
>037S
MIC
BOARD
CN3200
(Page 57)
LINK-DET
JL635
C1001
C980
C1002
0.1
220p
0.001
LINEOUT LEFT
LINEOUT RIGHT
C657
4.7
68k
C647
4.7
R662
56k
R914
R686
120k
C652
4.7
68k
470kR912
470kR911
680kR663
2.2C665
150kR651
Q605
XP4501
BIAS DETECTION
C650
4.7
R671
680kR669
C643 10pC641 10p
R
L
0
5.1
56k
C656 0.22
C966 0.22
5.1
0
1MR658
47kR659
R685
120k
R689
150k
TUNER-R
4.7C638
SN74LV4052APWR
AUDIO SELECTOR
C660
4.7C637
IC605
2.2
IC605
R700
C629
RN4902 (T5RSONY, D, F)
BIAS DETECTION
22k
0
10
R692
0
22k
10C917
2.6
1
Y0
2
Y2
2.6
3
Y
2.4
4
Y3
0.2
5
Y1
6
INH
7
GND
8
GND9B
Q607
3.4
5.1
5.1
TUNER-L
C662 4.7
4.7
4.7
C661
C658
1MR681
C651
JL609
47kR682
47kR684
0.1
0
3.4
1MR665
47kR666
5.1
VCC
16
X2
15
0.3
X1
14
2.5
X
13
2.6
X0
12
2.4
X3
11
0
A
10
0
R698
47k
R697
47k
0
3.4
JL611
Q604
RN1902
AUDIO SELECTOR
DRIVER
1MR693
47kR694
47kR696
JL619
JL604
JL620
JL605
R711
1k
R716 1k
JL616
MIC-DET
ANALOG-ASEL
ANALOG-BSEL
R792
0
JL613
JL614
JL615
AVDD+9V
MIC SIGNAL
VCC5V
HCD-GT3D
4040
Page 41
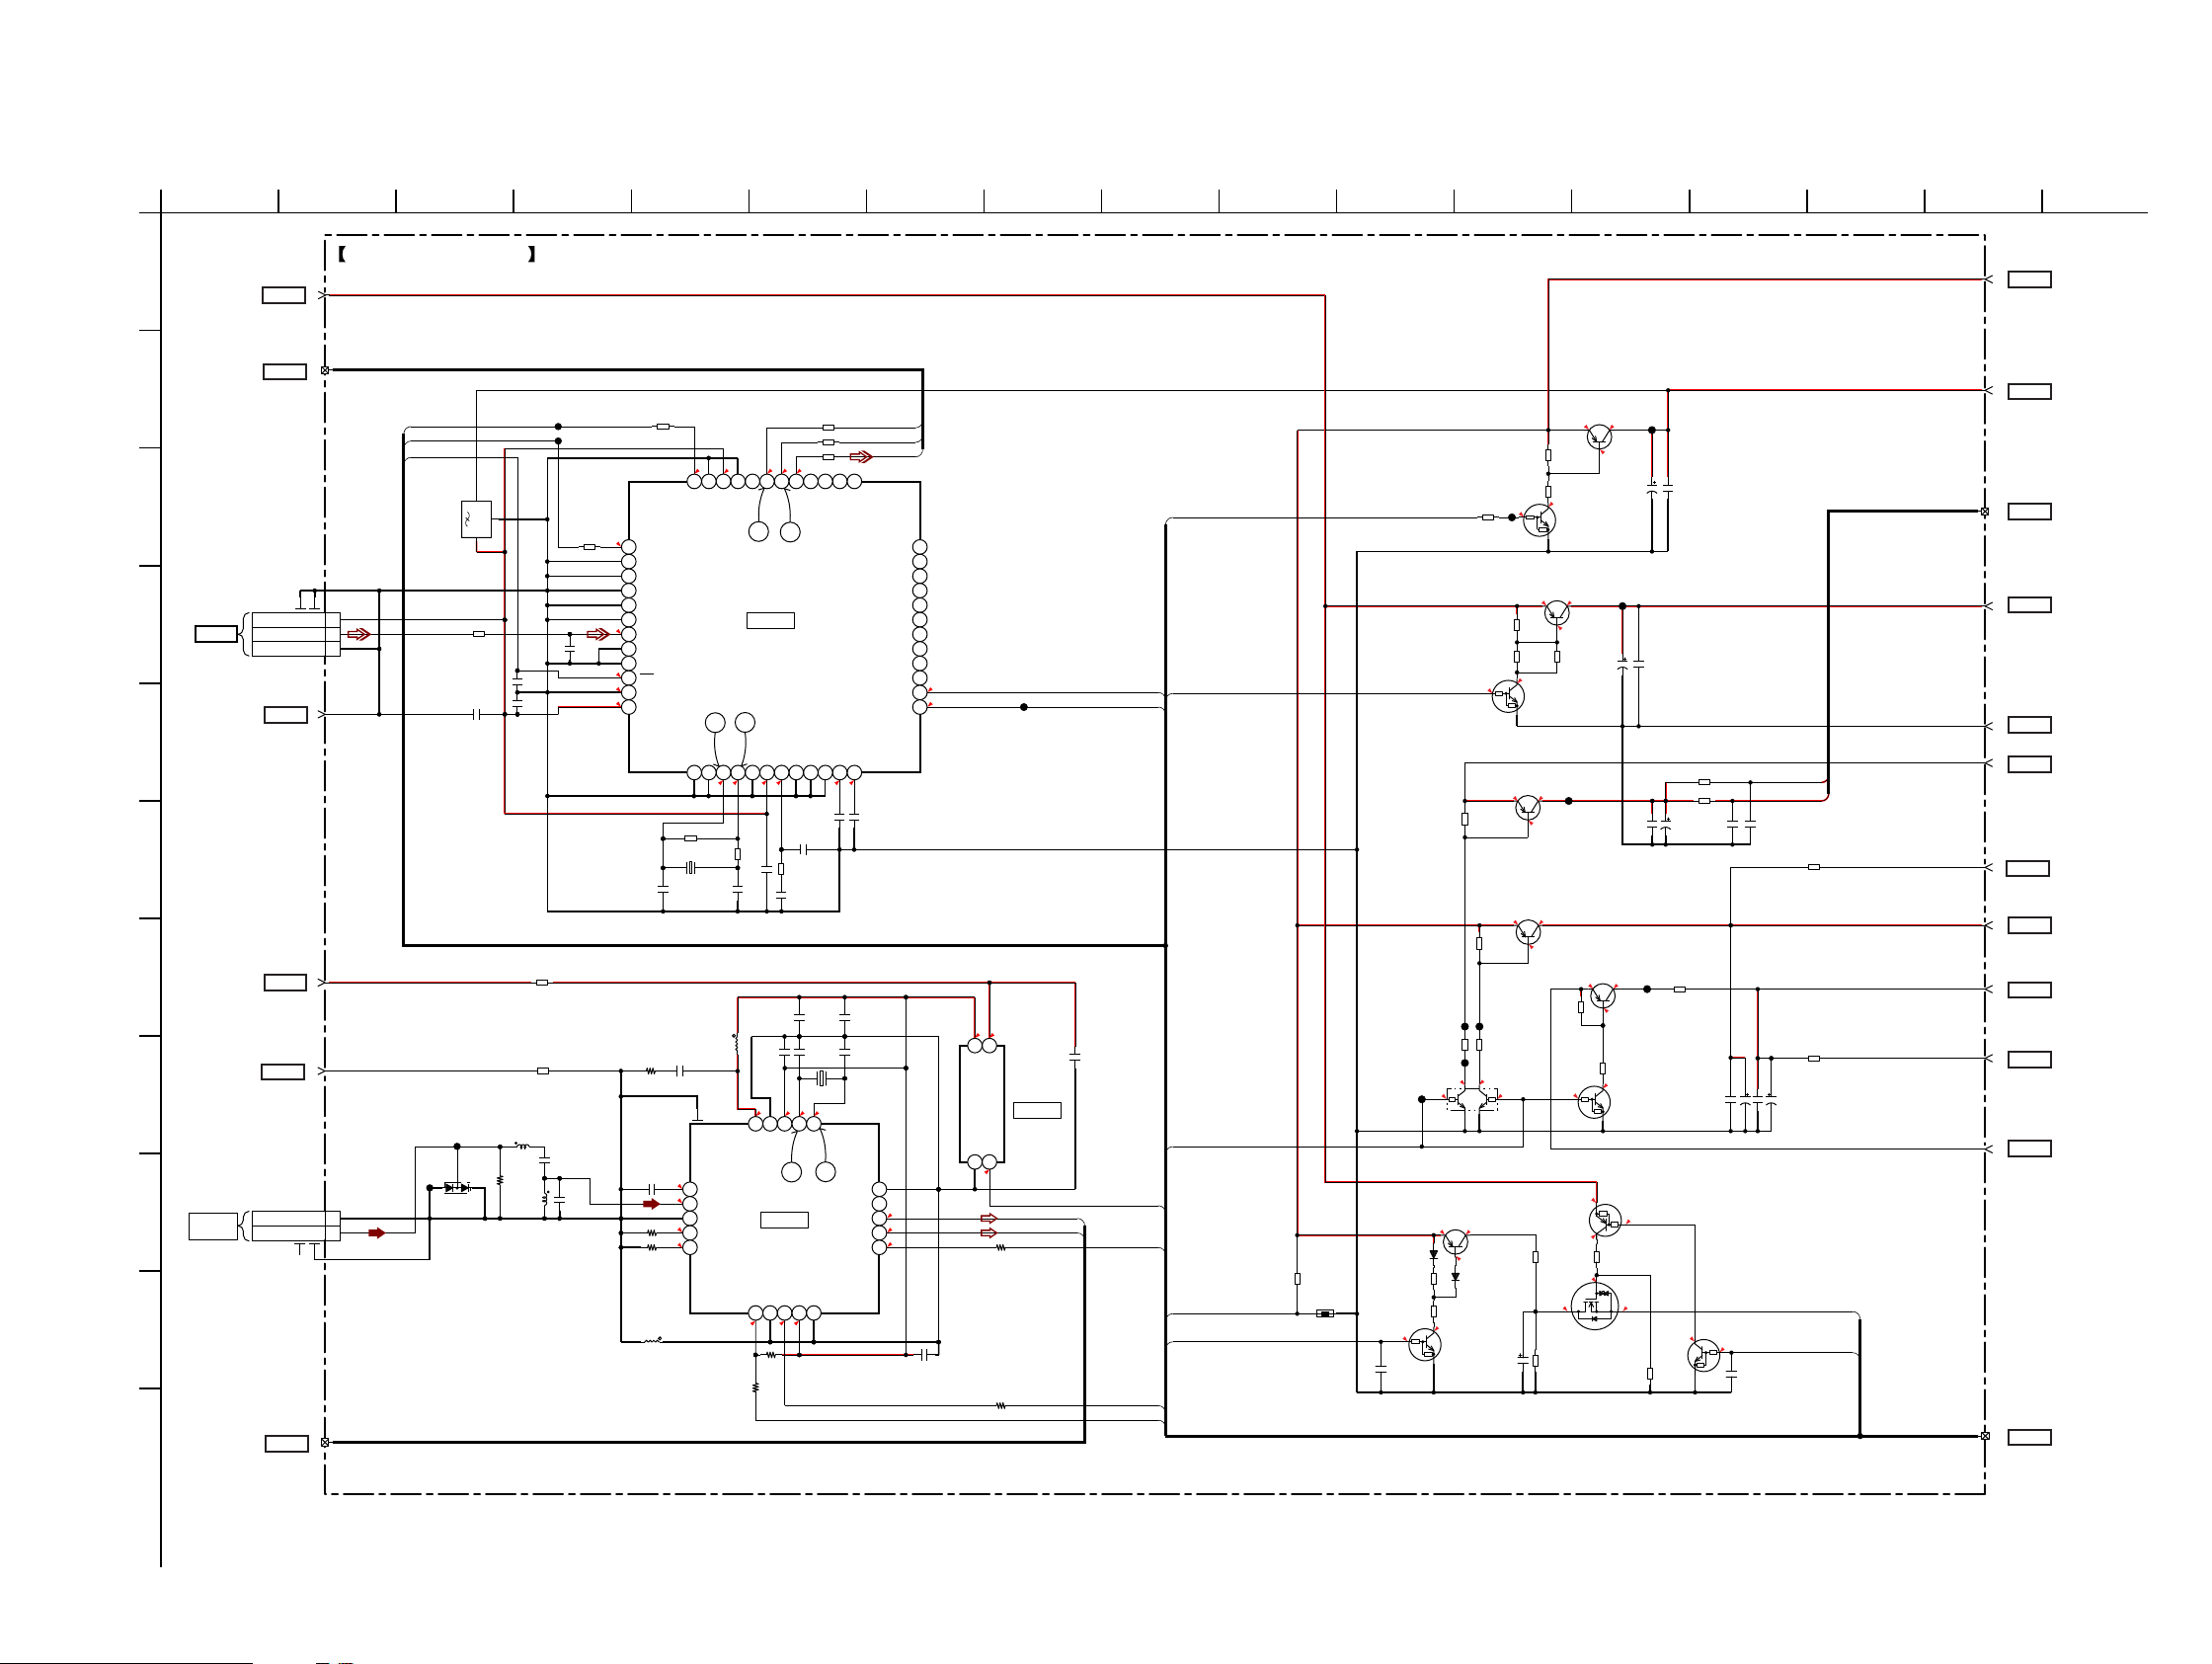
HCD-GT3D
Ver. 1.1
6-7. SCHEMATIC DIAGRAM - MOTHERBOARD Board (2/10) -
1
A
>013S
MOTHERBOARD
(4/10), (7/10)
(Page 43), (Page 46)
B
MOTHERBOARD
(Page 43)
C
D
E
>038S
OPTICAL
BOARD
CN3300
(Page 55)
MOTHERBOARD
(Page 40)
F
G
H
I
ANTENNA
FM
>005S
MOTHERBOARD
(Page 40)
>010S
MOTHERBOARD
BOARD
(Page 46)
J
K
MOTHERBOARD
2 3 4 5 6 7 8 9 10 11 12 13 14 15 16 17
MOTHERBOARD BOARD (2/10)
M+13V
13
BOARD
12
>012S
BOARD
(4/10)
>004S
BOARD
(1/10)
BOARD
(1/10)
(7/10)
>007S
BOARD
(1/10)
(Page 40)
VOUT 2
GND 1
4
5
10
7
CN602
3P
3VCC
DGND
VCC5V
AGND
CN2002
2P
1GND
2FM
DIR_CP-DATA
DIR_CP-CLK
DIR_RESET
FL601
JL638
JL630
BAV99-215
R949 100
C944 1
D600
R957
25
26
27
28
29
30
31
32
33
34
0
35
36
MC/SCL
MS/ADR1
MODE
RXIN7/ADIN0
RXIN6/ALRCKI0
RXIN5/ABCKI0
RXIN4/ASCKI0
RXIN3
RXIN2
RST
RXIN1
VDDRX
C951
10p
R938
0
C932
0.047
R996 0
R995 0
L602
47nH
10
24
37
R954 1M
X602
24.576MHz
C933
10p
0
1
0
2
3
0
4
0
5
JL636
JL637
2
3
1
C958
0.01
C950
10
R859
0
R857
0
L603
68nH
100R937
L604
68nH
C930
3.4
10
R959
0.3
C945
47p
3.4
3.4
68p
C931
47p
• See page 37 for Waveforms. • See page 59 for IC Block Diagrams.
10
10
10
1314151617181920212223
MPO0
MPIO_B3
VCCAD
VINL
4847464544434241403938
00
C956 100p
C957 100p
C941
LRCK/LOUT
BCLK/ROUT
MPIO_B2
NPCM/INT1
ERROR/INT0
VINR
1
CP1
IISD
DA
DIR BCK
DIR LACK
DIR DATA
MPIO_B1
MPIO_B0
MPIO_C3
MPIO_C2
MPIO_C1
MPIO_C0
MPIO_A3
MPIO_A2
MPIO_A1
MPIO_A0
15
14
13
12
11
PCONT-BTSTBY
12
11
10
9
8
7
6
5
4
3
0
2
3.4
1
1.6
1.5
3.4
C936
0.0022
GND VOUT
3.4
JL265
5.13.4
43
VDD
CE
12
R944
22
IC903
MM3411A33URE
IC903
+3.3V REG
TUNER-L
TUNER-R
22R943
C943
1
DIR_INT1
DIR_INT0/EVOL_DATA
ST-CE
ST-DATA
ST-CLK
ST-RDS
PCONT-PSAVE-PROTECT
MTK-POWER-CTRL
SPM-AMBINET-TEMP
C-CONT
3.4
MDI/SDA
MDO/ADR0
40
RXIN0
GNDRX
1.8
L605
2.2nH
CP2
FRF1
GNDRF
ARF1
ARF2
C952
R953
3.4
DVDD
XTI
560
12p
BCK
LRCK
SCKO
DGND
39
38
IC904
PCM9211PTR
IC904
DIGITAL AUDIO
INTERFACE RECEIVER
41
AGND
XTO
VCC
FILT
3.41.8
C953
0.0047
R955
680
C954
C960 0.1
0.068
C934
0.0022
20 19 18 17 16
VDDRF
VDD_18
GND_19
37
IC902
RN5B801-0002
IC902
FM RECEIVER
IIC/RDSILACK
6 78910
3.4 3.4
3.4
R939
10k
R940
100
R950
R951
R952
01.701.7
DOUT
MPO1
AGNDAD
VCOM
C938
10
C9351pC937
1p
X600
12MHz
0.1
0.13.43.4
X2
X1
36
VDD_9
GND_10
R489
6.8k
TH571
Q457
RN1911
PWR SUPPLY
CONTROL
JL021
D571
DA2J10100L
R571
220k
3.3
C573
0.1
R028
10k
JL022 JL024
R030
680
JL023
0.1
3.3
Q572
KTA1542T-RTK/P
PROTECTION
CONTROL
3.4
2.9
DA2J10100L
R479
220k
0
Q571
KRC402-RTK
PROTECTION
CONTROL
R063
0
R064
68k
R066
3.3k
3.3
KTA1542T-RTK/P
+3.3V PWR SUPPLY
R037
10k
R034
220
0.1
3.4
D572
R061
10k
R062
220
3.3
JL044
KTA1542T-RTK/P
+13V PWR SUPPLY
0.1
KRC402-RTK
PWR SUPPLY
5.4
Q005
3.4
3.3
C577 1000 6.3V
KTA1542T-RTK/P
+3.3V PWR SUPPLY
0.1
KRC402-RTK
PWR SUPPLY
CONTROL
Q011
13.7
13.7
13
R065
3.3k
Q012
CONTROL
5.4
Q459
KTA1542T-RTK/P
4.7
+5.2V PWR SUPPLY
3.3
2.6
KTA1542T-RTK/P
+5V PWR SUPPLY
R039
10k
3.3
R485
1k
3.4
RHK005N03T146
R487 2.2M
Q008
3.4
2.6
Q009
C088
220 16V
JL050
Q007
5.1
R040
470
13.7
13.7
R483
12.4
Q574
PROTECTION
CONTROL
JL049
3.3
C084
100 16V
JL059
C087
C064
0.1
JL032
5.1
4.4
0.1
Q006
KRC402-RTK
PWR SUPPLY
CONTROL
Q575
LTA014EUBFS8TL
PROTECTION
CONTROL
0
1k
3.4
E+3.3V
30
>030S
MOTHERBOARD
BOARD
(7/10)
(Page 46)
D+3.3V
1
>001S
MOTHERBOARD
BOARD
(1/10)
(Page 40)
C083
0.1
16
>016S
MOTHERBOARD
BOARD
(6/10)
(Page 45)
SW+13V
0.1
MGND
M+5.2V
C065 0.1
C067 100 10V
Q576
KRC402-RTK
PROTECTION
CONTROL
3.2
C574
0.1
FE_5.2V_M
FE_5.2V_TRAY
C075
0.1
C071 1
C073 100 10V
R054 0
R053 0
SPM-C-MON
PCONT-DAMP
FE_3.3V_1
DVDD3.3V
DVDD5V
FE_5V
AVDD+5V
R491
10k
R051 0
R052 0
C066
100 10V
R048
0
0
C074
0.1
>014S
14
MOTHERBOARD
BOARD
(10/10)
(Page 49)
MOTHERBOARD
BOARD
(7/10)
(Page 46)
>015S
15
31
>031S
MOTHERBOARD
BOARD
(7/10), (10/10)
(Page 46), (Page 49)
18
>018S
MOTHERBOARD
BOARD
(6/10)
(Page 45)
17
>017S
MOTHERBOARD
BOARD
(5/10), (6/10)
(Page 44), (Page 45)
19
>019S
MOTHERBOARD
BOARD
(4/10), (5/10)
(Page 43), (Page 44)
20
>020S
MOTHERBOARD
BOARD
(6/10)
(Page 45)
>021S
21
MOTHERBOARD
BOARD
(3/10), (7/10)
(Page 42), (Page 46)
11
>011S
MOTHERBOARD
BOARD
(9/10)
(Page 48)
HCD-GT3D
4141
Page 42
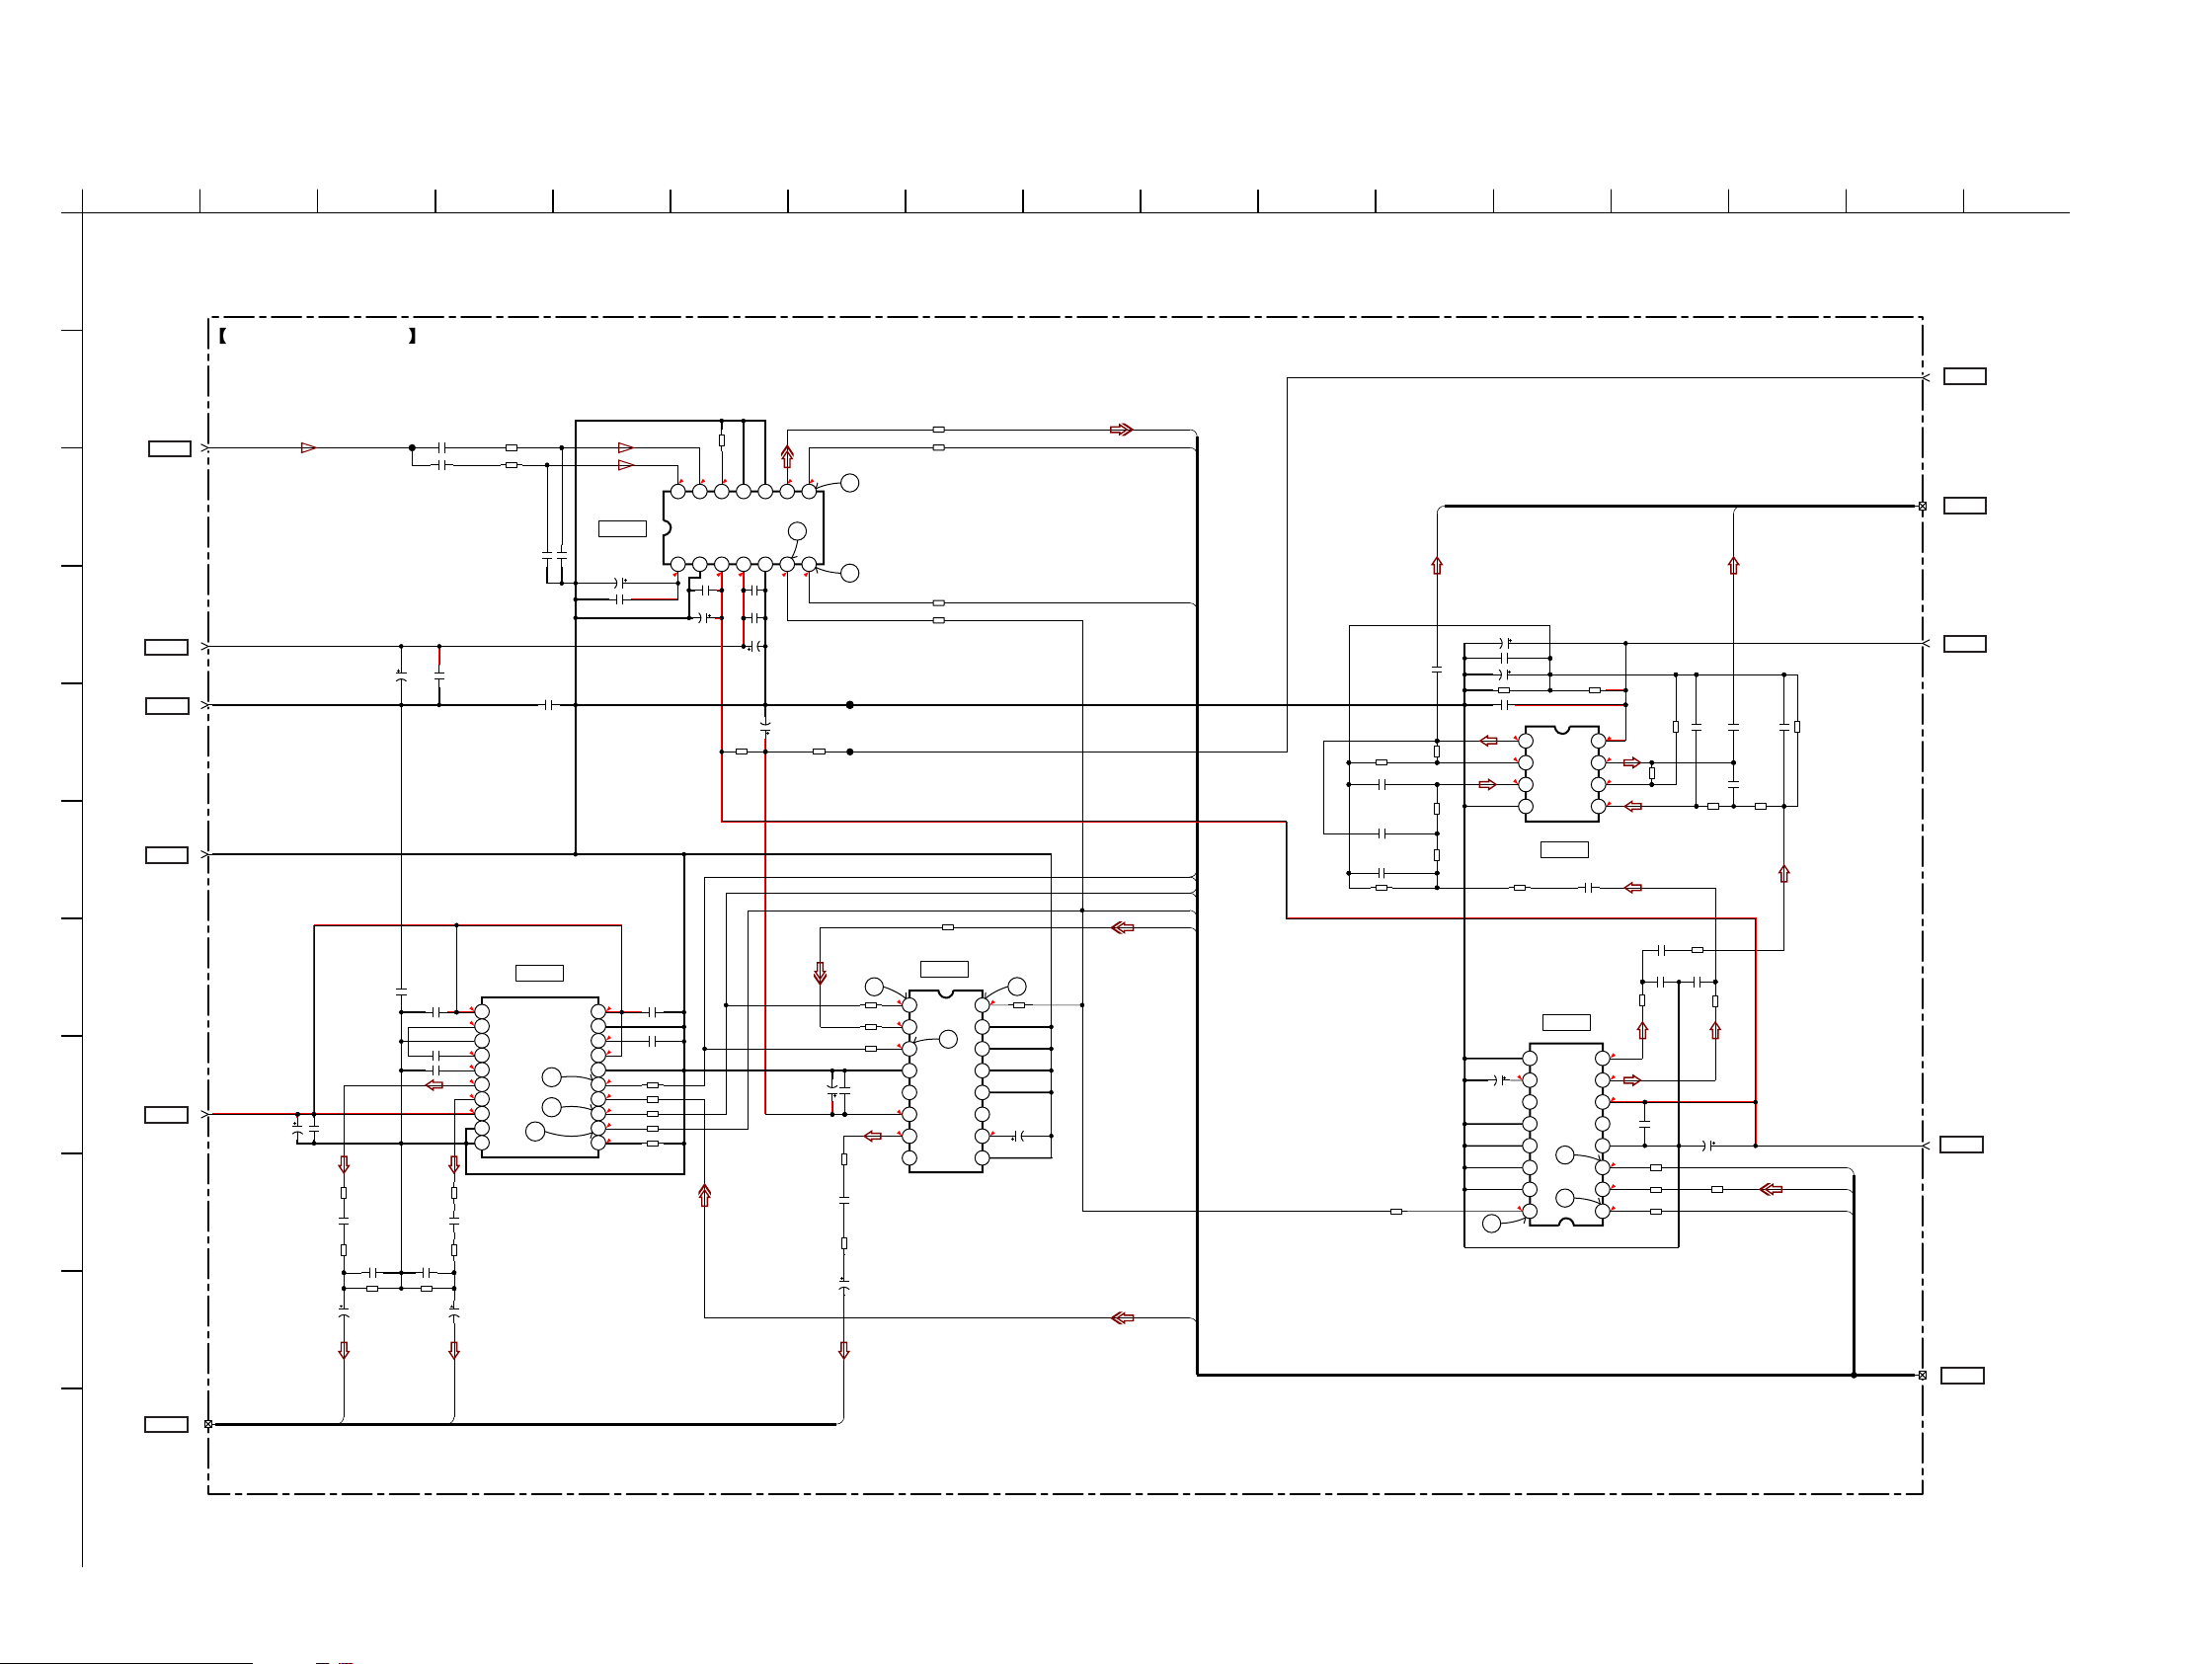
HCD-GT3D
Ver. 1.1
6-8. SCHEMATIC DIAGRAM - MOTHERBOARD Board (3/10) -
1
2 3 4 5 6 7 8 9 10 11 12 13 14 15 16 17
A
MOTHERBOARD BOARD (3/10)
B
>006S
MOTHERBOARD
BOARD
(1/10)
(Page 40)
6
MIC SIGNAL
JL612
C666
C667
C
D
>001S
MOTHERBOARD
BOARD
(1/10)
(Page 40)
>004S
MOTHERBOARD
BOARD
E
F
(Page 40)
>010S
MOTHERBOARD
BOARD
(Page 46)
G
H
>022S
MOTHERBOARD
BOARD
(7/10)
(Page 46)
I
(1/10)
(7/10)
D+3.3V
1
C691
10 16V
DGND
4
AGND
10
C922
0.1
C998 0.1
C997 2.2
C996 2.2
AVDD+3.3V
22
C696
10 16V
C699
R747
C983
R829
C690
10 16V
0.1
0
10
470
10kR830
R708 47
4.7
R709 47
4.7
IC609
PCM1808PWR
IC609
A/D CONVERTER
0.001C670
0.001
C669
C673
C695
0.1
C993 0.1
IC914
PCM5101
IC914
D/A CONVERTER
3.4
1
CPVDD
1.7
2
CAPP
3
CPGND
1.7
4
CAPM
3.3
5
VNEG
0
6
0
7
3.4
8
9
10
R763
0
C982
10
R826
470
2200pC6922200pC689
10kR827
C704
10 16V
50
OUTL
OUTR
49
AVDD
AGND
48
DEMP FLT
DVDD
DGND
LDOO
XSMT
LRCK
3.4
20
19
1.9
18
3.4
17
16
FMT
1.7
15
1.7
14
DIN
1.7
13
BCK
1.7
SCK
12
0
11
J
• See page 37 for Waveforms. • See page 59 for IC Block Diagrams.
DIN1
ARAGON-BCK0
ARAGON-LRCK0
ARAGON-LRCK0
ARAGON-BCK0
ARAGON-MCK
DOUT1
DOUT0
10 16VC672
0.1
C994 0.1
C995 0.1
R762 10
R761
R760 10
R817
R978
R719
1.7
1.7
1.7
5.1
2.6
10
R722
10
R723
10
R720
10
IC615
PCM1754DBQR
IC615
D/A CONVERTER
BCK
1
DATA
2
34
3
LRCK
DGND
4
NC
5
VCC
6
VOUTL
7
VOUTR
8
0R909
MUTE
DEMP
TEST
ZEROA
VCOM
AGND
35
1.7
16
SCK
R819
10
15
FMT
14
13
12
11
C748
10 16V
2.6
10
9
R718
0
2.5
2.5 0
11
12
14
13
FMT
MD1
VINL
VINR
AGND
VCC4VDD5DGND
VREF
3
1
2
2.6
5.1 3.4
C678
C674
0.1
0.1
C679
C986
10
10 16V
C1000
10 16V
R733
0
10
10
0
10
MD0
1.7
470 6.3V
9
6
C726
1.6
8
BCK
DOUT
30
SCKI7LRCK
1.7
R794
C742
10 16V
1.7
0
R793
C984
R831
C749
10 16V
32
31
JL618
JL617
33
R795
10
R796
10
R797
10
C744
0.1
0
10
100
R609
C603
C608
R820
4.7k
680p
820p
47pC604
10kR614
AVDD+5V
Y0
10 16VC618
0.1
C610
4.7
R617
1.5k
R618
2.7k
R619
2.7k
10
C613
R622
10 16V
26
C609
47 6.3VC614
4.7k
0.1C615
4.6
4.6
4.6
2.6
1.7
1
OUT
2
-
3
+
4
GND
BA4558F
IC603
OP AMP
3.3kR620 47C632
PCM1754DBQR
IC604
D/A CONVERTER
9
VCOM
10
ZEROA
11
TEST
12
DEMP
13
MUTE
14
FMT
15
SCK
16
IC603
IC604
25
24
VCC
OUT
VOUTRAGND
VOUTL
DGND
LRCK
DATA
4.7kR626
9.1
8
4.6
7
-
6
+
5
VCC
NC
BCK
R638
4.6
1.5k
4.6
C619
47
C624
100p
R629
0
2.6
8
2.6
7
5.1
6
C617
5
0.1
4
1.7
3
2
1
10R630
1.7
10R631
1.7
10R632
4.7kR640
R656
3.3k
C630
100p
680pC633
10 16V
C622
R652
X0
4.7
47pC635
10kR655
C625
C634
820p
R654
2.7k
2.7k
R643
0
VCC5V
ARAGON-LRCK0
0R948
DOUT2
ARAGON-BCK0
A+9V
>021S
21
MOTHERBOARD
BOARD
(2/10), (7/10),
(Page 41), (Page 46)
2
>002S
MOTHERBOARD
BOARD
(1/10)
(Page 40)
8
>008S
MOTHERBOARD
BOARD
(1/10)
(Page 40)
>005S
5
MOTHERBOARD
BOARD
(1/10)
(Page 40)
K
MOTHERBOARD
HCD-GT3D
>023S
BOARD
(10/10)
(Page 49)
11
>011S
MOTHERBOARD
BOARD
23
FRONT-L
FRONT-R
SW
(9/10)
(Page 48)
4242
Page 43
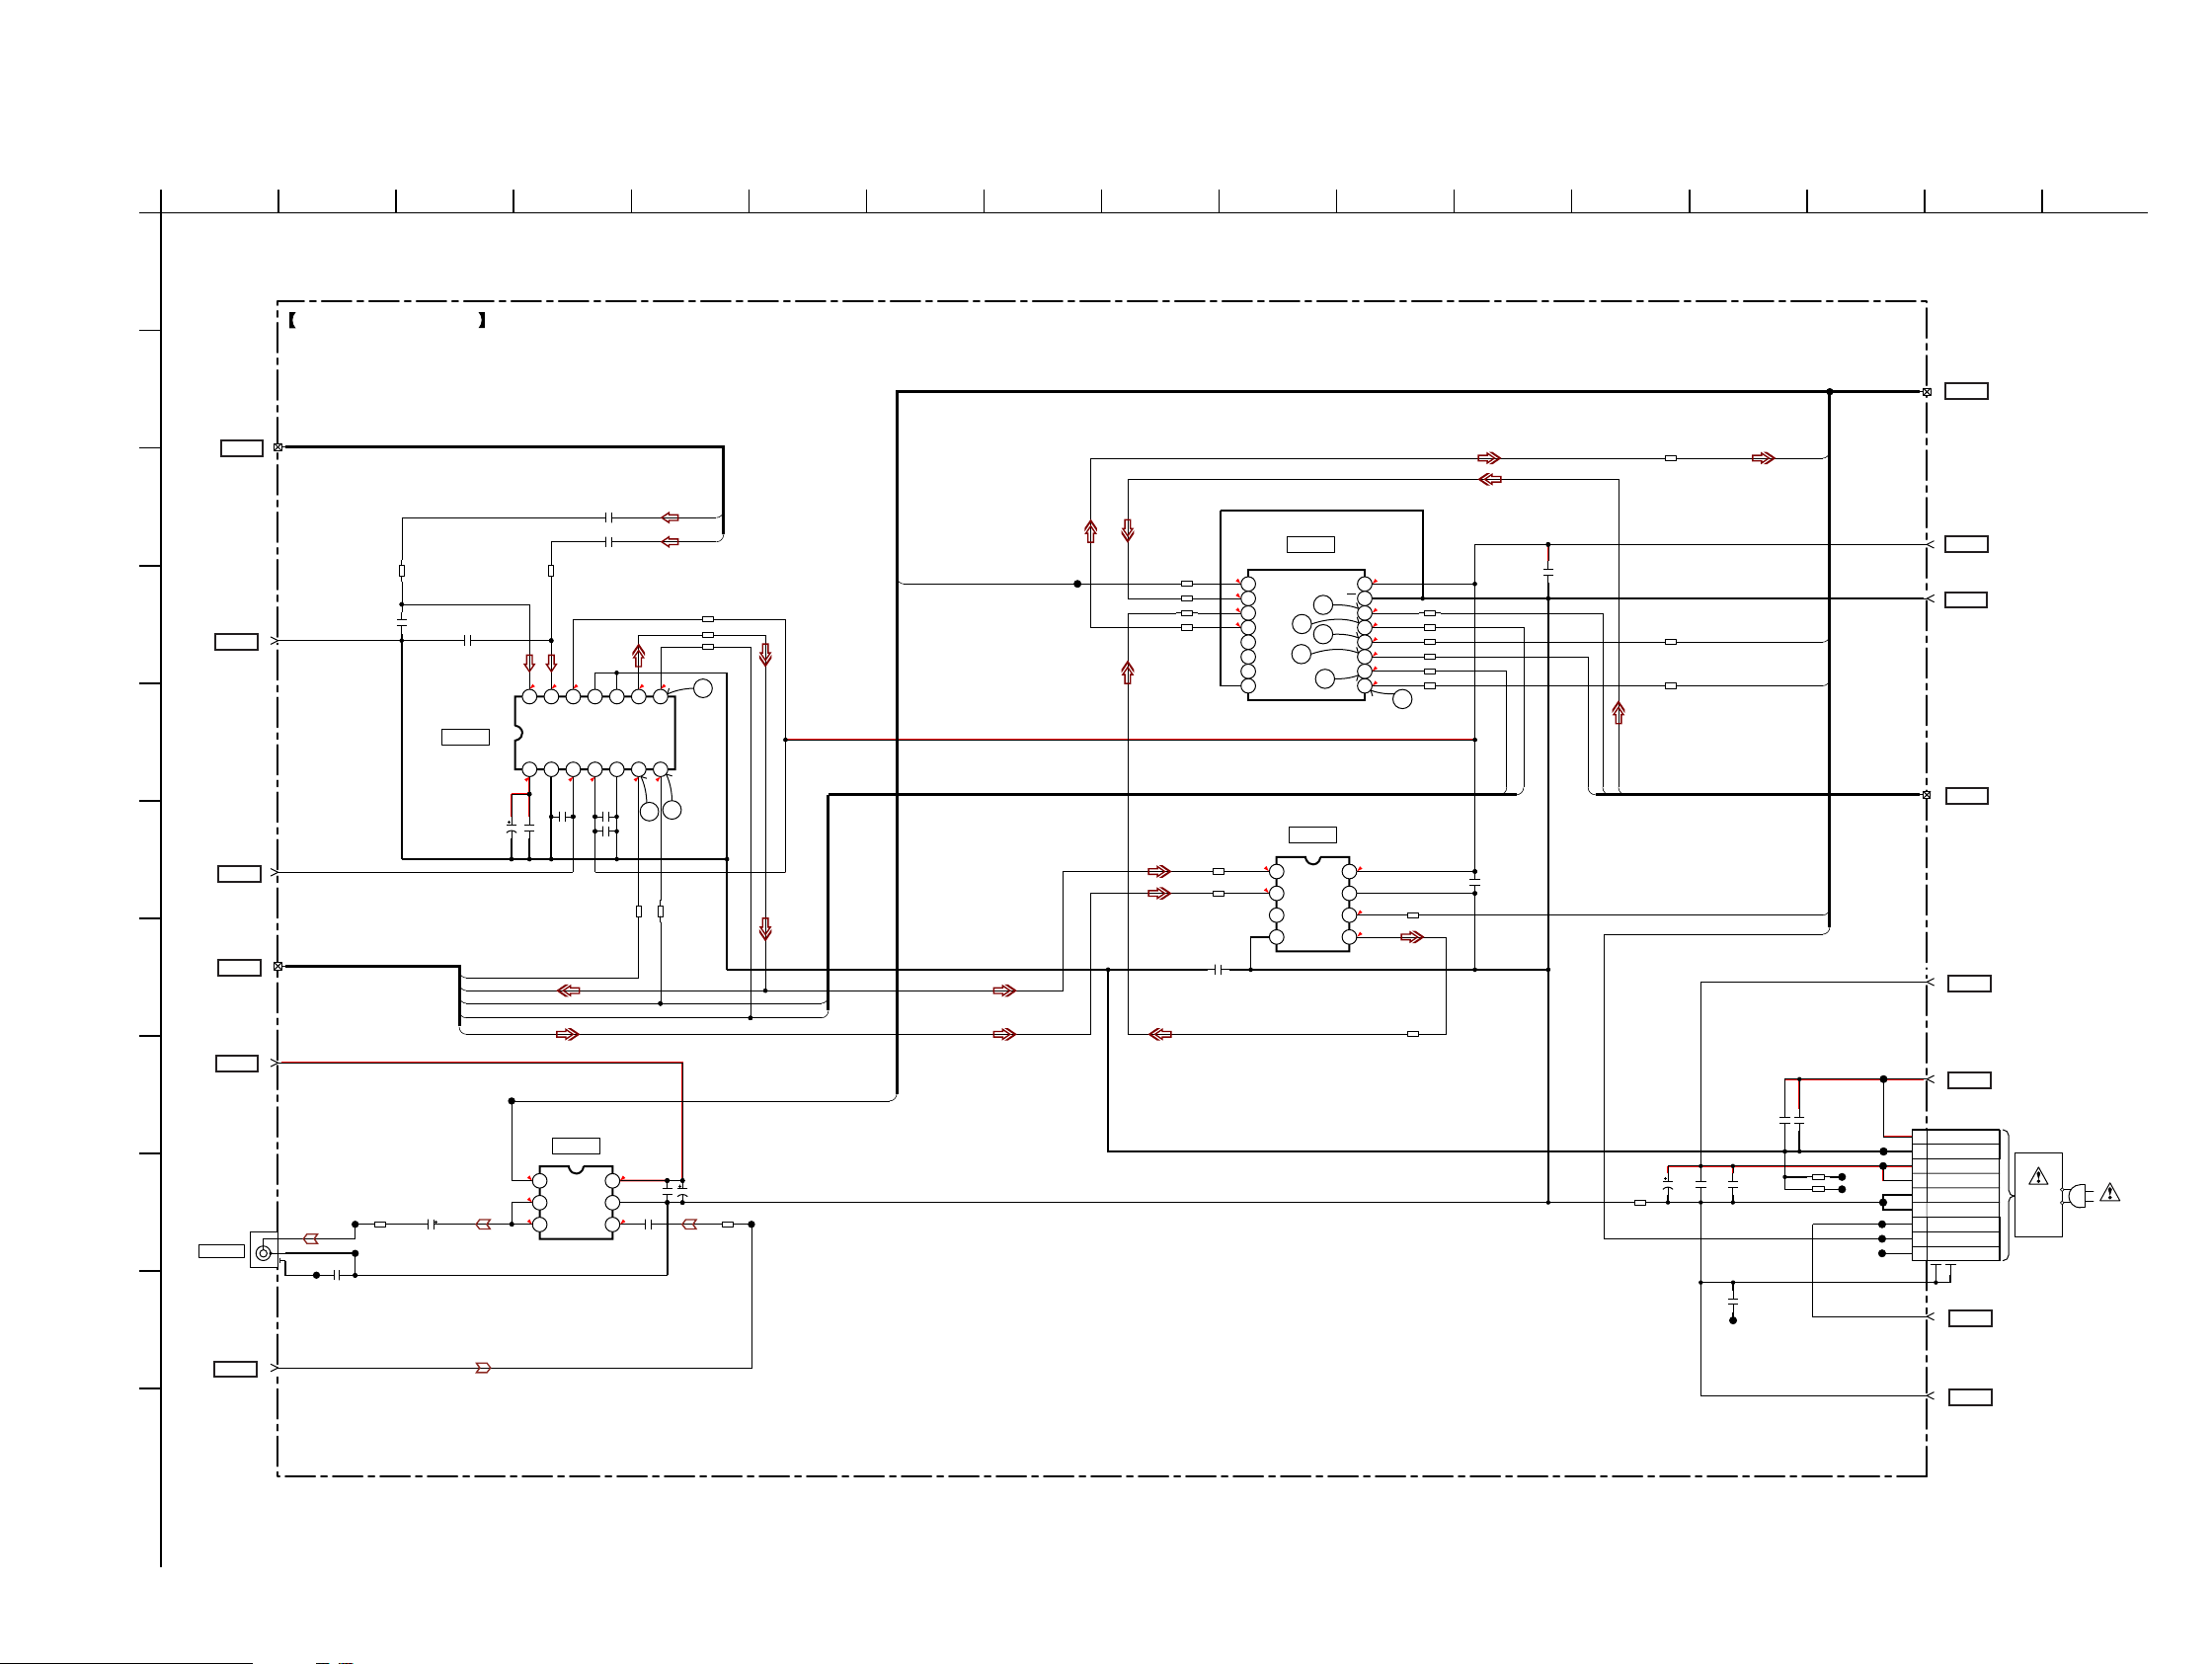
HCD-GT3D
6-9. SCHEMATIC DIAGRAM - MOTHERBOARD Board (4/10) -
1
2 3 4 5 6 7 8 9 10 11 12 13 14 15 16 17
A
MOTHERBOARD BOARD (4/10)
B
3
>003S
MOTHERBOARD
BOARD
(1/10)
(Page 40)
C
R661
100
C642
JL631
JL906
C1003
0.001
R935
10p
C644
10p
MTK-MCK
ADIN
MTK-LRCK
MTK-BCK
ASDATA0
14
2.6
C645 10 16V
JL904
3.14
1.2
1.2
IC606
PCM1808PWR
IC606
A/D CONVERTER
C928
1000 6.3V
75
D
>010S
MOTHERBOARD
BOARD
(Page 46)
(7/10)
AGND
10
E
F
G
H
>005S
MOTHERBOARD
(Page 40)
>024S
MOTHERBOARD
(Page 44)
>019S
MOTHERBOARD
BOARD
(2/10), (5/10)
(Page 41), (Page 44)
I
VIDEO OUT
BOARD
(1/10)
BOARD
(5/10)
VCC5V
5
24
DVDD5V
19
J907
1P
JL907
R674
2.5
2.5
13
VINL
VINR
AGND
VREF
1
2
C649
1000p
C646 0.1
NJM41031F1(TE2)
VIDEO AMP
POWER SAVE
1
VOUT
2
VSAG4VIN
3
100
12
3
5.1
IC901
IC901
C640 4.7
C648 4.7
3.4
FMT
VCC4VDD
3.4
V+
GND
10
MD011MD1
DGND
5
1.7
C653
0.1
C655
10
R68810R691
5.1
6
5
2.1
9
6
C906
1.5
DOUT
SCKI
27
C904
R677 0
R687 22
R690 10
1.7
29
8
BCK
LRCK
7
1.7
28
10
C905
100 10V
0.1
1
J
CVBUS
25
>025S
MOTHERBOARD
BOARD
(5/10)
(Page 44)
K
• See page 59 for IC Block Diagrams.
R
L
ANALOG-DSEL/SD_D1_0
MTK LACK
MTK BCK
VIDEO-MUTE
JL905
R905
0
JL134
R801
R702
R701
R802
11
>011S
MOTHERBOARD
BOARD
(9/10)
(Page 48)
ARAGON-BCK3
ARAGON-LRCK3
ANALOG-CSEL
PCONT-DAMP
C011
0.1
R080 0
R036 0
DIN3
C010
100p
JL053
JL057
JL005
JL007
JL008
JL006
JL045
JL004
JL068
D+3.3V
DGND
M+13V
A+13V
CN001
AC_DET
MGND
9P
1 13.5V
2AGND
3 13.5V
4 13.5V
5 M/DGND
6 M/DGND
7 AC-DET
8MAIN ON
9 LOW_AC
MOTHERBOARD
BOARD
(1/10)
(Page 40)
1
>001S
4
>004S
MOTHERBOARD
BOARD
(1/10)
(Page 40)
12
>012S
MOTHERBOARD
BOARD
(2/10)
(Page 41)
13
>013S
MOTHERBOARD
BOARD
(2/10), (7/10)
(Page 41), (Page 46)
26
>026S
MOTHERBOARD
BOARD
(7/10)
(Page 46)
29
>029S
MOTHERBOARD
BOARD
(8/10)
(Page 47)
15
>015S
MOTHERBOARD
BOARD
(7/10)
(Page 46)
SMPS
BOARD
(1/2)
~AC IN
0
R791
IC912
TC74VHC157FT (EK)
IC912
SIGNAL SELECTOR
3.4
100
10
10
22
C664
0.22
0
0
0
10R963
10R964
SELECT
1
1A
2
3
4
5
6
7
8
47
1B
46
1Y
45
2A
44
2B
2Y
GND 3Y
IC913
TC7WH157FK
IC913
SIGNAL SELECTOR
1.5
1
A
0
2
B
3
_Y
4
GND5Y
43
3.4
VCC
16
ST
15
1.7
4A
14
1.7
4B
13
1.7
4Y
12
1.7
3A
11
1.7
3B
10
1.7
9
3.4
8
VCC
7
_ST
3.4
6
SEL
0
42
10R835
10R836
22R837
10R838
10R839
22R840
C989
0.1
100R965
10R966
MTK LACK
MTK BCK
C977
0.1
0
R980
0
R981
DIR BCK
DIR LACK
DIR DATA
C091
C092
C024
470 25V
R086
0
100p
0.1
C076
0.01
JL056
HCD-GT3D
4343
Page 44
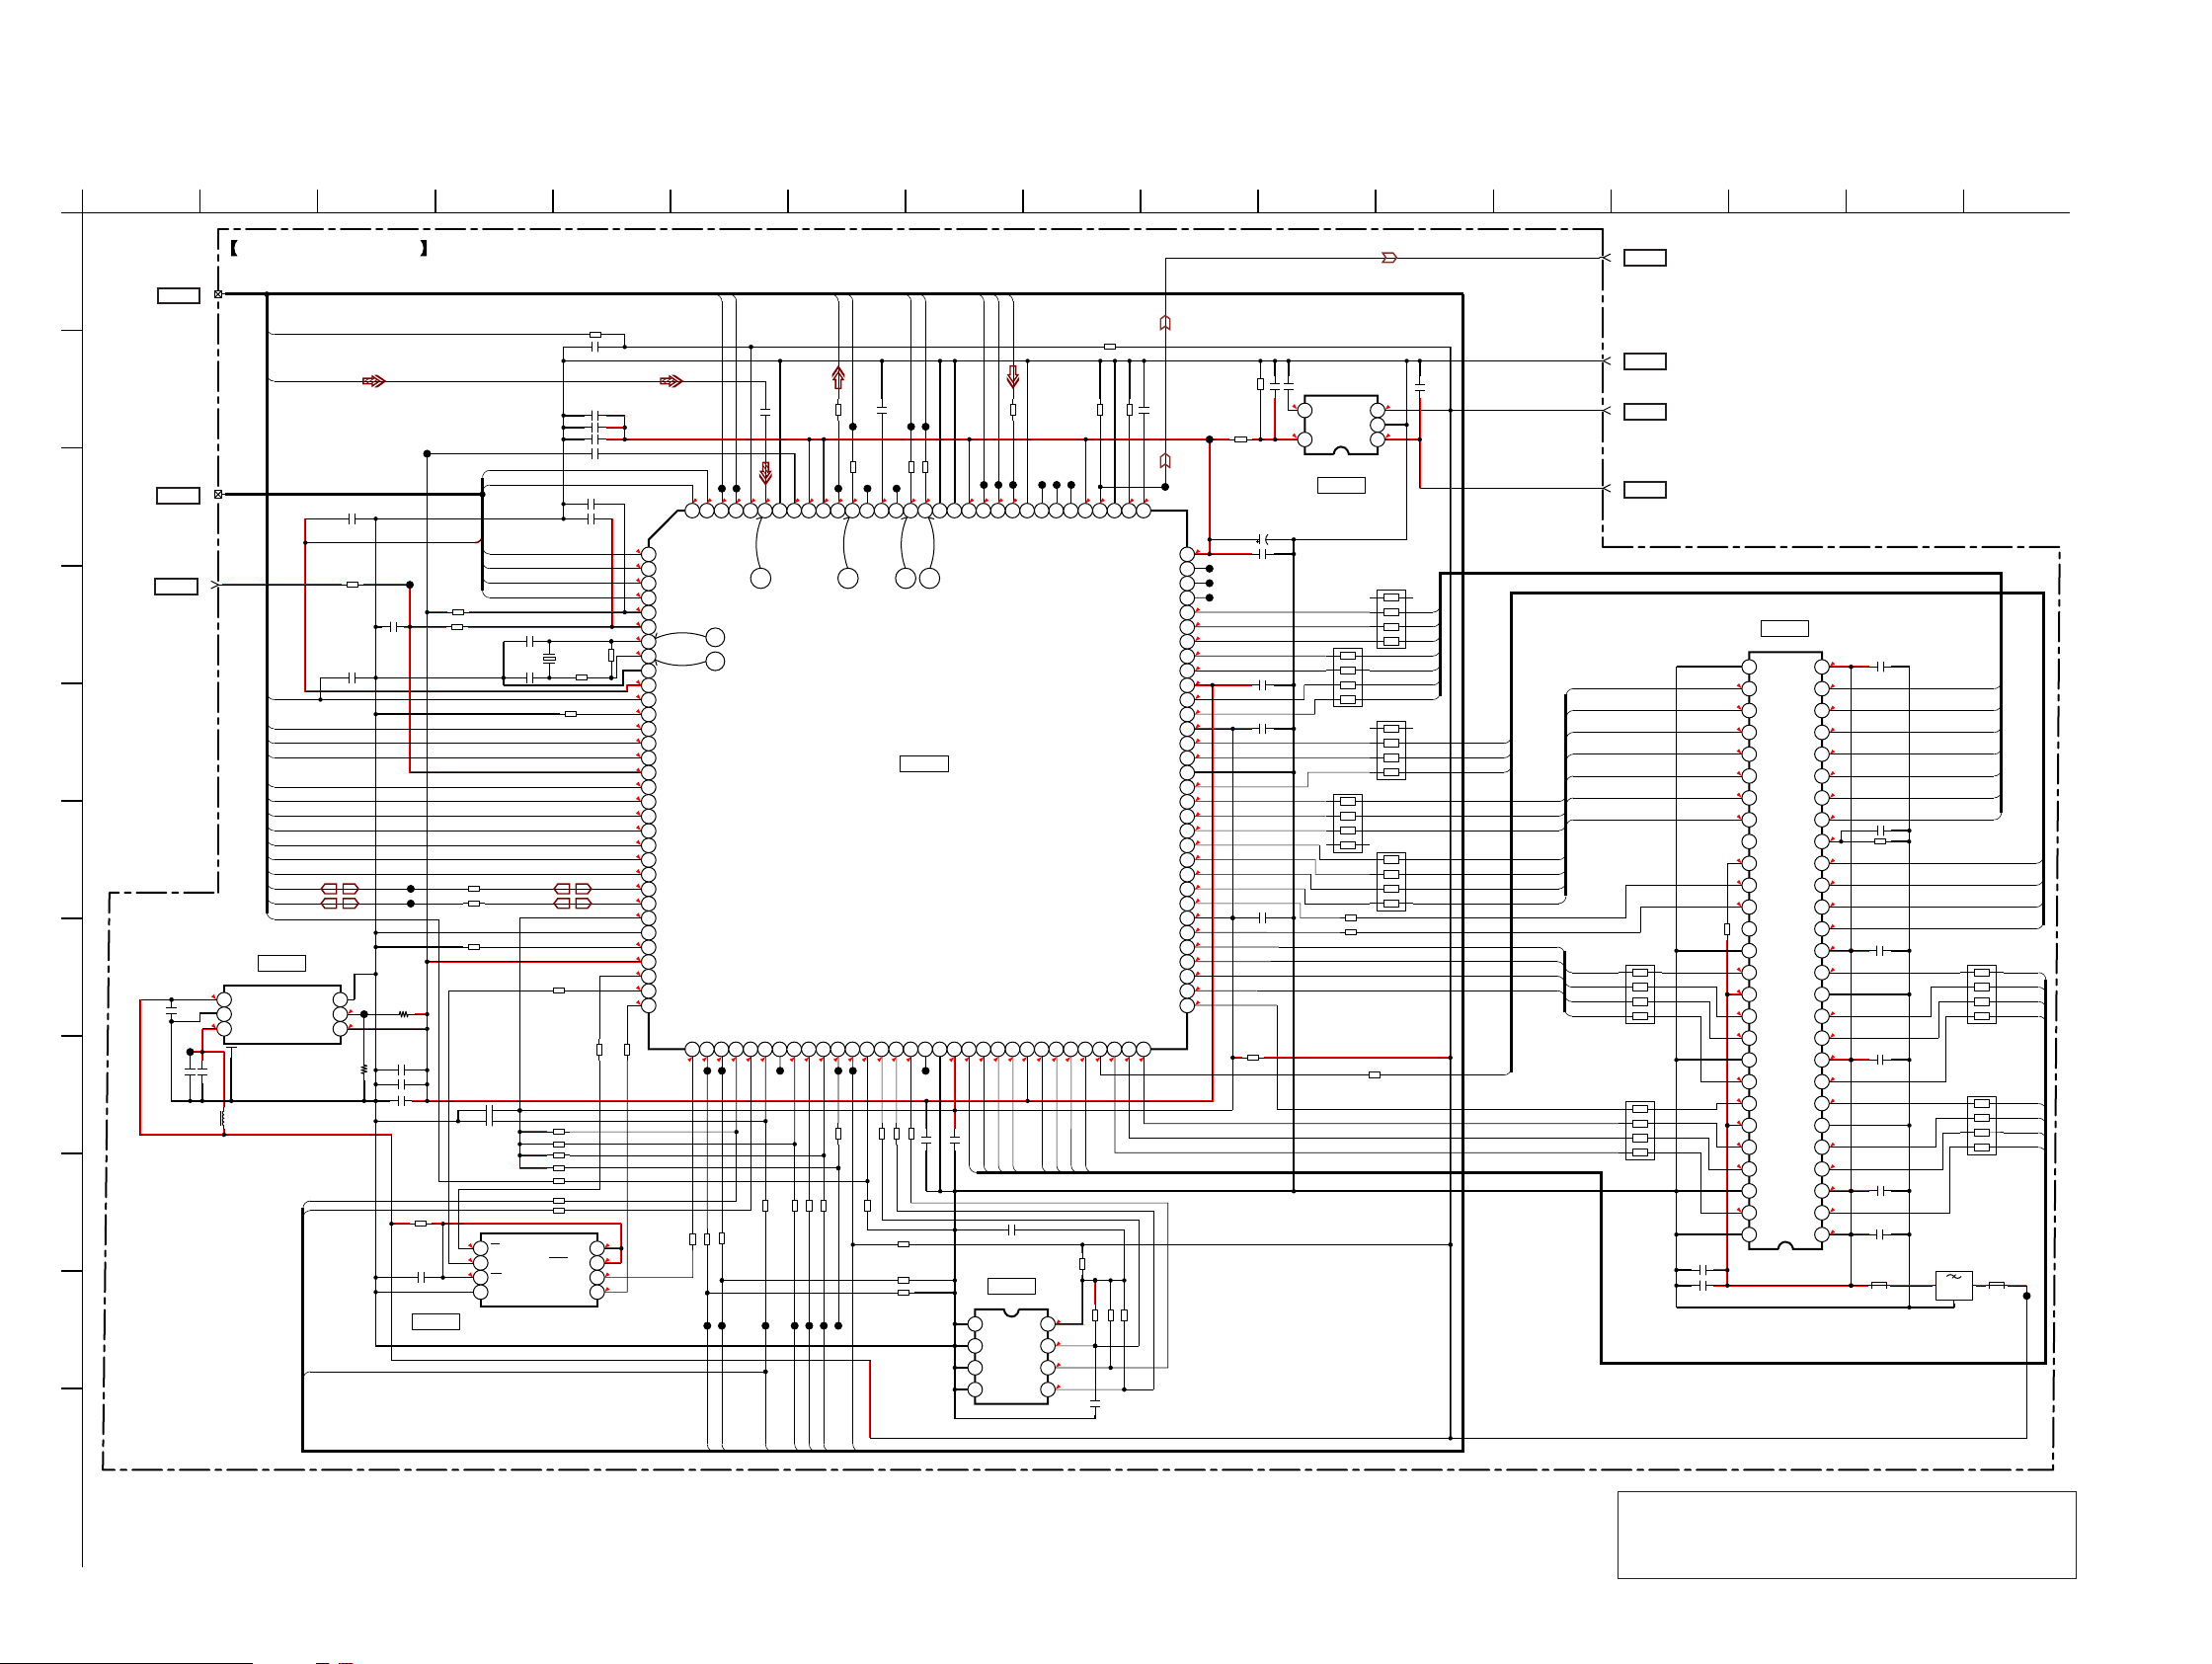
HCD-GT3D
Ver. 1.2
6-10. SCHEMATIC DIAGRAM - MOTHERBOARD Board (5/10) -
1
2 3 4 5 6 7 8 9 10 11 12 13 14 15 16 17
MOTHERBOARD BOARD (5/10)
A
24
>024S
MOTHERBOARD
BOARD
(4/10), (6/10),
(9/10), (10/10)
(Page 43), (Page 45),
(Page 48), (Page 49)
OPDIST
RFIP
R349 100
C334 0.01
B
C343 1
C340 1
X301
27MHz
R327 47
R348 4.7k
R387 3.3k
R357 3.3k
R361 4.7k
R321 100
R347 0
R350 0
C339 0.01
C338 0.1
C328 10
C330 0.1
R332 330
R330 15k
VCC
HOLD/SIO3
SCLK
R331
R334
100k
R340
47
47
3.3
8
3.3
7
1.4
6
0
5
CL308
FE_VOC
VC
R328 12
R326 0
R335 0
R337 0
R339 5.1k
FE_VOB
FE_VOA
FE_VOD
FE_VOF
FE_VOE
C322 10p
C323 12p
C325 0.01
C336 0.01
0.5
1
CS
1.3
2
SO/SIO1
3.3
3
WP/SIO2
4
GND SI/SIO0
27
>027S
C
D
E
F
G
H
I
J
MOTHERBOARD
BOARD
(6/10)
(Page 45)
>028S
MOTHERBOARD
BOARD
(6/10)
(Page 45)
C373
1000p
JL355
C316 10
FE_3.3V
28
BD00IC0WHFV-GTR
IC303
+1.2V REG
3.4
4
5
NC
3.1
6
VCC
C369 0.1
C372 10
L301
47nH
FE_VREFO
PD
FE_CD_LDD
FE_DVD_LDD
FE_DMO
FE_FMO
CD_VR
DVD_VR
FE_TRO
FE_FOO
MSW
USBM
USBP
FE_MUTE
IC303
R322 0
C319 10
3
GNDEN
2
FB
1
VO
RXD
TXD
MTK_RESET
R303
47k
0.8
0.3
CL307
C331
0.1
JL330
JL331
R302
27k
JL354
C321 10
C315 0.1
C326 0.01
R329 0
C324 0.1
MX25L3235EM2I-10G
IC302
IC302
SERIAL FLASH
K
• See page 37 for Waveforms. • See page 59 for IC Block Diagrams. • See page 66 for IC Pin Function Descriptions.
CVBUS
25
MOTHERBOARD
FE_OP-
FE_OPO
C337 1
CL310
CL312
2.1 2.1 2.6 2.6 0.93.4 1.3 3.4 3.4 0 1.7 1.7 1.7 1.7 3.4 0.2 1.3 1.3 3.4 0.4 1.3 0
128 127 126 125 124 123 122 121 120 119 118 117 116 115 114 113 112 111 110 109 108 107 106
RF_A
SPFG/OP-
IOPMON/OPO
IFSCK
IFSDORXTX
0.1 3.4 3.4 3.4
CL311
R345 100
JL333
IFSDO
RFIP
OPDIST
PRST#NCIFSDI
R352 100
JL335
XSYSRST
2
2
0.2
0.2
1.2
3.4
0.8
0.7
2
1.4
0
0
3.3
3.3
3.3
1.4
1.4
0
0
1.4
1.4
0.1
0
0
3.4
0.8
1.3
3.4
0
0.3
RF_B
1
RF_C
2
RF_D
3
RF_E
4
RF_F
AVDD12_2
5
AVDD33_1
6
7
8
9
10
11
12
13
14
15
16
17
18
19
20
21
22
23
24
25
26
27
28
29
30
31
32
18
XTALI
XTALO
19
AGND33
V20
V14/VREF0
REXT
MDI1
LDO1
LDO2
AVDD33_2
DMO
FMO
CD_VR
DVD_VR
TRO
FOO
MSW
USB_DM
USB_DP
VDD33_USB
VSS33_USB
PAD_VRT
VDD12_USB
SF_CS#
SF_DO
SF_DI
SF_CK
33 34 35 36 37 38 39 40 41 42 43 44 45 46 47 48 49 50 51 52 53 54 55 56 57 58 59 60 61 62 63 64
3.3
1.4
CL309
R344 100
R342 47
JL332
IFSCK
AGND12
AVDD12_1
3.3 2 3.2
CL313
R354 0
JL334
IFSDI
ASDATA0
MTK-LRCK
CL316
C341 10
R358 100
CL318
CL314
R360 100
NC
AVCM
ALRCK
ASDATA0
ADACVDD1
ADACVDD2
CD RF AMP FOCUS/TRACKING ERROR AMP,
CD SYSTEM PROCESSOR,
DIGITAL SERVO PROCESSOR
IFBSY
IFCS#
MFISW
LIMITSW
MUTE
EEWP
3.1 2.8 0 3.4 3.4 3.4
CL317
CL315
R359 1k
R363 0
47
R356
R355 0
R362 10k
R319
R346
R343
JL338
JL337
JL336
XIFBSY
XIFCS
FE_LIMIT
MTK-BCK
CL320
47
CL319
R365
NC
ABCK
21 202223
IC301
CXD9990R
IC301
SDA
SCLNCDVSS33
R366 0
R364 0
10k
3.3k
3.3k
MTK-MCK
CL321
330
R367
ACLK
3.4
CL322
C344 0.01
ADACVSS2
ADACVSS1
DVDD33
0.8 0.6 0.6
C342 0.01
MTK-P107
MTK-P108
CL330
CL329
NC
NC
AADVDD
RD0
RD1
RD2
0.7
RD0
RD1
RD2
C349 0.01
IC304
R1EX24016ASAS0A
IC304
EEPROM
1
A0
2
A1
3
A2
4
GND SDA
ADIN
R390 10
CL331
RD3
R351 10k
R368 150
CL334
CL332
CL333
105
104 103 102 101 100 99 98 97
ADIN
CR/R
CVBS
SY/Y/G
SC/CB/B
AADVSS
RD3
1.3 0.5 0.3 0.2 1.3 3 1.2 1.6
VCC
WE
SCL
DVDD12
RD4
DACVDDB
RD4
RD5
RD6
RD7
DQM0
RD7
RD5
RD6
R373
0
3.3
8
R374 10k
0
7
3.3
6
3.3
5
C354
0.1
DACVSSC
RD15
R376 4.7k
R377 4.7k
R370 560
FS
RD14
1.6
C345 0.1
VREF
DACVDDC
MFIDET
XMAMUTE
SPDIF
RA10
DVDD12
DVDD33
RAS#
CAS#
DVSS12
RWE#
RA11
RCLK
DVDD33
DQM1
RD10
RD11
RD12
RD13
C356
0
C355 0.01
C353 1
R372 10k
C350
47 10V
C352 0.1
C346 0.01
C347 0.01
C348 0.01
R378
0
3.4
CL335
R371 0
JL339
3.4
96
CL336
95
CL337
94
CL338
93
1.6
RA3
92
2.5
RA2
91
2.5
RA1
90
0.3
RA0
89
0
88
1.3
87
1.5
86
BA1
0.9
85
BA0
3.4
84
3.3
83
3.2
82
81
3.3
80
1.1
79
RA4
1.6
78
RA5
1.7
77
RA6
1.2
RA7
76
0
RA8
75
0
74
RA9
0
73
1.5
72
3.4
71
3
70
1.2
69
RD8
1
68
RD9
1.1
67
1.3
66
1.4
65
5
VOUT
IC305
BU33TD3WG-TR
IC305
+3.3V REG
R380 100
R379 22
RB305
22
RB304
22
R369 22
GND
VDD
CENC
34
2
1
RB303
RB302
RB301
1
3.3
5.1
22
RA3
RA2
RA1
RA0
RA10
BA1
BA0
RAS
CAS
RWE
22
22
DQM0
RA11
RD10
RD11
RA4
RA5
RA6
RA7
RA8
RA9
RD8
RD9
DGND
DVDD3.3V
DVDD5V
RA4
RA5
RA6
RA7
RA8
RA9
RA11
RD8
RD9
RD10
RD11
RD12
RD13
RD14
RD15
MOTHERBOARD
4
17
MOTHERBOARD
(Page 41), (Page 45)
19
MOTHERBOARD
(Page 41), (Page 43)
>025S
BOARD
(4/10)
(Page 43)
BOARD
(1/10)
(Page 40)
>004S
>017S
BOARD
(2/10), (6/10)
>019S
BOARD
(2/10), (4/10)
RB306
22
RB307
22
C357 0.1
C358 0.1
R381
10k
28
1.1
29
1.6
30
1.7
31
1.2
32
0
33
0
34
0
35
36
3.3
37
1.5
38
3
39
40
41
0.8
42
3.4
43
0.7
44
0.7
45
46
0.7
47
0.7
48
3.4
49
0.9
50
0.9
51
52
0.4
53
54
IC306
EM638165TSD-6G
IC306
SDRAM
VDDVSS
A4
A5
A6
A7
A10/AP
A8
BA1
A9
BA0
A11
NC
RAS
CLKE
CAS
CLK
UDQM
LDQM
NC
VDD
VSS
DQ7
DQ8
VSSQ
VDDQ
DQ6
DQ9
DQ5
DQ10
VDDQ
VSSQ
DQ4
DQ11
DQ3
DQ12
VSSQ
VDDQ
DQ2
DQ13
DQ1
DQ14
VDDQ
VSSQ
DQ0
DQ15
VDD
VSS
3.4
C364 0.1
27
1.1
26
A3
1.1
25
A2
1.1
24
A1
0.2
23
A0
0
22
1.3
21
1.2
20
C359 0.01
0
R382 10k
19
CS
3.3
18
3.2
17
3.3
16
WE
3
15
3.4
C360 0.1
14
1.1
13
12
0.2
11
0.3
10
3.3
C365 0.1
9
0.5
8
0.5
7
6
0.6
5
0.6
4
3.3
C363 0.1
3
0.8
2
3.4
C362 10
1
FB320
0uH
FL301
231
RA10
RB308
RB309
RA3
RA2
RA1
RA0
BA1
BA0
RAS
CAS
RWE
DQM0
RD7
RD6
RD5
RD4
22
RD3
RD2
RD1
RD0
22
FB321
0uH
JL341
HCD-GT3D
Note : IC301, IC302 and IC303 on the MOTHERBOARD
board cannot exchange with single. When these
parts on the MOTHERBOARD board are damaged,
exchange the entire mounted board.
4444
Page 45
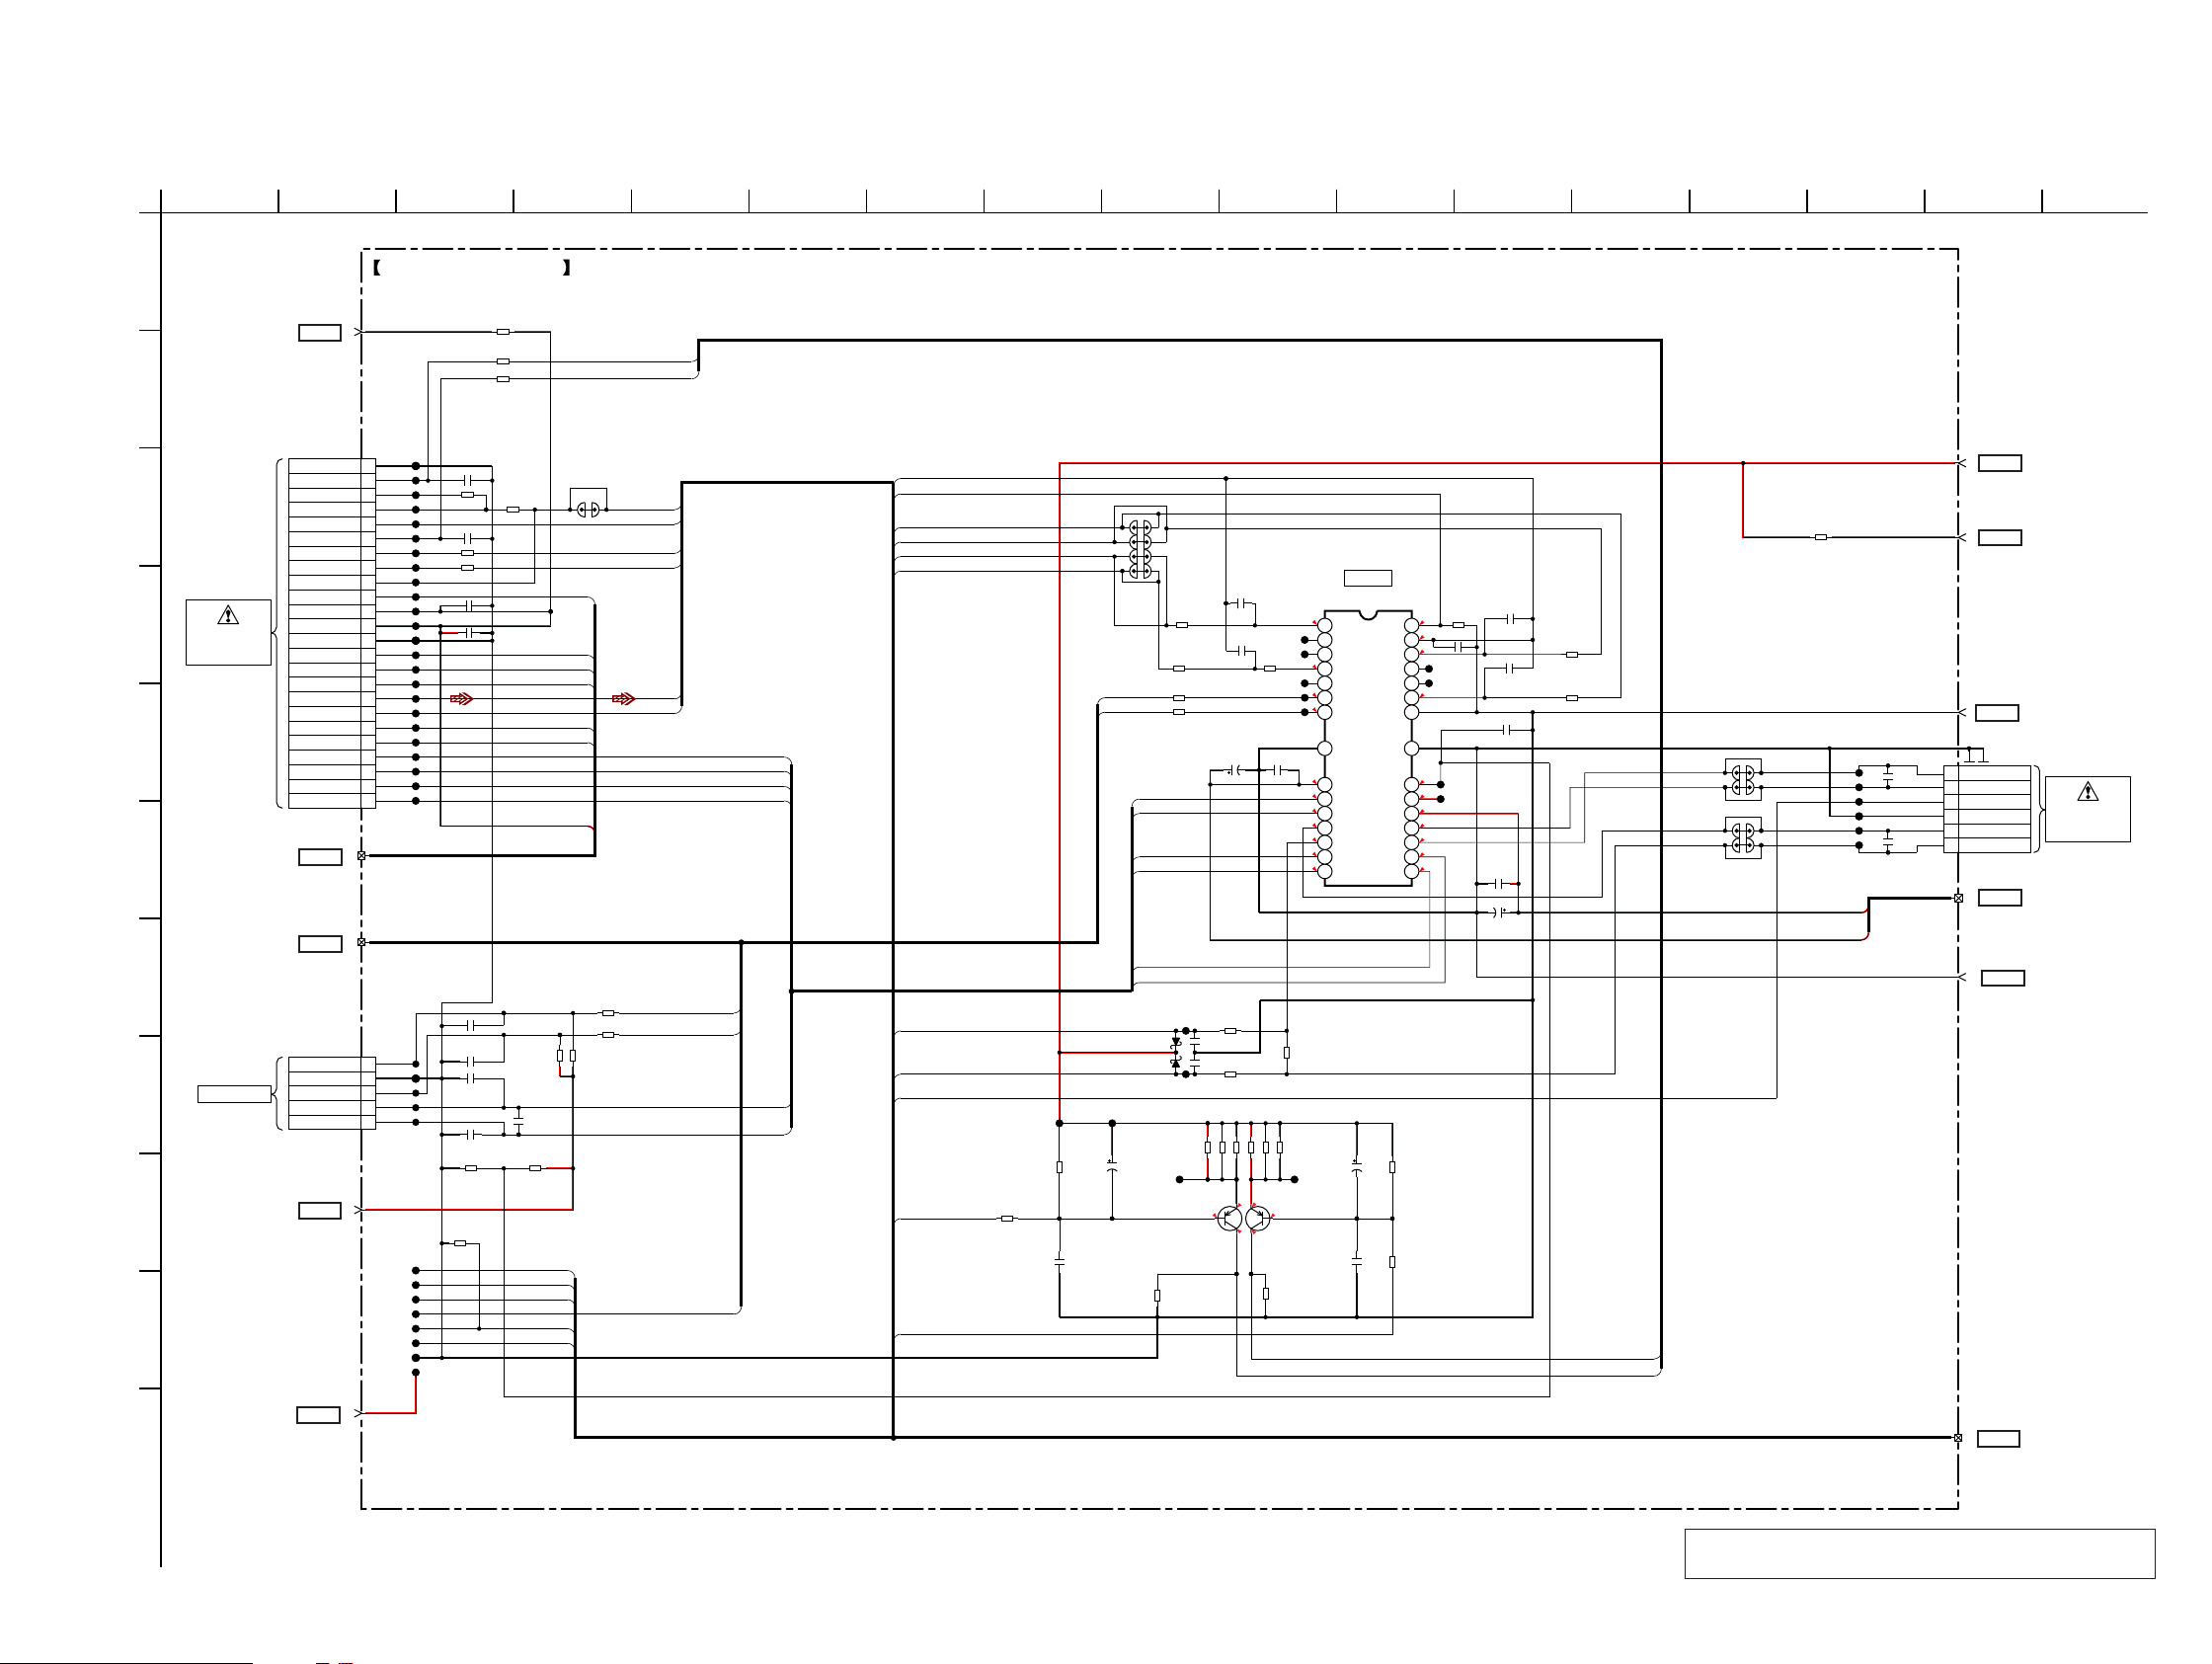
HCD-GT3D
6-11. SCHEMATIC DIAGRAM - MOTHERBOARD Board (6/10) -
1
A
2 3 4 5 6 7 8 9 10 11 12 13 14 15 16 17
MOTHERBOARD BOARD (6/10)
>020S
MOTHERBOARD
BOARD
(2/10)
(Page 41)
FE_5V
20
R386 0
R500 0
R471 0
FE_LD_DVD
FE_LD_CD
B
CN302
24P
JL301
C
D
E
F
G
H
SERVICE,
OPTICAL DEVICE(7G)
(1/2)
MS-476 BOARD
LD (650)
VR (780)
>027S
MOTHERBOARD
BOARD
(5/10)
(Page 44)
>011S
MOTHERBOARD
BOARD
(9/10)
(Page 48)
TRAY-OUT
TRAY-IN
MSW 18
VOD/C
TRK-
GND
LOAD+
LOAD-
1GND (LD)
2
3NC
45V
5PD
6LD (780)
7VR (650)
8
9NC
10VOE/E+G
11VCC
12VC
13GND (PDIC)
14VOF/F+H
15VOB/B
16VOA/A
17RF
19VOD/D
20
21
22TRK+
23FCS+
24FCS-
27
11
CN303
5P
5
4
3
2
1
JL302
JL303
JL304
JL305
JL306
JL307
JL308
JL309
JL310
JL311
JL312
JL313
JL314
JL315
JL316
JL317
JL318
JL319
JL320
JL321
JL322
JL323
JL324
JL325
JL326
JL327
JL328
JL329
C366 0.01
R318 10k
C367 0.01
R389 100
R301 100
C302 0.1
C303 0.1
C307 0.001
C308 0.001
C309 0.001
C310 0.001
R310
C311
SL301
FE_VOE
FE_VOF
FE_VOB
FE_VOA
FE_VOD
FE_VOC
VC
R312
R313
1k
1k
0.1
R316 1k
R317
1k
OPDIST
PD
DVD_VR
CD_VR
RFIP
MSW
UNLOAD_END_SW
LOAD_END_SW
4.7k
• See page 59 for IC Block Diagrams.
FE_VREFO
FE_MUTE
FE_FMO
FE_TRO
FE_FOO
FE_DMO
FE_TRKFE_TRK+
FE_FCS+
FE_FCS-
FE_OP-
FE_OPO
LOAD+
LOAD-
FE_LIMIT
CL412
SL401
SL402
SL403
SL404
FWD
REV
RB520S-30FJTE61
RB520S-30FJTE61
CL413
D401
D402
R406 0
R407 0
LOADLOAD+
FE_FCSFE_FCS+
FE_TRKFE_TRK+
R401
R402
27k
10k
CL406
CL407
C405
C406
FE_3.3V
28
>028S
MOTHERBOARD
BOARD
(5/10)
(Page 44)
R433
0
IC401
AM5890S
C402
330p
C403
CL401
0.015
CL402
R408
10k
CL403
CL404
CL405
C401
C404
100 10V
0.1
R409
10k
0.1
R410
10k
0.1
R404
IC401
FOCUS/TRACKING COIL DRIVE,
SPINDLE/SLED/LOADING MOTOR DRIVE
1.4
VINFC
1
TRB_1
2
REGO2
3
1.4
VINSL+
4
REGO1
5
0
6
FWD
0
REV
7
PGND
29
5.4
8
VCC1
0
9
VOTR-
0
VOTR+
10
2.6
VOSL+
11
2.6
12
VOSL-
2.7
VOFC-
13
2.7
VOFC+
14
1
MUTE
BIAS
VINTK
TRB_2
RESET
VINLD
GND
PGND
VCTL
VCCD
VCC2
VOLD-
VOLD+
VOTK-
VOTK+
0
28
1.4
27
1.4
26
25
24
23
22
30
1.5
21
20
19
18
17
16
15
1.4
0
5.4
2.6
2.6
2.6
2.6
C407 0.1
CL408
CL409
CL410
CL411
R411
C411
330p
10k
R415
27k
C413
C409 0.1
C408
0.1
C412
100 10V
R418
0.1
15k
SL405
SL406
SL407
SL408
FE_5.2V_M
FE_5.2V_TRAY
JL401
JL402
JL403
JL404
JL405
JL406
C418
C419
0.1
0.1
FE_3.3V_1
DGND
CN401
6P
MGND
18
MOTHERBOARD
MOTHERBOARD
4
6SL+
5SL4 NC(LIMIT)
3 NC(GND)
2 SP+
1 SP-
16
MOTHERBOARD
15
MOTHERBOARD
>018S
BOARD
(2/10)
(Page 41)
BOARD
(1/10)
(Page 40)
>004S
>016S
BOARD
(2/10)
(Page 41)
>015S
BOARD
(7/10)
(Page 46)
SERVICE,
OPTICAL DEVICE(7G)
(2/2)
K
HCD-GT3D
R422
JL352
JL353
JL346
JL347
JL348
JL349
JL350
JL351
R496 2.2k R463 2.7k
R388
100k
MTK-P108
MTK-P107
MTK_RESET
R421
FE_DVD_LDD
TXD
RXD
MTK-POWER-CTRL
FE_CD_LDD
100
MOTHERBOARD
BOARD
(2/10), (5/10)
(Page 41), (Page 44)
I
>017S
DVDD3.3V
17
J
E+3.3V
30
>030S
MOTHERBOARD
BOARD
(7/10)
(Page 46)
C421
0.01
C420
47k
47 35V
R424
100K
R423 15
CL414
3.3 3.3
Q401
2SA2119K
AUTOMATIC POWER
CONTROL (FOR DVD)
R425 15
R426 15
R427 15
R428 15
3.3
3.4
0
0
AUTOMATIC POWER
CONTROL (FOR CD)
R430 15
CL415
Q402
2SA2119K
R429
100k
C423
47 35V
C424
R431
47K
R432
0.01
100
FE_LD_CD
FE_LD_DVD
24
>024S
MOTHERBOARD
BOARD
(5/10)
(Page 44)
Note : When the MS-476 board is defective, exchange the
entire LOADING COMPLETE ASSY (T).
4545
Page 46
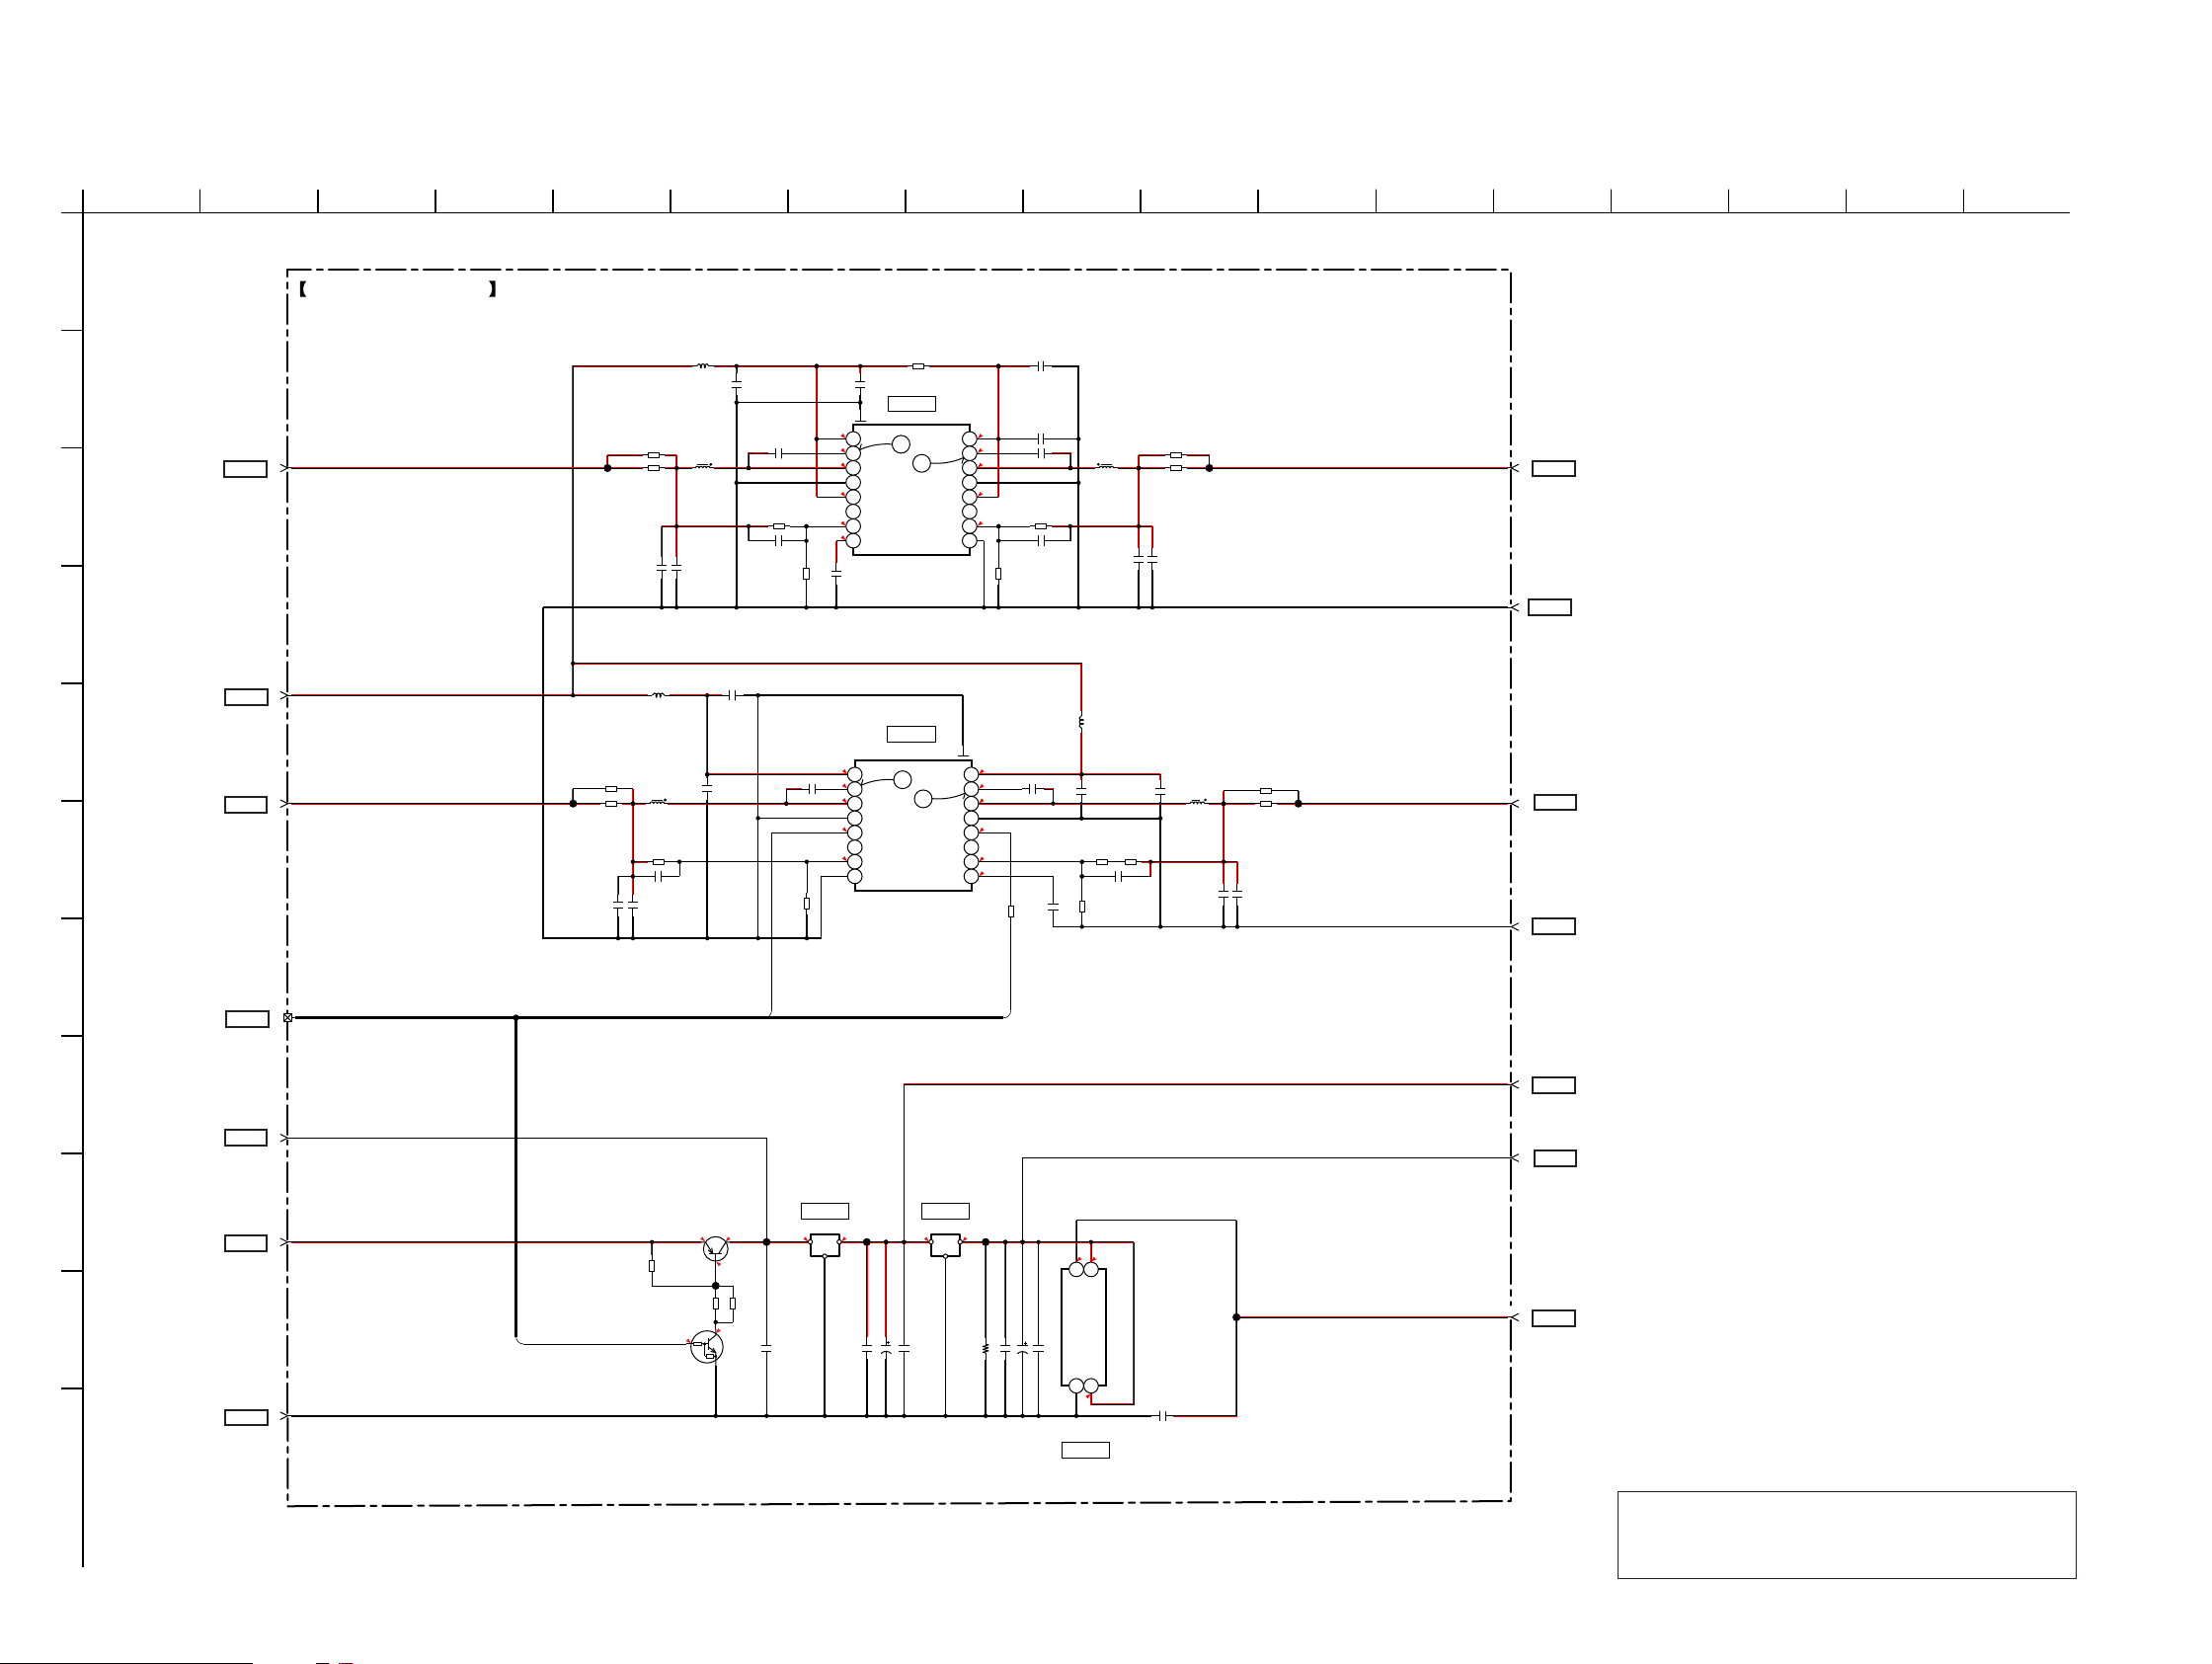
HCD-GT3D
6-12. SCHEMATIC DIAGRAM - MOTHERBOARD Board (7/10) -
1
2 3 4 5 6 7 8 9 10 11 12 13 14 15 16 17
A
MOTHERBOARD BOARD (7/10)
B
E+3.3V
30
>030S
MOTHERBOARD
BOARD
(2/10), (6/10),
C
(8/10), (9/10),
(10/10)
(Page 41), (Page 45),
(Page 47), (Page 48),
(Page 49)
JL040
D
M+13V
13
>013S
MOTHERBOARD
BOARD
(2/10), (4/10)
E
(Page 41), (Page 43)
>032S
MOTHERBOARD
BOARD
(10/10)
(Page 49)
JC001 0
USB+5V
32
JL001
JC002 0
F
C003 22
G
11
>011S
MOTHERBOARD
BOARD
(9/10)
(Page 48)
H
A+13V_GV2
33
>033S
MOTHERBOARD
BOARD
(10/10)
(Page 49)
I
A+13V
26
>026S
MOTHERBOARD
BOARD
(4/10)
(Page 43)
J
AGND
10
>010S
MOTHERBOARD
BOARD
K
(1/10), (2/10),
(3/10), (4/10),
(10/10),
(Page 40), (Page 41),
(Page 42), (Page 43),
(Page 49)
PCONT-PSAVE-PROTECT
• See page 37 for Waveforms.
L004
2.2uH
JC005 0
JC006 0
L003
2.2uH
L001
4.7uH
R059
C080
C005 22
R029
68k
KRC402-RTK
PWR SUPPLY
CONTROL
C004 22
68k
22p
Q461
C014
0.1
L002
2.2uH
C006 22
C013 0.1
C019
10
Q004
KTA1542T-RTK/P
+13V PWR SUPPLY
13.7
12.9
JL026
R033
3.3k
0.1
3.3
R035
3.3k
C018 0.1
R003 33k
C078 22p
VBUS-OE
JL046
C051
0.1
R006
10k
C017 0.1
R002
12k
78D09AG-TN3-R
IC004
+9V REG
13.6
IC004
VIN
C021
10
13.7
VIN2
16
9.2
VBST2
15
3.4
SW2
14
PGND2
13
13.7
EN2
12
PG2
11
0.9
VFB2
10
5.8
9
C036
1
13.7
1
10.4
2
5.1
3
4
3.4
5
6
1
7
8
9.113.6
GND
R087 0
IC002
TPS542941PWPR
IC002
DC-DC CONVERTER
4
IC001
TPS542941PWPR
IC001
DC-DC CONVERTER
VIN1
1
VBST1
SW1
PGND1
EN1
PG1
VFB1
GND
JL047
C062 0.1
C085 0.1
C057 100 16V
VIN1
VBST1
3
SW1
PGND1
EN1
PG1
VFB1
GNDVREG5
VIN2
VBST2
2
SW2
PGND2
EN2
PG2
VFB2
VREG5
IC006
78D05AG-TN3-R
IC006
+5V REG
9.1
VOUT
VINVOUT
GND
C039 0.1
13.7
C032 10
1
7
C034 0.1
2
1.2
3
4
13.7
5
6
0.9
R041 12k
7
C077 22p
8
R043 22k
13.7
16
9.2
C079 0.1
15
3.4
14
13
13.7
12
11
0.9
10
5.8
9
C035
R020
1
0
PCONT-BTSTBY
5.1
JL048
C072 100 10V
C100 1
R085 47
C068 0.1
2.2uH
L008
2.2uH
C030
10
R024
2.2k
R031
10k
5.13.4
3
4
VDD
CE
GND VOUT
2
1
5.1
IC008
MM3411A33URE
IC008
+3.3V REG
L007
C081
JC007 0
JC008 0
JL041
C050 22
C053 22
L006
4.7uH
JC003 0
E
JC004
0
JL003
C052 22
C049 22
JL067
C040
0.1
R023
56k
22p
C101 1
E+1.18V
DGND
M+5.2V
MGND
AVDD+9V
AVDD+5V
AVDD+3.3V
34
>034S
MOTHERBOARD
BOARD
(9/10)
(Page 48)
4
>004S
MOTHERBOARD
BOARD
(1/10)
(Page 40)
>031S
31
MOTHERBOARD
BOARD
(2/10), (10/10)
(Page 41), (Page 49)
15
>015S
MOTHERBOARD
BOARD
(2/10), (4/10),
(6/10), (10/10)
(Page 41), (Page 43),
(Page 45), (Page 49)
9
>009S
MOTHERBOARD
BOARD
(1/10)
(Page 40)
21
>021S
MOTHERBOARD
BOARD
(2/10), (3/10)
(Page 41), (Page 42)
22
>022S
MOTHERBOARD
BOARD
(3/10)
(Page 42)
Note : IC001 and IC002 on the MOTHERBOARD board
cannot exchange with single. When these parts on
the MOTHERBOARD board are damaged, exchange
the entire mounted board.
HCD-GT3D
4646
Page 47
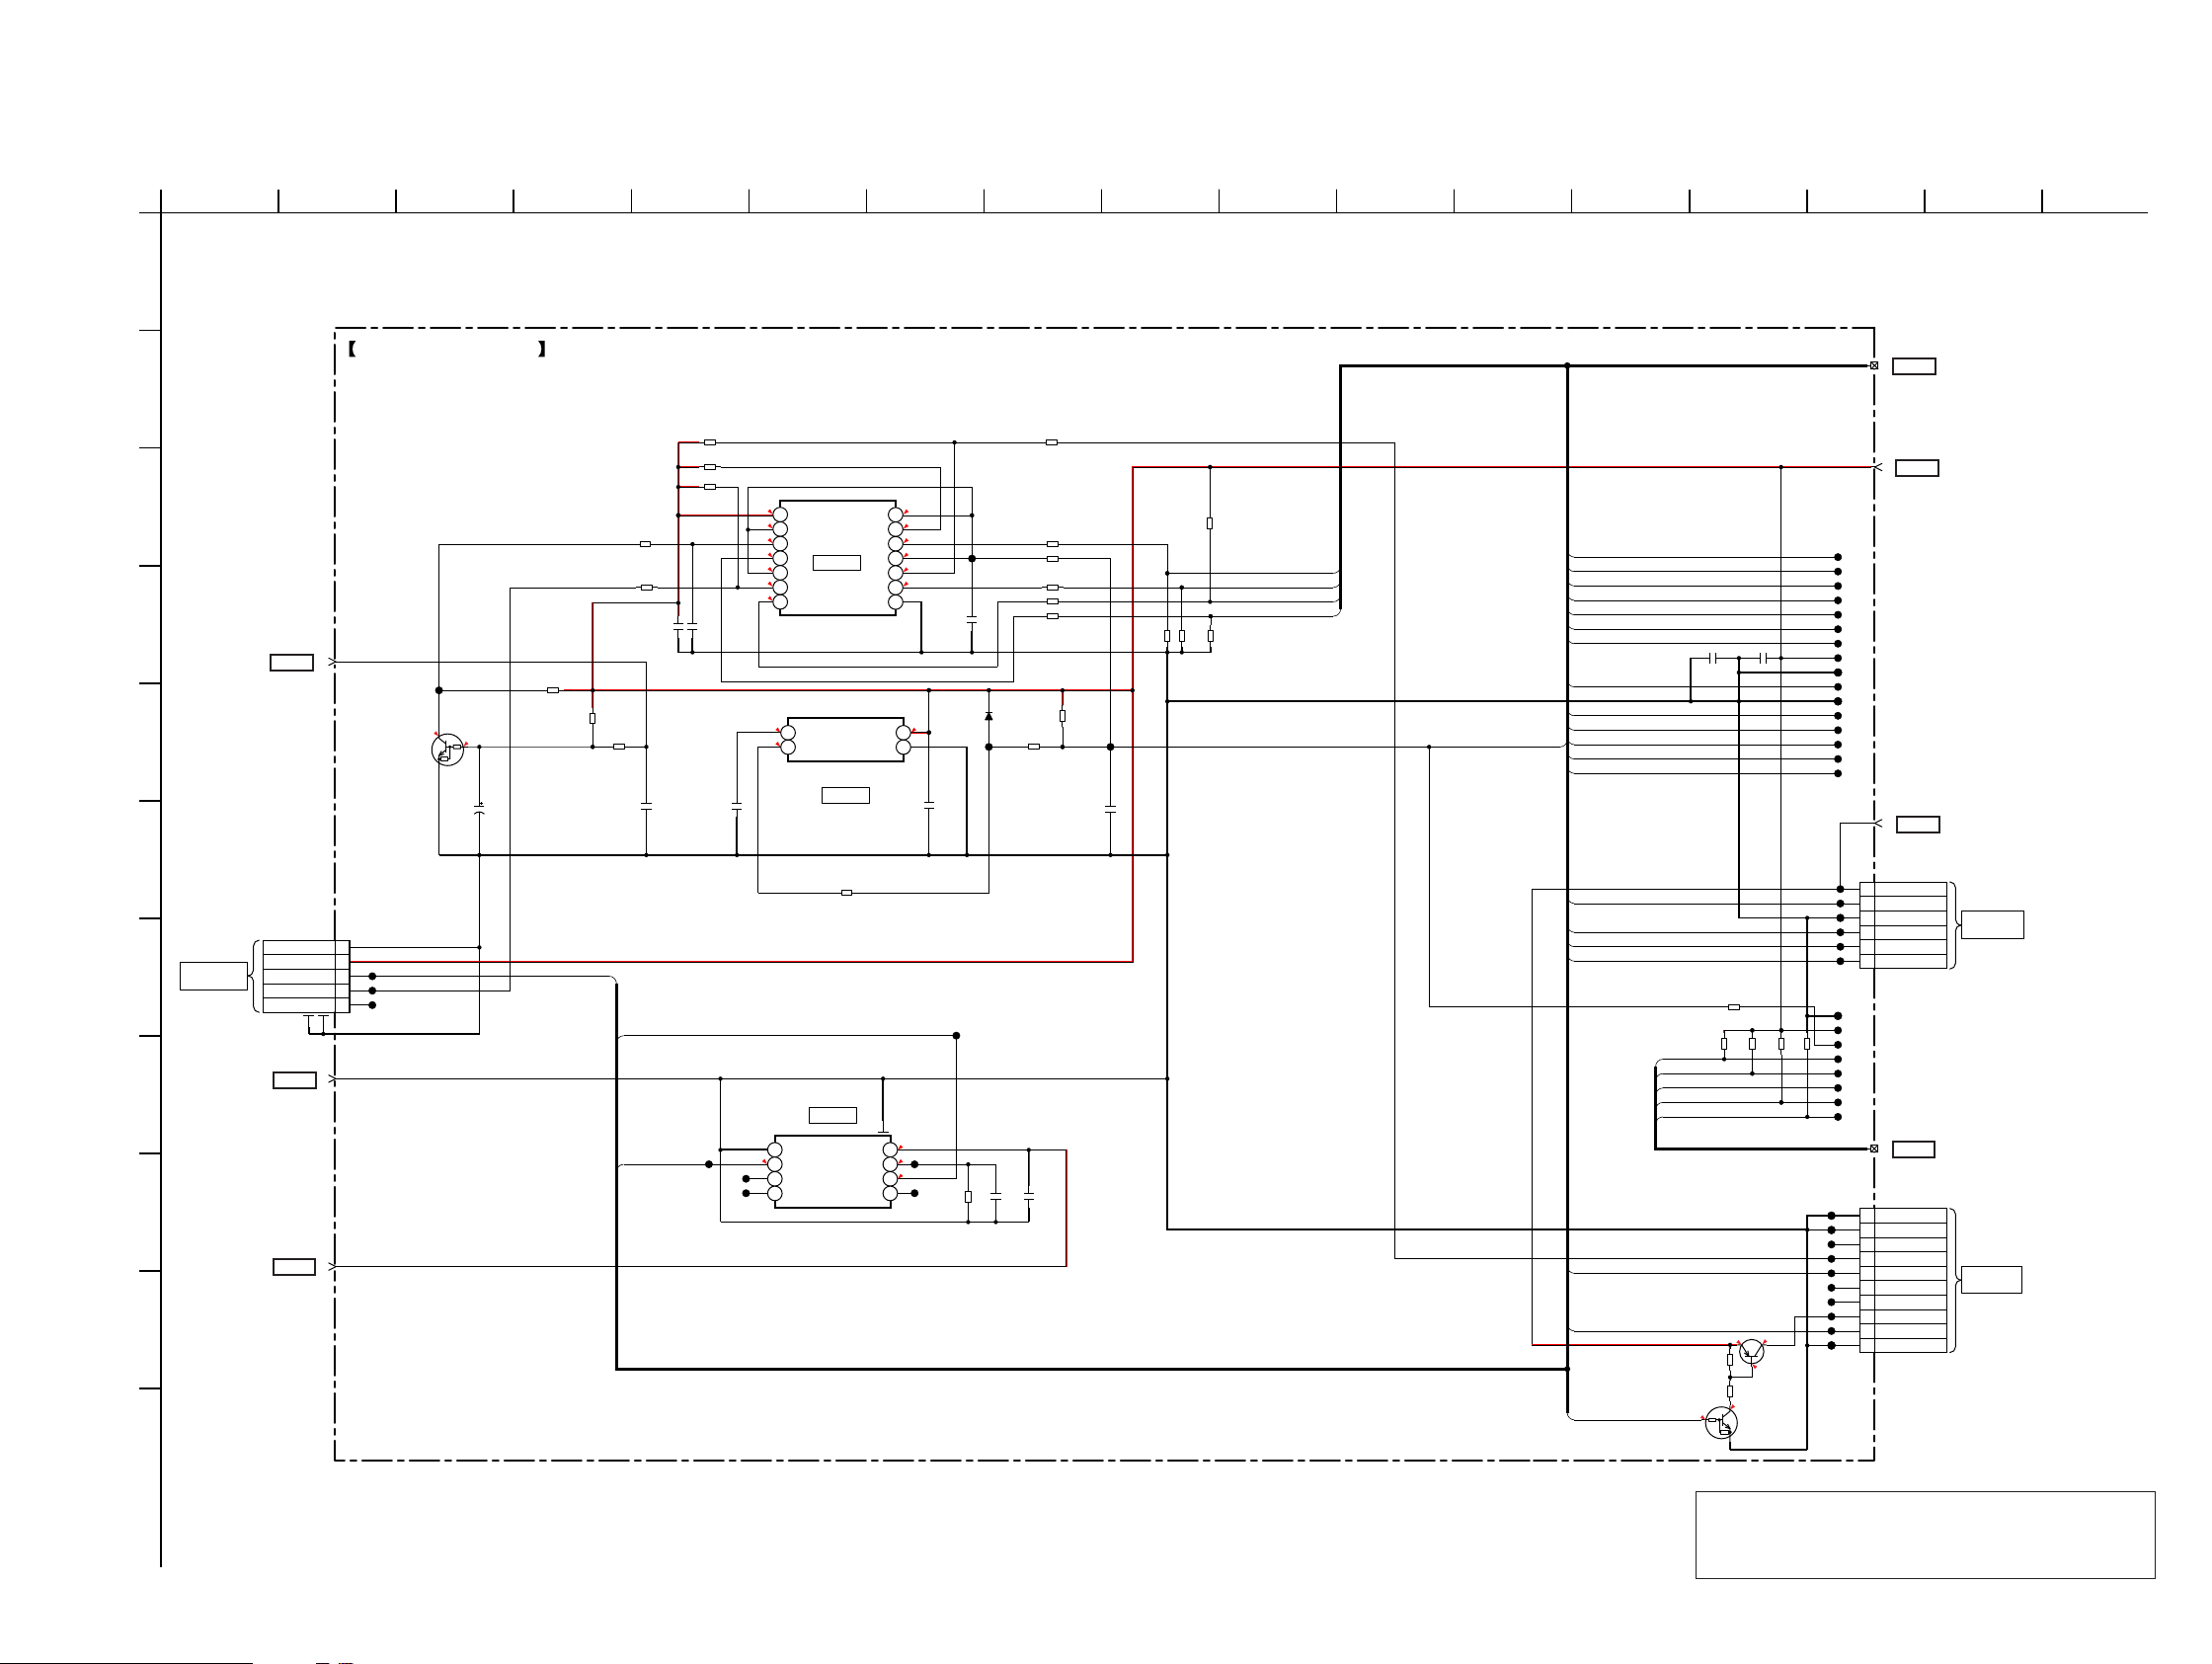
HCD-GT3D
Ver. 1.1
6-13. SCHEMATIC DIAGRAM - MOTHERBOARD Board (8/10) -
1
2 3 4 5 6 7 8 9 10 11 12 13 14 15 16 17
A
MOTHERBOARD BOARD (8/10)
B
R125 47k
R123 10k
R120 47k
C
R116 47k
R129 100
R099
C102
0.1
0
C104
0.1
D
AC_DET
29
>029S
MOTHERBOARD
BOARD
(4/10)
(Page 43)
E
KRC402-RTK
AC OFF DETECT
Q107
JL269
3.4
0.1
C103
4.7 35V
R115
1k
R117
6.8k
F
CN101
5P
1GND
>004S
BOARD
(1/10)
(Page 40)
2MCU VCC
JL110
3TXD1
JL111
4RXD1
JL103
5CLK1
DGND
4
DEBUG-TXD
DIR_CP-CLK
DIR_CP-DATA
JL132
FOR
SERVICE USE
G
H
MOTHERBOARD
I
D+3.3V
1
>001S
MOTHERBOARD
BOARD
(1/10)
(Page 40)
J
• See page 59 for IC Block Diagrams.
C106
0.1
C105
0.0022
JL224
JL225
3.4
3.4
3.4
3.4
3.4
3.4
3.4
3.4
14
VCC
4G
13
IC102
4A
12
TC74VHC126FT (EK)
4Y
11
IC102
3G
10
BUS BUFFER
3A
9
8
1.2
3
3.4
VOUT
4
BU4229F-TR
IC103
IC105
MFI337S3959
IC105
COPROCESSOR
1
GND
SDA
2
NC_3
3
NC_4 NC_5
4
IC103
RESET
R122
0
3.4
1G
1
3.4
1A
2
3.4
1Y
3
3.4
2G
4
3.4
2A
5
3.4
2Y
6
GND3Y
7
3.4
VDDCT
2
GND
1
C107
0.1
3.4
8
VCC
0
RST
7
3.4
SCL
6
5
JL227
JL228
C109
DA2J10100L
JL131
1
D102
R161
JL149
JL148
10k
C166
0.1
R131 100
R132 47
R127 10k
R133 47
R134 47
R135 47
R126
0
C165
0.1
R128
11
>011S
MOTHERBOARD
BOARD
(9/10)
(Page 48)
USBDPVCC
R140
22k
DEBUG-RXD(MD-BOOT1)
SS-DET(MD-CLKS)
BT-RXD(MD-CLK)
DEBUG-RXD(MD-BOOT1)
AC-CUT(MD-BOOT0)
R137
R139
22k
1k
JL150
C110
0.1
R143
22k
22k
TEST-MON0/SD_D2_0
AC-CUT(MD-BOOT0)
TEST-MON1/SD_D3_0
FL-LCD-CLK
TEST-MON2/SD_CMD_0
PCONT-BTSTBY
TEST-MON3/SD_CLK
TEST-MON4/SD_D0_0
LCD-CSB
ANALOG-DSEL/SD_D1_0
RESET
RGB-TRANS-LED/SD_CD_0
RGB-TRANS-LED-SPK/SD_WP_0
NFC_CLK
NFC_DATA
NFC-IRQ
NFC-RF-DET
BT-RXD
BT-TXD
BT-RESET
BT-ON
TCK
TMS
TDI
TDO
TRST
Q104
KRC402-RTK
PWR SUPPLY
CONTROL
C284 0.1
R206
10k
KTA1542T-RTK/P
+3.3V PWR SUPPLY
R108
10k
3.3
R191
100
3.4
C167 0.1
R204
10k
Q103
R109
2.2k
0
JL151
JL152
JL194
JL153
JL154
JL155
R202
R194
10k
10k
3.4
2.7
JL112
JL113
JL104
JL105
JL106
JL107
JL108
JL114
JL109
JL115
JL196
JL197
JL198
JL199
JL200
JL201
JL215
JL195
JL216
JL202
JL217
JL203
JL235
JL204
JL205
JL206
E+3.3V
CN105
JL169
JL170
JL171
JL172
JL173
JL174
JL175
JL176
CN102
6P
1VDD
2SCL
3DGND
4DATA
5IRQ
6 RF-DET
10P
1GND
2GND
3GPIO
4 BT-RXD
5 BT-TXD
6 BT-CTS
7 BT-RTS
83.3V
9 BT-RESET
10 GND
35
>035S
MOTHERBOARD
BOARD
(9/10)
(Page 48)
30
>030S
MOTHERBOARD
BOARD
(7/10)
(Page 46)
36
>036S
MOTHERBOARD
BOARD
(9/10)
(Page 48)
NFC MODULE
(RC-S730 (WW))
BLUETOOTH
MODULE
K
HCD-GT3D
Note : IC105 on the MOTHERBOARD board cannot
exchange with single. When this part on the
MOTHERBOARD board is damaged, exchange the
entire mounted board.
4747
Page 48
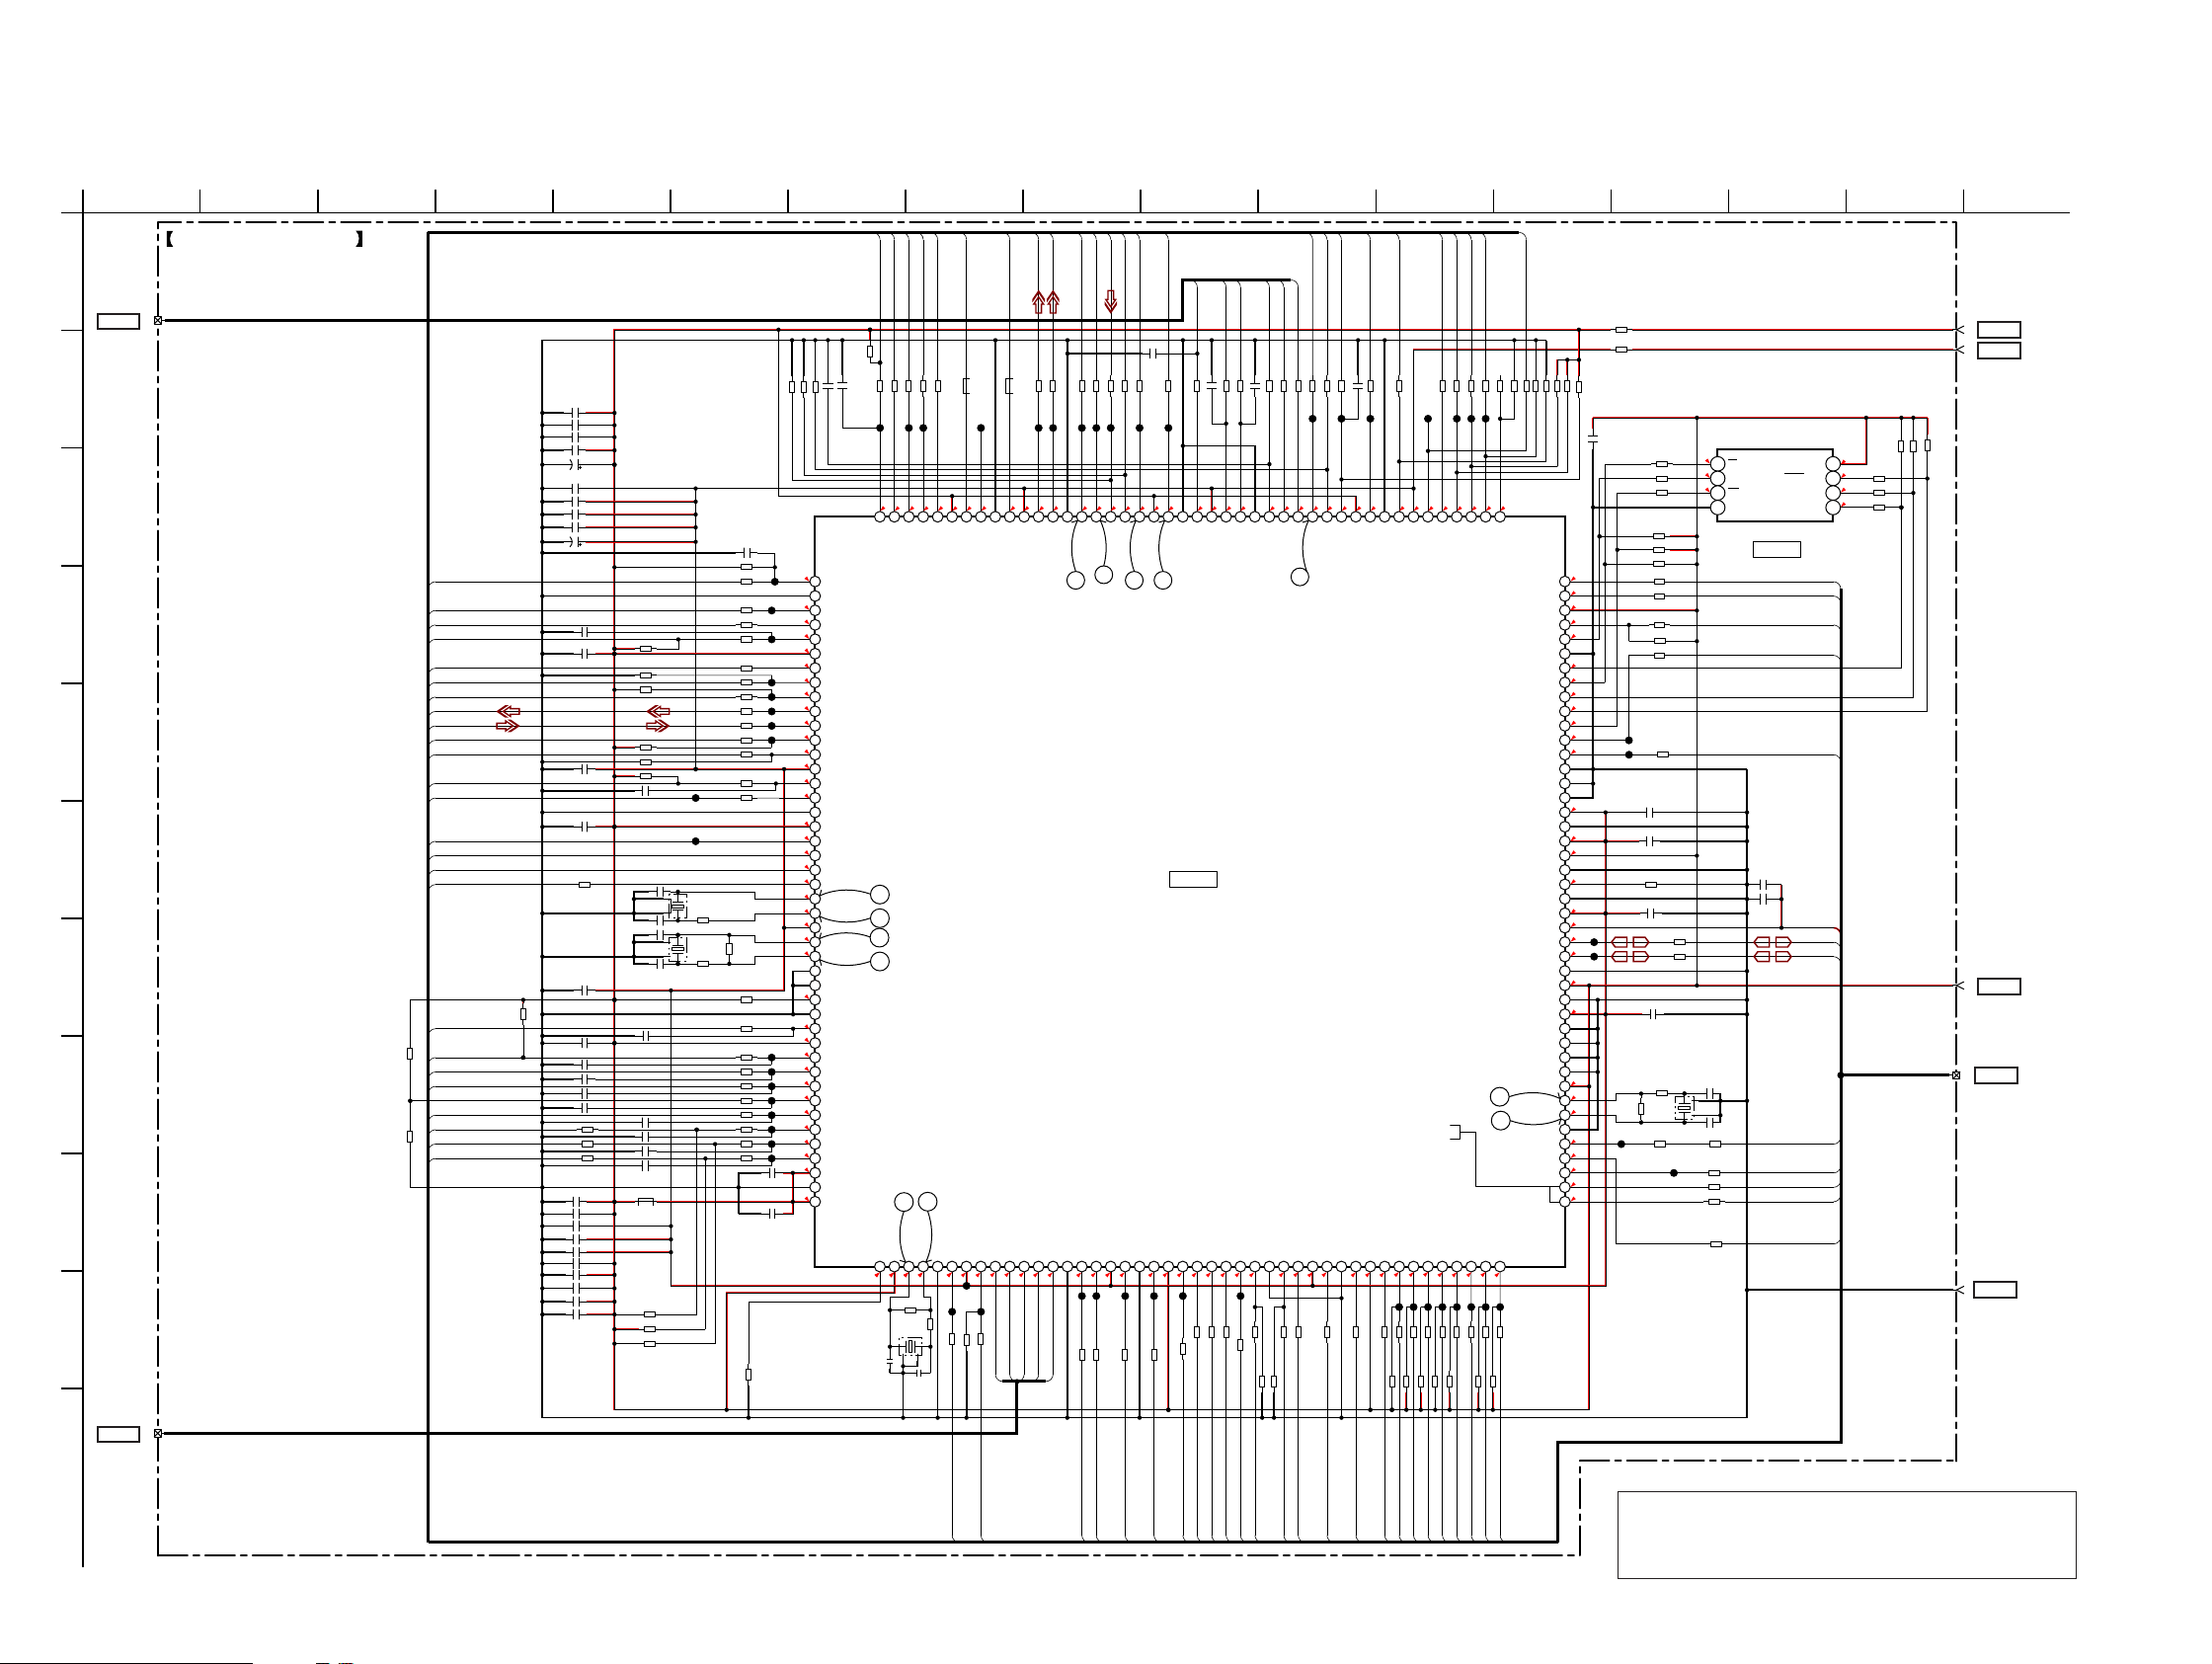
HCD-GT3D
Ver. 1.1
6-14. SCHEMATIC DIAGRAM - MOTHERBOARD Board (9/10) -
1
MOTHERBOARD BOARD (9/10)
2 3 4 5 6 7 8 9 10 11 12 13 14 15 16 17
A
24
>024S
MOTHERBOARD
BOARD
(5/10)
(Page 44)
B
C
C133 0.1
C137 0.1
C146 0.1
C162 0.01
C150 100 10V
C148 0.1
C140 0.1
C135 0.1
C161 0.01
C149 100 10V
POWER-KEY
USB-OC
D
E
F
RGB-SOUT
JOG-
LINK-OUT-B
VBUS-OE
NFC-RF-DET
DOUT1
DIN1
/SD-FAST
PCONT-PSAVE-PROTECT
LINK-DET
USB_HOST_SEL
AC-CUT(MD-BOOT0)
DEBUG-RXD(MD-BOOT1)
BT-RXD(MD-CLK)
SS-DET(MD-CLKS)
G
RESET
R104
/AMP-PROTECT
4.7k
SPM-C-MON
R160
4.7k
SPM-AMBINET-TEMP
FAN_DET
MASTER-VOLUME
AD-KEY0
AD-KEY1
H
R149
I
C296 0.01
C111 0.1
C112 0.1
C114 0.1
R102 100
C278
22p
C126
10p
C115 0.1
10k
C116 0.1
C117 4.7
C280 0.1
C282 0.1
C281 0.1
R157 1k
R158 470
R159 470
C158 0.1
C160 0.1
C134 0.1
C136 0.1
C144 0.1
C156 0.1
C153 0.1
C131 0.1
C138 0.1
C147 0.1
J
36
>036S
MOTHERBOARD
K
BOARD
(8/10)
(Page 47)
• See page 37 for Waveforms. • See page 59 for IC Block Diagrams. • See page 66 for IC Pin Function Descriptions.
OSC
BT-ON
NFC-IRQ
ARAGON-MCK
MTK-POWER-CTRL
C299 100p
R198 0
R237 100
JL298
NFC-INT
3.403.43.4
PVCC
JL294
OSC
R242 100
3.4
1.7
VSS
BT-ON
R582 100
R274 100
JL193
1.83.4
AUDIO_CLK_OUT
MTK-POWER-CTRL
LCD-INHB(LCD_BCKLED) / FL-LATCH
/AMP-RESET
VCC
VSS
CD-MOTOR+
PVCC
CD-MOTOR-
DIR_CP-CLK
3.4
3.3
R236 100
3.4
0
3.4
JL208
JL207
R243 100
R241 100
R238 100
R246 4.7k
R244 4.7k
BT-RESET
VIDEO-MUTE
LOAD_END_SW
UNLOAD_END_SW
R257 100
R261 0
R265 100
R251 100
R254 100
JL209
JL211
JL212
JL278
3.4
3.4
0.4
0.403.4
3.4
1.2
VCC
BT-RESET
VIDEO-MUTE
CDM-LOAD-SW
CDM-UNLOAD-SW
SRC-RST0
Q-FLASH-SIO1
LOW_AC_SUPPLY_DET / LCD_BCKLED
SS-DET/3D-DETECT/DIR-RESET
Q-FLASH-SIO0
Q-FLASH-CLK
Q-FLASH-SIO3
Q-FLASH-SIO2
ANALOG-CSEL
17
DIR_INT1/AMP-CLK-FR
ST-CLK
ST-DATA
EVOL_CLK/RELAY CONTROL
DIR_INT0/EVOL_DATA
NFC_CLK
3.4
3.4
3.4
JL275
JL274
JL273
JL272
R252 100
R105 100
R297 100
R189 100
R192 4.7k
R195 4.7k
R253 4.7k
16
NFC_DATA
JL276
R174 100
R167 4.7k
BT-TXD
DIR_CP-DATA
3.4
3.4
JL271
R248 100
R245 100
4.7k
R250
LCD-BCKLED
R267 10k
R581 100
R263 10k
LINK-OUT-A
LINK-SET
PVCC
MIC-DETECT
Q-FLASH-CS
USBUVSS
USBUVCC
USBAVSS
USBAVCC
USBAPVCC
USBAPVSS
REFRIN
USBDVSS
USBDVCC
VBUSIN0
USBDPVSS
USBDPVCC
USBDVSS
USBDVCC
VBUSIN1
USBDPVSS
USBDPVCC
USB-X2
USB-X1
RGB-SCLK
SIRCS
R113 0
R114 0
10k
R119 10k
R259 10k
R256 10k
R587
C164
3.4
176
0
175
3.4
174
3.4
173
0
172
171
VSS
3.4
170
0
169
0
168
0
167
0
166
3.4
165
3.4
164
163
VSS
162
VSS
161
1.2
160
159
1.2
158
3.4
157
156
0
155
154
1.2
153
5.2
152
JL295
0
151
DP0
0
150
DM0
JL296
149
3.4
148
147
1.2
146
145
144
DP1
143
DM1
142
3.4
141
1.7
140
1.7
139
138
VSS
0
137
0
136
3.3
135
3.4
134
3.4
133
R268 10k
R222 10k
R588 10k
R589 10k
R107 10k
R103 10k
C113 0.1
C279 22p
C127 10p
C118 0.1
C120
C121
C122
C123
FB101
0uH
R146
R144 15k
R145 15k
JOG+
DEBUG-TXD
R299
10k
R150 100
C143 47p
R283 10k
R216 10k
R284 10k
R193 100
C295 0.01
JL292
44 43 42 41 40 39 38 37 36 35 34 33 32 31 30 29 28 27 26 25 24 23 22 21 20 19 18 17 16 15 14 13 12 11 10 9 8 7 6 5 4 3 2 1
C168 0.1
R300 10k
R181 100
R163 0
R164 100
R247 100
R197 100
R255 100
R168 100
R169 47
R170 47
R234 100
R172 100
R173 100
R576 100
JL285
JL268
X101
32.768kHz
R185 0
R188
X102
1M
13.333MHz
R186
0
R175 10k
R176 100
R153 100
R154 100
R155 100
R156 100
0.1
0.01
0.1
0.1
R177 100
R178 100
R179 100
R180 100
C128 10
C129 0.1
JL162
JL163
JL293
JL210
JL297
JL161
JL164
JL288
JL160
JL159
JL158
JL255
JL165
JL256
JL167
JL168
3.4
3.4
3.4
3.4
3.4
3.4
1.7
1.2
3.4
3.4
1.2
3.4
3.4
3.4
3.4
3.4
3.4
1.1
1.6
1.2
1.7
1.7
3.4
3.4
3.4
3.4
3.4
1.7
1.7
1.3
3.4
3.4
3.4
3.4
3.4
POWER-KEY
45
VSS
46
47
USB-OC
0
RGB-SOUT
48
49
JOGPVCC
50
0
LINK-OUT-B
51
52
VBUS-OE
53
NFC-RF-DET
SSI1_DO
54
SSI1_DI
55
56
SD-FAST
57
PCONT-PSAVE-PROTECT
VCC
58
LINK-DET
59
0
60
USB_HOST_SEL
VSS
61
62
PVCC
63
AC-CUT(MD-BOOT0)
64
DEBUG-RXD(MD-BOOT1)
65
BT-RXD(MD-CLK)
66
MD-CLKS
67
RTC-X1
68
RTC-X2
69
PLLVCC
EXTAL
70
71
XTAL
72
VSS
73
VSS
NMI
74
75
VSS
76
RES
77
PVCC
78
AMP-PROTECT
79
SPM-C-MON
80
SPM-AMBIENT-TEMP
81
MODEL-DEST-IN
82
FAN_DET
MASTER-VOLUME
83
84
AD-KEY0
85
AD-KEY1
86
AVCC
87
AVSS
88
AVREF
10k
JOG+
DEBUG-TXD
10
11
12
13
14
BSCANP
PVCC
89 90 91 92 93 94 95 96 97 98 99
3.4
0
1.7
0
R196 1M
X103
12.288MHz
C130
10p
R190 100k
ANALOG-ASEL
ANALOG-BSEL
FL-SOUT_LCD-SDA
R201 100
R580 0
R579 0
JL281
JL282
ANALOG-ASEL
ANALOG-BSEL
LCD-SDA / FL-SOUT
15
AUDIO-X1
AUDIO-X2
VSS
1.7
3.4
R200
0
C132
10p
LCD-CSB
FB116 0uH
3.4
3.403.43.43.43.4
PVCC
LCD-CSB / TEST-MON38
/LINE-MUTE
VCC
3.4
1.2
JL178
JL289
R106 10k
R203 100
DOUT2
FL-LCD-CLK
R295 100
FB115 0uH
JL222
JL179
1.7
0
0.1
1.2
VSS
VCC
CKIO
SSI2_DO
LCD-CLK / FL-CLK
PCONT-BTSTBY
TRST
TDO
TDI
TMS
100 101 102 103 104 105 106 107 108 109 110 111 112 113 114 115 116 117 118 119 120 121 122 123 124 125 126 127 128 129 130 131 132
0
0.2
3.4
3.4
3.4
JL283
R171 100
TRST
TDO
TDI
TMS
DOUT0
R210 47
JL182
SSI0_DO
TCK
TCK
VSS
VSS
JL184
DIN3
C-CONT
ARAGON-BCK0
ARAGON-LRCK0
ARAGON-LRCK3
R215 100
R213 100
R211 100
R273 100
JL183
JL185
JL187
1.701.701.7
SSI3_DI
C-CONT
SSI0_BCKO
SSI0_LRCKO
8
TEST-MON0/SD_D2_0
TEST-MON1/SD_D3_0
VCC
TEST-MON2/SD_CMD_0
1.2
JL186
JL188
R217 47
R212 47
R214 47
ARAGON-BCK3
C139
47p
R219 100
R218 100
JL189
JL190
1.7
3.401.73.400
VSS
PVCC
SSI3_BCKO
SSI3_LRCKO
679
IC101
R7S7200032CFP-A
IC101
SYSTEM CONTROLLER
VSS
TEST_MON3/SD_CLK
PVCC
TEST-MON4/SD_D0_0
3.40
3.4
JL166
JL191
R220 47
R100 47
IFSDI
XIFCS
IFSCK
IFSDO
XIFBSY
XSYSRST
R226 100
C142 47p
R232 47
R230 100
R229 100
C141 47p
R224 0
R221 100
2
3.3
3.2
0.201.203.3
VSS
VCC
MTK-SDI
MTK-XIFCS
MTK-CLK
MTK-BUSY
MTK-RESET
MTK-SDO
5
3D-RESET_ANALOG-DSEL/SD_D1_0
RGB-TRANS-LED-SPK/SD_WP_0
RGB-TRANS-LED/SD_CD_0
ST-RDS
ST-CE
VSS
PCONT-DAMP
1.7
3.3
1.2
3.4
3.4
JL116
R574 47
R225 100
R223 100
R228 100
R166 100
R233 100
R227 100
R282 10k
R298 10k
RGB-PWM-CLK
0.1
JL299
JL300
JL214
R288 47
R289 47
R290 47
R112 100k
R286 100k
R287 100k
R270 100
R271 100
R272 100
R183 10k
R575 100
R590 0
C154 0.1
C155 0.1
R285 5.6k
C157 0.1
C159 0.1
R269
1M
R276 100
R585 0
R586 0
R275
470
X104
48MHz
JL213
0
0
0
C151
6p
FB117 0
R278 100
R279 100
R280 100
R572 100
1
2
3
4
CS
HOLD/SIO3
SO/SIO1
WP/SIO2
GND SI/SIO0
IC106
MX25L3235EM2I-10G
IC106
SERIAL FLASH
LINK-OUT-A
DIR_RESET
ANALOG-CSEL
C298
1
C297
0.1
USBA+5V
USB_DP0
USB_DM0
C152
7p
RGB-SCLK
FL-LAT_LCD-INHB
VCC
SCLK
LINK-SET
MIC-DET
SIRCS
BT-TXD
DIR_INT1
8
7
6
5
3.4
0
R291 47
0
R292 47
0
R293 47
R111
MOTHERBOARD
BOARD
(7/10)
E+3.3V
E+1.18V
(Page 46)
30
>030S
34
>034S
MOTHERBOARD
BOARD
(7/10)
(Page 46)
100k
R110 100k
R294 100k
USBDPVCC
35
>035S
MOTHERBOARD
BOARD
(8/10)
(Page 47)
11
>011S
MOTHERBOARD
BOARD
(1/10), (2/10),
(3/10), (4/10),
(6/10), (7/10),
(8/10), (10/10),
(Page 40), (Page 41),
(Page 42), (Page 43),
(Page 45), (Page 46),
(Page 47), (Page 49)
DGND
4
>004S
MOTHERBOARD
BOARD
(1/10)
(Page 40)
HCD-GT3D
/LINE-MUTE
PCONT-BTSTBY
TEST-MON0/SD_D2_0
TEST-MON1/SD_D3_0
TEST-MON2/SD_CMD_0
4848
ANALOG-DSEL/SD_D1_0
TEST-MON3/SD_CLK
TEST-MON4/SD_D0_0
ST-RDS
ST-CE
RGB-TRANS-LED-SPK/SD_WP_0
PCONT-DAMP
RGB-TRANS-LED/SD_CD_0
RGB-PWM-CLK
FWD
/AMP-RESET
REV
DIR_CP-DATA
DIR_CP-CLK
ST-CLK
ST-DATA
EVOL_CLK/RELAY CONTROL
DIR_INT0/EVOL_DATA
NFC_CLK
NFC_DATA
Note : IC101, IC106 on the MOTHERBOARD board cannot
exchange with single. When these part on the
MOTHERBOARD board are damaged, exchange the
entire mounted board.
Page 49
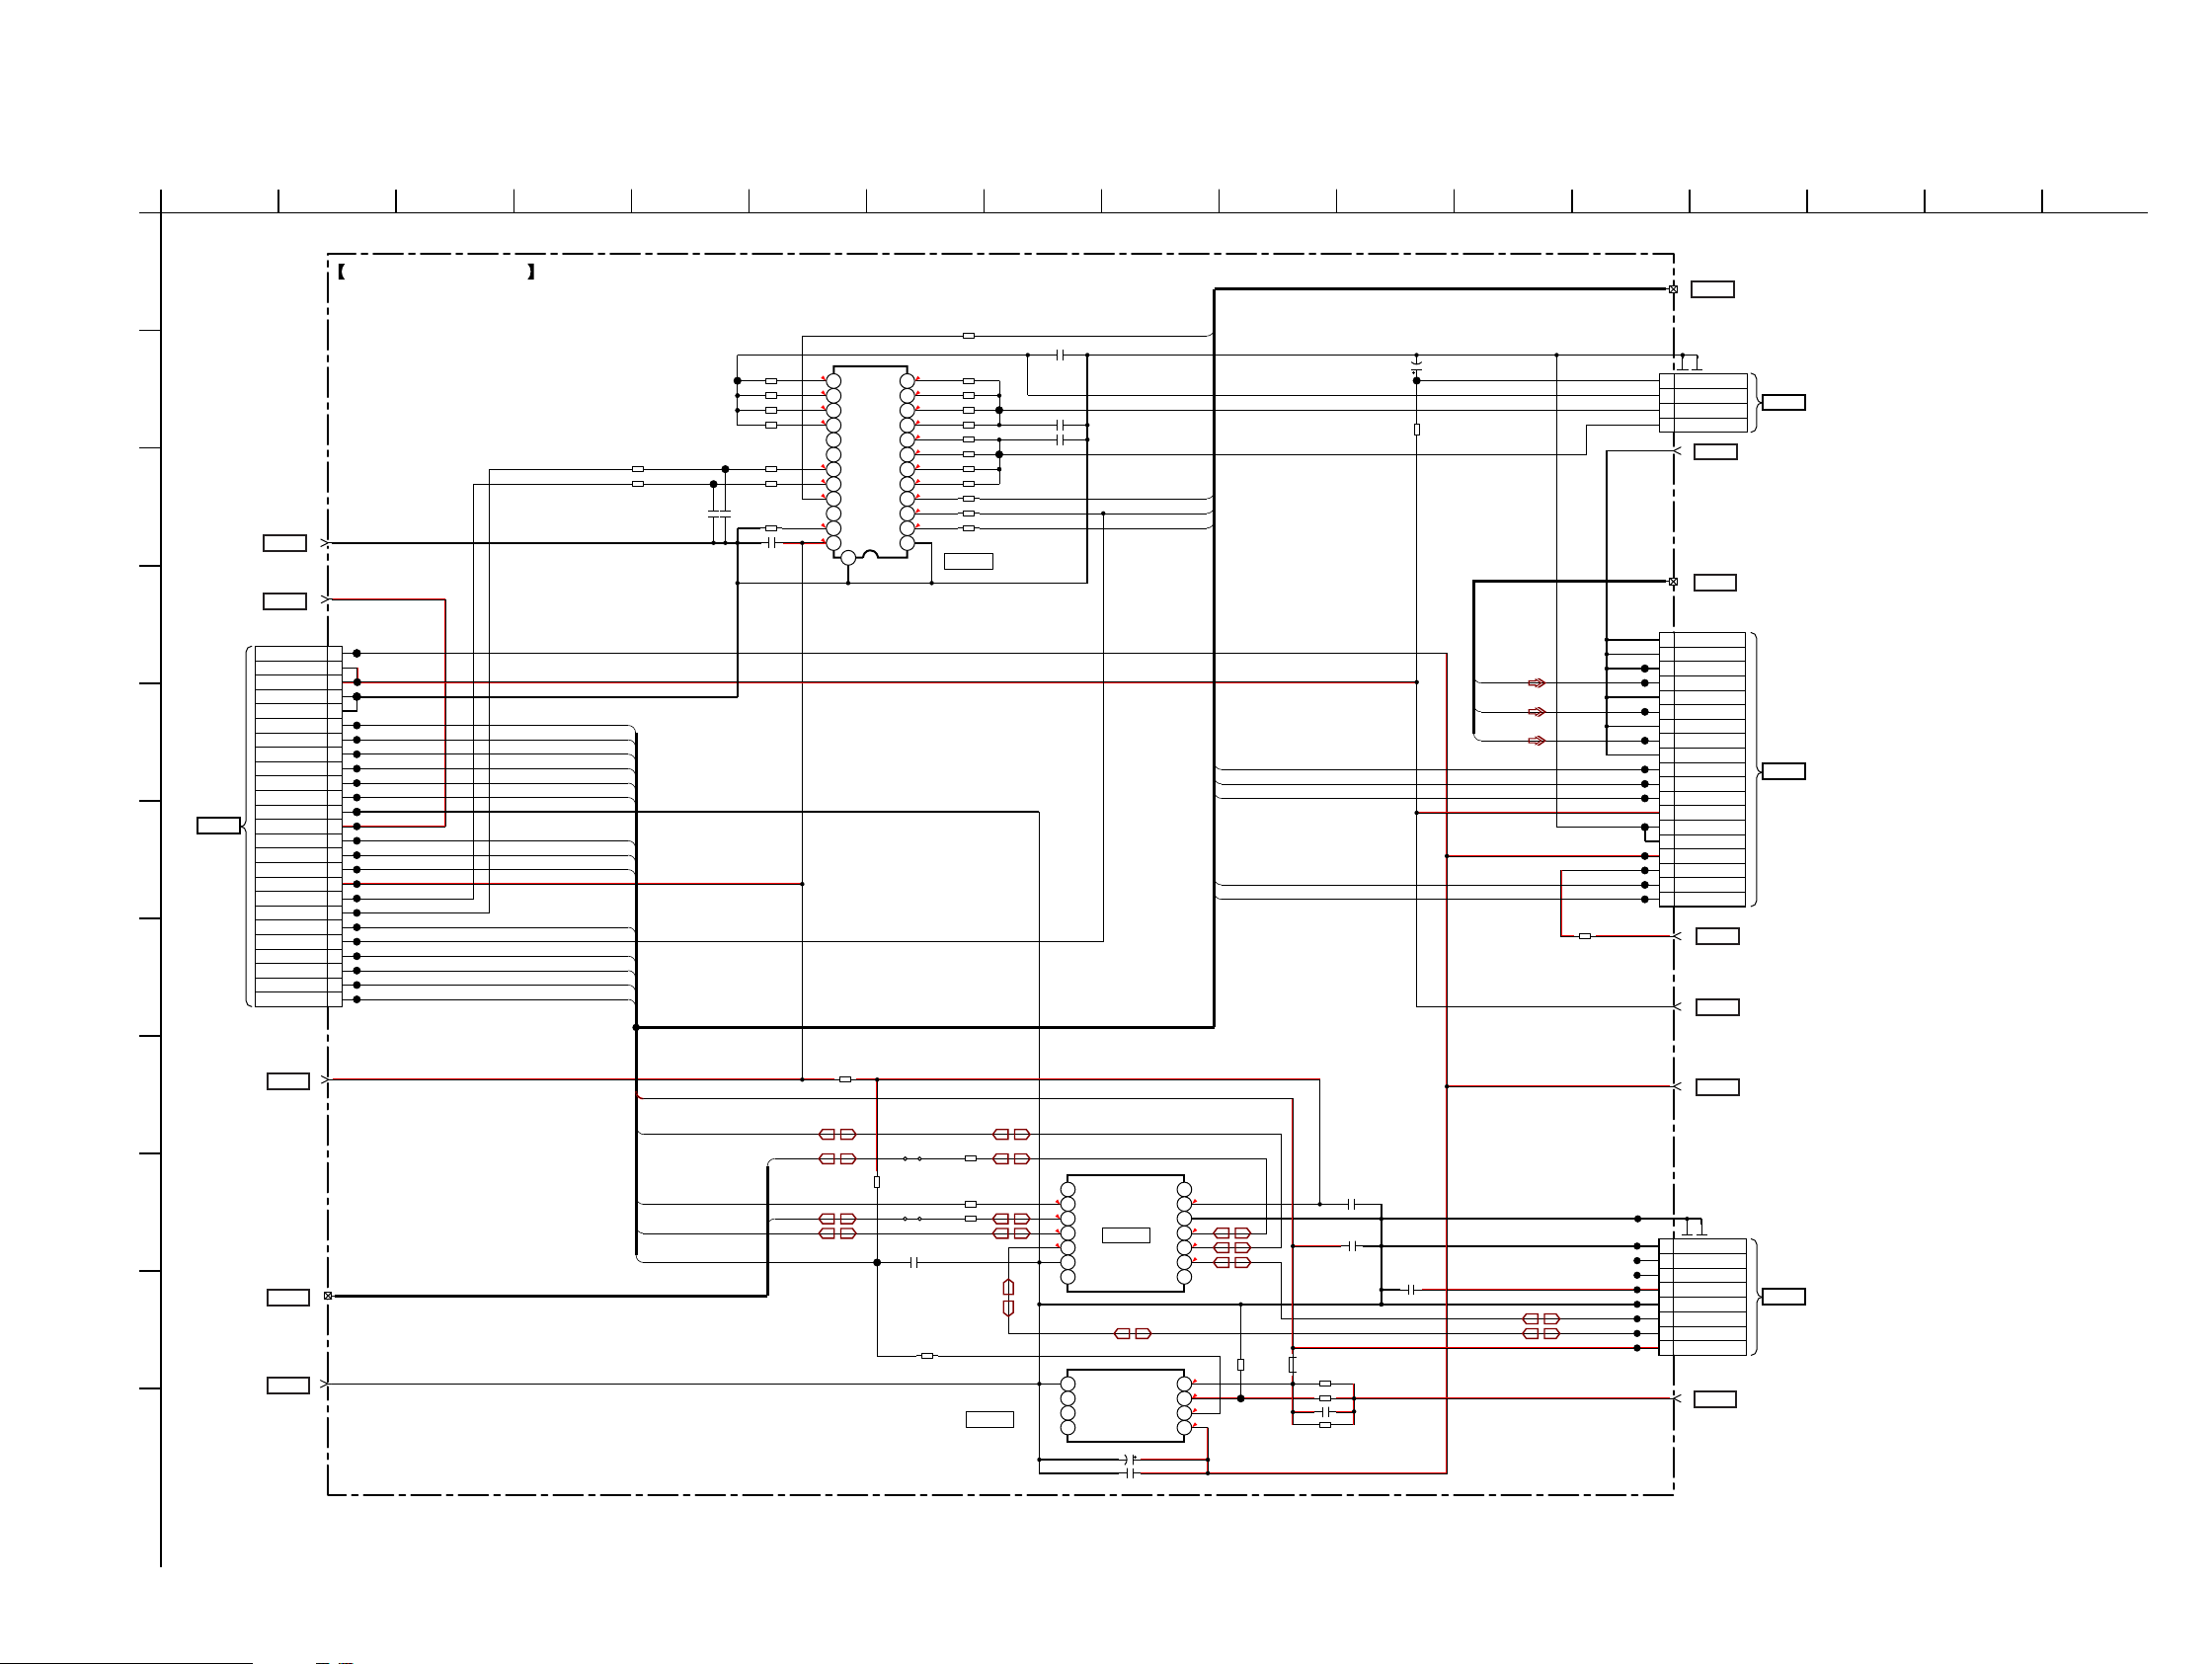
HCD-GT3D
6-15. SCHEMATIC DIAGRAM - MOTHERBOARD Board (10/10) -
1
A
2 3 4 5 6 7 8 9 10 11 12 13 14 15 16 17
MOTHERBOARD BOARD (10/10)
B
R264 0
R260 0
JL523
JL522
C
MGND
15
>015S
MOTHERBOARD
BOARD
(7/10)
(Page 46)
>030S
MOTHERBOARD
D
BOARD
(Page 46)
E
>039S
SPLITTER
BOARD
F
CN3400
(Page 58)
G
>001S
H
MOTHERBOARD
(Page 40)
I
>024S
MOTHERBOARD
J
(Page 44)
>004S
MOTHERBOARD
(Page 40)
(7/10)
BOARD
(1/10)
BOARD
(5/10)
BOARD
(1/10)
E+3.3V
30
CN118
25P
JL129
1NC
2LED+5.2V
JL130
3LED+5.2V
JL133
4LED_GND
5LED_GND
JL136
6LCD_SCL
JL137
7LCD_SDA
JL138
8LCD_INHB
JL139
9LCD_CSB
JL140
10AD-KEY0
JL141
11AD-KEY1
JL142
12DGND
JL143
13E+3.3V
JL144
14SIRCS
JL145
15POWER KEY
JL146
16VOL
JL147
17D+3.3V
JL290
18RGB_SD
JL230
19RGB_PWM
JL231
20RGB_TRANS
JL232
21RGB_SCLK
JL286
22LCD_BCK_LED
JL287
23JOG_POS
JL291
24JOG_NEG
JL284
25OSC
D+3.3V
1
24
DGND
4
FL-LCD-CLK
FL-SOUT_LCD-SDA
FL-LAT_LCD-INHB
LCD-CSB
AD-KEY0
AD-KEY1
SIRCS
POWER-KEY
MASTER-VOLUME
RGB-TRANS-LED/SD_CD_0
LCD-BCKLED
JOG+
JOG-
OSC
USBA+5V
USB_DP0
USB_HOST_SEL
USB_DM0
USB-OC
K
• See page 59 for IC Block Diagrams.
R543 100
JL525
C541 0.01
C530 0.01
R503 33
R504 33
R506 33
R507 33
R567 33
R566 22
R534 680
C511 0.1
USBP
USBM
4
4
14
4
15
4
16
17
18
4
19
3
20
1.7
21
22
1.1
23
3.4
24
R478 0
/OUT8
/OUT9
/OUT10
/OUT11
/OUT12
/OUT13
/OUT14
/OUT15
PWMCLK
SOUT
REXT
VDD
25
R559
JL455
10k
/OUT7
/OUT6
/OUT5
/OUT4
/OUT3
/OUT2
/OUT1
/OUT0
TRANS
SCK
SIN
GND
R46600
R467
C465 0.1
3.3
1213
3.3
11
3.3
10
3.3
9
3.3
8
3.3
7
3.3
6
3.3
5
0
4
0
3
0
2
1
R465 100
R564 22
R555 22
R552 22
R549 22
R510 22
R514 22
R511 22
R515 22
R569 100
R542 100
R541
IC502
TC62D723FNG
IC502
LED DRIVER
R470 0
R480 0
R472 0
NJM2903CV (TE1)
IC452
USB COMPARATOR
JL528
JL529
100
IC452
C526 0.01
C527 0.01
C528 0.01
0
0
0
0
1
2
3
4
5
6
7
1
2
3
4
RGB-PWM-CLK
RGB-TRANS-LED-SPK/SD_WP_0
NC1
S
1D2DDGND
NC_7
V- 2+IN
1+IN
1-IN
1OUT
IC453
TC7USB40FT
IC453
USB SWITCH
C462 10 16V
C463 0.1
NC_14
NC_8
2OUT
RGB-SCLK
RGB-SOUT
VCC
OE
1D+
2D+
D+
2-IN
V+
/SD-FAST
/AMP-RESET
/AMP-PROTECT
FAN-DET
EVOL-CLK/RELAY CONTROL
14
3.4
13
12
0
11
0
10
0
9
8
0
5
0
6
0
7
0
8
R464
33k
JL454
FB455
0uH
R583 0.1
R577 470
C466 0.1
R498 0.1
C468
C467
11
>011S
MOTHERBOARD
BOARD
(9/10)
(Page 48)
JL469
JL456
JL457
JL458
JL459
JL460
JL461
JL462
JL463
JL259
JL239
JL240
JL241
JL242
JL270
JL244
JL247
JL248
JL249
JL251
JL252
A+13V_GV2
CN517
4P
4 M+5.2V
3 RED_HLED
2 GREEN_HLED
1 BLUE_HLED
AGND
CN119
19P
1AGND
2AGND
3AGND
4SW
5AGND
6FR
7AGND
8FL
9AGND
10 /SD-FAST
11 /AMP-RESET
12 /DAMP-PROTECT
13 M+5V
14 MGND
15 MGND
16 M+13V
17
18
19
M+5.2V
SW+13V
CN451
8P
8 USB_B GND
7D+B
6D-B
5 USBB+5V
4 USB_A GND
3D+A
2D-A
1 USBA+5V
USB+5V
10
>010S
MOTHERBOARD
BOARD
(7/10)
(Page 46)
23
>023S
MOTHERBOARD
BOARD
(3/10)
(Page 42)
A+13V
FAN-DET
RELAY CONTROL
33
>033S
MOTHERBOARD
BOARD
(7/10)
(Page 46)
31
>031S
MOTHERBOARD
BOARD
(2/10), (7/10)
(Page 41), (Page 46)
14
>014S
MOTHERBOARD
BOARD
(2/10)
(Page 41)
32
>032S
MOTHERBOARD
BOARD
(7/10)
(Page 46)
>040S
SPK_HLED
BOARD
CN4000
(Page 56)
>041S
DAMP
BOARD
(2/2)
CN1001
(Page 52)
>042S
MIC
BOARD
CN3201
(Page 57)
C532
47 16V
JL518
R538
0
SW
FRONT-R
FRONT-L
R142
0
0.1
0.1
C464
0.1
HCD-GT3D
4949
Page 50
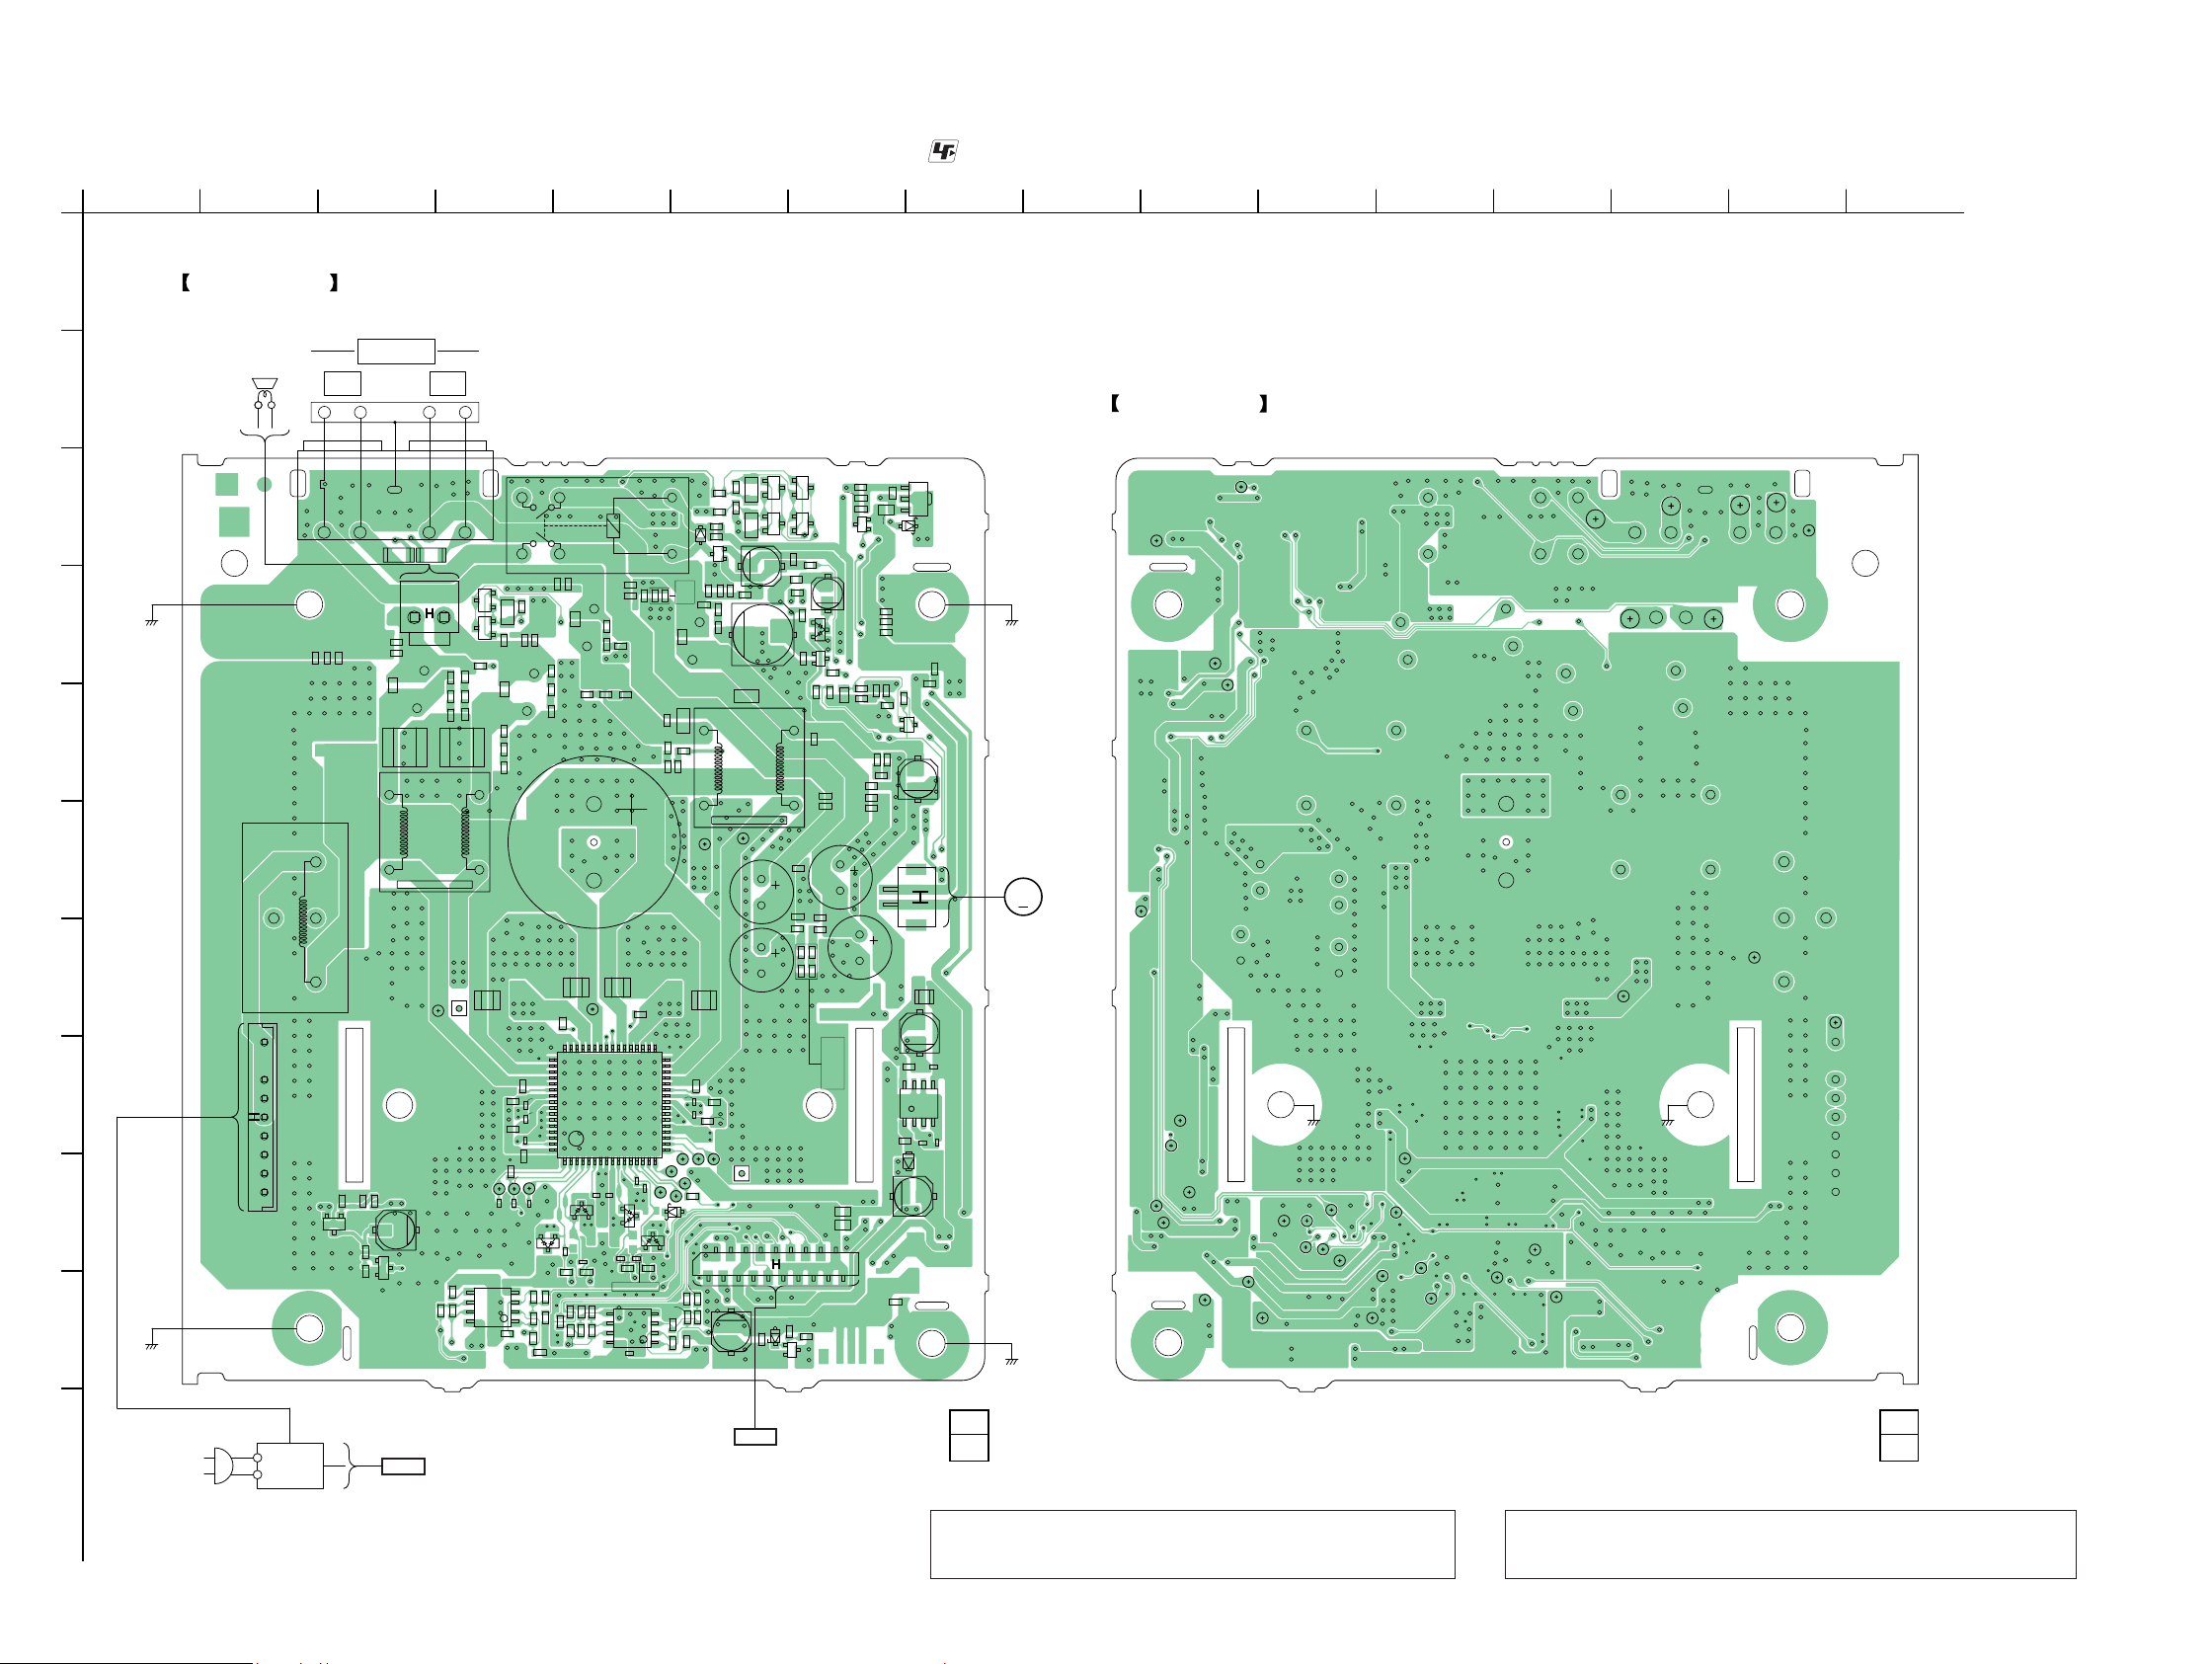
HCD-GT3D
Ver. 1.1
6-16. PRINTED WIRING BOARD - DAMP Board - • See page 32 for Circuit Boards Location. • : Uses unleaded solder.
1
A
2 3 4 5 6 7 8 9 10 11 12 13 14 15 16
DAMP BOARD
(COMPONENT SIDE)
MID/TWEETERS
LOUDSPEAKER
B
-
-
+
WHITE
+
IM3ED$NCE8SE2ȍ
L
–
R
RED
–
+
DAMP BOARD
(CONDUCTOR SIDE)
Q1014
Q1016
R1033
2
R1131
E
B
C1122
R1026
CL1027
R1012
R1011
CL1025
C1168
C1056
R1031
C1067
C1144
C1125 C1063
C1137
R1111
C1083
L1007
Q1015
C1127
C1126
R1147
BEB
B
E
R1072
R1106
C1107
CN1001
Q1022
D1014
Q1017
R1133
C1140
R1081
B
E
R1092
E
R1063
B
E
R1132
C1108
D1008
R1037
Q1006
B
E
R1036
R1138
R1070
R1069
C1005
R1078
C1139
C1141
R1079
C1138
R1077
C1128
R1076
C1105
C1106
C1104
R1087
R1088
JC1019
JC1020
18
19
C1143
R1145
R1032
R1112
R1130
D1013
Q1021
C1123
C1121
C1167
C1055
R1134
R1080
C1068
R1084
R1083
R1085
R1082
CL1030
C1022
3348
32
C1021
C1020
C1015
CL1024
CL1037
17
16
CL1041
R1035
CL1042
R1141
D1017
D1005
C1118
1
R1148
R1167
C1147
C1148
R1150
1
R1149
R1165
R1029
C1076
C1095
C1008
R1156
C1155
R1155
R1166
C1077
C1039
D1001
C1047
C1048
R1022
C1037C1038
CL1021
C1081
49
64
C1120
R1168
C1061
1
R1153 R1154
C1082
R1025
C1029
CL1028
C1011 C1012
D1002
R1002
R1003
R1169
C1150
RY001
R1135
C1142
C1151
R1151
C1059
C1080
C1051
C1053
C1026
IC1001
C1119
R1152
R1164
C1052
R1024
C1054
C1060
CL1043
R1009
D1006
C1117
R1005
R1004
IC1004
584
C1149
C1124
CL1044
R1160
R1162
TB001
R1170 R1171
CN1007
2
C1078
C1079
R1137
C1074
1
L1006
C1044
C1043
R1020
C1075
Q1003
Q1004
R1030
C1046
C1045
R1021
E
B
C1062
E
B
R1028
R1136
C1049
C1050
R1023
C
D
(CHASSIS)
R1161
E
F
L1010
G
19
H
CN1005
R1127
R1129
I
EB
Q1018
C1134
C1136
R1128
B
E
R1126
Q1019
J
(CHASSIS)
CL1026
C1036
R1017
R1018
C1040
CL1045
C1007
CL1022
R1001
R1008
R1157
5
4
IC1005
R1158
8
1
R1159
C1156
R1091
Q1023
R1064
R1066
C1058
C1129
Q1010
R1062
B
C
E
E
D1007
B
R1163
C1003
R1065
Q1011
C1057
C1132
C1131
C1169
R1067
R1139
R1068
B
E
R1027
12
CN1004
C1133
8
IC1003
14
C1090
R1052
C1089
C1004
C1091
C1092
D1016
C1002
L1009
5
(CHASSIS)
C1001
DC FAN
M
R1053
(CHASSIS)
CL1062
CL1002
CL1005
CL1038
CL1007
CL1006
CL1004
CL1052
CL1060
CL1053
CL1054
CL1039
(CHASSIS) (CHASSIS)
CL1008
CL1013
CL1018
CL1012
CL1014
CL1010
CL1015
CL1009
CL1011
CL1003
CL1023
CL1001
CL1016
CL1019
CL1017
CL1063
CL1050
CL1046
CL1059
CL1049
CL1048
CL1047
CL1032
CL1051
CL1061
CL1031
K
HCD-GT3D
~ AC IN
SMPS BOARD
>006P
MOTHERBOARD
BOARD
CN001
(Page 39)
>004P
MOTHERBOARD
BOARD
CN119
(Page 39)
1-894-011-
12
(12)
Note 1: When the complete DAMP board is replaced, refer to “NOTE
OF REPLACING THE IC1001 ON THE DAMP BOARD AND
THE COMPLETE DAMP BOARD” on servicing notes (page 5).
5050
12
1-894-011-
Note 2: When the C1126, C1127, C1128, C1129, C1142, L1010 and RY001
on the DAMP board are replaced, spread the bond referring to “BOND
FIXATION OF ELECTRIC PARTS” on servicing notes (page 6).
(12)
Page 51
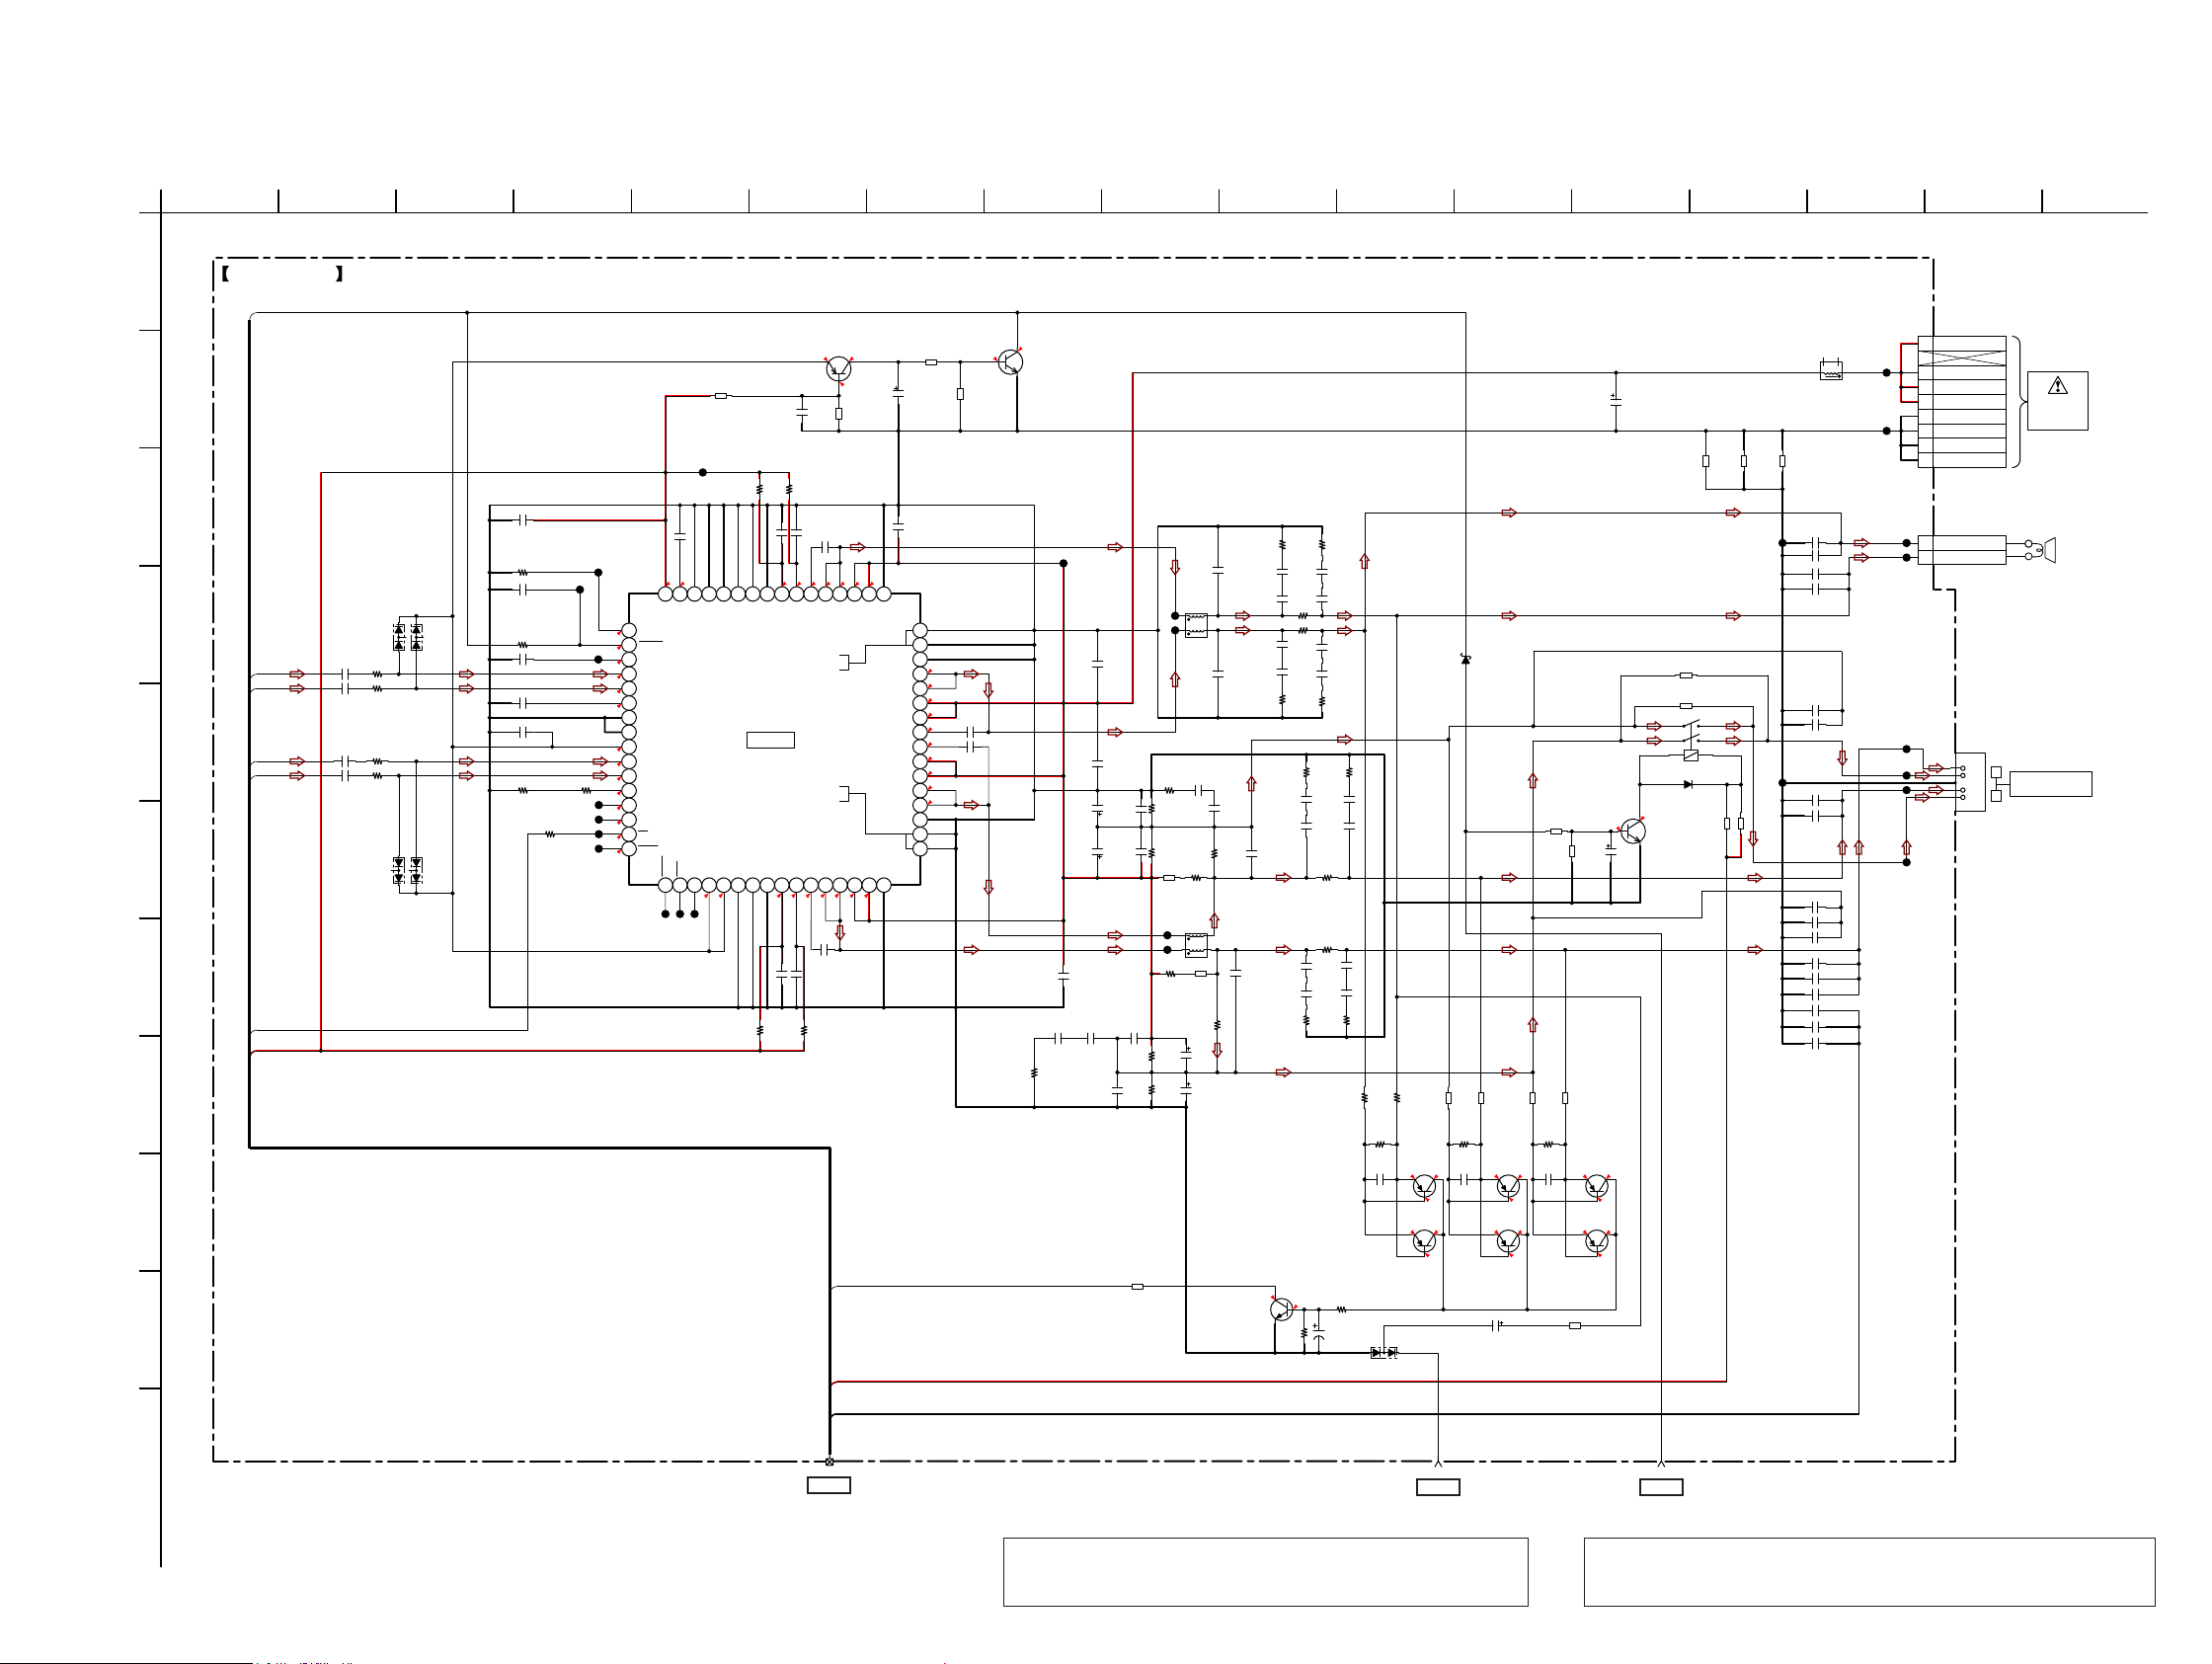
HCD-GT3D
Ver. 1.1
6-17. SCHEMATIC DIAGRAM - DAMP Board (1/2) -
1
A
(1/2)DAMP BOARD
/AMP-RESET
2 3 4 5 6 7 8 9 10 11 12 13 14 15 16 17
B
C
D1001 ~ D1002
D
SW+
SW-
E
FL
FR
C1120
C1119
C1117
C1118
F
BAV99-215
D1001
D1002
R1002
1
100
R1003
100
1
R1004
1
100
R1005
100
1
D1005
D1006
D1005 ~ D1006
BAV99-215
C1040 0.1
22kR1001
C1007 220p
100R1008
C1008 1000p
C1011 1000p
C1012 0.1
10kR1141
R1035
CL1045
1k
CL1022
CL1021
CL1044
CL1042
CL1041
CL1043
G
/SD-FAST
GVDD
H
I
J
• See page 59 for IC Block Diagrams.
Q1018
KTA1542T-RTK/P
AMP RESET SWITCH
0
3.3
R1129
33k
C1134
0.1
CL1023
3.3
NC_59
GND_58
IC1001
TAS5630BPHDR
IC1001
POWER AMP
R1011
3.3
C1038 0.1
GND_57
GND_24
C1015 0.1
R1012
R1017
GVDD_B
GVDD_C
C1020 0.1
3.3
3.3
C1037 0.1
GVDD_A
GND_A_48
GND_B_47
GND_C_34
GND_D_33
GVDD_D
R1018
C1039 330p
646362616059585756555453525150
VDD
NC_60
NC_61
OC_ADJ
1
1.2
2
RESET
3.1
C_STARTUP
3
3.3
INPUT_A
4
2
INPUT_B
5
2
6
VI_CM
2
7
GND_7
8
AGND
9
VREG
3.3
INPUT_C
10
2
INPUT_D
11
2
10kR1009
FREQ_ADJ
12
1
OSC_IO+
13
1.8
OSC_IO-
14
1.4
15
SD
3.4
16
OTW1
3.3
NC_62
PSU_REF
OTW2
CLIP
READYM1M2M3GND_23
17
181920212223242526272829303132
3.3 3.3 12.4 12.4 30.2 24.2 24.2 50.8 50.8
CL1024
CL1025
CL1037
R1127
12k
C1095
0.1
BST_A
BST_D
C1021
0.1
3.3
OUT_A_52
OUT_A_53
OUT_D_28
OUT_D_29
DAMP-PROTECT
M+13V
MGND
C1136
47 16V
50.850.824.224.230.212.412.4212.4
49
PVDD_A_50
PVDD_A_51
GND_B_46
OUT_B_45
OUT_B_44
PVDD_B_43
PVDD_B_42
PVDD_C_39
PVDD_C_38
OUT_C_37
OUT_C_36
GND_C_35
PVDD_D_30
PVDD_D_31
GND_A_49
BST_B
BST_C
GND_D_32
R1128 4.7k
R1126
100k
C1036
2.2
48
47
46
24.2
45
24.2
44
50.8
43
50.8
42
30.4
41
30.2
40
50.8
39
50.8
38
24.2
37
24.2
36
35
34
33
Q1019
PBSS4160T
AMP RESET SWITCH
0
C1061
0.1
C1060
0.1
R1087
CN1005
8P
CL1046
CL1047
CL1049
CL1050
CL1051
CL1048
CN1007
2P
1V1
3V1
4V1
5V1
6V1_GND
7V1_GND
8V1_GND
9V1_GND
1 SW 2 SW +
TB001
4P
RED
WHITE
+
+
-
-
-
+
R
MID/TWEETERS
,03('$1&(86(ȍ
L
SMPS
BOARD
LOUDSPEAKER
3.1
CL1031
L1010
C1142
3300 71V
R11600R11610R1162
0
R1020
0.0022
0.0022
R1023
C1107
0.0022
C1068
1
C1067 1
Q1006
LSCR523UBFS8TL
DC DETECTION
C1043
C1044
C1049
0.022
C1050
0.022
3.3
3.3
3.4
CL1028
C1029
2.2
C1026
2.2
C1126
220
C1140
35V
C1127
220
C1141
35V
C1022
2.2
C1104
C1105
0.0022
C1139
C1138
0.1
R1079
10k
R1076
10k
0.1
0.0022
3.3
C1074
1
L1006
CL1026CL1059
10uH
C1075
1
C1106
R1088
0.0022
3.3
R1081
10k
0.1
R1080
R1077
0.1
10k
10k
R1085
R1083
47k
100k
L1007
CL1030
10uH
CL1027
R1082
R1084
100k
47k
R1078
10k
C1128
220
35V
C1129
220
35V
18kR1138
R1021
3.3
C1045
0.022
C1046
R1137
0.022
0
R1136
C1047
0
0.0022
C1048
0.0022
R1022
3.3
R1025
R1024
3.3
3.3
C1051
C1053
0.0022
0.022
C1054
C1052
0.022
0.0022
R1135
0
R1134 0
C1057
C1055
0.022
0.0022
C1058
C1056
0.022
0.0022
R1026
R1027
3.3
3.3
Q1014 ~ Q1017
2SA1162-G
OVERLOAD DETECTION
Q1003 ~ Q1004
2SA1162-G
OVERLOAD DETECTION
R1037
680
0
R1036
C1083
100k
47 35V
R1028
680k
R1029
680k
C1062
47
D1008
BAV99-215
D1017
RB551V-30TE-17
R1030
680k
Q1004
24.6
0
24.6
Q1003
24.6
0
24.6
R1032
56k
R1033
220k
C1063
47
C1108 R1072 1k1 50V
25.3
25.3
R1106
56k
Q1016
Q1017
25.3
25.3
R1112
R1031
C1125
0
0
LSCR523UBFS8TL
R1132
1k
R1133 C1137
47k
R1111
56k
56k
220k
47
25.3
25.3
Q1021
RELAY DRIVER
0.8
100 10V
Q1014
0
25.3
Q1015
0
25.3
0.1
R1171
1k
R1170
1k
RY001
D1013
DA2J10100L
47R1130
CL1061
47R1131
20uH
C1076 0.1
C1077
0.01
C1078 0.01
C1079 0.1
C1080 0.1
C1059 0.01
CL1062
C1081 0.01
C1082 0.1
C1124 0.01
C1121 0.1
C1167 0.1
C1168 0.1
C1123 0.01
C1122 0.1
C1131 0.1
C1132 0.015
C1169 0.1
CL1032
K
HCD-GT3D
1
>043S
DAMP BOARD
3DJH
2
>044S
DAMP BOARD
3DJH
Note 1: When the complete DAMP board is replaced, refer to “NOTE
OF REPLACING THE IC1001 ON THE DAMP BOARD AND
THE COMPLETE DAMP BOARD” on servicing notes (page 5).
5151
3
>045S
DAMP BOARD
3DJH
Note 2: When the C1126, C1127, C1128, C1129, C1142, L1010 and RY001
on the DAMP board are replaced, spread the bond referring to “BOND
FIXATION OF ELECTRIC PARTS” on servicing notes (page 6).
Page 52
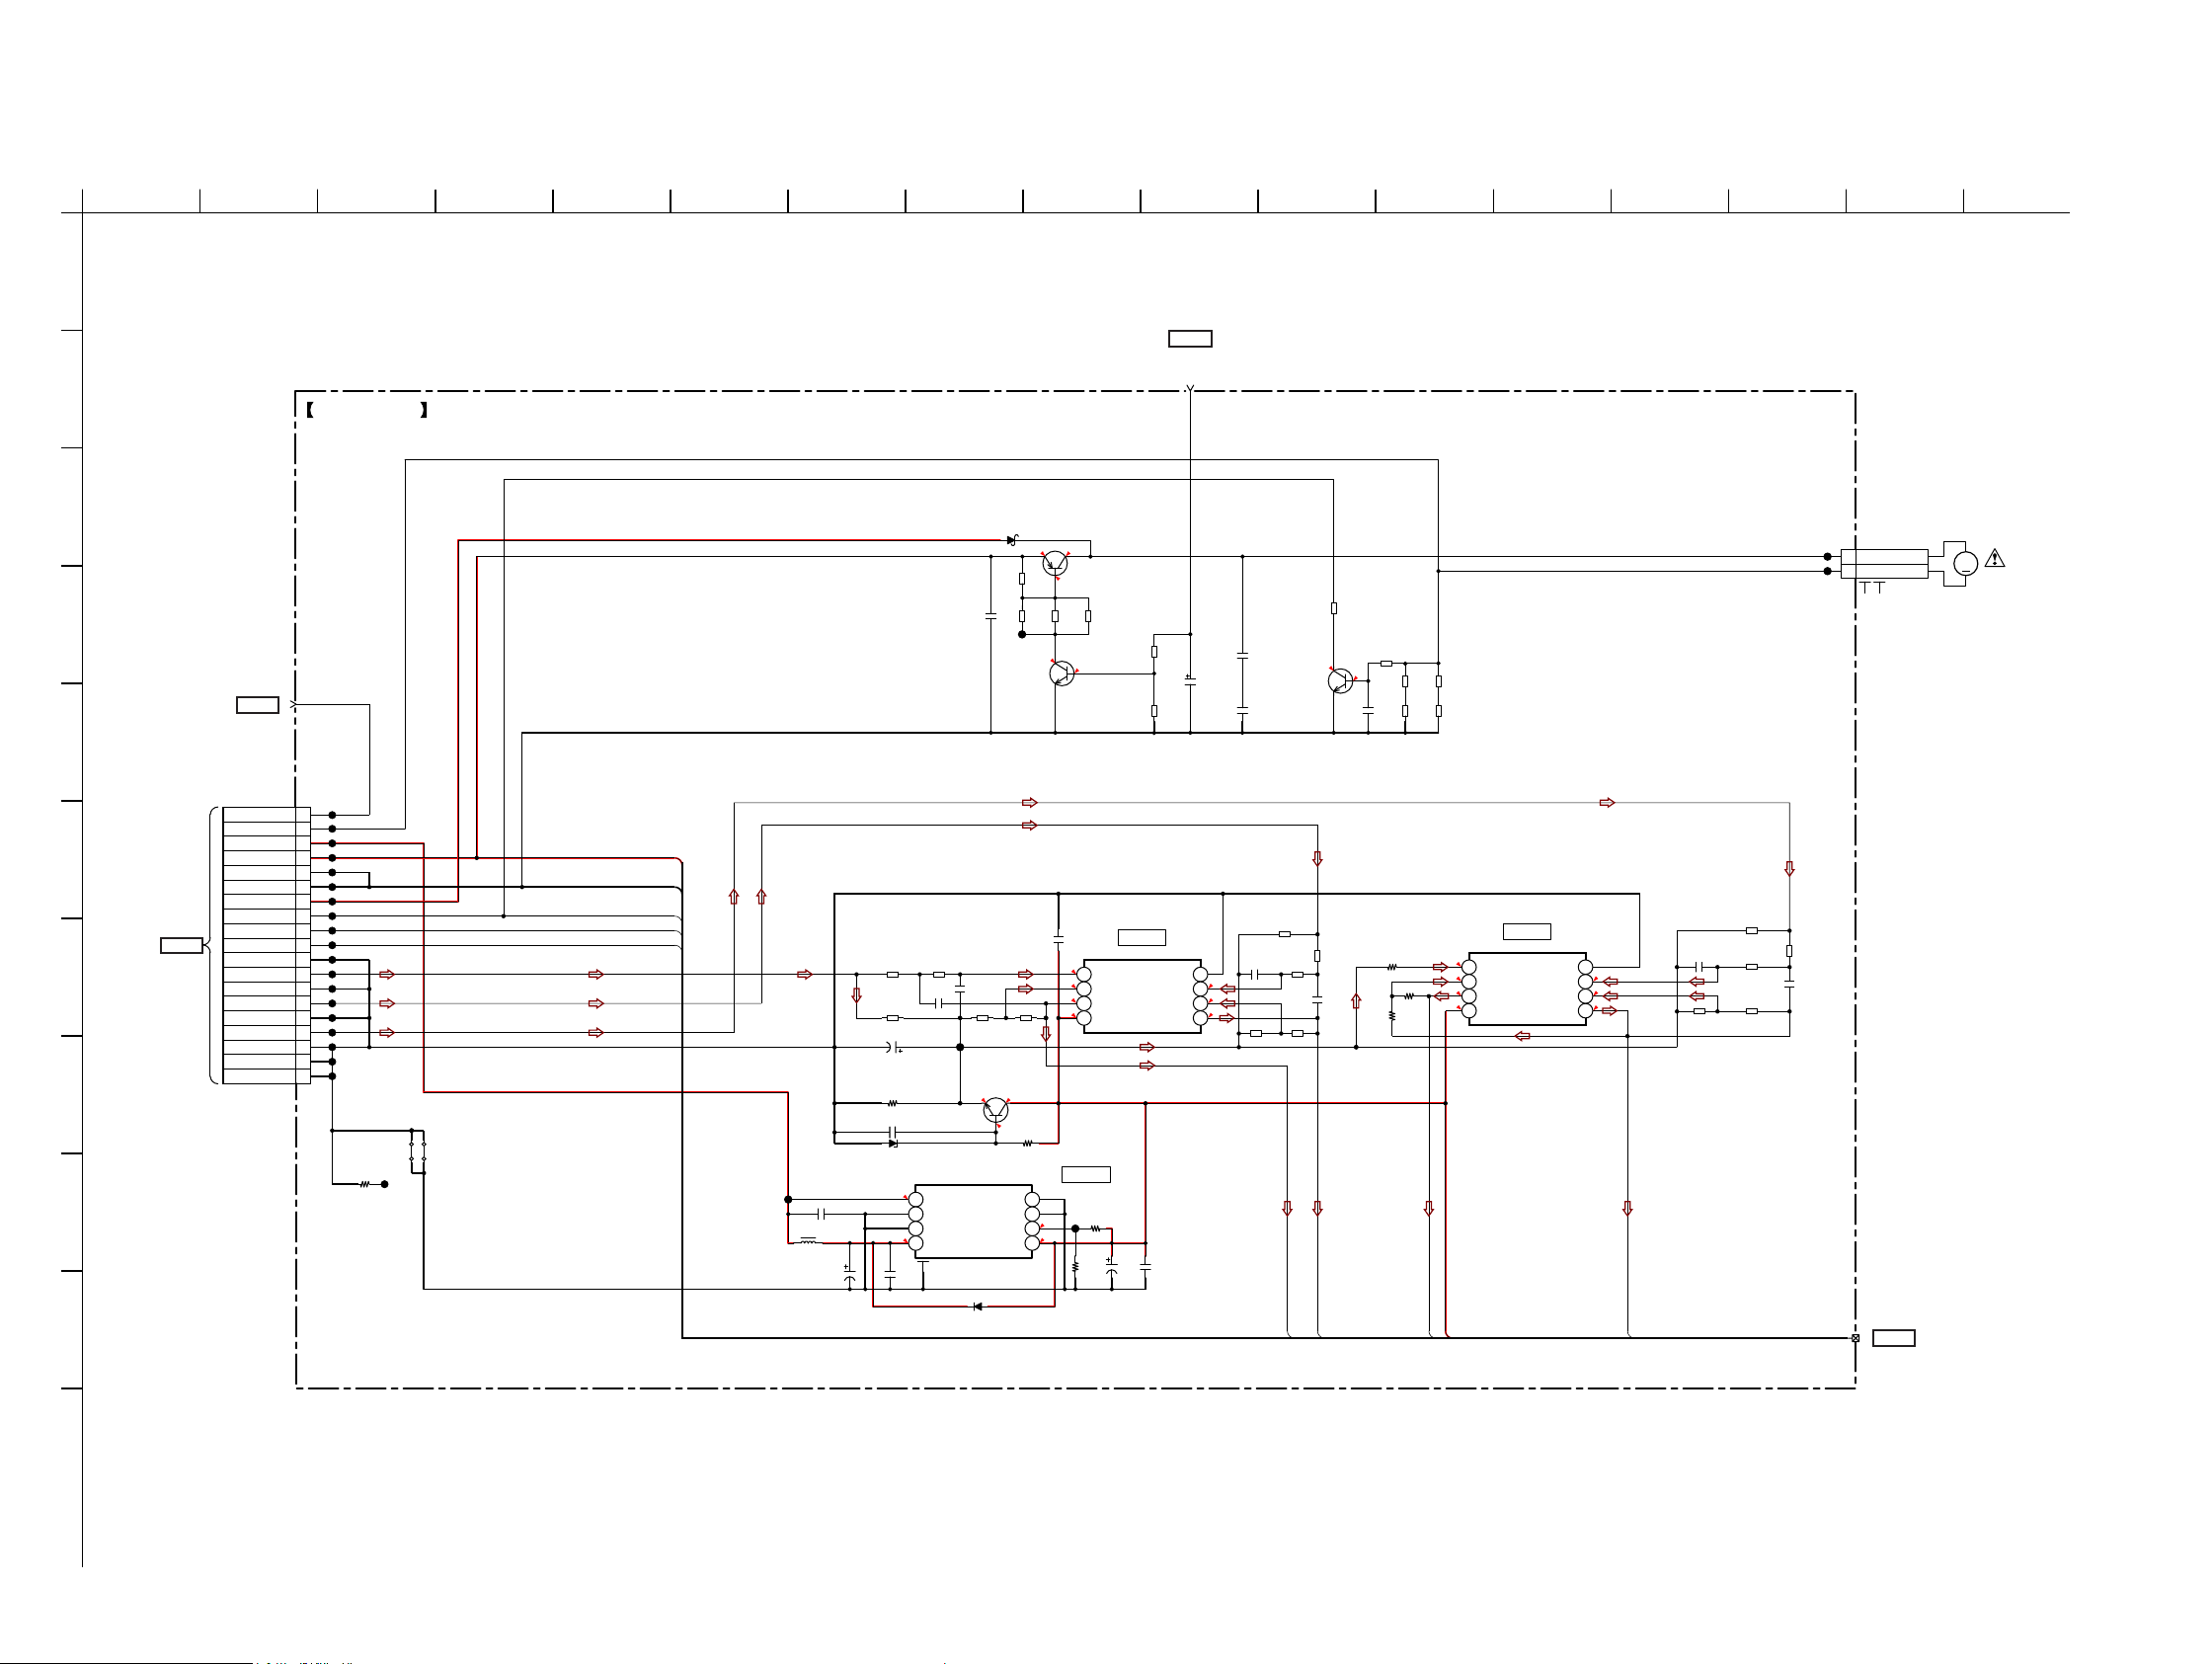
HCD-GT3D
6-18. SCHEMATIC DIAGRAM - DAMP Board (2/2) -
1
2 3 4 5 6 7 8 9 10 11 12 13 14 15 16 17
A
>044S
DAMP BOARD
(1/2)
(Page 51)
B
(2/2)DAMP BOARD
C
D
3
>045S
DAMP BOARD
(1/2)
E
(Page 51)
C1003
10
D1007
RB551V-30TE-17
R1062
10k
CL1054
13.7
R1063
3.3k
5.1
13.7
R1091
3.3k
0
0
Q1023
LSCR523UBFS8TL
FAN RESET
SWITCH
Q1010
DSA700300L
FAN MOTOR
DRIVER
R1092
3.3k
R1070
2
CN1004
2P
CL1052
1FAN+
CL1053
2FAN-
R1139
0
R1064
3.4
22k
0.1
R1065
R1067
2.2
2.2
C1005
22
R1066
3.3
R1068
2.2
C1004
10 50V
R1069
22k
C1001
C1002
0.1
0.1
Q1011
LSCR523UBFS8TL
FAN PROTECTION
27k
M
DC FAN
CN1001
19P
CL1001
1RELAY_CTRL
CL1002
2FAN-DET
CL1003
3A+13V
CL1004
F
>041S
MOTHERBOARD
BOARD
G
(10/10)
CN119
(Page 49)
4M+13V
CL1005
5MGND
CL1006
6MGND
CL1007
7M+5V
CL1008
8/DAMP-PROTECT
CL1009
9/AMP-RESET
CL1010
10/SD-FAST
CL1011
11AGND
CL1012
12FL
CL1013
13AGND
CL1014
14FR
CL1015
15AGND
CL1016
16SW
CL1017
17AGND
18AGND
CL1018
19AGND
CL1019
H
JC10190JC1020
0
R1163 0
CL1060
I
J
M+13V
MGND
/DAMP-PROTECT
/AMP-RESET
/SD-FAST
CL1039
C1092 1000p
L1009
47uH
C1091
10 50V
R1153 1.8k
R1169 3.3k
C1144 100 10V
100kR1147
C1143 0.1
D1014
DZ2J068M0L
13.6
13.4
C1133
0.1
5
6
7
8
2+IN
2-IN
2OUT
VCC
IC1005
NJM4565M(TE2)
IC1005
PRE AMP
GND
1OUT
R1168 3.9k
C1156
0.0027
R1166
3.3k
R1156 2.2k
R1155 5.6k
4
6.5
3
1+IN
6.5
2
1-IN
6.3
1
SW+
R1154
1.8k
C1155
0.0022
1
>043S
DAMP BOARD
(Page 51)
(1/2)
IC1004
6.5
5
6.5
6
6.5
7
12.4
8
IC1003
IC1003
+12V REG
CL1038
R1053
R1052
47k
3.3k
2+IN
2-IN
2OUT
VCC
NJM4565M(TE2)
IC1004
PRE AMP
C1089
C1090
10
50V
GND
1+IN
1-IN
1OUT
0.1
C1149
Q1022
BIAS
0.1
R1164
4.7k
12.5
7.1
2.2kR1145
BD00GA3WEFJ-E2
NC_4EN
4
GND
3
0.8
FB
2
12.2
VO
1
R1151
2.2k
C1151
C1150
0.0022
1500p
R1152
8.2k
CL1063
LSCR523UBFS8TL
6.5
5
NC_6
6
NC_7
7
VCC
8
D1016
RF05VAM2STR
R1167 3.3k
R1150
R1149
FL
R1148
1.8k
2.2k
C1147
1500p
R1158
4.7k
4.7k
FR
2.2kR1157
R1159
4.7k
6.5
6.5
6.7
12.4
SW-
GVDD
C1148
0.0022
4
6.5
3
6.5
2
6.5
1
R1165
8.2k
K
HCD-GT3D
5252
Page 53
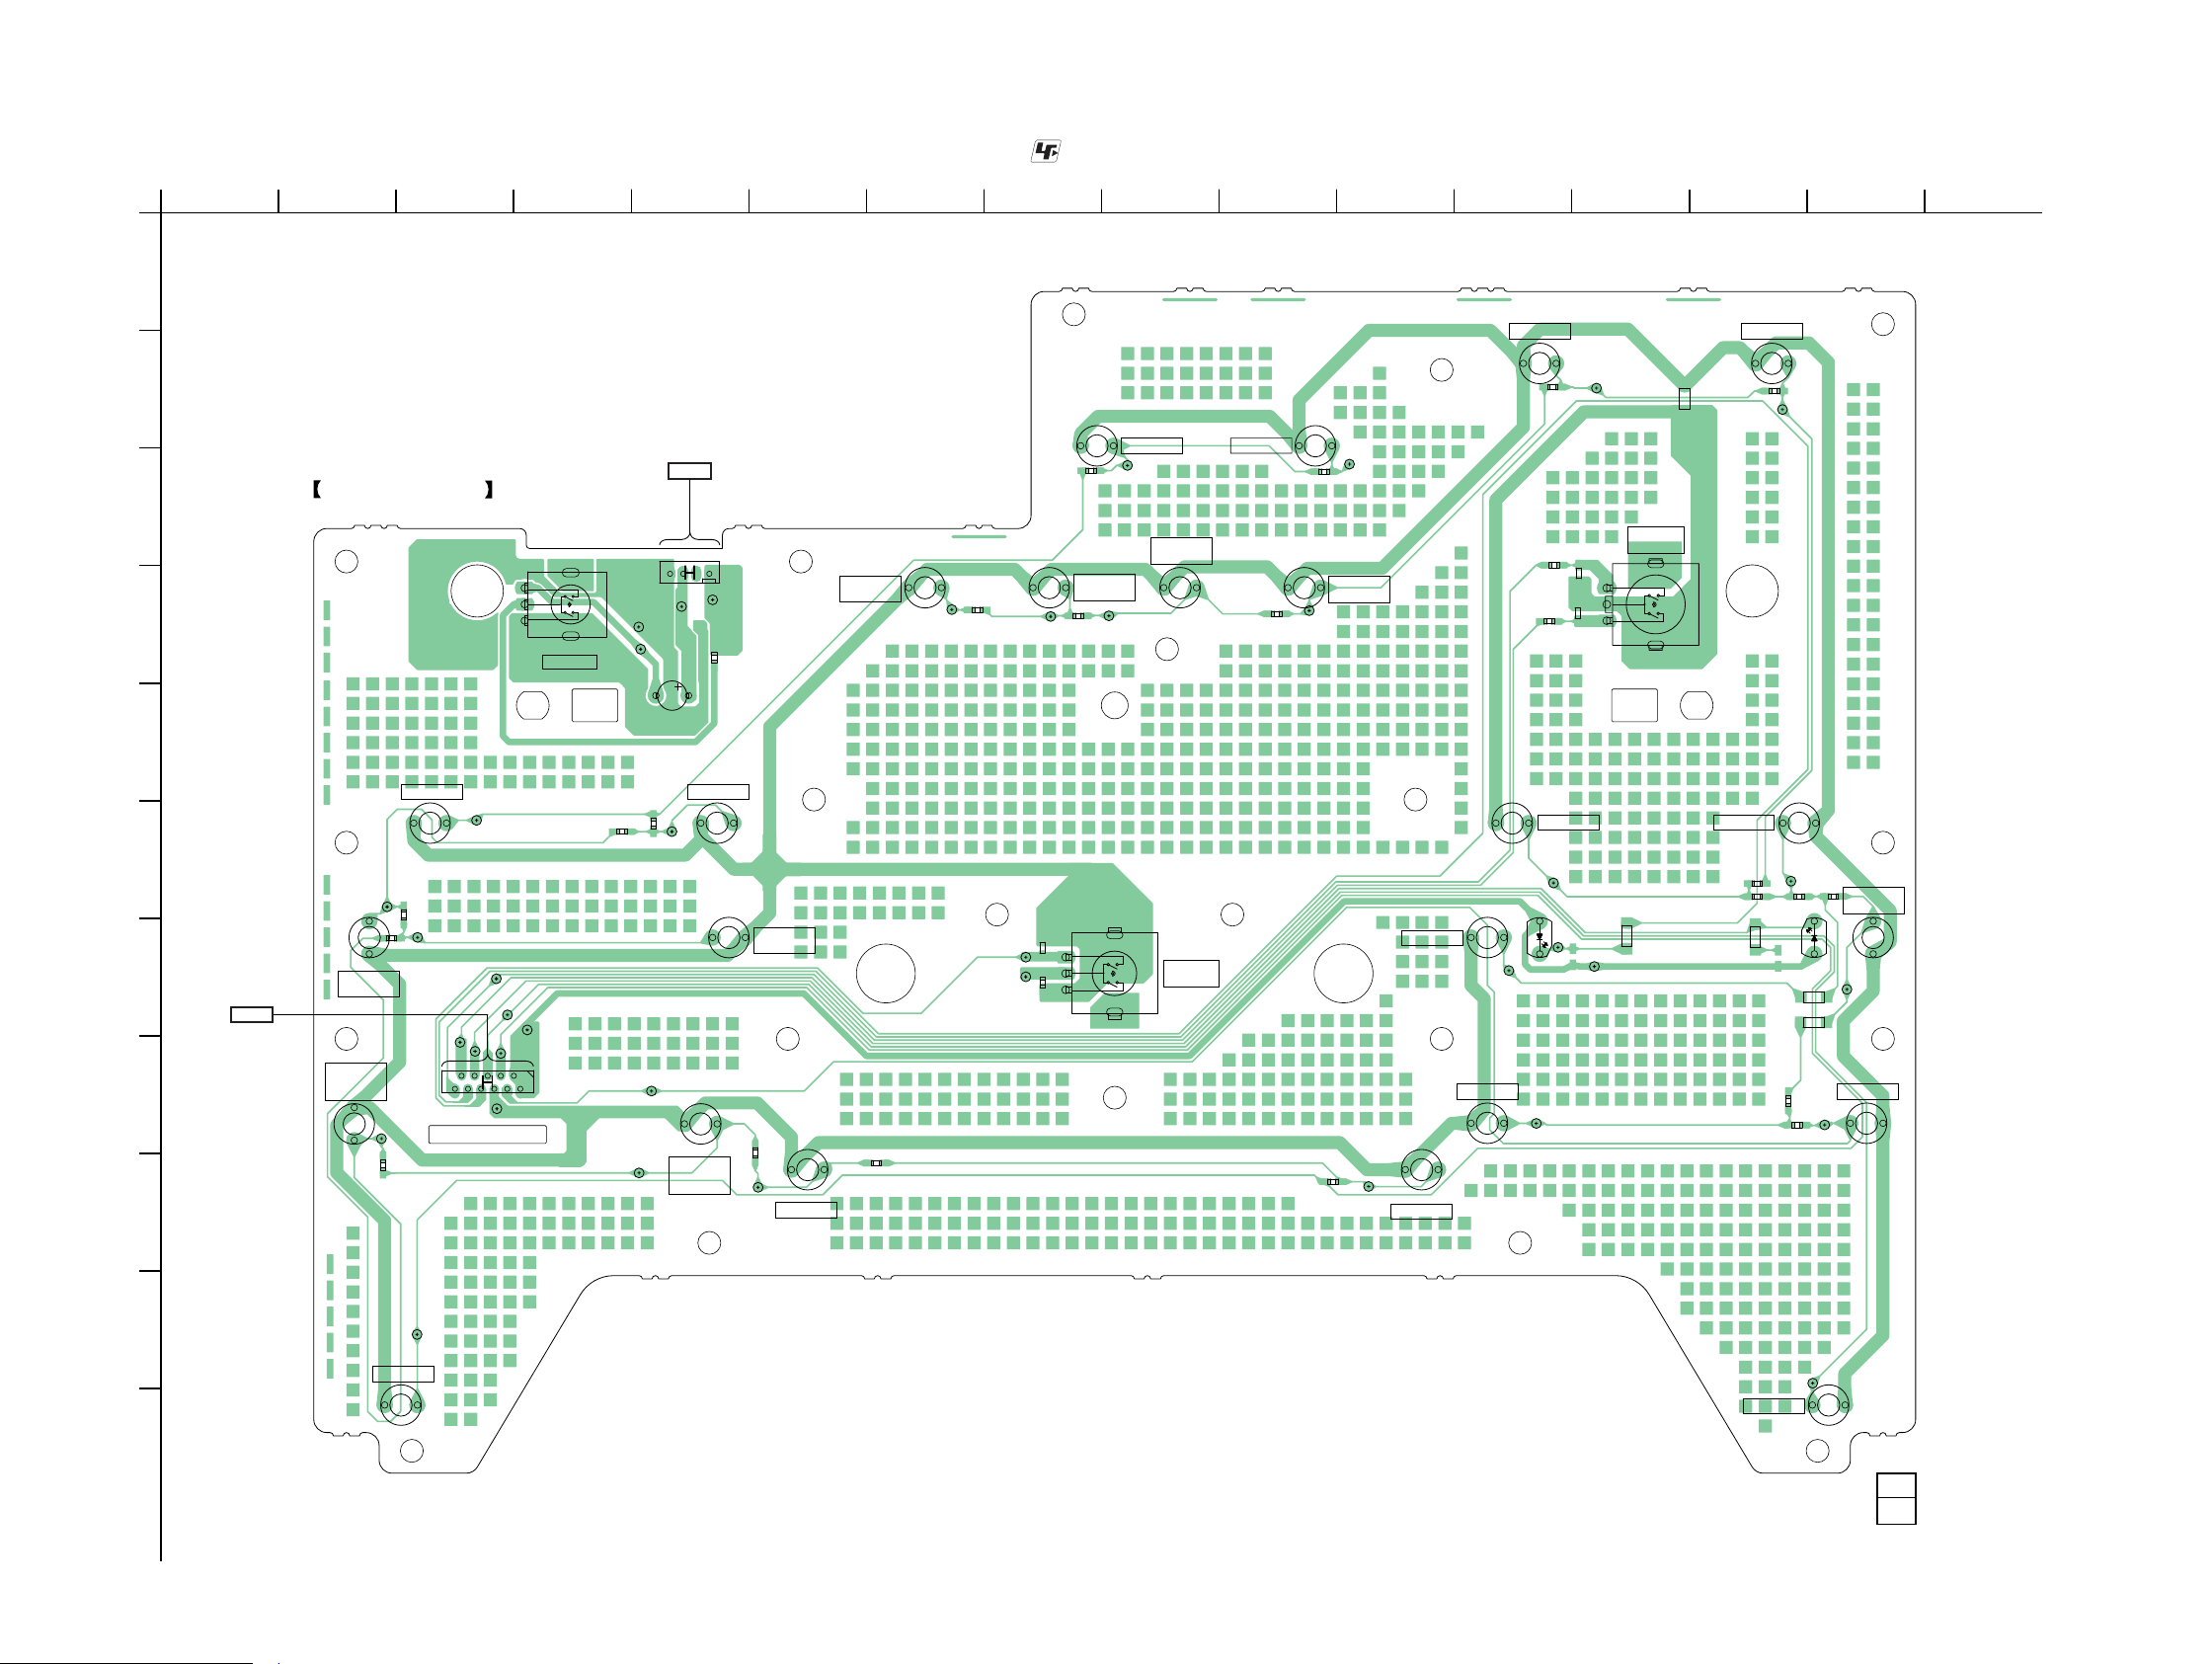
6-19. PRINTED WIRING BOARD - BUTTON Board - • See page 32 for Circuit Boards Location. • : Uses unleaded solder.
HCD-GT3D
1
2 3 4 5 6 7 8 9 10 11 12 13 14 15 16
A
S3108
SOUND FIELD
B
S3113
PARTY CHAIN
CL3131
R3141
BUTTON BOARD
MIC BOARD
CN3202
(Page 56)
>008P
R3150
REC TO USB
CL3141
S3123
C
S3110
DJ EFFECT
143
CN3101
CL3113
CL3114
D
RV3100
MIC LEVEL
CL3115
CL3116
R3125
C3113
S3111
DJ EFFECT
DJ OFF
R3139
CL3129
CL3130
R3140
S3112
DJ EFFECT
SAMPLER
CL3128
ISOLATOR
R3138
CL3127
S3109
DJ EFFECT
FLANGER
R3137
R3123
R3124
CL3126
C3107
C3111
EN3100
MULTI
CONTROL
JR
JR3104
S3107
FUNCTION
R3136
CL3125
E
S3121S3122
R3149
CL3103
CL3139
VOCAL FADER
S3117
S3
TUNING -
.
R3144
CL3134
S3119
S1
-
FOOTBALL
S3116
R3143
CL3107
CL3118
C3117
R3129
EN3101
VOLUME/
DJ CONTROL
R3142
CL3133
S3104
MEGA BASS
S3115
PARTY LIGHT
S3102
N
CL3122
D3100
CL3120
CL3124
S3106
ENTER
CL3109
CL3102
JR
JR3101
S3105
LIGHT MODE
R3135
R3134
JR3100
CL3123
R3133
JR
JR3103
JR3102
R3131
R3130
R3132
JR
JR
CL3119
D3105
CL3121
S3103
- PAIRING
BLUETOOTH
S3101
x
MIC ECHO
CL3140
R3148
F
CL3138
R3147
CL3137
R3146
S3120
S3118
S4
TUNING +
>
+
S2
CN3100
CL3136
R3145
CL3100
CL3108
1
CL3110
CL3117
CL3101
CL3132
2
CL3105
10
11
CL3135
G
>009P
SPLITTER BOARD
CN3402
(Page 58)
H
I
K
HCD-GT3D
S3114
Z
CL3104
S3100
"/1
CL3106
J
12
1-894-298-
(12)
5353
Page 54
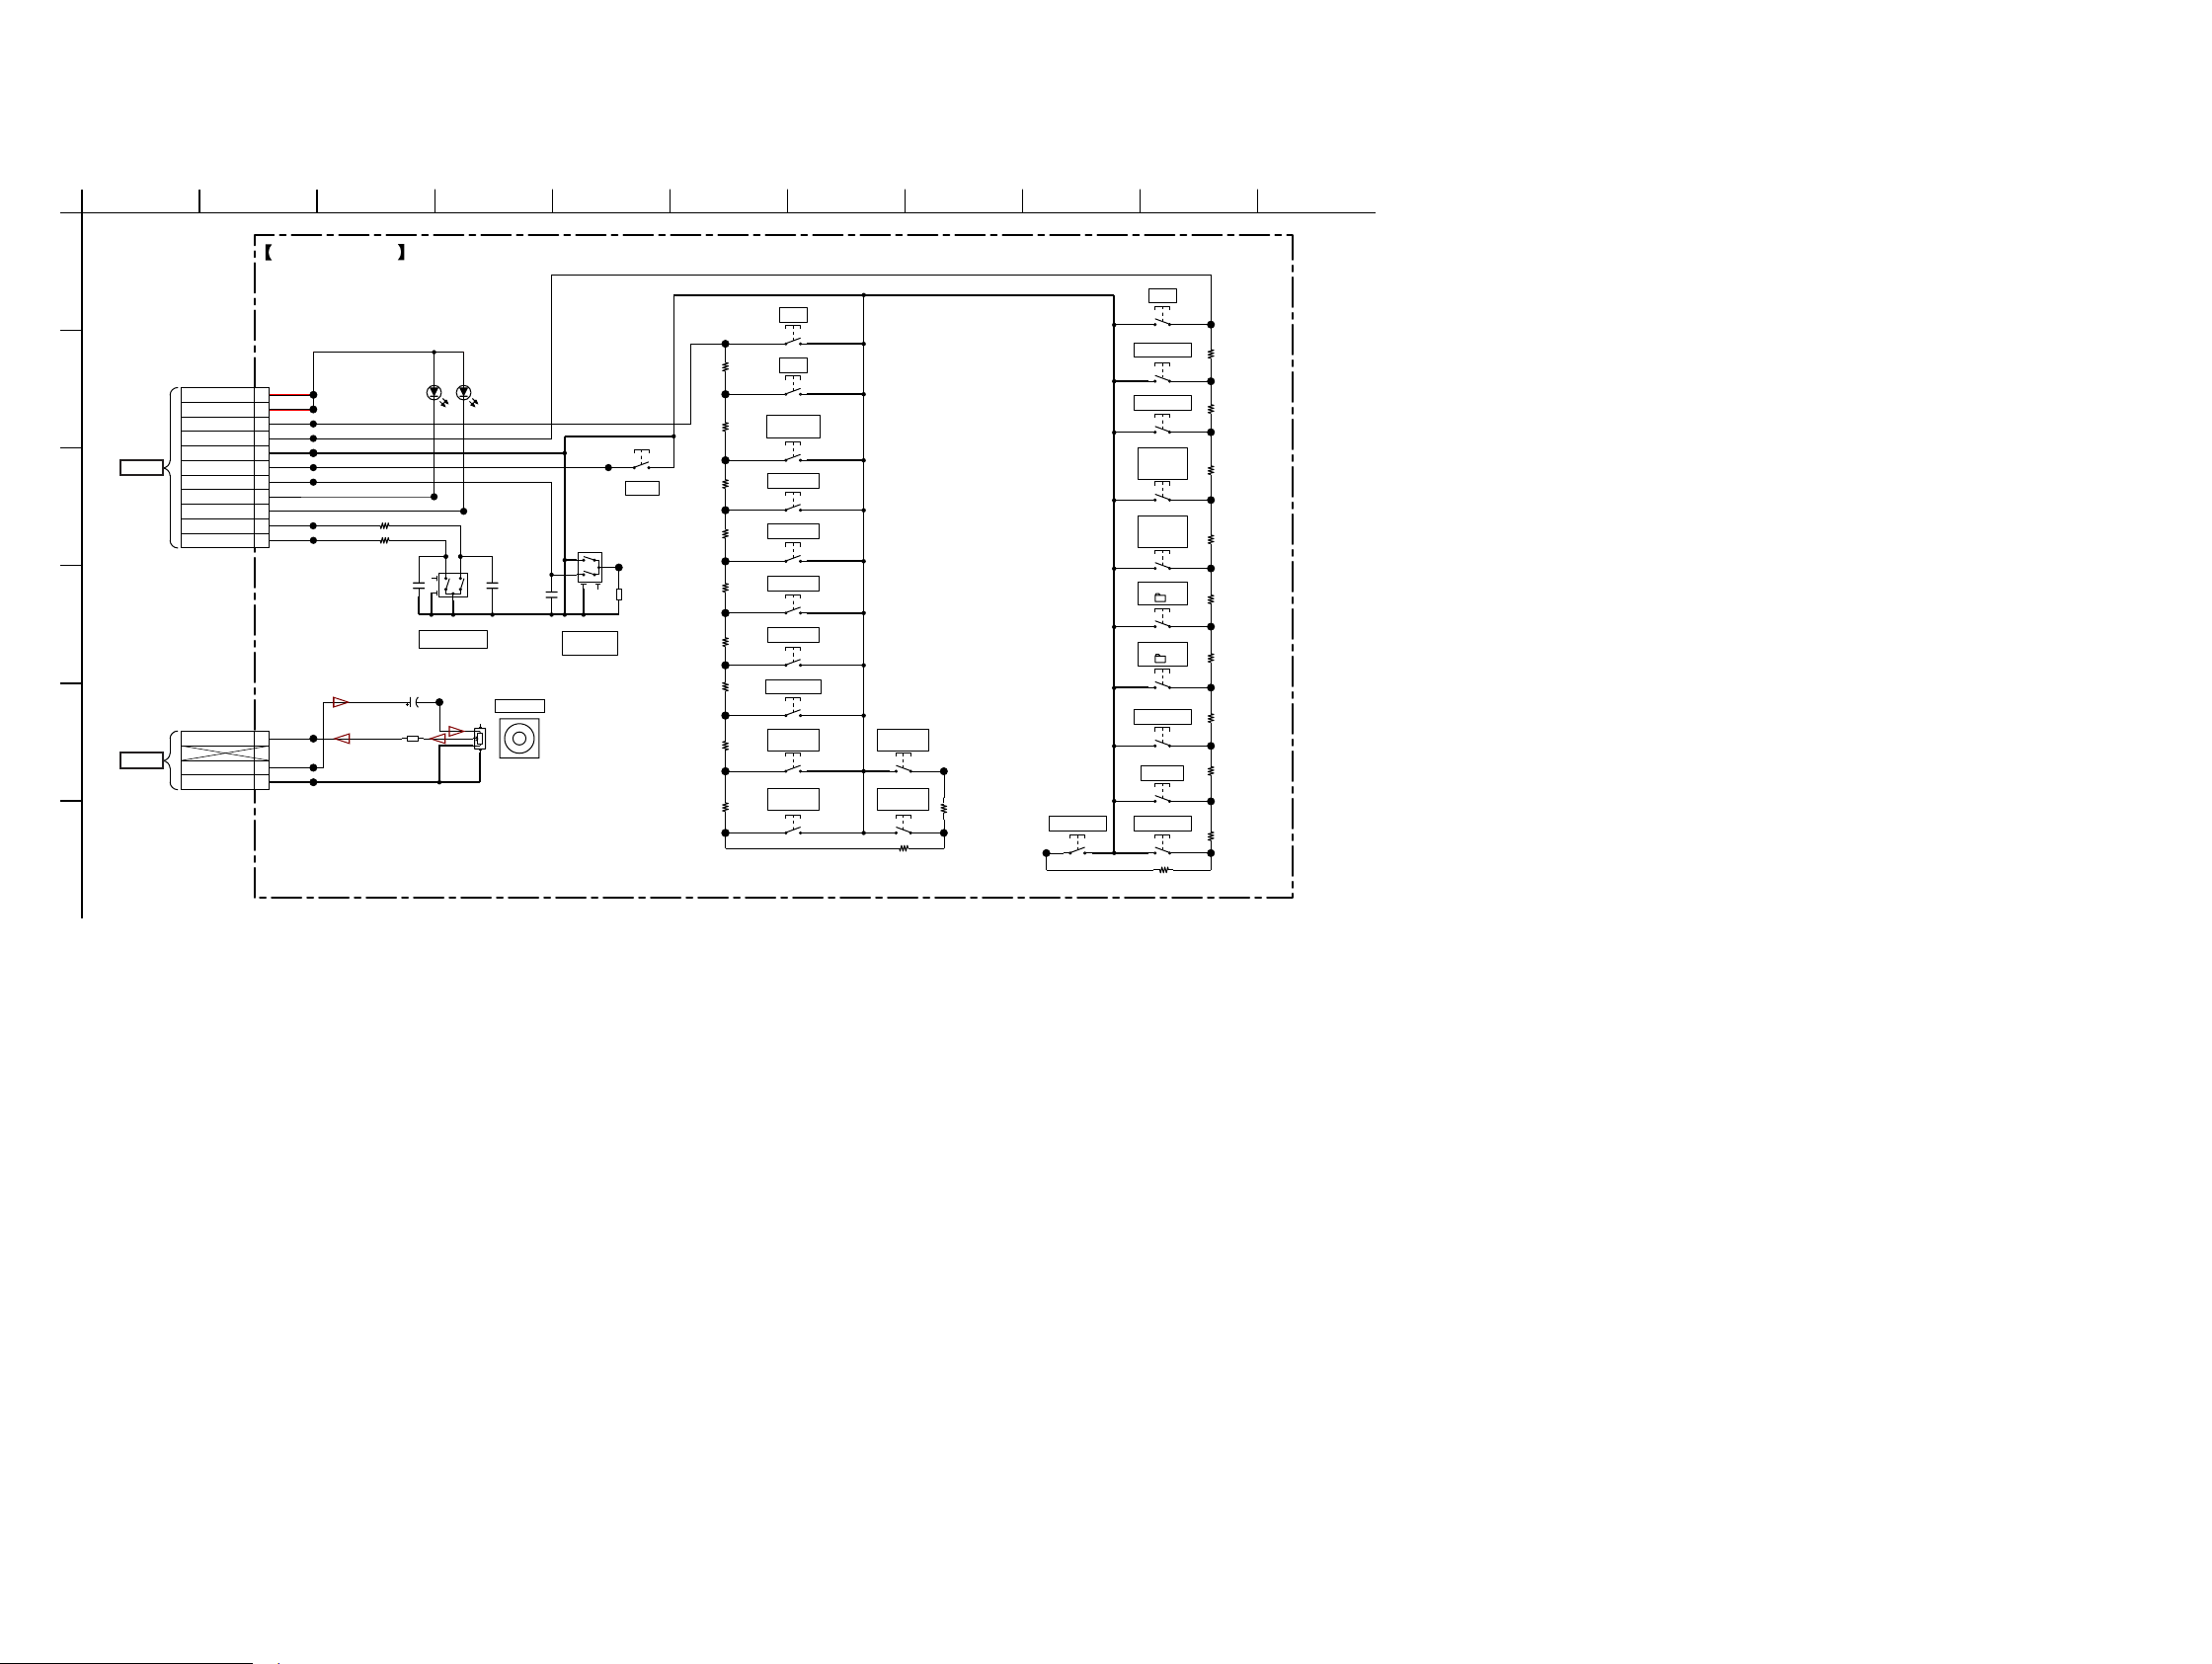
HCD-GT3D
Ver. 1.2
6-20. SCHEMATIC DIAGRAM - BUTTON Board -
1
2 3 4 5 6 7 8 9 10 11
BUTTON BOARD
A
S3101
x
CL3119
R3130
CN3100
11P
B
>047S
SPLITTER
BOARD
CN3402
C
(Page 58)
CL3101
11LED+5.2V
CL3102
10LED+5.2V
CL3103
9AD-KEY0
CL3104
8AD-KEY1
CL3105
7DGND
CL3106
6POWER-KEY
CL3107
5
VOL
4BLUE_LED
3RED_LED
CL3100
2JOG_POS
CL3110
1JOG_NEG
D
CN3101
4P
CL3113
E
>048S
MIC
BOARD
CN3202
(Page 57)
1AMP_+IN1
CL3114
3AMP_OUT2
CL3115
4MIC_GND
D3105
HL-364B460MZ-T
0R3124
0R3123
C3107
0.01
C3113
2.2 50V
R3125
CL3108
MULTI CONTROL
10k
CL3109
EN3100
CL3116
D3100
HL-364V620MZ-T
BASS BAZUCA LEDBT LED
C3111 0.01
RV3100
50k
MIC LEVEL
C3117
0.001
CL3107
EN3101
VOLUME /
DJ CONTROL
S3100
CL3118
R3129
10k
"/1
680
CL3120
R3131
CL3121
R3132
1.5k
CL3122
R3133
1.5k
CL3123
R3134
2.2k
CL3124
R3135
3.3k
CL3125
R3136
4.7k
CL3126
R3137
6.8k
CL3127
R3138
10k
CL3128
1k
F
S3102
N
S3103
- PAIRING
BLUETOOTH
S3104
MEGA BASS
S3105
LIGHT MODE
S3106
ENTER
S3107
FUNCTION
S3108
SOUND FIELD
S3109
DJ EFFECT
FLANGER
S3110
DJ EFFECT
ISOLATOR
S3111
DJ EFFECT
DJ OFF
S3112
DJ EFFECT
SAMPLER
CL3129
R3139
22k
CL3130
15kR3140
CL3131
S3113
PARTY CHAIN
S3114
Z
S3115
PARTY LIGHT
S3116
FOOTBALL
S3117
S3
TUNING -
.
S3118
S4
TUNING +
>
S3119
S1
-
S3120
S2
+
S3121
VOCAL FADER
S3122
MIC ECHO
S3123
REC TO USB
15kR3141
CL3132
R3142
680
CL3133
R3143
1k
CL3134
R3144
1.5k
CL3135
R3145
1.5k
CL3136
R3146
2.2k
CL3137
R3147
3.3k
CL3138
R3148
4.7k
CL3139
R3149
6.8k
CL3140
R3150
10k
CL3141
HCD-GT3D
5454
Page 55
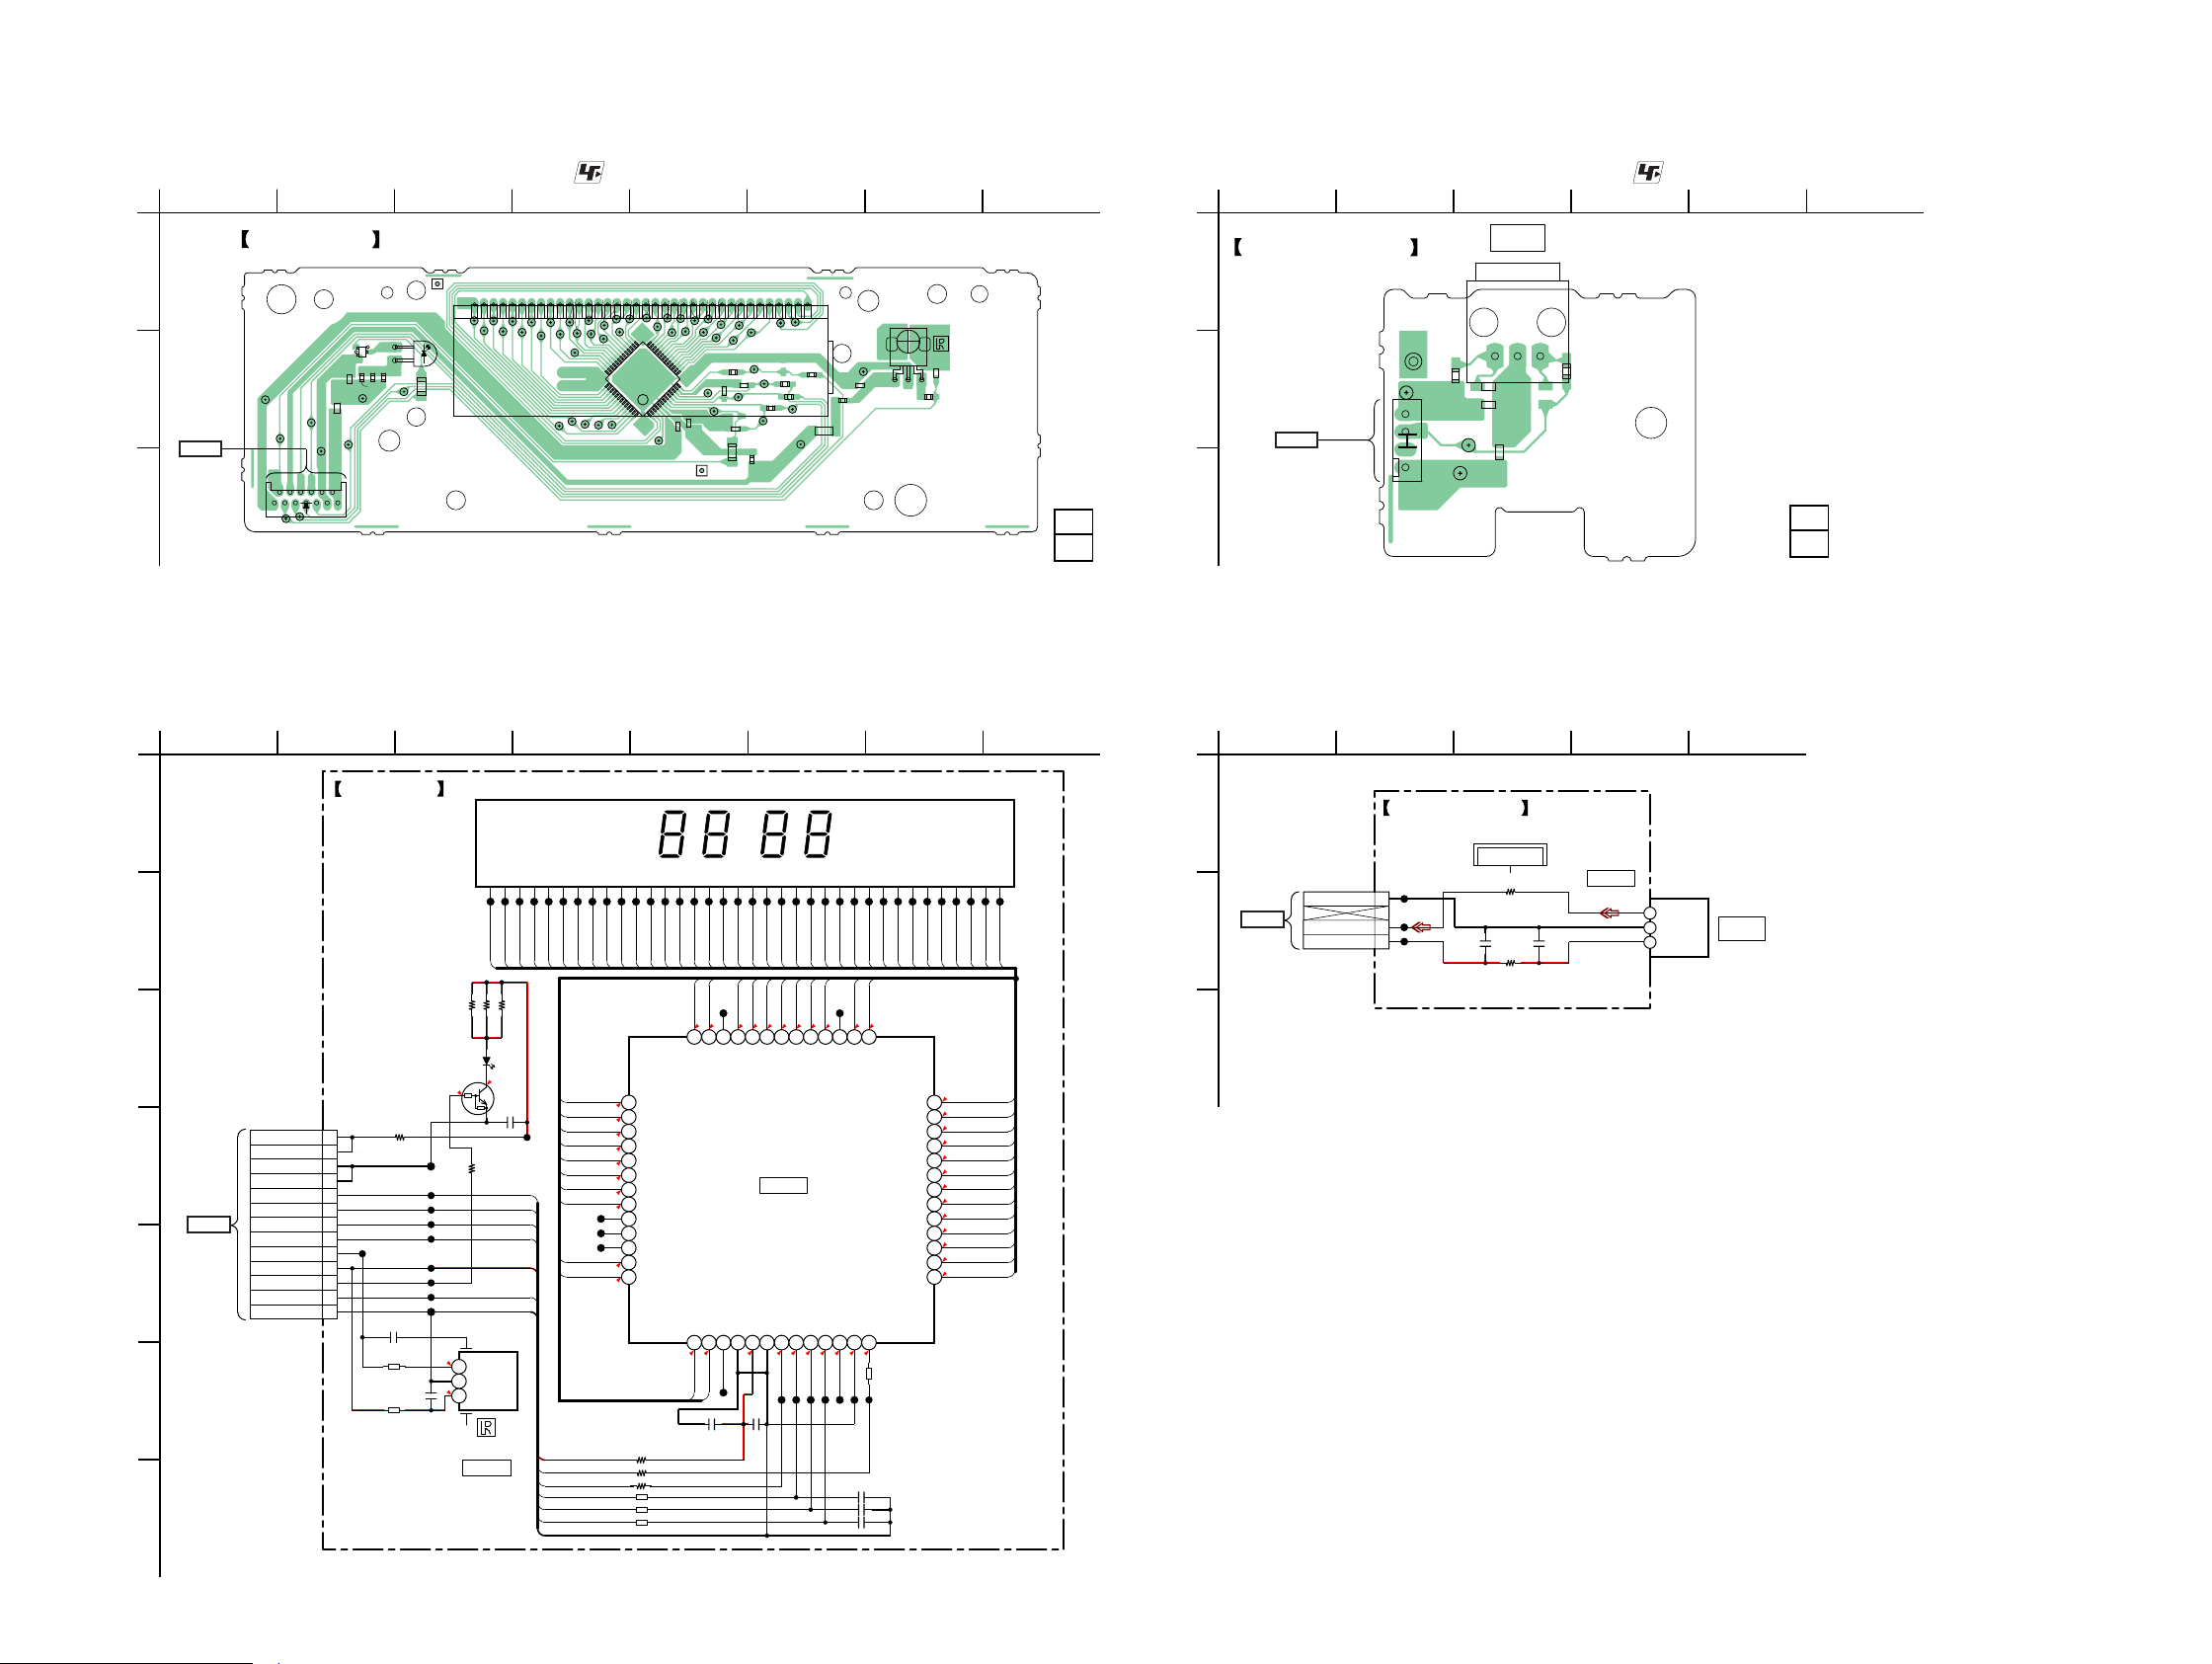
HCD-GT3D
Ver. 1.1
6-21. PRINTED WIRING BOARD - LCD Board -
• See page 32 for Circuit Boards Location. • : Uses unleaded solder.
1
2 3 4 5 6 78
LCD BOARD
A
CL3062
ND3000
B
C
>010P
SPLITTER BOARD
CN3401
(Page 58)
CL3000
CL3001
1
CL3009
Q3000
B
E
R3003
R3004
C3002
CL3005
R3002
CL3022
CL3004
R3035
CL3002
CL3003
CN3000
12
2
13
CL3007
CL3075
CL3073
CL3071
CL3074
D3001
R3011
CL3072
6-22. SCHEMATIC DIAGRAM - LCD Board -
CL3056
CL3048
CL3059
CL3067
CL3069
CL3070
CL3068
CL3064
CL3024
CL3044
CL3023
CL3053
CL3032
CL3050
39
40
CL3033
• See page 59 for IC Block Diagrams.
CL3047
CL3060
CL3034
CL3046
CL3043
27 26
IC3004
52 1
CL3045
CL3042
CL3041
14
13
CL3039
CL3040
CL3061
CL3049
C3009
CL3037
CL3038
C3008
CL3036
CL3035
CL3031
CL3030
R3033
C3011
C3010
R3025
C3012
CL3029
CL3028
CL3065
CL3054
R3026
CL3051
R3022
CL3027
CL3026
CL3057
R3030
R3028
CL3008
CL3025
R3034
CL3006
JR3000
JR
R3001
CL3063
C3001
IC3000
132
R3000
C3000
1-894-297-
12
(12)
6-23. PRINTED WIRING BOARD - OPTICAL Board -
• See page 32 for Circuit Boards Location. • : Uses unleaded solder.
1
OPTICAL BOARD
2 3 4 56
OPTICAL IN
TV
A
IC3300
C3301
213
R3301
JR
JR3300
LP3300
CL3302
R3300
143
C3303
CL3301
CN3300
CL3300
B
>001P
MOTHERBOARD
BOARD
CN602
(Page 39)
C
1-894-300-
6-24. SCHEMATIC DIAGRAM - OPTICAL Board -
12
(12)
1
A
B
C
D
>046S
SPLITTER
BOARD
CN3401
(Page 58)
E
F
G
2 3 4 5 6 78
ND3000
LIQUID CRYSTAL DISPLAY
CL3037
CL3038
CL3039
CL3040
CL3041
CL3045
CL3043
CL3046
SEG11
SEG12
SEG13
SEG8
SEG9
SEG7
39383736353433323130292827
SEG24
SEG25
SEG26
SEG27
SEG28
SEG29
SEG30
SEG31
SEG32
SEG33
SEG34
COM0
COM1
1.7 1.7 3.4 3.41.7 0 0 0 0 3.4
C3008 0.1
0R3022
0
0R3025
1k
SEG14
SEG10
CL3044
SEG20
SEG23
SEG22
SEG21
NC_37
SEG20
SEG21
SEG22
SEG23
BU9795AKS2
LIQUID CRYSTAL DISPLAY
COM2
COM3
NC_3
VLCD
COM3
CL3042
C3009
0.1
VDD
12345678910111213
COM2
CL3048
CL3047
SEG16
SEG15
SEG19
SEG18
SEG18
SEG19
IC3004
IC3004
DRIVER
VSS
OSCIN
CL3049
CL3050
SEG17
SEG17
SEG17
CSB
CL3051
CL3053
SEG18
SEG16
SEG16
SCL
CL3054
CL3059
CL3056
SEG20
SEG19
CL3060
SEG15
SEG15
SDA
CL3061
CL3057
C3010 22p
C3011 22p
C3012 22p
CL3062
NC_29
NC_11
SEG21
SEG14
SEG14
TEST
CL3063
CL3064
SEG22
SEG13
1.71.71.71.7 1.71.71.71.71.71.7 1.7
SEG13
INHB
R3033
CL3065
CL3067
SEG23
100
CL3068
SEG24
SEG12
SEG11
SEG10
CL3069
SEG25
SEG9
SEG8
SEG7
SEG6
SEG5
SEG4
SEG3
SEG2
SEG1
SEG0
CL3070
SEG26
26
25
24
23
22
21
20
19
18
17
16
15
14
CL3071
SEG27
1.7
1.7
1.7
1.7
1.7
1.7
1.7
1.7
1.7
1.7
1.7
1.7
1.7
CL3072
SEG28
CL3073
SEG29
CL3074
SEG30
SEG12
SEG11
SEG10
SEG9
SEG8
SEG7
SEG6
SEG5
SEG4
SEG3
SEG2
SEG1
SEG0
CL3075
SEG31
DGND
LCD BOARD
CN3000
13P
13LED+5.2V
12LED+5.2V
11LED_GND
10LED_GND
9LCD_SCL
8LCD_SDA
7LCD_INHB
6LCD_CSB
5SIRCS
CL3007
4E+3.3V
3LCD_BCK_LED
2OSC
1
C3000 0.001
R3000 100
R3001 47
1L043RW32E0CIE11
BACKLIGHT LED
Q3000
LTC014EUBFS8TL
LED DRIVER
R3035
0
CL3002
CL3003
CL3004
CL3005
CL3006
CL3008
CL3009
CL3001
CL3000
C3001
1
D3001
0.2
3.3
VO1
GND2
3.3
VCC3
PNA4823M03S0
IC3000
REMOTE CONTROL
SIGNAL RECEIVER
R3002 150
R3011
IC3000
CL3023
COM0
R3003 330
3.3
0
LCD_INHB
CL3024
COM1
R3004 470
C3002
0.1
CL3022
LCD_SCL
LCD_SDA
LCD_CSB
E+3.3V
OSC
DGND
CL3025
COM2
CL3026
COM3
CL3027
CL3028
SEG0
SEG1
E+3.3V
LCD_INHB
OSC
LCD_CSB
LCD_SCL
LCD_SDA
DGND
CL3029
SEG2
SEG24
SEG25
SEG26
SEG27
SEG28
SEG29
SEG30
SEG31
CL3032
CL3033
CL3034
COM0
COM1
CL3030
SEG3
CL3031
CL3035
SEG4
SEG5
40
1.7
41
1.7
42
1.7
43
1.7
44
1.7
45
1.7
46
1.7
47
1.7
48
49
50
51
1.7
52
1.7
R3034
R3026 1k
R3028
R3030 1k
CL3036
SEG6
1
A
>038S
MOTHERBOARD
B
BOARD
(2/10)
CN602
(Page 41)
2 3 45
OPTICAL BOARD
GND
CN3300
4P
1
3VOUT
4VCC
CL3300
CL3301
CL3302
C3301
0.22
LP3300
R3300
0
C3303
0.22
0R3301
IC3300
JSR1124
IC3300
DIGITAL OPTICAL
RECEIVER
1
VOUT
2
GND
3
VCC
OPTICAL IN
TV
C
HCD-GT3D
5555
Page 56
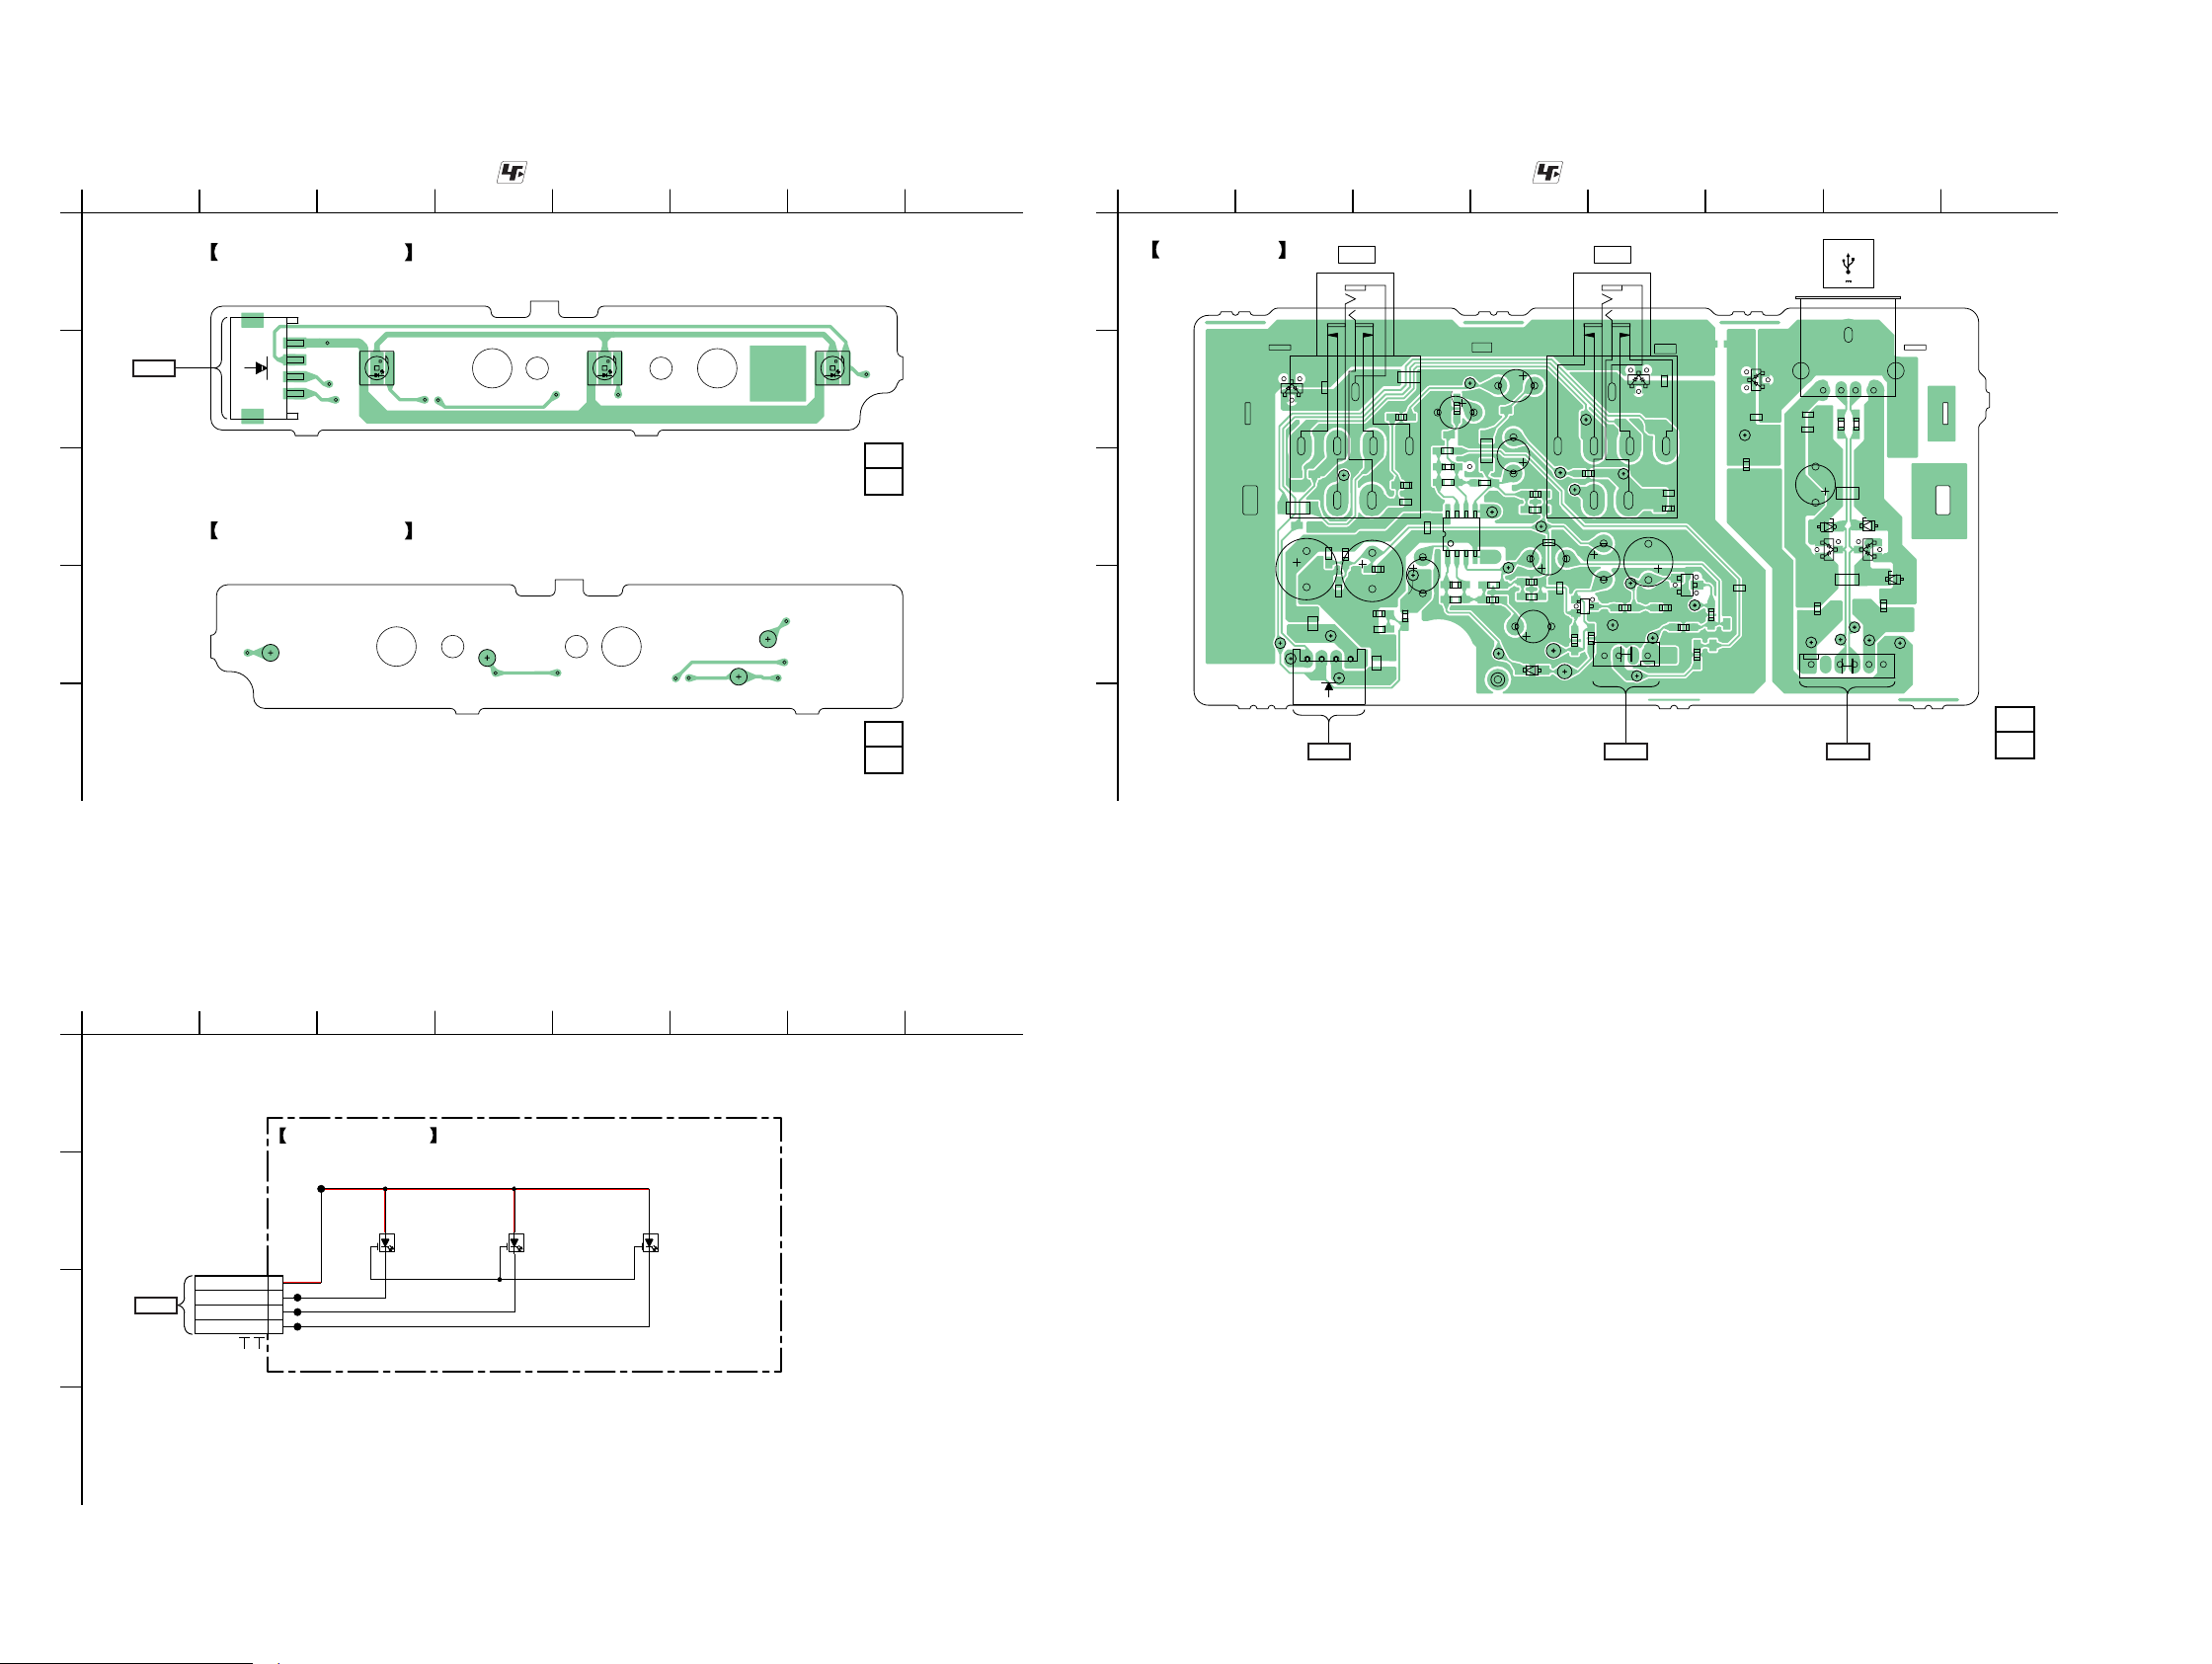
HCD-GT3D
Ver. 1.1
6-25. PRINTED WIRING BOARD - SPK_HLED Board -
• See page 32 for Circuit Boards Location. • : Uses unleaded solder.
1
2 3 4 5 6 78
SPK_HLED BOARD
A
>007P
MOTHERBOARD
B
BOARD
CN517
(Page 39)
C
(COMPONENT SIDE)
14
CN4000
SPK_HLED BOARD
(CONDUCTOR SIDE)
D
E
CL4001
CL4002
CL4003
1-894-386-
CL4000
1-894-386-
6-27. PRINTED WIRING BOARD - MIC Board -
• See page 32 for Circuit Boards Location. • : Uses unleaded solder.
1
MIC BOARD
A
D4000D4001 D4002
B
12
(12)
C
D
12
(12)
E
2 3 4 5 6 78
C3207
C3208
CL3204
D3204
JR3207
163
REC/PLAY
5V 1A
CN3203
14
R3230
R3231
C3204
JR
JR3208
D3202
D3205
D3206
JR
R3234
R3229
CL3206
CL3207
CL3205
CN3201
D3200
CL3232
D3209
CL3202
CL3203
JR3200
JR
CN3200
C3225
CL3200
C3237
FB002
C3224
C3221
CL3201
MIC 2
R3216
R3204
C3203
14
CL3229
C3222
R3215
FB003
JR3206
R3221
R3223
C3234
CL3213
JR
JR3204
C3223
C3206
R3205
CL3225
R3219
C3232
JR
R3217
C3226
C3227
CL3223
58
14
R3212
C3215
LP3200
JR
JR3205
IC3200
CL3214
C3217
R3207
CL3217
C3231
R3218
C3229
CL3222
R3211
C3230
C3218
C3210
CL3210
D3201
JR
C3211
JR3201
JR3202
CL3209
CL3227
R3220
CL3224
Q3200
JR
R3201
B
E
MIC 1
J3200J3201
CL3228
R3200
CN3202
C3201
CL3211
CL3220
R3202
CL3226
C3235
R3222
CL3218
D3208
C3202
R3203
143
CL3219
C3236
R3213
Q3201
G
S
CL3212
R3214
CL3221
R3206
C3216
JR3203
JR
D3207
R3210
12
>003P
MOTHERBOARD
BOARD
CN601
(Page 39)
>008P
BUTTON BOARD
CN3101
(Page 53)
>002P
MOTHERBOARD
BOARD
CN451
(Page 39)
1-894-299-
(12)
6-26. SCHEMATIC DIAGRAM - SPK_HLED Board -
1
2 3 4 5 6 78
A
SPK_HLED BOARD
CL4000
B
D4000
LA CN5M-GAHA-24-1 (R)
CN4000
4P
1M+5.2V
CL4001
>040S
MOTHERBOARD
C
BOARD
(10/10)
CN517
(Page 49)
2RED_HLED
CL4002
3GREEN_HLED
CL4003
4BLUE_HLED
RED HLED
D
D4002
LT CN5M-GAHB-25-1 (G)
GREEN HLED
D4001
LD CN5M-4Q4R-35-1 (B)
BLUE HLED
HCD-GT3D
5656
Page 57
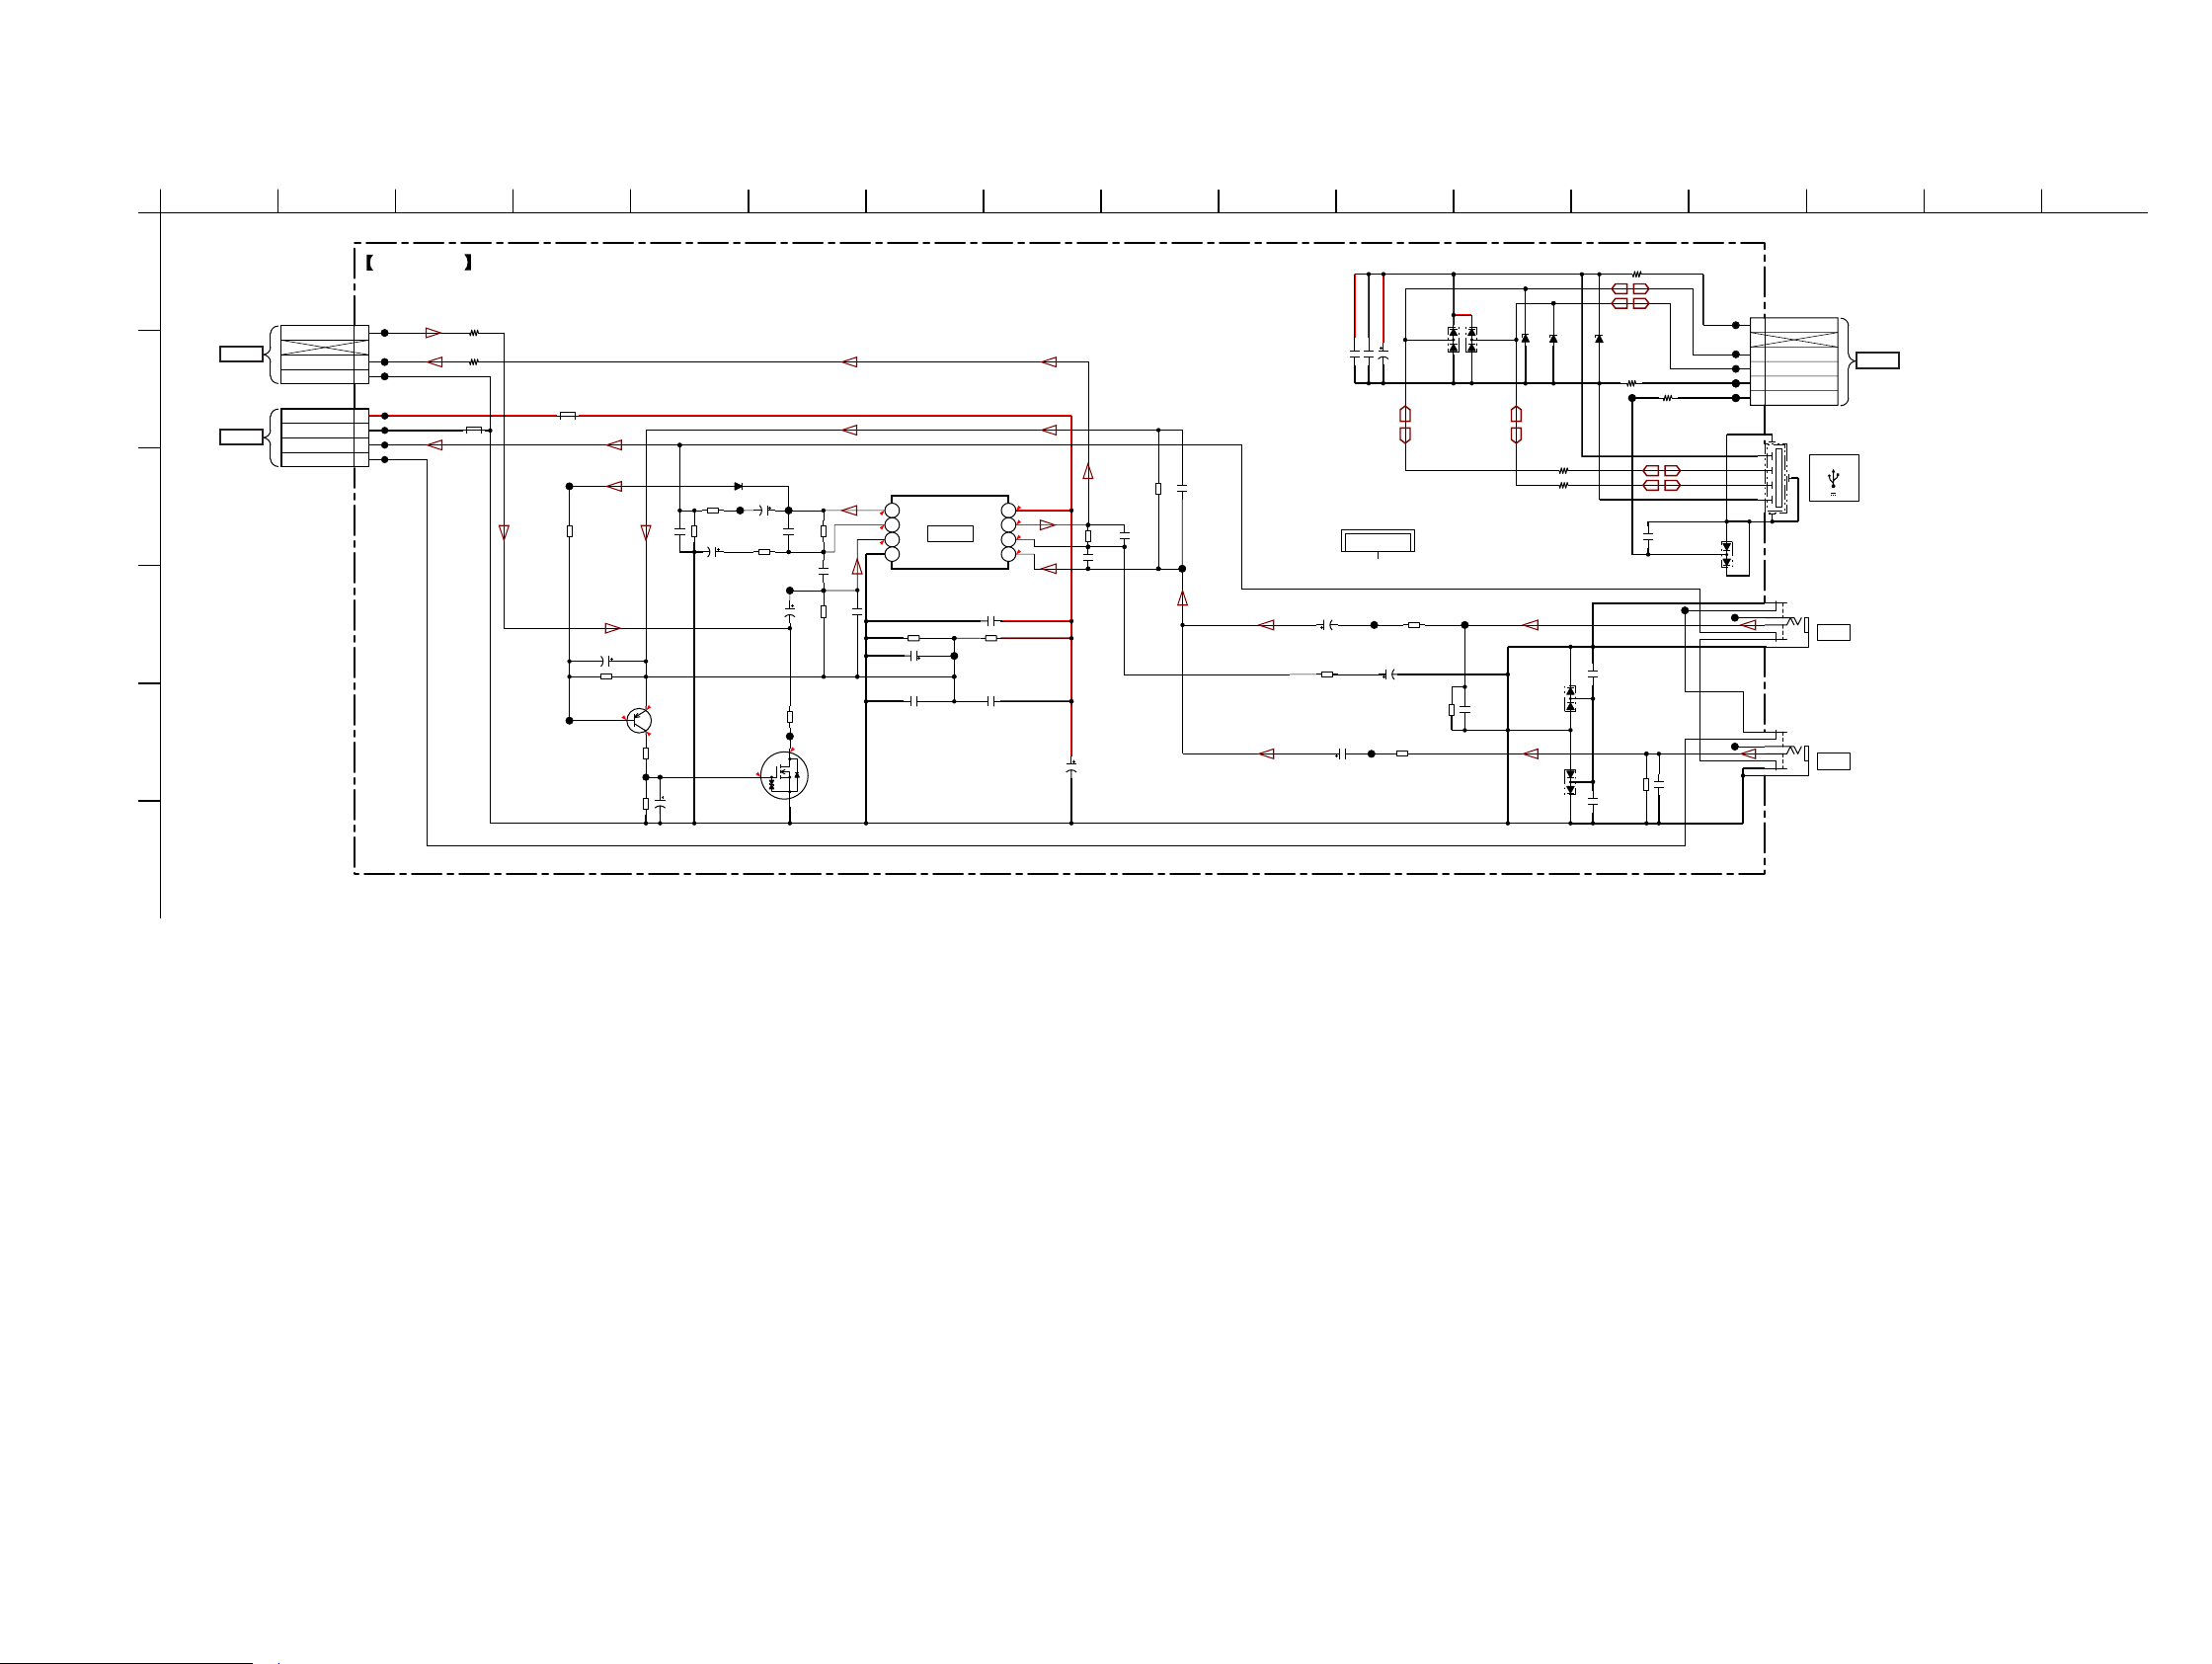
6-28. SCHEMATIC DIAGRAM - MIC Board -
HCD-GT3D
Ver. 1.1
1
A
>048S
BUTTON
BOARD
CN3101
B
(Page 54)
>037S
MOTHERBOARD
BOARD
(1/10)
CN601
(Page 40)
C
D
E
2 3 4 5 6 7 8 9 10 11 12 13 14 15 16 17
MIC BOARD
CN3202
4P
CL3218
1AMP_+IN1
CL3219
3AMP_OUT2
CL3220
4MIC_GND
CN3200
4P
CL3200
1A+9V
CL3201
2MIC_GND
CL3202
3MIC_SIGNAL
CL3203
4MIC_DET
R3213
R3214
FB003 0uH
0
C3207 10
LP3200
CL3224
C3232
CL3225
C3204 100 16V
R3220 1k
2.2 50V
R3221
1k
D3206
BAV99-215
0
C3208 0.01
FB002
0uH
D3201
C3202
10 50V
DA2J10100L
R3205
100
CL3213
R3204
100k
C3210
0.1 50V
Q3201
RHK005N03T146
GAIN CONTROL
C3206
2.2 50V
R3207
10k
CL3214
C3211
0.1 50V
0
C3215
68p
CL3217
R3212
100k
C3217
220p
R3211
100k
R3206
3.3k
CL3212
0
C3218
680p
OUT1
1
4.6
2
-IN1
4.6
+IN1
3
4.5
VEE
4
R3215 10k
C3222 220 10V
C3221 0.1
IC3200
BA4558F
IC3200
MIC AMP
VCC
OUT2
-IN2
+IN2
C3223 0.1
R3216 10k
CL3222
C3224 0.1
R3218
C3229
33k
0.001
0.001
CL3223
C3230 2.2 50V
R3219 1k
C3231
2.2 50V
9.1
8
4.6
7
4.6
6
4.5
5
C3225
220 10V
R3217
33k
C3226
220p
C3227
CL3209
R3200
1M
C3201
R3201 1M
LSAR523UBFS8TL
GAIN CONTROL
CL3210
Q3200
0.1 50V
3.9
R3202
CL3211
R3203
C3203
0.047
4.6
0
470
220k
R3222
100k
BAV99-215
CL3226
C3235
0.001
D3205
D3204
D3208
BAV99-215
D3209
BAV99-215
D3202
DZ2J068M0L
DZ2J068M0L
0R3230
0R3231
D3200
DZ2J068M0L
CL3221
C3236
0.001
C3237
0.001
0R3229
CN3201
6P
CL3204
1 VBUS
CL3205
3D-
CL3206
0R3234
0R3210
C3216
D3207
0.001
BAV99-215
CL3227
C3234 0.001
R3223 100k
CL3207
CL3232
CL3228
CL3229
CN3203
4P
4D+
5 USB_GND
6 SHIELD_GND
REC/PLAY
5V 1A
J3200
MIC 1
J3201
MIC 2
>042S
MOTHERBOARD
BOARD
(10/10)
CN451
(Page 49)
F
HCD-GT3D
5757
Page 58
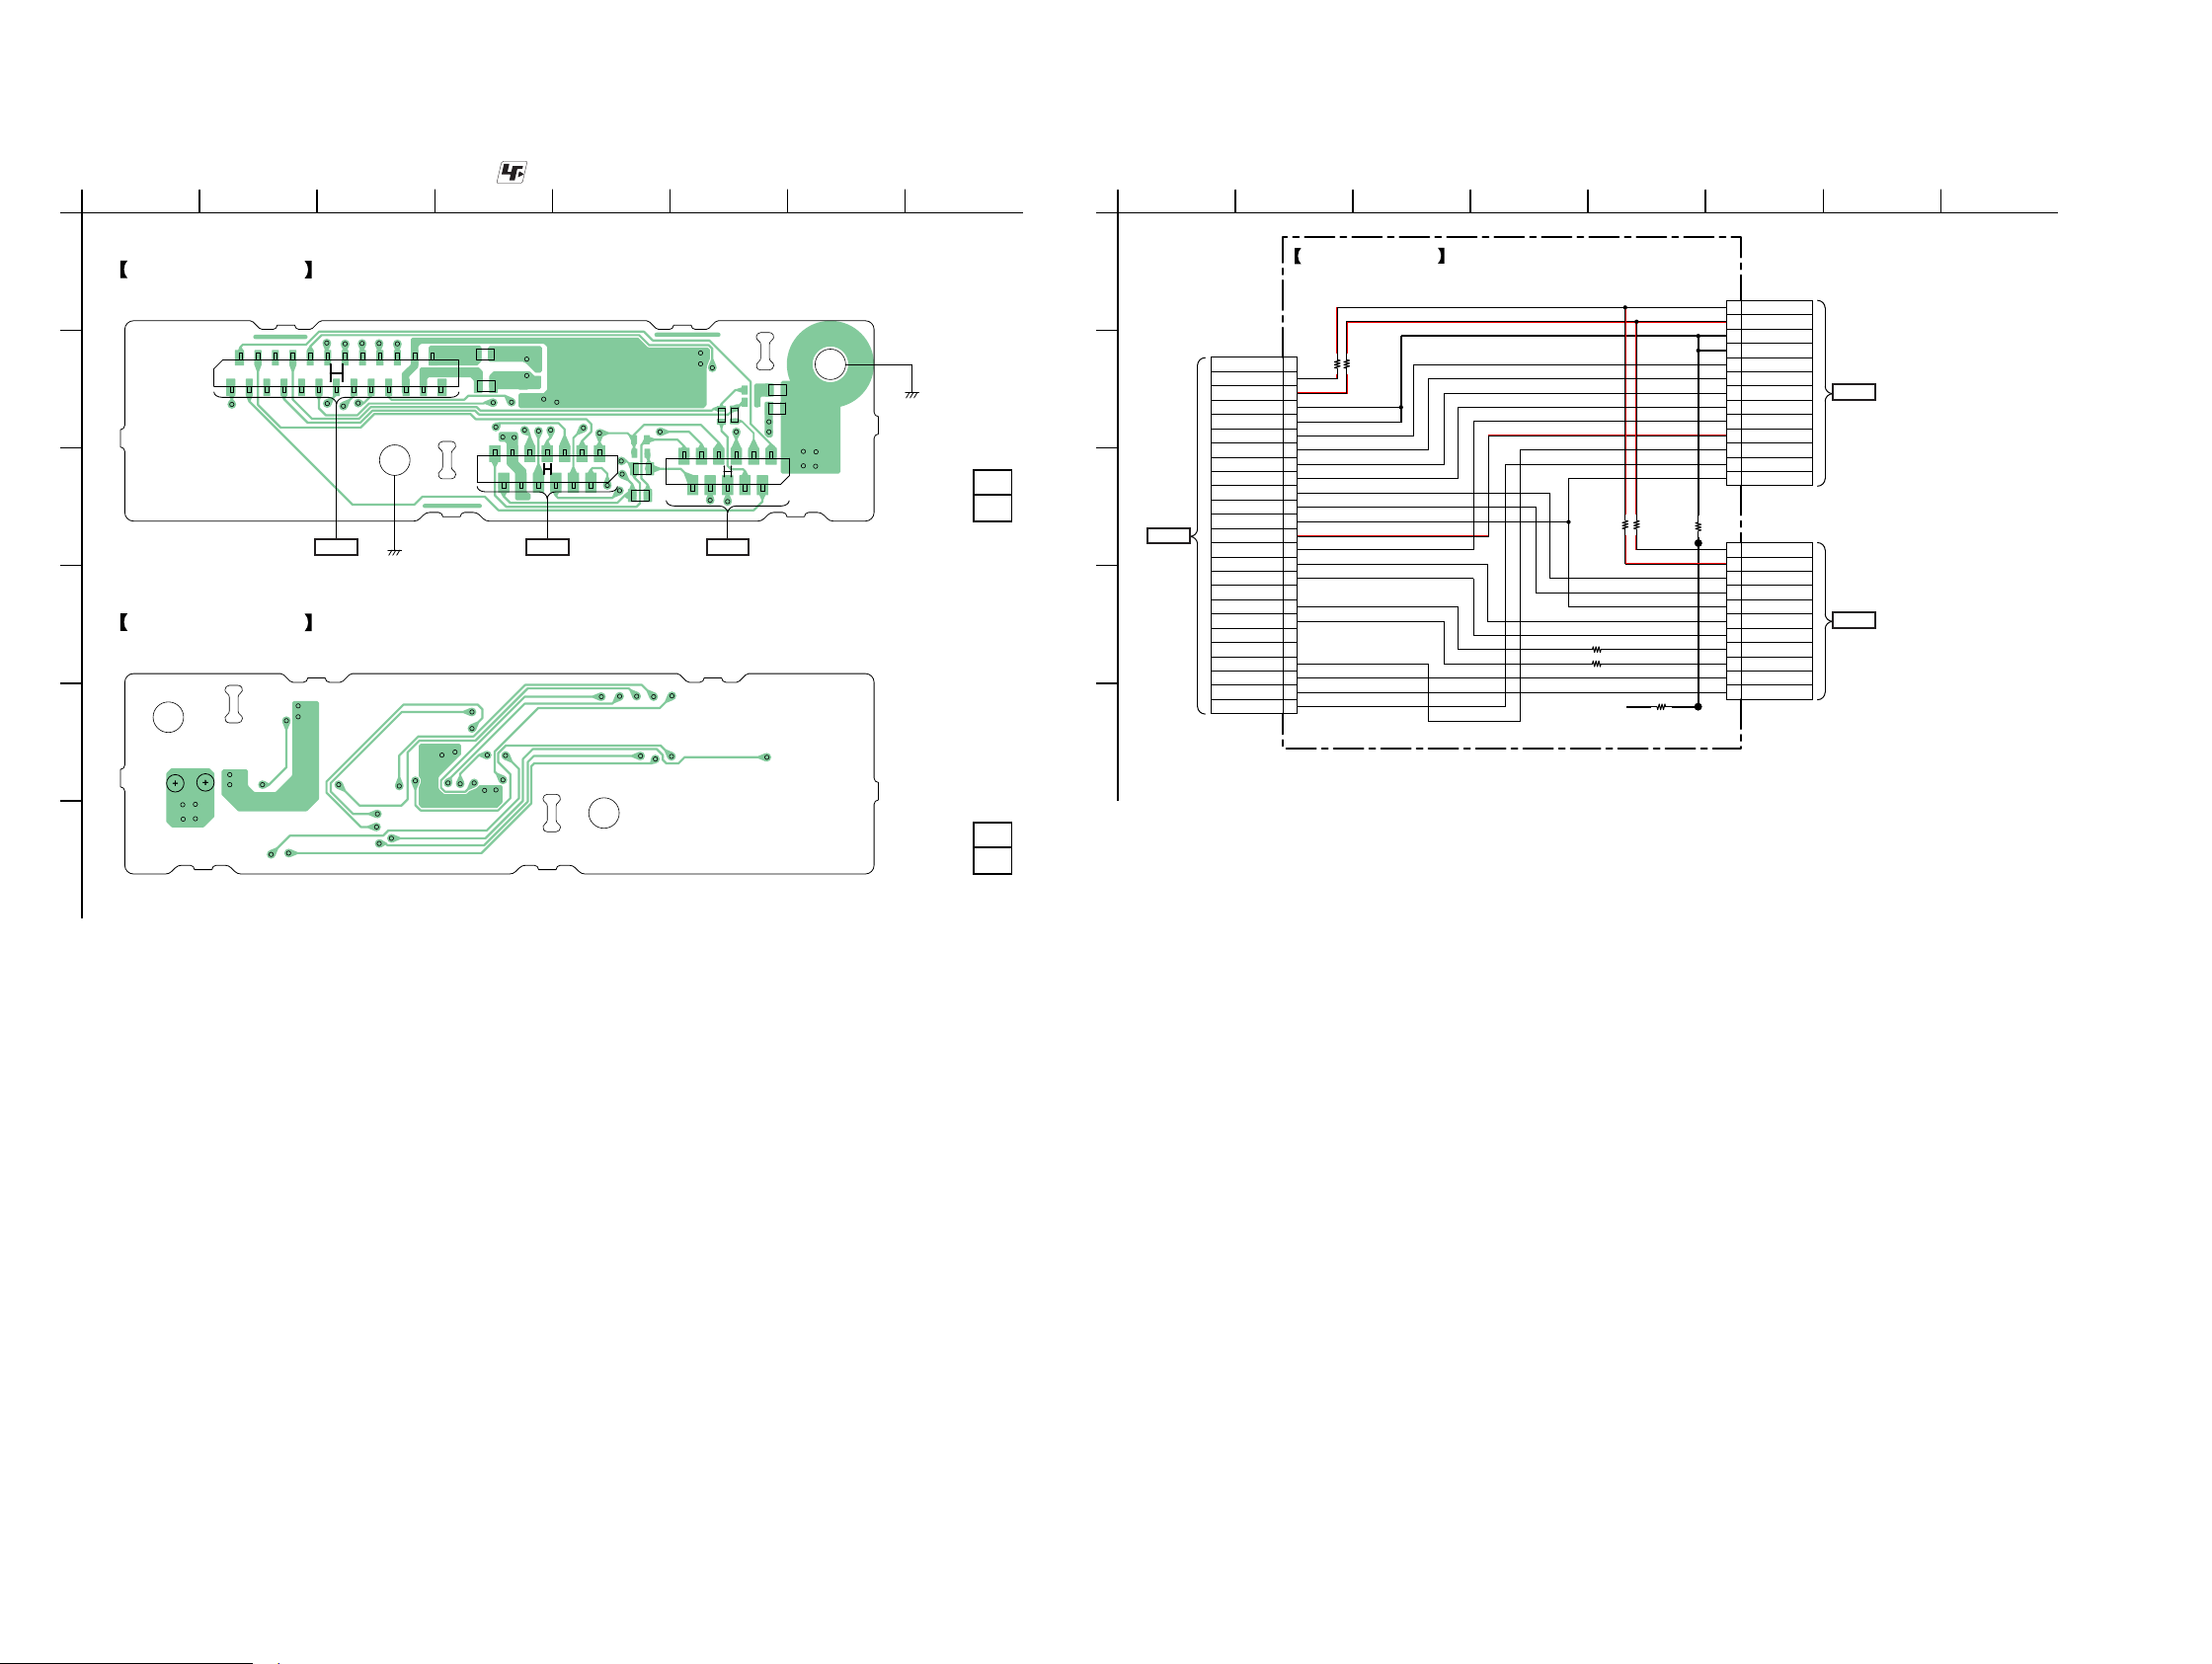
HCD-GT3D
Ver. 1.1
6-29. PRINTED WIRING BOARD - SPLITTER Board -
• See page 32 for Circuit Boards Location. • : Uses unleaded solder.
1
A
SPLITTER BOARD
2 3 4 5 6 78
(COMPONENT SIDE)
2
B
1
CN3400
C
>005P
MOTHERBOARD
D
SPLITTER BOARD
BOARD
CN118
(Page 39)
(CHASSIS)
R002
24
R001
25
13
CN3401
12
>010P
LCD BOARD
CN3000
(Page 55)
1
2
(CONDUCTOR SIDE)
E
JL3400 JL3401
R006
R007
11
CN3402
10
R005
R004
>009P
BUTTON BOARD
CN3100
(Page 53)
6-30. SCHEMATIC DIAGRAM - SPLITTER Board -
1
A
R008
R003
1
2
(CHASSIS)
1-894-358-
12
(12)
B
C
>039S
MOTHERBOARD
BOARD
(10/10)
CN118
(Page 49)
D
LCD_BCK_LED
2 3 4 5 6 78
SPLITTER BOARD
CN3401
13P
13 LED+5.2V
12 LED+5.2V
R003
0
JL3401
11 LED_GND
10 LED_GND
9LED_SCL
8LCD_SDA
7 LCD_INHB
6LCD_CSB
5 SIRCS
4 E+3.3V
3 LCD_BCK_LED
2OSC
1DGND
CN3402
11P
11 LED+5.2V
10 LED+5.2V
9 AD-KEY0
8 AD-KEY1
7DGND
6 POWER-KEY
5VOL
4 BLUE_LED
3 RED_LED
2 JOG_POS
1 JOG_NEG
>046S
LCD
BOARD
CN3000
(Page 55)
>047S
BUTTON
BOARD
CN3100
(Page 54)
LED+5.2V
LED+5.2V
LED_GND
LED_GND
LCD_SCL
LCD_SDA
LCD_INHB
LCD_CSB
AD_KEY0
AD_KEY1
DGND
E+3.3V
SIRCS
POWER_KEY
BLUE_LED
RED_LED
JOG_POS
JOG_NEG
CN3400
25P
R001
R002
25
NC
24
23
22
21
20
19
18
17
16
15
14
13
12
11
10
VOL
9
NC
8
7
6
NC
5
NC
4
3
2
1
OSC
0
0
R006
R007
0
0
JL3400
0R004
0R005
0R008
E
12
F
1-894-358-
(12)
HCD-GT3D
5858
Page 59
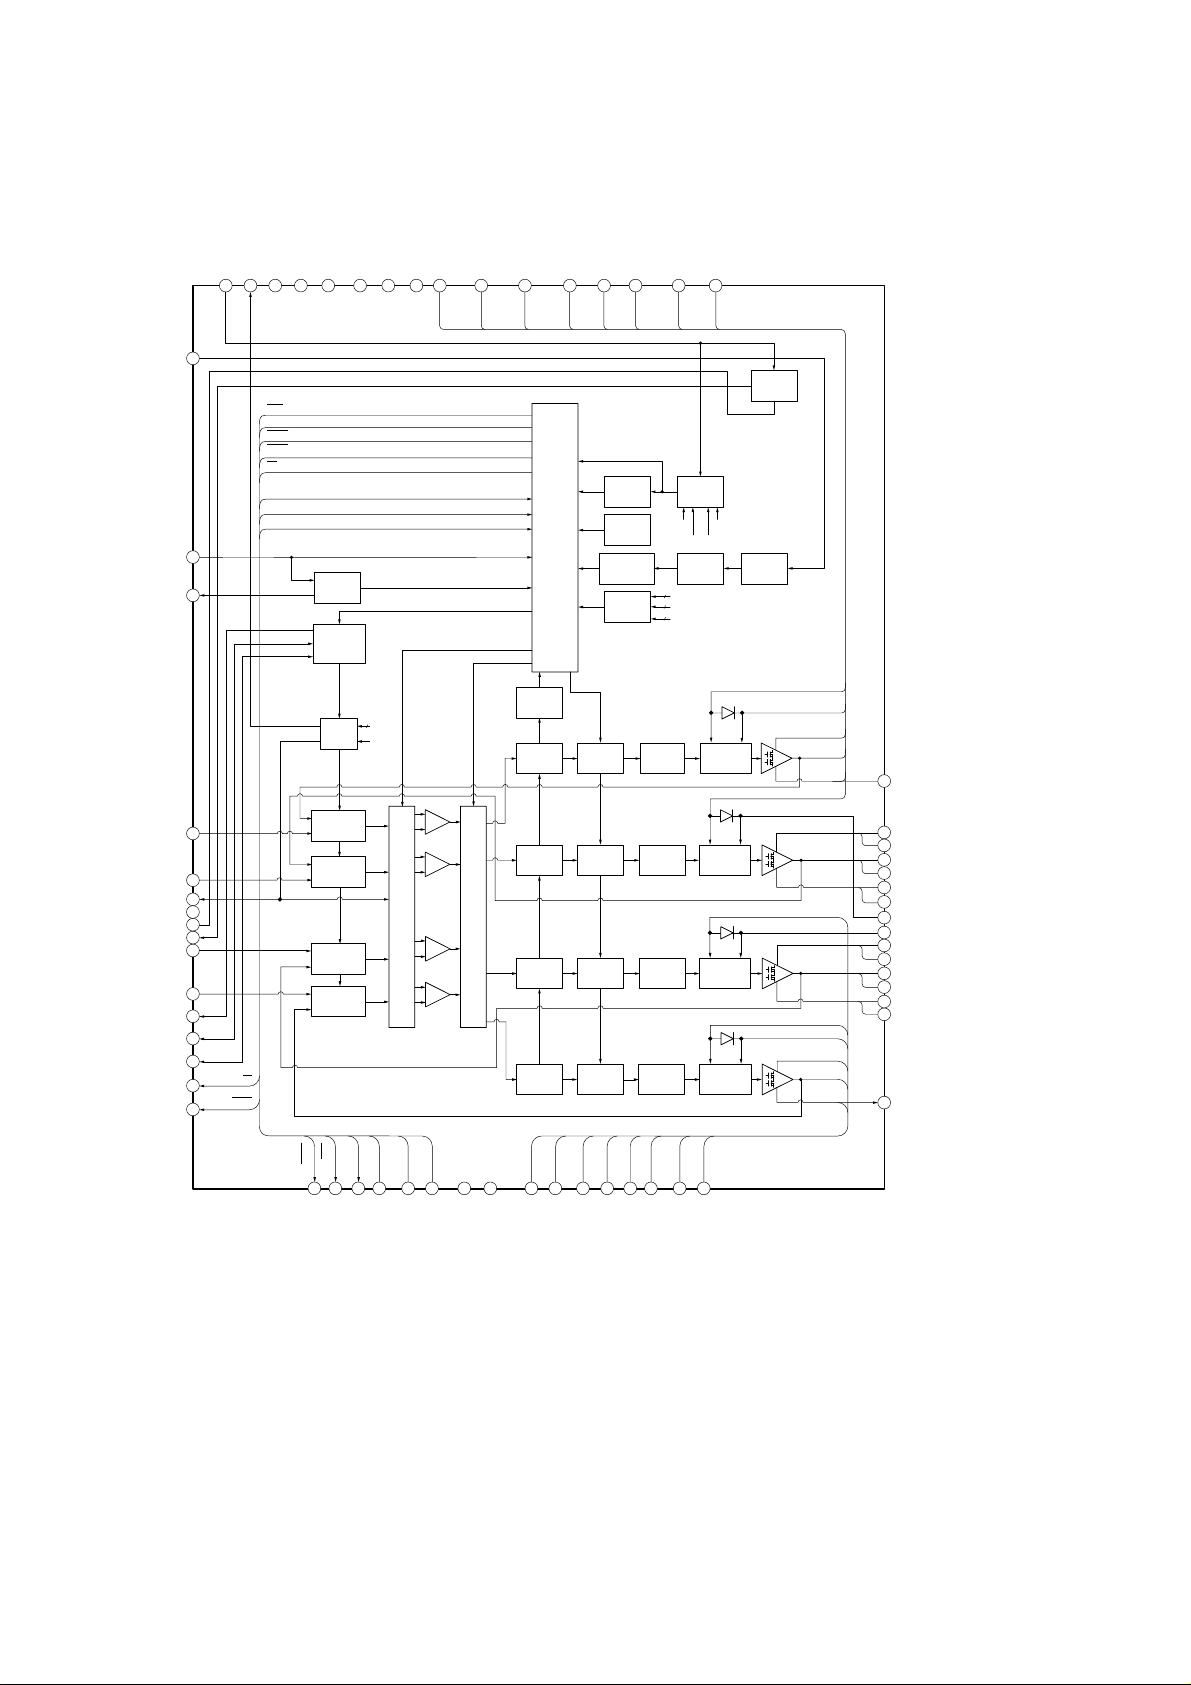
• IC Block Diagrams
IC1001 TAS5630BPHDR (DAMP BOARD (1/2))
GVDD_A
GVDD_B
GND
GND
57
58NC59
56
GVDD_B
55
GVDD_A
OC_ADJ 1
/RESET
C_STARTUP
VDD
PSU_REF
63
64
CLIP
READY
OTW1
OTW2
SD
M1
M2
M3
2
3
NC
60NC61NC62
STARTUP
CONTROL
OSCILLATOR
54
BST_A
BST_A
OUT_A
OUT_A
51
52
53
OUT_A
OUT_A
PROTECTION & I/O LOGIC
PVDD_A
POWER-UP
RESET
TEMP
SENSE
OVER-LOAD
PROTECTION
PPSC
PVDD_A
GVDD_A
PVDD_A
50
PVDD_A
UVP
GVDD_B GVDD_D
CB3C
4
PVDD_X
4
OUT_X
4
GND_X
GND_A
49
GND_A
GVDD_C
VREG
CURRENT
SENSE
HCD-GT3D
INPUT_A
INPUT_B
VI_CM
GND
AGND
VREG
INPUT_C
INPUT_D
FREQ_ADJ 12
OSC_IO+
OSC_IO-
/SD 15
/OTW1 16
PWM
ACTIVITY
4
PVDD_X
PSU_FF
GND
M1M3M2
+
+
-
-
ANALOG INPUT MUX
+
+
-
22
21
M3
M2
ANALOG
4
5
6
7
8
9
10
11
13
14
SD
OTW1
LOOP FILTER
ANALOG
LOOP FILTER
ANALOG
LOOP FILTER
ANALOG
LOOP FILTER
CLIP
OTW2
17
18
/OTW2
/CLIP
READY
19M120
READY
DETECTOR
PWM
RECEIVER
PWM
RECEIVER
ANALOG COMPARATOR MUX
PWM
RECEIVER
PWM
RECEIVER
GVDD_C
24
25
GND23GND
GVDD_C
GVDD_D
26
GVDD_D
CONTROL
CONTROL
CONTROL
CONTROL
BST_D
27 28
BST_D
OUT_D
OUT_D
OUT_D
29
OUT_D
TIMING
CONTROL
TIMING
CONTROL
TIMING
CONTROL
TIMING
CONTROL
PVDD_D
30
PVDD_D
PVDD_D
31
PVDD_D
GATE-DRIVE
GATE-DRIVE
GATE-DRIVE
GATE-DRIVE
GND_D
32
GND_D
GVDD_A
BST_A
PVDD_A
OUT_A
GND_A
GVDD_B
GVDD_C
GVDD_D
BST_D
PVDD_D
OUT_D
GND_D
48
47
46
45
44
43
42
41
40
39
38
37
36
35
34
33
GND_A
GND_B
GND_B
OUT_B
OUT_B
PVDD_B
PVDD_B
BST_B
BST_C
PVDD_C
PVDD_C
OUT_C
OUT_C
GND_C
GND_C
GND_D
59
Page 60
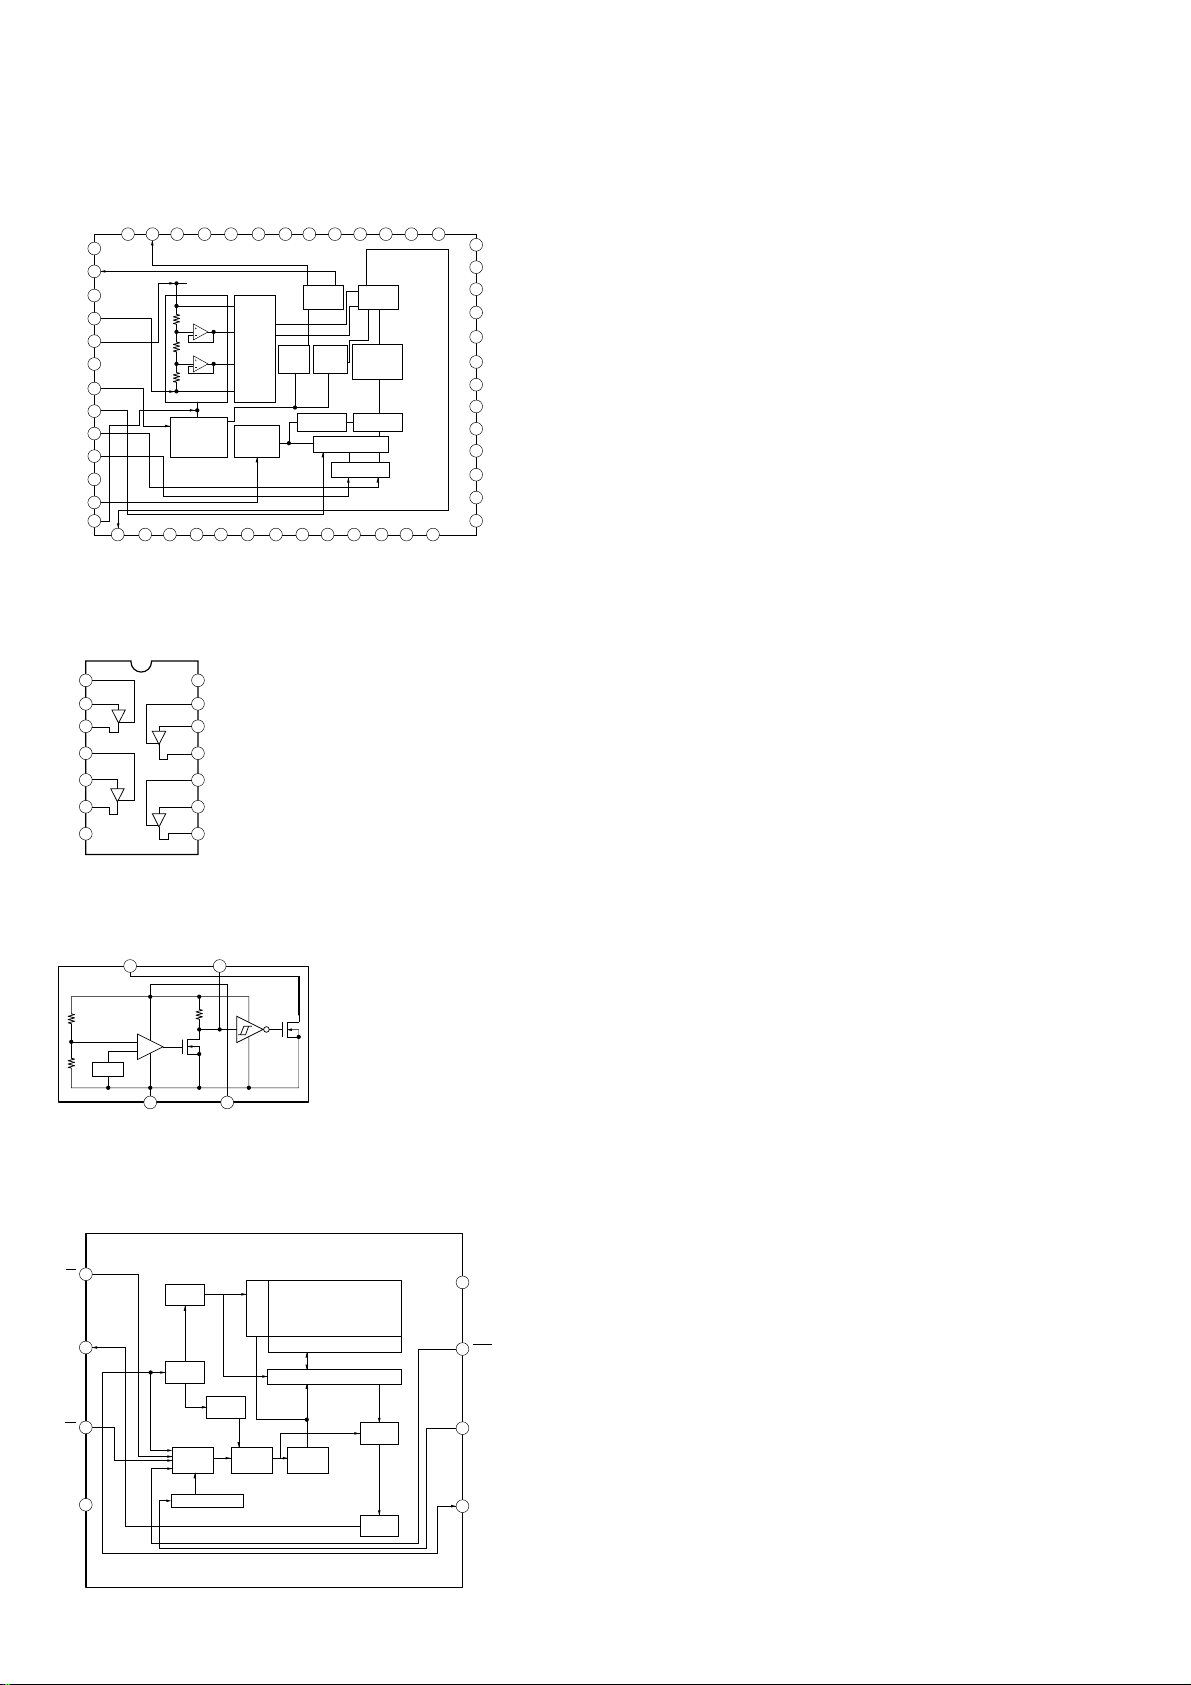
HCD-GT3D
IC3004 BU9795AKS2 (LCD BOARD)
COM151COM050NC49NC48NC47SEG3146SEG3045SEG2944SEG2843SEG2742SEG2641SEG2540SEG24
COM2 1
COM3
VLCD
OSCIO
TEST 12
52
2
3
NC
4
5
VDD
6
VSS
7
8
CSB
9
SCL
10
SDA
NC
11
INHb
13
14
SEG015SEG116SEG217SEG318SEG419SEG520SEG621SEG722SEG823SEG9
LCD voltage
generator
OSCILLATOR
LCD BIAS
SELECTOR
Power On
Reset
Common
counter
Common
driver
Blink
timing
generator
Command
register
Data Decoder
Serial inter face
IF FILTER
Segment
driver
DDRAM
Command
24
SEG1025SEG1126SEG12
IC102 TC74VHC126FT (EK) (MOTHERBOARD BOARD (8/10))
39
SEG23
38
SEG22
37
NC
36
SEG21
35
SEG20
34
SEG19
33
SEG18
32
SEG17
31
SEG16
30
SEG15
29
NC
28
SEG14
27
SEG13
GND
1G
1
1A
2
1Y
3
2G
4
2A
5
2Y
6
7
Vcc
14
4G
13
4A
12
4Y
11
3G
10
3A
9
3Y
8
IC103 BU4229F-TR (MOTHERBOARD BOARD (8/10))
Vout CT
4
–
+
Vref
12
GND V
3
DD
IC106 MX25L3235EM2I-10G (MOTHERBOARD BOARD (9/10))
IC302 MX25L3235EM2I-10G (MOTHERBOARD BOARD (5/10))
CS
DO
WP
GND
60
1
2
3
4
Address
Generator
Data
Register
Mode
Logic
Clock Generator
X-Decoder
SRAM
Buffer
State
MachineHVGenerator
Memory Array
Page Buffer
Y-Decoder
Sense
Amplifier
Output
Buffer
8
VCC
7
HOLD
6
CLK
5
DI
Page 61
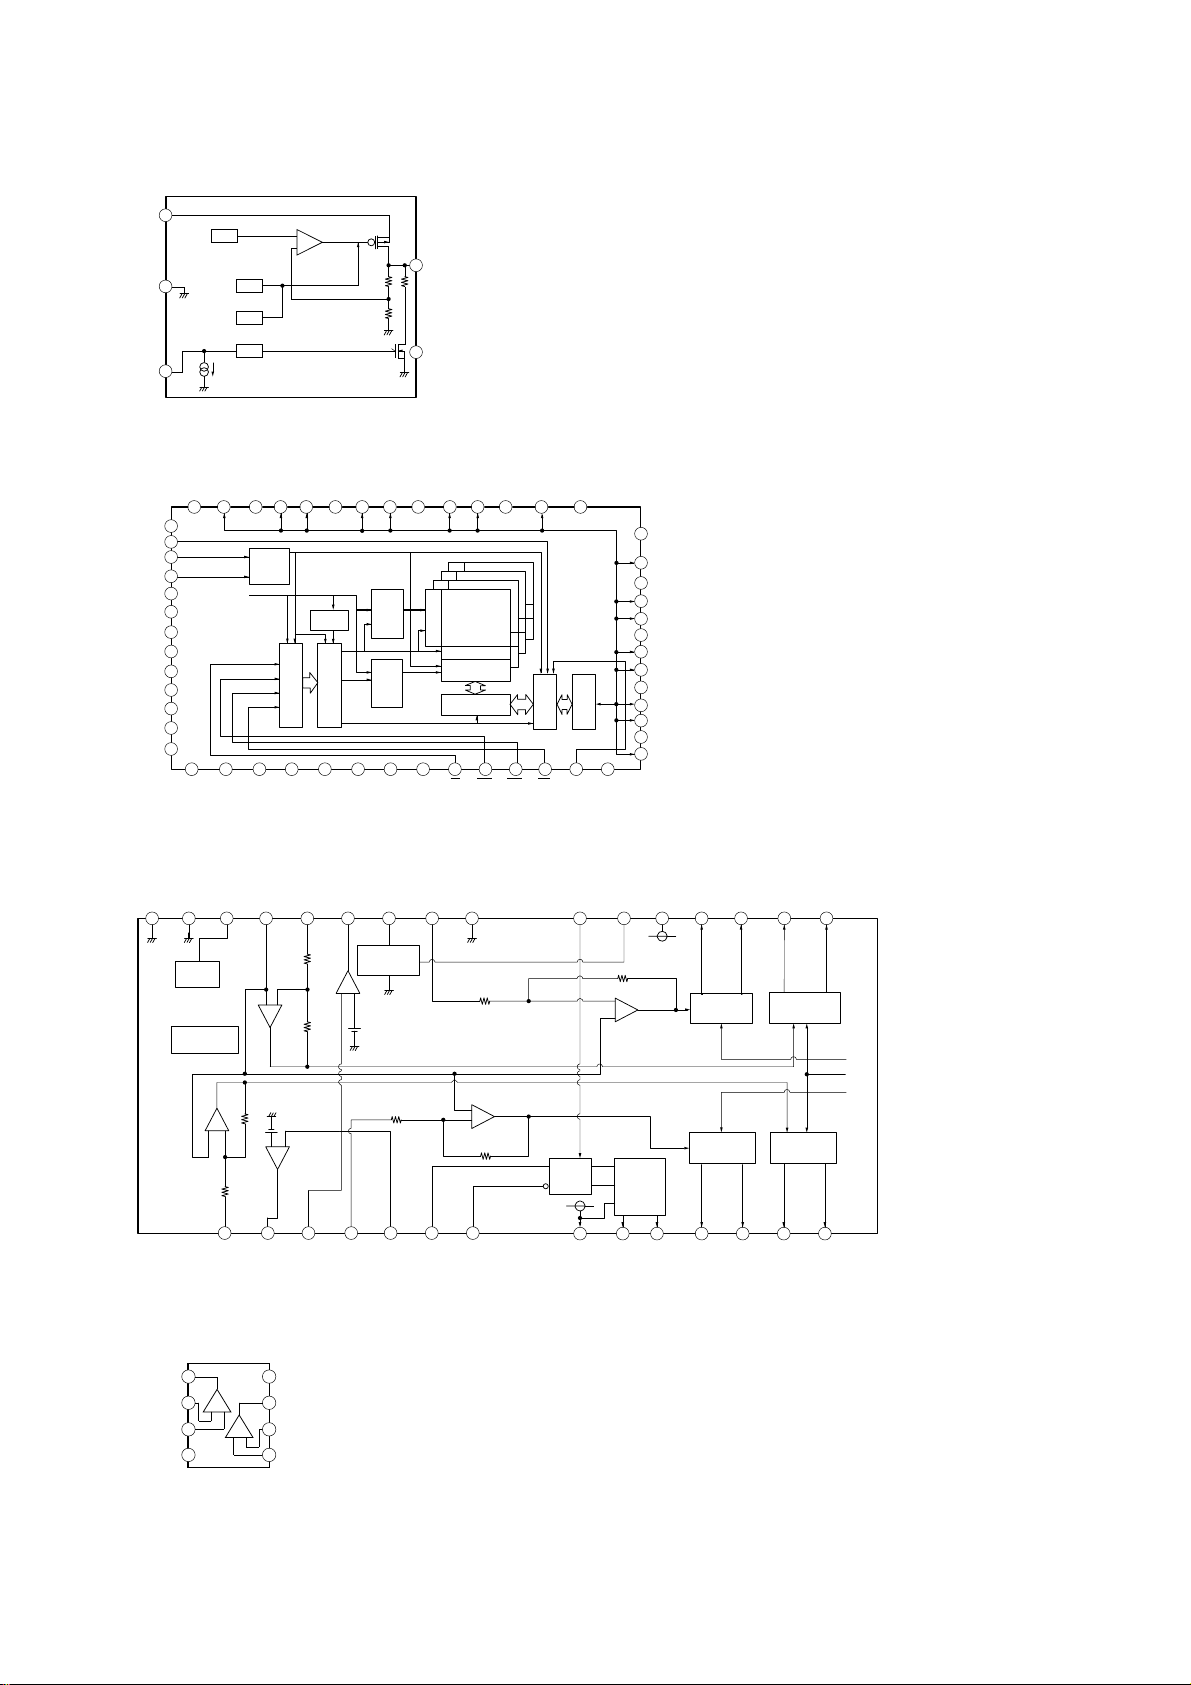
IC305 BU33TD3WG-TR (MOTHERBOARD BOARD (5/10))
VDD
GND
1
VREF
2
CE
3
OCP
TSD
STBY
–
+
Discharge
5VOUT
4NC
IC306 EM638165TSD-6G (MOTHERBOARD BOARD (5/10))
HCD-GT3D
Ver. 1.2
VSS41DQ842VDDQ43DQ944DQ1045VSSQ46DQ1147DQ1248VDDQ49DQ1350DQ1451VSSQ52DQ1553VSS
NC
40
UDQM
39
CLK
38
CKE
37
NC
36
A11
35
A9
34
A8
33
A7
32
A6
31
A5
30
A4
29
VSS
28
27
VDD
Clock
Generator
Mode
Register
Control Logic
Row
Address
Buffer
&
Refresh
Counter
Column
Address
Buffer
&
Refresh
Counter
Address
Command Decoder
A326A225A124A023A10/AP22BA121BA020CS19RAS18CAS17WE16LDQM15VDD
Bank B
Bank A
Row Decoder
Sense Amplifier
Column Decoder
Data Control Circuit
Bank C
Bank D
IC401 AM5890S (MOTHERBOARD BOARD (6/10))
PGND29PGND
30
MUTE27BIAS26VINTK25TRB_224RESET23VINLD22GND
28
MUTE
Thermal
Shut down
10K
+
-
25K
25K
-
+
+
-
10K
Voltage
Detection
-
+
10K
10K
+
-
25K
54
VDD
1
DQ0
2
VDDQ
3
DQ1
4
DQ2
5
VSSQ
6
DQ3
7
DQ4
8
VDDQ
9
DQ5
10
Buffer
Latch Circuit
Input & Output
VCTL20VCCD19Vcc218VOLD-17VOLD+16VOTK-15VOTK+
21
Pre-DRV
DQ6
11
VSSQ
12
DQ7
13
14
Vcc2
15K
-
+
TRAY
DRIVER
Spindle
Driver (4X)
Sled
Driver (4X)
Actuator
Driver (6X)
Actuator
Driver (6X)
Vcc2
Vcc2
Vcc1
1
2
3
4
5
6
VINFC
TRB_1
REGO2
VINSL+
REGO1
FWD
7
REV
8
9
Vcc1
VOTR-
IC452 NJM2903CV (TE1) (MOTHERBOARD BOARD (10/10))
B
+-
8
7
6
5
+
B+ INPUT
A OUTPUT V
1
A- INPUT B OUTPUT
A+ INPUT B- INPUT
A
2
+-
3
-
V
4
10
VOTR+
11
VOSL+
12
13
14
VOSL-
VOFC-
VOFC+
61
Page 62
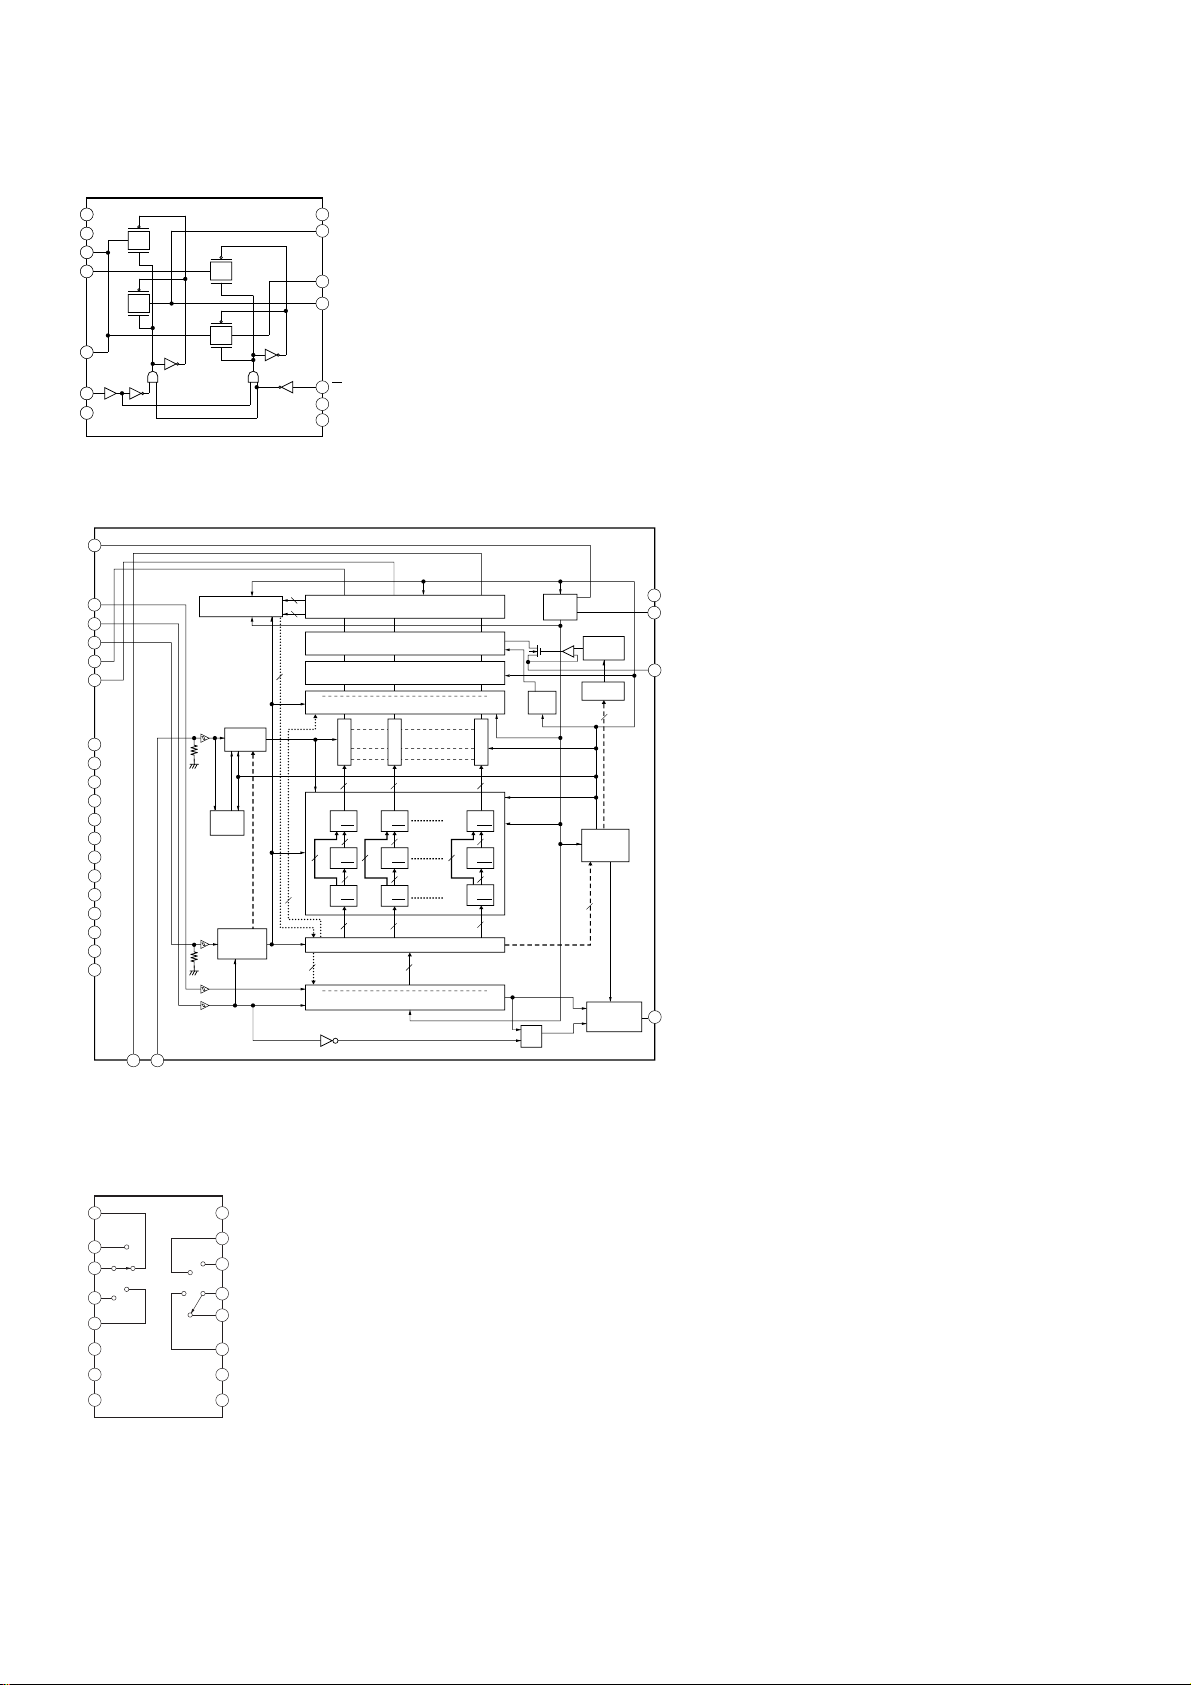
HCD-GT3D
IC453 TC7USB40FT (MOTHERBOARD BOARD (10/10))
GND
117
NC
116
115
D-
114
2D-
113
1D-
112
S
111
NC
8
NC
9
D+
10
2D+
11
1D+
12
OE
13
VCC
14
NC
IC502 TC62D723FNG (MOTHERBOARD BOARD (10/10))
DNG1
PWM
16
16
Output open/short detection circuit
Constant current output circuit
16
0-bit 15-bit
16
16
Output delay circuit
Output ON/OFF setting data register
Comparator
Comparator
16 1616
PWM data registor
16-bit
16-bit
PWM Data
PWM Data
for OUT1
for OUT0
16-bit
PWM Data
for OUT0
16-bit
PWM Data
for OUT0
16 1616
16-bit
16 16
PWM Data
for OUT1
16 1616
16-bit
PWM Data
for OUT1
16
16
(for synchronous)
Registor 3
(for output)
Registor 2
Registor 1
Data transfer control circuit
1616
0-bit 15-bit
16-bit shift registor
16-bit
PWM Data
for OUT15
16-bit
PWM Data
for OUT15
16-bit
PWM Data
for OUT15
Comparator
16
SCK
TRANS
/OUT0
/OUT1
/OUT2
/OUT3
/OUT4
/OUT5
/OUT6
/OUT7
/OUT8
/OUT9 14
/OUT10
/OUT11
/OUT12
/OUT13
/OUT14
SIN
2
3
Error detection result
data register
4
5
6
7
countor
8
9
10
11
12
POD
circuit
13
15
16
17
18
Command
control
circuit
19
20
21
/OUT15
PWMCLK
POR
circuit
Reference
25 GND
24 VDD
voltage
23 REXT
8-bit
TSD
circuit
DAC
8
16-bit x 2
State setting
register
16
SOUT
selection
22 SOUT
F/F
circuit
IC602, IC605 SN74LV4052APWR (MOTHERBOARD BOARD (1/10))
16
VCC
15
1Y2
1Y1
14
1-COM
13
12
1Y0
11
1Y3
10
A
9
B
2-COM
GND
GND
1
2Y0
2Y2
2
3
2Y3
4
5
2Y1
6
INH
7
8
62
Page 63
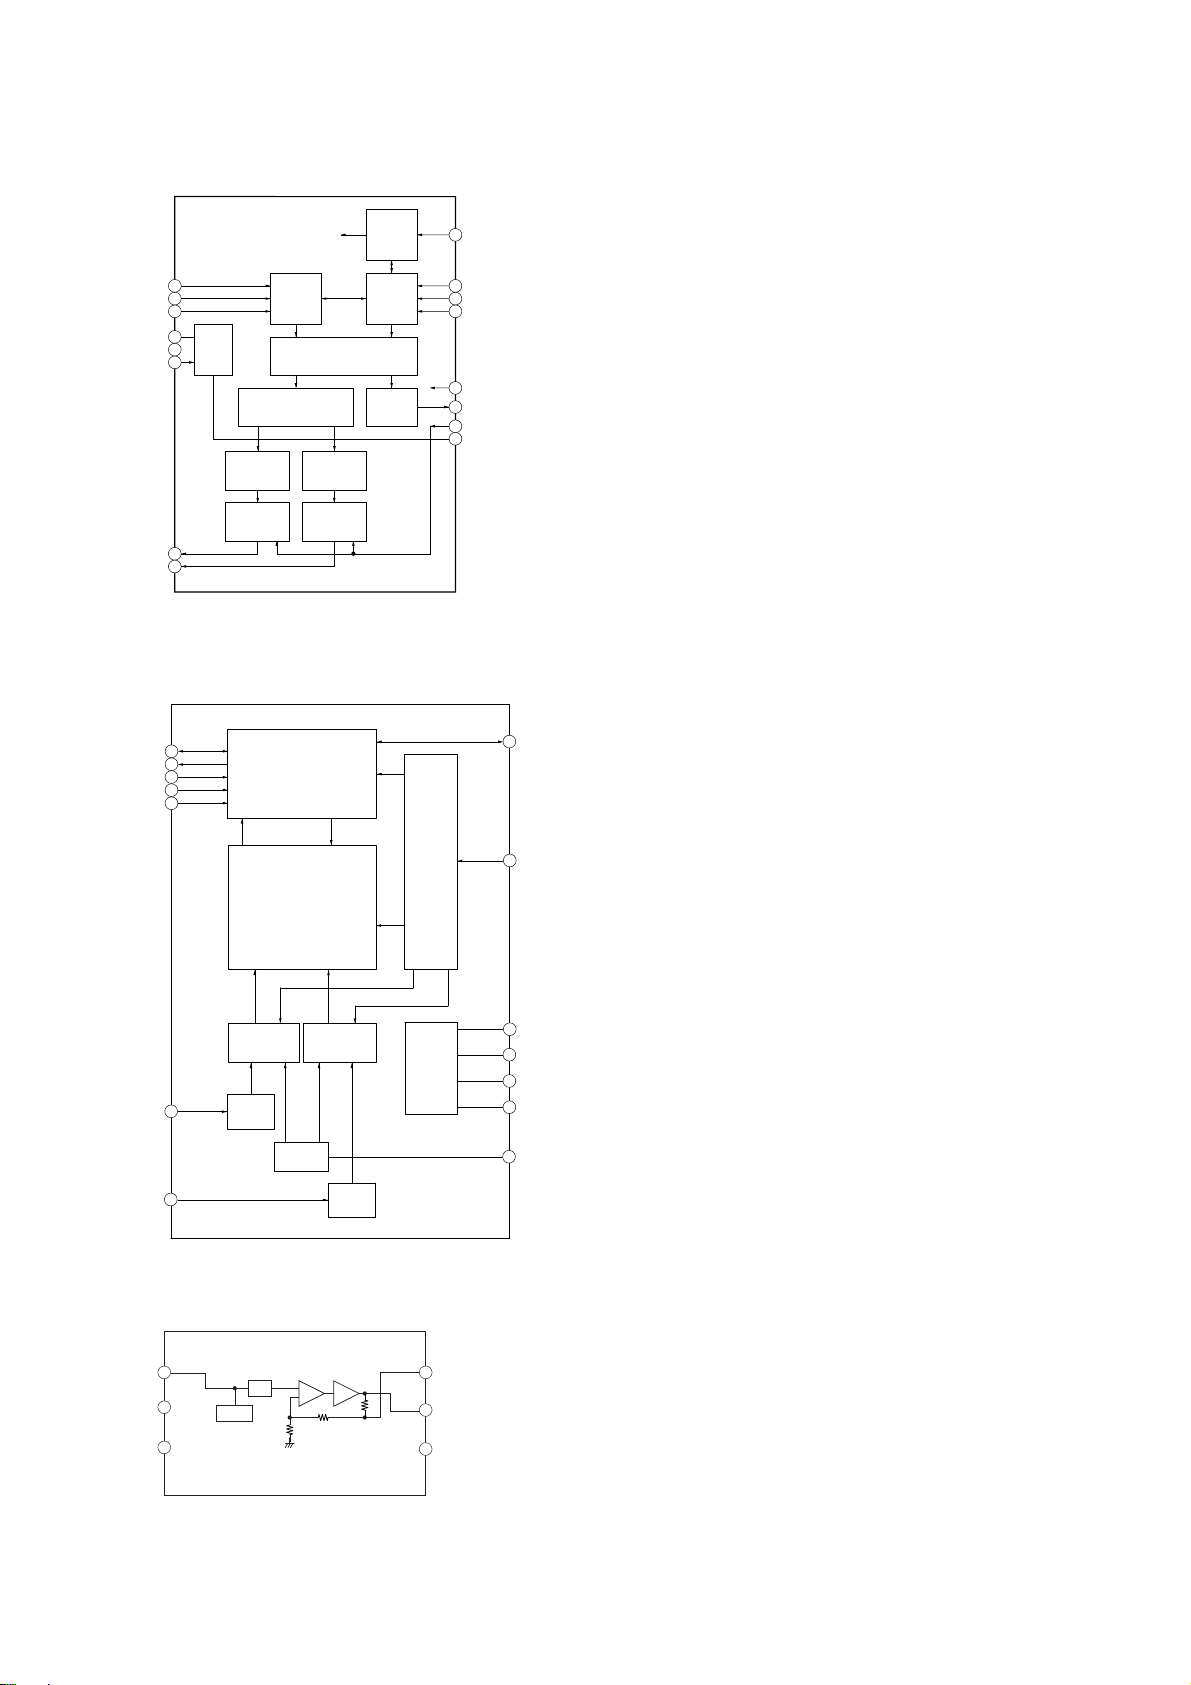
IC604, IC615 PCM1754DBQR (MOTHERBOARD BOARD (3/10))
HCD-GT3D
D/A
FILTER
SYSTEM
CLOCK
MANAGER
SERIAL
CONTROL
PORT
ZERO
DETECT
16 SCK
15
FMT
14
MUTE
13 DEMP
12 TEST
11 ZEROA
VCOM
10
9
AGND
VLTUO
VRTUO
SYSTEM
CLOCK
1
BCK
2DATA
3LRCK
4DGND
POWER
5NC
SUPPLY
6VCC
7
8
AUDIO
SERIAL
PORT
4x/8x OVERSAMPLING DIGITAL
FILTER & FUNCTION CONTROL
ENHANCED MULTILEVEL
DELTA-SIGMA MODULATOR
D/A
CONVERTER
OUTPUT AMP
& LOW-PASS
FILTER
CONVERTER
OUTPUT AMP
& LOW-PASS
IC606 PCM1808PWR (MOTHERBOARD BOARD (4/10))
IC609 PCM1808PWR (MOTHERBOARD BOARD (3/10))
7
LRCK
DOUT
BCK
8
9
MD0
10
11
MD1
12
FMT
Serial
Interface
Mode/
Format
Control
Clock
VINR
VINL
and
Timing
x1/64
Decimation
Filter
with
High Pass Filter
Delta Sigma
Modulator
13
14
Antialias
LPF
Reference
Delta Sigma
Modulator
Antialias
LPF
Control
Power
Supply
SCKI
6
5
DGND
VDD
4
3
VCC
AGND
2
VREF
1
IC901 NJM41031F1 (TE2) (MOTHERBOARD BOARD (4/10))
GND
VIN
4
5
V+
6
LPF
CLAMP
75Ω DRIVER
6dB
VSAG
3
VOUT
2
POWER SAVE
1
63
Page 64
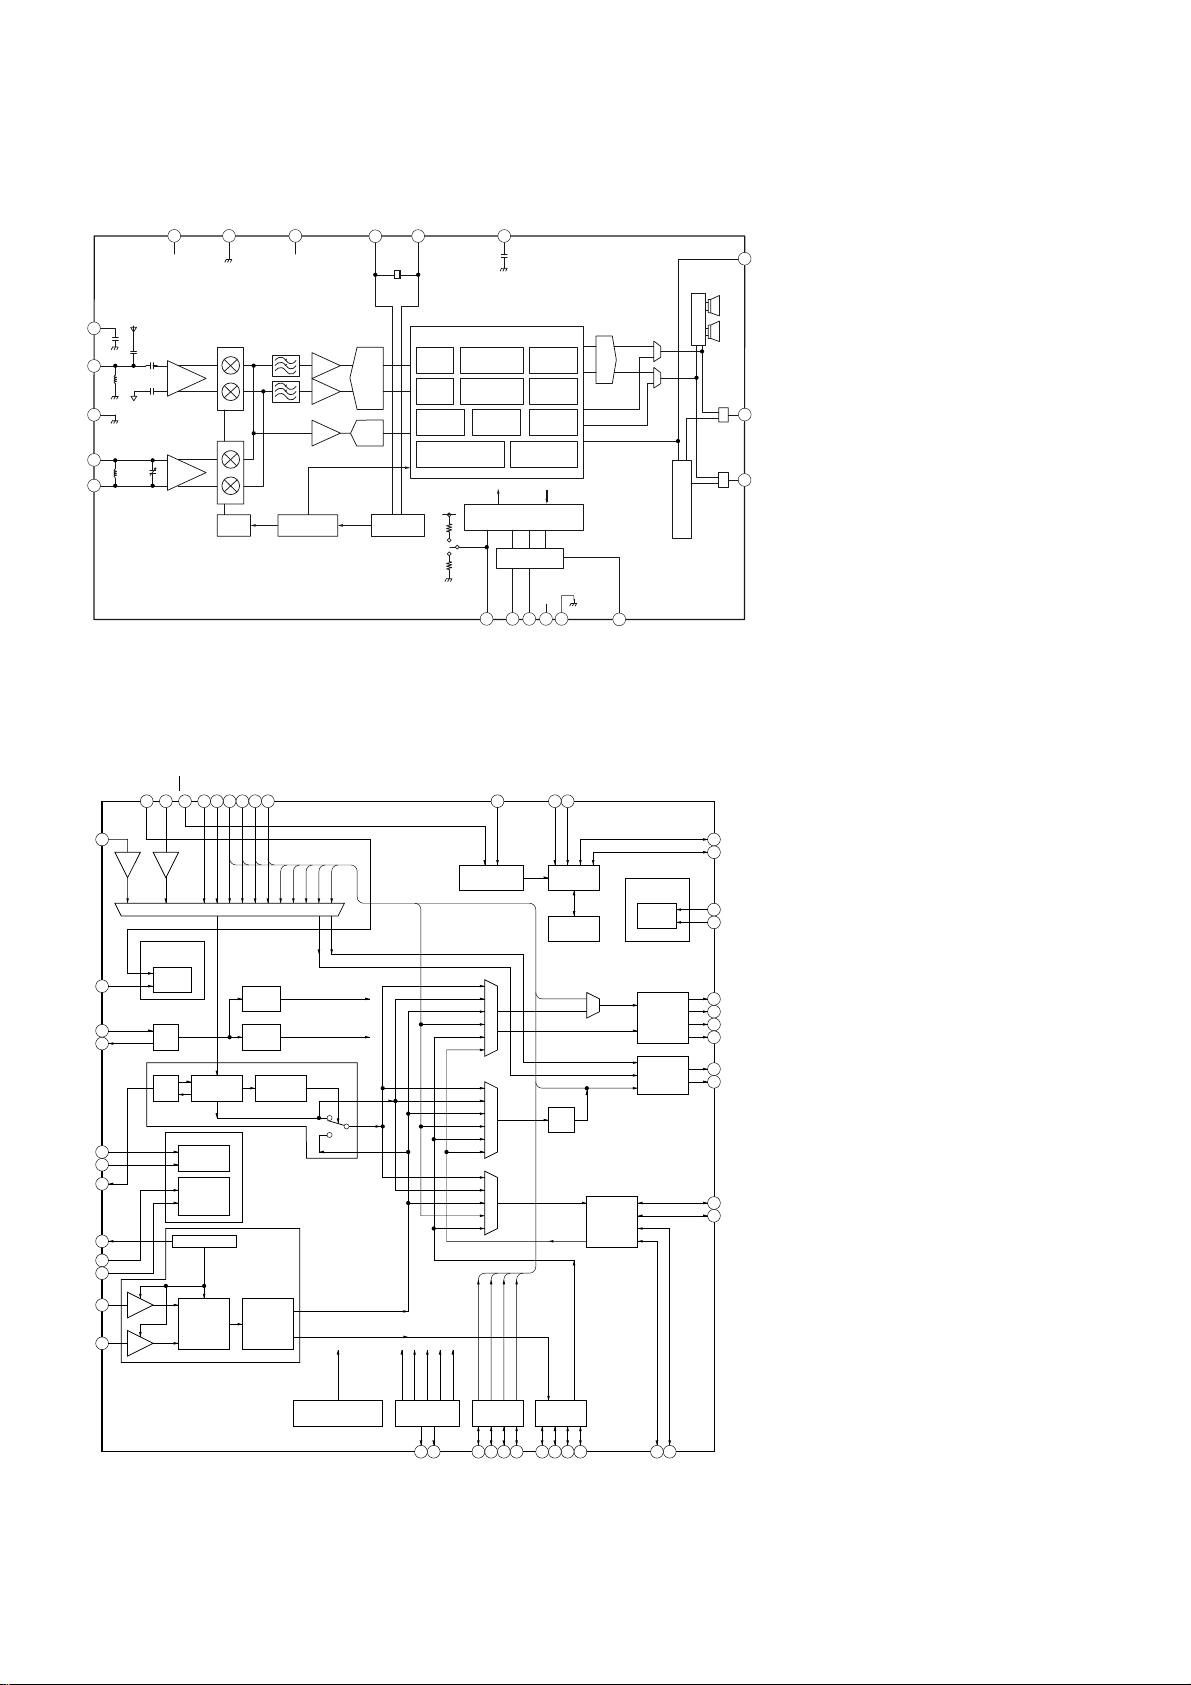
HCD-GT3D
Ver. 1.1
IC902 RN5B801-0002 (MOTHERBOARD BOARD (2/10))
GND
FRF1
GNDRF
ARF1
ARF2
VDDRF
19
20
VDD
3
CP2
FM Antenna
1
4
2
5
3
4
5
AM Antenna
TUNE
FM LNA
AM LNA
AM
LOSC
Filter
VDD
18
VDD
Clock
Generator
X2
X1
16
17
Digital Signal Process
XOSC
Digital
MixerFMDemodulator
Digital
AGC
Image
Control
Digital Filters
12C
SPI
AGC
AMP
ADC
AGC
AMP
ADC
AMP
CP1
15
AM
Demodulator
Station
Detector
Serial Interface / Registers
HOST Controller
DSI
IIC / R
LA
Stereo
Decoder
RDS
Decoder
Generator
RSSI
Calculation
VDD
CK
VDD
IISD
IISD
14
Lch
Rch
LOUT
DAC
ROUT
LRCK
IIS
BCLK
IISD
109876
11
DA
GND
Amplifier
LRCK
BCLK
IIS Controller
SW
SW
LRCK / LOUT
13
BCLK / ROUT
12
IC904 PCM9211PTR (MOTHERBOARD BOARD (2/10))
RXIN4/ASCKIO31RXIN5/ABCKIO
RST34RXIN233RXIN332RXIN6/ALRCKIO
30
29
28
RXIN2
RXIN3
RXIN4
RXIN5
RXIN6
RXIN7
DIVIDER
XMCKO
DIVIDER
CLOCK/DATA
RECOVERY
POWER SUPPLY
DIR
ANALOG
A/D
CONVERTER
ANALOG
COM. SUPPLY
A/D
CONVERTER
LOCK
DETECTION
A/D
CONVERTER
MODE
CONTROL
RXIN7/ADIN0
RXIN8
RXIN9
RXIN10
RXIN11
ADC CLOCK
(SCK/BCK/LRCK)
XMCKO
(TO MPIO_A & MPO0/1)
ADC
DTOUT
RECOUT1
RECOUT0
DIR
ADC_STANDALONE
27
RESET &
MODE SETTING
AUXIN0
AUTO
DIR
ADC
AUXIN0
AUXIN1
AUXIN2
AUTO
DIR
ADC
AUXIN0
AUXIN1
AUXIN2
AUTO
DIR
ADC
AUXIN0
AUXIN1
RXIN8
ADC
RXIN9
RXIN0 37
GNDRX
XTI 39
XTO
AGND 41
VCC 42
FILT 43
VCOM
AGNDAD 45
VCCAD 46
VINL 47
VINR 48
RXIN1
VDDRX
35
36
RXIN1
RXIN0
POWER
SUPPLY
DIR
ANALOG
38
OSC
40
PLL
44
MODE
RXIN10
RXIN11
MS/ADR1
MC/SCL
26
25
SPI/I2C
INTERFACE
REGISTER
RXIN7
DOUT
SCKO/BCK/LRCK
DIT
AUXOUT
AUXIN2
AUXIN1
RECOUT1
RECOUT0
DITOUT
MPIO_B
SELECTOR
POWER
SUPPLY
ALL
MAIN
OUTPUT
PORT
MPO0/1
SELECTOR
23
22
19
18
17
15
13
MD1/SDA24
MD0/ADR0
DVDD
DGND21
SCKO20
BCK
LRCK
DOUT
MPO116
MPO0
MPIO_B314
MPIO_B2
64
SBCK/SLRCK
( TO MPIO_A)
SECONDARY BCK/LRCK
DIVIDER SELECTOR
MPIO_A
MPIO_B
EXTRA DIR
FUNCTIONS
MPIO_C
MPO0
2
1
NPCM/INT1
ERROR/INT0
MPO1
MPIO_A
SELECTOR
4
3
MPIO_A1
MPIO_A0
5
MPIO_A2
6
MPIO_A3
MPIO_C
SELECTOR
8
7
MPIO_C1
MPIO_C0
9
MPIO_C2
10
MPIO_C3
12
MPIO_B011MPIO_B1
Page 65
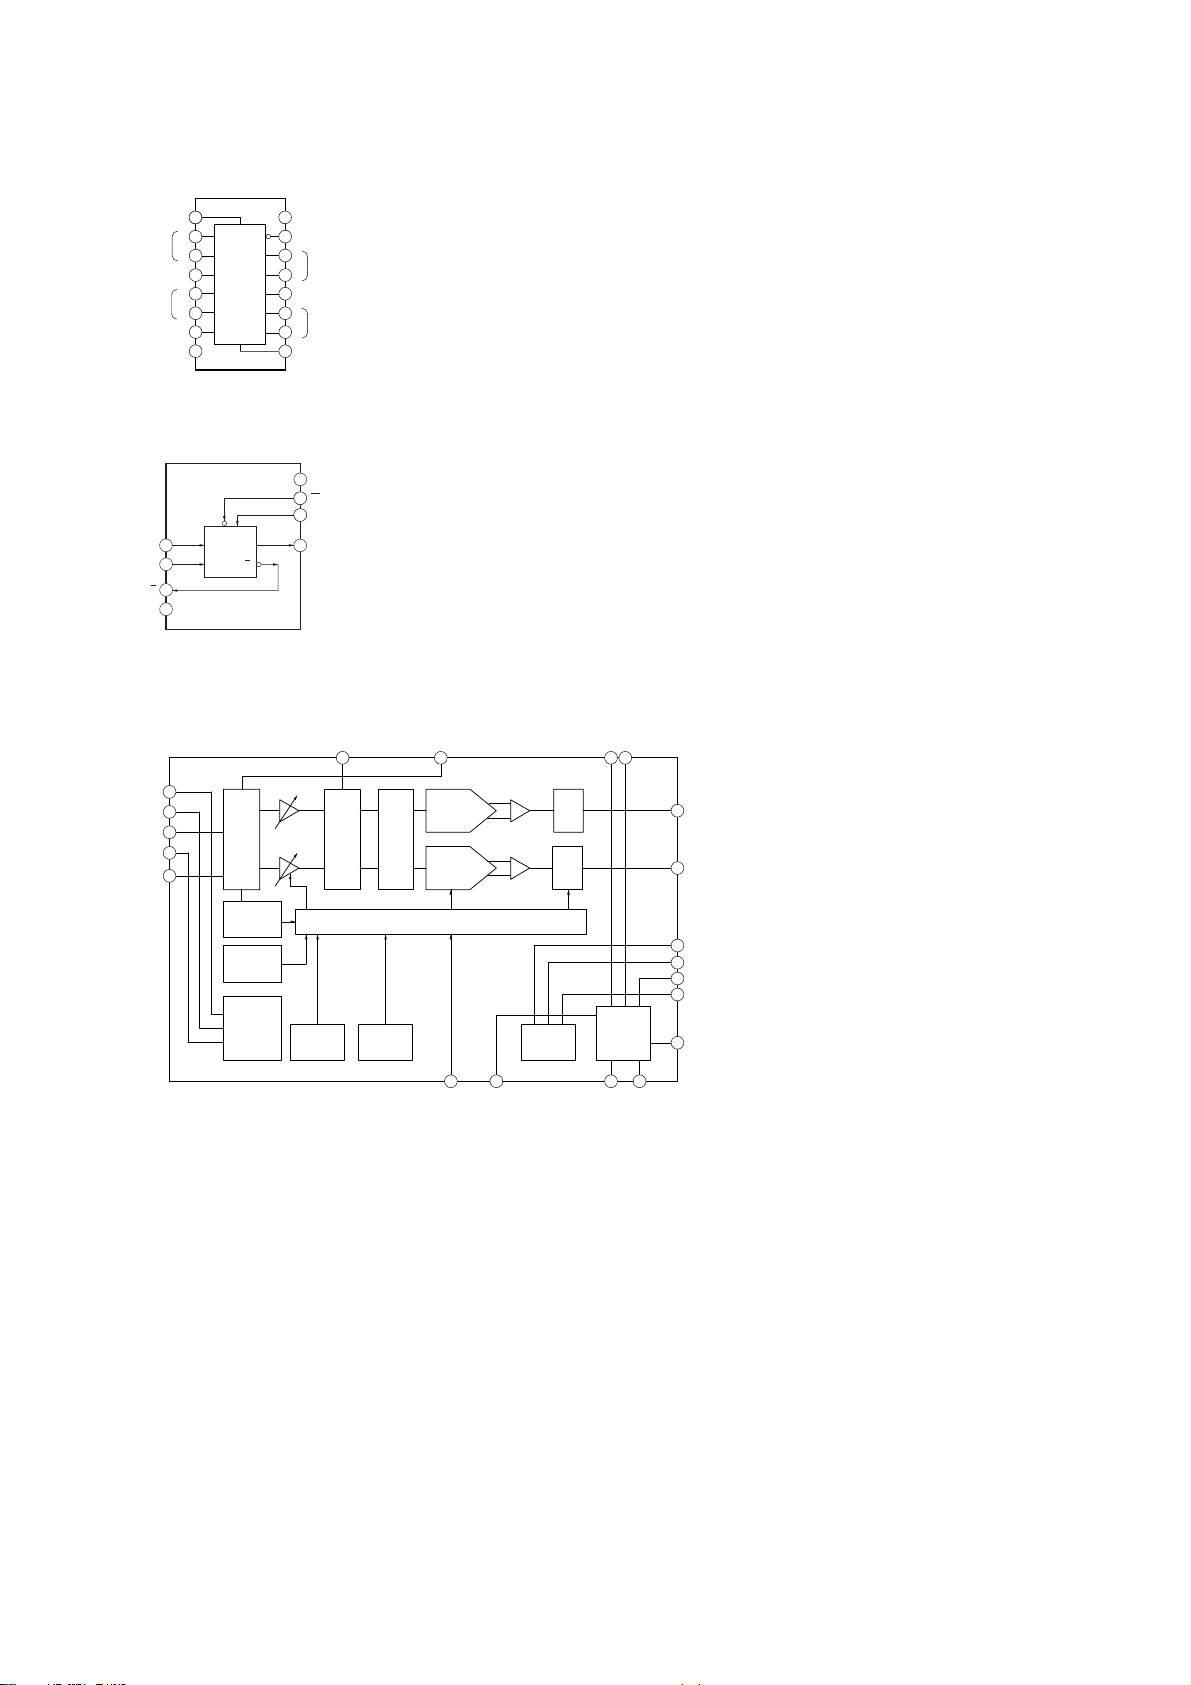
IC912 TC74VHC157FT (EK) (MOTHERBOARD BOARD (4/10))
HCD-GT3D
16
Vcc
S
15
STROBE
G
4A
14
4A
INPUT
4B
13
4B
12
11
4Y
OUTPUT
4Y
3A
11
3A
INPUT
3B
10
3B
3Y
3Y
OUTPUT
9
INPUT
OUTPUT
INPUT
OUTPUT
SELECT
GND
111
2
1A
1A
3
1B
1B
4
1Y
1Y
5
2A
2A
6
2B
2B
7
2Y
2Y
8
IC913 TC7WH157FK (MOTHERBOARD BOARD (4/10))
8
VCC
117
ST
116
5
SELECT
Y
GND
EN G
1
A
2
B
3
Y
4
Y
A
B
Y
IC914 PCM5101 (MOTHERBOARD BOARD (3/10))
SCK 12
BCK 13
DIN 14
LRCK 15
)07 16
Audio Interface
Zero
Data
Detector
Clock Halt
Detection
PLL Clock
UVP/Reset
)/7
11
8x Interpolation Filter
POR
'(03
10
Current
Segment
DAC
Current
ELWǻȈ0RGXODWRU
Segment
DAC
$GYDQFHG0XWH&RQWURO
I/VI/V
Ch. Pump
Analog
Analog
0XWH
0XWH
9
Power
Supply
AVDD8AGN
2875
7
287/
6
VNEG
5
&$30
4
CPGND
3
CAPP
2
CPVDD
1
20
18
17
;607
LDOO
19
DVD
DGND
65
Page 66
HCD-GT3D
• IC Pin Function Descriptions
MOTHERBOARD BOARD (9/10) IC101 R7S7200032CFP-A (SYSTEM CONTROLLER)
Pin No. Pin Name I/O Description
1 SRC-RST0 - Not used
2 VIDEO-MUTE O Muting Control for Video
3 CDM-UNLOAD-SW I CDM UNLOAD SW
4 CDM-LOAD-SW I CDM LOAD SW
5 BT-RESET O Reset signal output to Bluetooth section
6 LCD_BCKLED O FL Backlight
7 Vcc - Power supply terminal (+3.3V)
8 BT-ON O Bluetooth on/off control signal output terminal for bluetooth section
9 Vss - Ground terminal
10 LCD-OSC O FL Frame Rate EXT CLOCK
11 PVcc - Power supply terminal (+3.3V)
12 NFC-INT I NFC Interrupt
13 MTK-POWER-CTRL O Power Control pin for MTK
14 AUDIO_CLK_OUT O Clock Signal from Aragon to MTK master clock
15 MTK-RESET O MTK Reset pin
16 MTK-BUSY O BUSY Signal communication between MTK
17 MTK-CLK I Clock Signal from MTK
18 Vss - Ground terminal
19 MTK-XIFCS I MTK CHIP SELECT
20 MTK-SDI I Data In Signal from MTK
21 Vcc - Power supply terminal (+3.3V)
22 MTK-SDO O Data Out Signal to MTK
23 Vss - Ground terminal
24 SSI3_BCK0 I Bit clock signal from MTK or DIR to Aragon
25 PVcc - Power supply terminal (+3.3V)
26 SSI3_LRCKO I LR clock signal from MTK or DIR to Aragon
27 C-CONT O Trigger port to start charging of SPM
28 SSI3_DI I Data signal from MTK or DIR to Aragon
29 SSI0_BCKO O Clock signal from Aragon to Wf DAC BCK
30 SSI0_LRCKO O Clock signal from Aragon to Wf DAC LRCK
31 Vss - Ground terminal
32 SSI0_DO O Data Out from Aragon to Wf DAC
33 SSI2_DO O Data Out from Aragon to AUX OUT DAC
34 Vcc - Power supply terminal (+3.3V)
35 LCD-CLK O FL CIG serial data clock output
36 Vss - Ground terminal
37 CKIO - Not used
38 LCD-CSB O FL CHIP SELECT
39 PVcc - Power supply terminal (+3.3V)
40 LCD-SDA O FL CIG serial data output
41 ANALOG-ASEL O Multiplexer selector A for Analog input
42 ANALOG-BSEL O Multiplexer selector B for Analog input
43 DEBUG-TxD O TxD (for Debug)
44 JOG+ O FILE SEARCH JOG POS
45 POWER-KEY I Power Key input terminal
46 Vss - Ground terminal
47 USB-OC I USB Overcurrent Detection input port
48 RGB-SOUT O Serial data output to RGB driver
49 JOG- O FILE SEARCH JOG NEG
50 PVcc - Power supply terminal (+3.3V)
51 LINK-OUT-B O Selector B for Party Chain Signal
52 VBUS-OE O MTK Vbus Output enable control pin
53 NFC-RF-DET I NFC RF signal detection signal input from the NFC section
54 SSI1_DO O Data Out signal from Aragon to SWF DAC
66
Page 67
Pin No. Pin Name I/O Description
55 SSI1_DI I Data In Signal from ADC to Aragon
56 SD_FAST I SD FAST DETECT
57
58 Vcc - Power supply terminal (+3.3V)
59 LINK-DET I Party Chain input bias detection pin
60 USB_HOST_SEL O USB UPDATE SELECTOR
61 Vss - Ground terminal
62 PVcc - Power supply terminal (+3.3V)
63 AC-CUT I AC off detection signal input from the reset signal IC “L”: AC Cut detected
64 DEBUG-RxD I RxD (for Debug)
65 BT-RxD I RX input signal from Bluetooth section
66 MD-CLKS O For ARAGON Internal SRC
67 RTC_X1 I RTC clock input terminal
68 RTC_X2 O RTC clock output terminal
69 PLLVcc - Power supply terminal (+3.3V)
70 EXTAL I System clock input terminal
71 XTAL O System clock output terminal
72 Vss - Ground terminal
73 Vss - Ground terminal
74 NMI - Non-maskable interrupt input terminal
75 Vss - Ground terminal
76 RES I Reset signal
77 PVcc - Power supply terminal (+3.3V)
78 AMP PROTECT I Combination of TEMP, PS, SD & DC PROTECT
79 SPM-C-MON I Voice coil temperature monitor pin
80
81 MODEL-DEST-IN I Model and Destination setting terminal (A/D input)
82 FAN-DET I Fan speed detect
83 MASTER-VOLUME I Jog dial pulse input from the MASTER VOLUME encoder (A/D input)
84 AD-KEY0 I Key input terminal (A/D input)
85 AD-KEY1 I Key input terminal (A/D input)
86 AVcc - Power supply terminal (+3.3V)
87 AVss - Ground terminal
88 AVref - A/D Converter reference voltage input terminal (+3.3V)
89 BSCANP - Boundary scan setting pin
90 PVcc - Power supply terminal (+3.3V)
91 AUDIO_X1 I Audio clock input terminal
92 AUDIO_X2 O Audio clock output terminal
93 Vss - Ground terminal
94 /LINE-MUTE O Muting Control Switch for Party Chain. “L”: mute On
95 Vcc - Power supply terminal (+3.3V)
96 PCONT-BTSTBY O BT Standby Power Control Pin. “H”: ON
97 TRST I Debugging interface: Initialization-signal input pin
98 TDO O Debugging interface: Serial output pin for instructions and data
99 TDI I Debugging interface: Serial input pin for instructions and data
100 TMS I Debugging interface: Test-mode select signal input pin
101 TCK I Debugging interface: Test-clock input pin
102 Vss - Ground terminal
103
104
105 Vcc - Power supply terminal (+3.3V)
106
PCONT-PSAVE-
PROTECT
SPM-AMBIENT-
TEMP
TEST-MON103/
SD_D2_0
TEST-MON104/
SD_D3_0
TEST-MON106/
SD_CMD_0
O Main power on/off control signal output “H”:power on
I Ambient temperature monitor pin
O Test port for software checking
O Test port for software checking
O Test port for software checking
HCD-GT3D
67
Page 68
HCD-GT3D
Pin No. Pin Name I/O Description
107 Vss - Ground terminal
108
109 PVcc - Power supply terminal (+3.3V)
110
111
112
113
114 ST-RDS I Input for RDS Text Detect Signal (L: RDS Detect)
115 ST-CE O Tuner IC: Tuner enable input pin
116 Vss - Ground terminal
117 PCONT-DAMP O Digital Amp Module Power Control Pin. “H”: ON
118 RGB-PWM-CLK O PWM clock signal to RGB driver
119 Vcc - Power supply terminal (+3.3V)
120 /AMP-RESET O Digital Amp Reset Pin
121 Vss - Ground terminal
122 CD-MOTOR+ O CDM turning motor control signal output
123 PVcc - Power supply terminal (+3.3V)
124 CD-MOTOR- O CDM turning motor control signal output
125 DIR_CP-CLK O DIR & CP share clock
126 DIR_CP-DATA I/O DIR & CP share data
127 ST-CLK O Tuner IC: Clock signal for IIC communication
128 ST-DATA I/O Tuner IC: Data signal for IIC communication
129 RELAY CONTROL O Relay control
130 DIR INT0 I DIR INTERRUPT 0
131 NFC_CLK O NFC CLOCK
132 NFC_DATA I/O Two-way data bus with the NFC
133 BT-TxD O TX signal output terminal for Bluetooth section
134 LCD_INHB O FL inhibit pin
135 SIRCS I Remote control signal input
136 DIR INT1 I DIR INTERRUPT 1
137 RGB-SCLK O Serial clock output to RGB driver
138 Vss - Ground terminal
139 USB_X1 I USB clock input terminal
140 USB_X2 O USB clock output terminal
141 USBDPVcc - Power supply terminal (+3.3V)
142 USBDPVss - Ground terminal
143 DM1 - Not used
144 DP1 - Not used
145 VBUSIN1 - Not used
146 USBDVcc - Power supply terminal (+3.3V)
147 USBDVss - Ground terminal
148 USBDPVcc - Power supply terminal (+3.3V)
149 USBDPVss - Ground terminal
150 USB_DM0 I/O D- PIN FOR USB 2.0
151 USB_DP0 I/O D+ PIN FOR USB 2.0
152 VBUSIN0 O VBUS +5.0V supply monitoring pin
153 USBDVcc - Power supply terminal (+3.3V)
154 USBDVss - Ground terminal
155 REFRIN I Reference input
156 USBAPVss - Ground terminal
157 USBAPVcc - Power supply terminal (+3.3V)
158 USBAVcc - Power supply terminal (+3.3V)
TEST-MON108/
SD_CLK
TEST-MON110/
SD_D0_0
ANALOG-DSEL/
SD_D1_0
RGB-TRANS-LED-
SPK/SD_WP_0
RGB-TRANS-LED/
SD_CD_0
O Test port for software checking
O Test port for software checking
O ANALOG INPUT SELECTOR D
O Transfer signal to RGB driver (driver for Speaker LED)
O Transfer signal to RGB driver
68
Page 69
Pin No. Pin Name I/O Description
159 USBAVss - Ground terminal
160 USBUVcc - Power supply terminal (+3.3V)
161 USBUVss - Ground terminal
162 Vss - Ground terminal
163 Vss - Ground terminal
164 ANALOG-CSEL O ANALOG INPUT SELECTOR C
165 DIR-RESET O DIR RESET
166 Q-FLASH-SIO2 I/O QSPI: Data I/O pins for channel 0
167 Q-FLASH-SIO3 I/O QSPI: Data I/O pins for channel 0
168 Q-FLASH-CLK O Clock signal to QSPI
169 Q-FLASH-CS O Slave select pin to QSPI
170 Q-FLASH-SIO0 I/O QSPI: Data I/O pins for channel 0
171 Vss - Ground terminal
172 Q-FLASH-SIO1 I/O QSPI: Data I/O pins for channel 0
173 MIC-DETECT I Mic Input Detection pin. “H”: Mic detected
174 PVcc - Power supply terminal (+3.3V)
175 LINK-SET O Party Chain output bias pin
176 LINK-OUT-A O Selector A for Party Chain Signal
HCD-GT3D
69
Page 70
HCD-GT3D
MOTHERBOARD BOARD (5/10) IC301 CXD9990R (CD RF AMP FOCUS/TRACKING ERROR AMP, CD SYSTEM
PROCESSOR, DIGITAL SERVO PROCESSOR)
Pin No. Pin Name I/O Description
1 RF_C I RF main beam C input from the optical pick-up block
2 RF_D I RF main beam D input from the optical pick-up block
3 RF_E I RF sub beam E input from the optical pick-up block
4 RF_F I RF sub beam F input from the optical pick-up block
5 AVDD12_2 - Power supply terminal (+1.2V) (for analog system)
6 AVDD33_1 - Power supply terminal (+3.3V) (for analog system)
7 XTALI I System clock input terminal (27 MHz)
8 XTALO O System clock output terminal (27 MHz)
9 AGND33 - Ground terminal (for analog system)
10 V20 O Reference voltage (+2V) output to the optical pick-up block
11 V14/VREF0 O Reference voltage (+1.4V) output to the coil / motor driver
12 REXT I Current reference input terminal
13 MDI1 I Laser power monitor input from the optical pick-up block
14 LDO1 O Laser diode drive signal output to the optical pick-up block (for CD)
15 LDO2 O Laser diode drive signal output to the optical pick-up block (for DVD)
16 AVDD33_2 - Power supply terminal (+3.3V) (for analog system)
17 DMO O Spindle motor control signal output to the motor driver
18 FMO O Sled motor control signal output to the motor driver
19 CD_VR O Variable resistor control signal output to the optical pick-up block (for CD)
20 DVD_VR O Variable resistor control signal output to the optical pick-up block (for DVD)
21 TRO O Tracking coil control signal output to the coil / motor driver
22 FOO O Focus coil control signal output to the coil / motor driver
23 MSW O CD/DVD selection signal output terminal “L”: DVD, “H”: CD
24 USB_DM I/O Two-way USB data (-) bus terminal
25 USB_DP I/O Two-way USB data (+) bus terminal
26 VDD33_USB - Power supply terminal (+3.3V) (for USB)
27 VSS33_USB - Ground terminal (for USB)
28 PAD_VRT I/O USB generating reference current terminal
29 VDD12_USB - Power supply terminal (+1.2V) (for USB)
30 SF_CS# O Chip select signal output to the serial fl ash
31 SF_DO O Serial data output to the serial fl ash
32 SF_DI I Serial data input from the serial fl ash
33 SF_CK O Serial clock signal output to the serial fl ash
34 IFSCK O Serial data transfer clock signal output to the system controller
35 IFSDO O Serial data output to the system controller
36 RX I Serial data input terminal for fl ash writing
37 TX O Serial data output terminal for fl ash writing
38 PRST# I Reset signal input from the system controller “L”: reset
39 NC - Not used
40 IFSDI I Serial data input from the system controller
41 IFBSY I Communication initialization request signal input from the system controller
42 IFCS# O Communication initialization request acknowledge signal output to the system controller
43 MFISW - Not used
44 LIMITSW - Not used
45 MUTE O Muting signal output to the coil/motor driver (for focus/tracking coil and sled motor)
46 EEWP O Write protect signal output with the EEPROM
47 SDA I/O Two-way I2C data signal with EEPROM
48 SCL I/O Two-way I2C clock signal with EEPROM
49 NC - Not used
50 DVSS33 - Ground terminal (for digital system)
51 DVDD33 - Power supply terminal (+3.3V) (for digital system)
52 to 55 RD0 to RD3 I/O Two-way data bus with the SD-RAM
56 DVDD12 - Power supply terminal (+1.2V) (for digital system)
57 to 60 RD4 to RD7 I/O Two-way data bus with the SD-RAM
70
Page 71
Pin No. Pin Name I/O Description
61 DQM0 O Data mask signal output to the SD-RAM
62 to 69 RD15 to RD8 I/O Two-way data bus with the SD-RAM
70 DQM1 O Data mask signal output to the SD-RAM
71 DVDD33 - Power supply terminal (+3.3V) (for digital system)
72 RCLK O Clock signal output to the SD-RAM
73 to 79 RA11, RA9 to RA4 O Address signal output to the SD-RAM
80 RWE# O Write enable signal output to the SD-RAM
81 DVSS12 - Ground terminal (for digital system)
82 CAS# O Column address strobe signal output to the SD-RAM
83 RAS# O Row address strobe signal output to the SD-RAM
84 DVDD33 - Power supply terminal (+3.3V) (for digital system)
85 BA0 O Bank address signal output to the SD-RAM
86 BA1 O Bank address signal output to the SD-RAM
87 DVDD12 - Power supply terminal (+1.2V) (for digital system)
88 to 92 RA10, RA0 to RA3 O Address signal output to the SD-RAM
93 SPDIF - Not used
94 XMAMUTE - Not used
95 NC - Not used
96 DACVDDC - Power supply terminal (+3.3V) (for D/A converter)
97 VREF I Band gap reference voltage terminal
98 FS I Full scale adjustment terminal
99 DACVSSC - Ground terminal (for D/A converter)
100 CVBS O Composite video signal output terminal
101 DACVDDB - Power supply terminal (+3.3V) (for D/A converter)
102 SY/Y/G - Not used
103 SC/CB/B - Not used
104 CR/R - Not used
105 AADVSS - Ground terminal (for D/A converter)
106 ADIN I Audio data input from the A/D converter
107 NC - Not used
108 NC - Not used
109 AADVDD - Power supply terminal (+3.3V) (for D/A converter)
110 ADACVSS2 - Ground terminal (for D/A converter)
111 ADACVSS1 - Ground terminal (for D/A converter)
112 ACLK O Master clock signal output
113 ABCK O Bit clock signal output
114 NC - Not used
115 AVCM I Audio D/A converter reference voltage terminal
116 NC - Not used
117 ALRCK O L/R sampling clock signal output
118 ASDATA0 O Audio data output
119 ADACVDD1 - Power supply terminal (+3.3V) (for D/A converter)
120 ADACVDD2 - Power supply terminal (+3.3V) (for D/A converter)
121 AVDD12_1 - Power supply terminal (+1.2V) (for analog system)
122 AGND12 - Ground terminal (for analog system)
123 RFIP I AC coupled RF signal input from the optical pick-up block
124 OPDIST I Optical pick-up block type selection
125 IOPMON/OPO I Power monitor terminal
126 SPFG/OP I Spindle motor hall sensor input from the motor driver
127 RF_A I RF main beam A input from the optical pick-up block
128 RF_B I RF main beam B input from the optical pick-up block
HCD-GT3D
71
Page 72
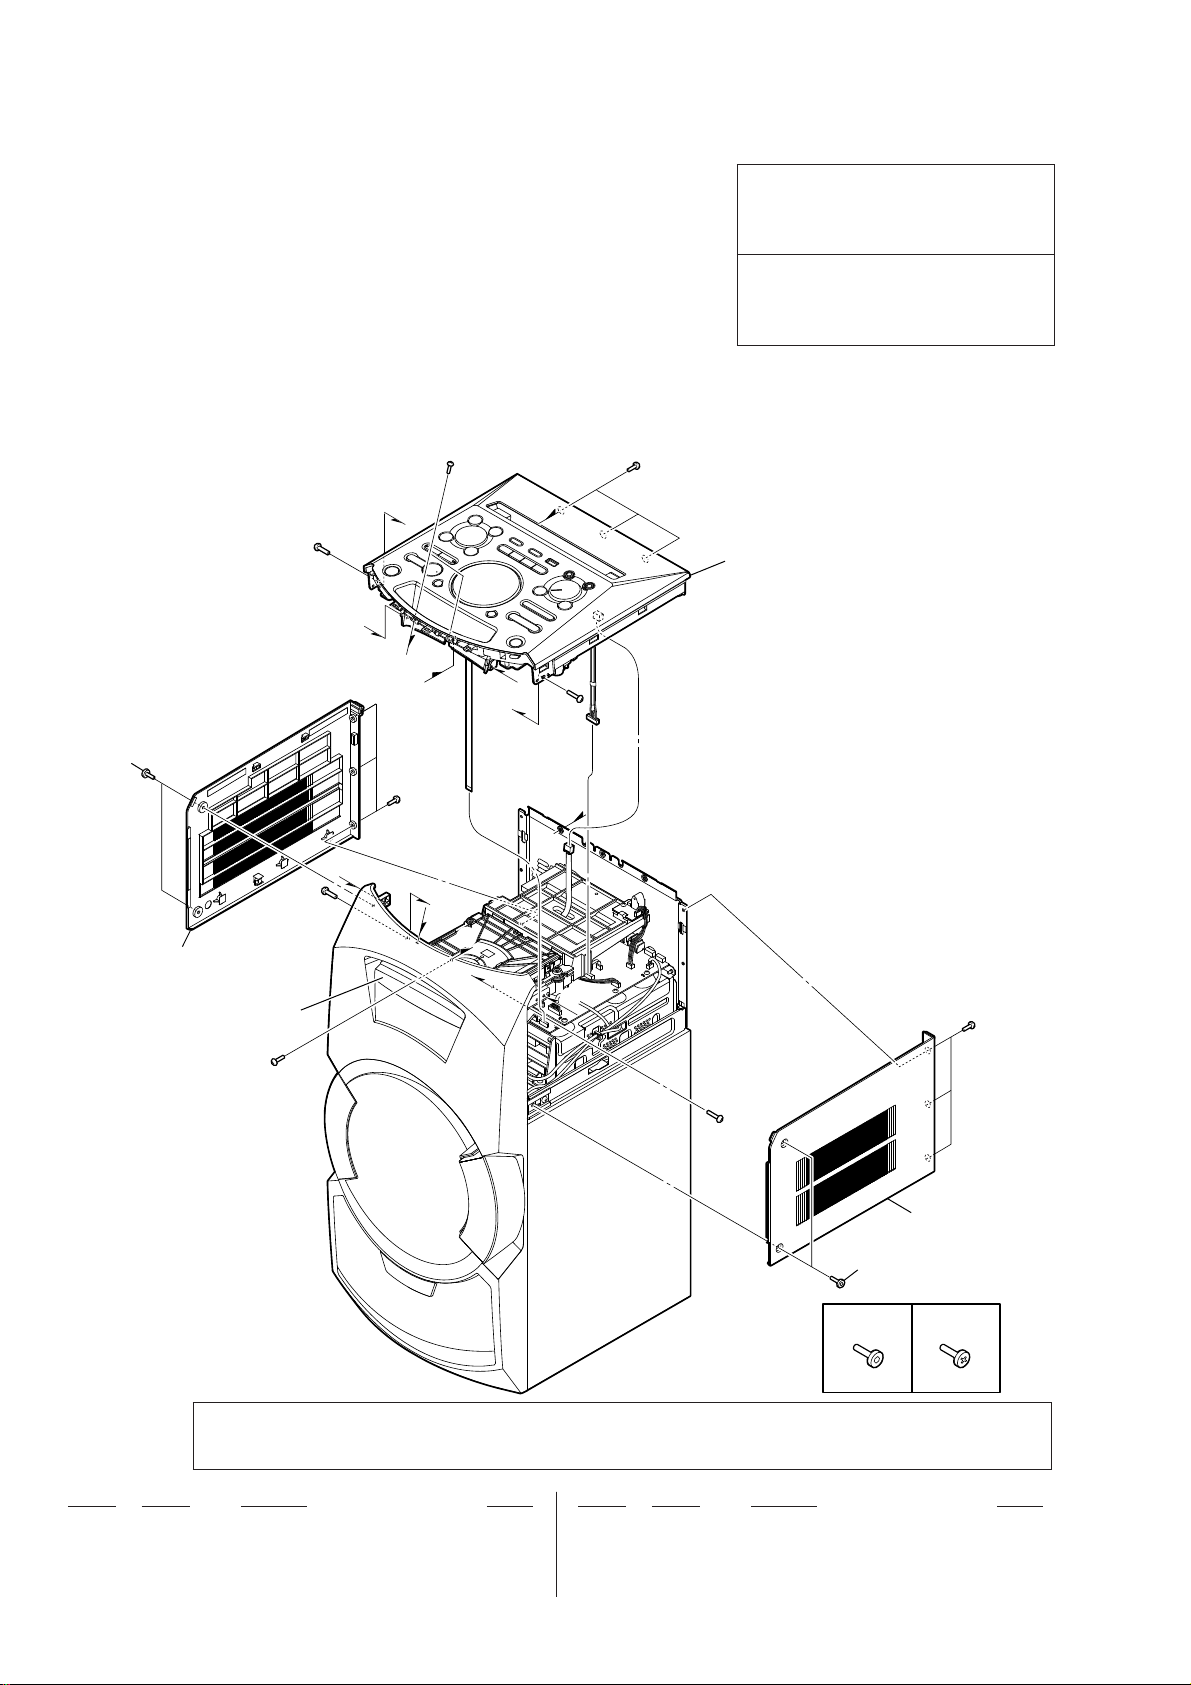
HCD-GT3D
Ver. 1.2
Note:
• The mechanical parts with no reference
number in the exploded views are not sup-
plied.
• Items marked “*” are not stocked since
they are seldom required for routine
service.
Some delay should be anticipated
when ordering these items.
• -XX and -X mean standardized parts, so
they may have some difference from the
original one.
7-1. SIDE PANEL SECTION
SECTION 7
EXPLODED VIEWS
• Abbreviation
AR : Argentina model
AUS : Australian model
E4 : African model
EA : Saudi Arabia model
LA9 : Latin-American model
MY : Malaysia model
RU : Russian model
TH : Thai model
The components identifi ed by mark 0
or dotted line with mark 0 are critical for
safety.
Replace only with part number specifi ed.
The components identifi ed by mark 9 con-
tain confi dential information.
Strictly follow the instructions whenever the
components are repaired and/or replaced.
1
2
loading panel section
#1
#1
D
F
#1
D
C
F
C
B
#2
B
G
G
E
A
#1
A
E
#1
top panel section
#1
#2
#1
3
1
1 (Type A) 1 (Type B)
Note 1: The screw type which screw between “PANEL, SIDE and PANEL, TOP” and “PANEL, SIDE and CHASSIS” for
this unit have been changed in the midway of production. About the screw type discrimination, refer to “SCREW
TYPE DISCRIMINATION BEFORE DISASSEMBLE THE PANEL, SIDE” on servicing notes (page 6).
Ref. No. Part No. Description Remark Ref. No. Part No. Description Remark
1 4-546-397-01 SCREW, TAPPING (HEX) (Type A)
1 4-162-271-01 SCREW, TAPPING (Type B)
2 X-2590-652-2 PANEL, SIDE (L) ASSY
3 X-2590-653-2 PANEL, SIDE (R) ASSY
#1 7-685-646-71 SCREW +BVTP 3X8 TYPE2 IT-3
#2 7-685-646-79 SCREW +BVTP 3X8 TYPE2 IT-3
72
Page 73
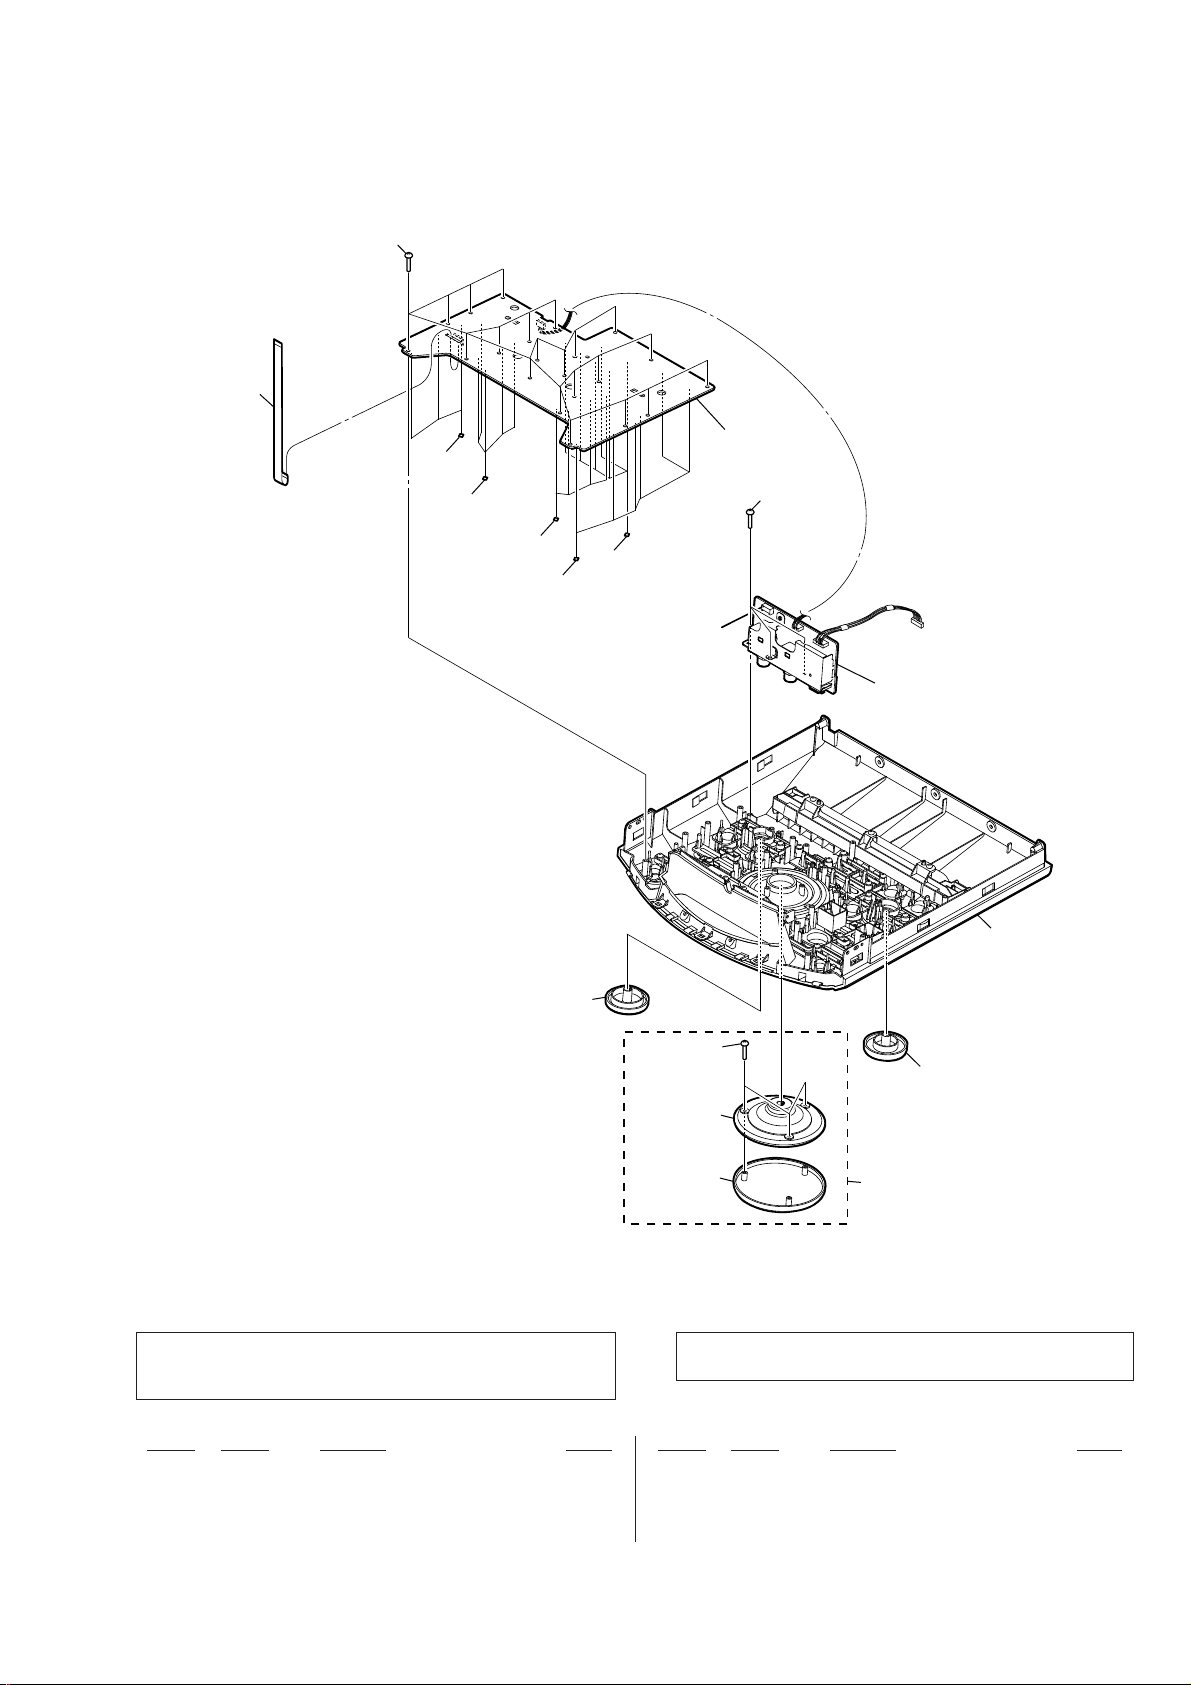
7-2. TOP PANEL SECTION
• Bottom view
54
55
56
HCD-GT3D
Ver. 1.2
not supplied
(BUTTON board)
56
56
54
56
56
not supplied
(MIC board)
57
51
54
52
not supplied
not supplied
Note 1: When the VOLUME knob assy or MIC knob is replaced,
refer to “NOTE OF REPLACING THE VOLUME KNOB
ASSY OR MIC KNOB” on servicing notes (page 7).
Ref. No. Part No. Description Remark Ref. No. Part No. Description Remark
51 4-549-432-01 KNOB, MIC
52 4-549-431-01 KNOB, FUNCTION
53 X-2590-651-1 KNOB, VOLUME ASSY
54 3-087-053-01 +BVTP2.6 (3CR)
Note 2: If wire (fl at type) is replaced, install it after bending it
in the same form as that before replacement.
55 1-849-009-11 WIRE (FLAT TYPE) (11 CORE)
56 4-543-517-02 HEMILON, 5X5X0.4
57 X-2590-580-5 PANEL, TOP ASSY
53
73
Page 74
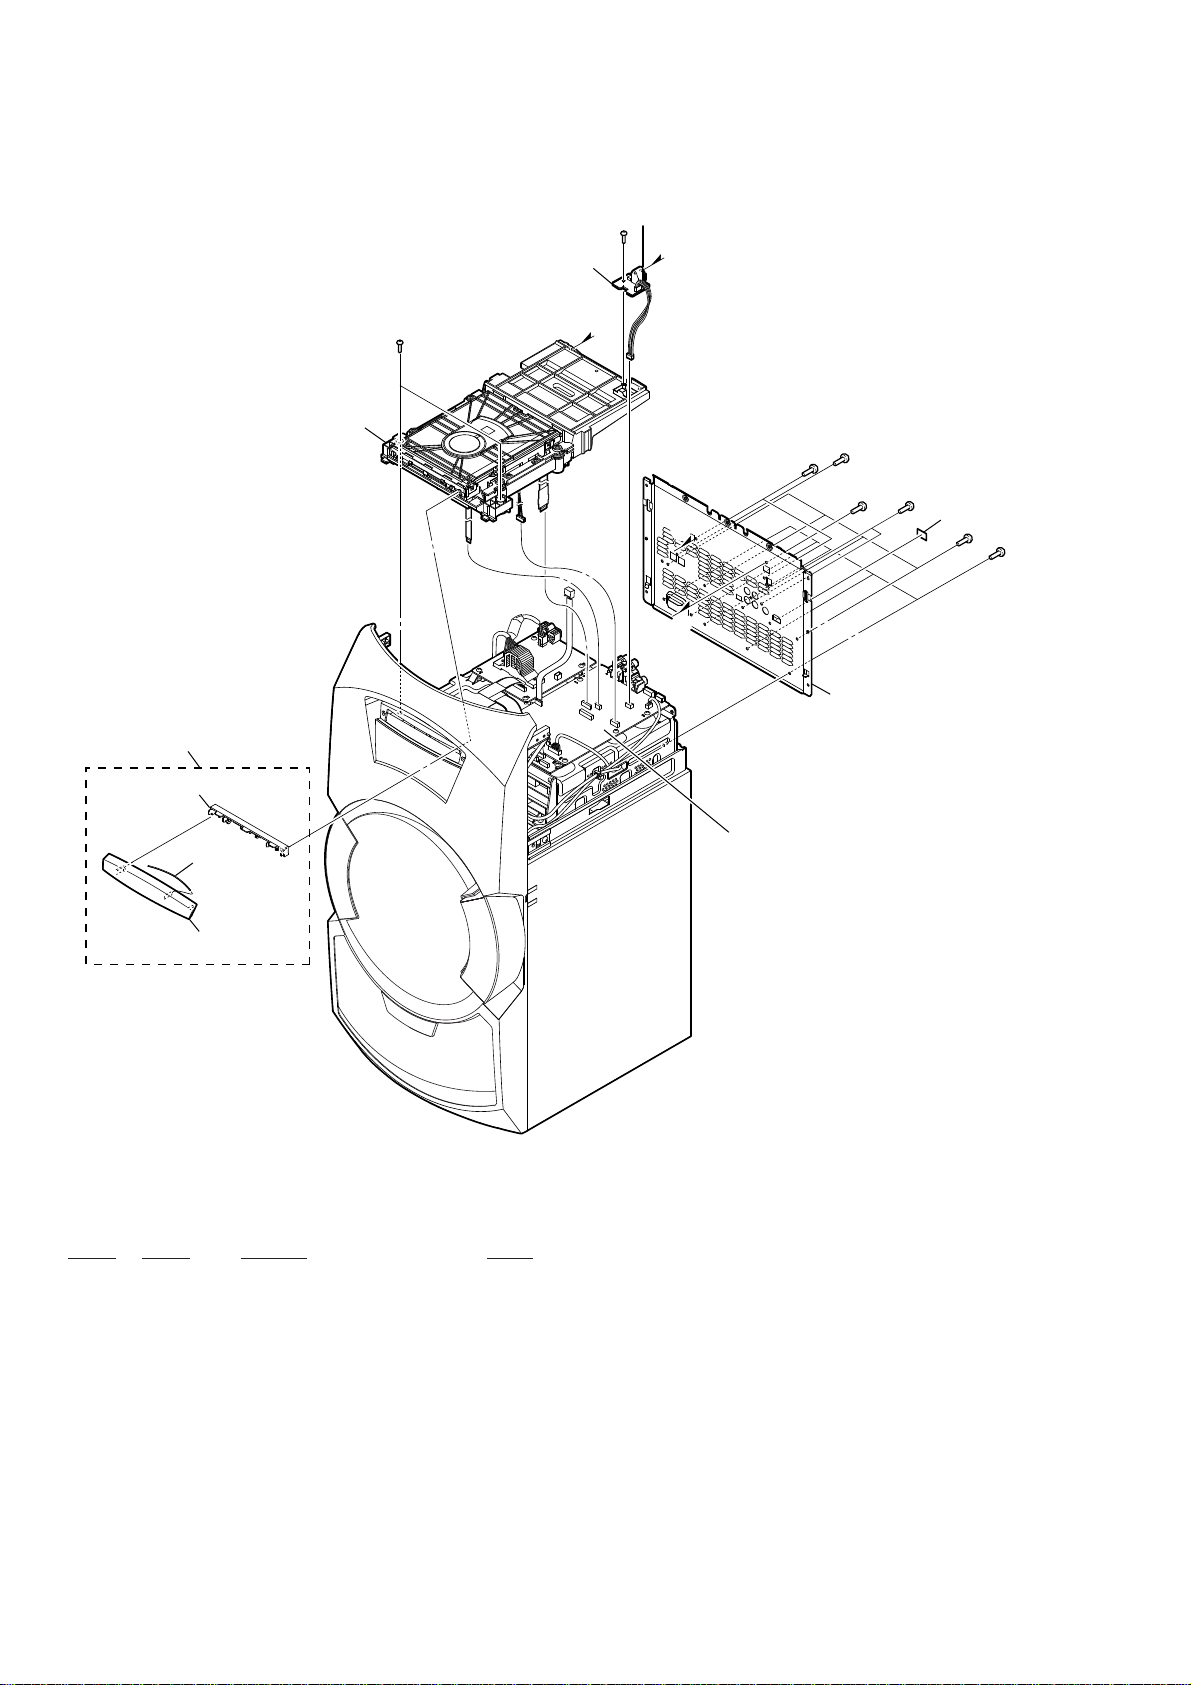
HCD-GT3D
Ver. 1.2
7-3. LOADING PANEL SECTION
101
not supplied
CDM section
#1
not supplied
(OPTICAL board)
B
#1
A
B
A
#1
not supplied
#1
#1
#1
not supplied
#1
#1
102
not supplied
Ref. No. Part No. Description Remark
101 X-2590-650-4 PANEL, LOADING ASSY
102 4-295-431-01 SPRING, LOADING
#1 7-685-646-71 SCREW +BVTP 3X8 TYPE2 IT-3
MOTHERBOARD board section
74
Page 75
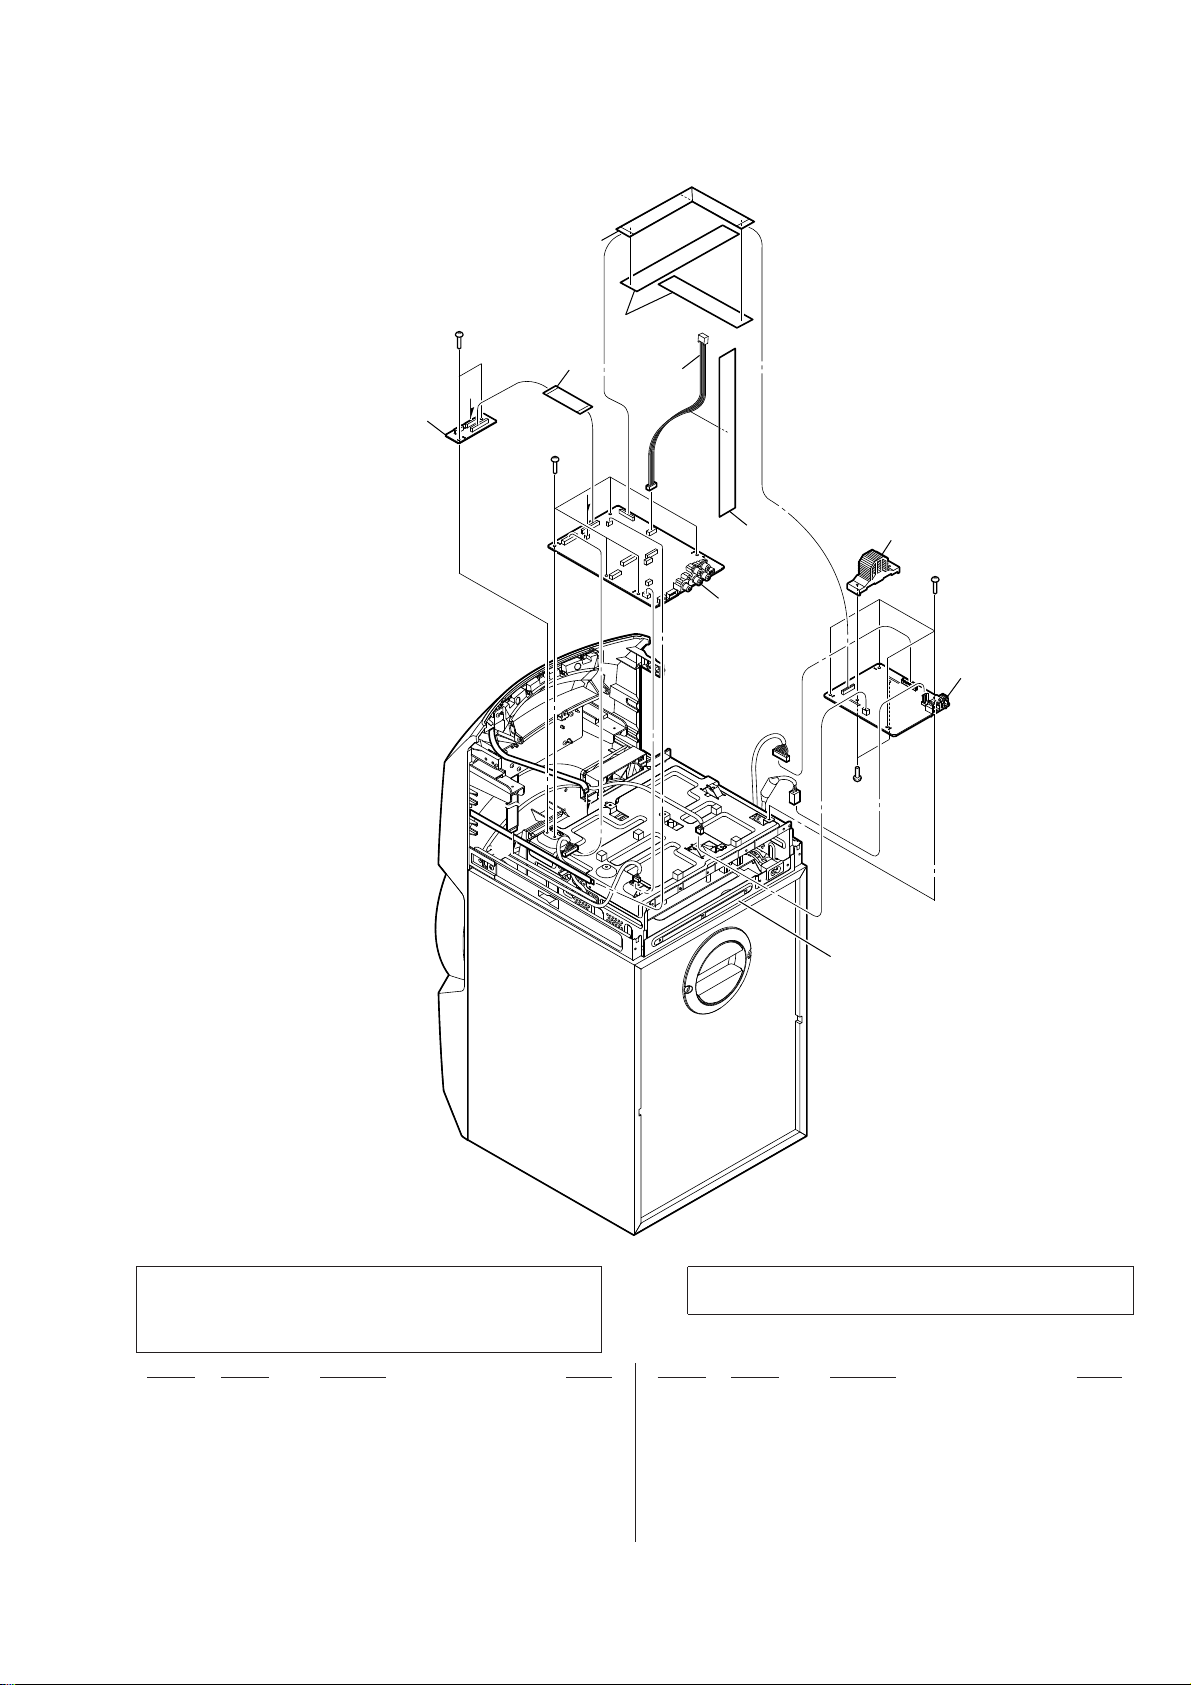
7-4. MOTHERBOARD BOARD SECTION
• Rear view
HCD-GT3D
Ver. 1.2
151
not supplied
(SPLITTER board)
#1
B
B
153
#1
A
A
not supplied
not supplied
not supplied
154
not supplied
#1
152
#1
chassis section
Note 1: When the complete DAMP board is replaced, refer to
“NOTE OF REPLACING THE IC1001 ON THE DAMP
BOARD AND THE COMPLETE DAMP BOARD” on
servicing notes (page 5).
Ref. No. Part No. Description Remark Ref. No. Part No. Description Remark
151 1-849-011-11 WIRE (FLAT TYPE) (19 CORE)
152 A-2061-348-A DAMP BOARD, COMPLETE
153 1-849-010-11 WIRE (FLAT TYPE) (25 CORE)
154 A-2071-965-A MOTHERBOARD BOARD, COMPLETE
(for SERVICE) (AR, LA9)
154 A-2071-984-A MOTHERBOARD BOARD, COMPLETE
(for SERVICE) (EA, E4)
Note 2: If wire (fl at type) is replaced, install it after bending it
in the same form as that before replacement.
154 A-2071-986-A MOTHERBOARD BOARD, COMPLETE
(for SERVICE) (AUS)
154 A-2071-987-A MOTHERBOARD BOARD, COMPLETE
(for SERVICE) (MY, TH)
154 A-2071-988-A MOTHERBOARD BOARD, COMPLETE
(for SERVICE) (RU)
#1 7-685-646-71 SCREW +BVTP 3X8 TYPE2 IT-3
75
Page 76
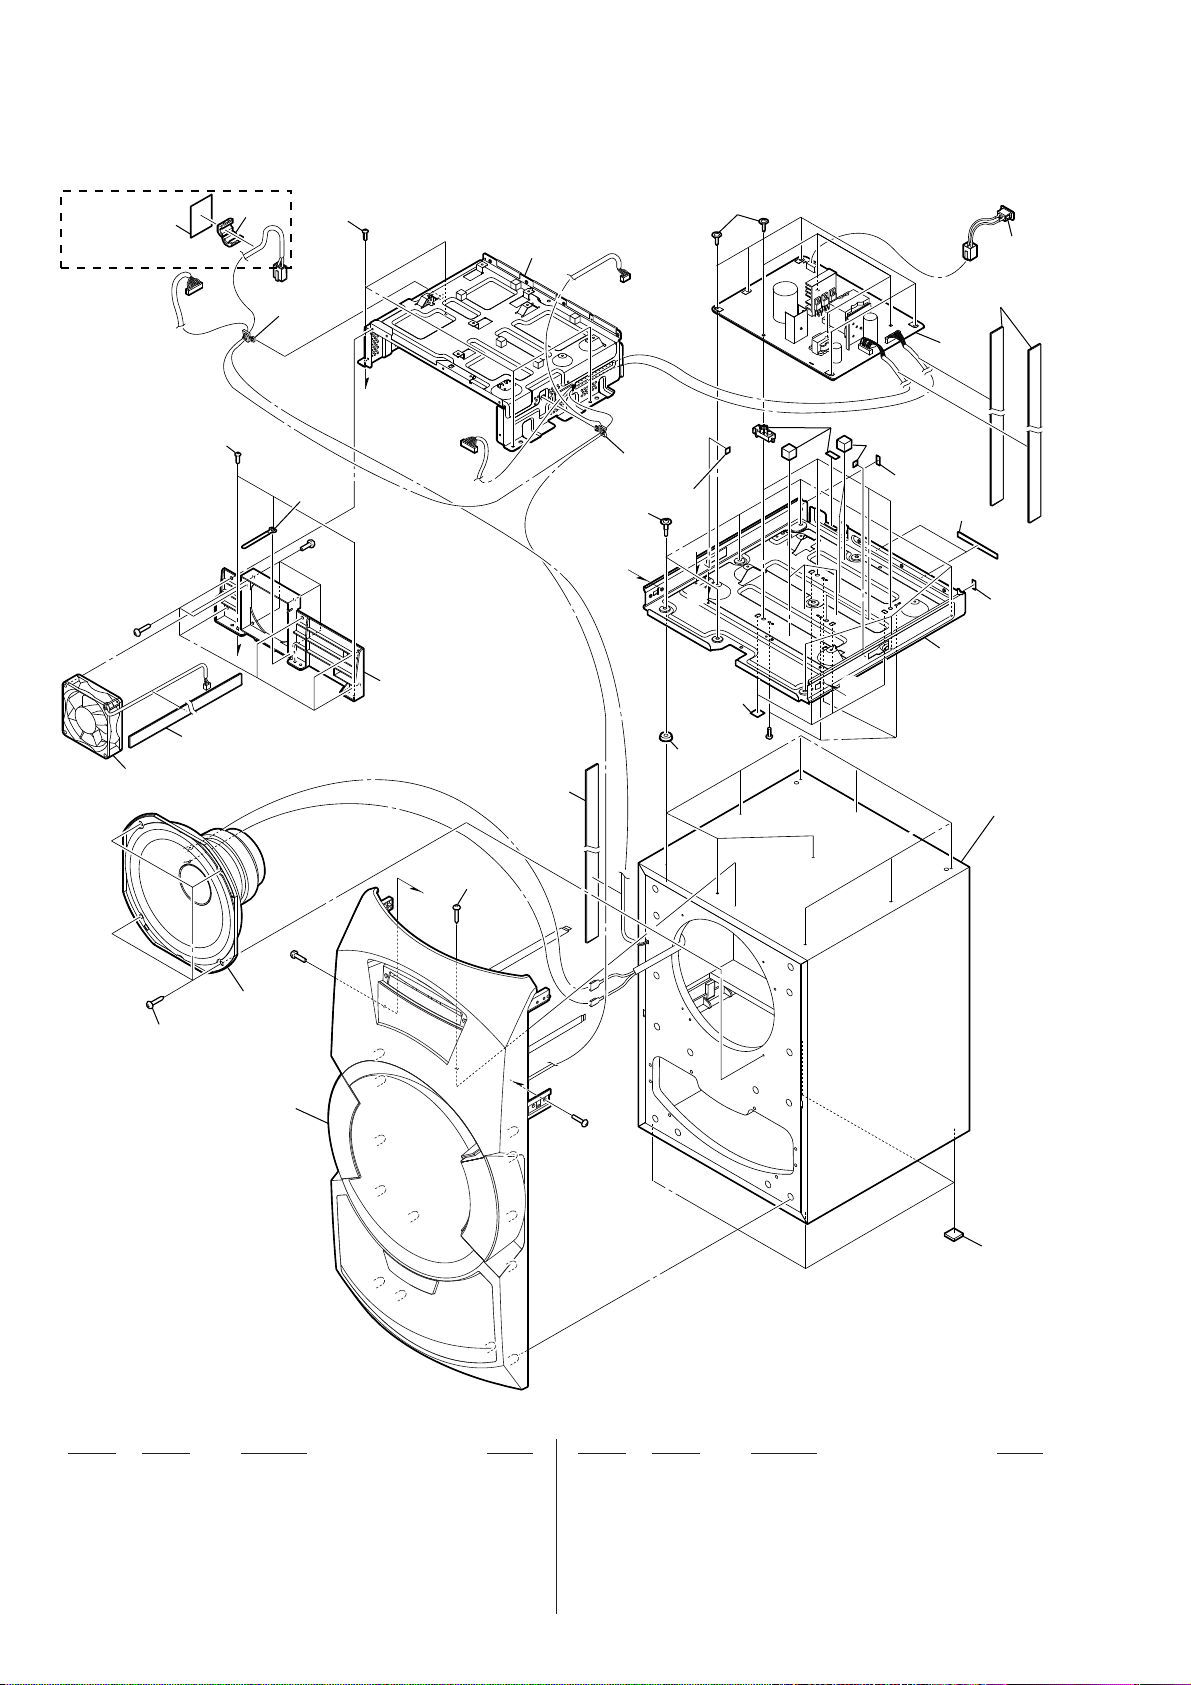
HCD-GT3D
Ver. 1.2
7-5. CHASSIS SECTION
not supplied
(RU, EA, MY, AUS, E4)
201
#1
not supplied
203
A
213
not supplied
202
#1
201
B
not supplied
not supplied
not supplied
not supplied
not supplied
207
C
204
B
A
not supplied
not supplied
205
not supplied
206
not supplied
not supplied
208
not supplied
208
not supplied
D
#1
not supplied
C
209
#1
211
210
D
front panel section
#1
212
Ref. No. Part No. Description Remark Ref. No. Part No. Description Remark
201 3-077-331-21 +BV3 (3-CR)
* 202 3-703-150-11 CLAMP
0 203 1-855-006-41 FAN, DC
204 2-677-839-01 +PWH 3X8 (SUMITITE)
0 205 1-844-234-21 AC INLET
0 206 A-2061-350-A SMPS BOARD, COMPLETE
207 4-558-595-01 STEP SCREW M4
208 3-559-407-21 CUSHION, STOPPER
209 4-532-593-01 SCREW (4X13) (TR-184A)
210 4-238-407-12 SCREW (1) (4X20), +BV TAPPING
211 1-859-087-11 LOUDSPEAKER (20CM)-087-11
212 4-546-027-01 FOOT, RUBBER
* 213 1-500-082-11 CLAMP, SLEEVE FERRITE (RU, EA, MY, AUS, E4)
#1 7-685-646-71 SCREW +BVTP 3X8 TYPE2 IT-3
76
Page 77
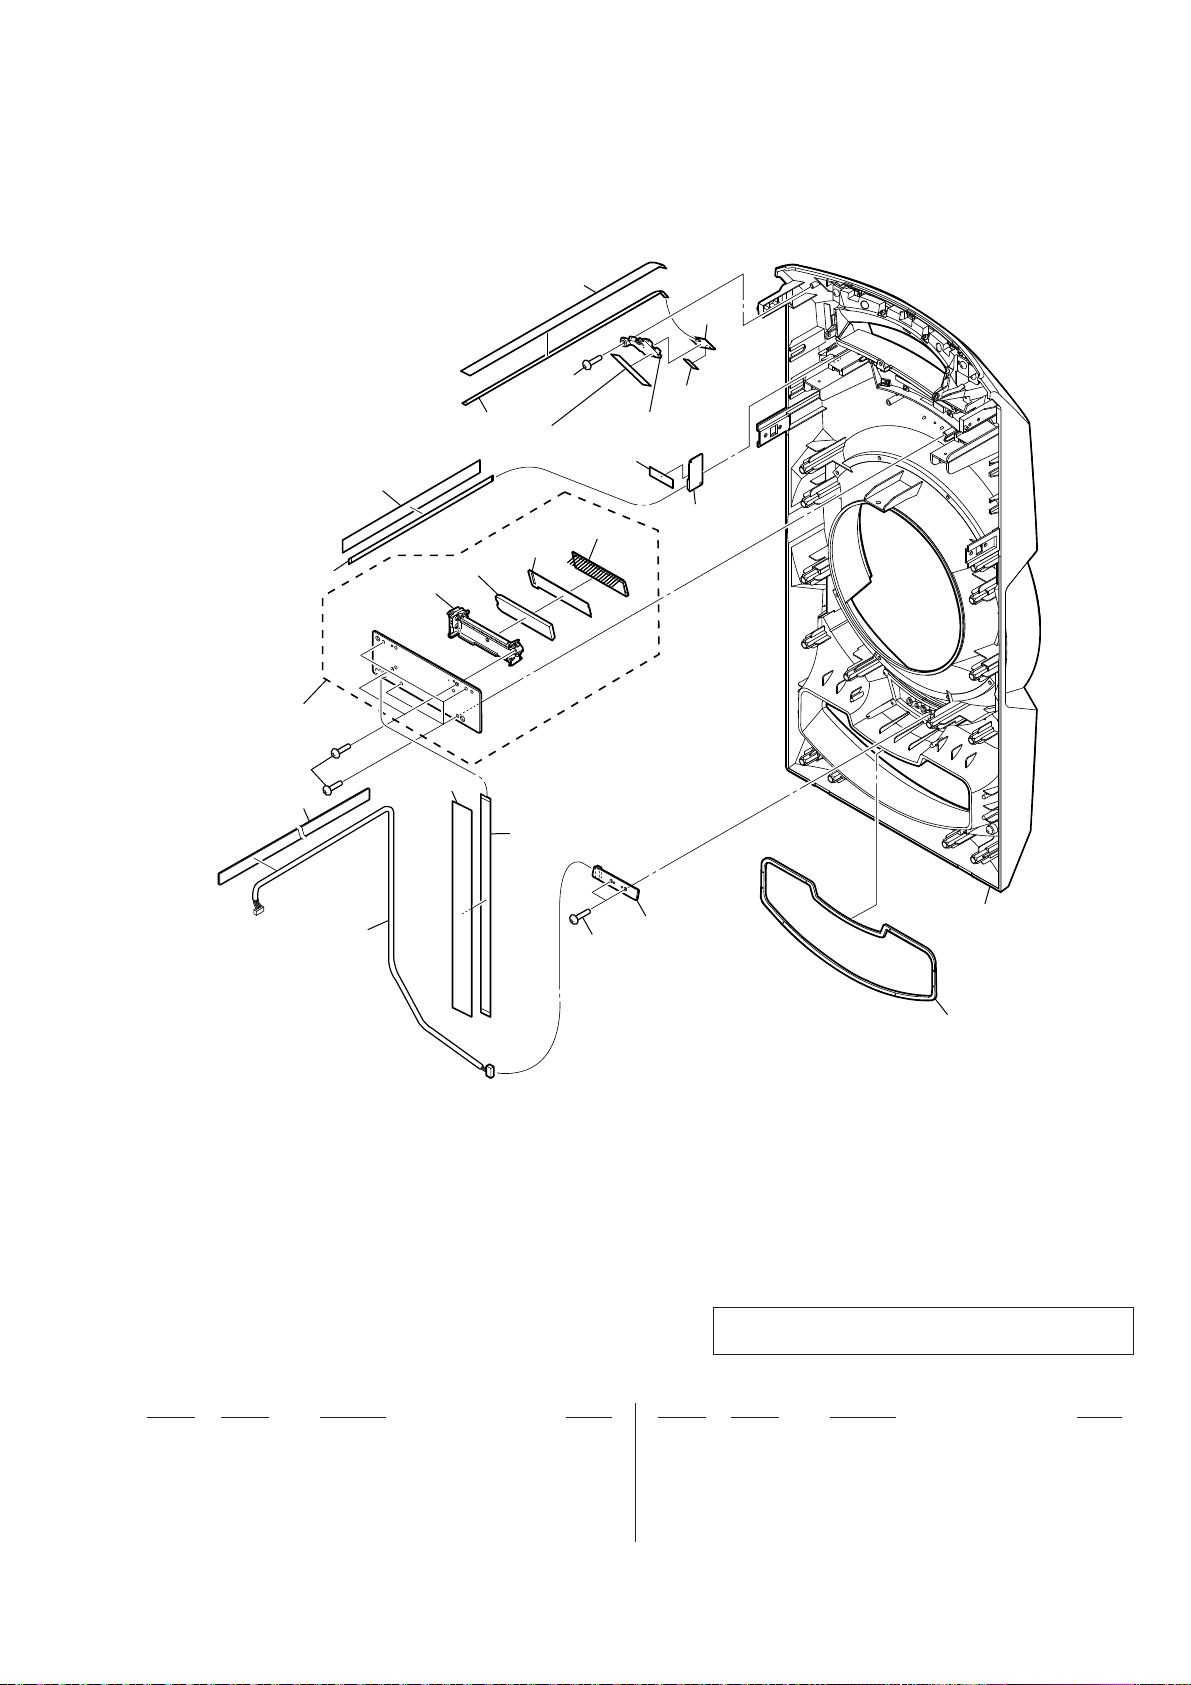
7-6. FRONT PANEL SECTION
• Rear view
HCD-GT3D
Ver. 1.2
not supplied
257
not supplied
(LCD board)
254
not supplied
not supplied
not supplied
252
not supplied
not supplied
not supplied
256
not supplied
not supplied
251
254
not supplied
ND3000
254
255
not supplied
253
not supplied
(SPK_HLED board)
258
not supplied
Note: If wire (fl at type) is replaced, install it after bending
it in the same form as that before replacement.
Ref. No. Part No. Description Remark Ref. No. Part No. Description Remark
251 1-849-013-11 WIRE (FLAT TYPE) (13 CORE)
252 1-849-014-11 WIRE (FLAT TYPE) (10 CORE)
253 1-492-699-11 BLUETOOTH MODULE
254 3-087-053-01 +BVTP2.6 (3CR)
255 4-449-063-01 CUSHION (NFC)
256 1-849-015-11 WIRE (FLAT TYPE) (6 CORE)
257 8-989-602-00 RC-S730 (WW)
258 X-2590-649-3 PANEL, FRONT (SW) ASSY
ND3000 1-812-078-11 LIQUID CRYSTAL DISPLAY
77
Page 78
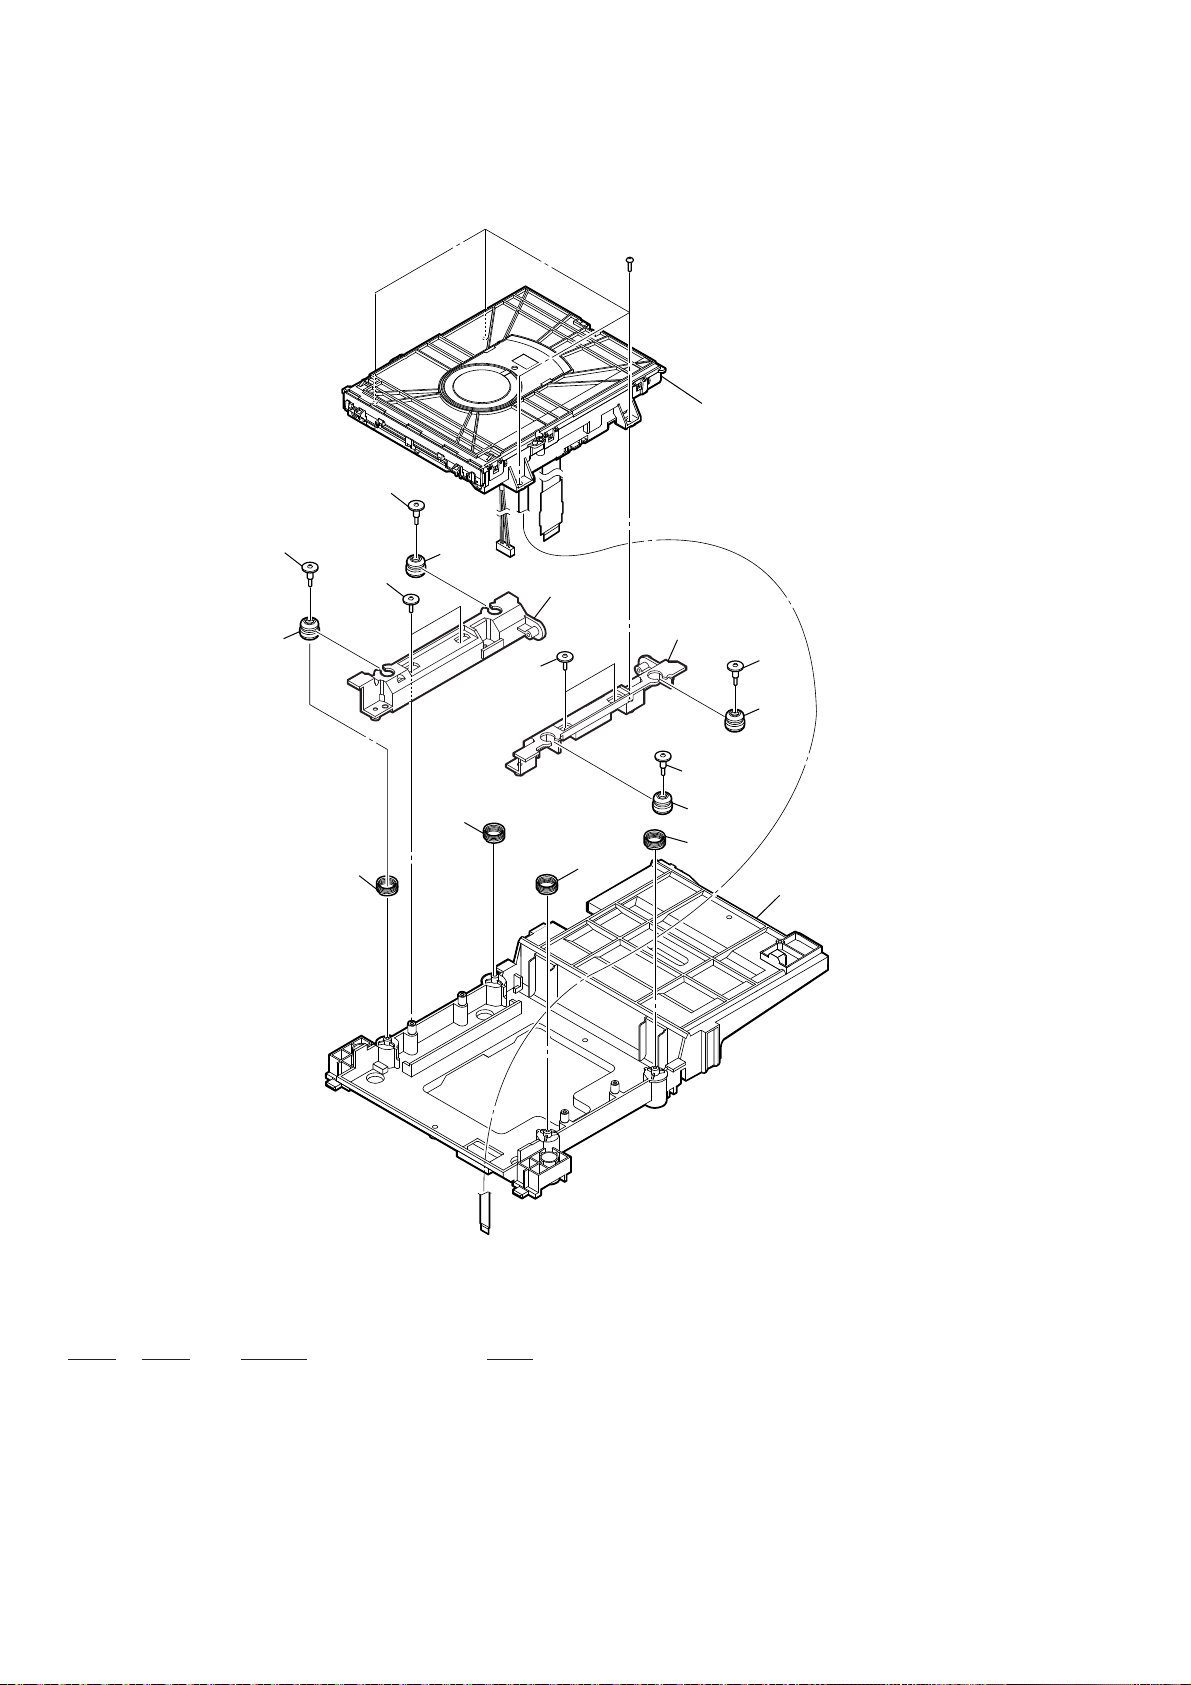
HCD-GT3D
Ver. 1.2
7-7. CDM SECTION
#1
CD mechanism section
(CDM90-DVBU204//M)
302
302
303
304
301
303
305
not supplied
301
not supplied
302
303
302
303
305
304
not supplied
Ref. No. Part No. Description Remark
301 2-345-115-01 SCREW (S), FLOAT
302 4-535-577-01 STEP SCREW M2.6
303 4-533-382-01 INSULATOR
304 4-533-939-01 SPRING, INSULATOR (F)
305 4-533-940-01 SPRING, INSULATOR (R)
#1 7-685-646-71 SCREW +BVTP 3X8 TYPE2 IT-3
78
Page 79
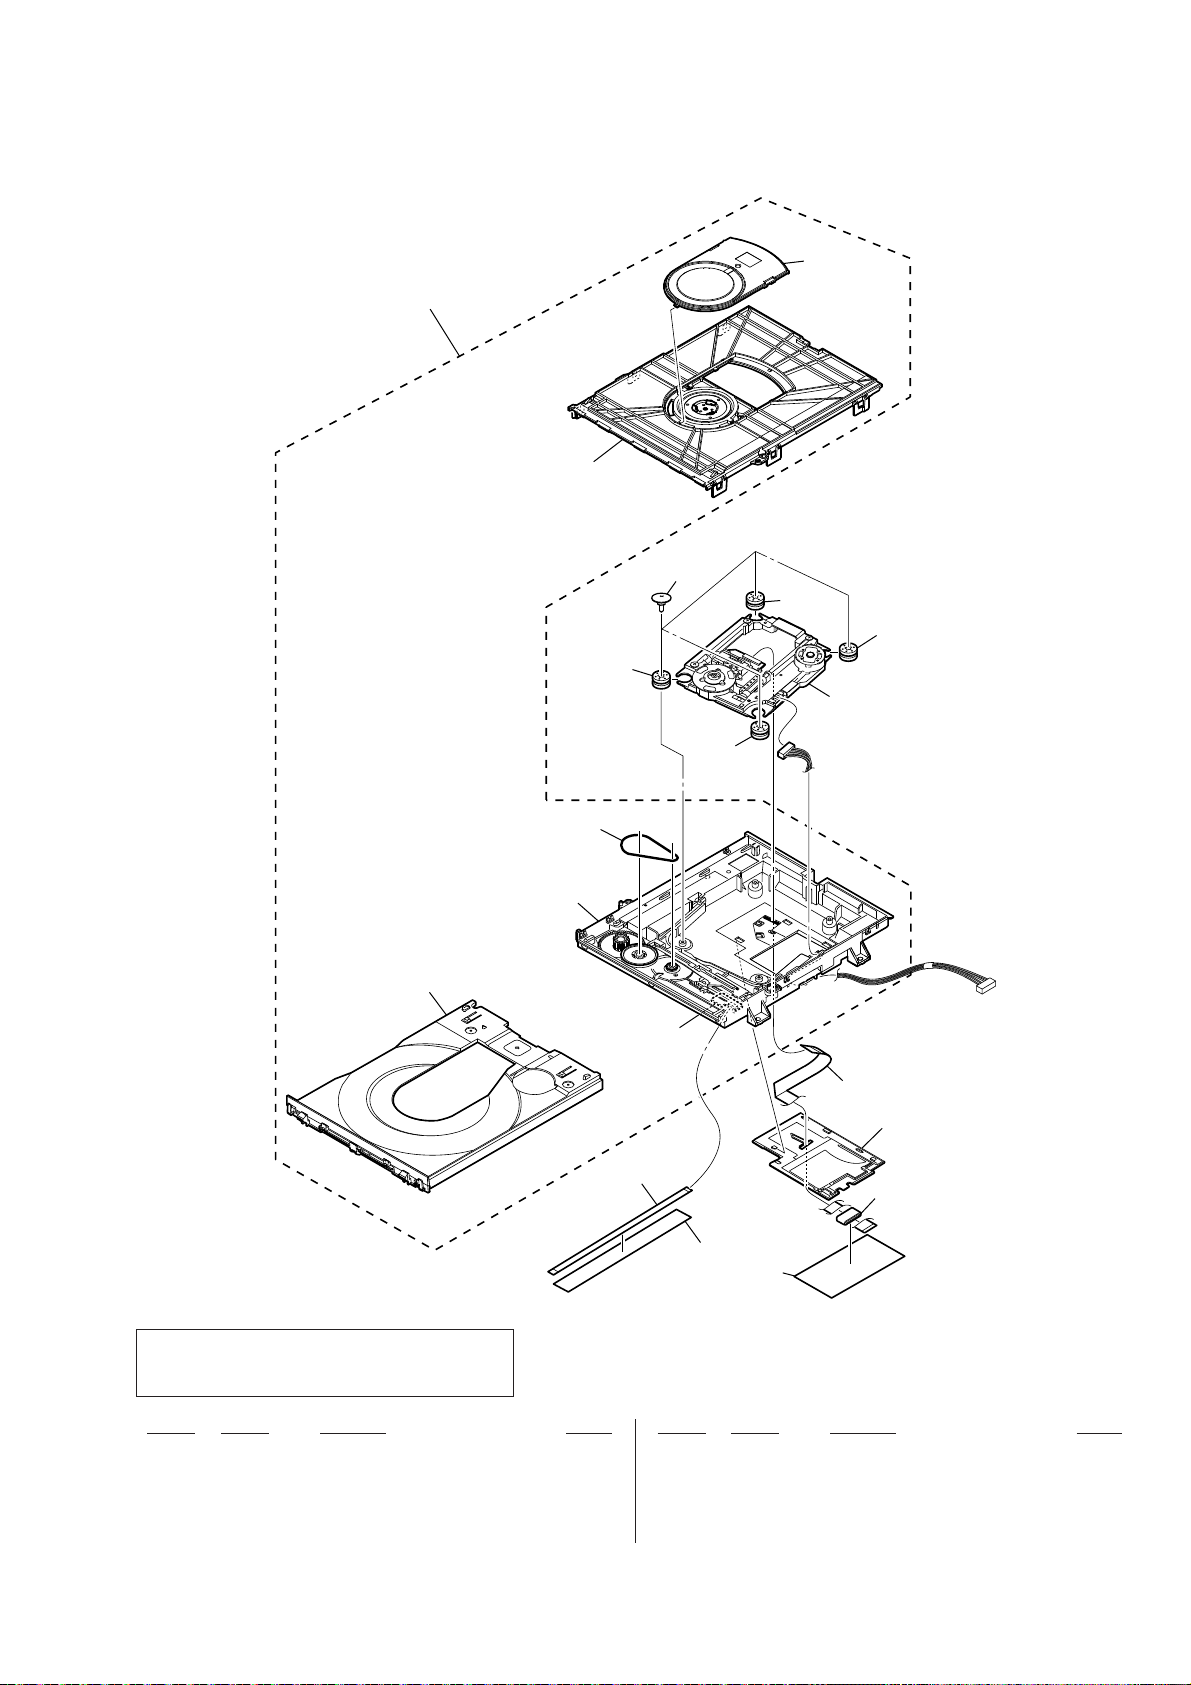
7-8. CD MECHANISM SECTION (CDM90-DVBU204//M)
351 (including MS-476 board)
HCD-GT3D
Ver. 1.2
not
supplied
not supplied
352
353
353
not supplied
353
354
353
not supplied
not supplied
not supplied
(MS-476 board)
356
not supplied
357
355
not supplied
not supplied
Note : If cable, fl exible fl at and wire (fl at type) is
Ref. No. Part No. Description Remark Ref. No. Part No. Description Remark
351 A-1896-391-B LOADING COMPLETE ASSY (T)
352 3-087-599-01 INSULATOR SCREW
353 2-634-618-21 INSULATOR
0 354 A-2046-956-A SERVICE, OPTICAL DEVICE(7G)
replaced, install it after bending it in the
same form as that before replacement.
355 1-469-829-11 CORE, FERRITE
(including MS-476 board)
356 1-849-012-11 WIRE (FLAT TYPE) (24 CORE)
357 1-849-016-11 WIRE (FLAT TYPE) (5 CORE)
79
Page 80
HCD-GT3D
Ver. 1.2
BUTTON
Note:
• Due to standardization, replacements in
the parts list may be different from the
parts specifi ed in the diagrams or the com-
ponents used on the set.
• -XX and -X mean standardized parts, so
they may have some difference from the
original one.
• RESISTORS
All resistors are in ohms.
METAL: Metal-fi lm resistor.
METAL OXIDE: Metal oxide-fi lm resistor .
F: nonfl ammable.
• Items marked “*” are not stocked since
they are seldom required for routine service.
Some delay should be anticipated when
ordering these items.
Ref. No. Part No. Description Remark Ref. No. Part No. Description Remark
BUTTON BOARD
*************
< CAPACITOR >
C3107 1-118-695-91 CERAMIC CHIP 0.01uF 5% 50V
C3111 1-118-695-91 CERAMIC CHIP 0.01uF 5% 50V
C3113 1-115-872-11 ELECT 2.2uF 20% 50V
C3117 1-115-416-11 CERAMIC CHIP 0.001uF 5% 25V
< CONNECTOR >
ELECTRICAL PARTS LIST
• SEMICONDUCTORS
In each case, u: μ, for example:
uA. . : μA. . , uPA. . , μPA. . ,
uPB. . : μPB. . , uPC. . , μPC. . ,
uPD. . : μPD. .
• CAPACITORS
uF: μF
• COILS
uH: μH
• Abbreviation
AR : Argentina model
AUS : Australian model
E4 : African model
EA : Saudi Arabia model
LA9 : Latin-American model
MY : Malaysia model
RU : Russian model
TH : Thai model
SECTION 8
The components identifi ed by mark 0
or dotted line with mark 0 are critical for
safety.
Replace only with part number specifi ed.
When indicating parts by reference number, please include the board name.
The components identifi ed by mark 9
contain confi dential information.
Strictly follow the instructions whenever the
components are repaired and/or replaced.
R3141 1-216-835-11 METAL CHIP 15K 5% 1/10W
R3142 1-216-819-11 METAL CHIP 680 5% 1/10W
R3143 1-216-821-11 METAL CHIP 1K 5% 1/10W
R3144 1-216-823-11 METAL CHIP 1.5K 5% 1/10W
R3145 1-216-823-11 METAL CHIP 1.5K 5% 1/10W
R3146 1-216-825-11 METAL CHIP 2.2K 5% 1/10W
R3147 1-216-827-11 METAL CHIP 3.3K 5% 1/10W
R3148 1-216-829-11 METAL CHIP 4.7K 5% 1/10W
R3149 1-218-867-11 METAL CHIP 6.8K 0.5% 1/10W
R3150 1-216-833-11 METAL CHIP 10K 5% 1/10W
CN3100 1-779-279-11 CONNECTOR, FFC (LIF (NON-ZIF)) 11P
< DIODE >
D3100 6-504-215-01 DI HL-364V620MZ-T
D3105 6-504-213-01 DI HL-364B460MZ-T
< ROTARY ENCODER >
EN3100 1-493-009-11 ENCODER, ROTARY (MULTI CONTROL)
EN3101 1-493-007-11 ENCODER, ROTARY (VOLUME/DJ CONTROL)
< JUMPER RESISTOR >
JR3100 1-216-296-11 SHORT CHIP 0
JR3101 1-216-296-11 SHORT CHIP 0
JR3102 1-216-296-11 SHORT CHIP 0
JR3103 1-216-296-11 SHORT CHIP 0
JR3104 1-216-296-11 SHORT CHIP 0
< RESISTOR >
R3123 1-216-864-11 SHORT CHIP 0
R3124 1-216-864-11 SHORT CHIP 0
R3125 1-216-833-11 METAL CHIP 10K 5% 1/10W
R3129 1-216-833-11 METAL CHIP 10K 5% 1/10W
R3130 1-216-819-11 METAL CHIP 680 5% 1/10W
R3131 1-216-821-11 METAL CHIP 1K 5% 1/10W
R3132 1-216-823-11 METAL CHIP 1.5K 5% 1/10W
R3133 1-216-823-11 METAL CHIP 1.5K 5% 1/10W
R3134 1-216-825-11 METAL CHIP 2.2K 5% 1/10W
R3135 1-216-827-11 METAL CHIP 3.3K 5% 1/10W
R3136 1-216-829-11 METAL CHIP 4.7K 5% 1/10W
R3137 1-218-867-11 METAL CHIP 6.8K 0.5% 1/10W
R3138 1-216-833-11 METAL CHIP 10K 5% 1/10W
R3139 1-216-837-11 METAL CHIP 22K 5% 1/10W
R3140 1-216-835-11 METAL CHIP 15K 5% 1/10W
< VARISTOR >
RV3100 1-227-918-11 RES, VAR, CARBON 50K (MIC LEVEL)
< SWITCH >
S3100 1-762-875-21 SWITCH, TACTILE (:/1)
S3101 1-762-875-21 SWITCH, TACTILE (x)
S3102 1-762-875-21 SWITCH, TACTILE (N)
S3103 1-762-875-21 SWITCH, TACTILE (-PAIRING BLUETOOTH)
S3104 1-762-875-21 SWITCH, TACTILE (MEGA BASS)
S3105 1-762-875-21 SWITCH, TACTILE (LIGHT MODE)
S3106 1-762-875-21 SWITCH, TACTILE (ENTER)
S3107 1-762-875-21 SWITCH, TACTILE (FUNCTION)
S3108 1-762-875-21 SWITCH, TACTILE (SOUND FIELD)
S3109 1-762-875-21 SWITCH, TACTILE (DJ EFFECT FLANGER)
S3110 1-762-875-21 SWITCH, TACTILE (DJ EFFECT ISOLATOR)
S3111 1-762-875-21 SWITCH, TACTILE (DJ EFFECT DJ OFF)
S3112 1-762-875-21 SWITCH, TACTILE (DJ EFFECT SAMPLER)
S3113 1-762-875-21 SWITCH, TACTILE (PARTY CHAIN)
S3114 1-762-875-21 SWITCH, TACTILE (Z)
S3115 1-762-875-21 SWITCH, TACTILE (PARTY LIGHT)
S3116 1-762-875-21 SWITCH, TACTILE (FOOTBALL)
S3117 1-762-875-21 SWITCH, TACTILE (S3 TUNING - .)
S3118 1-762-875-21 SWITCH, TACTILE (S4 TUNING + >)
S3119 1-762-875-21 SWITCH, TACTILE (S1 -)
S3120 1-762-875-21 SWITCH, TACTILE (S2 +)
S3121 1-762-875-21 SWITCH, TACTILE (VOCAL FADER)
S3122 1-762-875-21 SWITCH, TACTILE (MIC ECHO)
S3123 1-762-875-21 SWITCH, TACTILE (REC TO USB)
*************************************************************
80
Page 81
HCD-GT3D
Ver. 1.1
DAMP
Ref. No. Part No. Description Remark Ref. No. Part No. Description Remark
A-2061-348-A DAMP BOARD, COMPLETE
*********************
< CAPACITOR >
C1092 1-112-692-11 CERAMIC CHIP 1000PF 5% 50V
* C1095 1-118-360-11 CERAMIC CHIP 0.1uF 10% 25V
C1104 1-162-966-91 CERAMIC CHIP 0.0022uF 10% 50V
C1105 1-162-966-91 CERAMIC CHIP 0.0022uF 10% 50V
C1001 1-118-347-11 CERAMIC CHIP 0.1uF 10% 25V
C1002 1-118-347-11 CERAMIC CHIP 0.1uF 10% 25V
C1003 1-116-716-11 CERAMIC CHIP 10uF 10% 16V
C1004 1-128-991-21 ELECT CHIP 10uF 20% 50V
* C1005 1-116-714-11 CERAMIC CHIP 22uF 20% 6.3V
C1007 1-162-960-11 CERAMIC CHIP 220PF 10% 50V
C1008 1-112-692-11 CERAMIC CHIP 1000PF 5% 50V
C1011 1-112-692-11 CERAMIC CHIP 1000PF 5% 50V
C1012 1-118-386-11 CERAMIC CHIP 0.1uF 10% 16V
C1015 1-118-386-11 CERAMIC CHIP 0.1uF 10% 16V
C1020 1-118-386-11 CERAMIC CHIP 0.1uF 10% 16V
* C1021 1-118-360-11 CERAMIC CHIP 0.1uF 10% 25V
C1022 1-116-782-91 CERAMIC CHIP 2.2uF 10% 100V
C1026 1-116-782-91 CERAMIC CHIP 2.2uF 10% 100V
C1029 1-116-782-91 CERAMIC CHIP 2.2uF 10% 100V
C1036 1-116-782-91 CERAMIC CHIP 2.2uF 10% 100V
C1037 1-118-386-11 CERAMIC CHIP 0.1uF 10% 16V
C1038 1-118-386-11 CERAMIC CHIP 0.1uF 10% 16V
C1039 1-164-934-11 CERAMIC CHIP 330PF 10% 50V
C1040 1-118-289-11 CERAMIC CHIP 0.1uF 10% 16V
C1043 1-162-966-91 CERAMIC CHIP 0.0022uF 10% 50V
C1044 1-162-966-91 CERAMIC CHIP 0.0022uF 10% 50V
C1045 1-118-369-11 CERAMIC CHIP 0.022uF 10% 50V
C1046 1-118-369-11 CERAMIC CHIP 0.022uF 10% 50V
C1047 1-162-966-91 CERAMIC CHIP 0.0022uF 10% 50V
C1048 1-162-966-91 CERAMIC CHIP 0.0022uF 10% 50V
C1049 1-118-369-11 CERAMIC CHIP 0.022uF 10% 50V
C1050 1-118-369-11 CERAMIC CHIP 0.022uF 10% 50V
C1051 1-162-966-91 CERAMIC CHIP 0.0022uF 10% 50V
C1052 1-162-966-91 CERAMIC CHIP 0.0022uF 10% 50V
C1106 1-162-966-91 CERAMIC CHIP 0.0022uF 10% 50V
C1107 1-162-966-91 CERAMIC CHIP 0.0022uF 10% 50V
C1108 1-126-193-11 ELECT CHIP 1uF 20% 50V
C1117 1-165-908-11 CERAMIC CHIP 1uF 10% 10V
C1118 1-165-908-11 CERAMIC CHIP 1uF 10% 10V
C1119 1-165-908-11 CERAMIC CHIP 1uF 10% 10V
C1120 1-165-908-11 CERAMIC CHIP 1uF 10% 10V
C1121 1-118-066-11 CERAMIC CHIP 0.1uF 10% 100V
C1122 1-118-066-11 CERAMIC CHIP 0.1uF 10% 100V
C1123 1-116-405-11 CERAMIC CHIP 0.01uF 10% 100V
C1124 1-116-405-11 CERAMIC CHIP 0.01uF 10% 100V
C1125 1-116-708-11 CERAMIC CHIP 47uF 20% 6.3V
C1126 1-112-247-31 ELECT 220uF 20% 35V
C1127 1-112-247-31 ELECT 220uF 20% 35V
C1128 1-112-247-31 ELECT 220uF 20% 35V
C1129 1-112-247-31 ELECT 220uF 20% 35V
* C1131 1-118-360-11 CERAMIC CHIP 0.1uF 10% 25V
C1132 1-118-371-11 CERAMIC CHIP 0.015uF 10% 50V
* C1133 1-118-360-11 CERAMIC CHIP 0.1uF 10% 25V
C1134 1-118-361-11 CERAMIC CHIP 0.1uF 10% 50V
C1136 1-137-765-21 ELECT CHIP 47uF 20% 16V
C1137 1-165-492-21 ELECT CHIP 100uF 20% 10V
C1138 1-118-066-11 CERAMIC CHIP 0.1uF 10% 100V
C1139 1-118-066-11 CERAMIC CHIP 0.1uF 10% 100V
C1140 1-118-066-11 CERAMIC CHIP 0.1uF 10% 100V
C1141 1-118-066-11 CERAMIC CHIP 0.1uF 10% 100V
C1142 1-118-933-11 ELECT (BLOCK) 3300uF 20% 71V
C1143 1-118-289-11 CERAMIC CHIP 0.1uF 10% 16V
C1144 1-165-492-21 ELECT CHIP 100uF 20% 10V
C1147 1-112-514-91 CERAMIC CHIP 1500PF 5% 50V
C1053 1-118-369-11 CERAMIC CHIP 0.022uF 10% 50V
C1054 1-118-369-11 CERAMIC CHIP 0.022uF 10% 50V
C1055 1-162-966-91 CERAMIC CHIP 0.0022uF 10% 50V
C1056 1-162-966-91 CERAMIC CHIP 0.0022uF 10% 50V
C1057 1-118-369-11 CERAMIC CHIP 0.022uF 10% 50V
C1058 1-118-369-11 CERAMIC CHIP 0.022uF 10% 50V
C1059 1-116-405-11 CERAMIC CHIP 0.01uF 10% 100V
* C1060 1-118-360-11 CERAMIC CHIP 0.1uF 10% 25V
* C1061 1-118-360-11 CERAMIC CHIP 0.1uF 10% 25V
C1062 1-116-708-11 CERAMIC CHIP 47uF 20% 6.3V
C1063 1-116-708-11 CERAMIC CHIP 47uF 20% 6.3V
C1067 1-114-831-91 CERAMIC CHIP 1uF 10% 100V
C1068 1-114-831-91 CERAMIC CHIP 1uF 10% 100V
C1074 1-116-911-21 CERAMIC CHIP 1uF 10% 250V
C1075 1-116-911-21 CERAMIC CHIP 1uF 10% 250V
C1076 1-118-066-11 CERAMIC CHIP 0.1uF 10% 100V
C1077 1-116-405-11 CERAMIC CHIP 0.01uF 10% 100V
C1078 1-116-405-11 CERAMIC CHIP 0.01uF 10% 100V
C1079 1-118-066-11 CERAMIC CHIP 0.1uF 10% 100V
C1080 1-118-066-11 CERAMIC CHIP 0.1uF 10% 100V
C1081 1-116-405-11 CERAMIC CHIP 0.01uF 10% 100V
C1082 1-118-066-11 CERAMIC CHIP 0.1uF 10% 100V
C1083 1-128-403-11 ELECT CHIP 47uF 20% 35V
C1089 1-128-991-21 ELECT CHIP 10uF 20% 50V
* C1090 1-118-360-11 CERAMIC CHIP 0.1uF 10% 25V
C1091 1-128-991-21 ELECT CHIP 10uF 20% 50V
Note 1: When the complete DAMP board is replaced, re-
fer to “NOTE OF REPLACING THE IC1001 ON
THE DAMP BOARD AND THE COMPLETE DAMP
BOARD” on servicing notes (page 5).
C1148 1-118-381-11 CERAMIC CHIP 0.0022uF 10% 50V
* C1149 1-118-035-11 CERAMIC CHIP 0.1uF 10% 25V
C1150 1-112-514-91 CERAMIC CHIP 1500PF 5% 50V
C1151 1-118-381-11 CERAMIC CHIP 0.0022uF 10% 50V
C1155 1-162-966-91 CERAMIC CHIP 0.0022uF 10% 50V
C1156 1-114-588-91 CERAMIC CHIP 0.0027uF 5% 50V
C1167 1-118-066-11 CERAMIC CHIP 0.1uF 10% 100V
C1168 1-118-066-11 CERAMIC CHIP 0.1uF 10% 100V
C1169 1-118-066-11 CERAMIC CHIP 0.1uF 10% 100V
< CONNECTOR >
CN1001 1-820-117-51 CONNECTOR, FFC/FPC 19P
CN1004 1-770-469-21 PIN, CONNECTOR (PC BOARD) 2P
CN1005 1-691-770-11 PLUG (MICRO CONNECTOR) 8P
CN1007 1-564-320-00 PIN, CONNECTOR (3.96mm PITCH) 2P
< DIODE >
D1001 6-500-400-01 DIODE BAV99-215
D1002 6-500-400-01 DIODE BAV99-215
D1005 6-500-400-01 DIODE BAV99-215
D1006 6-500-400-01 DIODE BAV99-215
D1007 8-719-073-35 DIODE RB551V-30TE-17
D1008 6-500-400-01 DIODE BAV99-215
D1013 6-502-961-01 DI DA2J10100L
D1014 6-502-970-01 DI DZ2J068M0L
D1016 6-503-987-01 DI RF05VAM2STR
D1017 8-719-073-35 DIODE RB551V-30TE-17
Note 2:
When the C1126, C1127, C1128, C1129 and C1142 on the
DAMP board are replaced, spread the bond referring to “BOND
FIXATION OF ELECTRIC PARTS” on servicing notes (page 6).
81
Page 82
HCD-GT3D
Ver. 1.1
DAMP
Ref. No. Part No. Description Remark Ref. No. Part No. Description Remark
< IC >
IC1001 6-716-817-01 IC TAS5630BPHDR
IC1003 6-716-462-01 IC BD00GA3WEFJ-E2
IC1004 8-759-274-71 IC NJM4565M (TE2)
IC1005 8-759-274-71 IC NJM4565M (TE2)
< JUMPER >
JC1019 1-216-295-91 SHORT CHIP 0
JC1020 1-216-295-91 SHORT CHIP 0
< COIL >
L1006 1-482-158-11 INDUCTOR 10uH
L1007 1-482-158-11 INDUCTOR 10uH
L1009 1-400-793-21 INDUCTOR 47uH
L1010 1-482-160-21 INDUCTOR 20uH
< TRANSISTOR >
Q1003 8-729-216-22 TRANSISTOR 2SA1162-G
Q1004 8-729-216-22 TRANSISTOR 2SA1162-G
Q1006 6-552-892-01 TR LSCR523UBFS8TL
Q1010 6-552-746-01 TR DSA700300L
Q1011 6-552-892-01 TR LSCR523UBFS8TL
Q1014 8-729-216-22 TRANSISTOR 2SA1162-G
Q1015 8-729-216-22 TRANSISTOR 2SA1162-G
Q1016 8-729-216-22 TRANSISTOR 2SA1162-G
Q1017 8-729-216-22 TRANSISTOR 2SA1162-G
Q1018 6-553-509-01 TR KTA1542T-RTK/P
Q1019 6-553-083-01 TR PBSS4160T
Q1021 6-552-892-01 TR LSCR523UBFS8TL
Q1022 6-552-892-01 TR LSCR523UBFS8TL
Q1023 6-552-892-01 TR LSCR523UBFS8TL
< RESISTOR >
R1037 1-216-819-11 METAL CHIP 680 5% 1/10W
R1052 1-250-535-11 METAL CHIP 47K 1% 1/16W
* R1053 1-250-507-11 METAL CHIP 3.3K 1% 1/16W
R1062 1-216-833-11 METAL CHIP 10K 5% 1/10W
R1063 1-216-827-11 METAL CHIP 3.3K 5% 1/10W
R1064 1-216-837-11 METAL CHIP 22K 5% 1/10W
R1065 1-216-789-11 METAL CHIP 2.2 5% 1/10W
R1066 1-216-791-11 METAL CHIP 3.3 5% 1/10W
R1067 1-216-789-11 METAL CHIP 2.2 5% 1/10W
R1068 1-216-789-11 METAL CHIP 2.2 5% 1/10W
R1069 1-216-837-11 METAL CHIP 22K 5% 1/10W
R1070 1-216-838-11 METAL CHIP 27K 5% 1/10W
R1072 1-216-821-11 METAL CHIP 1K 5% 1/10W
R1076 1-216-833-11 METAL CHIP 10K 5% 1/10W
R1077 1-216-833-11 METAL CHIP 10K 5% 1/10W
R1078 1-216-833-11 METAL CHIP 10K 5% 1/10W
R1079 1-216-833-11 METAL CHIP 10K 5% 1/10W
R1080 1-216-833-11 METAL CHIP 10K 5% 1/10W
R1081 1-216-833-11 METAL CHIP 10K 5% 1/10W
R1082 1-216-845-11 METAL CHIP 100K 5% 1/10W
R1083 1-216-845-11 METAL CHIP 100K 5% 1/10W
R1084 1-216-841-11 METAL CHIP 47K 5% 1/10W
R1085 1-216-841-11 METAL CHIP 47K 5% 1/10W
R1087 1-216-791-11 METAL CHIP 3.3 5% 1/10W
R1088 1-216-791-11 METAL CHIP 3.3 5% 1/10W
R1091 1-216-827-11 METAL CHIP 3.3K 5% 1/10W
R1092 1-216-827-11 METAL CHIP 3.3K 5% 1/10W
R1106 1-216-842-11 METAL CHIP 56K 5% 1/10W
R1111 1-216-842-11 METAL CHIP 56K 5% 1/10W
R1112 1-216-842-11 METAL CHIP 56K 5% 1/10W
R1126 1-216-845-11 METAL CHIP 100K 5% 1/10W
R1127 1-216-834-11 METAL CHIP 12K 5% 1/10W
R1128 1-216-829-11 METAL CHIP 4.7K 5% 1/10W
R1001 1-208-715-11 METAL CHIP 22K 0.50% 1/16W
R1002 1-218-941-81 METAL CHIP 100 5% 1/16W
R1003 1-218-941-81 METAL CHIP 100 5% 1/16W
R1004 1-218-941-81 METAL CHIP 100 5% 1/16W
R1005 1-218-941-81 METAL CHIP 100 5% 1/16W
R1008 1-218-941-81 METAL CHIP 100 5% 1/16W
R1009 1-208-911-11 METAL CHIP 10K 0.50% 1/16W
R1011 1-216-791-11 METAL CHIP 3.3 5% 1/10W
R1012 1-216-791-11 METAL CHIP 3.3 5% 1/10W
R1017 1-216-791-11 METAL CHIP 3.3 5% 1/10W
R1018 1-216-791-11 METAL CHIP 3.3 5% 1/10W
R1020 1-216-791-11 METAL CHIP 3.3 5% 1/10W
R1021 1-216-791-11 METAL CHIP 3.3 5% 1/10W
R1022 1-216-791-11 METAL CHIP 3.3 5% 1/10W
R1023 1-216-791-11 METAL CHIP 3.3 5% 1/10W
R1024 1-216-791-11 METAL CHIP 3.3 5% 1/10W
R1025 1-216-791-11 METAL CHIP 3.3 5% 1/10W
R1026 1-216-791-11 METAL CHIP 3.3 5% 1/10W
R1027 1-216-791-11 METAL CHIP 3.3 5% 1/10W
* R1028 1-250-684-11 METAL CHIP 680K 1% 1/10W
* R1029 1-250-684-11 METAL CHIP 680K 1% 1/10W
* R1030 1-250-684-11 METAL CHIP 680K 1% 1/10W
R1031 1-216-849-11 METAL CHIP 220K 5% 1/10W
R1032 1-216-842-11 METAL CHIP 56K 5% 1/10W
R1033 1-216-849-11 METAL CHIP 220K 5% 1/10W
R1035 1-216-821-11 METAL CHIP 1K 5% 1/10W
R1036 1-216-845-11 METAL CHIP 100K 5% 1/10W
Note : When the L1010 on the DAMP board is replaced,
spread the bond referring to “BOND FIXATION OF
ELECTRIC PARTS” on servicing notes (page 6).
R1129 1-216-839-11 METAL CHIP 33K 5% 1/10W
R1130 1-216-805-11 METAL CHIP 47 5% 1/10W
R1131 1-216-805-11 METAL CHIP 47 5% 1/10W
R1132 1-216-821-11 METAL CHIP 1K 5% 1/10W
R1133 1-216-841-11 METAL CHIP 47K 5% 1/10W
R1134 1-216-295-91 SHORT CHIP 0
R1135 1-216-295-91 SHORT CHIP 0
R1136 1-216-295-91 SHORT CHIP 0
R1137 1-216-295-91 SHORT CHIP 0
R1138 1-216-836-11 METAL CHIP 18K 5% 1/10W
R1139 1-216-864-11 SHORT CHIP 0
R1141 1-208-911-11 METAL CHIP 10K 0.50% 1/16W
R1145 1-218-855-11 METAL CHIP 2.2K 0.50% 1/10W
R1147 1-216-845-11 METAL CHIP 100K 5% 1/10W
R1148 1-216-824-11 METAL CHIP 1.8K 5% 1/10W
R1149 1-216-829-11 METAL CHIP 4.7K 5% 1/10W
R1150 1-216-825-11 METAL CHIP 2.2K 5% 1/10W
R1151 1-216-825-11 METAL CHIP 2.2K 5% 1/10W
R1152 1-216-832-11 METAL CHIP 8.2K 5% 1/10W
R1153 1-216-824-11 METAL CHIP 1.8K 5% 1/10W
R1154 1-216-824-11 METAL CHIP 1.8K 5% 1/10W
R1155 1-250-634-11 METAL CHIP 5.6K 1% 1/10W
R1156 1-216-825-11 METAL CHIP 2.2K 5% 1/10W
R1157 1-216-825-11 METAL CHIP 2.2K 5% 1/10W
R1158 1-216-829-11 METAL CHIP 4.7K 5% 1/10W
R1159 1-216-829-11 METAL CHIP 4.7K 5% 1/10W
R1160 1-216-864-11 SHORT CHIP 0
82
Page 83
HCD-GT3D
Ver. 1.1
DAMP LCD MIC
Ref. No. Part No. Description Remark Ref. No. Part No. Description Remark
R1161 1-216-864-11 SHORT CHIP 0
R1162 1-216-864-11 SHORT CHIP 0
R1163 1-216-864-11 SHORT CHIP 0
R1164 1-216-829-11 METAL CHIP 4.7K 5% 1/10W
R1165 1-216-832-11 METAL CHIP 8.2K 5% 1/10W
R1166 1-216-827-11 METAL CHIP 3.3K 5% 1/10W
R1167 1-216-827-11 METAL CHIP 3.3K 5% 1/10W
R1168 1-250-630-11 METAL CHIP 3.9K 1% 1/10W
R1169 1-216-827-11 METAL CHIP 3.3K 5% 1/10W
R1170 1-216-198-91 METAL CHIP 1K 5% 1/8W
R1171 1-216-198-91 METAL CHIP 1K 5% 1/8W
R3022 1-216-864-11 SHORT CHIP 0
R3025 1-216-296-11 SHORT CHIP 0
R3026 1-216-821-11 METAL CHIP 1K 5% 1/10W
R3028 1-216-821-11 METAL CHIP 1K 5% 1/10W
R3030 1-216-821-11 METAL CHIP 1K 5% 1/10W
R3033 1-216-809-11 METAL CHIP 100 5% 1/10W
R3034 1-216-864-11 SHORT CHIP 0
R3035 1-216-295-91 SHORT CHIP 0
*************************************************************
MIC BOARD
*********
< RELAY >
RY001 1-755-307-21 RELAY
< TERMINAL >
TB001 1-780-932-11 TERMINAL BOARD
(MID/TWEETERS L/R IMPEDANCE USE 2Ω)
*************************************************************
LCD BOARD
*********
< CAPACITOR >
C3000 1-115-416-11 CERAMIC CHIP 0.001uF 5% 25V
C3001 1-116-734-11 CERAMIC CHIP 1uF 20% 16V
C3002 1-118-347-11 CERAMIC CHIP 0.1uF 10% 25V
C3008 1-118-347-11 CERAMIC CHIP 0.1uF 10% 25V
C3009 1-118-347-11 CERAMIC CHIP 0.1uF 10% 25V
C3010 1-162-919-11 CERAMIC CHIP 22PF 5% 50V
C3011 1-162-919-11 CERAMIC CHIP 22PF 5% 50V
C3012 1-162-919-11 CERAMIC CHIP 22PF 5% 50V
< CONNECTOR >
CN3000 1-779-550-21 CONNECTOR, FFC (LIF (NON-ZIF)) 13P
< DIODE >
D3001 6-503-770-11 DI 1L043RW32E0CIE11 (WHITE)
< CAPACITOR >
C3201 1-124-463-00 ELECT 0.1uF 20% 50V
C3202 1-124-261-00 ELECT 10uF 20% 50V
C3203 1-100-756-91 CERAMIC CHIP 0.047uF 10% 50V
C3204 1-126-382-11 ELECT 100uF 20% 16V
C3206 1-115-872-11 ELECT 2.2uF 20% 50V
* C3207 1-116-720-11 CERAMIC CHIP 10uF 20% 6.3V
C3208 1-118-345-11 CERAMIC CHIP 0.01uF 10% 25V
C3210 1-124-463-00 ELECT 0.1uF 20% 50V
C3211 1-124-463-00 ELECT 0.1uF 20% 50V
C3215 1-162-925-11 CERAMIC CHIP 68PF 5% 50V
C3216 1-118-290-11 CERAMIC CHIP 0.001uF 10% 50V
C3217 1-162-960-11 CERAMIC CHIP 220PF 10% 50V
C3218 1-162-963-11 CERAMIC CHIP 680PF 10% 50V
C3221 1-118-347-11 CERAMIC CHIP 0.1uF 10% 25V
C3222 1-126-176-11 ELECT 220uF 20% 10V
C3223 1-118-347-11 CERAMIC CHIP 0.1uF 10% 25V
C3224 1-118-347-11 CERAMIC CHIP 0.1uF 10% 25V
C3225 1-126-176-11 ELECT 220uF 20% 10V
C3226 1-162-960-11 CERAMIC CHIP 220PF 10% 50V
C3227 1-118-290-11 CERAMIC CHIP 0.001uF 10% 50V
C3229 1-118-290-11 CERAMIC CHIP 0.001uF 10% 50V
C3230 1-115-872-11 ELECT 2.2uF 20% 50V
C3231 1-124-257-00 ELECT 2.2uF 20% 50V
C3232 1-115-872-11 ELECT 2.2uF 20% 50V
C3234 1-118-290-11 CERAMIC CHIP 0.001uF 10% 50V
< IC >
IC3000 6-600-768-01 IC PNA4823M03S0 (
IC3004 6-720-239-01 IC BU9795AKS2
< JUMPER RESISTOR >
JR3000 1-216-296-11 SHORT CHIP 0
< LIQUID CRYSTAL DISPLAY >
ND3000 1-812-078-11 LIQUID CRYSTAL DISPLAY
< TRANSISTOR >
Q3000 6-552-936-01 TR LTC014EUBFS8TL
< RESISTOR >
R3000 1-216-809-11 METAL CHIP 100 5% 1/10W
R3001 1-216-805-11 METAL CHIP 47 5% 1/10W
R3002 1-216-811-11 METAL CHIP 150 5% 1/10W
R3003 1-216-815-11 METAL CHIP 330 5% 1/10W
R3004 1-216-817-11 METAL CHIP 470 5% 1/10W
R3011 1-216-296-11 SHORT CHIP 0
Note : When the RY001 on the DAMP board is replaced,
spread the bond referring to “BOND FIXATION OF
ELECTRIC PARTS” on servicing notes (page 6).
)
C3235 1-118-290-11 CERAMIC CHIP 0.001uF 10% 50V
C3236 1-118-290-11 CERAMIC CHIP 0.001uF 10% 50V
C3237 1-118-290-11 CERAMIC CHIP 0.001uF 10% 50V
< CONNECTOR >
CN3200 1-564-720-11 PIN, CONNECTOR (SMALL TYPE) 4P
CN3203 1-822-423-11 CONNECTOR, USB (A) (REC/PLAY 5V 1A)
< DIODE >
D3200 6-502-970-01 DI DZ2J068M0L
D3201 6-502-961-01 DI DA2J10100L
D3202 6-502-970-01 DI DZ2J068M0L
D3204 6-502-970-01 DI DZ2J068M0L
D3205 6-500-400-01 DIODE BAV99-215
D3206 6-500-400-01 DIODE BAV99-215
D3207 6-500-400-01 DIODE BAV99-215
D3208 6-500-400-01 DIODE BAV99-215
D3209 6-500-400-01 DIODE BAV99-215
< FERRITE BEAD >
FB002 1-469-670-21 FERRITE, EMI (SMD) (2012)
FB003 1-469-670-21 FERRITE, EMI (SMD) (2012)
83
Page 84

HCD-GT3D
Ver. 1.1
MIC MOTHERBOARD
Ref. No. Part No. Description Remark Ref. No. Part No. Description Remark
< IC >
IC3200 8-759-909-71 IC BA4558F
A-2071-988-A MOTHERBOARD BOARD, COMPLETE
(for SERVICE) (RU)
******************************************
< JACK >
J3200 1-822-967-12 JACK (MIC 1)
J3201 1-822-967-12 JACK (MIC 2)
< JUMPER RESISTOR >
JR3200 1-216-296-11 SHORT CHIP 0
JR3201 1-216-864-11 SHORT CHIP 0
JR3202 1-216-864-11 SHORT CHIP 0
JR3203 1-216-864-11 SHORT CHIP 0
JR3204 1-216-864-11 SHORT CHIP 0
JR3205 1-216-296-11 SHORT CHIP 0
JR3206 1-216-296-11 SHORT CHIP 0
JR3207 1-216-296-11 SHORT CHIP 0
JR3208 1-216-296-11 SHORT CHIP 0
< TRANSISTOR >
Q3200 6-552-891-01 TR LSAR523UBFS8TL
Q3201 6-552-967-01 TR RHK005N03T146
< RESISTOR >
R3200 1-216-857-11 METAL CHIP 1M 5% 1/10W
R3201 1-216-857-11 METAL CHIP 1M 5% 1/10W
R3202 1-216-817-11 METAL CHIP 470 5% 1/10W
R3203 1-216-849-11 METAL CHIP 220K 5% 1/10W
R3204 1-216-845-11 METAL CHIP 100K 5% 1/10W
R3205 1-216-809-11 METAL CHIP 100 5% 1/10W
R3206 1-216-827-11 METAL CHIP 3.3K 5% 1/10W
R3207 1-216-833-11 METAL CHIP 10K 5% 1/10W
R3210 1-216-864-11 SHORT CHIP 0
R3211 1-216-845-11 METAL CHIP 100K 5% 1/10W
R3212 1-216-845-11 METAL CHIP 100K 5% 1/10W
R3213 1-216-864-11 SHORT CHIP 0
R3214 1-216-864-11 SHORT CHIP 0
R3215 1-216-833-11 METAL CHIP 10K 5% 1/10W
R3216 1-216-833-11 METAL CHIP 10K 5% 1/10W
R3217 1-216-839-11 METAL CHIP 33K 5% 1/10W
R3218 1-216-839-11 METAL CHIP 33K 5% 1/10W
R3219 1-216-821-11 METAL CHIP 1K 5% 1/10W
R3220 1-216-821-11 METAL CHIP 1K 5% 1/10W
R3221 1-216-821-11 METAL CHIP 1K 5% 1/10W
R3222 1-216-845-11 METAL CHIP 100K 5% 1/10W
R3223 1-216-845-11 METAL CHIP 100K 5% 1/10W
R3229 1-216-864-11 SHORT CHIP 0
R3230 1-216-864-11 SHORT CHIP 0
R3231 1-216-864-11 SHORT CHIP 0
R3234 1-216-864-11 SHORT CHIP 0
*************************************************************
A-2071-965-A MOTHERBOARD BOARD, COMPLETE
(for SERVICE) (AR, LA9)
A-2071-984-A MOTHERBOARD BOARD, COMPLETE
(for SERVICE) (EA, E4)
A-2071-986-A MOTHERBOARD BOARD, COMPLETE
(for SERVICE) (AUS)
A-2071-987-A MOTHERBOARD BOARD, COMPLETE
(for SERVICE) (MY, TH)
< CAPACITOR >
* C003 1-116-714-11 CERAMIC CHIP 22uF 20% 6.3V
* C004 1-116-714-11 CERAMIC CHIP 22uF 20% 6.3V
* C005 1-116-714-11 CERAMIC CHIP 22uF 20% 6.3V
* C006 1-116-714-11 CERAMIC CHIP 22uF 20% 6.3V
C010 1-118-358-11 CERAMIC CHIP 100PF 1% 50V
C011 1-118-347-11 CERAMIC CHIP 0.1uF 10% 25V
C013 1-118-386-11 CERAMIC CHIP 0.1uF 10% 16V
C014 1-118-386-11 CERAMIC CHIP 0.1uF 10% 16V
C017 1-118-386-11 CERAMIC CHIP 0.1uF 10% 16V
C018 1-118-386-11 CERAMIC CHIP 0.1uF 10% 16V
C019 1-116-716-11 CERAMIC CHIP 10uF 10% 16V
C021 1-116-716-11 CERAMIC CHIP 10uF 10% 16V
C024 1-112-797-11 ELECT CHIP 470uF 20% 25V
C030 1-116-716-11 CERAMIC CHIP 10uF 10% 16V
C032 1-116-716-11 CERAMIC CHIP 10uF 10% 16V
C034 1-118-386-11 CERAMIC CHIP 0.1uF 10% 16V
C035 1-116-734-11 CERAMIC CHIP 1uF 20% 16V
C036 1-116-734-11 CERAMIC CHIP 1uF 20% 16V
C039 1-118-386-11 CERAMIC CHIP 0.1uF 10% 16V
C040 1-118-386-11 CERAMIC CHIP 0.1uF 10% 16V
* C049 1-116-714-11 CERAMIC CHIP 22uF 20% 6.3V
* C050 1-116-714-11 CERAMIC CHIP 22uF 20% 6.3V
C051 1-118-361-11 CERAMIC CHIP 0.1uF 10% 50V
* C052 1-116-714-11 CERAMIC CHIP 22uF 20% 6.3V
* C053 1-116-714-11 CERAMIC CHIP 22uF 20% 6.3V
C057 1-117-681-11 ELECT CHIP 100uF 20% 16V
C062 1-118-361-11 CERAMIC CHIP 0.1uF 10% 50V
C064 1-118-347-11 CERAMIC CHIP 0.1uF 10% 25V
* C065 1-118-035-11 CERAMIC CHIP 0.1uF 10% 25V
C066 1-165-492-21 ELECT CHIP 100uF 20% 10V
C067 1-165-492-21 ELECT CHIP 100uF 20% 10V
* C068 1-118-035-11 CERAMIC CHIP 0.1uF 10% 25V
C071 1-116-737-11 CERAMIC CHIP 1uF 20% 10V
C072 1-165-492-21 ELECT CHIP 100uF 20% 10V
C073 1-165-492-21 ELECT CHIP 100uF 20% 10V
C074 1-118-386-11 CERAMIC CHIP 0.1uF 10% 16V
C075 1-118-386-11 CERAMIC CHIP 0.1uF 10% 16V
C076 1-118-373-11 CERAMIC CHIP 0.01uF 10% 50V
C077 1-164-858-11 CERAMIC CHIP 22PF 5% 50V
C078 1-164-858-11 CERAMIC CHIP 22PF 5% 50V
C079 1-118-386-11 CERAMIC CHIP 0.1uF 10% 16V
C080 1-164-858-11 CERAMIC CHIP 22PF 5% 50V
C081 1-164-858-11 CERAMIC CHIP 22PF 5% 50V
C083 1-118-347-11 CERAMIC CHIP 0.1uF 10% 25V
C084 1-117-681-11 ELECT CHIP 100uF 20% 16V
C085 1-118-361-11 CERAMIC CHIP 0.1uF 10% 50V
C087 1-118-347-11 CERAMIC CHIP 0.1uF 10% 25V
C088 1-114-188-11 ELECT CHIP 220uF 20% 16V
C091 1-118-358-11 CERAMIC CHIP 100PF 1% 50V
C092 1-118-347-11 CERAMIC CHIP 0.1uF 10% 25V
* C100 1-116-738-11 CERAMIC CHIP 1uF 10% 6.3V
* C101 1-116-738-11 CERAMIC CHIP 1uF 10% 6.3V
* C102 1-118-035-11 CERAMIC CHIP 0.1uF 10% 25V
C103 1-126-603-11 ELECT CHIP 4.7uF 20% 35V
C104 1-118-386-11 CERAMIC CHIP 0.1uF 10% 16V
84
Page 85

HCD-GT3D
Ver. 1.1
MOTHERBOARD
Ref. No. Part No. Description Remark Ref. No. Part No. Description Remark
C105 1-162-966-91 CERAMIC CHIP 0.0022uF 10% 50V
* C106 1-118-035-11 CERAMIC CHIP 0.1uF 10% 25V
* C107 1-118-035-11 CERAMIC CHIP 0.1uF 10% 25V
C109 1-116-737-11 CERAMIC CHIP 1uF 20% 10V
* C110 1-118-035-11 CERAMIC CHIP 0.1uF 10% 25V
* C280 1-118-035-11 CERAMIC CHIP 0.1uF 10% 25V
* C281 1-118-035-11 CERAMIC CHIP 0.1uF 10% 25V
* C282 1-118-035-11 CERAMIC CHIP 0.1uF 10% 25V
C284 1-118-386-11 CERAMIC CHIP 0.1uF 10% 16V
C295 1-118-391-11 CERAMIC CHIP 0.01uF 10% 50V
* C111 1-118-035-11 CERAMIC CHIP 0.1uF 10% 25V
* C112 1-118-035-11 CERAMIC CHIP 0.1uF 10% 25V
* C113 1-118-035-11 CERAMIC CHIP 0.1uF 10% 25V
* C114 1-118-035-11 CERAMIC CHIP 0.1uF 10% 25V
* C115 1-118-035-11 CERAMIC CHIP 0.1uF 10% 25V
* C116 1-118-035-11 CERAMIC CHIP 0.1uF 10% 25V
C117 1-118-041-11 CERAMIC CHIP 4.7uF 10% 10V
* C118 1-118-035-11 CERAMIC CHIP 0.1uF 10% 25V
* C120 1-118-035-11 CERAMIC CHIP 0.1uF 10% 25V
C121 1-118-391-11 CERAMIC CHIP 0.01uF 10% 50V
* C122 1-118-035-11 CERAMIC CHIP 0.1uF 10% 25V
* C123 1-118-035-11 CERAMIC CHIP 0.1uF 10% 25V
C126 1-164-850-11 CERAMIC CHIP 10PF 0.5PF 50V
C127 1-164-850-11 CERAMIC CHIP 10PF 0.5PF 50V
C128 1-116-717-11 CERAMIC CHIP 10uF 20% 10V
* C129 1-118-035-11 CERAMIC CHIP 0.1uF 10% 25V
C130 1-164-850-11 CERAMIC CHIP 10PF 0.5PF 50V
* C131 1-118-035-11 CERAMIC CHIP 0.1uF 10% 25V
C132 1-164-850-11 CERAMIC CHIP 10PF 0.5PF 50V
* C133 1-118-035-11 CERAMIC CHIP 0.1uF 10% 25V
* C134 1-118-035-11 CERAMIC CHIP 0.1uF 10% 25V
* C135 1-118-035-11 CERAMIC CHIP 0.1uF 10% 25V
* C136 1-118-035-11 CERAMIC CHIP 0.1uF 10% 25V
* C137 1-118-035-11 CERAMIC CHIP 0.1uF 10% 25V
* C138 1-118-035-11 CERAMIC CHIP 0.1uF 10% 25V
C139 1-164-866-11 CERAMIC CHIP 47PF 5% 50V
* C140 1-118-035-11 CERAMIC CHIP 0.1uF 10% 25V
C141 1-164-866-11 CERAMIC CHIP 47PF 5% 50V
C142 1-164-866-11 CERAMIC CHIP 47PF 5% 50V
C143 1-164-866-11 CERAMIC CHIP 47PF 5% 50V
C296 1-118-391-11 CERAMIC CHIP 0.01uF 10% 50V
* C297 1-118-035-11 CERAMIC CHIP 0.1uF 10% 25V
C298 1-116-737-11 CERAMIC CHIP 1uF 20% 10V
C299 1-164-874-11 CERAMIC CHIP 100PF 5% 50V
C302 1-118-386-11 CERAMIC CHIP 0.1uF 10% 16V
C303 1-118-386-11 CERAMIC CHIP 0.1uF 10% 16V
C307 1-118-403-11 CERAMIC CHIP 0.001uF 10% 50V
C308 1-118-403-11 CERAMIC CHIP 0.001uF 10% 50V
C309 1-118-403-11 CERAMIC CHIP 0.001uF 10% 50V
C310 1-118-403-11 CERAMIC CHIP 0.001uF 10% 50V
C311 1-118-386-11 CERAMIC CHIP 0.1uF 10% 16V
* C315 1-118-360-11 CERAMIC CHIP 0.1uF 10% 25V
C316 1-116-717-11
C319 1-116-717-11 CERAMIC CHIP 10uF 20% 10V
C321 1-116-717-11 CERAMIC CHIP 10uF 20% 10V
C322 1-164-850-11 CERAMIC CHIP 10PF 0.5PF 50V
C323 1-164-852-11 CERAMIC CHIP 12PF 5% 50V
C324 1-118-386-11 CERAMIC CHIP 0.1uF 10% 16V
C325 1-118-459-11 CERAMIC CHIP 0.01uF 10% 25V
C326 1-118-459-11 CERAMIC CHIP 0.01uF 10% 25V
C328 1-116-717-11 CERAMIC CHIP 10uF 20% 10V
C330 1-118-386-11 CERAMIC CHIP 0.1uF 10% 16V
C331 1-118-386-11 CERAMIC CHIP 0.1uF 10% 16V
C334 1-118-459-11 CERAMIC CHIP 0.01uF 10% 25V
C336 1-118-459-11 CERAMIC CHIP 0.01uF 10% 25V
C337 1-116-737-11 CERAMIC CHIP 1uF 20% 10V
C338 1-118-386-11 CERAMIC CHIP 0.1uF 10% 16V
C339 1-118-459-11 CERAMIC CHIP 0.01uF 10% 25V
C340 1-116-737-11 CERAMIC CHIP 1uF 20% 10V
C341 1-116-717-11 CERAMIC CHIP 10uF 20% 10V
CERAMIC CHIP 10uF 20% 10V
* C144 1-118-035-11 CERAMIC CHIP 0.1uF 10% 25V
* C146 1-118-035-11 CERAMIC CHIP 0.1uF 10% 25V
* C147 1-118-035-11 CERAMIC CHIP 0.1uF 10% 25V
* C148 1-118-035-11 CERAMIC CHIP 0.1uF 10% 25V
C149 1-165-492-21 ELECT CHIP 100uF 20% 10V
C150 1-165-492-21 ELECT CHIP 100uF 20% 10V
C151 1-164-846-11 CERAMIC CHIP 6PF 0.5PF 50V
C152 1-164-847-11 CERAMIC CHIP 7PF 0.5PF 50V
* C153 1-118-035-11 CERAMIC CHIP 0.1uF 10% 25V
* C154 1-118-035-11 CERAMIC CHIP 0.1uF 10% 25V
* C155 1-118-035-11 CERAMIC CHIP 0.1uF 10% 25V
* C156 1-118-035-11 CERAMIC CHIP 0.1uF 10% 25V
* C157 1-118-035-11 CERAMIC CHIP 0.1uF 10% 25V
* C158 1-118-035-11 CERAMIC CHIP 0.1uF 10% 25V
* C159 1-118-035-11 CERAMIC CHIP 0.1uF 10% 25V
* C160 1-118-035-11 CERAMIC CHIP 0.1uF 10% 25V
C161 1-118-459-11 CERAMIC CHIP 0.01uF 10% 25V
C162 1-118-459-11 CERAMIC CHIP 0.01uF 10% 25V
* C164 1-118-035-11 CERAMIC CHIP 0.1uF 10% 25V
* C165 1-118-035-11 CERAMIC CHIP 0.1uF 10% 25V
* C166 1-118-035-11 CERAMIC CHIP 0.1uF 10% 25V
* C167 1-118-035-11 CERAMIC CHIP 0.1uF 10% 25V
* C168 1-118-035-11 CERAMIC CHIP 0.1uF 10% 25V
C278 1-164-858-11 CERAMIC CHIP 22PF 5% 50V
C279 1-164-858-11 CERAMIC CHIP 22PF 5% 50V
C342 1-118-459-11 CERAMIC CHIP 0.01uF 10% 25V
C343 1-116-737-11 CERAMIC CHIP 1uF 20% 10V
C344 1-118-459-11 CERAMIC CHIP 0.01uF 10% 25V
C345 1-118-386-11 CERAMIC CHIP 0.1uF 10% 16V
C346 1-118-459-11 CERAMIC CHIP 0.01uF 10% 25V
C347 1-118-459-11 CERAMIC CHIP 0.01uF 10% 25V
C348 1-118-459-11 CERAMIC CHIP 0.01uF 10% 25V
C349 1-118-459-11 CERAMIC CHIP 0.01uF 10% 25V
C350 1-128-994-21 ELECT CHIP 47uF 20% 10V
C352 1-118-386-11 CERAMIC CHIP 0.1uF 10% 16V
C353 1-116-737-11 CERAMIC CHIP 1uF 20% 10V
C354 1-118-386-11 CERAMIC CHIP 0.1uF 10% 16V
C355 1-118-459-11 CERAMIC CHIP 0.01uF 10% 25V
C356 1-116-737-11 CERAMIC CHIP 1uF 20% 10V
C357 1-118-386-11 CERAMIC CHIP 0.1uF 10% 16V
C358 1-118-386-11 CERAMIC CHIP 0.1uF 10% 16V
C359 1-118-459-11 CERAMIC CHIP 0.01uF 10% 25V
C360 1-118-386-11 CERAMIC CHIP 0.1uF 10% 16V
C362 1-116-717-11 CERAMIC CHIP 10uF 20% 10V
C363 1-118-386-11 CERAMIC CHIP 0.1uF 10% 16V
C364 1-118-386-11 CERAMIC CHIP 0.1uF 10% 16V
C365 1-118-386-11 CERAMIC CHIP 0.1uF 10% 16V
C366 1-118-459-11 CERAMIC CHIP 0.01uF 10% 25V
C367 1-118-459-11 CERAMIC CHIP 0.01uF 10% 25V
* C369 1-118-360-11 CERAMIC CHIP 0.1uF 10% 25V
85
Page 86

HCD-GT3D
Ver. 1.1
MOTHERBOARD
Ref. No. Part No. Description Remark Ref. No. Part No. Description Remark
C372 1-116-717-11 CERAMIC CHIP 10uF 20% 10V
C373 1-112-692-11 CERAMIC CHIP 1000PF 5% 50V
C401 1-165-492-21 ELECT CHIP 100uF 20% 10V
C402 1-100-904-11 CERAMIC CHIP 330PF 10% 50V
C403 1-114-807-11 CERAMIC CHIP 0.015uF 10% 25V
* C404 1-118-035-11 CERAMIC CHIP 0.1uF 10% 25V
* C405 1-118-035-11 CERAMIC CHIP 0.1uF 10% 25V
* C406 1-118-035-11 CERAMIC CHIP 0.1uF 10% 25V
* C407 1-118-035-11 CERAMIC CHIP 0.1uF 10% 25V
* C408 1-118-035-11 CERAMIC CHIP 0.1uF 10% 25V
C626 1-116-865-11 CERAMIC CHIP 10uF 10% 25V
C627 1-116-865-11 CERAMIC CHIP 10uF 10% 25V
* C628 1-116-727-11 CERAMIC CHIP 2.2uF 10% 16V
C629 1-116-716-11 CERAMIC CHIP 10uF 10% 16V
C630 1-164-874-11 CERAMIC CHIP 100PF 5% 50V
C631 1-118-041-11 CERAMIC CHIP 4.7uF 10% 10V
C632 1-116-707-11 CERAMIC CHIP 47uF 20% 10V
C633 1-164-936-11 CERAMIC CHIP 680PF 10% 50V
C634 1-117-949-81 CERAMIC CHIP 820PF 10% 50V
C635 1-164-866-11 CERAMIC CHIP 47PF 5% 50V
* C409 1-118-035-11 CERAMIC CHIP 0.1uF 10% 25V
C411 1-100-904-11 CERAMIC CHIP 330PF 10% 50V
C412 1-165-492-21 ELECT CHIP 100uF 20% 10V
* C413 1-118-035-11 CERAMIC CHIP 0.1uF 10% 25V
* C418 1-118-035-11 CERAMIC CHIP 0.1uF 10% 25V
* C419 1-118-035-11 CERAMIC CHIP 0.1uF 10% 25V
C420 1-128-403-11 ELECT CHIP 47uF 20% 35V
C421 1-118-391-11 CERAMIC CHIP 0.01uF 10% 50V
C423 1-128-403-11 ELECT CHIP 47uF 20% 35V
C424 1-118-391-11 CERAMIC CHIP 0.01uF 10% 50V
C462 1-124-779-00 ELECT CHIP 10uF 20% 16V
C463 1-118-347-11 CERAMIC CHIP 0.1uF 10% 25V
C464 1-118-347-11 CERAMIC CHIP 0.1uF 10% 25V
C465 1-118-347-11 CERAMIC CHIP 0.1uF 10% 25V
C466 1-118-347-11 CERAMIC CHIP 0.1uF 10% 25V
C467 1-118-347-11 CERAMIC CHIP 0.1uF 10% 25V
C468 1-118-347-11 CERAMIC CHIP 0.1uF 10% 25V
C511 1-118-347-11 CERAMIC CHIP 0.1uF 10% 25V
C526 1-118-459-11 CERAMIC CHIP 0.01uF 10% 25V
C527 1-118-459-11 CERAMIC CHIP 0.01uF 10% 25V
C528 1-118-459-11 CERAMIC CHIP 0.01uF 10% 25V
C530 1-118-459-11 CERAMIC CHIP 0.01uF 10% 25V
C532 1-137-765-21 ELECT CHIP 47uF 20% 16V
C541 1-118-459-11 CERAMIC CHIP 0.01uF 10% 25V
* C573 1-118-035-11 CERAMIC CHIP 0.1uF 10% 25V
* C574 1-118-035-11 CERAMIC CHIP 0.1uF 10% 25V
C577 1-100-588-21 ELECT CHIP 1000uF 20% 6.3V
C601 1-118-041-11 CERAMIC CHIP 4.7uF 10% 10V
C602 1-118-041-11 CERAMIC CHIP 4.7uF 10% 10V
C603 1-164-936-11 CERAMIC CHIP 680PF 10% 50V
C637 1-118-041-11 CERAMIC CHIP 4.7uF 10% 10V
C638 1-118-041-11 CERAMIC CHIP 4.7uF 10% 10V
C640 1-118-041-11 CERAMIC CHIP 4.7uF 10% 10V
C641 1-164-850-11 CERAMIC CHIP 10PF 0.5PF 50V
C642 1-164-850-11 CERAMIC CHIP 10PF 0.5PF 50V
C643 1-164-850-11 CERAMIC CHIP 10PF 0.5PF 50V
C644 1-164-850-11 CERAMIC CHIP 10PF 0.5PF 50V
C645 1-124-779-00 ELECT CHIP 10uF 20% 16V
C646 1-118-386-11 CERAMIC CHIP 0.1uF 10% 16V
C647 1-118-041-11 CERAMIC CHIP 4.7uF 10% 10V
C648 1-118-041-11 CERAMIC CHIP 4.7uF 10% 10V
C649 1-112-692-11 CERAMIC CHIP 1000PF 5% 50V
C650 1-118-041-11 CERAMIC CHIP 4.7uF 10% 10V
* C651 1-118-035-11 CERAMIC CHIP 0.1uF 10% 25V
C652 1-118-041-11 CERAMIC CHIP 4.7uF 10% 10V
C653 1-118-386-11 CERAMIC CHIP 0.1uF 10% 16V
C655 1-116-717-11 CERAMIC CHIP 10uF 20% 10V
C656 1-116-744-11 CERAMIC CHIP 0.22uF 10% 10V
C657 1-118-041-11 CERAMIC CHIP 4.7uF 10% 10V
C658 1-118-041-11 CERAMIC CHIP 4.7uF 10% 10V
* C660 1-116-727-11 CERAMIC CHIP 2.2uF 10% 16V
C661 1-118-041-11 CERAMIC CHIP 4.7uF 10% 10V
C662 1-118-041-11 CERAMIC CHIP 4.7uF 10% 10V
C664 1-116-744-11 CERAMIC CHIP 0.22uF 10% 10V
* C665 1-116-727-11 CERAMIC CHIP 2.2uF 10% 16V
C666 1-118-041-11 CERAMIC CHIP 4.7uF 10% 10V
C667 1-118-041-11 CERAMIC CHIP 4.7uF 10% 10V
C669 1-118-403-11 CERAMIC CHIP 0.001uF 10% 50V
C670 1-118-403-11 CERAMIC CHIP 0.001uF 10% 50V
C672 1-124-779-00 ELECT CHIP 10uF 20% 16V
C604 1-164-866-11 CERAMIC CHIP 47PF 5% 50V
C605 1-165-708-11 ELECT CHIP 47uF 20% 6.3V
* C606 1-118-035-11 CERAMIC CHIP 0.1uF 10% 25V
* C607 1-118-035-11 CERAMIC CHIP 0.1uF 10% 25V
C608 1-117-949-81 CERAMIC CHIP 820PF 10% 50V
C609 1-124-779-00 ELECT CHIP 10uF 20% 16V
C610 1-118-041-11 CERAMIC CHIP 4.7uF 10% 10V
C612 1-118-041-11 CERAMIC CHIP 4.7uF 10% 10V
* C613 1-118-035-11 CERAMIC CHIP 0.1uF 10% 25V
C614 1-165-708-11 ELECT CHIP 47uF 20% 6.3V
* C615 1-118-035-11 CERAMIC CHIP 0.1uF 10% 25V
* C616 1-118-035-11 CERAMIC CHIP 0.1uF 10% 25V
C617 1-118-386-11 CERAMIC CHIP 0.1uF 10% 16V
C618 1-124-779-00 ELECT CHIP 10uF 20% 16V
C619 1-116-707-11 CERAMIC CHIP 47uF 20% 10V
C620 1-116-707-11 CERAMIC CHIP 47uF 20% 10V
C621 1-116-707-11 CERAMIC CHIP 47uF 20% 10V
C622 1-124-779-00 ELECT CHIP 10uF 20% 16V
C624 1-164-874-11 CERAMIC CHIP 100PF 5% 50V
C625 1-118-041-11 CERAMIC CHIP 4.7uF 10% 10V
86
C673 1-118-386-11 CERAMIC CHIP 0.1uF 10% 16V
C674 1-118-386-11 CERAMIC CHIP 0.1uF 10% 16V
C678 1-118-386-11 CERAMIC CHIP 0.1uF 10% 16V
C679 1-116-717-11 CERAMIC CHIP 10uF 20% 10V
C689 1-164-676-11 CERAMIC CHIP 2200PF 5% 16V
C690 1-124-779-00 ELECT CHIP 10uF 20% 16V
C691 1-124-779-00 ELECT CHIP 10uF 20% 16V
C692 1-164-676-11 CERAMIC CHIP 2200PF 5% 16V
C695 1-118-386-11 CERAMIC CHIP 0.1uF 10% 16V
C696 1-124-779-00 ELECT CHIP 10uF 20% 16V
C699 1-118-386-11 CERAMIC CHIP 0.1uF 10% 16V
C704 1-124-779-00 ELECT CHIP 10uF 20% 16V
C726 1-128-392-11 ELECT CHIP 470uF 20% 6.3V
C742 1-124-779-00 ELECT CHIP 10uF 20% 16V
C744 1-118-386-11 CERAMIC CHIP 0.1uF 10% 16V
C748 1-124-779-00 ELECT CHIP 10uF 20% 16V
C749 1-124-779-00 ELECT CHIP 10uF 20% 16V
C766 1-118-041-11 CERAMIC CHIP 4.7uF 10% 10V
C767 1-118-041-11 CERAMIC CHIP 4.7uF 10% 10V
C904 1-118-386-11 CERAMIC CHIP 0.1uF 10% 16V
Page 87
HCD-GT3D
Ver. 1.2
MOTHERBOARD
Ref. No. Part No. Description Remark Ref. No. Part No. Description Remark
C905 1-165-492-21 ELECT CHIP 100uF 20% 10V
C906 1-165-908-11 CERAMIC CHIP 1uF 10% 10V
C917 1-116-716-11 CERAMIC CHIP 10uF 10% 16V
C922 1-118-386-11 CERAMIC CHIP 0.1uF 10% 16V
C928 1-110-530-11 ELECT CHIP 1000uF 20% 6.3V
C930 1-164-870-11 CERAMIC CHIP 68PF 5% 50V
C931 1-164-866-11 CERAMIC CHIP 47PF 5% 50V
C932 1-118-388-11 CERAMIC CHIP 0.047uF 10% 25V
C933 1-164-850-11 CERAMIC CHIP 10PF 0.5PF 50V
C934 1-118-399-11 CERAMIC CHIP 0.0022uF 10% 50V
< DIODE >
D102 6-502-961-01 DI DA2J10100L
D401 8-719-069-29 DIODE RB520S-30FJTE61
D402 8-719-069-29 DIODE RB520S-30FJTE61
D571 6-502-961-01 DI DA2J10100L
D572 6-502-961-01 DI DA2J10100L
D600 6-500-400-01 DIODE BAV99-215
< FERRITE BEAD >
C935 1-164-840-11 CERAMIC CHIP 1PF 0.25PF 50V
C936 1-118-399-11 CERAMIC CHIP 0.0022uF 10% 50V
C937 1-164-840-11 CERAMIC CHIP 1PF 0.25PF 50V
* C938 1-116-720-11 CERAMIC CHIP 10uF 20% 6.3V
* C941 1-116-738-11 CERAMIC CHIP 1uF 10% 6.3V
* C943 1-116-738-11 CERAMIC CHIP 1uF 10% 6.3V
C944 1-116-734-11 CERAMIC CHIP 1uF 20% 16V
C945 1-164-866-11 CERAMIC CHIP 47PF 5% 50V
C950 1-165-989-91 CERAMIC CHIP 10uF 10% 6.3V
C951 1-164-850-11 CERAMIC CHIP 10PF 0.5PF 50V
C952 1-164-852-11 CERAMIC CHIP 12PF 5% 50V
C953 1-162-968-91 CERAMIC CHIP 0.0047uF 10% 50V
C954 1-110-563-11 CERAMIC CHIP 0.068uF 10% 16V
C956 1-164-874-11 CERAMIC CHIP 100PF 5% 50V
C957 1-164-874-11 CERAMIC CHIP 100PF 5% 50V
C958 1-118-373-11 CERAMIC CHIP 0.01uF 10% 50V
C960 1-118-386-11 CERAMIC CHIP 0.1uF 10% 16V
C966 1-116-744-11 CERAMIC CHIP 0.22uF 10% 10V
C977 1-118-386-11 CERAMIC CHIP 0.1uF 10% 16V
C980 1-164-933-11 CERAMIC CHIP 220PF 10% 50V
C982 1-118-047-11 CERAMIC CHIP 10uF 10% 16V
C983 1-118-047-11 CERAMIC CHIP 10uF 10% 16V
C984 1-118-047-11 CERAMIC CHIP 10uF 10% 16V
C986 1-124-779-00 ELECT CHIP 10uF 20% 16V
C989 1-118-386-11 CERAMIC CHIP 0.1uF 10% 16V
C993 1-118-386-11 CERAMIC CHIP 0.1uF 10% 16V
C994 1-118-386-11 CERAMIC CHIP 0.1uF 10% 16V
C995 1-118-386-11 CERAMIC CHIP 0.1uF 10% 16V
C996 1-116-732-11 CERAMIC CHIP 2.2uF 20% 6.3V
C997 1-116-732-11 CERAMIC CHIP 2.2uF 20% 6.3V
C998 1-118-386-11 CERAMIC CHIP 0.1uF 10% 16V
C1000 1-124-779-00 ELECT CHIP 10uF 20% 16V
C1001 1-118-403-11 CERAMIC CHIP 0.001uF 10% 50V
C1002 1-118-386-11 CERAMIC CHIP 0.1uF 10% 16V
C1003 1-118-403-11 CERAMIC CHIP 0.001uF 10% 50V
< CONNECTOR >
CN001 1-816-296-21 PIN, CONNECTOR (PC BOARD) 9P
CN101 1-844-158-11 PIN, CONNECTOR 5P
(FOR SERVICE USE)
CN102 1-844-280-11 FFC ST CONNECTOR (NON-ZIF) 10P
CN118 1-820-123-51 CONNECTOR, FFC/FPC 25P
CN119 1-820-117-51 CONNECTOR, FFC/FPC 19P
CN302 1-844-191-11 FFC ST CONNECTOR (NON-ZIF) 24P
CN303 1-794-362-51 CONNECTOR, FFC/FPC 5P
CN401 1-770-470-21 PIN, CONNECTOR (PC BOARD) 6P
CN517 1-573-290-21 PIN, CONNECTOR (1.5MM) (SMD) 4P
CN601 1-843-888-11 PIN, CONNECTOR (PC BOARD) 4P
CN602 1-794-509-11 PIN, CONNECTOR (PC BOARD) (3P)
CN2002 1-770-160-21 PIN, CONNECTOR (PC BOARD) 2P
(ANTENNA FM)
Note : IC001, IC002, IC101, IC105, IC106, IC301, IC302 and IC303 on the MOTHERBOARD
board cannot exchange with single. When these parts on the MOTHERBOARD board
are damaged, exchange the entire mounted board.
FB101 1-481-515-11 BEAD, FERRITE (1608)
FB115 1-400-851-11 EMI, FERRITE (SMD) (1005)
FB116 1-400-851-11 EMI, FERRITE (SMD) (1005)
FB117 1-400-851-11 EMI, FERRITE (SMD) (1005)
FB320 1-481-348-21 EMI FERRITE (SMD) (1608)
FB321 1-481-348-21 EMI FERRITE (SMD) (1608)
FB455 1-481-348-21 EMI FERRITE (SMD) (1608)
< FILTER >
FL301 1-234-494-21 FILTER, EMI REMOVAL (SMD)
FL601 1-234-494-21 FILTER, EMI REMOVAL (SMD)
< IC >
IC001 (Not supplied) IC TPS542941PWPR
IC002 (Not supplied) IC TPS542941PWPR
IC004 6-721-872-01 IC 78D09AG-TN3-R
IC006 6-721-766-01 IC 78D05AG-TN3-R
IC008 6-719-198-01 IC MM3411A33URE
IC101 (Not supplied) IC R7S7200032CFP-A
IC102 6-707-866-01 IC TC74VHC126FT (EK)
IC103 6-719-856-01 IC BU4229F-TR
IC105 (Not supplied) IC MFI337S3959
IC106 (Not supplied) IC MX25L3235EM2I-10G
IC301 (Not supplied) IC CXD9990R
IC302 (Not supplied) IC MX25L3235EM2I-10G
IC303 (Not supplied) IC BD00IC0WHFV-GTR
IC304 6-714-351-01 IC R1EX24016ASAS0A
IC305 6-717-694-01 IC BU33TD3WG-TR
IC306 6-720-801-01 IC EM638165TSD-6G
IC401 6-720-195-01 IC AM5890S
IC452 6-721-822-01 IC NJM2903CV (TE1)
IC453 6-721-811-01 IC TC7USB40FT
IC502 6-719-142-01 IC TC62D723FNG
IC601 8-759-909-71 IC BA4558F
IC602 8-759-596-39 IC SN74LV4052APWR
IC603 8-759-909-71 IC BA4558F
IC604 6-705-973-01 IC PCM1754DBQR
IC605 8-759-596-39 IC SN74LV4052APWR
IC606 6-710-554-01 IC PCM1808PWR
IC609 6-710-554-01 IC PCM1808PWR
IC615 6-705-973-01 IC PCM1754DBQR
IC901 6-720-187-01 IC NJM41031F1 (TE2)
IC902 6-720-234-01 IC RN5B801-0002
IC903 6-719-198-01 IC MM3411A33URE
IC904 6-716-745-01 IC PCM9211PTR
IC912 6-707-870-01 IC TC74VHC157FT (EK)
IC913 8-759-680-48 IC TC7WH157FK
IC914 6-721-848-01 IC PCM5101
87
Page 88

HCD-GT3D
Ver. 1.1
MOTHERBOARD
Ref. No. Part No. Description Remark Ref. No. Part No. Description Remark
< JACK >
< RESISTOR >
J602 1-844-218-11 JACK, PIN 4P
(AUDIO PARTY CHAIN IN L/R / OUT L/R)
J907 1-794-970-11 JACK, PIN 1P (VIDEO OUT)
< JUMPER >
JC001 1-216-295-91 SHORT CHIP 0
JC002 1-216-295-91 SHORT CHIP 0
JC003 1-216-295-91 SHORT CHIP 0
JC004 1-216-295-91 SHORT CHIP 0
JC005 1-216-295-91 SHORT CHIP 0
JC006 1-216-295-91 SHORT CHIP 0
JC007 1-216-295-91 SHORT CHIP 0
JC008 1-216-295-91 SHORT CHIP 0
< COIL >
L001 1-460-359-11 INDUCTOR 4.7uH
L002 1-460-358-11 INDUCTOR 2.2uH
L003 1-400-789-21 INDUCTOR 2.2uH
L004 1-400-789-21 INDUCTOR 2.2uH
L006 1-457-439-11 INDUCTOR 4.7uH
L007 1-460-358-11 INDUCTOR 2.2uH
L008 1-400-789-21 INDUCTOR 2.2uH
L301 1-400-793-21 INDUCTOR 47uH
L602 1-414-851-21 INDUCTOR 47nH
L603 1-469-187-21 INDUCTOR 68nH
L604 1-469-187-21 INDUCTOR 68nH
L605 1-414-832-11 INDUCTOR 2.2nH
< TRANSISTOR >
Q004 6-553-509-01 TR KTA1542T-RTK/P
Q005 6-553-509-01 TR KTA1542T-RTK/P
Q006 8-729-054-16 TRANSISTOR KRC402-RTK
Q007 6-553-509-01 TR KTA1542T-RTK/P
Q008 6-553-509-01 TR KTA1542T-RTK/P
Q009 8-729-054-16 TRANSISTOR KRC402-RTK
Q011 6-553-509-01 TR KTA1542T-RTK/P
Q012 8-729-054-16 TRANSISTOR KRC402-RTK
Q103 6-553-509-01 TR KTA1542T-RTK/P
Q104 8-729-054-16 TRANSISTOR KRC402-RTK
Q107 8-729-054-16 TRANSISTOR KRC402-RTK
Q401 6-551-120-01 TRANSISTOR 2SA2119K
Q402 6-551-120-01 TRANSISTOR 2SA2119K
Q457 6-550-987-01 TR RN1911
Q459 6-553-509-01 TR KTA1542T-RTK/P
Q461 8-729-054-16 TRANSISTOR KRC402-RTK
Q571 8-729-054-16 TRANSISTOR KRC402-RTK
Q572 6-553-509-01 TR KTA1542T-RTK/P
Q574 6-552-967-01 TR RHK005N03T146
Q575 6-552-922-01 TR LTA014EUBFS8TL
Q576 8-729-054-16 TRANSISTOR KRC402-RTK
* Q602 6-551-959-01 TR IMX25T110
Q603 6-551-039-01 TRANSISTOR RN4902 (T5RSONY, D, F)
Q604 6-550-978-01 TR RN1902
Q605 8-729-427-72 TRANSISTOR XP4501
Q606 6-552-922-01 TR LTA014EUBFS8TL
Q607 6-551-039-01 TRANSISTOR RN4902 (T5RSONY, D, F)
Q611 6-550-978-01 TR RN1902
R002 1-208-709-11 METAL CHIP 12K 0.50% 1/16W
R003 1-208-923-11 METAL CHIP 33K 0.50% 1/16W
R006 1-208-911-11 METAL CHIP 10K 0.50% 1/16W
R020 1-216-864-11 SHORT CHIP 0
R023 1-218-974-11 METAL CHIP 56K 5% 1/16W
R024 1-208-895-81 METAL CHIP 2.2K 0.50% 1/16W
R028 1-218-965-11 METAL CHIP 10K 5% 1/16W
R029 1-216-843-11 METAL CHIP 68K 5% 1/10W
R030 1-218-843-11 METAL CHIP 680 0.50% 1/10W
R031 1-208-911-11 METAL CHIP 10K 0.50% 1/16W
R033 1-216-827-11 METAL CHIP 3.3K 5% 1/10W
R034 1-216-813-11 METAL CHIP 220 5% 1/10W
R035 1-216-827-11 METAL CHIP 3.3K 5% 1/10W
R036 1-216-864-11 SHORT CHIP 0
R037 1-218-965-11 METAL CHIP 10K 5% 1/16W
R039 1-218-965-11 METAL CHIP 10K 5% 1/16W
R040 1-216-817-11 METAL CHIP 470 5% 1/10W
R041 1-208-709-11 METAL CHIP 12K 0.50% 1/16W
R043 1-208-715-11 METAL CHIP 22K 0.50% 1/16W
R048 1-216-864-11 SHORT CHIP 0
R051 1-216-295-91 SHORT CHIP 0
R052 1-216-295-91 SHORT CHIP 0
R053 1-216-864-11 SHORT CHIP 0
R054 1-216-864-11 SHORT CHIP 0
R059 1-208-931-11 METAL CHIP 68K 0.50% 1/16W
R061 1-218-965-11 METAL CHIP 10K 5% 1/16W
R062 1-216-813-11 METAL CHIP 220 5% 1/10W
R063 1-216-864-11 SHORT CHIP 0
R064 1-216-843-11 METAL CHIP 68K 5% 1/10W
R065 1-216-827-11 METAL CHIP 3.3K 5% 1/10W
R066 1-216-827-11 METAL CHIP 3.3K 5% 1/10W
R080 1-216-864-11 SHORT CHIP 0
R085 1-257-604-11 RES-CHIP 47 5% 2W
R086 1-216-295-91 SHORT CHIP 0
R087 1-216-295-91 SHORT CHIP 0
R099 1-216-864-11 SHORT CHIP 0
R100 1-218-937-11 METAL CHIP 47 5% 1/16W
R102 1-218-941-81 METAL CHIP 100 5% 1/16W
R103 1-218-965-11 METAL CHIP 10K 5% 1/16W
R104 1-218-961-11 METAL CHIP 4.7K 5% 1/16W
R105 1-218-941-81 METAL CHIP 100 5% 1/16W
R106 1-218-965-11 METAL CHIP 10K 5% 1/16W
R107 1-218-965-11 METAL CHIP 10K 5% 1/16W
R108 1-218-965-11 METAL CHIP 10K 5% 1/16W
R109 1-218-957-11 METAL CHIP 2.2K 5% 1/16W
R110 1-218-977-11 METAL CHIP 100K 5% 1/16W
R111 1-218-977-11 METAL CHIP 100K 5% 1/16W
R112 1-218-977-11 METAL CHIP 100K 5% 1/16W
R113 1-216-864-11 SHORT CHIP 0
R114 1-216-864-11 SHORT CHIP 0
R115 1-218-953-11 METAL CHIP 1K 5% 1/16W
R116 1-218-973-11 METAL CHIP 47K 5% 1/16W
R117 1-218-963-11 METAL CHIP 6.8K 5% 1/16W
R119 1-218-965-11 METAL CHIP 10K 5% 1/16W
R120 1-218-973-11 METAL CHIP 47K 5% 1/16W
R122 1-218-990-81 SHORT CHIP 0
R123 1-218-965-11 METAL CHIP 10K 5% 1/16W
R125 1-218-973-11 METAL CHIP 47K 5% 1/16W
R126 1-218-990-81 SHORT CHIP 0
88
Page 89

HCD-GT3D
Ver. 1.1
MOTHERBOARD
Ref. No. Part No. Description Remark Ref. No. Part No. Description Remark
R127 1-218-965-11 METAL CHIP 10K 5% 1/16W
R201 1-218-941-81 METAL CHIP 100 5% 1/16W
R128 1-218-953-11 METAL CHIP 1K 5% 1/16W
R129 1-218-941-81 METAL CHIP 100 5% 1/16W
R131 1-218-941-81 METAL CHIP 100 5% 1/16W
R132 1-218-937-11 METAL CHIP 47 5% 1/16W
R133 1-218-937-11 METAL CHIP 47 5% 1/16W
R134 1-218-937-11 METAL CHIP 47 5% 1/16W
R135 1-218-937-11 METAL CHIP 47 5% 1/16W
R137 1-218-969-11 METAL CHIP 22K 5% 1/16W
R139 1-218-969-11 METAL CHIP 22K 5% 1/16W
R140 1-218-969-11 METAL CHIP 22K 5% 1/16W
R142 1-216-295-91 SHORT CHIP 0
R143 1-218-969-11 METAL CHIP 22K 5% 1/16W
R144 1-218-967-11 METAL CHIP 15K 5% 1/16W
R145 1-218-967-11 METAL CHIP 15K 5% 1/16W
R146 1-218-965-11 METAL CHIP 10K 5% 1/16W
R149 1-218-965-11 METAL CHIP 10K 5% 1/16W
R150 1-218-941-81 METAL CHIP 100 5% 1/16W
R153 1-218-941-81 METAL CHIP 100 5% 1/16W
R154 1-218-941-81 METAL CHIP 100 5% 1/16W
R155 1-218-941-81 METAL CHIP 100 5% 1/16W
R156 1-218-941-81 METAL CHIP 100 5% 1/16W
R157 1-218-953-11 METAL CHIP 1K 5% 1/16W
R158 1-218-949-11 METAL CHIP 470 5% 1/16W
R159 1-218-949-11 METAL CHIP 470 5% 1/16W
R160 1-218-961-11 METAL CHIP 4.7K 5% 1/16W
R161 1-218-965-11 METAL CHIP 10K 5% 1/16W
R163 1-218-990-81 SHORT CHIP 0
R164 1-218-941-81 METAL CHIP 100 5% 1/16W
R166 1-218-941-81 METAL CHIP 100 5% 1/16W
R167 1-218-961-11 METAL CHIP 4.7K 5% 1/16W
R202 1-218-965-11 METAL CHIP 10K 5% 1/16W
R203 1-218-941-81 METAL CHIP 100 5% 1/16W
R204 1-218-965-11 METAL CHIP 10K 5% 1/16W
R206 1-218-965-11 METAL CHIP 10K 5% 1/16W
R210 1-218-937-11 METAL CHIP 47 5% 1/16W
R211 1-218-941-81 METAL CHIP 100 5% 1/16W
R212 1-218-937-11 METAL CHIP 47 5% 1/16W
R213 1-218-941-81 METAL CHIP 100 5% 1/16W
R214 1-218-937-11 METAL CHIP 47 5% 1/16W
R215 1-218-941-81 METAL CHIP 100 5% 1/16W
R216 1-218-965-11 METAL CHIP 10K 5% 1/16W
R217 1-218-937-11 METAL CHIP 47 5% 1/16W
R218 1-218-941-81 METAL CHIP 100 5% 1/16W
R219 1-218-941-81 METAL CHIP 100 5% 1/16W
R220 1-218-937-11 METAL CHIP 47 5% 1/16W
R221 1-218-941-81 METAL CHIP 100 5% 1/16W
R222 1-218-965-11 METAL CHIP 10K 5% 1/16W
R223 1-218-941-81 METAL CHIP 100 5% 1/16W
R224 1-218-990-81 SHORT CHIP 0
R225 1-218-941-81 METAL CHIP 100 5% 1/16W
R226 1-218-941-81 METAL CHIP 100 5% 1/16W
R227 1-218-941-81 METAL CHIP 100 5% 1/16W
R228 1-218-941-81 METAL CHIP 100 5% 1/16W
R229 1-218-941-81 METAL CHIP 100 5% 1/16W
R230 1-218-941-81 METAL CHIP 100 5% 1/16W
R232 1-218-937-11 METAL CHIP 47 5% 1/16W
R233 1-218-941-81 METAL CHIP 100 5% 1/16W
R234 1-218-941-81 METAL CHIP 100 5% 1/16W
R236 1-218-941-81 METAL CHIP 100 5% 1/16W
R237 1-218-941-81 METAL CHIP 100 5% 1/16W
R168 1-218-941-81 METAL CHIP 100 5% 1/16W
R169 1-218-937-11 METAL CHIP 47 5% 1/16W
R170 1-218-937-11 METAL CHIP 47 5% 1/16W
R171 1-218-941-81 METAL CHIP 100 5% 1/16W
R172 1-218-941-81 METAL CHIP 100 5% 1/16W
R173 1-218-941-81 METAL CHIP 100 5% 1/16W
R174 1-218-941-81 METAL CHIP 100 5% 1/16W
R175 1-218-965-11 METAL CHIP 10K 5% 1/16W
R176 1-218-941-81 METAL CHIP 100 5% 1/16W
R177 1-218-941-81 METAL CHIP 100 5% 1/16W
R178 1-218-941-81 METAL CHIP 100 5% 1/16W
R179 1-218-941-81 METAL CHIP 100 5% 1/16W
R180 1-218-941-81 METAL CHIP 100 5% 1/16W
R181 1-218-941-81 METAL CHIP 100 5% 1/16W
R183 1-218-965-11 METAL CHIP 10K 5% 1/16W
R185 1-218-990-81 SHORT CHIP 0
R186 1-218-990-81 SHORT CHIP 0
R188 1-218-989-11 METAL CHIP 1M 5% 1/16W
R189 1-218-941-81 METAL CHIP 100 5% 1/16W
R190 1-218-977-11 METAL CHIP 100K 5% 1/16W
R191 1-218-941-81 METAL CHIP 100 5% 1/16W
R192 1-218-961-11 METAL CHIP 4.7K 5% 1/16W
R193 1-218-941-81 METAL CHIP 100 5% 1/16W
R194 1-218-965-11 METAL CHIP 10K 5% 1/16W
R195 1-218-961-11 METAL CHIP 4.7K 5% 1/16W
R196 1-250-567-11 METAL CHIP 1M 1% 1/16W
R197 1-218-941-81 METAL CHIP 100 5% 1/16W
R198 1-218-990-81 SHORT CHIP 0
R200 1-218-990-81 SHORT CHIP 0
R238 1-218-941-81 METAL CHIP 100 5% 1/16W
R241 1-218-941-81 METAL CHIP 100 5% 1/16W
R242 1-218-941-81 METAL CHIP 100 5% 1/16W
R243 1-218-941-81 METAL CHIP 100 5% 1/16W
R244 1-218-961-11 METAL CHIP 4.7K 5% 1/16W
R245 1-218-941-81 METAL CHIP 100 5% 1/16W
R246 1-218-961-11 METAL CHIP 4.7K 5% 1/16W
R247 1-218-941-81 METAL CHIP 100 5% 1/16W
R248 1-218-941-81 METAL CHIP 100 5% 1/16W
R250 1-218-961-11 METAL CHIP 4.7K 5% 1/16W
R251 1-218-941-81 METAL CHIP 100 5% 1/16W
R252 1-218-941-81 METAL CHIP 100 5% 1/16W
R253 1-218-961-11 METAL CHIP 4.7K 5% 1/16W
R254 1-218-941-81 METAL CHIP 100 5% 1/16W
R255 1-218-941-81 METAL CHIP 100 5% 1/16W
R256 1-218-965-11 METAL CHIP 10K 5% 1/16W
R257 1-218-941-81 METAL CHIP 100 5% 1/16W
R259 1-218-965-11 METAL CHIP 10K 5% 1/16W
R260 1-216-864-11 SHORT CHIP 0
R261 1-218-990-81 SHORT CHIP 0
R263 1-218-965-11 METAL CHIP 10K 5% 1/16W
R264 1-216-864-11 SHORT CHIP 0
R265 1-250-471-11 METAL CHIP 100 1% 1/16W
R267 1-218-965-11 METAL CHIP 10K 5% 1/16W
R268 1-218-965-11 METAL CHIP 10K 5% 1/16W
R269 1-218-989-11 METAL CHIP 1M 5% 1/16W
R270 1-218-941-81 METAL CHIP 100 5% 1/16W
R271 1-218-941-81 METAL CHIP 100 5% 1/16W
R272 1-218-941-81 METAL CHIP 100 5% 1/16W
89
Page 90

HCD-GT3D
Ver. 1.1
MOTHERBOARD
Ref. No. Part No. Description Remark Ref. No. Part No. Description Remark
R273 1-218-941-81 METAL CHIP 100 5% 1/16W
R354 1-218-990-81 SHORT CHIP 0
R274 1-218-941-81 METAL CHIP 100 5% 1/16W
R275 1-218-949-11 METAL CHIP 470 5% 1/16W
R276 1-218-941-81 METAL CHIP 100 5% 1/16W
R278 1-218-941-81 METAL CHIP 100 5% 1/16W
R279 1-218-941-81 METAL CHIP 100 5% 1/16W
R280 1-218-941-81 METAL CHIP 100 5% 1/16W
R282 1-218-965-11 METAL CHIP 10K 5% 1/16W
R283 1-218-965-11 METAL CHIP 10K 5% 1/16W
R284 1-218-965-11 METAL CHIP 10K 5% 1/16W
R285 1-208-905-11 METAL CHIP 5.6K 0.50% 1/16W
R286 1-218-977-11 METAL CHIP 100K 5% 1/16W
R287 1-218-977-11 METAL CHIP 100K 5% 1/16W
R288 1-218-937-11 METAL CHIP 47 5% 1/16W
R289 1-218-937-11 METAL CHIP 47 5% 1/16W
R290 1-218-937-11 METAL CHIP 47 5% 1/16W
R291 1-218-937-11 METAL CHIP 47 5% 1/16W
R292 1-218-937-11 METAL CHIP 47 5% 1/16W
R293 1-218-937-11 METAL CHIP 47 5% 1/16W
R294 1-218-977-11 METAL CHIP 100K 5% 1/16W
R295 1-218-941-81 METAL CHIP 100 5% 1/16W
R297 1-218-941-81 METAL CHIP 100 5% 1/16W
R298 1-218-965-11 METAL CHIP 10K 5% 1/16W
R299 1-218-965-11 METAL CHIP 10K 5% 1/16W
R300 1-218-965-11 METAL CHIP 10K 5% 1/16W
R301 1-218-941-81 METAL CHIP 100 5% 1/16W
* R302 1-250-529-11 METAL CHIP 27K 1% 1/16W
R303 1-250-535-11 METAL CHIP 47K 1% 1/16W
R310 1-218-961-11 METAL CHIP 4.7K 5% 1/16W
R312 1-218-953-11 METAL CHIP 1K 5% 1/16W
R313 1-218-953-11 METAL CHIP 1K 5% 1/16W
R355 1-218-990-81 SHORT CHIP 0
R356 1-218-937-11 METAL CHIP 47 5% 1/16W
R357 1-218-959-11 METAL CHIP 3.3K 5% 1/16W
R358 1-218-941-81 METAL CHIP 100 5% 1/16W
R359 1-218-953-11 METAL CHIP 1K 5% 1/16W
R360 1-218-941-81 METAL CHIP 100 5% 1/16W
R361 1-218-961-11 METAL CHIP 4.7K 5% 1/16W
R362 1-218-965-11 METAL CHIP 10K 5% 1/16W
R363 1-218-990-81 SHORT CHIP 0
R364 1-218-990-81 SHORT CHIP 0
R365 1-218-937-11 METAL CHIP 47 5% 1/16W
R366 1-218-990-81 SHORT CHIP 0
R367 1-218-947-11 METAL CHIP 330 5% 1/16W
R368 1-250-475-11 METAL CHIP 150 1% 1/16W
R369 1-218-933-11 METAL CHIP 22 5% 1/16W
* R370 1-250-489-11 METAL CHIP 560 1% 1/16W
R371 1-216-864-11 SHORT CHIP 0
R372 1-218-965-11 METAL CHIP 10K 5% 1/16W
R373 1-216-864-11 SHORT CHIP 0
R374 1-218-965-11 METAL CHIP 10K 5% 1/16W
R376 1-218-961-11 METAL CHIP 4.7K 5% 1/16W
R377 1-218-961-11 METAL CHIP 4.7K 5% 1/16W
R378 1-216-864-11 SHORT CHIP 0
R379 1-218-933-11 METAL CHIP 22 5% 1/16W
R380 1-218-941-81 METAL CHIP 100 5% 1/16W
R381 1-218-965-11 METAL CHIP 10K 5% 1/16W
R382 1-218-965-11 METAL CHIP 10K 5% 1/16W
R386 1-216-295-91 SHORT CHIP 0
R387 1-218-959-11 METAL CHIP 3.3K 5% 1/16W
R388 1-218-977-11 METAL CHIP 100K 5% 1/16W
R316 1-218-953-11 METAL CHIP 1K 5% 1/16W
R317 1-218-953-11 METAL CHIP 1K 5% 1/16W
R318 1-218-965-11 METAL CHIP 10K 5% 1/16W
R319 1-218-965-11 METAL CHIP 10K 5% 1/16W
R321 1-218-941-81 METAL CHIP 100 5% 1/16W
R322 1-216-864-11 SHORT CHIP 0
R326 1-216-864-11 SHORT CHIP 0
R327 1-218-937-11 METAL CHIP 47 5% 1/16W
R328 1-216-798-11 METAL CHIP 12 5% 1/10W
R329 1-216-864-11 SHORT CHIP 0
R330 1-218-967-11 METAL CHIP 15K 5% 1/16W
R331 1-218-937-11 METAL CHIP 47 5% 1/16W
R332 1-250-483-11 METAL CHIP 330 1% 1/16W
* R334 1-250-543-11 METAL CHIP 100K 1% 1/16W
R335 1-216-864-11 SHORT CHIP 0
R337 1-216-864-11 SHORT CHIP 0
R339 1-250-512-11 METAL CHIP 5.1K 1% 1/16W
R340 1-218-937-11 METAL CHIP 47 5% 1/16W
R342 1-218-937-11 METAL CHIP 47 5% 1/16W
R343 1-218-959-11 METAL CHIP 3.3K 5% 1/16W
R344 1-218-941-81 METAL CHIP 100 5% 1/16W
R345 1-218-941-81 METAL CHIP 100 5% 1/16W
R346 1-218-959-11 METAL CHIP 3.3K 5% 1/16W
R347 1-218-990-81 SHORT CHIP 0
R348 1-218-961-11 METAL CHIP 4.7K 5% 1/16W
R349 1-218-941-81 METAL CHIP 100 5% 1/16W
R350 1-218-990-81 SHORT CHIP 0
R351 1-218-965-11 METAL CHIP 10K 5% 1/16W
R352 1-218-941-81 METAL CHIP 100 5% 1/16W
R389 1-218-941-81 METAL CHIP 100 5% 1/16W
R390 1-218-929-11 METAL CHIP 10 5% 1/16W
R401 1-218-965-11 METAL CHIP 10K 5% 1/16W
R402 1-218-970-81 METAL CHIP 27K 5% 1/16W
R404 1-257-362-21 METAL CHIP 1 5% 1/2W
R406 1-218-990-81 SHORT CHIP 0
R407 1-218-990-81 SHORT CHIP 0
R408 1-218-965-11 METAL CHIP 10K 5% 1/16W
R409 1-218-965-11 METAL CHIP 10K 5% 1/16W
R410 1-218-965-11 METAL CHIP 10K 5% 1/16W
R411 1-218-965-11 METAL CHIP 10K 5% 1/16W
R415 1-218-970-81 METAL CHIP 27K 5% 1/16W
R418 1-218-967-11 METAL CHIP 15K 5% 1/16W
R421 1-218-941-81 METAL CHIP 100 5% 1/16W
R422 1-218-973-11 METAL CHIP 47K 5% 1/16W
* R423 1-250-572-11 METAL CHIP 15 1% 1/10W
R424 1-218-977-11 METAL CHIP 100K 5% 1/16W
* R425 1-250-572-11 METAL CHIP 15 1% 1/10W
* R426 1-250-572-11 METAL CHIP 15 1% 1/10W
* R427 1-250-572-11 METAL CHIP 15 1% 1/10W
* R428 1-250-572-11 METAL CHIP 15 1% 1/10W
R429 1-218-977-11 METAL CHIP 100K 5% 1/16W
* R430 1-250-572-11 METAL CHIP 15 1% 1/10W
R431 1-218-973-11 METAL CHIP 47K 5% 1/16W
R432 1-218-941-81 METAL CHIP 100 5% 1/16W
R433 1-216-295-91 SHORT CHIP 0
R463 1-218-958-11 METAL CHIP 2.7K 5% 1/16W
R464 1-218-971-81 METAL CHIP 33K 5% 1/16W
R465 1-218-941-81 METAL CHIP 100 5% 1/16W
90
Page 91

HCD-GT3D
Ver. 1.1
MOTHERBOARD
Ref. No. Part No. Description Remark Ref. No. Part No. Description Remark
R466 1-216-295-91 SHORT CHIP 0
R607 1-218-985-11 METAL CHIP 470K 5% 1/16W
R467 1-216-295-91 SHORT CHIP 0
R470 1-218-990-81 SHORT CHIP 0
R471 1-218-990-81 SHORT CHIP 0
R472 1-218-990-81 SHORT CHIP 0
R478 1-216-864-11 SHORT CHIP 0
R479 1-218-981-81 METAL CHIP 220K 5% 1/16W
R480 1-218-990-81 SHORT CHIP 0
R483 1-218-953-11 METAL CHIP 1K 5% 1/16W
R485 1-218-953-11 METAL CHIP 1K 5% 1/16W
R487 1-220-804-11 METAL CHIP 2.2M 5% 1/16W
R489 1-250-515-11 METAL CHIP 6.8K 1% 1/16W
R491 1-218-965-11 METAL CHIP 10K 5% 1/16W
R496 1-218-957-11 METAL CHIP 2.2K 5% 1/16W
R498 1-248-311-11 RES-CHIP 0.1 1% 1/4W
R500 1-218-990-81 SHORT CHIP 0
R503 1-218-935-11 METAL CHIP 33 5% 1/16W
R504 1-218-935-11 METAL CHIP 33 5% 1/16W
R506 1-218-935-11 METAL CHIP 33 5% 1/16W
R507 1-218-935-11 METAL CHIP 33 5% 1/16W
R510 1-218-933-11 METAL CHIP 22 5% 1/16W
R511 1-218-933-11 METAL CHIP 22 5% 1/16W
R514 1-218-933-11 METAL CHIP 22 5% 1/16W
R515 1-218-933-11 METAL CHIP 22 5% 1/16W
R534 1-218-951-11 METAL CHIP 680 5% 1/16W
R538 1-216-295-91 SHORT CHIP 0
R541 1-216-809-11 METAL CHIP 100 5% 1/10W
R542 1-216-809-11 METAL CHIP 100 5% 1/10W
R543 1-216-809-11 METAL CHIP 100 5% 1/10W
R549 1-218-933-11 METAL CHIP 22 5% 1/16W
R552 1-218-933-11 METAL CHIP 22 5% 1/16W
R608 1-218-961-11 METAL CHIP 4.7K 5% 1/16W
R609 1-218-961-11 METAL CHIP 4.7K 5% 1/16W
R610 1-218-973-11 METAL CHIP 47K 5% 1/16W
R611 1-218-973-11 METAL CHIP 47K 5% 1/16W
R612 1-218-973-11 METAL CHIP 47K 5% 1/16W
R613 1-218-989-11 METAL CHIP 1M 5% 1/16W
R614 1-218-965-11 METAL CHIP 10K 5% 1/16W
R615 1-218-985-11 METAL CHIP 470K 5% 1/16W
R616 1-218-961-11 METAL CHIP 4.7K 5% 1/16W
R617 1-218-955-11 METAL CHIP 1.5K 5% 1/16W
R618 1-218-958-11 METAL CHIP 2.7K 5% 1/16W
R619 1-218-958-11 METAL CHIP 2.7K 5% 1/16W
R620 1-218-959-11 METAL CHIP 3.3K 5% 1/16W
R621 1-218-990-81 SHORT CHIP 0
R622 1-218-961-11 METAL CHIP 4.7K 5% 1/16W
R624 1-218-957-11 METAL CHIP 2.2K 5% 1/16W
R625 1-218-957-11 METAL CHIP 2.2K 5% 1/16W
R626 1-218-961-11 METAL CHIP 4.7K 5% 1/16W
R627 1-218-961-11 METAL CHIP 4.7K 5% 1/16W
R628 1-218-961-11 METAL CHIP 4.7K 5% 1/16W
R629 1-216-864-11 SHORT CHIP 0
R630 1-218-929-11 METAL CHIP 10 5% 1/16W
R631 1-218-929-11 METAL CHIP 10 5% 1/16W
R632 1-218-929-11 METAL CHIP 10 5% 1/16W
R633 1-218-973-11 METAL CHIP 47K 5% 1/16W
R634 1-218-989-11 METAL CHIP 1M 5% 1/16W
R635 1-218-973-11 METAL CHIP 47K 5% 1/16W
R636 1-218-973-11 METAL CHIP 47K 5% 1/16W
R638 1-218-955-11 METAL CHIP 1.5K 5% 1/16W
R639 1-218-973-11 METAL CHIP 47K 5% 1/16W
R555 1-218-933-11 METAL CHIP 22 5% 1/16W
R559 1-218-965-11 METAL CHIP 10K 5% 1/16W
R564 1-218-933-11 METAL CHIP 22 5% 1/16W
R566 1-218-933-11 METAL CHIP 22 5% 1/16W
R567 1-218-935-11 METAL CHIP 33 5% 1/16W
R569 1-216-809-11 METAL CHIP 100 5% 1/10W
R571 1-218-981-81 METAL CHIP 220K 5% 1/16W
R572 1-218-941-81 METAL CHIP 100 5% 1/16W
R574 1-218-937-11 METAL CHIP 47 5% 1/16W
R575 1-218-941-81 METAL CHIP 100 5% 1/16W
R576 1-218-941-81 METAL CHIP 100 5% 1/16W
R577 1-218-949-11 METAL CHIP 470 5% 1/16W
R579 1-218-990-81 SHORT CHIP 0
R580 1-218-990-81 SHORT CHIP 0
R581 1-218-941-81 METAL CHIP 100 5% 1/16W
R582 1-218-941-81 METAL CHIP 100 5% 1/16W
R583 1-248-311-11 RES-CHIP 0.1 1% 1/4W
R585 1-218-990-81 SHORT CHIP 0
R586 1-218-990-81 SHORT CHIP 0
R587 1-218-965-11 METAL CHIP 10K 5% 1/16W
R588 1-218-965-11 METAL CHIP 10K 5% 1/16W
R589 1-218-965-11 METAL CHIP 10K 5% 1/16W
R590 1-218-990-81 SHORT CHIP 0
R600 1-208-931-11 METAL CHIP 68K 0.50% 1/16W
R602 1-218-973-11 METAL CHIP 47K 5% 1/16W
R603 1-218-973-11 METAL CHIP 47K 5% 1/16W
R604 1-218-973-11 METAL CHIP 47K 5% 1/16W
R605 1-218-989-11 METAL CHIP 1M 5% 1/16W
R606 1-218-990-81 SHORT CHIP 0
R640 1-218-961-11 METAL CHIP 4.7K 5% 1/16W
R641 1-218-967-11 METAL CHIP 15K 5% 1/16W
R642 1-218-970-11 METAL CHIP 27K 5% 1/16W
R643 1-216-864-11 SHORT CHIP 0
R644 1-208-931-11 METAL CHIP 68K 0.50% 1/16W
R645 1-218-973-11 METAL CHIP 47K 5% 1/16W
R646 1-218-989-11 METAL CHIP 1M 5% 1/16W
R647 1-218-973-11 METAL CHIP 47K 5% 1/16W
R648 1-218-973-11 METAL CHIP 47K 5% 1/16W
R649 1-218-970-11 METAL CHIP 27K 5% 1/16W
R650 1-218-969-11 METAL CHIP 22K 5% 1/16W
R651 1-218-979-11 METAL CHIP 150K 5% 1/16W
R652 1-218-958-11 METAL CHIP 2.7K 5% 1/16W
R653 1-250-515-11 METAL CHIP 6.8K 1% 1/16W
R654 1-218-958-11 METAL CHIP 2.7K 5% 1/16W
R655 1-218-965-11 METAL CHIP 10K 5% 1/16W
R656 1-218-959-11 METAL CHIP 3.3K 5% 1/16W
R658 1-218-989-11 METAL CHIP 1M 5% 1/16W
R659 1-218-973-11 METAL CHIP 47K 5% 1/16W
R661 1-218-941-81 METAL CHIP 100 5% 1/16W
R662 1-218-974-11 METAL CHIP 56K 5% 1/16W
R663 1-218-987-11 METAL CHIP 680K 5% 1/16W
R665 1-218-989-11 METAL CHIP 1M 5% 1/16W
R666 1-218-973-11 METAL CHIP 47K 5% 1/16W
R669 1-218-987-11 METAL CHIP 680K 5% 1/16W
R671 1-218-974-11 METAL CHIP 56K 5% 1/16W
R674 1-218-941-81 METAL CHIP 100 5% 1/16W
R677 1-218-990-81 SHORT CHIP 0
R681 1-218-989-11 METAL CHIP 1M 5% 1/16W
91
Page 92

HCD-GT3D
Ver. 1.1
MOTHERBOARD
Ref. No. Part No. Description Remark Ref. No. Part No. Description Remark
R682 1-218-973-11 METAL CHIP 47K 5% 1/16W
R840 1-218-933-11 METAL CHIP 22 5% 1/16W
R684 1-218-973-11 METAL CHIP 47K 5% 1/16W
R685 1-218-978-11 METAL CHIP 120K 5% 1/16W
R686 1-218-978-11 METAL CHIP 120K 5% 1/16W
R687 1-218-933-11 METAL CHIP 22 5% 1/16W
R688 1-218-929-11 METAL CHIP 10 5% 1/16W
R689 1-218-979-11 METAL CHIP 150K 5% 1/16W
R690 1-218-929-11 METAL CHIP 10 5% 1/16W
R691 1-218-929-11 METAL CHIP 10 5% 1/16W
R692 1-218-969-11 METAL CHIP 22K 5% 1/16W
R693 1-218-989-11 METAL CHIP 1M 5% 1/16W
R694 1-218-973-11 METAL CHIP 47K 5% 1/16W
R696 1-218-973-11 METAL CHIP 47K 5% 1/16W
R697 1-218-973-11 METAL CHIP 47K 5% 1/16W
R698 1-218-973-11 METAL CHIP 47K 5% 1/16W
R700 1-218-969-11 METAL CHIP 22K 5% 1/16W
R701 1-218-929-11 METAL CHIP 10 5% 1/16W
R702 1-218-929-11 METAL CHIP 10 5% 1/16W
R708 1-218-937-11 METAL CHIP 47 5% 1/16W
R709 1-218-937-11 METAL CHIP 47 5% 1/16W
R711 1-218-953-11 METAL CHIP 1K 5% 1/16W
R716 1-218-953-11 METAL CHIP 1K 5% 1/16W
R718 1-218-990-81 SHORT CHIP 0
R719 1-218-929-11 METAL CHIP 10 5% 1/16W
R720 1-218-929-11 METAL CHIP 10 5% 1/16W
R722 1-218-929-11 METAL CHIP 10 5% 1/16W
R723 1-218-929-11 METAL CHIP 10 5% 1/16W
R733 1-216-864-11 SHORT CHIP 0
R747 1-216-864-11 SHORT CHIP 0
R750 1-218-941-81 METAL CHIP 100 5% 1/16W
R751 1-218-941-81 METAL CHIP 100 5% 1/16W
R857 1-216-864-11 SHORT CHIP 0
R859 1-216-864-11 SHORT CHIP 0
R905 1-218-990-81 SHORT CHIP 0
R909 1-218-990-81 SHORT CHIP 0
R911 1-218-985-11 METAL CHIP 470K 5% 1/16W
R912 1-218-985-11 METAL CHIP 470K 5% 1/16W
R913 1-218-975-11 METAL CHIP 68K 5% 1/16W
R914 1-218-975-11 METAL CHIP 68K 5% 1/16W
R915 1-208-699-11 METAL CHIP 4.7K 0.50% 1/16W
R916 1-208-699-11 METAL CHIP 4.7K 0.50% 1/16W
R935 1-250-468-11 METAL CHIP 75 1% 1/16W
R937 1-218-941-81 METAL CHIP 100 5% 1/16W
R938 1-216-864-11 SHORT CHIP 0
R939 1-218-965-11 METAL CHIP 10K 5% 1/16W
R940 1-218-941-81 METAL CHIP 100 5% 1/16W
R943 1-218-933-11 METAL CHIP 22 5% 1/16W
R944 1-218-933-11 METAL CHIP 22 5% 1/16W
R948 1-218-990-81 SHORT CHIP 0
R949 1-216-809-11 METAL CHIP 100 5% 1/10W
R950 1-216-797-11 METAL CHIP 10 5% 1/10W
R951 1-216-797-11 METAL CHIP 10 5% 1/10W
R952 1-216-797-11 METAL CHIP 10 5% 1/10W
R953 1-218-950-11 METAL CHIP 560 5% 1/16W
R954 1-218-989-11 METAL CHIP 1M 5% 1/16W
R955 1-216-819-11 METAL CHIP 680 5% 1/10W
R957 1-216-797-11 METAL CHIP 10 5% 1/10W
R959 1-216-797-11 METAL CHIP 10 5% 1/10W
R963 1-218-929-11 METAL CHIP 10 5% 1/16W
R964 1-218-929-11 METAL CHIP 10 5% 1/16W
R965 1-218-941-81 METAL CHIP 100 5% 1/16W
R752 1-218-941-81 METAL CHIP 100 5% 1/16W
R753 1-218-941-81 METAL CHIP 100 5% 1/16W
R756 1-250-515-11 METAL CHIP 6.8K 1% 1/16W
R760 1-218-929-11 METAL CHIP 10 5% 1/16W
R761 1-218-929-11 METAL CHIP 10 5% 1/16W
R762 1-218-929-11 METAL CHIP 10 5% 1/16W
R763 1-216-864-11 SHORT CHIP 0
R791 1-218-990-81 SHORT CHIP 0
R792 1-216-864-11 SHORT CHIP 0
R793 1-216-864-11 SHORT CHIP 0
R794 1-216-864-11 SHORT CHIP 0
R795 1-218-929-11 METAL CHIP 10 5% 1/16W
R796 1-218-929-11 METAL CHIP 10 5% 1/16W
R797 1-218-929-11 METAL CHIP 10 5% 1/16W
R801 1-218-941-81 METAL CHIP 100 5% 1/16W
R802 1-218-933-11 METAL CHIP 22 5% 1/16W
R817 1-218-929-11 METAL CHIP 10 5% 1/16W
R819 1-218-929-11 METAL CHIP 10 5% 1/16W
R820 1-218-929-11 METAL CHIP 10 5% 1/16W
R826 1-218-949-11 METAL CHIP 470 5% 1/16W
R827 1-216-833-11 METAL CHIP 10K 5% 1/10W
R829 1-218-949-11 METAL CHIP 470 5% 1/16W
R830 1-216-833-11 METAL CHIP 10K 5% 1/10W
R831 1-218-941-81 METAL CHIP 100 5% 1/16W
R835 1-218-929-11 METAL CHIP 10 5% 1/16W
R836 1-218-929-11 METAL CHIP 10 5% 1/16W
R837 1-218-933-11 METAL CHIP 22 5% 1/16W
R838 1-218-929-11 METAL CHIP 10 5% 1/16W
R839 1-218-929-11 METAL CHIP 10 5% 1/16W
R966 1-218-929-11 METAL CHIP 10 5% 1/16W
R978 1-218-990-81 SHORT CHIP 0
R980 1-218-990-81 SHORT CHIP 0
R981 1-218-990-81 SHORT CHIP 0
R982 1-218-990-81 SHORT CHIP 0
R995 1-218-990-81 SHORT CHIP 0
R996 1-218-990-81 SHORT CHIP 0
< COMPOSITION CIRCUIT BLOCK >
RB301 1-234-370-21 RES, NETWORK 22 (1005X4)
RB302 1-234-370-21 RES, NETWORK 22 (1005X4)
RB303 1-234-370-21 RES, NETWORK 22 (1005X4)
RB304 1-234-370-21 RES, NETWORK 22 (1005X4)
RB305 1-234-370-21 RES, NETWORK 22 (1005X4)
RB306 1-234-370-21 RES, NETWORK 22 (1005X4)
RB307 1-234-370-21 RES, NETWORK 22 (1005X4)
RB308 1-234-370-21 RES, NETWORK 22 (1005X4)
RB309 1-234-370-21 RES, NETWORK 22 (1005X4)
< THERMISTOR >
TH571 1-804-949-11 THERMISTOR, NTC (SMD)
< VIBRATOR >
X101 1-814-273-11 QUARTZ CRYSTAL UNIT (32.768kHz)
X102 1-814-767-11 QUARTZ CRYSTAL UNITS (13.333MHz)
X103 1-814-466-11 QUARTZ CRYSTAL UNITS (12.288MHz)
X104 1-814-356-11 QUARTZ CRYSTAL UNIT (48MHz)
X301 1-814-023-11 QUARTS CRYSTAL UNIT (27MHz)
92
Page 93
HCD-GT3D
Ver. 1.2
MOTHERBOARD
Ref. No. Part No. Description Remark Ref. No. Part No. Description Remark
X600 1-814-365-11 QUARTZ CRYSTAL UNITS (12MHz)
X602 1-814-130-11 QUARTZ CRYSTAL UNIT (24.576MHz)
*************************************************************
MS-476 BOARD
************
When the MS-476 board is defective, exchange the entire LOADING COMPLETE
ASSY (T).
*************************************************************
OPTICAL BOARD
*************
< CAPACITOR >
C3301 1-127-715-11 CERAMIC CHIP 0.22uF 10% 16V
C3303 1-127-715-11 CERAMIC CHIP 0.22uF 10% 16V
MS-476 OPTICAL SPK_HLED SPLITTER
153 1-849-010-11 WIRE (FLAT TYPE) (25 CORE)
* 202 3-703-150-11 CLAMP
0 203 1-855-006-41 FAN, DC
0 205 1-844-234-21 AC INLET
0 206 A-2061-350-A SMPS BOARD, COMPLETE
211 1-859-087-11 LOUDSPEAKER (20CM)-087-11
* 213 1-500-082-11 CLAMP, SLEEVE FERRITE (RU, EA, MY, AUS, E4)
251 1-849-013-11 WIRE (FLAT TYPE) (13 CORE)
252 1-849-014-11 WIRE (FLAT TYPE) (10 CORE)
253 1-492-699-11 BLUETOOTH MODULE
256 1-849-015-11 WIRE (FLAT TYPE) (6 CORE)
257 8-989-602-00 RC-S730 (WW)
351 A-1896-391-B LOADING COMPLETE ASSY (T)
(including MS-476 board)
< IC >
IC3300 6-600-827-01 IC JSR1124 (OPTICAL IN TV)
< JUMPER RESISTOR >
JR3300 1-216-864-11 SHORT CHIP 0
< RESISTOR >
R3300 1-216-864-11 SHORT CHIP 0
R3301 1-216-864-11 SHORT CHIP 0
*************************************************************
SPK_HLED BOARD
***************
< CONNECTOR >
CN4000 1-580-057-11 PIN, CONNECTOR (SMD) 4P
< DIODE >
D4000 6-504-103-01 DI LA CN5M-GAHA-24-1 (R)
D4001 6-504-102-01 DI LD CN5M-4Q4R-35-1 (B)
D4002 6-504-104-01 DI LT CN5M-GAHB-25-1 (G)
*************************************************************
SPLITTER BOARD
**************
0 354 A-2046-956-A SERVICE, OPTICAL DEVICE(7G)
355 1-469-829-11 CORE, FERRITE
356 1-849-012-11 WIRE (FLAT TYPE) (24 CORE)
357 1-849-016-11 WIRE (FLAT TYPE) (5 CORE)
< CONNECTOR >
CN3400 1-820-123-51 CONNECTOR, FFC/FPC 25P
CN3401 1-785-468-51 CONNECTOR, FFC/FPC 13P
CN3402 1-820-113-51 CONNECTOR, FFC/FPC 11P
< RESISTOR >
R001 1-216-295-91 SHORT CHIP 0
R002 1-216-295-91 SHORT CHIP 0
R003 1-216-295-91 SHORT CHIP 0
R004 1-216-864-11 SHORT CHIP 0
R005 1-216-864-11 SHORT CHIP 0
R006 1-216-295-91 SHORT CHIP 0
R007 1-216-295-91 SHORT CHIP 0
R008 1-216-295-91 SHORT CHIP 0
*************************************************************
MISCELLANEOUS
**************
55 1-849-009-11 WIRE (FLAT TYPE) (11 CORE)
151 1-849-011-11 WIRE (FLAT TYPE) (19 CORE)
Note : If cable, fl exible fl at and wire (fl at type) is replaced,
install it after bending it in the same form as that
before replacement.
93
Page 94

HCD-GT3D
Ver. 1.2
MEMO
94
Page 95
REVISION HISTORY
Ver. Date Description of Revision
1.0 2015.02 New
1.1 2015.06 Addition of African, Argentina, Malaysia, Russian, Saudi Arabia and Thai models.
Add note for IC101 in page 5, 39, 48 and 87.
Change description of IC303, IC601 and IC603 in MOTHERBOARD board.
Change description of IC3004 in LCD board.
Change description of IC3200 in MIC board.
Change description of Ref. No. R3137 and R3149 in BUTTON board.
Change description of Ref. No. Q1003, Q1004, Q1014, Q1015, Q1016 and Q1017 in DAMP board.
Change description of Ref. No. C3204 in MIC board.
Change description of Ref. No. C105, C953, Q605, R023, R642 and R649 in MOTHERBOARD board.
Change illustration of CDM in page 13, 20, 74 and 78.
Change note for “BOND FIXATION OF ELECTRIC PARTS” in page 37, 50, 51, 81, 82 and 83.
Change of DAMP, SPK_HLED and SPLITTER boards (Suffi x 12).
Change of unit name in SPECIFICATIONS.
Change illustration of IC902 in page 64.
Change P/N of Ref. No. 57 in page 73.
Change P/N of Ref. No. 101 in page 74.
Change P/N of Ref. No. 258 in page 77.
Delete of “MODEL & DEST WRITE MODE” in page 23.
Delete note for “BOND FIXATION OF ELECTRIC PARTS” in page 75.
1.2 2015.08 Add illustration of CORE, FERRITE and CUSHION, SARANET (30X50) on WIRE (FLAT TYPE)
(24 CORE) in page 13, 20, 74, 78 and 79.
Add note of “SCREW TYPE DISCRIMINATION BEFORE DISASSEMBLE THE PANEL, SIDE” in
page 6, 10 and 72.
Add P/N and description for CORE, FERRITE in page 79 and 93.
Add P/N, description and illustration of Ref. No. 1 in page 72.
Change description of disassembly step (1) in page 10.
Change P/N and description of CN101 in MOTHERBOARD board.
Change P/N and description of CN102 in MOTHERBOARD board.
Change P/N and description of CN601 in MOTHERBOARD board.
Change P/N and description of IC306 in MOTHERBOARD board.
Change P/N and description of D3100 in BUTTON board.
Change P/N and description of D3105 in BUTTON board.
Change P/N and illustration of Ref. No. 57 in page 73.
Change P/N of Ref. No. 2 and 3 in page 72.
Change P/N of Ref. No. 258 in page 77.
Change illustration of PANEL, SIDE (L) ASSY in page 10 and 72.
Change illustration of PANEL, FRONT (SW) ASSY in page 7, 10, 11, 12, 13, 14, 15, 16, 17, 18, 72, 74,
75, 76 and 77.
Delete CN105 in MOTHERBOARD board for Electrical Part List section (Service code changed).
Delete CN451 in MOTHERBOARD board for Electrical Part List section (Service code changed).
Delete CUSHION, WIRE 1.0T on WIRE (FLAT TYPE) (24 CORE) in page 13, 20, 74, 78 and 79.
HCD-GT3D
Page 96
HCD-GT3D
Ver. Date Description of Revision
Delete four pieces of CUSHION (D-AMP) on SUB CHASSIS in page 15, 16, 75 and 76.
Delete four pieces of CUSHION (SMPS) on CHASSIS in page 17 and 76.
Delete four pieces of CUSHION, BUTTON on CDM section in page 13, 74 and 78.
Delete T CUSHION on PANEL, FRONT (SW) ASSY in page 14, 15, 75 and 77.
Delete HEMILON, 10XLX0.4 in page 13, 74 and 78.
Delete CLAMP, SLEEVE FERRITE for Argentina, Latin-American and Thai models in page 76 and 93.
How to search for a contact point of signal lines or the like in DIAGRAMS SECTION
If a contact point of a BLOCK DIAGRAM, PRINTED WIRING BOARD or SCHEMATIC DIAGRAM is shown in a different page, use
the PDF fi le search function to fi nd one.
e.g.) If a contact point is shown as
Procedure:
1. Press the [F] key while pressing the [Ctrl] key.
2. Input “>001Z” in the search box and press the [Enter] key.
3. The relevant part (page), where the contact point is shown, appears.
Note: If you still see the original page, press the [Enter] key again.
, follow the procedure below.
 Loading...