

Page 1
KITCHEN TOOLS
Coffee Maker SKAS 1000 B1
KOMPERNASS GMBH
BURGSTRASSE 21 · D-44867 BOCHUM
www.kompernass.com
ID-Nr.: SKAS 1000 B1-06/11-V1
IAN: 68663
Coffee Maker
Operating instructions
R
Filtru de cafea
Instrucţiunile
Καφετιέρα
Οδηγίες χρήσης
Aparat za kavu
Upute za upotrebu
Кафе машина
Ръководство за експлоатация
Kaffeemaschine
Bedienungsanleitung
Page 2
SKAS 1000 B1
8
7
1
2
3
4
6
5
Page 3
CONTENT PAGE
Safety instructions 2
Intended Application 3
Delivery Contents 3
Description 3
Appliance Overview 3
Setting up and connecting to the power supply 3
Operation 4
Before the first usage .......................................................................................................................4
Fill with ground coffee ....................................................................................................................4
Fill the appliance with water ...........................................................................................................5
Modifying the aroma .......................................................................................................................5
Switching On and Off......................................................................................................................5
Cleaning 5
Scale removal 6
Troubleshooting 7
Disposal 7
Technical data 7
Warranty and Service 8
Importer 8
Read the operating instructions carefully before using the device for the first time and preserve this booklet
for later reference. Pass this manual on to whoever might acquire the device at a future date.
- 1 -
Page 4
COFFEE MAKER
Safety instructions
Risk of electrocution!
• Connect the coffe machine only to correctly
installed and earthed power sockets. Ensure that
the voltage supplied through the power socket
tallies completely with the details given on the
appliance rating plate.
• Remove the plug from the wall socket when you
move the coffee machine, fill it with water, if it
malfunctions, before cleaning it and when it is
not in use.
Under no cirmstance may the coffee machine
be submersed in liquids. Do not expose the
appliance to humidity and do not use it outdoors.
Should liquids enter the housing, unplug the
appliance power socket from the power socket
immediately and arrange for it to be repaired
by a qualified technician.
• Never touch the coffee machine, the power cable
or the plug when your hands are wet.
• To disconnect, always pull the plug itself out of
the power socket, do not pull on the power cable.
• Do not fold or crush the power cable.
• To avoid potential risks, arrange for a defective
appliance to be checked and possibly repaired
by qualified technicians, or contact our Customer
Service Department.
• Arrange for defective power plugs and/or cables
to be replaced as soon as possible by a qualified
technician or by our Customer Service Department
to avoid the risk of injury.
• Do not use an extension cable.
Risk of fire!
• Do not leave the coffee machine unattended
when it is in use.
• NEVER operate the coffee machine without
mains water and NEVER fill it to more than the
Max. marking.
• Do not use an external timing switch or a separate
remote control system to operate the appliance.
Risk of personal injury!
• NEVER use the glass jug of the coffee machine
in a microwave oven.
• This appliance is not intended for use by individuals (including children) with restricted
physical, physiological or intellectual abilities
or deficiences in experience and/or knowledge
unless they are supervised by a person responsible for their safety or receive from this person
instruction in how the appliance is to be used.
• Children should be supervised to ensure that
they do not play with the device.
Risk of Burns!
• NEVER touch the hot surfaces of the coffee machine, especially the heating plate and the glass
jug.
Risk of scalds!
This symbol warns you about escaping steam.
Risk of scalding!
Please follow the safety instructions
• Do not hold your hands in the rising steam.
• Always close the filter container before switching
on, there exists a risk of scalds from steam and
hot water.
- 2 -
Page 5
• NEVER use the glass jug of the coffee machine
in a microwave oven.
• Do not move the coffee machine during the
brewing process.
• Remove the jug first when the brewing process
is complete and the filter has fully drained itself.
Risk of stumbling!
• Lay the power cable in such a way that no one
can tread on or trip over it.
• Do not use an extension cable.
Warning regarding appliance
damage!
• NEVER operate this appliance when it is empty
(without water). If you do, the glass jug could
shatter.
Intended Application
The coffee maker is intended exclusively for brewing
coffee. This coffee maker is intended exclusively for
use in private households. Do not use it commercially. This appliance is intended only for indoor use.
Pay heed to all of the information in this operating
manual, especially the safety instructions. All other
uses are deemed to be improper and may result in
property damage or even in personal injury. We
shall not accept liability for damages caused due to
improper use of the appliance.
Delivery Contents
Coffee Maker
Glass jug
Measuring spoon
Operating Instructions
Description
You can prepare hot filter coffee with the coffee machine.Brewed coffee can be kept warm in the jug
by leaving it on the heating plate with the appliance
switched on.
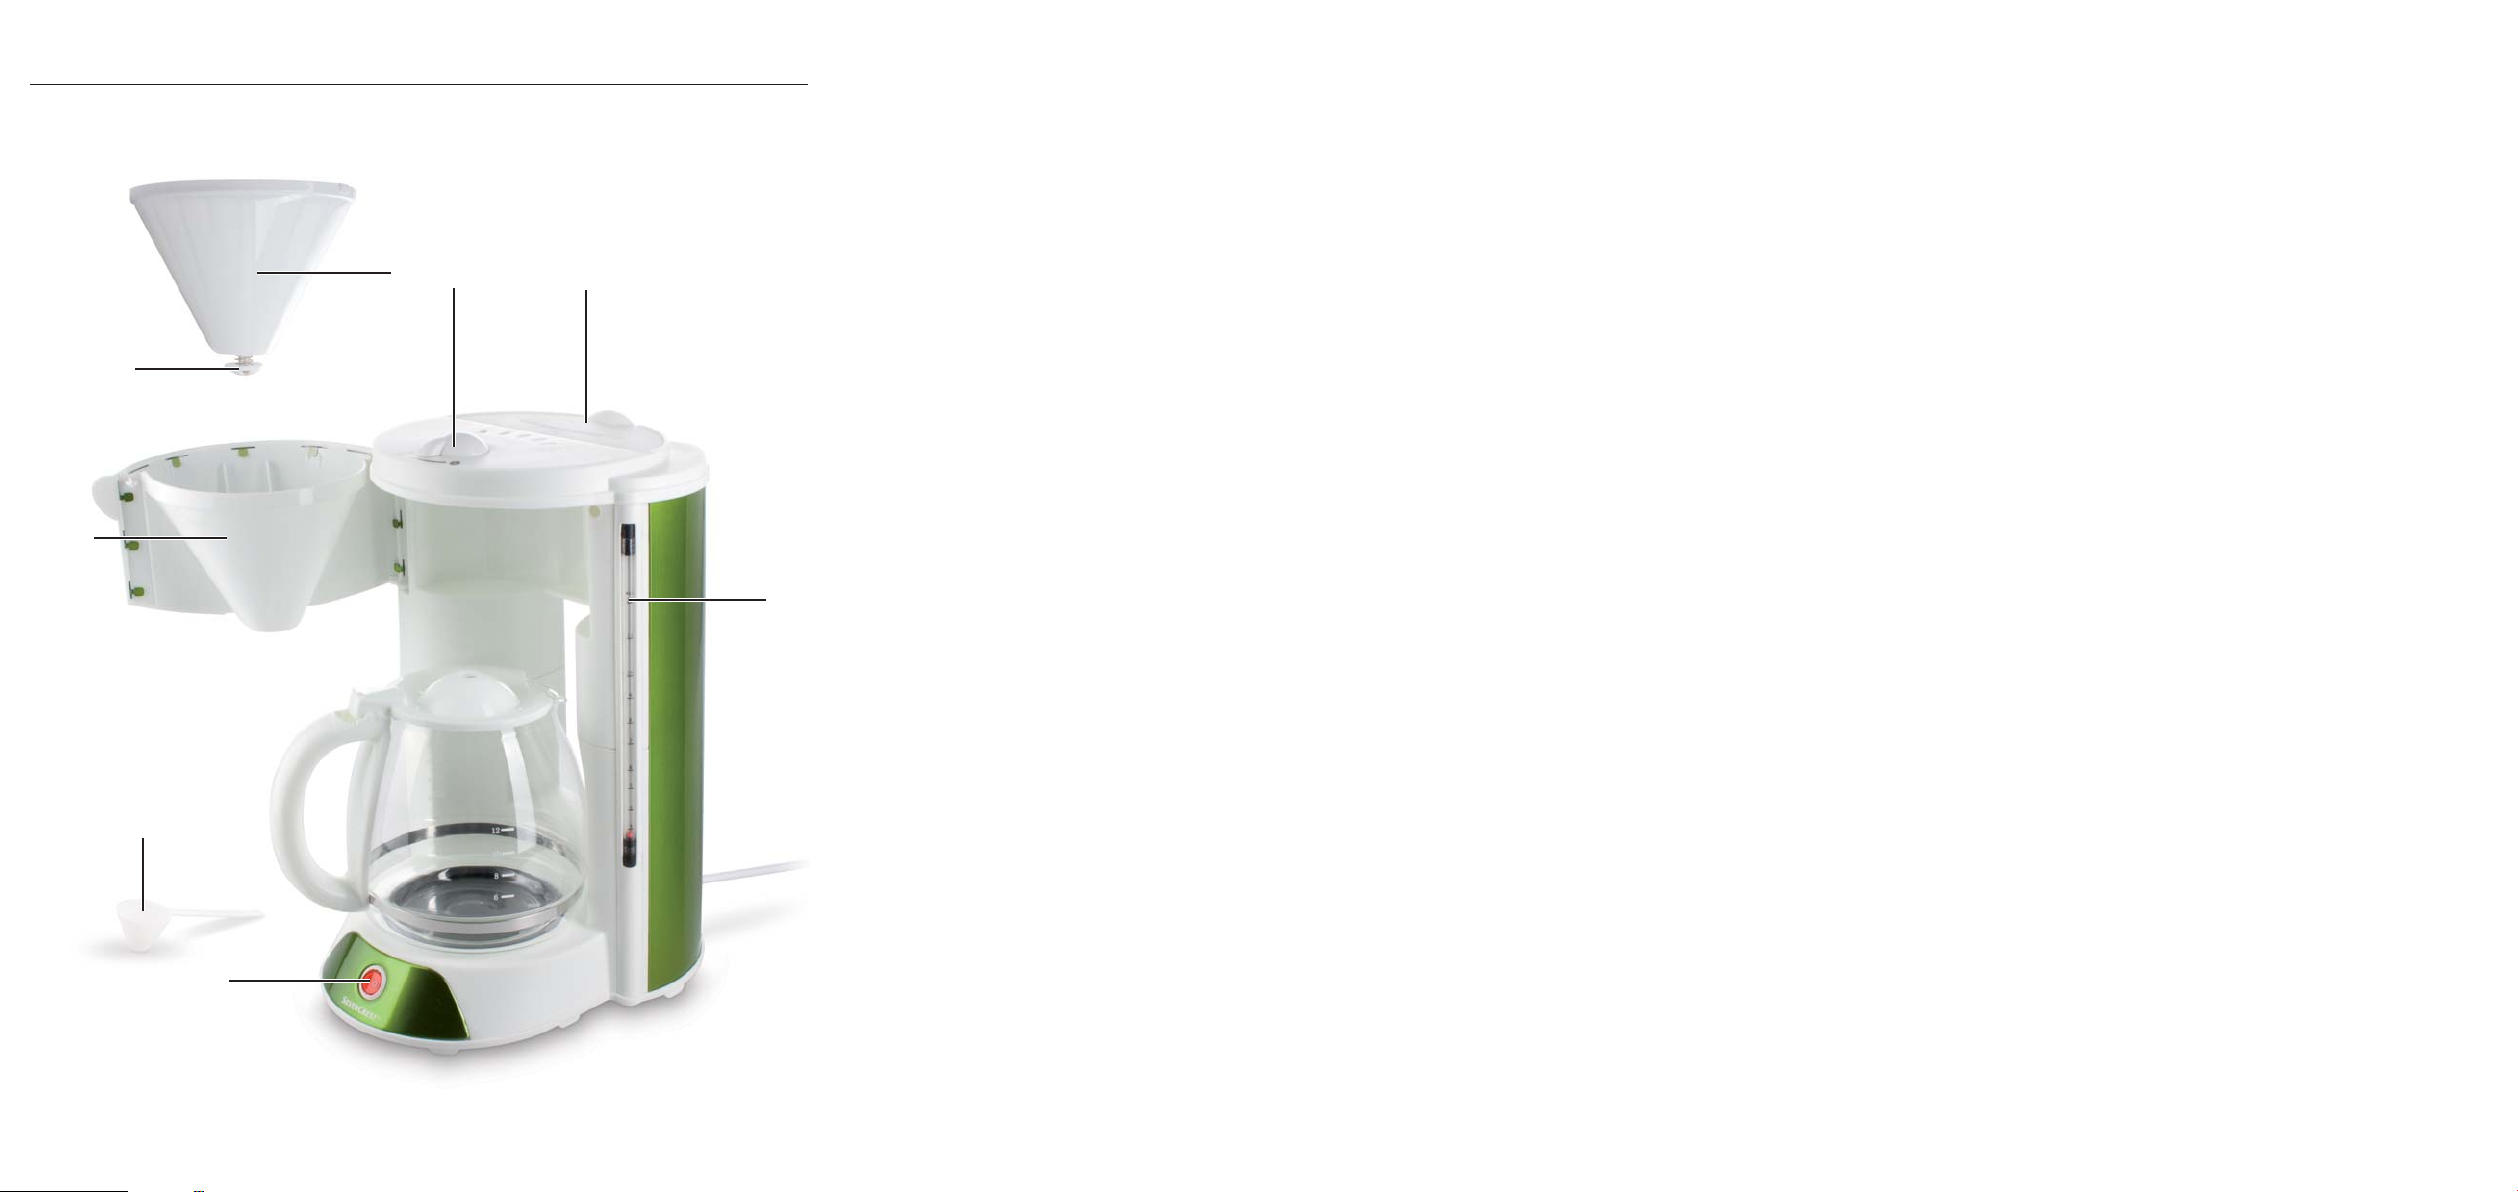
Appliance Overview
1 Filter insert
2 Aroma selector switch
3 Water tank lid
4 Water volume indicator
5 On/Off switch with integrated control lamp
6 Measuring spoon
7 Filter holder
8 Coffee exit
Setting up and connecting to
the power supply
Risk of electrocution!
Under no circumstances should the appliance be
located close to water, especially sinks and waterfilled
vessels. Use the coffee machine only on a dry
surface. The proximity of water presents a danger,
even when the appliance is switched off. After use,
always remove the plug from the power socket.
Risk of fire!
Never locate the coffee machine close to sources of
heat.
The appliance could be damaged.
Attention!
To avoid damage to the coffee machine and its
place of location, use the coffee machine only
on a level and heat-resistant surface.
- 3 -
Page 6

• Remove all packaging materials from the
appliance.
• Place the appliance on a dry, flat and heat-resistant surface.
• Place the glass jug on the heating plate in the
appliance.
• Open the filter holder
• Place the filter insert 1 in such that the coffee
exit 8 projects through the opening.
• Close the filter holder 7.
• Finally, insert the plug into the power socket.
7.
Operation
Before the first usage
Attention!
• Never fill the water tank with a total volume of
more than 12 cups of mains water.
NEVER fill the water tank with less than 3 cups
of water. Otherwise, the coffee machine could
be damaged. Use the markings on the water-fill
indicator 4.
• Unplug the coffee machine immediately after
use. The appliance is completely free of electrical power ONLY when it is unplugged.
• Fill the water tank only with mains water.
Using anything else could damage the
appliance.
1. Open the glass jug and the water tank lid 3.
2. Carefully rinse the glass jug with mains water.
Fill the water tank with mains water. Pay heed to
pouring the water slowly into the water tank,
so that it can run through both tank openings.
Empty it again by carefully tipping the appliance
over a sink and allowing the mains water to pour
out.
3. Fill the glass jug with 12 cups of mains water.
4. Pour the water completely into the water tank.
5. Close the water tank.
6. Place the emptied glass jug on the heating
plate.
7. Switch the coffee machine on with the On/Off
switch 5 (I). The integrated control lamp
glows. Wait until the brewing process is
complete.
8. Empty the glass jug.
9. Switch the coffee machine off with the On/Off
switch 5 (O). The integrated control lamp goes
out.
10. Wait until the appliance has cooled down.
Subsequently, you can use the coffee machine for
the brewing of ground coffee.
Fill with ground coffee
1. Swing the filter holder 7 to the side. The filter
bag 1 must be put in.
2. Place a filter bag (size 1x4) with folded over
sides into the filter compartment 1.
3. Fill it with the measuring spoon 6.
- 4 -
Page 7
Note:
Place approx. one heaped measuring spoon of
ground coffee in per cup. Should the coffee be
preferred a little weaker, you can reduce the
amount of coffee per cup.
4. Close the filter holder 7. Ensure that the coffee
throughflow 8 lies in the middle and above the
glass jug.
Fill the appliance with water
Note:
Use only freshly drawn mains water to brew coffee!
1. Open the water tank cover 3.
2. Fill the glass jug with water.
Attention!
• Never fill the water tank with a volume greater
than 12 cups of water. Never fill the water tank
with a volume of less than 3 cups of water. If
you do, the appliance could be damaged. Use
the marker on the water volume indicator 4.
Modifying the aroma
• Select the desired coffee strength on the aroma
selector switch 2. The setting gives strong
coffee, the setting gives mild coffee.
Switching On and Off
• When you are ready to switch the coffee machine
on, place the On/Off switch 5 at the position
“On” (I). The integrated control lamp glows.
• When you are ready to switch the coffee machine
off, place the On/Off switch 5 at the position
“Off” (O). The integrated control lamp goes out.
• Remove the plug from the mains socket if you
are intending to discontinue using the coffee machine.
Note:
If you do not switch the coffee machine off with the
On/Off switch 5 after the brewing process, the
coffee is kept warm on the hot plate until you do
switch the coffee machine off.
We recommend however to drink the coffee freshly
brewed.
3. Pour the amount of water required for the volume of ground coffee into the water tank. Use
the marker on the water volume indicator 4.
Ensure that the water is poured in slowly, so
that it can run between the two water tanks openings.
4. Close the water tank cover 3.
Cleaning
In order to obtain an optimal taste result from every
brewing process you should clean the coffee machine
after every use.
• Remove the plug from the mains socket.
Risk of electrocution!
Before you clean the Coffee Maker you MUST remove
the plug from the power socket. Under no circumstances
may the appliance be immersed in water or held
under running water during cleaning.
- 5 -
Page 8
Risk of Burns!
Always wait until the coffee maker has cooled down
before cleaning it. There is a risk of being burnt and
the appliance could be damaged.
Attention!
Do not use household detergents or sharp/pointed
objects to remove soiling. These could damage
the appliance.
• Wipe the housing of the coffee machine and
the glass jug with a soft cloth lightly moistened
with a soapy solution. At the same time remove
any deposits that may have settled in the glass
jug.
• After every usage remove the filter bag 1 from
the filter holder 7.
• Rinse it under flowing water.
• Clean the measuring spoon 6 in a mild soapy
solution and then rinse it with clear water.
• Dry all parts thoroughly with a tea towel before
taking the appliance back into use.
Scale removal
1. Switch the coffee machine off and allow it to
cool down completely.
2. Place the scale removal product in the water
tank.
3. Insert the stipulated volume of water.
4. Place the glass jug on the heating plate.
5. Switch the coffee machine on with the On/Off
switch 5.
6. Wait until the brewing process is completed.
Switch the coffee machine off and remove the
plug from the mains power socket.
7. Carefully rinse the glass jug with mains water.
Fill the water tank with mains water.
Pay heed to pouring the water slowly into the
water tank, so that it can run through both tank
openings. Empty it again by carefully tipping
the appliance over a sink and allowing the
mains water to pour out.
8. To finish, complete two brewing processes with
just mains water, as described in the section
"Before the first usage".
When completed, you can continue to use the
coffee machine.
The mineral content (hardness) in the water causes,
over a period of time, a calcification of the coffee
machine. This calcification impairs the appliance in
its function and diminishes the quality of the brewed
filter coffee.
Enquire at your local waterworks about the
hardness level of your mains water.The need for
decalcification comes early in hard water areas,
somewhat later in soft water areas.
Use a decalcifier designed for household appliances and pay heed to the usage instructions.
- 6 -
Page 9
Troubleshooting
Symptom Possible causes and
solutions
The coffee machine
does not switch on.
• The plug is not inserted
into the power socket.
Insert the plug into a
power socket.
• A domestic electrical
fuse is defective. Check
the domestic fuses and,
if necessary, renew the
defective one.
• The power socket is defective. Try another wall
socket.
• The coffee machine is
possibly defective.
Arrange for the coffee
machine to be checked
over by specialists.
Disposal
Do not dispose of the appliance in your
normal domestic waste. This product is
subject to the European directive
2002/96/EC.
Dispose of the appliance through an approved disposal
centre or at your community waste facility.
Observe the currently applicable regulations.
In case of doubt, please contact your waste disposal
centre.
Dispose of the packaging materials in an
environmentally responsible manner.
Technical data
Mains voltage: 230 V ~, 50 Hz
Nominal power: 1000 W
Coffee filter bags: Size 1 x 4
The quality of the
brewed coffee is
deteriorating.
• The coffee machine is
calcified. Decalcify the
coffee machine.
- 7 -
Page 10
Warranty and Service
The warranty for this appliance is for 3 years from
the date of purchase. The appliance has been manufactured with care and meticulously examined before delivery. Please retain your receipt as proof of
purchase. In the event of a warranty claim, please
make contact by telephone with our Service Department. Only in this way can a post-free despatch for
your goods be assured.
The warranty covers only claims for material and
manufacturing defects, but not for transport damage, for wearing parts or for damage to fragile components, e.g. buttons or batteries. This product is for
private use only and is not intended for commercial
use. The warranty is void in the case of abusive and
improper handling, use of force and internal tampering not carried out by our authorized service
branch. Your statutory rights are not restricted in any
way by this warranty.
The warranty period will not be extended by repairs
made under warranty. This applies also to replaced
and repaired parts. Any damage and defects extant
on purchase must be reported immediately after unpacking the appliance, at the latest, two days after
the purchase date. Repairs made after the expiration of the warranty period are subject to payment.
Service Great Britain
Tel.: 0871 5000 720 (£ 0.10/Min.)
E-Mail: kompernass@lidl.co.uk
IAN 68663
Service Ireland
Tel.: 1890 930 034
(0,08 EUR/Min., (peak))
(0,06 EUR/Min., (off peak))
E-Mail: kompernass@lidl.ie
IAN 68663
Importer
KOMPERNASS GMBH
BURGSTRASSE 21
44867 BOCHUM, GERMANY
www.kompernass.com
- 8 -
Page 11

SADRŽAJ STRANA
Sigurnosne upute 10
Uporaba u skladu sa namjenom. 11
Obim isporuke 11
Opis 11
Pregled uređaja 11
Postavljanje i priključivanje 11
Rukovanje 12
Prije prve uporabe . . . . . . . . . . . . . . . . . . . . . . . . . . . . . . . . . . . . . . . . . . . . . . . . . . . . . . . . .12
Umetanje mljevene kave . . . . . . . . . . . . . . . . . . . . . . . . . . . . . . . . . . . . . . . . . . . . . . . . . . . . .12
Umetanje vode . . . . . . . . . . . . . . . . . . . . . . . . . . . . . . . . . . . . . . . . . . . . . . . . . . . . . . . . . . . .13
Podešavanje arome . . . . . . . . . . . . . . . . . . . . . . . . . . . . . . . . . . . . . . . . . . . . . . . . . . . . . . . .13
Uključivanje i isključivanje . . . . . . . . . . . . . . . . . . . . . . . . . . . . . . . . . . . . . . . . . . . . . . . . . . . .13
Čišćenje 13
Odstranjivanje vapnenih naslaga 14
Otklanjanje funkcijskih smetnji 15
Zbrinjavanje 15
Tehnički podaci 15
Jamstvo & servis 16
Uvoznik 16
Upute za rukovanje prije prve upotrebe pažljivo pročitajte i sačuvajte ih za kasnije korištenje. Ukoliko uređaj
dajete trećim osobama, priložite i ove upute.
- 9 -
Page 12
APARAT ZA KAVU
Sigurnosne upute
Opasnost od strujnog udara!
• Aparat za kavu priključite isključivo na propisno
instaliranu i uzemljenu mrežnu utičnicu. Obratite
pažnju na to, da napon naveden na tipskoj ploči odgovara naponu mrežne utičnice.
• Izvucite utikač iz utičnice kada aparat za kavu
pomičete, punite, kada dođe do smetnji, prije čišćenja aparata ili u razdobljima kada aparat ne
koristite.
Aparat za kavu nikako ne smijete zaroniti u
tekućine. Uređaj ne smijete izložiti vlagi i ne
smijete ga koristiti na otvorenom prostoru.
Ukoliko ipak dospije tekućina u kućište
uređaja, odmah izvucite mrežni utikač iz
mrežne utičnice i dajte ga kvalificiranom
stručnom osoblju na popravak.
• Aparat za kavu, napojni kabel i utikač nikada
ne dirajte mokrim rukama.
• Mrežni kabel uvijek izvucite povlačenjem za
utikač, a nikada povlačenjem samoga kabela.
• Ne savijajte i ne gnječite mrežni kabel.
• Defektan uređaj neizostavno dajte kvalificiranoj
stručnoj radionici na popravak ili se obratite
servisu za kupce, kako biste izbjegli nastanak
mogućih opasnosti.
• Oštećene mrežne utikače ili kablove neizostavno
dajte na popravak ovlaštenim stručnjacima ili
servisu za kupce, kako biste izbjegli nastanak
opasnosti.
• Ne upotrebljavajte produžne kablove.
Opasnost od požara!
• Aparat za kavu za vrijeme rada nikada ne ostavite bez nadzora.
• Aparat za kavu nikada ne pogonite bez vode
i nikada ne napunite više vode od oznake Max.
• Ne koristite eksterni rasklopni sat ili odvojeni
daljinski sustav za rad sa uređajem.
Opasnost od ozljeđivanja!
• Staklenu posudu aparata za kavu nikada ne
grijte u mikrovalnoj peći.
• Ovaj uređaj nije namijenjen da bude korišten
od strane osoba (uključujući djecu) sa ograničenim fizičkim, senzoričnim i mentalnim osobinama i nedostatkom iskustva ili znanja, osim ako
ove osobe stoje pod nadzorom druge osobe
zadužene za njihovu sigurnost, ili ako su od nje
primili upute za ispravno korištenje uređaja.
• Djeca bi trebala biti pod nadzorom, čime treba
biti osigurano da se ne mogu igrati ovim
uređajem.
Opasnost od opeklina!
• Nikada ne dotaknite vruće površine aparata za
kavu, posebno grijaču ploču i staklenu posudu.
Opasnost ozljeđivanja parom!
Ovaj simbol Vas upozorava na izlazeću
paru. Opasnost od ozljeđivanja parom!
Obratite pažnju na sigurnosne napomene:
• Ruke ne držite u paru koja uzlazi.
• Prije uključivanja uvijek zatvorite držač filtra, u
protivnom postoji opasnost od ozljede uslijed izlazeće pare i vruće vode.
- 10 -
Page 13
• Staklenu posudu aparata za kavu nikada ne
grijte u mikrovalnoj peći.
• Aparat za kavu ne pomičite za vrijeme postupka
kuhanja.
• Posudu izvadite tek onda, kada je postupak kuhanja završen i kada je voda procurila kroz filtar.
Opasnost od protepanja!
• Mrežni kabel postavite tako, da nitko ne može
stati na njega ili se preko njega protepsti.
• Ne upotrebljavajte produžne kablove.
Upozorenje od oštećenja uređaja!
• Uređaj nikada ne pogonite u praznom stanju
(bez vode). U protivnom staklena posuda može
puknuti.
Uporaba u skladu sa namjenom.
Opis
Sa aparatom za kavu možete pripravljati vruću
filtarsku kavu. Gotovu kavu u uključenom uređaju
na ploči za grijanje u staklenoj posudi možete
držati toplom.
Pregled uređaja
1 Filtarski umetak
2 Prekidač za odabir arome
3 Poklopac spremnika za vodu
4 Pokazivač razine napunjene vode
5 Prekidač Uklj/Isklj sa integriranom kontrolnom
lampicom
6 Mjerna žlica
7 Držač filtra
8 Prolaz za kavu
Aparat za kavu služi isključivo za pripremanje kave.
Ovaj aparat za kavu je isključivo namijenjen za
uporabu u privatnim domaćinstvima. Ne koristite je
u gospodarske obrtne svrhe. Uređaj je namijenjen
isključivo za uporabu u unutrašnjosti prostorija.
Obratite pažnju na sve obavijesti u ovim uputama
za rukovanje, pogotovo na sigurnosne napomene.
Svaki drugi način uporabe smatra se protivnim
namjeni uređaja, i može proizrokovati materijalnu
štetu, pa čak i štetu po zdravlje osoba. Ne preuzimamo jamstvo za štete, koje nastaju uslijed upotrebe
protivne namjeni uređaja.
Obim isporuke
Aparat za kavu
Staklena posuda
Mjerna žlica
Upute za uporabu
Postavljanje i priključivanje
Opasnost od strujnog udara!
Aparat za kavu nikako ne postavljajte u blizini vode
sadržane u umivaonicima ili drugim posudama.
Aparat za kavu koristite isključivo na suhoj podlozi.
Blizina vode predstavlja opasnost čak i onda, kada
uređaj nije u pogonu. Zbog toga nakon svake upotrebe izvucite utikač.
Opasnost od požara!
Aparat za kavu nikada ne postavite u blizini izvora
toplote.
Uređaj bi mogao biti oštećen.
Pažnja!
Aparat za kavu koristite isključivo na ravnoj podlozi
otpornoj na visoke temperature, kako biste izbjegli
oštećenja uređaja i podloge.
- 11 -
Page 14
• Odstranite sav materijal ambalaže sa uređaja.
• Uređaj postavite na ravnu površinu otpornu na
visoke temperature.
• Staklenu posudu postavite na grijaču ploču
u uređaju.
• Otvorite držač filtra 7.
• Umetnite filtarski umetak 1 tako, da prolaz za
kavu 8 strši kroz otvor.
• Zatvorite držač filtra 7.
• Nakon toga mrežni utikač utaknite u utičnicu.
Rukovanje
Prije prve uporabe
Pažnja!
• U spremnik za vodu nikada ne umetnite veću
količinu od količine koja odgovara 12 punih
šalica vode.
U spremnik za vodu nikada ne umetnite manju
količinu vode od količine za 3 šalice. U protivnom
aparat za kavu može biti oštećen. Koristite
prikaz pokazivača razine vode 4.
• Aparat za kavu odmah nakon upotrebe odvojite
od napajanja strujom. Samo kada utikač izvučete iz utičnice, uređaj će potpuno biti oslobođen
od električne energije.
• U spremnik za vodu umetnite isključivo vodu iz
slavine. U protivnom aparat za kavu može biti
oštećen.
1. Otvorite staklenu posudu i poklopac spremnika
za vodu 3.
2. Staklenu posudu pažljivo isperite sa vodom iz
slavine. Ulijte vodu iz slavine u spremnik za
vodu. Obratite pažnju na to, da vodu polako
sipate u spremnik za vodu, kako bi voda mogla
curiti kroz dva otvora spremnika za vodu.
Ponogo ga ispraznite tako, što ćete uređaj
iznad sudopera oprezno okrenuti i proliti vodu.
3. Napunite staklenu posudu sa količinom vode
dostatnom za 12 šalica.
4. Napunite vodu iz slavine potpuno u spremnik
za vodu.
5. Zatvorite spremnik za vodu.
6. Odložite ispražnjenu staklenu posudu na
grijačoj ploči.
7. Aparat za kavu pomoću prekidača Uklj/Isklj 5
uključite (I). Integrirana kontrolna lampica svijetli.
Pričekajte, da postupak kuhanja bude dovršen.
8. Ispraznite staklenu posudu.
9. Aparat za kavu pomoću prekidača Uklj/Isklj 5
(O) isključite. Integrirana kontrolna lampica se
gasi.
10. Pričekajte, dok se uređaj ne ohladi.
Nakon toga aparat za kavu moÏete koristiti za
kuhanje mljevene kave.
Umetanje mljevene kave
1. Okrenite držač filtra 7 na stranu. Umetak filtra
1 mora biti umetnut.
2. Umetnite filtarsku vrećicu (veličine 1x4) sa
preklopljenim stranama u filtarski umetak 1.
3. Sa mjernom žlicom 6 napunite kavu u prahu.
- 12 -
Page 15
Napomena:
Umetnite približno jednu malu žlicu mljevene kave
za svaku šalicu filtarske kave. Ako želite manje jaku
kavu, količinu mljevene kave u prahu za svaku
šalicu možete reducirati.
4. Zatvorite držač filtra 7. Obratite pažnju na
to, da prolaz za kavu 8 bude iznad sredine
staklene posude.
Umetanje vode
Napomena:
Za pripremanje kave koristite isključivo pitku vodu!
Podešavanje arome
• Podesite željenu jačinu kave pomoću prekidača
za odabir arome 2. Podešavanje daje
jaku kavu, podešavanje daje blagu kavu.
Uključivanje i isključivanje
• Kada aparat za kavu želite uključiti, postavite
prekidač Uklj/Isklj 5 na “Ein” (Uklj) (I).
Integrirana kontrolna lampica svijetli.
• Kada aparat za kavu želite isključiti, postavite
prekidač Uklj/Isklj 5 na “Aus” (Isklj) (O).
Integrirana kontrolna lampica se gasi.
• Ukoliko aparat za kavu ne koristite, izvucite
mrežni utikač iz mrežne utičnice.
1. Otvorite poklopac spremnika za vodu 3.
2. Staklenu posudu napunite vodom.
Pažnja!
• Nikada u spremnik za vodu ne sipajte količinu
veću nego za 12 šalica kave. Nikada ne sipajte
količinu manju od količine potrebne za 3 šalice
u spremnik za vodu. U protivnom može doći do
oštećenja aparata za kavu. Koristite pokazivač
razine vode 4.
3. Vodu sipajte ovisno o željenoj količini filtarske
kave u spremnik za vodu. U tu svrhu koristite
pokazivač razine vode 4. Obratite pažnju na
to, da vodu polako sipate u spremnik, kako bi
voda mogla prolaziti kroz dva otvora spremnika
za vodu.
4. Zatvorite poklopac spremnika za vodu 3.
Napomena:
Ako aparat za kavu nakon postupka kuhanja ne
isključite pomoću prekidača Uklj/Isklj 5, kava će
na grijačoj ploči biti temperirana, sve dok ne isključite aparat za kavu.
Preporučamo me?utim da kavu pijete svježe pripravljenu.
Čišćenje
Kako biste prilikom spremanja kave uvijek ostvarili
optimalan okus, trebali biste aparat za kavu čistiti
nakon svake uporabe.
• Mrežni utikač izvucite iz utičnice.
Opasnost od strujnog udara!
Prije nego što čistite aparat za kavu, uvijek morate
izvući utikač iz utičnice. Uređaj prilikom čišćenja niukom slučaju ne smijete uroniti u vodu ili držati pod
mlaz tekuće vode.
- 13 -
Page 16

Opasnost od opeklina!
Uvijek čekajte, dok se aparat za kavu ohladi, prije
nego što ga čistite. Postoji opasnost od gorenja i
može doći do oštećenja uređaja.
Pažnja!
Ne koristite sredstva za čišćenje u domaćinstvu ili
oštre, odnosno šiljate predmete, da biste otklonili
nečistoće. Time biste mogli oštetiti aparat za kavu.
• Prebrišite kućište aparata za kavu i staklenu
posudu sa mekom krpom blago navlaženom
sapunskom lužinom. Pritom odstranite eventualne
naslage u staklenoj posudi.
• Nakon svake uporabe filtarski umetak 1 izvadite
iz držača filtra 7.
• Isperite ga pod mlazom tekuće vode.
• Očistite mjernu žlicu 6 u blagoj sapunskoj lužini
i isperite je bistrom vodom.
• Sve dijelove pomoću suhe krpe dobro osušite
prije nego što uređaj ponovo pustite u rad.
Odstranjivanje vapnenih naslaga
1. Isključite aparat za kavu i pustite ga da se potpuno ohladi.
2. Umetnite sredstvo za odstranjivanje vapnenih
naslaga u spremnik za vodu.
3. Dolijte maksimalno dopuštenu količinu vode.
4. Postavite staklenu posudu na grijaču ploču.
5. Aparat za kavu pomoću prekidača Uklj/Isklj 5
uključite.
6. Pričekajte završetak postupka kuhanja. Isključite
aparat za kavu i mrežni utikač izvucite iz mrežne
utičnice.
7. Staklenu posudu pažljivo isperite sa vodom
iz slavine. Ulijte vodu iz slavine u spremnik za
vodu. Obratite pažnju na to, da vodu polako
sipate u spremnik za vodu, kako bi voda mogla
curiti kroz dva otvora spremnika za vodu. Ponogo ga ispraznite tako, što ćete uređaj iznad
sudopera oprezno okrenuti i proliti vodu.
8. Nakon toga aparat za kavu pustite da dva puta
prokuha samo vodu iz slavine, na način opisan
u poglavlju "Prije prve uporabe".
Nakon toga opet možete koristiti aparat za kavu.
Sadržaj vapnenca (stupanj tvrdoće) u vodi vremenom dovodi do stvaranja naslaga u aparatu za
kavu. Vapnene naslage ometaju funkciju uređaja i
umanjuju kvalitetu kuhane filtarske kave.
Kod vašeg snabdjevača vodom se raspitajte za
stupanj tvrdoće vaše vode iz vodovoda. Kod
višeg stupnja tvrdoće vode je odstranjivanje
vapnenih naslaga ranije potrebno, kod nižeg
stupnja tvrdoće kasnije. Koristite sredstvo za
uklanjanje vapnenca u uređajima za domaćinstvo
i obratite pažnju na uputstvo za upotrebu.
- 14 -
Page 17

Otklanjanje funkcijskih smetnji
Simptom Mogući uzroci i pomoć
Zbrinjavanje
Uređaj nikako ne bacajte u obično kućno smeće. Ovaj proizvod podliježe europskoj smjernici 2002/96/EC.
Aparat za kavu se
ne uključuje.
Kvaliteta pripravljene
kave se pogoršava.
• Utikač nije utaknut u utičnicu. Utaknite utikač
u utičnicu.
• Jedan od osigurača je
defektan. Prekontrolirajte
osigurače u domaćinstvu
i po potrebi ih obnovite.
• Utičnica za struju je
neispravna.
I sprobajte drugu utičnicu.
• Aparat za kavu je možda neispravan.
Dajte aparat za kavu
stručnom osoblju na
kontrolu.
• Aparat za kavu ima
naslage vapnenca.
Otklonite naslage vapnenca u aparatu za kavu.
Uređaj zbrinite preko autoriziranog poduzeća za
zbrinjavanje otpada ili preko Vaše komunalne ustanove za zbrinjavanje.
Obratite pažnju na aktualno važeće propise.
U slučaju dvojbe se povežite sa Vašom ustanovom
za zbrinjavanje otpada.
Sve materijale ambalaže zbrinite na način
neškodljiv za okoliš.
Tehnički podaci
Mrežni napon: 230 V ~, 50 Hz
Nominalna snaga: 1000 W
Filtar za kavu: Veličina 1 x 4
Izjava o sukladnosti za ovaj proizvod dostupna je
na internet stranici www.lidl.hr.
- 15 -
Page 18

Jamstvo & servis
Uvoznik
Na ovaj uređaj vrijedi jamstvo u trajanju od 3 godine od datuma kupovine. Uređaj je pažljivo proizveden i prije isporuke brižljivo kontroliran. Molimo sačuvajte blagajnički račun kao dokaz o kupnji.
Molimo da se u slučaju ostvarivanja prava na jamstvo telefonski povežete sa Vašom servisnom ispostavom. Samo na taj način vaša roba može biti besplatno uručena.
Jamstvo vrijedi samo za greške materijala i izrade,
a ne za transportne štete, potrošne dijelove ili oštećenja lomljivih dijelova, na primjer prekidača ili baterija.
Proizvod je namijenjen isključivo za privatnu, a ne
za gospodarstvenu uporabu.
U slučaju nestručnog rukovanja, rukovanja protivnog namjeni uređaja, primjene sile i zahvata, koji
nisu izvršeni od strane našeg ovlaštenog servisnog
predstavništva, važenje jamstva prestaje. Vaša zakonska prava ovim jamstvom ostaju netaknuta.
Jamstveni rok se ne produžava uslijed ostvarivanja
prava na jamstvo. To vrijedi i za zamijenjene i popravljene dijelove. Eventualno već prilikom kupovine prisutna oštećenja i nedostaci moraju biti javljena neposredno nakon raspakiranja, ali najkasnije
dva dana nakon datuma kupovine. Popravke vršene
nakon isteka jamstvenog roka podliježu obavezi
plaćanja.
Lidl Hrvatska d.o.o. k.d.,
p.p. 61
10020 Novi Zagreb
Proizvođač:
KOMPERNASS GMBH
BURGSTRASSE 21
D-44867 BOCHUM, Njemačka
www.kompernass.com
Servis Hrvatska
Tel.: 0800 777 999
E-Mail: kompernass@lidl.hr
IAN 68663
- 16 -
Page 19

CUPRINS PAGINA
Indicaţii de siguranţă 18
Utilizarea conform destinaţiei 19
Furnitura 19
Descrierea produsului 19
Prezentarea aparatului 19
Amplasarea şi conectarea 19
Operarea 20
Înainte de prima utilizare . . . . . . . . . . . . . . . . . . . . . . . . . . . . . . . . . . . . . . . . . . . . . . . . . . . . .20
Adăugarea cafelei măcinate . . . . . . . . . . . . . . . . . . . . . . . . . . . . . . . . . . . . . . . . . . . . . . . . . .20
Adăugarea apei . . . . . . . . . . . . . . . . . . . . . . . . . . . . . . . . . . . . . . . . . . . . . . . . . . . . . . . . . . .21
Setarea aromei . . . . . . . . . . . . . . . . . . . . . . . . . . . . . . . . . . . . . . . . . . . . . . . . . . . . . . . . . . . .21
Pornirea şi oprirea . . . . . . . . . . . . . . . . . . . . . . . . . . . . . . . . . . . . . . . . . . . . . . . . . . . . . . . . . .21
Curăţarea 21
Eliminarea calcarului 22
Remedierea defecţiunilor 23
Eliminarea aparatelor uzate 23
Date tehnice 23
Garanţia şi service-ul 24
Importator 24
- 17 -
R
Page 20

FILTRU DE CAFEA
Indicaţii de siguranţă
Pericol de electrocutare!
• Conectaţi cafetiera numai la o priză instalată
regulamentar şi pământată. Asiguraţi-vă că
tensiunea indicată pe plăcuţa de fabricaţie cor
espunde cu tensiunea prizei.
• Dacă mişcaţi cafetiera, dacă o umpleţi, în caz
de defecţiuni, înainte de curăţare sau când nu
este utilizată, scoateţi ştecărul din priză.
Este interzisă introducerea cafetierei în lichide.
Nu expuneţi aparatul mediilor umede şi nu-l
utilizaţi în aer liber. Dacă, din întâmplare, în
carcasa aparatului se infiltrează lichide, scoateţ i
imediat ştecărul din priză şi predaţi cafetiera
unui specialist în vederea reparării.
• Nu puneţi niciodată mâinile ude pe cafetieră,
pe cablul de alimentare sau pe ştecăr.
• Scoateţi cablul din priză trăgând de ştecăr; nu
trageţi direct de cablu.
• Nu frângeţi şi nu striviţi cablul de alimentare.
• Aparatele defecte trebuie reparate imediat de
către un atelier de specialitate autorizat sau
adresaţi-vă serviciului pentru clienţi, pentru a
evita periclitările.
• Dacă ştecărul sau cablul de alimentare se defectează, solicitaţi imediat repararea de către personal specializat sau de către serviciul clienţi,
pentru a evita periclitările.
• Nu utilizaţi cabluri prelungitoare.
Pericol de incendiu!
• A nu se lăsa nesupravegheată în timpul funcţionării.
• Nu operaţi niciodată cafetiera fără apă şi nu
adăugaţi apă peste marcajul Max.
• Nu utilizaţi temporizatoare externe sau sisteme
separate de comandă de la distanţă pentru a
opera cafetiera.
Pericol de rănire!
• Nu introduceţi niciodată vasul de sticlă al cafetierei în cuptorul cu microunde.
• Acest aparat nu poate fi utilizat de către persoanele
(inclusiv copiii) ale căror capacităţi fizice,
senzoriale sau intelectuale sunt limitate sau cărora le lipseşte experienţa şi / sau cunoştinţel
e necesare, cu excepţia cazului în care sunt
supravegheate de către o altă persoană, responsabilă cu siguranţa lor sau dacă au primit în
prealabil indicaţii pentru utilizarea aparatului.
• Copiii trebuie supravegheaţi, pentru a împiedica
utilizarea aparatului ca jucărie.
Pericol de arsuri!
• Nu atingeţi niciodată suprafeţele fierbinţi ale
cafetierei, în special plita încinsă şi vasul de sticlă.
Pericol de opărire!
Acest simbol este un avertisment contra aburilor
fierbinţi. Pericol de opărire! Respectaţ i
indicaţiile de siguranţă.
• Nu ţineţi mâinile deasupra aburului care se
degajă.
• Înainte de pornire, închideţi întotdeauna suportul
filtrului, altfel există pericol de opărire din cauza
aburului şi apei fierbinţi degajate.
R
- 18 -
Page 21

• Nu introduceţi niciodată vasul de sticlă al cafetierei în cuptorul cu microunde.
• Nu mişcaţi cafetiera niciodată în timpul funcţionării.
• Scoateţi recipientul numai după terminarea fierberii
şi după golirea filtrului.
Pericol de împiedicare!
• Pozaţi cablul de alimentare astfel încât să nu se
calce pe el sau să devină un obstacol pentru
persoane.
• Nu utilizaţi cabluri prelungitoare.
Avertizare contra defecţiunilor
aparatului!
• Nu utilizaţi niciodată aparatul fără apă. Altfel,
vasul de sticlă poate plesni.
Utilizarea conform destinaţiei
Cafetiera este destinată exclusiv preparării cafelei.
Cafetiera poate fi utilizată exclusiv în locuinţele
private . A nu se utiliza în scopuri profesionale.
Aparatul trebuie utilizat numai în spaţii interioare.
Respectaţi toate informaţiile din acest manual de
utilizare, în special indicaţiile de siguranţă. Orice
altă utilizare este considerată neconformă cu
destinaţia şi poate conduce la pagube materiale sau
răniri umane. Nu se acordă garanţie pentru
pagubele rezultate în urma utilizării neconforme.
Furnitura
Descrierea produsului
Cu ajutorul cafetierei puteţi prepara cafea filtru
fierbinte. Cafeaua odată preparată poate fi menţinută caldă în vasul de sticlă, pe plita aparatului pornit.
Prezentarea aparatului
1 Element de filtrare
2 Comutator selectiv de aromă
3 Capacul rezervorului de apă
4 Indicator pentru nivelul apei
5 Comutator pornit/oprit cu bec de control integrat
6 Lingură gradată
7 Suport filtru
8 Orificiul de ieşire a cafelei
Amplasarea şi conectarea
Pericol de electrocutare!
Nu aşezaţi în niciun caz cafetiera în apropierea apei
chiuvetelot sau a altor recipiente cu apă. Utilizaţi
cafetiera numai pe un suport uscat. Apropierea de
apă este periculoasă chiar dacă aparatul este oprit.
De aceea, scoateţi ştecărul din priză după fiecare
utilizare.
Pericol de incendiu!
Nu amplasaţi niciodată cafetiera în apropierea
surselor de căldură.
Aparatul poate fi deteriorat.
Cafetieră
Vas de sticlă
Lingură gradată
Instrucţiuni de utilizare
Atenţie!
Utilizaţi cafetiera numai pe o suprafaţă plană şi
rezistentă la căldură, pentru a preveni deteriorarea
aparatului şi a suprafeţei pe care este aşezată
cafetiera.
- 19 -
R
Page 22

• Îndepărtaţi toate ambalajele de la aparat.
• Aşezaţi aparatul pe o suprafaţă plană şi
rezistentă la căldură.
• Aşezaţi vasul de sticlă pe plita aparatului.
• Deschideţi suportul filtrului 7.
• Aşezaţi elementul de filtrare 1 astfel încât orificiul
de ieşire a cafelei 8 să iasă prin deschizătură.
• Închideţi suportul filtrului 7.
• Introduceţi apoi ştecărul în priză.
Operarea
Înainte de prima utilizare
Atenţie!
• Nu adăugaţi niciodată în rezervor o cantitate
mai mare de apă decât cea necesară pentru
12 ceşti de cafea.
Nu adăugaţi niciodată în rezervor o cantitate
mai mică de apă decât cea necesară pentru 3
ceşti. Altfel, cafetiera se poate defecta. Ghidaţi-vă
după indicatorul de nivel al apei 4.
• După utilizare, deconectaţi imediat cafetiera de
la reţeaua de curent. Cafetiera este complet fără
curent doar după scoaterea din priză a ştecărului.
• Umpleţi rezervorul numai cu apă. Altfel, cafetiera
poate fi deteriorată.
1. Deschideţi vasul de sticlă şi capacul rezervorului
de apă 3.
2. Clătiţi bine vasul de sticlă cu apă. Umpleţi
rezervorul cu apă. Turnaţi apa încet în rezervor
pentru ca aceasta să poată curge prin ambele
orificii ale rezervorului. Goliţi rezervorul întorcând aparatul invers deasupra unei chiuvete.
3. Umpleţi vasul de sticlă cu apă pentru 12 ceşti.
4. Turnaţi toată apa în rezervor.
5. Închideţi rezervorul.
6. Aşezaţi vasul de sticlă gol pe plita cafetierei.
7. Porniţi cafetiera de la comutatorul pornit/oprit 5
(I). Se aprinde becul de control integrat. Aşteptaţi până la terminarea procesului de fierbere.
8. Goliţi vasul de sticlă.
9. Opriţi cafetiera de la comutatorul pornit/oprit 5
(O). Se stinge becul de control integrat.
10.Aşteptaţi până când aparatul s-a răcit.
Apoi, puteţi utiliza cafetiera pentru prepararea cafelei măcinate.
Adăugarea cafelei măcinate
1. Trageţi într-o parte suportul filtrului 7. Elementul
filtrant 1 trebuie să se găsească la locul lui.
2. Aşezaţi un filtru de hârtie (dimensiune 1 x 4) cu
marginile îndoite în elementul de filtrare 1.
3. Cu ajutorul lingurii gradate 6 adăugaţi cafea
măcinată.
R
- 20 -
Page 23

Indicaţie:
Adăugaţi cca o lingură gradată plină de cafea
măcinată pentru fiecare ceaşcă de cafea filtru. Dacă
cafeaua este prea tare, reduceţi cantitatea de cafea
măcinată pentru fiecare ceaşcă de cafea.
Setarea aromei
• Setaţi gradul de intensitate a cafelei de la comutatorul selectiv de aromă 2. Cu setarea se
obţine o cafea tare, iar cu setarea se
obţine o cafea mai slabă.
4. Închideţi suportul filtrului 7. Asiguraţi-vă că or
ificiul de scurgere a cafelei 8 se află deasupra
vasului de sticlă.
Adăugarea apei
Indicaţie:
Pentru prepararea cafelei, utilizaţi numai apă potabilă!
1. Deschideţi capacul rezervorului de apă 3.
2. Umpleţi vasul de sticlă cu apă.
Atenţie!
• Nu adăugaţi niciodată în rezervor o cantitate
mai mare de apă decât cea necesară pentru
12 ceşti de cafea.
Nu adăugaţi niciodată în rezervor o cantitate
mai mică de apă decât cea necesară pentru 3
ceşti. Altfel, cafetiera se poate defecta. Ghidaţivă după indicatorul de nivel al apei 4.
3. Turnaţi apă în rezervor în funcţie de cantitatea
de cafea pe care doriţi să o preparaţi. Ghidaţi-vă
după indicatorul de nivel al apei 4. Turnaţi apa
încet în rezervor pentru ca aceasta să poată curge
prin ambele orificii ale rezervorului.
4. Închideţi capacul rezervorului de apă 3.
Pornirea şi oprirea
• Dacă doriţi să porniţi cafetiera, apăsaţi comutatorul pornit/oprit 5 pe „Pornit” (I). Se aprinde
becul de control integrat.
• Dacă doriţi să opriţi cafetiera, apăsaţi comutatorul pornit/oprit 5 pe „Oprit” (O). Se stinge
becul de control integrat.
• Dacă nu utilizaţi cafetiera un timp mai îndelungat,
scoateţi ştecărul din priză.
Indicaţie:
Dacă după prepararea cafelei nu aţi oprit cafetiera de
la comutatorul ponit/oprit 5, cafeaua este menţinută
caldă pe plită până când opriţi aparatul.
Vă recomandăm însă să consumaţi cafeaua proaspătă.
Curăţarea
Pentru ca la fiecare preparare a cafelei să obţineţi
un gust optim, cafetiera trebuie curăţată de fiecare
dată după utilizare.
• Scoateţi ştecărul din priză.
Pericol de electrocutare!
Înainte de a curăţa cafetiera, trebuie să scoateţi
întotdeauna ştecărul din priză. La curăţare, este
interzisă introducerea cafetierei în apă sau ţinerea
sa sub jet de apă.
- 21 -
R
Page 24

Pericol de arsuri!
Aşteptaţi întotdeauna ca aparatul să se răcească
înainte de a-l curăţa Există risc de arsuri, iar apa-
ratul s-ar putea deteriora.
Atenţie!
Nu utilizaţi detergenţi sau obiecte ascuţite pentru a
îndepărta murdăria. Prin utilizarea acestora cafetiera
poate fi deteriorată.
• Ştergeţi carcasa cafetierei şi vasul de sticlă cu
un prosop umezit în apă cu detergent. Îndepărtaţi
eventualele depuneri din vasul de sticlă.
• După fiecare utilizare, scoateţi elementul de
filtrare 1 din suportul de filtru 7.
• Clătiţi-l sub jet de apă.
• Curăţaţi lingura gradată 6 în apă cu detergent
şi clătiţi-o cu apă curată.
• Ştergeţi toate componentele cu un prosop înainte
de a utiliza din nou aparatul.
Eliminarea calcarului
Conţinutul de calcar (gradul de duritate) din apă
provoacă pe parcursul utilizării depunerea calcarului
în cafetieră. Calcarul influenţează negativ funcţionarea
aparatului şi reduce calitatea cafelei preparate.
1. Opriţi cafetiera şi aşteptaţi să se răcească
complet.
2. Turnaţi substanţa de îndepărtare a calcarului în
rezervorul de apă.
3. Umpleţi rezervorul cu cantitatea maximă de apă.
4. Aşezaţi vasul de sticlă pe plită.
5. Porniţi cafetiera de la comutatorul pornit/oprit 5.
6. Aşteptaţi până la terminarea procesului de fierbere.
Opriţi cafetiera şi scoateţi ştecărul din priză.
7. Clătiţi bine vasul de sticlă cu apă. Umpleţi
rezervorul cu apă.
Turnaţi apa încet în rezervor pentru ca aceasta să
poată curge prin ambele orificii ale rezervorului.
Goliţi rezervorul întorcând aparatul invers deasupra unei chiuvete.
8. Apoi, lăsaţi cafetiera să fiarbă de două ori cu
apă, în modul descris în capitolul „Înainte de
prima utilizare“.
După aceasta, cafetiera poate fi din nou utilizată.
Solicitaţi informaţii despre gradul de duritate
al apei de la robinet de la furnizorul public de
apă. Dacă gradul de duritate este mare,
curăţarea calcarului trebuie să se realizeze
mai devreme, iar dacă gradul de duritate este
mai mic, mai târziu. Utilizaţi produse de
curăţare a calcarului pentru aparatele electrocasnice şi respectaţi instrucţiunile de utilizare
de pe ambalajul acestora.
R
- 22 -
Page 25

Remedierea defecţiunilor
Simptom Cauze posibile şi
remedii
Cafetiera nu porneşte. • Ştecărul nu este introdus
în priză. Introduceţi
ştecărul în priză.
• Este defectă o siguranţă
a instalaţiei electrice
a casei. Verificaţi
siguranţele instalaţiei
electrice şi, dacă este
necesar, înlocuiţile.
• Priza este defectă.
Încercaţi cu altă priză.
• Cafetiera poate fi defectă. Solicitaţi verificarea
cafetierei de către personal calificat.
Calitatea cafelei
preparate este din ce
în ce mai proastă.
• În interiorul cafetierei s-a
depus calcar.
Îndepărtaţi calcarul
din cafetieră.
Eliminarea aparatelor uzate
Nu aruncaţi în niciun caz cafetiera în
gunoiul menajer. Acest produs cade
sub incidenţa Directivei europene
2002/96/EC.
Eliminaţi aparatul prin intermediul unei firme autorizate
sau prin intermediul centrului local de colectare a
deşeurilor.
Respectaţi normele actuale în vigoare.
Dacă aveţi nelămuriri, contactaţi serviciul
dumneavoastră local de eliminare a deşeurilor.
Eliminaţi toate materialele de ambalare
într-un mod ecologic.
Date tehnice
Tensiune: 230 V ~, 50 Hz
Putere nominală: 1000 W
Hârtii filtrante: 1 x 4
- 23 -
R
Page 26

Garanţia şi service-ul
Pentru acest aparat se acordă o garanţie de 3 ani
începând cu data cumpărării. Aparatul a fost produs
cu foarte mate atenţie şi verificat conştiincios înainte
de livrare.
Păstraţi bonul de casă pentru a dovedi cumpărarea.
În caz de defecţiuni în perioada de garanţie contactaţi
telefonic centrul dumneavoastră de service. Numai
astfel poate fi asigurată o expediere gratuită a produsului dumneavoastră.
Garanţia acoperă numai defectele de material sau
de fabricaţie, nu şi deteriorările rezultate în urma
transportului, piesele de uzură sau deteriorările apărute
la componentele fragile, de exemplu, comutatoare
sau acumulatoare. Acest aparat este destinat exclusiv
uzului personal şi nu este permisă utilizarea lui în
scopuri comerciale.
În cazul manevrării abuzive sau necorespunzătoare,
al uzului de forţă şi intervenţiilor care nu au fost realizate
de către filiala noastră autorizată de service, garanţia
îşi pierde valabilitatea. Drepturile dumneavoastră legale
nu sunt îngrădite de această garanţie.
Perioada de garanţie nu este prelungită după realizarea reparaţiilor realizate în perioada de garanţie.
Acelaşi lucru este valabil şi pentru componentele înlocuite sau reparate. Dacă la cumpărare se constată
deteriorări sau vicii, acestea trebuie anunţate cel târziu în două zile de la data cumpărării. După expirarea
perioadei de garanţie, reparaţiile se efectuează
contra cost.
R
Service România
Tel.: 0800896637
E-Mail: kompernass@lidl.ro
IAN 68663
Importator
KOMPERNASS GMBH
BURGSTRASSE 21
44867 BOCHUM, GERMANIA
www.kompernass.com
R
- 24 -
Page 27

Cъдържание Cтраница
Указания за безопасност 26
Употреба по предназначение 27
Окомплектовка на доставката 27
Описание 27
Преглед на уреда 27
Инсталиране и свързване 27
Обслужване 28
Преди първата употреба . . . . . . . . . . . . . . . . . . . . . . . . . . . . . . . . . . . . . . . . . . . . . . . . . . .28
Сипване на мляно кафе . . . . . . . . . . . . . . . . . . . . . . . . . . . . . . . . . . . . . . . . . . . . . . . . . . . .28
Напълване с вода . . . . . . . . . . . . . . . . . . . . . . . . . . . . . . . . . . . . . . . . . . . . . . . . . . . . . . . . .29
Настройка на силата на кафето . . . . . . . . . . . . . . . . . . . . . . . . . . . . . . . . . . . . . . . . . . . . .29
Включване и изключване . . . . . . . . . . . . . . . . . . . . . . . . . . . . . . . . . . . . . . . . . . . . . . . . . . .29
Почистване 29
Отстраняване на котлен камък 30
Действия при неправилно функциониране 31
Изхвърляне 31
Технически характеристики 31
Гаранция и сервиз 32
Вносител 32
Прочетете внимателно ръководството за експлоатация преди да използвате уреда за първи път и го
запазете за по-нататъшна употреба. Когато предавате уреда на трети лица, предайте и това ръководство.
- 25 -
Page 28

Кафе машина
Указания за безопасност
Опасност от токов удар!
• Свързвайте кафемашината само към инсталиран според инструкциите и заземен контакт.
Внимавайте посоченото на фабричната табелка
напрежение да съответства на напрежението
на контакта.
• Изключвайте щепсела от контакта, когато
премествате или пълните кафемашината,
при повреди, преди почистване на кафемашината или ако няма да я използвате!
В никакъв случай не трябва да потапяте
кафемашината в течности. Не трябва да
излагате уреда на влага и да го използвате
на открито. Ако все пак някога попадне
течност в корпуса на уреда, изключете
веднага щепсела на уреда от контакта и
дайте уреда за ремонт от квалифицирани
специалисти.
• Никога не хващайте кафемашината, кабела
и щепсела с мокри ръце.
• Изключвайте кабела като дърпате винаги
щепсела от контакта, а не самия кабел.
• Не огъвайте или притискайте кабела.
• Дайте незабавно неизправния уред за ремонт
от квалифициран специалист или се обърнете
към сервиз, за да избегнете опасности.
• Дайте веднага повредения щепсел или кабел
за смяна от оторизиран електротехник или
сервиз, за да избегнете опасности.
• Не използвайте удължител.
Опасност от пожар!
• Никога не оставяйте кафемашината без наблюдение по време на работа.
• Никога не пускайте кафемашината да работи
без вода и никога не я пълнете над маркировката Max.
• За работа с уреда не използвайте външен
таймер или отделна система за дистанционно
управление.
Опасност от нараняване!
• Никога не слагайте стъклената кана на кафемашината в микровълнова фурна.
• Този уред не е предвиден за използване от лица
(включително и деца) с ограничени физически,
органолептични или умствени способности или
от лица, които не притежават необходимия опит
и/или знания, освен ако не са под надзора на
лица, отговорни за тяхната безопасност или не
са получили от тях указания как трябва да се
използва уредът.
• Децата трябва да се наблюдават, за да се
гарантира, че не играят с уреда.
Опасност от изгаряне!
• Никога не докосвайте горещите повърхности
на кафемашината, особено нагревателната
плоча и стъклената кана.
Опасност от попарване!
Този символ предупреждава за излизаща
пара. Опасност от попарване! Спазвайте
указанията за безопасност:
• Не дръжте ръцете си над издигащата се водна
пара.
• Преди включване винаги затваряйте държача
на филтъра, в противен случай съществува
опасност от попарване от излизаща пара и
гореща вода.
- 26 -
Page 29

• Никога не слагайте стъклената кана на кафемашината в микровълнова фурна.
• Не премествайте кафемашината по време
на процеса на запарване.
• Вземайте каната, едва след като процесът на
запарване е завършил и течността е изтекла
от филтъра.
Описание
С кафемашината можете да приготвите горещо
филтрирано кафе. При включен уред можете
да поддържате вече приготвеното кафе топло в
стъклената кана върху нагревателната плоча.
Опасност от спъване!
• Полагайте кабела така, че никой да не го
настъпва или да не се спъва в него.
• Не използвайте удължител.
Предупреждение за повреди на
уреда!
• Никога не пускайте уреда да работи в празно
състояние (без вода). В противен случай стъклената кана може да се пръсне.
Употреба по предназначение
Кафемашината служи само за приготвяне на кафе.
Тази кафемашина е предназначена само за домашна употреба. Вземайте под внимание цялата
информация в това ръководство за обслужване,
особено указанията за безопасност. Не използвайте машината за кафе със стопанска цел.
Уредът е предназначен само за използване в
затворени помещения. Всяка друга употреба се
счита за употреба не по предназ-начение и
може да доведе до материални щети и дори до
телесни повреди. Не се поема отгово-рност за
щети, които възникват вследствие употреба не по
предназначение.
Преглед на уреда
1 Вложка за филтъра
2 Превключвател за силата на кафето
3 Капак на резервоара за вода
4 Индикатор за нивото на напълване на вода
5 Бутон за включване/изключване с вграден
контролен индикатор
6 Дозаторна лъжица
7 Държач на филтъра
8 Проход за кафето
Инсталиране и свързване
Опасност от токов удар!
В никакъв случай не инсталирайте кафемашината в близост до вода, до мивки или други съдове,
в които има вода. Използвайте кафемашината
само върху суха основа. Близостта на вода представлява опасност, дори когато уредът не работи.
Затова след всяка употреба изключвайте щепсела
от контакта.
Опасност от пожар!
Никога не инсталирайте кафемашината в близост
до източници на топлина.
Уредът може да се повреди.
Окомплектовка на доставката
Кафемашина
Стъклена кана
Дозаторна лъжица
Ръководство за обслужване
Внимание!
Използвайте кафемашината само върху равна и
нечувствителна на топлина основа, за да избегнете
повреди по уреда и опорната повърхност.
- 27 -
Page 30

• Отстранете всички опаковъчни материали
от уреда.
• Инсталирайте уреда върху равна и нечувствителна на топлина повърхност.
• Поставете стъклената кана върху
нагревателната плоча в уреда.
• Отворете държача на филтъра 7.
• Поставете вложката за филтъра 1 така, че
проходът за кафето 8 да влиза в отвора.
• Затворете държача на филтъра 7.
• След това включете щепсела в контакта.
Обслужване
Преди първата употреба
Внимание!
• Никога не наливайте в резервоара за вода
общо количество вода над 12 чаши.
Никога не наливайте в резервоара за вода
по-малко от 3 чаши вода. В противен случай
кафемашината може да се повреди. Използвайте индикатора за нивото на напълване
на вода 4.
• Веднага след употреба изключвайте кафемашината от електрическата мрежа. Само
когато изключите щепсела от контакта, в нея
не протича ток.
• Наливайте единствено вода в резервоара за
вода. В противен случай можете да повредите
кафемашината.
1. Отворете стъклената кана и капака на резер-
воара за вода 3.
2. Изплакнете стъклената кана старателно с
вода. Налейте вода в резервоара за вода.
Обърнете внимание на това, че водата
трябва да се сипва бавно в резервоара за
вода, за да може да преминава през двата
отвора на резервоара за вода. Изпразнете
го, като обърнете уреда внимателно над
мивка и излеете водата.
3. Напълнете стъклената кана с вода за 12 чаши.
4. Налейте водата в резервоара за вода.
5. Затворете резервоара за вода.
6. Оставете изпразнената стъклена кана върху
нагревателната плоча.
7. Включете кафемашината с бутона за включване/изключване 5 (I). Вграденият контролен
индикатор свети. Изчакайте, докато процесът
на запарване завърши.
8. Изпразнете стъклената кана.
9. Изключете кафемашината с бутона за включване/изключване 5 (О). Вграденият контролен
индикатор угасва.
10. Изчакайте, докато уредът се охлади.
Кафе машината можете да използвате само за
приготвяне на смляно кафе.
Сипване на мляно кафе
1. Завъртете държача на филтъра 7 настрани.
Вложката за филтъра 1 трябва да е поставена вътре.
2. Поставете филтърна торбичка (размер 1x4) с
прегънати страни във вложката за филтъра 1.
3. Сипете мляно кафе с дозаторната лъжица 6.
- 28 -
Page 31

Указание:
Сипвайте по около една кафена лъжичка мляно
кафе с връх за всяка чаша филтрирано кафе.
Ако филтрираното кафе не трябва да е силно,
можете да намалите количеството кафе за чаша.
Настройка на силата на кафето
• Настройте желаната сила на кафето с превключвателя за силата на кафето 2. Настройката
е за силно кафе, а настройката - за
по-слабо кафе.
4. Затворете държача за филтъра 7. Внимавайте
проходът за кафето 8 да се намира в средата
над стъклената кана.
Напълване с вода
Указание
За приготвянето на кафе използвайте само питейна
вода!
1. Отворете капака на резервоара за вода 3.
2. Напълнете стъклената кана с вода.
Внимание!
• Никога не наливайте в резервоара за вода
общо количество вода над 12 чаши. Никога
не наливайте в резервоара за вода по-малко
от 3 чаши вода. В противен случай
кафемашината може да се повреди. Използвайте индикатора за нивото на напълване
на вода 4.
3. В резервоара за вода налейте вода за желаното
количество филтрирано кафе. За тази цел използвайте индикатора за нивото на напълване
на вода 4. Обърнете внимание на това, че
водата трябва да се сипва бавно в резервоара
за вода, за да може да преминава през двата
отвора на резервоара за вода.
4. Затворете капака на резервоара за вода 3.
Включване и изключване
• Когато искате да включите кафемашината,
поставете бутона за включване/изключване 5
на “Вкл.” (I). Вграденият контролен индикатор
свети.
• Когато искате да изключите кафемашината,
поставете бутона за включване/изключване 5
на “Изкл.” (О). Вграденият контролен индикатор
угасва.
• Когато не използвате кафемашината,
изключвайте щепсела от контакта.
Указание
Когато след процеса на запарване не изключите
кафемашината с бутона за включване/изключване
5, кафето се поддържа в топло състояние върху
нагревателната плоча, докато изключите кафемашината.
Все пак ние препоръчваме кафето да се пие
прясно приготвено.
Почистване
За да постигате оптимален резултат при запарването, трябва да почиствате кафемашината след
всяка употреба.
• Издърпайте щепсела от контакта.
Опасност от токов удар!
Преди почистване на кафемашината винаги трябва
да изключвате щепсела от контакта. При почистването в никакъв случай не трябва да потапяте уреда
във вода и да го държите под течаща вода.
- 29 -
Page 32

Опасност от изгаряне!
Винаги изчаквайте кафемашината да се охлади,
преди да я почистите. Съществува опасност от
изгаряне и уредът може да се повреди.
Внимание!
Не използвайте домакински почистващи препарати
или остри предмети, за да отстраните замърсявания.
С тях можете да повредите кафемашината.
• Избърсвайте корпуса на кафемашината и
стъклената кана с леко навлажнена със
сапунена вода, мека кърпа. Отстранявайте
евентуалните наслагвания в стъклената кана.
• След всяка употреба изваждайте вложката за
филтъра 1 от държача на филтъра 7.
• Измивайте я под течаща вода.
• Мийте дозаторната лъжица 6 с мека сапунена
вода и я изплаквайте с чиста вода.
• Изсушете добре всички части със суха кърпа,
преди да използвате отново уреда.
Отстраняване на котлен камък
1. Изключете кафемашината и я оставете да се
охлади напълно.
2. Сипете препарата за отстраняване на котлен
камък в резервоара за вода.
3. Налейте максимално допустимото количество
вода.
4. Поставете стъклената кана върху нагревателната плоча.
5. Включете кафемашината с бутона за включване/изключване 5.
6. Изчакайте, докато процесът на запарване
завърши. Изключете кафемашината от бутона
и изключете щепсела от контакта.
7. Изплакнете стъклената кана старателно с
вода. Налейте вода в резервоара за вода.
Обърнете внимание на това, че водата трябва
да се сипва бавно в резервоара за вода, за
да може да преминава през двата отвора
на резервоара за вода. Изпразнете го, като
обърнете уреда внимателно над мивка и излеете водата.
8. След това оставете кафемашината да се
запари два пъти само с вода, както е описано
в глава „Преди първата употреба“.
Съдържанието на варовик (степен на твърдост)
във водата води в течение на използването на
кафемашината до образуването на котлен камък.
Котленият камък се отразява отрицателно върху
функционирането на уреда, понижава качеството на запареното филтрирано кафе.
Осведомете се от вашето водоснабдително
дружество за степента на твърдост на водата
от водопровода. При висока степен на твърдост
отстраняването на котления камък се налага
по-скоро, а при ниска степен на твърдост по-късно. Използвайте препарат за отстраняване на котлен камък за домакински уреди и
спазвайте ръководството за употреба.
След това можете да използвате кафемашината
отново.
- 30 -
Page 33

Действия при неправилно
функциониране
Симптом Възможна причина и
начин на отстраняване
Изхвърляне
В никакъв случай не изхвърляйте уреда
с обикновените битови отпадъци.
Този уред подлежи на европейската
Директива 2002/96/EC.
Кафемашината не
се включва.
Качеството на
запареното
кафе се влошава.
• Щепселът не е включен в контакта.
Включете щепсела в
контакта.
• Има изгорял предпазител. Проверете
предпазителите и
при необходимост
ги сменете.
• Контактът е повреден.
Изпробвайте друг
контакт.
• Възможно е кафемашината да е повредена. Дайте
кафемашината за
проверка от
специалист.
• По кафемашината
се е натрупал котлен
камък. Почистете
кафемашината от
котления камък.
Изхвърляйте уреда чрез лицензирана фирма за
изхвърляне на отпадъци или общинската служба
за изхвърляне на отпадъци.
Спазвайте актуално валидните разпоредби.
В случай на съмнение се свържете със службата
за изхвърляне на отпадъци.
Предавайте опаковъчните материали за
екологично изхвърляне.
Технически характеристики
Мрежово напрежение: 230 V ~, 50 Hz
Номинална мощност: 1000 W
Филтърни торбички: 1 X 4
- 31 -
Page 34

Гаранция и сервиз
За този уред вие получавате гаранция от 3 години
от датата на закупуване. Уредът е произведен
старателно и е проверен добросъвестно преди
доставката.
Запазете касовата бележка като доказателство
за покупката. В гаранционен случай се свържете
по телефона с вашия сервиз. Само по този начин
може да се осигури безплатното изпращане на
вашата стока.
Даването на гаранция важи само за материални
или фабрични дефекти, но не и за транспортни
щети, износващи се части или при повреда на
лесно чупливи части, напр. ключове или акумулаторни батерии. Продуктът е предназначен единствено за домашна, а не за професионална употреба.
При непозволена и неправилна употреба, при
прилагане на сила или интервенции, които не са
извършени от нашия оторизиран сервизен филиал,
гаранцията отпада. Законните ви права не се
ограничават от тази гаранция.
Гаранционният срок не се удължава от гаранцията.
Това важи и за сменени и ремонтирани части.
За евентуалните, налични още при закупуването
повреди и недостатъци трябва да се съобщи веднага след разопаковането, но най-късно два
дена след датата на закупуване. След като изтече
гаранционният срок, ремонтите трябва да се
заплащат.
Сервизно обслужване България
Тел.:00800 111 4920
Е-мейл: kompernass@lidl.bg
IAN 68663
Вносител
KOMPERNASS GMBH
BURGSTRASSE 21
44867 BOCHUM, GERMANY
www.kompernass.com
- 32 -
Page 35

ΠΠεερριιεεχχόόμμεενναα ΣΣεελλίίδδαα
Υποδείξεις ασφαλείας 34
Σκοπός χρήσης 35
Σύνολο αποστολής 35
Περιγραφή 35
Επισκόπηση συσκευής 35
Τοποθέτηση και σύνδεση 35
Χειρισμός 36
Πριν από την πρώτη χρήση...........................................................................................................36
Εισάγετε τον αλεσμένο καφέ...........................................................................................................36
Γεμίστε με νερό ................................................................................................................................37
Ρύθμιση αρώματος .........................................................................................................................37
Ενεργοποίηση και απενεργοποίηση..............................................................................................37
Καθαρισμός 37
Απομάκρυνση αλάτων 38
Διόρθωση βλαβών 39
Απόρριψη 39
Τεχνικές πληροφορίες 39
Εγγύηση και σέρβις πελατών 40
Εισαγωγέας 40
Διαβάστε το εγχειρίδιο χειρισμού πριν από την πρώτη χρήση προσεκτικά και φυλάξτε το για μια μελλοντική
χρήση. Παραδώστε το εγχειρίδιο σε όποιον παραδοθεί στη συνέχεια η συσκευή.
- 33 -
Page 36

ΚΚααφφεεττιιέέρραα
Υποδείξεις ασφαλείας
Κίνδυνος ηλεκτροπληξίας!
• Συνδέστε την καφετιέρα μόνο σε μια σύμφωνα με
τις προδιαγραφές εγκατεστημένη και γειωμένη
πρίζα. Προσέχετε ώστε η δοθείσα τάση στην
πινακίδα τύπου να συμφωνεί με την τάση της
πρίζας.
• Τραβάτε το βύσμα από την πρίζα όταν κινείτε
την καφετιέρα, την γεμίζετε, σε βλάβες, πριν την
καθαρίσετε ή όταν δεν την χρησιμοποιείτε.
Σε καμία περίπτωση δεν επιτρέπεται να βυθίζετε
την καφετιέρα σε υγρά. Δεν επιτρέπετε να
εκθέτετε τη συσκευή σε υγρασία και να την
χρησιμοποιείτε σε εξωτερικό χώρο.
Στην περίπτωση που ωστόσο φτάσει υγρό
στην επικάλυψη συσκευής, τραβάτε αμέσως
το βύσμα της συσκευής από την υποδοχή
δικτύου και τηv παραδίδετε για επισκευή από
εξειδικευμένο προσωπικό.
• Ποτέ μην πιάνετε την καφετιέρα, το καλώδιο
δικτύου και το βύσμα με βρεγμένα χέρια.
• Να πιάνετε πάντα το φις κατά την εξαγωγή από
την πρίζα, μην τραβάτε ποτέ το καλώδιο.
• Μην διπλώνετε ή μαγγώνετε το καλώδιο
τροφοδοσίας.
• Μια ελαττωματική συσκευή πρέπει να επισκευάζεται
αμέσως από εξειδικευμένο συνεργείο ή πρέπει να
απευθύνεστε στο τμήμα εξυπηρέτησης πελατών
ώστε να αποφεύγετε κινδύνους.
• Τα χαλασμένα βύσματα ή καλώδια δικτύου
πρέπει να αντικαθίστανται αμέσως από
εξουσιοδοτημένο ειδικό προσωπικό ή από το
τμήμα εξυπηρέτησης πελατών ώστε να
αποφεύγονται κίνδυνοι.
• Μη χρησιμοποιείτε καλώδια επέκτασης.
Κίνδυνος πυρκαγιάς!
• Ποτέ μην αφήνετε την καφετιέρα κατά τη λειτουργία
χωρίς επιτήρηση.
• Ποτέ μη λειτουργείτε την καφετιέρα χωρίς νερό
βρύσης και ποτέ μη γεμίζετε περισσότερο από τη
σήμανση Max. (μέγιστο).
• Μη χρησιμοποιείτε εξωτερικό χρονοδιακόπτη
ή ξεχωριστό τηλεχειριστήριο για να λειτουργήσετε
τη συσκευή.
Κίνδυνος τραυματισμού!
• Ποτέ μην χρησιμοποιείτε την γυάλινη κανάτα της
καφετιέρας στη συσκευή μικροκυμάτων.
• Αυτή η συσκευή δεν προορίζεται για χρήση από
άτομα (συμπεριλαμβανομένων παιδιών) με
περιορισμένες φυσικές, αισθητηριακές ή πνευματικές
δυνατότητες ή με έλλειψη εμπειρίας και/ ή με
έλλειψη γνώσεων, εκτός εάν επιτηρούνται μέσω
ενός υπεύθυνου ατόμου για την ασφάλειά τους
ή εάν έχουν λάβει υποδείξεις για το πως
χρησιμοποιείται η συσκευή.
• Τα παιδιά πρέπει να επιτηρούνται ώστε να
εξασφαλίζεται ότι δεν παίζουν με τη συσκευή.
Κίνδυνος εγκαύματος!
• Ποτέ μην αγγίζετε τις καυτές επιφάνειες στην
καφετιέρα, κυρίως την θερμαντική πλάκα και το
γυάλινο δοχείο.
Κίνδυνος εγκαύματος!
Αυτό το σύμβολο σας προειδοποιεί για
εξερχόμενο ατμό.Κίνδυνος εγκαύματος!
Προσέχετε τις υποδείξεις ασφαλείας:
• Ποτέ μην βάζετε τα χέρια σας στον ατμό που
ανεβαίνει.
• Πριν από την ενεργοποίηση κλείνετε πάντα το
στήριγμα φίλτρου, αλλιώς υπάρχει κίνδυνος
εγκαύματος από εξερχόμενους ατμούς και
καυτό νερό.
- 34 -
Page 37

• Ποτέ μην χρησιμοποιείτε την γυάλινη κανάτα της
καφετιέρας στη συσκευή μικροκυμάτων.
• Μη μετακινείτε την καφετιέρα κατά την διαδικασία
δημιουργίας του καφέ.
• Απομακρύνετε το δοχείο μόνο όταν η διαδικασία
δημιουργίας καφέ έχει τερματιστεί και το φίλτρο
έχει αδειάσει.
Περιγραφή
Με την καφετιέρα μπορείτε να ετοιμάζετε καυτό καφέ
φίλτρου. Μπορείτε να διατηρείτε τον έτοιμο καφέ σε
ενεργοποιημένη συσκευή στην θερμαντική πλάκα
μέσα στο γυάλινο δοχείο.
Κίνδυνος να σκοντάψετε!
• Να τοποθετείτε το καλώδιο έτσι ώστε να μην μπορεί
να το πατήσει κανείς ή να σκοντάψει σε αυτό.
• Μη χρησιμοποιείτε καλώδια επέκτασης.
Προειδοποίηση βλαβών στη
συσκευή!
• Ποτέ μη λειτουργείτε τη συσκευή όταν είναι άδεια
(χωρίς νερό). Αλλιώς μπορεί η γυάλινη κανάτα
να εκραγεί.
Σκοπός χρήσης
Η καφετιέρα εξυπηρετεί αποκλειστικά για την
προετοιμασία καφέ. Αυτή η καφετιέρα προορίζεται
αποκλειστικά για τη χρήση στο ιδιωτικό νοικοκυριό.
Μην χρησιμοποιείτε για επαγγελματικό σκοπό.
Η συσκευή προορίζεται μόνο για χρήση σε εσωτερικό
χώρο. Προσέξτε όλες τις πληροφορίες σε αυτή την
οδηγία χρήσης, ειδικά τις υποδείξεις ασφαλείας. Κάθε
άλλη χρήση ισχύει ως μη σύμφωνη με τους
κανονισμούς και μπορεί να οδηγήσει σε εμπράγματες
βλάβες ή και σε ανθρώπινες βλάβες. Δεν αναλαμβάνονται ευθύνες για βλάβες οι οποίες προκαλούνται
από χρήση μη σύμφωνη με τους κανονισμούς.
Σύνολο αποστολής
Καφετιέρα
Γυάλινη κανάτα
Κουτάλι μέτρησης
Οδηγίες χρήσης
Επισκόπηση συσκευής
1 Ένθεμα φίλτρου
2 Διακόπτης επιλογής αρώματος
3 Καπάκι δοχείου νερού
4 Ένδειξη της στάθμης πλήρωσης νερού
5 Διακόπτης On/off με ενσωματωμένη λυχνία
ελέγχου
6 Δοσομετρικό κουτάλι
7 Βάση φίλτρου
8 Διέλευση καφέ
Τοποθέτηση και σύνδεση
Κίνδυνος ηλεκτροπληξίας!
Σε καμία περίπτωση μην τοποθετείτε την καφετιέρα
κοντά σε νερό που uπάρχει σε νεροχύτες ή άλλα
δοχεία. Χρησιμοποιείτε την καφετιέρα μόνο
επάνω σε μια στεγνή βάση. Όταν βρίσκεται κοντά
σε νερό υπάρχει κίνδυνος ακόμα και όταν δεν
δουλεύει η συσκευή. Για αυτό βγάλτε μετά τη χρήση το
φις από την πρίζα.
Κίνδυνος πυρκαγιάς!
Μην τοποθετείτε την καφετιέρα ποτέ κοντά σε πηγές
θερμότητας.
Μπορεί να πάθει βλάβη η συσκευή.
Προσοχή!
Χρησιμοποιείτε την καφετιέρα μόνο επάνω σε μια ίσια
και θερμανθεκτική βάση, ώστε να αποφεύγετε βλάβες
στη συσκευή και ζημιά στην επιφάνεια τοποθέτησης.
- 35 -
Page 38

• Απομακρύνετε όλα τα υλικά συσκευασίας από τη
συσκευή.
• Τοποθετηστε τη συσκευή σε μια ίσια και
θερμανθεκτική επιφάνεια.
• Τοποθετήστε τη γυάλινη κανάτα στην θερμαντική
πλάκα στη συσκευή.
• Ανοίξτε το στήριγμα φίλτρου 7.
• Τοποθετήστε το ένθεμα φίλτρου 1 έτσι ώστε
η διέλευση καφέ 8 να εξέχει από το άνοιγμα.
• Κλείστε το στήριγμα φίλτρου 7.
• Στη συνέχεια βάλτε το βύσμα στην πρίζα δικτύου.
Χειρισμός
Πριν από την πρώτη χρήση
Προσοχή!
• Μην γεμίζετε ποτέ με μία συνολική ποσότητα
περισσότερη από 12 φλιτζάνια νερό δικτύου
μέσα στο δοχείο νερού.
Ποτέ μη γεμίζετε με λιγότερο νερό από 3 φλιτζάνια
στο δοχείο νερού.Σε άλλη περίπτωση μπορεί
να πάθει βλάβη η καφετιέρα. Χρησιμοποιείτε την
ένδειξη της στάθμης πλήρωσης νερού 4.
• Αποσυνδέετε την καφετιέρα από το δίκτυο ρεύματος
αμέσως μετά τη χρήση. Μόνο όταν τραβάτε το
βύσμα από την πρίζα, είναι η συσκευή εντελώς
χωρίς ρεύμα.
• Γεμίζετε αποκλειστικά με νερό δικτύου στο δοχείο
νερού.Σε άλλη περίπτωση μπορεί να πάθει βλάβη
η καφετιέρα.
1. Ανοίξτε τη γυάλινη κανάτα και το κάλυμμα
δοχείου νερού 3.
2. Ξεπλύνετε τη γυάλινη κανάτα προσεκτικά με νερό
δικτύου. Γεμίστε με νερό δικτύου στο δοχείο νερού.
Προσέξτε ώστε να γεμίζετε αργά το δοχείο νερού
έτσι ώστε το νερό να μπορεί να ρέει διαμέσου των
δύο ανοιγμάτων δοχείου νερού. Αδειάστε το πάλι
γυρίζοντας προσεκτικά τη συσκευή πάνω από ένα
νεροχύτη και πετώντας το νερό δικτύου.
3. Γεμίζετε το γυάλινο δοχείο με νερό από τη βρύση
για 12 φλιτζάνια.
4. Γεμίστε πλήρως το δοχείο νερού.
5. Κλείστε το δοχείο νερού.
6. Τοποθετήστε την άδεια γυάλινη κανάτα επάνω στη
θερμαντική πλάκα.
7. Ενεργοποιήστε τη μηχανή καφέ με το διακόπτη
ON/OFF 5 (I). Ανάβει η ενσωματωμένη λυχνία
ελέγχου. Αναμένετε μέχρι να τελειώσει
η διαδικασία βρασίματος καφέ.
8. Αδειάστε τη γυάλινη κανάτα.
9. Απενεργοποιήστε τη μηχανή καφέ με τον
διακόπτη ON/OFF 5 (O). Η ενσωματωμένη
λυχνία θα σβήσει.
10.Αναμένετε έως ότου η συσκευή κρυώσει.
Μπορείτε στη συνέχεια να χρησιμοποιήσετε την
καφετιέρα για το βράσιμο αλεσμένου καφέ.
Εισάγετε τον αλεσμένο καφέ
1. Κλίνατε τη συγκράτηση φίλτρου 7 πλευρικά.
Πρέπει να έχει τοποθετηθεί το ένθεμα φίλτρου 1.
2. Τοποθετήστε ένα χάρτινο φίλτρο καφέ (μέγεθος
1x4) με γυρισμένες πλευρές στο ένθεμα 1.
3. Γεμίστε με το κουτάλι δοσομέτρησης 6 σκόνη
καφέ.
- 36 -
Page 39

Υπόδειξη:
Γεμίζετε περίπου ένα γεμάτο κουτάλι καφέ με
αλεσμένο καφέ ανά φλιτζάνι καφέ φίλτρου. Εάν
θέλετε ο καφές φίλτρου να είναι λιγότερο δυνατός,
τότε μπορείτε να μειώσετε την ποσότητα αλεσμένου
καφέ ανά φλιτζάνι.
4. Κλείστε τη συγκράτηση φίλτρου 7. Προσέχετε
ότι ο σωλήνας διέλευσης καφέ 8 θα πρέπει να
βρίσκεται στη μέση πάνω από τη γυάλινη κανάτα.
Γεμίστε με νερό
Υπόδειξη:
Χρησιμοποιείτε μόνο πόσιμο νερό για την
παρασκευή του καφέ!
1. Ανοίξτε το κάλυμμα δοχείου καφέ 3.
2. Γεμίστε τη γυάλινη κανάτα με νερό.
Προσοχή!
• Ποτέ μη γεμίζετε περισσότερο από μία συνολική
ποσότητα 12 φλιτζανιών νερού στο δοχείο
νερού. Ποτέ μη γεμίζετε λιγότερο νερό από 3
φλιτζάνια στο δοχείο νερού. Σε διαφορετική
περίπτωση μπορεί η μηχανή καφέ να φθαρεί.
Χρησιμοποιείτε την ένδειξη της πλήρωσης νερού
4.
3. Εισάγετε το νερό αντίστοιχα με την επιθυμούμενη
ποσότητα καφέ φίλτρου στο δοχείο νερού.
Χρησιμοποιείτε για αυτό την ένδειξη της στάθμης
πλήρωσης νερού 4. Προσέχετε ότι θα πρέπει να
χύνετε το νερό στο δοχείο αργά έτσι ώστε αυτό
να μη εκρέει από τα δύο ανοίγματα του δοχείου
νερού.
4. Κλείστε το κάλυμμα δοχείου καφέ 3.
Ρύθμιση αρώματος
• Ρυθμίστε την επιθυμούμενη δύναμη καφέ στον
δακόπτη επιλογής αρώματος 2.
Η ρύθμιση δίνει δυνατό καφέ, ενώ η ρύθμιση
δίνει ελαφρύ καφέ.
Ενεργοποίηση και απενεργοποίηση
• Εάν θέλετε να ενεργοποιήσετε τη μηχανή καφέ,
τότε θέστε το διακόπτη ON/OFF 5στο “ΟΝ” (I).
Ανάβει η ενσωματωμένη λυχνία ελέγχου.
• Εάν θέλετε να απενεργοποιήσετε τη μηχανή καφέ,
τότε θέστε το διακόπτη ON/OFF 5 στο “ΟFF” (O).
Η ενσωματωμένη λυχνία θα σβήσει.
• Εάν δεν θέλετε να χρησιμοποιήσετε τη μηχανή
καφέ, τότε αποσυνδέετε το φις από την πρίζα.
Υπόδειξη:
Εάν δεν απενεργοποιήσετε την καφετιέρα μετά τη
διαδικασία βρασίματος στο διακόπτη on/off 5, ο
καφές παραμένει για τόσο ζεστός επάνω στη
θερμαντική πλάκα, έως ότου απενεργοποιήσετε την
καφετιέρα.
Ωστόσο προτείνουμε να πίνετε τον καφέ φρεσκοβρασμένο.
Καθαρισμός
Για να επιτυγχάνετε κατά το βράσιμο πάντα ένα
βέλτιστο αποτέλεσμα γεύσης, πρέπει να καθαρίζετε
την καφετιέρα μετά από κάθε χρήση.
• Τραβάτε το βύσμα από την πρίζα.
Κίνδυνος ηλεκτροπληξίας!
Πριν από τον καθαρισμό της καφετιέρας, πρέπει
πάντα να τραβάτε το βύσμα από την πρίζα. Κατά
τον καθαρισμό δεν επιτρέπεται να βυθίζετε τη
συσκευή στο νερό ή να την κρατάτε κάτω από
ρέον νερό.
- 37 -
Page 40

Κίνδυνος εγκαύματος!
Πριν από τον καθαρισμό περιμένετε πάντα έως ότου
κρυώσει. Υπάρχει κίνδυνος εγκαύματος και η
συσκευή μπορεί να πάθει ζημιά.
Προσοχή!
Μη χρησιμοποιείτε οικιακά καθαριστικά ή αιχμηρά
ή μυτερά αντικείμενα, για να απομακρύνετε ακαθαρσίες.
Έτσι μπορεί να πάθει βλάβη η καφετιέρα.
• Σκουπίζετε το κάλυμμα της μηχανής καφέ και τη
γυάλινη κανάτα με ένα ελαφρά βρεγμένο πανί σε
διάλυμα νερoύ με σαπούνι. Απομακρύνετε έτσι
ενδεχόμενες επιστρώσεις στην γυάλινη κανάτα.
• Μετά από κάθε χρήση αφαιρείτε το ένθεμα
φίλτρου 1 από τη συγκράτηση φίλτρου 7.
• Καθαρίστε το κάτω από τρεχούμενο νερό.
• Καθαρίζετε το κουτάλι δοσομέτρησης 6 με ένα
ήπιο διάλυμα σαπουνιού - νερού και ξεπλένετε το
με καθαρό νερό.
• Στεγνώστε καλά όλα εξαρτήματα με ένα στεγνό
πανί, προτού θέσετε πάλι τη συσκευή σε
λειτουργία.
1. Απενεργοποιείστε τη μηχανή καφέ και αφήστε να
κρυώσει πλήρως.
2. Προσθέστε το προϊόν απομάκρυνσης αλάτων
στο δοχείο νερού
3. Γεμίστε με τη μέγιστη επιτρεπόμενη ποσότητα
νερού.
4. Τοποθετήστε τη γυάλινη κανάτα στη θερμαντική
πλάκα.
5. Ενεργοποιήστε τη μηχανή καφέ με το διακόπτη
ON/OFF 5.
6. Αναμένετε μέχρι να τερματιστεί η διαδικασία
βρασίματος καφέ . Απενεργοποιήστε τη μηχανή
καφέ και αφαιρέστε το φις από την πρίζα.
7. Ξεπλύνετε τη γυάλινη κανάτα προσεκτικά με νερό
δικτύου. Γεμίστε με νερό δικτύου στο δοχείο νερού.
Προσέξτε να γεμίσετε αργά το δοχείο νερού έτσι
ώστε αυτό να μπορεί να περάσει μέσα και από τα
δύο ανοίγματα νερού. Αδειάστε το πάλι γυρίζοντας
τη συσκευή πάνω από ένα νεροχύτη και πετώντας
το νερό δικτύου.
8. Στη συνέχεια αφήνετε τη συσκευή να λειτουργήσει
δύο φορές μόνο με νερό βρύσης, όπως
περιγράφεται στο κεφάλαιο “Πριν από την πρώτη
χρήση“.
Απομάκρυνση αλάτων
Η περιεκτικότητα αλάτων (βαθμός σκληρότητας) στο
νερό οδηγεί κατά τη χρήση σε δημιουργία αλάτων στην
καφετιέρα. Τα άλατα επηρεάζουν τη συσκευή ως
προς τη λειτουργία και μειώνουν την ποιότητα
του βρασμένου καφέ φίλτρου.
Ενημερωθείτε από την εταιρεία ύδρευσης ως
προς το βαθμό σκληρότητας του νερού του
δικτύου σας. Σε υψηλό βαθμό σκληρότητας
είναι απαραίτητη η έγκαιρη απομάκρυνση
αλάτων, σε χαμηλότερο βαθμό σκληρότητας
αυτό μπορεί να γίνει αργότερα.
Χρησιμοποιείστε ένα προϊόν αφαίρεσης αλάτων
για οικιακές συσκευές και προσέξτε την οδηγία
χειρισμού.
Στη συνέχεια μπορείτε να χρησιμοποιήσετε πάλι την
καφετιέρα.
- 38 -
Page 41

Διόρθωση βλαβών
Σύμπτωμα Πιθανή αιτία και
διορθωτική ενέργεια
Η καφετιέρα δεν
ενεργοποιείται .
• Το βύσμα δεν έχει μπει
στην πρίζα. Βάλτε το
βύσμα στην πρίζα
δικτύου.
• Μια οικιακή ασφάλεια
είναι ελαττωματική.
Ελέγξτε τις οικιακές
ασφάλειες και
αντικαταστήστε τις
εάν απαιτείται.
• Η υποδοχή δικτύου
είναι ελαττωματική.
Δοκιμάστε μια άλλη
υποδοχή δικτύου.
• Η καφετιέρα είναι
πιθανώς ελαττωματική.
Αφήστε την καφετιέρα
να ελεγχθεί από
εξειδικευμένο
προσωπικό.
Απόρριψη
Σε καμία περίπτωση μην πετάξετε τη
συσκευή στα οικιακά απορρίμματα.
Αυτό το προϊόν υπόκειται στην Ευρωπαϊκή
Οδηγία 2002/96/EC.
Απομακρύνετε τη συσκευή μέσω μιας εγκεκριμένης
επιχείρησης απομάκρυνσης ή μέσω της κοινοτικής
επιχείρησης απομάκρυνσης.
Να τηρείτε τους ισχύοντες κανονισμούς.
Σε περίπτωση αμφιβολιών ελάτε σε επαφή με την
επιχείρηση απόρριψης.
Απομακρύνετε όλα τα υλικά συσκευασιών
φιλικά προς το περιβάλλον.
Τεχνικές πληροφορίες
Τάση ρεύματος : 230 V ~, 50 Hz
Ονομαστική απόδοση: 1000 W
Η ποιότητα του
βρασμένου καφέ
χειροτερεύει.
• Η καφετιέρα έχει άλατα.
Αφαιρέστε τα άλατα
από την καφετιέρα
- 39 -
Page 42

Εγγύηση και σέρβις πελατών
Έχετε για αυτή τη συσκευή 3 χρόνια εγγύηση από
την ημερομηνία αγοράς. Η συσκευή κατασκευάστηκε
και ελέγχθηκε προσεκτικά πριν από την αποστολή.
Παρακαλούμε φυλάξτε την απόδειξη ταμείου ως
απόδειξη για την αγορά. Παρακαλούμε
επικοινωνήστε τηλεφωνικά με την υπηρεσία σέρβις σε
περίπτωση εγγύησης. Μόνο έτσι μπορεί να
εξασφαλιστεί μια δωρεάν αποστολή του
εμπορεύματός σας.
Η απόδοση εγγύησης ισχύει μόνο για σφάλματα
υλικού ή κατασκευής, όχι όμως για ζημιές από τη
μεταφορά, για εξαρτήματα φθοράς ή για βλάβες σε
εύθραυστα εξαρτήματα, π.χ. διακόπτες ή
συσσωρευτές. Το προϊόν προορίζεται μόνο για την
ιδιωτική και όχι για την επαγγελματική χρήση.
Σε περίπτωση κακής μεταχείρισης και ακατάλληλης
χρήσης, σε χρήση βίας και σε παρεμβάσεις οι
οποίες δεν διεξήχθησαν από το εξουσιοδοτημένο
μας τμήμα σέρβις, η εγγύηση παύει να ισχύει. Τα νομικά σας δικαιώματα δεν περιορίζονται μέσω αυτής
της εγγύησης.
Ο χρόνος εγγύησης δεν επεκτείνεται μέσω της
απόδοσης εγγύησης. Αυτό ισχύει και για
εξαρτήματα τα οποία έχουν αντικατασταθεί ή
επισκευαστεί. Ενδεχόμενες ήδη υπάρχουσες κατά
την αγορά, ζημιές και ελλείψεις πρέπει να
αναφέρονται αμέσως μετά την αποσυσκευασία, το
αργότερο όμως δύο ημέρες μετά την ημερομηνία
αγοράς. Επισκευές που εμφανίζονται μετά τη λήξη
του χρόνου εγγύησης χρεώνονται.
Σέρβις Ελλάδα
Tel.: 801 5000 019 (0,03 EUR/Min.)
E-Mail: kompernass@lidl.gr
IAN 68663
Εισαγωγέας
KOMPERNASS GMBH
BURGSTRASSE 21
44867 BOCHUM, GERMANY
www.kompernass.com
- 40 -
Page 43

INHALTSVERZEICHNIS SEITE
Sicherheitshinweise 42
Bestimmungsgemäßer Gebrauch 43
Lieferumfang 43
Beschreibung 43
Geräteübersicht 43
Aufstellen und anschließen 43
Bedienen 44
Vor dem ersten Gebrauch.............................................................................................................44
Gemahlenen Kaffee einfüllen .......................................................................................................44
Wasser einfüllen.............................................................................................................................45
Aroma einstellen.............................................................................................................................45
Ein- und ausschalten.......................................................................................................................45
Reinigen 45
Entkalken 46
Fehlfunktionen beseitigen 47
Entsorgen 47
Technische Daten 47
Garantie und Service 48
Importeur 48
Lesen Sie die Bedienungsanleitung vor der ersten Verwendung aufmerksam durch und heben Sie diese für
den späteren Gebrauch auf. Händigen Sie bei Weitergabe des Gerätes an Dritte auch die Anleitung aus.
- 41 -
Page 44

KAFFEEMASCHINE
Sicherheitshinweise
Gefahr eines Stromschlags!
• Schließen Sie die Kaffeemaschine nur an eine
vorschriftsmäßig installierte und geerdete Netzsteckdose an. Achten Sie darauf, dass die auf
dem Typenschild angegebene Spannung mit
der Spannung der Netzsteckdose übereinstimmt.
• Ziehen Sie den Netzstecker aus der Netzsteckdose, wenn Sie die Kaffeemaschine bewegen, befüllen, bei Störungen, bevor Sie die
Kaffeemaschine reinigen oder wenn Sie sie
nicht gebrauchen.
Sie dürfen die Kaffeemaschine keinesfalls in
Flüssigkeit tauchen. Sie dürfen das Gerät keiner Feuchtigkeit aussetzen und nicht im Freien
benutzen. Falls doch einmal Flüssigkeit in das
Gerätegehäuse gelangt, ziehen Sie sofort
den Netzstecker des Geräts aus der Netzsteckdose und lassen Sie es von qualifiziertem
Fachpersonal reparieren.
• Fassen Sie die Kaffeemaschine, Netzkabel und
-stecker nie mit nassen Händen an.
• Ziehen Sie das Netzkabel stets am Stecker aus
der Steckdose, ziehen Sie nicht am Kabel selbst.
• Knicken oder quetschen Sie das Netzkabel
nicht.
• Lassen Sie ein defektes Gerät umgehend von einer qualifizierten Fachwerkstatt instandsetzen
oder wenden Sie sich an den Kundenservice,
um Gefährdungen zu vermeiden.
• Lassen Sie beschädigte Netzstecker oder Netzkabel sofort von autorisiertem Fachpersonal
oder dem Kundenservice austauschen, um Gefährdungen zu vermeiden.
• Benutzen Sie keine Verlängerungskabel.
Brandgefahr!
• Lassen Sie die Kaffeemaschine während des
Betriebs niemals unbeaufsichtigt.
• Betreiben Sie die Kaffeemaschine niemals ohne
Wasser und füllen Sie nie mehr als bis zur Max.Markierung ein.
• Benutzen Sie keine externe Zeitschaltuhr oder
ein separates Fernwirksystem, um das Gerät zu
betreiben.
Verletzungsgefahr!
• Benutzen Sie die Glaskanne der Kaffeemaschine niemals in der Mikrowelle.
• Dieses Gerät ist nicht dafür bestimmt, durch
Personen (einschließlich Kinder) mit eingeschränkten physischen, sensorischen oder
geistigen Fähigkeiten oder mangels Erfahrung
und/oder mangels Wissen benutzt zu werden,
es sei denn, sie werden durch eine für ihre Sicherheit zuständige Person beaufsichtigt oder
erhielten von ihr Anweisungen, wie das Gerät
zu benutzen ist.
• Kinder sollten beaufsichtigt werden, um sicherzustellen, dass sie nicht mit dem Gerät spielen.
Verbrennungsgefahr!
• Berühren Sie niemals heiße Oberflächen an der
Kaffeemaschine, insbesondere die Heizplatte
und die Glaskanne.
Verbrühungsgefahr!
Dieses Symbol warnt Sie vor austretendem
Dampf. Verbrühungsgefahr! Beachten Sie die
Sicherheitshinweise:
• Halten Sie Ihre Hände nicht in den
aufsteigenden Wasserdampf.
• Schließen Sie vor dem Einschalten immer den
Filterhalter, es besteht sonst Verbrühungsgefahr
durch austretenden Dampf und heißes Wasser.
- 42 -
Page 45

• Benutzen Sie die Glaskanne der Kaffeemaschine niemals in der Mikrowelle.
• Bewegen Sie die Kaffeemaschine nicht
während des Brühvorgangs.
• Entnehmen Sie die Kanne erst, wenn der Brühvorgang abgeschlossen ist und der Filter
leergelaufen ist.
Beschreibung
Mit der Kaffeemaschine können Sie heißen Filterkaffee zubereiten. Den fertig zubereiteten Kaffee
können Sie bei eingeschaltetem Gerät auf der
Heizplatte in der Glaskanne warm halten.
Stolpergefahr!
• Verlegen Sie das Netzkabel so, dass niemand
darauf treten oder darüber stolpern kann.
• Benutzen Sie keine Verlängerungskabel.
Warnung vor Geräteschäden!
• Betreiben Sie das Gerät nie im Leerzustand
(ohne Wasser). Anderenfalls kann die Glaskanne zerspringen.
Bestimmungsgemäßer
Gebrauch
Die Kaffeemaschine dient ausschließlich dem
Zubereiten von Kaffee. Diese Kaffeemaschine ist
ausschließlich für die Benutzung in privaten Haushalten bestimmt. Benutzen Sie sie nicht gewerblich.
Das Gerät ist nur für den Innengebrauch bestimmt.
Beachten Sie alle Informationen in dieser Bedienungsanleitung, insbesondere die Sicherheitshinweise. Jede andere Verwendung gilt als nicht bestimmungsgemäß und kann zu Sachschäden oder
sogar zu Personenschäden führen. Es werden keine
Haftungen für Schäden, die durch nicht bestimmungsgemäßen Gebrauch entstehen, übernommen.
Geräteübersicht
1 Filtereinsatz
2 Aromawahlschalter
3 Wassertankdeckel
4 Anzeige des Wasserfüllstands
5 Ein-/Ausschalter mit integrierter Kontrollleuchte
6 Messlöffel
7 Filterhalter
8 Kaffeedurchlass
Aufstellen und anschließen
Gefahr eines Stromschlags!
Stellen Sie die Kaffeemaschine keinesfalls in der
Nähe von Wasser auf, das in Spülbecken oder anderen Gefäßen enthalten ist. Benutzen Sie die Kaffeemaschine nur auf einer trockenen Unterlage. Die
Nähe von Wasser stellt eine Gefahr dar, auch wenn
das Gerät nicht arbeitet. Ziehen Sie daher nach jedem Gebrauch den Netzstecker.
Brandgefahr!
Stellen Sie die Kaffeemaschine niemals in der Nähe
von Wärmequellen auf.
Das Gerät könnte beschädigt werden.
Lieferumfang
Kaffeemaschine
Glaskanne
Messlöffel
Bedienungsanleitung
Achtung!
Benutzen Sie die Kaffeemaschine nur auf einer
ebenen und hitzeunempfindlichen Unterlage,
um Schäden am Gerät und der Standfläche zu
vermeiden.
- 43 -
Page 46

• Entfernen Sie alle Verpackungsmaterialien vom
Gerät.
• Stellen Sie das Gerät auf eine ebene und hitzeunempfindliche Oberfläche.
• Stellen Sie die Glaskanne auf die Heizplatte in
das Gerät.
• Öffnen Sie den Filterhalter
• Setzen Sie den Filtereinsatz 1 so ein, dass der
Kaffeedurchlass 8 durch die Öffnung ragt.
• Schließen Sie den Filterhalter 7.
• Stecken Sie anschließend den Netzstecker in
die Netzsteckdose.
7.
Bedienen
Vor dem ersten Gebrauch
Achtung!
• Füllen Sie niemals mehr als eine Gesamtmenge
für 12 Tassen Wasser in den Wassertank ein.
Füllen Sie nie weniger Wasser als für 3 Tassen
in den Wassertank. Andernfalls könnte die
Kaffeemaschine beschädigt werden. Nutzen Sie
die Anzeige des Wasserfüllstands 4.
• Trennen Sie die Kaffeemaschine sofort nach
dem Gebrauch vom Stromnetz. Nur wenn Sie
den Netzstecker aus der Netzsteckdose ziehen,
ist sie vollständig stromfrei.
• Füllen Sie ausschließlich Wasser in den Wassertank. Andernfalls könnten Sie die Kaffeemaschine beschädigen.
1. Öffnen Sie die Glaskanne und den Wassertankdeckel 3.
2. Spülen Sie die Glaskanne sorgfältig mit Wasser
aus. Füllen Sie Wasser in den Wassertank. Achten Sie darauf, das Wasser langsam in den
Wassertank zu schütten, damit es durch die beiden Wassertanköffnungen laufen kann. Entleeren Sie ihn wieder, in dem Sie das Gerät über
einem Spülbecken vorsichtig umdrehen und das
Wasser auskippen.
3. Befüllen Sie die Glaskanne mit Wasser für 12
Tassen.
4. Füllen Sie das Wasser vollständig in den Wassertank.
5. Schließen Sie den Wassertank.
6. Stellen Sie die geleerte Glaskanne auf der
Heizplatte ab.
7. Schalten Sie die Kaffeemaschine am Ein-/Ausschalter 5 ein (I). Die integrierte Kontrollleuchte
leuchtet. Warten Sie, bis der Brühvorgang abgeschlossen ist.
8. Entleeren Sie die Glaskanne.
9. Schalten Sie die Kaffeemaschine am Ein-/Ausschalter 5 (O) aus. Die integrierte Kontrollleuchte erlischt.
10. Warten Sie, bis sich das Gerät abgekühlt hat.
Sie können anschließend die Kaffeemaschine für
das Aufbrühen von gemahlenem Kaffee verwenden.
Gemahlenen Kaffee einfüllen
1. Schwenken Sie den Filterhalter 7 zur Seite. Der
Filtereinsatz 1 muss eingesetzt sein.
2. Legen Sie eine Filtertüte (Größe 1x4) mit
umgeknickten Seiten in den Filtereinsatz 1.
3. Füllen Sie mit dem Messlöffel 6 Kaffeepulver
ein.
- 44 -
Page 47

Hinweis:
Füllen Sie ca. einen gehäuften Kaffeelöffel gemahlenen Kaffee pro Tasse Filterkaffee ein. Soll der
Filterkaffee weniger stark sein, können Sie die
Menge gemahlenen Kaffees pro Tasse reduzieren.
Aroma einstellen
• Stellen Sie die gewünschte Kaffeestärke am
Aromawahlschalter 2 ein. Die Einstellung
ergibt starken Kaffee, die Einstellung ergibt
milden Kaffee.
4. Schließen Sie den Filterhalter 7. Achten Sie
darauf, dass der Kaffeedurchlass 8 mittig über
der Glaskanne liegt.
Wasser einfüllen
Hinweis:
Benutzen Sie nur Trinkwasser zur Zubereitung des
Kaffees!
1. Öffnen Sie den Wassertankdeckel 3.
2. Füllen Sie die Glaskanne mit Wasser.
Achtung!
• Füllen Sie niemals mehr als eine Gesamtmenge
für 12 Tassen Wasser in den Wassertank ein.
Füllen Sie nie weniger Wasser, als für 3 Tassen
in den Wassertank. Andernfalls könnte die
Kaffeemaschine beschädigt werden. Nutzen Sie
die Anzeige des Wasserfüllstands 4.
3. Gießen Sie das Wasser entsprechend der gewünschten Menge Filterkaffee in den Wassertank. Nutzen Sie dafür die Anzeige des Wasserfüllstands 4. Achten Sie darauf, das Wasser
langsam in den Wassertank zu schütten, damit
das Wasser durch die beiden Wassertanköffnungen laufen kann.
4. Schließen Sie den Wassertankdeckel 3.
Ein- und ausschalten
• Wenn Sie die Kaffeemaschine einschalten
möchten, stellen Sie den Ein-/Ausschalter 5 auf
„Ein” (I). Die integrierte Kontrollleuchte leuchtet.
• Wenn Sie die Kaffeemaschine ausschalten
möchten, stellen Sie den Ein-/Ausschalter 5 auf
„Aus” (O). Die integrierte Kontrollleuchte erlischt.
• Wenn Sie die Kaffeemaschine nicht benutzen,
ziehen Sie den Netzstecker aus der Netzsteckdose.
Hinweis:
Wenn Sie die Kaffeemaschine nach dem Brühvorgang nicht am Ein-/Ausschalter 5 ausschalten,
wird der Kaffee solange auf der Heizplatte warmgehalten, bis Sie die Kaffeemaschine ausschalten.
Wir empfehlen jedoch den Kaffee frisch gebrüht zu
trinken.
Reinigen
Damit Sie beim Aufbrühen immer ein optimales Geschmacksergebnis erzielen, sollten Sie die Kaffeemaschine nach jeder Benutzung reinigen.
• Ziehen Sie den Netzstecker aus der
Netzsteckdose.
Gefahr eines Stromschlags!
Bevor Sie die Kaffeemaschine reinigen, müssen Sie
immer den Netzstecker aus der Netzsteckdose ziehen. Sie dürfen das Gerät bei der Reinigung
keinesfalls in Wasser tauchen oder unter fließendes
Wasser halten.
- 45 -
Page 48

Verbrennungsgefahr!
Warten Sie immer, bis die Kaffeemaschine
abgekühlt ist, bevor Sie sie reinigen. Es besteht Verbrennungsgefahr und das Gerät könnte beschädigt
werden.
Achtung!
Benutzen Sie keine Haushaltsreiniger oder scharfe
bzw. spitze Gegenstände, um Verschmutzungen zu
entfernen. Dadurch könnten Sie die Kaffeemaschine
beschädigen.
• Wischen Sie das Gehäuse der Kaffeemaschine
und die Glaskanne mit einem leicht mit milder
Seifenlauge befeuchteten weichen Tuch ab.
Beseitigen Sie dabei eventuelle Ablagerungen
in der Glaskanne.
• Nehmen Sie nach jeder Benutzung den
Filtereinsatz 1 aus dem Filterhalter 7.
• Spülen Sie ihn unter fließendem Wasser aus.
• Reinigen Sie den Messlöffel 6 in milder Seifenlauge und spülen Sie ihn mit klarem Wasser ab.
• Trocknen Sie alle Teile mit einem Trockentuch
gut ab, bevor Sie das Gerät wieder in Betrieb
nehmen.
Entkalken
1. Schalten Sie die Kaffeemaschine aus und
lassen Sie sie vollständig abkühlen.
2. Geben Sie das Entkalkungsmittel in den
Wassertank.
3. Füllen Sie die maximal zugelassene Wassermenge auf.
4. Stellen Sie die Glaskanne auf die Heizplatte.
5. Schalten Sie die Kaffeemaschine mit dem Ein-/
Ausschalter 5 ein.
6. Warten Sie, bis der Brühvorgang abgeschlossen ist. Schalten Sie die Kaffeemaschine aus
und ziehen Sie den Netzstecker aus der Netzsteckdose.
7. Spülen Sie die Glaskanne sorgfältig mit Wasser
aus. Füllen Sie Wasser in den Wassertank.
Achten Sie darauf, das Wasser langsam in den
Wassertank zu schütten, damit es durch die
beiden Wassertanköffnungen laufen kann. Entleeren Sie ihn wieder, in dem Sie das Gerät
über einem Spülbecken vorsichtig umdrehen
und das Wasser auskippen.
8. Lassen Sie anschließend die Kaffeemaschine
zweimal nur mit Wasser brühen, wie im Kapitel
„Vor dem ersten Gebrauch“ beschrieben.
Anschließend können Sie die Kaffeemaschine
wieder verwenden.
Der Kalkgehalt (Härtegrad) im Wasser führt im
Laufe der Benutzung zum Verkalken der Kaffeemaschine. Der Kalk beeinträchtigt das Gerät in
seiner Funktion und vermindert die Qualität des
aufgebrühten Filterkaffees.
Erkundigen Sie sich bei Ihrem Wasserversorger
nach dem Härtegrad Ihres Leitungswassers.
Bei hohem Härtegrad ist die Entkalkung bereits
eher notwendig, bei niedrigem Härtegrad
später. Verwenden Sie ein Entkalkungsmittel für
Haushaltsgeräte und beachten Sie die Gebrauchsanleitung.
- 46 -
Page 49

Fehlfunktionen beseitigen
Symptom Mögliche Ursache und
Abhilfe
Die Kaffeemaschine schaltet
sich nicht ein.
Die Qualität des
aufgebrühten
Kaffees verschlechtert sich.
• Netzstecker nicht in Netzsteckdose eingesteckt.
Stecken Sie den Netzstecker
in die Netzsteckdose.
• Eine Haushaltssicherung
ist defekt. Überprüfen Sie
die Haushaltssicherungen
und erneuern Sie diese gegebenenfalls.
• Die Netzsteckdose ist defekt.
Probieren Sie eine andere
Netzsteckdose aus.
• Die Kaffeemaschine ist möglicherweise defekt. Lassen
Sie die Kaffeemaschine von
Fachpersonal überprüfen.
• Die Kaffeemaschine ist
verkalkt. Entkalken Sie die
Kaffeemaschine.
Entsorgen
Werfen Sie das Gerät keinesfalls in den
normalen Hausmüll. Dieses Produkt
unterliegt der europäischen Richtlinie
2002/96/EC.
Entsorgen Sie das Gerät über einen zugelassenen
Entsorgungsbetrieb oder über Ihre kommunale
Entsorgungseinrichtung.
Beachten Sie die aktuell geltenden Vorschriften.
Setzen Sie sich im Zweifelsfall mit Ihrer
Entsorgungseinrichtung in Verbindung.
Führen Sie alle Verpackungsmaterialien
einer umweltgerechten Entsorgung zu.
Technische Daten
Netzspannung: 230 V ~, 50 Hz
Nennleistung: 1000 W
Filt ertüten: 1 x 4
- 47 -
Page 50

Garantie und Service
Sie erhalten auf dieses Gerät 3 Jahre Garantie ab
Kaufdatum. Das Gerät wurde sorgfältig produziert
und vor Anlieferung gewissenhaft geprüft.
Bitte bewahren Sie den Kassenbon als Nachweis
für den Kauf auf. Bitte setzen Sie sich im Garantiefall mit Ihrer Servicestelle telefonisch in Verbindung.
Nur so kann eine kostenlose Einsendung Ihrer Ware
gewährleistet werden.
Die Garantieleistung gilt nur für Material- oder
Fabrikationsfehler, nicht aber für Transportschäden,
Verschleißteile oder für Beschädigungen an zerbrechlichen Teilen, z. B. Schalter oder Akkus. Das
Produkt ist lediglich für den privaten und nicht für
den gewerblichen Gebrauch bestimmt.
Bei missbräuchlicher und unsachgemäßer Behandlung, Gewaltanwendung und bei Eingriffen, die
nicht von unserer autorisierten Service-Niederlassung vorgenommen wurden, erlischt die Garantie.
Ihre gesetzlichen Rechte werden durch diese
Garantie nicht eingeschränkt.
Die Garantiezeit wird durch die Gewährleistung
nicht verlängert. Dies gilt auch für ersetzte und reparierte Teile. Eventuell schon beim Kauf vorhandene
Schäden und Mängel müssen sofort nach dem
Auspacken gemeldet werden, spätestens aber zwei
Tage nach Kaufdatum. Nach Ablauf der Garantiezeit anfallende Reparaturen sind kostenpflichtig.
Service Deutschland
Tel.: 01805772033 (0,14 EUR/Min. aus dem dt.
Festnetz, Mobilfunk max. 0,42 EUR/Min.)
E-Mail: kompernass@lidl.de
IAN 68663
Service Österreich
Tel.: 0820 201 222 (0,15 EUR/Min.)
E-Mail: kompernass@lidl.at
IAN 68663
Service Schweiz
Tel.: 0842 665566 (0,08 CHF/Min.,
Mobilfunk max. 0,40 CHF/Min.)
E-Mail: kompernass@lidl.ch
IAN 68663
Importeur
KOMPERNASS GMBH
BURGSTRASSE 21
44867 BOCHUM, GERMANY
www.kompernass.com
- 48 -
 Loading...