


R-607/R-507
AUDIO/VIDEO RECEIVER RÉCEPTEUR AUDIO/VIDÉO RECEPTOR DE AUDIO/VÍDEO AUDIO/VIDEO RECEIVER АУДИО-/ВИДЕОРЕСИВЕР
OPERATING INSTRUCTIONS GUIDE D’UTILISATION INSTRUCCIONES DE FUNCIONAMIENTO BEDIENUNGSANLEITUNG ИНСТРУКЦИЯ ПО ЭКСПЛУАТАЦИИ
Safety Information
READ THIS BEFORE OPERATING YOUR UNIT
CAUTION
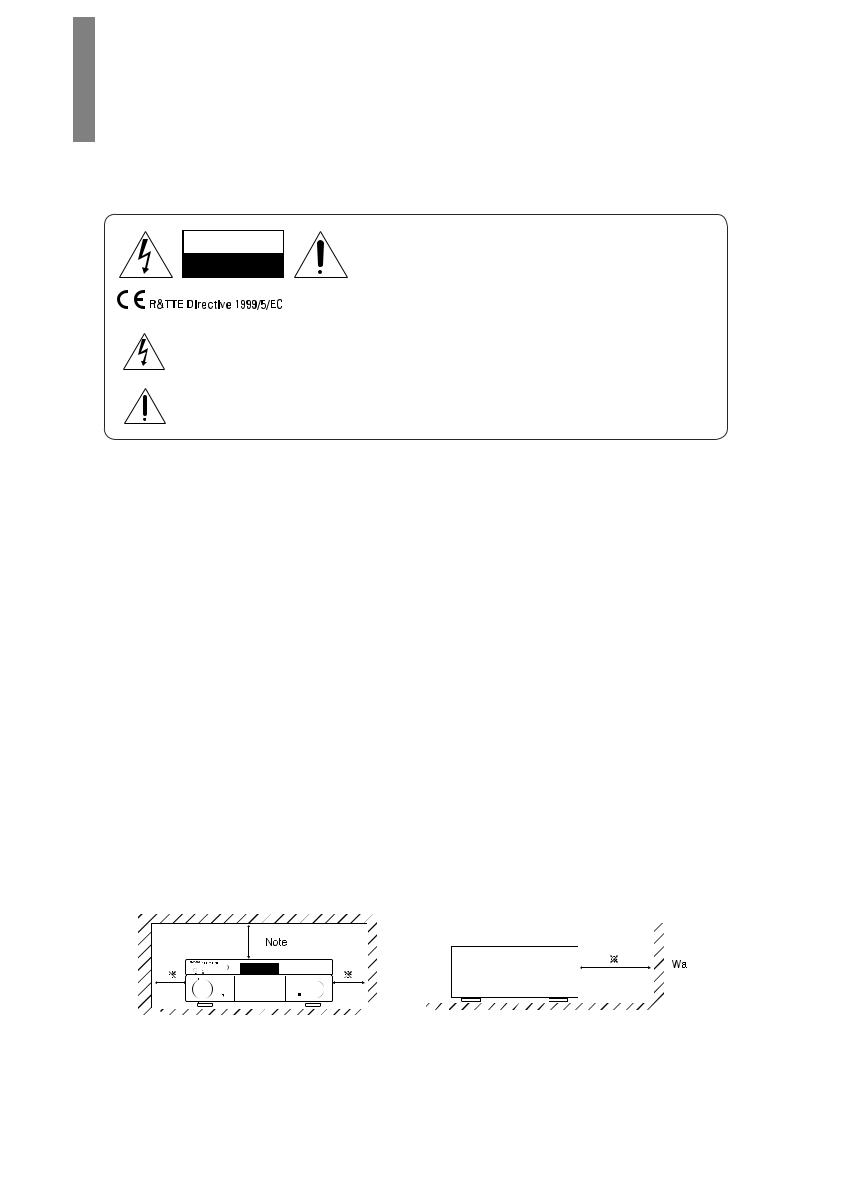
RISK OF ELECTRIC SHOCK
DO NOT OPEN
CAUTION
TO REDUCE THE RISK OF ELECTRIC SHOCK, DO NOT REMOVE FRONT OR BACK COVER. NO USER-SERVICEABLE PARTS INSIDE. REFER SERVICING TO QUALIFIED SERVICE PERSONNEL.
This symbol indicates the presence of uninsulated “dangerous voltage” within the product’s enclosure that may be of sufficient magnitude to constitute a risk of electric shock.
This symbol indicates important operating and maintenance (servicing) instructions in the literature accompanying the appliance.
WARNING: TO REDUCE THE RISK OF FIRE OR ELECTRIC SHOCK, DO NOT EXPOSE THIS APPLIANCE TO RAIN OR MOISTURE.
CAUTION
•• Leave space around the unit for sufficient ventilation.
•• Avoid installation in extremely hot or cold locations, or in an area that is exposed to direct sunlight or heating equipment.
•• Keep the unit free from moisture, water, and dust.
•• Do not let foreign objects in the unit.
•• Keep the ventilation openings clear of items, such as newspapers, linens, or curtains.
•• Keep open flame from candles or other sources away from the unit.
•• Observe the local regulations regarding disposal of packaging materials, exhausted batteries and old equipment.
•• Do not expose the unit to dripping or splashing, or place objects filled with liquids such as vases.
•• Do not let insecticides, benzene, or thinner come in contact with the unit.
•• Never disassemble or modify the unit in any way.
Notes on the AC power cord and the wall outlet
•• The unit remains connected to AC power as long as it is plugged into the wall outlet, even if the unit has been turned off.
•• To completely disconnect this product from AC power, disconnect the plug from the wall socket outlet.
•• When setting up this product, make sure that the AC outlet you are using is easily accessible.
•• Disconnect the plug from the wall outlet when not using the unit for long periods of time.
Manufactured under license under U.S.
Patent Nos: 5,956,674; 5,974,380;
6,226,616; 6,487,535; 7,212,872;
7,333,929; 7,392,195; 7,272,567 & other U.S. and worldwide patents issued & pending. DTS-HD, the Symbol, & DTS-HD and the Symbol together are registered trademarks & DTS-HD Master Audio is a trademark of DTS, Inc.
Product includes software. © DTS, Inc. All Rights Reserved.
Manufactured under license from Dolby Laboratories. Dolby, Pro Logic, and the double-D symbol are trademarks of Dolby Laboratories.
HDMI, the HDMI Logo, and High-
Definition Multimedia Interface are trademarks or registered trademarks
of HDMI Licensing LLC in the United States and other contries.
* DTS-HD Master Audio and Dolby TrueHD is applicable only for
R-607.
Caution regarding installation
 Note
Note
Wall
Do not block ventilation openings or stack other equipment on the top.
 Note: For heat dispersal, do not install this unit in a confined space such as a bookcase or similar enclosure.
2

Table of Contents
2 SAFETY INFORMATION
4 GETTING STARTED
4Front Panel
4Rear Panel
5Remote Control
6Placement
7CONNECTIONS
7 Connect Your Speakers
7Connect Your Subwoofer
8Connect Your TV or Video Display
9Connect Your Audio and Video Source Devices
13Connect the Tuner Antennas
13Connect to AC Power
13Install the Batteries in the Remote Control
14 SETUP
14 Turn On the AVR
14 Configure the AVR for Your Speakers
16 OPERATION
16 Operating Your AVR
16Listening to FM and AM Radio
17Listening to Media on a USB Device
17Selecting a Surround Mode
18Advanced Functions
20TROUBLESHOOTING
21SPECIFICATIONS
English
3

Getting Started
 Front Panel
1 |
2 |
3 |
4 |
5 |
6 |
7 |
||||||||||
|
|
|
|
|
|
|
|
|
|
|
|
|
|
|
|
|
|
|
|
|
|
|
|
|
|
|
|
|
|
|
|
|
|
|
|
|
|
|
|
|
|
|
|
|
|
|
|
|
|
|
|
|
|
|
|
|
|
|
|
|
|
|
|
|
|
|
|
|
|
|
|
|
|
|
|
|
|
|
|
|
|
|
|
|
|
|
|
|
|
|
|
|
|
|
|
|
|
|
|
|
|
|
|
|
|
|
|
|
|
|
|
|
|
|
|
|
|
|
|
|
|
|
|
|
|
|
|
|
|
|
|
|
|
|
|
|
|
|
|
|
|
|
|
|
|
|
|
|
|
|
|
|
|
|
|
|
|
|
|
|
8 |
9 |
10 11 |
12 |
13 |
14 |
15 |
||||
1 |
Main Power Switch |
|
|
|
|
|
9 |
Headphone Connector |
|||
2 |
Standby Indicator |
|
|
|
|
|
10 |
F.AUX Input Connector |
|||
3 |
On/Standby Switch |
|
|
|
|
|
11 |
Band Select Button |
|||
4 |
IR Sensor |
|
|
|
|
|
12 |
Tuning Up/Down Buttons |
|||
5 |
Display |
|
|
|
|
|
13 |
Preset Select Buttons |
|||
6 |
Surround Select Buttons |
|
|
|
|
|
14 |
Stereo Mode Button |
|||
7 |
Master Volume Control |
|
|
|
|
|
15 |
USB Port |
|
|
|
8 |
Input Selector |
|
|
|
|
|
|
|
|
|
|
 Rear Panel
1 2
|
|
|
|
|
|
|
|
|
|
|
|
|
|
|
|
|
|
|
|
|
|
|
|
|
|
|
|
|
|
|
|
|
|
|
|
|
|
|
|
|
|
|
|
|
|
|
|
|
|
|
|
|
|
|
|
|
|
|
|
|
|
|
|
|
|
|
|
|
|
|
|
|
|
|
|
|
|
|
|
|
|
|
|
|
|
|
|
|
|
|
|
|
|
|
|
|
|
|
|
|
|
|
|
|
|
|
|
|
|
|
|
|
|
|
|
|
|
|
|
|
|
|
|
|
|
|
|
|
|
|
|
|
|
|
|
|
|
|
|
|
|
|
|
|
|
|
|
|
|
|
|
|
|
|
|
|
|
|
|
|
|
|
|
|
|
|
|
|
|
|
|
|
|
|
|
|
|
|
|
|
|
|
|
|
|
|
|
|
|
|
|
|
|
|
|
|
|
|
|
|
|
|
|
|
|
|
|
|
|
|
|
|
|
|
|
|
|
|
|
|
|
|
|
|
|
|
|
|
|
|
|
|
|
|
|
|
|
|
|
|
|
|
|
|
|
|
|
|
|
|
|
|
|
|
|
|
|
|
|
|
|
|
|
|
|
|
|
|
|
|
|
|
|
|
|
|
|
|
|
|
|
|
|
|
|
|
|
|
|
|
|
|
|
|
|
|
|
|
|
|
|
|
|
|
|
|
|
|
|
|
|
|
|
|
|
|
|
||||||
|
3 |
|
4 |
|
|
5 |
|
|
6 |
|
7 |
|
8 |
|
||||||||||||
1 |
Digital Audio Connectors |
|
|
|
|
|
|
|
5 |
Subwoofer Connector |
|
|
|
|||||||||||||
2 |
HDMI Connectors |
|
|
|
|
|
|
|
|
|
|
|
|
6 |
Composite Video Connectors |
|
|
|
||||||||
3 |
Tuner Antenna Connectors |
|
|
|
|
|
|
|
7 |
Speaker Connectors |
|
|
|
|||||||||||||
4 |
Analog Audio Connectors |
|
|
|
|
|
|
|
8 |
AC Input Connector |
|
|
|
|||||||||||||
4

 Remote Control
1 


 22
22
2 


 21
21
20
19
18 17
3 

 16
16
4 |
|
15 |
|
|
|
5 |
|
14 |
6 |
|
13 |
7 |
12 |
|
8 |
|
11 |
9 


 10
10
Getting Started
1Power On Button
2Source Select Buttons
3Surround Select Buttons
(The GAME and NETWORK buttons are not available.)
4Top Menu Button
5 ▲/▼/◄/► |
Select Buttons |
ENTER/MEMO |
Enter/Memory Button |
SEARCH.M |
RDS Search Button |
(* The SEARCH.M button is available only in models that are distributed in Europe.)
6Display/Mode Button
7Stop Button
8Repeat Button
9Tuning Up/Down Buttons Rewind/Fast forward Buttons
10Preset Station Up/Down Buttons Previous/Next Buttons
11Random Button
12Play/Pause Button
13Return Button
14Volume Up/Down Buttons
15Setup Menu Button
16Mute Button
17Stereo Mode Button
18Audio Assign Button
19Channel Level Button
20Test Tone Sequence Button
21Tone Control Button
22Standby Button
English
5
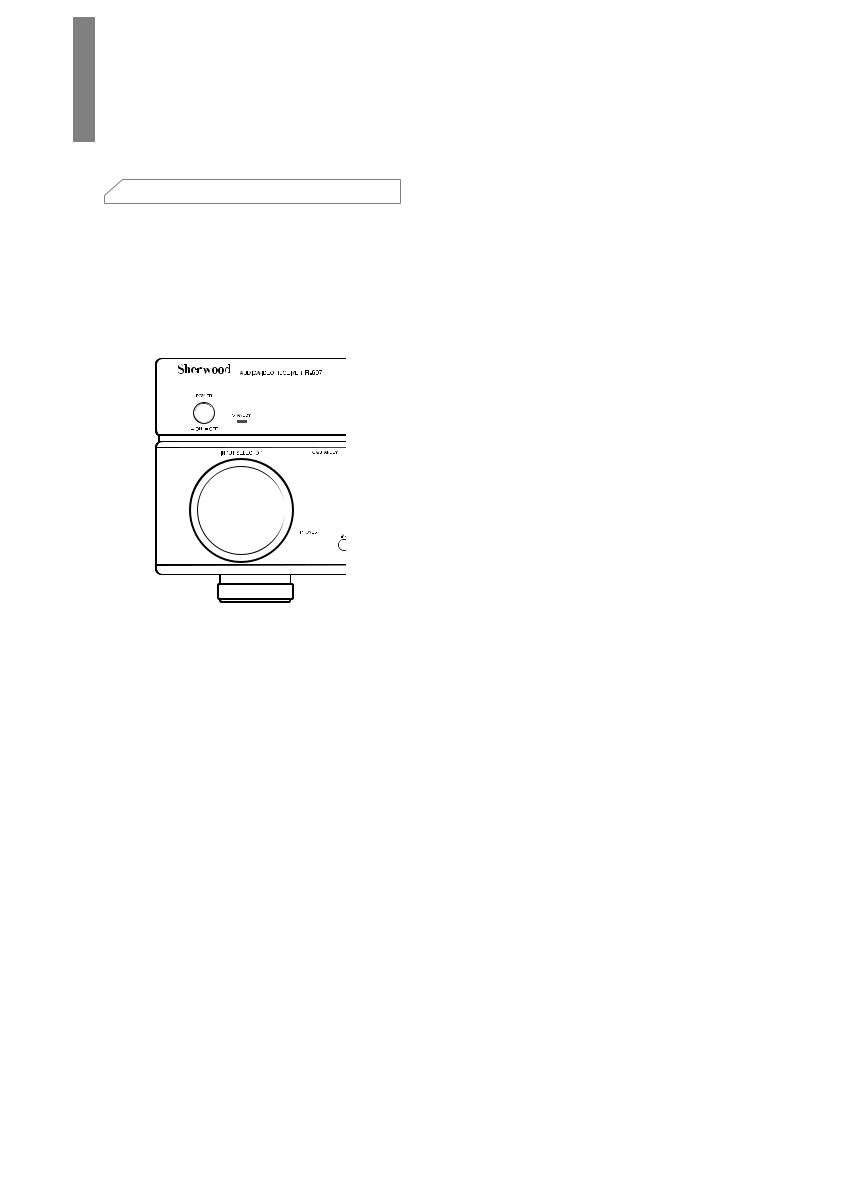
R-607/R-507 AUDIO/VIDEO RECEIVER
 Placement
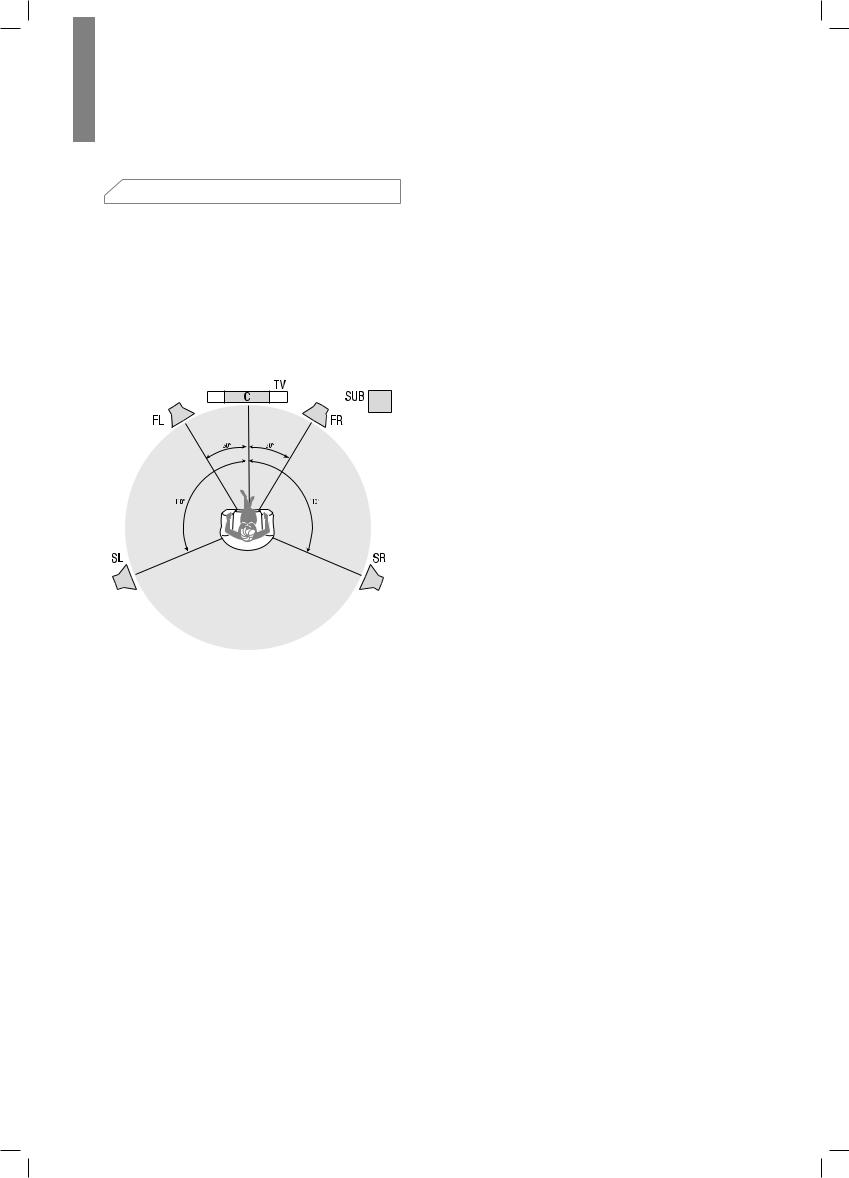
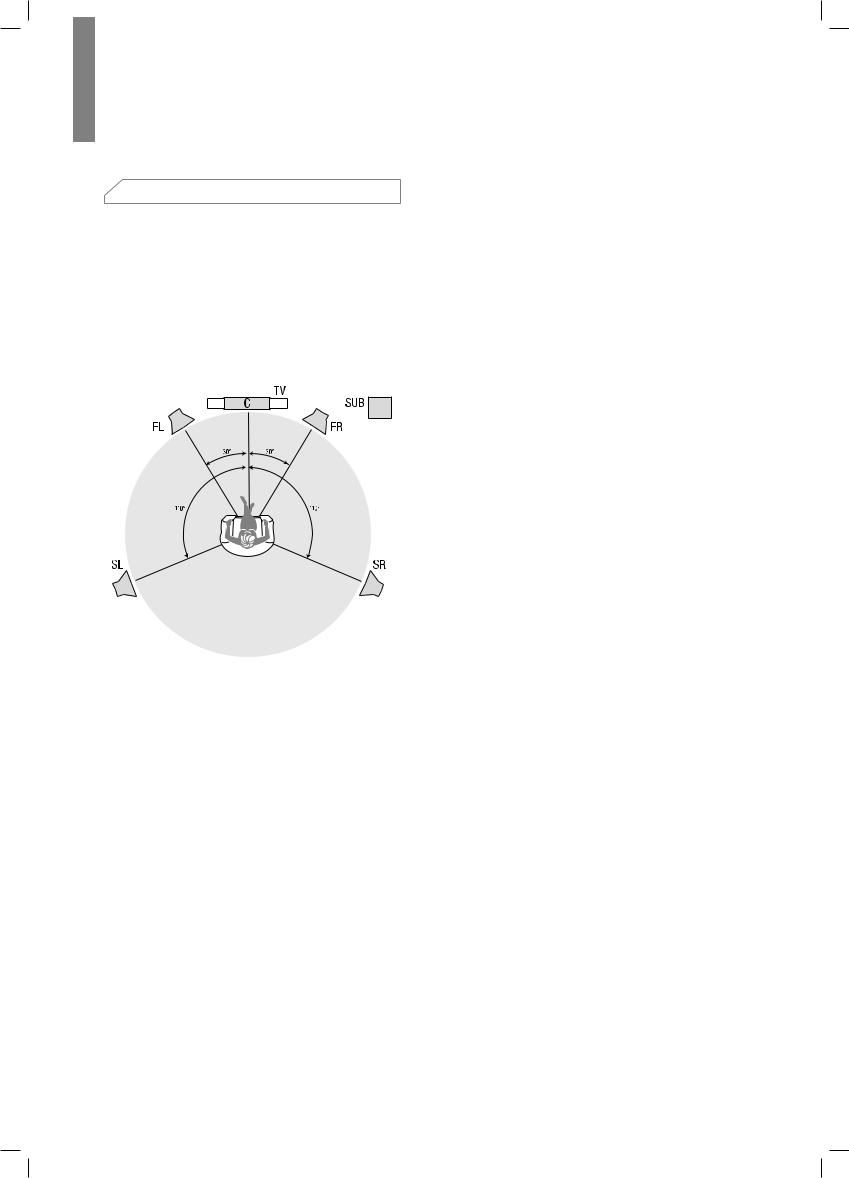
Place Your Speakers
Determine the locations for your system’s speakers according to their manufacturer’s directions and the layout of your listening room. Use the illustration below as a guide for 5.1-channel systems.
To create the most realistic surround-sound environment possible, you should place your speakers in a circle with the listening position at its center. You should angle each speaker so it directly faces the listening position.
Use the diagram below as a guide.
Placing the Left, Center and Right Speakers
Place the center speaker either on top of, below or mounted on the wall above or below the TV or videodisplay screen. Place the front left and right speakers along the circle, about 30 degrees from the center speaker and angled toward the listener.
Place the front left, front right and center speakers at the same height, preferably at about the same height as the listener’s ears. The center speaker should be no more than 2 feet (0.6m) above or below the left/ right speakers. If you’re using only two speakers with your AVR, place them in the front left and front right positions.
Placing the Surround Speakers
You should place the left and right surround speakers approximately 110 degrees from the center speaker, slightly behind and angled toward the listener.
Alternatively, you can place them behind the listener, with each surround speaker facing the opposite-side front speaker. You should place the surround speakers
2 feet – 6 feet (0.6m – 1.8m) higher than the listener’s ears.
Placing the Subwoofer
Because a room’s shape and volume can have a dramatic effect on a subwoofer’s performance, it is best to experiment with placement so that you will find the location that produces the best results in your particular listening room. With that in mind, these rules will help you get started:
•• Placing the subwoofer next to a wall generally will increase the amount of bass in the room.
•• Placing the subwoofer in a corner generally will maximize the amount of bass in the room.
•• In many rooms, placing the subwoofer along the same plane as the left and right speakers can produce the best integration between the sound of the subwoofer and that of the left and right speakers.
•• In some rooms, the best performance could even result from placing the subwoofer behind the listening position. A good way to determine the best location for the subwoofer is by temporarily placing it in the listening position and playing music with strong bass content. Move around to various locations in the room while the system is playing (putting your ears where the subwoofer would be placed), and listen until you find the location where the bass performance is best. Place the subwoofer in that location.
6

Connections
Caution
•• Before making any connections to the audio/ video receiver, ensure that the AVR’s AC cord is unplugged from the AVR and the AC outlet.
Making connections with the AVR plugged in and turned on could damage the speakers.
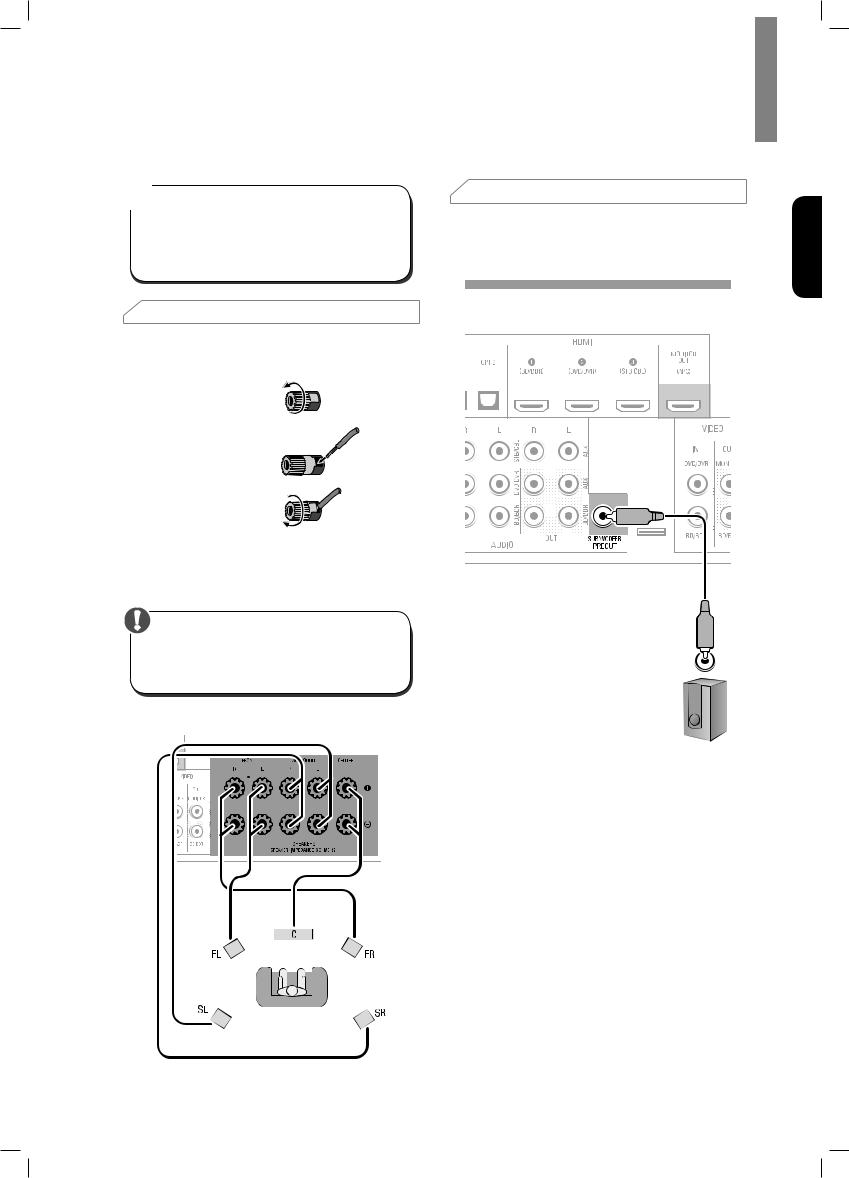
 Connect Your Speakers
How to use the AVR’s speaker terminals
1 Unscrew Cap
2 Insert Bare Wire
3 Tighten Cap
Always connect the colored (+) terminal on the AVR to the (+) terminal on the speaker (usually red), and the black (–) terminal on the AVR to the (–) terminal on the speaker (usually black).
Caution
•• Make sure the (+) and (–) bare wires do not touch each other or the other terminal. Touching wires can cause a short circuit that can damage your AVR.
Connect the speakers as shown in the illustration.
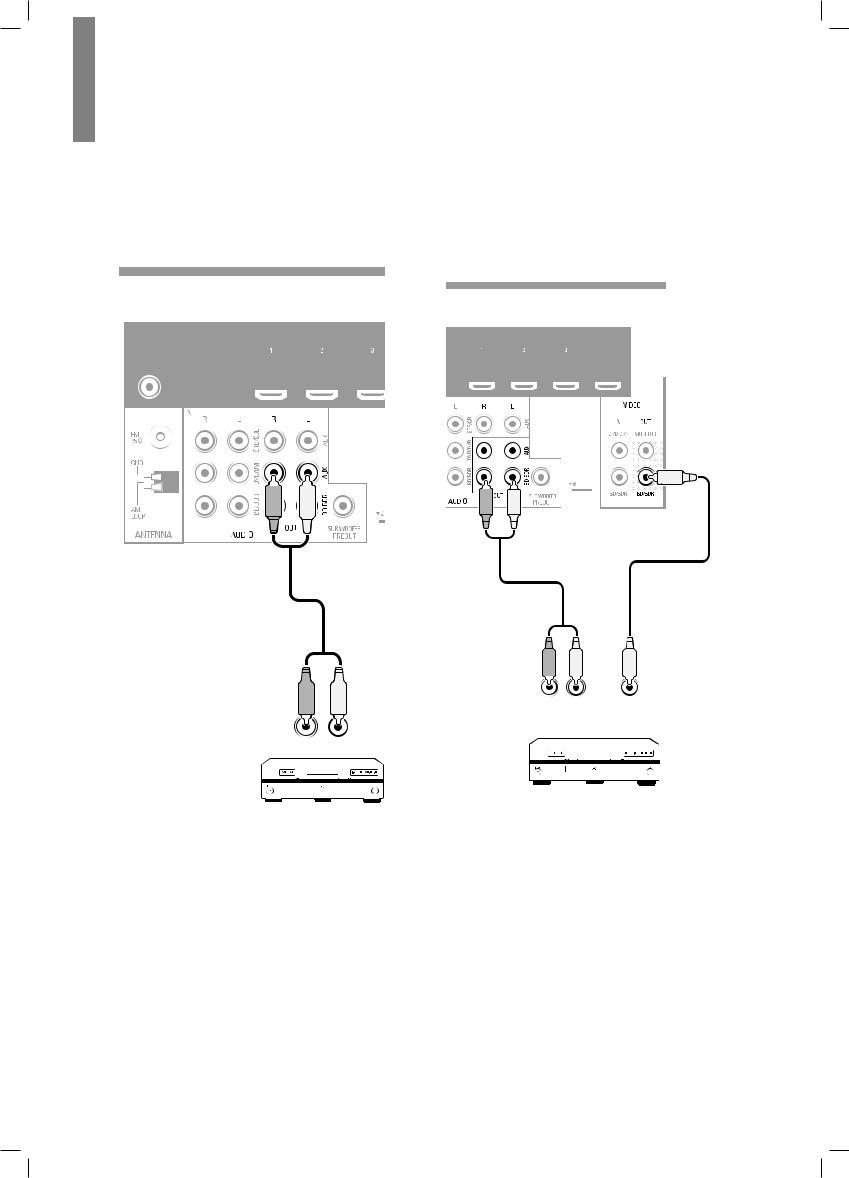
 Connect Your Subwoofer
Use a single RCA audio cable to connect the AVR’s Subwoofer Pre-Out connector to your subwoofer.
Consult your subwoofer’s user manual for specific information about making connections to it.
Rear Panel
Subwoofer
English
7

R-607/R-507 AUDIO/VIDEO RECEIVER
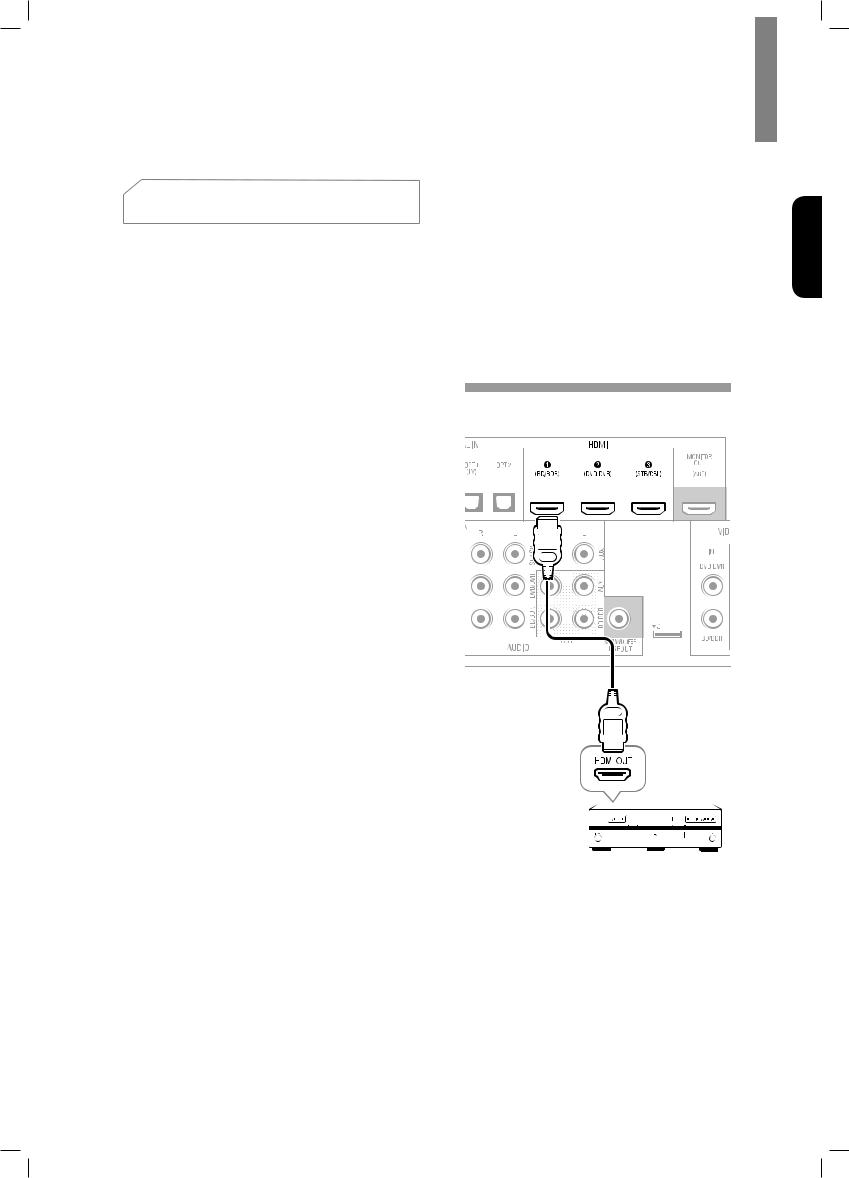
 Connect Your TV or Video Display
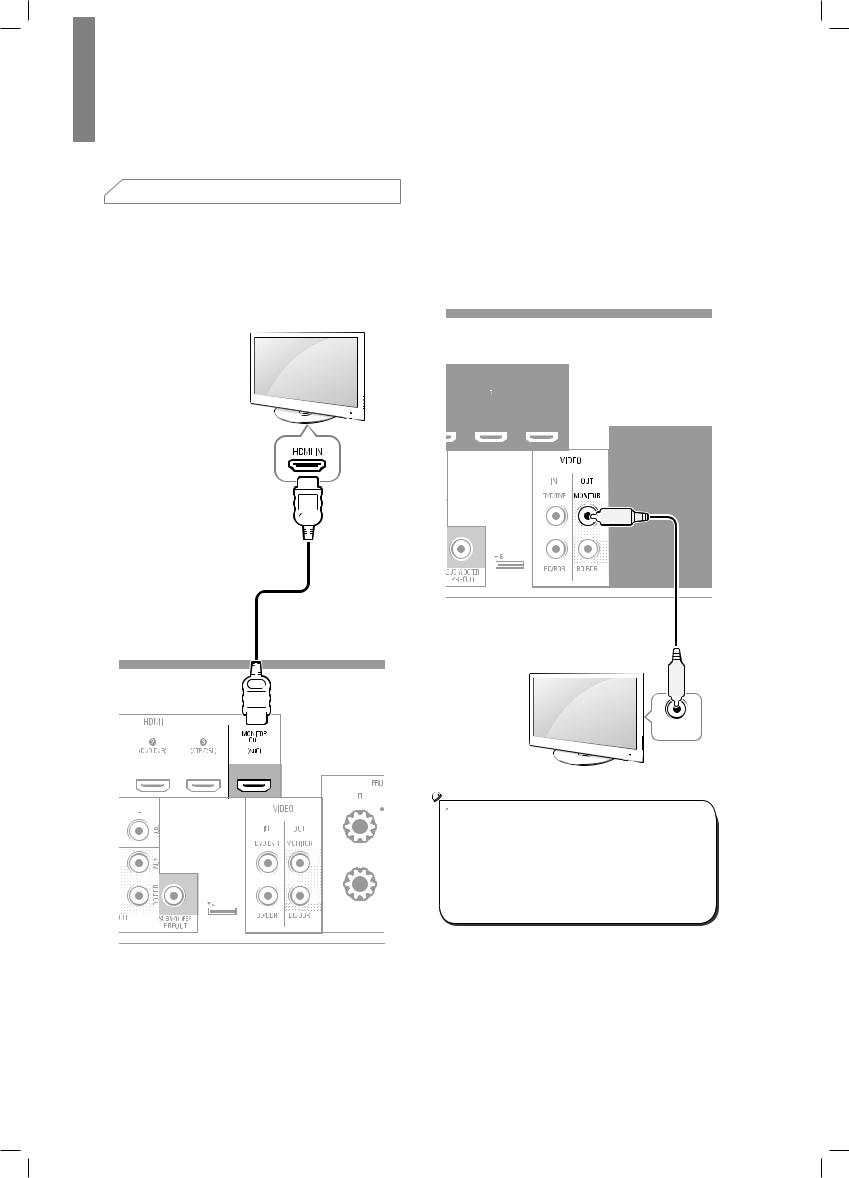
HDMI Monitor Out Connector
If your TV has an HDMI connector and you have HDMI video source devices, use an HDMI cable (not supplied) to connect your TV to the AVR’s HDMI Monitor Out connector.
It will provide the best possible picture quality.
Composite Video Monitor Out Connector
If your TV does not have an HDMI connector, or if your TV does have an HDMI connector but you are connecting some source devices with only composite video connectors, use a composite video cable (not included) to connect the AVR's Composite Monitor Out connector to your TV’s composite video connector.
Rear Panel
Composite Video Cable
(not supplied)
TV
Rear Panel
Composite
VIDEO IN
 Note
Note
•• The AVR’s on-screen display (OSD) only appears through the Composite Monitor Out connector. If you want to use the AVR’s OSD menus you need to connect its Composite Monitor Out connector to your TV even if you are not connecting any composite video source devices to the AVR.
8
 Connect Your Audio and
Video Source Devices
Source devices are components where a playback signal originates, e.g., a Blu-ray Disc™ or DVD player; a cable, satellite or HDTV tuner; etc. Your AVR has several different types of input connectors for your audio and video source devices: HDMI, composite video, optical digital audio, coaxial digital audio and analog audio.
Each of your AVR’s source buttons is assigned to an analog audio input connector.
The digital inputs are not assigned to any specific sets of analog inputs. Once you select a source device you can use the remote control’s DIGITAL button to select the specific audio input connection (HDMI, coaxial digital, optical digital, analog) that you want to listen to. (Note: You cannot select an audio input connection for the FM/AM or USB source buttons.)
As you connect your various source components, fill out the “Source Device Connected” and “Digital Audio Input Connector Used” columns in the following table. it will make it easy to keep track of which devices you have connected to which connectors.
Connections
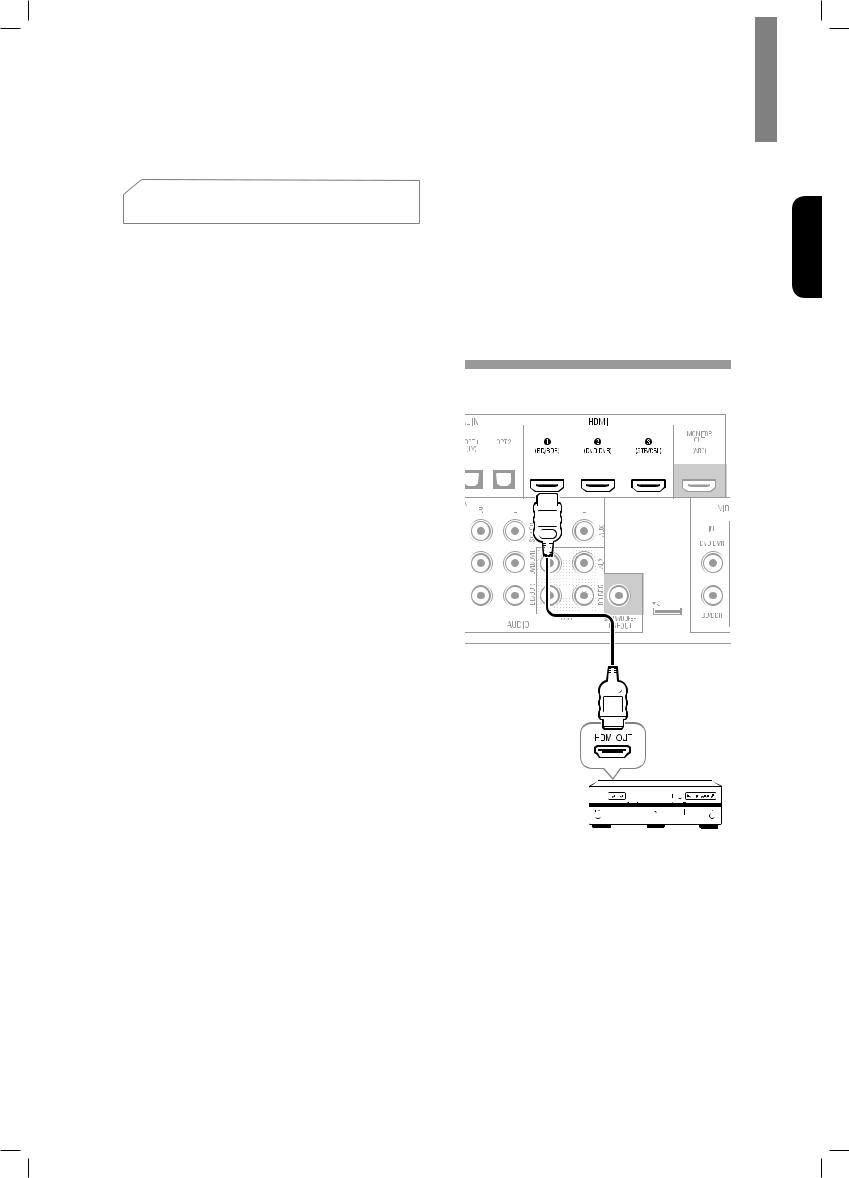
HDMI Devices
If any of your source devices have HDMI connectors, using those connectors will provide the best possible video and audio performance quality. Since the HDMI cable carries both digital video and digital audio signals, you do not have to make any additional audio connections for devices you connect via HDMI cables.
If you have a TV equipped with the HDMI Audio Return
Channel function, its sound is fed to the AVR via the HDMI Monitor Out connection’s Audio Return Channel, and it will not require additional audio connections to the AVR.
Rear Panel
HDMI Cable (not supplied)
HDMI-Equipped Source Device
English
9

R-607/R-507 AUDIO/VIDEO RECEIVER
Composite Video Devices
You will need to make composite video connections from your source devices that do not have HDMI video connections. You will also need to make an audio connection from the device to the AVR.
Rear Panel
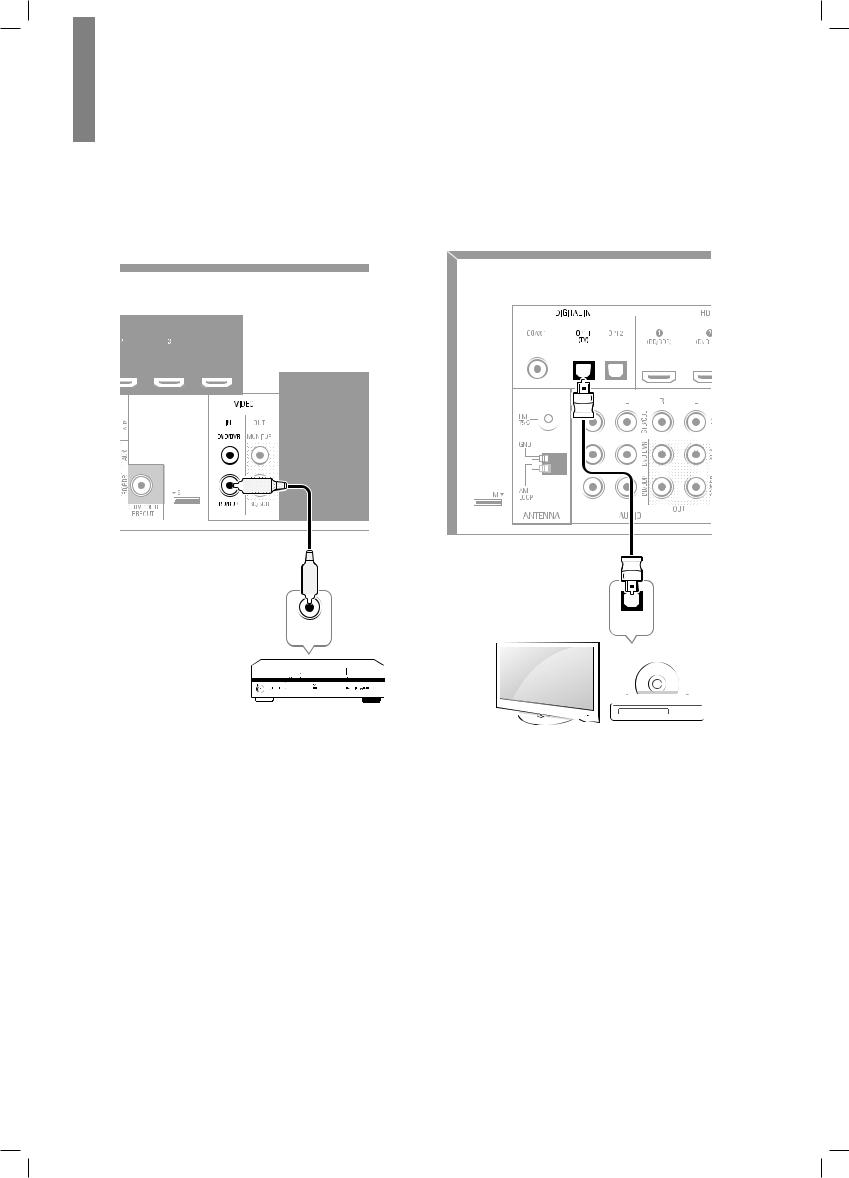
Optical Digital Audio Devices
If your source devices have optical digital outputs, connect them to the AVR’s optical digital audio connectors.
Rear Panel
Composite Video Cable
(not supplied)
OPTICAL
Composite OUT
VIDEO OUT
Composite Video-Equipped |
|
Source Device |
TV, DVD Player, etc. |
10
Coaxial Digital Audio Devices
If your source devices have coaxial digital outputs, connect them to the AVR’s coaxial digital audio connectors.
Rear Panel
Connections
Analog Audio Devices
Make analog audio connections from your source devices that do not have HDMI or digital audio connections. If you’re connecting video sources to the AVR’s Video 1 or Video 2 audio inputs, you must also connect the source device’s composite video output to the corresponding composite video connector.
Rear Panel
English
OUT
TV, DVD Player, etc.
R L
TV, DVD Player, etc.
11
R-607/R-507 AUDIO/VIDEO RECEIVER
Audio Recorder
Connect an analog audio recorder’s inputs to the AVR’s analog audio Tape Out connectors.
You can record any analog audio input signal (except Tape In).
Rear Panel
Video Recorders
Connect an analog video recorder’s video input connector to the AVR’s Video 1 Out composite video connector and its audio input connectors to the AVR’s Video 1 Out analog audio connectors. You can record the Video 2 composite video input signal.
Rear Panel
|
|
|
|
|
|
|
|
|
|
|
|
|
|
|
|
|
|
|
|
|
|
|
|
|
|
|
|
|
|
|
|
|
|
|
|
|
|
|
|
|
|
|
|
|
|
|
|
|
|
|
|
|
|
|
|
|
|
|
|
|
|
|
|
|
|
|
|
|
|
|
|
|
|
|
|
|
|
|
|
|
|
|
|
|
|
|
|
|
|
|
|
|
|
|
|
|
|
|
|
|
|
|
|
|
|
|
|
|
|
|
|
|
|
|
|
|
|
|
|
|
|
|
|
|
|
|
|
|
|
|
|
|
|
|
|
|
|
|
|
|
|
|
|
|
|
|
|
|
|
|
|
|
|
|
|
|
|
|
|
|
|
|
|
|
|
|
|
|
|
|
|
|
|
|
|
|
|
|
|
|
|
|
|
|
|
|
|
|
|
|
|
|
|
|
|
|
|
|
|
|
|
|
|
|
|
|
|
|
|
|
|
|
|
|
|
|
|
|
|
|
|
|
|
|
|
|
|
|
|
|
|
|
|
|
|
|
|
|
|
|
|
|
|
|
|
|
|
|
|
|
|
|
|
|
|
|
|
|
|
|
|
|
|
|
|
|
|
|
|
|
|
|
|
|
|
|
|
|
|
|
|
|
|
|
|
|
|
|
|
|
|
|
|
|
|
|
|
|
|
|
|
|
|
|
|
|
|
|
|
|
|
|
|
|
|
|
|
|
|
|
|
|
|
|
|
|
|
|
|
|
|
|
|
|
|
|
|
|
|
|
|
|
|
|
|
|
|
|
|
|
|
|
|
|
|
|
|
|
|
|
|
|
|
|
|
|
|
|
|
|
|
|
|
|
|
|
|
|
|
|
|
|
|
|
|
|
|
|
|
|
|
|
|
|
|
|
|
|
|
|
|
|
|
|
|
|
|
|
|
|
|
|
|
|
|
|
|
|
|
|
|
|
|
|
|
|
|
|
|
|
|
|
|
|
|
|
|
|
|
|
|
|
|
|
|
|
|
|
|
|
|
|
|
|
|
|
|
|
|
|
|
|
|
|
|
|
|
|
|
|
|
|
|
|
|
|
|
|
|
|
|
|
|
|
|
|
|
|
|
|
|
|
|
|
|
|
|
|
|
|
|
|
|
|
|
|
|
|
|
|
|
|
|
|
|
|
|
|
|
|
|
R |
|
|
L |
|
|
IN |
|||
|
|
|
|
|
|
|
|
|
|
|
|
|
|
|
|
|
|
|
|
|
|
||||||
|
|
|
|
|
|
|
|
|
|
|
|
|
|
|
|
|
|
|
|
|
|
||||||
|
|
|
|
|
|
|
|
|
|
|
|
|
|
|
|
|
|
|
|
|
|
||||||
|
|
|
|
|
|
|
|
|
|
|
|
|
|
|
|
|
|
|
|
|
|
||||||
|
|
|
|
|
|
|
|
|
|
|
|
|
|
|
|
|
|
|
|
|
|
||||||
|
|
|
|
|
|
|
|
|
|
|
|
|
|
|
|
|
|
AUDIO IN |
|
(COMPOSITE) |
|||||||
|
|
|
|
|
|
|
|
|
|
|
|
|
|
|
|
|
|
|
|
|
|
|
VIDEO |
||||
R L
Analog Video Recording Device
Analog Audio Recording Device
12
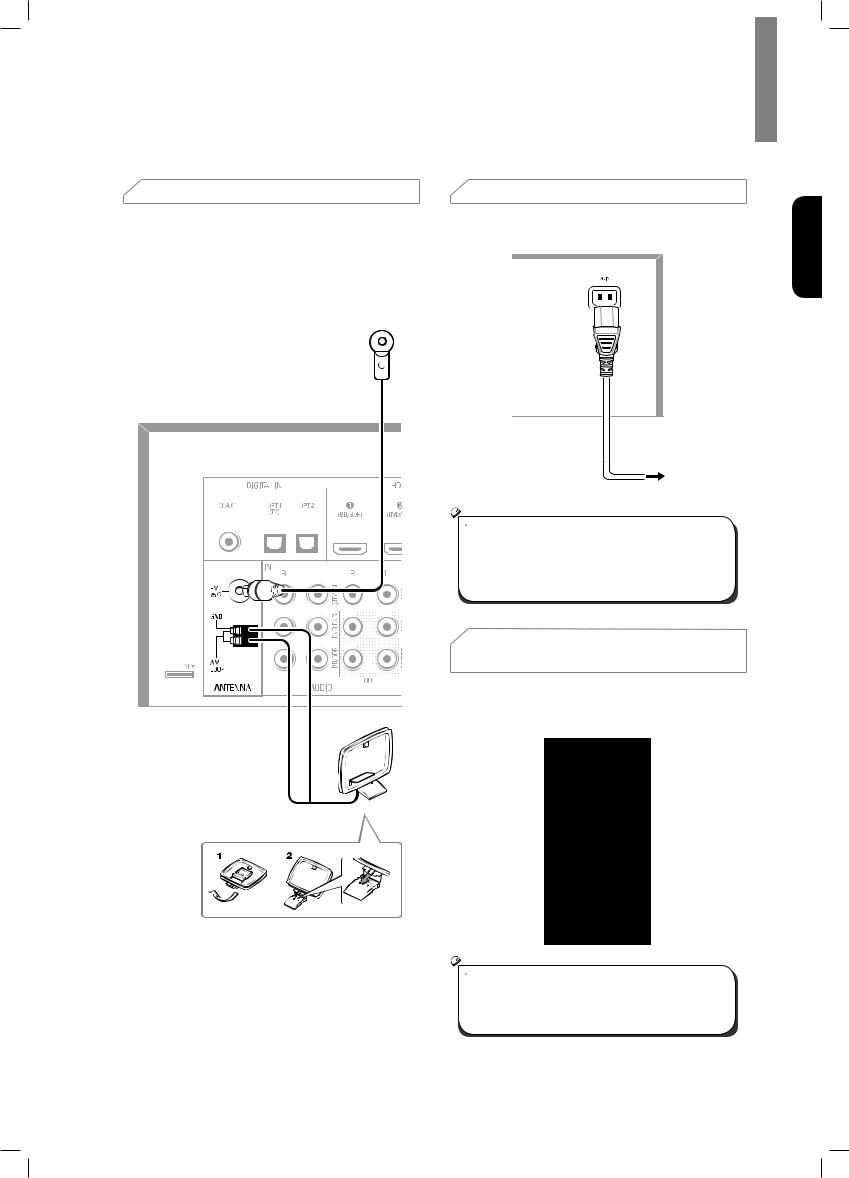
 Connect the Tuner Antennas
•• Connect the supplied FM antenna to the AVR’s FM
75Ω antenna connector. For the best reception, extend the FM antenna as far as possible.
•• Bend and fold the base of the supplied AM antenna as shown and connect the antenna wires to the AVR’s AM and Gnd connectors. Rotate the antenna as necessary to minimize background noise.
Connections
 Connect to AC Power
Connect the AC power cord to the AVR’s AC Input connector and then to a working AC power outlet.
Rear Panel
AC power cord
Rear Panel
To the wall outlet
 Note
Note
•• Before connecting the AC power cord, make sure that the AC voltage listed on the AVR’s back panel matches the AC voltage used in your country.
 Install the Batteries in the
Remote Control
Remove the remote control’s battery cover, insert the two supplied AAA batteries as shown in the illustration, and replace the battery cover.
AM Loop Antenna
English
 Note
Note
•• Remove the protective plastic from the AVR’s front panel to keep it from reducing the remote control’s effectiveness.
13
Setup
|
|
|
Turn On the AVR |
|
|
|
|
||
1 |
||||
Set the AVR’s Main Power switch to “On”. |
||||
|
|
|
(The Standby indicator will glow red.) |
|
2 |
Press the front-panel On/Standby button. |
|||
Main Power Switch Standby Indicator
On/Standby Button
On the remote control, you can only turn on or off the AVR to standby mode by following the steps below. When the power button is pressed on the main unit, you cannot turn on the main unit even by pressing the power button on the remote control.
POWER |
Standby |
|
ON |
||
Button |
||
Button |
||
|
1 |
Press POWER ON on the standby mode. |
2 |
Press STANDBY to turn on the standby mode. |
 Configure the AVR for Your
Speakers
You will be using the following remote control buttons to configure your AVR:
|
Setup |
|
Menu |
|
Button |
Left/ |
|
Right/ |
Enter |
Up/ |
|
Down |
Button |
Buttons |
|
|
Return |
|
Button |
1 |
Turn on your TV and select the TV input where |
|
you connected the AVR’s Composite Monitor |
|
Out connector in Connect Your Audio and Video |
|
Source Devices, on page 9. |
 Note
Note
•• Although you can configure the AVR using only its front-panel message display, it is much easier to use the On-Screen Display (OSD) menu system.
2 |
Press the remote control’s SETUP button. The |
|
|
AVR’s OSD System Setup menu will appear on |
|
|
the TV. |
|
|
System Setup |
|
|
1. |
Speaker Setup |
|
2. |
HDMI Setup |
|
3. |
Audio Setting’s |
|
4. |
Auto Power Control |
|
5. |
Speakers On/Off |
3 |
Use the remote’s arrow and ENTER buttons |
|
|
to select “Speaker Setup”. The Speaker Setup |
|
|
menu will appear. |
|
|
1. Speaker Setup |
|
|
a. Speaker Setting’s |
|
|
b. Crossover |
|
|
c. Channel Level |
|
|
d. Speaker Distance |
|
14

4 |
Select “Speaker Settings”. The Speaker Settings |
|
|
menu will appear. |
|
|
1a. SpeaKer Setting’s |
|
|
Front |
< LARGE > |
|
Center |
[ LARGE ] |
|
Surrround L/R |
[ LARGE ] |
|
Subwoofer |
[ YES ] |
5 |
Use the remote’s left and right arrow buttons |
|
to select NO, SMALL or LARGE for the Front,
Center and Surround speaker positions, depending on the speakers you have connected to the receiver.
NO: Select this setting if you have not connected a speaker in that position (not available for the Front speakers).
SMALL: Select this setting if the speaker is not capable of producing clean, deep bass energy at output levels that match those produced by a powered subwoofer. All bass in that channel is removed from that speaker and is sent to the
subwoofer (or to the Front speakers if Subwoofer is set to NO). Most speakers (unless they are large and powerful) should be considered SMALL.
LARGE: Select this setting if the speaker is capable of producing clean, deep bass energy at output levels that match those produced by a powered subwoofer. All bass in that channel is sent to that speaker.
When you’re finished, press the remote control’s RETURN button to return to the Speaker Setting menu.
 Note
Note
•• If your system has a subwoofer and you set the
Front speakers to LARGE, the subwoofer may not output audio except for Dolby Digital and DTS encoded program material that contains LFE channel information. If you set your
Front speakers to LARGE and you want your subwoofer to reproduce bass from all program material, set the Subwoofer to PLUS (see below).
•• For Subwoofer, select YES (if your system has a subwoofer), NO (if your system does not have a subwoofer), or PLUS (if your system has a subwoofer, you set your Front speakers to LARGE and you want your subwoofer to reproduce bass from all program material).
Setup
6 |
For now you can skip the “Crossover” setting. |
|
7 |
Select “Speaker Distance”. The Speaker |
|
|
Distance menu will appear. |
|
|
1d. SpeaKer Distance |
|
|
Units |
[ FEET ] |
|
Front L |
< 10.0ft > |
|
Center |
[ 10.0ft ] |
|
Front R |
[ 10.0ft ] |
|
Surrround R |
[ 10.0ft ] |
|
Surrround L |
[ 10.0ft ] |
|
Subwoofer |
[ 10.0ft ] |
 Note
Note
•• The unit display may differ depending on the distributed models.
8 |
Measure the distance from each speaker in your |
|
|
system to the listening position. Write down the |
|
|
distances. |
|
9 |
Use the remote’s left and right arrow buttons to |
|
|
change the distance setting for each speaker so |
|
|
it matches the distance you wrote down in step 8. |
|
|
When you’re finished, press the remote control’s |
|
|
RETURN button to return to the Speaker Setting |
|
|
menu. |
|
10 |
Select “Channel Level”. The Channel Level |
|
|
menu will appear. Use the remote’s left and |
|
|
right arrow buttons to set Test Tone to “Manual” |
|
|
and press the remote’s ENTER button. After the |
|
|
on-screen countdown you will hear test noise |
|
|
through the front left speaker. |
|
|
1c. Channel Level |
|
|
Test Tone |
< Manual > |
11 |
Sit in the main listening position and adjust |
|
|
the AVR’s volume control so the test noise |
|
|
is moderately loud. Note the volume of the |
|
|
test noise through the first speaker. Press the |
|
|
remote’s down arrow button to advance the |
|
|
test noise to each of your system’s speakers |
|
|
and note the volume level of the noise in each |
|
|
speaker. |
|
12 |
As you advance the test noise through the |
|
speakers, use the remote’s left and right arrow buttons to adjust the volumes of the channels until all of them play at the same volume.
When you’re finished, press the remote’s SETUP button to turn of the on-screen menus.
English
15
Operation
 Operating Your AVR
Now that you have installed your components and completed a basic configuration, you are ready to begin enjoying your home theater system.
Controlling the Volume
Adjust the volume either by turning the front-panel
Volume knob (clockwise to increase volume or counterclockwise to decrease volume) or by pressing the Volume Up/Down buttons on the remote.
Muting the Sound
To mute all speakers and the headphones, press the
Mute button on the remote. Any recording in progress will not be affected. The MUTE message will appear in the front-panel display as a reminder. To restore the sound, press the Mute button again, or adjust the volume.
Listening Through Headphones
Plug the 1/4-inch stereo plug on a pair of headphones into the front-panel Phones jack for private listening.
 Note
Note
•• For information about turning off the speakers during headphone listening, see page 14.
Selecting a Source
There are two different ways to select a source:
•• Rotate the front-panel INPUT SELECTOR.
•• Directly select any source by pressing its Source Selector button on the remote.
The AVR selects the analog audio and video inputs assigned to the source and any other settings you made during setup.
The digital audio inputs are not assigned to any specific sets of analog inputs. Once you select a source device you can use the remote control’s Audio Input Select
(DIGITAL) button to select the specific audio input connection (HDMI, coaxial digital, optical digital, analog) that you want to listen to. (Note: You cannot select an audio input connection for the FM/AM or USB source buttons.)
The source name, the selected audio input and the surround mode will appear on the front panel.
Video Troubleshooting Tips
If there is no picture:
•• Check the source selection.
•• Check all connections for a loose or incorrect connection.
•• Check the video-input selection on the TV/display device.
Additional Tips for Troubleshooting HDMI Connections
•• Turn off all devices (including the TV, the AVR and any source components).
•• Unplug the HDMI cables, starting with the cable between the AVR and the TV, and continuing with the cables between the AVR and each source device.
•• Carefully reconnect the cables from the source devices to the AVR. Connect the cable from the AVR to the TV last.
•• Turn on the devices in this order: TV, AVR, source devices.
 Note
Note
•• Depending upon the particular components involved, the complexity of the required communication between HDMI components may cause delays of up to a minute in the completion of some actions, such as input switching or switching between SD and HD channels.
 Listening to FM and AM Radio
Select the AM/FM source. Use the Tuning Up/Down buttons to tune a station, which will be shown on the front-panel display.
For automatic tuning, press and hold the Tuning Up/ Down buttons to scan stations until a station with acceptable signal strength is found. For manual tuning, press each Tuning button until the desired station is found. Using the FM Mono mode may improve the reception of weaker stations.
Preset Stations
A total of 30 stations (AM and FM combined) may be stored as presets. When the desired station has been tuned in, press the Memory button and the preset number will flash on the front-panel Message display.
Use the remote’s Number buttons to enter the desired preset number.
To tune a preset station, press the Preset Up/Down buttons or enter the preset number using the remote’s Number buttons.
RDS
RDS(Radio Data System) is a method for sending information signals together with the transmitter signals. These codes contain Program Service name (PS), A list of Program Types (PTY), Radio Text (RT).
16

 Note
Note
•• RDS is available only in models that are distributed in Europe.
•• RDS is only possible in the FM band.
•• RDS searches for the preset stations only. If no stations have been stored in the memory, or if the program type could not be found among the preset stations, “NO PTY” is displayed.
Operation
Use the remote’s Transport Control buttons to control playback.
To browse the contents of the current folder, press the remote’s RETURN button. The USB folder screen will appear on the OSD for 20 seconds.
 Listening to Media on a USB Device
Your AVR is compatible with USB 2.0 or USB 1.1 media in the FAT 16 or FAT 32 file format and is compatible with the following MP3 and WMA media:
•• MP3: Bit rates between 96 – 320kbps. Fixed bitrates at 44.1kHz sampling is recommended. Variable bit-rates (VBR) are playable, but playing time may be displayed incorrectly. Files must have a “.mp3” file extension.
•• WMA: Bit rates of 64kbps or higher. NOTE: Bit rates of 80kbps and 256kbps are not compatible. Files must have a “.wma” file extension.
A maximum number of 65,536 folders and files can be supported.
Playing files on a USB device
1 |
Insert the USB drive into the AVR’s front-panel |
|
USB port. |
Caution
•• Do not connect a personal computer or peripheral to the USB port. USB hubs are not supported.
2 |
Select USB as the source device. “USB” will |
||
|
appear on the front-panel display, and after the |
||
|
AVR loads the contents of the current folder the |
||
|
USB playback screen will appear on the OSD. |
||
|
File |
Playback |
Repeat |
|
Type |
Mode |
Mode |
Song Title
Artist Name
Album Title
Data |
Elapsed |
Rate |
Time |
Use the remote’s UP/Down and ENTER buttons to highlight and select tracks.
Caution
•• To prevent damage or malfunction, press the remote’s Stop (■) Transport Control button before removing the USB device from the AVR’s USB port.
 Selecting a Surround Mode
Selecting a surround mode can be as simple or sophisticated as your individual system and tastes. Feel free to experiment, and you may find a few favorites for certain sources or program types. You can find more detailed information on surround modes in Audio Processing and Surround Sound, below.
To select a surround mode, press the Surround Mode Select buttons. Each press advances to the next available surround mode.
Digital surround-sound modes, such as Dolby Digital and DTS systems, are available only with specially encoded programs, such as those available via HDTV, DVD and Blu-ray Disc media and digital cable or satellite television. Other surround modes such as Dolby Pro Logic II may be used with digital or analog signals to create a different surround presentation or to use a different number of speakers.
Surround mode selection depends upon the number of speakers in your system, the programs you are watching or listening to, and your personal tastes.
English
17

R-607/R-507 AUDIO/VIDEO RECEIVER
 Advanced Functions
Much of the adjusting and configuration your AVR requires is handled automatically, with little intervention required on your part. You can also customize your AVR to suit your system and your tastes. In this section, we will describe some of the more advanced adjustments available to you.
Audio Processing and Surround Sound
Audio signals can be encoded in a variety of formats that affect not only the quality of the sound but also the number of speaker channels and the surround mode.
You may also manually select a different surround mode, when available.
Analog Audio Signals
Analog audio signals usually consist of two channels – left and right. Your AVR offers several options for analog playback:
•• Stereo: When you want conventional 2-channel playback, press the STEREO button. Sound will be output from the front left and right speakers.
•• 5-Ch Stereo: When you want to hear stereo sound through all of the system’s speakers (such as during a party), select 5CH STEREO via the Surround Mode Select buttons. This plays the left-channel signal through the front left and surround left speakers, the right-channel signal through the front right and surround right speakers, and a summed mono signal through the center speaker.
•• Analog Surround Modes: Your AVR is able to process 2-channel audio signals to produce multichannel surround sound, even when no surround sound has been encoded in the recording. Among the available modes are Dolby Pro Logic II, Dolby Pro Logic, DTS Neo: 6, Theater, Hall, Stadium, Club and Arena modes. Use the Surround Mode Select buttons to select one of these modes.
Digital Audio Signals
Digital audio signals offer greater flexibility and capacity than analog signals and allow the encoding of up to 5.1 channels of discrete channel information directly into the signal. The result is improved sound quality and startling directionality, since each channel’s information is transmitted independently of the other channels. High-resolution recordings sound extraordinarily distortion-free, especially in the high frequencies.
Digital surround-sound formats include Dolby Digital 2.0 (two channels only), Dolby Digital 5.1, Dolby Digital EX, Dolby Digital Plus, Dolby TrueHD, DTS-HD HighResolution Audio, DTS-HD, DTS 5.1, DTS 96/24,
2-channel PCM modes in 44.1kHz, 48kHz, 88.1kHz, 96kHz or 176.4kHz, and 5.1 or 7.1 multichannel PCM. (Your AVR will downmix the discrete surround back-
channel information in 6.1-channel and 7.1-channel recordings into your system’s surround left and surround right channels.)
Surround Mode Selection
Surround-mode selection depends upon the format of the incoming audio signal as well as your personal taste. Although there is never a time when all of the AVR’s surround modes are available, the table below indicates which surround modes are available for a given input.
Input Signal |
Available Surround Modes |
|
Format |
||
|
||
Dolby TrueHD |
|
|
(Only for |
Corresponding Dolby TrueHD |
|
R- 607), |
||
(Only for R-607) or Dolby Digital |
||
Dolby Digital |
||
mode (Theater, Hall, Stadium, |
||
Plus (Only |
||
Club, Arena and 5-Ch Stereo are |
||
for R- 607), |
||
also available for 5.1-channel |
||
Dolby Digital |
||
programs) |
||
(7.1-channel/ |
||
|
||
5.1-channel) |
|
|
|
|
|
Dolby Digital |
Dolby Pro Logic II Movie, Dolby |
|
Pro Logic II Music, Dolby Pro |
||
(2.0-channel) |
||
Logic II Game, Dolby Pro Logic |
||
|
||
|
|
|
|
Corresponding DTS Mode |
|
DTS-HD (Only |
(Theater, Hall, Stadium, Club, |
|
for R- 607), |
Arena and 5-Ch Stereo are |
|
DTS, DTS 96/24 |
also available for 5.1-channel |
|
|
programs) |
|
|
|
|
|
Dolby Pro Logic II Movie, Dolby |
|
PCM |
Pro Logic II Music, Dolby Pro |
|
(2-channel), |
Logic II Game, Dolby Pro Logic, |
|
Analog |
DTS Neo:6 Cinema, DTS Neo:6 |
|
(2-channel) |
Music, Theater, Hall, Stadium, |
|
|
Club, Arena, 5-Ch Stereo |
|
|
|
|
|
Dolby Pro Logic II Movie, Dolby |
|
|
Pro Logic II Music, Dolby Pro |
|
MP3/WMA |
Logic II Game, Dolby Pro Logic, |
|
DTS Neo:6 Cinema, DTS Neo:6 |
||
|
||
|
Music, Theater, Hall, Stadium, |
|
|
Club, Arena, 5-Ch Stereo |
|
|
|
When in doubt, check the broadcast or the jacket of your disc for more information on which surround
modes are available. Usually, nonessential sections of a disc, such as trailers, extra materials or the disc menu, are available only in Dolby Digital 2.0 (2-channel) or
PCM 2-channel mode. Look for an audio setup section in the disc’s menu.
Also, make sure your disc player’s audio output is set to the original bitstream rather than 2-channel PCM. Stop play and check the player’s output setting.
18
Adjusting the Channel Volumes
In addition to using the AVR’s built-in test noise to configure the AVR for your speakers as explained in Configure the AVR for Your Speakers, you can also adjust the volume of any channel at any time to compensate for individual program sources or your personal taste.
1 |
Press the remote’s Channel Level button. The |
|
Message Display will show the left channel |
|
volume level. |
2 |
Use the remote’s up and down arrow buttons to |
|
display the channel you want to adjust. |
3 |
Use the remote’s left and right arrow buttons to |
|
adjust the channel’s volume. |
Press the RETURN button when you’re finished.
Recording
Two-channel analog audio signals, as well as composite video signals, are normally available at the appropriate recording output connectors. To make a recording, connect your audio or video recorder to the appropriate AVR output connectors as described in the Making
Connections section, insert blank media in the recorder and make sure the recorder is turned on and recording while the source is playing. Refer to the recording device’s instructions for complete information about making recordings.
 Note
Note
•• The AVR does not convert digital signals to analog. Only devices connected to the analog audio and composite video input connections can be recorded.
•• HDMI video sources are not available for recording.
•• Please make certain that you are aware of any copyright restrictions on any material you record. Unauthorized duplication of copyrighted materials is prohibited by law.
Sleep Timer
The sleep timer sets the AVR to play for up to 90 minutes and then turn off automatically.
Press the Sleep button on the remote, and the time until turn-off will be displayed on the front-panel Message display The available settings are 30 min., 60 min.,
90 min. and OFF.
When the sleep timer has been set, a small crescentmoon icon will appear on the front-panel display.
If you press the SLEEP button after the timer has been set, the remaining play time will be displayed. Press the SLEEP button again to change the play time.
Operation
Processor Reset
If the AVR behaves erratically after a power surge, first turn off the front-panel Main Power switch and unplug the AC power cord for at least 3 minutes. Plug the cord back in and turn the AVR on. If this procedure doesn’t help, reset the AVR’s processor as described below.
 Note
Note
•• Resetting the processor will erase all user configurations, including speaker and level settings, and tuner presets. After a reset, reenter all of these settings from your notes in the
Appendix worksheets.
To reset the AVR’s processor:
1 |
Press the front-panel Standby/On switch to |
|
place the unit in the Standby mode (the Standby |
|
Indicator LED will turn red). |
2 |
Press and hold the SURROUND down button on |
|
the remote control as pressing and holding the |
|
front-panel Standby/On switch simultaneously. |
3 |
When the RESET message “RESET?” appears |
|
on the front-panel Message display, press |
|
BAND. |
4 |
When the RESET message “OK?” appears on |
|
the front-panel Message display, press BAND. |
Memory
If the AVR is unplugged or experiences a power outage, it will retain your user settings for up to two weeks.
English
19

Troubleshooting
If you experience any of the following difficulties while using the system, use this troubleshooting guide to help remedy the problem before requesting servicing. Should any problem persist, consult your nearest authorized dealer or authorized independent company.
If the unit does not operate normally due to external influence such as static electricity, disconnect the power plug from the outlet and insert again to return to normal operating conditions.
Symptom |
Cause |
|
Solution |
Unit does not function when |
•• No AC power. |
|
•• Ensure that the power cord is plugged into |
|
|||
Main Power switch is turned |
|
|
a live AC power outlet. |
on. |
|
|
|
|
|
|
|
Front-panel Message display |
•• Intermittent input connection. |
|
•• Secure all input and speaker connections |
lights, but there's no sound |
•• Mute is on. |
|
•• Press Mute button. |
or picture. |
•• Volume control is turned down. |
|
•• Turn up Volume control. |
No sound from any speaker. |
•• Speakers set to “Off” in System |
|
•• Set speakers to “On” in System Setup |
|
Setup menu. |
|
menu. See page 14, for more information. |
No sound from any speaker; |
•• Amplifier is in protection mode |
|
•• Check all speaker wires at speaker and |
PROTECT message appears |
due to possible short circuit. |
|
AVR connections for crossed wires. |
•• Amplifier is in protection mode |
|
•• Contact your local service center. |
|
on Message display. |
due to internal problems. |
|
|
|
|
|
|
|
|
|
|
|
•• Incorrect surround mode. |
|
•• Select a surround mode other than stereo. |
|
•• Program material is |
|
•• Mono programs contain no surround |
|
monophonic. |
|
information. |
No sound from center or |
•• Incorrect speaker configuration. |
|
•• Check the speaker configuration in the |
surround speakers. |
•• Program material is stereo. |
|
setup menu. |
|
|
|
•• The surround decoder may not create |
|
|
|
centeror surround-channel information |
|
|
|
from non-encoded stereo programs. |
|
|
|
|
|
•• Weak batteries in remote. |
|
•• Change batteries in remote. |
Unit does not respond to |
•• AVR not selected. |
|
•• Press the Setup/AVR button. |
remote control commands. |
•• Remote sensor is obscured. |
|
•• Ensure that the AVR’s front-panel remote |
|
|
|
sensor is in the line of sight of the remote. |
|
|
|
|
|
•• Local interference. |
|
•• Move the AVR or antenna away from |
Intermittent buzzing in tuner. |
|
|
computers, fluorescent lights, motors or |
|
|
|
other electrical appliances. |
20
Specifications
Audio Section
Power Output
Input sensitivity/impedance
Signal-to-noise ratio (IHF-A)
Surround system adjacent-channel separation
Frequency response
High instantaneous-current capability (HCC)
100 W x 7ch (20 Hz~20 kHz, 6 Ohms, THD 1 %/Only Channel
Driven)
75 W x 2ch (20 Hz~20 kHz, 6 Ohms, THD 0.1 %/Stereo Mode)
200 mV/47k ohms
95 dB
Dolby Pro Logic/PLII: 40 dB Dolby Digital: 55 dB
DTS: 55 dB
10Hz – 100kHz: ±3 dB
±25 amps
FM Tuner Section
Frequency range
Usable sensitivity IHF
Signal-to-noise ratio (mono/stereo)
Distortion (mono/stereo)
Stereo separation
Image rejection
IF rejection
87.5 – 108.0 MHz
1.3 μV/13.2 dBf
65 dB/62 dB
0.2 %/0.3 %
35 dB @ 1 kHz
80 dB
80 dB
AM Tuner Section
Frequency range
Signal-to-noise ratio
Usable sensitivity (loop)
Selectivity (±10kHz)
IF rejection
520 – 1720 kHz, 522 –1161 kHz
45 dB
500 μV
30 dB
80 dB
Video Section
Television format
Input level/impedance
Output level/impedance
Video frequency response (composite video)
HDMI
NTSC/PAL
1 Vp-p/75 ohms
1 Vp-p/75 ohms
10 Hz – 8 MHz (–3 dB)
With 3 D and Deep Color
General Specifications
Power requirement |
AC 120 V/60 Hz, AC 230 V/50 Hz |
|
|
Power consumption |
<0.5 W (standby), 280 W maximum |
|
|
Dimensions (W×H×D, including protruding parts) |
17.1" x 5.4" x 14.9" (435mm x 138mm x 379mm) |
|
|
Weight (Net) |
17.6lb (8kg) |
|
|
English
21
Informations de sécurité
À LIRE AVANT D'UTILISER L'APPAREIL
ATTENTION
RISQUE DE CHOC ELECTRIQUE
NE PAS OUVRIR
ATTENTION
AFIN DE REDUIRE LES RISQUE DE CHOC ELECTRIQUE, N'ENLEVEZ PAS LE PANNEAU ARRIERE. AUCUNE PIÈCE À L'INTÉRIEUR NE PEUT ÊTRE RÉPARÉE PAR L'UTILISATEUR. EN CAS DE PROBLÈME, S'ADRESSER À DU PERSONNEL TECHNIQUE QUALIFIÉ.
Ce symbole sert à avertir l'utilisateur de la présence dans le boîtier de l'appareil de tensions dangereuses non isolées d'une magnitude pouvant constituer un risque d'électrocution.
Ce symbole indique que la documentation fournie avec l'appareil contient des instructions d'utilisation et d'entretien importantes.
AVERTISSEMENT : POUR REDUIRE TOUT RISQUE D'INCENDIE OU DE CHOC ELECTRIQUE, NE PAS EXPOSER CET APPAREIL A LA PLUIE OU A L'HUMIDITE.
ATTENTION
•• Laissez de l'espace autour de l'appareil pour en assurer une ventilation suffisante.
•• Evitez d'installer l'appareil dans des endroits trop chauds ou trop froids ou dans une zone exposée directement au soleil ou
à un dispositif de chauffage.
•• Protégez l’appareil de l’humidité, de l’eau et de la poussière.
•• Ne faites pas tomber de corps étrangers dans l’appareil.
•• N'obstruez pas les ouvertures de ventilation par des journaux, rideaux, linge etc.
•• Eloignez toute flamme nue, telle que bougie, ou autres sources de chaleur de l'appareil.
•• Respectez les réglementations locales concernant la mise au rebut des emballages, piles/batteries usagées et anciens
équipements.
•• N’exposez pas l’appareil au ruissellement ou à la projection d'eau et évitez de poser dessus des objets remplis de liquides, tels que des vases.
•• Ne pas mettre l'appareil en contact avec des insecticides, du benzène ou des diluants.
•• Ne démontez pas et ne modifiez pas l’appareil de quelle que manière que ce soit.
Remarques concernant le câble et la prise d’alimentation secteur
•• L'appareil reste sous tension tant qu'il est branché à une prise secteur, même s’il a été éteint.
•• Il faut le débrancher de la prise secteur pour le mettre complètement hors tension.
•• Lors de l’installation de l’appareil, veillez à ce que la prise secteur soit facilement accessible.
•• Débranchez l'appareil du secteur s'il ne va pas être utilisé pendant une longue période.
Fabriqué sous licence sous les
brevets américains n° : 5,956,674 ;
5,974,380 ; 6,226,616 ; 6,487,535 ;
7,212,872 ; 7,333,929 ; 7,392,195 ;
7,272,567 et autres brevets américains et étrangers en cours d’homologation.. DTS-HD et les logos DTS-HD sont des marques déposées et DTS-HD Master Audio est une marque de commerce de DTS, Inc. Le produit comprend le logiciel. © DTS, Inc. Tous droits réservés.
Fabriqué sous licence des laboratoires Dolby. Dolby, Pro Logic et le symbole du double D sont des marques déposées des laboratoires Dolby.
HDMI, le logo HDMI et High-
Definition Multimedia Interface sont des marques commerciales ou des
marques déposées de HDMI Licensing LLC aux Etats-Unis et dans d’autres pays.
* DTS-HD Master Audio et Dolby TrueHD est applicable uniquement pour R-607.
Avertissements concernant l'installation
 Remarque
Paroi
Ne pas couvrir les ouvertures de ventilation et ne pas placer d'autres équipements au-dessus de l'appareil.
 Remarque : Pour la dissipation de la chaleur, ne pas placer cet appareil dans un espace fermé, tel qu’une bibliothèque ou meuble similaire.
22

Table des matières
22 INFORMATIONS DE SÉCURITÉ
24 MISE EN ROUTE
24Panneau avant
24Panneau arrière
25Télécommande
26Emplacement
27CONNEXIONS
27Connexion des enceintes
27Connexion du Subwoofer
28Connexion d'écran télé/vidéo
29Connexion des sources audio/vidéo
33Connexion des antennes du tuner
33Branchement au courant
33Mettre des piles dans la télécommande
34 CONFIGURATION
34 Allumer le RAV(Récepteur Audio/Vidéo)
34 Configurer le RAV en fonction des enceintes
36 UTILISATION
36 Utilisation du RAV
36Ecouter la radio FM/AM
37Ecouter des contenus multimédias d’une une clé USB
37Sélection d'un mode surround
38Fonctions avancées
40DÉPANNAGE
41SPÉCIFICATIONS
Français
23
Mise en route
 Panneau avant
1 |
2 |
3 |
4 |
5 |
6 |
7 |
||||||||||
|
|
|
|
|
|
|
|
|
|
|
|
|
|
|
|
|
|
|
|
|
|
|
|
|
|
|
|
|
|
|
|
|
|
|
|
|
|
|
|
|
|
|
|
|
|
|
|
|
|
|
|
|
|
|
|
|
|
|
|
|
|
|
|
|
|
|
|
|
|
|
|
|
|
|
|
|
|
|
|
|
|
|
|
|
|
|
|
|
|
|
|
|
|
|
|
|
|
|
|
|
|
|
|
|
|
|
|
|
|
|
|
|
|
|
|
|
|
|
|
|
|
|
|
|
|
|
|
|
|
|
|
|
|
|
|
1
2
3
4
5
6
7
8
|
|
|
|
|
|
|
|
|
|
|
|
|
|
|
|
|
|
|
|
|
|
8 |
9 |
10 11 |
12 |
13 |
14 |
15 |
||||
Interrupteur d'alimentation principal |
|
9 |
Prise casque |
|
|
|||||
Témoin veille |
|
|
|
|
|
10 |
Prise d'entrée F.AUX |
|||
Commutateur Marche/Veille |
|
|
|
11 |
Touche sélecteur de bande |
|||||
Capteur infrarouge |
|
|
|
|
|
12 |
Touches Syntonisation vers le Haut/Bas |
|||
Ecran |
|
|
|
|
|
13 |
Touche sélecteur de préréglage |
|||
Touches sélection Surround |
|
|
|
14 |
Touche mode stéréo |
|||||
Contrôle du volume principal |
|
15 |
Port USB |
|
|
|||||
Sélecteur d'entrée
 Panneau arrière
1 2
|
|
|
|
|
|
|
|
|
|
|
|
|
|
|
|
|
|
|
|
|
|
|
|
|
|
|
|
|
|
|
|
|
|
|
|
|
|
|
|
|
|
|
|
|
|
|
|
|
|
|
|
|
|
|
|
|
|
|
|
|
|
|
|
|
|
|
|
|
|
|
|
|
|
|
|
|
|
|
|
|
|
|
|
|
|
|
|
|
|
|
|
|
|
|
|
|
|
|
|
|
|
|
|
|
|
|
|
|
|
|
|
|
|
|
|
|
|
|
|
|
|
|
|
|
|
|
|
|
|
|
|
|
|
|
|
|
|
|
|
|
|
|
|
|
|
|
|
|
|
|
|
|
|
|
|
|
|
|
|
|
|
|
|
|
|
|
|
|
|
|
|
|
|
|
|
|
|
|
|
|
|
|
|
|
|
|
|
|
|
|
|
|
|
|
|
|
|
|
|
|
|
|
|
|
|
|
|
|
|
|
|
|
|
|
|
|
|
|
|
|
|
|
|
|
|
|
|
|
|
|
|
|
|
|
|
|
|
|
|
|
|
|
|
|
|
|
|
|
|
|
|
|
|
|
|
|
|
|
|
|
|
|
|
|
|
|
|
|
|
|
|
|
|
|
|
|
|
|
|
|
|
|
|
|
|
|
|
|
|
|
|
|
|
|
|
|
|
|
|
|
|
|
|
|
|
|
|
|
|
|
|
|
|
|
|
|
|
|
|
|
|
|
|
|
|
|
|
|
|
||||||
|
3 |
|
4 |
|
|
5 |
|
|
6 |
|
7 |
|
8 |
|
|||||||||||||
1 |
Prises audio numérique |
|
|
|
|
|
|
|
5 |
Prise Subwoofer |
|
|
|
||||||||||||||
2 |
Prises HDMI |
|
|
|
|
|
|
|
|
|
|
|
|
|
6 |
Prises vidéo composite |
|
|
|
||||||||
3 |
Prises des antennes du tuner |
|
|
|
|
|
|
|
7 |
Prises enceintes |
|
|
|
||||||||||||||
4 |
Prises audio analogique |
|
|
|
|
|
|
|
8 |
Prise d'alimentation secteur |
|
|
|
||||||||||||||
24
 Télécommande
1 


 22
22
2 


 21
21
20
19
18 17
3 

 16
16
4 |
|
15 |
|
|
|
5 |
|
14 |
6 |
|
13 |
7 |
12 |
|
8 |
|
11 |
9 


 10
10
Mise en route
1Touche Allumer
2Touches Sélecteur de source
3Touches sélecteur de Surround
(Les touches GAME et NETWORK ne sont pas disponibles.)
4Touche Menu principal
5▲/▼/◄/► Touches de sélection ENTER/MEMO Touche Entrer/mémoire SEARCH.M Touche recherche
RDS (Radio Data System) (Système de radiocommunication de données)
(* La touche SEARCH.M n’est disponible que sur les modèles distribués en Europe)
6Touche Affichage/Mode
7Touche Stop
8Touche répéter
9Touches Syntonisation vers le Haut/Bas Touches Avance/Retour rapide
10Touches Station préréglée vers le Haut/Bas
Touches Précédent/Suivant
11Touche aléatoire
12Touche Lecture/Pause
13Touche Retour
14Touches Augmenter/diminuer le volume
15Touche menu réglages
16Touche Couper le son
17Touche mode stéréo
18Touche Attribution Audio
19Touche niveau de canal
20Touche Séquence de tonalité de test
21Touche Contrôle de tonalité
22Touche Veille
Français
25
R-607/R-507 RÉCEPTEUR AUDIO/VIDÉO
 Emplacement
Emplacement des enceintes
Déterminez l'emplacement des enceintes de votre système selon les instructions du fabricant et en fonction de l'aménagement de votre salle d'écoute. Utilisez l'illustration ci-dessous comme guide pour les systèmes 5.1 canaux. Pour créer l'environnement son surround le plus réaliste possible, vous devez placer vos enceintes autour
d’un cercle avec la position d'écoute au centre. Vous devez orienter chaque enceinte de manière qu'elle soit directement en face de la position d'écoute. Utilisez l'illustration ci-dessous comme guide.
Emplacement des enceintes gauche, centrale et droite
Placez l'enceinte centrale en haut, en bas ou accrochée au mur au dessus ou en dessous du téléviseur ou de l'écran vidéo. Placez les enceintes avant gauche et droite sur le cercle, orientées à environ 30 degrés de l'enceinte centrale et dirigées vers l'auditeur.
Placez de préférence les enceintes avant gauche, avant droite et centrale à environ la même hauteur que les oreilles de l'auditeur. Il est préférable que l'enceinte centrale soit à 0,6m (2 pieds) maximum au dessus ou en dessous des enceintes gauche/droite. Si vous n'utilisez que deux enceintes avec votre RAV, les placer dans les positions avant gauche et droite.
Emplacement des enceintes surround
Il est préférable d’orienter les enceintes surround gauche et droite à environ 110 degrés de l'enceinte centrale, légèrement en arrière et orientées vers l'auditeur. Vous pouvez également les placer derrière l'auditeur, en les orientant de façon opposée à l'enceinte avant. Vous devez placer les enceintes surround plus haut que les oreilles de l'auditeur de 0,6 - 1,8m (2 - 6 pieds).
Emplacement du subwoofer
Les performances d'un subwoofer sont considérablement affectées par la forme et le volume de la pièce d’écoute, il est préférable d'essayer différentes positions jusqu'à ce que vous trouviez l'emplacement qui produit les meilleurs résultats dans votre propre pièce. Dans ce contexte, les règles suivantes vous aideront dans vos débuts :
•• Un subwoofer placé à côté d'un mur accentue généralement les graves dans la pièce.
•• Un subwoofer placé dans un coin donne généralement les graves les plus fortes dans la pièce.
•• Dans plusieurs pièces, placer le subwoofer au niveau de la même hauteur que les enceintes gauche et droite peut produire la meilleure intégration entre le son du subwoofer et celui des enceintes.
•• Dans certaines pièces, le placement du subwoofer derrière la position d'écoute pourrait donner la meilleure performance. Une bonne manière pour déterminer la meilleure position du subwoofer consiste à le placer temporairement dans la position d'écoute et d’écouter de la musique avec un contenu très grave. Il faut ensuite se déplacer dans divers endroits de la pièce tout en écoutant (mettez vos oreilles là où le subwoofer serait placé), jusqu'à ce que vous trouviez l'emplacement où la performance des graves serait meilleure. Placez alors le subwoofer à l’endroit que vous jugez meilleur.
26
Connexions
Attention
•• Avant toute connexion au récepteur audio/vidéo, assurez-vous que le cordon d’alimentation secteur est débranché du RAV et de la prise secteur.
Des connexions avec le RAV branché et allumé pourraient endommager les enceintes.
 Connexion des enceintes
Comment utiliser les bornes d'enceintes du RAV (Récepteur Audio/Vidéo) :
1 Dévissez le capot
2 Insérez un fil dénudé
3 Serrez le capot
Connectez toujours la borne marquée (+) du RAV à la borne (+) de l'enceinte (généralement rouge), et la borne noire (-) du RAV à la borne (-) de l'enceinte (généralement noire).
Attention
•• Veillez à ce que les fils dénudés (+) et (-) ne se touchent pas et aucun ne touche l'autre borne. En cas de contact des fils, un court-circuit peut avoir lieu et peut endommager le RAV.
Connectez les enceintes comme indiqué dans l’illustration.
 Connexion du Subwoofer
Utilisez un simple câble audio RCA pour connecter la borne Subwoofer Pre-Out du RAV au Subwoofer. Reportez-vous au guide d'utilisation de votre subwoofer pour avoir des informations spécifiques sur les connexions.
Panneau arrière
Subwoofer (Enceinte d'extrêmes graves)
Français
27
R-607/R-507 RÉCEPTEUR AUDIO/VIDÉO
 Connexion d'écran télé/vidéo
Prise HDMI Monitor Out
(sortie HDMI moniteur)
Si votre téléviseur est doté d’une prise HDMI et que vous disposez de sources vidéo HDMI, utilisez un câble HDMI (non fourni) pour connecter votre téléviseur à la prise HDMI Monitor Out (sortie HDMI moniteur) du RAV.
Vous aurez la meilleure qualité d'image possible.
Panneau arrière
Prise Composite Video Monitor Out
(sortie vidéo composite moniteur)
Si votre téléviseur ne comprend pas une prise HDMI ou s’il en comprend mais vous utilisez certaines sources avec seulement des prises vidéo composite, utilisez un câble vidéo composite (non fourni) pour connecter la prise de sortie vidéo composite moniteur du RAV à la prise vidéo composite du téléviseur.
Panneau arrière
Câble vidéo composite (Non fourni)
TV
Composite
VIDEO IN
 Remarque
•• L'affichage à écran (OSD) du RAV n’apparaît que via la prise de sortie Composite moniteur (Composite Monitor Out). Pour utiliser les menus OSD du RAV vous devez connecter sa prise de sortie Composite moniteur à votre téléviseur, même si vous ne connectez pas de sources vidéo composite au RAV.
28
 Connexion des sources audio/vidéo
Les sources sont des composants qui reproduisent un signal de lecture, ex. un lecteur Blu-ray Disc™, un lecteur DVD, un tuner par câble, satellite ou HDTV etc. Ce RAV est doté de plusieurs types de prises d'entrée pour vos sources audio/vidéo : HDMI, vidéo composante, vidéo composite, audio numérique optique, audio numérique coaxiale et audio analogique.
Chacune des diverses touches sources du RAV est affectée à une prise d'entrée audio analogique.
Les entrées audio numérique ne sont pas affectées à des ensembles d'entrées audio analogique spécifiques. Une fois vous sélectionnez une source, vous pouvez utiliser la touche DIGITAL de la télécommande pour sélectionner la connexion d'entrée audio spécifique (HDMI, coaxiale numérique, optique numérique, analogique) souhaitée. (Remarque : Les touches source radio FM/AM et USB ne permettent pas de sélectionner une connexion d'entrée audio).
Au fur et à mesure que vous connectez vos composants sources, remplissez dans le tableau ci-dessous les colonnes « Sources connectées » et « Prise d’entrée audio utilisé » ; il vous sera facile de connaître quel appareil est connecté à quelle prise.
Connexions
Appareils HDMI
L'utilisation des prises HDMI des sources offre la meilleure qualité de reproduction audio/vidéo possible. Un câble HDMI transmet des signaux vidéo et audio numérique en même temps, vous n'avez pas à utiliser d’autres câbles de connexion audio si vous utilisez des connexions HDMI.
Si votre téléviseur ou autre appareil source est équipé de la fonction « Canal de Retour Audio HDMI » (HDMI ARC), vous pouvez connecter le RAV via la prise HDMI Monitor Out - ARC (sortie HDMI moniteur - Canal de Retour Audio) sans aucune autre connexion audio.
Panneau arrière
Câble HDMI (Non fourni)
Source avec HDMI
Français
29
R-607/R-507 RÉCEPTEUR AUDIO/VIDÉO
Appareils vidéo composite
Vous devez établir des connexions vidéo composite à partir de vos sources qui ne disposent pas de prise HDMI vidéo. Vous devez également établir une connexion audio de vos sources vers le RAV.
Panneau arrière
Câble vidéo composite (Non fourni)
Composite
VIDEO OUT
Source avec vidéo composite
Appareils audio numérique optique
Si vos sources sont dotées de sorties audio numérique optique, il faut les connecter aux prises audio numérique optique du RAV.
Panneau arrière
OPTICAL
OUT
TV, lecteur DVD, etc.
30
 Loading...