


 DD-5080(D) 2007.10.24 4:28 PM 21
OPERATING INSTRUCTIONS
BEDIENUNGSANLEITUNG
MANUALE D'ISTRUZIONI
DOUBLE CASSETTE DECK DD-5080C |
|
|
|
|
|
|
|
|
|
|
|
|
|
COUNTER |
MODE |
|
|
|
|
|
|
|
RESET |
A/B |
|
|
|
|
B C |
|
|
|
|
|
|
|
|
|
M |
|
TAPE SIZE |
MEMORY |
NR B/C/OFF |
|
|
|
|
|
|
RELAY PLAY |
|
REVERSE |
|
AUTO REVERSE |
EJECT |
DUBBING |
/ |
CD SYN REC |
EJECT |
AUTO REVERSE |
||
|
|
NORMAL |
HIGH |
|
|
|
|
|
|
B |
|
AMS |
|
AMS |
|
|
HX-PRO |
PLAY/AUTO TAPE SELECTOR |
|
|
|
|
|
|
A RECORD & PLAY/AUTO TAPE SELECTOR |
|
POWER |
PHONES |
REC LEVEL |
REC BALANCE |
|
ON/OFF |
|
|
|
|
|
0 |
10 |
L |
R |
DD-5080C
Double Cassette Deck
Doppel Cassetten Recorder
Registratore Stereo a Doppia Piastra
 DD-5080(D) 2007.10.24 4:28 PM 2
ENGLISH
Unpacking and installation
Congratulations on your purchase!
Your new high fidelity Integrated Cassette Deck is designed to deliver maximum enjoyment and years of trouble free service. Please take a few moments to read this manual thoroughly. It will explain the features and operation of your Unit and help a trouble free installation.
Please unpack your Cassette Deck carefully. We recommend that you save the carton and packing material. They will be helpful if you ever need to move your unit and may be required if you ever need to return it for service. Your Cassette Deck is designed to be placed in a horizontal position and it is important to allow at least two inches of space behind your unit for adequate ventilation and cabling convenience.
To avoid early damage, never place the unit near radiators, in front of heating vents, in direct sunlight, of in excessively humid or dusty location.
Connect your complementary components as illustrated in the following section.
CAUTION
RISK OF ELECTRIC SHOCK.
DO NOT OPEN
CAUTION: TO REDUCE THE RISK
OF ELECTRIC SHOCK,
DO NOT REMOVE COVER (OR BACK).
NO USER-SERVICEABLE PARTS INSIDE.
REFER SERVICING TO QUALIFIED SERVICE PERSONNEL.
CAUTION
To prevent electric shock, do not use this(polarzed) plug with an extension cord, receptacle or other outlet unless the blades can be fully inserted to prevent blade exposure.
This symbol is intended to alert the user to the presence of unisulated "dangerous voltage" within the product's enclosure that may be of sufficient magnitude to constitute a risk of electric shock to persons.
This symbol is intended to alert the user to the presence of important operating and maintenance (servicing) instructions in the literature accompanying the appliance.
WARNING
To prevent fire or shock hazard, do not expose the unit to rain or moisture.
2
 DD-5080(D) 2007.10.24 4:28 PM 3
Read this Before Operating Your Unit
FOR THE U.S.A. AND CANADA ......................... |
120 V |
FOR YOUR SAFETY
Units shipped to the U.S.A. and Canada are designed for operation on 120 V AC only.
Safety precaution for a polarized AC plug.
However, some products may be supplied with a nonpolarized plug.
CAUTION : To prevent electric shock, do not use this (polarized) plug with an extension cord, receptacle or other outlet unless the blades can be fully inserted to prevent blade exposure.
FOR AUSTRALIA AND EUROPE ... 220 V/230 V/240 V
FOR YOUR SAFETY
Units shipped to Australia are designed for operation on 240 V AC only.
To ensure safe operation the three-pin plug supplied must be inserted only into a standard three-pin power point which is effectively earthed through the normal household wiring. Extension cords used with the equipment must be three-core and be correctly wired to provide connection to earth.
Wrongly wired extension cords are a major cause of fatalities. The fact that the equipment operates satisfactorily does not imply that the power point is earthed and that the installation is completely safe. For your safety, if in any doubt about the effective earthing of the power point, consult a qualified electrician.
PAN-EUROPEAN UNIFIED VOLTAGE
All units are suitable for use on supplies 220-240 V AC.
FOR OTHER COUNTRIES ................... |
110 V/220 V |
FOR YOUR SAFETY
Units shipped to countries other than the above countries are equipped with an AC voltage selector switch on the rear panel. Refer to the following paragraph for the proper setting of this switch.
AC VOLTAGE SELECTION
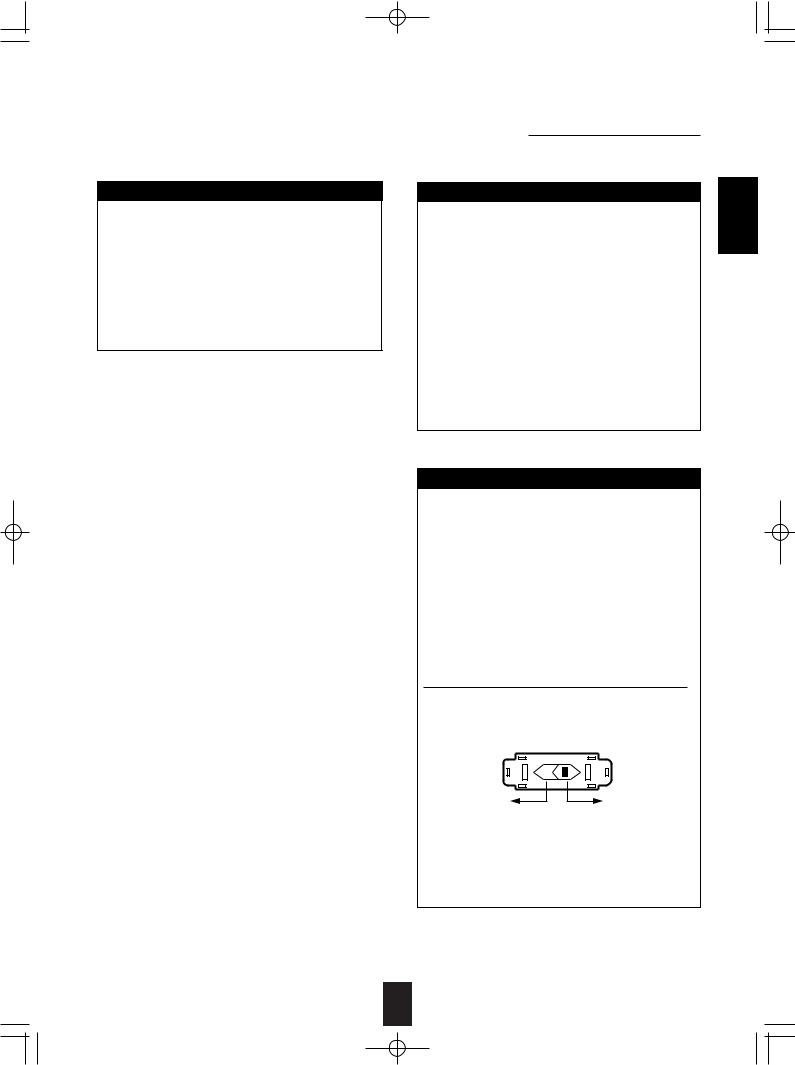
This unit operates on 110-220 V AC. The AC voltage selector switch on the rear panel is set to the voltage that prevails in the area to which the unit is shipped. Before connecting the power cord to your AC outlet, make sure that the setting position of this switch matches your line voltage. If not, it must be set to your voltage in accordance with the following direction.
AC voltage selector switch
Tape A
AC 220 V |
AC 110 V |
|
/120 V |
Move switch lever to match your line voltage with a small screwdriver or other pointed tool.
ENGLISH
3
 DD-5080(D) 2007.10.24 4:28 PM 4
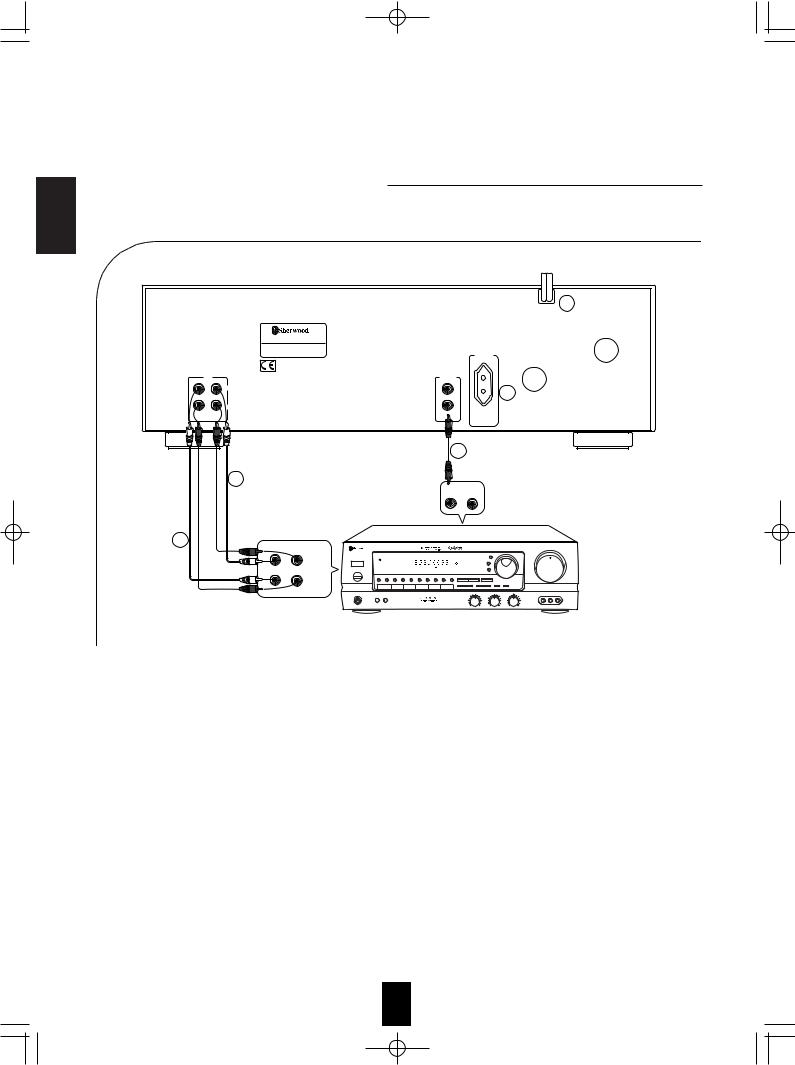
Rear Panel Connections
ENGLISH |
•Do not plug the AC input cord into the AC outlet when making connections. |
|
|
|
•Be sure to connect the white plugs to the L(Left) and the red plugs to the R(Right) jacks when making connections. |
AC INPUT 4 230V / ~50Hz
120W
|
|
|
MODEL NO. DD-5080C |
|
|
|
DOUBLE CASSETTE DECK |
|
|
|
AC OUTLET |
|
LINE |
|
DIGI LINK |
|
|
L |
5 |
|
|
|
|
|
|
R |
|
REC |
PLAY |
|
UNSWITCHED |
IN |
OUT |
|
230V/~50Hz |
|
|
|
100W MAX |
2
1
PLAY
TAPE
MON
REC
L R
3
DIGI LINK
|
AUDIO/VIDEO RECEIVER |
|
|
|
|
|
|
|
|
|
MASTER VOLUME |
||||
|
|
|
|
|
|
|
|
INPUT SELECTOR |
45 50 |
55 |
|||||
|
STANDBY |
|
|
|
|
|
|
|
|
|
|
BAND |
|
|
|
POWER |
MULTI ROOM |
|
|
|
|
|
|
|
|
|
|
|
25 |
|
75 |
|
|
|
|
|
|
|
|
|
|
|
FM MODE |
|
|
|
|
|
|
|
|
|
|
|
|
|
|
|
|
|
20 |
|
80 |
SLEEP |
|
|
|
|
|
|
|
|
|
|
|
MEMORY |
15 |
|
85 |
|
1 |
2 |
3 |
4 |
5 |
6 |
7 |
8 |
9 |
0 |
TUNING |
DIRECT |
|
|
|
|
|
|
|
|
|
|
|
|
|
- |
REAR LEVEL + |
- CENTER LEVEL + CENTER MODE |
TAPE MONI |
|
|
|
|
|
DOLBY |
|
DOLBY |
|
|
|
|
|
|
|
|
|
|
|
OFF |
PRO-LOGIC |
|
3 STEREO |
THEATER |
|
HALL |
SIMULATED |
|
|
|
|
|
|
|
PHONES |
SPEAKERS |
|
|
|
|
|
|
|
|
BASS |
TREBLE |
BALANCE |
VCR 2 / CAMCORDER INPUT |
||
|
A |
B |
|
|
|
|
|
|
|
|
|
|
|
|
|
-10 |
+10 |
-10 |
+10 |
LEFT |
RIGHT |
VIDEO |
L _ AUDIO _R |
REC INPUT JACKS
Connect the cords between the REC INPUT jacks of this unit and the REC OUTPUT jacks of your amplifier.
PLAY OUTPUT JACKS
Connect the cords between the PLAY OUTPUT jacks of this unit and the PLAY INPUT jacks of your amplifier.
DIGI LINK JACKS
Connect this jack to the DIGI LINK jack of Sherwood component such as R125, R325, etc., bearing the DIGI LINK or mark to control this unit remotely by DIGI LINK system.
AC INPUT CORD
Plug this cord into the switched AC outlet of amplifier or a household AC outlet.
UNSWITCHED AC OUTLET (REGIONAL OPTION)
Power always flows to this outlet, regardless of whether this unit is switched ON or OFF if power flows through the AC input cord of this unit.
NOTE : The equipment whose power consumption exceeds 100 watts should not be connected.
4

 DD-5080(D) 2007.10.24 4:28 PM 5
Front Panel Controls
■ Front Panel Controls
23 |
24 |
25 |
14 |
|
15 |
|
|
9 |
8 |
11 |
17 |
20 |
21 |
18 |
22 |
19 |
10 16 |
24 |
23 |
DOUBLE CASSETTE DECK DD-5080C |
|
|
|
|
|
|
|
|
|
|
|
|
|
|
|
|
|
||
|
|
|
|
|
|
|
|
|
|
|
|
|
COUNTER |
MODE |
|
|
|
|
|
|
|
|
|
|
|
|
|
|
|
|
|
|
RESET |
A/B |
|
|
|
|
|
|
|
B C |
|
|
|
|
|
|
|
|
|
|
|
|
|
|
|
|
|
|
|
HIGH NORM |
|
|
|
M |
RELAY P |
|
|
TAPE SIZE |
MEMORY |
NR B/C/OFF |
|
|
|
|
|||
|
|
CD SYN |
MPX |
|
MIN |
|
|
|
|
|
|
|
|||||||
|
|
|
|
SEC |
|
|
|
|
|
|
|
|
|
|
|
|
|||
|
|
REC |
|
|
|
|
|
|
REC |
|
|
|
|
|
|
|
|
|
|
|
|
L |
|
|
|
|
|
|
|
|
|
RELAY PLAY |
|
REVERSE |
|
|
|
|
|
|
|
dB -00 |
-20 |
-10 |
-6 |
-3 |
0 |
+3 |
+6 |
|
|
|
|
|
|
|
|
|
|
|
|
R |
|
|
|
|
|
|
|
|
|
|
|
|
|
|
|
|
|
AUTO REVERSE |
|
EJECT |
|
DUBBING |
|
|
|
|
/ |
|
CD SYN REC |
EJECT |
|
|
|
AUTO REVERSE |
|||
|
|
|
|
|
|
|
|
|
|
|
|
|
|
|
|
|
|
||
|
|
NORMAL |
HIGH |
|
|
|
|
|
|
|
|
|
|
|
|
|
|||
|
B |
|
|
|
AMS |
|
|
|
|
|
AMS |
|
|
|
|
|
|
|
HX-PRO |
PLAY/AUTO TAPE SELECTOR |
|
|
|
|
|
|
|
|
|
|
|
|
|
|
|
A RECORD & PLAY/AUTO TAPE SELECTOR |
|||
POWER |
PHONES |
REC LEVEL |
REC BALANCE |
|
ON/OFF |
|
|
|
|
|
0 |
10 |
L |
R |
3 4 5 1 7 2 6 12 5 13 7 6 3 4
24 |
25 |
14 |
|
15 |
|
9 |
|
8 |
11 |
17 |
20 |
21 |
18 |
22 |
19 |
10 16 |
24 |
DECK DD-5080C |
|
|
|
|
|
|
|
|
|
|
|
|
|
|
|
|
|
|
|
|
|
|
|
|
|
|
|
|
|
COUNTER |
MODE |
|
|
|
|
|
|
|
|
|
|
|
|
|
|
|
|
RESET |
A/B |
|
|
|
|
|
B C |
|
|
|
|
|
|
|
|
|
|
|
|
|
|
|
|
|
HIGH NORM |
|
|
|
M |
RELAY P |
|
|
TAPE SIZE |
MEMORY |
NR B/C/OFF |
|
|
|
|||
|
CD SYN |
MPX |
|
MIN |
|
SEC |
|
|
|
|
|
|
|
|
|
|
|
|
REC |
|
|
|
|
|
|
REC |
|
|
|
|
|
|
|
|
|
|
L |
|
|
|
|
|
|
|
|
|
RELAY PLAY |
|
REVERSE |
|
|
|
|
|
dB -00 |
-20 |
-10 |
-6 |
-3 |
0 |
+3 |
+6 |
|
|
|
|
|
|
|
|
|
|
R |
|
|
|
|
|
|
|
|
|
|
|
|
|
|
|
|
|
EJECT |
|
DUBBING |
|
|
|
|
/ |
|
CD SYN REC |
EJECT |
|
|
|
|||
|
NORMAL |
HIGH |
|
|
|
|
|
|
|
|
|
|
|
|
|||
B |
|
|
|
AMS |
|
|
|
|
|
AMS |
|
|
|
|
|
A RECORD & |
|
|
|
|
|
|
|
|
|
|
|
|
|
|
|
|
|||
POWER |
PHONES |
REC LEVEL |
REC BALANCE |
|
ON/OFF |
|
|
|
|
|
0 |
10 |
L |
R |
3 4 5 1 7 2 6 12 5 13 7 6 3 4
ENGLISH
5
 DD-5080(D) 2007.10.24 4:28 PM 6
ENGLISH
POWER SWITCH
Press this switch to turn the power on and press again to turn the power off.
For system operation, plug the AC input cord into the switched AC outlet on amplifier or receiver, keep the POWER switch ON and control power ON/OFF with the main POWER switch on the amplifier or receiver.
HEADPHONE JACK
Stereo headphones with a standard 1/4 inch plug can be plugged into this jack for private listening.
, REWIND and FAST FORWARD BUTTONS( and )
Press the button to rewind or advance the tape rapidly.
For AMS (Automatic Music Search), press this button during playback.
REVERSE PLAY BUTTON ( )
Press this button to play back the reverse side of the tape.
FORWARD PLAY BUTTON( )
Press this button to play back the forward side of the tape.
STOP BUTTON ( ■ )
Press this button to stop a tape.
RECORD/RECORD MUTING BUTTON (● /  ) (DECK A only)
Press this button and this unit will be in recording pause mode. To start recording, press the FORWARD PLAY or REVERSE PLAY button.
PAUSE BUTTON ( ■■ ) (DECK A only)
Press this button to temporarily stop playing back or recording or dubbing. To restart the tape, Press the PLAY button.
REVERSE MODE BUTTON
Press this button to select the desired reverse mode when playing back or recording.
RELAY PLAY BUTTON
Press this button and the deck relays to play from Deck A to Deck B or vice versa. Use this function with the REVERSE MODE button.
REC LEVEL CONTROL
Use this control to adjust the recording level.
REC BALANCE CONTROL
Use this control to adjust the balance of the right and left recording level.
NORMAL SPEED DUBBING BUTTON
Press this button to set to Normal Speed Dubbing Mode.
HIGH SPEED DUBBING BUTTON
Press this button to set to High Speed Dubbing Mode.
CD SYNCHRO RECORDING BUTTON
Press this button to use the CD SYNCHRO RECORDING function.
TAPE SIZE BUTTON
Press this button to select the tape length for displaying the elapsed time when playing back or recording.
6
 Loading...