


GT-N5110
User Manual
www.samsung.com
About this manual
This device provides high quality mobile communication and entertainment using Samsung’s high standards and technological expertise. This user manual is specially designed to detail the device’s functions and features.
rPlease read this manual before using the device to ensure safe and proper use.
rDescriptions are based on the device’s default settings.
rImages and screenshots may differ in appearance from the actual product.
rContent may differ from the final product, or from software provided by service providers or carriers, and is subject to change without prior notice. For the latest version of the manual, refer to the Samsung website, www.samsung.com.
rAvailable features and additional services may vary by device, software, or service provider.
rApplications and their functions may vary by country, region, or hardware specifications. Samsung is not liable for performance issues caused by applications from any provider other than Samsung.
rSamsung is not liable for performance issues or incompatibilities caused by edited registry settings or modified operating system software. Attempting to customise the operating system may cause the device or applications to work improperly.
rSoftware, sound sources, wallpapers, images, and other media provided with this device are licensed for limited use. Extracting and using these materials for commercial or other purposes is an infringement of copyright laws. Users are entirely responsible for illegal use of media.
rYou may incur additional charges for data services, such as messaging, uploading and downloading, auto-syncing, or using location services. To avoid additional charges, select an appropriate data tariff plan. For details, contact your service provider.
2

About this manual
rDefault applications that come with the device are subject to updates and may no longer be supported without prior notice. If you have questions about an application provided with the device, contact a Samsung Service Centre. For user-installed applications, contact service providers.
rModifying the device’s operating system or installing softwares from unofficial sources may result in device malfunctions and data corruption or loss. These actions are violations of your Samsung licence agreement and will void your warranty.
Instructional icons
Warning: situations that could cause injury to yourself or others
Caution: situations that could cause damage to your device or other equipment
Note: notes, usage tips, or additional information
Copyright
Copyright © 2013 Samsung Electronics
This guide is protected under international copyright laws.
No part of this guide may be reproduced, distributed, translated, or transmitted in any form or by any means, electronic or mechanical, including photocopying, recording, or storing in any information storage and retrieval system, without the prior written permission of Samsung Electronics.
3

About this manual
Trademarks
rSAMSUNG and the SAMSUNG logo are registered trademarks of Samsung Electronics.
rThe Android logo, Google™, Google Maps™, Google Mail™, YouTube™, Google Play™ Store, and Google Talk™ are trademarks of Google, Inc.
rBluetooth® is a registered trademark of Bluetooth SIG, Inc. worldwide.
rWi-Fi®, Wi-Fi Protected Setup™, Wi-Fi Direct™, Wi-Fi CERTIFIED™, and the Wi-Fi logo are registered trademarks of the Wi-Fi Alliance.
rAll other trademarks and copyrights are the property of their respective owners.
DivX®, DivX Certified®, and associated logos are trademarks of Rovi Corporation or its subsidiaries and are used under licence.
ABOUT DIVX VIDEO
DivX® is a digital video format created by DivX, LLC, a subsidiary of Rovi Corporation. This is an official DivX Certified® device that plays DivX video. Visit www.divx.com for more information and software tools to convert your files into DivX videos.
ABOUT DIVX VIDEO-ON-DEMAND
This DivX Certified® device must be registered in order to play purchased DivX Video-on- Demand (VOD) movies. To obtain your registration code, locate the DivX VOD section in your device setup menu. Go to vod.divx.com for more information on how to complete your registration.
DivX Certified® to play DivX® video up to HD 720p, including premium content.
4
Table of Contents
Getting started
8Device layout
9 |
Buttons |
10 |
S Pen |
10Package contents
11Charging the battery
14Inserting a memory card
16Turning the device on and off
16Holding the device
17Locking and unlocking the device
17Adjusting the volume
17Switching to silent mode
Basics
18Indicator icons
19Using the touch screen
22Control motions
24Page Buddy
24Activating Multi Window
25Using the S Pen
30S Pen Air View
30Quick Command
31Notifications
32Home screen
34Using widgets
34Using applications
35Applications screen
36 Help
36 Entering text
38Connecting to a Wi-Fi network
39Setting up accounts
40Transferring files
41Securing the device
43 Upgrading the device
Communication
44 Contacts
47 Email
49Google Mail
50Talk
51Google+
51Messenger
52ChatON
Web & network
53Internet
54Chrome
55Bluetooth
56AllShare Cast
57AllShare Play
58Group Play
58Smart Remote
5

Table of Contents
Media
60Music Player
61Camera
68 Gallery
71Paper Artist
72PS Touch
73Video Player
74YouTube
76Flipboard
Application & media stores
77Play Store
78Samsung Apps
78Game Hub
79Music Hub
80Play Books
80Play Movies
80Play Music
81Readers Hub
81Video Hub
81Learning Hub
Utilities
82 S Note
86aNote HD
87S Planner
90Polaris Office
93Dropbox
93Alarm
94World Clock
95Calculator
95S Voice
96Google
97Voice Search
97My Files
98Downloads
Travel & local
99Maps
100Local
101Navigation
Settings
102About Settings
102Wi-Fi
103Bluetooth
103Data usage
103More settings
104Home screen mode
104Blocking mode
105Sound
105Display
106Storage
107Power saving mode
107Battery
107Application manager
107Location services
108Lock screen
109Security
110Language and input
112Cloud
113Backup and reset
113Add account
6

Table of Contents
113Motion
113S Pen
114Accessory
114Date and time
115Accessibility
116Developer options
117About device
Troubleshooting
7
Getting started
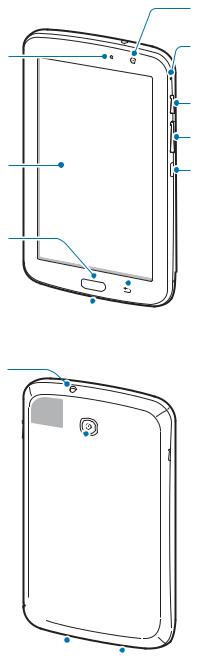
Device layout
|
Front camera |
Light sensor |
Microphone |
|
|
|
Power button |
|
Volume button |
Touch screen |
IrLED |
|
|
Home button |
|
Menu button 

Multipurpose jack
Headset jack
GPS antenna 
 Rear camera
S Pen 

Speaker
 Back button
 Memory card slot
 Speaker
8

Getting started
rDo not cover the antenna area with your hands or other objects. This may cause connectivity problems or drain the battery.
rDo not use a screen protector. This causes sensor malfunctions.
rDo not allow water to contact the touch screen. The touch screen may malfunction in humid conditions or when exposed to water.
Buttons
Button |
Function |
|
|
r Press and hold to turn the device on or off. |
|
|
r Press and hold for 8-10 seconds to reset the device if it has |
|
Power |
fatal errors or hang-ups, or freezes. |
|
|
r Press to lock or unlock the device. The device goes into lock |
|
|
mode when the touch screen turns off. |
|
|
|
|
Menu |
r Tap to open a list of options available for the current screen. |
|
r Tap and hold on the Home screen to launch Google search. |
||
|
||
|
|
|
|
r Press to return to the Home screen. |
|
Home |
r Press and hold to open the list of recent applications. |
|
|
r Press twice to launch S Voice. |
|
Back |
r Tap to return to the previous screen. |
|
r Tap and hold to activate or deactivate Multi Window. |
||
|
||
Volume |
r Press to adjust the device volume. |
|
|
|
9
Getting started
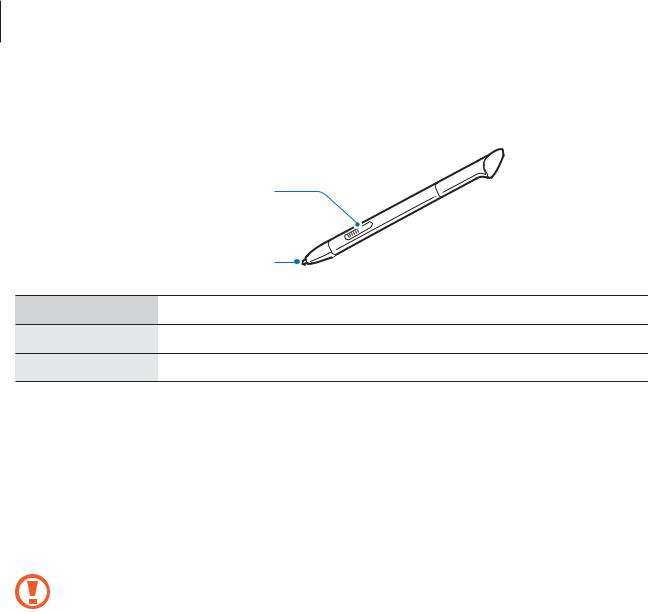
S Pen
|
|
S Pen button |
|
|
S Pen tip |
Name |
Function |
|
S Pen tip |
r |
Perform basic S Pen actions. (p. 19) |
S Pen button |
r |
Perform advanced S Pen actions. (p. 25) |
Package contents
Check the product box for the following items:
rDevice
rQuick start guide
Use only Samsung-approved software. Pirated or illegal software may cause damage or malfunctions, which are not covered by the warranty.
10
Getting started
rThe items supplied with the device and any available accessories may vary depending on the region or service provider.
rThe supplied items are designed only for this device and may not be compatible with other devices.
rAppearances and specifications are subject to change without prior notice.
rYou can purchase additional accessories from your local Samsung retailer. Make sure they are compatible with the device before purchase.
rOther accessories may not be compatible with your device.
rUse only Samsung-approved accessories. Malfunctions caused by using unapproved accessories are not covered by the warranty service.
rAvailability of all accessories is subject to change depending entirely on manufacturing companies. For more information about available accessories, refer to the Samsung website.
Charging the battery
Use the charger to charge the battery before using it for the first time.
Use only Samsung-approved chargers, batteries, and cables. Unapproved chargers or cables can cause the battery to explode or damage the device.
rWhen the battery power is low, the device emits a warning tone and displays a low battery power message.
rIf the battery is completely discharged, the device cannot be turned on immediately when the charger is connected. Allow a depleted battery to charge for a few minutes before turning on the device.
11
Getting started
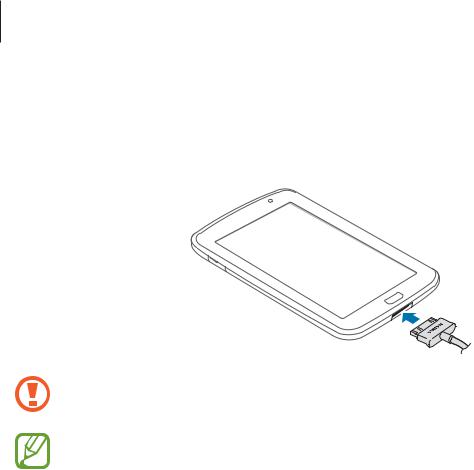
Charging with the charger
Connect the USB cable to the USB power adaptor and then plug the end of the USB cable into the multipurpose jack.
Connecting the charger improperly may cause serious damage to the device. Any damage caused by misuse is not covered by the warranty.
rThe device can be used while it is charging, but it may take longer to fully charge the battery.
rIf the device receives an unstable power supply while charging, the touch screen may not function. If this happens, unplug the charger from the device.
rWhile charging, the device may heat up. This is normal and should not affect the device’s lifespan or performance. If the battery gets hotter than usual, the charger may stop charging.
rIf the device is not charging properly, take the device and the charger to a Samsung Service Centre.
12
Getting started
After fully charging, disconnect the device from the charger. First unplug the charger from the device, and then unplug it from the electric socket.
To save energy, unplug the charger when not in use. The charger does not have a power switch, so you must unplug the charger from the electric socket when not in use to avoid wasting power. The device should remain close to the electric socket while charging.
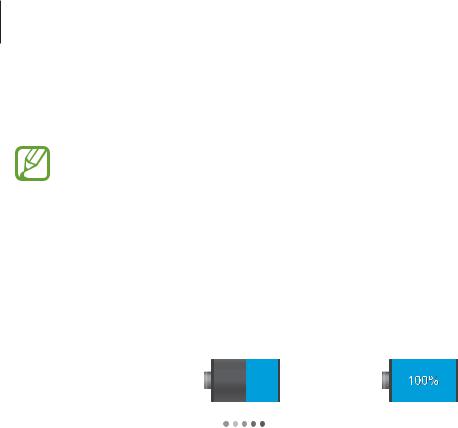
Checking the battery charge status
When you charge the battery while the device is off, the following icons will show the current battery charge status:
Charging |
Fully charged |
Reducing the battery consumption
Your device provides options that help you save battery power. By customising these options and deactivating features in the background, you can use the device longer between charges:
rWhen you are not using the device, switch to sleep mode by pressing the Power button.
rClose unnecessary applications with the task manager.
rDeactivate the Bluetooth feature.
rDeactivate the Wi-Fi feature.
rDeactivate auto-syncing of applications.
rDecrease the backlight time.
rDecrease the brightness of the display.
13
Getting started
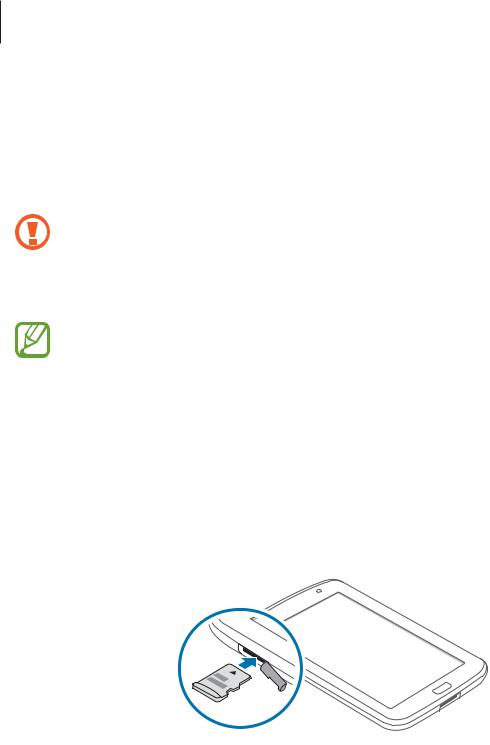
Inserting a memory card
Your device accepts memory cards with maximum capacities of 32 GB. Depending on the memory card manufacturer and type, some memory cards may not be compatible with your device.
1
2
rSome memory cards may not be fully compatible with the device. Using an incompatible card may damage the device or the memory card, or corrupt the data stored in it.
rUse caution to insert the memory card right-side up.
rThe device supports only the FAT file system for memory cards. When inserting a card formatted in a different file system, the device asks to reformat the memory card.
rFrequent writing and erasing of data shortens the lifespan of memory cards.
rWhen inserting a memory card into the device, the memory card’s file directory appears in the extSdCard folder under the internal memory.
Insert a memory card with the gold-coloured contacts facing downwards. Push the memory card into the slot until it locks in place.
14

Getting started
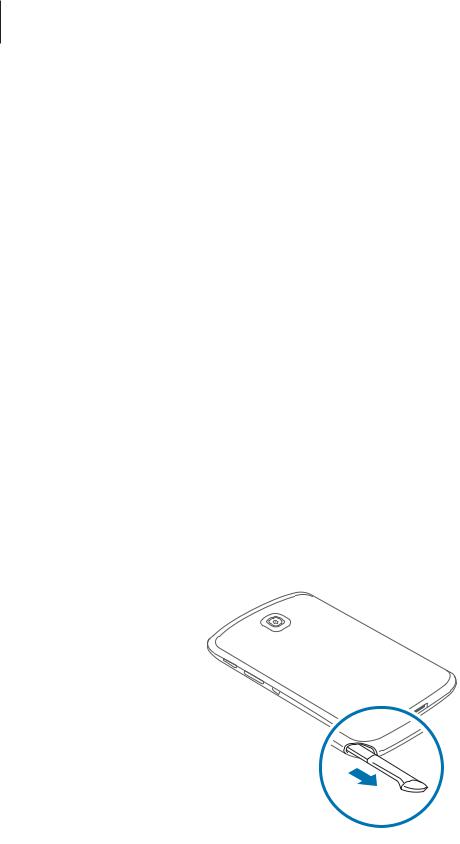
Removing the memory card
Before removing the memory card, first unmount it for safe removal. On the Home screen, tap
Apps Settings Storage Unmount SD card.
Push the memory card until it disengages from the device, and then pull it out.
Do not remove the memory card while the device is transferring or accessing information. Doing so can cause data to be lost or corrupted or damage to the memory card or device. Samsung is not responsible for losses that result from the misuse of damaged memory cards, including the loss of data.
Formatting the memory card
A memory card formatted on a computer may not be compatible with the device. Format the memory card on the device.
On the Home screen, tap Apps Settings Storage Format SD card Format SD card Erase everything.
Before formatting the memory card, remember to make backup copies of all important data stored on the device. The manufacturer’s warranty does not cover loss of data resulting from user actions.
15

Getting started
Turning the device on and off
When turning on the device for the first time, follow the on-screen instructions to set up your device.
Press and hold the Power button for a few seconds to turn on the device.
rFollow all posted warnings and directions from authorised personnel in areas where the use of wireless devices is restricted, such as aeroplanes and hospitals.
rPress and hold the Power button and tap Flight mode to disable the wireless features.
To turn off the device, press and hold the Power button, and then tap Power off.
Holding the device
Do not cover the antenna area with your hands or other objects. This may cause connectivity problems or drain the battery.
16

Getting started
Locking and unlocking the device
When not in use, lock the device to prevent unwanted operation. Pressing the Power button turns off the screen and puts the device into lock mode. The device automatically gets locked if it is not used for a specified period.
To unlock the device, press the Power button or the Home button when the touch screen is turned off, tap anywhere on the screen, and then flick your finger in any direction.
Adjusting the volume
Press the Volume button up or down to adjust the ringtone volume, or to adjust the sound volume when playing music or video.
Switching to silent mode
Use one of the following methods:
rPress and hold the Volume button down until it switches to silent mode.
rPress and hold the Power button, and then tap Mute.
rOpen the notifications panel at the top of the screen, and then tap Sound.
Set the device to alert you to various events in silent mode. Press and hold the Power button, and then tap Vibrate.
17

Basics
Indicator icons
The icons displayed at the top of the screen provide information about the status of the device. The icons listed in the table below are most common.
Icon Meaning
Wi-Fi connected
Bluetooth feature activated
GPS activated
Synced with the web
Connected to computer
Alarm activated
Silent mode activated
Vibration mode activated
Flight mode activated
Error occurred or caution required
Battery power level
18

Basics
Using the touch screen
Use only fingers or the S Pen to use the touch screen.
r Do not allow the touch screen to come into contact with other electrical devices. Electrostatic discharges can cause the touch screen to malfunction.
rDo not allow the touch screen to contact water. The touch screen may malfunction in humid conditions or when exposed to water.
rTo avoid damaging the touch screen, do not tap it with anything sharp or apply excessive pressure to it with your fingertips.
rLeaving the touch screen idle for extended periods may result in afterimages (screen burn-in) or ghosting. Turn off the touch screen when you do not use the device.
Finger gestures
Tapping
To open an application, to select a menu item, to press an on-screen button, or to enter a character using the on-screen keyboard, tap it with a finger.
19

Basics
Dragging
To move an icon, thumbnail, or preview to a new location, tap and hold it and drag it to the target position.
Double-tapping
Double-tap on a webpage, map, or image to zoom in a part. Double-tap again to return.
20
Basics
Flicking
Flick left or right on the Home screen or the Applications screen to see another panel. Flick up or down to scroll through a webpage or a list, such as contacts.
Pinching
Spread two fingers apart on a webpage, map, or image to zoom in a part. Pinch to zoom out.
21

Basics
Control motions
Simple motions allow easy control of the device.
Before using motions, make sure the motion feature is activated. On the Home screen, tap Apps Settings Motion, and then drag the Motion switch to the right.
Rotating the screen
Many applications allow display in either portrait or landscape orientation. Rotating the device causes the display to automatically adjust to fit the new screen orientation.
To prevent the display from rotating automatically, open the notifications panel and deselect
Screen rotation.
rSome applications do not allow screen rotation.
rSome applications display a different screen depending on the orientation. The calculator turns into a scientific calculator when rotated to landscape.
22

Basics
Sweeping
Sweep your hand across the screen to capture a screenshot. The image is saved in Gallery Screenshots. It is not possible to capture a screenshot while using some applications.
Covering
Cover the screen with a palm to pause media playback.
23

Basics
Page Buddy
Use this feature to use specific applications based on your actions. Pages related to your actions appear in the following conditions:
rWhen you pull out the S Pen from the slot.
rWhen you connect a headset or dock to the device.
Activating Multi Window
Use this feature to run two applications on the screen at the same time.
rWhen launching applications that contain multimedia files, such as music or videos, sound from both files will be played.
rThis feature may not be available depending on the region or service provider.
To use Multi Window, on the Applications screen, tap Settings Display, and then tick Multi window.
Using the Multi Window panel
To activate Multi Window panel, tap and hold . The Multi Window panel appears at the left side of the screen. To deactivate Multi Window panel, tap and hold
 again.
Tap the panel handle to hide or show the panel. When a panel is open, tap and hold the handle and drag it to an edge of the screen to move the panel. When a panel is hidden, tap and hold the handle and drag it up or down or left or right to move the handle.
24
Basics
Launching Multi Window applications
While using an application, tap  to switch to Multi Window mode or open the Multi Window panel and select an application.
To move an application to another location, tap and hold the application’s title and drag it to a new location.
To adjust the size of the window, drag  or
or  up or down. To make the application always stay on top, tap
  .
.
To maximise the window to fit the screen, tap  . To close the application, tap
  .
.
To display two different Multi Window applications in full screen, open the Multi Window panel, and then tap  .
.
To cascade Multi Window applications, open the Multi Window panel, and then tap  .
.
Using the S Pen
The included S Pen can be used to easily select items or perform functions. Actions using the S Pen with the button pressed provide additional conveniences, such as screen capture.
Pull out the S Pen from the slot to use it.
25

Basics
When you pull out the S Pen from the slot, the device detects it and performs the following:
rTurns on the touch screen (if it is off).
rOpens the S Pen page (from the Home screen).
rThe tip of the S Pen is not replaceable. If the tip gets dull, purchase a new S Pen.
rIf the S Pen is not working properly, take it to a Samsung Service Centre. Refer to the Samsung website for more information about the S Pen.
rFor best results, keep the S Pen mostly perpendicular to the touch screen and avoid using it at sharp angles.
rThe Menu button and the Back button cannot be activated by the S Pen.
Opening a menu
With the S Pen button pressed, draw  to open a list of the screen’s available options.
26

Basics
Undoing the last action
With the S Pen button pressed, draw  to undo the last action.
Capturing screenshots
With the S Pen button pressed, touch the screen until you hear a click. A screenshot is saved in the Gallery Screenshots folder.
It is possible to draw or write on or to crop a screenshot. The edited image is saved in the
Gallery IMG_edited folder.
It is not possible to capture a screenshot while using some applications.
27

Basics
Launching S Note
With the S Pen button pressed, double-tap the screen to launch S Note.
Selecting text
With the S Pen button pressed, drag left or right on the text to select. If you drag between lines, you may select unwanted text. To select only the text you intend, drag across the middle of the text or drag the text selection icons.
Samsung UserManual
28

Basics
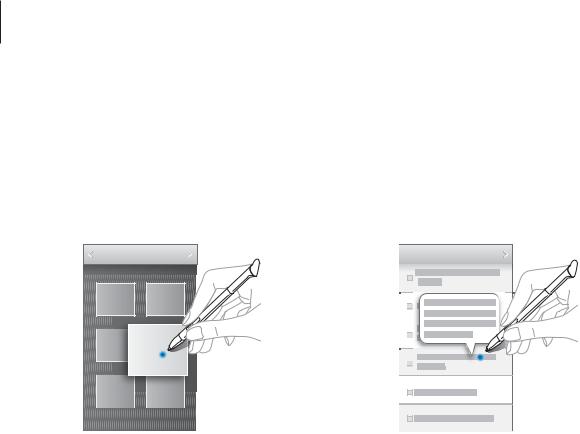
Launching Quick Command
With the S Pen button pressed, drag the S Pen up the screen to launch Quick Command.
On the Quick Command screen, draw a gesture command to launch the assigned application or feature.
Selecting and capturing an image
With the S Pen button pressed, draw a line around an area to select it. The selected area is saved in the Gallery Screenshots folder. Select an application to use with the selected area from the icons that appear at the bottom of the screen.
29
Basics
S Pen Air View
When you hold the S Pen near the screen, a pointer appears on the screen. Move the pointer to files, subjects, or options to preview the contents or view information in pop-up windows. You can scroll through panels or lists by moving the pointer to an edge (top/bottom/left/ right) of the screen.
Quick Command
Use this feature to send a message or search for content by drawing gesture commands on the screen. With the S Pen button pressed, drag the S Pen up on the screen to launch Quick Command.
Adding gesture commands
Tap 
 Select an application or Select functions/settings. Select an application or a feature an option. Draw a new gesture command, and then tap Done.
Using gesture commands
Draw a gesture command to launch applications or features.
For more specific tasks, draw a keyword, such as a name, after a gesture command. For example, when drawing @, the Email application launches. When adding a recipient’s name after @, an email composing screen opens so that you can send an email to the recipient.
30
 Loading...