


 Loading...
Scalar i40 and Scalar i80
Quick Start Guide
This quick start guide provides basic installation and configuration instructions for the Scalar® i40 and Scalar i80 libraries. For more information, see the Quantum Scalar i40 and Scalar i80 User’s Guide located on the documentation CD provided with your library.
This instruction uses the following conventions:
Caution: Cautions indicate potential hazards to equipment and are included to prevent damage to equipment.
WARNING: Warnings indicate potential hazards to personal safety and are included to prevent injury.
Scalar i40 and Scalar i80
Contents |
|
Required Tools and Equipment.............. |
2 |
Environmental Requirements ................ |
2 |
Taking ESD Precautions .......................... |
2 |
Unpacking the Library............................ |
3 |
Accessory Kit Contents .......................... |
5 |
Installing the Library in a Rack or |
|
Desktop Kit............................................. |
5 |
Installing the Tape Drives....................... |
5 |
Connecting the Cables........................... |
7 |
Turning the Library ON and Configuring |
|
Network Settings ................................... |
8 |
Accessing the Library Via the Web |
|
Client.................................................... |
13 |
Configuring Partitions.......................... |
14 |
Running the Installation and Verification |
|
Test ....................................................... |
14 |
Importing Tape Cartridges ................... |
15 |
Saving the Library Configuration ........ |
16 |
Configuring the Host Software............ |
17 |
Registering the Library......................... |
17 |
|
|
Scalar i80 |
Scalar i40 |
|
|
www.quantum.com

Scalar i40 and Scalar i80 Quick Start Guide
Required Tools and Equipment
• Ethernet cable
Environmental Requirements
The installation site must have the following environmental conditions:
•Humidity 20% – 80% non-condensing
•Temperature: 50°F – 95°F (10°C – 35°C)
•Altitude: –500 to 10,000 feet (–152 to 3048 meters)
These environmental conditions apply when the Scalar i40 and Scalar i80 libraries are in operation. For additional specifications, refer to the Quantum Scalar i40 and Scalar i80 User’s Guide.
In addition, install the library in a location that is as free from dust as possible. Dust can damage or degrade performance of library components and media.
Taking ESD Precautions
Some components within the Scalar i40 and Scalar i80 libraries contain static-sensitive parts. To avoid damaging these parts while performing installation procedures, always observe the following precautions:
•Use an antistatic wrist strap. If you do not have one, touch the outside of the library on the sheet metal before touching any components to discharge static from your body.
•Keep static-sensitive parts in their original shipping containers until ready for installation. Look for the ESD sticker to identify static sensitive parts.
•Avoid touching connectors and other components.
Note: Dry climates and cold-weather heating environments have lower relative humidity and are more likely to produce static electricity.
2 |
Required Tools and Equipment |
|
|
|
|

Scalar i40 and Scalar i80
Unpacking the Library
Figure 1 Packaging
Scalar i40
Note: Unpack the library as close to the installation location as possible.
1Inspect the outer library packaging for damage. If there is any damage evident on the library packaging, do not continue with the installation and contact Quantum customer support.
2Open the library packing box and remove the kit tray containing the accessory kit and rail kit (see Figure 1). Some configurations come with tape drives installed in the library, and some come with tape drives packaged separately. If yours comes with tape drives packaged separately, remove them and set aside for installation later.
Accessory kit
Rail kit
Kit tray
Media labels
Top foam
Bottom foam
Shipping carton
Bottom tray (Scalar i80 only)
Pallet (Scalar i80 only) 
Scalar i80
Unpacking the Library |
3 |
|
|
|
|
Scalar i40 and Scalar i80 Quick Start Guide
Figure 2 Removing the Robot
Restraint
4
3Remove the top foam.
4Scalar i80 only: Remove the shipping carton by lifting it straight up out of the bottom tray.
5With the help of a second person, lift the library chassis out of the bottom foam and place it on a table approximately waist high.
WARNING: Two people are required to safely lift the library out of its packaging or into a rack.
Caution: Lift the library chassis at the sides. Avoid putting the weight of the library chassis on the front bezel.
6Remove the anti-static wrapping from the library. Keep the anti-static wrapping intact so that you can use it later if needed.
7Save the packing box, packaging material, and anti-static wrapping in case you need to move or ship the library in the future.
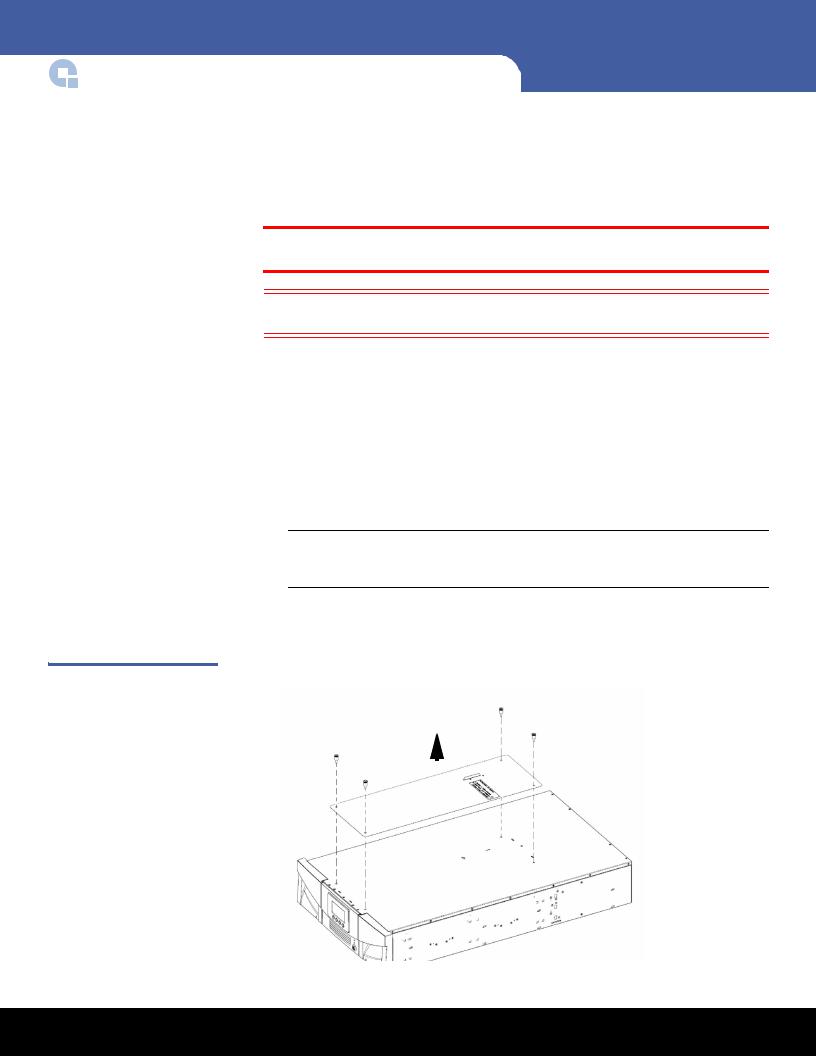
8Remove the robot restraint. The robot restraint consists of four (4) thumbscrews, a plastic sheet, and a small metal clip, located on the top cover of the library. (See Figure 2.)
aUnscrew and remove the four thumbscrews from the top cover (see Figure 2). Save the thumbscrews in case you need to move or ship the library in the future.
Note: The robot may stay at the top of the library, or it may move downward toward the floor of the library. If it moves downward, you will hear the gears turning as it moves. This is normal.
bRemove the plastic sheet and metal clip and discard. You will not need to use them again.
Plastic |
|
Metal |
||
sheet |
|
clip |
||
|
|
|
|
|
|
|
|
|
|
|
|
|
|
|
|
|
|
|
|
Unpacking the Library

Scalar i40 and Scalar i80
9Once you remove the robot restraint, you may cover the holes in the library top cover with stickers, which are provided in the accessory kit for this purpose. This step is optional and is intended to prevent small objects from accidentally falling into the library through the holes.
10 Remove the protective plastic sheet covering the front panel display.
Accessory Kit Contents
•Power cord(s) – one for each power supply
•Scalar i40 and Scalar i80 Documentation and Training CD
•Scalar i40 and Scalar i80 Quick Start Guide
•China RoHS statement
•System, Safety, and Regulatory Information Guide
•Stickers (clear, round) to cover holes in library top cover
Installing the Library in a Rack or Desktop Kit
Follow the instructions that came with your rail kit or desktop kit to install the library.
Installing the Tape Drives
If your library already has tape drives installed, skip this section.
Tape Drive Slot Location |
Tape drives can only fit in certain slots, as described below and illustrated in Figure 3. |
Considerations |
Slots are numbered starting from the bottom and moving up. |
|
• Scalar i40: Half-height tape drives can be installed in slots 1 and 2. A full-height |
|
|
|
tape drive can be installed in slot 1. |
|
• Scalar i80: Half-height tape drives can be installed in slots 1, 2, 3, 4, and 5. Full- |
|
height tape drives can be installed in slots 1, 3, and 5. The extra space where slot 6 |
|
would be cannot hold a half-height tape drive, but will accommodate a full-height |
|
tape drive installed in slot 5. |
|
It is recommended to start installing the tape drives at the bottom slot and work up, |
|
without leaving spaces between. |
Accessory Kit Contents |
5 |
|
|
|
|

Scalar i40 and Scalar i80 Quick Start Guide
Figure 3 Acceptable
Installation Locations for Full-
Height Tape Drives
Scalar i40 |
Scalar i80 |
Installation Instructions
1If needed, remove filler plates from the back of the library to make room for the tape drives. Unscrew the two captive thumbscrews and pull the filler plates out of the library. Save the filler plates in case you need to use them in the future.
2Unpack the tape drive and tape drive cable.
Caution: The tape drive always resides in a drive sled, and together they are effectively one unit. Do not remove the tape drive from the drive sled.
3Insert the tape drive into the drive slot. The “shelf” on the bottom of the drive sled fits into the notch in the library chassis and slides on the plastic guide rails (see Figure 4). The tape drive must be level to slide in smoothly. At the very end of the slide, you will feel a slight “click” as the tape drive sled connector connects into its mating connector in the library chassis.
Figure 4 Installing a Tape Drive
Notch in library chassis 
Drive sled “shelf” slides in notch
6 |
Installing the Tape Drives |
|
|
|
|
Loading...