


OPERATING INSTRUCTIONS
model FW7Q, FW8R
Digital Receivers
model FW9T
Digital Transmitter
Digital Wireless TTL Flash and Camera Trigger
DESIGNED AND MANUFACTURED IN THE USA
Patent Pending

Contents
Section . . . . . . .Description . . . . . . . . . . . . . . . . . . . . . . . . . . . . . . . . . . . . . . . . . .Page
1.0 . . . . . . . |
. . . .Introduction . . . . . . . . . . . . . . . . . . . . . . . . . . . . . . . . . . . . . . . . . . . |
. .4 |
2.0 . . . . . . . |
. . . .Channel Code and Zone set-up . . . . . . . . . . . . . . . . . . . . . . . . . . . . . |
.5 |
3.0 . . . . . . . |
. . . .Wireless Flash setup -- with or without on-camera Flash . . . . . . . . . |
.7 |
4.0 . . . . . . . |
. . . .Wireless Shutter Release (motor drive) . . . . . . . . . . . . . . . . . . . . . . . |
.8 |
5.0 . . . . . . . |
. . . .Mounting FREEXWIRE . . . . . . . . . . . . . . . . . . . . . . . . . . . . . . . . . . . |
.9 |
6.0 . . . . . . . |
. . . .Changing Qflash settings via Wireless Remote . . . . . . . . . . . . . . . . . |
11 |
7.0 . . . . . . . |
. . . .Wireless QTTL® control for Digital Cameras |
|
. . . . . . . . . |
. . . .& pre-flash Film Cameras . . . . . . . . . . . . . . . . . . . . . . . . . . . . . . . . . |
12 |
8.0 . . . . . . . |
. . . .Wireless TTL control for Film Cameras (non pre-flash) . . . . . . . . . . . |
14 |
9.0 . . . . . . . |
. . . .Wireless Auto mode for any Qflash without TTL Adapter . . . . . . . . . |
15 |
10.0 . . . . . . |
. . . .Miscellaneous . . . . . . . . . . . . . . . . . . . . . . . . . . . . . . . . . . . . . . . . . . |
16 |
11.0 . . . . . . |
. . . .FREEXWIRE Performance Guide . . . . . . . . . . . . . . . . . . . . . . . . . . . |
17 |
Appendix A . . . .Sync-in connectionscamera to Transmitter FW9T . . . . . . . . . . . . . |
19 |
|
Appendix B |
. . . .Sync-out connectionsReceiver FW8R to flash . . . . . . . . . . . . . . . . |
20 |
Appendix C |
. . . .Shutter Release (motor drive) cordsReceiver FW8R to camera . . . |
21 |
Appendix D . |
. . .QTTL® & TTL Wireless Adapters for Transmitter FW9T . . . . . . . . . . |
22 |
Appendix E . |
. . .Miscellaneous connections . . . . . . . . . . . . . . . . . . . . . . . . . . . . . . . . |
22 |
Appendix F |
. . . .Specifications . . . . . . . . . . . . . . . . . . . . . . . . . . . . . . . . . . . . . . . . . . . |
23 |
Customer Service . . . . . . . . . . . . . . . . . . . . . . . . . . . . . . . . . . . . . . . . . . . . . . . . . . . . . |
24 |
|
Limited Warranty . . . . . . . . . . . . . . . . . . . . . . . . . . . . . . . . . . . . . . . . . . . . . . . . . . . . . . |
24 |
|
Included with FREEXWIRE FW7Q: |
|
|
Instructions, Hook and Loop mounting pads (cables and batteries not required)) |
|
|
Included with FREEXWIRE FW8R: |
|
|
Pole mounting kit, 2x AAA batteries, Instructions, Hook and Loop mounting pads |
|
|
Included with FREEXWIRE FW9T: |
|
|
2x AAA batteries, Sync-in cord, Hook & Loop mounting pads, Instructions |
|
|
Included with FREEXWIRE FW89 (set of Receiver and Transmitter): |
|
|
FW8R, FW9T, and all accessories included with those models above |
|
|
All specifications and features are subject to change, updating, and improvements. |
|
|
Glossary
Qflash 2 series |
refers to models QFT2, QFT2d, QFX2, QFX2d |
Qflash 4 series |
refers to models QFT4d, QFX4d |
Qflash 5 series |
refers to models QFT5d, QFX5d |
Receiver FW7Q |
FREEXWIRE Receiver dedicated for Qflash |
|
series 4 and 5. |
Receiver FW8R |
FREEXWIRE Receiver for any flash or remote |
|
shutter release. |
Transmitter FW9T |
FREEXWIRE Transmitter |
Transceiver FW10 |
FREEXWIRE Transceiver |
|
(can be set as transmitter or receiver). |
Transceiver FW10w |
Upgraded FW10 incorporating the features of |
|
Section 7.0. |
Unimod FW11 |
Hot shoe adapter with additional sync inputs- |
|
used with QF series TTL adapters |
Hot Shoe Adapter FW12 |
FREEXWIRE hot shoe adapter to mount |
|
FW9T or FW10 on camera shoe |
Zones 1, 2, 3, and 4 |
wireless links that can be turned on or off to |
|
change lighting and camera activation |
Channels 0 thru 7 |
independent channels for separate FREEXWIRE |
|
setups operating in the same area |
Local, or on-camera flash |
a flash close to the camera and connected |
|
with a sync cord |
Remote flash |
a flash at a distance from the camera and |
|
wirelessly synchronized |
3
1.0 Introduction
We introduce the newest additions to the FREEXWIRE system: Receivers FW8R, FW7Q and Transmitter FW9T. Transmitter FW9T emits higher power for extended range. Receiver FW8R has extra sensitivity and simplified operation. FW7Q is dedicated to, and designed for any Qflash 4 or 5 series flash. FW7Q, FW8R and FW9T are fully compatible with all other FREEXWIRE system components. Transceiver FW10 may be upgraded for additional features of Section 7.0.
Wireless Sync, Wireless Shutter - Working with all popular flashes and cameras, FREEXWIRE s provide wireless sync for remote flash and/or wireless shutter control for remote camera operation.
Wireless TTL flash control: FW8R, FW7Q and FW9T, in conjunction with Dw series Adapters and Qflash 5d flashes, provide wireless “QTTL” flash control from digital and film cameras. This wireless QTTL feature also transmits the “pre-flash” signal utilized by many digital and film cameras to determine exposure values. Qflash 4 series (QFT4d, QFX4d) can be upgraded to Qflash 5 series via software update.
FREEXWIRE controls four independent Zones for wireless flash or wireless shutter release. You can activate any one Zone, or any combination of Zones 1,2,3 and 4. Switch your lighting instantly, remotely. Select and trigger flash, cameras, or combinations of them, from your remote position.
FREEXWIRE also has eight unique Channel Codes. FREEXWIRE units set to one Channel cannot activate FREEXWIRE ’s set to different Channels. You control the Channel Code to make FREEXWIRE units work together or independently, as required.
FREEXWIRE is very small |
|
|
||
and light and |
mounts |
|
|
|
easily to cameras, brack- |
|
|
||
ets, poles, and tripod legs. |
|
|
||
Sync and Shutter Release |
|
|
||
(motor |
drive) Cords are |
|
|
|
available for popular cam- |
|
|
||
eras and flashes. You can |
|
|
||
mount |
Transmitter FW9T |
|
|
|
directly on a camera’s hot |
|
|
||
shoe |
using |
optional |
|
|
UniMod FW11 or Hot Shoe |
|
|
||
Adapter FW12. |
FW7Q |
|
FW9T |
|
FW8R |
||||
|
|
|
|
|
2.0Channel Code and Zone set-up
2.1Setting the Channel Code and Zones
The Channel Codes allow FREEXWIRE s to work together. Set all units that you want to work together to the same Channel Code. If you desire independent groups of FREEXWIRE s (to work in the same area but not interfere), assign each group of FREEXWIRE s its own Channel.
The Channel dial is located on the left side of FW8R and FW9T, and on the front of FW7Q. Rotate the dial to the desired Code, 0 through 7. To rotate, press the pad of your thumb on the dial and turn. Or, use a small screwdriver. Channels can be matched by number or by the position of the cutout in the Channel dial.
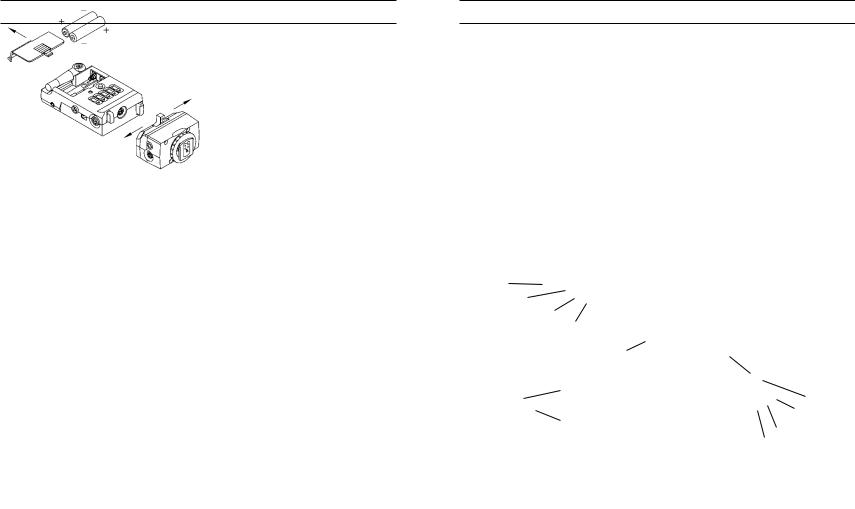
Install AAA batteries (not required for FW7Q).
SHUTTER |
|
|
|
LOCK |
|
|
|
|
|
|
|
|
|
|
||||||||||
|
|
|
|
|
|
FW8R, FW9T |
||||||||||||||||||
RELEASE - MD |
|
|
|
|
|
|
|
|||||||||||||||||
PC SYNC OUT |
|
|
|
|
|
|
|
|
|
|
|
|
|
|
|
|
|
|
|
|||||
FW9T - TTL ON/OFF |
|
|
|
|
|
|
|
|
|
|
|
|
|
|
|
|
|
|
||||||
FW8R - RANGE HI/NORM |
|
|
|
|
|
|
|
|
|
|
|
|
|
|
|
|
|
|
||||||
|
|
|
|
|
|
|
|
|
|
|
|
|
|
|
|
|
|
|
|
|
|
|||
|
|
|
|
|
UNLOCK |
|
|
|
|
|
|
|
|
|
|
|
|
|
|
|
|
|
|
|
|
CHANNEL CODE 0-7 |
|
|
|
|
|
|
|
|
|
|
|
|
|
|
|
|
|
|
|||||
|
|
|
|
|
|
|
|
|
|
|
|
|
ANTENNA |
|||||||||||
|
|
|
|
|
|
|
|
|
|
|
|
|
|
|
|
|
|
|||||||
|
|
|
|
|
|
|
|
|
|
|
|
|
|
|
|
|
|
|
|
|
|
|
|
|
|
|
|
|
|
|
|
|
|
|
|
|
STATUS |
|
|
|
|
|
|
|
|
|
|||
|
|
|
FW11 or FW12 |
|
|
|
|
|
|
|
|
|
|
|
|
|
|
|
|
|||||
|
|
|
|
|
|
|
|
LIGHT |
|
|
|
|
|
|
|
|
|
|
|
|||||
|
|
|
|
|
|
|
|
|
|
|
|
|
|
|
|
|
|
|
|
|
|
|
||
|
|
|
|
|
|
|
|
|
|
|
|
|
|
|
|
|
|
|
|
|
|
|
|
|
|
|
|
|
|
|
|
|
|
|
|
|
|
|
|
|
|
||||||||
|
|
CHANNEL |
UNLOCK |
|
|
|
|
|
|
|
|
|
|
|||||||||||
|
|
|
|
|
|
|
|
|
|
|
|
|
|
|
|
|
|
|
|
|||||
|
|
CODE |
|
|
|
|
|
|
|
|
|
|
|
|
|
|
|
|
|
|
||||
|
|
|
|
|
|
|
|
|
|
|
|
|
|
TEST |
||||||||||
|
|
|
|
|
|
|
|
|
|
|
|
|
|
|
|
|
|
|
|
|
|
|
|
|
|
|
|
|
|
|
|
|
|
|
|
|
|
|
|
|
|
|
|
FW8R SYNC OUT |
|||||
|
|
STATUS |
|
|
|
|
|
|
|
|
|
|
|
|
FW9T SYNC IN |
|||||||||
|
|
LIGHT |
|
|
|
|
|
|
|
|
|
|
|
|
|
|
|
|
|
|
||||
|
|
|
|
|
|
|
|
|
|
ON/OFF |
|
|
|
|
|
|
||||||||
|
|
|
|
|
|
|
|
|
|
|
|
|
|
|
|
|
|
|
|
|
|
|||
|
|
|
|
|
|
|
|
|
|
|
|
|
LOCK |
|
|
|
|
|
|
|
|
|
|
|
|
|
|
|
|
|
|
|
|
|
|
|
|
|
|
|
|||||||||
|
|
|
|
|
|
|
EXTERNAL |
|
|
|
|
|
|
|
||||||||||
|
|
|
|
|
|
|
|
|
|
|
|
|
|
|
|
|
|
|
|
|
|
|
||
|
|
|
|
|
|
|
|
|
|
|
|
|
|
|
|
POWER |
|
|
||||||
|
|
|
|
|
|
|
|
|
|
|
|
|
|
|
|
|
|
|
|
|
|
|
|
|
FW7Q
4 |
5 |

Activate at least one Zone on both FW8R and FW9T by |
FW8R |
|
sliding Zone switches 1, 2, 3, and/or 4 up, towards the “+” |
|
|
symbol. Any FW8R and FW9T Zones that match will acti- |
|
|
vate FW8R units each time the FW9T unit transmits. |
|
|
There are many possible combinations and you can |
|
|
change them as you work. To deactivate a Zone slide its |
|
|
switch down towards the “-“ symbol. |
|
|
The FREEXWIRE FW7Q has no Zone Switch. When used |
|
|
with a Qflash 4 series, FW7Q will activate for any Zone 1, |
FW9T |
|
2, 3, or 4, on the matching Channel. However, Qflash 5 |
||
|
||
series can set the Zone of FW7Q through its control panel. |
|
|
(Note: Qflash 4 series can be upgraded to Qflash 5 series. |
|
|
Please contact the Service Department at www.qtm.com). |
|
|
To set the Zone on a Qflash 5 series, press the Option |
|
|
button three times. The Zone Code settings should display |
|
|
on Qflash screen. Use the Set button select a Zone, then |
|
|
press the Up ▲ and Down ▼ buttons to turn the selected |
|
|
Zone on or off. |
|
2.2 Turn on the units
Slide the power switch to ON. The status light of FW9T blinks red, slowly. FW8R units blink green, slowly. Low batteries are indicated by 3 quick blinks every few seconds. Qflash 4 and 5 series power Receiver FW7Q which requires no batteries. The green LED indicator on the FW7Q blinks once per second when Qflash is powered.
Open the antennas so that they are approximately vertical. See Section 5.0, Mounting FREEXWIRE.
Press TEST on the Transmitter FW9T to confirm that all units are working. STATUS should light steadily on all FREEXWIRE Receivers for as long as you hold TEST (assuming correct Channel and Zone settings.)
3.0 Wireless Flash set-up -
with or without On Camera Flash
3.1 Transmitter FW9T
Connect the included (or other) sync-in cord from your camera PC nipple to FW9T Sync-In. Or use the optional FW11 or FW12 to connect FREEXWIRE to your camera’s hot shoe. (See Appendix A for other sync-in options.)
If you want to sync an on-camera flash (in addition to a wireless one) connect the flash manufacturer’s PC sync cord to the Sync-Out PC nipple on Transmitter FW9T, and set the Local switch to (+). To turn off the local flash, switch to (-).
If Qflash is the on-camera flash, connect FW31 from Qflash to the FW9T bottom socket (or FW11 DIN socket if used). Then, Qflash can power the FW9T by setting the power switch to EXT, and batteries are not needed.
3.2 Receiver FW8R
Connect the PC sync cord supplied by your flash’s manufacturer to the Sync-Out PC nipple or mini phone socket on the FW8R. (See Appendix B for other syncout options.)
Generally set the RANGE switch to NORM. Only if you require greater range, set RANGE to HI. (See Section 11.0 for range distances). However, whenever using any FREEXWIRE for wireless
TTL, always use NORM range.
LOCAL FLASH
OPTIONAL
SYNC-OUT or
FW31 CABLE 
FW9T
PC
PC
SYNC-IN CABLE
SYNC-OUT
CABLE
FW8R
6 |
7 |

3.3 Wireless Qflash with Receiver FW7Q
This receiver is dedicated to Qflash series 4 and 5 and mounts directly onto the flash. Please see Section 5.0 for proper mounting. FW7Q will be set to NORM range when connected to a Qflash 4d. When connected to Qflash 5d, range can be set to
HI or NORM, however, only NORM can be used for FW7Q wireless TTL (Sections 7 and 8). See Section 11 for
range specifications.
cameras require a delay between the meter/focus function and shutter release (for example, Contax 645). Select Shutter MD Delay for those cameras by sliding MD DELAY switch to (+). Without Shutter MD Delay, the camera focus, meter, and shutter will be activated together (and the camera will shoot as soon as it can). The Shutter MD Delay requires a two step Shutter Release Cord listed in Appendix C. Shutter Release Cords will be added periodically; please consult your dealer or the Quantum Web Site (qtm.com) for the latest models available.
4.4 Remote shutter operation is not possible with FW7Q.
4.0 Wireless Shutter Release (motor drive)
FW8R
SHUTTER
RELEASE
CORD
4.1 Receiver FW8R:
Connect a Shutter Release Cord (see Appendix C) from the Receiver FW8R MD connection to the camera shutter release connection.
4.2 Transmitter FW9T:
Press TEST and hold (up to 1 second ) to release the shutter. Test the camera -- some require time to wake-up and to auto focus before they release the shutter.
4.3 Shutter MD Delay on FW8R:
Many cameras have two step shutter buttons: Pressing part way turns on the meter and auto focusing, and pressing all the way releases the shutter. Some of these
8
5.0 Mounting FREEXWIRE
FREEXWIRE units mount by several means: |
|
5.1 Pole Mount Adapter 513: This item is included |
|
with your Receiver FW8R. Attach it to the back of |
|
FREEXWIRE and clamp it around any pole, leg, or struc- |
513 |
ture where the antenna can be opened away from metal |
|
objects.
FW8R/FW9T
|
|
|
5.2 Mounting directly to a bracket: Use the |
|
|
|
#8/32 screw included with FREEXWIRE to |
BRACKET |
|
FW11 |
secure it through a hole in a bracket. Any other |
|
|
screw used must protrude not more than 3/4” |
|
|
|
or FW12 |
|
|
|
OPTIONAL |
(2 cm) into the FREEXWIRE case, or you will |
|
|
damage FREEXWIRE! |
|
|
|
DEAD SHOE |
|
|
512 |
|
|
|
|
|
When mounting the FW12 or FW11 to a Dead |
|
|
|
Shoe (model 512) it will be necessary to con- |
|
|
|
nect a sync-in cable for FW9T units, or sync-out |
|
|
|
cable for FW8R units. See Appendices A and B. |
|
|
|
9 |
 Loading...