


Qflash® 4d
Digital Flash
Models T4d, X4d
For use with Quantum Turbo® , Turbo 2x2, Turbo Compact, or Turbo Z Batteries
Quantum Instruments
Designed and manufactured in the USA
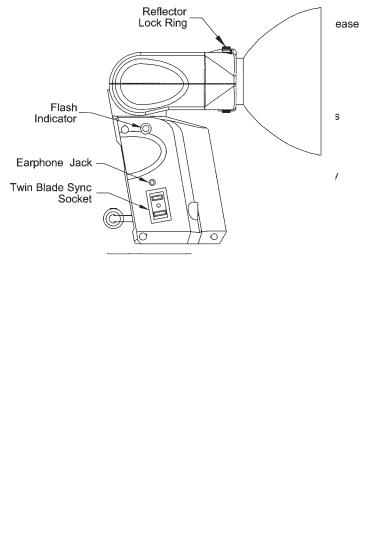
Reflector Lock
Ring
M Open Flash (Test)
|
|
|
|
|
|
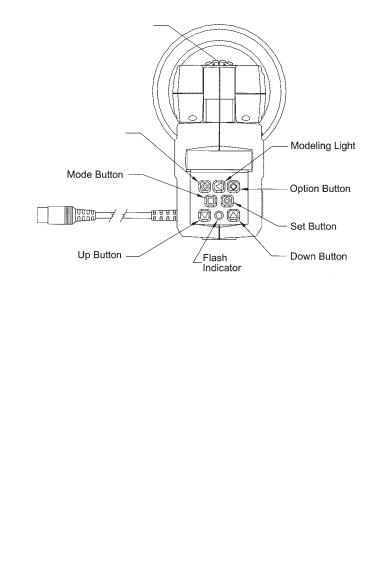
Mode Button I |
|
|
|
|
|
|
|
|
|
|
■ Option Button |
|
|
|
|
|
|
|
|
|
|
|
|
|
|
|
|
|
|
|
|
Set Button G |
|
|
|
|
|
|
|
||
|
|
|
|
|
|
|
|
|
|
|
|
|
|
|
|
|
|
|
|
|
|
Modeling Light ● |
|
|
|
|
|
|
|
||
|
|
|
|
|
|
|
|
|
L Down Button |
|
|
|
|||
|
|
|
|
|
Up Button J |
|
|
|
|
|
Flash |
|
|
||
|
|
|
|
Indicator |
|
|
|
1

TABLE OF CONTENTS
Section Description
1.0INTRODUCTION
2.0WARNINGS
3.0SETTING UP Qflash
4.0NEW FEATURES FOR PREVIOUS Qflash OWNERS
5.0QUICK START
6.0Qflash OPERATION WITH QUANTUM DEDICATED QTTL ADAPTERS
7.0MULTIPLE Qflash OPERATION - WIRED MODE
8.0MULTIPLE Qflash OPERATION - WIRELESS MODE
9.0EXPOSURE COMPENSATION OF Qflash
10.0TYPICAL LIGHTING SITUATIONS
11.0CUSTOMER SERVICE
1.INTRODUCTION
Qflash models T4d and X4d provide professional quality lighting for both digital and film cameras. Quantum’s proprietary QTTL® Adapters* dedicate Qflash seamlessly to your camera. Also, many features of the Qflash “Digitals” enhance lighting control for cameras without dedicated control.
While powerful and extremely versatile, Qflash operation is intuitive and straightforward. Advanced features for most every lighting need can be accessed or ignored as needed.
We highly recommend reading this entire instruction manual. Whether or not you require all of Qflash’s capability now, you will want to know it exists when the need arises.
*QTTL D- series adapters are optional for specific makes and camera models. Please consult your dealer or www.qtm.com for the latest availability.
2. WARNINGS AND CAUTIONS
•Disconnect external power before changing the flash tube, or connecting or disconnecting to/from cameras, power packs, or any other equipment.
•Operate only with a flash tube in the socket.
•DO NOT TOUCH THE FLASH TUBE SOCKET WITH METAL OBJECTS.
•THIS IS A PROFESSIONAL INSTRUMENT. KEEP AWAY FROM CHILDREN
•DO NOT ATTEMPT TO OPEN THE FLASH UNIT! DANGEROUS HIGH VOLTAGE INSIDE!
•Repairs can be made only by a qualified Quantum service representative.
2

3. SETTING UP Qflash
3.1 Inserting the Flash Tube
Match the red dot on the flash tube base with the red dot on the socket. Push the flash tube in until it is seated snugly into the socket. Excessive force is not required.
Replace the flash tube only with Quantum type QF30 or QF30uv for Qflash model T4d. Qflash model X4d requires QF32 or QF32uv flash tubes. Other flash tubes will not provide proper exposure, may not work at all, or they may damage the Qflash.
3.2 Reflectors and Bare Bulb
Reflectors are secured by the locking ring near the base of the flash tube. Rotate the ring in the directions shown in the diagram to loosen or tighten the reflectors.
When inserting a reflector, first rotate it until the notch in the “drops” fully into the reflector Then tighten the locking ring. reflector drop fully in before become loose.
Note to previous Qflash T, T2 ,X or X2 owners: There is no longer a
“Wide” or “Normal” position for the reflectors. The only position is “Normal”. For wide angle coverage, use the included diffusers or optional QF67A or Soft Box QF68.
Swivel Head
is locked and can be changed button (see diagram). Press hold this button, then adjust the to the desired position. Release the button, and slightly move the head until it “clicks” and locks in vertical and hori-
zontal planes.
3

3.4 Bracket Mounting
Qflash mounts with a 1/4-20 brackets, light stands, and
are made especially for Qflash bracket manufacturers.
Quantum also has two optional els QF70US and QF70E. The below that describe mounting both of these brackets applies also to other brackets, light stands, and tripods.
Two types of 1/4-20 fasteners and a friction pad are supplied with Qflash. Place the mounting pad between Qflash and the bracket, insert one the fasteners and tighten. the mounting surface has pad, the mounting pad is
necessary). Note that brackets vary in thickness. Always
that the mounting knob screws at least two complete turns.
3.5 Connecting Qflash to a Camera
There are several ways to connect a Qflash to a camera, both wired and wireless.
For wired connection use 1) a household two-prong sync cord (supplied) to the sync connector of Qflash; 2) a QF or FW series TTL adapter; 3) Use a D series QTTL adapter; or 4) use a QF53 Hot Shoe sync. Consult your dealer or www.qtm.com for the latest TTL and QTTL adapter models.
Note: When using a household type two-prong cord, if you have difficulty getting the sync signal to the flash, reverse the plug to match the camera’s sync polarity.
3.6 Powering Qflash
Before turning on any power to Qflash always make all electrical connections first, both to the camera and to Turbo Batteries.
Plug the Qflash T4d cable into the output jack of any Quantum Turbo Battery. For Qflash X4d, connect the power cable to a Qpaq system*. Turn on Turbo or Qpaq power. Qflash will be powered up and ready to run.
If a “Check Turbo” or “Check Power” message appears on the Qflash display, turn off the Turbo or Qpaq, wait one second, and turn it on again. If the message appears again, the power pack needs recharging.
If a “Reset Flash?” message appears in the Qflash display press any button, except the Mode I button, to resume operation.
4

If at any other time Qflash should behave strangely or not respond to commands, it may be restored to factory settings. Refer to Section 5.10.7 to force a reset. Note that in the event of a reset all operator data entered (film speed, f/#, etc.) will be lost and must be entered again.
* Lumedyne or Norman systems may power Qflash X4d. See the separate sheet enclosed for compatible model numbers.
3.7 Reflector Specifications
The ”normal” QF60 reflector is supplied with Qflash 4d. Other reflectors are available as options from your dealer.
|
Approx. Angle |
Guide No. for ISO 200* |
||
Reflector |
of Illumination |
QFT4d1 |
QFX4d2 |
QFX4d3 |
Normal QF60 |
55˚ |
226ft / 72m |
226ft / 72m |
320ft / 100m |
|
|
|
|
|
QF60 w/ flat diffuser |
70˚ |
128ft / 40m |
128ft / 40m |
180ft / 56m |
|
|
|
|
|
QF67A Dome Diffuser |
90˚ |
128ft / 40m |
128ft / 40m |
180ft / 56m |
|
|
|
|
|
QF62Bs/g Bare Bulb Reflector4 |
120˚ |
90ft / 28m |
90ft / 28m |
128ft / 40m |
QF63B Tele Reflector |
20˚ |
453ft / 143m |
453ft / 143m |
640ft / 202m |
|
|
|
|
|
Notes
*Guide numbers vary according to surroundings.
Guide numbers can be higher in small rooms or lower in open spaces.
1QFT4d rated for 150 watt-seconds
2QFX4d rated for 200 watt-seconds
3QFX4d rated for 400 watt-seconds
4QF62 guide no. will vary greatly due to likely bounce light
4.NEW FEATURES FOR PREVIOUS Qflash OWNERS
The following features will be of interest to owners of older Qflash models:
•QTTL™ adapters provide full dedication (and more) to digital and film cameras. - Section 6.0
•New Linked mode to set lighting ratios between Qflashes -
Sections 7.0 and 8.0
•New modeling lamp function for both models T4d and X4d.
Section 5.10.9
•Flash Indicator Lights - Sections 5.9.5 and 5.10.2
• Quick turn off - Section 5.10.8 If you are using the Qflash as an on camera flash and want to disable the flash for a few shots you can use the ‘quick turn off’ feature.
•Program mode now accepts up to 8 pre sets. - Section 5.8
•Easy Exposure Compensation. - Section 9.0
•New choices are available with the Option ■ button. - Section 5.9
These include Flash Sensor Limit, Flash Counter, and Indicator Lights.
•Lighting tips - Section 10
5
5. QUICK START
IMPORTANT! With digital cameras perform a custom white balance prior to a shooting session. Otherwise, the camera will assume you are using some unknown flash.
5.1 Controls
Qflash controls operate in predictable ways. Spend a moment to get the feel of the controls.
The Mode I, Set G, and Option ■ buttons select the type of features or settings you want to change.
Mode I sets the flash operating mode, such as Automatic, Manual, TTL, etc. Set G lets you pick parameters to change, such as f/, ISO, etc. After you push Mode I or Set G (one or more times) you see part of the display blinking. You then push the Up J or Down L buttons to change the blinking parameter or feature. After a few moments the display stops blinking.
Option ■ lets you select other features such as Speaker ON/OFF, Reflector type, Flash Indicators ON/OFF, etc. Press Option ■ once or twice, then Set G one or more times, then Up J or Down L. See Section 5.9 for more details about options.
The flash Test M button fires the flash without taking a picture.
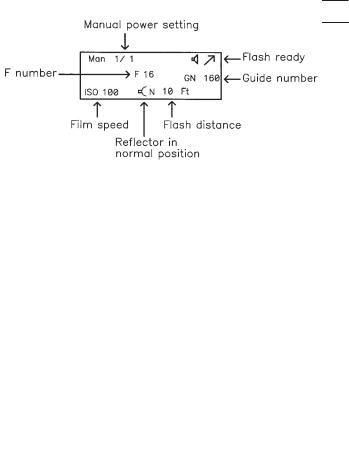
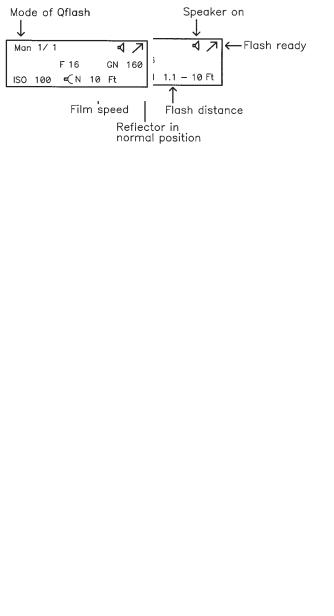
5.2 Display
Aperture numbers are displayed in 1/3 steps, in a range from f/2.0 to f/32, like this: 2.0, 2.03, 2.07, 2.8, 2.83, 2.87 ......16, 163, 16 7, 22, 223, 227, 32.
ISO film speeds, Guide Numbers, and distances are shown as their actual values.
Power settings are displayed in 1/3 steps from full power to 1/64th power like this: 1/1, 1/1-, 1/2+, 1/2 ,1/2- ...... 1/32, 1/32-, 1/64+, 1/64.
Only parameters required for the particular mode in use are displayed. Various symbols may also display, which will be explained with each feature later on.
The rest of Section 5 explains the basic operation of the Qflash, when used as a single unit. Available modes are Manual, Automatic, Auto Fill, TTL/QTTL, Program, or Strobo.
6
5.3 Changing modes
To change from one mode to another:
Press Mode I button. The flash mode display will blink.
Use Up J or Down L buttons to change mode.
5.4 Changing settings in Manual mode
The camera exposure may be set to manual, or aperture or shutter priority; however, Qflash will emit the fixed amount of light shown on its display.
Press Set G one or more times until the parameter you wish to change blinks. Set G will cycle through the displays for Manual Power Setting, F#, and ISO, and Compensation (Section 9.0).
Then, press the Up J or Down L buttons to change the blinking parameter. Note that as you change Power, F# or ISO the shooting distance changes also.
For model X4d only there is an additional Manual setting for 200/400 watt seconds, which can be set using the Options button, Section 5.9.
5.5 Changing settings in Auto mode.
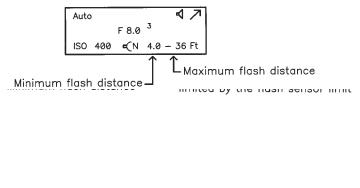
The camera exposure may be set to shutter or aperture priority, or manual when Qflash is set to Auto mode. Light output is controlled by Qflash.
Press Set G one or more times until the parameter you wish to change blinks. Set G will cycle through the displays for F#, ISO, and Compensation (Section 9.0).
Then, press the Up J or Down L buttons to change the blinking parameter. Note that the display shows the minimum to maximum flash distance, and those distances change when you change F# or ISO. The F# also may change when the ISO changes in order to keep you in the allowable ranges of Qflash.
7
5.6 TTL mode
TTL mode may be used when the camera exposure is set to manual, aperture or shutter priority, or program.
In TTL mode the camera will determine flash exposure and there are no parameters to set. TTL mode requires a Quantum QF series TTL adapter compatible with the camera. The listing for compatible QF series TTL adapters is available from your dealer, in the latest Quantum price list, or at www.qtm.com.
QF series TTL adapters are generally not compatible with digital cameras. See Section 6 for instructions on using D series QTTL adapters.
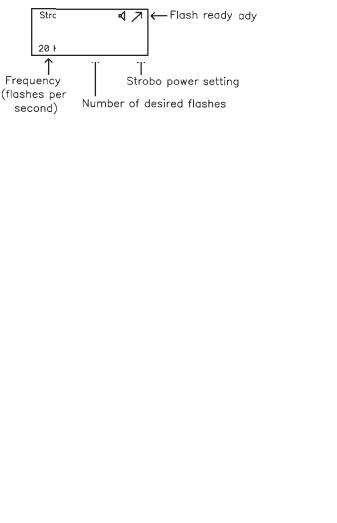
5.7 Stroboscopic mode
Pressing the Set G button cycles through Frequency, Number of Flashes, and Strobo Power, in that order.
5.8 Program mode
The Program mode allows you to store your favorite settings and set-ups and then quickly recall them just by pressing the Up J or Down L buttons. Program up to 8 Qflash set-ups of Manual, Auto, or TTL operation, including settings for all parameters.
8
Your Qflash is factory preset with several Programs (which you can always change). To view them, press Mode I, then Up J or Down L until you see the Program mode displayed, like the one above. After the “P” stops blinking, press the Up J or Down L buttons jump to the next higher, or lower program number. (Programs numbers which have not been “set” will be skipped).
How to set up or change a Program
While in the Program mode, press the Set G button. The program number will blink, and the Up/Down J L buttons will select the program number you wish to set or change. All program numbers will be displayed this way, even those that were “skipped” above.
Press Set G again (or press it twice if the Program number stopped blinking). The mode (Manual, Auto, TTL, etc.) will be blinking. Press Up J or Down L to select your flash mode for this program.
Once your flash mode is selected keep pressing Set G to choose parameters to program. To change any settings use the same procedures as the usual for Manual, Auto, TTL, or Wireless/Wired modes (see Sections 5.4, 5.5, 5.6, and 8.0 )
There are times when you will want to “clear” a Program from memory. Clearing unwanted programs allows for quicker switching between stored programs during actual shoots. For example, if you need just 3 Programs for a job, and you clear out the other 5 Program numbers, you will cycle through just the 3 Programs you want for a shoot, using the Up/Down J L buttons.
To clear out a Program
Start in the Program number you wish to clear. Press Set G until the ‘mode’ blinks in the display. Press Up J or Down L until the word CLEAR appears. After several seconds the display will stop blinking and the program will be cleared from memory.
Note: You can never clear out Program 1.
5.9 Option ■ button
The Option ■ button lets you set various features and preferences for your Qflash.
There are two Option menus. Press the Option ■ button once to enter into Option menu #1. Press Option ■ twice to enter into Option menu #2.
Press Option ■ again to return to original display.
You may select any option to change by pressing the Set G button until the option blinks. Then use the Up/Down J L buttons to make the change.
Option menu #1
9
5.9.1Flash Sensor Limit for Auto and Auto Fill Modes
Flash sensor limit is an option that limits the distance that the sensor “sees” when the Qflash is in Auto mode. If the subject has no background (an open field outside) or the background is far away (a large catering hall), the sensor tries to balance the light from the subject with the lack of light coming from the background. The result is an over exposed subject.
By limiting the sensor distance, the sensor will no longer try to balance the light from a far background, but will set exposure only for the subjects that are within the sensor limit distance. Sensor limit works for any Auto mode including Program Auto (Section 5.8).
Setting the Sensor Limit
Press Option ■ once and push Set G once. The sensor limit will blink.
2. Use Up J or Down L buttons to change the sensor limit. The available limits are:
∞ - no limit placed on sensor distance |
|
20ft / 6m, 15ft / 4m, 10ft / 3m, |
5ft / 2m, |
When the Flash Sensor Limit is set to ∞ Ft, the flash will produce the desired F/number for a subject within the flash’s minimum and maximum flash distance.
If, for example, the Flash Sensor Limit is set to 15 Ft, the flash will have a maximum output of the desired F/number up to the sensor limit in this case 15 feet).
Quick turn ON / OFF of Sensor Limit
There are times you may want to quickly change from a Sensor Limit distance, to no sensor limit [∞]. For example, at a wedding reception you may shoot close up from 5’ with no background, and next shoot a group shot from 25’.
To set or cancel a sensor limit quickly: Press the Option ■ button. Then, without pressing the Set G button, use the Up J or Down L buttons to toggle between maximum sensor limit [∞] and the last sensor limit set (in the procedure above).
You can also use Program to preset the sensor limits you want. Then, just toggle between them using the Up J or Down L buttons.
10
5.9.2 Linked Ratio
Linked Ratio sets lighting ratios between any Qflash and a Qflash 4d. The available ratios are from -3 to +3 stops, in 1/3 stop increments that display as: -3, -2 7, -2 3, -2, ...etc... +2, +2 3 +2 7, +3. See Sections 7 and 8 for more details.
5.9.3 Resetting the Flash Counter
This option can be used as a way of confirming that the flash has fired for every picture taken. To zero the counter, push the Set G until number of flashes will blink. Use Up/Down J L buttons to clear the counter.
Note: The flash counter will also reset when the flash is turned off. The maximum flash count is 99, then the counter will reset to zero and continue counting.
Option menu #2
Push Option ■ button twice to view
Option menu #2. Turn these options on or off by
Pressing Set G until they blink, then Up/Down J L.
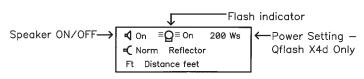
5.9.4 Turning the Speaker ON/OFF
You may want the speaker off for sensitive shooting, or turn it on for audible confirmation of flash exposure. The earphone signals always sound whether the speaker function is set on or off. For more about the speaker signals see Sections 5.10.2 to 5.10.6.
5.9.5 Turning the Flash Indicator Lights ON/OFF
The red Flash Indicators on 4 sides of Qflash give visual indication that a flash fired, whether the exposure was good or not, or that the flash did not fire. You can enable or disable the lights. For more about Flash Indicators, refer to Sections 5.10.2 to 5.10.6.
5.9.6 Changing The Reflector settings
Setting reflector type is important so that the displays of distance, guide number, and f/ number correspond to the reflector in use. The choices are NORM (for the reflector supplied with Qflash), DIFF (for diffusers supplied with Qflash, or optional QF67A), BBE (optional Bare Bulb Enhancers QF62Bs and QF62Bg), and TELE (for optional QF63B). The reflectors must be repositioned manually.
Notes: When using QF62Bs/g the manual parameters are accurate only for an open area. In medium and small rooms the very widely dispersed light will bounce off nearby walls and increase exposure. A practical solution when using QF62B in small rooms is to meter the light, or else use Auto Fill, Auto, TTL, or QTTL modes which will provide better exposures and attractive, soft lighting.
11
When using a Telephoto Reflector QF63B the Auto mode cannot be used because the flash sensor is blocked. Use Manual, TTL, QTTL, Strobo or Linked modes.
Use “B” series reflectors (QF61B, QF62B g/s, QF63B) with Qflash 4d. The standard QF60 reflector mounts to Qflash 4d as well.
5.9.7 Changing between Feet and Meters
Set your preference for the display of metric (M) or US distance (Ft) units. Guide numbers also change accordingly.
5.10 Features of Qflash
5.10.1 Flash Ready
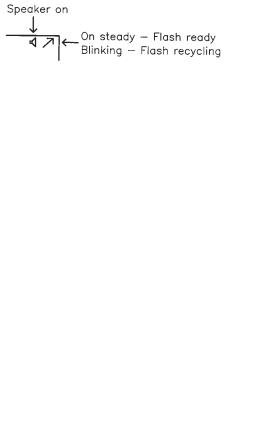
One beep will sound
(if the speaker P is ON) when Qflash finishes recycling.
5.10.2 Display, Speaker, and Indicator Lights
Qflash indicates the result of a flash exposure on the Display, via Speaker (if turned on, Section 5.9.4) or by Flash Indicator Lights (if turned on, Section 5.9.5). The signals are shown in the table below:
Flash exposure condition |
Display |
Speaker/Earphone |
Flash Indicator Lights |
Good exposure |
OK |
one beep |
rapid blink |
Under/Over |
Under or Over |
3”beeps |
3 blinks, pause, |
|
|
|
3 blinks, pause... |
No flash |
No Flash |
long steady beep |
long steady on |
5.10.3 Auto mode exposure indications
There are three types of exposure indications. The display will blink either OK, Over, or Undr. The display will also indicate how much over or under the exposure was, from +3 stops to -3 stops. If an arrow appears then the exposure error is more than 3 stops (for example  3)
3)
12
 Loading...