


User's Guide User's Guide User's Guide User's Guide
Quantum Scalarl i2000 Libraryi
2000i Scalar
6-00421-11
Scalar i2000 User’s Guide, 6-00421-11, June 2007, Made in USA.
Quantum Corporation provides this publication “as is” without warranty of any kind, either express or implied, including but not limited to the implied warranties of merchantability or fitness for a particular purpose. Quantum Corporation may revise this publication from time to time without notice.
COPYRIGHT STATEMENT
Copyright 2007 by Quantum Corporation. All rights reserved.
Your right to copy this manual is limited by copyright law. Making copies or adaptations without prior written authorization of Quantum Corporation is prohibited by law and constitutes a punishable violation of the law.
TRADEMARK STATEMENT
Quantum, ADIC, DLT, DLTtape, the Quantum logo, and the DLTtape logo are all registered trademarks of Quantum Corporation.
SDLT and Super DLTtape are trademarks of Quantum Corporation.
Other trademarks may be mentioned herein which belong to other companies.

Contents
Chapter 1 |
About This Guide and Your Product |
1 |
|
Product Safety Statements................................................................................ |
1 |
|
Mechanical Locks ....................................................................................... |
2 |
|
Power Button on the Library’s Indicator Panel...................................... |
2 |
|
Disposal of Electrical and Electronic Equipment.......................................... |
3 |
|
Product Model Number.................................................................................... |
3 |
|
Explanation of Symbols and Notes ................................................................. |
4 |
|
Other Documents you Might Need................................................................. |
4 |
|
Getting More Information or Help.................................................................. |
5 |
Chapter 2 |
Troubleshooting Your Library |
6 |
|
How Does the Library Report Issues? ............................................................ |
7 |
|
Understanding Indicators on System Status Buttons............................ |
9 |
|
Understanding E-mail Notifications...................................................... |
10 |
|
Working With Tickets ..................................................................................... |
12 |
|
Ticket Guidelines...................................................................................... |
12 |
|
Displaying Ticket Lists ............................................................................ |
16 |
|
Viewing Ticket Details .................................................................................... |
21 |
|
Viewing History Ticket Details .............................................................. |
25 |
|
Viewing Ticket Details Reports .............................................................. |
26 |
|
Viewing Repair Pages .............................................................................. |
30 |
|
Viewing Tape Alerts and Generating Media Integrity Analysis |
|
Scalar i2000 User’s Guide |
iii |

|
Reports ................................................................................................ |
31 |
|
Mailing, Saving, and Printing Ticket Information............................... |
39 |
|
Running Verification Tests to Determine Issue Resolution................ |
42 |
|
Closing Tickets .......................................................................................... |
43 |
|
Generating the Tickets Report ................................................................ |
45 |
|
Interpreting LEDs ............................................................................................ |
51 |
|
Interpreting Blade Status LEDs .............................................................. |
52 |
|
Interpreting Drive Status LEDs .............................................................. |
56 |
|
Interpreting Fibre Port Link LEDs ........................................................ |
59 |
|
I/O Blade Fibre Port Link LED............................................................... |
62 |
|
Interpreting MCB Port LEDs................................................................... |
64 |
|
Interpreting LBX Terminator LEDs........................................................ |
66 |
|
Interpreting Power Supply LEDs ........................................................... |
69 |
|
Working With Command History Logs ....................................................... |
71 |
|
Viewing Command History Logs .......................................................... |
72 |
|
Mailing and Saving Logs ......................................................................... |
75 |
|
Accessing Online Help.................................................................................... |
76 |
Chapter 3 |
Description |
77 |
|
Library Features ............................................................................................... |
79 |
|
Density........................................................................................................ |
79 |
|
Centralized Management ........................................................................ |
80 |
|
Proactive Availability............................................................................... |
80 |
|
Serviceability and Reliability .................................................................. |
80 |
|
Data Path Conditioning ........................................................................... |
80 |
|
SAN Backup .............................................................................................. |
81 |
|
Host Attachment....................................................................................... |
81 |
|
Remote Management ............................................................................... |
82 |
|
Capacity on Demand................................................................................ |
82 |
|
Control Module ................................................................................................ |
83 |
|
Expansion Modules ......................................................................................... |
84 |
|
Library Management Module ........................................................................ |
86 |
|
Management Control Blade .................................................................... |
87 |
|
Robotics Control Unit............................................................................... |
87 |
|
Library Motor Driver ............................................................................... |
87 |
|
I/O Management Units................................................................................... |
87 |
|
Control Management Blade .................................................................... |
88 |
|
FC I/O Blades............................................................................................ |
88 |
|
Cartridge Accessor........................................................................................... |
89 |
|
Import/Export Stations................................................................................... |
89 |
|
Cartridges.......................................................................................................... |
91 |
Scalar i2000 User’s Guide |
iv |

|
Cartridge Magazines ....................................................................................... |
92 |
|
Support for WORM ......................................................................................... |
93 |
|
Tape Drives....................................................................................................... |
94 |
|
LTO Drives................................................................................................. |
96 |
|
DLT Drives................................................................................................. |
97 |
|
Mixed Media Support and Rules................................................................... |
97 |
|
Operator Panel................................................................................................ |
100 |
|
Power System ................................................................................................. |
101 |
Chapter 4 |
Configuring Your Library |
102 |
|
Running the Setup Wizard ........................................................................... |
103 |
|
Enabling Licenses........................................................................................... |
104 |
|
Working With Partitions............................................................................... |
106 |
|
Understanding Partition Media Policy Settings................................. |
107 |
|
Creating Partitions.................................................................................. |
111 |
|
Modifying Partitions .............................................................................. |
119 |
|
Deleting Partitions .................................................................................. |
126 |
|
Setting Up the Network Configuration ...................................................... |
127 |
|
Managing Connectivity................................................................................. |
129 |
|
Port Configuration.................................................................................. |
129 |
|
FC Host Port Failover............................................................................. |
132 |
|
Setting Up Policies for the Physical Library............................................... |
136 |
|
Specifying the Date and Time ...................................................................... |
138 |
|
Configuring E-mail ........................................................................................ |
140 |
|
Setting Up E-mail Notifications ................................................................... |
142 |
|
Configuring Devices...................................................................................... |
147 |
|
Device IDs ................................................................................................ |
148 |
|
Channel Zoning ...................................................................................... |
150 |
|
SCSI Host ................................................................................................. |
152 |
|
FC Host..................................................................................................... |
157 |
|
Generating the LUN Mapping Report................................................. |
173 |
|
Generating the Library Configuration Report.................................... |
177 |
|
Configuring Drive Cleaning......................................................................... |
179 |
|
Registering SNMP Traps............................................................................... |
184 |
|
Registering an Application.................................................................... |
184 |
|
Removing an Application’s Trap Registration................................... |
185 |
|
Configuring Library Security ....................................................................... |
186 |
|
Accessing the Security Configuration Dialog Box............................. |
186 |
|
Configuring Access for Network Services .......................................... |
187 |
|
Configuring Access for Remote LMC Clients .................................... |
189 |
|
Configuring Access for SNMP and SMI-S .......................................... |
191 |
Scalar i2000 User’s Guide |
v |

|
Using LDAP.................................................................................................... |
192 |
|
Configuring LDAP ................................................................................. |
194 |
|
Configuring Screen Saver Preferences........................................................ |
195 |
|
Working With Data Path Conditioning...................................................... |
198 |
|
Configuring Datapath Conditioning ................................................... |
198 |
|
Installing the Host Registration Service .............................................. |
201 |
Chapter 5 |
Maintaining Your Library |
203 |
|
Monitoring the Library ................................................................................. |
204 |
|
Monitoring System Status ..................................................................... |
205 |
|
Monitoring Drive Status ........................................................................ |
208 |
|
Monitoring Connectivity Status ........................................................... |
209 |
|
Monitoring I/E Station Status............................................................... |
214 |
|
Monitoring Slot Status ........................................................................... |
216 |
|
Monitoring Media Status....................................................................... |
219 |
|
Monitoring Sensor Status ...................................................................... |
221 |
|
Monitoring Users Status ........................................................................ |
227 |
|
Monitoring Partitions Status ................................................................. |
228 |
|
Mailing, Saving, and Printing Status Information............................. |
230 |
|
Maintenance Actions ..................................................................................... |
232 |
|
Is the Access Door Closed?.................................................................... |
233 |
|
Is a Cartridge Old?.................................................................................. |
233 |
|
Using Library Explorer .......................................................................... |
234 |
|
Configuring and Testing Drives........................................................... |
238 |
|
Working With Connectivity.................................................................. |
248 |
|
Capturing Snapshots.............................................................................. |
250 |
|
Teaching the Library (Configuration and Calibration)..................... |
253 |
|
Saving and Restoring Library Configuration ..................................... |
256 |
|
Viewing the Drive Resource Utilization Reports............................... |
265 |
|
Setting Up Advanced Reporting Options ........................................... |
269 |
|
Working With Verification Tests.......................................................... |
275 |
|
Using the Partitions Defragmentation Tool........................................ |
328 |
|
Removing Lodged Cartridges............................................................... |
332 |
|
Maintaining the Air Filters .................................................................... |
333 |
Scalar i2000 User’s Guide |
vi |

Chapter 6 |
Running Your Library |
337 |
|
Logging On and Off....................................................................................... |
338 |
|
Logging On From the Touch Screen (Local Client) ........................... |
338 |
|
Logging Off From the Touch Screen (Local Client)........................... |
340 |
|
Logging On From the LMC Applet (Web Browser) .......................... |
340 |
|
Logging Off From the LMC Applet (Web Browser).......................... |
342 |
|
Logging On From a Remote Client ...................................................... |
342 |
|
Logging Off From a Remote Client...................................................... |
345 |
|
Connecting to Multiple Libraries................................................................. |
345 |
|
Operator Panel................................................................................................ |
347 |
|
Indicator Panel ........................................................................................ |
348 |
|
Library Management Console (LMC)......................................................... |
349 |
|
Menus ....................................................................................................... |
352 |
|
Toolbar ..................................................................................................... |
361 |
|
Reading the Library Information Panel............................................... |
362 |
|
System Status Buttons ............................................................................ |
364 |
|
Understanding Location Coordinates......................................................... |
366 |
|
Cartridge Locations ................................................................................ |
366 |
|
Tape Drive Locations ............................................................................. |
373 |
|
I/O Blade Locations ............................................................................... |
376 |
|
Viewing the Library (Physical or Partition) ............................................... |
378 |
|
Displaying the Physical Library or a Partition ................................... |
378 |
|
Managing Library Views ....................................................................... |
378 |
|
Changing the Library’s State........................................................................ |
380 |
|
Working With Local User Accounts............................................................ |
383 |
|
Creating Local User Accounts .............................................................. |
383 |
|
Deleting Local User Accounts............................................................... |
391 |
|
Viewing Local User Account Permissions .......................................... |
391 |
|
Shutting Down/Rebooting the Library ...................................................... |
393 |
|
.Powering Off the Library............................................................................. |
394 |
|
Powering On the Library .............................................................................. |
395 |
|
Locking/Unlocking the I/E Station ............................................................ |
395 |
|
When Robotics Are Not Ready .................................................................... |
397 |
Chapter 7 |
Working With Cartridges and Barcodes |
400 |
|
Handling Cartridges Properly ..................................................................... |
401 |
|
Write-Protecting Cartridges ......................................................................... |
402 |
|
Barcode Requirements .................................................................................. |
403 |
|
Installing Barcode Labels.............................................................................. |
405 |
|
Using Cleaning Cartridges ........................................................................... |
406 |
Scalar i2000 User’s Guide |
vii |
Managing Media ............................................................................................ |
407 |
Importing Cartridges Into Partitions ................................................... |
408 |
Exporting Cartridges From Partitions ................................................. |
410 |
Loading Drives........................................................................................ |
411 |
Unloading Drives.................................................................................... |
413 |
Moving Media ......................................................................................... |
415 |
Inventory.................................................................................................. |
416 |
Installing a Remote Client............................................................................. |
426 |
Installing the Client on a Windows System........................................ |
426 |
Installing the Client on a UNIX System............................................... |
427 |
Launching the Remote Client ............................................................... |
429 |
Launching a Windows Client ............................................................... |
429 |
Launching a UNIX Client ...................................................................... |
430 |
Scalar i2000 User’s Guide |
viii |

Tables
Table 1 |
Severity Levels Assigned to Tickets ......................................... |
8 |
Table 2 |
Report Criteria ............................................................................ |
36 |
Table 3 |
Tickets Report Criteria Options ............................................... |
46 |
Table 4 |
Explanations of Blade Status LED States................................ |
54 |
Table 5 |
Blade Status LED States - Normal Conditions...................... |
55 |
Table 6 |
Drive Sled Status LED States (UDS-2 and UDS-3) ................ |
58 |
Table 7 |
Drive Sled Status LED States - Normal Conditions .............. |
59 |
Table 8 |
Fibre Drive Sled Link LED States (UDS-2) ............................. |
60 |
Table 9 |
Fibre Drive Sled Link LED States (UDS-3) ............................. |
61 |
Table 10 |
I/O Blade Link LED States ....................................................... |
63 |
Table 11 |
Explanations of MCB Ethernet Port LED States .................... |
65 |
Table 12 |
LBX LED Version 01 ................................................................. |
67 |
Table 13 |
LBX LED Version 03 .................................................................. |
69 |
Table 14 |
Explanation of Power Supply LED States .............................. |
70 |
Table 15 |
Cartridge Capacities in Library Modules ............................... |
93 |
Table 16 |
LTO Drive and Cartridge Compatibility ................................ |
96 |
Table 17 |
DLT Drive and Cartridge Compatibility ................................ |
97 |
Scalar i2000 User’s Guide |
ix |
Table 18 |
Sampling of Media Type Identifiers...................................... |
109 |
Table 19 |
Return Media Identifier Behavior Example ......................... |
111 |
Table 20 |
FC I/O Blade Port Settings ..................................................... |
131 |
Table 21 |
Severity Levels Assigned to Issues ........................................ |
142 |
Table 22 |
Show Details.............................................................................. |
163 |
Table 23 |
Descriptors ................................................................................ |
164 |
Table 24 |
Test Results................................................................................ |
283 |
Table 25 |
Robotics Enabled Indicator.................................................. |
348 |
Table 26 |
Status Indicator ....................................................................... |
349 |
Table 27 |
Power Indicator........................................................................ |
349 |
Table 28 |
Menu Commands: Privileges and Environments................ |
354 |
Table 29 |
Areas on the Library Information Panel ............................... |
363 |
Table 30 |
Subsystems and Their Components ...................................... |
364 |
Table 31 |
Drive Location Coordinates.................................................... |
374 |
Table 32 |
Blade Location Coordinates.................................................... |
378 |
Table 33 |
Library Functions Requiring Online or Offline State.......... |
382 |
Table 34 |
Menu Commands When Robotics Are Disabled................ |
397 |
Scalar i2000 User’s Guide |
x |
Figures
Figure 1 |
Status Indicator ........................................................................... |
7 |
Figure 2 |
Locations and Colors of Blade Status LEDs ........................... |
52 |
Figure 3 |
Rear View of Fibre Channel Drive Sled (UDS-2)................... |
56 |
Figure 4 |
Rear View of Fibre Channel Drive Sled (UDS-3)................... |
57 |
Figure 5 |
Locations - Colors of I/O Blade Fibre Port Link LEDs......... |
62 |
Figure 6 |
Locations - Colors of MCB Ethernet Port LEDs..................... |
64 |
Figure 7 |
Locations - Colors MCB FC / SCSI Port LEDs ...................... |
66 |
Figure 8 |
Locations of LBX Terminator LEDs (Version 01) .................. |
67 |
Figure 9 |
Locations of LBX Terminator LEDs (Version 03) .................. |
68 |
Figure 10 |
Locations and Colors of Power Supply LEDs........................ |
70 |
Figure 11 |
Front View of a Control Module and Expansion Module ... |
78 |
Figure 12 |
Front and Back View of the Control Module......................... |
84 |
Figure 13 |
Expansion Module ..................................................................... |
85 |
Figure 14 |
Library Management Module Boards..................................... |
86 |
Figure 15 |
I/O Management Unit .............................................................. |
88 |
Figure 16 |
Example of LTO Cartridge Insertion into a Magazine ......... |
91 |
Figure 17 |
Magazine and Drive Locations in the Control Module........ |
92 |
Scalar i2000 User’s Guide |
xi |
Figure 18 Magazine Installation Order..................................................... |
99 |
|
Figure 19 |
Operator Panel.......................................................................... |
100 |
Figure 20 Verification Tests Dialog Box ................................................. |
279 |
|
Figure 21 |
Report Window ........................................................................ |
285 |
Figure 22 Joint Alignments Graphical Report ....................................... |
287 |
|
Figure 23 Vertical Alignments Graphical Report.................................. |
289 |
|
Figure 24 Horizontal Alignments Graphical Report ............................ |
291 |
|
Figure 25 Calibration Offsets Graphical Report.................................... |
293 |
|
Figure 26 Boundary/Accessibility Graphical Report........................... |
295 |
|
Figure 27 Get/Put Graphical Report ...................................................... |
297 |
|
Figure 28 Scan Fiducials Graphical Report ............................................ |
299 |
|
Figure 29 Picker Pivot/Reach Graphical Report................................... |
301 |
|
Figure 30 Example Test Log Output ....................................................... |
303 |
|
Figure 31 Top and Bottom Air Filters ..................................................... |
333 |
|
Figure 32 Library Op Panel ...................................................................... |
347 |
|
Figure 33 LMC (Local Touch Screen - Physical Library View) ........... |
351 |
|
Figure 34 LMC (Remote Client With Partition View Shown) ............. |
352 |
|
Figure 35 LMC (Remote Client With Partition View Shown) ............. |
362 |
|
Figure 36 System Status Buttons in Good Status .................................. |
364 |
|
Figure 37 |
Status Buttons - Drives and Robotics Issues....................... |
365 |
Figure 38 Aisle, Module, and Rack Numbering Locations.................. |
367 |
|
Figure 39 Section, Column, and Row Numbering for Rack 1 - LTO |
|
|
|
Cartridges368 |
|
Figure 40 Section, Column, and Row Numbering for Rack 2 - LTO |
|
|
|
Cartridges370 |
|
Figure 41 Example Location Coordinates .............................................. |
372 |
|
Figure 42 Coordinates in Load Drives Dialog...................................... |
373 |
|
Figure 43 Location Coordinates for Drives ............................................ |
374 |
|
Figure 44 Drive-side Location Coordinates ........................................... |
375 |
|
Figure 45 I/O Blade Location Coordinates............................................ |
376 |
|
Scalar i2000 User’s Guide |
xii |
Figure 46 |
I/O Management Unit Blade Numbering ............................ |
377 |
Figure 47 |
Write-protect Switch on an LTO-1 Cartridge....................... |
403 |
Figure 48 |
Applying Barcode Labels to Cartridges................................ |
406 |
Scalar i2000 User’s Guide |
xiii |
Chapter 1
About This Guide and Your
Product
This guide contains information and instructions necessary for the normal operation and management of the Scalar® i2000 library. This guide is intended for system administrators, operators, or anyone interested in learning about or using the Scalar i2000 library after its initial installation and configuration. Be aware that you must have administrator privileges to use many of the features that this guide describes.
Be sure to read all operating instructions in this
CAUTION manual and in the System, Safety, and Regulatory
Information Guide before operating this product.
Product Safety Statements
This product is designed for data storage and retrieval using magnetic tape. Any other application is not considered the intended use. ADIC will not be held liable for damage arising from unauthorized use of the product. The user assumes all risk in this aspect.
This unit is engineered and manufactured to meet all safety and regulatory requirements. Be aware that improper use may result in
Scalar i2000 User’s Guide |
1 |
Mechanical Locks
Power Button on the Library’s Indicator Panel
Chapter 1 About This Guide and Your Product
Product Safety Statements
bodily injury, damage to the equipment, or interference with other equipment.
CAUTION |
Be sure to read all operating instructions in this |
|
manual and in the System, Safety, and Regulatory |
||
|
||
|
Information Guide before operating this product. |
|
WARNING |
BEFORE POWERING ON OR USING THIS |
|
EQUIPMENT, READ THE SYSTEM, SAFETY, |
||
|
||
|
AND REGULATORY INFORMATION GUIDE. |
|
|
KEEP THE GUIDE FOR FUTURE REFERENCE. |
|
Note |
WHEN DRIVE SLED POSITIONS ARE EMPTY, |
|
DRIVE COVER PLATES MUST BE INSTALLED |
||
|
||
|
AND IN PLACE AT ALL TIMES TO PREVENT |
|
|
ACCESS INTO THE EMPTY DRIVE SLED |
|
|
POSITIONS. |
The access and service doors can only be opened with a key. The key should be kept by an authorized person at your company. Access to the interior of the library is both a data-integrity and safety issue.
Switching off the Power button on the indicator panel, located on the front of the library, removes power from the electronics, which causes the picker to stop immediately. This button also removes power from the drives.
THIS POWER BUTTON FUNCTIONS AS A WARNING POWER INTERRUPT ONLY. TO COMPLETELY
REMOVE ALL POWER BEFORE SERVICING OR IN AN EMERGENCY, TURN OFF THE CIRCUIT BREAKER ON THE POWER DISTRIBUTION UNIT, AND THEN DISCONNECT THE POWER CORD FROM THE ELECTRICAL SOURCE.
Scalar i2000 User’s Guide |
2 |
Chapter 1 About This Guide and Your Product
Disposal of Electrical and Electronic Equipment
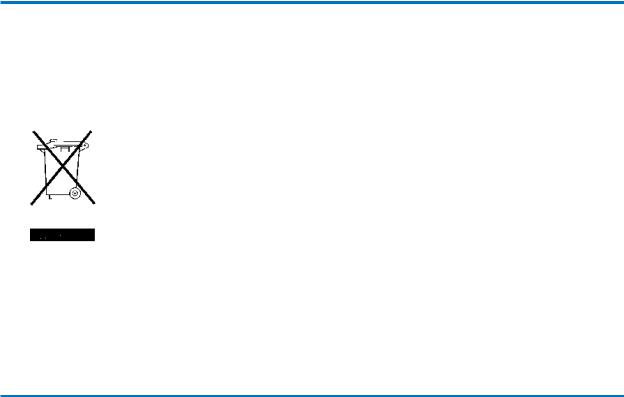
Disposal of Electrical and Electronic Equipment
THIS SYMBOL ON THE PRODUCT OR ON ITS PACKAGING INDICATES THAT THIS PRODUCT SHOULD NOT BE DISPOSED OF WITH YOUR OTHER WASTE. INSTEAD, IT SHOULD BE HANDED OVER TO A DESIGNATED COLLECTION POINT FOR THE RECYCLING OF ELECTRICAL AND ELECTRONIC EQUIPMENT. THE SEPARATE COLLECTION AND RECYCLING OF YOUR WASTE EQUIPMENT AT THE TIME OF DISPOSAL WILL HELP TO CONSERVE NATURAL RESOURCES AND ENSURE THAT IT IS RECYCLED IN A MANNER THAT PROTECTS HUMAN HEALTH AND THE ENVIRONMENT. FOR MORE INFORMATION ABOUT WHERE YOU CAN DROP OFF YOUR WASTE EQUIPMENT FOR RECYCLING, PLEASE VISIT OUR WEBSITE AT: HTTP:// QCARE.QUANTUM.COM OR CONTACT YOUR LOCAL GOVERNMENT AUTHORITY, YOUR HOUSEHOLD WASTE DISPOSAL SERVICE OR THE BUSINESS FROM WHICH YOU PURCHASED THE PRODUCT.
Product Model Number
The Scalar i2000 model number is as follows: SCi2000.
Scalar i2000 User’s Guide |
3 |

Chapter 1 About This Guide and Your Product
Explanation of Symbols and Notes
Explanation of Symbols and Notes
The following symbols appear throughout this document to highlight important information.
INDICATES A POTENTIALLY HAZARDOUS
WARNING SITUATION WHICH, IF NOT AVOIDED,
COULD RESULT IN DEATH OR BODILY
INJURY.
Indicates a situation that may cause possible CAUTION damage to equipment, loss of data, or
interference with other equipment.
Note |
Indicates important information that helps you |
|
make better use of your system. |
||
|
Other Documents you Might Need
The following documents are also available for this product. These documents can be found on the product CD or at www.quantum.com/ support.
•Scalar i2000 Planning Guide (6-00418-xx)
•Scalar i2000 User’s Guide (6-00421-xx)
•Scalar i2000 Maintenance Guide (6-00422-xx)
•ADIC Management Console User’s Guide (6-00064-xx)
Scalar i2000 User’s Guide |
4 |

Chapter 1 About This Guide and Your Product
Getting More Information or Help
•Scalar i2000 Unpacking Instructions (6-00771-xx)
•System, Safety, and Regulatory Information Guide (6-00618-xx)
Note |
Release Notes are also available for this product. |
|
The Release Notes describe changes to your system |
||
|
||
|
or firmware since the last release, provide |
|
|
compatibility information, and discuss any known |
|
|
issues and workarounds. The Release Notes can be |
|
|
found in the product box or at |
|
|
www.quantum.com/support |
Getting More Information or Help
More information about this product is available on the Service and Support website at www.quantum.com/support. The Service and Support Website contains a collection of information, including answers to frequently asked questions (FAQs). You can also access software, firmware, and drivers through this site.
For further assistance, or if training is desired, contact Quantum:
For additional contact information: www.quantum.com/support
To open a Service Request: |
www.quantum.com/esupport |
Scalar i2000 User’s Guide |
5 |

Chapter 2
Troubleshooting Your Library
This chapter describes how the library informs you of issues that it detects within its subsystems. It also provides information about working with tickets to resolve issues, running verifications tests to check whether they have been resolved, interpreting LEDs, viewing command history logs, and accessing Online Help.
This chapter consists of the following sections:
•How Does the Library Report Issues? on page 7
•Working With Tickets on page 12
•Viewing Tape Alerts and Generating Media Integrity Analysis Reports on page 31
•Generating Media Integrity Analysis Reports on page 34
•Saving a Report Template on page 39
•Generating the Tickets Report on page 45
•Interpreting LEDs on page 51
•Interpreting LBX Terminator LEDs on page 66
•Working With Command History Logs on page 71
•Accessing Online Help on page 76
Scalar i2000 User’s Guide |
6 |
Chapter 2 Troubleshooting Your Library
How Does the Library Report Issues?
How Does the Library Report Issues?
The library has advanced problem detection, reporting, and notification functionality. The library has many processors and sensors that monitor conditions and operations, such as temperatures, voltages, current, calibrations, firmware versions, and so forth.
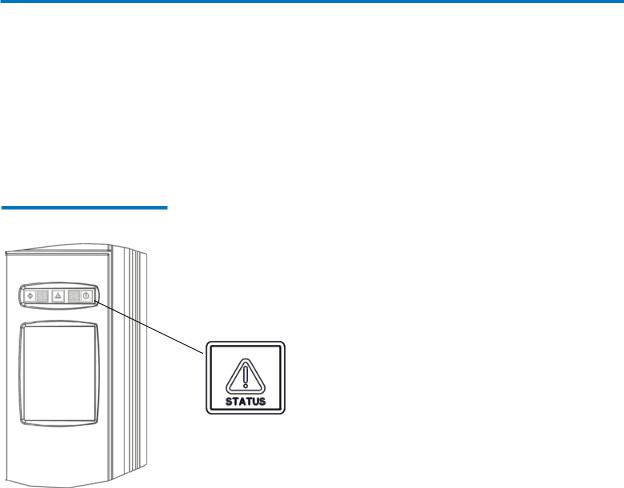
The first indication of issues is the status indicator on the indicator panel, as shown in Figure 1.
Figure 1 Status Indicator
Status indicator
•If the Status indicator light is solid green, the library currently has no tickets in an Open state.
•If the Status indicator light is flashing amber, at least one of the six subsystems has a ticket in an Open state.
When the library detects an issue, it creates a ticket for it. A ticket includes the following types of information:
•Details about the issue
•Reports that are associated with the ticket
Scalar i2000 User’s Guide |
7 |
Chapter 2 Troubleshooting Your Library
How Does the Library Report Issues?
• A repair page that provides corrective actions
In most cases, tickets isolate field replaceable units (FRUs) that you must service or replace.
Note |
Tickets can indicate failures or other serious |
|
problems, but they also can indicate warning |
||
|
||
|
conditions that you should investigate or other |
|
|
helpful information. For example, opening the |
|
|
library’s access door or changing the library’s |
|
|
configuration causes the library to create a ticket, |
|
|
but these situations would not indicate serious |
|
|
problems. However, you should investigate the |
|
|
tickets. |
The library assigns a severity level to each ticket that it creates, and it notifies users of the ticket. Table 1 describes possible severity levels for tickets.
Table 1 Severity Levels
Assigned to Tickets
Severity Level |
Description |
|
|
1 (Failed) |
Indicates that a failure has occurred or a different serious condition exists within a |
|
library subsystem that requires immediate corrective action. In most cases, a |
|
hardware component is no longer functioning at an acceptable level or has failed. |
|
Typical library operations are either impossible or highly unreliable. |
|
Examples of failure situations include a FRU that is not functioning, a temperature |
|
threshold that has been reached that causes unreliable operations, or a partition that |
|
the library has automatically taken offline. |
|
|
2 (Degraded) |
Indicates that a degraded condition exists within a library subsystem that impacts |
|
system performance or redundancy. Typical library operations can continue |
|
without immediate corrective action, but an administrator should investigate the |
|
condition and correct the problem soon. |
|
Examples of degraded situations include a redundant power supply that has failed |
|
or a connectivity problem that has caused host port failover to occur. |
|
|
Scalar i2000 User’s Guide |
8 |

|
|
Chapter 2 Troubleshooting Your Library |
|
|
How Does the Library Report Issues? |
|
|
|
Table 1 Severity Levels |
|
|
Assigned to Tickets |
|
|
|
|
|
Severity Level |
Description |
|
|
|
|
3 (Warning) |
Indicates that a condition exists within a library subsystem that has little effect on |
|
|
system operations. Typical library operations can continue without immediate |
|
|
corrective action, but you should investigate the condition and correct the problem |
|
|
when possible. Warnings also can provide helpful information, such as indicating |
|
|
that a door is open. |
|
|
Examples of warning situations include a FRU that is functioning less reliably or a |
|
|
temperature threshold that has been reached that does not affect reliable operations. |
|
|
|
|
|
|
The library has two ways of notifying users that it has discovered issues |
|
|
and has created tickets for them: |
|
|
• Status indicators on Library Management Console (LMC) system |
|
|
status buttons |
|
|
• E-mail notifications |
|
|
System status buttons are located in the Overall System Status area at the |
Understanding Indicators |
||
on System Status |
|
bottom of the LMC display. Each button displays a status indicator for |
Buttons |
|
the library subsystem it represents. For more information about the |
|
|
buttons, see System Status Buttons on page 364. When the library creates |
|
|
|
a ticket, the status indicator button for the affected subsystem automatically changes from the following icon:
Good (green)
to one of the following icons:
Warning or Degraded (yellow)
Failed (flashing red)
The meanings of these status indicators correspond to the severity levels described in table 1 on page 8. If a system status button indicates anything other than a Good state, clicking it displays a list of open tickets
Scalar i2000 User’s Guide |
9 |

Understanding E-mail
Notifications
Chapter 2 Troubleshooting Your Library
How Does the Library Report Issues?
for the subsystem. To access tickets by using the system status buttons, see Working With Tickets on page 12.
The library collects status information on its components and, if the appropriate e-mail notifications have been set up in the LMC, the library can send notifications whenever tickets with severity levels 1, 2, or 3 are created. For information about severity levels, see table 1 on page 8. The library assigns a severity level to each ticket it creates. If the ticket’s severity level matches one of an e-mail address’ severity codes (as set up in e-mail notifications), the library sends a notification to that particular e-mail address. The library also sends a notification if a ticket’s severity level escalates to a more severe level. The library does not send one when an ticket’s severity level becomes less severe.
By default, the only e-mail address to which the library sends e-mail notifications (severity level 1 issues only) is techsup@quantum.com (Quantum technical support). To set up other e-mail addresses to receive notifications, see Configuring E-mail on page 140 and Setting Up E-mail Notifications on page 142.
Note |
Even though you can remove the Quantum |
|
technical support e-mail address so that Quantum |
||
|
||
|
does not receive severity level 1 notifications, |
|
|
Quantum recommends that you do not remove it. |
|
|
Also, do not include the Quantum technical |
|
|
support e-mail address for severity level 2 or 3 |
|
|
notifications. |
The subject line of the e-mail notification indicates “Scalar i2000,” the library’s serial number, and the severity level of the ticket. The body of the message states that the library sent the message automatically. The message body also includes the following information, which provides details about the ticket and library conditions at the time of the event:
•Ticket summary
•Ticket details, including status information
•Firmware versions, including MCB, RCU, CMB, and drive bricks
•Physical library configuration
Scalar i2000 User’s Guide |
10 |

Chapter 2 Troubleshooting Your Library
How Does the Library Report Issues?
•Library states, such as physical library online or offline, partitions online or offline, or robotics enabled or disabled
•Time stamps of recent activity
•Report summary
•Report details for the ticket
The notification also includes a repair page attachment. This page provides a problem description and corrective actions you or a customer service engineer (CSE) can perform. For more information about repair pages, see Viewing Repair Pages on page 30.
Note |
A notification e-mail contains helpful information |
|
about a ticket and how to resolve it. However, the |
||
|
||
|
notification represents a condition that existed at a |
|
|
certain time in the past. The notification might not |
|
|
reflect the current situation. The notification |
|
|
indicates a specific ticket ID, so you should find |
|
|
and examine that specific ticket in the LMC. The |
|
|
ticket reflects the real-time status of the issue. For |
|
|
more information about accessing tickets, see |
|
|
Working With Tickets on page 12. |
Scalar i2000 User’s Guide |
11 |

Chapter 2 Troubleshooting Your Library
Working With Tickets
Working With Tickets
|
Tickets are your primary troubleshooting tool when you experience |
|
problems with the library. A ticket provides details and reports about the |
|
issue and library conditions at the time of the event. It also provides |
|
guidance on how to resolve the issue. If you are an administrator or a |
|
service representative, you can access the tickets through the LMC. This |
|
section explains how to display ticket lists, view ticket and report details, |
|
view repair pages, and resolve and close tickets. |
|
To help you quickly troubleshoot an issue by using tickets, read the |
Ticket Guidelines |
following guidelines. |
|
What is the issue and its cause? |
|
|
|
You became aware of a library issue because either the library sent an |
|
e-mail notification, an LMC system status button indicated a subsystem |
|
status of Warning, Degraded, or Failed, or a backup/archive software |
|
application indicated a problem. Tickets include details about the issue |
|
and library conditions at the time of the event. They also include reports, |
|
any history tickets that the library has created in the past for the same |
|
FRU, and a repair page that provides a detailed description of the issue |
|
and its possible causes. The repair page also provides corrective actions |
|
that you or a CSE can perform. To use a ticket to determine an issue and |
|
its cause, you can perform the following general steps: |
|
1 Display a list of tickets (see Displaying Ticket Lists on page 16). |
|
2 View the details for the appropriate ticket (see Viewing Ticket Details |
|
on page 21). |
|
3 View the reports that are associated with this ticket (see Viewing |
|
Ticket Details Reports on page 26. |
|
4 View the ticket’s repair page (see Viewing Repair Pages on page 30). |
Scalar i2000 User’s Guide |
12 |
Chapter 2 Troubleshooting Your Library
Working With Tickets
Where did the issue occur in the library?
The Status Group field on the Details tab of the Ticket Details dialog box indicates the library subsystem that caused the ticket. For more information about the Details tab, see Viewing Ticket Details on page 21 The FRU ID field on the Report tab of the Ticket Details dialog box indicates the type of FRU that is affected, and the FRU Instance field indicates the specific FRU by its location in the library. For more information about the Report tab, see Viewing Ticket Details Reports on page 26.
When did the issue first occur?
The Posted field on the Details tab of the Ticket Details dialog box indicates the date and time on which the library first reported the issue and created a ticket for it. For more information about the Details tab, see Viewing Ticket Details on page 21.
Has the issue occurred repeatedly?
The Duplicates field on the Details tab of the Ticket Details dialog box indicates how many times the library has reported the same issue while the ticket has been open. In addition, you can determine whether the same issue has occurred and been resolved in the past. The FRU History List area on the Details tab lists tickets that have been opened for the same FRU in the past, but have been resolved and are now in the Closed or Verified state. By selecting a history ticket and then clicking Show, you can investigate the ticket history of a particular FRU. For more information about the Details tab and viewing history tickets, see Viewing Ticket Details on page 21.
Has the FRU been replaced before?
You can determine whether a specific FRU has been replaced in the past by examining the FRU SN field on the Details tab of the Ticket Details dialog box for the open ticket and the history tickets. Because the history tickets associated with an open ticket are for the same specific instance of a FRU, and because a FRU instance is identified by its location in the library, the FRU serial number, which is uniquely assigned to each FRU, will change if the unit has been replaced in the past. For more
Scalar i2000 User’s Guide |
13 |
Chapter 2 Troubleshooting Your Library
Working With Tickets
information about the Details tab and viewing history tickets, see Viewing Ticket Details on page 21.
How do I resolve the issue?
The repair page provides comprehensive, step-by-step procedures for resolving the issue. Both user and CSE procedures are provided. When the procedures require a CSE to perform them, contact technical support. For more information, see Viewing Repair Pages on page 30.
How can I know whether the issue is resolved?
Some issues require you to determine whether they are resolved and others the library will detect automatically.
•In some cases, the library can automatically detect that an issue is resolved (for example, an open door that is now shut). For these, the library automatically transitions the ticket to the Verified state.
•In other cases, the library cannot automatically detect that an issue is resolved (for example, a faulty tape cartridge). You must determine whether the issue is resolved by running a verification test or, if an applicable test does not exist, by following the repair page instructions. If you run a test and the results are all good, the library automatically transitions the ticket to the Verified state. If you cannot run a test, you should physically examine the FRU, and then manually transition the ticket to the Closed state after determining that the issue is resolved. After you close the ticket, the library transitions it to the Verified state if it is able to do so. For more information, see Running Verification Tests to Determine Issue Resolution on page 42 and Closing Tickets on page 43.
The library reopens tickets that receive failed, degraded, or warning reports within 30 minutes of transitioning to the Closed or Verified state. If a Closed or Verified ticket remains free of failed, degraded, or warning reports for 30 minutes, the library locks them from transitioning back to the Open state. A failed, degraded, or warning report that is received beyond 30 minutes causes the library to open a new ticket.
Scalar i2000 User’s Guide |
14 |
Chapter 2 Troubleshooting Your Library
Working With Tickets
What do I do if I cannot resolve the issue?
Contact Quantum technical support. See Getting More Information or Help on page 5. Technical support personnel might ask you to send them an electronic copy of the ticket. For instructions, see Mailing, Saving, and Printing Ticket Information on page 39.
How do I view the number of tickets that occurred in a certain time range?
The Tickets Report lets you see how many tickets occurred in a particular time period. You can choose to group tickets by subsystem, module, or FRU, and the results can be presented as a rollup summary or as a trend so you can see if the number of issues is increasing or decreasing over time. Also, the report results can be presented in different chart formats, such as bar graphs or pie charts. For more information, see Generating the Tickets Report on page 45.
Scalar i2000 User’s Guide |
15 |
Chapter 2 Troubleshooting Your Library
Working With Tickets
|
The LMC provides three ways to display ticket lists: |
|
Displaying Ticket Lists |
||
• By clicking a system status button that indicates a Warning, |
||
|
||
|
||
|
Degraded, or Failed state |
|
|
This option displays a list of open tickets for the associated subsystem. |
|
|
See Using System Status Buttons to Display Ticket Lists on page 16. |
|
|
• By clicking Tools→ Tickets |
|
|
This option displays the Tickets dialog box from which you can obtain a |
|
|
list of all tickets or a partial list of tickets according to selection criteria. |
|
|
See Using the Tickets Command or the Tickets Button to Display Ticket |
|
|
Lists on page 19. |
|
|
• By clicking the Tickets button on the toolbar |
|
|
This option displays the same Tickets dialog box as the Tools→ Tickets |
|
|
command does. See Using the Tickets Command or the Tickets Button to |
|
|
Display Ticket Lists on page 19. |
|
|
From the ticket list, you can select a ticket to view ticket details, |
|
|
associated reports, and a repair page. |
|
|
Using System Status Buttons to Display Ticket Lists |
|
|
To display a list of tickets by using a system status button, the button |
|
|
must indicate a Warning, Degraded, or Failed state. Clicking a system |
|
|
status button that indicates a Good state either displays a list of |
|
|
subsystem tickets that are in Closed or Verified states or informs you that |
|
|
no tickets exist for the subsystem. |
|
|
1 Click the system status button that corresponds with the subsystem |
|
|
for which you want to display a list of open tickets. |
Scalar i2000 User’s Guide |
16 |
Chapter 2 Troubleshooting Your Library
Working With Tickets
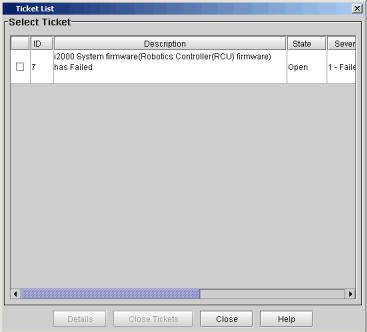
The Ticket List dialog box appears with a list of open tickets for the subsystem.
|
The following table describes the elements on the Ticket List dialog box. |
|
|
|
|
Element |
Description |
|
|
|
|
In the Select Ticket area: |
|
|
|
|
|
Check Box |
To close multiple tickets, select each ticket you want to close by clicking the |
|
|
check box. |
|
|
|
|
ID |
The library-assigned identifier for the ticket. |
|
|
|
|
Description |
A summary description of the ticket. The description identifies the FRU that |
|
|
caused the ticket and includes reason text that describes the cause of the ticket. |
|
|
|
|
Scalar i2000 User’s Guide |
17 |
 Loading...