


 Loading...
Quantum
Quick Start Guide
SDLT 220/320 Tape Drive
PROCEDURES
Getting Started - - - - - - - - - 1
Checking the Tape Drive 1
SCSI Setup 2
Connecting the Tape Drive 3
Confirming the Installation 4
Performing a Trial Backup 4
VORGÄNGE
Erste Schritte - - - - - - - - - - 5 Überprüfen des Bandlaufwerks 5 SCSI-Setup 6
Anschließen des Bandlaufwerks 7 Überprüfen der Installation 8 Durchführen eines Test-Backups 8
PROCEDIMIENTOS
Introducción - - - - - - - - - - 9
Comprobación de la unidad de cinta 9
Configuración de SCSI 10 Conexión de la unidad de cinta 11 Comprobación de la instalación 12
Realización de una copia de seguridad de prueba 12
PROCÉDURES
Démarrage - - - - - - - - - - - 13 Vérification du lecteur de bande 13 Configuration SCSI 14
Connexion du lecteur de bande 15 Confirmation de l'installation 16 Exécution d'un test de sauvegarde 16
- - - - - - - - - - - - - 17
17 SCSI 18
1920
20
Quick Start Guide SDLT 220/320 Tape Drive • i
|
|
- - - - - - - - - - - - - - - 21 |
- - - - - - - - - - - - - - - 25 |
22 |
25 |
SCSI 22 |
SCSI 26 |
23 |
27 |
24 |
28 |
24 |
28 |
ii • Quick Start Guide SDLT 220/320 Tape Drive

P r o c e d u r e s
Getting Started
This guide describes how to install your tape drive. To get started:
a.Inspect the contents of the box.
If items are damaged, contact your tape drive provider.
b.Verify that the enclosed cable is compatible with the SCSI connector on the host computer.
c.Confirm that the host computer’s SCSI controller card matches the tape drive’s SCSI interface: single-ended, low-voltage differential (LVD), or high-voltage differential (HVD).
A single-ended drive will not work with an HVD controller card, and vice versa.
d.Verify that the backup software and operating system are compatible with the new drive.
Visit www.dlttape.com for current compatibility information.
DFor more information about compatibility, refer to the
SDLT 220 and SDLT 320 User Reference Guide.
For more information:
Refer to the documents on the enclosed CD-ROM, or visit www.quantum.com.
For help installing the tape drive:
Contact Quantum Technical Support at 1-888-827-3378.
Checking the Tape Drive
To check that the tape drive works and is not damaged:
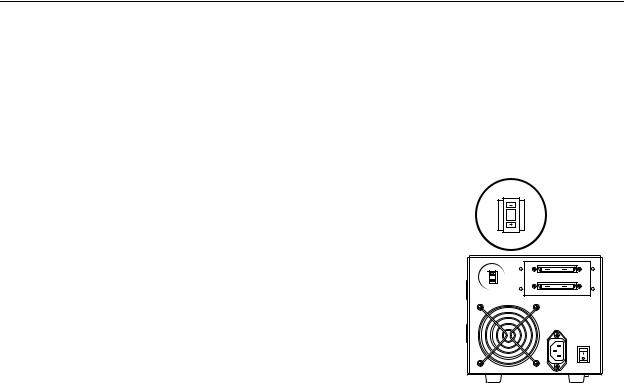
a.Connect the power cord to the tape drive and plug it into an AC power source.
b.Power on the tape drive using the switch on the back the drive.
c.Monitor the tape drive’s Power-On Self-Test (POST) behavior and messages displayed on your computer screen.
DFor more information about POST messages, refer to the
SDLT 220 and SDLT 320 User Reference Guide.
d. Power off the tape drive and unplug it from the AC outlet.
3
On/Off Switch
Getting Started • 1
SCSI Setup
Consider these factors when connecting your tape drive to the SCSI bus:
a. If the tape drive will be the only device connected to the SCSI bus, attach the enclosed terminator to the upper SCSI connector on the back of the drive. (Refer to illustration on page 3.)
The SCSI bus must be terminated at each end. The controller provides termination at one end, and the last device connected to the
bus must be terminated to complete the SCSI chain.
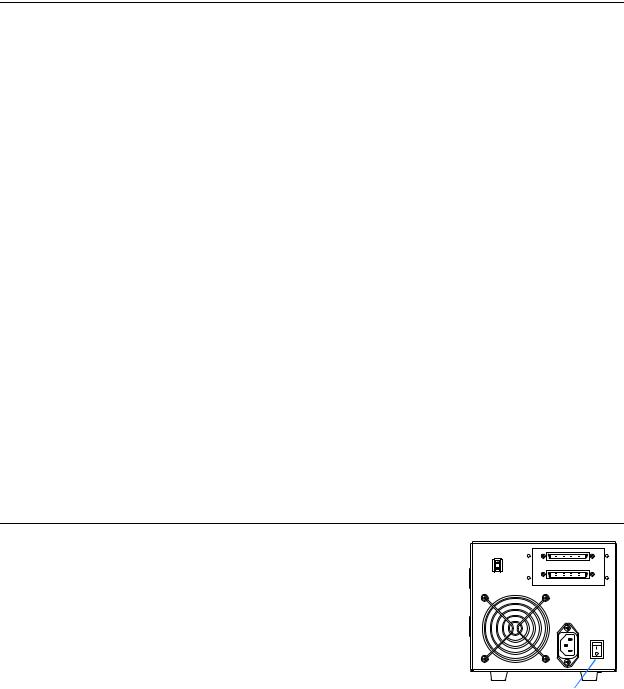
SCSI ID Switch
b. If you are inserting the tape drive into a SCSI daisy chain, ensure that the last device on the chain is terminated properly.
c. Each device (external or internal) attached to the SCSI bus must
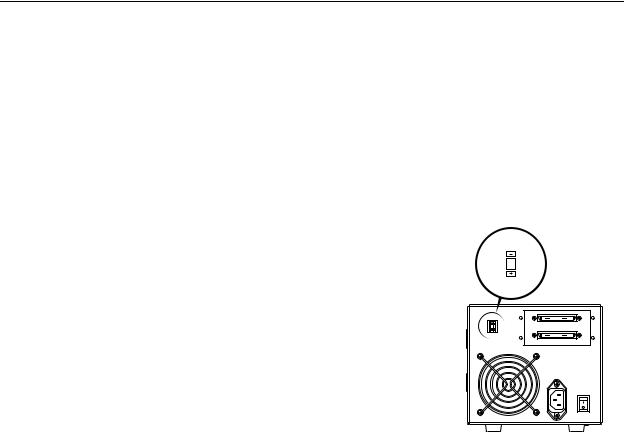
have a unique SCSI ID. If necessary, change the SCSI ID of your  tape drive using the SCSI ID switch on the back of the drive.
 3
3 The tape drive’s pre-set SCSI ID is 3. Change it if necessary.
! Do not use SCSI ID 7. It is typically used by the SCSI card.
2 • SCSI Setup
Connecting the Tape Drive
To connect the tape drive:
a.Before connecting your tape drive, make sure the tape drive and host computer are powered off.
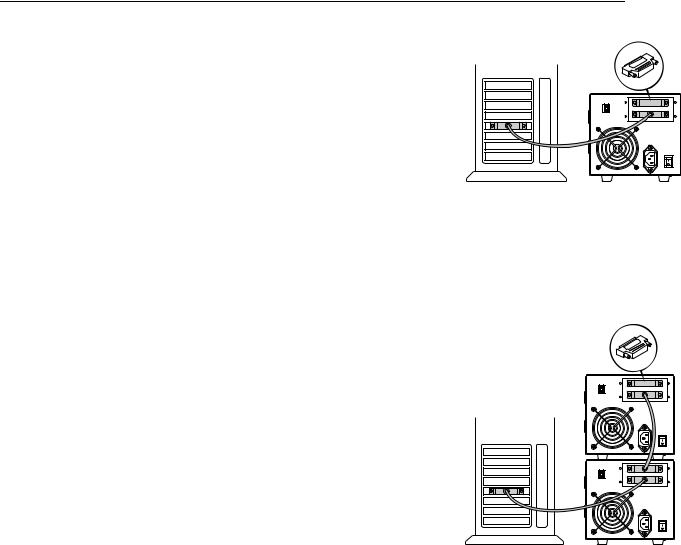
b.If you are daisy-chaining the drive, use the lower SCSI connector to connect to the host computer, and the upper to connect to additional devices.
If you plan to connect several devices to the SCSI bus, first connect only the Super DLTtape drive to the host computer. This will confirm that the drive is communicating properly with the host before adding additional devices.
c.Connect your tape drive to the host computer using the SCSI cable. Check connections and ensure that they are attached correctly and firmly seated.
DSee “Confirming the Installation” on page 4.
! You must terminate the SCSI bus by connecting a terminator to the last device in the chain, as discussed on page 2.
Terminator
3
Cabling for Single Tape Drive
Terminator
3
3
Cabling for Daisy Chain
Connecting the Tape Drive • 3

Confirming the Installation
Follow these steps to confirm that the installation was successful:
a.Power on the tape drive and the host computer.
b.If your system displays BIOS, OS, and SCSI controller information at startup, check to confirm that the host successfully recognizes the tape drive.
c.Let the tape drive finish its Power-On Self-Test.
d.Launch your backup software.
e.Confirm that your backup software recognizes the tape drive.
Performing a Trial Backup
To perform a trial backup:
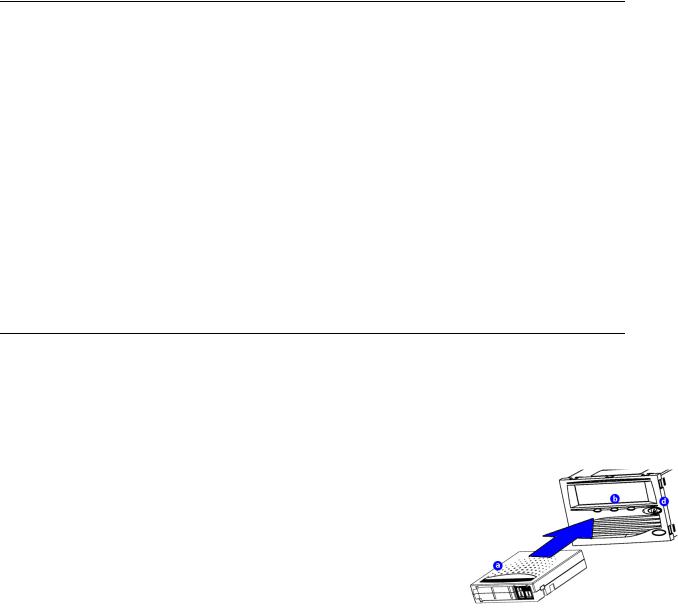
a.Insert a data cartridge into the tape drive. Ensure that you are using a Super DLTtape I™ data cartridge, as shown in the illustration.
b.Push the data cartridge completely into the drive. The tape loads automatically. The green LED lights steadily when the tape drive is ready for use.
c.Do a trial backup.
Choose a sample file set from the host computer. Perform a backup and then restore the file set. If the backup and restore complete without errors, you have installed the drive correctly.
d.To unload the cartridge, press the Eject button on the front of the drive and remove the cartridge.
DFor troubleshooting information, refer to the SDLT 220 and
SDLT 320 User Reference Guide and the SDLT 220 and SDLT 320 Product Manual.
4 • Confirming the Installation
V o r g ä n g e
Erste Schritte
In diesem Handbuch wird die Installation Ihres Bandlaufwerks beschrieben. Führen Sie die folgenden Schritte aus:
a.Überprüfen Sie den Inhalt Ihres Pakets.
Falls das Paket beschädigte Artikel enthält, wenden Sie sich an den Händler, bei dem Sie das Bandlaufwerk erworben haben.
b.Überprüfen Sie, ob das im Lieferumfang enthaltene Kabel mit dem SCSI-Anschluss am Hostcomputer kompatibel ist.
c.Vergewissern Sie sich, dass die SCSI-Controllerkarte des Hostcomputers der SCSI-Schnittstelle des Bandlaufwerks entspricht: Single-Ended, LVD (Low Voltage Differential) oder HVD (High Voltage Differential).
Ein Single-Ended-Laufwerk funktioniert nicht mit einer HVDControllerkarte und umgekehrt.
d.Vergewissern Sie sich, dass die Backup-Software und das Betriebssystem mit dem neuen Laufwerk kompatibel sind. Unter www.dlttape.com erhalten Sie aktuelle Informationen zur Kompatibilität.
DWeitere Informationen zur Kompatibilität finden Sie im
SDLT 220 und SDLT 320 Benutzerhandbuch.
Weitere Informationen:
Detaillierte Informationen finden Sie in den Dokumenten auf der im Lieferumfang enthaltenen CD-ROM oder unter www.quantum.com.
Hilfe beim Installieren des Bandlaufwerks:
Wenden Sie sich an Quantum Technischer Support unter 1-888-827-3378.
Überprüfen des Bandlaufwerks
Überprüfung der Funktionsfähigkeit des Bandlaufwerks:
3
a. Verbinden Sie das Netzkabel mit dem Bandlaufwerk, und stecken Sie das andere Ende des Kabels in eine Steckdose mit Wechselstrom.
b. Schalten Sie das Bandlaufwerk mithilfe des Schalters auf der Rückseite des Geräts ein.
Ein-/Aus-Schalter
Erste Schritte • 5
c.Beobachten Sie das POST-Test-Verhalten des Bandlaufwerks sowie die Meldungen, die auf Ihrem Bildschirm angezeigt werden.
DWeitere Informationen über POST-Meldungen finden Sie im SDLT 220 und SDLT 320 Benutzerhandbuch.
d.Schalten Sie das Bandlaufwerk aus, und ziehen Sie den Stecker aus der Steckdose.
SCSI-Setup
Beachten Sie die folgenden Faktoren, wenn Sie Ihr Bandlaufwerk an den SCSI-Bus anschließen:
a.Wenn das Bandlaufwerk das einzige Gerät ist, das an den SCSI-Bus angeschlossen wird, verbinden Sie den im Lieferumfang enthaltenen Abschlusswiderstand mit dem oberen SCSI-Anschluss auf der Rückseite des Laufwerks. (Siehe hierzu die Abbildung auf Seite 7.) Der SCSI-Bus muss an jedem Ende terminiert werden. Der Controller bildet den Abschluss an einem Ende. Das letzte an den Bus angeschlossene Gerät muss terminiert werden, um die SCSI-
Kette zu schließen.
SCSI-ID-Schalter
b. Stellen Sie sicher, dass das letzte Gerät der Kette korrekt terminiert |
|
|
|
|
ist, wenn Sie das Bandlaufwerk einer SCSI-Kette hinzufügen. |
|
|
3 |
|
c. Alle Geräte (extern/intern), die an einen SCSI-Bus angeschlossen |
|
|
|
|
|
|
|
|
|
|
|
|
|
|
sind, müssen eine eindeutige SCSI-ID aufweisen. Ändern Sie |
|
|
|
|
gegebenenfalls mithilfe des SCSI-ID-Schalters auf der Rückseite |
3 |
|
|
|
|
|
|
|
des Laufwerks die SCSI-ID. Die voreingestellte SCSI-ID des Bandlaufwerks ist 3. Diese können Sie gegebenenfalls ändern.
! Verwenden Sie nicht die SCSI-ID 7. Diese wird normalerweise von der SCSI-Karte verwendet.
6 • SCSI-Setup

Anschließen des Bandlaufwerks
Anschluss des Bandlaufwerks:
a.Prüfen Sie vor dem Anschließen des Bandlaufwerks, ob das Bandlaufwerk und der Hostcomputer ausgeschaltet sind.
b.Wenn Sie das Laufwerk an eine Gerätekette anschließen, verwenden Sie den unteren SCSI-Anschluss, um eine Verbindung mit dem Hostcomputer herzustellen, sowie den oberen Anschluss, um eine Verbindung mit zusätzlichen Geräten herzustellen.
Wenn Sie mehrere Geräte an den SCSI-Bus anschließen möchten, schließen Sie zuerst nur das Super DLTtape-Laufwerk an den Hostcomputer an. Hierdurch wird sichergestellt, dass die Kommunikation zwischen Laufwerk und Host korrekt funktioniert, bevor zusätzliche Geräte hinzugefügt werden.
c.Verbinden Sie Laufwerk und Hostcomputer mithilfe des SCSI-Kabels. Prüfen Sie den korrekten Sitz der Verbindungen.
Abschlusswiderstand
3
Verkabelung für
Einzelbandlaufwerk
Abschlusswiderstand
DSiehe „Überprüfen der Installation“ auf Seite 8.
! Sie müssen den SCSI-Bus terminieren, indem Sie einen Abschluss- |
|
widerstand an das letzte Gerät in der Kette anschließen, wie auf Seite 6 |
3 |
beschrieben. |
|
3
Verkabelung für Gerätekette
Anschließen des Bandlaufwerks • 7
Überprüfen der Installation
Führen Sie die folgenden Schritte aus, um zu überprüfen, ob die Installation erfolgreich abgeschlossen wurde:
a.Schalten Sie das Bandlaufwerk und den Hostcomputer ein.
b.Überprüfen Sie gegebenenfalls beim Hochfahren des Computers die BIOS-, Betriebssystemund SCSI-Controller-Informationen, um sicherzugehen, dass der Host das Bandlaufwerk erkennt.
c.Warten Sie, bis das Bandlaufwerk den POST-Test beendet hat.
d.Starten Sie die Backup-Software.
e.Überprüfen Sie, ob die Backup-Software das Bandlaufwerk erkennt.
Durchführen eines Test-Backups
Führen Sie die folgenden Schritte aus, um ein Test-Backup durchzuführen:
a.Legen Sie eine Datenkassette in das Bandlaufwerk ein. Vergewissern Sie sich, dass Sie eine Super DLTtape I™- Datenkassette verwenden, wie in der Abbildung dargestellt.
b.Drücken Sie die Datenkassette ganz in das Laufwerk. Das Band wird automatisch geladen. Die grüne LED leuchtet kontinuierlich auf, wenn das Bandlaufwerk betriebsbereit ist.
c.Führen Sie ein Test-Backup aus.
Wählen Sie mehrere Beispieldateien auf dem Hostcomputer. Führen Sie ein Backup aus, und stellen Sie anschließend die Dateien wieder her. Ist dies ohne Probleme möglich, haben Sie das Bandlaufwerk erfolgreich installiert.
d.Wenn Sie die Kassette entladen möchten, drücken Sie die Auswurftaste auf der Vorderseite des Laufwerks und entnehmen Sie die Kassette.
DInformationen zur Fehlersuche finden Sie im SDLT 220 und
SDLT 320 Benutzerhandbuch sowie in den SDLT 220 und SDLT 320 Produktinformationen.
8 • Überprüfen der Installation
Loading...