


DJM750MK2
DJ MIXER
DJM-750MK2
pioneerdj.com/support/
rekordbox.com
For FAQs and other support information for this product, visit the above site.
Operating Instructions

Contents
How to read this manual
Thank you for purchasing this Pioneer DJ product.
Be sure to read this manual and the “Operating Instructions (Quick Start
Guide)” included with the unit. Both documents include important information that you should understand before using this product.
! In this manual, names of channels and buttons on the product,
menus in the software, etc., are enclosed in square brackets ([ ]).
(e.g. [MASTER] channel, [ON/OFF], [Start]menu)
! Screens, external appearance, and software and hardware specifica-
tions described in this manual are based on the product that is still
under development and may differ from the final specifications.
! Depending on your operating system, the web browser settings,
etc., the procedures described in this manual may differ from actual
operations.
! Note that the language on the software screens explained in this unit
may differ from the language used on actual screens.
Before start
Features ....................................................................................................... 3
Part names and functions
Rear panel ................................................................................................... 4
Control Panel .............................................................................................. 5
Connections
Connecting input terminals ....................................................................... 7
Connecting output terminals .................................................................... 8
Connecting to the control panel ................................................................ 9
Operation
Basic Operation ........................................................................................ 10
Advanced Operations ............................................................................... 11
Types of effects
Types of SOUND COLOR FX effects ........................................................ 14
Types of BEAT FX
...................................................................................... 14
Use rekordbox dj
rekordbox ................................................................................................... 16
Installing rekordbox .................................................................................. 16
Launch rekordbox. .................................................................................... 17
Preparing rekordbox ................................................................................. 17
Adding track files to [Collection]
............................................................ 18
Using the DVS
The settings of rekordbox dj ..................................................................... 19
Setting the control signals ....................................................................... 19
Using applications other than rekordbox dj
Installing the driver software ................................................................... 20
Changing the settings
Setting preferences .................................................................................. 22
Changing the settings ............................................................................. 22
Returning to default settings ................................................................... 22
About the auto standby function ............................................................. 22
About the talk over function..................................................................... 23
Setting utility software .............................................................................. 23
Checking the latest information on the driver software ........................ 24
[Mixer Audio Output] pull-down menu list ........................................ 24
Additional information
Troubleshooting ........................................................................................ 25
Block Diagram .......................................................................................... 27
Trademarks and registered trademarks ................................................. 28
Cautions on copyrights ............................................................................ 28
En
2
Before start
Before start
Features
This unit is a 4-channel DJ mixer that continues the tradition of the DJM
series from Pioneer DJ, the global standard for the disco/club scene.
This unit is equipped with the EQ/fader curve, SOUND COLOR FX, BEAT
FX, and SEND/RETURN functions that were newly developed for the
DJM-900NXS2, which is the permanent equipment in a club. This allows
a broad range of DJ performances. Additionally, it features a design
that offers high sound quality, excellent reliability, and an easy-to-use
panel layout, as well as the ability to connect to a variety of devices such
as USB sound cards that allow connection to PC, Mac, or iOS devices,
providing a high level of support for DJ performances of all kinds.
HIGH SOUND QUALITY
We have worked to achieve improvements and enhancements in sound
output in all digital and analog inputs and outputs. The USB sound
card is compatible with 48 kHz 24-bit high-resolution audio. Moreover,
32-bit high sound quality A/D and D/A converters provide playback with
high fidelity to the original sound. This unit performs 48 kHz 64-bit DSP
mixing processing to enable a lively sound with high resolution, a wide
range, and tight tone, and offers the experience of clear, warm, and
powerful club sound.
EQ & FADER
This unit features the same curve characteristics offered in the EQ curve
and fader curve revised in the DJM-900NXS2, allowing the creation
of natural mixes that sound exactly the way you want. 3 BAND EQ/
ISOLATOR: Equipped with a three-band equalizer that allows the levels
of the high, mid, and low frequency ranges to be adjusted separately. In
addition to changing the tone to suit your preferences, this unit also features an isolator function that mutes the sound in the relevant frequency
range when you rotate a control to the left.
CHANNEL FADER: Equipped with the same characteristics as the channel fader curve of the DJM-900NXS2 that is a permanent equipment in a
club. Select curves suited to quick mixes or smooth long mixes to create
a mix that sounds exactly the way you want.
MAGVEL FADER: Equipped with magnetic crossfader developed by
Pioneer DJ. Highly durable hardware that is built to withstand more
than 10 million operations, and precise operability is perfect for frenetic
scratch playing.
STANDARD LAYOUT
This unit retains the control panel layout of the Pioneer DJ DJM series,
a world standard for DJ mixers. The simple, easy-to-understand control
panel layout makes DJ performance easy, and allows performance in the
same way as the DJM-900NXS2, a standard for use in clubs.
“rekordbox dj” and “rekordbox dvs”
This unit comes with a license key for “rekordbox dj” and “rekordbox
dvs”, which are DJ applications to make tracks on your PC/Mac to be
played with a turn table/Control Vinyl. This unit is equipped with an
internal sound card, enabling you to control “rekordbox dj” and “rekordbox dvs” by only connecting a USB cable to your PC/Mac, without complicated settings. Only the unit, turn table/Control Vinyl, and PC/Mac are
required to use these applications.
rekordbox
rekordbox is composite software that facilitates track management
and DJ performances. The rekordbox DJ performance function is
called rekordbox dj. For details, refer to Use rekordbox dj (page 16 ).
FX
This unit features the acclaimed SOUND COLOR FX, BEAT FX, and
SEND/RETURN found on the DJM-900NXS2 used in many clubs, allowing a variety of DJ performances.
SOUND COLOR FX: Equipped with four types of effects. Simply rotate
the [COLOR] control for each channel to obtain effects and adjust the
sound qualities of the music tracks input to each channel, creating
impromptu performances. Additionally, adjust the [PARAMETER] to
obtain more diverse expression.
BEAT FX: Equipped with eleven types of BEAT FX. Link a range of
effects to BPM to add more variety to a performance. Equipped with
[FX FREQUENCY] that allows you to choose the frequency band to add
effects for greater freedom when performing.
SEND/RETURN: An independent SEND/RETURN section is provided,
allowing an external effects unit to be used at the same time as onboard
FX. In addition to the existing method of using insert-style SEND/
RETURN effects for handling RMX series effects, the RETURN AUX
method of assigning RETURN sound to a channel and thus allowing the
original sound to be combined freely with the effects sound to produce
a more personal sound. In addition to external hardware effects unit,
countless effects applications on iOS devices can be utilized through a
simple, single-USB cable connection.
En
3
Part names and functions
1 4 54 54 54 5 62
ad c
3
7
89
b
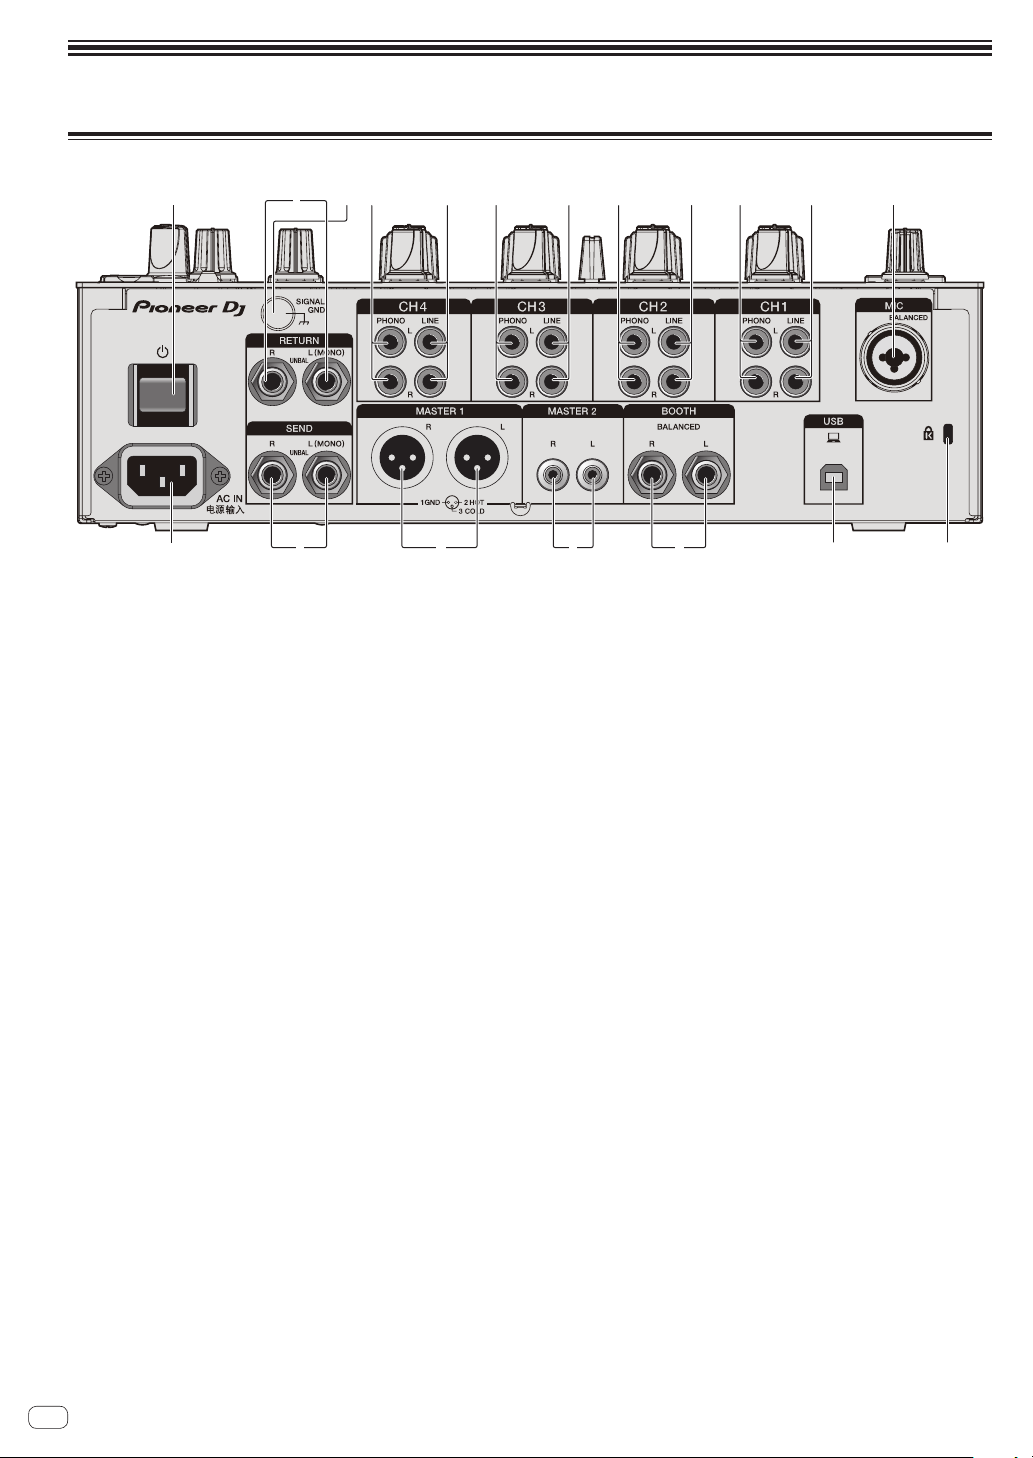
Rear panel
1 u button (page 10 )
Turns this unit on and off.
2 RETURN terminals (page 8 )
Connect to output terminals of an external effects unit. If a cable
is connected to the [L (MONO)] terminal only, the input to the
[L (MONO)] terminal is also input to the [R] channel.
3 SIGNAL GND terminal (page 7 )
Connect a ground wire of an analog player to reduce noise that
occurs when an analog player is connected.
4 PHONO terminals (page 7 )
Connect a phono level (MM cartridge) output device. Do not input
line level signals.
5 LINE terminals (page 7 )
Connect a DJ player or a line level output component.
6 MIC terminal (page 7 )
Connect a microphone.
Phantom power supply is not supported.
7 Kensington security slot
8 USB terminal (page 7 )
Use the USB cable included to connect to a PC.
9 BOOTH terminals (page 8 )
These are output terminals for a booth monitor.
Be sure to use these as balanced outputs.
a MASTER2 terminals (page 8 )
Connect to analog input terminals of a power amplifier, etc.
b MASTER1 terminals (page 8 )
Connect to analog input terminals of a power amplifier, etc.
Be sure to use these as balanced outputs.
Be careful not to accidentally insert the power cord of another
unit.
Do not connect the terminal that can supply phantom power.
c SEND terminals (page 8 )
Connect to input terminal of an external effects unit. If a cable is
connected to the [L (MONO)] terminal only, a monaural audio signal
is output.
d AC IN
Connect to a power outlet with a supplied power cord. Connect the
power cord after all the connections are completed.
Be sure to use the supplied power cord.
En
4

Control Panel
8
3
2
w
7
5
u
v
F
G
H
r
C
E
s
t
y
z
A
D
1
4
6
a
9
B
x
Part names and functions
j
b
c
d
e
f
g
h
i
b
c
d
e
f
g
h
i
b
c
d
e
f
g
h
i
k
b
l
m
c
d
e
f
g g
n
o
h
p
q
i
1 PHONES terminal (page 10 )
Connect headphones.
1/4” stereo phone plugs and 3.5 mm stereo mini plugs are supported.
2 LEVEL control (page 10 )
Adjusts the level of sound output from the headphones.
3 MIXING control (page 10 )
Adjusts the monitor volume balance for the sound of the [MASTER]
channel and the sound of the channel for which the [CUE] button is
pressed.
4 MONO SPLIT, STEREO selector switch (page 10 )
Sets the distribution of the monitor sound output from the
headphones.
5 PARAMETER control (page 11 )
Adjusts the SOUND COLOR FX parameter.
6 SOUND COLOR FX buttons (page 11 )
Turns on and off SOUND COLOR FX.
7 OFF, ON, TALK OVER selector switch (page 11 )
Turns the microphone on and off.
8 Microphone indicator (page 11 )
9 EQ (HI, LOW) controls (page 11 )
Adjusts the sound quality of the microphones.
a MIC LEVEL control (page 11 )
Adjusts the level of sound output from the microphone.
b Input selector switches (page 10 )
Selects the input source for each channel from the components
connected to this unit.
c TRIM control (page 10 )
Adjusts the level of sound input to each channel.
En
5

d EQ/ISO (HI, MID, LOW) controls (page 10 )
Adjusts the sound quality of each channel.
e Channel Level Indicator (page 10 )
Displays the sound level of each channel before it passes through
the channel faders.
f COLOR control (page 11 )
This changes the parameters of the SOUND COLOR FX of the different channels.
g CUE button (page 10 )
Presses the [CUE] button of the channel to be monitored.
h Channel Fader (page 10 )
Adjusts the level of sound output from each channel.
i CROSS FADER ASSIGN (A, THRU, B) selector switch
(page 10 )
Sets the output destination of each channel to [A] or [B].
j Crossfader (page 10 )
Outputs audio signals assigned by the crossfader assign switch corresponding to the curve characteristics selected by [CROSS FADER]
(Crossfader Curve Selector Switch).
k MASTER LEVEL control (page 10 )
Adjusts the audio level output from the [MASTER1] and [MASTER2]
terminals.
l CLIP indicators
Blinks when excessive volume level is output from the [MASTER1] or
[MASTER2] terminals.
— Blinks slowly: indicates that the sound is about to be distorted.
— Blinks fast: indicates that the sound is distorted.
m Master Level Indicator (page 10 )
Displays the level of sound output from the [MASTER1] and
[MASTER2] terminals.
n BOOTH MONITOR control (page 11 )
Adjusts the level of sound output from the [BOOTH] terminal.
o EQ CURVE (ISOLATOR, EQ) selector switch (page 10 )
Sets the function of the [EQ/ISO (HI, MID, LOW)] controls.
p CH FADER ( , , ) selector switch
(page 10 )
Sets the curve characteristics of the channel fader.
q CROSS FADER ( , , ) selector switch
(page 10 )
Sets the curve characteristics of the crossfader.
r SEND/RETURN (1/4” JACK, ) selector switch
(page 12 )
Sets the input and output sources for the SEND/RETURN channel.
You can select the device connected to the [SEND/RETURN] terminals on the rear panel of this unit or the device connected to the
mobile device connection terminal on the operation panel.
s RETURN TYPE (AUX, INSERT) selector switch
(page 12 )
Sets the SEND/RETURN method.
t Mobile device connection terminal (USB port)
(page 9 )
Connect a mobile device.
u USB connection indicator (page 9 )
Lights when a mobile device compatible with the mobile device
connection terminal (USB port) is connected. Blinks when a noncompatible device is connected.
v SEND/RETURN ON/OFF button (page 12 )
Turns SEND/RETURN on and off.
w SEND/RETURN LEVEL control (page 12 )
Adjusts the sound level of SEND/RETURN.
x Main display (page 11 )
Displays the effect name, BPM, effect parameter, etc.
y BEAT c, d buttons (page 11 )
Sets the beat fraction for synchronizing the effect sound.
z TAP button (page 11 )
When the BPM measurement mode is set to [TAP], tap this button
with a finger to input the BPM manually.
A UTILITY (WAKE UP) button (page 22 )
— UTILITY: Press and hold this button to display the [UTILITY]
screen. This button lights when the [UTILITY] screen is displayed. Press this button when the [UTILITY] screen is displayed
to return to the normal screen.
— WAKE UP: Lights up when this unit enters standby mode. Press
this button in standby mode to exit standby mode.
B AUTO/TAP button (page 11 )
Sets the BPM measurement mode.
C FX FREQUENCY button (page 12 )
Sets the range to apply BEAT FX. BEAT FX is applied to the lit button.
D Beat effect selector switch (page 12 )
Sets the BEAT FX type.
E Effect channel selector switch (page 12 )
Sets the channel to apply the BEAT FX and SEND/RETURN to.
F TIME control (page 12 )
Adjusts the BEAT FX time parameter.
G LEVEL/DEPTH control (page 12 )
Adjusts the BEAT FX quantitative parameter.
H Beat effect ON/OFF button (page 12 )
Turns BEAT FX on and off.
Do not pull on the channel fader and crossfader knobs with excessive
force. The knobs have a structure by which they cannot be pulled off
easily. Pulling the knobs strongly may result in damaging the unit.
En
6
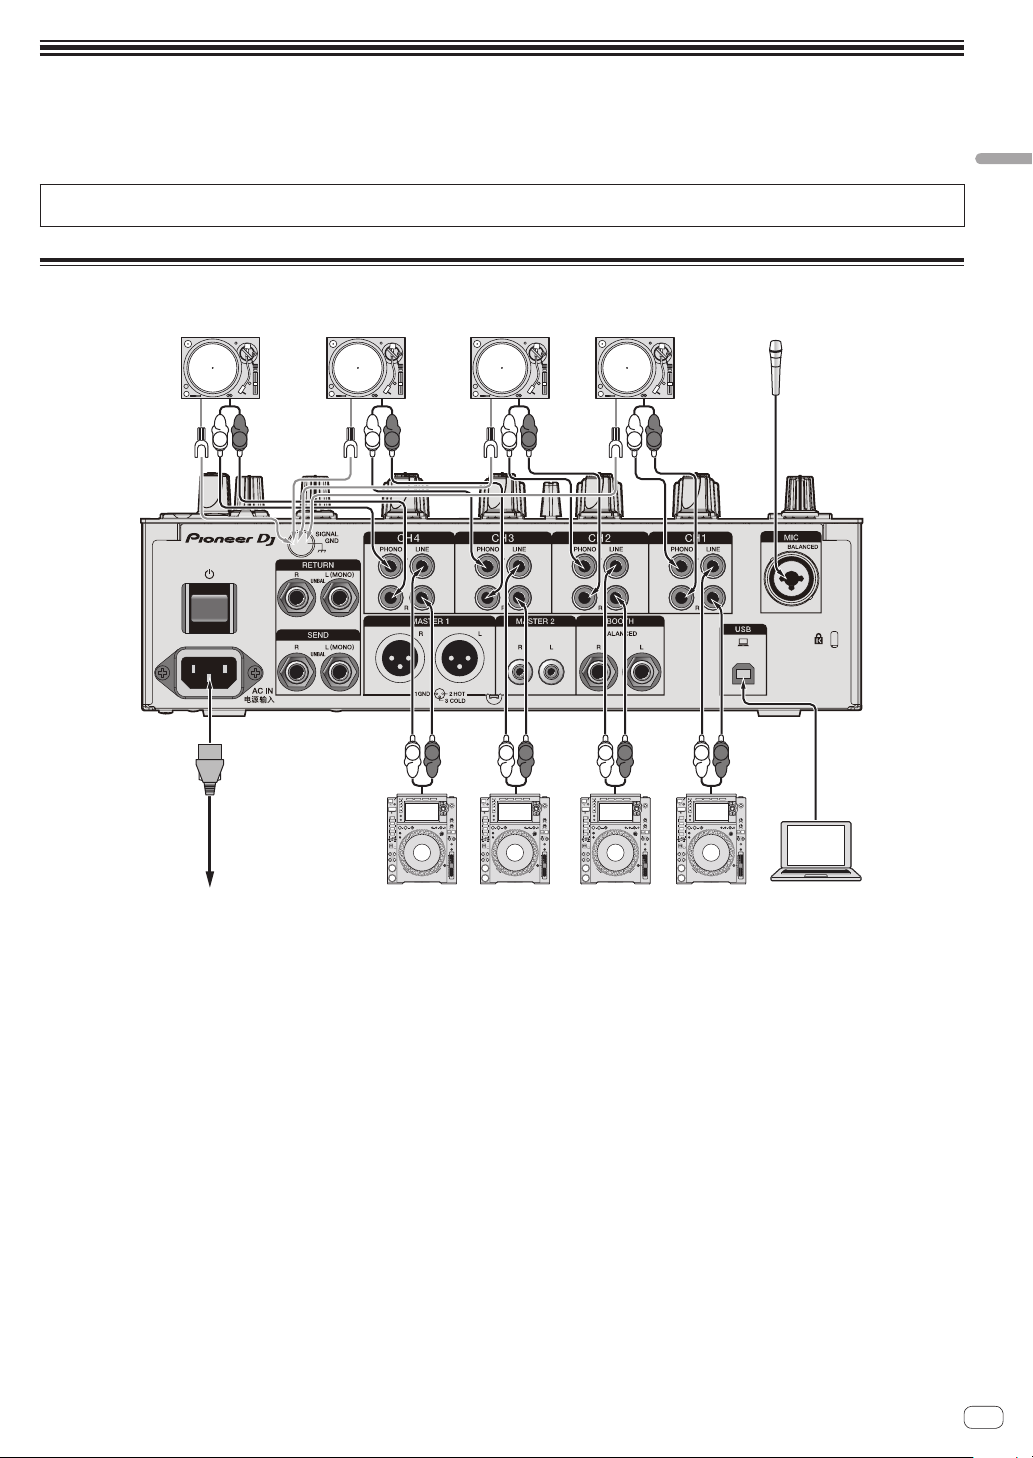
Connections
Pioneer DJ’s DJ playerPioneer DJ’s DJ playerTo power outlet
Analog player Analog player Analog player Analog player
Microphone
Turn off this unit and disconnect the power cord from the power outlet before connecting components or changing the connections.
Connect the power cord to a power outlet after all the connections are completed.
Use the power cord supplied with this unit.
Refer to the operating instructions for the components to be connected.
! Use the USB cable supplied with this unit when connecting this unit to a computer.
! A USB hub cannot be used.
Connecting input terminals
Connections
L
R
L
R
R
L
L
R
L
L
R
R
R
L
R
L
rekordbox
Computer
En
7
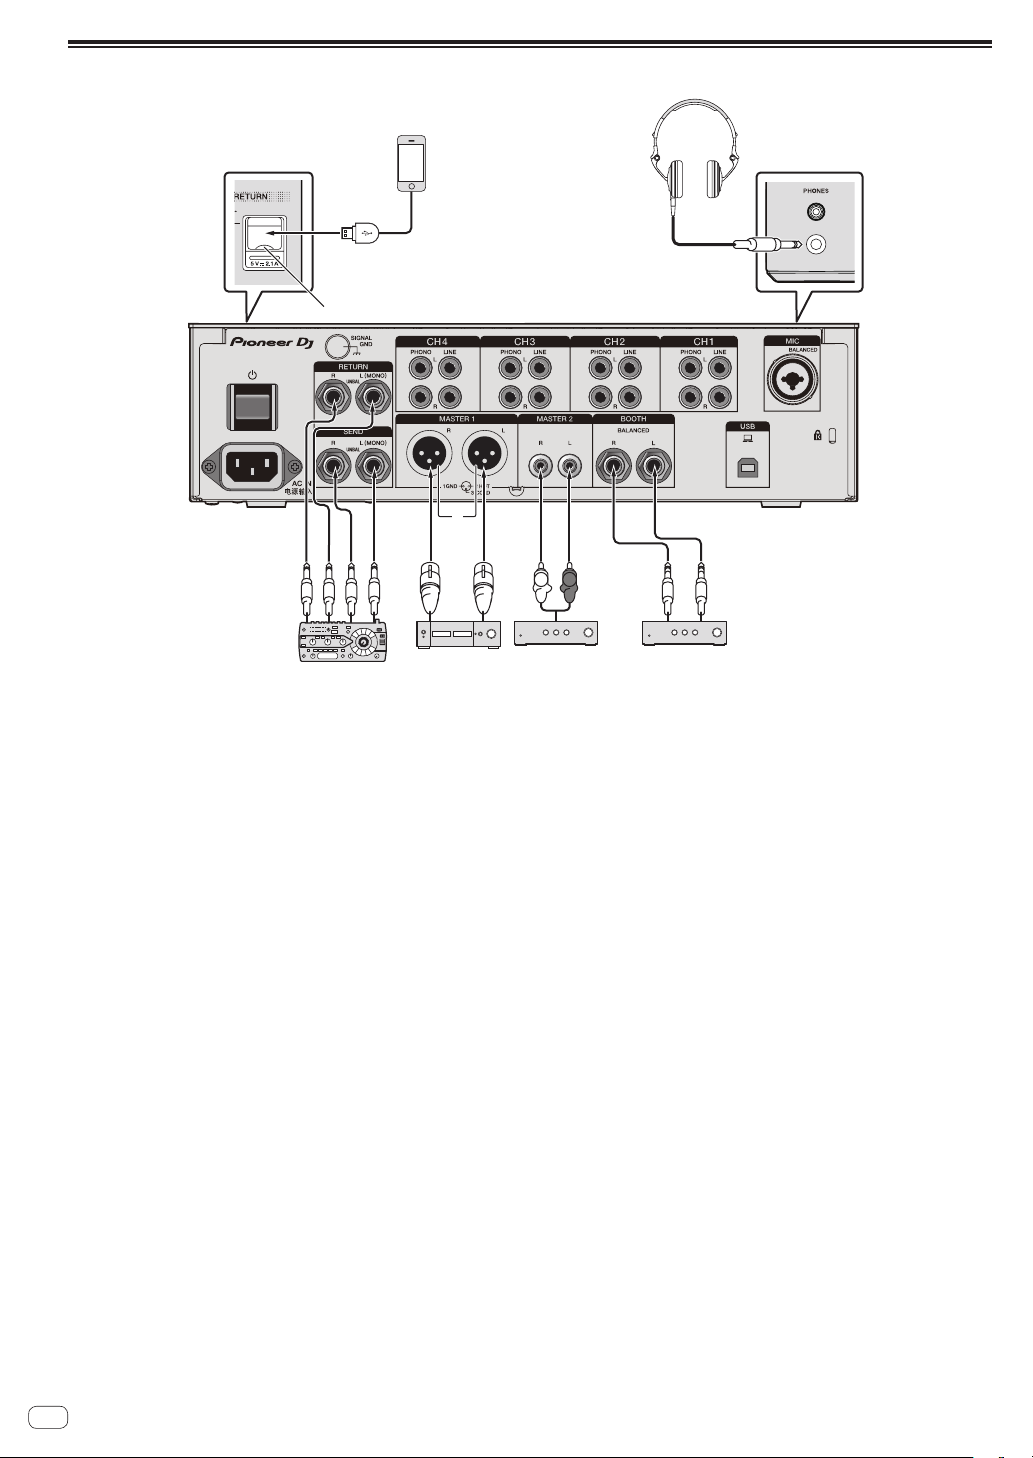
Connecting output terminals
Mobile device
1
Headphones
6
Top panel of unit
USB hubs cannot be used.
USB port covers
External effector
4
L
Power amplifier3Power amplifier
2
R
3
Power amplifier
(for booth monitor)
Rear panel
5
1 Connect an external effector to the [RETURN] terminal (input terminal).
2 Be sure to use the [MASTER1] terminals for a balanced output. If they are connected to an unbalanced input (such as RCA) with an XLR to RCA
converter cable (or converter adapter), etc., the sound quality may be lowered or noise may occur.
Use the [MASTER2] terminals for an unbalanced input (such as RCA).
3 Be careful not to accidentally insert the power cord of another unit to [MASTER1] terminal.
Do not connect the terminal that can supply phantom power to the [MASTER1] terminal.
4 Be sure to use the [BOOTH] terminals for a balanced output. If they are connected to an unbalanced input (such as an RCA or TS input) with an
TRS to RCA converter cable (or converter adapter), TS cable, etc., the sound quality may be lowered or noise may occur.
En
8

Connecting to the control panel
Headphones
1
Mobile device
3
1 Do not push or pull hard on the USB port cover. It could be damaged.
2 When connecting a mobile device, use the cable supplied with the device.
For information on supported mobile devices, access the following Pioneer DJ site below.
pioneerdj.com/support/
3 Connect headphones to either the phone jack or the mini jack. If both jacks are used at the same time, the sound quality and volume may be
lowered.
2
USB hubs cannot be used.
USB port covers
Connections
En
9
 Loading...