


Philips Hospitality TV
Installation manual for
32HFL5007D/10
42HFL5007D/10
47HFL5007D/10
55HFL5007D/10
Version 1.1

Contents |
|
|
1. |
Requirements before starting the installation |
.......................................................................................................... 2 |
2. |
Find out the state of the TV ...................................................................................................................................... |
3 |
3. |
Re-install TV .............................................................................................................................................................. |
4 |
4. |
Installation wizard..................................................................................................................................................... |
6 |
5. |
Channel options ...................................................................................................................................................... |
15 |
a. |
Reordering channels ........................................................................................................................................... |
15 |
b. |
Rename channels................................................................................................................................................ |
17 |
c. |
Hide channels...................................................................................................................................................... |
17 |
6. |
Professional Setup .................................................................................................................................................. |
18 |
7. |
Welcome Logo ........................................................................................................................................................ |
31 |
8. |
Smart Clone ............................................................................................................................................................ |
32 |
9. |
Feature settings...................................................................................................................................................... |
33 |
10. |
RF Download .......................................................................................................................................................... |
34 |
11. |
CSM Menu (Consumer Setup menu)...................................................................................................................... |
35 |
1

1. Requirements before starting the installation
Before starting the installation, make sure that you have everything you need at hand.
Master remote control 22AV8573 |
or |
Guest remote control 22AV1109A |
And
USB stick
You will need the master remote control or the guest remote control to access the menus.
To access the setup menu press the ‘RC5 SETUP’ key, and then press the ‘Home/Menu’ button. For the guest remote control, press the following keys sequential: 3, 1, 9, 7, 5, 3, ‘MUTE’.
Note: The sequence: 3,1,9,7,5,3, ‘MUTE’ will not show the Setup Menu if High Security Menu is enabled. (See. Page 19).
For cloning settings from one TV to another TV, you will need to have a USB stick. This stick needs to be formatted as FAT32 and should be empty.
For the best guest experience check if the software version on the TV is the latest one. This can be done using the Master Remote control by pressing Recall Button and checking on page ‘2.1 - Current Main Software’. This also can be done with the Guest Remote by pressing 1,2,3,6,5,4.
Go to: http://www.support.philips.com/support
Enter the model number and check to confirm you have the latest version available.
Confirm the software version present on TV is identical with the one from website. If not please download the latest version from website, unzip and save on to a USB key The USB key must be format FAT32 and preferably empty to avoid and accidental upload of wrong setting and software. Follow the instruction how to upgrade the software.
If the software version from your TV is identical with the one available on website it is not necessary to upgrade.
If an upgrade is necessary you can upgrade and clone files at the same time automatically. (Upgrade -> Manual Reboot -> Clone) --- See Instant Initial Cloning (page 32)
Initial instant cloning option can only be used if you reinstall TV or TV is out the box.
2

2. Find out the state of the TV
It is important to know if a TV is in ‘virgin mode’ (out of the box) or installed before.
If you can see this screen below, you know that the TV is in ‘virgin mode’ and you can install the set. See chapter 4 of this manual.
If you power on the set and then press the ‘Home’ button on the guest remote, you will see this screen appear, if the TV already has been installed or the wizard was already skipped.
PBS mode on |
PBS mode off |
You can start the installation wizard again by reinstalling the TV as explained in chapter 3 of this manual.
Disable the PBS Mode
Access the setup menu press the ‘RC5 SETUP’ key, and then press the ‘Home/Menu’ button.(For the guest remote control, press the following keys in sequence: 3,1,9,7,5,3, ‘MUTE’).
Go to, PBS Mode select the OFF option and confirm with “OK”. Go back with the arrow keys and select Store settings. Do confirm with “OK”. After restart the TV will have the PBS mode set to OFF.
3

3. Re-install TV
If you want to start an installation from scratch you can always re-install the TV. This can be done by using the option: Re-install TV set.
If PBS is active you can access the setup menu press the ‘RC5 SETUP’ key, and then press the ‘Home/Menu’ button (For the guest remote control, press the following keys in sequence: 3,1,9,7,5,3, ‘MUTE’) , then go to TV Setup, confirm with “OK”. This menu will appear:
If the PBS Menu is disabled, you can access the Setup menu with the guest remote control Select “Setup” and press “OK”.
Select the option TV settings for this menu:
4
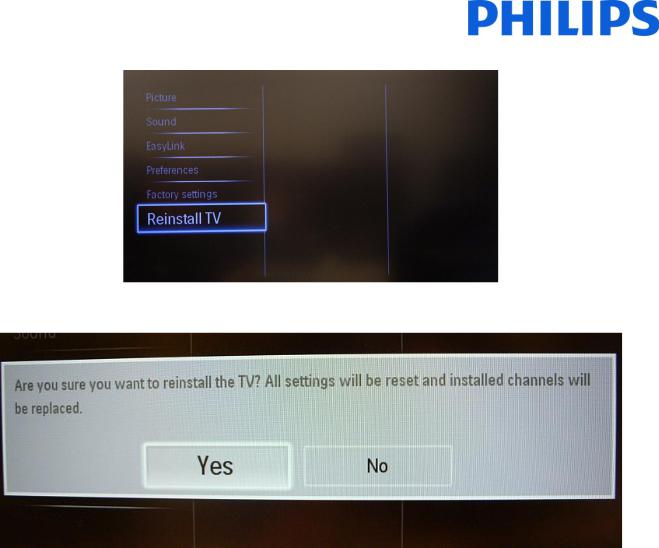
Press “OK” to access the sub-menu, navigate to “Reinstall TV”.
Press “OK” to reinstall the TV set.
If all is correct select “YES” and press “OK”.
After this operation the TV will power off and on and display the installation wizard.
Note: All settings are at default values and no channel plan is available.
After reinstalling, the PBS Setup menu will keep the PBS Mode, Room ID and PBS Setup menu and reset all other parameters to default values.
5

4. Installation wizard
When you turn on the TV for the first time, or you have reinstalled the TV, you should see the following screen.
Here you will need to select your preferred language.
After this, you will need to select the country. Depending on the country selection, some pre-defined settings will be activated, because of local broadcast requirements. Example: digital/analog channels could be disabled; reordering and deleting channels can in some cases not be possible.
Note: If you are experiencing some issues after selecting your country, please select ‘Others’ in the menu.
6

The next step is to select ‘Wall mounted’ or ‘On a TV stand’. This option changes some settings for the audio and image of the TV.
Now you can select the visual and hearing impaired options. If you select ‘On’, your TV will automatically turn on settings to help visual and hearing impaired people. THE MOST COMMON OPTION IS TO TURN THIS FUNCTION OFF.
On the following page we can start the channel installation wizard. You can also press “Back” to correct any previous setting. We recommend you only select your preferred options as this will result in longer installation times.
7

For the channel installations, select ‘Install TV channels’ and press ‘OK’
Then you can select ‘Continue’ and press ‘OK’ again.
Here you can select the type of channels you would like to install and what preference you will use.
It is advisable to check the settings before starting the search.
8

Note: If all options are disabled you have to go down to the Digital channels option and set the digital channels to ON.
A screen is displayed to make changes to set the channel list/map configuration: [Symbol rate mode]: Automatic TV will use the preset Symbol rate (6.900/6.875)
Manual Option to set Symbol rate 1 and Symbol rate 2 [Symbol rate 1]: 0.000 (to set)
[Symbol rate 2]: 0.000 (to set)
The “Frequency scan” contains two options:
-“Quick”: this is a fast method to search channels but it might skip some channels (depending on the network).
-“Full”: the scan will search on all frequencies and will store all channels available. This is the safe method if you don’t know the network parameters, but it takes more time.
9
Frequency step size has two options:
1.“1 MHz” – With Full scan, the step size to search for channels is 1 MHz. The scan will take more time but will find also channels broadcasted not according to the channel grid.
2.“8 MHz (default)” – With Full scan, the step size to search for channels is 8 MHz. The scan will be shorter in time but some channels which are not in the expected channel grid (local head-end) will not be found.
When details of the local network are known they can be filled out in this menu. If the details are not known leave everything as the default values.
Digital channels – Allows the TV to search for digital channels. If the TV doesn’t find any DVB channels this means the option is set on OFF. This option is available only if you select country “Other”. For most cases this option is replaced by Analog channels option (On - OFF).
LCN sorting: With the LCN function (Logical Channel Number), the channel list is ordered automatically. This function can be disabled and the TV will not change channel order according to the LCN table.
Note: Only applicable if this is supported on the local network.
The “Reset” option will reset the search settings to default. After you have checked or changed settings, you can select “Done” and select “Start” to start the channel search.
10
 Loading...