


rp-bts50
Table of contents
 Loading...
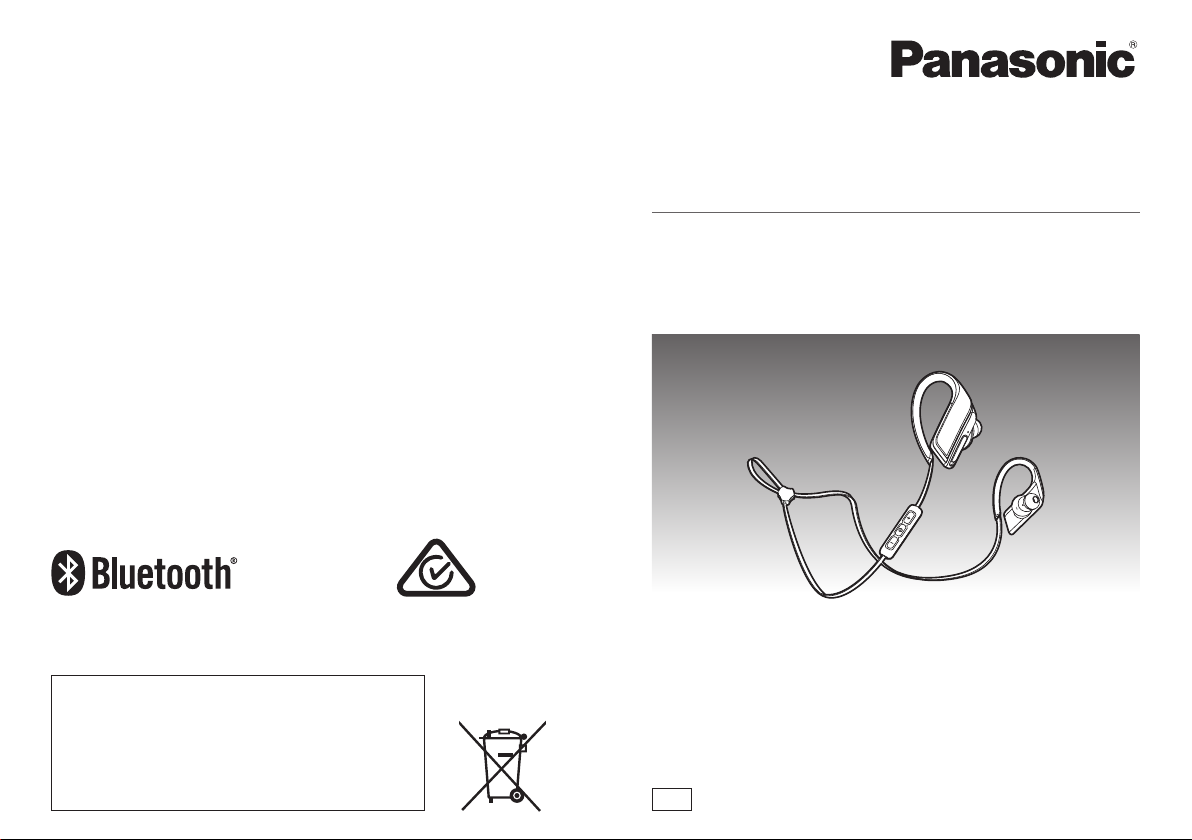
Operating Instructions
Digital Wireless Stereo Earphones
Model No. RP-BTS50
SQW0575
E
EU
Manufactured by:
Panasonic Corporation
Kadoma, Osaka, Japan
Importer for Europe:
Panasonic Marketing Europe GmbH
Panasonic Testing Centre
Winsbergring 11, 22525 Hamburg, Germany

2
Table of
contents
Before use
Dear customer
Thank you for purchasing this product.
Please read these instructions carefully
before using this product, and save this
manual for future use.
(Important) About water resistance
• Specifications for this unit are equivalent of IPX5 of IEC 60529.
■
About the IPX5 (liquid ingress protection level against water jet)
This unit is compatible to operate after water jet from nozzles approximately
12.5 L/min of room temperature tap water from every direction approximately
3 m from this unit for 3 minutes. Supplied USB charging cord is not water
resistant.
Water resistance is not guaranteed under all conditions.
■
Cautions for using around water
Conform to following. Improper use may result in a malfunction.
• Securely close the USB lid.
• Do not open or close the USB lid with wet hands or when water droplets are
on this unit. Doing so may cause malfunction such as terminal rusting with the
water droplets.
• Do not connect and use a USB charging cord.
• Do not pour soap water or detergent, or immerse in water.
• Remove any hair, lint, sand, dust, etc., that may be attached to the rubber seal
on the USB lid before closing.
• Leaving the device with water droplets in a cold region may result to
malfunction such as the USB lid stuck closed.
• The sound may become smaller or distorted when water is accumulated in the
earphones or microphone of this unit. Wipe this unit with dry soft cloth.
• When water enters inside this unit, stop using this unit, and contact the nearest
Dealer or Service Centre. Malfunction due to exposure to water by improper
handling by the customer will not be covered by the warranty. Supplied USB
charging cord is not water resistant.
Accessories ........................................ 2
(Important) About water resistance..... 2
Part names ......................................... 3
Charging ............................................. 3
Turning the power on/off ..................... 3
Connecting a Bluetooth
®
device ......... 4
How to wear the earphones................ 4
Listening to music ............................... 5
Making a phone call............................ 5
Useful functions .................................. 6
Restoring to the factory settings ......... 7
Copyright, etc. .................................... 7
Maintenance ....................................... 7
Safety precautions .............................. 8
About Bluetooth
®
................................ 9
Specifications ..................................... 9
Troubleshooting guide ...................... 10
To remove the battery when
disposing of this unit ..................... 11
Preparation
Operation
Other
Please check and identify the supplied
accessories.
1 USB charging cord
1 Carrying case
1 Earpieces set (L, S)
For the United Kingdom and Ireland
customers
Sales and Support Information
Customer Communications Centre
• For customers within the U.K.:
0344 844 3899
• For customers within Ireland:
01289 8333
• Monday - Friday 9:00am - 5:00pm
(Excluding public holidays).
• For further support on your product,
please visit our website:
www.panasonic.co.uk
Direct Sales at Panasonic U.K.
• Order accessory and consumable
items for your product with ease and
confidence by phoning our Customer
Communications Centre -
Monday - Friday 9:00am - 5:00pm
(Excluding public holidays).
• Or go on line through our Internet
Accessory ordering application at
www.pas-europe.com
• Most major credit and debit cards
accepted.
• All enquiries transactions and
distribution facilities are provided
directly by Panasonic U.K.
• It couldn’t be simpler!
• Also available through our Internet is
direct shopping for a wide range of
finished products. Take a browse on
our website for further details.
Accessories
3
1
2
3
4
5 7
9
10
11
12
13
14
2
86
The product illustrations may differ from
the actual product.
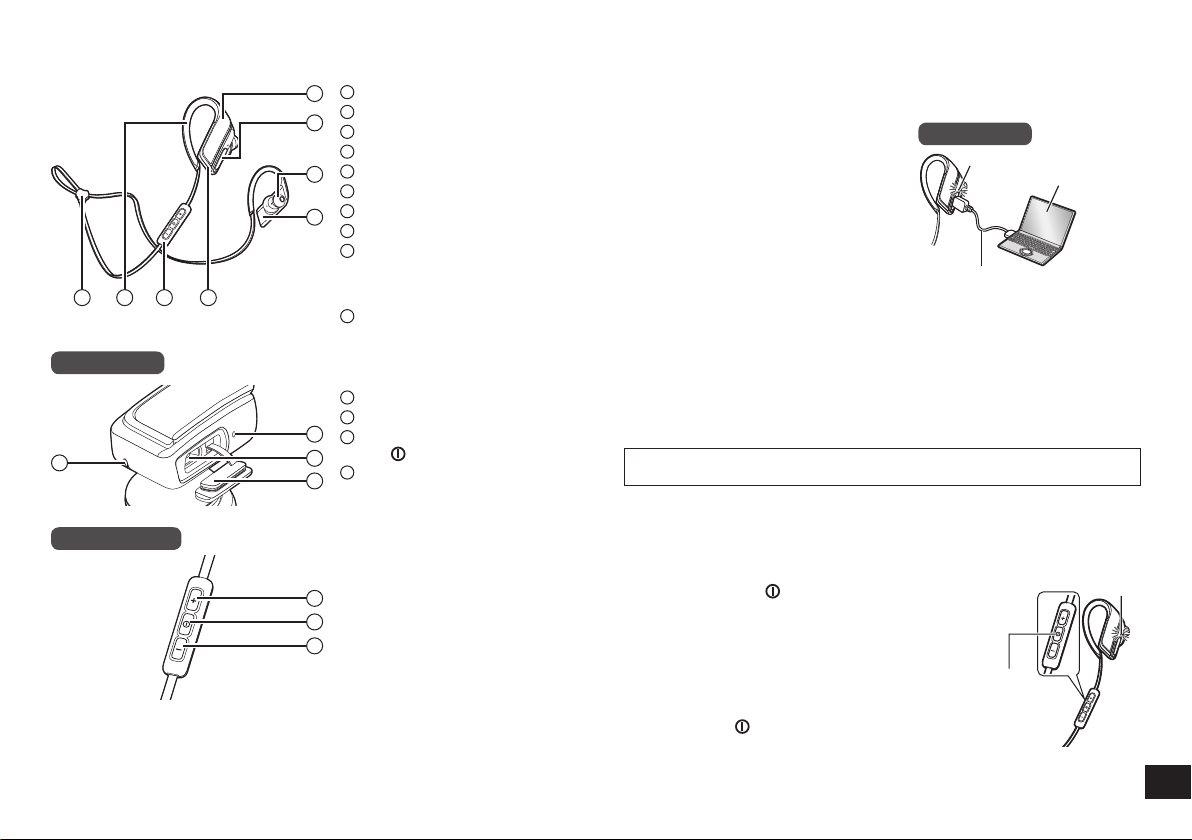
Part names
The rechargeable battery (installed in the unit) is not charged initially. Charge
the battery before using the unit.
1
Connect this unit to a computer
using the USB charging cord
• Within approximately 3 seconds after
the connection is established, the LED
on the right earphone will light in red.
• The LED lights in red when charging
is in progress. When charging is
completed, the LED will go out.
• Charging will take approximately
1.5 hours from empty state to fully
charged. (Quick charging time
for 70 minutes operation: Approx.
15 minutes)
Right earphone
Computer
LED
USB charging cord (supplied)
■
Note
• The Bluetooth
®
feature cannot be used when this unit is connected to a computer
using the USB charging cord.
• Charge in a room temperature between 10 °C and 35 °C. Outside of this range
of temperatures, charging may stop.
• The power cannot be turned on while charging.
• Do not use any other USB charging cords except the supplied one.
Caution: Use only the supplied USB charging cord when connecting to a
computer.
Charging
1
Press and hold for approximately
3 seconds
• A beep will sound and the LED on the right
earphone will blink.
Power
LED
To turn the power off
• Press and hold
for approximately 3 seconds.
A beep will sound and the power will be turned off.
■
Note
• When the unit is not operated for approximately 5 minutes, the power will
automatically turn off. (See “Auto power off” (→ P. 6))
Turning the power on/off
1
Right earphone
2
USB lid
3
Earpiece
4
Left earphone
5
Cord adjuster
6
Clip
7
Remote controller
8
LED illumination
9
LED indicator light*
• The number of blinks or colour
notifies the status of the unit.
(* hereafter referred to as “LED”)
10
Charging terminal (DC IN)
• Open the USB lid and connect
the USB charging cord
(supplied) to this terminal when
charging. (See “Charging”)
11
Microphone
12
Volume +/Next
13
Power/Pairing/Play/Pause/
Call
14
Volume –/Previous
■
Note
• Do not use any other USB
charging cords except the
supplied one.
• When using the unit, do not cover
the right housing with the palm
of your hand. The Bluetooth
®
connection may be blocked.
Remote controller
Right earphone
4
To establish a wireless connection, register the unit with Bluetooth
®
compatible
devices.
Preparation on the Bluetooth
®
device
• Turn on the power, and enable the Bluetooth
®
feature.
• Place the device within 1 m from the unit.
• Check the device operation in its operation instructions, as required.
Power on for the first time
1
Turn on the unit
• The unit will start searching
for the Bluetooth
®
device to
connect to, and the LED on the
right earphone will blink in blue
and red alternately. (Only one
operation after purchase)
2
When the unit (“RP-BTS50”)
is detected by the Bluetooth
®
device, select it
• The MAC address (e.g.,
6C:5A:B5:B3:1D:0F) may be
displayed before the device
name is displayed.
• If prompted for a passkey, input
“0000 (four zeros)”.
• If the Bluetooth
®
profile selection
screen appears, select the
“A2DP” profile. If “A2DP” is not
supported or if you want to just
use phone calls, select the “HSP”
or “HFP” profile. (For details
on profiles, see “Listening to
music” and “Making a phone call”
(→ P. 5))
3
Check the connection with
the Bluetooth
®
device on the
unit
• First the LED on the right
earphone lights in blue and
repeats on and off. When the
connection is established,
blinking pattern will change.
Connection after the second
time
<Connect the same Bluetooth
®
device>
When the unit is turned on, it will
search for the previously setup
Bluetooth
®
device and automatically
start connecting to it. First the LED
on the right earphone lights in blue
and repeats on and off. When the
connection is established, blinking
pattern will change.
<Connect a different Bluetooth
®
device>
Disable the Bluetooth
®
feature on the
previously connected device. Check
that the unit is turned off. Press and
hold
for approximately 5 seconds.
A beep will sound. The unit will start
searching for other Bluetooth
®
device.
The LED on the right earphone will
blink in blue and red alternately.
Continue steps 2 and 3.
Connecting a Bluetooth
®
device
■
Note
• If connection to a device is not
established within approximately
5 minutes, the unit will be turned off.
Start from step 1 again.
• 2 or more Bluetooth
®
devices cannot
be connected to the unit at the same
time.
• You can pair up to 8 devices with
this unit. If a 9th device is paired, the
device with the oldest connection will
be replaced. To use it, pair it again.
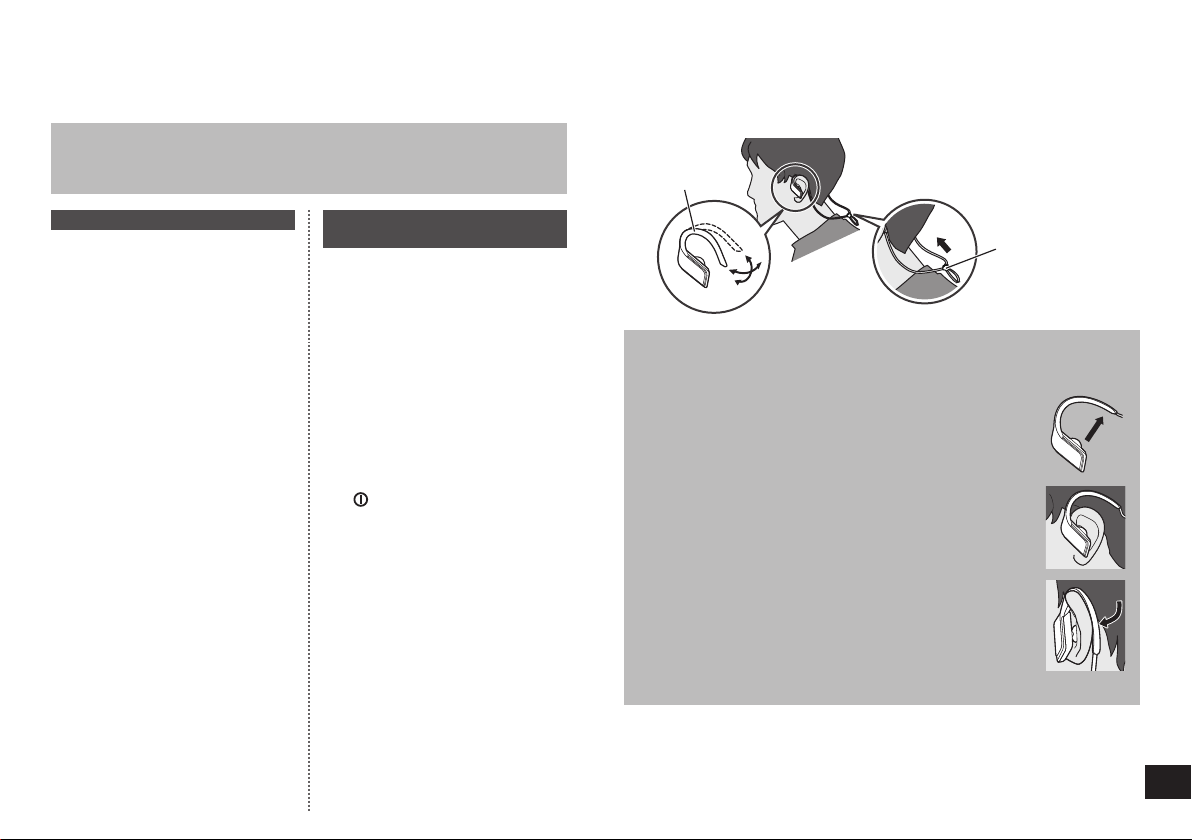
Check the sides (L and R), then wear the earphones from behind your neck and
hook over both ears, and bend the clip to adjust. Move the cord adjuster towards
the back of your head.
Cord adjuster
Clip
Adjusting the clips for your ears
Follow the steps below for the first time to ensure the most comfortable and
secure fit.
1
Expand the clip by bending the clip away from
the earphone
2
Place the earphone on your ear
3
Bend the clip around your ear
4
Adjust another earphone
How to wear the earphones
Loading...