


rf-d10eg.book Page 1 Friday, January 3, 2014 4:54 PM
Thank you for purchasing this product.
For optimum performance and safety, please read these instructions carefully.
Please keep this manual for future reference.
Wir möchten Ihnen dafür danken, dass Sie sich für dieses Gerät entschieden haben.
Um eine optimale Leistung und Sicherheit zu gewährleisten, lesen Sie bitte diese Bedienungsanleitung sorgfältig durch. Bewahren Sie diese Anleitung auf, um sie später zum Nachschlagen griffbereit zu haben.
La ringraziamo per aver acquistato questo prodotto.
Per ottenere le prestazioni migliori e per la sicurezza, leggere attentamente queste istruzioni.
Conservare questo manuale per future consultazioni.
Nous vous remercions pour votre achat de cet appareil. Pour en obtenir des performances optimales et pour votre sécurité, veuillez lire attentivement le présent manuel. Conservez ce manuel.
Dank u voor de aankoop van dit product.
Gelieve deze gebruiksaanwijzing aandachtig door te lezen voor een optimale prestatie en een veilig gebruik van het systeem.
Bewaar deze gebruiksaanwijzing.
Tak fordi du har valgt dette produkt.
Læs venligst denne betjeningsvejledning omhyggeligt, således at optimal ydelse og sikkerhed opnås.
Gem vejledningen til senere brug.
Děkujeme za zakoupení tohoto výrobku.
Pro dosažení optimálního výkonu a z bezpečnostních důvodu si pečlivě přečtěte tyto pokyny.
Uschovejte si prosím tento návod k obsluze.
Tack för valet av denna apparat.
Läs igenom bruksanvisningen noga för bästa resultat och för säkerhets skull.
Spara denna bruksanvisning.
Takk for at du kjøpte dette produktet.
For optimal ytelse og sikkerhet, bør du lese denne bruksanvisningen nøye.
Ta vare på denne bruksanvisningen for fremtidig referanse.
Downloaded |
printing |
|
|
from |
|
|
www |
|
. |
|
vandenborre |
|
. |
|
be |
Operating Instructions
Bedienungsanleitung
Istruzioni per l’uso
Mode d’emploi
Gebruiksaanwijzing
Betjeningsvejledning
Návod k obsluze
Bruksanvisning
Bruksanvisning
DAB-FM Radio
DAB FM-Radio
Radio DAB-FM
Radio DAB-FM
DAB-FM radio
DAB-FM-radio
Rádio DAB-FM
DAB-FM-radio
DAB-FM-radio
Model No. RF-D10
|
|
|
EG |
|
|
RQTN0173 |
|||
|
|
|
|
||||||
|
|
|
|
|
|
|
|
|
|
|
|
|
|
|
|
|
|
|
|
|
|
|
|
|
|
|
|
|
|
|
|
|
|
|
|
|
|
|
|

rf-d10eg.book Page 2 Friday, January 3, 2014 4:54 PM
Safety precautions
WARNING!
Unit
•To reduce the risk of fire, electric shock or product damage,
–Do not expose this unit to rain, moisture, dripping or splashing.
–Do not place objects filled with liquids, such as vases, on this unit.
–Use only the recommended accessories.
–Do not remove covers.
–Do not repair this unit by yourself. Refer servicing to qualified service personnel.
AC mains lead
•The mains plug is the disconnecting device. Install this unit so that the mains plug can be unplugged from the socket outlet immediately.
CAUTION!
Unit
•This unit may receive radio interference caused by mobile telephones during use. If such interference occurs, please increase separation between this unit and the mobile telephone.
Battery
•Danger of explosion if battery is incorrectly replaced. Replace only with the type recommended by the manufacturer.
•When disposing the batteries, please contact your local authorities or dealer and ask for the correct method of disposal.
•Do not heat or expose to flame.
•Do not leave the battery(ies) in a car exposed to direct sunlight for a long period of time with doors and windows closed.
•Do not break open or short-circuit the battery.
•Do not charge the alkaline or manganese battery.
•Do not use the battery if the cover has peeled off.
•Remove the battery if you do not use the unit for a long period of time or if the unit is to be powered exclusively by AC power. Keep in a cool, dark area.
Small objects
•The knobs (e.g., [VOLUME] knob) can come off when pulled hard. To prevent children from swallowing the knob, do not pull it off.
RQTN0173
2
Downloaded |
printing |
||||||
|
|
||||||
|
from |
|
|
|
|
|
|
|
|
|
|
|
|
|
|
|
www |
|
|
|
|||
|
|
. |
|
|
|
||
|
|
|
|
|
|
|
|
|
|
|
|
|
|
|
|
Supplied accessories |
|
|
|
|
vandenborre |
||
|
|
|
|
|
|
|
|
Check and identify the supplied accessories. |
|
. |
|||||
1 AC mains lead |
|
||||||
|
|
|
|
|
|
be |
|
|
|
|
|
|
|
|
|
Table of contents
Safety precautions. . . . . . . . . . . . . . . . . . . . . . . . . . 2
Supplied accessories . . . . . . . . . . . . . . . . . . . . . . . 2
Overview of controls . . . . . . . . . . . . . . . . . . . . . . . . 3
Power sources. . . . . . . . . . . . . . . . . . . . . . . . . . . . . 4
Getting started. . . . . . . . . . . . . . . . . . . . . . . . . . . . . 4
DAB . . . . . . . . . . . . . . . . . . . . . . . . . . . . . . . . . . . . . 4
FM radio . . . . . . . . . . . . . . . . . . . . . . . . . . . . . . . . . . 5
System settings . . . . . . . . . . . . . . . . . . . . . . . . . . . . 6
Troubleshooting. . . . . . . . . . . . . . . . . . . . . . . . . . . . 6
Specifications . . . . . . . . . . . . . . . . . . . . . . . . . . . . . 7
This product incorporates the following software:
(1)The software developed independently by or for Panasonic Corporation,
(2)The software owned by third party and licensed to Panasonic Corporation, and/or
(3)Open source software
The software categorized as (3) is distributed in the hope that it will be useful, but WITHOUT ANY WARRANTY, without even the implied warranty of MERCHANTABILITY or FITNESS FOR A PARTICULAR PURPOSE. Please refer to the detailed terms and conditions thereof shown below.
This software is copyright 2008 Simon Tatham.
Permission is hereby granted, free of charge, to any person obtaining a copy of this software and associated documentation files (the “Software”), to deal in the Software without restriction, including without limitation the rights to use, copy, modify, merge, publish, distribute, sublicense, and/or sell copies of the Software, and to permit persons to whom the Software is furnished to do so, subject to the following conditions:
The above copyright notice and this permission notice shall be included in all copies or substantial portions of the Software.
THE SOFTWARE IS PROVIDED “AS IS”, WITHOUT
WARRANTY OF ANY KIND, EXPRESS OR IMPLIED,
INCLUDING BUT NOT LIMITED TO THE WARRANTIES
OF MERCHANTABILITY, FITNESS FOR A
PARTICULAR PURPOSE AND NONINFRINGEMENT. IN
NO EVENT SHALL THE COPYRIGHT HOLDERS BE
LIABLE FOR ANY CLAIM, DAMAGES OR OTHER
LIABILITY, WHETHER IN AN ACTION OF CONTRACT,
TORT OR OTHERWISE, ARISING FROM, OUT OF OR
IN CONNECTION WITH THE SOFTWARE OR THE USE
OR OTHER DEALINGS IN THE SOFTWARE.
2

rf-d10eg.book Page 3 Friday, January 3, 2014 4:54 PM
Overview of controls
Front view
12
3
K
J
9 8 7 6
AStandby/on switch [1]
Press to switch the unit from on to standby mode or vice versa. In standby mode, the unit is still consuming a small amount of power.
BSelect FM or DAB radio
CDirect preset buttons
DAdjust the volume
ESelect desired frequency in manual tuning View available options
FConfirm an option
GView available menu
HAuto tuning for FM stations
IView available information
JDisplay panel
KSpeaker (monaural)
The speaker does not have magnetic shielding. Do not put this unit near TVs, PCs or other equipment easily influenced by magnetism.
|
Downloaded |
printing |
|
|
|
|
|
|
|
|
from |
|
|
|
|
|
www |
|
|
|
|
|
. |
|
|
|
ENGLISH |
vandenborre |
|
|
|
|
. |
|
|
|
|
be |
|
|
|
|
|
|
|
Rear view |
|
|
|
|
L |
|
|
|
4 |
|
M |
|
|
|
|
|
|
|
|
|
N |
|
|
|
|
O |
|
|
|
P |
|
|
|
5
L Antenna
Extend the antenna, adjust the length, angle and direction for best reception.
Signal strength indicator
(blinking) |
|
Weak |
Strong |
MHandle
NHeadphones jack
Plug type: Ø 3.5 mm stereo (not supplied)
–Excessive sound pressure from earphones and headphones can cause hearing loss.
–Listening at full volume for long periods may damage the user’s ears.
O AC IN terminal |
|
P Battery compartment |
RQTN0173 |
|
3
3
rf-d10eg.book Page 4 Friday, January 3, 2014 4:54 PM
Power sources
Using the household mains socket
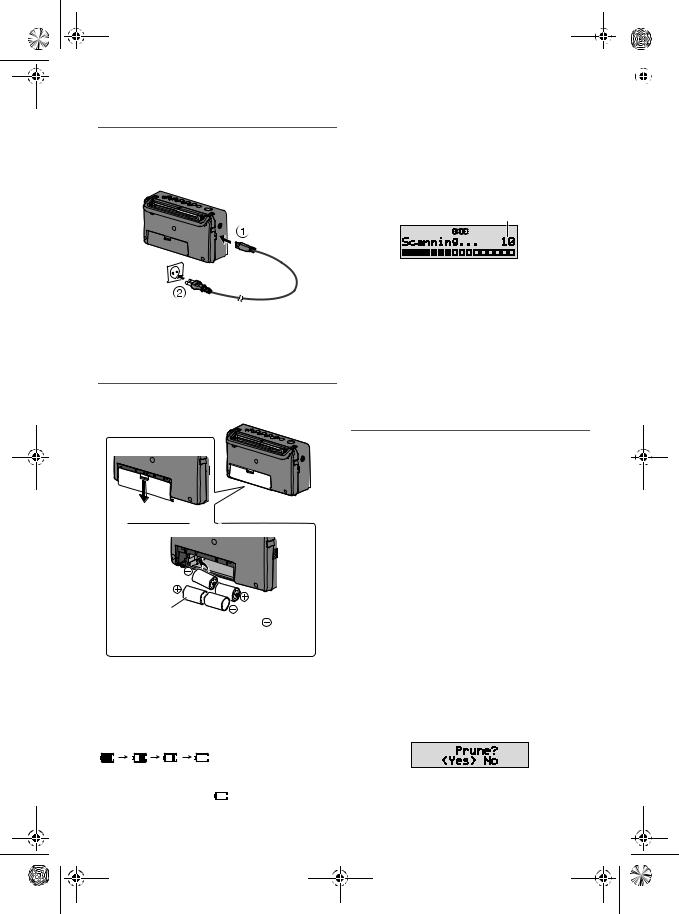
Connect the AC mains lead firmly to the unit and the household mains socket.
Note:
•Do not use an AC mains lead from other equipment.
•This unit consumes a small amount of power when it is in standby mode. Disconnect the power supply if you do not use the unit.
Using the batteries (not supplied)
1
|
4 |
2 |
|
3 |
|
R14/LR14, C |
|
|
|
|
|
|
|
Press towards while |
|
|
inserting the battery. |
Use alkaline or manganese batteries.
Install the batteries so that the poles (+ and –) align with those in the unit.
This unit will use the batteries as the power source when you disconnect the AC mains lead. The battery indicator will light up.
The battery indicator shows the battery levels.
Note:
RQTN0173 |
• |
The unit switches on after you insert the batteries. |
|
||
|
• |
When the battery indicator “ ” begins flashing, replace all |
|
|
4 of the batteries. |
|
• |
After the battery indicator flashes for 10 seconds, the unit |
4will switch off automatically.
Downloaded |
printing |
||||||
|
|
||||||
|
from |
|
|
|
|||
|
|
|
|
|
|
||
|
|
www |
|
|
|
||
|
|
. |
|
|
|
||
|
|
|
|
|
|
|
|
|
|
|
|
|
|
|
|
Getting started |
|
|
|
|
vandenborre |
||
|
|
|
|
|
|
|
|
1 Extend the antenna. |
|
. |
|||||
2 Press [1] to switch on the unit. |
|
||||||
|
|
|
|
|
|
be |
|
The first time you switch on the unit, it will enter DAB mode and automatically scan for stations. It sets the time and date (if data is available) and starts playing the first station it finds.
Number of stations found
Note:
In standby mode, the unit shows the time and date (only when the unit is powered by AC).
DAB
DAB (Digital Audio Broadcasting) is a procedure of broadcasting the radio digitally. It gives less interference and better sound quality.
This unit supports DAB in “BAND III” bands.
DAB operation
The first time you enter DAB mode, or if the station list is empty, the unit will start the full scan and memorise the stations.
You can perform the full scan procedure when there is a new station or a station becomes available.
1 Press [BAND] to select “DAB”.
2Press [MENU] to select “Full scan” and then press [ENTER] to start full scan.
To cancel, press [MENU].
█ Remove unavailable listed stations
This unit indicates those stations that are closed or no longer available with a question mark in front of the station name. You can remove these stations from the station list.
1Press [MENU] and then turn [ TUNE/SELECT
  ] to select “Prune”.
2 Press [ENTER].
3Turn [ TUNE/SELECT
  ] to select “Yes” and then press [ENTER].
To cancel, select “No”.
4

rf-d10eg.book Page 5 Friday, January 3, 2014 4:54 PM
Listening to a station
1Turn [ TUNE/SELECT
  ] to select a station from the station list.
2 Press [ENTER] to tune to the selected station.
Note:
“ ” indicates a secondary service station. Secondary service stations are always listed next to their primary station in the station list.
Presetting stations
You can preset up to 10 stations into the direct preset buttons.
1While listening to a station, press and hold the desired direct preset button ([1] to [10]).
Example: press and hold [2] to store current station into preset 2.
2 Press [ENTER] to preset the station.
█ Listening to a preset station
Press the direct preset button ([1] to [10]) to listen to the preset station.
|
|
Downloaded |
printing |
|
|||||||||
|
|
|
|
|
|
||||||||
|
|
|
|
from |
|
|
|
|
|
|
|
||
|
|
|
|
|
|
|
|
|
|
|
|||
|
|
|
|
|
www |
|
|
|
|
||||
|
|
|
|
|
|
|
. |
|
|
|
|
||
|
|
|
|
|
|
|
|
|
|
|
|||
|
|
|
|
|
|
|
|
|
|
|
|
|
|
FM radio |
|
|
|
|
|
|
vandenborre |
||||||
|
|
ENGLISH |
|
|
|
|
|
|
|
||||
1 |
Press [BAND] to select “FM”. |
|
|
|
|
|
|
|
|
. |
|||
|
|
|
|
|
|
|
|
|
|||||
2 |
|
|
|
|
|
|
|
|
|
|
|
|
|
Press [AUTOTUNE] to tune to a station. |
|
|
|
|
|
|
|
|
|
be |
|||
|
|
|
|
|
|
|
|
|
|
|
|
|
|
|
|
|
|
|
|
|
|
|
|
|
|
|
|
The unit stops tuning when it finds a station.
Press [AUTOTUNE] again to tune to the next station.
Manual tuning
Turn [ TUNE/SELECT
  ] to tune to the required station.
Presetting stations
You can preset up to 10 stations into the direct preset buttons.
The first five stations are preset with a default frequency for your convenience.
1While listening to a station, press and hold the desired direct preset button ([1] to [10]).
2 Press [ENTER] to preset the station.
█ Listening to a preset station
Press the direct preset button ([1] to [10]) to listen to the preset station.
Manual tuning
You can perform manual tuning to a particular channel or frequency. This can be useful when you are adjusting the antenna to achieve the best possible reception and scanning a particular channel to update the station list.
1 Press [MENU].
2Turn [ TUNE/SELECT
  ] to select “Manual tune” and then press [ENTER].
3Turn [ TUNE/SELECT
  ] to select a frequency or channel and then press [ENTER].
The display shows the received signal strength of the selected frequency. Adjust the antenna to achieve the best reception.
threshold indicator
Adjust the antenna so that the received signal strength (solid rectangles) exceeds the threshold indicator.
Viewing available information
You can view the information of the radio station such as RDS text (available in some areas), frequency and date.
Press [DISPLAY].
Note:
RDS may not be available if reception is poor.
Viewing available information
You can view various information about the DAB broadcast such as dynamic label information (if available), signal strength, program type, ensemble name, channel number, bit rate, DAB variant and date.
Press [DISPLAY] to view available information.
Press and hold [DISPLAY] to show the default display.
RQTN0173
5
5

rf-d10eg.book Page 6 Friday, January 3, 2014 4:54 PM
System settings
█ To view the System menu
When in DAB mode
1 Press [MENU].
2Turn [ TUNE/SELECT
  ] to select “System” and then press [ENTER].
When in FM mode
Press [MENU].
█ To navigate around the menu
Turn [ TUNE/SELECT
  ] to select an item or option. Press [ENTER] to confirm.
Example: Backlight setting displays
Time
Backlight
Language
Factory
Reset
Downloaded |
printing |
|||||
|
||||||
from |
|
|
|
|
|
|
|
|
|
|
|
|
|
www |
|
|
|
|||
|
. |
|
|
|
||
|
|
|
|
|
|
|
|
|
|
|
|
|
|
The time and date information are |
|
|
|
vandenborre |
||
updated automatically with the DAB/RDS |
|
|
|
|
|
|
|
|
|
|
|
|
|
broadcast (if available). |
|
|
|
|
|
|
You can also set the time and date |
. |
|||||
|
||||||
manually with the Time menu. |
|
|
|
|
|
be |
|
|
|
|
|
|
|
This is a 24 hour clock.
•Set time: Set the hours and minutes.
•Set date: Set the day, month and year.
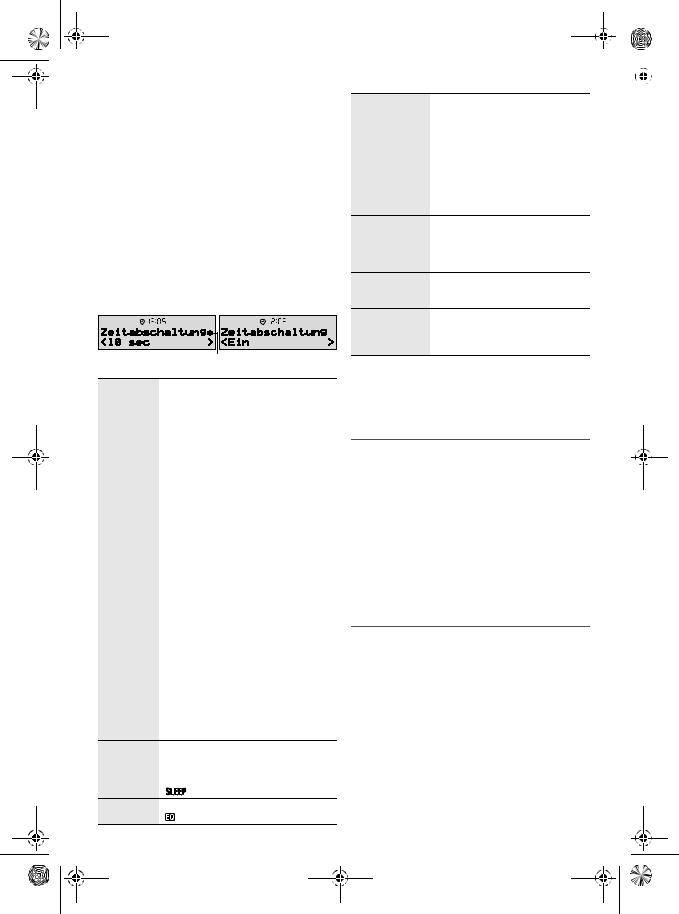
•10 sec: The backlight switches off after
10 seconds of inactivity.
•On: The backlight is always on.
You can change the language for the display panel.
English, Italiano, Deutsch, Français
Yes, No
Select “Yes” to reset the unit to factory default setting.
Indicates current setting
Alarm The Alarm Wizard is shown.
•Alarm: On, Off
Select “On” to switch on the alarm.
•On time: Set the hours and minutes of start time.
•Source: Buzzer, DAB, FM
Set the audio source.
If FM or DAB is set, select the last station you tuned in to (“Last listened”) or a preset station as the audio source.
•Set the volume
The alarm starts at a low volume and increases gradually to the preset level.
“ ” is shown after you set the alarm.
Note:
•The alarm does not work when the unit is powered by batteries.
•Check that the date and time are set correctly, or else the alarm may not work as desired.
•The alarm will come on at the set time every day for a duration of 90 minutes. Press any button or turn any knob to stop the alarm.
•You need to set the alarm again every time you disconnect and connect the AC power or after you remove the batteries.
Sleep |
The sleep timer switches off the unit after |
|
|
the set time (in minutes). |
|
|
Sleep Off, 30 minutes, 60 minutes, |
|
|
90 minutes, 120 minutes |
|
|
“ |
” is shown. |
Equaliser |
Flat, Heavy, Soft, Clear, Vocal |
|
|
“ |
” is shown. |
Troubleshooting
General
Sound is distorted or no sound.
•Adjust the volume.
•Check and adjust the antenna.
•Move the unit to another location and do a full scan again.
•An AC mains lead or fluorescent light is near the cables. Keep other appliances and cords away from the cables of this unit.
Reception is poor or beat sound is heard.
•Keep the antenna away from computers, TVs, other cables and cords. Move mobile telephones away from the unit if the interference is apparent.
Messages
“Service not available”
• No DAB reception.
“No DAB station”
•No DAB station available.
•Check the antenna.
•Move the unit to another location and do a full scan again.
“Time Not saved”
•The changes made to the time was not saved, the changes will be lost.
“Alarm Not saved”
•The changes made to the alarm was not saved, the changes will be lost.
RQTN0173
6
6

rf-d10eg.book Page 7 Friday, January 3, 2014 4:54 PM
Specifications
Power supply |
|
|
|
|
|
|
|
AC |
|
|
|
|
AC 230 V, 50 Hz |
|
Battery |
|
|
DC 6 V (4 x R14/LR14, C) |
||
Power consumption |
|
|
7 W |
|||
Frequency range |
|
|
|
|||
|
FM |
87.50 MHz to 108.00 MHz (50 kHz steps) |
||||
|
DAB/DAB+ BAND III |
|
|
|
||
|
|
5A to 13F (174.928 MHz to 239.200 MHz) |
||||
Terminal |
|
|
|
|
|
|
|
Headphones |
|
|
|
Stereo, 3.5 mm (16 Ω) |
|
Speaker |
|
|
|
|
|
|
|
Full range |
|
|
|
|
10 cm (4 Ω) |
Output power |
|
|
|
2 W (RMS 10% THD) |
||
Battery life |
|
|
|
|
|
|
|
|
|
|
|
|
|
|
Power |
|
Manganese |
|
Alkaline |
|
|
source |
|
R14 battery |
|
LR14 battery |
|
|
|
|
|
|
|
|
|
FM |
|
Approx. 9 H |
|
Approx. 30 H |
|
|
|
|
|
|
|
|
|
DAB/DAB+ |
|
Approx. 12 H |
|
Approx. 40 H |
|
|
|
|
|
|
||
Dimensions (W x H x D) |
251 mm x 138 mm x 91 mm |
|||||
Mass |
|
|
|
|
|
|
|
With batteries |
|
|
1.3 kg |
||
|
Without batteries |
|
|
1.0 kg |
||
Operating temperature range |
|
0°C to +40°C |
||||
Operating humidity range
35% to 80% RH (no condensation)
Power consumption in standby mode
0.6 W (approximate)
Note:
Specifications are subject to change without notice. Mass and dimensions are approximate.
|
|
|
|
|
Downloaded |
printing |
|
|||||||
|
|
|
|
|
|
|
||||||||
|
|
|
|
|
from |
|
|
|
|
|
|
|
||
|
|
|
|
|
|
|
|
|
|
|
|
|||
|
|
|
|
|
|
www |
|
|
|
|
||||
|
|
|
|
|
|
|
|
. |
|
|
|
|
||
|
|
|
|
|
|
|
|
|
|
|
|
|
||
|
|
|
|
|
|
|
|
|
|
|
|
|
|
|
Disposal of Old Equipment and Batteries |
|
|
|
|
|
vandenborre |
||||||||
|
|
|
|
|
|
|
|
|
||||||
Only for European Union and countries with |
|
ENGLISH |
|
|
|
|
|
|
|
|||||
recycling systems |
|
|
|
|
|
|
|
. |
||||||
|
|
|
|
|
|
|
|
|||||||
|
|
|
|
|
|
|
|
|
|
|
|
|
|
|
|
|
|
|
|
|
|
|
|
|
|
|
|
|
|
|
|
|
|
|
These symbols on the products, packaging, |
|
|
|
|
|
|
|
|
be |
|
|
|
|
|
and/or accompanying documents mean that |
|
|
|
|
|
|
|
|
|
|
|
|
|
|
used electrical and electronic products and |
|
|
|
|
|
|
|
|
|
|
|
|
|
|
batteries must not be mixed with general |
|
|
|
|
|
|
|
|
|
|
|
|
|
|
household waste. |
|
|
|
|
|
|
|
|
|
|
|
|
|
|
For proper treatment, recovery and recycling |
|
|
|
|
|
|
|
|
|
|
|
|
|
|
|
|
|
|
|
|
|
|
|
|
|
|
|
|
|
of old products and used batteries, please |
|
|
|
|
|
|
|
|
|
|
|
|
|
|
take them to applicable collection points in |
|
|
|
|
|
|
|
|
|
|
|
|
|
|
accordance with your national legislation. |
|
|
|
|
|
|
|
|
|
|
|
|
|
|
By disposing of them correctly, you will help |
|
|
|
|
|
|
|
|
|
|
|
|
|
|
to save valuable resources and prevent any |
|
|
|
|
|
|
|
|
|
|
|
|
|
|
potential negative effects on human health |
|
|
|
|
|
|
|
|
|
|
|
|
|
|
and the environment. |
|
|
|
|
|
|
|
|
|
|
|
|
|
|
For more information about collection and |
|
|
|
|
|
|
|
|
|
|
|
|
|
|
recycling, please contact your local |
|
|
|
|
|
|
|
|
|
|
|
|
|
|
municipality. |
|
|
|
|
|
|
|
|
|
|
|
|
|
|
Penalties may be applicable for incorrect |
|
|
|
|
|
|
|
|
|
|
|
|
|
|
disposal of this waste, in accordance with |
|
|
|
|
|
|
|
|
|
|
|
|
|
|
national legislation. |
|
|
|
|
|
|
|
|
|
Note for the battery symbol (bottom symbol):
This symbol might be used in combination with a chemical symbol. In this case it complies with the requirement set by the Directive for the chemical involved.
RQTN0173
7
7
|
|
Downloaded |
printing |
|
|
|
|
|
|
from |
|
rf-d10eg.book Page 2 Friday, January 3, 2014 4:54 PM |
|
www |
|
|
|
|
. |
Sicherheitsmaßnahmen |
Inhaltsverzeichnis |
vandenborre |
|
|
|||
WARNUNG! |
Sicherheitsmaßnahmen . . . |
. . . . . . . . . . . . . . . . . . . . . 2 |
. |
Mitgeliefertes Zubehör . . . . |
. . . . . . . . . . . . . . . . . . . . 2 |
||
|
Liste der Bedienelemente . . |
3. . . . . . . . . . . . . . . . . . . . |
be |
Gerät |
Stromquellen . . . . . . . . . . . . |
. . . . . . . . . . . . . . . . . . . . 4 |
|
• Zur Reduzierung der Gefahr von Brand, elektrischem |
Erste Schritte |
4 |
|
Schlag und Beschädigung: |
|
||
DAB |
4 |
|
|
– Dieses Gerät sorgfältig vor Nässe, Feuchtigkeit, Spritz- |
|
||
FM (UKW)-Radio |
5 |
|
|
und Tropfwasser schützen. |
|
||
– Blumenvasen und andere mit Flüssigkeiten gefüllte |
Systemeinstellungen . . . . . . |
. . . . . . . . . . . . . . . . . . . . 6 |
|
Behälter dürfen nicht auf dieses Gerät gestellt werden. |
Fehlersuchanleitung . . . . . . |
. . . . . . . . . . . . . . . . . . . . 6 |
|
– Ausschließlich das empfohlene Zubehör verwenden. |
Technische Daten |
7 |
|
– Auf keinen Fall die Abdeckung entfernen. |
|
||
|
|
|
|
– Versuchen Sie nie, dieses Gerät selbst zu reparieren. |
|
|
|
Reparaturarbeiten sind grundsätzlich dem |
|
|
|
|
Kundendienstpersonal zu überlassen. |
|
Dieses Produkt ist mit der folgenden Software |
||
Netzkabel |
|
ausgerüstet. |
|||
|
(1) |
Software, die auf unabhängige Weise von bzw. für |
|||
• |
Das Netzkabel ist das trennende Gerät. Installieren Sie |
|
|||
|
|
die Panasonic Corporation entwickelt wurde, |
|||
|
dieses Gerät so, dass das Netzkabel sofort aus der |
|
|
||
|
|
(2) |
Software, die Eigentum einer dritten Partei ist und |
||
|
Steckdose gezogen werden kann, wenn irgendwelche |
|
|||
|
Probleme auftreten. |
|
|
für die die Panasonic Corporation eine Lizenz |
|
|
|
|
|
erworben hat und/oder |
|
|
|
|
(3) Open Source-Software |
||
VORSICHT! |
|||||
|
Die im Punkt (3) genannte Software, die KEINER |
||||
Gerät |
|
GARANTIE unterliegt und für die auch weder |
|||
|
MARKTFÄHIGKEIT noch EIGNUNG FÜR EINEN |
||||
• |
Dieses Gerät kann beim Betrieb Hochfrequenzstörungen |
|
|||
|
BESTIMMTEN ZWECK garantiert werden kann, wird in |
||||
|
auffangen, die von einem in der Nähe verwendeten Handy |
|
|||
|
|
der Hoffnung bereitgestellt, dass sie sich als nützlich |
|||
|
verursacht werden. Falls eine solche Störbeeinflussung |
|
|||
|
|
erweist. Siehe diesbezüglich auch die relevanten |
|||
|
festgestellt wird, sollte das Handy in größerer Entfernung |
|
|||
|
|
detaillierten Geschäftsbedingungen unten. |
|||
|
von diesem Gerät betrieben werden. |
|
|||
|
|
|
|
||
Batterie |
|
This software is copyright 2008 Simon Tatham. |
|||
• |
Explosionsgefahr bei falschem Einlegen der Batterie. Nur |
|
Permission is hereby granted, free of charge, to any |
||
|
mit einem vom Hersteller empfohlenen Typ ersetzen. |
|
person obtaining a copy of this software and associated |
||
• |
Was die Entsorgung der Batterien betrifft, erfragen Sie |
|
documentation files (the “Software”), to deal in the |
||
|
bitte bei den örtlichen Behörden oder Ihrem Händler, |
|
Software without restriction, including without limitation |
||
|
welches die ordnungsgemäße Entsorgungsmethode ist. |
|
the rights to use, copy, modify, merge, publish, |
||
• |
Niemals starker Wärme oder offenen Flammen aussetzen. |
|
distribute, sublicense, and/or sell copies of the |
||
• |
Die Batterie(n) nicht über längere Zeit bei geschlossenen |
|
Software, and to permit persons to whom the Software |
||
|
Türen und Fenstern in direktem Sonnenlicht im Auto |
|
is furnished to do so, subject to the following |
||
|
liegen lassen. |
|
conditions: |
||
• |
Die Batterie niemals zerlegen oder kurzschließen. |
|
The above copyright notice and this permission notice |
||
• |
Die Alkalioder Mangan-Batterie niemals wieder aufladen. |
|
|||
|
shall be included in all copies or substantial portions of |
||||
• |
Niemals eine Batterie mit abgelöster Umhüllung benutzen. |
|
|||
|
the Software. |
||||
• |
Nehmen Sie die Batterie heraus, wenn Sie das Gerät für |
|
|||
|
THE SOFTWARE IS PROVIDED “AS IS”, WITHOUT |
||||
|
längere Zeit nicht benutzen oder wenn das Gerät |
|
|||
|
|
WARRANTY OF ANY KIND, EXPRESS OR IMPLIED, |
|||
|
ausschließlich über Netzstrom betrieben wird. Bewahren |
|
|||
|
|
INCLUDING BUT NOT LIMITED TO THE WARRANTIES OF |
|||
|
Sie sie an einem kühlen, dunklen Ort auf. |
|
|||
|
|
MERCHANTABILITY, FITNESS FOR A PARTICULAR |
|||
|
|
|
|||
Kleinteile |
|
PURPOSE AND NONINFRINGEMENT. IN NO EVENT |
|||
|
SHALL THE COPYRIGHT HOLDERS BE LIABLE FOR ANY |
||||
• |
Die Knöpfe (z. B. der [VOLUME]-Knopf) können sich |
|
|||
|
CLAIM, DAMAGES OR OTHER LIABILITY, WHETHER IN |
||||
|
lösen, wenn zu stark daran gezogen wird. Ziehen Sie |
|
|||
|
|
AN ACTION OF CONTRACT, TORT OR OTHERWISE, |
|||
|
Knöpfe nicht ab, um zu vermeiden, dass diese von |
|
|||
|
|
ARISING FROM, OUT OF OR IN CONNECTION WITH THE |
|||
|
Kindern verschluckt werden. |
|
|||
|
|
SOFTWARE OR THE USE OR OTHER DEALINGS IN THE |
|||
|
|
|
|||
|
|
|
SOFTWARE. |
||
|
|
|
|
|
|
Mitgeliefertes Zubehör
RQTN0173
2
Kontrollieren Sie bitte das mitgelieferte Zubehör.
1 Netzkabel
8

rf-d10eg.book Page 3 Friday, January 3, 2014 4:54 PM
Liste der Bedienelemente
Vorderansicht
12
Downloaded |
printing |
|
|
from |
|
|
www |
|
. |
|
vandenborre |
|
. |
|
be |
3
Rückansicht
L
4
M


 N
N

 O
O
|
|
P |
|
K |
|
|
|
J |
|
|
|
9 8 7 |
6 |
5 |
|
|
|
||
|
|
|
|
A Bereitschafts-/Ein-Schalter [1] |
|
L Antenne |
|
Mit diesem Schalter wird das Gerät aus der elektrischen |
Verlängern Sie die Antenne und |
||
Betriebsbereitschaft heraus eingeschaltet. Auch im |
passen Sie Länge, Winkel und |
||
Bereitschaftszustand nimmt das Gerät eine geringe |
Richtung für einen optimalen |
|
|
Menge Strom auf. |
|
Empfang an. |
|
B Wählen Sie FM (UKW) oder DAB-Radio |
|
Signalstärke-Anzeiger |
|
C Direktvoreinstellungstasten |
|
|
|
|
|
|
|
D Lautstärke einstellen |
|
|
|
E Wählen Sie die gewünschte Frequenz per manueller |
(Blinkend) |
|
|
|
|
||
Abstimmung |
|
Schwach |
Stark |
Verfügbare Optionen anzeigen |
|
||
|
|
|
|
F Bestätigen Sie die Option |
|
M Griff |
|
G Verfügbares Menü anzeigen |
|
N Kopfhörerbuchse |
|
HAutomatische Abstimmungsfunktion für FM (UKW)-Sender
I Verfügbare Informationen anzeigen |
|
|
|
|
|
|
|
|
|
|
J Anzeigebereich |
|
|
|
|
|
|
|
|
|
|
K Lautsprecher (mono) |
|
|
|
|
|
|
|
|
|
|
Der Lautsprecher ist nicht mit einer magnetischen |
Steckerausführung: Ø 3,5 mm Stereostecker (nicht |
|||||||||
Abschirmung ausgestattet. Stellen Sie dieses Gerät |
||||||||||
|
|
|
|
mitgeliefert) |
||||||
daher nicht in der Nähe von Fernsehgeräten, PCs oder |
|
|
|
|
||||||
– |
Ein übermäßiger Schalldruckpegel von Ohrund |
|||||||||
anderen Geräten auf, die für magnetische Einstreuungen |
||||||||||
|
Kopfhörern kann Gehörverlust verursachen. |
|||||||||
empfindlich sind. |
|
|||||||||
– |
Ein Betrieb in voller Lautstärke über längere Zeit kann |
|||||||||
|
||||||||||
das Gehör schädigen.
O AC IN-Anschluss
P Batteriefach
DEUTSCH
RQTN0173
3
9

rf-d10eg.book Page 4 Friday, January 3, 2014 4:54 PM
Stromquellen
Anschluss an das Netzsteckdose
Verbinden Sie das Netzkabel fest mit dem Gerät und der Netzsteckdose.
Hinweis:
•Kein Netzkabel eines anderen Gerätes verwenden.
•Dieses Gerät verbraucht eine geringe Menge an Strom, wenn es sich im Standby-Modus befindet. Bei Nichtverwendung empfehlen wir, das Gerät von der Stromversorgung zu trennen.
Batteriebetrieb (nicht mitgeliefert)
1
|
|
|
4 |
3 |
2 |
|
|
|
|
||
|
|
R14/LR14, C |
|
|
|
|
|
|
|
|
|
|
|
|
Zum Einlegen der Batterien |
||
|
|
|
in Richtung drücken. |
||
|
Benutzen Sie Alkalioder Mangan-Batterien. |
||||
|
Legen Sie die Batterien so ein, dass die Pole (+ und –) mit |
||||
|
denen im Gerät übereinstimmen. |
|
|||
|
Dieses Gerät verwendet als Stromquelle die Batterien, wenn |
||||
|
Sie das Netzkabel abziehen. Die Batterieanzeige leuchtet |
||||
|
auf. |
|
|
|
|
|
Die Batterieanzeige zeigt die Akkukapazität an. |
||||
|
Hinweis: |
|
|
|
|
RQTN0173 |
• Das Gerät schaltet sich ein, nachdem Sie die Batterien |
||||
|
eingelegt haben. |
|
|
|
|
• |
Wenn die Batterieanzeige „ “ zu blinken beginnt, alle 4 |
||||
|
Batterien auswechseln. |
|
|
|
|
4 |
• Nachdem die Batterieanzeige 10 Sekunden lang geblinkt hat, |
||||
|
schaltet sich das Gerät automatisch aus. |
||||
Downloaded |
printing |
|
|
from |
|
|
www |
|
. |
Erste Schritte |
vandenborre |
1 Verlängern Sie die Antenne. |
|
|
|
2 Drücken Sie [1], um das Gerät einzuschalten. |
. |
be |
|
Beim erstmaligen Einschalten des Geräts wechselt dieses in den DAB-Modus und scannt automatisch nach Sendern. Es stellt Zeit und Datum ein (sofern Daten verfügbar sind) und startet mit der Wiedergabe des ersten gefundenen Senders.
Siehe „Systemeinstellungen“ auf Seite 6. Gehen Sie zum
Menü „Language“ (Sprache), um die Sprache für die
Anzeige auf „Deutsch“ zu ändern.
Anzahl der gefundenen Sender
Hinweis:
Im Standby-Modus zeigt das Gerät Zeit und Datum an (nur wenn das Gerät über Netzstrom betrieben wird).
DAB
DAB (Digital Audio Broadcasting) ist ein Verfahren zur Ausstrahlung von Digital-Radio. Es ist weniger störanfällig und bietet eine bessere Tonqualität.
Dieses Gerät unterstützt DAB in „BAND III“-Bändern.
DAB-Betrieb
Beim erstmaligen Aufrufen des DAB-Modus, oder wenn die Senderliste leer ist, startet das Gerät den vollständigen Suchlauf und speichert die gefundenen Sender.
Sie können den vollständigen Suchlauf ausführen, wenn ein neuer Sender hinzukommt bzw. ein neuer Sender verfügbar ist.
1 Drücken Sie [BAND] um „DAB“ auszuwählen.
2Drücken Sie [MENU], um „Vollständiger Suchlauf“ auszuwählen, und dann [ENTER], um den vollständigen Suchlauf zu starten.
Um die Funktion abzuschalten, [MENU] drücken.
█Entfernen von nicht verfügbaren aufgeführten Sendern
Dieses Gerät zeigt Sender, die geschlossen wurden oder nicht mehr verfügbar sind, mit einem Fragezeichen vor dem Sendernamen an. Sie können diese Sender aus der Senderliste entfernen.
1Drücken Sie [MENU] und drehen Sie dann
[ TUNE/SELECT
  ], um „Leeren“ auszuwählen.
2 Drücken Sie [ENTER].
3Drücken Sie [ TUNE/SELECT
  ], um „Ja“ auszuwählen, und drücken Sie dann [ENTER].
Um die Funktion abzuschalten, wählen Sie „Nein“.
10
rf-d10eg.book Page 5 Friday, January 3, 2014 4:54 PM
Einen Sender hören
1Drehen Sie [ TUNE/SELECT
  ], um einen Sender aus der Senderliste auszuwählen.
2Drücken Sie [ENTER], um den ausgewählten Sender einzustellen.
Hinweis:
„ “ zeigt an, dass es sich um einen sekundären Servicesender handelt. Sekundäre Servicesender werden in der Senderliste immer neben dem entsprechenden Primärsender aufgeführt.
Voreinstellen von Sendern
Mithilfe der Direktvoreinstellungstasten können Sie bis zu 10 Sender speichern.
1Halten Sie die gewünschte Direktvoreinstellungstaste ([1] bis [10]) gedrückt, während Sie einen Sender anhören.
Beispiel: Halten Sie [2] gedrückt, um den aktuellen Sender auf Speicherplatz 2 zu speichern.
2 Drücken Sie [ENTER], um den Sender zu speichern.
█ Anhören eines voreingestellten Senders
Drücken Sie die Direktvoreinstellungstaste ([1] bis [10]), um den gespeicherten Sender anzuhören.
Downloaded |
printing |
|||||||
|
||||||||
from |
|
|
|
|||||
|
|
|
|
|
|
|||
|
www |
|
|
|
||||
|
. |
|
|
|
||||
|
|
|
|
|
|
|
||
|
|
|
|
|
|
|
|
|
|
|
|
|
|
vandenborre |
|||
Verfügbare Informationen anzeigen |
||||||||
Sie können verschiedene Informationen über den |
. |
|||||||
DAB-Sender einsehen, wie z. B. Dynamic Label-Daten |
||||||||
(sofern verfügbar), Signalstärke, Programmtyp, |
|
|
|
|
|
|
|
be |
Ensemblename, Kanalnummer, Bitrate, DAB-Variante und |
|
|
|
|
|
|
|
|
das Datum. |
|
|
|
|
|
|
|
|
Drücken Sie [DISPLAY], um verfügbare Informationen |
|
|
|
|
|
|
|
|
anzuzeigen. |
|
DEUTSCH |
|
|
|
|
|
|
Halten Sie [DISPLAY] gedrückt, um die Standardanzeige |
|
|
|
|
|
|
||
einzublenden. |
|
|
|
|
|
|
|
|
|
|
|
|
|
|
|
|
|
FM (UKW)-Radio
1 Drücken Sie [BAND] um „FM“ (UKW) auszuwählen.
2Drücken Sie [AUTOTUNE], um einen Sender einzustellen.
Das Gerät stoppt den Suchlauf, sobald ein Sender gefunden wurde.
Drücken Sie [AUTOTUNE] noch einmal, um den nächsten Sender einzustellen.
Manuelle Abstimmung
Drücken Sie [ TUNE/SELECT
  ], um den gewünschten
Sender einzustellen.
Manuelle Abstimmung
Mithilfe der manuellen Abstimmung können Sie einen bestimmten Kanal bzw. eine Frequenz einstellen. Dies kann hilfreich sein, wenn Sie die Antenne einstellen, um den bestmöglichen Empfang zu erhalten, und wenn Sie nach einem bestimmten Kanal suchen, um die Senderliste zu aktualisieren.
1 Drücken Sie [MENU].
2Drücken Sie [ TUNE/SELECT
  ], um „Manuell einstellen“ auszuwählen, und drücken Sie dann [ENTER].
3Drücken Sie [ TUNE/SELECT
  ], um eine Frequenz oder einen Kanal auszuwählen, und drücken Sie dann [ENTER].
In der Anzeige wird die empfangene Signalstärke der ausgewählten Frequenz eingeblendet. Stellen Sie die Antenne ein, um den bestmöglichen Empfang zu erhalten.
Grenzwertanzeige
Stellen Sie die Antenne so ein, dass die empfangene Signalstärke (ausgefüllte Rechtecke) über der Grenzwertanzeige liegen.
Voreinstellen von Sendern
Mithilfe der Direktvoreinstellungstasten können Sie bis zu 10 Sender speichern.
Die ersten fünf Sender sind für Sie mit Standardfrequenzen voreingestellt.
1Halten Sie die gewünschte Direktvoreinstellungstaste ([1] bis [10]) gedrückt, während Sie einen Sender anhören.
2 Drücken Sie [ENTER], um den Sender zu speichern.
█ Anhören eines voreingestellten Senders
Drücken Sie die Direktvoreinstellungstaste ([1] bis [10]), um den gespeicherten Sender anzuhören.
Verfügbare Informationen anzeigen
Sie können die Informationen über den Radiosender ansehen, wie RDS-Text (in einigen Regionen verfügbar), Frequenz und Datum.
Drücken Sie [DISPLAY].
Hinweis:
Bei ungünstigen Empfangsbedingungen erscheinen u. U. keine RDS-Anzeigen.
RQTN0173
5
11
rf-d10eg.book Page 6 Friday, January 3, 2014 4:54 PM
Systemeinstellungen
█ Zur Anzeige des Systemmenüs
Im DAB-Modus
1 Drücken Sie [MENU].
2Drücken Sie [ TUNE/SELECT
  ], um „System“ auszuwählen, und drücken Sie dann [ENTER].
Im FM-Modus
Drücken Sie [MENU].
█ Zum Navigieren im Menü
Drehen Sie [ TUNE/SELECT
  ], um einen Menüpunkt oder eine Option auszuwählen. Drücken Sie [ENTER], um zu bestätigen.
Beispiel: Einstellung Hintergrundbeleuchtung für Anzeigen
Zeigt die aktuelle Einstellung an
Wecker Der Wecker Assistent wird angezeigt.
•Wecker: Ein, Aus
Wählen Sie „Ein“, um den Weckruf einzuschalten.
•Zt. Ein: Stellen Sie Stunden und Minuten für die Startzeit ein.
•Quelle: Summer, DAB, FM
Stellen Sie die Audioquelle ein. Wenn Sie FM (UKW) oder DAB
einstellen, wählen Sie den Sender, den Sie zuletzt gehört haben („Zuletzt gehört“), oder einen voreingestellten Sender als Audioquelle.
•Stellen Sie die Lautstärke ein
Der Weckruf beginnt mit einer niedrigen Lautstärke und wird sich nach und nach bis zum voreingestellten Pegel erhöhen.
„ “ wird angezeigt, nachdem Sie den Alarm eingestellt haben.
Hinweis:
•Der Weckruf funktioniert nicht, wenn das Gerät mit Batterien betrieben wird.
•Überprüfen Sie, dass das Datum und die Uhrzeit richtig eingestellt sind, andernfalls wird der Alarm nicht wie gewünscht funktionieren.
•Der Weckruf wird jeden Tag zur eingestellten Zeit und für eine Dauer von 90 Minuten aktiviert. Um den Weckruf zu stoppen, drücken Sie eine beliebige Taste oder drehen einen beliebigen Knopf.
•Sie müssen den Alarm nach jedem Trennen von der Stromversorgung sowie nach einem Batteriewechsel erneut einstellen.
|
Sleep |
Der Einschlaftimer schaltet das Gerät nach |
|
|
|
der festgelegten Zeit (in Minuten) aus. |
|
|
|
Aus, 30 Minuten, 60 Minuten, 90 Minuten, |
|
RQTN0173 |
|
120 Minuten |
|
|
„ |
“ wird angezeigt. |
|
|
|
||
|
Equaliser |
Flach, Klangvoll, Weich, Klar, Gesang |
|
6 |
|
„ |
“ wird angezeigt. |
|
|
|
|
Uhrzeit
Beleuchtung
Sprache
Werkseinstellung
Downloaded |
printing |
||||||
|
|||||||
from |
|
|
|
|
|
|
|
|
|
|
|
|
|
||
www |
|
|
|
||||
|
. |
|
|
|
|||
|
|
|
|
|
|
||
|
|
|
|
|
|
|
|
Die Zeitund Datumsinformationen |
|
|
|
vandenborre |
|||
|
|
|
|
|
|
||
werden über den DAB/RDS-Sender |
|
|
|
|
|
|
|
(sofern verfügbar) automatisch |
. |
||||||
aktualisiert. |
|||||||
|
|
|
|
|
be |
||
Im Menü Zeit können Sie Zeit und |
|
|
|
|
|
||
|
|
|
|
|
|
||
Datum auch manuell einstellen.
Dies ist eine 24-Stunden-Uhr.
•Zeit einstellen: Stellen Sie Stunden und Minuten ein.
•Datum einstellen: Stellen Sie Tag, Monat und Jahr ein.
•10 sec: Die Hintergrundbeleuchtung schaltet nach 10 Sekunden Inaktivität aus.
•Ein: Die Hintergrundbeleuchtung ist immer aktiviert.
Sie können die Sprache für die
Anzeige ändern.
English, Italiano, Deutsch, Français
Ja, Nein
Wählen Sie „Ja“, um das Gerät in die Standard-Werkseinstellungen zurückzusetzen.
Fehlersuchanleitung
Allgemeine Daten
Verzerrter bzw. kein Ton.
•Lautstärke einstellen.
•Prüfen Sie die Antenne und stellen Sie sie ein.
•Platzieren Sie das Gerät an einem anderen Standort und führen Sie erneut einen vollständigen Suchlauf aus.
•Das System befindet sich in der Nähe von Netzkabeln oder Leuchtstofflampen. Halten Sie andere Geräte und Kabel von den Kabeln dieses Geräts fern.
Empfang ist schlecht oder es sind Klopfgeräusche zu hören.
•Halten Sie die Antenne von Computern, Fernsehgeräten und anderen Kabeln fern. Wenn Interferenzen auftreten, entfernen Sie Mobiltelefone aus der Nähe des Gerätes.
Meldungen
„Dienst nicht verfügbar“
• Kein DAB-Empfang.
„Kein DAB-Sender“
•Kein DAB-Sender verfügbar.
•Prüfen Sie die Antenne.
•Platzieren Sie das Gerät an einem anderen Standort und führen Sie erneut einen vollständigen Suchlauf aus.
„Uhrzeit Nicht gesichert“
•Die Änderungen an der Zeit wurden nicht gespeichert und werden verloren gehen.
„Wecker nicht gespeichert“
•Die Änderungen am Weckruf wurden nicht gespeichert und werden verloren gehen.
12

rf-d10eg.book Page 7 Friday, January 3, 2014 4:54 PM
Technische Daten
Stromversorgung |
|
AC |
230 V Wechselstrom, 50 Hz |
Batterie |
6 V Gleichstrom (4 x R14/LR14, C) |
Leistungsaufnahme |
7 W |
Frequenzbereich |
|
FM (UKW) |
|
87,50 MHz bis 108,00 MHz (50-kHz-Schritte)
DAB/DAB+ BAND III
5A bis 13F (174,928 MHz bis 239,200 MHz)
Anschluss |
|
|
|
|
||
|
Kopfhörer |
|
|
Stereo, 3,5 mm (16 Ω) |
||
Lautsprecher |
|
|
|
|
||
|
Gesamter Bereich |
|
|
10 cm (4 Ω) |
||
Ausgangsleistung |
|
|
|
2 W (RMS 10% THD) |
||
Batterie-Lebensdauer |
|
|
|
|||
|
|
|
|
|
|
|
|
Stromquelle |
|
Mangan-Batterie |
|
Alkali-Batterie |
|
|
|
|
R14 |
|
|
LR14 |
|
|
|
|
|
|
|
|
FM |
|
Ca. 9 Stunden |
|
Ca. 30 Stunden |
|
|
|
|
|
|
|
|
|
DAB/DAB+ |
|
Ca. 12 Stunden |
|
Ca. 40 Stunden |
|
|
|
|
|
|
||
Abmessungen (B x H x T) |
251 mm x 138 mm x 91 mm |
|||||
Masse |
|
|
|
|
||
|
Mit Batterien |
|
|
|
1,3 kg |
|
|
Ohne Batterien |
|
|
|
1,0 kg |
|
Betriebstemperaturbereich |
|
|
0°C bis +40°C |
|||
Betriebsluftfeuchtigkeitsbereich
35% bis 80% rel. Feuchte (ohne Kondensatbildung)
Leistungsaufnahme im Bereitschaftszustand
0,6 W (ca.)
Hinweis:
Änderungen der technischen Daten sind jederzeit vorbehalten. Die angegebenen Masseund Abmessungsdaten sind ungefähre Werte.
|
|
|
|
|
Downloaded |
printing |
|||||||
|
|
|
|
|
|
||||||||
|
|
|
|
|
from |
|
|
|
|||||
|
|
|
|
|
|
|
|
|
|
|
|||
|
|
|
|
|
|
www |
|
|
|
||||
|
|
|
|
|
|
. |
|
|
|
||||
|
|
|
|
|
|
|
|
|
|
|
|||
|
|
|
|
|
|
|
|
|
|
|
|
|
|
Entsorgung von veralteten Geräten und benutzten |
|
|
|
|
|
vandenborre |
|||||||
Batterien |
|
|
|
|
|
|
|
|
|||||
Nur für EU und Länder mit Recycling-Systemen |
. |
||||||||||||
|
|
|
|
|
|
||||||||
|
|
|
|
|
|
||||||||
|
|
|
|
|
Diese Symbole auf den Produkten, |
|
|
|
|
|
|
|
be |
|
|
|
|
|
Verpackungen und/oder Begleitdokumenten |
|
|
|
|
|
|
|
|
|
|
|
|
|
bedeuten, dass benutzte elektrische und |
|
|
|
|
|
|
|
|
|
|
|
|
|
elektronische Produkte und Batterien nicht in |
|
|
|
|
|
|
|
|
|
|
|
|
|
den allgemeinen Hausmüll gegeben werden |
|
|
|
|
|
|
|
|
|
|
|
|
|
dürfen. |
|
DEUTSCH |
|
|
|
|
|
|
|
|
|
|
|
|
|
|
|
|
|
|||
|
|
|
|
|
Bitte bringen Sie diese alten Produkte und |
|
|
|
|
|
|
||
|
|
|
|
|
Sammelpunkten. |
|
|
|
|
|
|
||
|
|
|
|
|
Batterien zur Behandlung, Aufarbeitung bzw. |
|
|
|
|
|
|
|
|
|
|
|
|
|
zum Recycling gemäß Ihrer |
|
|
|
|
|
|
|
|
|
|
|
|
|
Landesgesetzgebung zu Ihren zuständigen |
|
|
|
|
|
|
|
|
|
|
|
|
|
Indem Sie sie ordnungsgemäß entsorgen, |
|
|
|
|
|
|
|
|
|
|
|
|
|
helfen Sie dabei, wertvolle Ressourcen zu |
|
|
|
|
|
|
|
|
|
|
|
|
|
|
|
|
|
|
|
|
|
|
|
|
|
|
|
schützen und eventuelle negative |
|
|
|
|
|
|
|
|
|
|
|
|
|
Auswirkungen auf die menschliche Gesundheit |
|
|
|
|
|
|
|
|
|
|
|
|
|
und die Umwelt zu vermeiden. |
|
|
|
|
|
|
|
|
|
|
|
|
|
Wenn Sie ausführlichere Informationen zur |
|
|
|
|
|
|
|
|
|
|
|
|
|
Sammlung und zum Recycling wünschen, |
|
|
|
|
|
|
|
|
|
|
|
|
|
wenden Sie sich bitte an Ihre örtlichen |
|
|
|
|
|
|
|
|
|
|
|
|
|
Verwaltungsbehörden. |
|
|
|
|
|
|
|
|
|
|
|
|
|
Gemäß Landesvorschriften können wegen |
|
|
|
|
|
|
|
|
|
|
|
|
|
nicht ordnungsgemäßer Entsorgung dieses |
|
|
|
|
|
|
|
|
|
|
|
|
|
Abfalls Strafgelder verhängt werden. |
|
|
|
|
|
|
|
|
|
|
|
|
|
Hinweis zum Batteriesymbol (unteres |
|
|
|
|
|
|
|
|
|
|
|
|
|
|
|
|
|
|
|
|
|
|
|
|
|
|
|
|
|
|
|
|
|
|
|
|
|
|
|
|
|
Symbol): |
|
|
|
|
|
|
|
|
|
|
|
|
|
Dieses Symbol kann in Kombination mit einem |
|
|
|
|
|
|
|
|
|
|
|
|
|
chemischen Symbol verwendet werden. In |
|
|
|
|
|
|
|
|
|
|
|
|
|
diesem Fall erfüllt es die Anforderungen |
|
|
|
|
|
|
|
|
|
|
|
|
|
derjenigen Richtlinie, die für die betreffende |
|
|
|
|
|
|
|
|
|
|
|
|
|
Chemikalie erlassen wurde. |
|
|
|
|
|
|
|
|
|
|
|
|
|
|
|
|
|
|
|
|
|
|
RQTN0173
7
13
rf-d10eg.book Page 2 Friday, January 3, 2014 4:54 PM
Precauzioni per la sicurezza
AVVERTENZA!
Unità
•Per ridurre il rischio d’incendio, scosse elettriche o danni al prodotto,
–Non esporlo alla pioggia, umidità, gocciolamenti o spruzzi.
–Evitare di mettervi sopra oggetti pieni di liquidi, come vasi.
–Usare soltanto gli accessori consigliati.
–Non aprire i coperchi.
–Non tentare di riparare questa unità da soli. Per le riparazioni, rivolgersi al personale di assistenza qualificato.
Cavo di alimentazione CA
•La spina di alimentazione è il dispositivo di interruzione. Installare questa unità in modo che la spina di alimentazione possa essere scollegata immediatamente dalla presa di corrente.
Downloaded |
printing |
||||||
|
|||||||
from |
|
|
|
||||
|
|
|
|
|
|||
|
www |
|
|
|
|||
|
. |
|
|
|
|||
|
|
|
|
|
|
||
|
|
|
|
|
|
|
|
Accessori in dotazione |
|
|
|
vandenborre |
|||
|
|
|
|
|
|
||
Controllare e identificare gli accessori in dotazione. |
. |
||||||
1 Cavo di alimentazione CA |
|||||||
|
|
|
|
|
be |
||
|
|
|
|
|
|
||
Indice
Precauzioni per la sicurezza . . . . . . . . . . . . . . . . . . 2
Accessori in dotazione . . . . . . . . . . . . . . . . . . . . . . 2
Panoramica dei comandi . . . . . . . . . . . . . . . . . . . . 3
Fonti di alimentazione . . . . . . . . . . . . . . . . . . . . . . . 4
Per iniziare . . . . . . . . . . . . . . . . . . . . . . . . . . . . . . . . 4
DAB . . . . . . . . . . . . . . . . . . . . . . . . . . . . . . . . . . . . . 4
Radio FM . . . . . . . . . . . . . . . . . . . . . . . . . . . . . . . . . 5
Impostazioni di sistema . . . . . . . . . . . . . . . . . . . . . 6
Risoluzione dei problemi. . . . . . . . . . . . . . . . . . . . . 6
Dati tecnici . . . . . . . . . . . . . . . . . . . . . . . . . . . . . . . . 7
ATTENZIONE!
Unità
•Durante l’uso, questa unità potrebbe essere soggetta alle interferenze radio causate dal cellulare. Se si dovesse verificare tale interferenza, aumentare la distanza tra questa unità e il cellulare.
Batteria
•Se la batteria non è sostituita correttamente, potrebbe verificarsi un’esplosione. Per la sostituzione utilizzare solo batterie di tipo consigliato dal produttore.
•Durante lo smaltimento delle batterie, vi preghiamo di contattare le autorità locali od il rivenditore ed informarvi sulle modalità per un corretto smaltimento.
•Non riscaldare o esporre alle fiamme.
•Non lasciare la (le) batteria(e) in un’automobile esposta alla luce diretta del sole e con sportelli e finestrini chiusi per un periodo di tempo prolungato.
•Non smontare o cortocircuitare la batteria.
•Non caricare la batteria alcalina o al manganese.
•Non usare la batteria se il coperchio è stato rimosso.
•Rimuovere la batteria se non si usa l’unità per un periodo di tempo prolungato o se l’unità deve essere alimentata solo da alimentazione CA. Conservare in un luogo fresco e al buio.
Piccoli oggetti
•Le manopole (ad esempio, la manopola [VOLUME]) possono fuoriuscire se tirate con forza. Per evitare che i bambini ingeriscano la manopola, non estrarla.
RQTN0173
2
Questo prodotto dispone del seguente software integrato:
(1)Il software sviluppato in modo indipendente da o per Panasonic Corporation,
(2)Il software di proprietà di terzi e concesso in licenza a Panasonic Corporation, e/o
(3)Software open source
Il software classificato come (3) è distribuito nella speranza che sia utile, ma SENZA ALCUNA GARANZIA, neppure la garanzia implicita di COMMERCIABILITÀ o IDONEITÀ PER UN PARTICOLARE SCOPO. Consultare i termini e le condizioni riportati di seguito nei dettagli.
This software is copyright 2008 Simon Tatham.
Permission is hereby granted, free of charge, to any person obtaining a copy of this software and associated documentation files (the “Software”), to deal in the Software without restriction, including without limitation the rights to use, copy, modify, merge, publish, distribute, sublicense, and/or sell copies of the Software, and to permit persons to whom the Software is furnished to do so, subject to the following conditions:
The above copyright notice and this permission notice shall be included in all copies or substantial portions of the Software.
THE SOFTWARE IS PROVIDED “AS IS”, WITHOUT WARRANTY OF ANY KIND, EXPRESS OR IMPLIED, INCLUDING BUT NOT LIMITED TO THE WARRANTIES OF MERCHANTABILITY, FITNESS FOR A PARTICULAR PURPOSE AND NONINFRINGEMENT. IN NO EVENT SHALL THE COPYRIGHT HOLDERS BE LIABLE FOR ANY CLAIM, DAMAGES OR OTHER LIABILITY, WHETHER IN AN ACTION OF CONTRACT, TORT OR OTHERWISE, ARISING FROM, OUT OF OR IN CONNECTION WITH THE SOFTWARE OR THE USE OR OTHER DEALINGS IN THE SOFTWARE.
14

rf-d10eg.book Page 3 Friday, January 3, 2014 4:54 PM
Panoramica dei comandi
Vista frontale
12
Downloaded |
printing |
|
|
from |
|
|
www |
|
. |
|
vandenborre |
|
. |
|
be |
3
Vista posteriore
L
4
M


 N
N

 O
O
P
K
J
9 8 7 |
6 |
5 |
|
||
|
|
ITALIANO
AInterruttore di attesa/accensione [1]
Premerlo per disporre l’apparecchio nella modalità di attesa o per accenderlo. Durante la modalità di attesa, l’apparecchio continua a consumare una piccola quantità di corrente.
BSelezionare radio FM o DAB
CPulsanti di preselezione diretta
DRegolare il volume
ESelezionare la frequenza desiderata in sintonizzazione manuale
Visualizzare le opzioni disponibili
FConfermare un’opzione
GVisualizzare il menu disponibile
HSintonizzazione automatica delle stazioni FM
IVisualizzare le informazioni disponibili
JPannello del display
KDiffusore (mono)
Il diffusore non ha la schermatura magnetica. Non posizionare l’unità accanto a televisori, PC o altri apparecchi facilmente influenzati dal magnetismo.
L Antenna
Estende l’antenna, regolare lunghezza, angolo e direzione per una ricezione ottimale.
Indicatore di intensità del segnale
(Lampeggiante) |
|
Scarso |
Ottimo |
MManiglia
NPresa cuffie
Tipo di spina: Ø 3,5 mm stereo (non fornita)
–Una pressione sonora eccessiva negli auricolari e nelle cuffie potrebbe causare perdite dell’udito.
–L’ascolto a pieno volume per lunghi periodi può danneggiare l’udito dell’utente.
OTerminale AC IN
PVano batterie
RQTN0173
3
15

rf-d10eg.book Page 4 Friday, January 3, 2014 4:54 PM
Fonti di alimentazione
Uso della presa di corrente domestica
Collegare firmamente il cavo di alimentazione CA all’unità e alla presa di corrente domestica.
Nota:
•Non usare un cavo di alimentazione CA di altri apparecchi.
•Questa unità consuma poca corrente in modalità di attesa. Scollegare l’alimentazione se non si utilizza l’unità.
Downloaded |
printing |
|
|
||
|
from |
|
|
|
www |
|
|
. |
Per iniziare |
|
vandenborre |
1 Allungare l’antenna. |
|
|
|
|
|
2 Premere [1] per accendere l’unità. |
|
. |
|
be |
|
La prima volta che si accende l’unità, entra in modalità DAB e ricerca automaticamente stazioni. Imposta l’ora e la data (se la data è disponibile) e inizia a riprodurre la prima stazione che trova.
Fare riferimento a “Impostazioni di sistema” a pagina 6. Accedere al menu “Language” (Lingua) per cambiare la lingua del pannello del display in “Italiano”.
Numero di stazioni trovate
Nota:
In modalità di attesa, l’unità mostra l’ora e la data (solamente quando l’unità è alimentata da corrente CA).
Uso delle batterie (non fornite)
|
|
1 |
|
4 |
2 |
|
3 |
|
R14/LR14, C |
|
|
|
|
Premere in direzione di  quando si inserisce la batteria.
Usare batterie alcaline o al manganese.
Installare le batterie in modo che le polarità (+ e –) siano allineate con quelle dell’unità.
L’unità utilizza le batterie come fonte di alimentazione quando si scollega il cavo di alimentazione CA. L’indicatore delle batterie si accende.
L’indicatore delle batterie mostra il livello di carica delle batterie.
|
|
|
|
|
|
|
|
|
|
|
|
|
|
|
|
|
Nota: |
||||||||||||||
RQTN0173 |
• |
L’unità si accende quando si inseriscono le batterie. |
|||||||||||||
• |
Quando l’indicatore delle batterie “ ” comincia a |
||||||||||||||
|
|||||||||||||||
|
|
|
lampeggiare, sostituire tutte le 4 batterie. |
||||||||||||
|
• |
Dopo che l’indicatore delle batterie lampeggia per |
|||||||||||||
410 secondi, l’unità si spegne automaticamente.
DAB
DAB (Digital Audio Broadcasting) è una procedura di trasmissione digitale della radio. Garantisce meno interferenze e una migliore qualità audio.
Questa unità supporta bande DAB in “BAND III”.
Funzionamento DAB
La prima volta che si entra in modalità DAB, oppure se l’elenco delle stazioni è vuoto, l’unità avvia la ricerca completa e memorizza le stazioni.
È possibile effettuare una procedura di ricerca completa quando si trova una nuova stazione o si rende disponibile una stazione.
1 Premere [BAND] per selezionare “DAB”.
2Premere [MENU] per selezionare “Ricerca completa”, quindi premere [ENTER] per avviare la ricerca completa.
Per annullare, premere [MENU].
█Rimuovere le stazioni elencate non disponibili
L’unità indica le stazioni chiuse o non più disponibili con un punto interrogativo davanti al nome della stazione. È possibile rimuovere queste stazioni dall’elenco.
1Premere [MENU], quindi girare [ TUNE/SELECT
  ] per selezionare “Elimina”.
2 Premere [ENTER].
3Girare [ TUNE/SELECT
  ] per selezionare “Sì”, quindi premere [ENTER].
Per annullare, selezionare “No”.
16

rf-d10eg.book Page 5 Friday, January 3, 2014 4:54 PM
Ascolto di una stazione
1Girare [ TUNE/SELECT
  ] per selezionare una stazione dall’elenco.
2Premere [ENTER] per sintonizzarsi sulla stazione selezionata.
Nota:
“ ” indica una stazione di servizio secondaria. Le stazioni di servizio secondarie sono sempre elencate accanto alla relativa stazione principale nell’elenco.
Preselezione delle stazioni
È possibile preselezionare fino a 10 stazioni nei pulsanti di preselezione diretta.
1Mentre si ascolta una stazione, tenere premuto il pulsante di preselezione diretta desiderato (da [1] a [10]).
Esempio: tenere premuto [2] per memorizzare la stazione attuale nella preselezione 2.
Downloaded |
printing |
||||||
|
|||||||
from |
|
|
|
||||
|
|
|
|
|
|||
|
www |
|
|
|
|||
|
. |
|
|
|
|||
|
|
|
|
|
|
||
|
|
|
|
|
|
|
|
|
|
|
|
vandenborre |
|||
Visualizzazione delle informazioni |
|||||||
disponibili |
. |
||||||
È possibile visualizzare varie informazioni sulla |
|||||||
|
|
|
|
|
be |
||
trasmissione DAB, ad esempio informazioni etichetta |
|
|
|
|
|
||
dinamica (se disponibile), intensità di segnale, tipo di programma, nome insieme, numero canale, bit rate, variante DAB e data.
Premere [DISPLAY] per visualizzare le informazioni disponibili.
Tenere premuto [DISPLAY] per mostrare il display predefinito.
Radio FM |
ITALIANO |
||
1 |
Premere [BAND] per selezionare “FM”. |
||
|
|||
2 |
Premere [AUTOTUNE] per sintonizzarsi su una |
|
|
|
stazione. |
|
|
|
|
||
2 Premere [ENTER] per preselezionare la stazione.
█ Ascolto di una stazione di preselezione
Premere il pulsante di preselezione diretta desiderato (da [1] a [10]) per ascoltare la stazione preselezionata.
Sintonizzazione manuale
È possibile effettuare la sintonizzazione manuale su un particolare canale o frequenza. Ciò può essere utile quando si regola l’antenna per ottenere la migliore ricezione possibile e la ricerca di un particolare canale per aggiornare l’elenco di stazioni.
1 Premere [MENU].
2Girare [ TUNE/SELECT
  ] per selezionare “Sint. manuale”, quindi premere [ENTER].
3Girare [ TUNE/SELECT
  ] per selezionare una frequenza o un canale, quindi premere [ENTER].
Il display mostra l’intensità del segnale ricevuto della frequenza selezionata. Regolare l’antenna per ottenere la ricezione ottimale.
Indicatore soglia
Regolare l’antenna in modo che l’intensità del segnale ricevuto (rettangoli solidi) superi l’indicatore di soglia.
L’unità arresta la sintonizzazione quando trova una stazione.
Premere di nuovo [AUTOTUNE] per sintonizzarsi sulla stazione successiva.
Sintonizzazione manuale
Girare [ TUNE/SELECT
  ] per sintonizzarsi sulla stazione desiderata.
Preselezione delle stazioni
È possibile preselezionare fino a 10 stazioni nei pulsanti di preselezione diretta.
Le prime cinque stazioni sono preselezionate con una frequenza predefinita per maggiore comodità.
1Mentre si ascolta una stazione, tenere premuto il pulsante di preselezione diretta desiderato (da [1] a [10]).
2 Premere [ENTER] per preselezionare la stazione.
█ Ascolto di una stazione di preselezione
Premere il pulsante di preselezione diretta desiderato (da [1] a [10]) per ascoltare la stazione preselezionata.
Visualizzazione delle informazioni disponibili
È possibile visualizzare le informazioni della stazione radio, ad esempio testo RDS (disponibile in alcune aree), frequenza e data.
Premere [DISPLAY].
Nota: |
RQTN0173 |
|
|
RDS potrebbe non essere disponibile se la ricezione è debole. |
|
|
5 |
17
 Loading...