


AUTO
STANDARD
BLOOD GLUCOSE
MONITORING SYSTEM
HGM-111
INSTRUCTION MANUAL

IMPORTANT SAFETY PRECAUTIONS
READ BEFORE USE
1.Use this device ONLY for the intended use described in this manual.
2.Do NOT use accessories which are not specified by the manufacturer.
3.Do NOT use the device if it is not working properly or if it is damaged.
4.Do NOT use the equipment in places where aerosol sprays are being used or where oxygen is being administered.
5.Do NOT use under any circumstances the device on neonates or infants.
6.This device does NOT serve as a cure for any symptoms or diseases. The data measured is for reference only. User should not take any decision of medical relevance without first consultation of medical practitioner. Always consult your doctor to have the results interpreted.
7.Before using this device to test blood glucose, read all instructions thoroughly and practice the test. Carry out all the quality control checks as directed.
8.Use this instrument in a dry environment, if synthetic materials are present (synthetic clothing, carpets etc.) it may cause damaging static discharges that may cause erroneous results.
9.Do not use this instrument in close proximity to sources of strong electromagnetic radiation, as these may interfere with the accurate operation.
10.Do not use this meter near cellular or cordless telephones, walkie talkies, garage door openers, radio transmitter, or other electrical or electronic equipment that are sources of electromagnetic radiation, as these may interfere with the proper operation of the meter.
11.The device for self-testing is used for the monitoring of an existing disease (eg., diabetes), before changing treatment patients should refer to a medical professional.

BLOOD GLUCOSE MONITORING SYSTEM-HGM-111
Contents
Chapter 1 HGM-111 Blood Glucose System
1.1Introduction
1.2Intended use
1.3List of Box Contents
1.4Product and Meter Display
Chapter 2 Installing and Setting up the HGM-111 meter
2.1Inserting / replacing batteries
2.2Setting up your HGM-111 meter
2.3Performing a blood glucose test
Chapter 3 Finger Blood Glucose Testing
3.1Preparation before glucose testing
3.2Fingertip blood measurement
3.3Alternate Site Testing (AST)
Chapter 4 Glucose Control Solution Testing (Optional)
4.1 HGM-111 system testing
Chapter 5 Memory Function
5.1 Reviewing result records
Chapter 6 Caring for Your Strips and Meter
6.1Caring for the strips
6.2Caring for the meter
Chapter 7 Troubleshooting
Chapter 8 HGM-111 Performance Characteristics
Chapter 9 Specifications
9.1 Specification of HGM-111 meter
2
2
3
3
6
8
12
14
14
21
23
27
28 28
29
30
31
1

BLOOD GLUCOSE MONITORING SYSTEM-HGM-111
Chapter 1 HGM-111 Blood Glucose System
1.1 Introduction
The HGM-111 system measures the small electrical current and displays the blood glucose results. The current is produced from the blood glucose mixing well with chemicals on the test strip.
User needs to apply 1μLof fresh capillary whole blood for one test, and the test result will be displayed in 5 seconds. The strip ejection function of HGM-111 can help users avoid the risk of contamination after testing. Besides that, HGM-111 also has unique strip technology with auto coding system. Users do not need to code the glucose meter.
1.2 Intended Use
Only the HGM-STP1A blood glucose test strips are used with HGM-111 meter. They are designed for users to measure the glucose concentration in fresh capillary whole blood obtained from fingertips and palm. HGM-111 system is intended to be used by people with diabetes at home.
Warning: HGM-111 system should not be used for screening diagnosis of diabetes or testing neonates.
 Warning: Do not change the therapy according to HGM-111 system test result without consulting healthcare professional. If you have any question about the test results, please discuss with your healthcare professionals.
 Warning: Only for in-vitro diagnostic test.
Warning: Please read system instruction manual and strip manual carefully before using HGM-111 system.

BLOOD GLUCOSE MONITORING SYSTEM-HGM-111
1.3List of Box Contents
1.Blood Glucose Meter HGM-111
2.Lancing Device
3.AST Cap
4.10 pcs Lancets
5.Carrying Case
6.Instruction Manual
7.Log Book
8.CR2032 x 2
1.4Product and Meter Display
A. HGM-111 Blood Glucose Meter Display
Left Button
Right Button 
Cable Port
Link with USB cable to download testing records to computers
 Meter Display
Middle Button
- Power On or Power Off
Strip Slot - Insert test strip here
 Caution: This meter will not display mmol/L.
3

BLOOD GLUCOSE MONITORING SYSTEM-HGM-111

 Battery Compartment
Strip Ejection Button
B. HGM-STP1A Blood Glucose Test Strip
Top Edge - Apply blood sample here
 Confirmation Window
Inserting Bar - Insert this test strip into the meter’s strip slot with this face up
Back Side |
Front Side |
 Warning: Touch the drop of sample to the top edge of th confirmation window of the test strip. Do not smear sample on the strip.
4

BLOOD GLUCOSE MONITORING SYSTEM-HGM-111
C. Function Display
AC (Before Meal) |
CS (Control Solution) |
PC (After Meal) |
|
5

BLOOD GLUCOSE MONITORING SYSTEM-HGM-111
Chapter 2 Installing and Setting up the HGM-111 meter
2.1 Inserting/replacing batteries
 When should users change the batteries?
1.When the symbol  shows on the display, it means the battery power is low and need to replace batteries as soon as possible.
Even the battery power is low, HGM-111 meter still can work well: You still can use HGM-111 and the test results will still be accurate, but we strongly suggest you replace the batteries as soon as possible.
2.There is not enough power to support HGM-111 to operate when the symbol  is shown on display after powering on. Thus, the
meter will shut down after 20 seconds when the symbol is shown on display after powering on. It represents that the battery power is too low to perform a test. You have to replace the batteries to continue using the HGM-111 meter. Time and date must be reset after replacing the batteries, but the results records still remain.
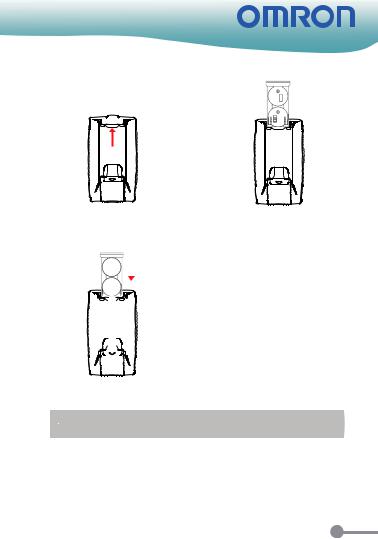
 How to replace HGM-111’s batteries
1.Turn HGM-111 to the back side and open the battery compartment.
2.Take out the batteries and insert two CR2032 batteries with the (+) sign facing up.
3.Push back the battery compartment until hearing a “click” sound.
4.Try to turn on the device to see whether the HGM-111 can be powered on. If not, please check the above steps.
5.After turning on the HGM-111 meter, it will enter into Buzzer and date setting mode directly. (Please refer to setting up your HGM-111 of 2.2 for relative settings)
6
BLOOD GLUCOSE MONITORING SYSTEM-HGM-111
Push
a. Open battery compartment |
b. Take out and insert new batteries |
|||||||||
|
|
|
|
|
|
|
|
|
Push |
|
|
|
|
|
|
|
|
|
|
|
|
|
|
|
|
|
|
|
|
|
|
|
|
|
|
|
|
|
|
|
|
|
|
|
|
|
|
|
|
|
|
|
|
|
|
|
|
|
|
|
|
|
|
|
|
|
|
|
|
|
|
|
|
|
|
|
|
|
|
|
|
|
|
|
|
|
|
|
|
|
|
|
|
|
|
|
|
|
c. Push back the battery compartment
 Warning: Dispose of old batteries according to your local environmental regulations.
7
BLOOD GLUCOSE MONITORING SYSTEM-HGM-111
2.2 Setting up your HGM-111 meter
How to enter the setting mode
1.Replace the batteries.
2.Press and hold middle button when HGM-111 under waiting mode.
How to set up the Buzzer On/Off and date A. Setting Buzzer On/Off and the date
When you are using a new glucose meter or replace new batteries, the display will be showing all symbols for one second, and enter buzzer setting mode.
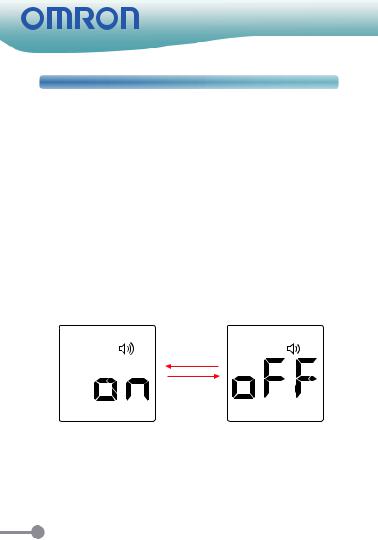
1.Setting the buzzer:
Press left or right button shortly to select the on or off when the meter is in buzzer setting mode. After selection, please press the middle button shortly to set up and enter the year setting mode.
8
BLOOD GLUCOSE MONITORING SYSTEM-HGM-111
2.Setting the year
Once you enter the date setting mode, the last two digits of the year will flash.
(1)Click the right button to increase the year.
(2)Click the left button to decrease the year.
(3)Click the middle button to save your setting. The display will now enter the month setting mode.
3.Setting the month
Once you enter the month setting mode, the month field will flash.
(1)Click the right button to increase the month.
(2)Click the left button to decrease the month.
(3)Click the middle button to save your setting. The display will now enter the day setting mode.
9
 Loading...