


Instruction Manual
Wrist Blood Pressure Monitor
with Advanced Positioning
Sensor (APS) 


Model HEM-637
Thank you for purchasing the
Omron Wrist Blood Pressure Monitor with APS.

Contents
Introduction ……………………………………………………………………… 3 Know Your Unit ……………………………………………………………… 4, 5 Suggestions Before Measuring Blood Pressure ………………………………… 6 Initial Set-Up
Battery Installation / Replacement ……………………………………… 7, 8 Automatic Memory Setting ………………………………………………… 9 Advanced Positioning Sensor (APS) Setting ……………………………… 10 Wrist Selection Setting …………………………………………………… 11 Alarm Setting ………………………………………………………… 12, 13 Date and Time Setting ………………………………………………… 14, 15 How to Reset this Monitor ………………………………………………… 16
Correct Usage
How to Apply the Wrist Cuff …………………………………………… 17 How to Wrap the Wrist Cuff ……………………………………………… 18 How to Measure Blood Pressure ……………………………………… 19-21 How to Use the Memory Function ………………………………………… 22 Memory Reset Function …………………………………………………… 23 How to Use the Graph Function ……………………………………… 24, 25
Troubleshooting ……………………………………………………………… 26 Care and Maintenance ………………………………………………………… 27 Caution ………………………………………………………………………… 28 Specifications…………………………………………………………………… 29 Warranty ……………………………………………………………………… 30 Notes …………………………………………………………………………… 31
2

Introduction
Thank you for purchasing the Omron HEM-637 Wrist Blood Pressure Monitor with Advanced Positioning Sensor (APS). This remarkable instrument is ideal for people who frequently monitor their own blood pressure because it’s so compact and easy to use. There is no tricky arm cuff, just a small, pre-formed wrist cuff that is easy to apply. With the push of a button the Omron Wrist Monitor measures your blood pressure and pulse and displays the reading
on a clear digital panel. Perfect for quick, easy readings at home, at work, and while traveling.
The Omron Wrist Monitor uses the oscillometric method of blood pressure measurement. This means the monitor detects your blood’s movement through the artery in your wrist and converts the movements into a digital reading.
An oscillometric monitor does not need a stethoscope so the monitor is simple to use and measurements are easy to obtain.
Clinical research has proven a direct relationship between blood pressure in the wrist and blood pressure in the arm. Changes in wrist blood pressure reflect changes in arm blood pressure because the arteries in the wrist
and the arm connect. Frequently measuring the blood pressure in your wrist will provide you and your doctor with an accurate indication
of changes in your true blood pressure.
Please read this instruction manual thoroughly before operating the Omron Wrist Blood Pressure Monitor with Advanced Positioning Sensor (APS) to assure proper use. For specific information on your own blood pressure, CONTACT YOUR PHYSICIAN.
3

Know Your Unit
Main unit
Battery Cover |
Wrist Cuff |
|
Wrap the wrist cuff |
||
Insert the batteries. |
||
over your wrist snugly. |
||
|
Two AAA Alkaline batteries (LR03)
Carrying Case
IntelliSense™ Technology Is An Assurance of Accuracy
Blood pressure changes throughout the day. IntelliSense technology was developed by Omron which enables your blood pressure monitor to inflate and deflate at the optimum level for each individual. This helps ensure accurate measurement, and is particularly useful for people with certain arrythmia or heart disorders.
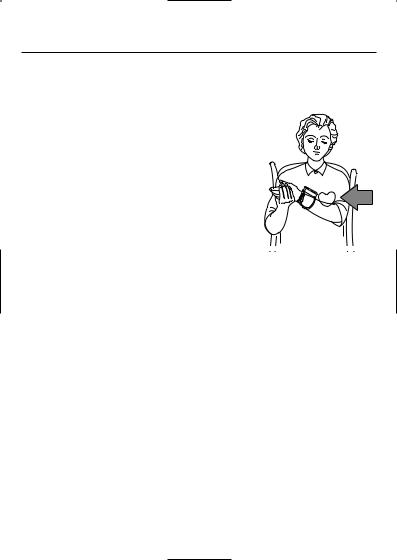
Advanced Positioning Sensor (APS) Ensures a Reliable Measurement
Correct cuff positioning is critical when monitoring blood pressure. The Omron Wrist (APS) Blood Pressure Monitor has a unique positioning sensor that confirms the cuff is level with the user’s heart. This helps ensure that each reading is accurate and reliable.
4

Know Your Unit
Diastolic Blood
Pressure Display
Date/Time
Display


 Mark
Mark
Displayed when the stored measurement values are called out.
Systolic Blood
Pressure Display
MEMORY button
Push this button to see the measured values stored in the monitor.
 GRAPH button
Push this button to see the graph.
Pulse Display
button
Push to move the displayed item forward. Push to move the displayed item backward. In the Selection Screen, push either button for selection.
SET button
Push this button
to set various items on the monitor such as time setting.
START/STOP button
Push this button to measure blood pressure. You can also push this button to stop measurement or turn off the power. Push this button in the Setting Screen to lock the setting.
5
Suggestions Before Measuring
Blood Pressure
1.Avoid eating, smoking and exercising for at least 30 minutes before taking measurement. Also rest for at least 10 to 15 minutes before taking a reading.
2.Stress raises blood pressure. Avoid taking measurements during stressful times.
3.The cuff can be applied to your left or right wrist.
4. Measurements should be taken in a quiet place and you should be in a relaxed, seated position.
5. Remain still and do not talk during the measurements.
6.Keep a record of you blood pressure and pulse for you doctor. Remember, a single measurement does not provide an accurate indication of your true blood pressure. You need to take and record several readings over a period of time. Try to measure your blood pressure at the same time each day for consistency.
7.Wait 2-3 minutes between measurements. Waiting allows the engorged blood vessels to return to normal. You may require more rest time between readings depending on your individual physiological characteristics.
6
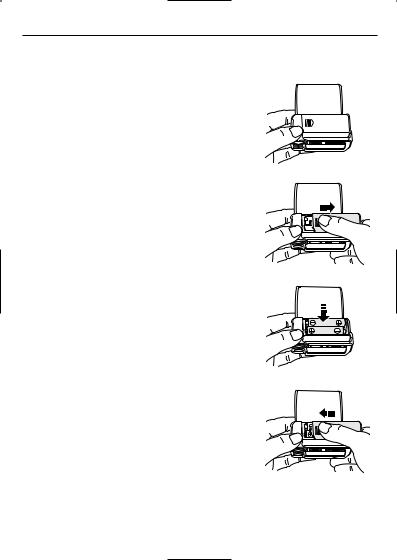
Battery Installation
Use this monitor after inserting batteries in the main unit.
1.Place the main unit with the Battery Cover facing upward.
2.Remove the Battery Cover.
Push down the indent portion of Battery Cover and slide it into the direction of the arrow.
3.Insert two AAA Batteries with the polarities
in the correct direction.
4. Close the Battery Cover.
Close the Battery Cover by sliding it as shown in the Figure until it clicks.
7

Battery Replacement
•High performance alkaline dry cell batteries (2 “AAA”) should be good for approximately 300 readings.
•Battery life varies with ambient temperature. Battery life is shorter under cold conditions such as during the winter.
•If the battery replacement symbol blinks while measuring or if pressure is not applied when the START / STOP button is pressed, replace both batteries (use the same brand).
•Holding the START / STOP button down may shorten battery life. To avoid pressure on the button when transporting or storing, use the case provided.
•If the batteries have been replaced or removed, resetting of the date and time is required.
•If you are not going to use this monitor for a long period of time (approximately three months or more), remove the batteries.
•Do not use batteries not specified for this unit, worn and new batteries together, or different brands of batteries together.
8
Automatic Memory Setting
The monitor stores the measured values and the date and time of measurement, which is helpful for the continuous blood pressure management.
However, if more than one person is expected to use this monitor, the measured values of more than one person will be stored. In that case, setting the Automatic Memory to OFF is recommended.
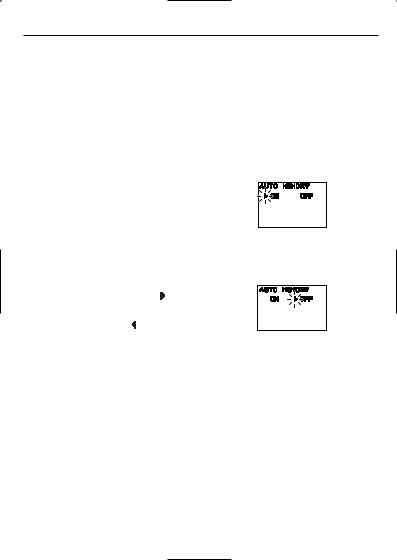
1.Push the SET button while the power is turned off.
Automatic Memory Screen is displayed.
Automatic Memory Screen
2.Select ON or OFF.
•The monitor is set to ON (to store) at time of your purchase.
To set it to OFF, push the button.
• If you want to set to ON after setting it to OFF, push the button.
Automatic Memory OFF Screen
3.Lock the setting.
If you are going to change other settings, push the SET button to lock the setting.
•When you push the SET button, the display changes to the Position Sensor Screen.
If you want to finish operation after locking the setting, push the START/STOP button to turn off the power.
9
Advanced Positioning Sensor (APS) Setting
Set the (APS) function to ON or OFF and set SIGNAL of the position sensor to ON (beeps) or OFF (does not beep).
1.Push the SET button while the power is turned off.
Keep pressing the SET button until the Position Sensor Screen is displayed.
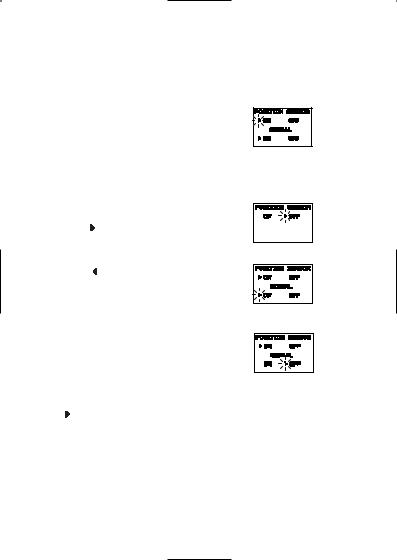
2.Select ON or OFF.
•The Position Sensor is set to ON and the SIGNAL is set to ON (to beep) at the time of your purchase of the monitor.
For setting the Position Sensor to OFF
Push the button to set the Position Sensor to OFF.
• To set it to ON after setting it OFF, push the button.
•There is no SIGNAL setting when the Position Sensor is set to OFF.
How to set the SIGNAL to OFF when the Position Sensor is set to ON
Push the SET button to make
SIGNAL ON flash.
To set the monitor to SIGNAL OFF, push the button.
Position Sensor Screen
Position Sensor OFF Screen
Position Sensor ON
and SIGNAL ON Screen
Position Sensor ON and
SIGNAL OFF Screen
3.Lock the setting.
If you are also going to change other settings, push the SET button to lock the setting.
•When you push the SET button, the display changes to Measurement Screen.
If you want to finish after locking the setting, push the START/STOP button to turn off the power.
10
 Loading...