


OMRON K6CM, K6CM-CICB005, K6CM-CICB025, K6CM-CICB100, K6CM-CICB200 Startup Guide
...Motor Condition
Monitoring Device
K6CM
|
|
|
|
|
|
Startup Guide |
|
Step0 |
Selection of sensor to use |
|
|
|
|
|
|
|
|
Step1 |
Confirmation of details |
|
|
|
|
|
|
|
|
Step2 |
itemsPreparation of necessary |
|
|
|
|
|
|
|
|
|
Installation of Motor |
|
|
|
Step3 condition monitoring Tool |
|
|
|
|
|
|
|
|
|
|
K6CM configuration in the Motor |
|
|
|
Step4 condition monitoring Tool |
|
|
|
|
|
|
|
|
|
Step5 |
Installation |
|
|
|
|
|
|
|
|
Step6 |
Connection |
|
|
|
|
|
|
|
|
Step7 |
Monitoring |
|
|
|
|
|
|
|
|
Step8 |
Pre-verification |

Thank you for purchasing this product. This guide explains simple procedures for starting the product, and methods for its operation.
For more detailed explanations, please refer to the included Operation Manual and the User’s Manual on the included CDROM.
Ensure you read and employ “Safety Precautions”, “Precautions for Safe Use”, and “Precautions for Correct Use” in the Operation Manual.
Step0 Selection of sensor to use
Comprehensive current diagnosis
Use one CT per motor to detect current flowing into the motor. Select a CT that matches the motor capacity.
|
CT type |
Measurement range |
Applicable motor |
Applicable motor |
|
(200 VAC) |
(400 VAC) |
||
|
|
|
||
K6CM-CICB005 |
5 A |
1.00 A to 5.25 A |
0.75 kW |
1.5 kW to 2.2 kW |
|
|
|
|
|
K6CM-CICB025 |
25 A |
5.00 A to 26.25 A |
1.5 kW to 5.5 kW |
3.7 kW to 11 kW |
|
|
|
|
|
K6CM-CICB100 |
100 A |
20 A to 105 A |
7.5 kW to 22 kW |
15 kW to 45 kW |
|
|
|
|
|
K6CM-CICB200 |
200 A |
40 A to 210 A |
30 kW to 45 kW |
55 kW to 90 kW |
|
|
|
|
|
K6CM-CICB400 |
400 A |
80 A to 420 A |
55 kW to 90 kW |
110 kW to 200 kW |
K6CM-CICB600 |
600 A |
120 A to 630 A |
110 kW to 150 kW |
250 kW to 300 kW |
Note. At no load, the motor current is at approximately half rated load.
Select a CT that can cover the range of 50% to 100% of rated current.
Vibration & temperature
This uses a single sensor per motor that can detect vibration and temperature at the same time. One type of sensor can be used. (Sensor model: K6CM-VBS1)
Insulation resistance
This uses one ZCT per motor to detect leakage current. One type of ZCT can be used. (ZCT model: K6CM-ISZBI52)
2

Step1 Confirmation of details
□ K6CM unit |
1 |
□ |
LAN port cover |
1 |
|
|
|
□ Tool (Motor condition monitoring |
1 |
|
|
Tool) CD-ROM |
|
|
|
|
□ Operation Manual |
1 |
|
|
|
|
|
|
|
|
|
|
|
|
|
|
|
(JP/EN, A4 size) |
|
|
|
|
|
|
|
|
|
|
|
|
|
|
|
|
|
|
|
|
|
|
|
|
|
|
|
|
|
|
|
|
|
|
|
|
|
|
|
|
|
|
|
|
|
|
|
|
|
|
|
|
|
|
|
|
|
|
|
|
|
|
|
|
|
|
|
|
|
|
|
|
|
|
|
|
|
|
|
|
|
|
|
|
|
|
|
|
|
|
|
|
|
|
|
|
|
|
|
|
|
|
|
|
|
|
|
|
|
|
|
|
|
|
|
|
|
|
|
|
|
|
|
|
|
|
|
|
|
|
|
|
|
|
|
|
|
|
|
|
|
|
|
|
|
|
|
|
|
|
|
|
|
|
|
|
|
|
|
|
|
|
|
|
|
|
|
|
|
|
|
|
|
|
|
|
|
|
|
|
|
|
|
|
|
|
|
|
|
|
|
|
|
|
|
|
|
|
|
|
|
|
|
|
|
|
|
|
|
|
|
|
|
|
|
|
|
|
|
|
|
|
|
|
|
|
|
|
|
|
|
|
|
|
|
|
|
□ IP address label |
1 |
(for IP address input) |
|
□ Push-in Plus Terminal Blocks |
1 |
erroneous insertion prevention |
|
label |
|
Step2 Preparation of necessary items
□ PC |
□ Unit power supply 100 VAC to 240 VAC or |
(Requires CD-ROM drive, LAN port)* |
24 VAC/DC |
□ LAN cable |
|
(Category 5 or above, straight type or |
□ Startup Guide (This Document) 1 |
cross type acceptable) |
|
□ DIN rail or M3 screws |
|
□ Push-in Plus Terminal Block wiring |
|
Motor Condition |
|
Monitoring Device |
|
K6CM |
|
Startup Guide |
0 |
|
1 |
|
2 |
|
3 |
|
4 |
|
5 |
|
6 |
|
7 |
* Prepare a PC that meets the following conditions.
Item |
|
Description |
OS |
Windows 7, Windows 8.1, Windows 10 (32 bit/64 bit) (JP/EN) |
|
CPU |
1 |
GHz or more, 32 bit or 64 bit processor |
|
|
|
Memory |
1 |
GB or more, or 2 GB or more (in the case of 64 bits) |
Disk reserved area capacity |
16 GB or more, or 20 GB or more (in the case of 64 bits) |
|
|
|
|
Monitor resolution |
1024 × 768 (XGA), High Color 16 bit or more |
|
.NET Framework |
.NET Framework 4 and .NET Framework 3.5 SP1 |
|
|
|
|
Others |
CD-ROM drive: For installation |
|
|
LAN port: For network connection |
|
3
Step3 Installation of Motor condition monitoring Tool
1 Installing .NET Framework 3.5 SP1
The Motor condition monitoring Tool requires Microsoft .NET Framework 3.5 SP1 to run the program. If .NET Framework 3.5 SP1 is not installed on your PC, install it manually.
It is installed as a standard on Windows 7 PC. Follow steps (2) to (4) below. It is not installed as a standard on Windows 8.1 and Windows 10 PC.
When using on a PC with Windows 8.1 or Windows 10, perform the steps (2) to (4) after installing the .NET Framework 3.5 SP1 shown in the following step (1).
(1)Install .NET Framework 3.5 SP1.
●Installing by connecting the PC to the network
[1]Install by "dotnetfx35.exe" in the Framework folder on the CD.
[2]If you use Japanese 32bitOS, install language pack by "dotnetfx35langpack _ x86ja.exe" in Framework folder on CD. If you use Japanese 64bit OS, install language pack by "dotnetfx35langpack _ x64ja.exe" in Framework folder on CD.
●Installing without connecting the PC to the network
This procedure shows how to install the Motor condition monitoring Tool (and attached software) on PCs (Windows 8.1 or Windows 10 OS) that cannot connect to the network.
What are required to prepare :
•Network connected PC
•Empty recording medium (USB memory of 8GB or more, HDD or DVD)
This procedure also details the resolution technique published on the following Microsoft official website. Microsoft official website URL : https://msdn.microsoft.com/ja-jp/library/windows/hardware/dn898529(v=vs.85).aspx#nointerent
*In Windows version 8.1 or later OS version, the "Microsoft .NET Framework 3.5" required for installing the above mentioned attached software is not installed in advance. Therefore, if you are using a PC with the above OS version and cannot connect to the network, you cannot acquire the above. NET and you cannot install the software included with the Motor condition monitoring Tool.
Outline of this procedure
(Install Motor condition monitoring Tool after [3])
Network |
|
||
|
PC |
K6CM |
|
|
[1] Obtaining OS Win 8.1/10 |
||
|
|
||
|
media creation |
|
|
PC |
[3] . NET Framework 3.5 |
||
Offline installation |
|||
|
|||
|
[2] Preparation of OS media |
|
|
USB memory, HDD Or DVD
[1]Acquire OS media creation tool
To create the OS media that matches the Windows version of the PC you want to install the Motor condition monitoring Tool, download the OS media creation tool "MediaCreationTool.exe" from the official Microsoft page at the following URL.
Windows 8.1 https://www.microsoft.com/en-us/software-download/windows8 Windows 10 https://www.microsoft.com/en-us/software-download/windows10
* If you do not know the Windows version of your PC, perform the following procedure.
1)Hold down the Windows key and press the R key.
Alternatively, click [Run] from the [Start] menu.
4
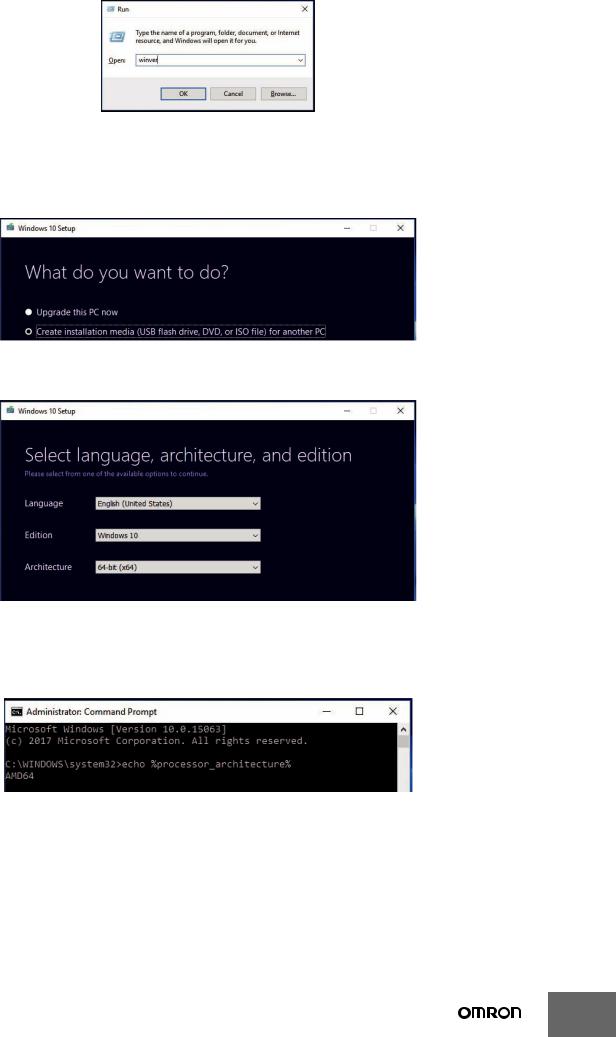
2) Enter “winver”and click [OK].Button.
3)The Windows version is displayed, so confirm.
[2]OS media creation
Run the downloaded OS media creation tool.
Be sure to select "Create installation media of another PC" for the option after agreeing to the license terms
In the selection screen of language, architecture, and edition, uncheck the check box at the bottom and select the same one as the PC you want to install the Motor condition monitoring Tool.
* If you do not know the architecture of your PC, perform the following procedure.
1)On the personal PC where you want to install the Motor condition monitoring Tool, hold down the Windows key and press the R key. Alternatively, click [Run] from the [Start] menu.
2)Enter “cmd” and click OK. A command prompt is launched.
3)Enter “echo %processor_architecture%”and press Enter key.
4) 32 bits are displayed as x86, 64 bits are displayed as x64, and so on.
5
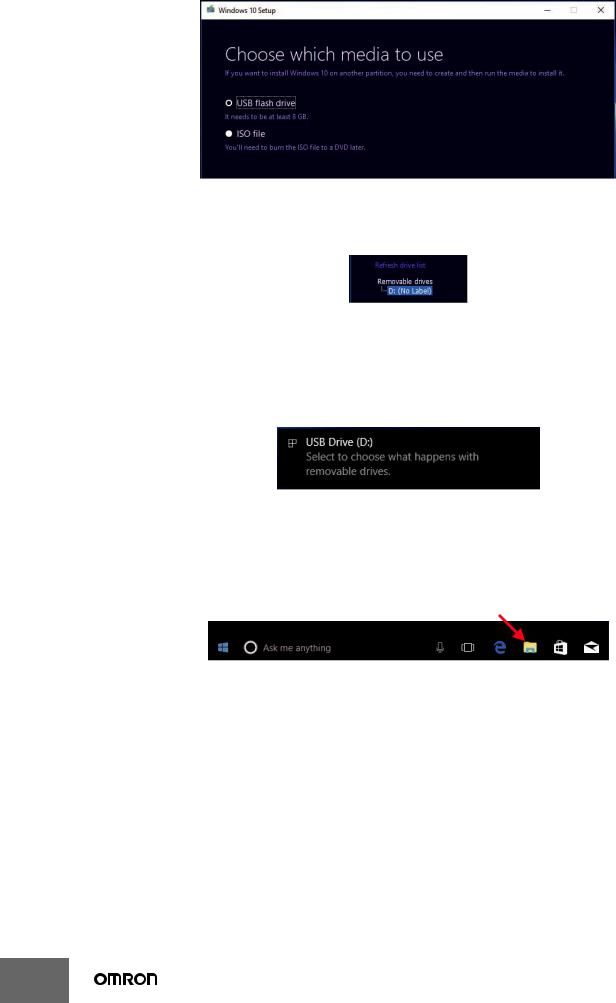
Select the media type to use.
When selecting "USB flash drive", be sure to prepare an empty recording medium (USB memory of 8 GB or more,
HDD or DVD) without data.
At this point, connect the USB memory to your PC and select "Next" on the installation screen. Confirm that the
USB memory is normally recognized by the PC and displayed as a removable drive as below and proceed with creating OS media.
[3].NET Framework 3.5 Offline installation
Make the Motor condition monitoring Tool recognize the created OS media on the PC you want to install (If you are using a USB memory or HDD, connect it to a PC, mount it on a PC if it is a DVD).
When the OS media is recognized correctly, the following popup will be displayed. In this example, you can see that the USB memory as the OS media has been assigned to D drive (D :).
As we will use the drive information we have confirmed in the later operation, be sure to check which drive the OS media is assigned to.
* It is possible to check the media with other methods.
Click the Explorer icon located at the bottom of the desktop screen.(If there is no icon, hold down the Windows key and press the E key to start the explorer screen)
6
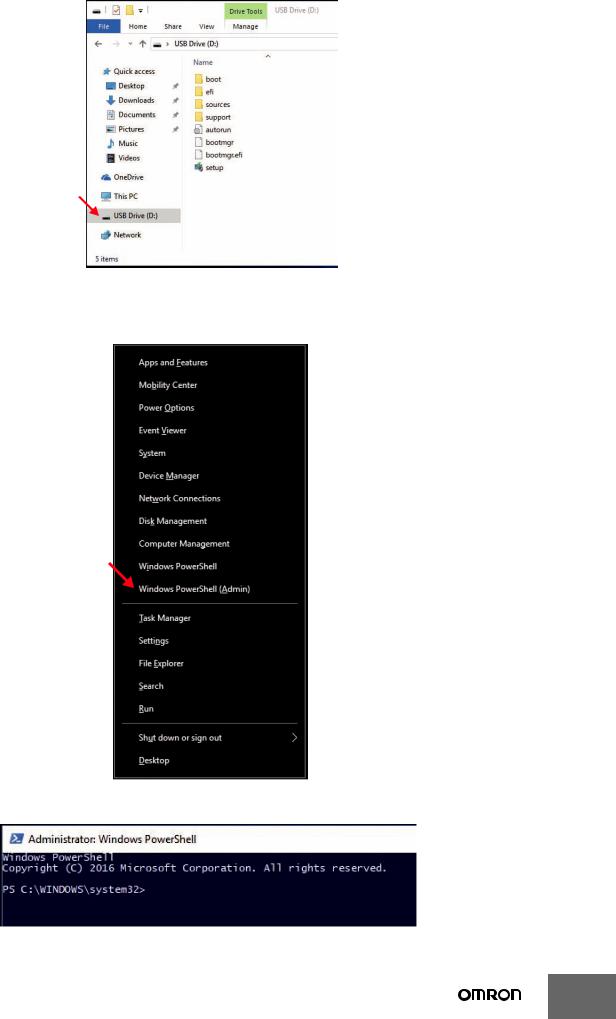
Since the Explorer screen starts, click the drive icon displayed on the left side of the screen that started up.If the
OS media is recognized correctly, the drive containing the following data will be displayed.
Execute the command prompt (shell script) with administrator privileges after confirming that the OS media was recognized correctly. Hold down the Windows key while pressing the X key, the following screen will be displayed, so select Windows PowerShell (Administrator).
After that, confirm that the following command prompt screen is displayed.
7
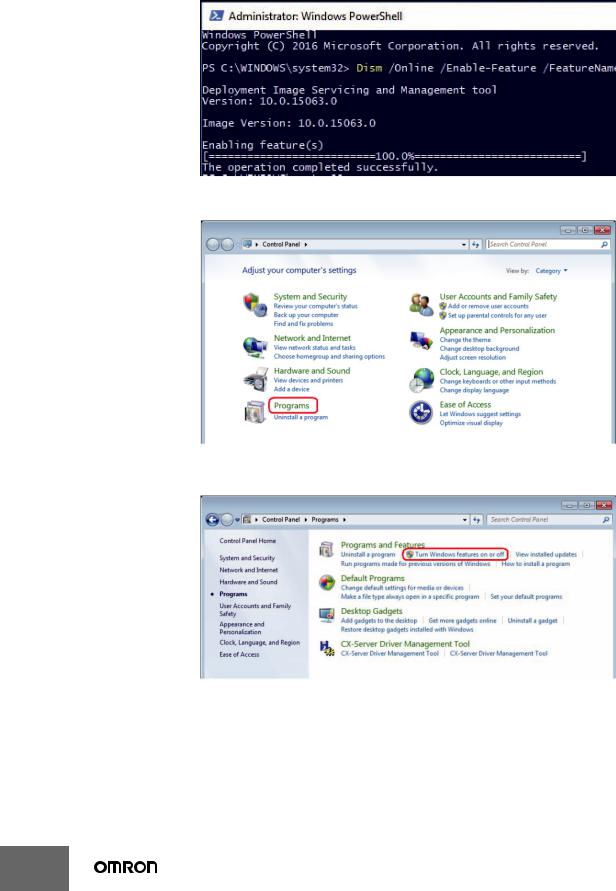
Enter the following command and press Enter to execute. In the command, "D:" is the drive to which the OS media checked earlier was assigned. Depending on the user environment used.
As you can see, be sure to modify the command according to the drive information you have confirmed.
Command :
Dism /Online /Enable-Feature /FeatureName:NetFX3 /All/Source:D:¥Sources¥SxS /LimitAccess
* Enter the command on one line without line break. Insert a space between Dism and the set of words (/ ***) that compose the command.
Wait for a while until the completion screen as shown below. If this screen can be confirmed, the installation of
.NET Framework 3.5 will be completed, continue installing the Motor condition monitoring Tool.
(2) Select "Programs" from the Control Panel.
(3) Select "Turn Windows features on or off".
8

(4) Check the check box of "Microsoft .NET Framework 3.5.1" and click "OK".
2 Installation Procedures
This section shows the procedure for installing a new Motor condition monitoring Tool.
Precautions for Correct Use
"User account control" may be displayed depending on PC settings during installation procedure. In that case, click "yes" if there is no problem.
(1)Insert the attached CD in the PC and select "setup.exe" from the autoplay screen.
If automatic playback was not done, double-click the "setup.exe" file under the CD drive. The following [Select language setting] Dialog Box will be displayed.
 CAUTION
If the following message is displayed, the old version of CX-Compolet/SYSMAC Gateway has already been installed on the PC. In order to use Motor condition monitoring Tool, upgrade of CX-Compolet/
SYSMAC Gateway is necessary.
Please read "3.5. Upgrade installation" of "CX-Compolet_SGW_InstallationGuide_E.pdf" in the Manual folder on the CD and uninstall the CX-Compolet/SYSMAC Gateway after backing up the data. Then reperform step (1).
9
 CAUTION
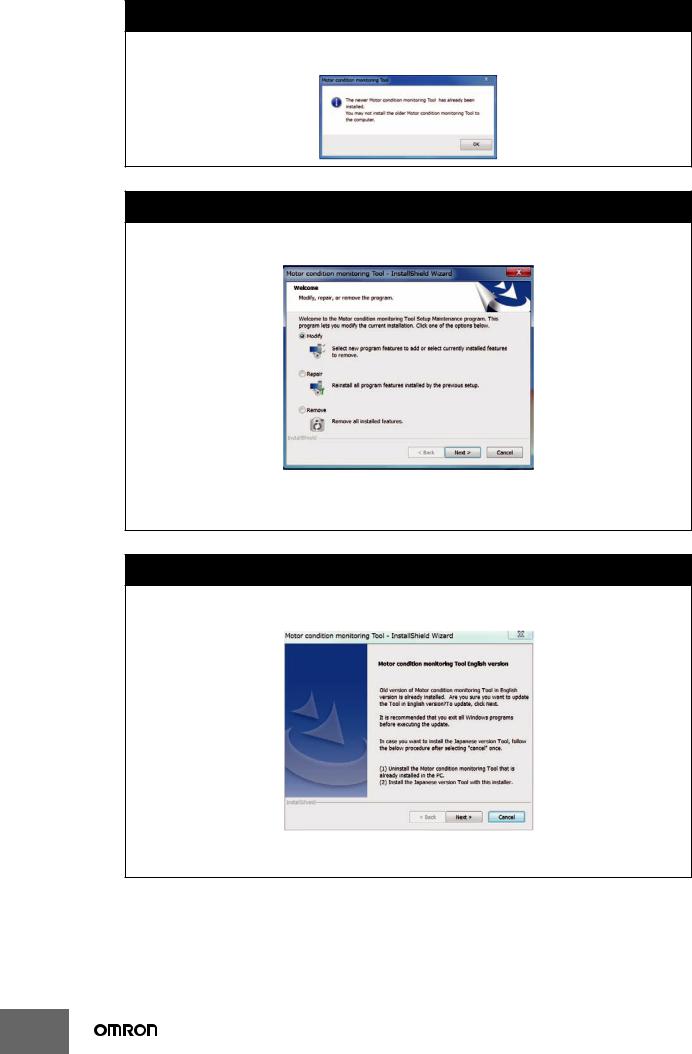
If the following message is displayed, a newer version of the software tool than the launched installer has already been installed on your PC. Therefore, installation is unnecessary.
 CAUTION
If the following message is displayed, a software tool of the same version as the launched installer has already been installed in your PC.
[Modify] is used to change the function to be installed. Do not use it now for future expansion. [Repair] is used to reinstall the software tool.
[Remove] is used to uninstall the software tool.
 CAUTION
If the following message is displayed, a older version of the software tool than the launched installer is installed on your PC.
To update the software tool, click [Next] Button. Start updating after clicking. When the update is completed, a completion message is displayed.
10
(2)Select "Japanese" or "English" and click the [Next] Button.
The following Dialog Box will be displayed.
* After installation, you cannot change the language of the software tool. If you want to change the language, reinstall the software tool.
*If you select Japanese on your PC with other than Japanese OS, depending on the environment of your PC, the characters during installation may not be displayed correctly, or the software tool may not work properly.
(3)Click the [Next] Button.
The License Agreement Dialog Box appears.
(4)Please read "License Agreement" carefully and check "I accept the terms of the license agreement" and click the [Next] Button if you can agree to all the terms.
The [User Information] Dialog Box appears.
(5)Click the "Install" Button.
Installation of the Motor condition monitoring Tool starts.
(6)Install the Communications Middleware. Select the language to display in the installation.
If an old version of the Communications Middlware is already installed, select whether to update Communications Middlware.
If a new version of the Communications Middlware is already installed, go to step (15).
(7)While the installation wizard is running, the [Windows Security] Dialog Box will be displayed.
Click the [Install] Button.
"OMRON Corporation Modems" is installed and the following [Windows Security] Dialog Box will be displayed.
(8) Click the [Install] Button.
"OMRON Corporation Ports (COM & LPT)" is installed.
11
 Loading...