


Health Management Software
User’s Help Manual
Copyright 2006 Omron Healthcare Co., Ltd.
World Rights Reserved
IM-HMS-HEMSOFTIT2-01-12/06

TABLE OF CONTENTS
Before Using the Software
Important Information . . . . . . . . . . . . . . . . . . . . . . . . . . . . . . . . . . . . . . . . . . . . . . . . . . . . 4 Operating Environment Requirement . . . . . . . . . . . . . . . . . . . . . . . . . . . . . . . . . . . . . . . . . 5
User Management Screen
Register new user . . . . . . . . . . . . . . . . . . . . . . . . . . . . . . . . . . . . . . . . . . . . . . . . . . . . . . . 6 Edit a user . . . . . . . . . . . . . . . . . . . . . . . . . . . . . . . . . . . . . . . . . . . . . . . . . . . . . . . . . . . . . 7 Delete a user . . . . . . . . . . . . . . . . . . . . . . . . . . . . . . . . . . . . . . . . . . . . . . . . . . . . . . . . . . . 7 Search for a user on the user list . . . . . . . . . . . . . . . . . . . . . . . . . . . . . . . . . . . . . . . . . . . . 7 View user data . . . . . . . . . . . . . . . . . . . . . . . . . . . . . . . . . . . . . . . . . . . . . . . . . . . . . . . . . . 7 Change the title names on user list . . . . . . . . . . . . . . . . . . . . . . . . . . . . . . . . . . . . . . . . . . . 7 Change sorting order or hide user list at startup . . . . . . . . . . . . . . . . . . . . . . . . . . . . . . . . . 8 Create CSV file . . . . . . . . . . . . . . . . . . . . . . . . . . . . . . . . . . . . . . . . . . . . . . . . . . . . . . . . . 8 Exit the screen . . . . . . . . . . . . . . . . . . . . . . . . . . . . . . . . . . . . . . . . . . . . . . . . . . . . . . . . . . 8
Blood Pressure Data Management Screen
Menu Area
Transfer the data from the monitor to the PC . . . . . . . . . . . . . . . . . . . . . . . . . . . . . . . . . . . 9 Print the screen . . . . . . . . . . . . . . . . . . . . . . . . . . . . . . . . . . . . . . . . . . . . . . . . . . . . . . . . . 9 Set the target blood pressure . . . . . . . . . . . . . . . . . . . . . . . . . . . . . . . . . . . . . . . . . . . . . . 10 Create CSV file . . . . . . . . . . . . . . . . . . . . . . . . . . . . . . . . . . . . . . . . . . . . . . . . . . . . . . . . 10 Create PDF file . . . . . . . . . . . . . . . . . . . . . . . . . . . . . . . . . . . . . . . . . . . . . . . . . . . . . . . . 11 Exit the screen . . . . . . . . . . . . . . . . . . . . . . . . . . . . . . . . . . . . . . . . . . . . . . . . . . . . . . . . . 11
Data Display Area
Function Chart . . . . . . . . . . . . . . . . . . . . . . . . . . . . . . . . . . . . . . . . . . . . . . . . . . . . . . . . . 11 Date range selection . . . . . . . . . . . . . . . . . . . . . . . . . . . . . . . . . . . . . . . . . . . . . . . . . . . . . 12 Time range selection . . . . . . . . . . . . . . . . . . . . . . . . . . . . . . . . . . . . . . . . . . . . . . . . . . . . 12 Graph selection . . . . . . . . . . . . . . . . . . . . . . . . . . . . . . . . . . . . . . . . . . . . . . . . . . . . . . . . 12 View the data list . . . . . . . . . . . . . . . . . . . . . . . . . . . . . . . . . . . . . . . . . . . . . . . . . . . . . . . 15 Enter data manually . . . . . . . . . . . . . . . . . . . . . . . . . . . . . . . . . . . . . . . . . . . . . . . . . . . . . 17
Walking Data Management Screen
Menu Area
Transfer the data from the step counter to the PC . . . . . . . . . . . . . . . . . . . . . . . . . . . . . . . 18 Print the screen . . . . . . . . . . . . . . . . . . . . . . . . . . . . . . . . . . . . . . . . . . . . . . . . . . . . . . . . 18 Set the daily goal . . . . . . . . . . . . . . . . . . . . . . . . . . . . . . . . . . . . . . . . . . . . . . . . . . . . . . . 19 Set the startup screen . . . . . . . . . . . . . . . . . . . . . . . . . . . . . . . . . . . . . . . . . . . . . . . . . . . . 19 Set the starting date on Weekly graph . . . . . . . . . . . . . . . . . . . . . . . . . . . . . . . . . . . . . . . 19 Create CSV file . . . . . . . . . . . . . . . . . . . . . . . . . . . . . . . . . . . . . . . . . . . . . . . . . . . . . . . . 20 Create PDF file . . . . . . . . . . . . . . . . . . . . . . . . . . . . . . . . . . . . . . . . . . . . . . . . . . . . . . . . 20 Exit the screen . . . . . . . . . . . . . . . . . . . . . . . . . . . . . . . . . . . . . . . . . . . . . . . . . . . . . . . . . 20
Data Display Area
Date range selection . . . . . . . . . . . . . . . . . . . . . . . . . . . . . . . . . . . . . . . . . . . . . . . . . . . . . 21 Graph selection . . . . . . . . . . . . . . . . . . . . . . . . . . . . . . . . . . . . . . . . . . . . . . . . . . . . . . . . 21 Event and step counter usage . . . . . . . . . . . . . . . . . . . . . . . . . . . . . . . . . . . . . . . . . . . . . . 22 View walking data . . . . . . . . . . . . . . . . . . . . . . . . . . . . . . . . . . . . . . . . . . . . . . . . . . . . . . 22
2

TABLE OF CONTENTS
Combination Data Management Screen
Menu Area
Print the screen . . . . . . . . . . . . . . . . . . . . . . . . . . . . . . . . . . . . . . . . . . . . . . . . . . . . . . . . 23 Create CSV file . . . . . . . . . . . . . . . . . . . . . . . . . . . . . . . . . . . . . . . . . . . . . . . . . . . . . . . . 23 Create PDF file . . . . . . . . . . . . . . . . . . . . . . . . . . . . . . . . . . . . . . . . . . . . . . . . . . . . . . . . 23 Exit the screen . . . . . . . . . . . . . . . . . . . . . . . . . . . . . . . . . . . . . . . . . . . . . . . . . . . . . . . . . 24
Data Display Area
Date range selection . . . . . . . . . . . . . . . . . . . . . . . . . . . . . . . . . . . . . . . . . . . . . . . . . . . . . 25 Walking graph selection . . . . . . . . . . . . . . . . . . . . . . . . . . . . . . . . . . . . . . . . . . . . . . . . . 25 Time range selection . . . . . . . . . . . . . . . . . . . . . . . . . . . . . . . . . . . . . . . . . . . . . . . . . . . . 25
Transferring/Merging User Data . . . . . . . . . . . . . . . . . . . . . . . . . . . . . . . . . . . . . . . . . . . . . . . .26 Uninstalling the Software . . . . . . . . . . . . . . . . . . . . . . . . . . . . . . . . . . . . . . . . . . . . . . . . . . . . . .29
Before Using the Software
3

Important Information
•Use this software and Help Manual under conditions described on the License Agreement applicable to this product.
•It is prohibited to use or copy all or part of this software and Help Manual without prior permission from Omron Healthcare Co.,Ltd.
•The specifications of this software and the descriptions in this Help Manual are subject to change without prior notice.
•The screen images printed in this Help Manual may slightly differ from the images displayed by the software.
•Microsoft, Windows, Internet Explorer, Access, and Excel are registered trademarks or trademarks of Microsoft Corporation in the United States and other countries.
•Adobe, Adobe logo, Acrobat and Reader are registered trademarks or trademarks of Adobe Systems Incorporated in the United States and other countries.
•Other company names and product names used in this Help Manual are trademarks or registered trademarks of the respective companies. Trademark and registered trademark symbols such as ® and TM are omitted in this Help Manual.
•In this Help Manual, the Microsoft Windows XP Operating System is abbreviated to “Windows XP”, and the Microsoft Windows 2000 Professional Operating System is abbreviated to “Windows 2000”. Also, Microsoft Internet Explorer is abbreviated to “Internet Explorer”, and Microsoft Excel is abbreviated to “Excel”.
4

Operating Environment Requirement
The following operating environments are required to run this software.
Supported OS: |
Microsoft Windows 2000 Professional |
|
Microsoft Windows XP Home Edition |
|
Microsoft Windows XP Professional Edition |
PC: |
600 MHz or higher, Pentium compatible CPU, PC/AT compatible machine |
Memory capability: |
128 MB or more |
Hard disc space: |
32 MB or more |
Display: |
Super VGA (800 × 600 pixel) or higher resolution video adapter and monitor |
Others: |
A CD-ROM or DVD drive |
|
USB connector (USB Revision 1.1 compliant) |
|
A printer |
|
Microsoft Internet Explorer 5.0 or higher |
|
Adobe Acrobat Reader 5.0 or higher |
5

User Management Screen
This software can register multiple users and manage the data for their blood pressure measurements and walking. Data is controlled by user name.
NOTE: • The number of users who can register for this software varies depending on the amount of free disc space in your PC.
User List
Register new user
Click the [Add User] icon then enter the user name and other information if necessary into the memo fields. Click [OK] to register.
NOTES: • A user name must be entered to register a new user.
•The user name can be up to 28 characters, using either letters or numbers.
•The number of users can be up to 1000 users.
Click [Password Options] on the dialog box to set a password if necessary.
Click [OK] to confirm.
NOTES: • Remember your password. If you forget your password you cannot log in, edit or delete the user. Write your password down, and keep it in a secure location.
•To cancel the password leave the “New Password” and the “Input again for confirmation” fields blank.
6
User Management Screen
Edit a user
Select the user name on the user list then click the [Edit User] icon.
Delete a user
Select the user name on the user list then click the [Delete User] icon.
NOTE: • To select multiple users click the desired users while pressing the Ctrl key or the Shift key.
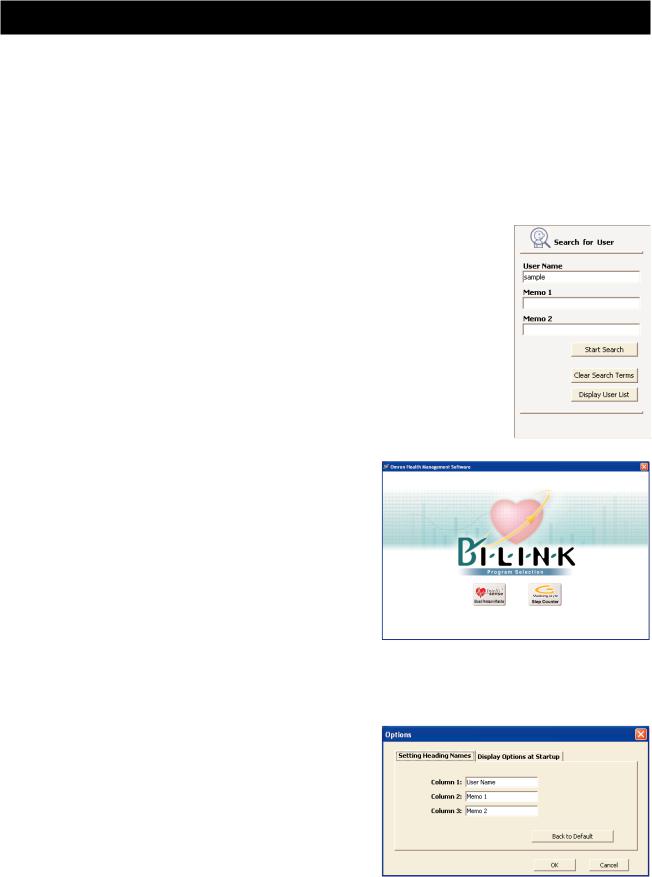
Search for a user on the user list
Enter the keywords in “User Name”, “Memo 1” or “Memo 2” then click [Start Search].
Click [Clear Search Terms] to clear the keywords. Click [Display User List] to display all users.
View user data
Select the user name on the user list then click the [Graphs Screen] icon.
When you click on the [Graphs Screen] icon for the first time, the dialog box to select [Blood Pressure Monitor] or [Step Counter] will appear. Select the icon that represents the data you want to view.
The next time that you click on the [Graphs Screen] icon, it will automatically display the screen for the data type you viewed the previous time. If you wish to change which information you want to view, click on the [Change Screens] icon, and pick the appropriate selection.
Change the title names on user list
Click the [Option] icon then click the [Setting Heading
Names] tab.
Enter title names as needed.
Click [OK] to confirm.
7
User Management Screen
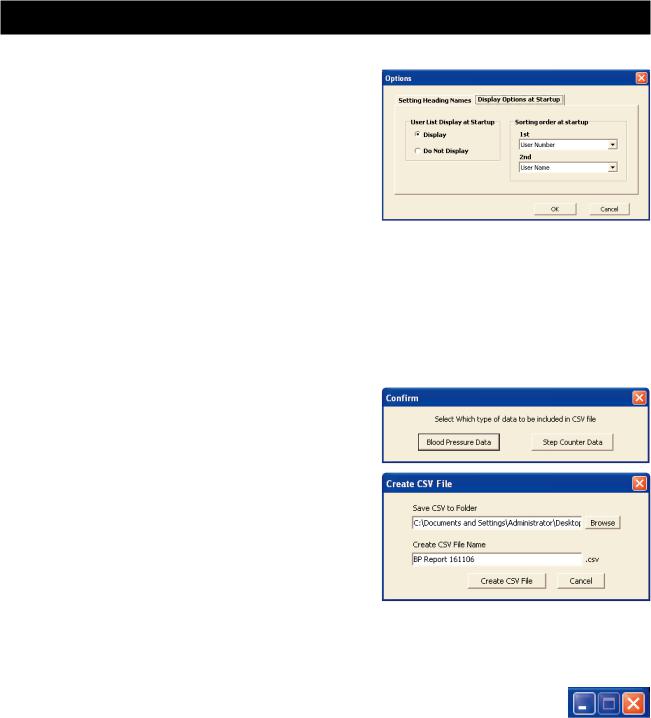
Change sorting order or hide user list at startup
Click the [Option] icon then click the [Display Options at Startup] tab.
Select sorting order on “Sorting order at startup” to change the order at startup.
Select “Do not Display” on “User List Display at Startup” to hide the user list at startup.
Create CSV file
This software can create a CSV file for export and database purposes for a single user or multiple users. CSV files can be used to bring data into other programs, such as EXCEL.
NOTE: • To select multiple users click the desired users while pressing the Ctrl key or the Shift key.
1.Select single or multiple users on the user list then click the [Create CSV file] icon.
2.Click either [Blood Pressure Data] or [Step Counter Data].
3.Select the destination folder and change the file name if necessary.
4.Click [Create CSV File] to save the file to the destination folder.
Exit the screen
Click [X] at the upper right of the screen. You will exit the Health Management Software program.
8

Blood Pressure Data Management Screen
The Blood Pressure Data Management screen consists of the following major areas.
Menu Area
Data Display Area
Menu Area
Transfer the data from the monitor to the PC
1.Connect the USB cable from the Omron blood pressure monitor to the PC. Click the [Download Data] icon.
2.The Confirm dialog appears. Click [Yes] to import the data.
When you transfer the data for the first time, the [Options] box as shown below will appear. Select USER A or USER B of the Omron blood pressure monitor you use.
3.Start importing data. Click [Cancel] if you want to cancel.
4.The dialog appears when complete. Click [OK].
NOTES: • You cannot transfer the data while taking a blood pressure reading.
• Do not turn the PC off or unplug the USB cable while the data is being transferred.
Print the screen
Click the [Print] icon, then set up to print according to your needs.
9
 Loading...