


HEM-705CP
Automatic Blood Pressure Monitor
with Printer
Model HEM-705CP
INSTRUCTION MANUAL
R
ENGLISH
ESPAÑOL

TITLE
2
TITLE
TABLE OF CONTENTS
Before Using the Monitor
Introduction ........................................................................................ 3
Important Safety Notes ....................................................................... 4
Before Taking a Measurement ........................................................... 5
Operating Instructions
Know Your Unit .................................................................................. 6
Battery Installation ............................................................................. 7
Connecting the Printer ........................................................................ 8
Loading the Paper ............................................................................... 9
Setting the Date and Time ................................................................ 10
Applying the Arm Cuff .................................................................... 12
Taking a Measurement ..................................................................... 14
Using the Memory Function ............................................................ 16
Using the Printer ............................................................................... 17
Care and Maintenance
Care and Maintenance ...................................................................... 20
Error Indicators and Troubleshooting Tips ...................................... 21
Quick Reference Guide .................................................................... 23
FCC Statement ................................................................................. 25
Warranty Information ....................................................................... 26
Specifications ................................................................................... 27

INTRODUCTION
3
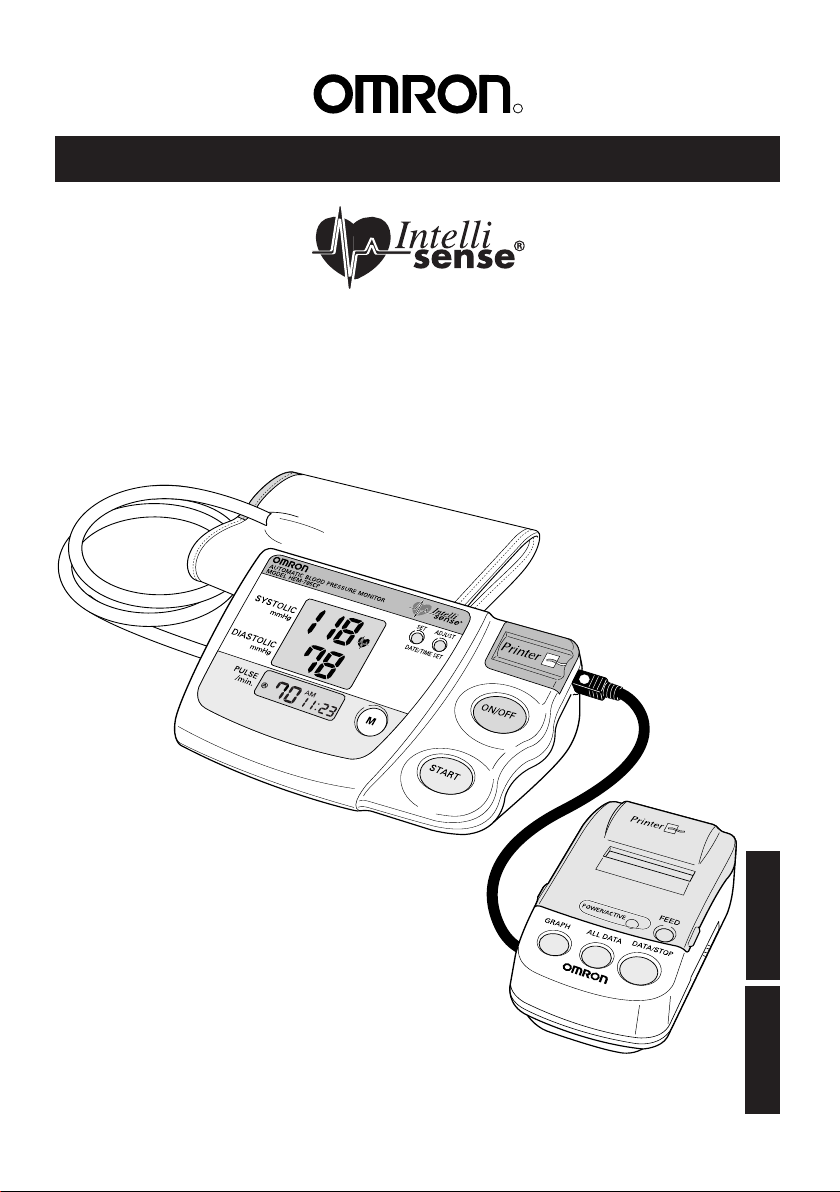
Thank you for purchasing the Omron
®
HEM-705CP Intellisense
®
Automatic Blood Pressure Monitor with Printer
Fill in for future reference
DATE PURCHASED: ______
SERIAL NUMBER: ________
Staple your purchase receipt here.
Your new digital blood pressure monitor uses the oscillometric method of
blood pressure measurement. This means the monitor detects your blood’s
movement through your brachial artery and converts the movements into
a digital reading. An oscillometric monitor does not need a stethoscope
so the monitor is simple to use.
The HEM-705CP comes with the following components:
• Monitor • Standard Cuff (9''-13'' arm circumference)
• Printer • Printer Tape
• Instruction Manual printed in English and Spanish
The HEM-705CP Intellisense
®
Automatic Blood Pressure Monitor with
Printer is intended for home use.
SAVE THESE INSTRUCTIONS

4
IMPORTANT SAFETY NOTES
To assure the correct use of the product basic safety measures should
always be followed including the precautions listed below:
þ Read all information in the instruction book and any other
literature included in the box before using the unit.
þ Contact your physician for specific information about your
blood pressure. Follow the instructions of your healthcare provider.
þ Operate the unit only as intended. Do not use for any other purpose.
þ The unit is intended for use in measuring blood pressure and
pulse rate in adult patient population. Do not use on infants.
þ Do not use a cellular phone near the unit. It may result in
operational failure.
þ Do not plug or unplug the adapter power cord with wet hands.
þ Changes or modifications not approved by Omron Healthcare will
void the user warranty. Do not disassemble or attempt to repair
the unit or components.

BEFORE TAKING A MEASUREMENT
5
To ensure a reliable reading follow these recommendations:
1. Avoid eating, smoking, and exercising for 30 minutes before taking
a measurement. Rest for at least 15 minutes before taking
the measurement.
2. Stress raises blood pressure. Avoid taking measurements during
stressful times.
3. Measurements should be taken in a quiet place.
4. Remo
ve tight-fitting clothing from your left arm.
5. Sit in a chair with your feet flat on the floor. Rest your left arm on
a table so that the cuff is at the same level as your heart.
6. Remain still and do not talk during the measurement.
7. Keep a record of your blood pressure and pulse readings for your
physician. A single measurement does not provide an accurate
indication of your true blood pressure. You need to take and record
several readings over a period of time. Try to measure your blood
pressure at the same time each day for consistency.
8. Wait 2-3 minutes between measurements. The wait time allows the
arteries to return to the condition prior to taking the blood pressure
measurement. You may need to increase the wait time depending on
your individual physiological characteristics.
TITLE
TITLE
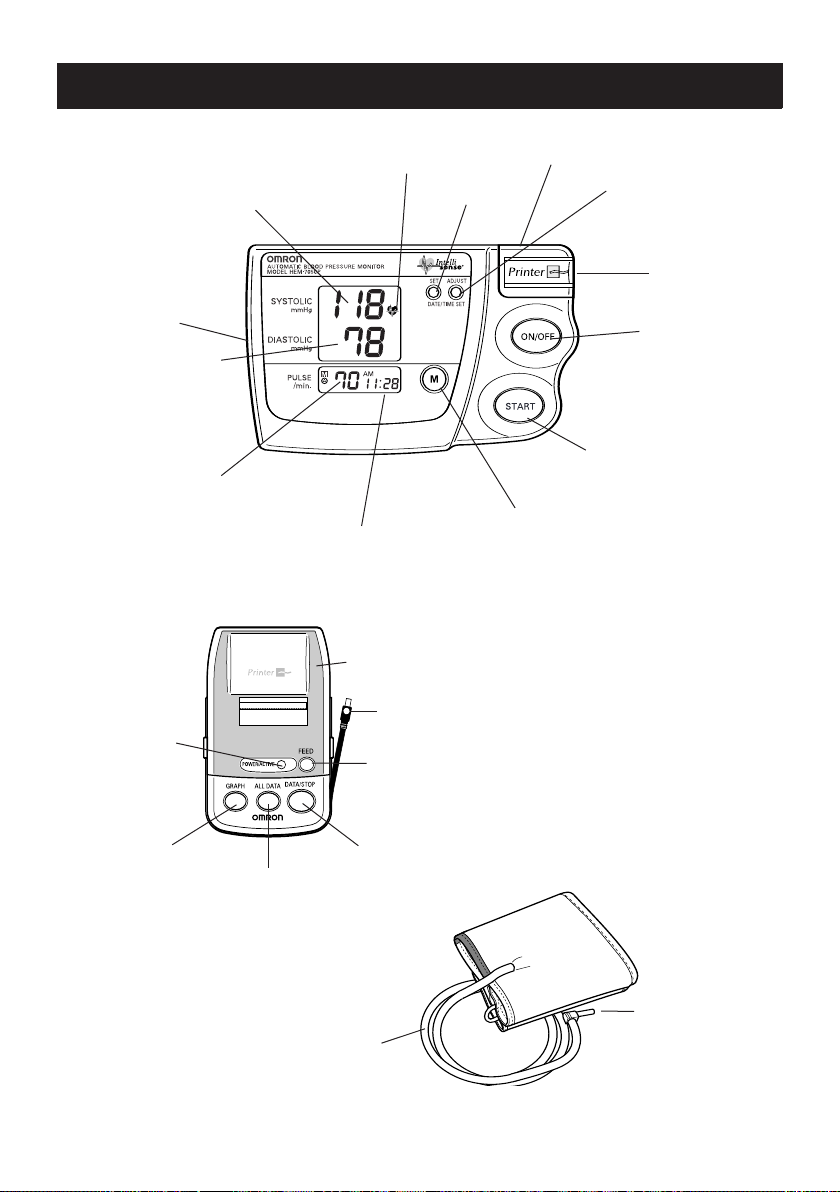
KNOW YOUR UNIT
START Button
Paper Feed
Pulse Rate
Print Graph
Date/Time Display
Heart Symbol
Air
T
ube
Memory Button
S
ystolic Blood Pressure
ON/OFF Button
Set Date/Time
Adjust Date/Time
Diastolic Blood
Pressure
Print All Data
Print Current
Data/Stop Printing
Printer Cover
Air Plug
(Connects to Air Jack)
Main Unit:
Components:
AC Adapter Jack
Printer Jack
Cuff Jack
Printer Cable Plug
Power/Operation
Light
6
Arm Cuff
Printer
TITLE
TITLE
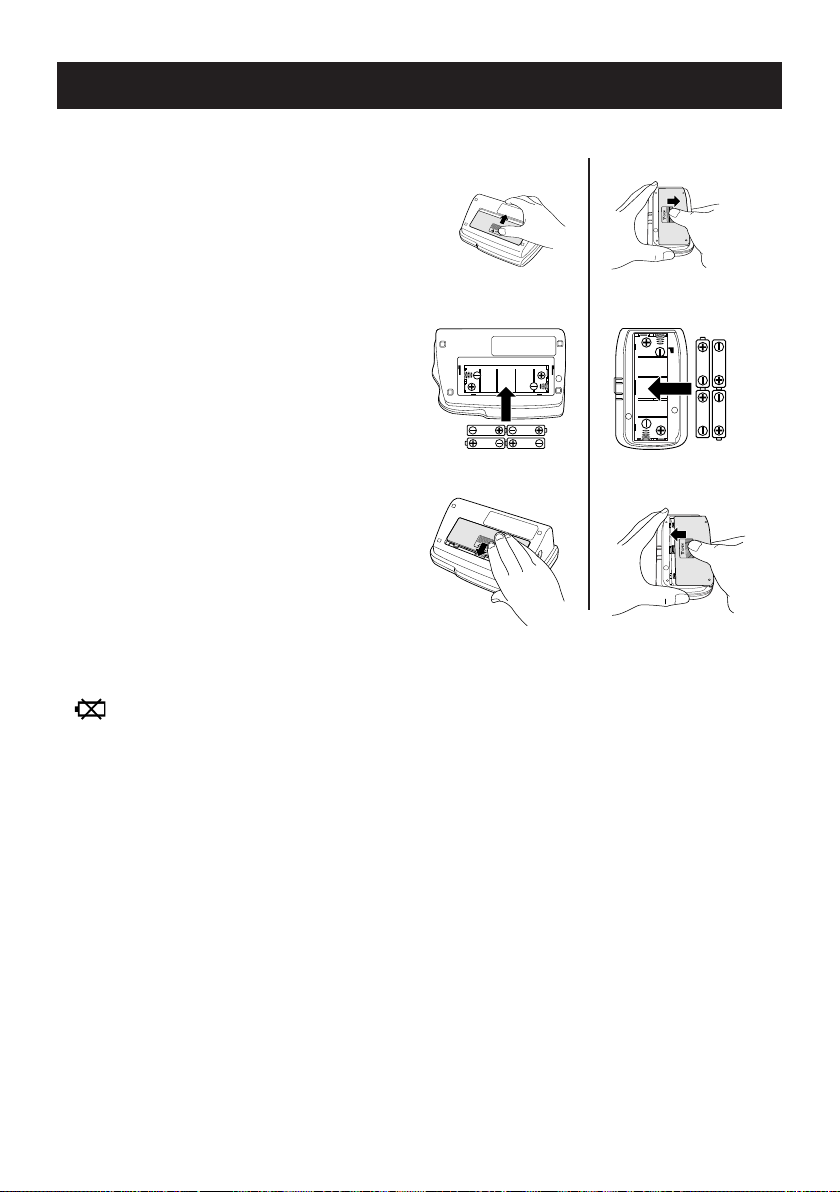
BATTERY INSTALLATION/REPLACEMENT
1. Press the ▼ OPEN indicator
on the battery cover and slide
the cover off in the direction
of the arrow.
2. Install 4 “AA” size batteries
so the + (positive) and -
(negative) polarities match
the polarities of the battery
compartment as indicated.
3. Replace the battery cover.
Main Unit:
Printer Unit:
7
BATTERY REPLACEMENT
Low Battery Indicator
When the Low Battery Indicator appears on the display screen remove
all the batteries. Replace with four new batteries at the same time.
Long-life alkaline batteries are recommended.
NOTE: Measurement values stored in the memory will not be
deleted during battery replacement. After replacing the
batteries, reset the date and time. Refer to page 9, Setting
the Date and Time.
TITLE
8
TITLE
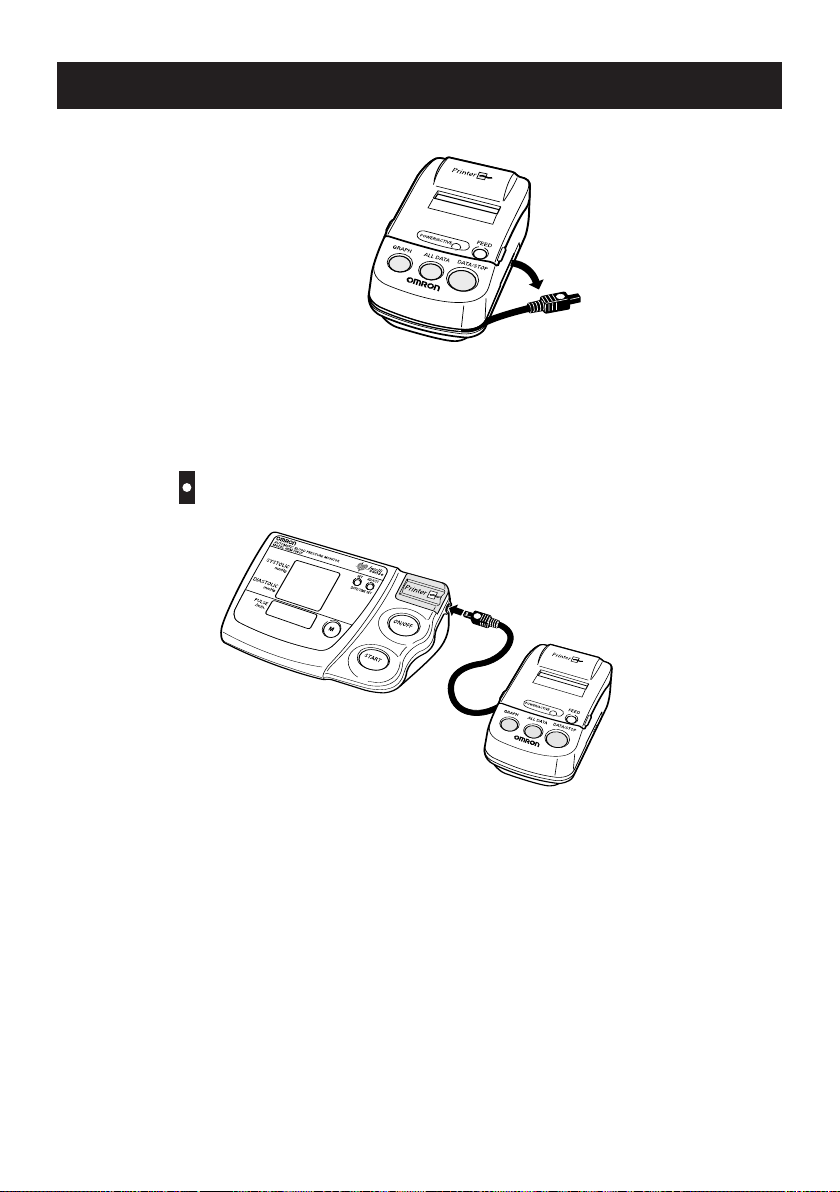
CONNECTING THE PRINTER
1. Remove the printer cord from
around the printer unit.
2. Connect the printer to the blood pressure monitor. Insert the cable plug
with the indicator facing upward.
CAUTION: Inserting the cable plug in any other position will
damage the monitor.
9
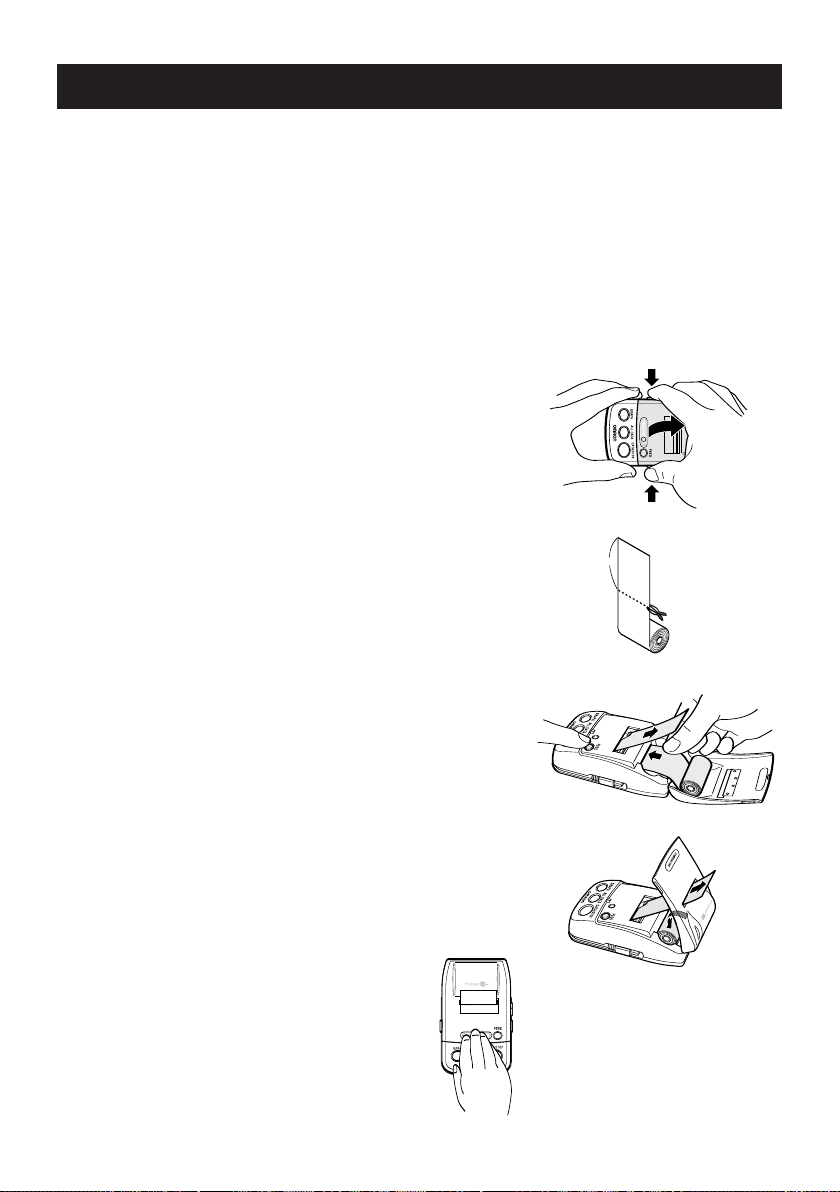
LOADING THE PRINTER PAPER
This printer uses OMRON
®
thermal paper, part number 90TRP. Use
only this thermal paper or thermal paper of similar size, width 38mm,
roll diameter not to exceed 26mm.
NOTE: For information on where to purchase printer paper visit
our website at www.omronhealthcare.com or call
customer service at 1-800-634-4350.
1. Open the printer cover in the direction
as indicated by the arrow symbols in
the illustration.
2. Peel back the glued edge of the printer paper.
Cut off the first 4 inches of the paper with
a pair of scissors.
3. Insert the edge of the printer paper in paper
feeding slot. Press the FEED button until
the paper extends approximately 3 inches.
4. Insert the paper through the printer cover.
Make sure the paper extends out from the top.
5. Close the printer cover.
4in
 Loading...