


Foreword
Welcome to the growing family of new NISSAN owners. This vehicle has been delivered to you with confidence. It has been produced using the latest techniques and strict quality control.
This manual was prepared to help you understand the operation and maintenance of your vehicle so that you may enjoy many kilometers (miles) of driving pleasure. Please read through this manual before operating your vehicle.
A separate Warranty Information & Maintenance Booklet explains details about the warranties covering your vehicle.
A NISSAN dealer knows your vehicle best. When you require any service or have any questions, we will be glad to assist you with the extensive resources available for you.
IMPORTANT SAFETY INFORMATION |
MODIFICATION OF YOUR VEHICLE |
REMINDERS FOR SAFETY! |
|
Follow these important driving rules to help ensure a safe and complete trip for you and your passengers!
●NEVER drive under the influence of alcohol or drugs.
●ALWAYS observe posted speed limits and never drive too fast for conditions.
●ALWAYS use your seat belts and appropriate child restraint systems. Preteen children should be seated in the rear seat.
●ALWAYS provide information about the proper use of vehicle safety features to all occupants of the vehicle.
●ALWAYS review this Owner’s Manual for important safety information.
WHEN READING THE MANUAL
This manual includes information for all options available on this model. Therefore, you may find some information that does not apply to your vehicle.
All information, specifications and illustrations in this manual are those in effect at the time of printing. NISSAN reserves the right to change specifications or designs without notice and without obligation.
This vehicle should not be modified. Modification could affect its performance, safety or durability, and may even violate governmental regulations. In addition, damage or performance problems resulting from modifications may not be covered under NISSAN warranties.
READ FIRST — THEN DRIVE SAFELY
Before driving your vehicle, read this Owner’s Manual carefully. This will ensure familiarity with controls and maintenance requirements, assisting you in the safe operation of your vehicle.
Throughout this manual we have used the symbol  followed by the word WARNING. This is used to indicate the presence of a hazard that could cause death or serious personal injury. To avoid or reduce the risk, the procedures must be followed precisely.
The symbol  followed by the word CAUTION is also used throughout this manual to indicate the presence of a hazard that could cause minor or moderate personal injury or damages to your vehicle. To avoid or reduce the risk, the procedures must be followed carefully.
ON-PAVEMENT AND OFF-ROAD DRIVING
This vehicle will handle and maneuver differently from an ordinary passenger car, because it has a higher center of gravity for off-road use. As with other vehicles with features of this type, failure to operate this vehicle correctly may result in loss of control or an accident.
Be sure to read the “ON-PAVEMENT AND OFF-
ROAD DRIVING PRECAUTIONS” in the “5.
Starting and driving” section of this manual.
SIC0697
If you see this symbol, it means “Do not do this” or “Do not let this happen” .
If you see a symbol similar to these in an illustration, it means the arrow points to the front of the vehicle.
Arrows in an illustration that are similar to these indicate movement or action.
Arrows in an illustration that are similar to these call attention to an item in the illustration.
© 2013 NISSAN MOTOR (THAILAND) CO., LTD.
Table of contents
Illustrated table of contents |
|
0 |
|
|
|
|
|
|
Safety — seats, seat belts and supplemental |
|
1 |
restraint system |
|
|
|
|
|
|
|
|
Instruments and controls |
|
2 |
|
|
|
|
|
|
Pre-driving checks and adjustments |
|
3 |
|
|
|
|
|
|
Heater and air conditioner, and audio system |
|
4 |
|
|
|
|
|
|
Starting and driving |
|
5 |
|
|
|
|
|
|
In case of emergency |
|
6 |
|
|
|
|
|
|
Appearance and care |
|
7 |
|
|
|
|
|
|
Maintenance and do-it-yourself |
|
8 |
|
|
|
|
|
|
Technical information |
|
9 |
|
|
|
|
|
|
Index |
|
10 |
|
|
|

0 Illustrated table of contents
Seats, seat belts and Supplemental Restraint |
|
System (SRS) ......................................................................... |
0-2 |
Exterior front ............................................................................ |
0-3 |
Exterior rear ............................................................................. |
0-4 |
Passenger compartment ....................................................... |
0-5 |
Instrument panel ..................................................................... |
0-6 |
Left-Hand Drive (LHD) model ......................................... |
0-6 |
Right-Hand Drive (RHD) model ....................................... |
0-7 |
Engine compartment .............................................................. |
0-8 |
YD25DDTi engine model (LHD model) ......................... |
0-8 |
YD25DDTi engine model (RHD model) ........................ |
0-9 |
QR25DE engine model .................................................. |
0-10 |
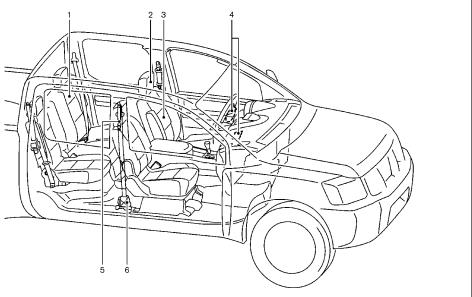
SEATS, SEAT BELTS AND
SUPPLEMENTAL RESTRAINT
SYSTEM (SRS)
Left-hand drive (LHD) Double Cab model
1.Rear seats (folding)* (Double Cab model) (P. 6-3) Jump seat* (King Cab model) (P. 1-4)
2.Head restraints (P. 1-4)
3.Front seats (P. 1-2)
4.Supplemental front impact air bags* (P. 1-21)
5.Seat belts (P. 1-5)
6.Pre-tensioner seat belt system * (P. 1-27)
*: if equipped
0-2 Illustrated table of contents
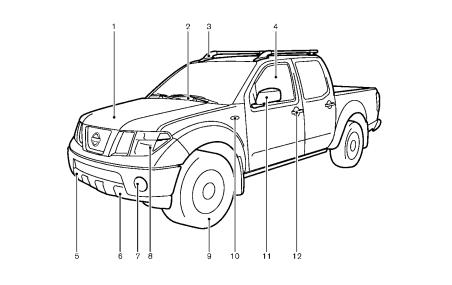
EXTERIOR FRONT
|
|
|
JVC0446X |
|
|
|
|
||
|
Double Cab model |
|
||
1. |
Hood (P. 3-9) |
7. |
Fog lights* (P. 2-20) |
11. Outside rearview mirrors (P. 3-12) |
2. |
Windshield wiper and washer |
8. |
Headlights and turn signals |
12. Doors |
|
— Wiper and washer switch (P. 2-21) |
|
— Headlight and turn signal switch (P. 2-18) |
— Keys (P. 3-2) |
|
— Wiper maintenance (P. 8-24) |
|
— Bulb replacement (P. 8-27) |
— Door locks (P. 3-2) |
|
— Washer fluid (P. 8-18) |
9. |
Tires |
— Remote keyless entry system* (P. 3-5) |
3. |
Roof rack* (P.2-28) |
|
— Tires and wheels (P. 8-32) |
|
4. |
Power windows* (P. 2-23) |
|
— Flat tire (P. 6-2) |
*: if equipped |
5. |
Recovery hook (Left-Hand Drive model) |
|
— Specifications (P. 9-7) |
|
|
(P.6-15) |
10. Side turn signal light |
|
|
6. |
Recovery hook (Right-Hand Drive model) |
|
— Switch operation (P.2-20) |
|
|
(P. 6-15) |
|
— Bulb replacement (P.8-27) |
|
Illustrated table of contents 0-3
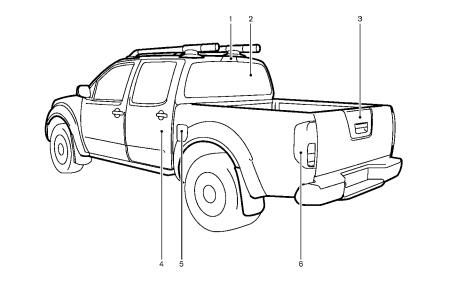
EXTERIOR REAR
|
|
JVC0447X |
|
|
|
|
Double Cab model |
|
1. |
High-mounted stop light* |
5. Fuel filler lid |
|
— Bulb replacement (P.8-27) |
— Operation (P. 3-10) |
2. |
Rear window |
— Fuel recommendation (P. 9-4) |
|
— Defogger switch* (P.2-22) |
6. Rear combination light (Bulb replacement) |
3. |
Truck box (P. 3-14) |
(P. 8-27) |
4. |
Rear doors* |
|
|
— Child safety rear door locks (Double Cab |
*: if equipped |
|
model) (P. 3-5) |
|
|
— Rear access doors (King Cab model) |
|
|
(P. 3-4) |
|
0-4 |
Illustrated table of contents |
|
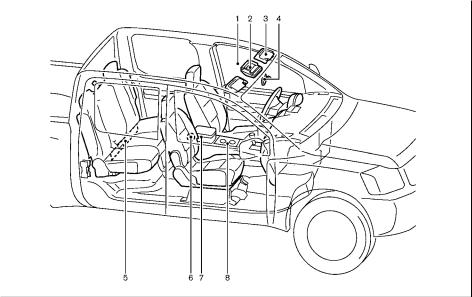
PASSENGER COMPARTMENT
Left-hand drive (LHD) Double Cab model
1.Microphone*
—Bluetooth Hands-Free phone system (P.4-27)
2.Map lights* (P. 2-29)
3.Sun visors (P. 2-28)
4.Inside rearview mirror
—Adjustment (P. 3-11)
—Compass operation* (P. 2-9)
5.Jacking equipment (P. 6-3)
6.Rear cup holders* (P. 2-27)
7.Console box* (P. 2-26)
8.Front cup holders* and ashtray* (P. 2-27)
*: if equipped
Illustrated table of contents 0-5
INSTRUMENT PANEL
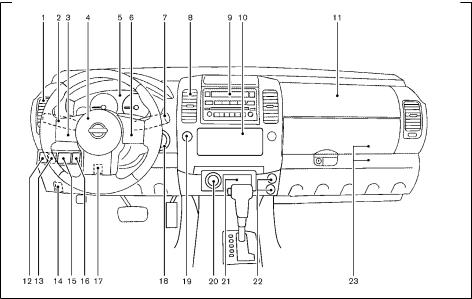
10. Air conditioner control (P. 4-2)
11. Front passenger supplemental front-impact air bag* (P. 1-26)
12. Diesel Particulate Filter (DPF) regeneration switch* (P.5-6)
13. Headlight aiming control switch* (P. 2-19)
14. Hood release switch (P. 3-9)
15. Outside rearview mirror control switch* (P. 3-12) 16. Fuel filler lid opener* (P. 3-10)
17. Tilting steering wheel lock lever* (P. 3-10) 18. Ignition switch (P. 5-7)
19. Hazard indicator flasher switch (P. 2-22)
20. 4WD shift switch* (P. 5-20)
21. Ashtray* (P. 2-25)
22. Cigarette lighter* (P. 2-25)/Power outlet (P.
2-24)
23. Glove box (P. 2-26)
*: if equipped
Left-hand drive (LHD) model
LEFT-HAND DRIVE (LHD) MODEL
1.Side ventilator (P. 4-2)
2.Headlight, fog light* and turn signal switch (P. 2-18)
3.Steering-wheel-mounted controls (left side)
— Audio control* (P.4-15)
4Steering wheel
— Driver’s supplemental front-impact air bag* (P. 1-21)
0-6 Illustrated table of contents
—Horn (P. 2-22)
—Power steering system (P. 5-34)
5.Meters and gauges (P. 2-4)/Warning and indicator lights (P. 2-12)
6.Steering-wheel-mounted controls (right side)
—Cruise control switches* (P.5-25)
7.Wiper and washer switch (P. 2-21)
8.Center ventilator (P. 4-2)
9.Audio system* (P. 4-8)
INSTRUMENT PANEL
JVC0432X
Right-hand drive (RHD) model
RIGHT-HAND DRIVE (RHD) MODEL
1.Front passenger supplemental air bag* (P. 1-26)
2.Air conditioner control (P. 4-2)
3.Audio system* (P. 4-8)
4.Center ventilator (P. 4-2)
5.Wiper and washer switch (P. 2-21) or Head light, fog light* and turn signal switch (P.2-18)
6.Steering-wheel-mounted controls (left side)
— Audio control* (P.4-15)
7.Meters and gauges (P. 2-4)/Warning and indicator lights (P. 2-12)
8.Steering wheel
—Driver’s supplemental front-impact air bag (P. 1-21)
—Horn (P. 2-22)
—Power steering system (P. 5-34)
9.Steering-wheel-mounted controls (right side)
—Cruise control switches* (P.5-25)
10.Headlight, fog light* and turn signal switch (P. 2-18) or Wiper and washer switch (P.2-21)
11.Side ventilator (P. 4-2)
12.Glove box (P. 2-26)
13.Ashtray* (P. 2-25) or Rear differential locking switch* (P.5-25)
14.4WD shift switch* (P. 5-20)
15.Cigarette lighter* (P. 2-25)/Power outlet (P. 2-24)
16.Hazard indicator flasher switch (P. 2-22)
17.Fuel filler lid opener* (P. 3-10)
18.Tilting steering wheel lock lever* (P. 3-10)
19.Ignition switch (P. 5-7)
20.Outside rearview mirror control switch* (P. 3-12)
21.Hood release switch (P. 3-9)
22.Vehicle Dynamic Control (VDC) off switch* (P. 5-34)
23.Headlight aiming control switch* (P. 2-19)
*: if equipped
Illustrated table of contents 0-7
ENGINE COMPARTMENT
SSI0442
Left-hand drive (LHD) model (with engine cover*)
YD25DDTi ENGINE MODEL (LHD model)
1.Window washer fluid reservoir (P. 8-18)
2.Fuse/fusible link holder (P. 8-26)
3.Engine oil dipstick (P. 8-9)
4.Fuel filter (P. 8-14)
5.Engine oil filler cap (P. 8-10)
6.Brake and clutch fluid reservoir* (P. 8-17)
7.Sedimentor* (P. 8-15)
0-8 Illustrated table of contents
8.Engine coolant reservoir (P. 8-8)
9.Battery (P. 8-19)
10.Power steering fluid reservoir (P. 8-16)
11.Drive belts (P. 8-22)
12.Radiator filler cap (P. 8-8)
13.Air cleaner (P. 8-23)
*: if equipped

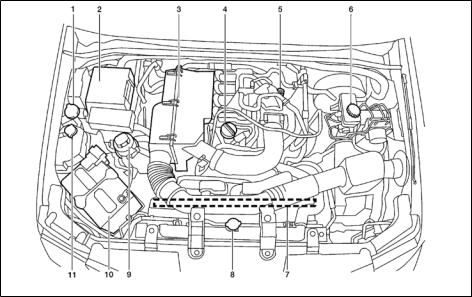
Right-hand drive (RHD) model (with engine cover*)
YD25DDTi ENGINE MODEL (RHD model)
1.Window washer fluid reservoir (P. 8-18)
2.Fuse/fusible link holder (P. 8-26)
3.Brake and clutch fluid reservoir* (P. 8-17)
4.Engine oil dipstick (P. 8-9)
5.Fuel filter (P. 8-14)
6.Engine oil filler cap (P. 8-10)
7.Sedimentor* (P. 8-15)
8.Engine coolant reservoir (P. 8-8)
9.Battery (P. 8-19)
10.Power steering fluid reservoir (P. 8-16)
11.Drive belts (P. 8-22)
12.Radiator filler cap (P. 8-8)
13.Air cleaner (P. 8-23)
*: if equipped
Illustrated table of contents 0-9
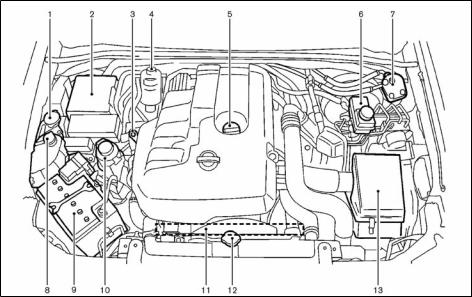
SSI0335
Left-hand drive (LHD) model
QR25DE ENGINE MODEL
1.Window washer fluid reservoir (P. 8-18)
2.Fuse/fusible link box (P. 8-26)
3.Air cleaner (P. 8-23)
4.Engine oil filler cap (P. 8-12)
5.Engine oil dipstick (P. 8-9)
6.Brake fluid reservoir/Clutch fluid reservoir (P. 8-17)
7.Drive belts (P. 8-22)
0-10 Illustrated table of contents
8.Radiator cap (P. 8-8)
9.Power steering fluid reservoir (P. 8-16)
10.Battery (P. 8-19)
11.Engine coolant reservoir (P. 8-8)

1 Safety — seats, seat belts and supplemental restraint system
Seats.......................................................................................... |
1-2 |
Front seats............................................................................ |
1-2 |
Jump seat (King Cab model)............................................ |
1-4 |
Head restraints.................................................................... |
1-4 |
Seat belts.................................................................................. |
1-5 |
Precautions on seat belt usage........................................ |
1-5 |
Child safety........................................................................... |
1-8 |
Pregnant women.................................................................. |
1-8 |
Injured persons..................................................................... |
1-8 |
Center mark on seat belts (if equipped)......................... |
1-9 |
Three-point type seat belts................................................ |
1-9 |
Two-point type seat belts (if equipped).......................... |
1-11 |
Seat belt maintenance....................................................... |
1-12 |
Child restraints (for Australia)............................................... |
1-13 |
Child restraints (except for Australia)................................. |
1-13 |
Precautions on child restraints usage ........................... |
1-13 |
Installation of child restraint system ............................... |
1-14 |
Supplemental Restraint System (SRS) |
|
(if equipped) ............................................................................ |
1-21 |
Precautions on Supplemental Restraint System |
|
(SRS) ................................................................................... |
1-21 |
Supplemental air bag systems ........................................ |
1-26 |
Pre-tensioner seat belt system (if equipped) ............... |
1-27 |
Repair and replacement procedure ............................... |
1-28 |
SEATS
SSS0133A
 WARNING:
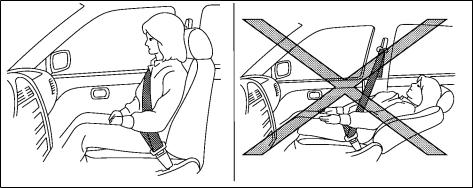
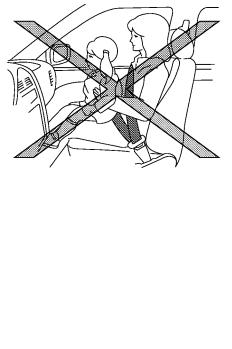
●Do not drive and/or ride in the vehicle with the seat back reclined. This can be
dangerous. The shoulder belt will not be properly against the body. In an accident, you and your passengers could be thrown into the shoulder belt and receive neck or other serious injuries. You and your passengers could also slide under the lap belt and receive serious injuries.
●For the most effective protection while the vehicle is in motion, the seat back should be upright. Always sit well back in the seat and adjust the seat belt properly. (See “SEAT BELTS” later in this section.)
 CAUTION:
When adjusting the seat positions, be sure not to contact any moving parts to avoid possible injuries and/or damages.
FRONT SEATS
 WARNING:
Do not adjust the driver’s seat while driving so that full attention may be given to vehicle operation.
Manual seat adjustment
 WARNING:
●After adjusting a seat, gently shake the seat to confirm that the seat is locked securely. If the seat is not locked securely, it may move suddenly and could cause the loss of control of the vehicle.
●The seat back should not be reclined any more than needed for comfort.
Seat belts are most effective when the passenger sits well back and up right in the seat. If the seat back is reclined, the risk of sliding under the lap belt and being injured is increased.
1-2 Safety - seats, seat belts and supplemental restraint system
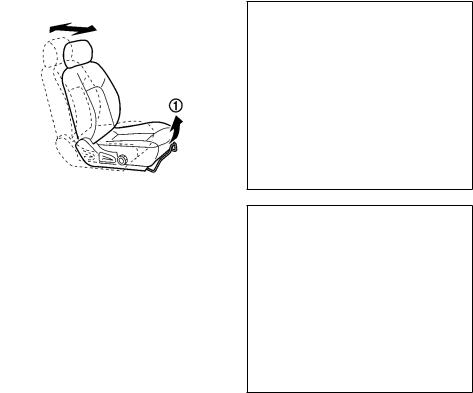
Forward and backward (if equipped):
1.Pull up the adjusting lever .
2.Slide the seat to the desired position.
3.Release the adjusting lever to lock the seat in position.
2. |
Tilt the seat back to the desired position. |
3. |
Release the adjusting lever to lock the |
|
seat back in position. |
The reclining feature allows the adjustment of the seat back for occupants of different sizes to help obtain the proper seat belt fit. (See “SEAT BELTS” later in this section.)
The seat back may be reclined to allow occupants to rest when the vehicle is parked.
Type A
Type B (front passenger seat) Reclining:
1. Pull up the adjusting lever .
Safety - seats, seat belts and supplemental restraint system 1-3

Driver’s seat Seat lifter (if equipped):
Turn the dial to adjust the height of the seat cushion to the desired position.
JUMP SEAT (King Cab model)
 WARNING:
●Do not use the jump seat for child restraint installation.
●When folding the jump seat, be careful not to squeeze your finger between the seat cushion and the body side.
1-4 Safety - seats, seat belts and supplemental restraint system
HEAD RESTRAINTS
 WARNING:
Do not drive and/or ride in the vehicle with the head restraint removed. This can be dangerous. Head restraints should be adjusted properly as they may provide significant protection against injury in an accident. Check the height after someone else uses the seat.
The proper adjustment of the head restraint is as illustrated.
Adjust the head restraint so that the head restraint’s center is level with the center of the ears.
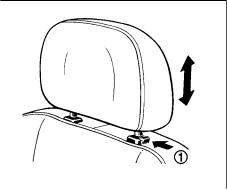
Adjustment (if equipped)
1.Pull up the head restraint to raise to the proper position.
2.Push in the lock knob and push down the head restraint to lower to the proper position.
The rear head restraint (if equipped) should only be used in the notched stem positions. The lowest head restraint position is the stowed position.
SEAT BELTS
PRECAUTIONS ON SEAT BELT USAGE
If you are wearing the seat belt properly adjusted and sitting upright and well back in the seat, chances of being injured or killed in an accident and/or the severity of injury may be greatly reduced. NISSAN strongly encourages you and all of your passengers to buckle up every time you drive, even if your seating position includes the supplemental air bag.
Safety - seats, seat belts and supplemental restraint system 1-5
1-6 Safety - seats, seat belts and supplemental restraint system
 WARNING:
●Seat belts are designed to bear upon the
bony structure of the body, and should be worn low across the front of the pelvis or the pelvis, chest and shoulders, as applicable; wearing the lap section of the belt across the abdominal area must be avoided. Serious injury may occur if a seat belt is not worn properly.
●Position the lap belt as low and snug as possible around the hips, not the waist. A lap belt worn too high could increase the risk of internal injuries in an accident.
●Do not allow more than one person to use the same seat belt. Each belt assembly must only be used by one occupant; it is dangerous to put a belt around a child being carried on the occupant’s lap.
●Never carry more people in the vehicle than there are seat belts.
●Never wear seat belts inside out. Belts should not be worn with straps twisted. Doing so may reduce their effectiveness.
●Seat belts should be adjusted as firmly as possible, consistent with comfort, to provide the protection for which they
have been designed. A slack belt will greatly reduce the protection afforded to the wearer.
●Every person who drives or rides in this vehicle should use a seat belt at all times. Children should be properly restrained in the rear seat (if equipped) and, if appropriate, in a child restraint system.
●Do not run the belt behind your back or under your arm. Always route the shoulder belt over your shoulder and across your chest. The belt should be away from your face and neck, but not falling off your shoulder. Serious injury may occur if a seat belt is not worn properly.
●No modifications or additions should be made by the user which will either prevent the seat belt adjusting devices from operating to remove slack, or prevent the seat belt assembly from being adjusted to remove slack.
●Care should be taken to avoid contamination of the webbing with polishes, oils and chemicals, and particularly battery acid. Cleaning may safely be carried out using mild soap and water. The belt should be replaced if webbing becomes frayed, contaminated or damaged.
●It is essential to replace the entire assembly after it has been worn in a severe impact even if damage to the assembly is not obvious .
●All seat belt assemblies including retractors and attaching hardware should be inspected after any collision by a NISSAN dealer. NISSAN recommends that all seat belt assemblies in use during a collision be replaced unless the collision was minor and the belts show no damage and continue to operate properly. Seat belt assemblies not in use during a collision should also be inspected and, when necessary, replaced if either damage or improper operation is noted.
●Once the seat belt pre-tensioner has activated, it cannot be reused. It must be replaced together with the retractor. Contact a NISSAN dealer.
●Removal and installation of the pretensioner seat belt system components should be done by a NISSAN dealer.
Safety - seats, seat belts and supplemental restraint system 1-7
CHILD SAFETY
 WARNING:
●Infants and children need special protection. The vehicle’s seat belts may not fit them properly. The shoulder belt may come too close to the face or neck. The lap belt may not fit over their small hipbones. In an accident, an improperly fitted seat belt could cause serious or fatal injury.
●Always use an appropriate child restraint system.
Children need adults to help protect them. They need to be properly restrained. The proper restraint depends on the child’s size.
Infants and small children
NISSAN recommends that infants and small children be seated in a child restraint system. You should choose a child restraint system that fits your vehicle and the child, and always follow the manufacturer’s instructions for installation and use.
Large children
WARNING:
● Never allow children to stand or kneel on any seats.
● Never allow children in the luggage area while the vehicle is moving. A child could be seriously injured in an accident or sudden stop.
1-8 Safety - seats, seat belts and supplemental restraint system
Children who are too large for a child restraint system should be seated and restrained by the seat belts that are provided.
If the child’s seating position has a shoulder belt that fits close to the face or neck, the use of a booster seat (commercially available) may help overcome this. The booster seat should raise the child so that the shoulder belt is properly positioned across the top, middle portion of the shoulder and the lap belt is low on the hips. The booster seat should also fit the vehicle seat.
Once the child has grown so that the shoulder belt is no longer on or near the face or neck of the child, use the shoulder belt without the booster seat. In addition, there are many types of child restraint systems available for larger children that should be used for maximum protection.
PREGNANT WOMEN
NISSAN recommends that pregnant women use seat belts. The seat belt should be worn snug, and always position the lap belt as low as possible around the hips, not the waist. Place the shoulder belt over your shoulder and across your chest. Never run the lap/shoulder belt over your abdominal area. Contact your doctor for specific recommendations.
INJURED PERSONS
NISSAN recommends that injured persons use seat belts. Contact your doctor for specific recommendations.
pulling motion permits the seat belt to move, and allows you some freedom of movement in the seat.
●If the seat belt cannot be pulled from its fully retracted position, firmly pull the belt and release it. Then smoothly pull the belt out of the retractor.
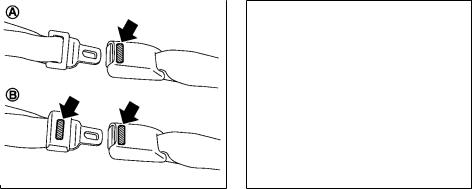
CENTER MARK ON SEAT BELTS (if equipped)
Selecting correct set of seat belts
The center seat belt buckle or both the buckle and the tongue are identified by the CENTER mark. The center seat belt tongue can be fastened only into the center seat belt buckle.
THREE-POINT TYPE SEAT BELTS
Fastening seat belts
 WARNING:
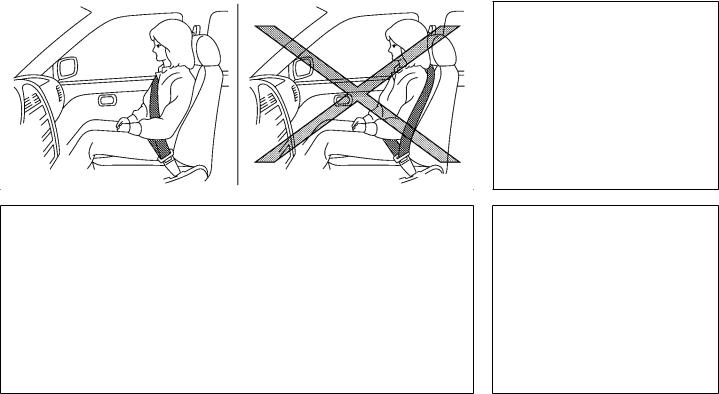
The seat back should not be in a reclined position any more than needed for comfort. Seat belts are most effective when the passenger sits well back and straight up in the seat.
1.Adjust the seat. (See “SEATS” earlier in this section.)
2.Slowly pull the seat belt out of the retractor and insert the tongue into the buckle until
you hear and feel the latch engage.
●The retractor is designed to lock during a sudden stop or on impact. A slow
Safety - seats, seat belts and supplemental restraint system 1-9
3. |
Position the lap belt portion low and snug on |
Type A |
|
||
|
the hips as shown. |
|
4. |
Pull the shoulder belt portion toward the |
|
|
retractor to take up extra slack. Be sure the |
|
|
shoulder belt is routed over your shoulder |
|
|
and is snug across your chest. |
|
|
|
|
Type B
1-10 Safety - seats, seat belts and supplemental restraint system
Shoulder belt height adjustment (if equipped)
 WARNING:
●The shoulder belt anchor height should be adjusted to the position best for you. Failure to do so may reduce the effectiveness of the entire restraint system and increase the chance or severity of injury in an accident.
●The shoulder belt should rest on the middle of the shoulder. It must not rest against the neck.
●Be sure that the seat belt is not twisted in any way.
●Be sure that the shoulder belt anchor is secured by trying to move the shoulder belt anchor up and down after adjustment.
The shoulder belt anchor height should be adjusted to the position best for you.
The belt should be away from your face and neck, but not falling off your shoulder. Release the button to lock the shoulder belt anchor into position.
Type A:
To adjust, push the release button and move the shoulder belt anchor to the proper position, so that the belt passes over the center of the shoulder.

Type B:
To adjust, pull up or push down the release button, and move it to the desired position.
Unfastening seat belts
Push the button on the buckle. The seat belt automatically retracts.
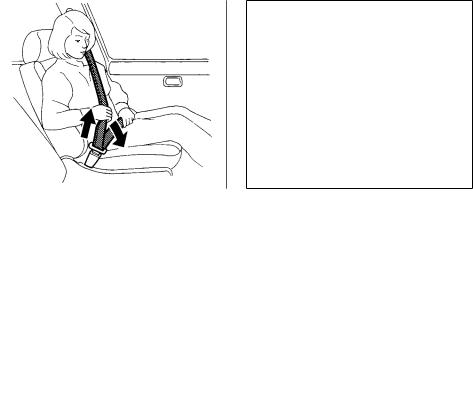
Checking seat belts operation
Seat belt retractors are designed to lock seat belt movement:
●When the seat belt is pulled quickly from the retractor.
●When the vehicle slows down rapidly.
To increase your confidence in the seat belts, check the operation by grasping the shoulder belt and pulling forward quickly. The retractor should lock and restrict further belt movement. If the retractor does not lock during this check, contact a NISSAN dealer immediately.
TWO-POINT TYPE SEAT BELTS (if equipped)
Fastening seat belts
 WARNING:
The seat back should not be in a reclined position any more than needed for comfort. Seat belts are most effective when the passenger sits well back and straight up in the seat.
1.Insert the tongue into the buckle until you hear and feel the latch engage.
2.Adjust the seat belt length. To shorten, hold the tongue and pull the upper belt as illustrated . To lengthen, hold the tongue and pull the under belt as illustrated .
Safety - seats, seat belts and supplemental restraint system 1-11
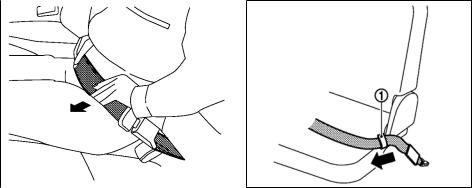
3.Position the lap belt portion low and snug on the hips as shown.
Unfastening seat belts
Push the button on the buckle.
SSS0808
Seat belt holder (Double Cab model with front bench seat)
If your vehicle is equipped with the seat belt holder on the front center seat cushion, pass the seat belt webbing through the seat belt holder as illustrated to prevent the entire seat belt assembly from falling down to the floor.
SEAT BELT MAINTENANCE
Periodically check that the seat belt and all the metal components, such as buckles, tongues, retractors, flexible wires and anchors, work properly. If loose parts, deterioration, cuts or other damage on the seat belt webbing is found, the entire seat belt assembly should be replaced.
If dirt builds up in the shoulder belt guide of the seat belt anchors, the seat belts may retract slowly. Wipe the shoulder belt guide with a clean, dry cloth.
To clean the seat belt webbing, apply a mild soap solution or any solution recommended for cleaning upholstery or carpet. Then wipe with a cloth and allow the seat belts to dry in the shade. Do not allow the seat belts to retract until they are completely dry.
1-12 Safety - seats, seat belts and supplemental restraint system
CHILD RESTRAINTS (for Australia) |
CHILD RESTRAINTS (except for |
|
Australia) |
Child restraints are not fitted to this model.
PRECAUTIONS ON CHILD
RESTRAINTS USAGE
 WARNING:
● Infants and small children should never be carried on your lap. It is not possible for even the strongest adult to resist the forces of a severe accident. The child could be crushed between the adult and parts of the vehicle. Also, it is dangerous to put a seat belt around a child being carried on the occupant’s lap.
● Infants and children need special protection. The vehicle’s seat belts may
not fit them properly. The shoulder belt may come too close to the face or neck. The lap belt may not fit over their small hip bones. In an accident, an improperly fitting seat belt could cause serious or fatal injury.
●Infants and small children should always be placed in an appropriate child restraint system while riding in the vehicle. Failure to use a child restraint system can result in serious injury or death.
●Child restraint systems specially designed for infants and small children are available from several manufacturers. When selecting any child restraint systems, place your child in the child restraint system and check the various adjustments to be sure that the child restraint system is compatible with your child. Always follow the manufacturer’s instructions for installation and use.
●NISSAN recommends that the child restraint system be installed on the rear seat. According to accident statistics, children are safer when properly restrained in the rear seat rather than in the front seat. (Double Cab model)
●Follow all of the child restraint system manufacturer’s instructions for installation and use. When purchasing a child restraint system, be sure to select
Safety - seats, seat belts and supplemental restraint system 1-13
one which will fit your child and vehicle. It may not be possible to properly install some types of child restraint systems in your vehicle.
●For a front-facing child restraint system, make sure the shoulder belt does not fit close to child’s face or neck. If it does, put the shoulder belt behind the child restraint system.
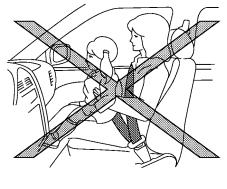
●Never install a rear-facing child restraint system on the front seat. An inflating supple mental front-impact air bag could seriously injure or kill your child. A rear-facing child restraint system must only be used on the rear seat. (Front passenger air bag equipped model).
●Adjustable seat backs should be positioned to fit a child restraint system, but as upright as possible.
●If the seat belt in the position where a child restraint system is installed requires a locking clip and if it is not used, injuries could result from a child restraint system tipping over during normal vehicle braking or cornering.
●After attaching a child restraint system, test it before you place the child in it. Tilt it from side to side. Try to tug it forward and check if it is held securely in place.
●The child restraint system should not move more than 25 mm (1 in) . If the
restraint is not secure, tighten the belt as necessary, or install the restraint in another seat and test it again.
●Check the child restraint system in your vehicle to be sure that it is compatible with the vehicle’s seat belt system.
●If a child restraint system is not anchored properly, the risk of a child being injured in a collision or a sudden stop greatly increases.
●Improper use of a child restraint system can increase the risk or severity of injury for both the child and other occupants in the vehicle.
●Always use an appropriate child restraint system. An improperly installed child restraint system could lead to serious injury or death in an accident.
●When the child restraint system is not in use, keep it secured with a seat belt to prevent it from being thrown around in case of a sudden stop or accident.
●Do not use the jump seat for child restraint installation. (King Cab model)
1-14 Safety - seats, seat belts and supplemental restraint system
NISSAN recommends that infants and small children be seated in a child restraint system. You should choose a child restraint system that fits your vehicle and always follow the manufacturer’s instructions for installation and use. In addition, there are many types of child restraint systems available for larger children that should be used for maximum protection.
 CAUTION:
Remember that a child restraint system left in a closed vehicle can become very hot. Check the seating surface and buckles before placing your child in a child restraint system.
INSTALLATION OF CHILD RESTRAINT SYSTEM
Installation on rear seats (Double Cab model)
 WARNING:
●NISSAN recommends that the child restraint system be installed in a seat equipped with the three-point type seat belt.
●The direction of the child restraint system depends on the type of the child restraint system and the size of the child.
Rear center seat |
Rear outboard seats |
Locking clip |
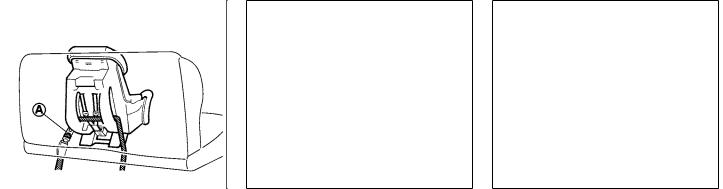
Front-facing:
When you install a front-facing child restraint system on a rear outboard or center seat, follow these steps:
1.Position the front-facing child restraint system on a rear seat.
Always follow the child restraint system manufacturer’s instructions for installation and use.
2.Route the seat belt tongue through the child restraint system and insert it into the buckle until you hear and feel the latch engage.
3.To prevent slack in the seat belt, it is necessary to secure the lap/shoulder belt in place with a locking clip . Use the locking clip attached to the child restraint system, or one which is equivalent in dimensions and strength.
Be sure to follow the child restraint system manufacturer’s instructions for belt routing.
4.Test the child restraint system before you place the child in it. Tilt it from side to side. Try to tug it forward and check if it is held securely in place.
5.Make sure that the child restraint system is properly secured prior to each use.
Safety - seats, seat belts and supplemental restraint system 1-15
Rear center seat |
Rear outboard seats |
Locking clip |
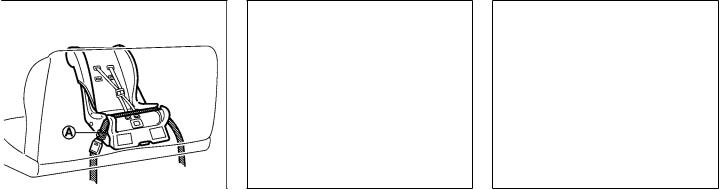
Rear-facing:
When you install a rear-facing child restraint system on a rear outboard or center seat, follow these steps:
1. Position |
the |
rear-facing |
child restraint |
system |
on a rear seat. Always follow the |
||
child |
restraint |
system |
manufacturer’s |
instructions for installation and use.
2.Route the seat belt tongue through the child restraint system and insert it into the buckle until you hear and feel the latch engage.
1-16 Safety - seats, seat belts and supplemental restraint system
3.To prevent slack in the seat belt, it is necessary to secure the lap/shoulder belt in place with a locking clip . Use the locking clip attached to the child restraint system, or one which is equivalent in dimensions and strength.
Be sure to follow the child restraint system manufacturer’s instructions for belt routing.
4.Test the child restraint system before you place the child in it. Tilt it from side to side. Try to tug it forward and check if it is held securely in place.
5.Make sure that the child restraint system is properly secured prior to each use.
 Loading...