


How to connect up, build-in, set up, use and look after your U1644 oven
NEFF (UK) Ltd
Table of contents |
Inhaltsverzeichnis |
Important Information . . . . . . . . . . 4
Packaging and old appliances . . . . . 4 Before installation . . . . . . . . . . . . . . 5 Safety information . . . . . . . . . . . . . . 5 Reasons for damage . . . . . . . . . . . . 7
Your new cooker . . . . . . . . . . . . . . 8
The control panel . . . . . . . . . . . . . . . 8 Oven operating modes . . . . . . . . . . 8 Press-down switches . . . . . . . . . . . 9 Shelf positions . . . . . . . . . . . . . . . . . 9 NeffLight – main oven . . . . . . . . . . . 10
Accessories . . . . . . . . . . . . . . . . . . 11
Before using your Appliance
for the first time . . . . . . . . . . . . . . . 12
Language for the text display . . . . . 12 Preliminary cleaning . . . . . . . . . . . . . 13 Initial burn-in . . . . . . . . . . . . . . . . . . 13 Subsequent cleaning . . . . . . . . . . . . 13 Time of day . . . . . . . . . . . . . . . . . . . 13
Electronic clock . . . . . . . . . . . . . . . 14
The control panel . . . . . . . . . . . . . . . 14 Clock functions . . . . . . . . . . . . . . . . 14 Time of day . . . . . . . . . . . . . . . . . . . 15 Minute timer . . . . . . . . . . . . . . . . . . 15
Automatic timer . . . . . . . . . . . . . . . . 16 Special functions . . . . . . . . . . . . . . . 17
Oven operating modes . . . . . . . . . 18
Hot air functions . . . . . . . . . . . . . . . 18 Conventional functions . . . . . . . . . . 19 Grill functions . . . . . . . . . . . . . . . . . . 20 Special functions . . . . . . . . . . . . . . . 21
Operating the oven . . . . . . . . . . . . 22
Switching the oven ON . . . . . . . . . . 22 Rapid heat up . . . . . . . . . . . . . . . . . 23 Current oven temperature . . . . . . . . 23 Switching the oven OFF . . . . . . . . . 23
Safety features . . . . . . . . . . . . . . . 25
Lock . . . . . . . . . . . . . . . . . . . . . . . . 25 Permanent lock . . . . . . . . . . . . . . . 26 Automatic safety off function . . . . . 26
Baking . . . . . . . . . . . . . . . . . . . . . . 27
Cooking Tips and Helpful Hints . . . 28
Roasting . . . . . . . . . . . . . . . . . . . . 29
Grilling . . . . . . . . . . . . . . . . . . . . . . 31
Circo-roasting . . . . . . . . . . . . . . . . . 32 Surface grilling . . . . . . . . . . . . . . . . 32
2
Table of contents |
Inhaltsverzeichnis |
Defrosting and Cooking . . . . . . . . 33
Defrosting with Circotherm . . . . . . . 33 Defrost setting . . . . . . . . . . . . . . . . . 35
Steam cooking – main oven . . . . . 36 Dough proving – main oven . . . . . 37 Cleaning and Care . . . . . . . . . . . . . 39
Important cleaning basics . . . . . . . . 39 Catalytic oven surfaces . . . . . . . . . . 41 Oven Cleaning . . . . . . . . . . . . . . . . . 42
Removing/installing
the oven door . . . . . . . . . . . . . . . . . 43
Shelf support / Telescopic pull-outs . 44
Service and Repair information . . 45 Trouble-shooting Guide . . . . . . . . . 47
Assembly Instructions
For the installer and kitchen expert!
Important installation notes . . . . . . . 50 Installation of the built-in oven . . . . . 51
3
Important information
Packaging and old appliances
Before using your new appliance, please read these Instructions for Use carefully. They contain important information concerning your Personal safety as well as on use and care of the appliance.
The Instructions for Use apply to several versions of this appliance. Accordingly, you may find descriptions of individual features that do not apply to your specific appliance.
Please keep the operating and installation instructions in a safe place; this important documentation may also be of use to a possible subsequent owner.
Your new appliance was protected by suitable packaging while it was on its way to you. All materials used for this purpose are environmentally friendly and can be recycled. Please make a contribution to protecting the environment by disposing of the packaging appropriately.
Old appliances are not worthless rubbish. Environmentally-conscious recycling can reclaim valuable raw materials.
Before disposing of your old appliance, please make sure that it is unusable, or label it with a sticker stating „Caution, scrap”.
This appliance is labelled in accordance with European Directive 2002/96/EG concerning used electrical and electronic appliances (waste electrical and electronic equipment – WEEE). The guideline determines the framework for the return and recycling of used appliances as applicable throughout the EU.
Up-to-date information on how to dispose of your old appliance and the packaging from the new one can be obtained from your retailer or local authority.
4
Before installation
Transport damage |
Check the appliance after unpacking it. Do not |
|
connect the appliance if it has been damaged in |
|
transport. |
Electrical connection |
The cooker may only be connected by an approved |
|
specialist. Losses resulting from damage caused by |
|
incorrect connection will invalidate warranty claimes. |
Safety information
Hot oven
Before using your appliance, ensure that it has been installed properly.
This appliance is intended for domestic use only. Only use the cooker for food preparation.
The appliance is not intended for use by young children or infirm persons without supervision. Young children should be supervised to ensure that they do not play with the appliance.
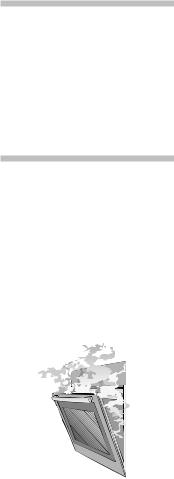
Open the oven door carefully. Hot steam may escape. Never touch the internal surfaces of the oven or the heating elements. There is a risk of burning.
Children must be kept at a safe distance from the appliance.
Never leave the appliance unattended when cooking with fat or oil. They can catch fire if overheated.
Never store combustible items in the oven.
Risk of fire. Never place flammable objects onto the hot plates. Fire hazard!
Never place cables of electronic devices onto the hot plates.
Never clamp leads of electrical appliances in the hot oven door. The insulation on the leads could melt. There is a risk of short-circuiting.
5
Remove all packaging remnants, e.g. polystyrene parts, from the oven.
Caution: The extension rails heat up during oven operation. Use special care to avoid burns when extending the rails.
Use only heat-resistant utensils for roasting or grilling.
Repairs |
Incorrectly done repairs are dangerous. There is a |
|
risk of electrocution. |
|
Repairs may only be carried out by after-sales |
|
service technicians who have been fully trained by |
|
BSH. |
|
If there is a fault, switch off the oven fuse at the fuse |
|
box. |
|
Call the after-sales service. |
6

Reasons for damage
Baking tray, aluminium foil or dishes on the oven floor
Slide-in accessories
Baking paper
Water in the oven
Fruit juice
Cooling with the oven door
Very dirty oven seal
Using the oven door as a seat
Care and cleaning
Do not place the baking tray on the oven floor. Do not cover it with aluminium foil.
Do not place dishes on the oven floor.
This will cause heat accumulation. The baking and roasting times will no longer be correct and the enamel will be damaged.
To avoid damage, insert slide-in accessories carefully.
If using hot air functions *, do not place greaseproof paper loosely in the oven (e.g. when heating the oven).
The hot-air fan could draw in the paper which may damage the heater and fan.
Never pour water directly into a hot oven. This could damage the enamel.
When baking very moist fruit cakes, do not put too much on the baking sheet. Fruit juice dripping from the baking sheet leaves stains that cannot be removed.
It is recommended that you use the deeper universal pan.
Only leave the oven to cool with the door closed. Do not allow anything to become trapped in the oven door. Even if you only leave the oven door open slightly, the fronts of adjacent units may become damaged over time.
If the oven seal is very dirty, the oven door will no longer close properly when the oven is in use. The fronts of adjacent units could be damaged. Keep the oven seal clean.
Do not stand or sit on the oven door.
Do not use high-pressure cleaners or steam jets.
7
Your new cooker
Here you will learn more about your new oven. The control panel and its switches and indicators are explained here. The heating modes and the accessories included with your oven will be explained here.
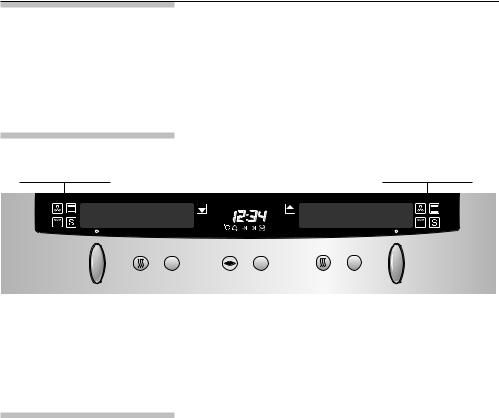
The control panel
Main oven function |
Electronic timer controls |
Mini oven function |
|
|
|
|
|
|
|
|
|
|
|
|
|
|
|
|
|
|
|
|
|
|
|
|
|
|
|
|
|
|
|
|
|
|
|
|
|
|
|
|
|
|
|
|
|
|
|
|
|
|
|
|
|
|
|
|
|
|
|
|
|
|
|
|
|
|
|
|
|
|
|
|
|
|
|
|
|
|
|
|
|
|
|
|
|
|
|
|
|
|
|
|
|
|
|
|
|
|
|
|
|
|
|
|
|
|
|
|
|
|
|
|
|
|
|
|
|
|
|
|
|
|
|
|
|
|
|
|
|
|
|
|
|
|
|
|
|
|
|
|
|
|
|
|
Function selector with |
|
|
|
Temperature selector |
|
|
|
Function selector with |
|||||||
setting for prefered |
|
|
|
with oven temperature |
|
|
|
setting for prefered |
|||||||
temperature |
|
|
|
|
|
display |
|
|
|
temperature |
|||||
|
|
|
|
|
|
|
|
|
|
|
|
|
|
|
|
|
|
|
|
|
|
|
|
|
|
|
|
|
|
|
|
Rapid heating for Circotherm mode |
Rapid heating for Circotherm mode |
and Bread baking setting |
and Bread baking setting |
Oven operating modes |
Oven functions |
|
* Hot air functions |
/ Conventional functions |
|
Circotherm |
Top/bottom heat |
|
Defrost |
Bottom heat |
|
Circotherm intensive |
( Special functions |
|
Bread baking |
||
Steam cooking, |
||
) Grill functions |
||
for system steam cooker |
||
Large area grill |
(option available from specialist dealers) |
|
Small area grill |
Dough proving |
|
Circo-roasting |
Oven cleaning |
|
|
Light |
|
Note |
|
The oven light switches on for every oven function.
Rapid heating scan be selected for circotherm or bread baking.
8

Press-down switches
Shelf position
Mini oven
2 |
1 |
To engage and disengage, depress the switch, making sure that it is in OFF position.
Your oven features 2 shelf positions.
The shelf positions are counted from bottom to top.
The numbers are marked in the oven.
Main oven |
Your oven features 4 shelf position. The shelf |
|
position are counted from bottom to top. |
|
The numbers are marked in the oven. |
When using hot air functions *, do not use shelf position »2«, in order not to block air circulation.
The shelf supports and telescopic rails can be inserted at your preferred shelf position.
The simple plug-in system provides you with flexible and quick handling when changing the shelf supports and telescopic rails.
9
NeffLight
– main oven
Door contact switch
Saving energy
The oven features the additional lighting ”NeffLight”:
Turn the function selector to the position oven light; NeffLight will be activated.
Advantages:
–Great illumination on all levels.
–Illumination of the food from the front.
–Your eyes will not be blinded by lamps when looking into the oven.
NeffLight is activated/deactivated automatically when the oven door is opened/closed.
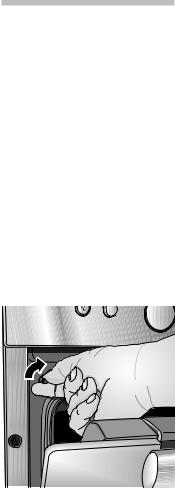
In order to save energy, you can deactivate NeffLight. Turn the door contact switch to the
right. If you keep turning it to the right you re-activate NeffLight.
10
Accessories |
Your appliance is supplied with: |
|||||
Universal pan with wire shelf |
2 wire shelf |
|||||
|
|
|
|
|
|
|
|
|
|
|
|
|
|
|
|
|
|
|
|
|
Additional accessories can be obtained from a specialist dealer. |
|
|
Before ordering, please check the Neff sales literature to |
|
|
confirm which of the following items are available in the UK: |
Order no. |
|
|
|
|
Universal pan |
|
Z 1232 X0 |
|
|
|
Universal pan, non-stick |
|
Z 1233 X0 |
|
|
|
Small grill-set |
|
Z 1240 X2 |
|
|
|
Glass pan |
|
Z 1262 X0 |
|
|
|
Soufflé pan |
|
Z 1272 X0 |
|
|
|
Baking tray, aluminium |
|
Z 1332 X0 |
|
|
|
Baking tray, enamelled |
|
Z 1342 X0 |
|
|
|
Baking tray, non-stick |
|
Z 1343 X0 |
|
|
|
Pizza tray |
|
Z 1352 X0 |
|
|
|
Wire shelf, high/low |
|
Z 1432 X0 |
|
|
|
Wire shelf, close mesh |
|
Z 1442 X0 |
|
|
|
Upgrade set – Single Telescope |
|
Z 1784 X0 |
|
|
|
System steam cooker |
|
N 8642 X0 EU |
|
|
|
Pizza stone |
|
Z 1912 X0 |
|
|
|
Universal oval roaster enamelled |
|
Z 9930 X0 |
|
|
|
Note:
The baking tray or universal pan may distort while the oven is operating. This is caused by major temperature differences on the utensil. These differences may occur if only one part of the utensil was covered or if deep-frozen food, e.g. pizza, was placed on the utensil.
The distortion will subside again during baking, roasting or grilling.
11
Before using your appliance for the first time
Language for the
text display |
You can choose one of seven languages for the |
|
the display text. |
Change language |
The default setting for the display text is German. |
|
There are various languages you can choose from. |
Example: main oven |
|
Change standard setting |
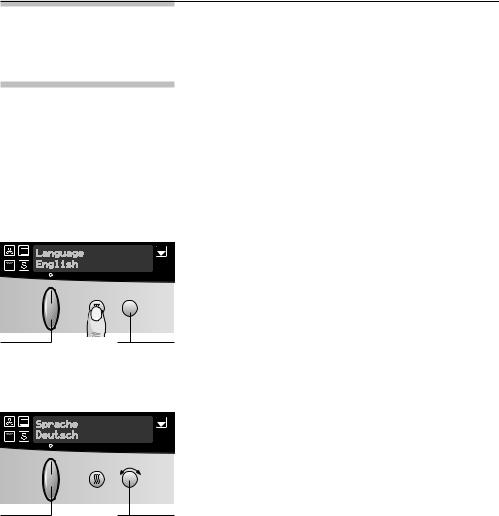
The function selector must be switched OFF. |
|
1. Keep the rapid heating sbutton pressed until |
|
Language English appears on the text display. |
Function |
Temperature |
selector |
selector |
Example: deutsch
2. Turn the temperature selector until the language you want appears.
This language is activated after three seconds.
Function |
Temperature |
selector |
selector |
12

Preliminary cleaning
Initial burn-in
Subsequent cleaning
Time of day
Setting the time
Take the accessories out of the oven.
Remove all packaging remnants, e.g. polystyrene parts, from the oven.
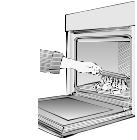
1.Clean the appliance exterior with a soft moistened cloth.
2.Remove the shelf supports and telescopic rails from the oven.
3.Clean the oven and the accessories with a hot detergent solution.
Please observe the operating instructions furnished with the hob.
Before using the appliance for the first time, you must set the time on the electronic clock.
Heat the empty oven for approx. 30 minutes. Select top and bottom heat at a setting of 240° C.
Clean the oven with a hot detergent solution. Install the shelf supports and telescopic rails.
After connecting to the mains, or after a power failure, the display 0:00 will blink.
Press the > button and set the current time with the rotary knob (e.g. 15:00 hours).
To correct the time, press the > button until the symbol flashes.
Then set the time.
Note: The time cannot be corrected if an automatic function or the timer has been set (to cancel see ”Electronic clock”).
13
Electronic clock
The electronic clock can be operated with one hand; after pressing the button, set the time with the rotary knob. Settings can be made for as long as the function display flashes (~4 seconds).
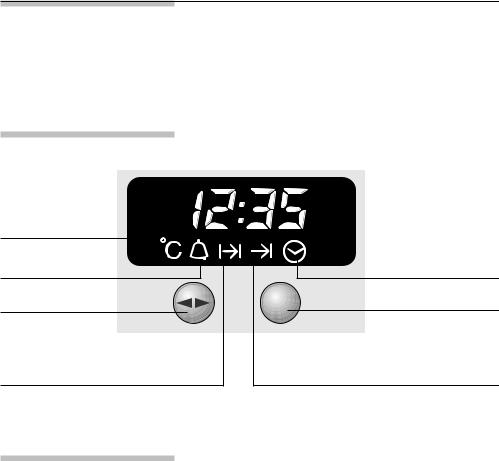
The control panel
Current |
oven temperature |
Minute timer |
Function selector |
Set cooking time |
Time of day
Rotary knob
To engage and disengage, depress gently
OFF time
Note |
The current oven temperature is displayed only when |
|
the temperature is checked. |
Clock functions
Minute timer, |
Counts down minutes (max. 24 h). |
Set cooking time ? |
Switches off automatically. You set an cooking time |
|
for the current operating mode (max. 6 h) after which |
|
the appliance switches off automatically. |
Time preselection ! |
Switches on and off automatically. You specify when |
|
the oven switches on automatically and after how |
|
long it switches off again (max. 24 h). |
Time of day# |
To change the current time of day or reset following |
|
a power failure. |
Delete times |
Delete time settings: Minute timer, Set cooking timer |
|
and Timer preselection. |
14
Time of day
Setting the time
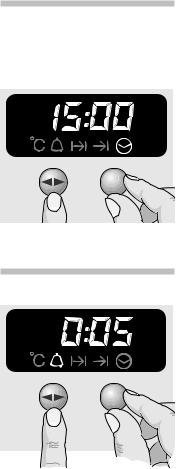
After connecting to the mains, or after a power failure, the display 0:00 will blink.
Press the > button and set the current time with the rotary knob (e.g. 15:00 hours).
To correct the time, press the > button until the symbol flashes.
Then set the time.
Note: The time cannot be corrected if an automatic function or the timer has been set (to cancel see ”Electronic clock”).
Minute timer
1. Press the > button until the,
symbol flashes, and set the time you want
(e.g. 5 minutes).
When the timer switches on, the remaining time is displayed.
2. When the time has elapsed, a signal is emitted and the ,symbol flashes. To stop the signal, press the > button.
15
Automatic timer
– main oven
Set cooking time Automatic switch off
Time preselection Automatic switch on and switch off
You can switch the oven on and off via the electronic clock.
The most suitable dishes for automatic timing are those which require little attention.
If you wish to bake or roast food immediately, it is only necessary to set the cooking time.
1.Select the operating mode and the oven temperature.
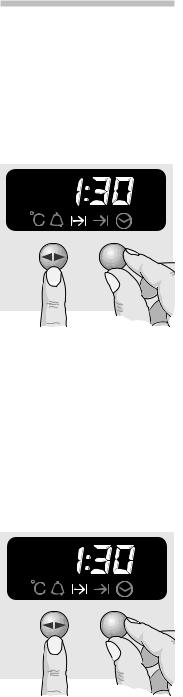
2.Press the > button until the ?
symbol flashes and set the cooking time with the rotary knob (example: 1 hour and 30 minutes). When the setting has been made, the current time is displayed after approx. 4 seconds.
The ? symbol signals automatic mode.
3.When the time has elapsed (example: 1 hour and 30 minutes), a signal is emitted and the ! display flashes.
The oven switches off automatically.
To stop the signal, press the > button.
4.Switch the oven off.
5.To end automatic mode, press the > button again.
If the food is to be baked or roasted later on, both the cooking time and OFF time must be set.
1.Select the operating mode and the oven temperature.
2.Press the > button until the ?
symbol flashes and set the cooking time with the rotary knob (example: 1 hour and 30 minutes).
3.Press the > button until the ! symbol flashes
and set the OFF time with the rotary knob (example: 12:30).
When the setting has been made, the current time is displayed after approx. 4 seconds. The ! symbol signals automatic mode.
16
 Loading...