

Page 1

Manual
Page 2

The information in this document is subject to change without notice and does not represent a
commitment on the part of Native Instruments GmbH. The software described by this document is subject to a License Agreement and may not be copied to other media. No part of this
publication may be copied, reproduced or otherwise transmitted or recorded, for any purpose,
without prior written permission by Native Instruments GmbH, hereinafter referred to as Native
Instruments.
“Native Instruments”, “NI” and associated logos are (registered) trademarks of Native Instruments GmbH.
Mac, Mac OS, GarageBand, Logic, iTunes and iPod are registered trademarks of Apple Inc.,
registered in the U.S. and other countries.
Windows, Windows Vista and DirectSound are registered trademarks of Microsoft Corporation
in the United States and/or other countries.
All other trade marks are the property of their respective owners and use of them does not imply any affiliation with or endorsement by them.
Document authored by: Native Instruments GmbH
Software version: 2.6 (10/2012)
Disclaimer
Special thanks to the Beta Test Team, who were invaluable not just in tracking down bugs, but
in making this a better product.
Page 3
Germany
Native Instruments GmbH
Schlesische Str. 29-30
D-10997 Berlin
Germany
www.native-instruments.de
USA
Native Instruments North America, Inc.
6725 Sunset Boulevard
5th Floor
Los Angeles, CA 90028
USA
www.native-instruments.com
Contact
© Native Instruments GmbH, 2012. All rights reserved.
Page 4

Table of Contents
Table of Contents
1 Welcome ..................................................................................................................
1.1 TRAKTOR 2 Documentation Overview .......................................................................................... 18
1.2 System Requirements and Compatibility .................................................................................... 20
1.1.1 In This Manual ........................................................................................................... 18
1.1.2 Other Documentation ................................................................................................. 19
1.1.3 Recommended Reading Order ................................................................................... 19
2 Upgrading (from TRAKTOR PRO, TRAKTOR LE, and TRAKTOR ME) ..................................
2.1 Backup ....................................................................................................................................... 21
2.2 Installation ................................................................................................................................. 21
2.3 Importing Your Data ................................................................................................................... 22
3 TRAKTOR's Setup Wizard ...........................................................................................
4 The User Interface (Overview) ....................................................................................
4.1 The Big Picture ........................................................................................................................... 32
4.2 Interface Elements ..................................................................................................................... 33
4.2.1 Application Menu Bar ................................................................................................ 33
4.2.2 Header ....................................................................................................................... 34
4.2.3 Global Section ........................................................................................................... 36
4.2.4 Decks ......................................................................................................................... 40
4.2.5 Mixer .......................................................................................................................... 45
4.2.6 Browser ..................................................................................................................... 46
5 The Browser ..............................................................................................................
5.1 The Track Collection ................................................................................................................... 49
5.2 Importing Music Folders ............................................................................................................. 50
5.3 Tracks Managed by iTunes ......................................................................................................... 52
5.2.1 Alternative Importing Methods .................................................................................. 52
5.3.1 Playing Tracks Managed by iTunes ............................................................................ 53
17
21
23
31
49
TRAKTOR - Manual - 4
Page 5

Table of Contents
5.4 Track Search ...............................................................................................................................54
5.5 Working with the Track Collection and Playlists ......................................................................... 56
5.6 Editing Track Meta Data ............................................................................................................. 64
5.7 Track Icons ................................................................................................................................. 66
5.8 The Preview Player ...................................................................................................................... 67
5.9 Cover Art .....................................................................................................................................68
5.3.2 Importing a Selection of Tracks from iTunes .............................................................. 53
5.3.3 Importing iTunes Playlists ......................................................................................... 53
5.4.1 Filtering Playlists ....................................................................................................... 54
5.4.2 Refining a Search ...................................................................................................... 55
5.4.3 Searching for Similar Tracks ..................................................................................... 55
5.4.4 Search in Playlists ..................................................................................................... 55
5.5.1 Creating a Playlist ..................................................................................................... 56
5.5.2 Adding Tracks to Playlists ......................................................................................... 56
5.5.3 Showing Tracks in Collection ..................................................................................... 57
5.5.4 Deleting Tracks .......................................................................................................... 57
5.5.5 Sorting Playlists ........................................................................................................ 58
5.5.6 Organizing Playlists in Folders .................................................................................. 59
5.5.7 Track Collection Subfolders ....................................................................................... 59
5.5.8 Favorites .................................................................................................................... 59
5.5.9 Preparation Playlists ................................................................................................. 60
5.5.10 Exporting Playlists ..................................................................................................... 61
5.5.11 Importing Playlists .................................................................................................... 61
5.5.12 Printing Playlists ....................................................................................................... 62
5.5.13 More Playlist Functions .............................................................................................. 62
5.5.14 History Playlist ........................................................................................................... 64
5.6.1 Editing Track Properties via Inline Editing ................................................................. 65
5.6.2 Editing Track Properties via the Edit Dialog .............................................................. 65
TRAKTOR - Manual - 5
Page 6

Table of Contents
5.10 Collection Maintenance .............................................................................................................. 69
5.11 Working with Audio CDs .............................................................................................................. 73
5.12 Working with Digital Audio Players ............................................................................................. 74
5.9.1 Show Cover Art .......................................................................................................... 68
5.9.2 Editing Cover Art ....................................................................................................... 68
5.10.1 Consistency Check ..................................................................................................... 69
5.10.2 Analysis ..................................................................................................................... 71
5.10.3 Data Directories ......................................................................................................... 72
5.10.4 Other Maintenance Functions .................................................................................... 72
5.11.1 CD Text ...................................................................................................................... 73
5.11.2 Audio CDs and Favorites ............................................................................................ 73
5.11.3 Eject CD ..................................................................................................................... 73
5.12.1 iPod ........................................................................................................................... 74
6 The Decks .................................................................................................................
6.1 Deck Flavor Descriptions ............................................................................................................ 75
6.2 Loading Tracks / Remix Sets ....................................................................................................... 85
6.3 The Deck Heading ....................................................................................................................... 86
6.4 The Waveform Display and the Stripe View ................................................................................. 90
6.5 The Transport Controls ............................................................................................................... 91
6.1.1 Track Deck ................................................................................................................. 77
6.1.2 Remix Deck ................................................................................................................ 79
6.1.3 Live Input .................................................................................................................. 85
6.3.1 Deck Focus ................................................................................................................ 86
6.3.2 Deck Flavor ................................................................................................................ 86
6.3.3 Playback Mode ........................................................................................................... 87
6.3.4 Flux Mode .................................................................................................................. 87
6.3.5 Deck Layout ............................................................................................................... 88
6.3.6 Deck Audio Drag and Drop ......................................................................................... 89
75
TRAKTOR - Manual - 6
Page 7

6.6 Loop Controls ..............................................................................................................................93
6.7 Tempo Controls ........................................................................................................................... 94
6.8 The Advanced Panel ................................................................................................................... 98
6.7.1 Manual Tempo Controls ............................................................................................. 95
6.7.2 Phase Meter ............................................................................................................... 96
6.7.3 Beat Syncing ............................................................................................................. 96
6.8.1 BeatJump and Loop Move (MOVE Panel) .................................................................... 99
6.8.2 Cue Point and Loop Management Panel (CUE Panel) ................................................. 105
6.8.3 Cue Point Types ......................................................................................................... 107
6.8.4 Deleting a Stored Cue Point or Loop ........................................................................... 109
6.8.5 Hotcue Mapping ........................................................................................................ 110
6.8.6 Beatgrid Panel (GRID) ............................................................................................... 110
7 The Internal Mixer & the Crossfader ...........................................................................
7.1 Channel Faders .......................................................................................................................... 117
7.2 Crossfader .................................................................................................................................. 117
7.3 Equalizer .................................................................................................................................... 118
7.4 GAIN, Cue and PAN ..................................................................................................................... 120
7.5 FILTER, KEY and Effect Insert ..................................................................................................... 121
7.6 The Internal Mixer in External Mixer Mode ................................................................................... 124
7.3.1 Equalizer Types .......................................................................................................... 119
7.5.1 Headphone Controls .................................................................................................. 123
8 Using TRAKTOR with an External Mixer .......................................................................
8.1 Requirements ............................................................................................................................. 125
8.2 Hardware Setup .......................................................................................................................... 126
8.3 Software Setup ........................................................................................................................... 126
8.1.1 The Mixer ................................................................................................................... 125
8.1.2 Audio Device .............................................................................................................. 125
Table of Contents
117
125
TRAKTOR - Manual - 7
Page 8

Table of Contents
9 Using the Header and Global Sections ........................................................................
9.1 Header ........................................................................................................................................ 128
9.2 The Global Section ...................................................................................................................... 131
9.3 Effect Panels .............................................................................................................................. 136
9.1.1 TRAKTOR 2 Logo ........................................................................................................ 128
9.1.2 Status Indicators ....................................................................................................... 128
9.1.3 Layout Selector .......................................................................................................... 129
9.1.4 Utility Buttons ........................................................................................................... 130
9.2.1 Master Panel ............................................................................................................. 132
9.2.2 The Loop Recorder ..................................................................................................... 133
9.2.3 Master Clock Panel .................................................................................................... 134
9.2.4 MIDI Clock Send ......................................................................................................... 135
9.3.1 Group Mode ............................................................................................................... 137
9.3.2 Single Mode ............................................................................................................... 138
9.3.3 Audio Recorder Panel ................................................................................................. 140
9.3.4 Broadcasting ............................................................................................................. 141
10 Mouse Control for Faders and Knobs ..........................................................................
10.1 Basic Controls ............................................................................................................................ 142
10.2 Advanced Control ....................................................................................................................... 143
11 Control via Keyboard & MIDI Hotkeys .........................................................................
11.1 Keyboard Hotkeys ........................................................................................................................144
11.2 MIDI Hotkeys ............................................................................................................................... 145
12 Setting Up TRAKTOR SCRATCH ...................................................................................
12.1 The Turntable Setup ................................................................................................................... 147
12.2 CD Player Setup .......................................................................................................................... 149
12.1.1 Making Connections for Turntables ........................................................................... 147
12.1.2 Test Drive TRAKTOR SCRATCH with Turntables .......................................................... 148
12.1.3 The Control Zones on Vinyl ......................................................................................... 148
128
142
144
147
TRAKTOR - Manual - 8
Page 9

Table of Contents
12.3 Mixed Setup ................................................................................................................................ 150
12.4 Enabling the Decks .....................................................................................................................151
12.5 Calibration ................................................................................................................................. 151
12.6 Tracking Modes .......................................................................................................................... 152
12.7 Timecode Preferences ................................................................................................................. 153
12.8 TRAKTOR SCRATCH PRO 2 Troubleshooting ................................................................................ 154
12.2.1 Making connections ................................................................................................... 149
12.2.2 Test Drive TRAKTOR SCRATCH with CD Players .......................................................... 149
12.2.3 The Control Zones on CD ............................................................................................ 150
12.6.1 Absolute Tracking Mode ............................................................................................. 152
12.6.2 Relative Tracking Mode ............................................................................................. 152
12.6.3 Internal Playback Mode ............................................................................................. 153
12.8.1 Calibration Troubleshooting ...................................................................................... 154
12.8.2 Audio Troubleshooting ............................................................................................... 168
13 Preferences ..............................................................................................................
13.1 ................................................................................................................................................... 169
13.2 Audio Setup ................................................................................................................................ 171
13.3 Output Routing ........................................................................................................................... 172
13.4 Input Routing ............................................................................................................................. 173
13.5 MIDI Clock .................................................................................................................................. 174
13.6 Timecode Setup .......................................................................................................................... 174
13.1.1 The Preferences Window ............................................................................................ 169
13.2.1 Audio Device .............................................................................................................. 171
13.2.2 Phono / Line ............................................................................................................... 171
13.2.3 Routing ...................................................................................................................... 172
13.2.4 Built-in Soundcard (only Windows) ............................................................................ 172
13.2.5 Multi-Core ................................................................................................................. 172
13.3.1 Mixing Mode .............................................................................................................. 172
169
TRAKTOR - Manual - 9
Page 10

13.7 Loading ...................................................................................................................................... 176
13.8 Transport .................................................................................................................................... 177
13.9 Decks Layout .............................................................................................................................. 181
13.10 Track Decks ................................................................................................................................ 182
13.11 Remix Decks ............................................................................................................................... 183
13.12 Mixer ...........................................................................................................................................185
13.13 Global Settings ........................................................................................................................... 186
13.14 Effects ........................................................................................................................................ 187
13.15 Mix Recorder ............................................................................................................................... 189
13.16 Loop Recorder ............................................................................................................................. 190
13.17 Broadcasting .............................................................................................................................. 190
13.18 Browser Details .......................................................................................................................... 192
13.19 Layout Manager .......................................................................................................................... 192
13.20 File Management ........................................................................................................................ 193
13.21 Controller Manager ..................................................................................................................... 195
13.21.1 Overview .................................................................................................................... 196
13.21.2 Device Setup .............................................................................................................. 196
13.21.3 Assignment Table ...................................................................................................... 198
13.21.4 Device Mapping ......................................................................................................... 199
13.21.5 Mapping Details ........................................................................................................ 200
13.21.6 Available Controller Types ......................................................................................... 201
14 Advanced Operation of TRAKTOR ................................................................................
14.1 TRAKTOR Profiles ........................................................................................................................ 204
14.1.1 The TRAKTOR Root folder ........................................................................................... 204
14.1.2 The Recordings folder ................................................................................................ 205
14.1.3 Complete Backup ...................................................................................................... 205
14.1.4 Restoring TRAKTOR from a Backup ............................................................................ 206
14.1.5 Creating a portable version of TRAKTOR .................................................................... 206
Table of Contents
204
TRAKTOR - Manual - 10
Page 11

Table of Contents
14.2 Syncing via MIDI Clock ............................................................................................................... 208
14.3 Broadcasting .............................................................................................................................. 210
14.4 The Effects in Detail ................................................................................................................... 212
14.1.6 Automatic Collection Backup (Security Backup) ........................................................ 207
14.1.7 Repairing a Corrupted Collection ............................................................................... 208
14.2.1 TRAKTOR as Tempo Source (MIDI Clock send) ............................................................ 208
14.2.2 Syncing TRAKTOR to an external MIDI Clock Signal (External Sync) ........................... 209
14.2.3 Syncing two versions of TRAKTOR .............................................................................. 209
14.3.1 Streaming Protocol .................................................................................................... 210
14.3.2 Configuring TRAKTOR ................................................................................................ 210
14.3.3 Starting the Broadcast .............................................................................................. 211
14.3.4 How to setup a microphone for your Broadcast .......................................................... 211
14.4.1 Introduction ............................................................................................................... 212
14.4.2 FX Panel Modes ......................................................................................................... 213
14.4.3 Common Parameters ................................................................................................. 215
14.4.4 Delay ......................................................................................................................... 216
14.4.5 Reverb ....................................................................................................................... 217
14.4.6 Flanger ...................................................................................................................... 217
14.4.7 Flanger Pulse ............................................................................................................. 218
14.4.8 Flanger Flux ............................................................................................................... 219
14.4.9 Gater ......................................................................................................................... 219
14.4.10 Beatmasher 2 ............................................................................................................ 220
14.4.11 Delay T3 ..................................................................................................................... 221
14.4.12 Filter LFO ................................................................................................................... 222
14.4.13 Filter Pulse ................................................................................................................ 223
14.4.14 Filter .......................................................................................................................... 224
14.4.15 Filter:92 LFO .............................................................................................................. 225
14.4.16 Filter:92 Pulse ........................................................................................................... 226
TRAKTOR - Manual - 11
Page 12

Table of Contents
14.4.17 Filter:92 ..................................................................................................................... 226
14.4.18 Phaser ....................................................................................................................... 227
14.4.19 Phaser Pulse .............................................................................................................. 228
14.4.20 Phaser Flux ................................................................................................................ 229
14.4.21 Reverse Grain ............................................................................................................ 230
14.4.22 Turntable FX .............................................................................................................. 231
14.4.23 Iceverb ....................................................................................................................... 231
14.4.24 Reverb T3 .................................................................................................................. 232
14.4.25 Ring Modulator .......................................................................................................... 232
14.4.26 Digital LoFi ................................................................................................................ 233
14.4.27 Mulholland Drive ....................................................................................................... 234
14.4.28 Transpose Stretch ...................................................................................................... 234
14.4.29 BeatSlicer Buffer ....................................................................................................... 236
14.4.30 Formant Filter ............................................................................................................ 236
14.4.31 Peak Filter ................................................................................................................. 237
14.4.32 Tape Delay ................................................................................................................. 237
14.4.33 Ramp Delay ............................................................................................................... 238
14.4.34 Auto Bouncer ............................................................................................................. 239
14.4.35 Bouncer ..................................................................................................................... 240
15 Tutorials ...................................................................................................................
15.1 Prerequisites .............................................................................................................................. 241
15.2 Goals of the Following Chapters ................................................................................................. 242
15.3 Playing Your First Track .............................................................................................................. 243
15.4 Mixing In a Second Track ............................................................................................................ 248
15.3.1 Quick Loading a Track ............................................................................................... 243
15.3.2 Playing the Track ....................................................................................................... 245
15.3.3 If You Don’t Hear the Track ........................................................................................ 246
15.4.1 Pre-listening a Second Track in the Preview Player ................................................... 248
241
TRAKTOR - Manual - 12
Page 13

Table of Contents
15.5 Adjusting Levels ......................................................................................................................... 260
15.6 Looping and Cueing ....................................................................................................................263
15.7 Adding FX ................................................................................................................................... 269
15.8 Using the Remix Decks in Your Mix ............................................................................................. 274
15.4.2 Loading and Playing the Second Track ...................................................................... 250
15.4.3 Using Headphones to Prepare the Mix ....................................................................... 250
15.4.4 Synchronizing the Second Track ................................................................................ 251
15.4.5 Setting a Cue Point as Starting Point ........................................................................ 252
15.4.6 Snapping to the Beats ............................................................................................... 255
15.4.7 Sticking to the Beats ................................................................................................. 255
15.4.8 Interlude: In Case the Left Track Is Over… ............................................................... 256
15.4.9 Mixing In the Track by Using the Channel EQ and Filter ............................................ 256
15.4.10 Manual Beat-matching ............................................................................................. 258
15.5.1 The Theory… ............................................................................................................. 260
15.5.2 …and the Practice .................................................................................................... 261
15.6.1 Playing with Loops ..................................................................................................... 264
15.6.2 Using Hotcues ........................................................................................................... 267
15.7.1 Assigning a Deck to an FX Unit .................................................................................. 270
15.7.2 Group Mode ............................................................................................................... 271
15.7.3 Getting the FX Unit Ready .......................................................................................... 271
15.7.4 Controlling the FX Unit .............................................................................................. 272
15.7.5 Single Mode ............................................................................................................... 273
15.7.6 Storing a Snapshot .................................................................................................... 273
15.8.1 Loading a Sample from the Collection ....................................................................... 275
15.8.2 Triggering the Sample ............................................................................................... 276
15.8.3 Capturing a Sample from a Track .............................................................................. 278
15.8.4 More Sample Controls ................................................................................................ 279
15.8.5 Saving A Remix Set .................................................................................................... 282
TRAKTOR - Manual - 13
Page 14

15.9 Using the Loop Recorder ............................................................................................................. 282
15.10 Synchronization .......................................................................................................................... 287
15.9.1 Choosing a Source ..................................................................................................... 283
15.9.2 Recording a Loop ....................................................................................................... 284
15.9.3 Overdubbing .............................................................................................................. 286
15.9.4 Further Uses of the Recorded Loop ............................................................................ 286
15.10.1 Introduction ............................................................................................................... 287
15.10.2 The Tempo Master ..................................................................................................... 287
15.10.3 The Beatgrid .............................................................................................................. 292
15.10.4 Other Useful Tools for Synching ................................................................................. 293
16 Troubleshooting ........................................................................................................
16.1 TRAKTOR Won’t Start .................................................................................................................. 296
16.2 Latency Issues ............................................................................................................................ 296
16.3 TRAKTOR 2 Crashes .................................................................................................................... 297
16.4 Updates ...................................................................................................................................... 297
17 Getting Help ..............................................................................................................
17.1 Knowledge Base ......................................................................................................................... 298
17.2 Technical Support .......................................................................................................................298
17.3 Registration Support .................................................................................................................. 299
17.4 User Forum ................................................................................................................................. 299
18 Appendix — Common Setups .....................................................................................
18.1 TRAKTOR with an On-board Sound Card and Fallback ................................................................ 300
18.2 TRAKTOR with an External Audio Interface ................................................................................. 301
18.3 TRAKTOR with an External Mixer ................................................................................................. 302
18.4 TRAKTOR with a Controller .......................................................................................................... 303
18.5 TRAKTOR KONTROL S4 with TRAKTOR SCRATCH PRO 2 ............................................................... 306
18.4.1 Controllers with Mixer Controls (and optionally a Built-In Audio Interface) ............... 304
18.4.2 Controllers without Mixer Controls ............................................................................. 306
Table of Contents
296
298
300
TRAKTOR - Manual - 14
Page 15

18.6 Adding a Microphone .................................................................................................................. 307
18.7 Recording Setup ......................................................................................................................... 308
18.6.1 Using Your Microphone with the Loop Recorder ......................................................... 307
18.6.2 Using Your Microphone as a Live Input and with TRAKTOR FX ................................... 307
18.7.1 Recording from the Internal Source ........................................................................... 308
18.7.2 Recording from an External Source ............................................................................ 309
19 Default Keyboard Mappings .......................................................................................
19.1 Transport .................................................................................................................................... 312
19.2 Remix Decks ............................................................................................................................... 313
19.3 Cue & Loop ................................................................................................................................. 314
19.4 Favorites & Navigation ............................................................................................................... 314
19.5 Loop Recorder ............................................................................................................................. 315
19.6 Zoom & Layout ............................................................................................................................315
19.7 Scratch Modes ............................................................................................................................ 316
20 Assignable MIDI Controls ...........................................................................................
20.1 Deck Common ............................................................................................................................. 318
20.2 Track Deck .................................................................................................................................. 320
20.3 Remix Deck ................................................................................................................................. 322
20.4 Mixer ...........................................................................................................................................324
20.5 FX Unit ........................................................................................................................................326
20.6 Browser ...................................................................................................................................... 327
20.7 Preview Player ............................................................................................................................ 330
20.8 Loop Recorder ............................................................................................................................. 330
20.9 Audio Recorder ........................................................................................................................... 330
20.10 Master Clock ...............................................................................................................................331
20.11 Global ......................................................................................................................................... 331
20.12 Layout .........................................................................................................................................332
Table of Contents
312
317
TRAKTOR - Manual - 15
Page 16

20.13 Modifier ...................................................................................................................................... 332
Index ........................................................................................................................
Table of Contents
334
TRAKTOR - Manual - 16
Page 17

1 Welcome
TRAKTOR
you can mix your tracks traditionally as well as combine your tracks and loops in a non-linear
way using it as a powerful live remixing tool. In this manual, you will find everything there is to
know about TRAKTOR. For information on how to use NI TRAKTOR KONTROL controllers
(TRAKTOR KONTROL S4, S2, X1, F1) with TRAKTOR, or for further information on TRAKTOR's audio interfaces and their configuration, please consult the relevant documents from
TRAKTOR's documentation depository, which you can access from the Help menu in TRAKTOR's application menu bar.
Differences Between Versions
TRAKTOR Light Edition 2 and TRAKTOR Manufacturer Edition 2 are limited in certain features compared to the full TRAKTOR (SCRATCH) PRO 2 version. The differences will be documented at the appropriate places in this manual.
Your TRAKTOR version is a Manufacturer Edition 2 version if you obtained it as part of one of
the following bundled products:
2 is the most powerful and versatile DJ software on the market. With TRAKTOR 2,
Welcome
▪ Pioneer DDJ-T1 (Traktor Pioneer DDJ-T1 Edition)
▪ Numark 4TRAK (Traktor Numark 4TRAK Edition)
▪ Velocity MIDI Station (Traktor Velocity MIDI Station Edition)
Pet Names for Software and Hardware
Throughout the documentation, we will refer to the TRAKTOR (SCRATCH) PRO 2 software as
“TRAKTOR 2” or simply “TRAKTOR.”
TRAKTOR Manufacturer Edition 2 will hereinafter be referred to as "TRAKTOR ME 2" or simply
"ME 2." TRAKTOR Light Edition 2 will hereinafter be referred to as "TRAKTOR LE 2" or simply
"LE 2."
TRAKTOR - Manual - 17
Page 18

TRAKTOR 2 Documentation Overview
Document Conventions
manual uses particular formatting to point out special facts and to warn you of potential
This
issues. The icons introducing these notes let you see what kind of information is to be expected:
Whenever this exclamation mark icon appears, you should read the corresponding note
carefully and follow the instructions and hints given there if applicable.
This light bulb icon indicates that a note contains useful extra information. This information
may often help you to solve a task more efficiently, but does not necessarily apply to
the setup or operating system you are using; however, it's always worth a look.
Furthermore, the following formatting is used:
Welcome
▪ Text
appearing in (drop-down) menus (such as Open…, Save as… etc.), in paths to locations on your hard drive or other storage devices, and in Preferences paths is printed in
italics.
▪ Text appearing elsewhere (labels of buttons, controls, text next to checkboxes etc.) is
printed in blue. Whenever you see this formatting applied, you will find the same text appearing somewhere on the screen.
▪ Important names and concepts are printed in bold.
Single instructions are introduced by this play button type arrow.
►
Results of actions are introduced by this smaller arrow.
→
1.1 TRAKTOR 2 Documentation Overview
TRAKTOR
documents and a short description of their content in this chapter.
1.1.1 In This Manual
This
TRAKTOR you will find in here.
2 provides you with many information sources. Find an overview of the available
manual covers all elements of TRAKTOR 2 in detail. Everything there is to know about
TRAKTOR - Manual - 18
Page 19

TRAKTOR 2 Documentation Overview
1.1.2 Other Documentation
These
(find also a recommended reading order in ↑1.1.3, Recommended Reading Order).
The Setup Guide
The Setup Guide will guide you through the software (and hardware where appropriate) installation of TRAKTOR 2 from the very beginning to the first sound coming through your speakers.
This should be your first stop in learning TRAKTOR 2. The Setup Guide is available on the
TRAKTOR 2 registration page. Find a link to the registration page on the registration flyer,
which is included in your TRAKTOR product box.
The Getting Started Guide
After having read the Setup Guide and followed its instructions, TRAKTOR should be up and
running. The next step is to read the Getting Started guide. The Getting Started guide gives
you a practical approach to TRAKTOR.
The Keyboard Shortcut Overview Card
are the additional documents available to help you aquaint yourself with TRAKTOR 2
Welcome
A keyboard shortcut overview card is included in the product box. It provides quick access to
the dedicated keyboard mappings for the TRAKTOR 2 software.
The Video Tutorials
The Native Instruments website provides you with a bunch of video tutorials that give you a
hands-on approach to many sides of the TRAKTOR 2 workflow. Find them here:
http://www.native-instruments.com/traktor
1.1.3 Recommended Reading Order
The documentation items should be read in the following order:
Setup Guide relating to your TRAKTOR product.
1.
2. TRAKTOR 2 Getting Started guide and video tutorials.
3. TRAKTOR 2 Manual.
TRAKTOR - Manual - 19
Page 20
System Requirements and Compatibility
The whole documentation is available via the Open Manual... entry from the Help drop-down
menu in TRAKTOR.
1.2 System Requirements and Compatibility
the minimum system requirements your computer needs to meet, see the TRAKTOR sec-
For
tion of the Native Instruments website:
http://www.native-instruments.com/#/en/products/dj/traktor-pro-2/specifications/?page=2050
Please note that meeting the system requirements does not guarantee running all TRAK-
2 features hassle-free. You might be forced to tweak your system following Native In-
TOR
struments’ tuning tips for audio computers. You can find these tuning tips in the Knowledge Base—see ↑17.1, Knowledge Base for more information.
To check the compatibility with several operating systems, please have a look at: http://
www.native-instruments.com/compatibility
Welcome
TRAKTOR - Manual - 20
Page 21

Upgrading (from TRAKTOR PRO, TRAKTOR LE, and TRAKTOR ME)
2 Upgrading (from TRAKTOR PRO, TRAKTOR LE, and
TRAKTOR ME)
When
data and mappings. This is a straightforward process assisted by the TRAKTOR software; however, there are a few things to be observed when upgrading. See the following sections for
more info.
2.1 Backup
Before installing TRAKTOR 2 over your previous version, backup the following folders and files:
upgrading from one of the aforementioned versions, you will need to import your user
Backup
▪ your
TRAKTOR folder, per default found in [User]\My Documents\Native Instruments
\Traktor (Windows) and User:Documents:Native Instruments:Traktor (Mac OS X)
▪ your Music folders as defined in Preferences > Data Location > Music Folders
▪ any other data that is not stored in the aforementioned places because you have chosen
another location for them.
At this point, it is a good idea to remove all unnecessary files from your TRAKTOR folder,
e.g,. mappings for controllers you don’t use anymore, etc.
2.2 Installation
Follow the instructions from the Setup Guide carefully.
As a general rule: start with the software installation before you install the hardware (TRAKTOR AUDIO 6/10, TRAKTOR KONTROL X1, TRAKTOR KONTROL S4, etc.)!
The installation creates a new User Folder in [User]\My
2.x.x (Windows) and User:Documents:Native Instruments:Traktor 2.x.x (Mac OS X). Also, your
previous TRAKTOR version will not be uninstalled. This means that from now on you’ll always
be able to easily return to the last version if needed.
Documents\Native Instruments\Traktor
TRAKTOR - Manual - 21
Page 22

Upgrading (from TRAKTOR PRO, TRAKTOR LE, and TRAKTOR ME)
Importing Your Data
2.3 Importing Your Data
▪ When you start TRAKTOR 2 for the first time, the Setup Wizard greets you with some sim-
ple questions regarding your setup. This will adjust TRAKTOR’s look and Preferences accordingly. Read more about the Setup Wizard in ↑3, TRAKTOR's Setup Wizard.
▪ Next, TRAKTOR will ask if you want to import your previous data by copying the existing
user content to a new folder in your user folder. Your previous data will not be altered if
you copy it to the new default folder.
Importing Your MIDI and Hotkey Mappings
For TRAKTOR 2, the mapping system has been changed. While some mappings created with
previous versions of TRAKTOR may still work, others will not be imported correctly.
We recommend double-checking your imported mappings before you use them in a live situation.
TRAKTOR - Manual - 22
Page 23
TRAKTOR's Setup Wizard
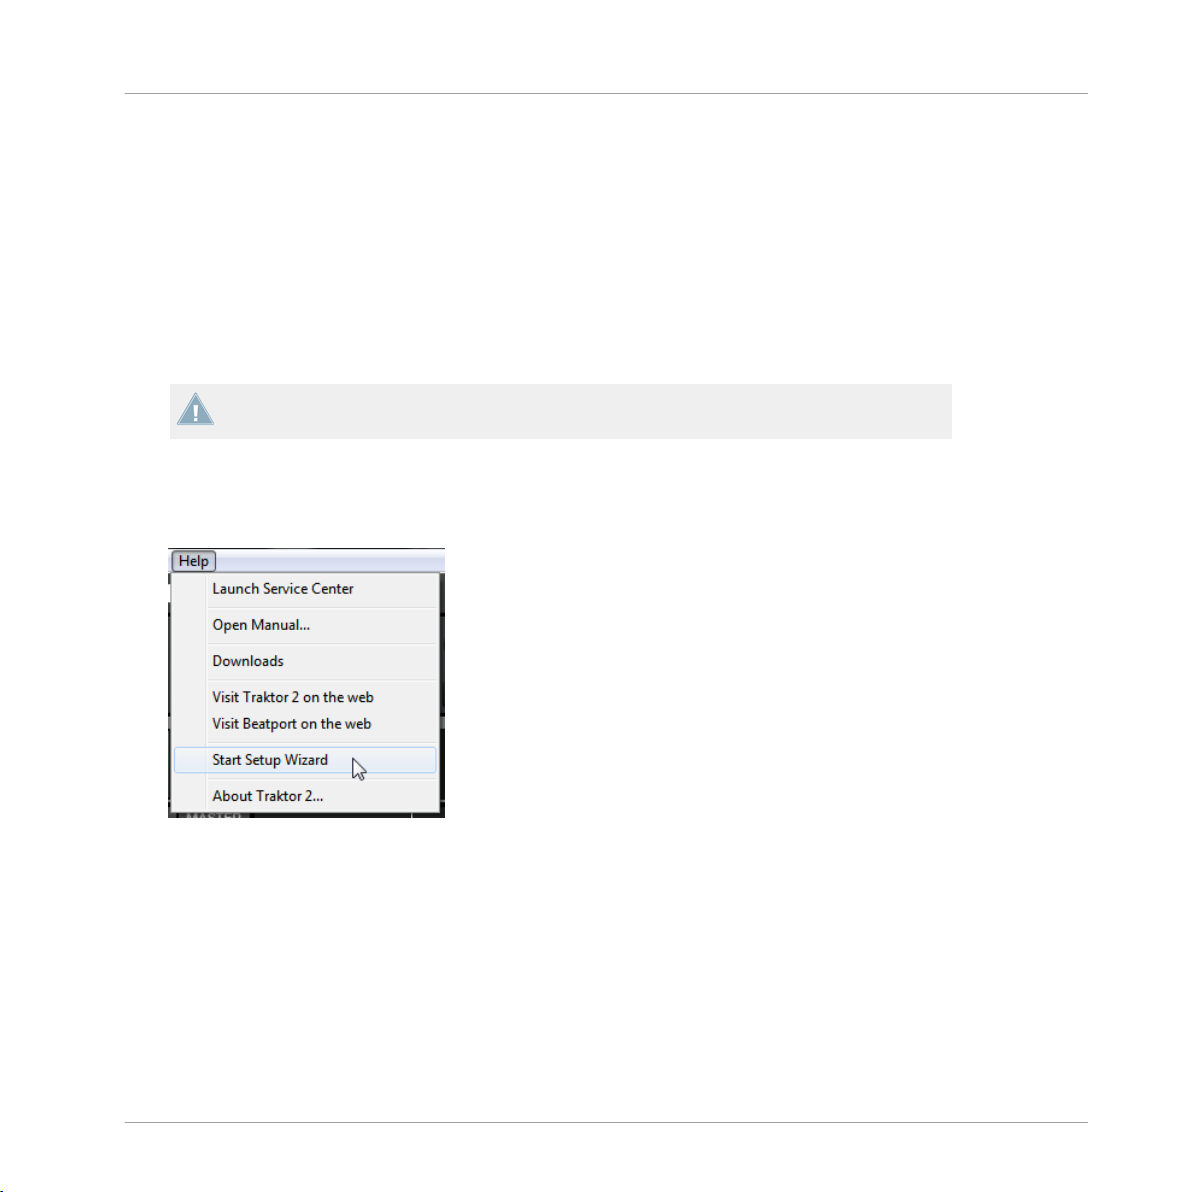
3 TRAKTOR's Setup Wizard
The
Setup Wizard lets you configure TRAKTOR in a few simple steps. It also is a convenient
way to restart with a fresh out-of-the-box setup. The Setup Wizard does two things:
▪ It lets you choose from a few basic audio, MIDI, and general setup configurations and au-
tomatically sets the available options accordingly.
▪ It resets all other TRAKTOR 2 settings to their default values.
Depending on the version of TRAKTOR software you have (e.g., LE 2, ME 2), the Setup
Wizard may not offer all shown screens or selections.
You can start the Setup Wizard in two ways:
Select Start Setup Wizard in the Help menu of the Application Menu Bar (to see this bar,
►
Fullscreen mode must be deactivated).
Or click the Setup Wizard button at the bottom left corner of the Preferences window.
►
Exemplary Setup
Let's walk you through an exemplary configuration using the Setup Wizard:
TRAKTOR - Manual - 23
Page 24
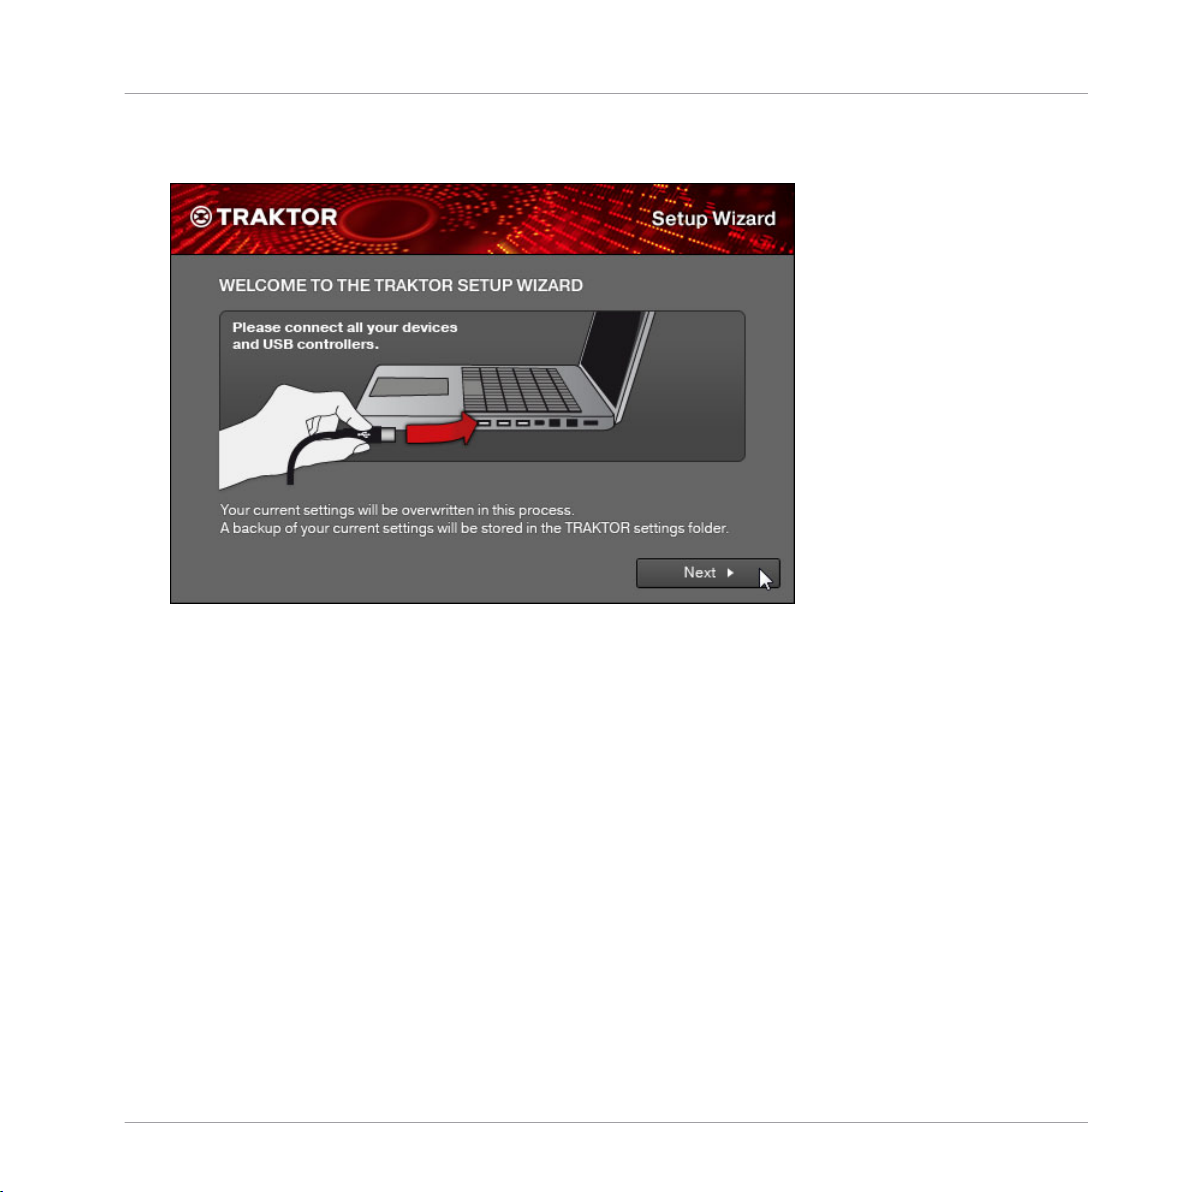
TRAKTOR's Setup Wizard
1. On the welcome screen, click Next to confirm you have connected any TRAKTOR controllers to your computer via USB (if you are using any).
TRAKTOR - Manual - 24
Page 25

TRAKTOR's Setup Wizard
2. Select whether or not you want to use TRAKTOR with a MIDI controller and proceed with
Next. If you are using one of NI's "KONTROL" models (S4, S2, F1, X1, etc.), select No
here as TRAKTOR is already pre-configured for use with these.
TRAKTOR - Manual - 25
Page 26
TRAKTOR's Setup Wizard
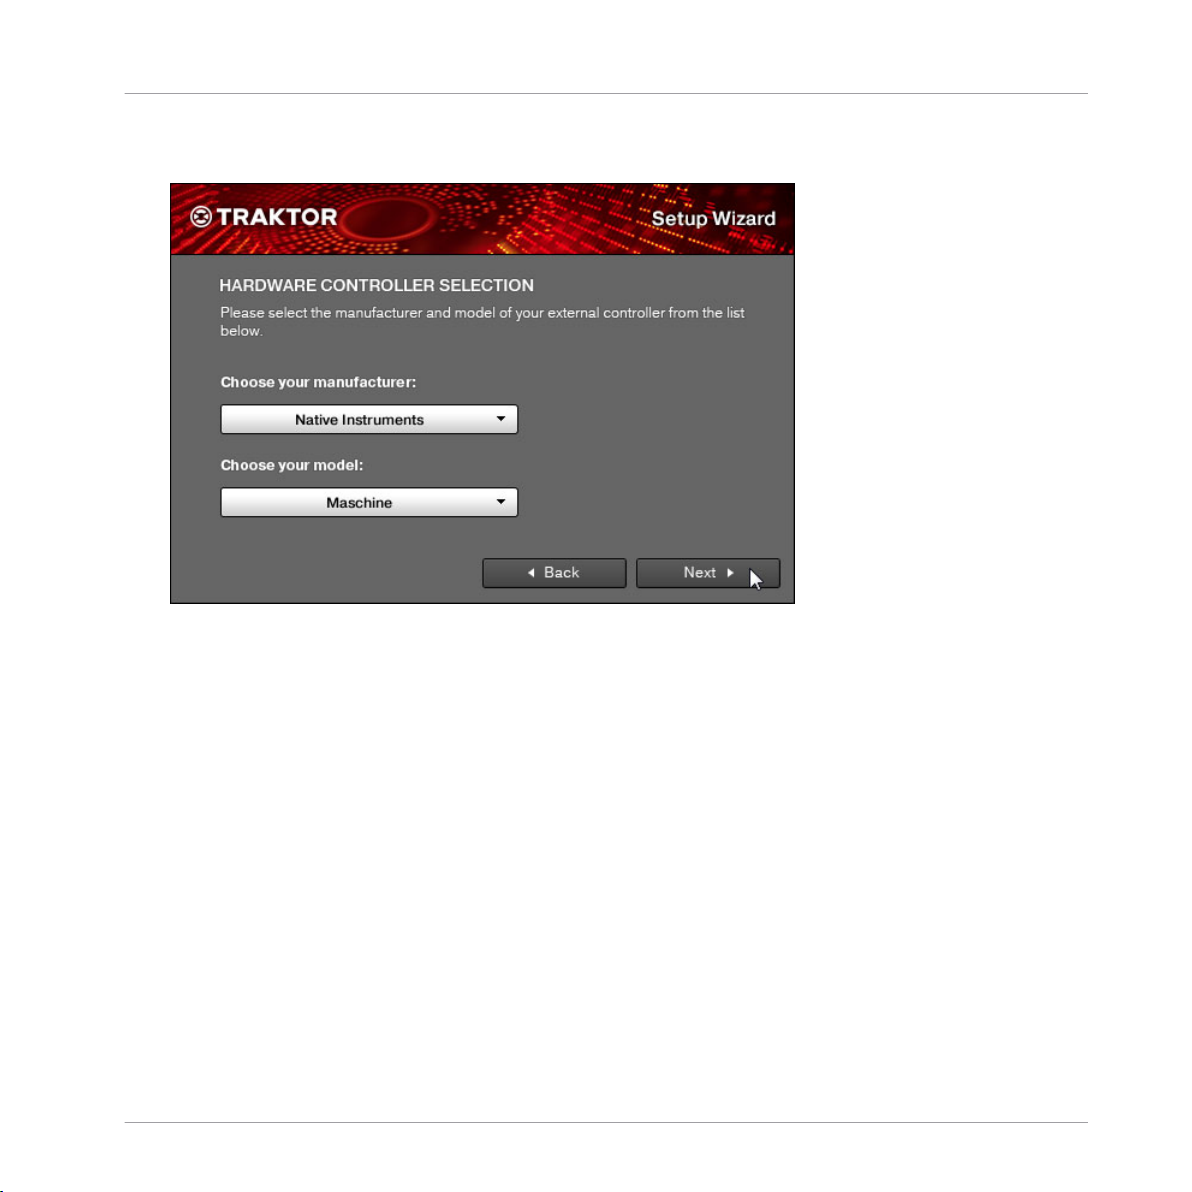
3. If you previously selected to use TRAKTOR with a controller, choose the controller manufacturer and model from the drop-down lists and confirm with Next.
TRAKTOR - Manual - 26
Page 27

TRAKTOR's Setup Wizard
4. In case your TRAKTOR version is TRAKTOR PRO, ME, or LE, select whether you want to
use an external DJ mixer or TRAKTOR's internal software mixer in your setup. Confirm
with Next. In case of TRAKTOR SCRATCH PRO, this screen is skipped and external mixing is auto-selected.
TRAKTOR - Manual - 27
Page 28
TRAKTOR's Setup Wizard
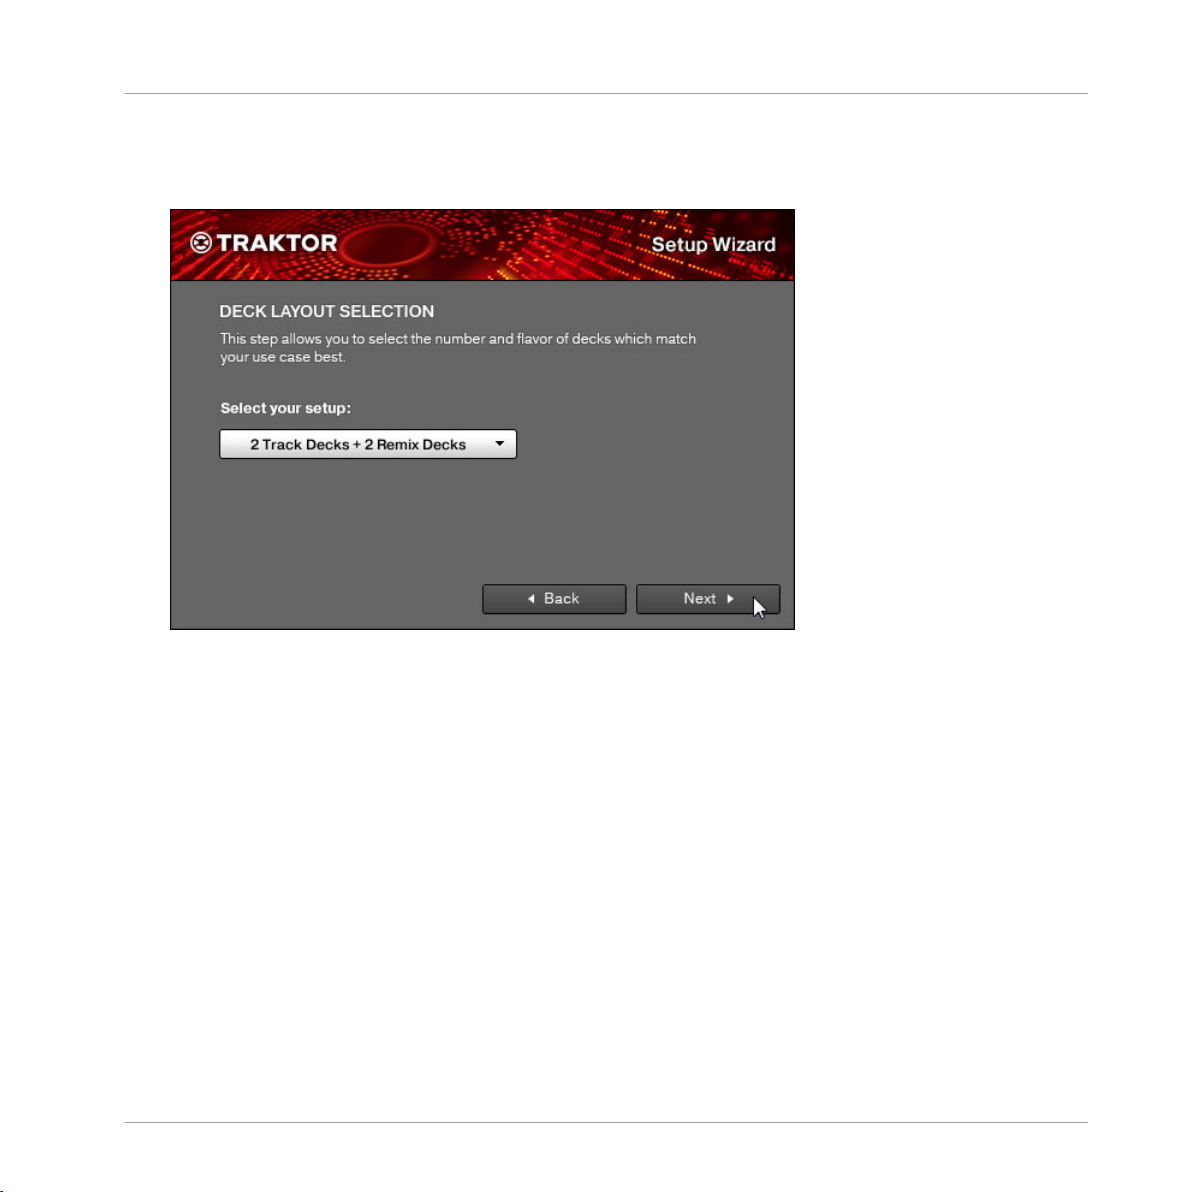
5. Select a basic setup for your Decks (how many Decks and what Deck Flavors to use). This
can later be easily changed from within the software. The available options can vary, depending on your TRAKTOR version.
6. The
last screen of the Setup Wizard sums up your selection of options. Below you see a
summary screen with an exemplary configuration of TRAKTOR with: four Decks (two Track
Decks and two Remix Decks); an external DJ mixer; a German keyboard layout (derived
TRAKTOR - Manual - 28
Page 29
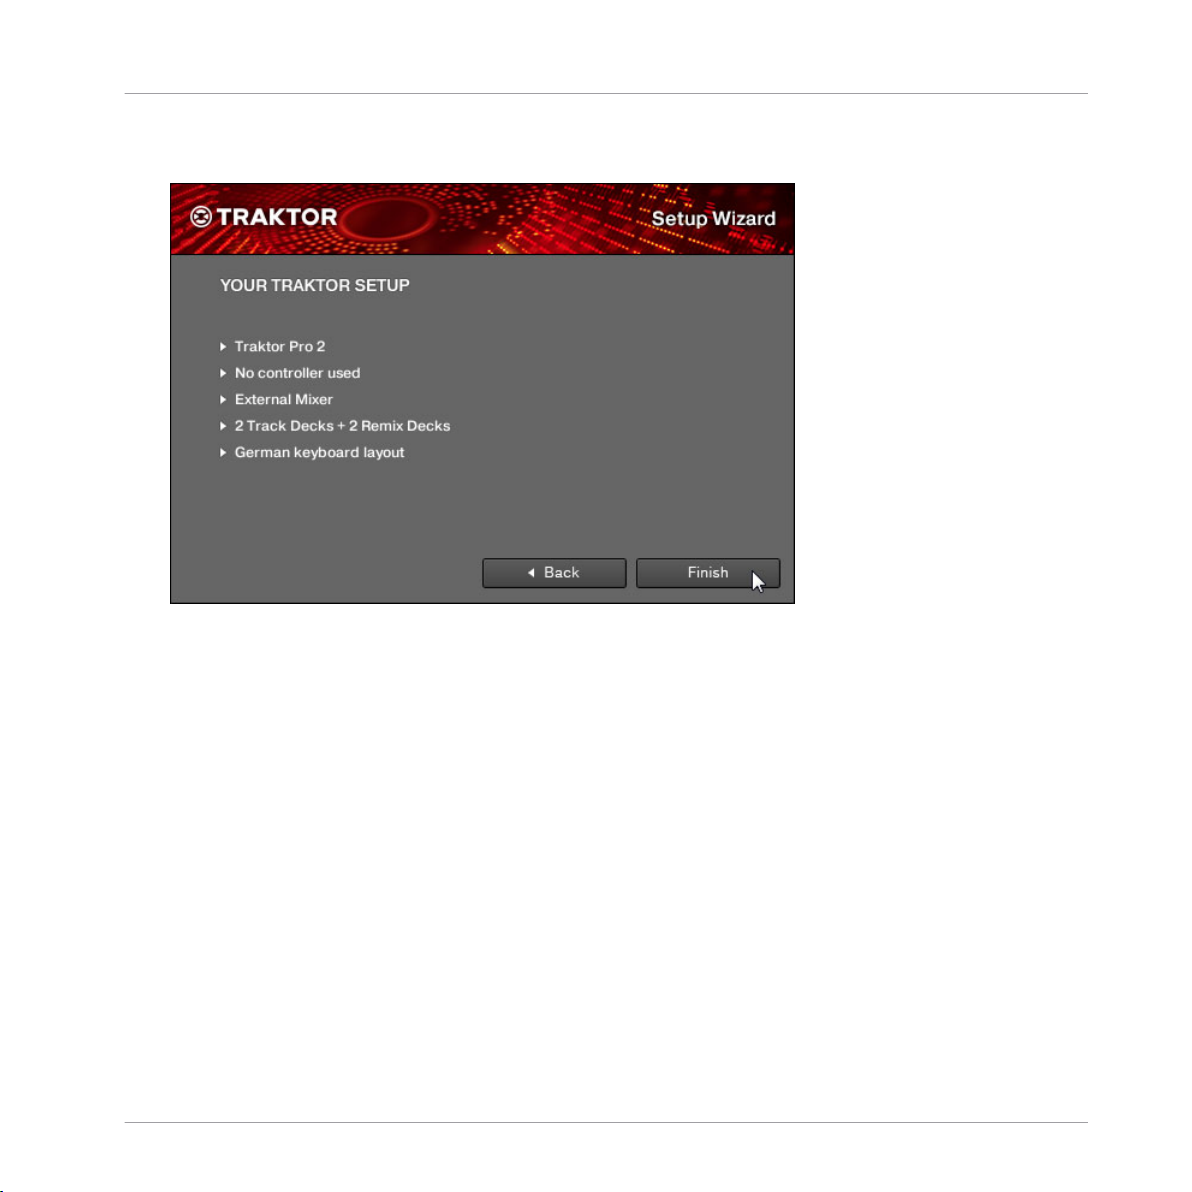
TRAKTOR's Setup Wizard
from the system settings).You can click Back to change the settings made, Cancel to cancel the Setup Wizard completely, or Finish, which confirms your selections.
TRAKTOR - Manual - 29
Page 30
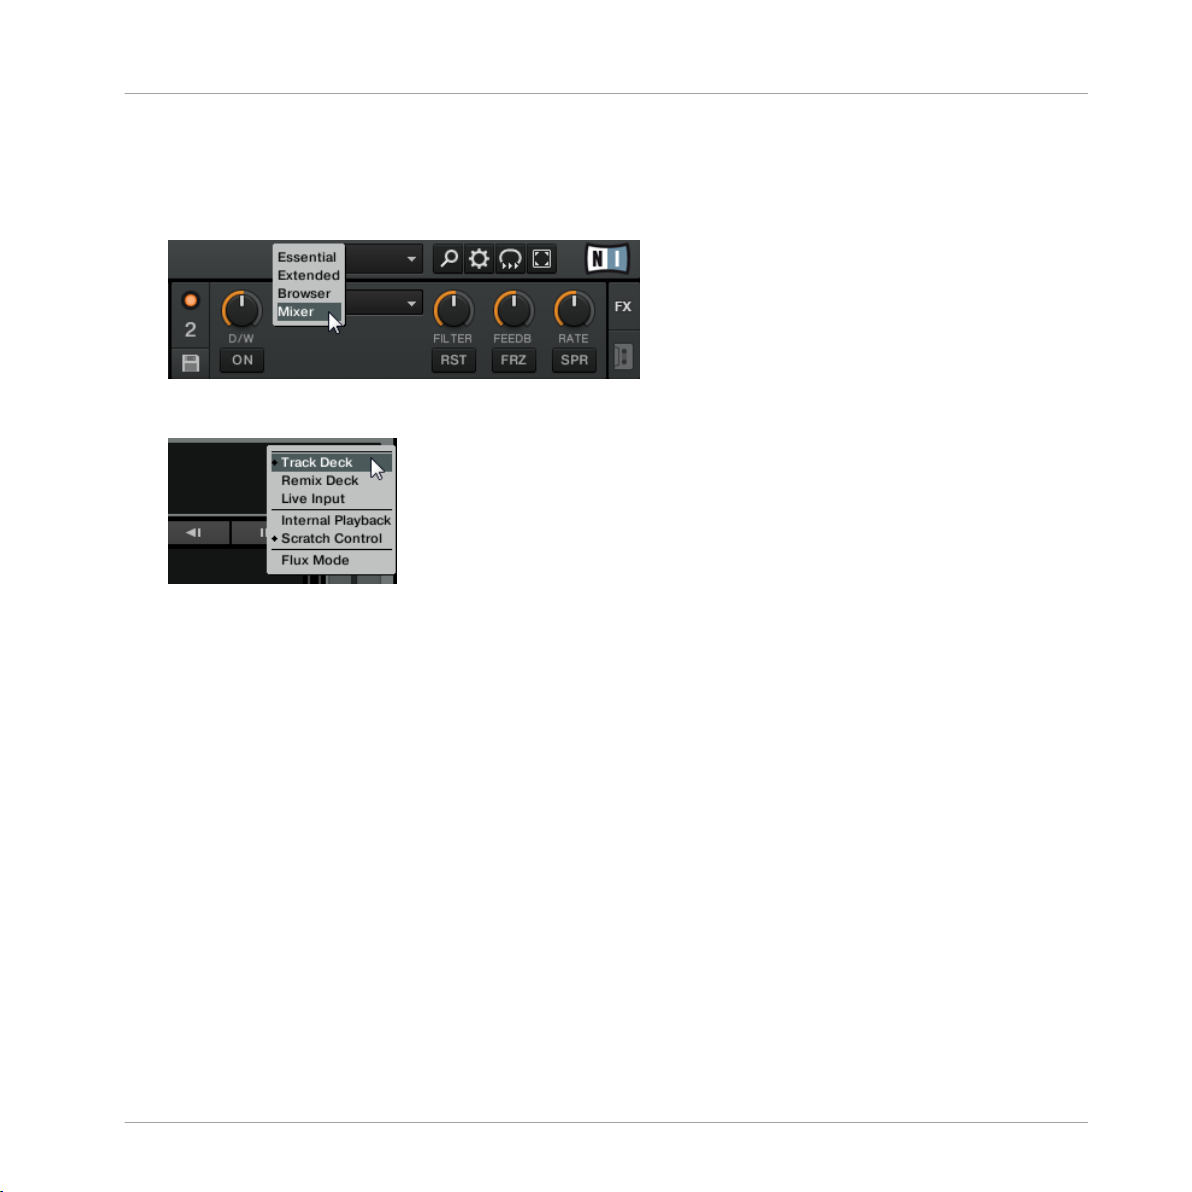
TRAKTOR starts with the selected settings and a matching interface layout, e.g., if you
→
selected to use an external DJ mixer, TRAKTOR's software mixer will be hidden. You can
always change the Layout of the user interface with the Layout selection menu in TRAKTOR's header.
To change the Deck Flavors, click on the Deck letter in a Deck's upper right corner and
select a Flavor from the drop-down menu:
TRAKTOR's Setup Wizard
TRAKTOR - Manual - 30
Page 31

4 The User Interface (Overview)
This chapter will introduce you to TRAKTOR’s user interface.
Take the time to read these few pages, as they will familiarize you with the way TRAKTOR
works and provide insight on the power of its design.
Preparation
The User Interface (Overview)
TRAKTOR
uses a set of user interface layouts to organize its graphical user interface. These
are called "Layouts" in TRAKTOR terminology. You can access them from TRAKTOR's Layout
selection drop-down menu in the software's Header.
Use the Layout selection drop-down menu to select a Layout.
Depending
on which Layout you select, certain elements of the user interface will be displayed
while others will remain hidden.
To make all elements described hereafter visible:
Select the Mixer Layout from the drop-down menu.
►
If you are using TRAKTOR SCRATCH PRO 2, you will most likely use an external mixer instead of TRAKTOR's internal software mixer; however, to follow the explanations in this
manual, you should also select the Mixer Layout.
TRAKTOR ME 2 note: The contained layouts differ for ME 2.
TRAKTOR - Manual - 31
Page 32

The User Interface (Overview)
The Big Picture
4.1 The Big Picture
The picture below shows the interface of TRAKTOR SCRATCH PRO. Your graphical user interface will look slightly different if you are using TRAKTOR LE.
The main areas of the software.
(1) Application Menu Bar: The Application Menu Bar provides access to basic functions and information about the software.
(2) Header: Here you can find various status indicators and useful functions and buttons, e.g.,
the Preferences button (cog wheel symbol).
TRAKTOR - Manual - 32
Page 33

The User Interface (Overview)
Interface Elements
(3) Global section: The Global section contains the FX Units, Master Clock, the Audio Recorder,
and the Loop Recorder.
(4) Decks: TRAKTOR provides you with four virtual Decks. The Decks are the place where
tracks, Samples, and live input are played back. The Decks can be seen as the virtual equivalent to good old vinyl or CD decks. If you previously selected to use only two Decks from the
Setup Wizard, you can make the lower Decks C and D visible via Preferences > Decks Layout >
Deck Layout; simply put a checkmark next to Show C & D, and confirm by closing the Prefer-
ences window.
(5) Mixer: Sitting in the middle of your TRAKTOR window is the Mixer. It receives on its four
channels the audio signals coming from the four Decks described above. There is one channel
for each Deck. As with any DJ mixer, the Mixer’s basic purpose is to adjust the relative level of
each channel, to control the channels’ frequency content, possibly feeding them into the FX
Units, before sending the overall result to your audience.
(6) Browser: The Browser manages all your tracks in a database, called the Track Collection (also Collection). You can group tracks in Playlists, sort them according to various attributes, and
search within Playlists as well as in the whole Collection.
TRAKTOR LE 2 note: The Audio Recorder is not available in LE 2.
4.2 Interface Elements
This chapter explains the main areas and elements of the TRAKTOR 2 software.
4.2.1 Application Menu Bar
The File, View, and Help menus provide access to basic TRAKTOR functions.
The Application menu bar (on Windows).
TRAKTOR - Manual - 33
Page 34

The User Interface (Overview)
4.2.2 Header
TRAKTOR’s Header.
The
Header is the small horizontal strip located at the very top of TRAKTOR’s user interface.
Its elements are described hereafter from left to right.
TRAKTOR Logo
TRAKTOR logo.
on the TRAKTOR logo to open the About screen. This screen displays the full version
Click
number of your TRAKTOR software, the software credits, and some additional information.
Status Indicators
Interface Elements
Status indicators.
Several status indicators update you about the current state of the TRAKTOR software. From
left to right:
▪ CTRL : displays the incoming MIDI and Native (NHL) signals. It flashes blue while a signal
is received.
▪ Connection (mixer symbol): shows if all listed controllers are connected — blue = all con-
nected; orange = some controller(s) not connected; unlit = none connected.
▪ AUDIO : displays the connection to your audio interface — blue = connected; red = not
connected; orange = internal soundcard selected.
▪ LOAD indicator: indicates how much of computing time available per audio buffer is cur-
rently used by TRAKTOR to process audio data contained in one buffer. This value shows
how stressed the audio processing is and how much headroom is left before audio starts
dropping out. The system should be kept at values below the LOAD Indicator turning red.
▪ System Clock : displays the time of day derived from the system time.
TRAKTOR - Manual - 34
Page 35

The User Interface (Overview)
▪ MAIN : displays the Master Output level. There are three colors: blue, orange and red. Ad-
just it so that the MAIN level meter fully uses the available range (peaks go into the orange area) but without clipping (red area).
▪ BAT : gives information about how much power remains in your computer’s battery. It
glows blue if you have a power supply connected and red when you’re running out of battery.
▪ REC : displays the status of TRAKTOR’s Audio Recorder. It turns red when recording.
TRAKTOR LE 2 note: The REC indicator is not available in LE 2.
Layout Selection Menu
Layout selection drop-down menu.
Interface Elements
TRAKTOR
uses a set of user interface layouts to organize its graphical user interface. These
are called "Layouts" in TRAKTOR terminology. You can access them from TRAKTOR's Layout
selection menu.
Click on the drop-down menu and choose from one of the default Layouts. You can delete, define, and save your own Layouts in TRAKTOR's Preferences.
TRAKTOR LE 2 note: Layout customizing and managing is not available in LE 2.
Utility Buttons
Utility buttons.
From left to right:
TRAKTOR - Manual - 35
Page 36

The User Interface (Overview)
Interface Elements
▪ Maximize Browser : A click on this button will toggle the maximized Browser view which
comes in handy whenever you’re searching for a track in a large list.
▪ Preferences : here you can open the Preferences — all TRAKTOR settings are made here.
▪ Cruise : if you activate this button, Cruise mode starts (i.e., autoplay of the current Play-
list).
▪ Fullscreen : activates Fullscreen mode, where none of the operating system’s controls are
visible.
TRAKTOR ME 2 note: The Utility buttons are not available in ME 2.
4.2.3 Global Section
The Global section.
Global section offers six distinct panels. Depending on the screen size and resolution of
The
your computer, not all panels can be displayed at the same time. In that case, you can reach
every panel by clicking on the corresponding tab at the far left and right. We will describe every panel in the sections below.
TRAKTOR LE 2 note: Loop Recorder and Master Clock are disabled in LE 2. In addition to
this, the Snap and Quantize buttons are not available in LE 2.
Master Clock
The Master Clock.
Master Clock panel controls the synchronization settings. We will learn about Clock modes
The
in ↑9.2.3, Master Clock Panel.
TRAKTOR - Manual - 36
Page 37

The User Interface (Overview)
Interface Elements
TRAKTOR LE 2 note: The Master Clock is not available in LE 2.
TRAKTOR ME 2 note: The Master Clock is not available in ME 2.
FX Units
The FX Unit 1 in Single mode.
The FX Unit 2 in Group mode.
Adding effects to songs can tremendously expand the sonic possibilities of your mix. For that
purpose, TRAKTOR provides you with a great selection of high-quality effects (or FX, in short).
These FX can be loaded into so-called FX Units.
TRAKTOR offers four FX Units. By default, two FX Units are active. Both FX Unit 1 and FX
Unit 2 can be freely assigned to any of the mixer’s channels A-D.
FX Unit 1 being activated for Channel A using TRAKTOR's internal mixer.
TRAKTOR - Manual - 37
Page 38

The User Interface (Overview)
Interface Elements
You can choose from two different FX Unit modes in TRAKTOR: Either Single, where four buttons and four knobs control one effect, or Group, where you can use three effects simultaneously.
You can switch the FX Unit modes via Preferences > Effects > FX Panel Mode.
TRAKTOR LE 2 note: In LE 2, only one Group FX is available, and the number of effect
types has been reduced.
TRAKTOR ME 2 note: Only the FX Group mode is available in ME 2.
For a detailed overview of FX units, please see ↑14.4, The Effects in Detail.
Audio Recorder
The Audio Recorder.
The
Audio Recorder enables you to record your mix from the main output (be it TRAKTOR’s
internal main output or the master output of your external mixer) as well as from other sources
(turntable, microphone, etc.). The recording will be saved to your computer's hard disk as a
*.wav file. It will also be added to the Track Collection in a special Playlist called Audio Re-
cordings, from which it is immediately available for playback.
TRAKTOR LE 2 note: The Audio Recorder is not available in LE 2.
Loop Recorder
The Loop Recorder.
TRAKTOR - Manual - 38
Page 39

The User Interface (Overview)
Interface Elements
The Loop Recorder is a powerful tool for live remixing of your tracks. It allows you to instantly
create loops from the Mixer’s main output signal, from a particular Deck, or from a physical
audio input. As soon as a loop is recorded, it is automatically triggered. You can then blend
between the loop playing in the Loop Recorder and your main mix. Moreover, you can save the
recorded loop to your hard disk or, better, transfer it directly to any relevant location in TRAKTOR 2 — typically a Sample Slot on a Remix Deck! The Loop Recorder can be used in Internal
and External mixing mode.
TRAKTOR LE 2 note: The Loop Recorder is not available in LE 2.
TRAKTOR ME 2 note: The Loop Recorder is not available in ME 2.
Master Panel
The Master panel.
The
Master panel contains the MAIN knob, which controls the overall volume of TRAKTOR,
and the Snap (S) and Quantize (Q) buttons. They are lit blue when active.
With Snap mode on, any Cue Point you create in the track will snap to the closest beat, thus
ensuring that you get directly to that beat next time you press the Hotcue.
With Quantize mode on, whenever you jump through the track (e.g., by pressing a Hotcue button or clicking somewhere in the Overview waveform), the playback jumps to the nearest position that preserves the beat-matching, thus, ensuring that the current sync doesn’t get lost
when you jump through the track.
TRAKTOR LE 2 note: The Snap and Quantize buttons are not available in LE 2.
TRAKTOR - Manual - 39
Page 40

The User Interface (Overview)
Interface Elements
4.2.4 Decks
TRAKTOR
modes (which are called Deck Flavors in TRAKTOR terminology). The available Flavors are:
▪ Track Deck Flavor
▪ Remix Deck Flavor
▪ Live Input Flavor
See the following sections for a quick overview. For a more detailed description of the Decks
and their control elements, please refer to chapter ↑6, The Decks.
Track Deck
The Track Deck in TRAKTOR is the equivalent of a record player or a CD player in a classic
mixing setup; however, TRAKTOR's Track Decks come with an arsenal of additional mixing features to be utilized in your mix.
provides you with four virtual Decks. The Decks can be operated in different Deck
TRAKTOR - Manual - 40
Page 41

The User Interface (Overview)
Interface Elements
A Track Deck.
Track Deck provides you with a bunch of synchronization, trigger, and track modification
A
tools: the SYNC and MASTER buttons (1), the Tempo Bend buttons (2), and the tempo fader (3).
Traditional Play and CUE/CUP buttons (4) are available as are Hotcue buttons (5) and Loop con-
trols (6).
For more detailed descriptions of the Decks and their elements, please refer to chapter ↑6, The
Decks.
Remix Deck
The Remix Deck lets you add Samples (and loops), and create remixes live in your mix.
TRAKTOR - Manual - 41
Page 42

The User Interface (Overview)
Interface Elements
A Remix Deck.
It
provides you with four Sample Slots (1); each of them consists of 16 Sample Cells (2) and a
Slot Player (3) on top.
Every Sample Slot comes with a Filter control (4) and a Volume control (5). There are additional
parameter controls available per Sample Slot when hovering over a Slot Player (see screenshot
below).
The Slot Parameters above the Slot Player when hovering over it.
The
Sample Cells also have individual parameter controls (6), which are available from the Re-
mix Deck's Advanced Panel.
The Advanced Panel of the Remix Deck is only visible in the Advanced Deck Layout. Double-click the Deck's upper border to cycle through the various Deck Layouts.
TRAKTOR - Manual - 42
Page 43

The User Interface (Overview)
Interface Elements
The entirety of the Sample Cells (4x16 equals 64 Sample Cells in total) amounts to the Sample
Grid of the Remix Deck. To navigate through the pages of the Sample Grid, use the Page Selector buttons (7).
You can build complex sets and then save a Remix Deck as a Remix Set to your Collection.
For a better understanding of the Remix Deck (especially if you are coming from an older
version
know that this Deck Flavor is now a fully functional Deck, completely independent with its
own Tempo, Transport controls, Sync, and it can be scratched using Timecode. Therefore,
it shares a common set of basic Deck controls with the Track Deck, such as the Transport
buttons, SYNC/MASTER controls, Loop controls, etc. These unified Deck controls can be
mapped to a MIDI controller and respond to the same trigger across both Deck Flavors,
Track Deck and Remix Deck, so you only have to map the control once; when initiated, it
will affect the Deck currently in focus. For more information on mapping controls in TRAKTOR, please refer to the Controller Manager manual.
of TRAKTOR, and are used to the former Sample Decks), it is also important to
Find an in-depth description of the Remix Deck and all of its elements in ↑6.1.2,
Remix Deck.
For a tutorial on using a Remix Deck, please refer to ↑15.8, Using the Remix Decks in Your
Mix.
TRAKTOR LE 2 note: The Remix Decks are not available in LE 2.
TRAKTOR ME 2 note: The Remix Decks are not available in ME 2.
TRAKTOR - Manual - 43
Page 44

Live Input
A Live Input Deck.
The User Interface (Overview)
Interface Elements
A Deck switched
to Live Input enables you to use an external analog source such as a turntable
or microphone. You can then apply TRAKTOR 2's FX to the signal coming from the external
source.
For detailed information on Decks please refer to ↑6, The Decks.
TRAKTOR - Manual - 44
Page 45

4.2.5 Mixer
The User Interface (Overview)
Interface Elements
The Mixer in TRAKTOR 2.
The Mixer
is sitting in the center of your TRAKTOR window. Its four channels receive the audio
signals coming from the various Decks described above. There is one channel for each Deck, A
to D (TRAKTOR LE will only have channels A and B). Like with any DJ mixer, the Mixer serves
a number of purposes. You can:
▪ adjust the relative level of each channel (2),
▪ control the channels’ frequency content with the EQs (3),
▪ feed signals into the FX Units via the FX Assign (1) buttons, and
▪ send the overall result to the Main section, thus generating the mix that is sent to your
audience.
TRAKTOR - Manual - 45
Page 46

The User Interface (Overview)
Interface Elements
Of course, the Mixer also provides you with a crossfader (5), which allows you to make seamless transitions between various channels, and Headphones Cue (4) buttons to pre-listen to your
songs. Cue Mix (6) and Cue Vol knobs (7) controlling your headphones signal can be found on
the right of the crossfader (5). The AUX knob (8) controls the volume of the Aux input, which
can be fed by an external signal like a microphone.
TRAKTOR LE 2 note: FX assignments are fixed, and no PAN knobs are available in LE 2.
For more information on the Mixer, please read ↑7, The Internal Mixer & the Crossfader.
4.2.6 Browser
TRAKTOR’s Browser
TRAKTOR’s Browser provides you with tools to organize your tracks and to build and maintain
your track database: the Track Collection. Search for a track in the Search Field (2), drag your
Playlists to a Favorite slot (4) for quicker access, and sort the Browser list (5) by a specific attribute. You can edit all track tags here in the Browser list. By using the Browser Tree (3), you
can browse your hard drives and access various Playlists, including the special Archive, which
automatically saves a Playlist for every session. With the Preview Player (1), you can pre-listen
to tracks before loading them into a Deck. The Status Bar (6) provides basic info.
(1) Preview Player: Click the Preview Player icon in the Browser List to load a track into the
Preview Player. Alternatively, you can also drag-and-drop a track directly into the Preview Player. This will allow you to pre-listen to tracks before loading them onto a Deck.
TRAKTOR - Manual - 46
Page 47

The User Interface (Overview)
Interface Elements
(2) Search Field: provides a live search based on the tags of the tracks in the Collection. Read
more in chapter ↑5.4, Track Search called Finding Tracks (Search).
(3) Browser Tree:
▪ Track Collection: contains all Tracks imported to your Collection. They are automatically
sorted by Artist, Release, Label or Genre.
▪ Playlists: contains all your TRAKTOR Playlists.
▪ Explorer: Browse your hard drive for music tracks. This can be useful in finding tracks
which have not been imported.
◦ Archive: Via the Archive browser sub-node in the Explorer node you can quickly access
the folder containing all your History Playlists. Each History Playlist is time-stamped
and contains the additional columns “Start-Time”, “Duration”, “Deck” for more information about when and how you have played the track.
▪ Audio Recordings: contains all recordings done with the TRAKTOR Audio Recorder.
▪ iTunes: provides direct access to your iTunes Library including all Playlists.
▪ Favorites: Favorites provide direct access to Playlists or folders. Drag and drop a folder or
Playlist onto one of the Favorites slots to map them.
▪ Track Info: displays the title and the artist of the currently chosen track.
▪ History: contains the History Playlist of your current session. It is stored automatically af-
ter every session. You can find History Playlists from former sessions in the Archive subnode of the Explorer node.
(4) Favorite Slot: drag and drop any folder or Playlist from the Browser List.
(5) Browser List: shows tracks depending on the source that is selected (folder, Playlist, search
results or tag-based).
▪ Click on the column headline to sort the list. Another click inverts the sorting.
▪ Right-/[Ctrl]-Click on the column headline to customize which columns are displayed or
hidden.
▪ Drag-and-drop columns to the left or to the right to re-arrange their order.
(6) Status Bar: displays track analysis progress, analyzing, error messages, and the overall status of TRAKTOR.
TRAKTOR - Manual - 47
Page 48

For further information on the Browser, please refer to ↑5, The Browser.
The User Interface (Overview)
Interface Elements
TRAKTOR - Manual - 48
Page 49

The Track Collection
5 The Browser
This
section provides detailed information on TRAKTOR’s Browser. The Browser’s primary design is to help you quickly manage your songs through the use of Playlists. Let’s first look at
which file types are compatible with TRAKTOR.
Compatible Music File Formats
TRAKTOR supports the following music file formats:
▪ MP3
▪ M4A (AAC)
▪ WAV
▪ AIFF
▪ WMA
▪ FLAC
▪ OGG Vorbis
The Browser
DRM-protected music files cannot be played back in TRAKTOR. This affects for example
AAC-tracks bought in the iTunes store.
You have to install Windows Media Player in order to use WMA files in TRAKTOR.
You have to install QuickTime in order to use M4A files in TRAKTOR.
5.1 The Track Collection
TRAKTOR's
that you are using, or that you plan to use in TRAKTOR.
Track Collection (or simply “Collection”) represents the music that you have used,
TRAKTOR - Manual - 49
Page 50

Importing Music Folders
Based on the music files on your computer, the Collection makes it easy to organize, tag, and
prepare your tracks for being played as part of your mix.
Worth noting is that the Track Collection doesn’t care about the actual file structure on
your hard disk, nor will it alter this structure in any way (as long as you don’t delete your
files from within TRAKTOR).
The Track Collection is:
▪ A database storing information about your music files.
convenient way to filter your music files by many of their characteristics (tags) like title,
▪ A
artist name, BPM, genre, etc.
▪ The place where TRAKTOR-specific information about your tracks is stored.
▪ The basis on which you can create your Playlists.
The Track Collection is not:
▪ Moving, copying, or converting any audio file to some secret location.
▪ Modifying in any way the hierarchic structure of the files on your hard disk.
To make use of the Track Collection, you have to populate it by importing your music files.
The Browser
TRAKTOR reads existing song tags during the import of the music and writes tags to the
immediately when you change some property of one or more track(s), like changing
tracks
the Genre of a song.
5.2 Importing Music Folders
TRAKTOR offers an easy import function for tracks stored on your hard drive:
Right-click (Windows) or [Ctrl]+click (Mac OS X) on the Collection icon in the Browser
►
Tree and select Import Music Folders from the menu.
TRAKTOR - Manual - 50
Page 51

Importing Music Folders
The contextual menu for the Track Collection, with the Import Music Folders entry selected.
By
default, this process imports all music files contained in the My Music folder of your operat-
ing system.
The Browser
TRAKTOR analyzes music for certain characteristics (BPM, length, etc.) when loaded into a
Deck for the first time. This function takes some time to process. Be sure to prepare the
tracks you want to use in a DJ set beforehand if you want to use features such as syncing
or Auto Looping with them without having to wait for this analysis process.
If your Track Collection contains more than 10,000 files, it is recommended to have TRAK-
2 analyze your Track Collection in smaller chunks of only a few thousand files each.
TOR
As this procedure may take quite a while, it is a good idea to let TRAKTOR perform the
analysis while you are not working with your computer such as overnight.
The Status Bar at the bottom of the Browser window will provide a visual indication of the
analysis process and alert you to any problems.
Adding Files from Other Folders
you have stored tracks in other folders or on external storage devices, you can add these
If
folders to the list of TRAKTOR Music Folders as follows:
1. Open Preferences > File Management.
TRAKTOR - Manual - 51
Page 52

2. Click Add… at the bottom of the Music Folders section.
3. Navigate to a folder you want to add.
4. Confirm with Choose (Mac OS X) or OK (Windows).
5. Click Close to apply the changes.
Repeat to add all of your music folders.
Subfolders are automatically included in the scan. Hence, you don’t need to add them to
this list.
5.2.1 Alternative Importing Methods
TRAKTOR
part of your normal Music Folder structure:
►
or
►
offers alternative methods to import single tracks and special folders that are not
Drag and drop a track or folder from either the Mac OS X Finder or Windows Explorer onto
the Collection icon within the TRAKTOR Browser Tree.
Drag and drop a track or a folder from within the TRAKTOR Explorer icon. This Icon represents all of the drives connected to your computer.
The Browser
Importing Music Folders
or
You can also right-/[Ctrl]-click on a track or folder within the TRAKTOR Explorer icon and
►
choose Add to Collection.
Any track played within a Deck will be added to the collection.
5.3 Tracks Managed by iTunes
have organized your music collection with iTunes, TRAKTOR offers direct access to your
If you
iTunes Library and your iTunes Playlists.
TRAKTOR - Manual - 52
Page 53

5.3.1 Playing Tracks Managed by iTunes
You can browse your iTunes Library and Playlists directly from TRAKTOR.
The iTunes tree node represents a read-only view on your iTunes Library and Playlists. Editing functions are not available in this view.
To browse your iTunes content from within TRAKTOR:
Click the iTunes icon in the Browser Tree to open that node.
1.
2. Browse through the Library and Playlists as you would in iTunes.
3. Load
a track into a Deck as you would do from a normal TRAKTOR Playlist—for example
by dragging the track onto that Deck.
5.3.2 Importing a Selection of Tracks from iTunes
can import a selection of tracks from your iTunes Library into the Track Collection via the
You
TRAKTOR 2 user interface:
The Browser
Tracks Managed by iTunes
1. Click the iTunes icon in the Browser Tree to open the iTunes node.
2. Select the tracks to import into the Track Collection.
Drag the selection onto the Track Collection icon in the Browser Tree.
3.
4. Alternatively, right-click (Windows) or [Ctrl]-click (Mac OS X) on the selection and choose
Import to Collection in the contextual menu.
5.3.3 Importing iTunes Playlists
can directly import iTunes Playlists as TRAKTOR Playlists via the TRAKTOR 2 user inter-
You
face:
1. Click the iTunes icon in the Browser Tree to open the iTunes node.
TRAKTOR - Manual - 53
Page 54

2. Select the Playlist to be imported.
3. Drag the Playlist onto the Playlists icon. Alternatively right-click (Windows) or [Ctrl]-click
(Mac OS X) on the Playlist and choose Import to Playlists in the contextual menu.
4. A dialog box will appear, asking for a name for the new Playlist. Type in a name and click
OK.
5.4 Track Search
By entering text
to the entries containing the typed string.
The search field in the Browser Tree.
into the search field, the currently displayed list is dynamically narrowed down
The Browser
Track Search
5.4.1 Filtering Playlists
1.
Click in the search field or hit [Ctrl]/[Cmd]+F.
2. Type a few characters of the track‘s attributes (e.g., the first characters of the track title).
3. As you type, the search results on the right side are narrowed down to the tracks contain-
ing the typed search string.
4. Hitting the [Tab] key reverts back to Hotkey control, required for scrolling the list of re-
sults.
Hotkeys will not work while searching.
Hitting the [Enter] key after entering the search string extends the search to the entire
►
Track Collection.
TRAKTOR - Manual - 54
Page 55

Pressing [Esc] clears the search string and terminates text entry mode.
►
Each individual Playlist will retain independent search entries until they are cleared from
►
the text entry box.
5.4.2 Refining a Search
can narrow a search to a specific subset of metadata fields by selecting one of the options
You
from the Refine List.
1. Type a word into the search field.
2. Click the Refine button (magnifying glass) behind the Search field and choose a field
from the drop-down menu.
3. The list is narrowed down to only display tracks fitting the criteria chosen from the drop-
down menu.
5.4.3 Searching for Similar Tracks
the Browser List, you will notice that some metadata fields have a small Magnifying Glass
In
icon. Click this to search for tracks sharing the category of that specific metadata field. For
example:
The Browser
Track Search
In the Browser List, click the Magnifying Glass next to an artist name.
►
TRAKTOR will search for tracks sharing the same information within the Artist field.
→
5.4.4 Search in Playlists
You can call up a list of all Playlists containing a certain track.
1. In
2. Click on an entry to select a Playlist.
→
the Browser List, right-/[Ctrl]-click on a track and choose Show in Playlists. A list is
shown with all of the Playlists containing this track.
The entries are displayed in the Browser List.
TRAKTOR - Manual - 55
Page 56

Working with the Track Collection and Playlists
5.5 Working with the Track Collection and Playlists
Playlists are an effective way of organizing your tracks while preparing for a set. Essentially,
Playlists offer a means of grouping tracks into an order that has several significant advantages
over physical record crates.
One track can be contained in multiple Playlists.
►
A Playlist can be re-ordered or reset to the original state rapidly.
►
Additional advantages are saving, loading and exporting Playlists.
►
5.5.1 Creating a Playlist
Method I:
Right-/[Ctrl]-click on the Playlists folder icon in the Browser Tree.
1.
2. Choose Create Playlist from the context menu.
3. Type a name for your new Playlist into the window.
4. Click OK to confirm.
5. Your new Playlist will appear under the Playlists folder.
The Browser
Method II:
1. Select one or more tracks in the Browser List.
2. Drag these tracks onto the Playlists folder in the Browser Tree.
3. Type a name for your Playlist in the pop-up window.
4. Click OK to confirm.
5. Your new Playlist will now appear under the Playlists folder.
5.5.2 Adding Tracks to Playlists
Click and hold one or more tracks.
1.
TRAKTOR - Manual - 56
Page 57

Working with the Track Collection and Playlists
2. Drag it onto a Playlist of your choice while holding the mouse button. The view of the
Browser List changes and shows the destination Playlist. (This behavior is shown if the
Playlist follows its original order.)
3. If you move your mouse over the content of the Playlist now, you will see a red line indi-
cating where the track(s) will be inserted when releasing the mouse button.
4. If the Playlist has a sorted order, the track(s) will be inserted according to the sorting.
This behavior is shown if the Playlist follows a sorted order.
5.5.3 Showing Tracks in Collection
When
browsing inside the Explorer Node of the Browser Tree or in the iTunes folder within
TRAKTOR, all tracks that are already imported into the Track Collection have the option Show
in Collection when right-/[Ctrl]-clicking them. The browser then directly jumps to the tracks in
your collection.
5.5.4 Deleting Tracks
The Browser
General Deleting Options
To delete
the selection and select the Delete entry from the context menu. The security dialog contains 3
different options to choose from:
Delete from collection
If this option is checked the chosen track(s) will be removed from the collection.
Delete from collection and remove TRAKTOR tags
If this option is checked all TRAKTOR specific tags will be removed from the music files.
Delete from collection and delete from hard drive
Check this option if you want to completely erase the music file(s) from your computer.
tracks from your collection, select the tracks to be deleted, then right-/[Ctrl]-click on
Deleting track(s) from the Collection will also delete them from all Playlists.
TRAKTOR - Manual - 57
Page 58

Working with the Track Collection and Playlists
Deleting Tracks from One Playlist
There are two ways for deleting tracks:
Click on one or more track(s) and press the [Del] or [Backspace] key of your computer
►
keyboard.
or
Right-/[Ctrl]-click on one or more track(s) and choose Delete.
►
5.5.5 Sorting Playlists
There
are several ways to sort and arrange Playlists. Changes to the sort order can be undone
by clicking on #.
Sorting by Columns
1. Click on the name of the column header to sort the Playlist by this category. Click a sec-
ond time to invert the sort order.
2. Click on the header of the #-column to restore the Playlist to its original order.
3. After restarting TRAKTOR all Playlists will reset to their original order.
The Browser
Consolidating a new Sorting Order
1. Click on the name of the column header to sort the Playlist by this category.
2. To make the new order permanent, right-/[Ctrl]-click on that Playlist’s icon and choose the
option Consolidate.
Permanently Changing the Position of Selected Tracks within a Playlist
1. Reset a Playlist to its original order by clicking on the header of the #-Column.
2. Select one or more track(s) and drag them up or down in the Playlist.
3. The red line indicates where the selection will drop when releasing the mouse button.
This is only possible when the Playlist is in its original order which you get by clicking on
the header of the #-Column.
TRAKTOR - Manual - 58
Page 59

Working with the Track Collection and Playlists
5.5.6 Organizing Playlists in Folders
You have the option to further organize your actual Playlists by creating a Playlist Folder:
1.
Right-/[Ctrl]-click on the Playlist Folder icon in the Browser Tree.
2. Choose Create Folder from the context menu.
3.
Choose a name for your new Playlist Folder and type it in the following dialog.
4. Confirm with OK.
5. Your new Playlist Folder will appear under the Playlist Folder icon.
6. You can now add Playlists to this folder via drag-and-drop.
5.5.7 Track Collection Subfolders
subfolders below the Track Collection icon are grouped by Artists, Releases, Labels or
The
Genres. A number indicates the amount of entries in this category. You may also view All
Tracks, or All Samples within their respective subfolders.
The Browser
Double-click one of the entries to see a further breakdown of each category.
►
Example:
Double-clicking Artists will expand the Playlist to show all artists and the number of
related tracks within your Collection.
Click on an artist’s name to show all of their tracks in the Browser List.
►
5.5.8 Favorites
The
Favorites area is the navigational tool located at the top of the Browser. If you do not see
the Favorites, go to: Preferences > Browser Details and activate Show Playlist Favorites.
You can assign any File Browser folder or Playlist as a Favorite.
TRAKTOR - Manual - 59
Page 60

Working with the Track Collection and Playlists
Pre-assigned Favorites:
▪ Track Collection
▪ History
▪ Preparation
▪ All Tracks
▪ All Samples
▪ All Remix Sets
▪ Demo Tracks
▪ Demo Loops
▪ Demo One-Shots
To create a new Favorite:
Click the Playlists folder to browse its contents.
1.
2. Click, hold and drag the Playlist name onto a free (not assigned) Favorite slot.
Now you can access the Playlist quickly by clicking on the relevant Favorite.
The Browser
Dragging a new Playlist onto an existing Favorite will replace the previous Favorite with the
new one.
5.5.9 Preparation Playlists
Any Playlist
ration Playlist at a time. The Preparation Playlist has the following special features:
▪ The Playlist icon changes to a dedicated Preparation Playlist icon.
▪ Each track contained in the Preparation Playlist is displayed with a diamond icon. The
icon suggests a “Waiting” state. This way you can see what tracks you already added to
the Preparation Playlist while browsing.
▪ Right-/[Ctrl]-click on any Playlist and choose Select as Preparation List to change this list
into the Preparation List.
can be defined as the Preparation Playlist, but only one Playlist can be the Prepa-
TRAKTOR - Manual - 60
Page 61

Working with the Track Collection and Playlists
▪ Right-/[Ctrl]-click on any track(s) and choose Append to Preparation Playlist to add the se-
lection to the Preparation Playlist.
The Browser
▪ Right-/[Ctrl]-click
on any track(s) and choose Add as Next to Preparation Playlist to insert
the selection after the last loaded track into the Preparation Playlist.
5.5.10 Exporting Playlists
Exporting
a Playlist creates a folder containing the tracks in the Playlist as well as the Playlist
file. To export a Playlist:
1. Right-/[Ctrl]-click on the Playlist and select Export Playlist from the context menu.
2. Enter a name for the exported Playlist.
3. Enter a destination path.
4. Confirm with OK.
5.5.11 Importing Playlists
Importing Playlists can be done in several ways:
Method I
Locate the Playlist in the TRAKTOR Explorer inside the Browser Tree.
1.
2. Drag-and-drop the Playlist file onto the Playlists folder in the Browser Tree or onto a Play-
list folder you have created.
3. The Playlist and all contained tracks will be added to your Track Collection.
You can use this method to import Playlists from previous TRAKTOR versions after exporting as explained above.
Method II
Locate the Playlist file (*.nml) in the Windows Explorer or Mac OS X Finder.
1.
2. Drag-and-drop the Playlist file onto the Playlists folder in the Browser Tree or onto a Play-
list Folder you have created.
3. The Playlist and all contained tracks will be added to your Track Collection.
TRAKTOR - Manual - 61
Page 62

Working with the Track Collection and Playlists
Method III
Right-/[Ctrl]-click on the TRAKTOR Playlists folder or a Playlist Folder you have created
►
and choose Import Playlist.
The Playlist and all contained tracks will be added to your Track Collection.
►
Method IV
The Browser
Right-/[Ctrl]-click
on the TRAKTOR Playlists folder or a Playlist Folder you have created and
choose Import Playlist Folder.
The Playlist Folder and all contained tracks will be added to your Track Collection.
5.5.12 Printing Playlists
Printing Playlists allows you to save Playlist track name contents in a format readable by any
web browser (HTML).
1. Right-/[Ctrl]-click on the Playlist in the Browser Tree.
2. Choose Save as Webpage.
3. Enter a name for the Playlist.
4. Enter a destination for the exported file.
5. From the List Options select the columns you want to add to the file.
6. Confirm with OK.
5.5.13 More Playlist Functions
Right-/[Ctrl]-click on a TRAKTOR Playlist to find the following additional options:
▪ Rename: enables you to rename the selected Playlist.
▪ Consolidate: stores the current sorting order and arrangement for the current Playlist.
▪ Remove Duplicates: removes all double entries in the selected Playlist.
TRAKTOR - Manual - 62
Page 63

Working with the Track Collection and Playlists
▪ Analyze: analyzes the tracks contained in the selected Playlist. Before TRAKTOR starts
analyzing your tracks, you will be presented with an Analysis Options dialog.
Here you can (temporarily) change TRAKTOR's default settings for track Analysis. The dialog provides the following options:
The Browser
◦ BPM Range:
Select an estimated BPM range of the tracks you want TRAKTOR to analyze. In case you are analysing a large number of tracks with very different tempos,
you can select 60-200; however, narrowing down the range will provide better results.
Note: Selecting a range here, will also change the default BPM Range setting so that
the next time TRAKTOR auto-analyzes tracks from the Collection, the setting you
made here will be effective.
◦ Set Beatgrid: Checking this option will move all Gridmarkers of unlocked tracks to
their automatic position. Leaving this option unchecked will remove all existing Beatgrids from unlocked tracks. This setting affects the current Analysis job only, and will
not change TRAKTOR's default Analysis settings.
◦ Replace existing Gain: Checking this option will remove the current Gain values of the
selected tracks, and replace them with an Auto-Gain value during Analysis.
▪ Clear Playlist: removes all tracks from the selected Playlist.
▪ Delete Playlist: deletes the selected Playlist. This will not delete the tracks from your Track
Collection.
▪ Select as Preparation List: will make the current Playlist the Preparation List.
▪ Reset Played State: removes all Track Icons from the Icon Column in the Browser List.
TRAKTOR - Manual - 63
Page 64

Working with the Track Collection and Playlists
▪ Restore AutoGain: will recalculate original gain values if they have been changed.
5.5.14 History Playlist
TRAKTOR
Often, it can be useful to have a record of which tracks were played in a specific session.
History Playlist storage location
►
►
Tips for Using the History Playlist
You can import History Playlists after good sessions for use during future gigs. If you have been
working
Try this trick:
automatically lists the tracks you have played during a gig in the History Playlist.
TRAKTOR LE 2 note: The History Playlist is not available in LE 2.
After closing TRAKTOR, the History Playlist is cleared. However, you can find the Playlist
stored under: My Documents\Native Instruments\Traktor\History (Windows) and Users/~/
Native Instruments/Traktor/History (Mac OS X).
A History Playlist is labeled with a date and time after every TRAKTOR session.
with TRAKTOR for a long time, the amount of History Playlists can become very large.
The Browser
1. In the Windows Explorer/Mac OS X Finder, navigate to your Traktor folder and open the
History (Windows: My Documents\Native Instruments\Traktor\History; Mac OS X: Users/~/
Native Instruments/Traktor).
2. As a rule of thumb: every track in a list equals around 1 kB. This means that all Playlists
of 5 kB or less will have less than 4-6 tracks within them.
3. You can delete the smaller files making browsing in the History Playlists more manageable.
5.6 Editing Track Meta Data
track in your Collection has track properties (“tags” or “metadata”) such as Song Title,
Each
Artist Name, Album Name, Cover Artwork, etc. TRAKTOR gives you the option to edit this data
in two ways.
TRAKTOR - Manual - 64
Page 65

Editing Track Meta Data
TRAKTOR LE 2 note: Editing track metadata is not available in LE 2.
If you are using iTunes for collection management we recommend that you only edit tag
data in iTunes.
5.6.1 Editing Track Properties via Inline Editing
1.
In the Browser List, click on a track to highlight it.
2. Click again in the field you want to edit, e.g. the artist name.
3. You will see a cursor appear in the info field.
4. Edit the artist's name.
5. Click in another property field to edit its contents.
6. Hit the [Enter] key on your keyboard to exit Inline Editing mode and confirm your entries,
or hit [Esc] to abort editing.
5.6.2 Editing Track Properties via the Edit Dialog
all properties of a track are visible in the Browser List. To get access to all available prop-
Not
erties of a track, use the Edit Dialog. This dialog allows simultaneous editing of a selection of
tracks.
The Browser
Editing a Single Track
1. Select a track in the Browser List by clicking it.
2. Right-/[Ctrl]-Click the selected track and choose Edit from the context menu.
3. The Browser List turns into the Edit dialog.
4. Edit the desired information for your track.
5. Use the drop-down menu next to a track property to select a previously stored property
from your Track Collection.
6. Use the Restore button to undo any changes you have made. To apply the changes, click
the button labeled Apply or OK. You can abort editing by clicking Cancel.
TRAKTOR - Manual - 65
Page 66

Editing a Selection of Tracks
If you want to edit a selection of tracks (e.g., all tracks of an album), select them and
►
choose Edit from the context menu, (just as you did when editing a single track).
In the Edit dialog you will notice that most of the checkboxes beneath the attributes are
►
unchecked.
At the bottom of the Edit dialog you will notice 3 new buttons called Previous, Select All
►
and Next. You can use these buttons to browse your selection of tracks.
The checkboxes indicate which of the attributes share the same value across the selected
►
tracks. The checks also indicate that anything written into the related field will be saved
to the metadata tag upon applying changes.
If you want to change an attribute globally for all selected tracks (e.g. to change an Artist
►
Name), make sure that the box is checked and press Apply or OK.
If you want to edit your selected tracks one by one, use the Previous and Next buttons at
►
the bottom of the dialog to step through the list.
Clicking Restore will undo your changes.
►
The Browser
Track Icons
To abort editing click Cancel.
►
5.7 Track Icons
It is important to have an overview of your set when you are performing in front of an audience.
icon column provides information about the status of a track. It can be sorted in the order
The
of the status messages.
▪ The letters A, B, C and D identify the tracks currently loaded into the Decks.
▪ A Check Mark means that the track has been played in one of the Decks.
▪ An Exclamation Mark identifies tracks not found at the file’s previous location. Some pos-
sible reasons for this could be that a storage medium is unavailable (external hard drive
for example), the location of the track has been changed or the track has been renamed.
TRAKTOR - Manual - 66
Page 67

The Preview Player
▪ A Lock marks tracks with a locked Beatgrid.
▪ A Triangle marks tracks that have already been played live. Tracks that have been pre-
viewed will not be marked. This icon is only available in the History and Archive folders.
Sorting by this column orders the tracks as follows
▪ Already played tracks on top.
▪ Currently playing tracks in the center.
▪ Unplayed tracks below.
▪ Missing tracks at the bottom.
5.8 The Preview Player
TRAKTOR’S Browser
a Deck. The Preview Player is designed for use with Internal and External Mixer mode. To prelisten to a track in the Preview Player:
Drag-and-drop a track from the Browser List onto the Preview Player.
►
provides a Preview Player to pre-listen to tracks without loading them into
The Browser
or
Click the small Headphones icon in the Pre-listen column of the Browser List.
►
One advantage of using the Preview Player is that you do not need an additional Deck. Also the
Played
State and Play Count of the tracks will not change. You can stop the Preview Player by
clicking on the small Play/Pause button. Skip through the track by clicking the small Stripe.
To use the Preview Player you need to assign an output to "Output Preview" (for External
Mixer
mode) or "Output Monitor" (for Internal Mixer mode). Find these settings in: Prefer-
ences > Output Routing.
TRAKTOR - Manual - 67
Page 68

5.9 Cover Art
TRAKTOR has several Cover Art features at your disposal. Not only can you see Cover Art within the Browser, but you can also freely assign your own Cover Art from image files on your hard
drive.
5.9.1 Show Cover Art
Cover Art Window
The Browser
Cover Art
TRAKTOR
provides a Cover Art Window underneath the Browser Tree. It can be activated or
deactivated within the Preferences window.
Go to Preferences > Browser Details and check or uncheck Show Cover Art.
►
List Window
There is a column for cover art in the Browser List. To activate or deactivate it:
Right-/[Ctrl]-Click on the Headline of the Browser List and check or uncheck Cover Art.
►
5.9.2 Editing Cover Art
TRAKTOR allows you to either import or delete .jpeg cover art from your track collection.
It works as follows:
Importing Cover Art
Right-/[Ctrl]-Click on a track and choose: Import Cover.
1.
2. Use the dialog box to direct TRAKTOR to the cover art image file.
3. Select the image file and confirm the dialog.
4. The cover art is now stored within the file.
You can also choose several tracks and import cover art for all selected tracks at once.
TRAKTOR - Manual - 68
Page 69

Collection Maintenance
TRAKTOR LE 2 note: Editing cover art is not available in LE 2.
TRAKTOR LE 2 note: Editing cover art is not available in LE 2.
Deleting Cover Art
To delete Cover Art:
1.
Right-/[Ctrl]-Click on a track and choose: Delete Cover.
2. The cover art is now deleted.
You can also choose several tracks and delete the cover art for all selected tracks at once.
5.10 Collection Maintenance
Working
things to keep track of such as removing obsolete tracks or relocating tracks that have been
moved to another folder on your HD, etc.
with the Browser before the gig or in a live situation can be intense. There are many
The Browser
5.10.1 Consistency Check
Consistency Check Report provides an overview of your Track Collection by providing op-
The
tions to help you manage it.
1. In the Browser Tree, right-/[Ctrl]-click the Track Collection Icon and select Check Consis-
tency from the menu.
2. Once TRAKTOR has run the check, the Consistency Check Report will appear showing the
results.
Show Overview / Missing Tracks / Tracks to Analyze
The Consistency Check Report gives you information about the following:
▪ Total Tracks: The total number of tracks in your Collection.
TRAKTOR - Manual - 69
Page 70

Collection Maintenance
▪ Tracks Missing: The total number of tracks that have been deleted from your hard drive or
moved from their original location.
▪ Tracks Not Analyzed: The total number of tracks that have not been analyzed.
▪ Tracks Missing Stripe: The total number of tracks that have been imported and analyzed
but their Overview Waveform (Stripe) has been moved or deleted.
▪ Total Tracks To Analyze: The total number of tracks that need to be analyzed.
Relocate Missing Tracks
The Consistency Check Report also allows you to relocate tracks that are missing from your
Collection.
1. Click the Relocate button.
2. Relocating tracks in a folder that contains many subfolders can be a lengthy process.
Don’t hesitate to interrupt relocation — this will not damage your Collection consistency.
3. Use the browse window to navigate to the folder where your missing tracks have been
moved.
4. To find multiple tracks in different folders, choose the top-level folder where they are stored. You can even choose your main hard drive folder.
The Browser
Remove Missing Tracks
If you no longer want these missing tracks to be referenced in your Collection, delete their references by clicking the Remove button.
Analyze Tracks
If you have tracks in the Collection that are not analyzed yet, you can analyze them by clicking
the Analyze button.
Show Consistency Check on Startup
The Consistency Check Report can be set to run each time you open TRAKTOR. Please be
aware that this feature can increase TRAKTOR’s startup time, thus can be impractical with
large collections in a live situation.
1. Go to: Preferences > File Management.
TRAKTOR - Manual - 70
Page 71

Collection Maintenance
2. Check the box labeled Show Consistency Check Report on Startup and close the Preferences.
3. The Consistency Check Report will now open each time you start TRAKTOR.
5.10.2 Analysis
TRAKTOR
your tracks. These are:
BPM Estimate
The BPM Estimate is an accurate tempo readout based on the type of music you are scanning.
Read more about verifying the BPM Estimate and about how to create a Beatgrid in ↑6.8.6,
Beatgrid Panel (GRID).
Gain Value
Each track has a perceived loudness based on its musical properties. The Gain Value established during the Analysis is an accurate estimation for the optimal setting of the channel GAIN
knob to match the loudness of a track to 0dB.
uses an “Analysis” function to collect several important pieces of information from
The Browser
To use this gain estimation when loading a track into a Deck, enable the Auto Gain func-
►
tion by activating Set Autogain When Loading Track in Preferences > Mixer > Level. You
can at any time readjust the Autogain set during Analysis as described in ↑7.4, GAIN,
Cue and PAN.
Stripe
analysis process creates a small representation of the waveform underneath the Waveform
The
Display, which is called the Stripe. If the Stripe of a track is missing it has not yet been analyzed.
To keep file size to a minimum Stripe is not stored in files. When moving your music to
another computer you should re-analyze your music on the target machine.
Auto Analysis
can set TRAKTOR to analyze your tracks automatically either when loading a track into a
You
Deck or after importing it into your Collection.
TRAKTOR - Manual - 71
Page 72

Collection Maintenance
Open Preferences > File Management for options on background track analysis.
►
Read more about the analysis options in ↑13.20, File Management.
►
The Status Bar at the bottom of the Browser will provide a visual indication of the analy-
►
sis process and alert you to any problems.
5.10.3 Data Directories
TRAKTOR has
in their own default directories. These directory paths can be changed in the Preferences window:
Open: Preferences > File Management > Directories.
►
You can change the directory path for the following file types by clicking on the button with
the exclamation mark (…!):
functions that create and reference certain file types. These file types are stored
The Browser
▪ Root
Dir (Root Directory): the file path TRAKTOR follows for loading and storing Collec-
tion information and settings.
▪ Sample Dir (Sample Directory): the file path TRAKTOR follows for loading and storing
Sample information and settings.
▪ iTunes Music Library : the file path to your iTunes Library (this path has to be identical to
the settings in iTunes).
▪ Music Folders: use to specify the location of music to be scanned when using the Import
Music Folders function.
5.10.4 Other Maintenance Functions
▪ Reset
▪ Relocate: Opens a dialog in which you can navigate to the folder containing the missing
▪ Analyze (Async): Starts analysis for the selected track(s).
Played State : Resets the play count and the Track Icon next to any track that has
been played.
track(s). This can be useful if you have restructured a Music Folder.
TRAKTOR - Manual - 72
Page 73

Working with Audio CDs
▪ Show in Explorer/Finder : Use to find the track in the Windows Explorer or Mac OS X Find-
er.
▪ Search in Playlists: Searches for the selected track(s) and returns with a report showing all
Playlists containing the selected track(s).
5.11 Working with Audio CDs
This chapter provides information on how to work with audio CDs.
5.11.1 CD Text
the past, tracks of audio CDs were displayed as Track01, Track02, etc; however, if you in-
In
sert an audio CD with related information — artist, title, etc. — you will be able to see this
data in TRAKTOR’s Browser.
Not all commercial Audio CDs show these additional info texts.
The Browser
5.11.2 Audio CDs and Favorites
If you drag the Audio CD icon onto a Favorite, the CD will stay assigned to the Favorite
►
even if you remove the CD.
If you do not have an audio CD loaded in your CD drive, the Favorite will be displayed
►
with a Missing Icon, shown as a red cross.
5.11.3 Eject CD
You can also eject a CD from within TRAKTOR.
Right-click/[Ctrl]-click on the Audio CD icon and choose Eject CD to eject the CD.
►
TRAKTOR - Manual - 73
Page 74

Working with Digital Audio Players
5.12 Working with Digital Audio Players
TRAKTOR allows you to play tracks directly from your digital audio player.
1. Start TRAKTOR and plug your player into your computer. TRAKTOR will then recognize
your digital audio player as a hard drive and display its icon in the Browser Tree — this
may take up to 10 seconds.
2. When first selecting the player, the message Loading will appear to let you know that
TRAKTOR is reading the track information.
3. When loading is finished you will be able to select tracks just as you would from any other
hard drive.
Plugging and un-plugging the player while tracks are playing may cause the audio to stop
briefly. Be careful not to unplug the player when playing a track from it!
5.12.1 iPod
The Apple iPod uses a unique file system for storing music. When you connect an iPod to your
computer, TRAKTOR will recognize it and display the iPod in the Browser with its name.
The Browser
Double-click the iPod to access the Playlists and tracks stored on the iPod.
You cannot play protected DRM files purchased in the iTunes Store.
TRAKTOR - Manual - 74
Page 75

6 The Decks
TRAKTOR
modes (called Deck Flavors in TRAKTOR). The available Flavors are:
▪ Track Deck
▪ Remix Deck
▪ Live Input
2 provides you with four virtual Decks. The Decks can be operated in different
TRAKTOR LE 2 note: Only two Decks are available in LE 2.
TRAKTOR LE 2 note: The Remix Decks are not available in LE 2.
TRAKTOR ME 2 note: The Remix Decks are not available in ME 2.
The Decks
Deck Flavor Descriptions
6.1 Deck Flavor Descriptions
For each Deck you can choose one of the following Flavors:
▪ Track
▪ Remix Deck: A Remix Deck provides you with four Sample Slots, which you will use for
Deck: A Track Deck in TRAKTOR is the equivalent of a record player or a CD player
in a classic mixing setup. Use this Deck Flavor if you want to play back a particular sequence of tracks. Find an in-depth description in ↑6.1.1, Track Deck. For a tutorial on
using Track Decks, please refer to ↑15.3, Playing Your First Track.
adding Samples (and loops) to your mix. With a Remix Deck, you can build and save complex Remix Sets (which is the term for a saved set of Samples in a Remix Deck in TRAKTOR terminology), and arrange and remix Samples live in your mix. A Remix Deck comes
with a variety of Sample-related features. Find an in-depth description of the Remix Deck
and its elements in ↑6.1.2, Remix Deck. For a tutorial on using a Remix Deck, please refer to ↑15.8, Using the Remix Decks in Your Mix.
TRAKTOR - Manual - 75
Page 76

Deck Flavor Descriptions
TRAKTOR LE 2 note: The Remix Decks are not available in LE 2.
TRAKTOR ME 2 note: The Remix Decks are not available in ME 2.
▪ Live Input:The Live Input Flavor allows you to include live audio in your set, which can be
any audio input; a turntable, a microphone, or a synthesizer. Find an in-depth description
in ↑6.1.3, Live Input.
TRAKTOR LE 2 offers only two Decks and Deck Flavors cannot be changed.
Changing the Deck Flavor
To select a Deck Flavor:
The Decks
1. Click
on the Deck Focus letter on the upper right of a Deck, which will open a drop-down
menu.
2. Select the desired Deck Flavor from the menu.
a TRAKTOR SCRATCH PRO 2 user, you can also choose the Playback mode (Internal
As
Playback or Scratch Control), and, if you own a TRAKTOR AUDIO 6 or TRAKTOR AU-
DIO 10 audio interface, a hardware Direct Thru mode for a complete audio bypass via this
drop-down menu. (For more information on this, please refer to the Setup Guide of your
audio interface.)
TRAKTOR - Manual - 76
Page 77

The Decks
Deck Flavor Descriptions
For more information on Deck preferences, please read ↑13.9,
Track Decks.
6.1.1 Track Deck
Track Deck overview
Decks Layout and ↑13.10,
(1) Deck Cover Artwork: Displays artwork related to the loaded track.
(2) Deck
Heading: The Deck Heading displays information about the loaded track such as the
artist name and title, tempo. It also has some unique drag and drop features that are explained
in detail in ↑6.3, The Deck Heading.
(3) Phase Meter: Visualizes the offset of the beats playing in the Deck to the beats playing in
the Master Deck, or the Master Clock tick.
TRAKTOR - Manual - 77
Page 78

Deck Flavor Descriptions
(4) Deck Focus: Holds a menu for selecting the Deck Flavor and the playback method for the
Deck. Click the Deck letter and use the drop-down menu to change the Deck Flavor and playback method. The Deck letter is highlighted orange for the Deck currently in focus. (If no Deck
letter is highlighted, the function is propably disabled in the Preferences. You can activate focus highlighting from the Preferences via Global Settings > Deck Focus > Software.)
(5) Bend: Temporarily slows down or speeds up the Deck.
(6) Tempo Fader: Decreases or increases the tempo of the track playing by moving the slider up
or down.
(7) Key: Activates or deactivates the Keylock feature.
(8) SYNC button: Synchronizes the current track to the tempo master. MASTER button: Defines
the Deck as tempo master for syncing.
(9) Waveform Display: Visually represents a localized view of the loaded track. The brighter color shade represents higher frequencies, while the darker color shade represents lower frequencies.
(10) Stripe: The Stripe displays the whole waveform of the loaded track including Cue Points
and Loops.
(11) Transport: Includes the Play/Pause, CUE (Cue/Play) and CUP (Cue/Pause) buttons.
The Decks
(12) Advanced Panels: Contains advanced control options for MOVE (Loop move and beat
jump), CUE (Cue Point and Loop Management) and GRID (Beatgrid) panels.
(13) Hotcues: Provides direct access to 8 user-definable Cue/Loop In Points per track.
(14) Loop Controls: Set Auto Loops and control their size.
For a tutorial on using Track Decks, please refer to ↑15.3, Playing Your First Track.
TRAKTOR - Manual - 78
Page 79

6.1.2 Remix Deck
The Decks
Deck Flavor Descriptions
A Remix Deck.
(1) Deck Heading:
The Deck Heading displays information about the currently loaded Remix Set
such as the title and the tempo. On the left hand side, it also displays artwork for the Set if
artwork is available. On the right hand side, there are two interactive elements: the Quantize
Value (3) and the Deck Tempo display. Click and drag the Deck Tempo display to change the
tempo of the Deck.
To save a Remix Deck's content as a Remix Set, double-click the Deck Heading, type in a new
name for the Deck, and then drag-and-drop the name to your Track Collection; the Deck content will be saved as a Remix Set, and appears as an entry in your Track Collection. To load a
Remix Set, simply drag-and-drop its entry from the Collection onto a Remix Deck's Heading.
The file format for importing/exporting Remix Sets is a Traktor Pak (.trak). See ↑15.8, Using
the Remix Decks in Your Mix for a tutorial on importing/exporting Remix Sets.
TRAKTOR - Manual - 79
Page 80

Deck Flavor Descriptions
(2) Phase Meter: Visualizes the offset of the Remix Deck's internal beat count to the beat count
playing in the Master Deck, or the Master Clock tick. See ↑6.7.2, Phase Meter for more information on the Phase Meter.
(3) Quantize Value: When Quantize is activated, a triggered Sample will become active at a certain point of the Remix Deck's internal timeline; e.g., setting the Quantize Value to "1" will activate the triggered Sample at the next beat of the Remix Deck's internal timeline. Setting it to
"4," a Sample you hit will start playing with the next 4/4 bar of the Remix Deck's internal timeline. You can see the internal timeline displayed below the Quantize Value display.
Note that the Quantize Value does not represent the amount of beats it will take before a
Sample
mark in the Remix Deck's internal timeline (such as a bar line on a sheet of music).
starts playing, therefore, it is not a "delay" value; the Quantize Value represents a
To activate/deactivate the Quantize feature for the Deck, click the dot on the right hand side of
the
value. Click the arrow on the left hand side of the value to open the drop-down menu to
select a Quantize Value.
(4) Deck Focus: Holds a menu for selecting the Deck Flavor and the playback method for the
Deck. Click the Deck letter and use the drop-down menu to change the Deck Flavor and playback method. The Deck letter is highlighted orange for the Deck currently in focus. (If no Deck
letter is highlighted, the function is propably disabled in the Preferences. You can activate focus highlighting from the Preferences via Global Settings > Deck Focus > Software.)
The Decks
(5) Bend: Temporarily slows down or speeds up the Deck.
(6) Sample Slot: This is where the main action takes place. A Sample Slot consists of a Slot
Player on top and 16 Sample Cells below. Click the Page Selector buttons (10) to navigate
through the pages of Sample Cells, the so-called Sample Grid. Load single Samples to a Sample Cell, capture Loops from the Loop Recorder or the Track Decks to a Cell, or load whole Remix Sets — the TRAKTOR term for a saved set of Samples in a Remix Deck — to the Sample
Grid (for a tutorial on using Remix Decks, please refer to ↑15.8, Using the Remix Decks in
Your Mix). While a Sample is being played, the Slot Player will show the Sample’s waveform
and include a moving red playhead, indicating the current playback position.
For a detailed description of the Sample Slot's features, see the subsection "Inside the Sample
Slot" below.
(7) Loop Controls: Set Auto Loops and control their size from here.
TRAKTOR - Manual - 80
Page 81

Deck Flavor Descriptions
(8) Advanced Panel: The Advanced Panel gives you access to the parameter settings of the individual Sample Cells. Key and gain settings per Sample Cell can be set from here, and also the
Type properties, i.e., Gate vs. Latch mode, Loop vs. One-shot mode, and Synced vs. Unsynced
mode. For further information on these, please see subsection "The Advanced Panel" below.
The Advanced Panel of the Remix Deck is only visible in the Advanced Deck Layout. Double-click the Deck's upper border to cycle through the various Deck Layouts.
(9) Transport: Includes the Play/Pause, CUE (Cue/Play) and CUP (Cue/Pause) buttons.
The Decks
(10) Page Selector buttons:
Use the four Page Selector buttons to navigate through the pages of
the Sample Grid.
(11) SYNC button: Synchronizes the Deck's internal timeline to the tempo master. MASTER but-
ton: Defines the Deck as tempo master for syncing. Other Decks will sync to this Deck if activated.
Inside the Sample Slot
One of the four Sample Slots inside a Remix Deck.
(1) Sample Title: Displays the title of the Sample currently loaded in the Slot Player.
(2) Slot
indicates the current playback position within the Sample. Hovering over the Slot Player, you'll
see a Mute button, which mutes/unmutes the Sample currently loaded.
Player: Displays the waveform of the Sample currently loaded. A moving red playhead
(3) Filter: Apply a quick low-pass or high-pass filter to the Sample Slot by moving the bar
downwards or upwards, respectively.
TRAKTOR - Manual - 81
Page 82

Deck Flavor Descriptions
(4) Volume: Controls the Sample Slot's volume. This control is applied after the individual
GAIN control of a Sample Cell, which is accessible from the Advanced Panel.
(5) Sample Cell: A Sample Cell is the container element for Samples. Drag-and-drop Samples
from your Collection onto a Sample Cell, or capture Samples and Loops from the Loop Recorder or a Track Deck (see ↑15.8, Using the Remix Decks in Your Mix for a tutorial on using the
Remix Decks). On the left hand side of the Sample Cell, you can see a symbol (the Play Type
indicator), indicating whether the Sample Cell is set to Loop or One-shot mode. Clicking this
symbol also triggers the Sample. [Shift] + click stops the Sample and resets its play marker to
the Sample start position.
You can change a Sample Cell's settings from the Advanced Panel at the bottom of the Remix
Deck. If at any time the Advanced Panel should not be visible, double-click the upper border
of the Deck until the Advanced Panel becomes visible. See section "The Advanced Panel" below for a description of the Sample Cells' parameters.
(6) Slot Parameters: Each Sample Slot in the Remix Deck has a set of parameters. Hovering
over the Heading of the Sample Slot, the relevant buttons become visible.
The Decks
The Slot Parameter buttons when hovering over the Slot Player.
▪ Keylock (note symbol): Separates playback pitch from playback speed. This control needs
to be active in order for the PITCH knob in the Advanced Panel to affect the Sample Cell.
Otherwise a Sample Cell's pitch will be directly related to the Remix Deck's tempo.
▪ FX: Routes the Sample Slot through the FX Unit(s) currently assigned to the Remix Deck’s
channel in the Mixer.
▪ Monitor (headphones symbol): Routes the Sample Slot to the Mixer’s Monitor Output
(which can be monitored on headphones).
▪ Punch mode (arrow symbol): When a Sample, either in One-shot or Loop mode, is triggered
in a Sample Slot, the position of that Sample is fixed to the Remix Deck's internal timeline. This is most noticeable when using One-shot Samples since you can trigger the Sam-
TRAKTOR - Manual - 82
Page 83

Deck Flavor Descriptions
ple, let it play, then wind the Deck backwards to the original location of the Sample and
play it again. Since only one Sample can be played in a Slot at a time, triggering a new
One-shot Sample will remove the previous Sample from the Deck's internal timeline and
will fix the new Sample to the current location.
This behavior is changed, however, when Punch mode is enabled. With Punch enabled, every Sample you trigger will be placed in the same location as the previous Sample in the
Deck's internal timeline. What this means is that you can trigger a One-shot Sample, let it
play, trigger a different One-shot Sample in the Sample Slot, then wind the Deck backwards to the location of the first Sample and you will hear the new Sample instead.
Punch mode is also beneficial when using Loops because it allows musical phrasing to be
maintained when switching Loops. Just as with One-shots, triggering a Loop while Punch
mode is enabled will place the Loop back at the location of the previous Loop. Because
Loops repeat themselves infinitely into the future and past of the Deck's internal timeline,
you'll hear the new Sample playing at your current playback location, but the Loop will be
playing in the correct position as if it had been triggered back at the position of the first
Loop.
The Advanced Panel
Each Sample Cell has a set of individual parameters, which are accessible from the Remix
Deck's Advanced Panel. If at any time the Advanced Panel of a Remix Deck is not visible, double-click the upper border of the Deck until the Advanced Panel becomes visible.
The Decks
The Advanced Panel at the bottom of a Remix Deck.
(1) Move Grid Left: Moves the Samle Cell's Beatgrid to the left.
(2) Move Grid Right: Moves the Samle Cell's Beatrgid to the right.
TRAKTOR - Manual - 83
Page 84

Deck Flavor Descriptions
(3) Trigger Type: When activated (Latch mode), a Sample will continue to play after you release
the mouse button, either until the end of the Sample is reached (for One-shot Samples) or until it is stopped by some other method (like triggering a new Sample in the same Slot).
The alternative Type is Gate mode, where a Sample will play only while you’re holding down on
the mouse button. Upon releasing the mouse button, the Sample will stop playing.
Note that both modes are also subject to the settings of the Quantize system; e.g., with Quantize active, a Sample in Gate mode must be held until the Quantize interval is reached before
it starts playing. Similarly, after releasing the mouse button, the Sample will continue to play
until the next Quantize interval is reached at which point it will stop.
(4) Reverse Playback: Activate reverse playback for the Sample Cell currently being played in
the Slot Player.
(5) Play Type: This property determines whether a Sample stops after reaching its end or if it
continuously loops. When set to One-Shot (arrow symbol), a Sample will stop playing when it
gets to its end. When set to Loop (ellipse symbol), the Sample will automatically return to its
start and continue playing indefinitely.
(6) Sync Type: This property determines if the Sample should be synchronized to the Remix
Deck’s Tempo or not. When SYNC is on, the Sample’s BPM will match the Remix Deck’s BPM.
When SYNC is off, the Sample will play at its original speed.
The Decks
(7) BPM Decrease: This button changes the BPM of a Sample. As a result, the Beatgrid gets
expanded.
(8) BPM Increase: This button changes the BPM of a Sample. As a result, the Beatgrid gets
compressed.
(9) x2: Doubles the tempo of the Sample.
(10) /2: Halves the tempo of the Sample.
(11) GAIN: Each Cell in the Sample Grid has its own gain value. Click the name of the Sample
you want to edit in order to select it, and adjust the GAIN knob.
(12) PITCH: Each Cell in the Sample Grid has its own pitch value. Click the name of the Sample Cell you want to edit in order to select it, and adjust the PITCH knob. A Sample’s pitch can
only be altered if Keylock is enabled for the Slot. If Keylock is disabled, the Sample’s pitch
will be directly related to the playback speed of the Deck (changing speed will change the
pitch), and the KEY control will have no effect.
TRAKTOR - Manual - 84
Page 85

The Decks
Deck Flavor Descriptions
For a tutorial on using Remix Decks, please refer to ↑15.8,
Mix.
TRAKTOR LE 2 note: The Remix Decks are not available in LE 2.
TRAKTOR ME 2 note: The Remix Decks are not available in ME 2.
6.1.3 Live Input
A Live Input Deck.
Using the Remix Decks in Your
A Deck switched
to Live Input enables you to use an external analog source such as a turntable
or microphone. You can then apply TRAKTOR 2's FX to the signal coming from the external
source.
6.2 Loading Tracks / Remix Sets
To load a track / Remix Set into a Deck, you may use one of the following methods:
▪ Drag
▪ Right-click: Use the mouse to right-/[Ctrl]-click on the selected track / Remix Set, and
and Drop: Use the mouse to drag-and-drop a track / Remix Set from the Browser List
into the desired Deck.
choose Load into Track Deck A/B/C/D, or Load into Remix Deck A/B/C/D from the menu.
TRAKTOR - Manual - 85
Page 86

The Deck Heading
▪ Default Keyboard: Select a track / Remix Set from the Browser List with the up/down arrow
keys. Then use the [Ctrl] + [Arrow Left] to load a track / Remix Set into Deck A or [Ctrl] +
[Arrow Right] to load a track into Deck B.
▪ MIDI Command: Use MIDI commands to load tracks / Remix Sets into the Decks. These
must first be mapped to your keyboard or MIDI controller. See ↑11.2, MIDI Hotkeys for
more details on how to do this.
6.3 The Deck Heading
The Deck Heading displays
alter the Deck Flavor, Playback Mode, and Deck Layout, and you may also drag-and-drop audio
from one Deck heading to another Deck.
information about the loaded track / Remix Set, and can be used to
The Decks
The Heading of Track Deck B.
6.3.1 Deck Focus
Each Deck is named with a letter A, B, C and D. TRAKTOR highlights the letter of the Deck
that is currently selected and, therefore, in focus.
6.3.2 Deck Flavor
Click
the Deck letter to change the Deck Flavor (Track Deck, Remix Deck, Live Input). Alterna-
tively, you may use Preferences > Decks Layout > Deck Flavor.
TRAKTOR - Manual - 86
Page 87

The Deck Heading
6.3.3 Playback Mode
Click the Deck letter to reveal the Playback Mode drop-down menu. This will allow you to
►
change to: Internal Playback or Scratch Control. In Internal Playback mode the Track
Deck displays the Play, CUE and CUP buttons on the Transport section of the Deck. In
Scratch Control mode, the CUE and CUP buttons are changed to Relative Mode and Absolute Mode time tracking icons for use with Scratch Control. When in Scratch Control
mode, TRAKTOR will use a timecode signal to control the Decks.
For more information on Scratch Control please read ↑12, Setting Up TRAKTOR SCRATCH.
Specific information on Playback Tracking Modes (Absolute, Relative and Internal) can be
found in ↑12.6, Tracking Modes.
You can find more options regarding Scratch Control in Preferences > Timecode Setup.
6.3.4 Flux Mode
Flux mode lets you jump to cue points and loops without loosing the phrasing of your tracks. It
is a timeline-based transport technique that lets you interact with TRAKTOR's transport controls and then immediately jump back to the position of the timeline where the track would
have been if the transport action had not been used in the first place. In other words, it is as if
a second, virtual playhead continues forward in your song while TRAKTOR loops or jumps to a
cue point. When you release the loop (or cue point) — by releasing the relevant Cue/Sample
Trigger button (1 - 4) — playback resumes at this playhead position. The longer you loop, the
farther ahead the playhead position will move and therefore the farther ahead playback will
jump to when you release the Cue/Sample trigger button. The virtual Flux mode timeline is represented by a green playhead in the waveform view. Additionally, a Flux Mode indicator will
flash in the Deck Header.
The Decks
TRAKTOR - Manual - 87
Page 88

The Deck Heading
While playing the track from a stored cue point, the virtual timeline is indicated with the extra green playhead, and the Flux
Mode indicator flashes in the Deck Header.
To activate Flux mode:
Click the Deck letter and select the Flux Mode entry from the bottom of that list.
►
The Decks
6.3.5 Deck Layout
When
using Full or Advanced Decks, you will see information regarding the loaded track / Remix
Set, the Phase Meter, Tempo and Cover Art in the Deck's Header. You can customize information displayed in the Deck Heading using Preferences > Decks > Deck Heading.
You can double-click Deck's upper border to change the Deck Layout. Each double-click
will cycle through the different Deck Layouts: Micro, Small, Essential, Full or Advanced.
TRAKTOR ME 2 note: The Deck Heading info is not available in ME 2.
TRAKTOR - Manual - 88
Page 89

6.3.6 Deck Audio Drag and Drop
▪ If
a track / Remix Set is currently loaded into a Deck, you can copy it to another Deck via
drag-and-drop from one Deck Heading to another. This action can be performed while a
track / Remix Set is playing.
▪ You can also drag and drop a track from a Track Deck into the Sample Slot of a Remix
Deck:
◦ If the current playback position is within an active Loop, the Sample is a copy of the
Loop and the playback position in the Sample Slot mirrors the playback position in
the Loop.
◦ If the current playback position is outside any active Loop, the Sample starts at the
current playback position and its size is defined by the selected loop size (as displayed by the Loop Size Display).
When importing a Sample from the loaded track, as soon as the Sample is played live three
in the main mix, the Sample is automatically saved to the Collection for later use!
times
Samples can be accessed for reuse via the ‘All Samples’ folder in the Browser.
Dragging audio to Sample Slots can help you to quickly build a complex mix on the fly. Add
effects
such as Filter LFO and Gater to these short Samples, and they become interesting
tempo locked sweeping synth effects over your mixes. Remember to activate Snap (S) and
Quantize (Q) in the Master panel for a tempo locked mix!
The Decks
The Deck Heading
For a tutorial on using the Remix Decks, refer to ↑15.8, Using the Remix Decks in Your Mix.
TRAKTOR - Manual - 89
Page 90

6.4 The Waveform Display and the Stripe View
Track Deck — Waveform Display and Stripe View.
The Decks
The Waveform Display and the Stripe View
The Waveform
Display (1) and the Stripe View (2) are visual representations of a loaded track.
The Waveform is instantly visible, however the Stripe is only displayed once the track has been
analyzed. Once a track has been analyzed, the Stripe will be displayed instantly upon loading.
Read more about the analyzing tracks in ↑5.10.2, Analysis.
(1) Waveform Display: The Waveform Display gives a detailed overview of the loaded track and
its transient information.
▪ The Waveform Display is only visible in Essential, Full, and Advanced Deck Layout modes.
It is not available when using Micro or Small Deck Layout modes. To change the Deck Layout, double-click the Deck Heading or go to Preferences > Decks Layout > Deck Layout.
▪ The Waveform Display has color-coded transients; Lighter colors represent high frequency
content while darker colors represent low frequency content.
▪ You can zoom in and out on a waveform by clicking the + and - buttons. Click the = sym-
bol to reset the zoom view.
▪ The Waveform Display provides a visual reference for BeatJumps, Cue Points, Loops and
Beatmarkers. Zoom in the Waveform Display to precisely place markers.
TRAKTOR - Manual - 90
Page 91

The Transport Controls
▪ The Waveform Display and Stripe View share the same Color Mode (color scheme). There
are four Color Modes available: Ultraviolet, Infrared, X-Ray and Spectrum. Select a Color
Mode in Preferences > Decks > Miscellaneous > Color Mode.
▪ The behavior of dragging the waveform with the mouse depends on the Mouse Control
mode. There are two Mouse Control modes available: Vinyl and Snap. These can be chosen
in Preferences > Transport > Mouse Control. Read more about these Transport Mouse
modes in ↑13.8, Transport. For a general overview of Mouse modes please read ↑10,
Mouse Control for Faders and Knobs.
(2) Stripe View: The Stripe View gives an overview of the whole track. It also displays the current playback position as well as all of the Cue Points and Loops.
▪ Strip View is visible in all Deck Layout modes.
▪ The Stripe View provides a visual overview of BeatJumps, Cue Points, Loops and Beat-
markers.
▪ The Stripe View flashes red when the configured Track End Warning Time is reached. You
may change the warning time in Preferences > Decks > Miscellaneous.
▪ When clicking inside the Stripe display, the behavior depends on the Snap (S) and Quan-
tize (Q) mode. Snap and Quantize can be activated from the Master panel of the Global
section and will allow tempo synced BeatJumps and effects. Read more about the Master
panel in ↑9.2.1, Master Panel.
The Decks
TRAKTOR ME 2 note: The Stripe View is limited to Track Deck mode in ME 2.
6.5 The Transport Controls
Track Deck — Transport Controls.
Transport Controls are the main buttons used for playing tracks with TRAKTOR’s internal
The
playback mode.
Play : Click Play/Pause to start and stop playback.
TRAKTOR - Manual - 91
Page 92

The Transport Controls
CUE : This button has multiple functions depending on the playback state of the track.
▪ On a paused Deck, clicking CUE sets a new Floating Cue Point at the current play posi-
tion. In Snap mode this Cue Point will snap to the beat nearest the play position.
▪ When the track is paused and cued up to the Floating Cue Point, click and hold the CUE
button to pre-listen to the Cue placement. Release CUE to return to the Floating Cue
Point.
▪ Clicking CUE during playback jumps the current play position back to the previously set
Floating Cue Point and stops playback.
CUP (Cue/Play) : The CUP button behaves similarly to CUE, but stops playback as long as it is
held down.
▪ On a paused Deck, clicking CUP sets a Floating Cue Point and starts playback when upon
releasing the button.
▪ Clicking CUP during playback jumps the current play position back to the Floating Cue
Point and pauses playback. Release the button to resume playback.
The Decks
TRAKTOR - Manual - 92
Page 93

6.6 Loop Controls
The Decks
Loop Controls
Track Deck Loop Controls
The main Loop controls offer the functions required for the creative use of loops in your mix.
Auto Looping :
▪ Click
on a number in the Loop Size control (3) to set a loop. The numbers represent the
loop length in beats.
▪ Upon choosing a loop size, the relevant button and the ACTIVE button (7) will both high-
light in green. When inactive, the buttons are gray.
▪ When active the loop (1) will be highlighted in green in the Waveform Display.
▪ To stop looping, click on either the same loop length number or on the ACTIVE button (7).
TRAKTOR - Manual - 93
Page 94

Tempo Controls
▪ To change the size of an active loop on the fly, click on another length in the Loop Size
control (3).
▪ Click on the Arrow buttons (2 or 4) on each end of the Loop Size control (3) to see higher or
lower values. The Arrow buttons flash if the currently selected length is out of range.
Manual Looping :
▪ Click on the Loop In button (5) to set the start point of the loop.
▪ Click on the Loop Out button (6) to set the end point of the loop. Your track will begin to
loop between these two points and the ACTIVE button will be highlighted.
▪ To stop looping, click on the highlighted ACTIVE button (7).
Activate Snap (S) and Quantize (Q) in the Master Panel to get seamless loops.
6.7 Tempo Controls
TRAKTOR
well as a variety of automated sync functions. These features will give you more control over
your mixes than ever before.
provides a Tempo Fader with customizable range, a pair of Tempo Bend buttons as
The Decks
TRAKTOR - Manual - 94
Page 95

6.7.1 Manual Tempo Controls
Tempo Controls.
The Decks
Tempo Controls
(1) Tempo Fader: Moving
the Tempo Fader up or down will slow down or speed up the tempo of
the track. TRAKTOR’s Tempo Fader offers the same functionality as a pitch fader on any
standard DJ turntable or pitchable CD player.
▪ To adjust the tempo in steps, use the + and — buttons which become visible when you
mouse over the Tempo Fader.
▪ Alternatively, you can use the scroll wheel of your mouse to move the Tempo Fader up or
down.
▪ The sensitivity of the + and - buttons, and the scroll wheel of your mouse, can be adjust-
ed by right-/ [Ctrl]-clicking on the + or - button and selecting one of the sensitivity options.
(2) Tempo Bend Buttons: The Tempo Bend buttons are used if two tracks are playing at the
same tempo, but their phase is slightly shifted. This is similar to nudging a record to slow
down or speed up as the tracks go slightly out of sync.
Click the left arrow to slightly slow down the track and the right arrow to speed it up.
►
Holding down either Tempo Bend button will continue to speed up or slow down the track
until the button is released.
TRAKTOR - Manual - 95
Page 96

Tempo Controls
6.7.2 Phase Meter
The
Phase Meter is a visual reference for syncing tracks. It shows you if a track is in or out of
sync with the Master Deck or the Master Clock. Picture the Phase Meter as a ruler with the
length of one beat, and each section of the ruler represents a quarter beat.
▪ If two tracks’ phases are synced, the meter will stay in the middle:
one track’s phase is shifted backward, a yellow stripe will appear left of the center
▪ If
marker. In this example, the Deck's phase is a little more than a quarter beat behind the
Master Clock / Master Deck:
▪ If a track’s phase is shifted forward, a yellow stripe will appear right of the center marker:
You can manually shift the Phase by clicking within the Phase Meter and dragging towards
the center marker. This can also be accomplished with your mouse’s scroll wheel.
The Decks
You can globally activate or deactivate the Phase Meter in: Preferences > Decks > Deck
►
Heading > Show Phase Meter.
6.7.3 Beat Syncing
Automatic Beat Syncing is one of the central features of TRAKTOR. All it takes is a single
click.
Sync Button : The SYNC button provides the fastest way to match beats.
Click on SYNC to automatically match the tempo and the phase of the playing track to: the
Master Deck or the Master Clock, if no Deck is selected as Master Deck.
The SYNC button can be left permanently on. However, sometimes a Deck cannot be synced at
the moment, then the SYNC button will be appearing half-lit. Following circumstances lead to
half-lit SYNC button:
▪ The selected Deck is concurrently the Master (Syncing to itself is not possible).
TRAKTOR - Manual - 96
Page 97

Tempo Controls
▪ The loop length is smaller than 1 beat (Phase syncing is not possible).
As soon as these circumstances are resolved, because you choose another Deck as Master, increased the loop length above 1 beat, deactivated the loop, loaded a track with valid Beatgrid
into the Deck, either increased the Tempo Fader’s range in the Preferences, or chose a track
with a tempo closer to the other track’s tempo, the SYNC button will be lit fully and the synching will work again.
The Decks
Sync Mode :
It is not possible to activate SYNC
matically analyzed the first time it is added to a Deck. If your track does not have a Beatgrid or the Beatgrid is incorrect, you may need to manually set the Beatgrid. For more information see ↑6.8.6, Beatgrid Panel (GRID).
There are two methods for synchronizing tracks: TempoSync and BeatSync. You can
if a track does not have a valid Beatgrid. A track is auto-
select Sync Mode in Preferences > Transport > Sync Mode.
▪ TempoSync : maintains tempo-only synchronization between the tracks. The phase of the
Decks will be aligned when the SYNC button is turned on and SYNC will turn dim if the
phase of the Decks are shifted. Tempos will remain synced in this mode.
▪ BeatSync : forces tempo and phase synchronization between the tracks. The phase of the
Decks will be aligned when the SYNC button is turned on. SYNC will turn dim if the
phase of the tracks are shifted manually (i.e. Scratching or holding a Deck in the stopped
position), but TRAKTOR will re-align the phase of the tracks when the Deck plays normally again (i.e. you release the record or jog wheel).
TRAKTOR ME 2 note: The Sync mode is limited to BeatSync in ME 2.
This concept allows you, (even if you are using TRAKTOR SCRATCH) to keep your tracks tempo-matched, and also raise the tempo of two or more tracks simultaneously, even if their phases are shifted!
Master Deck:
▪ The Master Deck provides the target tempo to which other Decks can sync. Two Master
Deck modes are selectable from the Master Clock panel of the Global section.
◦ In Auto mode TRAKTOR will automatically select the Master Deck depending on which
track has the longest uninterrupted playtime.
TRAKTOR - Manual - 97
Page 98

The Advanced Panel
◦ In Manual mode the Master Deck must be selected by clicking the MASTER button on
the desired Deck.
You can prevent Remix Decks from becoming the Master Deck by deactivating the relevant
option in the Transport section of the Preferences. See ↑13.8, Transport for further information.
When switching the Master Clock to Manual mode, you must manually select the Master Deck
for it will no longer be done automatically.
The Decks
▪ The
Master Clock will define the target tempo if no Master Deck is selected in Manual
mode.
Sync Start/Sync Lock: Once you have SYNC engaged for a Deck, it will remain engaged when
loading a new track. This is basically all you need to do and never have to press the SYNC button again.
Several circumstances can lead to a situation where a synced track will not run in sync. These
are:
▪ Non-Integer Loop Sizes such as 1/16-1/2 (Master & Slave)
▪ Synced tempo out of range of tempo fader (Master & Slave)
When playing tracks without Beatgrid, the SYNC
avoid unwanted sync skips. In this case you need to engage SYNC manually for the next
track loaded.
button will not stay locked in order to
To view the tutorial on Beat Syncing please go to ↑15.10, Synchronization.
6.8 The Advanced Panel
The Advanced
Hotcueing, BeatJumping, and for adding Beatgrids to your tracks.
You cannot open the Advanced panels when using Micro, Small or Essential Deck layout. You
must switch to Full or Advanced Deck Layout by double-clicking the Deck Heading or by going
to Preferences > Decks Layout > Deck Layout.
panels provide additional editing and storing functions for Loops and Cue Points,
TRAKTOR - Manual - 98
Page 99

To open the Advanced Panels in Full Deck Layout mode, click the Advanced Open/Close
►
button underneath the ACTIVE button.
To permanently display the Advanced Panel, select Advanced Deck Layout mode in Pref-
►
erences > Decks Layout > Deck Layout.
You may then chose one of three subpanels; MOVE, CUE and GRID.
6.8.1 BeatJump and Loop Move (MOVE Panel)
BeatJump and Loop Move panel (MOVE) lets you edit previously set loops. You can then
The
move the loop points within a track by a predefined number of beats.
▪ The four available modes are described below. Use the Move Mode menu to change
modes.
▪ The Amount control applies to all modes. Use this to select the size of the beat or loop-
jump. The yellow value defines the selected size. Use the left and right buttons to scroll
through the predefined move sizes.
TRAKTOR LE 2 note: BeatJump and the Loop Move panel are not available in LE 2.
The Decks
The Advanced Panel
Activate Snap (S)
MOVE.
and Quantize (Q) in the Master panel, to get a seamless BeatJump and
Here is an explanation of the four options available in the MOVE panel:
TRAKTOR - Manual - 99
Page 100

Move — BeatJump
The Decks
The Advanced Panel
Move BeatJump Advanced Panel.
This Move mode allows you to jump forwards or backwards within the track.
Use the Move Amount Control (2) to choose a move size.
►
Click the MOVE buttons (4) to jump forwards or backwards by the selected MOVE size (3).
►
With the FINE button (5) activated, you can jump by a precise amount. Further, choosing
►
xFNE (1) allows for even more precise BeatJumping.
Assign the MOVE buttons to a MIDI controller for on the fly BeatJumping. For more information
↑13.21, Controller Manager.
on the assigning BeatJump markers and the TRAKTOR Controller Manager see
TRAKTOR - Manual - 100
 Loading...