

Page 1
Getting Started
Page 2

The information in this document is subject to change without notice and does not represent a
commitment on the part of Native Instruments GmbH. The software described by this document is subject to a License Agreement and may not be copied to other media. No part of this
publication may be copied, reproduced or otherwise transmitted or recorded, for any purpose,
without prior written permission by Native Instruments GmbH, hereinafter referred to as Native
Instruments.
“Native Instruments”, “NI” and associated logos are (registered) trademarks of Native Instruments GmbH.
Mac, Mac OS, GarageBand, Logic, iTunes and iPod are registered trademarks of Apple Inc.,
registered in the U.S. and other countries.
Windows, Windows Vista and DirectSound are registered trademarks of Microsoft Corporation
in the United States and/or other countries.
All other trade marks are the property of their respective owners and use of them does not imply any affiliation with or endorsement by them.
Document authored by: Native Instruments GmbH
Software version: 2.6 (10/2012)
Disclaimer
Special thanks to the Beta Test Team, who were invaluable not just in tracking down bugs, but
in making this a better product.
Page 3

Germany
Native Instruments GmbH
Schlesische Str. 29-30
D-10997 Berlin
Germany
www.native-instruments.de
USA
Native Instruments North America, Inc.
6725 Sunset Boulevard
5th Floor
Los Angeles, CA 90028
USA
www.native-instruments.com
Contact
© Native Instruments GmbH, 2012. All rights reserved.
Page 4

Table of Contents
Table of Contents
1 Welcome to the World of TRAKTOR 2! .........................................................................
1.1 What Is TRAKTOR 2? ................................................................................................................... 8
1.2 Manual Conventions ................................................................................................................... 8
1.3 System Requirements and Compatibility .................................................................................... 9
2 Upgrading (from TRAKTOR PRO, TRAKTOR LE, and TRAKTOR ME) ..................................
2.1 Backup ....................................................................................................................................... 11
2.2 Installation ................................................................................................................................. 11
2.3 Importing Your Data ................................................................................................................... 12
3 TRAKTOR's Setup Wizard ...........................................................................................
4 The User Interface (Overview) ....................................................................................
5 Importing Your Music ................................................................................................
5.1 What Is the Track Collection? ..................................................................................................... 24
5.2 Importing Music Folders ............................................................................................................. 25
5.3 Tracks Managed by iTunes ......................................................................................................... 26
5.3.1 Playing Tracks Managed by iTunes ............................................................................ 26
5.3.2 Importing a Selection of Tracks from iTunes .............................................................. 27
5.3.3 Importing iTunes Playlists ......................................................................................... 27
6 Tutorials ...................................................................................................................
6.1 Prerequisites .............................................................................................................................. 28
6.2 Goals of the Following Chapters ................................................................................................. 29
6.3 Playing Your First Track .............................................................................................................. 30
6.4 Mixing In a Second Track ............................................................................................................ 35
6.3.1 Quick Loading a Track ............................................................................................... 30
6.3.2 Playing the Track ....................................................................................................... 32
6.3.3 If You Don’t Hear the Track ........................................................................................ 33
6.4.1 Pre-listening a Second Track in the Preview Player ................................................... 35
8
11
13
21
24
28
TRAKTOR - Getting Started - 4
Page 5

Table of Contents
6.5 Adjusting Levels ......................................................................................................................... 48
6.6 Looping and Cueing ....................................................................................................................51
6.7 Adding FX ................................................................................................................................... 56
6.8 Using the Remix Decks in Your Mix ............................................................................................. 61
6.4.2 Loading and Playing the Second Track ...................................................................... 37
6.4.3 Using Headphones to Prepare the Mix ....................................................................... 37
6.4.4 Synchronizing the Second Track ................................................................................ 38
6.4.5 Setting a Cue Point as Starting Point ........................................................................ 39
6.4.6 Snapping to the Beats ............................................................................................... 42
6.4.7 Sticking to the Beats ................................................................................................. 42
6.4.8 Interlude: In Case the Left Track Is Over… ............................................................... 43
6.4.9 Mixing In the Track by Using the Channel EQ and Filter ............................................ 43
6.4.10 Manual Beat-matching ............................................................................................. 45
6.5.1 The Theory… ............................................................................................................. 48
6.5.2 …and the Practice .................................................................................................... 48
6.6.1 Playing with Loops ..................................................................................................... 51
6.6.2 Using Hotcues ........................................................................................................... 54
6.7.1 Assigning a Deck to an FX Unit .................................................................................. 57
6.7.2 Group Mode ............................................................................................................... 58
6.7.3 Getting the FX Unit Ready .......................................................................................... 58
6.7.4 Controlling the FX Unit .............................................................................................. 59
6.7.5 Single Mode ............................................................................................................... 60
6.7.6 Storing a Snapshot .................................................................................................... 60
6.8.1 Loading a Sample from the Collection ....................................................................... 62
6.8.2 Triggering the Sample ............................................................................................... 63
6.8.3 Capturing a Sample from a Track .............................................................................. 65
6.8.4 More Sample Controls ................................................................................................ 66
6.8.5 Saving A Remix Set .................................................................................................... 69
TRAKTOR - Getting Started - 5
Page 6

6.9 Using the Loop Recorder ............................................................................................................. 69
6.10 Synchronization .......................................................................................................................... 74
6.9.1 Choosing a Source ..................................................................................................... 70
6.9.2 Recording a Loop ....................................................................................................... 71
6.9.3 Overdubbing .............................................................................................................. 73
6.9.4 Further Uses of the Recorded Loop ............................................................................ 73
6.10.1 Introduction ............................................................................................................... 74
6.10.2 The Tempo Master ..................................................................................................... 74
6.10.3 The Beatgrid .............................................................................................................. 79
6.10.4 Other Useful Tools for Synching ................................................................................. 80
7 Using TRAKTOR SCRATCH PRO 2 ................................................................................
7.1 Enabling the Decks .....................................................................................................................83
7.2 Calibration ................................................................................................................................. 83
7.3 Tracking Modes .......................................................................................................................... 84
7.4 Timecode Preferences ................................................................................................................. 86
7.5 TRAKTOR SCRATCH PRO 2 Troubleshooting ................................................................................ 87
7.3.1 Absolute Tracking Mode ............................................................................................. 84
7.3.2 Relative Tracking Mode ............................................................................................. 85
7.3.3 Internal Playback Mode ............................................................................................. 85
7.5.1 Calibration Troubleshooting ...................................................................................... 87
7.5.2 Audio Troubleshooting ............................................................................................... 100
8 Customizing TRAKTOR 2 ............................................................................................
8.1 Routing .......................................................................................................................................103
8.2 Switching the Deck Flavors ......................................................................................................... 103
8.3 Effects (TRAKTOR PRO 2 / SCRATCH PRO 2 Only) ....................................................................... 104
8.4 Adjusting TRAKTOR’s Look (TRAKTOR PRO 2 / SCRATCH PRO 2 Only) ......................................... 105
8.5 MIDI and Mappings .................................................................................................................... 106
8.6 Profiles and Backup ................................................................................................................... 107
Table of Contents
83
101
TRAKTOR - Getting Started - 6
Page 7

Table of Contents
9 Appendix — Common Setups .....................................................................................
9.1 TRAKTOR with an On-board Sound Card and Fallback ................................................................ 108
9.2 TRAKTOR with an External Audio Interface ................................................................................. 109
9.3 TRAKTOR with an External Mixer ................................................................................................. 110
9.4 TRAKTOR with a Controller .......................................................................................................... 111
9.5 TRAKTOR KONTROL S4 with TRAKTOR SCRATCH PRO 2 ............................................................... 114
9.6 Adding a Microphone .................................................................................................................. 114
9.7 Recording Setup ......................................................................................................................... 116
9.4.1 Controllers with Mixer Controls (and Optionally a Built-In Audio Interface) ............... 112
9.4.2 Controllers without Mixer Controls ............................................................................. 113
9.6.1 Using Your Microphone with the Loop Recorder ......................................................... 115
9.6.2 Using Your Microphone as a Live Input and with TRAKTOR FX ................................... 115
9.7.1 Recording from the Internal Source ........................................................................... 116
9.7.2 Recording from an External Source ............................................................................ 117
Index ........................................................................................................................
108
120
TRAKTOR - Getting Started - 7
Page 8

Welcome to the World of TRAKTOR 2!
What Is TRAKTOR 2?
1 Welcome to the World of TRAKTOR 2!
We
are delighted that you have chosen TRAKTOR 2! This Getting Started guide is intended to
help you set up and use your TRAKTOR system correctly.
1.1 What Is TRAKTOR 2?
TRAKTOR
you can mix your tracks traditionally as well as combine your tracks and loops in a non-linear
way using it as a powerful live remixing tool.
Differences Between Versions
TRAKTOR Light Edition 2 and TRAKTOR Manufacturer Edition 2 are limited in certain features compared to the full TRAKTOR (SCRATCH) PRO 2 version. The differences will be documented at the appropriate places in this manual.
You're TRAKTOR version is a Manufacturer Edition 2 version if you obtained it as part of one of
the following bundled products:
2 is the most powerful and versatile DJ software on the market. With TRAKTOR 2,
▪ Pioneer DDJ-T1 (Traktor Pioneer DDJ-T1 Edition)
▪ Numark 4TRAK (Traktor Numark 4TRAK Edition)
▪ Velocity MIDI Station (Traktor Velocity MIDI Station Edition)
1.2 Manual Conventions
Document Conventions
manual uses particular formatting to point out special facts and to warn you of potential
This
issues. The icons introducing these notes let you see what kind of information is to be expected:
TRAKTOR - Getting Started - 8
Page 9
Whenever this exclamation mark icon appears, you should read the corresponding note
carefully and follow the instructions and hints given there if applicable.
This light bulb icon indicates that a note contains useful extra information. This information
may often help you to solve a task more efficiently, but does not necessarily apply to
the setup or operating system you are using; however, it's always worth a look.
Furthermore, the following formatting is used:
Welcome to the World of TRAKTOR 2!
System Requirements and Compatibility
▪ Text
appearing in (drop-down) menus (such as Open…, Save as… etc.), in paths to locations on your hard drive or other storage devices, and in Preferences paths is printed in
italics.
▪ Text appearing elsewhere (labels of buttons, controls, text next to checkboxes etc.) is
printed in blue. Whenever you see this formatting applied, you will find the same text appearing somewhere on the screen.
▪ Important names and concepts are printed in bold.
Single instructions are introduced by this play button type arrow.
►
Results of actions are introduced by this smaller arrow.
→
Pet Names for the Software
Throughout the documentation, we will refer to the TRAKTOR (SCRATCH) PRO 2 software as
“TRAKTOR 2” or simply “TRAKTOR.”
TRAKTOR Manufacturer Edition 2 will hereinafter be referred to as "TRAKTOR ME 2" or simply
"ME 2." TRAKTOR Light Edition 2 will hereinafter be referred to as "TRAKTOR LE 2" or simply
"LE 2."
1.3 System Requirements and Compatibility
the minimum system requirements your computer needs to meet, see the TRAKTOR sec-
For
tion of the Native Instruments website:
http://www.native-instruments.com/#/en/products/dj/traktor-pro-2/specifications/?page=2050
TRAKTOR - Getting Started - 9
Page 10

Welcome to the World of TRAKTOR 2!
System Requirements and Compatibility
Please note that meeting the system requirements does not guarantee running all TRAKTOR
2 features hassle-free. You might be forced to tweak your system following Native Instruments’ tuning tips for audio computers. You can find these tuning tips in the Knowledge Base—see the TRAKTOR 2 Manual's "Getting Help" chapter for more information.
To check the compatibility with several operating systems, please have a look at: http://
www.native-instruments.com/compatibility
TRAKTOR - Getting Started - 10
Page 11
Upgrading (from TRAKTOR PRO, TRAKTOR LE, and TRAKTOR ME)
2 Upgrading (from TRAKTOR PRO, TRAKTOR LE, and
TRAKTOR ME)
When
data and mappings. This is a straightforward process assisted by the TRAKTOR software; however, there are a few things to be observed when upgrading. See the following sections for
more info.
2.1 Backup
Before
files:
upgrading from one of the aforementioned versions, you will need to import your user
installing TRAKTOR 2 over you're previous version, backup the following folders and
▪ your TRAKTOR folder, per default found in [User]\My Documents\Native Instruments
\Traktor (Windows) and User:Documents:Native Instruments:Traktor (Mac OS X)
▪ your Music folders as defined in Preferences > Data Location > Music Folders
Backup
▪ any other data that is not stored in the aforementioned places because you have chosen
another location for them.
At this point, it is a good idea to remove all unnecessary files from your TRAKTOR folder,
e.g,. mappings for controllers you don’t use anymore, etc.
2.2 Installation
Follow the instructions from the Setup Guide carefully.
As a general rule: start with the software installation before you install the hardware (TRAKTOR AUDIO 6/10, TRAKTOR KONTROL X1, TRAKTOR KONTROL S4, etc.)!
TRAKTOR - Getting Started - 11
Page 12
Upgrading (from TRAKTOR PRO, TRAKTOR LE, and TRAKTOR ME)
Importing Your Data
The installation creates a new User Folder in [User]\My Documents\Native Instruments\Traktor
2.x.x (Windows) and User:Documents:Native Instruments:Traktor 2.x.x (Mac OS X). Also, your
previous TRAKTOR version will not be uninstalled. This means that from now on you’ll always
be able to easily return to the last version if needed.
2.3 Importing Your Data
▪ When
▪ Next, TRAKTOR will ask if you want to import your previous data by copying the existing
Importing Your MIDI and Hotkey Mappings
For TRAKTOR 2, the mapping system has been changed. While some mappings created with
previous versions of TRAKTOR may still work, others will not be imported correctly.
you start TRAKTOR 2 for the first time, the Setup Wizard greets you with some sim-
ple questions regarding your setup. This will adjust TRAKTOR’s look and Preferences accordingly. Read more about the Setup Wizard in ↑3, TRAKTOR's Setup Wizard.
user content to a new folder in your user folder. Your previous data will not be altered if
you copy it to the new default folder.
We recommend double-checking your imported mappings before you use them in a live situation.
TRAKTOR - Getting Started - 12
Page 13

TRAKTOR's Setup Wizard
3 TRAKTOR's Setup Wizard
The
Setup Wizard lets you configure TRAKTOR in a few simple steps. It also is a convenient
way to restart with a fresh out-of-the-box setup. The Setup Wizard does two things:
▪ It lets you choose from a few basic audio, MIDI, and general setup configurations and au-
tomatically sets the available options accordingly.
▪ It resets all other TRAKTOR 2 settings to their default values.
Depending on the version of TRAKTOR software you have (e.g., LE 2, ME 2), the Setup
Wizard may not offer all shown screens or selections.
You can start the Setup Wizard in two ways:
Select Start Setup Wizard in the Help menu of the Application Menu Bar (to see this bar,
►
Fullscreen mode must be deactivated).
Or click the Setup Wizard button at the bottom left corner of the Preferences window.
►
Exemplary Setup
Let's walk you through an exemplary configuration using the Setup Wizard:
TRAKTOR - Getting Started - 13
Page 14
TRAKTOR's Setup Wizard
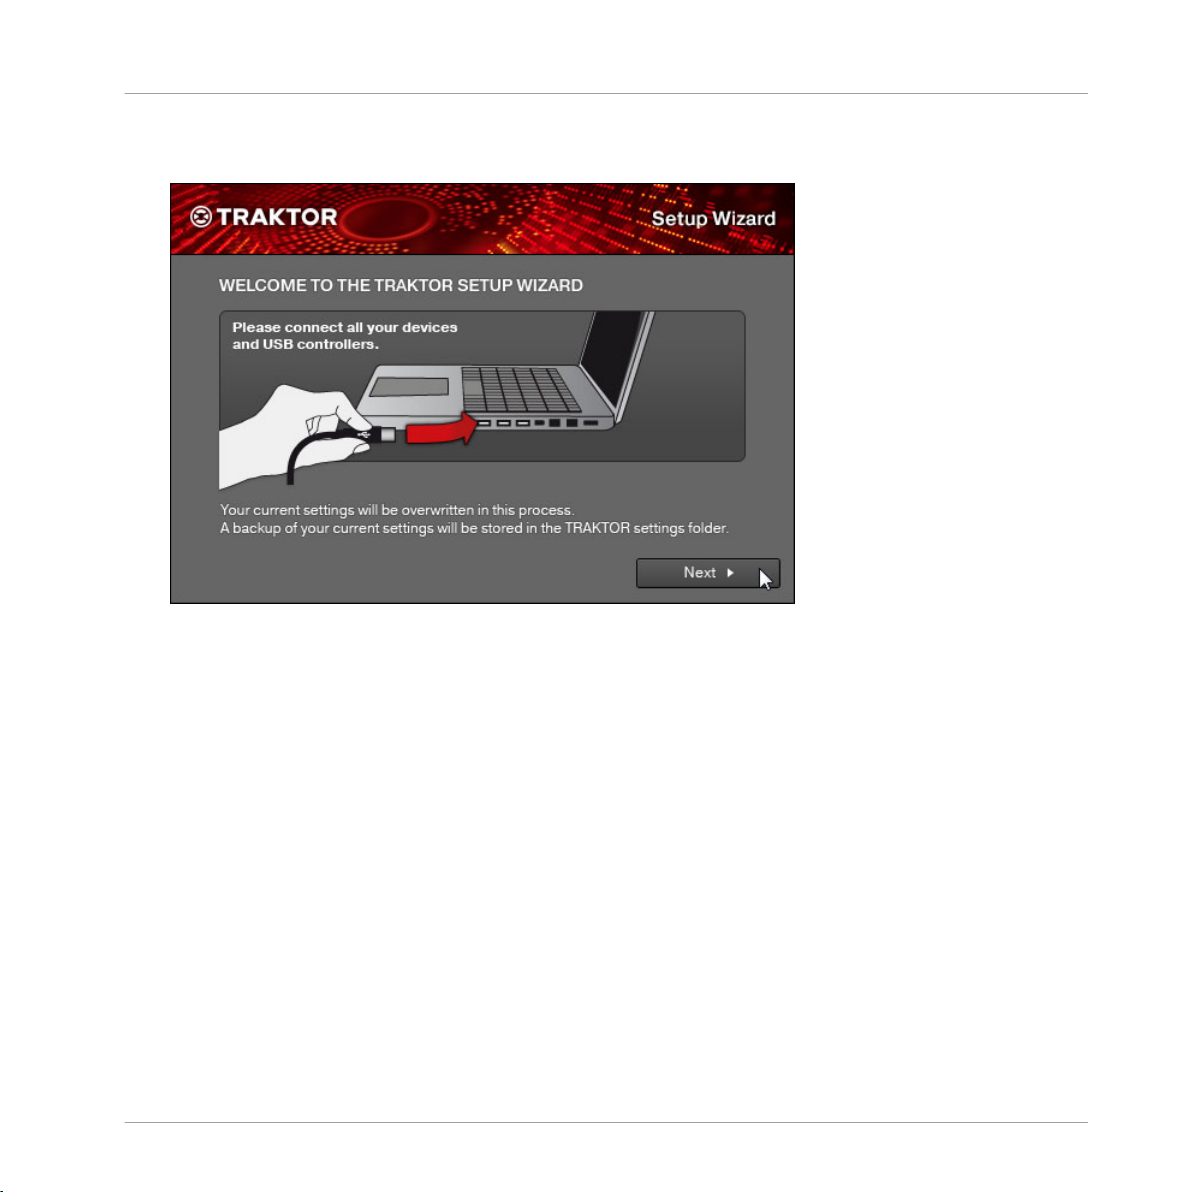
1. On the welcome screen, click Next to confirm you have connected any TRAKTOR controllers to your computer via USB (if you are using any).
TRAKTOR - Getting Started - 14
Page 15
TRAKTOR's Setup Wizard
2. Select whether or not you want to use TRAKTOR with a MIDI controller and proceed with
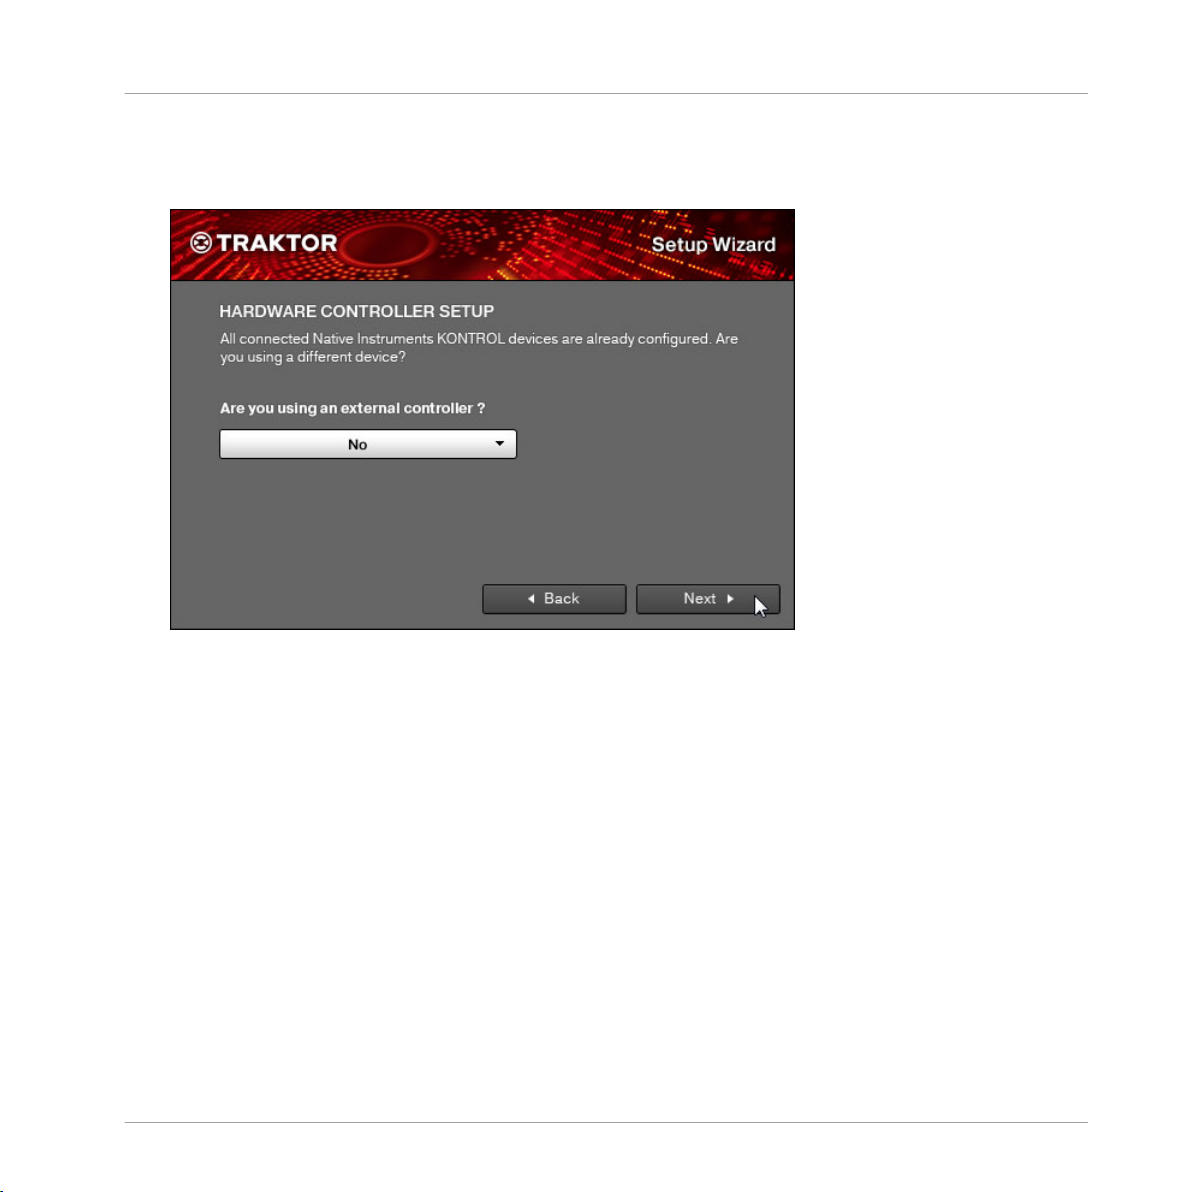
Next. If you are using one of NI's "KONTROL" models (S4, S2, F1, X1, etc.), select No
here as TRAKTOR is already pre-configured for use with these.
TRAKTOR - Getting Started - 15
Page 16
TRAKTOR's Setup Wizard
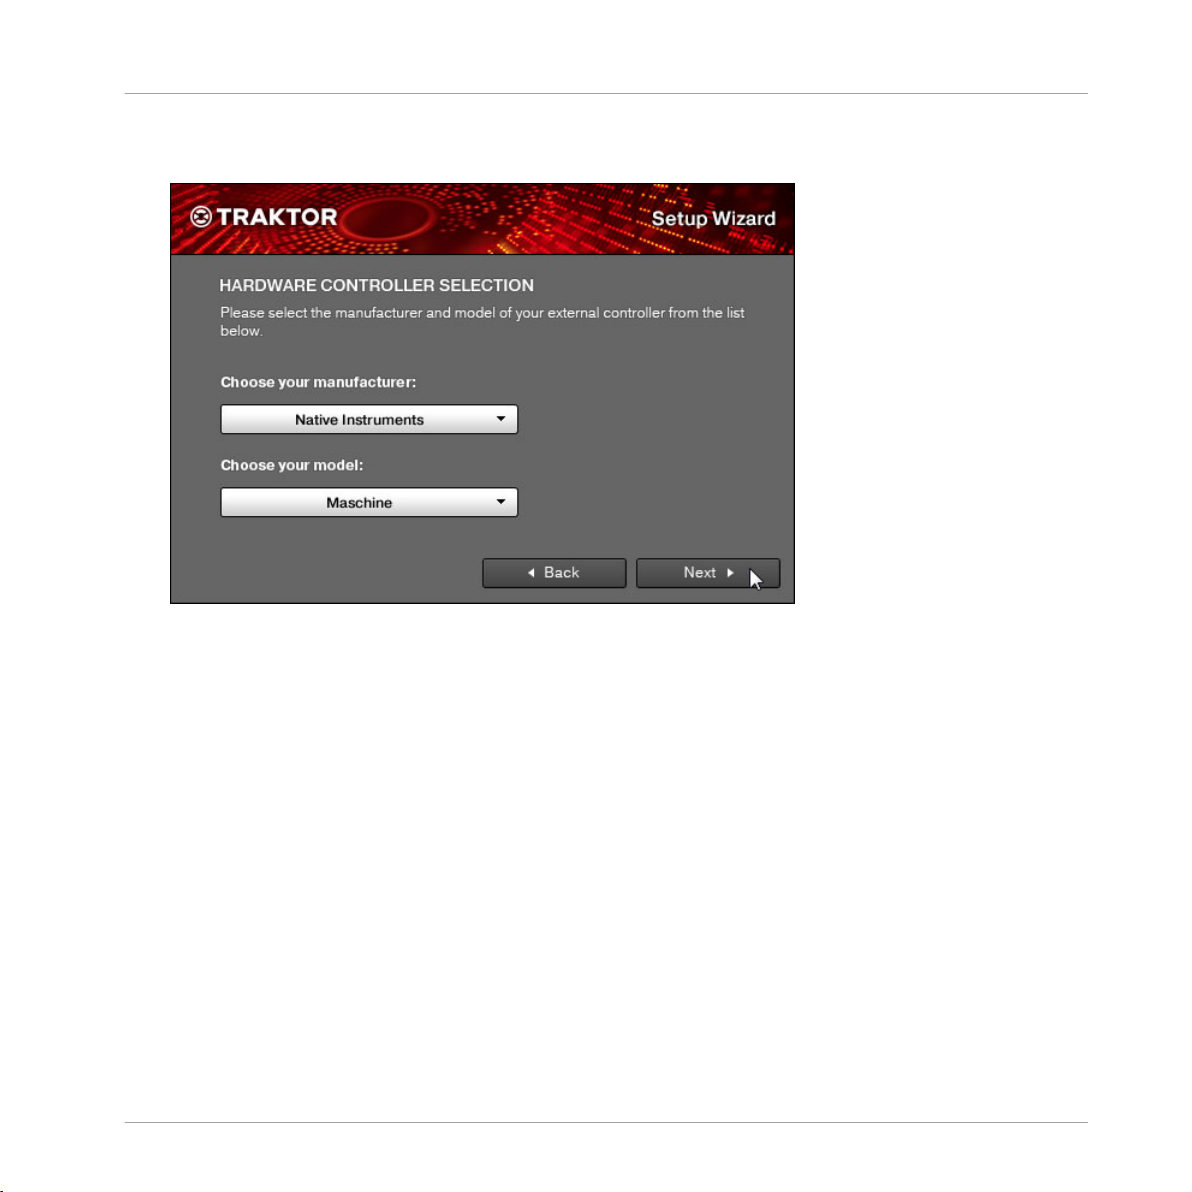
3. If you previously selected to use TRAKTOR with a controller, choose the controller manufacturer and model from the drop-down lists and confirm with Next.
TRAKTOR - Getting Started - 16
Page 17
TRAKTOR's Setup Wizard
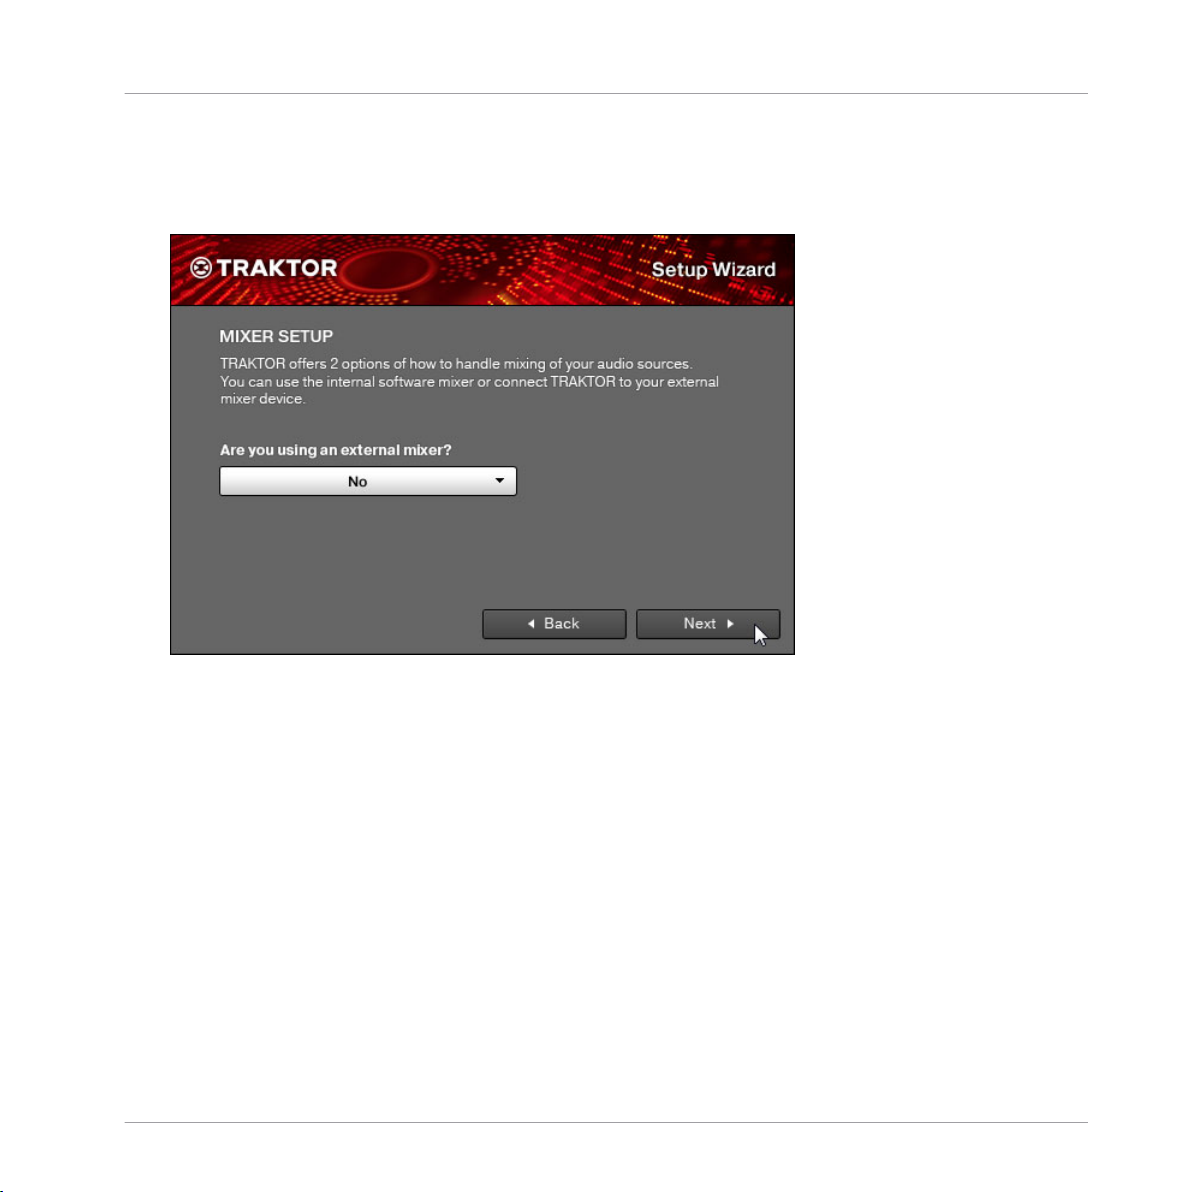
4. In case your TRAKTOR version is TRAKTOR PRO, ME, or LE, select whether you want to
use an external DJ mixer or TRAKTOR's internal software mixer in your setup. Confirm
with Next. In case of TRAKTOR SCRATCH PRO, this screen is skipped and external mixing is auto-selected.
TRAKTOR - Getting Started - 17
Page 18
TRAKTOR's Setup Wizard
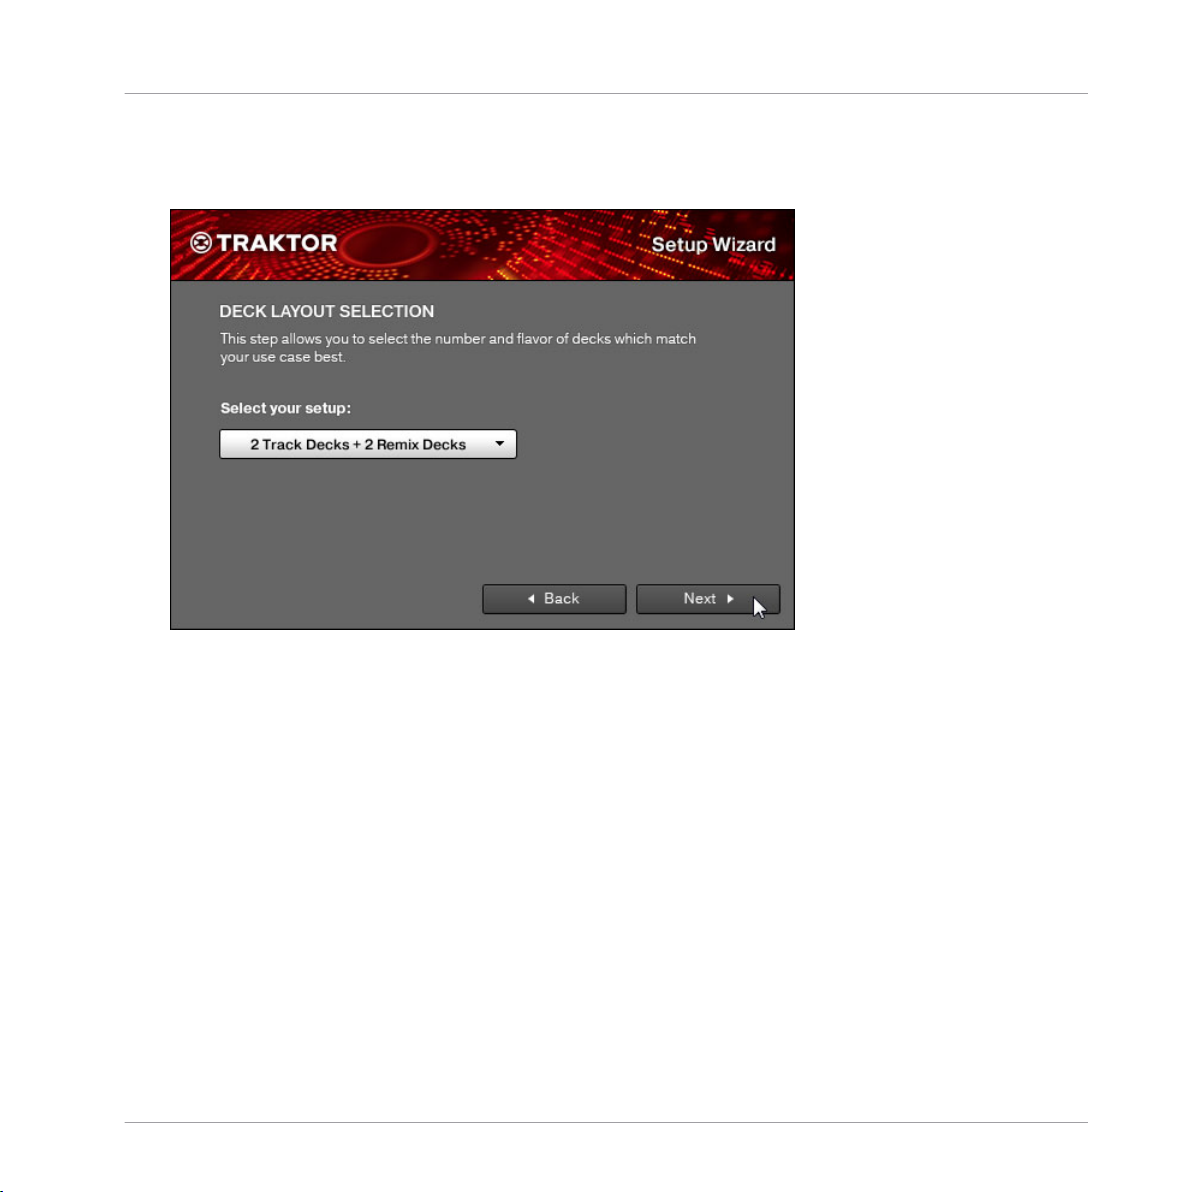
5. Select a basic setup for your Decks (how many Decks and what Deck Flavors to use). This
can later be easily changed from within the software. The available options can vary, depending on your TRAKTOR version.
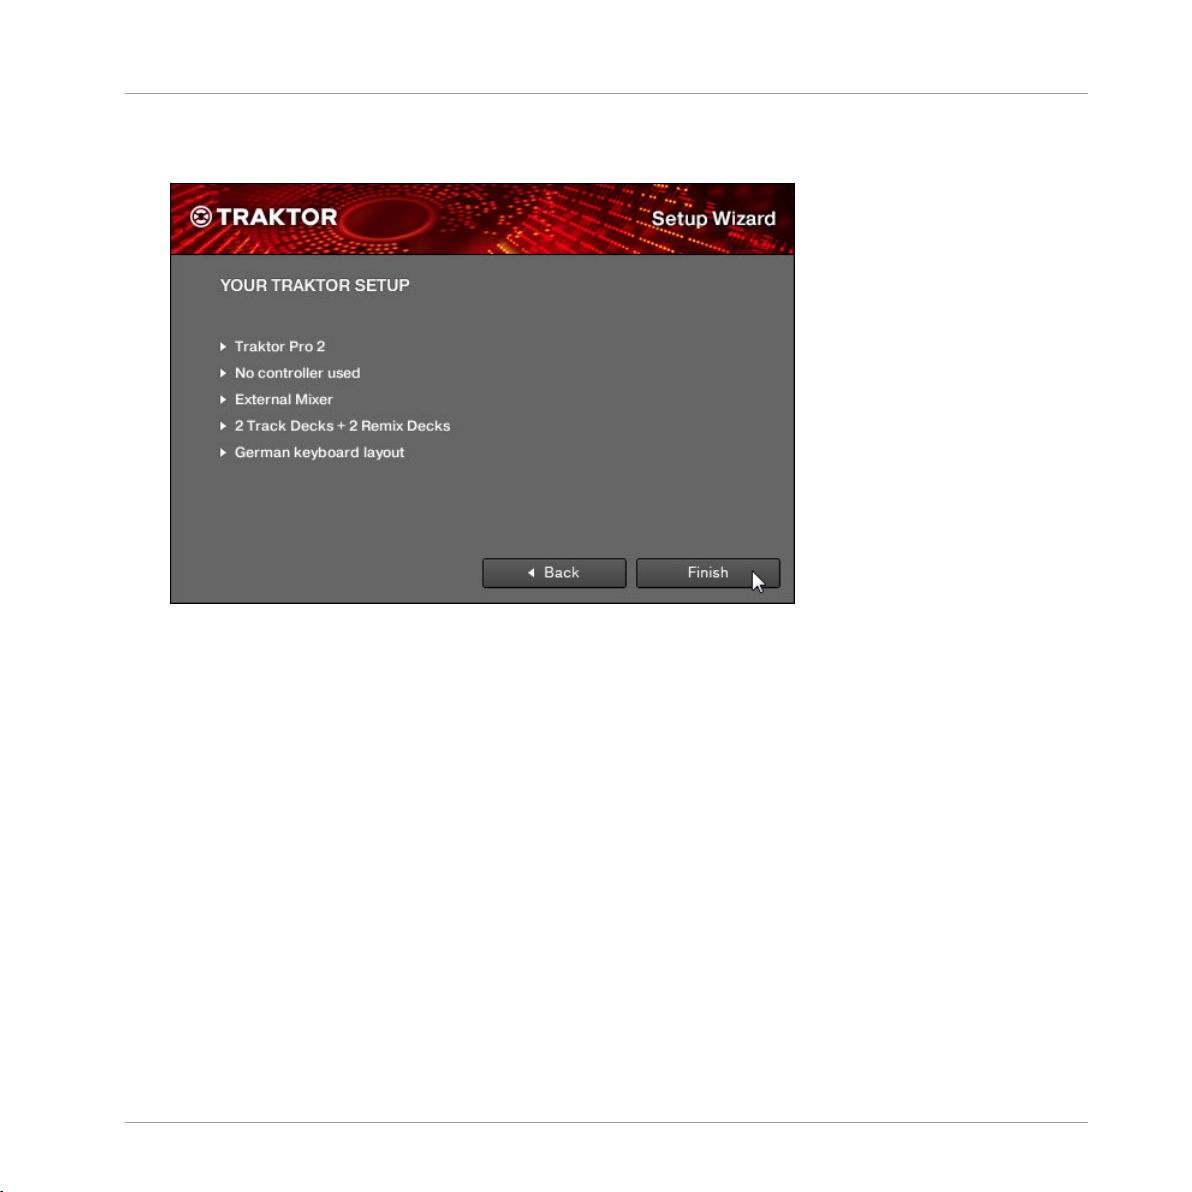
6. The
last screen of the Setup Wizard sums up your selection of options. Below you see a
summary screen with an exemplary configuration of TRAKTOR with: four Decks (two Track
Decks and two Remix Decks); an external DJ mixer; a German keyboard layout (derived
TRAKTOR - Getting Started - 18
Page 19
TRAKTOR's Setup Wizard
from the system settings).You can click Back to change the settings made, Cancel to cancel the Setup Wizard completely, or Finish, which confirms your selections.
TRAKTOR - Getting Started - 19
Page 20
TRAKTOR starts with the selected settings and a matching interface layout, e.g., if you
→
selected to use an external DJ mixer, TRAKTOR's software mixer will be hidden. You can
always change the Layout of the user interface with the Layout selection menu in TRAKTOR's header.
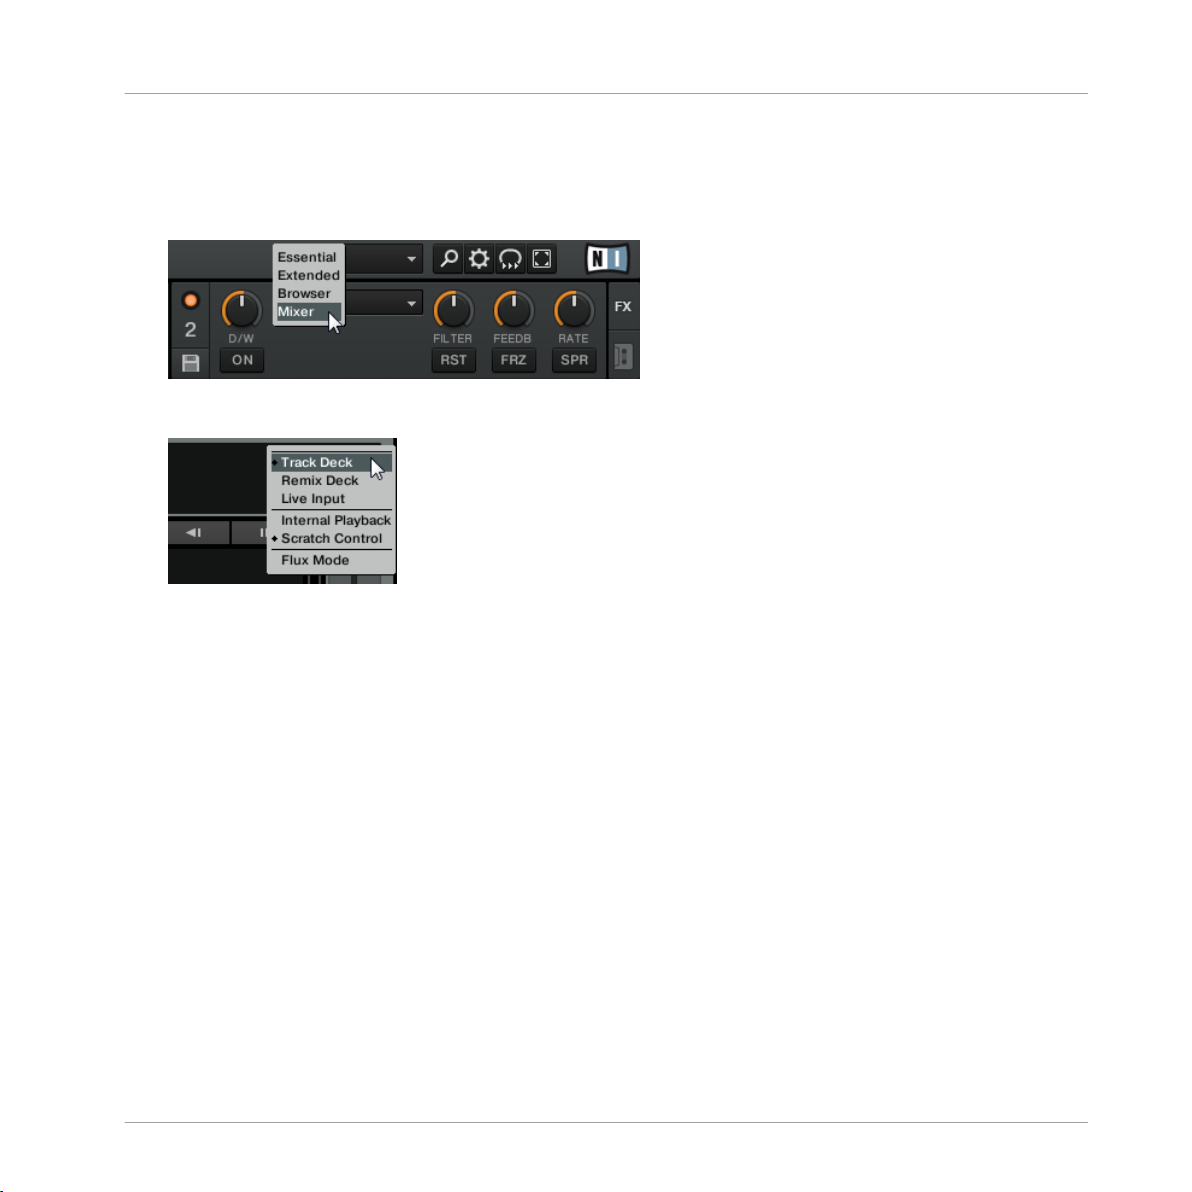
To change the Deck Flavors, click on the Deck letter in a Deck's upper right corner and
select a Flavor from the drop-down menu:
TRAKTOR's Setup Wizard
TRAKTOR - Getting Started - 20
Page 21

4 The User Interface (Overview)
This chapter will introduce you to TRAKTOR 2’s user interface.
Take the time to read these few pages, as they will familiarize you with the way TRAKTOR 2 works and provide insight to the power of its design.
Preparation
The User Interface (Overview)
TRAKTOR
uses a set of user interface layouts to organize its graphical user interface. Accordingly, these are called "Layouts" in TRAKTOR terminology. You can access them from TRAKTOR's Layout drop-down menu in the software's Header.
Use the Layout selection drop-down menu to select a Layout.
Depending
on which Layout you select, certain elements of the user interface will be displayed
while others will remain hidden.
When you start TRAKTOR 2 for the first time, it opens the "Essential" Layout, which shows all
TRAKTOR Decks and navigational elements, but it hides the Mixer.
To make all elements described hereafter visible:
Open the layout named "Mixer" by selecting it from the drop-down menu.
►
TRAKTOR ME 2 note: The contained layouts differ for ME 2.
If you are using TRAKTOR SCRATCH PRO 2, you will most likely use an external mixer instead
of TRAKTOR's internal software mixer; however, to follow the explanations in this
manual, you should also open the Mixer layout.
TRAKTOR - Getting Started - 21
Page 22
The User Interface (Overview)
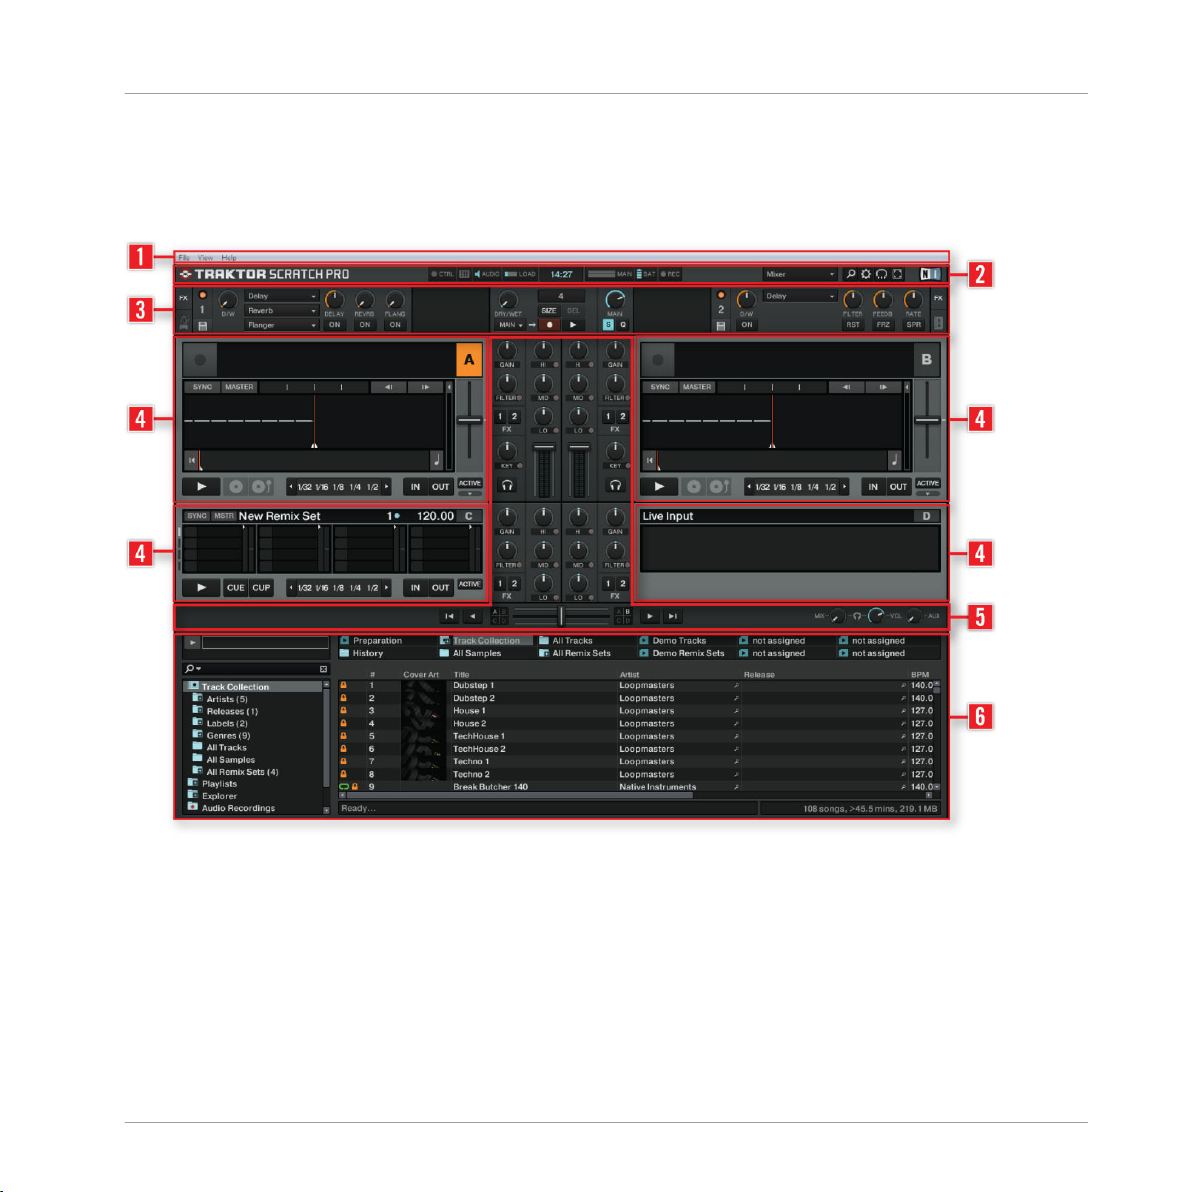
The Big Picture
picture below shows the interface of TRAKTOR SCRATCH PRO 2. Your graphical user in-
The
terface will look slightly different if you are using TRAKTOR LE 2.
The main areas of the software.
(1) Application
Menu Bar: The Application Menu Bar provides access to basic functions and in-
formation about the software.
(2) Header: Here you can find various status indicators and useful functions and buttons, e.g.
the Preferences button.
(3) Global section: The Global section contains the FX Units, Master Clock, the Audio Recorder
as well as the new Loop Recorder.
TRAKTOR - Getting Started - 22
Page 23
The User Interface (Overview)
(4) Decks: TRAKTOR provides you with four virtual Decks. The Decks are the place where
tracks, Samples, and live input are played back. The Decks can be seen as the virtual equivalent to good old vinyl or CD decks.
(5) Mixer: Sitting in the middle of your TRAKTOR 2 window is the Mixer. It receives on its four
channels the audio signals coming from the four Decks described above. There is one channel
for each Deck. As with any DJ mixer, the Mixer’s basic purpose is to adjust the relative level of
each channel, to control the channels’ frequency content, possibly feeding them into the FX
Units, before sending the overall result to your audience.
(6) Browser: The Browser manages all your tracks in a database called the Track Collection.
You can group tracks in Playlists, sort them according different attributes, and search within
Playlists as well as in the whole Collection.
TRAKTOR LE 2 note: The Audio Recorder is not available in LE 2.
For further details, please refer to the TRAKTOR 2 Manual.
TRAKTOR - Getting Started - 23
Page 24
Importing Your Music
What Is the Track Collection?
5 Importing Your Music
Most
likely you already have a collection of music files on your computer. For those of you who
can’t wait to start mixing your tracks, this chapter is for you! You will learn here how to quickly
import your music into the powerful Track Collection of TRAKTOR.
5.1 What Is the Track Collection?
The Track Collection (or simply “Collection”) represents the music that you have used, that you
are using, or that you plan to use in TRAKTOR 2.
Based
on the music files on your computer, the Collection makes it easy to organize, tag, and
prepare your tracks for being played as part of your mix.
Worth noting is that the Track Collection doesn’t care about the actual file structure on
your
hard disk, nor will it alter this structure in any way (as long as you don’t delete your
files from within TRAKTOR 2).
The Track Collection is:
▪ A database storing numerous information about your music files.
▪ A
convenient way to filter your music files by many of their characteristics (tags) like title,
artist name, BPM, genre, etc.
▪ The place where TRAKTOR-specific information about your tracks is stored.
▪ The basis on which you can create your Playlists.
The Track Collection is not:
▪ Moving, copying, or converting any audio file to some secret location.
▪ Modifying in any way the hierarchic structure of your files on your hard disk.
To make use of the Track Collection, you have to populate it by importing your music files.
TRAKTOR reads existing song tags during the import of the music and writes tags to the
tracks
immediately when you change some property of one or more track(s), like changing
the Genre of a song.
TRAKTOR - Getting Started - 24
Page 25
5.2 Importing Music Folders
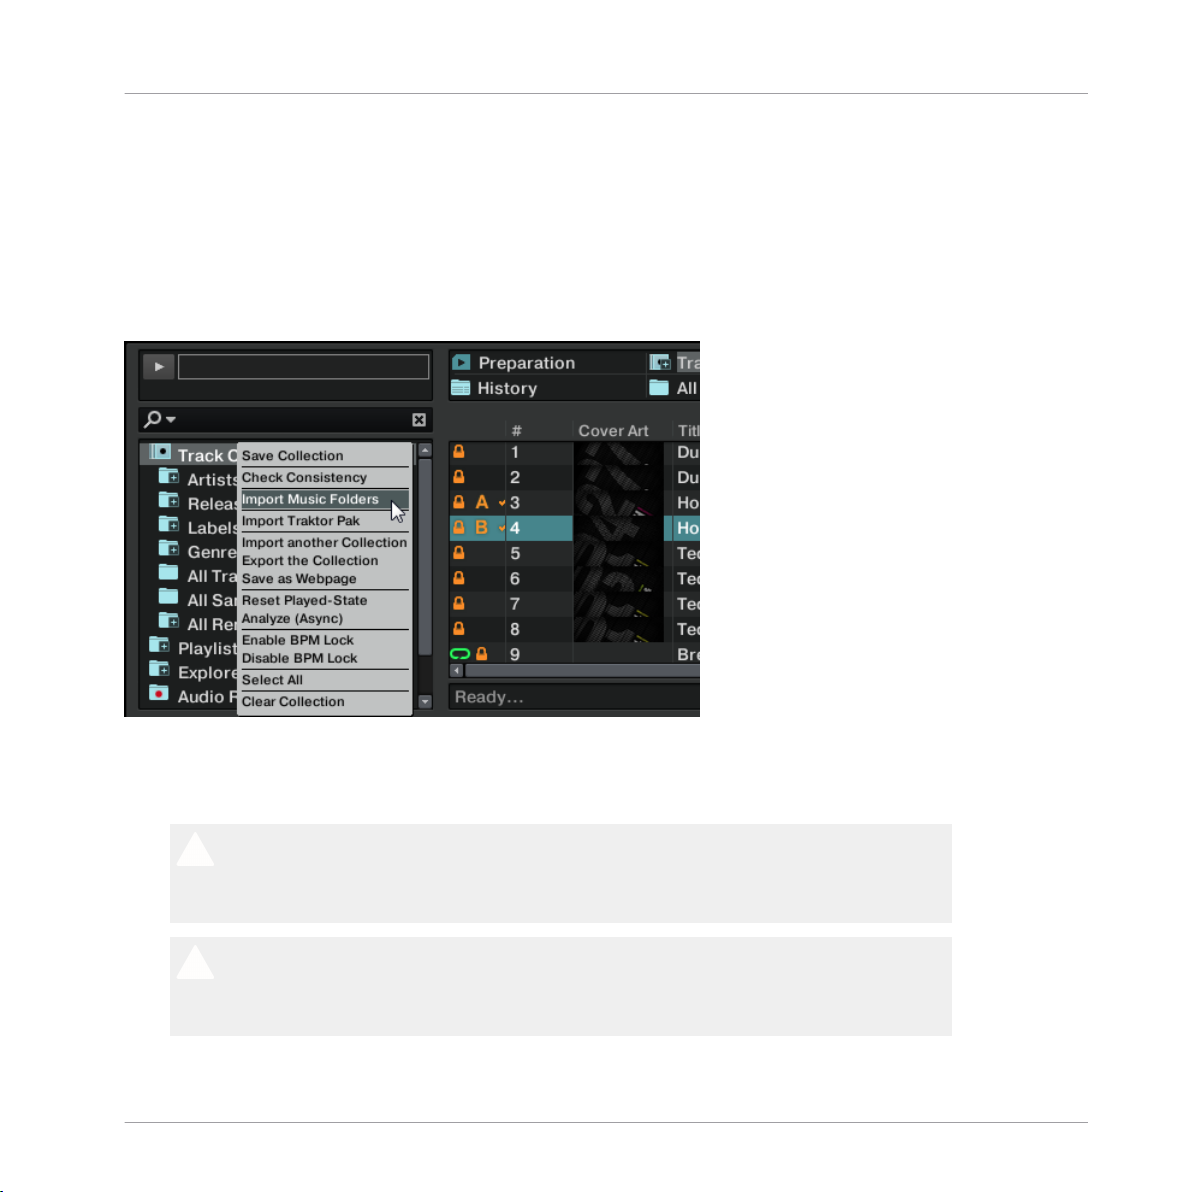
TRAKTOR offers an easy import function for tracks stored on your hard drive:
Right-click (Windows) or [Ctrl]+click (Mac OS X) on the Collection icon in the Browser
►
Tree and select Import Music Folders from the menu.
Importing Your Music
Importing Music Folders
The contextual menu for the Track Collection, with the Import Music Folders entry selected.
By
default, this process imports all music files contained in the My Music folder of your operat-
ing system.
TRAKTOR analyzes
Deck for the first time. This function takes some time to process. Be sure to prepare the
tracks you want to use in a DJ set beforehand if you want to use features such as syncing
or Auto Looping with them without having to wait for this analysis process.
If your Track Collection contains more than 10,000 files, it is recommended to have TRAK-
2 analyze your Track Collection in smaller chunks of only a few thousand files each.
TOR
As this procedure may take quite a while, it is a good idea to let TRAKTOR perform the
analysis while you are not working with your computer such as overnight.
music for certain characteristics (BPM, length, etc.) when loaded into a
TRAKTOR - Getting Started - 25
Page 26
Importing Your Music
Tracks Managed by iTunes
The Status Bar at the bottom of the Browser window will provide a visual indication of the
analysis process and alert you to any problems.
Adding Files from Other Folders
If
you have stored tracks in other folders or on external storage devices, you can add these
folders to the list of TRAKTOR Music Folders as follows:
1. Open Preferences > File Management.
2. Click Add… at the bottom of the Music Folders section.
3. Navigate to a folder you want to add.
4. Confirm with Choose (Mac OS X) or OK (Windows).
5. Click Close to apply the changes.
Repeat to add all of your music folders.
Subfolders are automatically included in the scan. Hence, you don’t need to add them to
this list.
5.3 Tracks Managed by iTunes
you have organized your music collection with iTunes, TRAKTOR 2 offers direct access to
If
your iTunes Library and your iTunes Playlists.
5.3.1 Playing Tracks Managed by iTunes
You can browse your iTunes Library and Playlists directly from TRAKTOR.
The iTunes tree node represents a read-only view on your iTunes Library and Playlists. Editing functions are not available in this view.
To browse your iTunes content from within TRAKTOR:
Click the iTunes icon in the Browser Tree to open that node.
1.
2. Browse through the Library and Playlists as you would in iTunes.
3. Load a track into a Deck as you would do from a normal TRAKTOR Playlist—for example
by dragging the track onto that Deck.
TRAKTOR - Getting Started - 26
Page 27

Importing Your Music
Tracks Managed by iTunes
5.3.2 Importing a Selection of Tracks from iTunes
You
can import a selection of tracks from your iTunes Library into the Track Collection via the
TRAKTOR 2 user interface:
1. Click the iTunes icon in the Browser Tree to open the iTunes node.
2. Select the tracks to import into the Track Collection.
3. Drag the selection onto the Track Collection icon in the Browser Tree.
4. Alternatively, right-click (Windows) or [Ctrl]-click (Mac OS X) on the selection and choose
Import to Collection in the contextual menu.
5.3.3 Importing iTunes Playlists
can directly import iTunes Playlists as TRAKTOR Playlists via the TRAKTOR 2 user inter-
You
face:
1. Click the iTunes icon in the Browser Tree to open the iTunes node.
2. Select the Playlist to be imported.
3. Drag the Playlist onto the Playlists icon. Alternatively right-click (Windows) or [Ctrl]-click
(Mac OS X) on the Playlist and choose Import to Playlists in the contextual menu.
A dialog box will appear asking for a name for the new Playlist. Type in a name and click
→
OK.
TRAKTOR - Getting Started - 27
Page 28
6 Tutorials
This chapter
work with TRAKTOR.
The tutorials are workflow-oriented. They start with the simplest tasks and progressively lead
you to more complex operation, helping you to get more and more familiar with TRAKTOR 2.
After reading this, you should have the basic know-how allowing you to mix with TRAKTOR 2.
6.1 Prerequisites
These tutorials
have used previous TRAKTOR versions and are already familiar with certain tasks, you can skip
the first tutorials and continue reading the later tutorials. Or, if you want to experiment more
with TRAKTOR and come back to the tutorials later, you can find the needed prerequisites for
every tutorial here.
will guide you through the most common tasks that you will encounter during your
If you are using TRAKTOR LE 2 or TRAKTOR Manufacturer Edition 2, some of the instructions do not apply due to the limitations of your software flavor.
can be read in a linear manner from the first to the last tutorial. However, if you
Tutorials
Prerequisites
Even if you’re already familiar with TRAKTOR, all tutorials are worth a read as every chapter may have little workflow hints of which you weren’t aware.
The tutorials make use of the included demo tracks which were copied to your hard disk during
the
installation procedure. Thus, you can follow these tutorials even if you haven’t imported
your own music into the Track Collection yet. For more info on how to import your music into
the Track Collection, please refer to chapter ↑5.2, Importing Music Folders.
We assume that your TRAKTOR is already up and running. If it’s not the case, please follow
instructions in the Setup Guide and come back here when you have set up your system
the
correctly!
In case you already changed some settings in TRAKTOR before you started with these tutorials,
we strongly recommend you to reset TRAKTOR to the factory settings:
TRAKTOR - Getting Started - 28
Page 29
Goals of the Following Chapters
1. Click the Help menu in the menu bar at the top of your screen (on Mac OS X) or at the
top of the window (on Windows), and select Help > Start Setup Wizard.
2. Follow the instructions of the Setup Wizard to incorporate your equipment (read more
about the Setup Wizard in ↑3, TRAKTOR's Setup Wizard). TRAKTOR is now reset to the
factory settings.
3. Choose the Mixer Layout from the available options in the Layout Selector menu.
6.2 Goals of the Following Chapters
The following sections describe the goals and prerequisites for every chapter. This way you can
jump into a desired tutorial whenever you like!
Chapter ↑6.3, Playing Your First Track to ↑6.7, Adding FX
Tutorials
Read the instructions below. If you feel unsure about any step, read the respective chapter. If
you can accomplish the task without assistance, you can ignore the relevant chapter and continue with the subsequent step.
1. Load the track Techno 1 from the included Demo Tracks Playlist onto to Deck A and start
playback (chapter ↑6.3, Playing Your First Track).
2. Load the track Techno 2 from the included Demo Tracks Playlist onto Deck B and start
playback. Deck A should be the tempo master (chapter ↑6.4, Mixing In a Second Track).
3. Synchronize the tempo of the track in Deck B with the tempo of the track in Deck A
(chapter ↑6.5, Adjusting Levels).
4. From chapter ↑6.6, Looping and Cueing on, a new track will be loaded and played back in
Deck A: House 1. Deck B should now be tempo master.
5. If you know how to store Loops and Cue Points, do so in both tracks and skip chapter
↑6.6, Looping and Cueing.
TRAKTOR - Getting Started - 29
Page 30
Playing Your First Track
6. If you know how to assign an FX Unit to a Deck, and if you know the difference between
Single and Group FX mode, and how to change FX, you can also skip chapter ↑6.7, Add-
ing FX.
Chapter ↑6.8, Using the Remix Decks in Your Mix to ↑6.10, Synchronization
Chapters ↑6.8, Using the Remix Decks in Your Mix and ↑6.9, Using the Loop Recorder introduce the Remix Decks and the Loop Recorder. Read these tutorials for a comprehensive introduction to the versatile Remix Deck and Loop Recorder features!
Chapter ↑6.10, Synchronization is about Master Clock modes and syncing tracks. Since the
Master Clock/Syncing concept has been changed and improved in TRAKTOR 2, we strongly
recommend you to read this chapter carefully, even if you were familiar with the syncing concept in older versions of TRAKTOR!
6.3 Playing Your First Track
first tutorial will show you how to load and play a track, how to check the needed audio
This
outputs, and how to quickly troubleshoot your system if no music can be heard.
Tutorials
Prerequisites
In case you already changed some settings in TRAKTOR 2 before you started with these tutorials, we strongly recommend you to reset TRAKTOR 2 to the factory settings by doing as described above in chapter ↑6.1, Prerequisites.
6.3.1 Quick Loading a Track
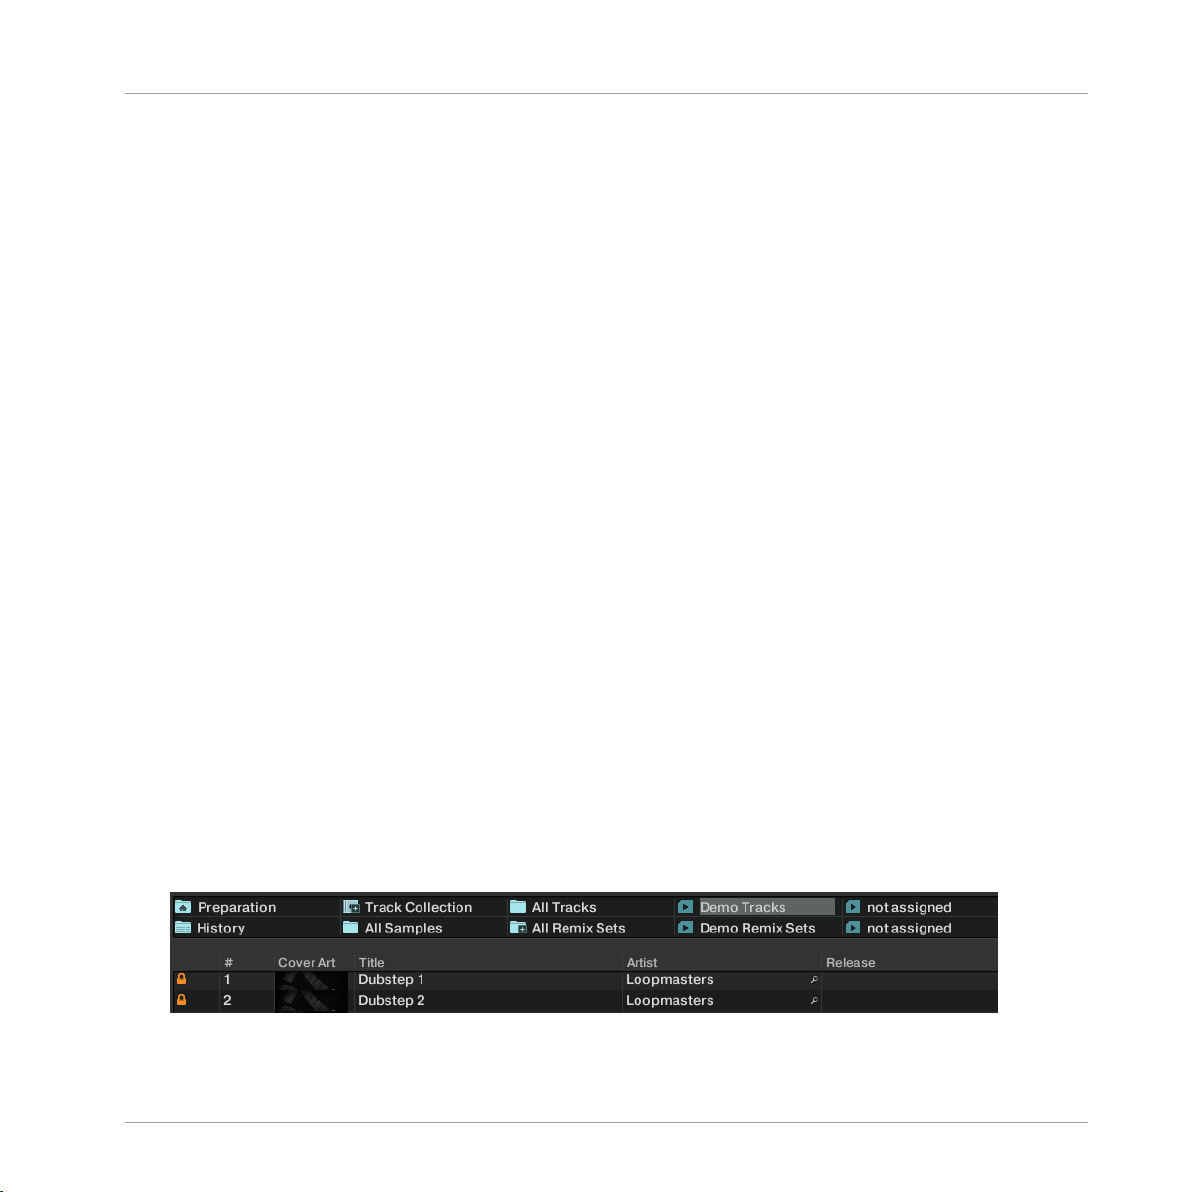
Let’s load the track Techno 1 from the included demo tracks on to Deck A:
Click on the Demo Tracks Favorite. The tracks of the Demo Tracks Playlist appear below:
1.
2. Click on the track Techno 1 in the Playlist. The track will be highlighted.
TRAKTOR - Getting Started - 30
Page 31

Playing Your First Track
3. Drag and drop the Track onto Deck A. The track will be loaded. Its waveform and info ap-
pear on Deck A:
Favorites are customizable shortcuts sitting at the top of the Browser in TRAKTOR’s window. If you can’t see the Favorite Playlists, you can activate them via Preferences > Brows-
er Details > Show Playlist Favorites. Note: this option doesn’t exist in TRAKTOR LE 2.
Tutorials
Alternative Loading Methods
Right-click (Windows) or [Ctrl]-click (Mac OS X) on a track and choose Load Track in
►
Deck A.
Click the hotkey [Ctrl]+[Left].
►
TRAKTOR - Getting Started - 31
Page 32

6.3.2 Playing the Track
Once the track is loaded, simply press the Play button at the bottom of the left Deck:
►
The track starts playing. The Play button lights up and the waveform starts moving in
→
TRAKTOR 2.
Tutorials
Playing Your First Track
Move your mouse on the right end of the waveform — the plus, equal and minus buttons
appear. Use these to zoom in and out of the waveform for more or less details!
To Each Deck Its Own Channel
This chapter explains TRAKTOR’s Internal Mixer. If you’re using TRAKTOR SCRATCH
PRO
2, you will most likely use your external mixer. However, you can still follow this tutorial and substitute TRAKTOR’s EQs, Channel Faders, and crossfader with those on your
mixer.
The audio playing on each Deck can be further shaped by the controls on the corresponding
channel
nel A:
of the Mixer. Since the track is loaded on Deck A, you can control its sound on chan-
TRAKTOR - Getting Started - 32
Page 33

Playing Your First Track
The channel A on the Mixer.
At
this point you will probably hear some audio coming through your speakers or PA. If not,
please check the following section.
6.3.3 If You Don’t Hear the Track
the track is playing on the Deck but the audio coming through your amplification system
If
sounds too low, or if there is no sound at all, check the following:
Tutorials
▪ At the bottom of the Mixer, verify that the crossfader is moved all the way to the left:
TRAKTOR - Getting Started - 33
Page 34

▪ Above, the channel fader should be raised on channel A:
Tutorials
Playing Your First Track
▪ The
channel meter (the vertical bar of indicators along the channel fader, see picture
above) should show some activity. If not, check that the HI, MID, LOW and FILTER knobs
higher up on that channel are set to center position; at the top of the channel, doubleclick the GAIN encoder once to reset the channel’s input gain to 0 dB.
▪ At the top center of TRAKTOR, the MAIN level meters should show some activity. If not,
check that the MAIN knob is raised.
If you see some activity on the MAIN level meters but don’t hear any sound, then double-check
the audio setup and audio routing in the Preferences following the Setup Guide.
Please note that, with TRAKTOR SCRATCH PRO 2, the master out knob/fader on your ex-
mixer works independently from TRAKTOR’s MAIN knob. Adjust both carefully for a
ternal
clean, loud signal, which is not clipping.
TRAKTOR - Getting Started - 34
Page 35

Mixing In a Second Track
6.4 Mixing In a Second Track
Now that you have learned how to quickly load and play tracks using TRAKTOR 2, let’s see
how to mix in a second track. On the way, you will learn a few basic mixing tasks that every
digital DJ needs to know: how to pre-listen tracks, synchronize tracks, start the playback at the
right position, and mix the tracks together using the crossfader.
Prerequisites
We assume here that you already followed the instructions in the previous tutorial (see ↑6.3,
Playing Your First Track). TRAKTOR 2 now is in the following state:
▪ The track Techno 1 is loaded in Deck A. The track is audibly playing. The MASTER button
of Deck A should be lit.
▪ The crossfader is all the way to the left.
6.4.1 Pre-listening a Second Track in the Preview Player
Tutorials
If you use an external mixer (e.g. along with TRAKTOR SCRATCH PRO 2) and therefore External
Mixing mode, you will most likely not use the Preview Player at all and will, instead,
preview your next track in the opposite Deck using the cue function on your hardware mixer. However, you can assign an output pair of your audio interface to the Preview Player via
Preferences > Output Routing > Output Preview, sacrificing a Deck (with the AUDIO 4/8
DJ) or the Send Outputs (TRAKTOR AUDIO 6/10).
Before
we load another track, we will use TRAKTOR’s Preview Player to pre-listen to a track in
the headphones directly from the Browser.
If you can’t see the Preview Player, you can activate it via Preferences
Show Preview Player. Users of TRAKTOR LE 2 don’t have this option.
> Browser Details >
TRAKTOR - Getting Started - 35
Page 36

TRAKTOR’s Preview Player in the upper left of the Browser.
Cue Mix and Cue Vol knobs above the Browser.
If it’s not already done, plug in a pair of headphones to the headphones socket on your
►
soundcard, controller, or hardware mixer depending on your setup.
Tutorials
Mixing In a Second Track
1. Click
on the track Techno 2 in the Demo Playlist and drag it onto the Preview Player. The
track begins to play immediately.
2. Turn the Cue Mix knob (MIX) completely counter-clockwise to listen only to the previewed
signal.
3. Turn the Cue Vol knob (VOL) to raise or lower the headphones volume.
4. Click anywhere in the waveform to preview another part of the track.
5. Click and drag the playhead (vertical line) to scroll through the track.
6. Click on the Preview Player’s Play button to stop the playback in the Preview Player.
7. Drag the track from the Preview Player onto a Deck to load it, or select another track for
pre-listening
Although a MIDI controller is an external device, please note that you have to choose Internal Mixing mode in TRAKTOR because it controls TRAKTOR’s Internal Mixer!
TRAKTOR - Getting Started - 36
Page 37

6.4.2 Loading and Playing the Second Track
We will choose the track Techno 2, load and play it on Deck B:
Tutorials
Mixing In a Second Track
1. Drag
and drop the track from the Preview Player onto Deck B. Alternatively, use any other
loading method described in chapter ↑6.3.1, Quick Loading a Track. The track info and
waveform appear on Deck B.
2. Press the Play button on the right Deck to start the playback. The track starts playing. The
Play button lights up and the waveform starts moving on TRAKTOR’s Deck B.
We don’t hear anything from Deck B through the speakers yet because we have set the crossfader all the way to the left — our plan is to slowly mix in the track on Deck B.
You can already give it a try: by slowly moving the crossfader to the right, you should hear the
track on Deck B fade in, whereas the track on Deck A progressively fades out as you move the
crossfader further to the right. Obviously, our mix is not satisfying at all yet—before mixing in
the second track, we first have to beat-match it to the track playing on Deck A. So for now,
pull the crossfader all the way back to the left.
6.4.3 Using Headphones to Prepare the Mix
now on, let’s get used to preparing our mix with headphones until the next track (here on
From
Deck B) is ready to be mixed in.
TRAKTOR - Getting Started - 37
Page 38

The Headphones Cue button on channel B (lit blue).
Click the Headphones Cue button on channel B.
►
The button lights up, indicating that Deck B is now sent to the Cue channel which you
will hear in your headphones.
Tutorials
Mixing In a Second Track
At any time, use the Cue Mix (MIX)
knob to adjust the balance between the cued track
(Deck B) and the main mix (where you hear Deck A) in your headphones. Turn it counter-clockwise when you want to concentrate on the cued track and turn it clockwise when you want to
hear more of the main mix.
You are now ready to work on the track playing on Deck B without interfering with the main
mix sent to your audience. Regardless of the mix that you’re hearing in your headphones, the
main mix is still controlled by the crossfader and channel faders.
If you’re using an external hardware mixer, it will provide its own headphones cue buttons
(sometimes implemented as fader).
6.4.4 Synchronizing the Second Track
Before
to adjust its tempo to that of Deck A. This is done in just one step via the SYNC button:
mixing in the track playing on Deck B, we will use TRAKTOR’s automatic Sync feature
TRAKTOR - Getting Started - 38
Page 39

The SYNC button in the upper left of the Deck.
Press the SYNC button on Deck B to synchronize the track’s tempo and phase with those
►
of Deck A.
The SYNC button lights up. Now the two tracks are in perfect sync.
►
Tutorials
Mixing In a Second Track
The syncing feature only works perfectly with a proper Beatgrid! Therefore, the tracks in the
Demo Playlist are already beat-gridded.
By slowly turning the Cue Mix knob (MIX),
you will hear the second track come into the mix in
sync with Deck A.
Note that you should always adjust the tempo or sync of the track that is not
audience!
audible to the
6.4.5 Setting a Cue Point as Starting Point
You will probably want to have more control over the starting point of the track you mix in. For
example, most of the time, not only the tempos but also the downbeats of both tracks should
match. Starting from a particular point in a track (for mixing in, triggering, etc.) is called “cueing.”
TRAKTOR - Getting Started - 39
Page 40

Mixing In a Second Track
TRAKTOR lets you mark points for cueing — we call them Cue Points. Cue Points are saved
with each track which allows you to re-use them at a later stage or in a later session.
TRAKTOR LE 2 note: Cue Points not available in LE 2.
To use the Cue Points, you have to open the CUE tab of the Advanced Panel first:
Click on the little arrow button below the ACTIVATE button to display the Advanced Pan-
►
els of Deck A and B. Then click on the CUE button to select the CUE tab.
Tutorials
TRAKTOR - Getting Started - 40
Page 41

On Deck B, whether or not the track is playing, simply press one of the unlit Hotcue but-
►
tons on a downbeat — let’s say the Hotcue button 2. The Hotcue button lights up in
blue; you’ve just stored a Cue Point that you can return to simply by pressing the same
Hotcue button again. Try it!
Tutorials
Mixing In a Second Track
Aligning the Tracks
Aligning both tracks is straightforward:
1.
Press Play on both Deck A and Deck B (their Play button must be lit).
2. Check that Deck A is defined as tempo master. If not, click on the MASTER button.
3. Check that the SYNC button on Deck B is pressed, i.e. lit. If not, click it to match the
tempo of Deck A.
4. When you hear a downbeat in the track in Deck A, press the Hotcue button you just stored
on Deck B. The playback position on Deck B jumps to the stored Cue Point, and the playback continues from there. Both tracks now are perfectly aligned, ready to be mixed.
TRAKTOR - Getting Started - 41
Page 42

Mixing In a Second Track
6.4.6 Snapping to the Beats
You
don’t have to worry about placing a Hotcue directly on a beat. By default, TRAKTOR 2 will
make sure this happens automatically. This is done by the so-called Snap mode. Clicking on
the little S button in the Global section will activate and deactivate Snap mode:
The Snap button (S) in the Global section.
With
Snap mode on, any Cue Point you create in the track will snap to the closest beat, thus
ensuring that you get directly to that beat next time you press the Hotcue.
6.4.7 Sticking to the Beats
is another reason you don’t have to worry about pressing the lit Hotcue button exactly on
There
the beat: By default, TRAKTOR will make sure that the beats of both tracks stick together and
that jumps don’t ruin the beat-matching. This is because the so-called Quantize mode is on, as
you can see by the lit Quantize Button in the Global section.
Tutorials
The Quant button (Q) in the Global section.
Quantize mode on, whenever you jump through the track (e.g. by pressing a Hotcue but-
With
ton or clicking somewhere in the Overview waveform), the playback jumps to the nearest position that preserves the beat-matching, thus ensuring that the current sync doesn’t get lost
when you jump through the track.
TRAKTOR - Getting Started - 42
Page 43

Mixing In a Second Track
6.4.8 Interlude: In Case the Left Track Is Over…
The
track Techno 1 on Deck A has been playing since we started with the tutorials, and it is
possible that the playback has reached the end of the track. In this case, just do the following:
On the left Deck, click the Jump to Start button to skip back to the beginning of the track
►
and resume from there.
Alternatively, you can press [Shift]+T for Deck A and [Shift]+G for Deck B.
►
Tutorials
Jump to the beginning of the track with the Jump to Start button right above the Deck's Play button.
6.4.9 Mixing In the Track by Using the Channel EQ and Filter
Now would be a great time to audition some of TRAKTOR 2’s EQs and filters:
TRAKTOR - Getting Started - 43
Page 44

Tutorials
Mixing In a Second Track
The EQ knobs and the FILTER knob
Turn the EQ knobs and the FILTER knob on channel B to hear the effect on the cued
►
track.
Before the Filter has any effect on the sound, click on the small button next to the word
“FILTER” to activate it. It is lit blue when activated.
TRAKTOR - Getting Started - 44
Page 45

Mixing In a Second Track
The EQs and filters are excellent tools for making adjustments to tracks before mixing them in
so that you get the smoothest transition possible. The most common technique is to filter the
bassline out of the incoming track—having 2 basslines running simultaneously rarely sounds
good. Do the following:
We will now carry out a first version of the mix “for real.” Thus, turn the Cue Mix knob
(MIX) fully clockwise to hear the main mix in your headphones (or take off your phones and
listen to your mix coming through your amplification system).
With the crossfader still on the left, turn down the LO knob on channel B to take the bass
►
out of the track in Deck B.
Progressively mix in channel B by gradually moving the crossfader from the left to the
►
center position.
When both tracks are running together and you want to bring the bass back in, gradually
►
decrease the bass amount of channel A while simultaneously increasing that of channel B
using the LO knobs on both channels.
Complete the transition by gradually moving the crossfader all the way to the right. You
►
just did your first mix with TRAKTOR 2!
Tutorials
6.4.10 Manual Beat-matching
can also beat-match manually instead of using TRAKTOR’s sync facilities. Some DJs just
You
prefer manual beat-matching, but it can also become necessary in certain situations:
▪ playing tracks that have not been beat-gridded
▪ syncing to a vinyl record or audio CD
▪ playing “back-to-back” with another DJ
▪ playing music styles that don’t have quantized beats, e.g. Soul, Funk and other music
with a live drummer.
To show this, let’s mix the track in Deck B with a new track in Deck A.
From now on, the track on Deck B is “on air,” i.e. it is heard by your audience. Hence, we
will now exclusively work on the Deck A.
TRAKTOR - Getting Started - 45
Page 46

First Steps
First check that the crossfader is at full right.
►
Make sure the SYNC button of Deck A is off.
►
At first, it may help to select a track with a similar BPM.
Adjusting the Tempo with Tempo Fader and Phase Meter
The tempo for each Deck can be manually controlled via the Tempo fader:
Tutorials
Mixing In a Second Track
Use the Tempo fader to adjust the Deck’s tempo.
Adjust the Tempo fader on Deck A until the track’s tempo matches the tempo of the
►
track on Deck B.
If the tempo of two tracks match but the phase doesn’t, you can drag the Phase meter forwards
and backwards (left and right) to align the downbeats. Alternatively, use the Tempo
Bend buttons.
TRAKTOR - Getting Started - 46
Page 47

Use the Phase meter or the Tempo Bend buttons to adjust the phase.
Manually Cueing and Aligning the Beats
If you use TRAKTOR SCRATCH PRO 2, your Decks will show the Scratch Control Playback
Mode
and you will control the cue position manually on the turntable or your CD player.
However, you can also choose Internal Playback mode from the context menu that appears
if you click on the Deck letter. Using this mode, you can follow the next steps, too.
First, find an interesting Cue Point to start from, e.g., the break:
Tutorials
Mixing In a Second Track
1. With
Deck A stopped, drag the waveform of the track in Deck A until the beginning of the
break.
2. Click the CUE button. A blue triangle shows that there is now a floating Cue Point.
3. Click the CUP button and release it when you hear a downbeat in Deck B. The track will
start playing when you release the button.
4. If done correctly, the songs will be in sync. If the songs begin to fall out of sync, adjust
the tempo with TRAKTOR’s Tempo fader and re-press the CUP button to try again.
5. Use the Phase meter to align the downbeats.
6. When you’re ready, you can bring the crossfader over from Deck B and slowly mix in the
track in Deck A.
Don’t expect to be capable of manually matching beats right away, though—this requires
intensive
to learn beat-matching by watching someone perform it. For this reason, it is recommended
that you search the Internet for beat-matching tutorial videos to see the process in action.
Remember: Practice makes perfect!
training and can’t be fully explained here in detail. In fact, it’s often much easier
TRAKTOR - Getting Started - 47
Page 48

Adjusting Levels
6.5 Adjusting Levels
For TRAKTOR SCRATCH PRO 2 users, the theory described in the next sections is pretty
much the same, however, you have to continue the practice on your hardware mixer!
Before going any further, we would like you to be aware of how important it is to have your mix
at the right level. We provide you here with a few simple hints in order to get the best sound
out of your mix.
Even if this section might look a bit technical, please take the time to read these few pages
as they can save you a lot of trouble, especially in a live situation!
6.5.1 The Theory…
There are three basic mixing rules:
Tutorials
Making
best use of the available dynamic range on each stage of the mix. This ensures to be
safely above the so called "noise floor", which is the “buzz” that you hear when stopping all
decks and cranking up the speakers.
Leveling the signals from your decks for a smooth mix - none of the tracks should dominate
over the others.
Avoiding clipping at all costs. Audio interfaces have physical limits - if you exceed these limits
your sound get's distorted, hurts peoples ears and looses punch.
Note that internally Traktor's mixer cannot clip, due to its digital nature - clipping only occurs at the output stage towards the audio interface.
6.5.2 …and the Practice
To
assist you in adjusting levels, the Mixer of TRAKTOR 2 is equipped with level meters and
controls. Each level meter consists of a colored bar indicating the signal level. The rules mentioned above can thus be translated as follows:
TRAKTOR - Getting Started - 48
Page 49

Adjusting Levels
Best practices when adjusting levels: The levels should be kept in the upper third and
►
should not at all (or only rarely) touch the red top of the level meter.
By using a mixing technique where you swap the bass lines of two tracks as described in
chapter ↑6.4.9,
ensure that the main level (Master output signal) doesn’t clip or distort.
Mixing In the Track by Using the Channel EQ and Filter, you should also
Making Best Use of the Dynamic Range on Each Channel
Each channel on the Mixer provides you with a vertical channel meter. This meter shows you
the pre-fader level of the signal on that channel, i.e. the level of the signal before it passes the
the channel fader. To adjust this level, use the GAIN knob:
Adjust the channel’s GAIN knob so that the level displayed on the channel meter stays in
►
the upper third without reaching the top.
Of course, the artistic side of your tracks should not be overlooked: for tracks with a varia-
average level over time (e.g. a track starting with a soft intro), you should consider the
ble
loudest parts of the track when adjusting the channel level.
TRAKTOR 2 already does this for you by automatically setting the level for each newly load-
track to a satisfying value. This so-called “Autogain” feature relies on the gain values
ed
extracted from your tracks. It is activated by default and can be turned off via Preferences
> Mixer > Set Autogain when Loading Track. Nevertheless, depending on the particular EQ,
filter, and FX applied to the cued track, you might have to double-check the level before
you mix in the track. Moreover, what is important here is the average level of the specific
part of the track that you’re about to mix in.
Tutorials
Matching Levels Between Channels
Moreover, in order to avoid any level jump when crossfading between two channels, you must
adjust the average channel levels between the decks involved in a mix:
Before mixing in a cued channel, adjust its GAIN encoder so that its channel meter activ-
►
ity roughly matches that of the channel currently on air. In doing so, you must be aware,
that variations of volume within the tracks may influence this procedure – the Autogain
value always gives you a good indication of the Gain level that should be applied to a
track as described above.
TRAKTOR - Getting Started - 49
Page 50

Controlling the Main Output Level
Tutorials
Adjusting Levels
output level in TRAKTOR can be adjusted independently from a master out con-
The signals
The MAIN
trol on an external hardware mixer!
coming from all channels are mixed together according to the relative levels set by
the channel faders and by the crossfader. This mix is then sent to TRAKTOR’s MAIN output. In
this section, the MAIN level meters show you the (left and right) overall level of your mix and
can be adjusted by the MAIN level knob:
Adjust the MAIN knob in so that the level meters stay in the upper blue and orange area
►
without reaching the red ends.
By default a mixer headroom of -6 dB is applied to the output. This provides you an extra
dB of headroom between the MAIN level meter’s upper orange area (clear signal) and the
6
red area (signal starts clipping). Headroom is used to avoid instantly creating signal peaks
that clip the output as this can create unpleasant distortion. However, headroom is applied
at the cost of the overall output volume, to compensate for this the hardware level (or gain)
on the DJ mixer or amplifiers driving the speaker system should be increased during soundcheck.
In simple words:
boosting it afterwards on hardware level.
The digital headroom using in TRAKTOR’s internal mixer can be set in Preferences
> Levels > Headroom. Set it to -3 dB or even 0 dB if due to poor amplification you can’t
achieve the output volume you whish – but don’t overdo this, because more volume easily
turns into less punch!
your sound will benefit from keeping it a bit lower on software level and
> Mixer
For safety reasons a limiter is enabled on TRAKTOR’s main output by default. With this
limiter enabled, the MAIN
tively limiting the volume. While the limiter virtually cancels any distortion that might occur, the resulting reduction of the dynamic range cannot be undone. Therefore, even with
the limiter enabled, ensure that the clipping indicators don’t light up too often! For un-altered sound even in the peaks you can deactivate the limiter via Preferences > Mixer > En-
able Limiter but you must watch your outputs much more thoroughly, because clipping on
a powerful speaker system can easily harm your audiences ears!
level meters’ red clipping indicators show when the limiter is ac-
TRAKTOR - Getting Started - 50
Page 51

Looping and Cueing
6.6 Looping and Cueing
Now that you have learned the basic mixing tasks, we will focus on one of TRAKTOR’s great
features: its looping facilities.
Prerequisites
TRAKTOR 2 is in the following state:
▪ The track House 1 is loaded on Deck A. The track is playing and audible. It is also the
tempo master.
▪ The crossfader is all the way to the left.
6.6.1 Playing with Loops
TRAKTOR’s
under the Deck display:
Decks are equipped with dedicated loop controls located in the Loop section, right
Tutorials
The Loop section, from left to right: Auto Loop buttons, IN and OUT buttons, ACTIVE button.
Setting a Loop with a Predefined Size
Let’s add a Loop to the track on Deck A.
To engage a loop on a playing track, just click one of the Auto Loop buttons.
►
This will automatically add a loop at that position in the track over the area marked in
→
green. Also, the ACTIVE button will light up in green.
The loop length in beats will correspond to the number written on the Auto Loop button:
→
TRAKTOR - Getting Started - 51
Page 52

Auto Loop and ACTIVE buttons in the Loop section of the Deck.
To change the size of the Loop, just click another Auto Loop button.
►
Tutorials
Looping and Cueing
Setting a Loop Manually
You can also
OUT buttons in the Loop section:
The Loop IN and Loop OUT buttons.
manually set loop start and loop end points. To do this, use the Loop IN and Loop
TRAKTOR - Getting Started - 52
Page 53

Press the IN button to set the Loop In Point.
►
Press the OUT button to set the Loop Out Point. As soon as you hit the OUT button, the
►
Loop is set and the track will start looping.
Tutorials
Looping and Cueing
We already introduced the Snap mode in the previous tutorial (see ↑6.4.5,
Setting a Cue Point
as Starting Point). This mode also affects the Loop In and Loop Out Points so that they will
automatically be positioned directly on the beat.
Moving a Loop
You can also quickly move the active Loop across your track by using the MOVE Advanced tab:
The MOVE Advanced Tab
Select Loop from the drop-down menu on the left.
►
Select a Move Size from the list on the right by clicking on the desired button.
►
Move the Loop forward or backward with the Loop Move buttons (arrow buttons).
►
The MOVE Advanced tab also offers the options to move only the Loop In or Loop Out point
which can be used for tension-building drum rolls.
TRAKTOR LE 2 note: Moving Loops is not available in LE 2.
TRAKTOR - Getting Started - 53
Page 54

Storing a Loop
the previous tutorial, we looked at how to store Cue Points. In a similar fashion, you can
In
store Loops as well:
To store the active Loop, press an unlit Hotcue button.
►
The Hotcue button lights up, this time in green—you’ve just stored a Loop that you can
→
return to simply by pressing the same Hotcue button again.
The Cue tab with a stored loop, marked in green.
Tutorials
Looping and Cueing
If you exceed the 8 Hotcue slots, you can use the STORE
cues or Loops in your track. The MAP button allows you to re-organize their order.
TRAKTOR LE 2 note: Storing Loops is not available in LE 2.
button to store even more Hot-
Deactivating Looping
If you want to deactivate the current Loop, do the following:
To deactivate looping, click the green ACTIVE button. The playback continues after the
►
Loop.
By pressing the ACTIVE
The next Loop in the track will be activated.
button when there is no Loop currently active, you activate looping.
6.6.2 Using Hotcues
We’ve already seen how to use Hotcues to store Cue Points and Loops. We want to show you
here a few more details on their use.
First, open the CUE Advanced tab again.
►
TRAKTOR - Getting Started - 54
Page 55

Looping and Cueing
As already explained, when pressing an unlit Hotcue button, if there is no Loop active, you
store a Cue Point at the current playback position (the Hotcue button turns blue). If there is a
Loop active, you store this Loop (the Hotcue button turns green).
In the waveform of the Deck, you can see that a vertical line with the same color appears in
the track at the corresponding position. Moreover, a little number at the top reminds you which
button you should use to jump to that Cue Point or Loop:
A waveform with a Cue Point stored as Hotcue 1 and a Loop stored as Hotcue 2.
you made a mistake, or just decide you no longer want a particular Hotcue, you can quickly
If
delete it:
1. Click on the respective Hotcue.
2. Click on the Trash button (trash can symbol).
Tutorials
You can see that the button is no longer lit.
→
TRAKTOR LE 2 note: Hotcues are not available in LE 2.
Creative Uses of Hotcues
Hotcues
tive techniques such as remixing parts of a song, beat-juggling, etc.
aren’t just bookmarks to particular sections of a track—they can also be used for crea-
TRAKTOR - Getting Started - 55
Page 56

As an example, we will show you here how you can quickly make use of a Loop stored in a
Hotcue slot to introduce the track you’re about to mix in. By the way, this will allow us to sum
up what we’ve learned until now.
The track Techno 2 is still loaded on Deck B. The track on Deck A is on air (crossfader at full
left) and you want to prepare the track on Deck B for mixing in:
Start the playback of the track in Deck B and send it to your headphones by activating
►
the Headphones Cue button of Deck B.
Tutorials
Adding FX
1. Find
an interesting Loop near the beginning of the track by using the controls in the Loop
section of Deck B.
2. Once you have a nice Loop running, store it by pressing an unlit Hotcue button.
3. Press the respective Hotcue button again to let the Loop start on a downbeat of the track
in Deck A.
4. Now start to bring this Loop in your mix, for example by implementing the low-cut we ex-
plained in the previous tutorial (see chapter ↑6.4.9, Mixing In the Track by Using the
Channel EQ and Filter).
5. When you’re about to fade out the previous track completely, deactivate the Loop on the
new track and you’re done.
The CUE Advanced tab offers a lot more options.
6.7 Adding FX
TRAKTOR LE 2 note: The FX section of LE 2 only offers one Group FX per Deck and an
even smaller amount of FX.
Now that we have seen the basics of playing tracks on the Decks and mixing them together,
let’s see how to add effects—or “FX” in the TRAKTOR terminology.
TRAKTOR
has an extremely powerful effect section. By default, there are two different FX
Units in TRAKTOR, which can be assigned to any of the Decks.
TRAKTOR - Getting Started - 56
Page 57

A FX Unit in Group mode
A FX Unit in Single mode
Prerequisites
TRAKTOR 2 now is in the following state:
Tutorials
Adding FX
▪ The
track Techno 2 is loaded on Deck B. The track is playing and audible and should be
the tempo master.
▪ The Deck A is stopped (if it’s not the case, press the PLAY button on the left Deck).
▪ The crossfader is all the way to the right.
6.7.1 Assigning a Deck to an FX Unit
We need to assign an FX Unit to a Deck. To do this, we use the FX Assign buttons:
The FX Assign buttons on each channel
Let’s assign the FX Unit 1 to Deck B:
TRAKTOR - Getting Started - 57
Page 58

Press the FX Assign button 1 on channel B to assign Deck B to the FX Unit 1.
►
Most commonly, you will assign one FX Unit to one channel (FX 1 to Deck A, FX 2 to
B, etc), but for this tutorial we wanted to demonstrate also TRAKTOR’s versatile FX
Deck
assignment; you can assign any other channel to the same FX Unit as well. For example, if
you want to apply these FX to the track loaded on Deck A, simply press the FX Assign button 1 also on Deck A.
TRAKTOR LE 2 note: Assigning Decks to FX Units is not available in LE 2.
TRAKTOR ME 2 note: Assigning Decks to FX Units is not available in ME 2.
6.7.2 Group Mode
First we’ll look at
ously in a single FX Unit. You see three different FX slots stacked on top of each other in the
corresponding FX Unit.
Group mode. This mode allows up to three different FX to be used simultane-
Tutorials
Adding FX
Group FX
6.7.3 Getting the FX Unit Ready
Per default, there are three effects loaded in both FX Units: Delay, Reverb, and Flanger.
Choose which of the three loaded effects you want to activate by pressing the correspond-
►
ing FX ON Button:
TRAKTOR - Getting Started - 58
Page 59

The FX Button lights up and activates the respective effect.
→
Turn the D/W knob to mix between the unprocessed (“dry”) and the processed (“wet”)
►
signal. Slowly turn the D/W knob clockwise to bring in more of the FX and turn it counterclockwise to reduce the FX:
You now hear the track on Deck B being processed by the FX Unit 2.
→
Of course, you can use all three effects together—simply activate all three buttons.
6.7.4 Controlling the FX Unit
You can control each FX in this FX Unit by turning the respective FX Knob:
The FX Knobs
Tutorials
Adding FX
Play around with the FX Knobs 1-3 and listen to the result on the audio.
►
Changing the FX in a Slot
You can load another FX in each slot. Let’s switch the first FX slot to the Gater:
TRAKTOR LE 2 note: The Gater effect is not available in LE 2.
Click on the downwards-pointing arrow next to Delay to open the drop-down menu. Now
►
choose Gater from the list.
If the first FX slot is currently deactivated, press the respective FX Button to activate it
►
(the button must be lit).
You will hear now the Gater cutting the audio at regular intervals. If the effect is not audi-
→
ble, make sure the D/W knob is at least set to 50 %.
TRAKTOR - Getting Started - 59
Page 60

Tempo-synchronized FX
Now try the following:
Set the FX Knob to various positions and listen to the resulting effect on the audio.
►
You’ll notice that the gating effect stays synchronized to the beat because its tempo fol-
→
lows the Master.
You can check this by raising the tempo of the Master—you will hear the track playing faster and the Gater following.
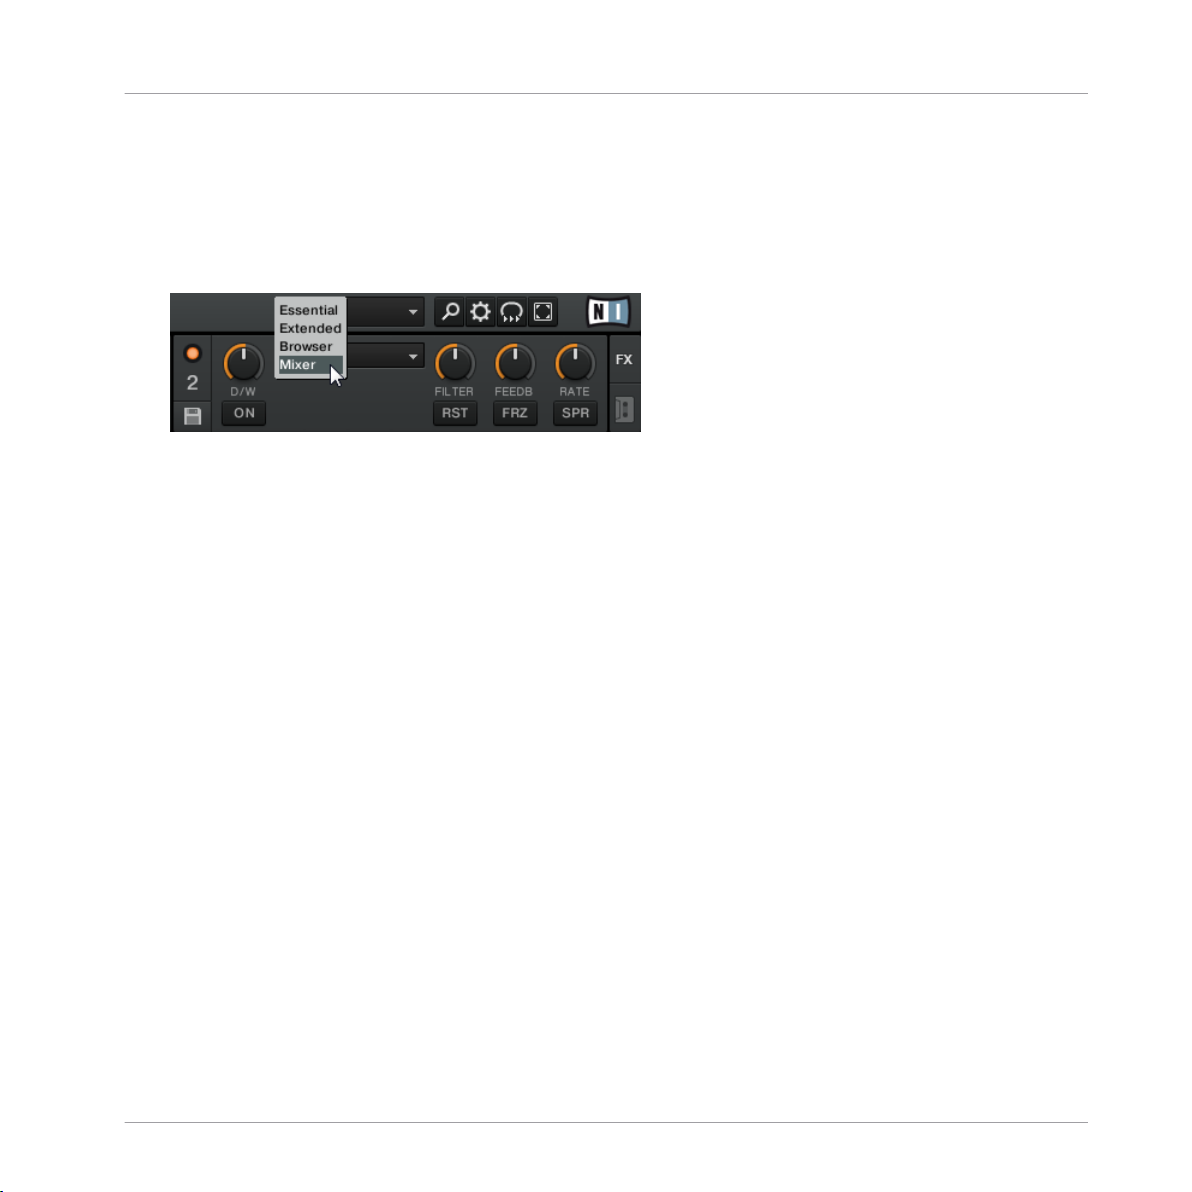
6.7.5 Single Mode
You
can also switch each FX Unit to Single mode. Instead of multiple FX with one parameter
each, Single mode will give you one FX but with much more control over its parameters.
This time, we will do it on FX Unit 2:
Press FX Assign button 1 on channel B to remove the FX assignment.
►
Press FX Assign button 2 on channel B to assign Deck B to the FX Unit 2.
►
Tutorials
Adding FX
The FX Knobs and Buttons will give you access to each of the advanced parameters for
→
that particular FX. At any time, you can press the RST Button to reset the parameters to
their default value. As in Group mode, the D/W knob allows you to adjust the balance between the unprocessed (dry) signal and the processed (wet) signal.
TRAKTOR LE 2 note: Single mode is not available in LE 2.
TRAKTOR ME 2 note: Single mode is not available in ME 2.
6.7.6 Storing a Snapshot
you find yourself making the same settings to the FX each time and would like to set a de-
If
fault state for the FX parameters, simply do the following:
TRAKTOR - Getting Started - 60
Page 61

Using the Remix Decks in Your Mix
1. Adjust the FX Knobs and Buttons to your liking.
2. Press the Snapshot button (floppy disk icon) to store these settings as snapshot.
The next time you press the RST (Reset) Button with this FX loaded, its parameters will
→
assume the values you stored.
6.8 Using the Remix Decks in Your Mix
The former Sample Decks have now become
(For a general overview of the Remix Deck's control elements, please refer to the TRAKTOR 2
Manual.)
Remix Decks. Let's have a look at how these work!
Tutorials
The Remix Deck C with the "Remix Deck Tutorial" Remix Set loaded.
With
Remix Decks, you can add Samples (One-shots and Loops) to your mix, live-remix with
whole sets of Sample Cells, and even capture Samples from Track Decks or the Loop Recorder.
You can also save a Remix Deck and all of its content to the Collection as a Remix Set, and
then use it as a single-line item in a Playlist!
TRAKTOR - Getting Started - 61
Page 62

In case you were using Sample Decks in an earlier TRAKTOR version, don't panic! All former Sample Slot functionality stays preserved.
TRAKTOR LE 2 note: Remix Decks are not available in LE 2.
TRAKTOR ME 2 note: Remix Decks are not available in ME 2.
Prerequisites
TRAKTOR now is in the following state:
Tutorials
Using the Remix Decks in Your Mix
▪ The
track Techno 2 is loaded on Deck B. The track is audibly playing and it is the tempo
master. By the way, from now on we will use the term “Track Deck” to describe Decks
that play tracks so that we can easily distinguish them from Remix Decks. In TRAKTOR,
you can see that the two upper Decks (A and B) are Track Decks whereas the two lower
Decks (C and D) are Remix Decks. If the latter is not the case, click the Deck letters of
Deck's C and D and select the Remix Deck entry for both.
▪ Deck A is stopped (if this is not the case, press the PLAY button on the left Deck).
▪ The crossfader is all the way to the right.
6.8.1 Loading a Sample from the Collection
You can load Samples directly from TRAKTOR’s Track Collection.
Click on the Playlist called All Samples from your Favorites.
1.
2. Click on the Sample named D4 BassComplex in the Playlist to select it.
TRAKTOR - Getting Started - 62
Page 63

3. Drag it onto left-upmost Sample Cell of Deck C.
The Sample is now loaded and ready to play.
→
6.8.2 Triggering the Sample
Triggering the Sample works as follows:
Tutorials
Using the Remix Decks in Your Mix
1. Make
sure SYNC is activated on Deck C so that the Deck will start synchronized to the
tempo master Deck, Deck B.
TRAKTOR - Getting Started - 63
Page 64

Using the Remix Decks in Your Mix
2. Set the Remix Deck's Quantize Value to 1 (one beat) with the Quantize Value selection
menu in the Deck Heading. To open the menu, click on the Quantization Value number
next to the blue dot in the Deck Heading.
Tutorials
3. Click
the Play button on Deck C. The Remix Deck will start playing, with its internal time-
line synchronized to Deck B. The Sample itself is not yet playing!
4. Shortly before a down beat in Deck B, click the Play Type indicator on the left side of the
Sample Cell to activate the Sample Cell.
The Play Type indicator flashes until the next down beat of its internal timeline is
→
reached (remember, we have set the Quantize Value to one beat), and then starts playing
in sync with Deck B (as the Remix Deck is synced to Deck B).
To stop the Sample, and reset the play marker to the Sample start position, [Shift] +
►
click the Sample Mode indicator. The Sample stops playback according to the setting of
the Quantize Value.
TRAKTOR - Getting Started - 64
Page 65

Using the Remix Decks in Your Mix
Note that the Quantize Value does not represent the amount of beats it will take before a
Sample
mark in the Remix Deck's internal timeline (such as a bar line on a sheet of music).
starts playing, therefore, it is not a "delay" value; the Quantize Value represents a
6.8.3 Capturing a Sample from a Track
We have
TOR’s Browser, but here’s an even cooler performance feature:
1. Check that the track Techno 2 is still playing on Deck B. If the playback has reached the
2. Make sure that Snap mode (S) is activated in the Master panel of the Global section.
seen how we can load Samples directly into one of the Remix Decks using TRAK-
end of the track, press the Skip Back to Start button above the Deck's Play button. Alternatively press [Shift]+G on your computer keyboard.
Tutorials
3. Set
a Loop in this track using the controls in the Loop section as described in ↑6.6.1,
Playing with Loops.
TRAKTOR - Getting Started - 65
Page 66

Using the Remix Decks in Your Mix
4. Drag and drop the track name (Techno 2) from Deck B's Deck Heading into the first Sample Cell of Sample Slot 2 in our Remix Deck C.
The loop is copied as a Sample to Remix Deck C.
→
You could now load a different track into Track Deck B, and still have the loop from the
►
original song playing in Remix Deck C. It’s great for capturing loops on the fly and using
them to build an alternate mix.
Tutorials
If the Deck you copied from wasn’t playing a Loop, the Remix Deck will still capture a loop
from
the capture source Deck, but it will instead take it from the current playback position.
The loop will automatically be cut to the length of the current loop size (grey-shaded Auto
Loop button in the Track Deck).
Capture a few Samples from various places from the track in Deck B and play around to
►
get used to the basic playback controls that we described above.
6.8.4 More Sample Controls
you have a Sample loaded on one of the Remix Decks, you can change its sound utilizing
Once
a number of controls. There's more possibilities than described here (see also the TRAKTOR 2
Manual for a detailed overview of all control elements of the Remix Deck, and also the TRAKTOR KONTROL F1 Manual), but we will at least show you some of the available functions:
TRAKTOR - Getting Started - 66
Page 67

Using the Remix Decks in Your Mix
▪ With the Play Type indicator button on the left side of a Sample Cell, you start and stop
the playback of each Sample Cell. It also indicates whether the Sample is in One-shot or
Loop Mode. Click on the Play Type indicator to start Sample playback. To stop the Sample, and reset the play marker to the Sample start position, [Shift] + click the Sample
Mode indicator. The Sample then stops playback according to the setting of the Quantize
Value
▪ With the Volume fader, you can adjust the volume of the relevant Sample Slot.
▪ With the Filter fader, you can apply a lowpass/highpass filter to the Sample Slot.
Tutorials
▪ Hovering
over the Slot Player of a Sample Slot, you get presented with additional Slot Parameter buttons. These govern the behavior and sound of all the Sample Cells belonging
to the relevant Sample Slot. Refer to the TRAKTOR 2 Manual for further information on
the Slot Parameter buttons.
▪ With the Play Type button in the Advanced Panel, you can switch between One-shot and
Loop mode of the Sample Cell. The Play Type indicator on the left side of the Sample Cell
changes its symbol accordingly.
The Advanced Panel of the Remix Deck is only visible in the Advanced Deck Layout. Dou-
TRAKTOR - Getting Started - 67
Page 68

Using the Remix Decks in Your Mix
ble-click the Deck's upper border to cycle through the various Deck Layouts.
See the TRAKTOR 2 Manual for further information.
Tutorials
▪ With
the Deck's GAIN knob in the associated Mixer channel, you can raise or lower the
volume of all Samples in that Deck at once.
▪ With the Deck FILTER knob in the associated Mixer channel, you can apply a lowpass/
highpass filter on all Samples in that Deck at once.
▪ With the FX Assign buttons in the associated Mixer channel, you can assign an FX Unit on
all Samples in that Deck at once.
▪ With the EQ knobs in the associated Mixer channel, you can shape the sound of all Sam-
ples in that Deck at once.
Remix Deck Hotkeys
Much more versatile than using the mouse, is the use of Keyboard Hotkeys. Depending on the
current state of the Sample Slot, a different action is triggered by the Hotkey:
▪ If the slot is empty, a Sample is loaded from the Deck above it.
▪ If the Sample is playing, but muted, it gets unmuted.
▪ If the Sample is playing unmuted, it gets muted.
▪ If the Sample is stopped, it starts playing.
▪ If the Sample is playing, press and hold the key to stop and reset the Sample.
The Hotkeys for the individual Sample Slots, from left to right, are: [Z]/[X]/[C]/[V] (for Deck C),
and [B]/[N]/[M]/[<] (for Deck D).
Additionally if a Sample is playing:
Pressing [Shift] + Hotkey will stop the Sample and reset the play marker to the Sample
►
start position.
TRAKTOR - Getting Started - 68
Page 69

Using the Remix Decks in Your Mix
Pressing [Shift] + Hotkey again will delete the Sample from the Sample Cell.
►
If you press [Shift] + Hotkey once more, the item currently selected in the Browser List
►
will be loaded to the Sample Cell.
The Hotkeys will always control the upmost Sample Cell of a Sample Slot.
Please note that these are the Hotkey mappings for an English keyboard layout. In case of
a non-english keyboard layout, the key labeling will vary.
6.8.5 Saving A Remix Set
you think a Remix Deck might be worth saving, you can save it to the Collection, and
Once
later on even use it as a single-line item in a Playlist. It's as easy as this:
1. Double-click the name of the Deck in the Deck Heading.
2. Type in a new name for the Deck.
3. Click and hold the name, and drag it down into the Browser List.
Your new Remix Set is now saved to the Collection. Additionally, all Samples are stored
→
as individual Samples in the "All Samples" folder.
Tutorials
6.9 Using the Loop Recorder
Earlier we
This is all based upon existing audio material. The Loop Recorder, on the other hand, allows
you to record new material on the fly!
The Loop Recorder.
saw how you can use Remix Decks as a means for triggering One-shots and Loops.
TRAKTOR - Getting Started - 69
Page 70

Using the Loop Recorder
You could, for example, capture the signal from the microphone input of your soundcard (or
mixer), record your scratching in real time, or just record a few bars of a particular track while
tweaking the FX settings.
Prerequisites
TRAKTOR 2 now is in the following state:
▪ The track Techno 2 is still loaded on Deck B. The track is audibly playing and set to Mas-
ter. Deck A is stopped.
▪ The crossfader is all the way to the right.
▪ FX Unit 2 is in Single mode, assigned to Deck B, and loaded with your favorite FX. The
effect, however, should be turned off (ON button deactivated).
TRAKTOR LE 2 note: The Loop Recorder is not available in LE 2.
TRAKTOR ME 2 note: The Loop Recorder is not available in ME 2.
Tutorials
6.9.1 Choosing a Source
The Loop Recorder can capture the input from several sources. You can choose the desired
source by clicking on the Source menu (the drop-down menu directly under the Loop Recorder’s DRY/WET knob):
The Loop Recorder’s Source menu.
In this menu, you have following choices:
▪ Main will record TRAKTOR’s overall signal.
TRAKTOR - Getting Started - 70
Page 71

Using the Loop Recorder
▪ Cue will record any channel(s) whose Headphones Cue button is on.
▪ Ext picks up the signal assigned to TRAKTOR’s Input Send channel.
▪ Aux will pick up the signal assigned to TRAKTOR’s Aux channel—typically the micro-
phone input (for more info on how to use a microphone, please see chapter ↑9.6, Adding
a Microphone).
For our example, we’ll capture the main output:
Select Main in the Source menu.
►
6.9.2 Recording a Loop
Let’s now record a loop.
Adjusting the Loop Size
Before we start recording, we need to specify the size of the loop we are going to record:
Press the SIZE button repeatedly to cycle through loop record sizes (in beats).
►
You can see the current loop size at the top of the Loop Recorder. For our example, we’ll
choose a loop of 4 beats:
Tutorials
The selected loop size is displayed in the software.
Starting the Recording
Now do the following:
Cut the low and mid frequencies on channel B by turning the LO and MID knobs fully
►
counter-clockwise.
Turn the DRY/WET knob of the Loop Recorder fully clockwise.
►
When you’re ready, press the Record button.
TRAKTOR - Getting Started - 71
Page 72

Using the Loop Recorder
The Loop Recorder will punch in (Record button lit) and out (Record button back off) according to the selected loop size and then begin playing (Play button lit). That’s all!
You can hear that our adjustments to the EQ are now part of the recording.
You’ll notice that the loop automatically started playing when it finished recording. If you
want this to happen, just push the Play button during recording. Now the loop will
don’t
only trigger when you explicitly tell it to.
Playing with the Recorded Loop
You can control the balance between the looped recording and the main output using the Loop
Recorder’s DRY/WET knob:
You can stop and start again the recorded loop by using the Play button. By doing this, you’ll
notice the following:
▪ The Loop Recorder always stays in sync the current tempo master, which is Deck B at the
moment in our example.
▪ You don’t have to bother with the DRY/WET knob position when stopping the Loop Re-
corder. When you stop the Loop Recorder, the DRY/WET knob is automatically bypassed
regardless of its current position. This ensures a seamless transition with the main signal
at its original level.
Tutorials
Deleting the Loop and Trying Again
If you don’t like what you hear and want to try again:
Press the UNDO button when the Loop Recorder is stopped (when the Loop Recorder is
►
playing the button is hidden).
Now the recording has been cleared and you can try again.
→
For example, you could try again to record a loop from the track on Deck B, this time while
tweaking the FX loaded on the FX Unit 2:
Turn channel B’s EQ knobs back to neutral position.
1.
2. Press the Record button on the Loop Recorder and tweak the FX knobs and buttons of the
FX Unit 2.
TRAKTOR - Getting Started - 72
Page 73

Using the Loop Recorder
Since the Loop Recorder records the audio (including any processing by the FX), you can create brand new loops from your existing tracks!
6.9.3 Overdubbing
You can also dub over the current recorded loop, building additional recorded layers on the fly.
To do this:
Press the Record button while the Loop Recorder is already playing an existing loop, per-
►
form your tweaks, scratches, or vocals, and press it again to exit overdubbing.
The new audio will then be added to the existing loop.
→
If you don’t like the overdub, just hit UNDO and it will clear your last overdub and you
►
can try it again.
If you hit UNDO once more, it will act as a “redo” and bring back the overdub.
►
If you want to completely clear all the contents of the Loop Recorder, just press DEL
►
while the Loop Recorder is stopped.
Tutorials
6.9.4 Further Uses of the Recorded Loop
of the great things about the Loop Recorder is that you can use it to record loops that you
One
can then transfer to the Remix Decks. This is how it works:
Click on the Loop Length display of the Loop Recorder and drag the Loop from there to
►
an empty Sample Slot in a Remix Deck.
Now the loop has been stored, and you can record a new loop into the Loop Recorder if
→
you like.
Last but not least, the loop is automatically added to your Collection and can be re-used
→
whenever you want to!
TRAKTOR - Getting Started - 73
Page 74

Synchronization
6.10 Synchronization
It is now time to give a closer look at the advanced synchronization features offered by TRAKTOR. Once you will get more familiar with them, you will be able to use these powerful tools to
build rich and complex mixes.
6.10.1 Introduction
the previous tutorials, we have already seen TRAKTOR’s synchronization facilities many
In
times in action:
▪ We synchronized a track to the previous one before we mixed it in (see chapter ↑6.4, Mix-
ing In a Second Track).
▪ We played with Loops and jumped to Cue Points without losing the beat (see chapter
↑6.6, Looping and Cueing).
▪ We noticed that the Gater FX was synchronized to the track it was processing (see chapter
↑6.7, Adding FX).
Tutorials
▪ We captured a Sample from a track and it played in sync with the track (see chapter ↑6.8,
Using the Remix Decks in Your Mix).
▪ We recorded a loop in the Loop Recorder and it played in sync with the track (see chapter
↑6.9, Using the Loop Recorder).
6.10.2 The Tempo Master
Note that, in TRAKTOR 2, the syncing concept has been extended and improved so TRAKTOR
SCRATCH PRO 2 users can also take full advantage of sync-lock when using Time-
code Vinyl or CD control!
For
all this to work, TRAKTOR needs both a tempo and beat reference to which it can syn-
chronize things. We call this reference source the tempo master. The tempo master doesn’t
have to be the same source throughout the entirety of your mix, but there will always be one
source designated as the tempo master—and only one.
TRAKTOR - Getting Started - 74
Page 75

Tutorials
Synchronization
For example, by activating SYNC
ize the track on this Deck with the current tempo master.”
on a Track Deck, you are saying to TRAKTOR: “Synchron-
In TRAKTOR, the Master Clock or any Track Deck can be the tempo master:
▪ TRAKTOR’s
Master Clock can provide a tempo and a tick (which can be used for beat-
gridding).
▪ A Track Deck can provide the tempo and the phase from the track that it is currently play-
ing.
TRAKTOR LE 2 users only have the option to set a Deck as tempo master.
Who’s the Master?
You can build your mix using various Deck setups: you can mix with two Track Decks only, or
make also use of the Remix Decks (default setup), or even replace the Remix Decks with another two Track Decks.
Depending on your preferred way of DJing and Deck setup, you will have different needs and
perspectives for choosing your tempo master. We will describe here the various use cases.
What’s New in the New Synching Concept?
Up until now, if you had synced a track to another, the Phase has always been synced as well.
TRAKTOR 2 now decouples the phase-syncing from the tempo-syncing when using TempoSync
mode. In other words, SYNC doesn’t get completely deactivated if TempoSync is selected and
you nudge the tracks out-of-phase—instead, it turns dim. If you use BeatSync, the SYNC button will turn dim when the tracks are out of phase, but TRAKTOR will then force the tracks
back into sync.
This concept allows all users, including the TRAKTOR SCRATCH users, to keep their tracks
tempo-matched, thus enabling them to raise the tempo of two or more tracks simultaneously,
even if their phases are shifted!
What Is Synced and What Is Not?
Basically, Samples playing in Looped mode and time-evolving FX are always automatically
synced to the current tempo master.
TRAKTOR - Getting Started - 75
Page 76

Synchronization
On the other hand, for each Track Deck, you can decide whether to use the automatic sync or
not, such as if you want to beat-match the track manually (see tutorial in chapter ↑6.4, Mixing
In a Second Track) or if you don’t want any beat-matching at all for that track.
Letting TRAKTOR Decide for You: the Auto Mode
Tutorials
TRAKTOR LE 2 note: In TRAKTOR LE 2, AUTO
change the Deck MASTER manually by clicking on the respective MASTER button of a
Deck. The Master Clock panel however is disabled.
is turned on by default. However, you can
Let’s first give a look at TRAKTOR’s Master Clock:
Click on the metronome icon at the top left of the window to show the Master Clock pan-
►
el:
The Master Clock panel in TRAKTOR 2
this Master Clock panel, you see the activated AUTO button, meaning that TRAKTOR is in
In
Auto mode.
Auto mode is activated by default, and this the mode we used in all the previous tutorials.
With AUTO
activated, TRAKTOR automatically switches the tempo master between Decks in
the following situations:
▪ When the Deck set as tempo master is stopped.
▪ When you load a new track onto it.
This way, you don’t have to worry about setting the tempo master yourself during your mix.
Should there be no other Deck playing, the Master Clock would become the tempo master,
thus keeping in sync any FX and/or looped Samples still on air!
You can check this by doing the following:
TRAKTOR - Getting Started - 76
Page 77

Synchronization
1. Stop any playing Deck. The MASTER button in the Master Clock panel lights up, indicating that the Master Clock is currently the tempo master:
2. Load two tracks in Deck A and B.
3. Start the playback in Deck A. Deck A now is the tempo master: the MASTER button in the
Master Clock panel turns back off, whereas the MASTER button in the left Deck Display
lights up:
Tutorials
4. Start
the playback on Deck B and beat-match the track on Deck B with that on Deck A
(whether manually or via automatic Sync).
5. Stop Deck A.
TRAKTOR - Getting Started - 77
Page 78

Synchronization
Deck B now is the tempo master: the MASTER button on the left Deck Display turns off,
→
whereas that of the right Deck lights up:
If you play sets with two Decks only, or if you prefer to do your beat-matching manually, the
mode might be for you: it guarantees that each new track in the mix follows the previous
Auto
tempo reference.
If you’d like to do a combination of manual and synced beat-matching, again leave the AUTO
button engaged and enable the SYNC button for individual Decks as needed:
▪ If SYNC is enabled, the new Deck inherits the tempo from the previous tempo master.
Tutorials
▪ If SYNC is disabled, the new track plays at its own individual tempo.
Note that you can also manually set a particular Deck As tempo master:
To manually set a Track Deck as tempo master, simply click the Deck’s MASTER button.
►
Using the Master Clock as Tempo Master (TRAKTOR PRO 2 / TRAKTOR SCRATCH PRO 2
Only)
If
you run beat-mixed sets with more than 2 Decks, possibly along with synchronized Remix
Decks, you should use the Master Clock as tempo master. The Master Clock will always give
you a solid tempo reference that will not change unless you want it to. Also, if you intend to
only do beat-synced transitions and would like to stay within the same general BPM range
throughout your set, this is the ideal mode to use. To set it up, do as follows:
1. In TRAKTOR’s Master Clock panel, deactivate the AUTO button.
2. Click the MASTER button in the Master Clock panel to set it as the tempo master.
TRAKTOR - Getting Started - 78
Page 79

Synchronization
3. The Master Clock panel should now looks like this:
4. Now activate sync on all Decks by pressing the respective SYNC buttons.
way, all Decks will instantly follow the Master Clock’s tempo. You can then set the Master
This
Clock’s tempo to the tempo you intend for your set via the numeric field to the right of the
MASTER button (see picture above):
Change the Master Clock’s tempo by clicking the displayed BPM value and dragging your
►
mouse vertically while holding the mouse button depressed (of course you can also assign
raising or lowering the tempo to a keyboard hotkey or MIDI control).
You can see the tempos on every Deck changing accordingly.
→
Tutorials
As in Auto mode, you can change the tempo master at any time by pressing MASTER
on the
desired Deck.
Setting TRAKTOR’s Master Clock as tempo master is now recommended for all TRAKTOR
versions,
the synchronization. This means, even with Timecode Vinyl or CDs, you can tempo-lock
tracks and you’re still able to tweak the phase through nudging and scratching!
including the Scratch versions, because the phase is now handled separately from
6.10.3 The Beatgrid
A Track
mined during automatic analysis. If not, the “reference” provided by the Deck would not be
correct. Tracks are analyzed by TRAKTOR in order to determine the BPM (tempo) as well as
the position of the beats (“transients”). Using this information, TRAKTOR creates the so-called
Beatgrid which provides the phase-reference for synchronization.
Deck can serve as a reliable tempo master only if its song’s tempo was precisely deter-
TRAKTOR - Getting Started - 79
Page 80

Synchronization
A track's waveform with the Beatmarker (1) and the Beatgrid (indicated by the white vertical segments, 2).
track’s Beatgrid is not only important when a Track Deck is set as tempo master, but also
The
when you want this Track Deck to be synchronized with the current tempo master, whichever it
may be.
The included demo tracks used in the tutorials were previously analyzed and have a reliable
Beatgrid.
you will have to analyze and beat-grid them as well. By default, this is done automatically
when you load a track for the first time in a Deck, but this may not be good enough for all
tracks, therefore you can adjust the Beatgrid manually.
Before you can effectively use the synchronization facilities on your own tracks,
Tutorials
6.10.4 Other Useful Tools for Synching
Lastly,
chronization: the Snap and Quantize modes, and the Keylock function.
Snap and Quantize Modes
As you probably remember, we already mentioned Snap and Quantize in the tutorial in chapter
↑6.4, Mixing In a Second Track. They are other important tools that can help with synchroniz-
ing your tracks:
Click on the S and Q buttons in the Global section to enable/disable Snap and Quantize
modes:
we would like to quickly mention here three other interesting features related to syn-
▪ The Snap mode ensures that any Loop or Cue Point you set in a track will snap to the
closest beat.
▪ The Quantize mode ensures that any jump you make within the track will retain the phase
sync—may you jump to a Loop, a Cue Point, or a beat without worry.
TRAKTOR - Getting Started - 80
Page 81

The S and Q buttons allow you to activate/deactivate Snap and Quantize mode, respectively.
Tutorials
Synchronization
Depending
on what you are about to do, you can decide to enable or disable them at any time.
Here are a few examples:
▪ If you want to set a Loop starting directly on a beat, activate Snap and press an Auto Loop
button around the desired beat.
▪ On the contrary, should you wish to set a Cue Point at the beginning of some backing vo-
cals that don’t necessarily start on the beat, deactivate Snap before pressing an unlit Hotcue button.
▪ If you’re about to mix in a synched track and want the downbeats of both tracks to per-
fectly match, activate the Quant button before you press Play (or some Hotcue button).
▪ On the other hand, if you want to jam around with a Sample loaded on a Remix Deck and
make some stutter-like effects by pressing the corresponding Hotcue button repeatedly,
you might prefer to deactivate Quant to create repetitions shorter than one beat.
Locking the Key of Your Tracks
When synchronizing tracks, you alter their tempo and, consequently, their pitch (or key). Slowing down a track will cause its pitch to drop while speeding up the track will cause its pitch to
rise. For small tempo adjustments, this is not really serious. But when the tempo is changed
more drastically, the resulting pitch shift might get problematic: kick sounds would lose their
power, vocals would sound unnatural and silly, etc.
To avoid this, TRAKTOR provides you with a Keylock feature that uncouples the pitch (key)
and the tempo (BPM) of a track:
1. Load two tracks with quite different tempos on Deck A and B. (The default value for
TRAKTOR’s internal Tempo fader is +/-8 % — therefore the tracks should not exceed a
tempo range difference of +/-8 %, otherwise you can’t sync them manually. However, you
can choose a bigger tempo range via Preferences > Transport > Tempo)
TRAKTOR - Getting Started - 81
Page 82

2. Start the playback on both Decks and synchronize Deck B to Deck A.
You can clearly hear how the key of the track on Deck B changed.
Now press the Keylock On button in Deck B. This activates the Keylock on that Deck.
3.
The key of the track goes back to its original pitch, thus preserving most of its acoustic
→
feeling. In the Mixer and in the corresponding Deck, the Keylock indicator lights up to
remind you that the Keylock is active on that Deck:
If you activate the Keylock button in the Mixer, the current key will be preserved. Use the
KEY
knob to change the key which can allow you to harmonically mix into a track in anoth-
er Deck.
Tutorials
Synchronization
TRAKTOR - Getting Started - 82
Page 83

Using TRAKTOR SCRATCH PRO 2
Enabling the Decks
7 Using TRAKTOR SCRATCH PRO 2
This
chapter explains the main steps of getting Timecode control up and running, but serves
only as short introduction to the TRAKTOR SCRATCH functionality. To control your tracks with
Timecode records or CDs, you must have a TRAKTOR SCRATCH PRO 2 serial.
We assume that your TRAKTOR SCRATCH system is up and running and the audio routing
is
correct. You should not need to worry about this, since TRAKTOR SCRATCH PRO 2 features automated interface detection. However, if you run into problems, please refer to the
Setup Guide.
If you own a TRAKTOR AUDIO 6/10, please refer to the interface's documentation for setting up the hardware properly.
7.1 Enabling the Decks
Users
are disabled by default because the output channels are switched to Direct Thru on the soundcard. You can access the Deck Mode menu by clicking on the Deck letter in the upper right of
a Deck (e.g., "A").
of the TRAKTOR AUDIO 6 or TRAKTOR AUDIO 10 will notice that TRAKTOR's Decks
To start TRAKTOR with enabled Decks by default, change the Direct Thru default in the control panel of the audio interface.
7.2 Calibration
The calibration
cord or play the Control CD for the first time. TRAKTOR will detect which timecode medium
you are using, verify the signal quality, and — if the signal quality is adequate — complete the
calibration phase. From then on, the software platters will rotate at the speed of the turntables
or CD players and the motion of the record will be followed exactly.
process is performed automatically when you put the needle on the Control Re-
TRAKTOR - Getting Started - 83
Page 84

The rotating platter follows the motion of the timecode record.
Using TRAKTOR SCRATCH PRO 2
Tracking Modes
The easiest way to check which software Deck is being controlled by which turntable is
simply to stop the turntable and see which software Deck stops as well.
If your platters do not follow the rotation of your turntables, or if you see any error messages on
the
platter or Scope display, please refer to chapter ↑7.5, TRAKTOR SCRATCH PRO 2 Trouble-
shooting for troubleshooting.
7.3 Tracking Modes
The following sections describe how the timecode will be interpreted.
7.3.1 Absolute Tracking Mode
Absolute
on the CD - to the playback position of your track.
Tracking mode links the absolute position of the needle on the record - or the laser
TRAKTOR - Getting Started - 84
Page 85

Using TRAKTOR SCRATCH PRO 2
Tracking Modes
To activate Absolute Tracking mode, click the button displaying a record and tone-arm.
►
In this mode, you can skip through the track by placing the needle at another position on
the record (known as needle-dropping).
7.3.2 Relative Tracking Mode
Relative
still retaining the tactile feel of the medium, and is where timecode control really gets interesting. Relative Tracking mode allows you to play loops, use cue points, match beats and even
prevent skipping, all while still allowing control of playback with a real record. This does mean
that the speed and position of the track no longer correspond to the speed and position of the
turntable, but while this may initially seem unusual, in practice the actual feel of the record
remains the same.
►
Tracking mode opens up possibilities beyond the scope of traditional vinyl DJing while
To activate Relative Tracking mode, click the button displaying a record with no tonearm.
To skip back to the beginning of the track while using Relative Tracking mode, simply drop
the
needle into the lead-in area of the record, or on CD players, skip back to the beginning
of Track 2.
Relative Tracking mode is activated automatically when entering a loop or when syncing a
track to another tempo source (e.g. the master tempo or another Deck).
7.3.3 Internal Playback Mode
In
Internal Playback mode, playback on the Deck is controlled with the Play button and the
tempo fader in TRAKTOR — the external turntable or CD player is ignored in this mode.
This comes in handy in case of a hardware problem, or when using only one turntable or CD
player to control two or more Decks.
TRAKTOR - Getting Started - 85
Page 86

Using TRAKTOR SCRATCH PRO 2
Timecode Preferences
7.4 Timecode Preferences
The following sections explain a few of the settings in the Preferences relevant to timecode
control.
To open the Preferences, click on the Preferences button in the upper-right corner:
The Preferences button
Preferences > Audio Setup > Win Built-In (Fallback Option)
Windows
only: Here you can define the audio device that TRAKTOR SCRATCH 2 uses by default when no TRAKTOR AUDIO series soundcard (i.e., an AUDIO 4/8 DJ or a TRAKTOR AUDIO 6/10) is attached to your computer. In this case, you may also use Internal Playback mode
— click on the Deck’s letter to open its context menu and choose Internal Playback.
This comes in handy when you’re on an airplane and want to prepare tracks for your next
gig!
Preferences > Timecode Setup > Switch to Absolute Mode in Lead-In
Several
Tracking mode. When this option is active, you can easily switch back to Absolute Tracking
mode without touching the computer:
►
►
TRAKTOR commands, such as looping or synching, automatically switch to Relative
On vinyl, drop the needle in the lead-in area of the record
On CD, skip to Track 1
TRAKTOR - Getting Started - 86
Page 87

Using TRAKTOR SCRATCH PRO 2
TRAKTOR SCRATCH PRO 2 Troubleshooting
7.5 TRAKTOR SCRATCH PRO 2 Troubleshooting
This chapter describes a few common issues when using timecode. More troubleshooting tips
can be found in the TRAKTOR 2 Manual.
7.5.1 Calibration Troubleshooting
In
general, we recommend always checking the Scope panel when setting up TRAKTOR to ensure timecode control is working properly. This is especially important if the Deck platters do
not follow the movement of your turntables or CD players as expected.
You can open the Scope panel by clicking on the platter, or, if the platter is not shown, by clicking on the small arrow (minimize button) above the timecode quality meter.
The small arrow (minimize button) above the quality meter will also minimize the Scope
panel if you would rather have a larger view of the track waveform.
The panel provides four valuable indicators:
The four indicators on the Scope panel.
(1) The central Scope with a circular representation of the incoming timecode signal
(2) The orange quality meter on the right side
(3) The small stereo input level meter on the bottom right
(4) The status information on the bottom center
TRAKTOR - Getting Started - 87
Page 88

Using TRAKTOR SCRATCH PRO 2
TRAKTOR SCRATCH PRO 2 Troubleshooting
In addition, the CALIBRATE button resets timecode calibration. This is executed automatically
when starting TRAKTOR.
The following pictures describe the most common setup scenarios:
Successful Calibration
▪ SCOPE: blue circle and an orange diagonal line (or two orange circles using timecode
MK1)
▪ QUALITY: fully orange
▪ INPUT: two channels about halfway up
▪ TEXT: one of the following
Vinyl MK2 (15/10 min)
CD MK2
TRAKTOR - Getting Started - 88
Page 89

Vinyl MK1 (15/10 min)
Using TRAKTOR SCRATCH PRO 2
TRAKTOR SCRATCH PRO 2 Troubleshooting
CD MK1
CD MK1 (dotted line shows up at specific playback speeds)
Scratch Disabled
TRAKTOR - Getting Started - 89
Page 90

Scratch functionality in TRAKTOR is only available with specific audio interfaces which
have been "certified" by Native Instruments.
▪ SCOPE: blank
▪ QUALITY: blank
▪ INPUT: two channels about halfway up
▪ TEXT: "Scratch disabled"
Scratch disabled
Using TRAKTOR SCRATCH PRO 2
TRAKTOR SCRATCH PRO 2 Troubleshooting
WHY: No Scratch certified device is selected.
FIX:
Please make sure that you have chosen the right audio driver in Preferences > Audio Set-
up, namely an audio interface that supports TRAKTOR SCRATCH PRO 2 (i.e., TRAKTOR AU-
DIO 6/10, AUDIO 4/8 DJ, TRAKTOR KONTROL S4 or a certified Mixer).
No Input
▪ SCOPE: blank
▪ QUALITY: blank
▪ INPUT: blank
▪ TEXT: Waiting…
TRAKTOR - Getting Started - 90
Page 91

Using TRAKTOR SCRATCH PRO 2
TRAKTOR SCRATCH PRO 2 Troubleshooting
TRAKTOR is waiting for input.
WHY:
No signal is detected on the Input channels, or the signal received is not suitable for cal-
ibration.
FIX: Please check that the RCA cables from turntable or CD player are securely connected,
and check whether input sensitivity is correctly switched to Phono for all connected turntables
or Line for all connected CD players. Check that a signal level is displayed in both channels of
the level meter under the quality indicator. Also check the correct assignment inputs to the
decks in the preferences.
Missing Channel
▪ SCOPE: horizontal or vertical line
▪ QUALITY: blank
▪ INPUT: only one channel
▪ TEXT: "Waiting... Left/Right ch. missing"
TRAKTOR - Getting Started - 91
Page 92

Missing channel left
Using TRAKTOR SCRATCH PRO 2
TRAKTOR SCRATCH PRO 2 Troubleshooting
Missing channel right
WHY: One channel of the signal from turntable or CD player is not present.
Please verify that all RCA cables from the turntable or CD player are securely connected
FIX:
and check the contacts connecting the headshell to the tone-arm.
Input Sensitivity Too Low
▪ SCOPE: small white circle
▪ QUALITY: blank
▪ INPUT: blank
▪ TEXT: "Waiting… Low input"
TRAKTOR - Getting Started - 92
Page 93

TRAKTOR SCRATCH PRO 2 Troubleshooting
Turntable is connected to CD/Line input.
WHY: A record player is connected to a line-level input.
FIX: Switch input sensitivity to Phono in the control panel of the audio interface.
Input Sensitivity Too High
▪ SCOPE: random figures
▪ QUALITY: random (depends on signal level)
Using TRAKTOR SCRATCH PRO 2
▪ INPUT: full (clipping red)
▪ TEXT: random (depends on signal level)
CD player is connected to Phono input (MK2).
TRAKTOR - Getting Started - 93
Page 94

Using TRAKTOR SCRATCH PRO 2
TRAKTOR SCRATCH PRO 2 Troubleshooting
CD player is connected to Phono input (MK1).
WHY: A CD player or other line-level source is connected to a phono preamp input.
FIX: Switch input sensitivity to Line in the control panel of the audio interface.
Ground Hum Warning
▪ SCOPE: overlaid red grounding symbol
▪ QUALITY: full
▪ INPUT: two channels about halfway up
▪ TEXT: depends on the severity of the hum
Vinyl MK2 (10 min)
TRAKTOR - Getting Started - 94
Page 95

Using TRAKTOR SCRATCH PRO 2
TRAKTOR SCRATCH PRO 2 Troubleshooting
Vinyl MK1 (15 min)
WHY: Defective grounding of turntables.
FIX:
Please ensure that the grounding wire of the turntable is connected to the ground on your
mixer or audio interface and that your turntables and cables are in good working order.
Note that the ground hum warning may be triggered when playing "normal" audio records
a timecode input, and also when a CD player is connected to a Phono input. You can
into
disregard the warning in this case.
Heavy Rumble
▪ SCOPE: oscillating and unsteady
▪ QUALITY: full
▪ INPUT: two channels about halfway up
▪ TEXT: type of played timecode medium
TRAKTOR - Getting Started - 95
Page 96

Vinyl MK2 (15 min)
Using TRAKTOR SCRATCH PRO 2
TRAKTOR SCRATCH PRO 2 Troubleshooting
Vinyl MK1 (15 min)
WHY: Your turntable is subject to strong vibrations due to, e.g., loud bass or heavy dancing.
FIX: You don't need to worry too much, as most of the rumble is filtered by the decoder.
Wrong Timecode Version, Timecode MK1 greyed out in Scope
▪ SCOPE: two grey circles
▪ QUALITY: blank
▪ INPUT: two channels about halfway up
▪ TEXT: "Unknown Medium - Calib. failed"
TRAKTOR - Getting Started - 96
Page 97

Using TRAKTOR SCRATCH PRO 2
TRAKTOR SCRATCH PRO 2 Troubleshooting
Vinyl MK1 failing to calibrate.
This could mean one of the following:
WHY:
You are attempting to use old timecode records or CDs (MK1) on systems purchased af-
ter October 2011.
FIX: Please use only MK2 timecode media on systems purchased after October 2011.
or
WHY: Your system is compatible with timecode MK1, but calibration failed for another reason.
FIX: Please check that the four wires connecting the cartridge to the headshell are attached in
the right order. If your records are old, try a new timecode record, or troubleshoot using a timecode CD.
Mono Input due to Faulty Routing
▪ SCOPE: grey diagonal line
▪ QUALITY: blank
▪ INPUT: two channels about halfway up
▪ TEXT: Waiting…
TRAKTOR - Getting Started - 97
Page 98

TRAKTOR SCRATCH PRO 2 Troubleshooting
Failed calibration due to faulty input routing.
WHY: The decoder receives a mono signal due to an unassigned input channel.
▪ FIX: Press the Restore button in Preferences > Audio Setup > Routing.
Switching Timecode Media without Recalibrating
▪ SCOPE: uncommon shape (see pictures)
▪ QUALITY: blank
Using TRAKTOR SCRATCH PRO 2
▪ INPUT: two channels about halfway up
▪ TEXT: see pictures
Vinyl MK1 calibrated as MK2.
TRAKTOR - Getting Started - 98
Page 99

CD MK2 calibrated as MK1.
Using TRAKTOR SCRATCH PRO 2
TRAKTOR SCRATCH PRO 2 Troubleshooting
CD MK1 calibrated as MK2.
Vinyl MK2 calibrated as MK1.
TRAKTOR - Getting Started - 99
Page 100

Using TRAKTOR SCRATCH PRO 2
TRAKTOR SCRATCH PRO 2 Troubleshooting
WHY: The timecode medium has been switched to another generation (MK1 or MK2) without
recalibrating.
FIX: Recalibrate by pressing CALIBRATE.
Other Reasons for Calibration Failure
▪ SCOPE: oscillating and unsteady
▪ QUALITY: blank
▪ INPUT: two channels about halfway up
▪ TEXT: "Unknown Medium - Calib. failed"
Vinyl MK2 failing to calibrate.
Calibration
has failed for an unknown reason. Please check that the four wires connecting the
cartridge to the headshell are attached in the right order. If your records are old, try a new
timecode record, or troubleshoot using a timecode CD.
7.5.2 Audio Troubleshooting
case you run into sound problems like crackles and interruptions, you should have a look at
In
chapters 16 and 17 of the TRAKTOR 2 Manual for improvement tips.
TRAKTOR - Getting Started - 100
 Loading...