


 Loading...
Operating instructions
Heat pump tumble dryer
To avoid the risk of accidents or damage to the appliance, it is essential to read these instructions before it is installed and used for the first time.
en-AU, NZ |
M.-Nr. 10 263 330 |

Caring for the environment
Disposal of the packing material
The packaging is designed to protect the appliance from damage during transportation. The packaging materials used are selected from materials which are environmentally friendly for disposal and should be recycled.
Recycling the packaging reduces the use of raw materials in the manufacturing process and also reduces the amount of waste in landfill sites. Ensure that any plastic wrappings, bags etc. are disposed of safely and kept out of the reach of babies and young children. Danger of suffocation.
Disposing of your old appliance
Electrical and electronic appliances often contain materials which, if handled or disposed of incorrectly, could be potentially hazardous to human health and to the environment. They are, however, essential for the correct functioning of your appliance. Therefore, please do not dispose of your old appliance with your household waste.
Please dispose of it at your local community waste collection / recycling centre.
Ensure that your old appliance presents no danger to children while being stored for disposal.
Energy saving tips
To avoid unnecessarily long drying times and high consumption of energy:
–Make sure that your laundry is thoroughly spun before drying. The higher the spin, the greater the savings that can be made in energy
and time during drying, e.g. approx. 20% energy can be saved if spun at 1600 rpm instead of 1000 rpm.
–Load according to the optimum amount of laundry recommended for the programme being used. Underloading is uneconomical. Overloading gives a poorer quality of drying and may cause unnecessary creasing.
–Make sure the room temperature is not too high. If there are other heat producing appliances in the room in which the tumble dryer is located, make sure the room is well-ventilated and switch the other appliances off, if possible.
–Clean the fluff filters in the door opening after every drying cycle.
2

|
Contents |
Caring for the environment .................................................................................. |
2 |
Warning and Safety instructions ......................................................................... |
6 |
Operating the tumble dryer................................................................................. |
17 |
Control panel.......................................................................................................... |
17 |
Touch display and sensors .................................................................................... |
18 |
Main menu ......................................................................................................... |
18 |
Examples on how to operate the appliance........................................................... |
19 |
Before using for the first time............................................................................. |
21 |
EcoFeedback........................................................................................................ |
23 |
1. Notes on correct laundry care........................................................................ |
24 |
Points to note regarding washed laundry .............................................................. |
24 |
Preparing the laundry before drying ...................................................................... |
24 |
Garment care label symbols ............................................................................. |
25 |
Laundry care when drying in a tumble dryer ......................................................... |
25 |
2. Loading the tumble dryer ................................................................................ |
26 |
3. Selecting a programme and starting it .......................................................... |
27 |
(1) Programmes...................................................................................................... |
27 |
(2) Favourite programmes ...................................................................................... |
30 |
(3) Drying assistant................................................................................................. |
30 |
(4) Mixed items....................................................................................................... |
30 |
Selecting any Extras or Delay start (if required) ..................................................... |
31 |
Starting the programme......................................................................................... |
32 |
4. Removing the laundry at the end of the programme.................................... |
33 |
End of programme/Anti-crease.............................................................................. |
33 |
Removing the laundry ............................................................................................ |
33 |
Extras .................................................................................................................... |
34 |
Freshen up ............................................................................................................. |
34 |
ECO........................................................................................................................ |
34 |
Anti-crease............................................................................................................. |
34 |
Auto load control.................................................................................................... |
34 |
Gentle tumble......................................................................................................... |
34 |
Turbo ...................................................................................................................... |
34 |
Drying programme chart - Extras........................................................................... |
35 |
Favourite programmes ........................................................................................ |
36 |
3

Contents |
|
Drying assistant ................................................................................................... |
38 |
Selecting a textile type........................................................................................... |
38 |
List of textile types ................................................................................................. |
39 |
Mixed items .......................................................................................................... |
40 |
Selecting items....................................................................................................... |
40 |
List of items ...................................................................................................... |
41 |
Delay start............................................................................................................. |
42 |
Programme chart ................................................................................................. |
43 |
Changing the programme sequence.................................................................. |
50 |
Cleaning and care ................................................................................................ |
51 |
Emptying the condensed water container ............................................................. |
51 |
Preparing the condensed water container for Steam smoothing .......................... |
52 |
Fluff filters .............................................................................................................. |
53 |
Removing visible fluff........................................................................................ |
53 |
Cleaning the fluff filters and air flow openings thoroughly................................ |
54 |
Plinth filter .............................................................................................................. |
55 |
Removing the plinth filter .................................................................................. |
55 |
Cleaning the plinth filter .................................................................................... |
55 |
Cleaning the plinth filter panel .......................................................................... |
56 |
Checking the heat exchanger unit .................................................................... |
56 |
Replacing the plinth filter .................................................................................. |
57 |
Fragrance flacon .................................................................................................. |
59 |
Inserting a fragrance flacon ................................................................................... |
59 |
Replacing the fragrance flacon .............................................................................. |
61 |
Problem solving guide ......................................................................................... |
63 |
Problem solving guide ........................................................................................... |
63 |
Messages in the display ........................................................................................ |
63 |
Unsatisfactory drying results ................................................................................. |
65 |
Other problems ...................................................................................................... |
66 |
Bottom right grille .................................................................................................. |
69 |
Fluff filter in the condensed water container.......................................................... |
70 |
Steam smoothing spray jet .................................................................................... |
71 |
After sales service ............................................................................................... |
72 |
Repairs................................................................................................................... |
72 |
Optional accessories ............................................................................................. |
72 |
Warranty................................................................................................................. |
72 |
4

|
Contents |
Installation and connection................................................................................. |
73 |
Front view............................................................................................................... |
73 |
Rear view ............................................................................................................... |
74 |
Transporting the dryer............................................................................................ |
74 |
Installation.............................................................................................................. |
75 |
Levelling the dryer............................................................................................. |
75 |
Ventilation ......................................................................................................... |
76 |
Before moving the tumble dryer again (e.g. when moving houses).................. |
76 |
Additional installation requirements....................................................................... |
77 |
Externally draining condensed water..................................................................... |
78 |
Installation conditions requiring a non-return valve.......................................... |
78 |
Arranging the drain hose................................................................................... |
79 |
Examples .......................................................................................................... |
80 |
Changing the door hinging .................................................................................... |
82 |
Changing the hinging over................................................................................ |
82 |
Refitting............................................................................................................. |
87 |
Electrical connection.............................................................................................. |
88 |
Consumption data ............................................................................................... |
89 |
Technical data ..................................................................................................... |
90 |
Settings menu ...................................................................................................... |
91 |
Calling up settings ................................................................................................. |
91 |
Language ............................................................................................................ |
91 |
Time ....................................................................................................................... |
92 |
Drying levels .......................................................................................................... |
92 |
Extended cool down .............................................................................................. |
92 |
Airways indicator.................................................................................................... |
92 |
Buzzer volume ...................................................................................................... |
93 |
Keypad tone........................................................................................................... |
93 |
Conductivity........................................................................................................... |
93 |
Total consumption ................................................................................................. |
94 |
PIN Code................................................................................................................ |
94 |
Display brightness ................................................................................................ |
95 |
Display switch-off status........................................................................................ |
95 |
Appliance switch-off status ................................................................................... |
95 |
Display maximum load........................................................................................... |
95 |
Memory.................................................................................................................. |
96 |
Anti-crease............................................................................................................. |
96 |
Delay start.............................................................................................................. |
96 |
5

Warning and Safety instructions
It is essential to read these instructions.
This tumble dryer complies with current local and national safety requirements. Inappropriate use can, however, lead to personal injury and damage to property.
To avoid the risk of accidents and damage to the tumble dryer, please read these instructions carefully before using it for the first time. They contain important information on its safety, installation, use and maintenance.
Keep these instructions in a safe place and ensure that new users are familiar with the content. Pass them on to any future owner.
Correct application
This tumble dryer is designed for domestic use and for use in similar environments by guests in hotel or motel rooms, bed & breakfasts and other typical living quarters. This does not include common/shared facilities or commercial facilities within hotels, motels or bed & breakfasts.
This tumble dryer is not suitable for outdoor use.
It must only be used to dry items which have been washed in a water solution and which are marked on the manufacturer's care label as being suitable for tumble drying. If using dry cleaning kits, do so at your own risk, and follow the instructions provided on the packaging.
Any other applications may be dangerous. Miele cannot be held liable for damage resulting from incorrect or improper use or operation.
6

Warning and Safety instructions
This appliance is not intended for use by persons (including children) with reduced physical, sensory or mental capabilities, or lack of experience or knowledge, unless they are supervised whilst using it or have been shown how to use it by a person responsible for their safety.
Safety with children
Young children must not be allowed to use this appliance.
Older children may only use the appliance when its operation has been clearly explained to them and they are able to use it safely, recognising the dangers of misuse.
Children must not be allowed to clean or maintain the tumble dryer unsupervised.
Please supervise children in the vicinity of the tumble dryer and do not let them play with it.
7

Warning and Safety instructions
Technical safety
Before setting up the tumble dryer, check it for any externally visible damage.
Do not install or use a damaged tumble dryer.
Before connecting the tumble dryer, ensure that the connection data on the data plate (fuse rating, voltage and frequency) matches the mains electricity supply. If in any doubt, consult a qualified electrician.
The electrical safety of this tumble dryer can only be guaranteed when correctly earthed. It is essential that this standard safety requirement is met. If in any doubt, please have the household wiring system tested by a qualified electrician. Miele cannot be held liable for the consequences of an inadequate earthing system (e.g. electric shock).
Reliable and safe operation of this tumble dryer can only be assured if it has been connected to the mains electricity supply.
Do not connect the tumble dryer to the mains electricity supply by an extension lead. Extension leads do not guarantee the required safety of the appliance (e.g. danger of overheating).
If the connection cable is faulty, it must only be replaced by a Miele approved service technician to protect the user from danger.
Unauthorised repairs could result in unforeseen dangers for the user, for which Miele cannot accept liability. Repairs should only be undertaken by a Miele authorised service technician, otherwise any subsequent damage will not be covered by the warranty.
Faulty components must only be replaced by genuine Miele spare parts. Miele can only guarantee the safety of the appliance when Miele replacement parts are used.
8

Warning and Safety instructions
In the event of a fault or for cleaning purposes, the tumble dryer is only completely isolated from the electricity supply when:
–it is switched off at the wall socket and the plug is withdrawn, or
–it is switched off at the mains circuit breaker.
This tumble dryer must not be installed and operated in mobile installations (e.g. on a ship).
Do not make any alterations to the tumble dryer, unless authorised to do so by Miele.
Heat pump technology and refrigerant:
The heat pump in this tumble dryer uses a refrigerant which is condensed by the compressor and led in a closed circuit through the heat exchanger unit where heat exchange with the circulating drying air takes place.
–The humming noises caused by the heat pump are normal and do not impair the efficient functioning of the dryer.
–The refrigerant is not flammable or explosive.
–In general it is not necessary to leave the dryer standing for any length of time before it is connected to the mains provided it has been transported and installed correctly.
9

Warning and Safety instructions
Please observe the instructions in "Installation and connection" and "Technical data".
The accessibility of the plug must be always ensured in order to separate the tumble dryer from the mains.
Do not block the gap between the bottom of the tumble dryer and the floor with plinth facings, deep pile carpet etc. This would hinder a sufficient flow of air to the tumble dryer.
Make sure the dryer door can be opened without hindrance after installation.
10
Warning and Safety instructions
Correct use
Caution! Risk of fire.
To avoid the possible danger of fire, please read these warnings carefully.
A clogged filter is a fire hazard!
The fluff filter must be cleaned after every programme.
The maximum load for this tumble dryer is 9.0 kg (dry weight). See the "Programme chart" for the maximum recommended loads for individual programmes.
To prevent the risk of fire, do not connect the tumble dryer via a controllable socket (e.g. a timer or a peak-load switch-off device). If the drying programme is interrupted before the end of the cooling down phase, this could cause the laundry to self-ignite.
11

Warning and Safety instructions
To prevent the risk of fire, the following textiles must not be dried in this tumble dryer:
–Items which have not been washed.
–Items, such as workwear, which have not been thoroughly cleaned and which are still soiled with grease, oil or other desposits (such as cosmetics, lotions etc). If items have not been thoroughly cleaned, there is a danger that these might ignite when heated, even after they have been removed from the dryer at the end of the programme.
–Items that have been soiled with substances such as cooking oil, acetone, petrol, kerosene, spot removers, turpentine, waxes, wax removers and other chemicals (e.g. mops and floor cloths).
–Items which have been splashed with hair lacquer, hair spray, nail varnish remover or similar substances.
When washing such heavily soiled items ensure that you use sufficient detergent and select a high temperature. If in doubt, wash the items several times.
Oil-affected items can ignite spontaneously, especially when exposed to heat sources such as in a tumble dryer.
The items become warm, causing an oxidation reaction in the oil. Oxidation creates heat.
If the heat cannot escape, the items can become hot enough to catch fire. Piling, stacking or storing oil-affected items can prevent heat from escaping and so create a fire hazard.
If it is unavoidable that fabrics contaminated with vegetable or cooking oil, or hair care products, be placed in a tumble dryer, they should first be washed in hot water with extra detergent - this will reduce, but not eliminate, the hazard.
Remove all items from pockets (e.g. lighters, matches).
12

Warning and Safety instructions
Warning: Ensure that you always wait until the end of the programme before removing the laundry. If the drying programme is stopped prematurely, remove the laundry immediately and hang it up or spread it out to cool it down.
Fabric softener and similar products must be used according to the instructions on the manufacturer's packaging.
To prevent the risk of fire, the following textiles must not be dried in this tumble dryer:
–Items which have been cleaned using chemicals (e.g. professional dry-cleaning agents).
–Fabrics which contain a large proportion of rubber, foam rubber or rubber-like materials. For example, products made from latex foam rubber, shower caps, waterproof textiles, rubberised articles and items of clothing and pillows with foam rubber filling.
–Damaged fabrics which contain padding or fillings (e.g. pillows, jackets). When damaged, the filling can get out with the risk of it igniting in the dryer.
In many programmes, the heating phase is followed by a cooling down phase to ensure that the items are not too hot to handle when you remove them (this also avoids the danger of the laundry selfigniting). The programme is not finished until the cooling down phase has been completed.
As soon as the programme has finished, remove all laundry from the drum.
Do not let anyone sit or lean on the door, as this can cause the tumble dryer to tip up.
Always close the door after use. This way you will avoid the danger of:
–children climbing onto or into the dryer or hiding things in it.
–pets or other small animals climbing into it.
13

Warning and Safety instructions
The tumble dryer must not be used without or
–with damaged fluff filters.
–with a damaged plinth filter.
This would cause an excessive build-up of fluff which in turn would cause a fault.
The fluff filters must be cleaned after every drying cycle.
Fluff must not be allowed to accumulate around the tumble dryer.
The fluff filters and the plinth filter must be thoroughly dried after cleaning. Do no replace them if they are damp or wet. Damp or wet filters could cause operational faults.
Do not install the tumble dryer in a room where there is a risk of frost occurring. At temperatures around freezing point the tumble dryer may not be able to operate properly. There is a risk of damage if the condensed water is allowed to freeze in the pump and hoses.
If the water is drained externally through the drain hose instead of being collected in the condensed water container, make sure the drain hose is securely attached if you hang it in a sink or basin to avoid the hose slipping and the water causing damage.
Condensed water is not drinking water.
It can cause health problems in both people and animals.
Always keep the area around the tumble dryer free of dust and fluff.
Dust drawn into the tumble dryer can cause blockages in the heat exchanger over time.
The tumble dryer must not be hosed down.
14

Warning and Safety instructions
Using a fragrance flacon (optional accessory)
Only use genuine Miele original fragrance flacons.
The fragrance flacon must be stored in its packaging so please make sure you retain this.
Caution. The fragrance can run out of the flacon. Make sure that you always keep the flacon, or the fluff filter with the flacon inserted in it, in a horizontal position when carrying and do not tip or place down on any surface.
Use an absorbent cloth immediately to wipe up any fragrance which has run out of the flacon onto the floor, the dryer or any dryer components (e.g. the fluff filter).
If fragrance which has run out of a flacon should come in contact with the skin - wash the skin thoroughly with soap and water; come in contact with the eyes - rinse the eyes with clean water for at least 15 minutes; be swallowed - rinse out the mouth thoroughly with clean water. Seek medical advice in the case of contact with the eyes or if fragrance has been swallowed.
If fragrance which has run out of a flacon comes in contact with clothing, change the clothing immediately. Wash the clothing or any cloths used for mopping up fragrance thoroughly with plenty of water and detergent.
There is the risk of fire or damage to the tumble dryer if the following instructions are not observed:
–Never refill a flacon with fragrance.
–Never use a faulty fragrance flacon.
Dispose of an empty fragrance flacon with the household waste and never use it for any other purpose.
Please also observe the information supplied with the fragrance flacon.
15

Warning and Safety instructions
Accessories
Only use genuine Miele spare parts and accessories with this appliance. If spare parts or accessories from other manufacturers are used, this will invalidate the warranty, and Miele cannot accept liability.
A Miele tumble dryer can be stacked on top of a Miele washing machine using the appropriate stacking kit (available as an optional accessory). Please make sure you order the correct one for the Miele washing machine and Miele tumble dryer.
Miele cannot be held liable for damage caused by noncompliance with these Warning and Safety instructions.
16
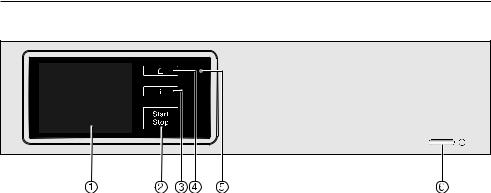
Operating the tumble dryer
Control panel
aTouch display
See the next page for more information.
bStart/Stop sensor
For starting the programme selected and cancelling a programme once it has started.
The programme selected can be started as soon as the sensor starts flashing.
c sensor
The sensor lights up when information about the menu in the display is available.
d sensor
For returning to the main menu. Values set previously are not saved.
eOptical interface
For service technicians.
f button
For switching the tumble dryer on and off. To save energy, the tumble dryer will switch off automatically 15 minutes after the end of the programme/Anti-crease phase or after being switched on if no other selection is made.
17

Operating the tumble dryer
Touch display and sensors
The , and Start/Stop sensors and the sensors in the display react to fingertip contact.
The display can be scratched by pointed or sharp objects, e.g. pens.
Only touch the touch display with your fingertips.
Touching the sensors in the display reveals a list of options or a sub-menu and also takes you to another menu.
In some instances, if you do not touch one of the sensors for several seconds, the display will revert to the previous menu. You may then need to enter the settings again.
Main menu
After switching on, the main menu will appear in the display.
You access all the important submenus from the main menu.
You can return to the main menu at any time by touching the sensor. Values set previously are not saved.
10:30
1Programmes
2Favourite programmes
3 |
Drying assistant |
|
4 |
|
|
5 |
|
|
Programmes
For selecting a programme.
Favourite programmes
You can save up to ten of your own customised programmes.
See "Favourite programmes" for more information.
Drying assistant
The Drying assistant guides you step by step so that you can select the optimum drying programme for your laundry.
See "Drying assistant" for more information.
Scroll bar
The scroll bar indicates that further options or more text follows.
The width of the scroll bar changes depending on the length of the option list or information.
The position of the scroll bar indicates where you are in a list or block of text.
Navigation sensors
You can use the and sensors to scroll through a list or block of text.
Touch the sensor to scroll to the second page of the main menu .
10:30
6 Mixed items
7 Settings
|
|
18

Operating the tumble dryer
Mixed items
For drying a small mixed load consisting of different types of fabric when it is not obvious which programme is the most suitable.
The tumble dryer will use the list of items to determine the correct programme setting.
See "Mixed items" for more information.
Settings
You can alter the tumble dryer's electronics to suit changing requirements in the Settings menu.
See "Settings menu" for more information.
Examples on how to operate the appliance
Option lists
Programmes menu (single option list):
Programmes
Cottons |
Minimum iron |
Delicates |
Express |
Automatic plus |
Denim |
|
|
Touching the or sensor scrolls to the left or right of the list.
The scroll bar indicates that further options follow.
Touch a programme name to select the programme.
The load for the programme selected will appear in the display.
After a few seconds or if you confirm with the OK sensor, the display will change to show the standard menu for the programme selected.
19

Operating the tumble dryer
Extras menu (multiple option list):
Extras
Freshen up |
ECO |
Anti-crease |
Auto load |
control |
|
Gentle tumble |
Turbo |
|
OK |
Touch an Extra to select it.
The Extra currently selected will be marked with a and only the Extras which can be combined with it will be displayed.
The OK sensor activates / saves the marked Extra.
The sensor takes you back a menu level.
Touch the Extra again to deselect it.
Setting numerical values
You can set numerical values in some menus.
Duration
0 : 20 h
(0:20–2:00 h )
– +
|
OK |
The numerical value is highlighted in white. Touching the – sensor decreases the value and touching the + sensor increases it. The OK sensor is used to adopt the selected value.
Useful tip: The values will count upwards and downwards automatically if you keep your finger on the + or – sensor.
20
Before using for the first time
Removing the protective foil and stickers
Please remove
–the protective foil from the door.
–any stickers from the front and the lid (Exception: warning labels must not be removed).
Please do not remove any labels (e.g. the data plate) which are visible when you open the door.
After installing the tumble dryer
Before using the tumble dryer for the first time, ensure that it is installed and connected to the electricity supply correctly. If it has not been transported as described in "Installation and connection", then it must be left to stand for at least 1 hour before it is connected to the electricity supply.
When the tumble dryer is switched on, the welcome display Miele Willkommen will appear briefly.
Setting the language
You will be asked to select the language you want for the display. It is possible to change the language at any time after setting it via "Settings".
Sprache
bahasa malaysia |
čeština |
|
dansk |
deutsch |
|
english (AUS) |
english (GB) |
|
|
|
|
Touch the or sensor until the language you want appears.
Touch the sensor for the language you want.
The language selected will be marked with a tick and the display for setting the Clock format will appear.
Setting the clock format
Select the required Clock format:
24 h clock or 12 h clock.
The clock format selected will be marked with a tick and the display for setting the Time will appear.
21

Before using for the first time
Setting the time of day
Time
12 : 00
– +
OK
Use the – and + sensors to set the current hour and confirm with OK.
Set the minutes in the same way and confirm with OK.
Useful tip: If you have selected the 12hour clock format, you can then select
am or pm.
Setting up the appliance
Some information will appear.
Confirm the information with OK.
The display will change to show the main menu .
Read "1. Notes on correct laundry care" and "2. Loading the tumble dryer".
You can then load the tumble dryer and select a programme as described in "3. Selecting a programme and starting it".
The procedure for using for the first time is completed when a programme lasting longer than one hour has been carried out in full.
22

EcoFeedback
You can view information about the energy consumption of your tumble dryer with the ECO feedback sensor.
–An estimate of the consumption before the programme begins.
–During or after drying, the energy consumption (kWh) and the cost
(Price per kWh).
1. Estimate before drying
After selecting a programme, touch
the ECO feedback sensor.
For a few seconds bars which indicate the estimated consumption will be shown:
Energy
The more bars visible, the higher the energy consumption.
The estimate will vary depending on the programme and any options selected.
2. Actual consumption during the drying programme
Consumption data and cost, if these have been set (see "Settings menu"), can be displayed.
Touch the Change sensor.
Touch the ECO feedback sensor.
You can view the actual amount of energy used. For example:
Energy |
2.0 kWh |
Cost |
0.00 5 1 |
< 0.1 kWh will be displayed if the energy consumption is very low, with the cost appearing as 0.00.
The consumption/cost will vary depending on the programme stage and residual moisture present.
After a few seconds Change will reappear at the bottom left.
It is also possible to view the level of soiling in the filter as a % at the end of the programme before opening the door: Filter (0 % = light, 50 % = medium, 100 % = heavy). The more soiled the filter, the longer the programme will take. This will also result in an increased level of energy consumption.
If the door is opened or the appliance has switched off automatically at the end of the programme, the data will revert to the estimated consumption.
Total consumption setting
See "Settings menu" for more detailed information.
–Shows consumption data for the programme which has just been run
and
–shows total energy consumption to date.
23

1. Notes on correct laundry care
Points to note regarding washed laundry
–When washing very heavily soiled items, ensure that you use sufficient detergent and select a high temperature. If in doubt, wash the items several times.
–Do not put soaking wet items into the tumble dryer. Make sure your laundry is thoroughly spun before drying. The higher the spin speed, the greater the savings that can be made in energy and time during drying.
–New dark coloured garments should be washed and dried separately from light coloured garments to avoid the danger of colours running and discolouring other garments or even plastic components in the dryer. Dark coloured fibres can also settle on light coloured garments and vice versa.
–Starched laundry can be dried in the tumble dryer. To achieve the usual finish, double the amount of starch should be used.
Preparing the laundry before drying
Make sure that any objects, e.g. detergent dosing balls, lighters etc. have been removed from the laundry.
They could melt or explode and cause damage to the tumble dryer or the laundry.
See "Warning and Safety" instructions for further information.
Loading or using the tumble dryer incorrectly could cause a fire.
–Sort the laundry according to the type of fibre and weave, size, garment care label symbol and the drying level required.
–Check the seams of padded or down-filled items to prevent the risk of fillings coming out. These could catch fire when being dried.
–Disentangle the laundry.
–Tie together textile belts and apron ties.
–Fasten . . .
. . . duvet covers and pillow cases to prevent small items from being trapped inside them.
. . . hooks and eyes.
–Sew in or remove underwiring from bras.
–Leave jackets open and undo any long zips so that textiles dry evenly.
–Minimum iron fabrics tend to crease more, the greater the load. This is also the case for garments made from very fine weave fabric, such as shirts or blouses. If necessary, reduce the size of the load for these types of fabric.
24

1. Notes on correct laundry care
Garment care label symbols
Drying
Normal/Higher temperature
Reduced temperature:
Select Gentle tumble (for delicate textiles)
Do not tumble dry
Ironing
Very hot
Hot
Warm
Do not iron
Laundry care when drying in a tumble dryer
See the "Programme chart".
This describes the programmes and gives their maximum load.
–Load according to the optimum amount of laundry recommended for the programme being used. Underloading is uneconomical. Overloading gives a poorer quality of drying and may cause unnecessary creasing.
–With half loads you can select the
Auto load control Extra.
–Select an appropriate drying level, e.g. . . .
. . . Normal plus if you want to fold and put away the laundry after you take it out of the dryer.. . . Machine iron if the laundry, e.g. table linen, requires further processing after drying.
–Down-filled garments have linings which have a tendency to shrink, depending on the quality of the item. They can be partially dried using the
Gentle smoothing programme.
–Pure linen should only be machine dried if specified as suitable by the manufacturer on the care label, as the surface of the fabric may otherwise become rough. It can be partially dried using the Gentle smoothing programme.
–Woollens and wool blends tend to become matted and shrink if dried in a tumble dryer. They can, however, be "fluffed up" in the Woollens handcare programme.
–Loopknit garments (e.g. T-shirts and underwear) tend to shrink depending on their quality. Do not overdry these textiles. When purchasing these garments, it is advisable to take their shrinkage properties into account.
–Select the Gentle tumble Extra for fabric which is particularly heatsensitive or susceptible to creasing.
25

2. Loading the tumble dryer
It is essential to read "1. Notes on correct laundry care" first of all.
Switch the tumble dryer on by pressing the button.
The interior drum lighting will come on.
The interior drum lighting will automatically go out after a few minutes and/or after the start of a programme to save energy.
Opening the door
Pull the door open at the side with the orange marker.
Unfold the laundry and load loosely into the drum.
Do not overload the drum.
Overloading can cause unnecessary wear and tear to the laundry, give a disappointing drying result and cause more creasing.
When closing the door, make sure that laundry does not get trapped in the door opening.
This could damage the laundry.
If you are not using a fragrance flacon: the tab must be pushed down completely (see arrow).
Closing the door
Shut the door with a gentle swing.
26

3. Selecting a programme and starting it
Selecting a programme
You can select a programme via the following sensors:
–(1) Programmes or
–(2) Favourite programmes or
–(3) Drying assistant or
–(4) Mixed items
(1) Programmes
Touch the Programmes sensor in the main menu .
The programmes will appear in the display.
Programmes
Cottons |
Minimum iron |
Delicates |
Express |
Automatic plus |
Denim |
|
|
You can use the and sensors to select a programme from a list.
Touch the sensor for the programme you want to select.
Load
Cottons
1–9 kg
OK
When a programme is selected, the maximum load (weight of dry laundry) possible for the programme will appear in the display for a few seconds.
You can confirm with OK or wait a few seconds until the display changes to show the standard menu for the programme.
If you think you have loaded too much laundry, remove a few items.
27

3. Selecting a programme and starting it
Programmes with drying levels
–Cottons, Minimum iron, Delicates, Denim, Shirts, Express, Gentle smoothing, Steam smoothing, Automatic plus, Sportswear, Outerwear, Extra quiet
The drying level can be altered after selecting one of these programmes.
Cottons |
2:00 h |
10:30 |
Drying level |
Extras |
|
Normal |
|
|
Start at |
ECO feedback |
|
Touch the Drying level sensor to select a different drying level.
Drying level
Extra dry |
Normal plus |
Normal |
Slightly dry |
|
|
|
|
The currently selected drying level will be marked with a tick .
You can use the and sensors to select a drying level from a list.
Not all drying levels are suitable for use with every programme and so the range is limited (see the "Programme chart").
Touch the sensor for the drying level you want.
Important: When selecting the
Steam smoothing programme, you
must make sure that the condensed water container has been filled as described in these operating instructions (see "Cleaning and care").
28

3. Selecting a programme and starting it
Other programmes and the timed drying programmes
–Cottons , Woollens handcare, Silks handcare, Standard/Large pillows, Proofing, Cottons hygiene
The drying level and the duration are preset and cannot be altered.
–Cool air, Warm air, Basket programme
You can select the duration in tenminute stages.
Cool air = 0:20 - 1:00 h Warm air = 0:20 - 2:00 h
Basket programme = 0:40 - 2:30 h
Warm air |
0:20 h |
10:30 |
Duration |
Extras |
|
0:20 h |
|
|
Start at |
ECO feedback |
|
Touch the Duration sensor.
The field which can be changed is highlighted and the other field will have a square around it. You can select the minutes or the hour by touching the appropriate field:
Duration
0 : 20 h
(0:20–2:00 h )
– +
|
OK |
Set the hour and/or minutes with the
– and + sensors.
Finally confirm with OK.
29

3. Selecting a programme and starting it
Alternative ways of selecting the programme
(2) Favourite programmes
You can customise up to 10 programmes and save these under names of your choice. These programmes can then be selected from a list.
–The Favourite programmes are selected in the main menu by
touching the Favourite programmes
sensor.
–See "Favourite programmes".
Useful tip: You can easily save a programme which is currently running as a favourite:
After the programme has started, touch the Save sensor.
Please read the information under "Favourite programmes" from "2. Entering a name".
(3) Drying assistant
You can also select a programme from here by selecting the type of fabric to be dried. You can then select Extras or a drying level, if these are available for selection.
– The Drying assistant is selected in the main menu by touching the
Drying assistant sensor.
– See "Drying assistant".
(4) Mixed items
If you want to dry a mixed load, you can select from a list of 19 different items. The dryer will use the list to select the correct programme setting.
– Mixed items can be selected in the main menu by touching the Mixed items sensor.
– See "Mixed items".
30
Loading...