


Installation Instructions
. 9L . 9L HQ &$
. 9L . 9L
,QVWDOODWLRQ UHSDLU DQG PDLQWHQDQFH ZRUN VKRXOG EH SHUIRUPHG E\
D 0LHOH DXWKRUL]HG VHUYLFH WHFKQLFLDQ LQ DFFRUGDQFH ZLWK QDWLRQDO
DQG ORFDO VDIHW\ UHJXODWLRQV DQG WKH SURYLGHG LQVWDOODWLRQ LQVWUXFWLRQV

Caring for the environment
Disposing of the packaging materials
The packaging is designed to protect the appliance from damage during transportation. The packaging materials used are selected from materials which are environmentally friendly for disposal and should be recycled.
Ensure that any plastic wrappings, bags, etc. are disposed of safely and kept out of the reach of children. Return the packaging to your dealer.
Disposal of your old appliance
Old appliances may contain materials that can be recycled. Please contact your local recycling authority about the possibility of recycling these materials.
Please take care not to damage the pipework while the appliance is being stored for transport to a waste disposal facility.
By protecting the pipework, you help keep the coolants and compressor oil from contaminating the environment.
Before discarding an old appliance disconnect it from the electrical supply and cut off the power cord to prevent it from becoming a hazard.
36

Installation
Have the appliance installed by a qualified technician, according to the enclosed installation instructions.
WARNING
This appliance is top-heavy and must be secured to prevent it from tipping forward.
Keep the door closed until the appliance is completely installed and secured as per the installation instructions.
Empty weight of your machine:
K 18x3 Vi . . . . . . . . . . 419 lbs (189 kg)
K 19x3 Vi . . . . . . . . . . 452 lbs (205 kg)
Climate Range
The appliance is designed for use within certain climate ranges (ambient temperatures) and should not be used outside this range. The climate range of this appliance is stated on the data plate inside the appliance.
Climate |
Ambient room temperature |
|
range |
|
|
|
|
|
SN |
+50°F (10 |
°C) to +90°F (32 °C) |
N |
+60°F (16 |
°C) to +90°F (32 °C) |
ST |
+60°F (16 |
°C) to +100°F (38 °C) |
T |
+60°F (16 |
°C) to 110°F (43 °C) |
|
|
|
Operating in a room which is too cold will cause the compressor to switch off for too long, causing the internal temperature in the appliance to rise with the risk of food deteriorating and going off.
Installation site
The appliance should be installed in a dry, well ventilated room.
Do not install the appliance:
-outdoors,
-in an environment with dripping water,
-in rooms which are at risk of frost.
The installation location should not be exposed to direct sunlight, nor near a heat source, such as an oven, radiator, etc.
The ambient temperature should not drop below 55°F (13°C) or rise above 110°F (43°C), otherwise malfunctions may occur.
If installation next to a heat source is unavoidable observe the following minimum distances from the heat source:
–1 1/4" (3 cm) from an electric cooktop or electric oven.
–12" (30 cm) from a gas or oil cooktop, range or oven.
The following should also be taken into consideration:
–The electrical outlet must be easily accessible in case of an emergency,not concealed behind the appliance.
–The plug and cord must not touch the rear of the appliance as they could be damaged by vibrations from the appliance.
–Do not plug in other devices behind this appliance.
37

Installation
Important! When there is high humidity a build-up of condensation on the outer surfaces of the appliance can occur.This can cause the surfaces to corrode.To prevent this, it is advisable to install the appliance in a dry and/or an air-conditioned room with sufficient ventilation.Please ensure that doors close and seal properly after installation and that the appliance is installed in accordance with these installation instructions and and with the required ventilation openings.
–If the room is too cold, it will cause the cooling system in the appliance to remain off for too long.This can cause the temperature in the appliance to rise, resulting in damage.
38

Installation
Base
A fully loaded appliance is very heavy. The load-bearing capacity of your floor must meet the following requirements:
K 18x3 Vi . . . . . . . . . . 996 lbs (452 kg)
K 19x3 Vi . . . . . . . . . 1,191 lbs (540 kg)
To ensure that the appliance is installed securely and functions properly, the base must be flat, level and made of a hard, rigid material.
If in doubt, contact Miele.
Furniture/fixtures
The new appliance will be mounted securely to adjacent and overhead furniture/fixtures.
For this reason it is essential that all attachable furniture/fixtures are connected securely to the base or the wall by suitable means.
Ventilation
The air intake and outlet must not be blocked or covered in any way. They also need to be dusted/cleaned on a regular basis.
Installation niche
To ensure safe, trouble-free installation and the best possible cosmetic result, check to be sure that the installation space complies with the installation dimensions. See "Niche dimensions".
The side walls of the installation cavity must be plumb.
The minimum thickness of the side walls and the top wall must be 5/8" (16 mm).
The minimum thickness of the toe-kick panel must be ½" (13 mm). A thickness of 3/4" (19 mm) is recommended.
39

Installation
Stainless steel panels
Stainless steel door panels and toe-kick covers are available from Miele.
Custom door panels
This appliance is compatible with all styles and designs of kitchen cabinetry.
The total weight of the decorative panel(s) must not exceed the following:
K 18x3 Vi. . . . . . . . . . . . 110 lbs (50 kg)
K 19x3 Vi. . . . . . . . . . . . . 81 lbs (37 kg)
Installation options
There are many different installation options. These are limited only by the design of the kitchen.
The door hinge cannot be exchanged.
Single column
The appliance can be installed at any preferred location in the kitchen.
However, be sure the door will open and close properly in the chosen location.
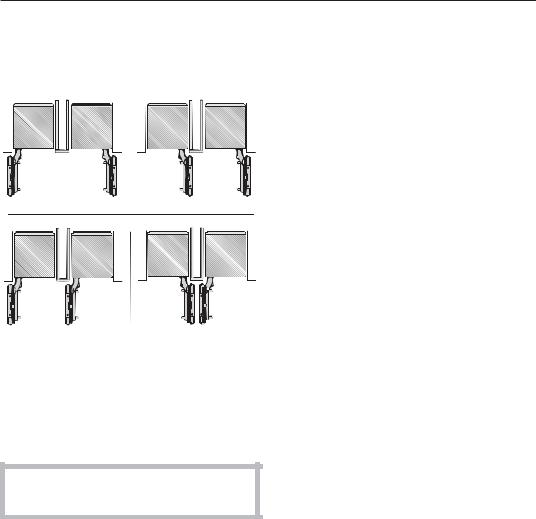
Side-by-side
This appliance can be installed "side-by-side" with another fridge/freezer using a "Merging Kit".
The "Merging Kit" is available from Miele.
Contact Miele or your dealer for specific information about which combinations will work with your appliance.
For instructions on how to attach the appliances and install the heating mat, please refer to the instructions included with the "Merging Kit", available from Miele.
Installation without a partition using the "Merging Kit"
If the appliances are installed directly next to each other (without a partition), they need to be attached together using the "Merging Kit".
40
Installation
Installation with partition using the "Merging Kit"
The minimum thickness of the partition is 5/8" (16 mm).
If there is a partition with a thickness
from 5/8" (16 mm) to 6 5/16" (160 mm) between the adjacent appliances, then
each appliance should be individually installed within its own niche using the mounting accessories included.
The "Merging Kit" will also be needed.
The "Merging Kit" is available from Miele.
Installation with partition without using the "Merging Kit"
If there is a partition with a thickness of more than 6 5/16" (160 mm) between the adjacent appliances, then each appliance should be individually installed within its own niche using the mounting accessories included (the "Merging Kit" is not necessary).
Side panels
If one side of the appliance is visible, a side panel must be used.
The side panel must be firmly secured to the wall, the floor and the overhead furniture/fixtures before the appliance is placed in the cavity.
The dimensions of the side panel are taken from the opposite wall of the installation space. During installation, ensure that the cavity is square and the measurements are correct.
41
Installation
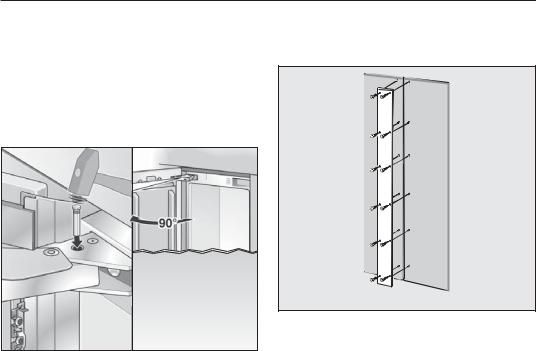
Adjusting the door opening angle (optional accessory)
Depending on the installation site, it may be necessary to adjust the door opening angle to 90°.
Open the door.
Insert the banking pin through the holes and drive in with a hammer.
The door opening angle is now limited to 90°.
Front panel gap kit (optional accessory)
Two adjacent furniture doors can be attached instead of one large door.
To connect these furniture doors on the rear, a metal strip can be purchased as an optional accessory. Contact Miele.
When attaching the metal strip to the furniture doors, observe the maximum length of the screws and the position of the drill holes.
Always screw into the best possible load-bearing material of the custom doors.
42
Dimensions
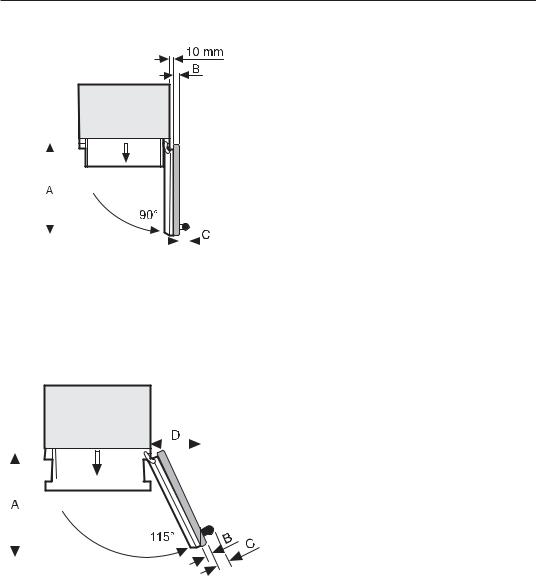
Door dimensions (open min. 90°)
*The dimensions of the door fronts and handles will vary according to each individual kitchen.
3/8" (10 mm)
|
|
|
|
|
|
|
|
|
|
|
|
|
|
|
|
|
|
|
|
|
|
|
|
|
|
|
|
|
|
|
|
|
|
|
|
|
|
|
|
|
|
|
|
|
|
|
|
|
|
|
|
|
|
|
|
|
|
|
|
|
|
|
|
|
|
|
|
|
|
|
|
|
|
|
|
|
|
|
|
|
|
|
|
|
|
|
|
|
|
|
|
|
|
|
|
|
|
|
|
|
|
|
|
|
|
|
|
|
|
|
|
|
|
|
|
|
|
|
|
|
|
|
|
|
|
|
|
|
|
|
|
|
|
|
|
|
|
|
|
|
|
|
|
|
|
|
|
|
|
|
|
|
|
|
|
|
|
|
|
|
|
|
|
|
|
|
|
|
|
|
|
|
|
|
|
|
|
|
|
|
|
|
|
|
|
|
|
|
|
|
|
|
|
|
|
|
|
|
|
|
|
|
|
|
|
|
|
|
|
|
|
|
|
|
|
|
|
|
|
|
|
|
|
|
|
|
|
|
|
|
|
|
|
|
|
|
|
|
|
|
|
|
|
|
|
|
|
A |
B |
C |
|||||||||
|
|
|
|
|
|
|
|
|
|
|
|
|
|
|
|
|
|
|
|
K 18X3 Vi |
32 |
5/ |
" (829 mm) |
Door front max. 1 1/2" (38 mm) |
Door handle* |
||||||||||||||
|
|
|
|
|
|
8 |
|
|
|
|
|
|
|
|
|
|
|
|
|
K 19X3 Vi |
38 11/ |
16 |
" (982 mm) |
Door front max. 1 1/2" (38 mm) |
Door handle* |
||||||||||||||
|
|
|
|
|
|
|
|
|
|
|
|
|
|
|
|
|
|
|
|
Door dimensions (open min. 115°C)
*The dimensions of the door fronts and handles will vary according to each individual kitchen.
|
|
|
|
|
|
|
|
|
|
|
|
|
|
|
|
|
|
|
|
|
|
|
|
|
|
|
|
|
|
|
|
|
|
|
|
|
|
|
|
|
|
|
|
|
|
|
|
|
|
|
|
|
|
|
|
|
|
|
|
|
|
|
|
|
|
|
|
|
|
|
|
|
|
|
|
|
|
|
|
|
|
|
|
|
|
|
|
|
|
|
|
|
|
|
|
|
|
|
|
|
|
|
|
|
|
|
|
|
|
|
|
|
|
|
|
|
|
|
|
|
|
|
|
|
|
|
|
|
|
|
|
|
|
|
|
|
|
|
|
|
|
|
|
|
|
|
|
|
|
|
|
|
|
|
|
|
|
|
|
|
|
|
|
|
|
|
|
|
|
|
|
|
|
|
|
|
|
|
|
|
|
|
|
|
|
|
|
|
|
|
|
|
|
|
|
|
|
|
|
|
|
|
|
|
|
|
|
|
|
|
|
|
|
|
|
|
|
|
|
|
|
|
|
|
|
|
|
|
|
|
|
|
|
|
|
|
|
A |
B |
C |
|
D |
|||||||
|
|
|
|
|
|
|
|
|
|
|
|
|
|
|
|
|
|
|
|
|
|
|
|
|
K 18X3 Vi |
32 |
5/ |
" (829 mm) |
Door front max. |
Door handle* |
14 |
5/16" |
|||||||||||||||||
|
|
|
|
|
|
|
|
|
|
8 |
|
|
|
|
|
|
|
|
|
|
|
|
|
|
|
|
|
|
|
|
|
|
|
|
|
|
|
|
|
|
|
|
|
|
|
1 1/2" (38 mm) |
|
(363 mm) |
|
|
|
|
|
|
|
|
|
|
|
|
|
|
|
|
|
|
|
|
|
|
|
|
|
|
K 19X3 Vi |
38 11/ |
16 |
" (982 mm) |
Door front max. |
Door handle* |
16 |
7/8" |
|||||||||||||||||
|
|
|
|
|
|
|
|
|
|
|
|
|
|
|
|
|
|
|
|
|
1 1/2" (38 mm) |
|
(428 mm) |
|
|
|
|
|
|
|
|
|
|
|
|
|
|
|
|
|
|
|
|
|
|
|
|
|
|
43
Dimensions
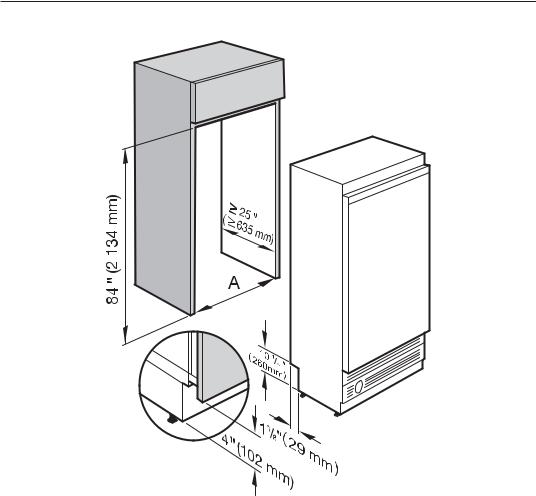
Niche dimensions
|
Niche width (A) |
|
|
K 18X3 Vi |
30" (762 mm) |
|
|
K 19X3 Vi |
36" (915 mm) |
|
|
44
Dimensions
Power supply
1. Power supply
|
|
|
|
|
|
|
|
|
|
|
|
|
A |
|
|
|
|
|
|
|
|
|
|
|
|
|
|
|
|
|
|
|
|
|
|
|
|
|
|
|
|
|
|
|
|
|
|
|
|
|
|
|
|
K 18X3 Vi |
15" (381 mm) |
|
|
|
|
|
|
|
|
|
|
|
|
||
|
|
|
|
|
|
|
|
|
|
|
|
|
|
|
|
|
|
|
|
|
|
|
|
|
|
K 19X3 Vi |
18" (458 mm) |
|
|
|
|
|
|
|
|
|
|
|
|
|
|
|
|
|
|
|
|
|
|
|
|
|
|
|
|
|
|
|
|
|
|
|
|
|
|
|
|
|
|
|
|
|
|
|
|
|
|
|
|
|
|
|
|
|
|
|
|
|
|
|
|
|
|
|
|
|
|
|
|
|
|
|
|
|
|
|
|
|
|
|
|
|
|
|
|
|
|
|
|
|
|
|
|
|
|
|
|
|
|
|
|
|
|
|
|
|
|
|
|
|
|
|
|
|
|
|
|
|
|
|
|
|
|
Power bars or extension cords are not safe (risk of fire). Do not use them to connect the appliance to the power supply.
45
 Loading...