


 Loading...
Operating and Installation
Instructions
Refrigerators
To prevent accidents and machine damage, read these instructions before installation or use.
en-US, CA |
M.-Nr. 11 508 620 |

Contents |
|
IMPORTANT SAFETY INSTRUCTIONS ............................................................ |
5 |
Caring for the environment .............................................................................. |
14 |
Installation.......................................................................................................... |
15 |
Installation location ............................................................................................. |
15 |
Climate class .................................................................................................. |
15 |
Installation notes ................................................................................................. |
16 |
Adjoining cabinetry/units................................................................................ |
16 |
Load-bearing capacity of the niche floor ....................................................... |
17 |
Ventilation....................................................................................................... |
17 |
Door hinge...................................................................................................... |
17 |
Side-by-side................................................................................................... |
18 |
Installation dimensions........................................................................................ |
20 |
Position of the electrical connection .............................................................. |
20 |
Dimensions when the appliance door is open (opening angle 90°/115°)....... |
23 |
Building in the appliance ..................................................................................... |
24 |
Before starting................................................................................................ |
24 |
Tools required................................................................................................. |
24 |
Aligning the installation niche......................................................................... |
25 |
Checking the installation niche ...................................................................... |
25 |
Before installation........................................................................................... |
26 |
Preparing the installation niche ...................................................................... |
27 |
Pushing the appliance into the niche ............................................................. |
29 |
Aligning the refrigeration appliance................................................................ |
31 |
Securing the appliance in the niche ............................................................... |
33 |
Securing the toe-kick board and cover.......................................................... |
34 |
Aligning the appliance door............................................................................ |
34 |
Limiting the opening angle of the appliance door.......................................... |
37 |
Electrical connection ........................................................................................... |
38 |
Saving energy .................................................................................................... |
40 |
Guide to the appliance...................................................................................... |
42 |
Main screen......................................................................................................... |
44 |
Settings mode ................................................................................................ |
45 |
Accessories ....................................................................................................... |
47 |
Accessories supplied .......................................................................................... |
47 |
Optional accessories........................................................................................... |
47 |
Before first use .................................................................................................. |
48 |
Choosing the right Door Assistant (Push2Open/Pull2Open) ........................ |
48 |
Inserting the Active AirClean filters ................................................................ |
49 |
2

Contents |
|
Operating the refrigeration appliance.................................................................. |
49 |
Starting up for the first time ........................................................................... |
50 |
Switching on and off ......................................................................................... |
52 |
Switching off for longer periods of time .............................................................. |
52 |
Selecting additional settings............................................................................ |
53 |
Switching Keypad Lock / on or off .............................................................. |
53 |
Adjusting the temperature in the MasterFresh zone (dry compartment) ....... |
54 |
Switching Eco Mode on or off........................................................................ |
54 |
Performing a Self Test ..................................................................................... |
55 |
Switching on the Door Assistant ..................................................................... |
56 |
Switching off the Door Assistant ..................................................................... |
58 |
Setting up Miele@home ...................................................................................... |
58 |
Switching off Demo Mode ................................................................................ |
62 |
Resetting the settings to their default settings .............................................. |
63 |
Switching Sabbath Mode on or off .................................................................. |
65 |
Switching on, switching off, or resetting the Display Active AirClean Filter ... |
66 |
The correct temperature................................................................................... |
68 |
... in the refrigerator section and in the MasterFresh zone .................................. |
68 |
Automatic cold air circulation (DynaCool) ...................................................... |
68 |
Setting the temperature....................................................................................... |
69 |
Adjusting the temperature in the dry compartment of the MasterFresh zone |
69 |
Temperature range ......................................................................................... |
69 |
Using Automatic SuperCool............................................................................. |
70 |
Door alarm ......................................................................................................... |
71 |
Adjusting the interior fittings............................................................................ |
72 |
Removing or moving the door shelves................................................................ |
72 |
Removing or moving the shelves ........................................................................ |
72 |
Removing the hanging drawer ............................................................................ |
73 |
Removing compartments from the Fridge Zone ................................................. |
74 |
Storing food in the refrigerator section........................................................... |
75 |
Different storage zones ....................................................................................... |
75 |
Food which is not suitable for storage in the fridge zone ................................... |
76 |
Notes on buying food.......................................................................................... |
77 |
Storing food correctly.......................................................................................... |
77 |
3

Contents |
|
Storing food in the MasterFresh zone ............................................................. |
78 |
MastertFresh zone............................................................................................... |
78 |
Humidity-controlled compartment with moisture adjustment........................ |
78 |
Dry compartment with adjustable temperature.............................................. |
80 |
Automatic defrosting ........................................................................................ |
82 |
Cleaning and care ............................................................................................. |
83 |
Cleaning agents................................................................................................... |
83 |
Before cleaning the appliance............................................................................. |
84 |
Interior and accessories ...................................................................................... |
84 |
Cleaning the door seal ........................................................................................ |
85 |
Cleaning the ventilation gaps .............................................................................. |
85 |
Replacing the Active AirClean filters ................................................................... |
86 |
Frequently Asked Questions ............................................................................ |
87 |
Causes of noises ............................................................................................... |
92 |
Customer Service.............................................................................................. |
93 |
Contact in the event of a fault ............................................................................. |
93 |
Appliance warranty and product registration ...................................................... |
93 |
Declaration of conformity................................................................................. |
94 |
Copyrights and licenses ................................................................................... |
95 |
4

IMPORTANT SAFETY INSTRUCTIONS
This refrigeration appliance complies with current safety requirements. Inappropriate use can, however, lead to personal injury and material damage.
Please read the operating and installation instructions carefully before using the refrigeration appliance for the first time. They contain important information on safety, installation, use, and maintenance. This is to protect yourself from injury, and from damaging your refrigeration appliance.
Miele expressly and strongly advises that you read and follow the instructions in the chapter on installing the refrigeration appliance, as well as the IMPORTANT SAFETY INSTRUCTIONS.
Miele cannot be held liable for injury or damage caused by noncompliance with these instructions.
Keep these instructions in a safe place and pass them on to any future owner.
Risk of injury and damage due to tipping refrigeration appliance.
This refrigeration appliance is very heavy and can tip forward when the door is open.
Keep the appliance door shut until the refrigeration appliance has been built in and secured in its housing in accordance with the operating and installation instructions.
5

IMPORTANT SAFETY INSTRUCTIONS
Appropriate use
This appliance is intended for use in domestic households and similar residential environments such as
– staff kitchen areas in shops, offices and other working environments
– farm houses and by clients in hotels, motels and other residential type environments
– bed and breakfast type environments
– catering and similar non-retail applications.
This appliance is not intended for use outdoors, in damp environments or in places exposed to rain.
This refrigeration appliance is intended for domestic use only for the cool storage of food and drink.
Any other usage is at the owner’s risk and could be dangerous.
This refrigeration appliance is not suitable for storing and keeping cool medicines, blood plasma, laboratory preparations, or other similar substances or products that are subject to the Medical Device Directive. Incorrect use of the refrigeration appliance for such purposes may cause deterioration of the items stored. The refrigeration appliance is also not suitable for use in areas where there is a risk of explosion.
Miele cannot be held liable for damage resulting from incorrect or improper use or operation.
This refrigeration appliance may only be used by people (including children) with reduced physical, sensory, or mental capabilities or lack of experience and knowledge if they are supervised while using it.
The refrigeration appliance may only be used by these people without supervision if they have been shown how to use it in a safe way and recognize and understand the consequences of incorrect operation.
6
IMPORTANT SAFETY INSTRUCTIONS
Safety with children
To reduce the risk of injury, do not allow children to play in, on or near the appliance.
The door hinges can cause injury. Keep children well away at all times.
Ensure that any packing material is disposed of safely and kept out of the reach of children. DANGER of suffocation!
Technical safety
The coolant circuit has been checked for leaks. The refrigeration appliance complies with statutory and regulatory requirements.
This refrigeration appliance contains the coolant Isobutane (R600a), a natural gas which is environmentally friendly. Although it is combustible, it does not damage the ozone layer and does not contribute to the greenhouse effect.
The use of this coolant has, however, led to a slight increase in the noise level of the appliance. In addition to the noise of the compressor, you might be able to hear the coolant flowing around the cooling circuit. Unfortunately, this cannot be avoided, but it does not affect the performance of the refrigeration appliance.
When transporting and installing the refrigeration appliance, ensure that no parts of the cooling circuit are damaged. Splashes of coolant can damage the eyes.
In the event of damage:
-Avoid open flames or anything which creates a spark.
-Disconnect the refrigeration appliance from the power supply.
-Ventilate the room where the refrigeration appliance is located for several minutes.
7

IMPORTANT SAFETY INSTRUCTIONS
- Contact Miele Customer Service.
The more coolant there is in a refrigeration appliance, the larger the room it should be installed in. In the event of a leakage, if the appliance is in a small room, there is the danger of a combustible gas/ air mixture building up. For every 11 g of coolant, at least 1 m3 of room space is required. The amount of coolant in the refrigeration appliance is stated on the data plate inside the appliance.
To avoid the risk of damage to the appliance, make sure that the connection data (fuse rating, frequency and voltage) on the data plate corresponds to the household supply.
Check that this is the case before connecting the appliance. Consult a qualified electrician if in any doubt.
The electrical safety of the appliance can only be guaranteed when correctly grounded. It is essential that this standard safety requirement is met. If in any doubt please have the electrical installation tested by a qualified electrician.
Reliable and safe operation of this appliance can only be assured if it has been connected to the electricity supply.
The outlet must not be concealed behind the appliance and must be easily accessible so that the appliance can be quickly disconnected from the electrical supply in case of an emergency.
If the power cord supplied is damaged, it must only be replaced by an original part to prevent a hazard for the user. Miele can only guarantee the safety of the appliance when original Miele parts are used.
The electrical outlet must be properly grounded.
Do not connect the appliance to the electrical supply with a power bar or extension cord. These are a fire hazard and do not guarantee the required safety of the appliance.
8

IMPORTANT SAFETY INSTRUCTIONS
If moisture gets into electrical components or into the power cord, it could cause a short circuit. Therefore, do not operate the machine in areas where there may be moisture or splashing water (e.g., garages, laundry rooms).
This appliance must not be installed and operated in mobile installations (e.g. on a ship).
Do not use a damaged appliance. It could be dangerous. Check the appliance for visible signs of damage.
For safety reasons, this appliance may only be used after it has been built in.
During installation, side-by-side heater installation, maintenance and repair work, the appliance must be disconnected from the electrical power supply. It is only completely isolated from the electricity supply when:
-the circuit breaker has been tripped, or
-the screw-type fuses on the electrical service panel have been removed or
-the power cord has been unplugged. Pull on the plug and not on the cord when removing it from the outlet.
Installation, repair, and maintenance work should only be performed by a Miele-authorized service technician.
Work by unqualified persons could be dangerous and may void the warranty.
Any manufacturer's warranty will be void if the appliance is not repaired by a Miele approved service technician.
Faulty components must only be replaced by genuine Miele replacement parts. Miele can only guarantee the safety standards of the appliance when Miele replacement parts are used.
9

IMPORTANT SAFETY INSTRUCTIONS
Correct use
The refrigeration appliance is designed for use within a specific climate class (room temperature range). Do not use in a climate class for which it is not designed. A lower room temperature will cause the compressor to switch off for longer periods, meaning that the refrigeration appliance is unable to maintain the required temperature.
WARNING! DANGER of overheating! Do not cover or block the air vents. This can impair the efficiency of the appliance, increase the power consumption and cause damage to the appliance.
If storing food which contains a lot of fat or oil in the appliance, make sure that it does not come into contact with plastic components as this could cause stress cracks or break the plastic.
Risk of fire and explosion. Do not store any explosive materials or products containing flammable propellants (e.g., spray cans) in the appliance. Electrical components can cause flammable mixes of gases to ignite.
Risk of explosion. Do not operate any electrical equipment (e.g., an electric ice-cream maker) inside the refrigeration appliance. Risk of sparking and explosion.
When eating stored food, there is a danger of food poisoning. Storage times will depend on several factors, including the freshness and quality of the food, as well as the temperature at which it is stored. Observe the manufacturer's “use-by” dates and storage instructions.
Use only genuine original Miele parts. If parts or accessories from other manufacturers are used, the warranty may become invalid.
10
IMPORTANT SAFETY INSTRUCTIONS
Stainless steel machines:
Adhesives will damage the coated stainless steel surface and cause it to lose its dirt-repellent protective coating. Do not use sticky notes, transparent adhesive tape, masking tape, or other types of adhesive on the stainless steel surface.
The surface is easily scratched. Even magnets can cause scratching.
11

IMPORTANT SAFETY INSTRUCTIONS
Cleaning and maintenance
Do not use any oil or grease on the door seals. They can cause the seals to deteriorate over time.
Never use a steam cleaner to clean the appliance.
The steam can reach the electrical components and cause a short circuit.
Sharp edged or pointed objects will damage the evaporator, causing irreversible damage to the appliance. Do not use sharp edged or pointed objects to
-remove frost or ice,
-separate frozen foods or remove ice trays.
Transport
To avoid damage to the appliance, always transport it upright and in its packaging.
Risk of injury and damage. The refrigeration appliance is very heavy and must be transported by 2 people.
12

IMPORTANT SAFETY INSTRUCTIONS
Disposal of your old appliance
Children could become trapped in the machine and could suffo-
cate.
-Remove the machine doors.
-Remove the drawers.
-Leave the adjustable shelves in the machine so children cannot climb inside.
DANGER of electric shock!
-Cut the plug off the power cord.
-Cut the power cord off the old appliance.
Dispose of them separately from the appliance.
Ensure that the appliance is not stored in the vicinity of gasoline or inflammable gases and liquids during and after disposal.
Make sure that the coolant pipework is not damaged during disposal to avoid uncontrolled leakage of oil and coolant (see data plate for coolant type).
Splashes of coolant can cause damage to the eyes. Be careful not to damage any part of the pipework while awaiting disposal, e.g. by
-puncturing the coolant channels in the evaporator,
-kinking any pipework,
-scratching the surface coating.
13

Caring for the environment
Disposal of packaging material
The packaging is designed to protect the appliance from damage during transportation. The packaging materials used are selected from materials which are environmentally friendly for disposal and should be recycled.
Ensure that any plastic wrappings, bags, etc. are disposed of safely and kept out of the reach of children. Return the packaging to your dealer.
Disposing of your old appli-
ance
Electronic and electrical appliances contain many valuable materials. They also contain certain materials, compounds, and components which were essential for their correct functioning and safety. These could be hazardous to your health and to the environment if disposed of with general waste or if handled incorrectly. Please do not, therefore, dispose of your old appliance with general waste.
Instead, please make use of officially designated collection and disposal points to dispose of and recycle electrical and electronic appliances. By law, you are solely responsible for deleting any personal data from the appliance prior to disposal.
Take care not to damage your refrigeration appliance’s pipework before or during transportation to an authorized collection depot.
This is to ensure that coolant in the cooling circuit and oil in the compressor is contained, and will not leak into the environment.
Please ensure that your old appliance poses no risk to children while being stored for disposal. For additional information, see “IMPORTANT SAFETY INSTRUCTIONS” in these operating and installation instructions.
14

Installation
Installation location
This appliance should be installed in a dry, well-ventilated room.
When deciding where to install your refrigeration appliance, please bear in mind that it will use more energy if installed near to a heater, a range, or another appliance that gives off heat. Direct sunlight should also be avoided. The higher the room temperature, the longer the compressor runs and the higher the energy consumption of the refrigeration appliance.
When installing the refrigeration appliance, please note the following:
-The electrical socket must be easily accessible in an emergency and not concealed behind the appliance.
-The plug and power cord must not touch the rear of the refrigeration appliance as they could be damaged by vibrations from the appliance.
-Do not plug in other appliances behind the refrigeration appliance.
If installation near a heat source is unavoidable, observe the following minimum distances between the appliance and the heat source:
-At least 1 1/4" (3 cm) to electric or gas stoves
-At least 11 3/4" (30 cm) to oil or coal-based stoves
If it is not possible to observe these minimum distances, an isolation plate must be installed between the refrigeration appliance and the heat source.
Climate class
The refrigeration appliance is designed for use within the climate class (room temperature range) SN-T. Do not use in a climate class for which it is not designed.
Climate class |
Room tempera- |
|
ture |
|
|
SN |
50°F to 90°F / |
|
10°C to 32°C |
|
|
N |
60°F to 90°F / |
|
+16°C to +32°C |
|
|
ST |
60°F to 100°F / |
|
+16 to +38°C |
|
|
T |
60°F to 109°F / |
|
+16 to +43°C |
|
|
A lower room temperature will cause the compressor to switch off for longer periods. This can cause the internal temperature in the refrigeration appliance to rise with the risk of food deteriorating and going off.
15
Installation
Risk of damage due to high humidity.
In environments with high humidity, condensation can build up on external refrigeration appliance panels, which can cause corrosion.
Install the refrigeration appliance in a dry and/or air-conditioned room with sufficient ventilation.
After installation, make sure that the appliance door closes properly, the ventilation gaps are not covered, and the refrigeration appliance has been installed in accordance with these operating and installation instructions.
Installation notes
Risk of damage and injury due to the refrigeration appliance tipping over.
This refrigeration appliance is very heavy and can tip forwards when the appliance door(s) is (are) open. Keep the appliance door(s) shut until the refrigeration appliance has been built in and secured in its housing in
accordance with these operating and installation instructions.
Due to its weight and size, the refrigeration appliance must be installed by two people.
Adjoining cabinetry/units
The appliance is screwed to the adjoining cabinetry/units to the side and above. For this reason, it is essential that all cabinets/units are fixed to the ground and/or wall.
16

Installation
Load-bearing capacity of the niche floor
To ensure the safe installation of the refrigeration appliance and to guarantee its correct functioning, the floor of the niche where the appliance is to be installed must be smooth and even.
It must be made from strong, rigid material.
Because the refrigeration appliance is extremely heavy when fully loaded, it is essential that the floor it stands on is able to bear its weight. If necessary, seek the advice of an architect or construction expert.
When fully loaded, the weight of the refrigeration appliance is approx.:
K 2602 |
SF |
776 lbs |
|
|
(352 kg) |
K 2802 |
SF, K 2812 SF |
899 lbs |
|
|
(408 kg) |
K 2902 |
SF, K 2912 SF |
1042 lbs |
|
|
(473 kg) |
Ventilation
Risk of fire and damage due to insufficient ventilation.
If the refrigeration appliance is not ventilated sufficiently, the compressor will run more frequently and for longer periods.
This causes increased energy consumption and an increased compressor operating temperature, which can result in damage to the compressor.
Please ensure that there is adequate ventilation around the refrigeration appliance.
Do not block the ventilation gaps. The ventilation gaps must never be obstructed.
Door hinge
Risk of damage and injury when changing the door hinges.
Changing the door hinges singlehandedly can cause damage to the appliance and injury.
The refrigeration appliance is supplied with a fixed hinge. On no account should you attempt to change the door hinge yourself.
If you need to change the door hinge to the other side, please contact the Miele Service department.
17
Installation
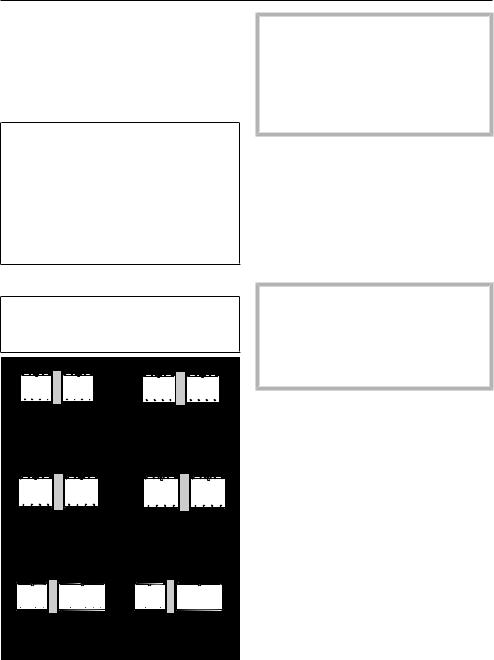
Side-by-side
This appliance can be installed side-by- side with another refrigeration appliance. The following overview will show you which side-by-side options you have with your appliance:
A side-by-side merging kit and a top frame (KTF) are required for this. Both are available from your Miele dealer or Miele Service.
Instructions for installing appliances side-by-side can be found in the side- by-side merging kit instruction manual.
. . . with partition wall
The wall a between the side-by-side appliances must be at least
5/8" (16 mm) thick.
If the door hinges of the refrigeration appliances are next to each other, you must take into account the thickness of the cabinet fronts and door handles so that the appliance doors do not collide and become damaged if they are opened at the same time.
The refrigeration appliances are secured individually in their installation niche using the supplied installation material.
If the partition wall a is narrower than 6 5/16" (160 mm), you will need the side panel heater from the side-by-side installation kit to prevent condensation from forming and any resulting damage.
When planning installation niches, please note that the niche into which the refrigeration appliance with the side panel heater is installed must be
3/16" (4 mm) wider (see “Installation
– Building-in dimensions”).
If the partition wall a is thicker than
6 5/16" (160 mm), you do not need the side-by-side installation kit, nor the side panel heater.
18
Installation
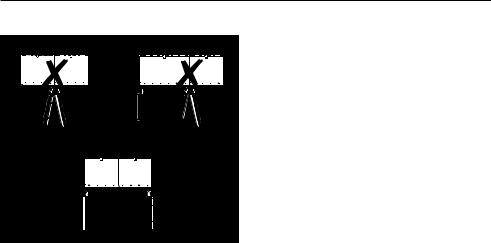
. . . without partition wall
If the appliances are to be installed next to each other without a partition wall between them, they will need to be joined together with the side-by-side installation kit. In addition, you must install the side panel heater to prevent condensation from forming and any resulting damage.
19
Installation
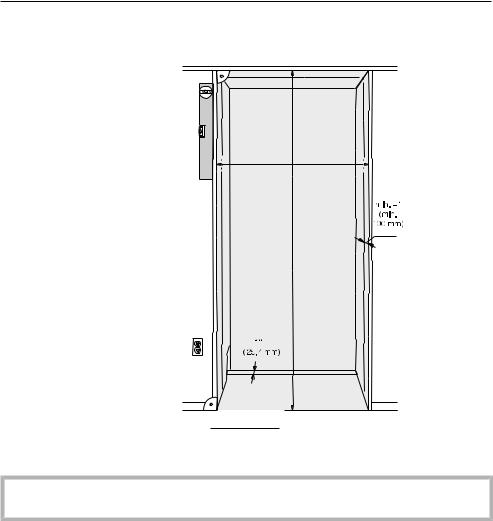
Installation dimensions
Position of the electrical connection
-The electrical connection must not be positioned higher than 9" (228 mm) above the floor.
The electrical socket must not be concealed behind the appliance and must be
easily accessible in an emergency.
20
Installation
C
D
A
B
|
|
A |
B |
C |
D |
|
|
|
|
|
|
K 2602 SF, |
84"–85 3/16" |
24" (610 mm) |
24" (610 mm) |
3/4" (19 mm) |
|
K 2612 SF |
(2,134–2,164 mm) |
|
|
|
|
|
|
|
|
|
|
K 2802 |
SF, |
84"–85 3/16" |
30" (762 mm) |
24" (610 mm) |
3/4" (19 mm) |
K 2812 |
SF |
(2,134–2,164 mm) |
|
|
|
|
|
|
|
|
|
K 2902 |
SF, |
84"–85 3/16" |
36" (915 mm) |
24" (610 mm) |
3/4" (19 mm) |
K 2912 |
SF |
(2,134–2,164 mm) |
|
|
|
|
|
|
|
|
|
21
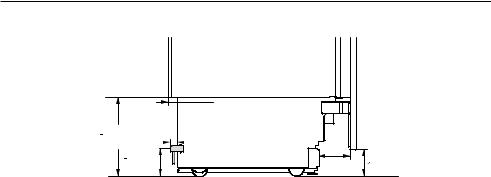
Installation
 1 3/16" (30 mm)
10 5/16" |
7/8" |
||
(22 mm) |
|||
(262 mm) |
|||
|
|
||
3 3/8" |
4" |
4" |
|
(85 mm) |
|||
(102 mm) |
(102 mm) |
||
|
Side view
22
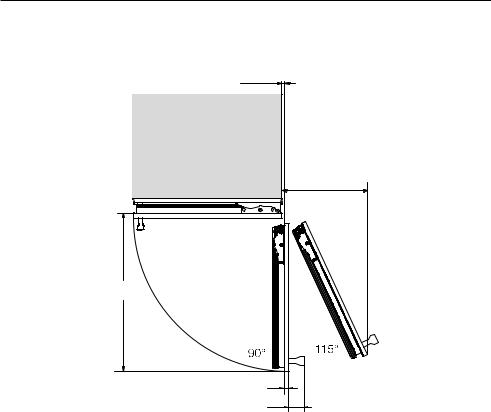
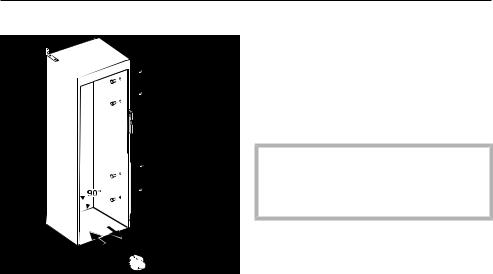
Installation
Dimensions when the appliance door is open (opening angle 90°/115°)
3/8" (10 mm) |
D |
A |
B |
C |
|
A |
|
B |
C |
D |
|
|
|
|
|
|
|
|
K 26x2 SF |
26 |
5/8" |
Cabinet front |
Door handle |
11 |
5/8" (296 mm) |
|
(677 mm) |
|
|
|
|
|
|
|
|
|
|
|
|
K 28x2 SF |
32 |
5/8" |
Cabinet front |
Door handle |
14 |
5/16" (363 mm) |
|
(829 mm) |
|
|
|
|
|
|
|
|
|
|
|
|
K 29x2 SF |
38 |
11/16" |
Cabinet front |
Door handle |
16 |
7/8" (428 mm) |
|
(982 mm) |
|
|
|
|
|
|
|
|
|
|
|
|
23

Installation
Building in the appliance
Before starting...
It is essential to read these installation instructions carefully before starting to install the appliance.
The appliance should be installed by a suitably qualified tradesman in accordance with these installation instructions. Safe operation of the appliance is only assured if it has been installed and connected in accordance with the installation instructions.
Risk of damage and injury!
This appliance is very heavy and can tip forwards when the door is open. Keep the appliance door shut until the appliance has been built in and secured in its housing in accordance with the operating and installation instructions.
The appliance is both large and heavy. Installation must be carried out by two people.
The appliance must be installed in accordance with local regulations. If local regulations are not available, the following regulations must be observed:
-in the USA: the National Electric Code, ANSI/NFPA 70 - latest edition/ State and Municipal codes and/or local codes.
-in Canada: the Canadian Electric code C22.1 - latest edition/Provincial and Municipal codes and/or local codes.
Tools required
-Cordless drill
-TX 20 screwdriver
-Hammer drill
-Drill bits in various sizes, depending on materials
-Hammer
-Open-ended wrench
-Ratchet wrench, attachment: socket, 5/16" (8 mm)
-Adhesive tape
-Utility knife
-Pipe wrench
-Level
-Tape measure
-Pencil
Other
-Step ladder
-Hand truck
24
Installation
Aligning the installation niche |
Checking the installation niche |
The building-in niche must be carefully aligned using a spirit level before the refrigeration appliance is installed. The niche corners must be at 90° angles to each other, otherwise the cabinet front will not sit straight on all 4 corners of the building-in niche.
Check the installation dimensions (see “Installation – Installation dimensions”).
Check the position of the electrical connection. The length of the power cord is 9' 10" (3 m).
The electrical socket must not be concealed behind the appliance and must be easily accessible in an emergency.
Check the surroundings for possible collisions (see “Installation – Dimensions with appliance door open”).
Only install the refrigeration appliance in stable, solid installation niches, positioned on an even and level floor.
Also check the installation niche for the following criteria:
-The side panels of the installation niche must be even.
-The surrounding walls of the installation niche must be at least
5/8" (16 mm) thick.
-The surrounding walls must be securely fixed to the floor or wall.
-Shortened side walls must be at least 4" (100 mm) deep.
25

Installation
Before installation
Before installation, remove any accessories from the back of the appliance.
Check the refrigeration appliance for damage during transportation.
Do not install a damaged appliance.
Check that all parts at the back of the appliance are unhindered.
To protect the floor during installation, secure an off-cut of flooring or similar material to the floor in front of the installation area.
Risk of damage and injury due to the refrigeration appliance tipping over.
As soon as you unscrew the brackets that fix the refrigeration appliance to the pallet, the appliance is no longer secured.
Due to its weight and size, the refrigeration appliance must be installed by two people.
Unscrew the fixing brackets .
With the help of several people as required, carefully lift the refrigeration appliance from the pallet, starting with the back of the appliance.
Risk of damaging the floor from the load.
Moving the refrigeration appliance can cause damage to the floor. Move the refrigeration appliance carefully on floors that are sensitive to scratching.
As soon as you have set the appliance upright, you can move it using the rollers on the bottom.
26
Installation
Preparing the installation niche
Risk of damage and injury due to the refrigeration appliance tipping over.
This refrigeration appliance is very heavy and can tip forwards when the doors are open.
The installation niche must be secured to the wall behind it and/or above it with several screws. Only this will prevent the refrigeration appliance from tipping over after being installed.
In addition, use the provided anti-tip brackets to secure the installation niche.
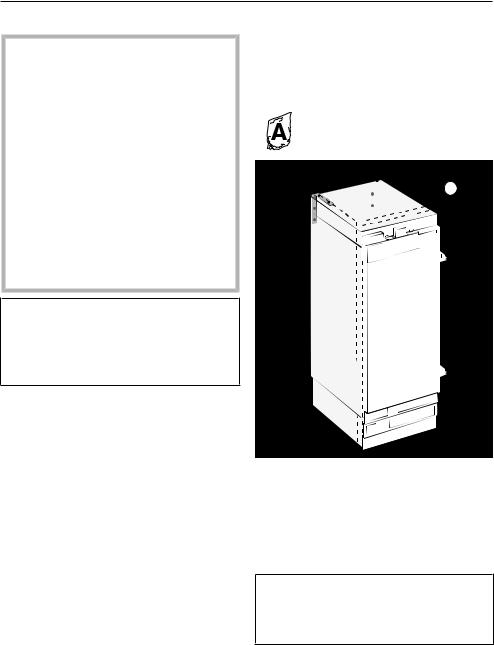
The parts required for installation are supplied with the refrigeration appliance. The plastic bags supplied are marked with letters for easy identification.
When performing the individual assembly steps, observe the letters specified and use the matching plastic bag with the required installation equipment.
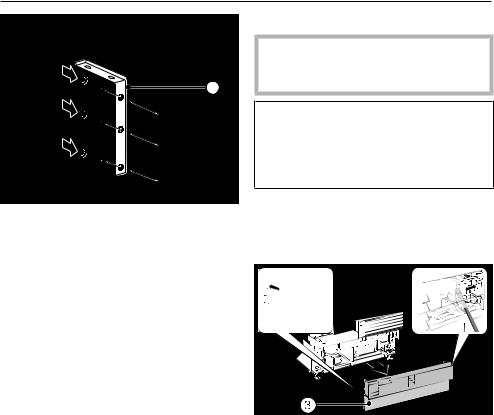
The anti-tip brackets prevent the refrigeration appliance from tipping.
The anti-tip brackets are also used to fix the installation niche securely to the surrounding walls.


 2
2
Use 2 anti-tip brackets for each individual appliance or 4 anti-tip brackets for each (side-by-side) combination of 2 appliances.
Position the anti-tip brackets on the left and right of the niche.
Depending on the subsequent adjustment of the feet, the anti-tip brackets are positioned 84"-85 3/16" (2,134– 2,164 mm) from the floor of the niche.
27

Installation
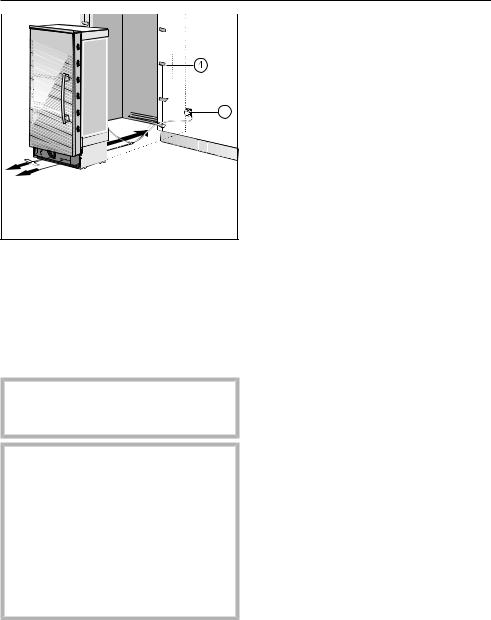
Risk of damage and injury due to the refrigeration appliance tipping over.
If the anti-tip brackets are fixed too high up, they cannot be used to secure the refrigeration appliance.
The distance between the
anti-tip brackets and the refrigeration appliance must not exceed
5/16" (8 mm).
2
Retaining screws for different uses
and types of material are supplied in
the accompanying pack.
2
Securing to a concrete wall
2 |
2 |
|
Make sure that the gap between the refrigeration appliance‘s rear wall and
the installation niche does not exceed Securing to a wooden wall
2" (51 mm).
Place a wooden wedge behind the anti-tip brackets if necessary.
While holding the anti-tip brackets in place, mark the necessary drill holes on the rear wall of the installation niche.
28
Installation
2
Securing with a wooden wedge
Secure the installation niche to the wall behind it and/or above it as required using the anti-tip brackets .
Pushing the appliance into the niche
Then push the appliance into the niche, taking care not to damage the electrical connection!
If you are installing several refrigeration appliances side by side, now secure the appliances to one another (see the installation instructions for the side-by-side installation kit).
To ensure that the refrigeration appliance can then be aligned correctly, the toe-kick ventilation grille must be removed from the appliance toe kick:
Carefully guide a flat-head screwdriver through the toe-kick ventilation grille on both sides and use it to push the internal plastic latches outwards to release the toe-kick ventilation grille.
Place the toe-kick ventilation grille to one side.
29
Installation |
|
|
|
Tip: Secure the power cord to prevent it |
|
|
becoming caught: tie a piece of string |
|
|
to the middle of the power cord and as |
|
|
the refrigeration appliance is being |
|
|
pushed into the niche, pull the cord for- |
|
5 |
ward underneath the appliance. |
|
Carefully push the refrigeration appli- |
||
|
||
|
ance into the niche. |
|
|
If the refrigeration appliance cannot |
|
|
be pushed into the niche (because |
|
|
the floor is uneven, for example), un- |
|
|
screw the rear feet slightly (see “In- |
|
|
stallation – Aligning the refrigeration |
|
Affix edge protection to the adja- |
appliance”) and slide the refrigeration |
|
appliance into the installation niche. |
||
cent cabinet fronts. |
|
Remove the edge protection fromInsert the plug connector at the back the adjacent cabinet fronts.
of the refrigeration appliance (see “Installation – Electrical connection”).
Insert the plug into the electrical socket.
The electrical socket must be close to the refrigeration appliance and easily accessible.
Risk of damage due to electrical overload.
If the refrigeration appliance is electrically overloaded, this can cause a short circuit and thus damage your refrigeration appliance.
When you install appliances side by side, each refrigeration appliance must have its own separate electrical socket.
30
Loading...