


G 605 SCI
Operating instructions
for the G 605 / G805
dishwasher
To prevent accidents and reduce
the risk of damaging the machine,
read the Operating Manual
before installing or using
the machine. M.-Nr. 04 988 131
ö

2

Contents
Contents
Guide to the appliance. . . . . . . . . . . . . . . . . . . . . . . . . . . . . . . . . . . . . . . . . . . . . . 5
View of the machine . . . . . . . . . . . . . . . . . . . . . . . . . . . . . . . . . . . . . . . . . . . . . . . . . 6
Control panel . . . . . . . . . . . . . . . . . . . . . . . . . . . . . . . . . . . . . . . . . . . . . . . . . . . . . . 6
Caring for the environment. . . . . . . . . . . . . . . . . . . . . . . . . . . . . . . . . . . . . . . . . 12
Before using for the first time. . . . . . . . . . . . . . . . . . . . . . . . . . . . . . . . . . . . . . . 13
Opening and closing the door . . . . . . . . . . . . . . . . . . . . . . . . . . . . . . . . . . . . . . 14
Child safety lock. . . . . . . . . . . . . . . . . . . . . . . . . . . . . . . . . . . . . . . . . . . . . . . . . . . 14
Water softener (Not available in US models.) . . . . . . . . . . . . . . . . . . . . . . . . . . 15
Setting the water hardness level. . . . . . . . . . . . . . . . . . . . . . . . . . . . . . . . . . . . . . . 15
Filling the salt reservoir. . . . . . . . . . . . . . . . . . . . . . . . . . . . . . . . . . . . . . . . . . . . . . 16
Salt indicator. . . . . . . . . . . . . . . . . . . . . . . . . . . . . . . . . . . . . . . . . . . . . . . . . . . . . . 17
Bypassing the Salt indicator lamp. . . . . . . . . . . . . . . . . . . . . . . . . . . . . . . . . . . . . 17
Adding rinse aid. . . . . . . . . . . . . . . . . . . . . . . . . . . . . . . . . . . . . . . . . . . . . . . . . . 18
Setting the dosage. . . . . . . . . . . . . . . . . . . . . . . . . . . . . . . . . . . . . . . . . . . . . . . . . 19
Loading the dishwasher . . . . . . . . . . . . . . . . . . . . . . . . . . . . . . . . . . . . . . . . . . . 20
Loading examples.. . . . . . . . . . . . . . . . . . . . . . . . . . . . . . . . . . . . . . . . . . . . . . . . . 21
Upper basket. . . . . . . . . . . . . . . . . . . . . . . . . . . . . . . . . . . . . . . . . . . . . . . . . . . 21
Bottom basket. . . . . . . . . . . . . . . . . . . . . . . . . . . . . . . . . . . . . . . . . . . . . . . . . . 21
Cutlery tray. . . . . . . . . . . . . . . . . . . . . . . . . . . . . . . . . . . . . . . . . . . . . . . . . . . . . 22
Adjustable cup racks. . . . . . . . . . . . . . . . . . . . . . . . . . . . . . . . . . . . . . . . . . . . . . . 23
Adjusting the upper basket . . . . . . . . . . . . . . . . . . . . . . . . . . . . . . . . . . . . . . . . . . 24
Items not suitable for dishwashers . . . . . . . . . . . . . . . . . . . . . . . . . . . . . . . . . . 25
Adding detergent . . . . . . . . . . . . . . . . . . . . . . . . . . . . . . . . . . . . . . . . . . . . . . . . . 26
Choosing a program . . . . . . . . . . . . . . . . . . . . . . . . . . . . . . . . . . . . . . . . . . . . . . 27
Program chart. . . . . . . . . . . . . . . . . . . . . . . . . . . . . . . . . . . . . . . . . . . . . . . . . . . . 28
Operating the dishwasher. . . . . . . . . . . . . . . . . . . . . . . . . . . . . . . . . . . . . . . . . . 30
Turning on. . . . . . . . . . . . . . . . . . . . . . . . . . . . . . . . . . . . . . . . . . . . . . . . . . . . . . . . 30
Changing programs. . . . . . . . . . . . . . . . . . . . . . . . . . . . . . . . . . . . . . . . . . . . . . . . 30
Turning off. . . . . . . . . . . . . . . . . . . . . . . . . . . . . . . . . . . . . . . . . . . . . . . . . . . . . . . . 30
Program sequence indication. . . . . . . . . . . . . . . . . . . . . . . . . . . . . . . . . . . . . . . . . 31
Program interruption . . . . . . . . . . . . . . . . . . . . . . . . . . . . . . . . . . . . . . . . . . . . . . . 31
Unloading the dishwasher. . . . . . . . . . . . . . . . . . . . . . . . . . . . . . . . . . . . . . . . . . 32
3

Contents
Cleaning and care . . . . . . . . . . . . . . . . . . . . . . . . . . . . . . . . . . . . . . . . . . . . . . . . 33
Cleaning the filters in the wash cabinet. . . . . . . . . . . . . . . . . . . . . . . . . . . . . . . . . 33
Cleaning the spray arms.. . . . . . . . . . . . . . . . . . . . . . . . . . . . . . . . . . . . . . . . . . . . 35
Cleaning the drain pump and non-return valve. . . . . . . . . . . . . . . . . . . . . . . . . . . 36
Cleaning the water inlet filter. . . . . . . . . . . . . . . . . . . . . . . . . . . . . . . . . . . . . . . . . . 37
Installing an in-line water filter. . . . . . . . . . . . . . . . . . . . . . . . . . . . . . . . . . . . . . . . . 38
Cleaning the wash cabinet. . . . . . . . . . . . . . . . . . . . . . . . . . . . . . . . . . . . . . . . . . . 38
Cleaning the door and the door seal . . . . . . . . . . . . . . . . . . . . . . . . . . . . . . . . . . . 38
Cleaning the control panel. . . . . . . . . . . . . . . . . . . . . . . . . . . . . . . . . . . . . . . . . . . 38
Cleaning the door panel. . . . . . . . . . . . . . . . . . . . . . . . . . . . . . . . . . . . . . . . . . . . . 38
Checking the water level . . . . . . . . . . . . . . . . . . . . . . . . . . . . . . . . . . . . . . . . . . . 39
Increasing the water intake time. . . . . . . . . . . . . . . . . . . . . . . . . . . . . . . . . . . . . . . 40
Problem solving guide. . . . . . . . . . . . . . . . . . . . . . . . . . . . . . . . . . . . . . . . . . . . . 41
After Sales Service. . . . . . . . . . . . . . . . . . . . . . . . . . . . . . . . . . . . . . . . . . . . . . . . 41
Accessories . . . . . . . . . . . . . . . . . . . . . . . . . . . . . . . . . . . . . . . . . . . . . . . . . . . . . 42
Dishwasher installation . . . . . . . . . . . . . . . . . . . . . . . . . . . . . . . . . . . . . . . . . . . . 43
Electrical connection. . . . . . . . . . . . . . . . . . . . . . . . . . . . . . . . . . . . . . . . . . . . . . 60
Plumbing . . . . . . . . . . . . . . . . . . . . . . . . . . . . . . . . . . . . . . . . . . . . . . . . . . . . . . . 62
Technical Data . . . . . . . . . . . . . . . . . . . . . . . . . . . . . . . . . . . . . . . . . . . . . . . . . . . 66
4

Guide to the appliance
Miele dishwashers are available in two
versions:
1. Integrated (“i”) dishwashers
“i”- dishwashers are designed for installation under a continuous countertop.
The control panel with its accessories
is included with the “i”- dishwasher in a
separate package for on-site installation. The front is designed to accept a
custom made panel, matching the existing kitchen cabinets.
Installation directions can be found in
the Installation chapter.
2. “U” dishwashers
The built-under (“U”) dishwashers use
the integrated (“i”) dishwashers as the
basic machine.
By using a GDU decor kit the “i”dishwasher can be converted into a “U”
model dishwasher.
Guide to the appliance
GDU installation instructions are included in a separate pamphlet supplied with the decor kit.
5
Guide to the appliance
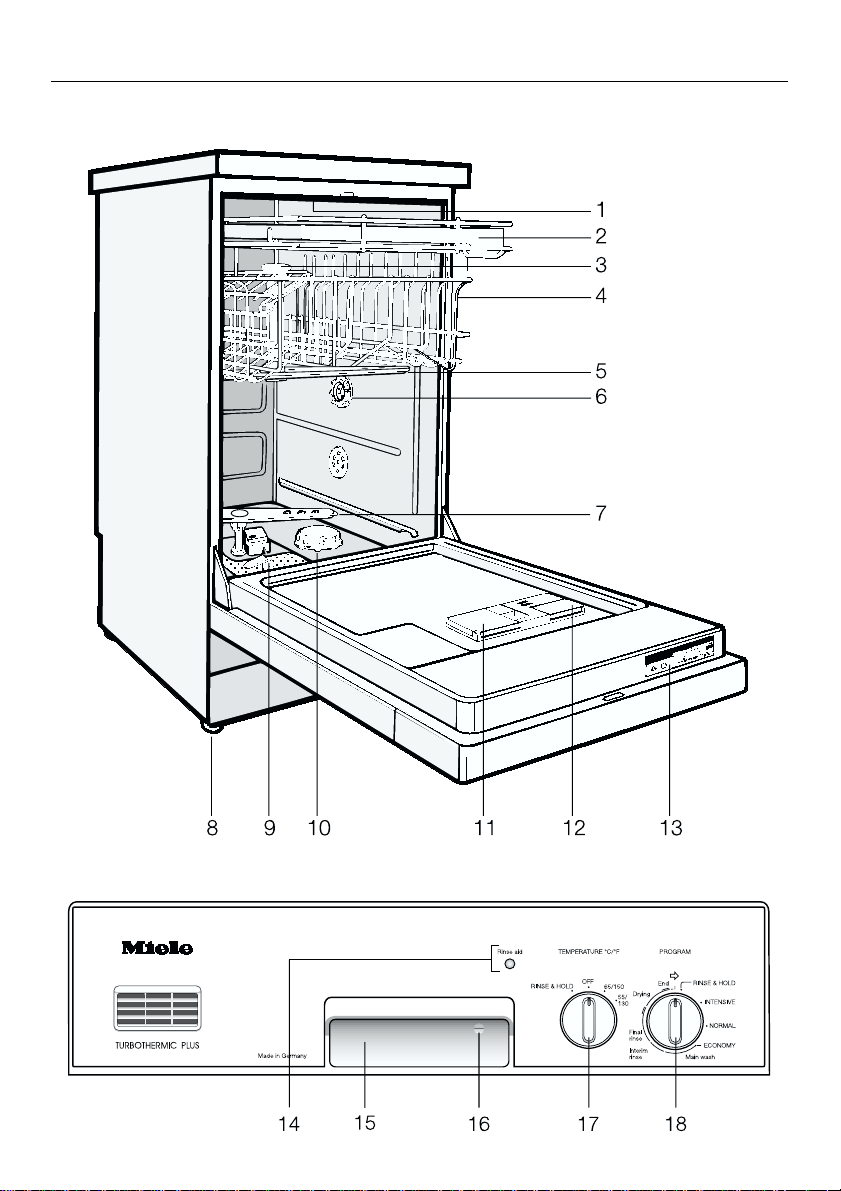
View of the machine
Control panel
6

Guide to the appliance
1. Upper spray arm (not visible)
2. Cutlery tray
3. Inlet funnel for middle spray arm
4. Upper basket
5. Middle spray arm
6. Water hardness selector
7. Lower spray arm
8. Four height adjustable levelling legs
9. Combination filter
10. Salt reservoir (if applicable)
11. Dual compartment detergent
dispenser
12. Rinse aid reservoir
(with dosage selector)
13. Data plate
14. Rinse aid indicator lamp
15. Door release
The models G 605 SC (i) and
G 805 SC (i) are both described in
these operating instructions.
You can find the model of your dishwasher on the data plate (13).
16. Child safety lock
17. Temperature selector knob
18. Program selector knob
Note: Lower basket is not shown.
7

IMPORTANT SAFETY INSTRUCTIONS
WARNING
When using your dishwasher, follow all basic
safety precautions.
This appliance conforms to
all uniform safety codes and
regulations. To avoid injury
and machine damage, read
the operating instructions
carefully before using the
dishwasher.
This dishwasher is designed for
household use only.
The manufacturer cannot be held
responsible for damage or injury
caused by improper use or for
uses other than those for which
the appliance is intended.
Repairs should only be performed
by qualified personnel. Disconnect
the appliance from the power supply
before servicing (pull out the plug or
turn off the circuit breaker).
If not purchased specifically as a
“Freestanding” model, only install
the dishwasher under a continuous
countertop which is secured to the
cabinetry.
The dishwasher must be electri-
cally grounded. Install the dishwasher as per the included Installation
instructions.
Use only powder detergents and
liquid rinse aids recommended for
dishwashers. Never use gels or liquid
detergents.
Do not use commercial or indus-
trial grade detergents, as these
may cause adverse chemical reactions
and damage the machine. Use
detergents made for residential dishwashers.
only
Do not use your dishwasher unless
all enclosure panels are properly in
place.
Do not allow children to play in or
on the dishwasher.
Keep all detergents and rinse aids
out of the reach of children.
Dishwasher detergents contain So-
dium Silicate and Sodium Carbonate. In case of eye contact, immediately flush with water. Call a physician or
poison control.
Do not tamper with the
controls.
8

IMPORTANT SAFETY INSTRUCTIONS
When loading items to be
washed:
– Load pointed items so that they are
not likely to damage the door seal.
– Load knives with the cutting edge
down to reduce the risk of injuries.
Do not wash plastic items unless
they are labeled “dishwasher safe”
or the equivalent. For items not labeled,
check the manufacturer’s recommendations.
Do not abuse, sit, or stand on the
door or dishracks of the dishwasher.
Remove the front door and cut off
the power cord of the dishwasher
before removing it from service or discarding it. This will help protect children from injury or accidentally locking
themselves in.
Under certain conditions, hy-
drogen gas may be produced in a
hot water system that has not been
used for two weeks or more.
HYDROGEN GAS IS EXPLOSIVE. If the
hot water system has not been used for
such a period, turn on all hot water
faucets and let the water flow from
each for several minutes before using
the dishwasher. This will release any accumulated hydrogen gas. Do not
smoke or use an open flame during this
time.
For dishwashers with visible heating
element
Do not touch the heating element
during or immediately after use.
Do not drink the water from the
wash cabinet.
SAVE THESE INSTRUCTIONS
9

INSTRUCTIONS IMPORTANTES SUR LA SÉCURITÉ
AVERTISSEMENT
Au moment d’utiliser votre lave-vaisselle, veuillez observer toutes les mesures de sécurité de base.
Cet appareil électroménager est conforme à tous les règlements et codes
sur la sécurité. Pour éviter de vous
blesser et d’endommager l’appareil,
veuillez lire soigneusement les instructions sur l’utilisation.
N’utilisez le lave-vaiselle que pour
laver la vaiselle.
Le fabricant ne peut être tenu responsable des dommages ou blessures causés par une utilisation
inadéquate ou par des utilisations
autres que celles auxquelles l’appareil est destiné.
Les réparations doivent être effec-
tuées uniquement par une personne compétente. Débrancher l’appareil de la prise de courant avant d’en
faire l’entretien (enlever la fiche de la
prise ou fermer le disjoncteur).
Installer uniquement le lave-vais-
selle sous un comptoir continu qui
est fixé à des meubles adjacents.
Vous devez mettre le lave-vaisselle
à la terre. Installer le lave-vaisselle
en observant les instructions pour l’installation ci-jointes.
Utiliser uniquement des détersifs et
des produits de rinçage recommandés pour les lave-vaisselle.
Ne pas utiliser de détersifs de
qualité commerciale ou industrielle
puisqu’ils pourraient causer des réactions chimiques défavorables et endommager l’appareil. Utiliser des détersifs pour les lave-vaisselle ménagers
seulement.
10
Ne pas utiliser votre lave-vaisselle
à moins que tous les panneaux
soient bien en place.
Ne pas permettre aux enfants de
jouer dans ou sur le lave-vaisselle.
Ranger tous les détersifs et pro-
duits de rinçage hors de la portée
des enfants.
Les détersifs pour lave-vaisselle
contiennent du silicate de soude et
du carbonate de soude. En cas de contact avec les yeux, les rincer immédiatement à grande eau. Téléphoner à
un médecin ou à un centre de traitement antipoison.

INSTRUCTIONS IMPORTANTES SUR LA SÉCURI TÉ
Ne pas modifier les
commandes.
Ne pas boire l’eau du meuble de
lavage.
Au moment de remplir le lave-vais-
selle :
– Mettre les articles pointus de manière
à ce qu’ils n’endommagent pas le seau
étanche de la porte.
– Mettre le tranchant des couteaux vers
le bas afin de réduire les risques de
blessure.
Ne pas laver les articles en plas-
tique à moins qu’ils n’indiquent “Va
au lave-vaisselle” ou l’équivalent. Vérifier les recommandations du fabricant
pour les articles non étiquetés.
Ne pas abuser et ne pas vous as-
seoir ni vous tenir sur la porte ou
sur les paniers du lave-vaisselle.
Enlever la porte et débrancher le
lave-vaisselle avant de le faire réparer ou de le jeter afin d’empêcher les
enfants de se blesser ou de s’enfermer
dans l’appareil par accident.
Dans certaines conditions, un sys-
tème d’eau chaude qui n’a pas été
utilisé pendant plus de 2 semaines
peut dégager de l’azote.
L’AZOTE EST EXPLOSIF. Si le système
d’eau chaude n’a pas été utilisé pendant une telle période de temps, ouvrir
tous les robinets d’eau chaude et
laisser l’eau couler pendant plusieurs
minutes avant d’utiliser le lave-vaisselle. Ceci dissipera tout l’azote accumulé. Ne pas fumer ni utiliser une
flamme nue durant ce temps.
Lave-vaiselle avec l’élément
chauffant
Ne touchez pas l’élément chauf-
fant pendant le fonctionnement de
l’appareil ou immédiatement après.
CONSERVER CES INSTRUCTIONS
11

Caring for the environment
Caring for the environment
Disposal of the packing material.
The cardboard box and packing material protects the appliance during
shipping. It has been deliberately designed to be biodegradable and recyclable. Please dispose of these materials as you would any other
recyclable products.
Energy saving washing.
These dishwashers are exceptionally efficient in their use of water and electricity. You can make the most of your
appliance by following these tips:
Make full use of the baskets without
overloading the dishwasher for the
most economical washing.
Disposal of your old machine.
Old machines contain materials which
can be recycled. Please contact your
local recycling center about the possibility of recycling these materials. Make
certain the machine has been made
child resistant as outlined in the “Important safety instuctions” before disposing
of the appliance.
Choose a program that best suits the
degree of soiling and the type of
dishes being washed.
If the baskets are only half full, use
the ECONOMY program.
Use the correct amounts of detergent and rinse aid.
12

Before using for the first time
Before using for the first time,
please note the following points.
Setting the water softener
(if applicable).
The water softener must be set to correspond to the water hardness in your
area. This can be obtained from your
local water company, or by using a test
kit that can be purchased from the
Miele Parts Department.
Before using for the first time
Add the correct amount of detergent.
Generally, one to two tablespoons of
detergent will be adequate for most
wash loads. Not enough or too much
detergent can lead to poor wash results.
Cleaning results vary between detergents. If you are not satisfied with the
results from one brand, try another
quality brand before contacting the
Miele Service Department for advice.
The salt reservoir must only be filled
with water and salt. Never fill it with
detergent.
Adding rinse aid.
Inadvertently filling the rinse aid
reservoir with liquid or powder detergent will damage the reservoir.
Use only powder detergents and liquid
rinse aids formulated for domestic dishwashers.
It is important to choose the correct
program.
Different wash programs should be selected for different loads and different
degrees of soiling. See the program
chart for further program descriptions.
Load the dishes correctly.
Load the dishes so that water can contact all surfaces. Ensure that the spray
arms are not blocked by items which
are too tall for the basket or which extend through the bottom of the basket.
If necessary, manually rotate the spray
arms to test for clearance.
The combination filter in the base of
the wash cabinet and the spray arms
must be kept clean.
These should be regularly inspected
and cleaned, if necessary.
See the corresponding chapters for detailed information on the above points.
13
Opening and closing the doo r
Opening and closing the door
To open the door.
Child safety lock.
Press the release catch inside the
door grip.
If the door is opened during operation,
all functions will automatically be interrupted.
To close the door.
Push the baskets in.
Lift the door and push until it clicks
into position.
The child safety lock is designed to
deter children from opening the dishwasher door.
Use the provided key to turn the
child safety lock to the desired setting.
Horizontal setting = The door is
locked.
Vertical setting = the door can
be opened.
14
Water softener (Not available in US models.)
Water softener (Not available in US models.)
The water softener must be set to correspond to the water hardness in your
area. This can be obtained from your
local water company or by using a test
kit that can be purchased from the
Miele Parts Department.
Note:
If the water hardness in your area is
under 7 gr/gal, it is not necessary to reactivate the softener with salt.
To avoid the build up of calcium deposits on dishes, cutlery, and in the
dishwasher, the water should be softened if it is harder than 7 gr/gal.
The dishwasher is factory set for a hardness level of 4 - 14 gr/gal. If your water
is harder or softer, this setting will need
to be adjusted.
To ensure a steady supply of softened water, the built in water softener must be:
1. Correctly set.
2. Reactivated with salt when depleted.
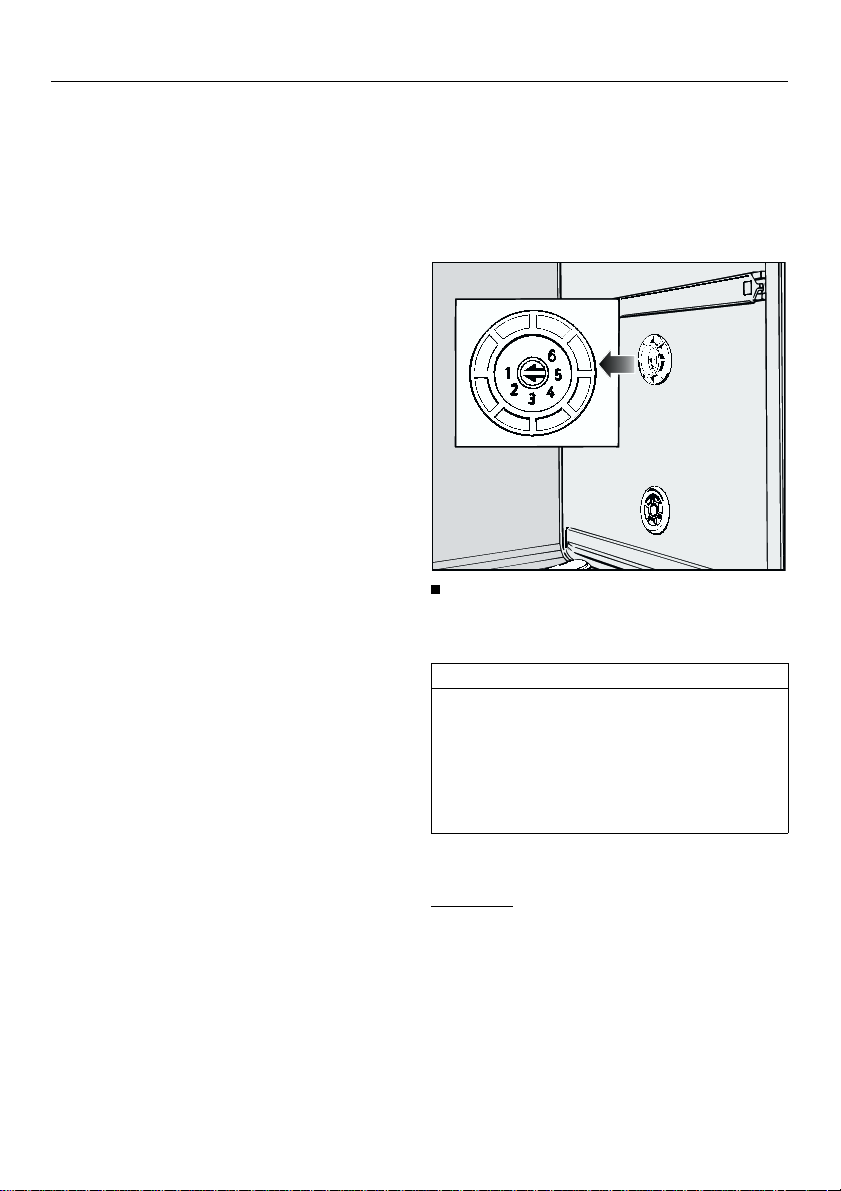
Setting the water hardness
level.
There are six settings on the selector, located on the right side of the wash
cabinet:
Using a screwdriver, adjust the water
hardness level by turning the selector switch to the appropriate setting.
Setting gr/gal ppm °f
1* 4-14 70- 250 7- 25
2 15-21 270- 380 27- 38
3 22-35 400- 630 40- 63
4 36-47 650- 850 65- 85
5 48-65 860-1170 86-117
6 66-70 1190-1260 119-126
*) factory setting
Example:
The water hardness is 340 ppm. The
water hardness switch should be set to
position 2.
15
Water softener (Not available in US models.)
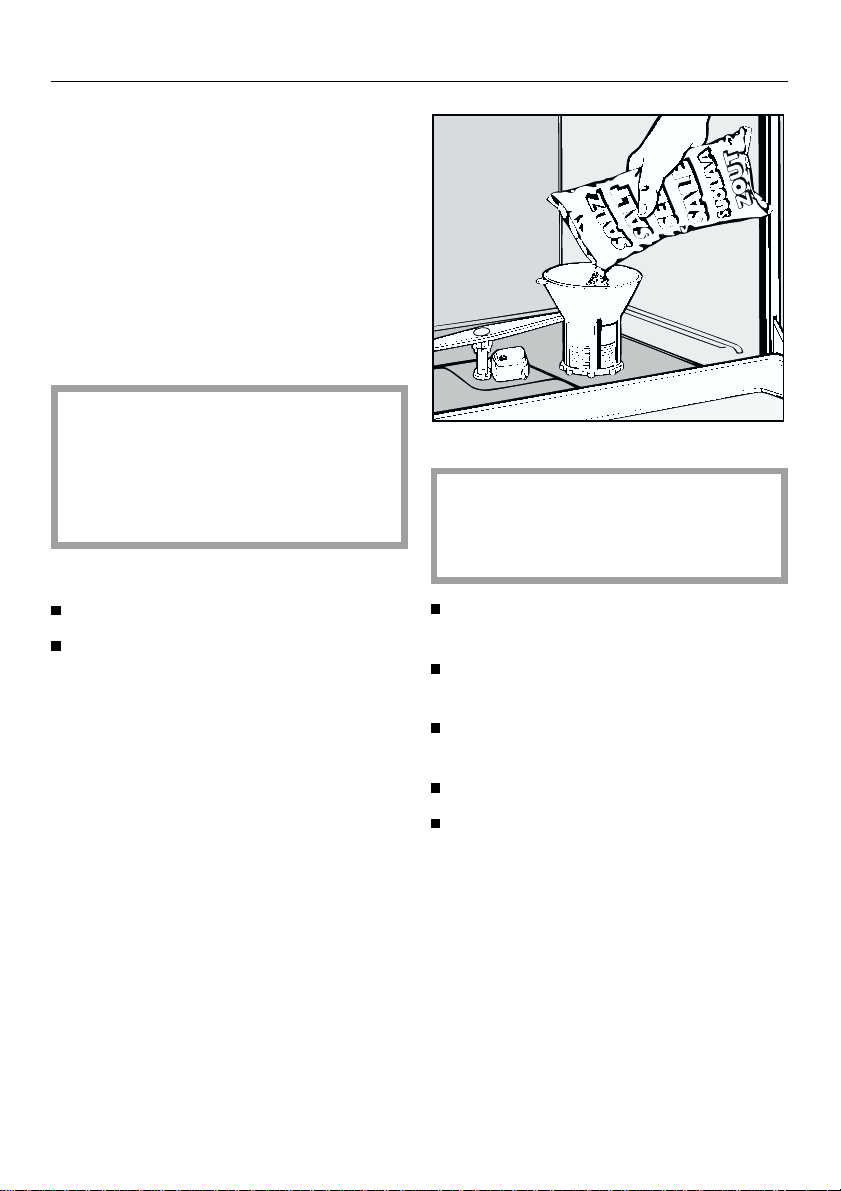
Filling the salt reservoir.
The salt reservoir should be filled before the first use and when the “Salt” indicator lamp is lit. Use water softener
reactivation salt (1 - 4 mm grain size),
as other salts may contain insol-uble
additives which can impair the functioning of the softener.
The salt reservoir holds approx.
2 1/2 Ibs (1.2 kg) of salt.
Inadvertently filling the salt reservoir
with dishwashing detergent will
damage the water softener. Make
sure that only water softener reactivation salt of the proper grain size is
used.
To fill the salt reservoir:
Remove the lower basket.
Unscrew and remove the salt
reservoir cap.
Before filling the salt reservoir for
the first time:
Fill the salt reservoir with approximately 1 1/2 quarts of water.
Place the funnel (provided) over the
salt reservoir.
Carefully fill with salt. As it is filled,
water will run out.
16
Clean any excess salt from the
threads of the reservoir opening.
Screw the cap on firmly.
If the dishwasher will not be used immediately after reactivation, run the
RINSE & HOLD program. This will
remove any traces of salt from the
cabinet.
Water softener (Not available in US models.)
Salt indicator.
When the salt reservoir is empty, the
“Salt” indicator lamp will light, notifying
you that the reservoir should be refilled
with reactivation salt.
Note:
If the water used is very soft (below
4 gr/gal), the salt indicator lamp will
stay on. In this case the reservoir
should not be filled with salt. The indicator lamp will remain lit and can be disregarded or bypassed.
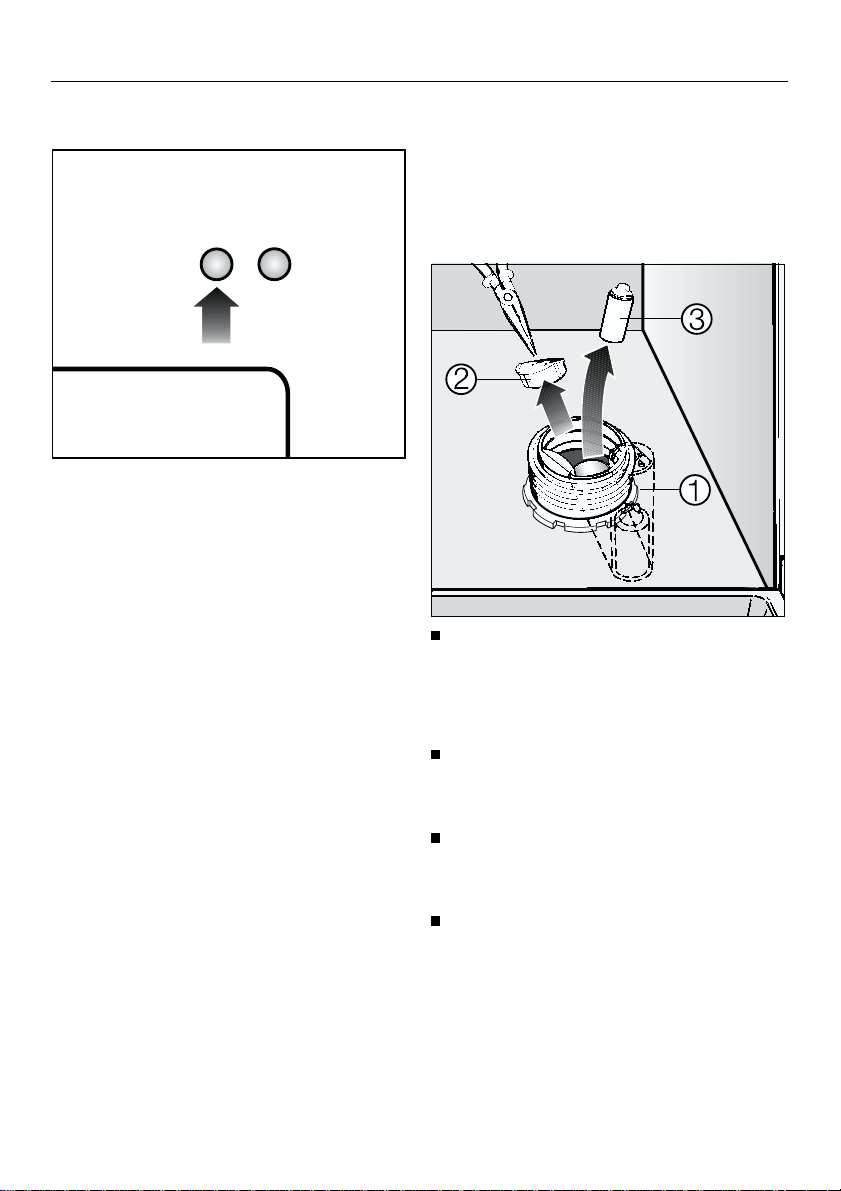
Bypassing the Salt indicator
lamp.
In order to bypass the salt indicator
lamp, you will need a screwdriver and
needle nose pliers.
Remove the salt reservoir cap.
Looking into the salt reservoir, you will
see the top of the float chamber on the
right hand side
Using a screwdriver, carefully pivot
the float chamber towards the center
of the reservoir.
b.
Using the needle nose pliers, first
pull the cap
ber, then remove the float
Replace the float chamber cap,
push the chamber back into its upright position, and replace the salt
reservoir cap. The indicator lamp
should now remain off.
c off of the float cham-
d.
17
Adding rinse aid
Adding rinse aid
The use of Rinse Aid is recommended
to prevent spotting on dishes and glassware that normally occurs during the
drying phase of automatic dishwashing.
Inadvertently filling the rinse aid
reservoir with detergent will always
damage the reservoir. Only pour liquid rinse aid formulated
tial dishwashers into the reservoir.
for residen-
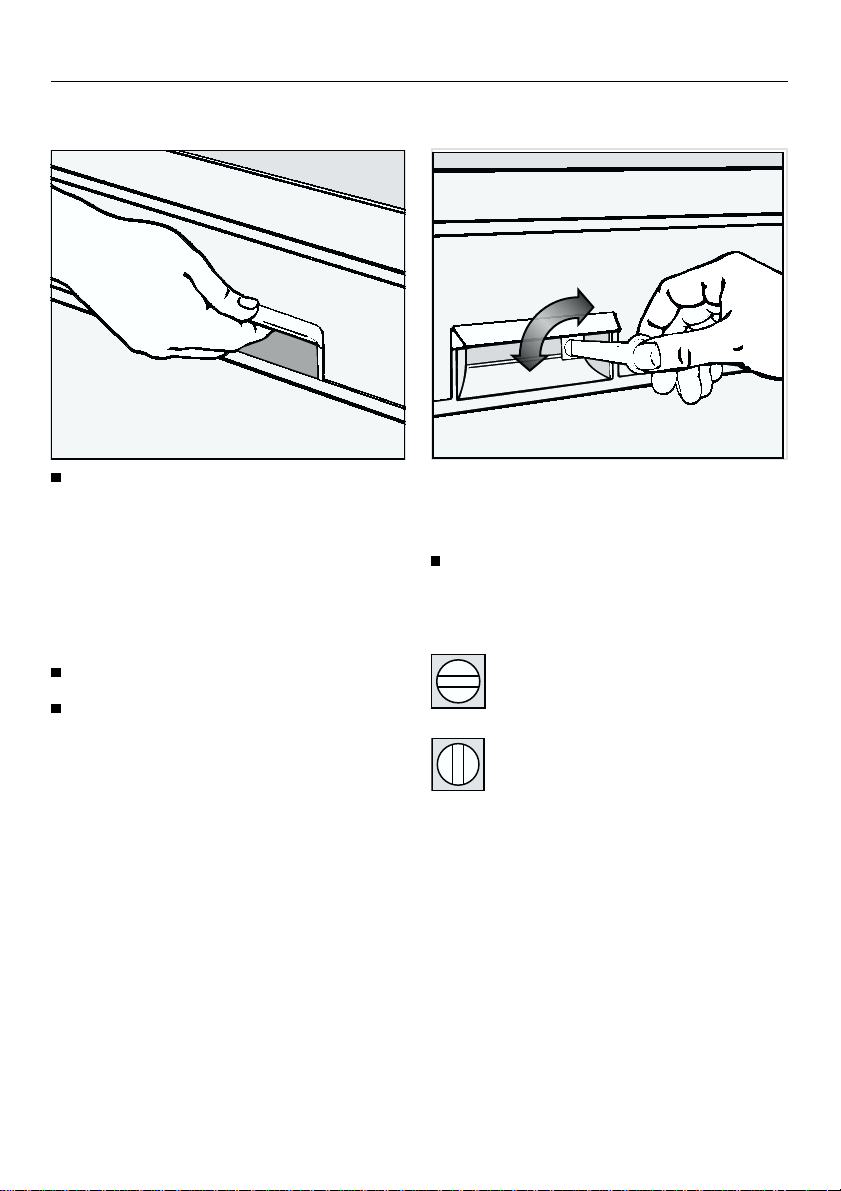
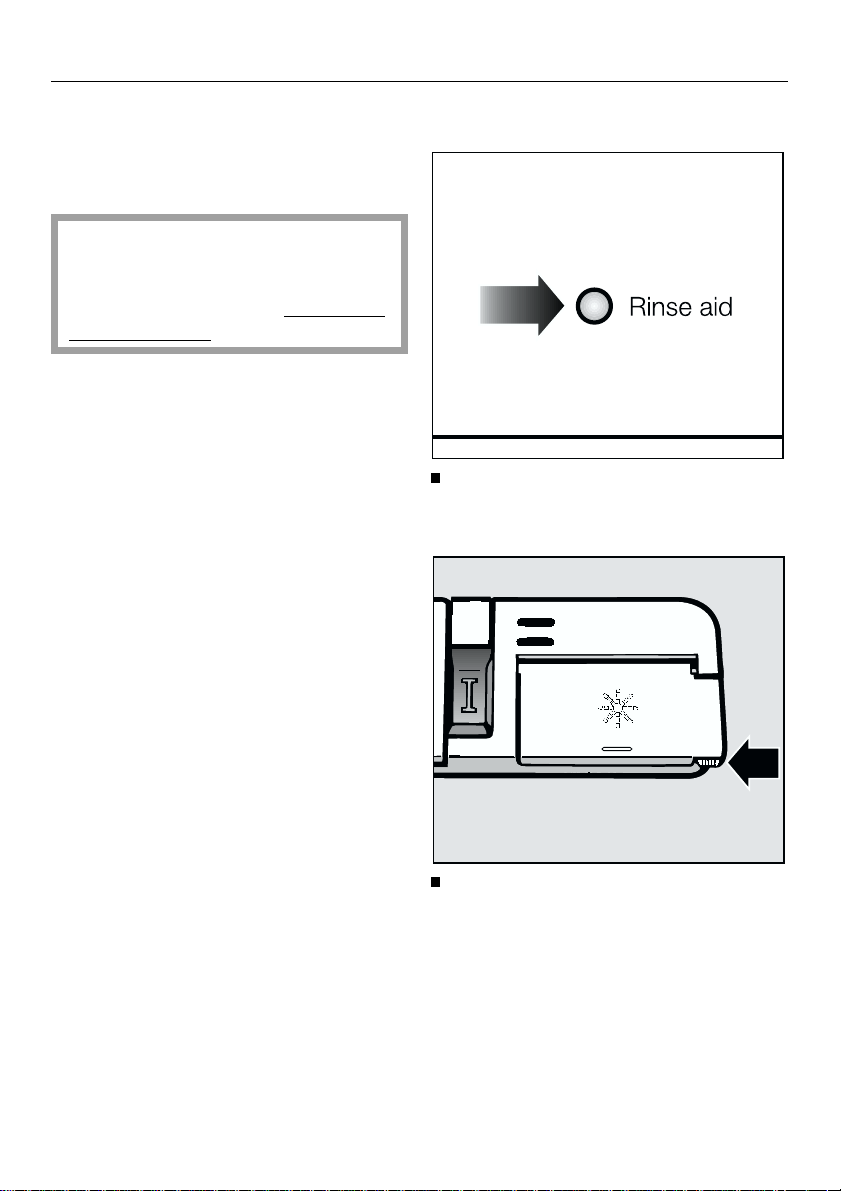
Adding rinse aid.
Add Rinse Aid before the first use
and anytime the “Rinse Aid” indicator lamp comes on.
18
Press the button in the direction of
the arrow until the flap springs open.
Adding rinse aid
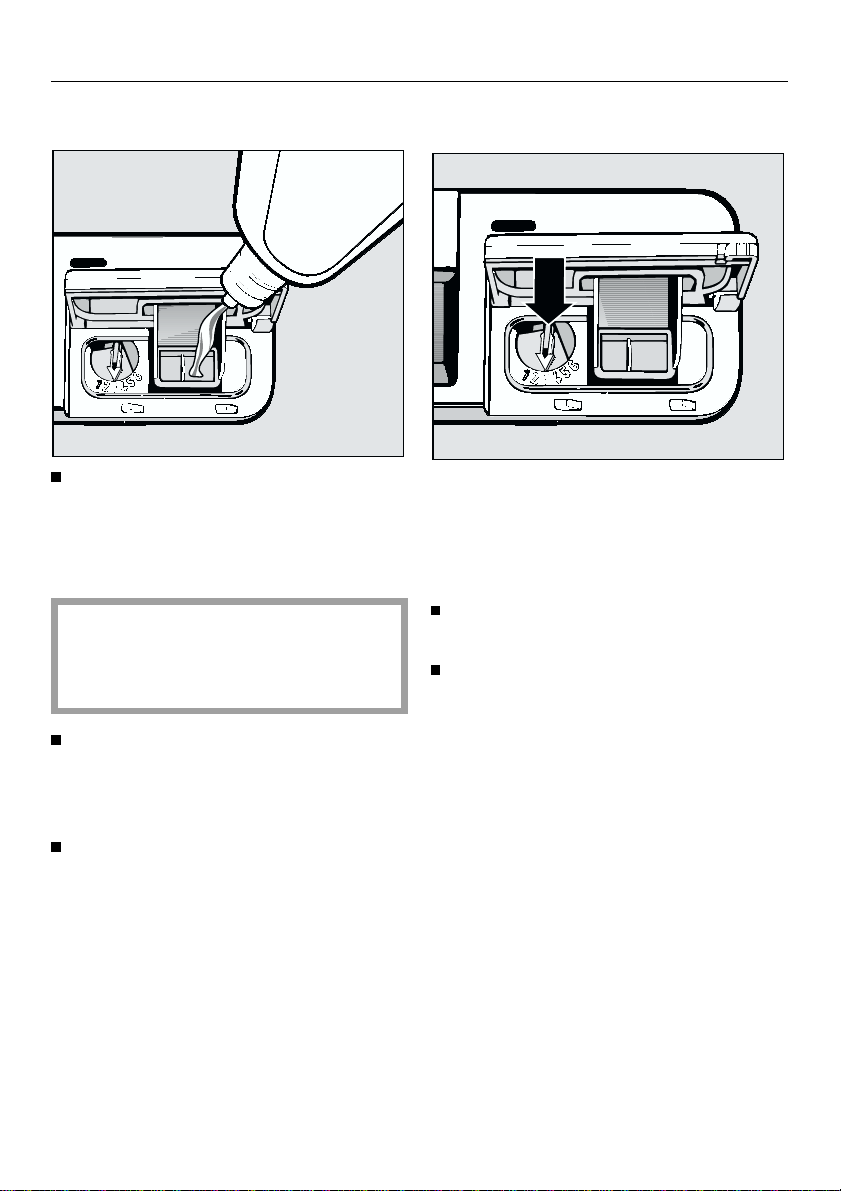
Setting the dosage.
Pour liquid rinse aid into the storage
container until it is visible on the surface of the screen. Do not refill until
the “Rinse aid” indicator lamp comes
on.
Only use rinse aid specifically
labeled for residential dishwashers.
Inadvertently adding detergent will
damage the rinse aid dispenser.
Press on the flap until you hear it
click shut. Failure to close it all the
way will allow water to enter the
reservoir during the wash program.
Wipe up any spilled rinse aid.
The flap will remain closed during normal operation.
The dosage selector comes factory set
to 3. It can be adjusted from 1 to 6, depending on your requirements. This setting dispenses approximately 3 ml
rinse aid per program.
Use a higher setting if spots appear
on dry glassware.
If streaking appears on dishes or
glasses, use a lower setting.
19

Loading the dishwasher
Loading the dishwasher
Load the dishes so that water can
reach all surfaces.
Do not place dishes and cutlery inside other pieces where they may be
concealed.
Hollow items such as cups and
glasses should be inverted and
placed in the upper basket.
Concave based items should be
placed at an angle so that water can
run off them freely.
Tall, narrow, hollow pieces should be
placed in the center of the basket,
rather than in the corners, to ensure
water coverage.
Small cups and glasses should be
placed on the cup racks. Taller mugs
and glasses can be placed underneath the rack.
Do not cover the funnel in the middle
of the upper basket.
Some loading examples are shown on
the following pages.
The spray arms must not be blocked
by items which are too tall or hang
through the baskets. If in doubt, test
for free movement by manually rotating the spray arms.
Some food items may contain natural
dyes that can discolor plastic items
in the dishwasher (e.g. carrots, tomatoes, ketchup, etc.). The strength
and utility of plastic items is not affected by this discoloration.
20

Loading the dishwasher
Loading examples.
Upper basket.
For small, lightweight, or delicate items
such as cups, saucers, glasses, dessert bowls, etc.
Bottom basket.
For larger and heavier items such as
plates, serving platters and saucepans.
Glasses should only be placed in the
bottom basket if the special glassware
insert is used.
The plate inserts on the left and right
rear of the lower basket are removable.
To remove, push the handles of both inserts toward the inside of the basket.
Once removed, the open area can accomodate large pots, casserole dishes,
or accessory inserts (see “Accessories”).
There are slanted holders in the corners of the upper basket. These are
made to support narrow glasses in the
optimum position for a thorough cleaning.
21
 Loading...