


Operating Instructions
Dishwasher
G 5100
G 5105
To prevent accidents and appliance damage read these instructions before
en - US, CA
installation or use. |
M.-Nr. 09 349 510 |

Contents
IMPORTANT SAFETY INSTRUCTIONS. . . . . . . . . . . . . . . . . . . . . . . . . . . . . . . . . 4
Guide to the dishwasher . . . . . . . . . . . . . . . . . . . . . . . . . . . . . . . . . . . . . . . . . . . . 7
Control panel . . . . . . . . . . . . . . . . . . . . . . . . . . . . . . . . . . . . . . . . . . . . . . . . . . . . . . 8
Caring for the environment . . . . . . . . . . . . . . . . . . . . . . . . . . . . . . . . . . . . . . . . . . 9
Before using for the first time. . . . . . . . . . . . . . . . . . . . . . . . . . . . . . . . . . . . . . . 10
To open the door . . . . . . . . . . . . . . . . . . . . . . . . . . . . . . . . . . . . . . . . . . . . . . . . . . 10 To close the door . . . . . . . . . . . . . . . . . . . . . . . . . . . . . . . . . . . . . . . . . . . . . . . . . . 10 Child safety lock . . . . . . . . . . . . . . . . . . . . . . . . . . . . . . . . . . . . . . . . . . . . . . . . . . 10 Water softener . . . . . . . . . . . . . . . . . . . . . . . . . . . . . . . . . . . . . . . . . . . . . . . . . . . . 11 Filling the salt container . . . . . . . . . . . . . . . . . . . . . . . . . . . . . . . . . . . . . . . . . . . . . 14 Refill salt message. . . . . . . . . . . . . . . . . . . . . . . . . . . . . . . . . . . . . . . . . . . . . . . . . 15 Rinse aid . . . . . . . . . . . . . . . . . . . . . . . . . . . . . . . . . . . . . . . . . . . . . . . . . . . . . . . . 17 Adding rinse aid . . . . . . . . . . . . . . . . . . . . . . . . . . . . . . . . . . . . . . . . . . . . . . . . . . 17 Rinse aid indicator . . . . . . . . . . . . . . . . . . . . . . . . . . . . . . . . . . . . . . . . . . . . . . . . . 18 Adjusting the dosage. . . . . . . . . . . . . . . . . . . . . . . . . . . . . . . . . . . . . . . . . . . . . . . 19
Loading the dishwasher . . . . . . . . . . . . . . . . . . . . . . . . . . . . . . . . . . . . . . . . . . . 20
Items not recommended for dishwashing . . . . . . . . . . . . . . . . . . . . . . . . . . . . . . . 21 Typical load for 10 place settings . . . . . . . . . . . . . . . . . . . . . . . . . . . . . . . . . . . . . 22 Typical load for 16 place settings . . . . . . . . . . . . . . . . . . . . . . . . . . . . . . . . . . . . . 23 Typical load for 10 place settings with cutlery basket. . . . . . . . . . . . . . . . . . . . . . 24 Typical load for 13 place settings with cutlery basket. . . . . . . . . . . . . . . . . . . . . . 25 Upper basket . . . . . . . . . . . . . . . . . . . . . . . . . . . . . . . . . . . . . . . . . . . . . . . . . . . . . 26 Lower basket . . . . . . . . . . . . . . . . . . . . . . . . . . . . . . . . . . . . . . . . . . . . . . . . . . . . . 28
Optional accessories. . . . . . . . . . . . . . . . . . . . . . . . . . . . . . . . . . . . . . . . . . . . . . 33
Use . . . . . . . . . . . . . . . . . . . . . . . . . . . . . . . . . . . . . . . . . . . . . . . . . . . . . . . . . . . . 34
Detergent . . . . . . . . . . . . . . . . . . . . . . . . . . . . . . . . . . . . . . . . . . . . . . . . . . . . . . . . 34 Adding detergent. . . . . . . . . . . . . . . . . . . . . . . . . . . . . . . . . . . . . . . . . . . . . . . . . . 35 Turning on . . . . . . . . . . . . . . . . . . . . . . . . . . . . . . . . . . . . . . . . . . . . . . . . . . . . . . . 36 Selecting a program . . . . . . . . . . . . . . . . . . . . . . . . . . . . . . . . . . . . . . . . . . . . . . . 36 Starting a program . . . . . . . . . . . . . . . . . . . . . . . . . . . . . . . . . . . . . . . . . . . . . . . . . 36 Progress indicator . . . . . . . . . . . . . . . . . . . . . . . . . . . . . . . . . . . . . . . . . . . . . . . . . 36
Program Guide . . . . . . . . . . . . . . . . . . . . . . . . . . . . . . . . . . . . . . . . . . . . . . . . . . . 37
2

Contents
Use . . . . . . . . . . . . . . . . . . . . . . . . . . . . . . . . . . . . . . . . . . . . . . . . . . . . . . . . . . . . 38
Standby . . . . . . . . . . . . . . . . . . . . . . . . . . . . . . . . . . . . . . . . . . . . . . . . . . . . . . . . . 38 At the end of a program. . . . . . . . . . . . . . . . . . . . . . . . . . . . . . . . . . . . . . . . . . . . . 38 Turning off . . . . . . . . . . . . . . . . . . . . . . . . . . . . . . . . . . . . . . . . . . . . . . . . . . . . . . . 38 Preparing your appliance for an extended vacation . . . . . . . . . . . . . . . . . . . . . . . 38 Unloading the dishwasher . . . . . . . . . . . . . . . . . . . . . . . . . . . . . . . . . . . . . . . . . . . 39 Interrupting a program. . . . . . . . . . . . . . . . . . . . . . . . . . . . . . . . . . . . . . . . . . . . . . 39 Changing a program . . . . . . . . . . . . . . . . . . . . . . . . . . . . . . . . . . . . . . . . . . . . . . . 39
Additional options . . . . . . . . . . . . . . . . . . . . . . . . . . . . . . . . . . . . . . . . . . . . . . . . 40
Turbo . . . . . . . . . . . . . . . . . . . . . . . . . . . . . . . . . . . . . . . . . . . . . . . . . . . . . . . . . . . 40 Delay start . . . . . . . . . . . . . . . . . . . . . . . . . . . . . . . . . . . . . . . . . . . . . . . . . . . . . . . 40 Optimize Standby . . . . . . . . . . . . . . . . . . . . . . . . . . . . . . . . . . . . . . . . . . . . . . . . . 42 Factory default . . . . . . . . . . . . . . . . . . . . . . . . . . . . . . . . . . . . . . . . . . . . . . . . . . . . 43
Frequently asked questions . . . . . . . . . . . . . . . . . . . . . . . . . . . . . . . . . . . . . . . . 44
Technical faults . . . . . . . . . . . . . . . . . . . . . . . . . . . . . . . . . . . . . . . . . . . . . . . . . . . 44 Problems water Intake / Drain . . . . . . . . . . . . . . . . . . . . . . . . . . . . . . . . . . . . . . . . 45 General problems with the dishwasher . . . . . . . . . . . . . . . . . . . . . . . . . . . . . . . . . 46 Sounds. . . . . . . . . . . . . . . . . . . . . . . . . . . . . . . . . . . . . . . . . . . . . . . . . . . . . . . . . . 47 Poor cleaning results . . . . . . . . . . . . . . . . . . . . . . . . . . . . . . . . . . . . . . . . . . . . . . . 48
After sales service . . . . . . . . . . . . . . . . . . . . . . . . . . . . . . . . . . . . . . . . . . . . . . . . 51
Transport . . . . . . . . . . . . . . . . . . . . . . . . . . . . . . . . . . . . . . . . . . . . . . . . . . . . . . . 52
User Maintenance Instructions. . . . . . . . . . . . . . . . . . . . . . . . . . . . . . . . . . . . . . 53
Cleaning and Care . . . . . . . . . . . . . . . . . . . . . . . . . . . . . . . . . . . . . . . . . . . . . . . . 54
Triple filter system . . . . . . . . . . . . . . . . . . . . . . . . . . . . . . . . . . . . . . . . . . . . . . . . . 55 Cleaning the drain pump and non-return valve . . . . . . . . . . . . . . . . . . . . . . . . . . . 58
Installation instructions . . . . . . . . . . . . . . . . . . . . . . . . . . . . . . . . . . . . . . . . . . . 59
Help to protect the environment. . . . . . . . . . . . . . . . . . . . . . . . . . . . . . . . . . . . . 60
Electrical connection. . . . . . . . . . . . . . . . . . . . . . . . . . . . . . . . . . . . . . . . . . . . . . 61
Plumbing. . . . . . . . . . . . . . . . . . . . . . . . . . . . . . . . . . . . . . . . . . . . . . . . . . . . . . . . 63
Connection to the water supply . . . . . . . . . . . . . . . . . . . . . . . . . . . . . . . . . . . . . . . 63 Drainage . . . . . . . . . . . . . . . . . . . . . . . . . . . . . . . . . . . . . . . . . . . . . . . . . . . . . . . . 64
3

IMPORTANT SAFETY INSTRUCTIONS
WARNING –
When using your dishwasher, follow basic precautions, including the following:
Read all instructions before installation or use of the dishwasher to prevent injury and machine damage.
Use the dishwasher only for its intended purpose. This appliance is intended for residential use only.
Keep these operating instructions in a safe place and pass them on to any future user.
Correct usage
The dishwasher is not designed for commercial use. It is intended for use in domestic households and in similar working and residential environments such as, shops, offices and showrooms or guest houses.
The dishwasher is not intended for outdoor use.
It must only be used as a domestic appliance as specified in these operating instructions, for cleaning domestic crockery and cutlery. Any other usage is not supported by the manufacturer and could be dangerous.
Persons who lack physical, sensory or mental abilities, or experience with the appliance should not use the dishwasher without supervision or instruction by a responsible person.
Electrical Safety
Before installation, make sure that the voltage and frequency listed on the data plate correspond with the household electrical supply. This data must correspond to prevent injury and machine damage. Consult a qualified electrician if in doubt.
Before installation or service, disconnect the power supply to the work area by unplugging the unit, "tripping" the circuit breaker or removing the fuse.
Do not use an extension cord to connect this appliance to electricity. Extension cords do not guarantee the required safety of the appliance (e.g. danger of overheating).
Be certain your appliance is properly installed and grounded by a qualified technician. To guarantee the electrical safety of this appliance continuity must exist between the appliance and an effective grounding system. It is imperative that this basic safety requirement be met. If there is any doubt, have the electrical system of the house checked by a qualified electrician.
If the supplied power cord is damaged it must only be replaced by a Miele Service technician with a genuine Miele power cord.
The outlet must be accessible at all times after installation to disconnect the dishwasher.
4

IMPORTANT SAFETY INSTRUCTIONS
Installation
The dishwasher must be installed and connected in accordance with the installation instructions.
Installation and repair work should be performed by a Miele authorized service technician. Work by unqualified persons could be dangerous and may void the warranty.
Do not install or use a damaged dishwasher. A damaged appliance is dangerous. Unplug the machine and contact Miele Technical Service Department.
Ensure that any plastic wrappings, bags, etc. are disposed of safely and kept out of the reach of children.
Danger of suffocation!
This appliance must not be used in a non-stationary location (e.g. on a boat).
WARNING - Fire hazard!
Do not cover or crush the plug of the appliance. Ensure that the cabinet opening for the dishwasher provides ample space for the plug and cord. Installing the dishwasher in a tight space may crimp the power cord or put pressure on the plug which could cause overheating.
This dishwasher should only be installed under a continuous counter top secured to adjacent cabinetry.
Do not install this dishwasher beneath a cooking surface, oven or any appliance that radiates heat.
High temperatures from these units may damage the dishwasher.
A toe-kick must be used with the dishwasher. If the supplied toe-kick is not used, a cabinet matching toe-kick must be installed.
Do not install the dishwasher in an area where it will be exposed to temperatures below freezing.
Do not cut the intake hose or submerge it in liquid. This hose contains electrical components that could cause injury or property damage if cut or submerged.
Only power up the dishwasher when all installation and plumbing work is complete.
5

IMPORTANT SAFETY INSTRUCTIONS
Use
To reduce the risk of injury, do not allow children to play in, on or near the dishwasher. It is possible for small fingers may be pinched in the door.
Only use the dishwasher if all panels are properly in place.
Do not tamper with the controls.
Do not sit or stand on the door or baskets of the dishwasher. Close the door when not in use.
Under certain conditions, hydrogen gas may be produced in a hot water system that has not been used for two weeks or more. HYDROGEN GAS IS EXPLOSIVE. If the hot water system has not been used for such a period, turn on all hot water faucets and let water flow from each for several minutes before using the dishwasher. This will release any accumulated hydrogen gas. Do not smoke or use an open flame during this time.
Be sure that all items placed in the dishwasher are "dishwasher safe". For items not labeled, check the manufacturer’s recommendations.
When loading tableware, place sharp items away from the door to prevent damage to the seal. Load sharp items pointing downwards to prevent injuries.
Only use detergents and rinse aids recommended for residential dishwashers. Keep all detergents and rinse aids out of the reach of children.
Do not inhale or swallow detergents. Dishwasher detergents contain irritant and corrosive ingredients. They can cause burning in the mouth and throat if swallowed, or inhibit breathing. Consult a doctor immediately if detergent has been swallowed or inhaled.
Do not drink water from the dishwasher! Harmful residues could be present.
Do not fill the rinse aid reservoir or salt container with detergent. It will destroy the rinse aid compartment and water softener.
Dishes can be very hot at the end of a program. Allow the dishes to cool until they are cool enough to handle before unloading them.
The water supply must be turned off when the appliance is not used for a longer period of time (e.g. during vacations).
Disposal of an appliance
If the appliance is removed from its installation site and will not be used, remove the doorlock to the wash cabinet to prevent children from locking themselves in the machine.
SAVE THESE
INSTRUCTIONS
6

Guide to the dishwasher
Upper spray arm (not visible)
Cutlery tray
Upper basket
Middle spray arm
Air inlet for drying (depending on model)
Lower spray arm
Triple filter system
Data plate
Child Safety Lock in the door handle (not visible)
Rinse aid reservoir
Dual compartment detergent dispenser
7

Guide to the dishwasher
Control panel
Program selection |
Delay Start button |
Delay start display |
Turbo button with indicator light |
Program sequence display |
Program selector button |
Check/Refill indicators |
On/Off button |
Start/Stop button with indicator light |
|
This operating instruction manual describes several dishwasher models with different indicated settings.
The different dishwasher models are named : Standard = 32 1/16" (81.5 cm) high dishwashers XXL = 33 11/16" (85.5 cm) high dishwashers.
8

Caring for the environment
Energy saving washing
This dishwasher is exceptionally economical in the use of water and electricity. For best results follow these tips:
For lowest energy consumption you may connect the dishwasher to a cold water source.
For fastest possible wash times, with slightly higher energy consumption, connect the dishwasher to a hot water source.
Make full use of the baskets without overloading for the most economical washing.
Use the correct amount of detergent and rinse aid. Detergent dosage is dependent upon the amount of soiling and type of dishware being washed. See the "Program Guide" for more information.
When using powder or gel detergent, reduce the amount to 2/3 of the normal amount when washing a small load.
Choose a program that best suits the degree of soiling and the type of dishes being washed.
9

Before using for the first time
To open the door |
|
|
|
|
|
Child safety lock |
||||||||||||
|
|
|
|
|
|
|
|
|
|
|
|
|
|
|
|
|
|
|
|
|
|
|
|
|
|
|
|
|
|
|
|
|
|
|
|
|
|
|
|
|
|
|
|
|
|
|
|
|
|
|
|
|
|
|
|
|
|
|
|
|
|
|
|
|
|
|
|
|
|
|
|
|
|
|
|
|
|
|
|
|
|
|
|
|
|
|
|
|
|
|
|
|
|
|
|
|
|
|
|
|
|
|
|
|
|
|
|
|
|
|
|
|
|
|
|
|
|
|
|
|
|
|
|
|
|
|
|
|
|
|
|
|
|
|
|
|
|
|
|
|
|
|
|
|
|
|
|
|
|
|
|
|
|
|
|
|
|
|
|
|
|
|
|
|
|
|
|
|
|
|
|
|
|
|
|
|
|
|
|
|
|
|
|
|
|
|
|
|
|
Reach under the handle and pull the door open.
If the door is opened during operation the dishwasher will stop running. Once the door is closed the program will restart.
To close the door
Push the baskets in.
Lift the door and push until it clicks into place.
Te child Safety Lock is designed to prevent children from opening the dishwasher.
To lock the door, push the slider below the door grip to the right.
To unlock the door, push the slider to the left.
10
Before using for the first time
Water softener
To achieve good cleaning results, the dishwasher needs soft water (water that is low in minerals). Hard water results in calcium deposits on dishware and in the dishwasher.
If your tap water hardness is above 4 °d (4 gr/gal) the water should be softened. The built-in water softener is designed for this purpose. The water softener is suitable for a water hardness up to
70 °d (73 gr/gal).
–If using "Tab" detergent products you do not need to add salt, depending on the water hardness 22 gr/gal (21 °d) (see "Detergents").
–The dishwasher must be correctly programmed to match the hardness of your water.
–Your local water authority will be able to advise you of the exact water hardness level in your area.
If the hardness of your local supply is constantly lower than 4 °d (4 gr/gal), you do not need to add water softener salt. However the water hardness level must still be programmed.
In areas where the water hardness fluctuates (e.g. 37-50 °d [39-52 gr/gal]) always program the machine to the higher value (in this example 50 °d
[52 gr/gal]).
If there is a fault, it will help the service technician to know the hardness of your local water supply.
Please note your water hardness below:
°d (gr/gal)
The water hardness was programmed at 1 °d (1 gr/gal) by factory default.
11

Before using for the first time
Programming the water softener
To exit the programming mode at any time turn the dishwasher off with the button.
Press the button to turn the dishwasher off.
Press and hold the "Start / Stop" button and turn the dishwasher on simultaneously using the button. Keep the "Start / Stop" button pressed for at least four seconds until the "Start / Stop" indicator light comes on.
If it does not come on, start over.
Now press the "Delay Start" button twice.
The characters "P 1 5" will flash one after the other in the display. This means that the water hardness level has been set at 15 °d [2.7 mmol/l (factory setting)].
The value which has been set for the water hardness is shown as a figure after the "P" in the display (see chart).
Use the "Start / Stop" button to select the flashing rhythm that corresponds to your water hardness level.
With each press of the button the value will raise one level. Once the highest value is reached the setting will start again from the beginning.
Press the button to turn the dishwasher off.
|
|
Value |
°d |
gr/gal |
displayed |
|
|
|
1 |
1 |
1 |
2 |
2 |
2 |
3 |
3 |
3 |
4 |
4 |
4 |
5 |
5 |
5 |
6 |
6 |
6 |
7 |
7 |
7 |
8 |
8 |
8 |
9 |
9 |
9 |
10 |
10 |
10 |
11 |
11 |
11 |
12 |
13 |
12 |
13 |
14 |
13 |
14 |
15 |
14 |
15 |
16 |
15 |
16 |
17 |
16 |
17 |
18 |
17 |
18 |
19 |
18 |
19 |
20 |
19 |
20 |
21 |
20 |
21 |
22 |
21 |
22 |
23 |
22 |
23 |
24 |
23 |
24 |
25 |
24 |
25 |
26 |
25 |
26 |
27 |
26 |
27 |
28 |
27 |
28 |
29 |
28 |
29 |
30 |
29 |
30 |
31 |
30 |
31 |
32 |
31 |
32 |
33 |
32 |
33 |
34 |
33 |
34 |
35 |
34 |
35 |
36 |
35 |
36 |
38 |
36 |
37-50 |
39-52 |
50 |
51-60 |
53-63 |
60 |
61-70 |
64-73 |
70 |
|
|
|
12

Before using for the first time
Checking the programmed water hardness
Press the button to turn the dishwasher off.
Press and hold the "Start/Stop" button and turn the dishwasher on simultaneously using the button. Keep the "Start/Stop" button pressed for at least four seconds until the "Start/Stop" indicator light comes on.
Press the "Delay Start"" button twice.
The Delay Start indicator will flash twice briefly in intervals.
Character will flash in sequence in the display.
The number at the "P" is the value for the water hardness level which has been set (see chart).
Press the button to turn the dishwasher off.
13
Before using for the first time
Every dishwasher is tested before leaving the factory. Any water remaining in the machine is from the final factory test and does not indicate that the machine has been used.
Important: The salt container must be filled with 2 quarts (2 l) of water before adding salt for the first time so the salt can dissolve
properly. Water does not have to be added with subsequent refills.
Filling the salt container
Inadvertently filling the salt container with dishwashing detergent (including liquid detergent) will damage the water softener.
Only use water softener salt specially formulated for dishwashers. Other salts may contain insoluble additives which can impair the water softener.
If using "Tab" products which include salt, still add salt to the machine to achieve optimal cleaning results and ensure long-term functioning of the water softener.
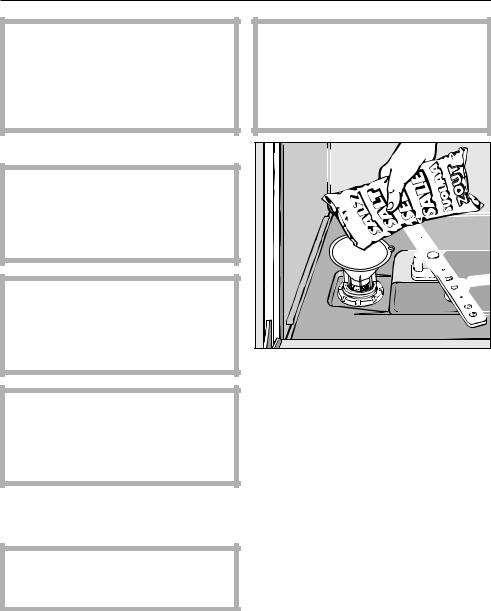
Remove the lower basket from the wash cabinet and unscrew the salt container lid.
When opening the salt container, water will run out. Open the container only to refill salt.
Place the provided funnel over the salt container and carefully fill it with salt. The salt container holds approx. 4.4 lbs (2 kg) of salt, depending on the type of salt.
Clean any excess salt from the threads of the container opening. Screw the lid on firmly.
Immediately after each refill, run the " Express" program without a load (no "Turbo" function if available). This will remove any traces of salt from inside the wash cabinet.
14

Before using for the first time
Refill salt message
When the "Salt" indicator light comes on, refill the salt after the program has finished.
After the container has been filled, the "Salt" indicator light can remain on for a short time. It will go out once the reactivation process is complete.
The "Salt" indicator light is turned off if you have programmed the dishwasher to a water hardness below 4 °d
(4 gr/gal).
Immediately after each refill, run the "Express" program without a load (no "Turbo" function if available).
This will remove any traces of salt from inside the wash cabinet.
15

Before using for the first time
Deactivate indicators
If you only ever use "Tab" detergent products in your dishwasher, you can switch both messages off if you wish.
Turn the dishwasher off with the button.
Press and hold the "Start/Stop" button and turn the dishwasher on simultaneously using the button. Keep the "Start/Stop" button pressed for at least four seconds until the "Start/Stop" indicator light comes on.
If it does not come on, start over.
Press the "Delay start" button nine times.
The "Delay start" indicator will flash briefly 9 times in intervals.
The characters flashing in the display will show whether the refill indicators are turned on or off.
–"P 1": the refill indicators are turned on.
–"P 0": the refill indicators are turned off.
Press the "Start/Stop" button if you wish to change the setting.
The setting is saved immediately.
Press the button to turn the dishwasher off.
If you switch to using detergent that does not contain salt or rinse aid, it is important to remember to replenish the salt and rinse aid and to switch the indicators back on.
16

Before using for the first time
Rinse aid
Rinse aid is needed to prevent spotting on dishes and glassware.
The rinse aid is filled in the reservoir and the set amount will be automatically dosed.
Filling the rinse aid reservoir with detergent will damage the reservoir. Only pour rinse aid formulated for residential dishwashers into the reservoir.
When using "Tab" detergents rinse aid is not needed.
Adding rinse aid
Press the button in the direction of the arrow until the flap springs open.
Pour liquid rinse aid into the reservoir until it its visible on the surface of the screen.
The rinse aid reservoir holds approx. 3.7 oz (110 ml).
Press on the flap until you hear it click shut. Failure to close it all the way allows water to enter the reservoir during the wash program.
Clean any spilled rinse aid. The flap will remain closed during normal operation.
17

Before using for the first time
Rinse aid indicator
When the Rinse aid indicator first comes on, there will be enough rinse aid left for 2 - 3 washes.
The rinse aid indicator on the control panel will light when the rinse aid reservoir needs refilling.
If you only ever use "Tab" detergent products in your dishwasher, you can switch the reminders for salt and rinse aid off if you wish (see "Before using for the first time - Refill salt message").
If you switch to using detergent that does not contain salt or rinse aid, it is important to remember to replenish the salt and rinse aid and to switch the indicators back on.
18

Before using for the first time
Adjusting the dosage
In order to obtain an optimal cleaning result you can adjust the dosing quantity of the rinse aid.
The dosage selector is preset to 3. This dispenses approximately 3 ml of rinse aid per program. It can be adjusted from 0 to 6.
The amount of rinse aid dispensed can be more than the value set due to the automatic adjustment of the "Sensor Wash" program.
–Use a higher setting if spots appear on dry glassware.
Use a lower setting if streaking appears on dishes or glasses.
Turn the dishwasher off " ".
Press the "Start / Stop" button and at the same time turn the dishwasher on. Hold the "Start / Stop" button until the "Start / Stop" indicator comes on.
If it does not come on, start over.
Press the "Delay Start" button three times.
The "Delay Start" indicator will flash briefly three times in intervals.
P 3 will flash in the display. This means that the rinse aid dosage has been set to 3 ml at the factory.
The dosage set will show in the display after the P.
Select the desired setting with the "Start / Stop" button. Every touch of the button increases the level.
The programmed dosage is saved.
Turn the dishwasher off " ".
19

Loading the dishwasher
Do not wash items soiled with ash, sand, wax, grease or paint in the dishwasher.
Ash and sand do not dissolve and will be distributed throughout the inside of the dishwasher.
Wax, grease and paint will cause permanent discoloration and damage to the dishwasher.
Scrape food from dishes before placing them in the dishwasher, rinsing is not necessary.
Some foods contain natural dyes, e.g. carrots or tomatoes. Plastic items may discolor permanently if they come in contact with food dyes.
All items can be placed anywhere in the baskets.
Load dishes so that water can reach all surfaces. Do not place dishes or cutlery inside other pieces.
Make sure that all items are securely positioned.
Hollow items such as cups and glasses should be placed upside down in the baskets.
To ensure good water coverage, tall, narrow and hollow items, i.e. vases or champagne glasses, should be placed in the center of the basket rather than in the corners.
Concave based items such as mugs or bowls, should be placed at an angle so that water does not pool.
The spray arms must not be blocked by items that are too tall or hang through the baskets. Check clearance by manually rotating the spray arms.
Place very small items in the cutlery tray or basket so they do not fall to the bottom of the wash cabinet.
Food residue and spilled liquids should be cleaned from the sides of the dishwasher door. These are outside of the wash cabinet and are not cleaned by water from the spray arms.
20
Loading the dishwasher
Items not recommended for dishwashing
–Cutlery with wooden handles
–Wooden cutting boards
–Glued items such as old knives with handles glued together around the shank of the blade
–Handmade craft items, antique, metal trimmed or decorative glassware
–Plastic items that are not heat resistant
–Copper, brass, tin or aluminum
–Dishes with color painted over the glaze. These dishes may fade over time
–Fine glassware and crystal items should only be washed using the "China & Crystal" program*.
Otherwise clouding or etching may occur after frequent washing.
–Cast iron pots and pans
* depending on model
If unsure whether your china and crystal are dishwasher safe, please check with the manufacturer. The China & Crystal program*, although extremely gentle and thorough can cause the china and crystal to "wear" if they are not dishwasher safe.
Glassware:
–There are no standard guidelines for washing glassware, when in doubt wash by hand.
–When purchasing new dishes, glasses and cutlery, make sure they are dishwasher safe. Only wash items marked "dishwasher safe" in the dishwasher.
–If fine glassware is washed in the dishwasher select the "China & Crystal" program*. This will reduce the risk of clouding.
Silver and aluminum:
–Silver or aluminum items may tarnish.
–Silverware previously cleaned with a silver polish may be damp or spotted at the end of a program where water has adhered to the polish. This can be rubbed off with a soft, dry cloth. Silver that has been cleaned in an immersion dip is usually dry at the end of a program, but may tarnish.
–If left to dry, foods containing sulfur can discolor silver. These include egg yolk, onions, mayonnaise, mustard, fish and marinades.
–Silverware may tarnish or pit if washed next to stainless steel. Leave space between these metals.
–Clean aluminum items, e.g. grease filters, with domestic dishwasher detergent only.
21
 Loading...