


 Loading...
Operating Instructions
Dishwasher
To prevent accidents and machine damage, read these instructions be fore installation or use.
en-US |
HG05 |
M.-Nr. 10 014 140 |

Contents |
|
IMPORTANT SAFETY INSTRUCTIONS................................................................. |
5 |
Guide to the dishwasher ..................................................................................... |
14 |
Appliance overview................................................................................................ |
14 |
Control panel.......................................................................................................... |
15 |
Display functions.................................................................................................... |
16 |
Caring for the environment ................................................................................. |
17 |
Disposal of packaging material.............................................................................. |
17 |
Disposal of your old appliance .............................................................................. |
17 |
Energy-saving dishwashing ................................................................................... |
17 |
Before using for the first time............................................................................. |
18 |
Opening the door................................................................................................... |
18 |
Closing the door .................................................................................................... |
18 |
Basic settings......................................................................................................... |
19 |
Before using the appliance for the first time, you require:..................................... |
21 |
Dishwasher salt...................................................................................................... |
21 |
Filling the salt reservoir ..................................................................................... |
22 |
Salt refill indicator ............................................................................................. |
23 |
Rinse aid ................................................................................................................ |
24 |
Adding rinse aid ................................................................................................ |
24 |
Rinse aid indicator ............................................................................................ |
25 |
Loading the dishwasher ...................................................................................... |
26 |
Tips ........................................................................................................................ |
26 |
Loading examples.................................................................................................. |
28 |
Upper basket ......................................................................................................... |
32 |
Adjusting the upper basket............................................................................... |
33 |
Lower basket ......................................................................................................... |
34 |
Grates and filters.................................................................................................... |
36 |
Cutlery.................................................................................................................... |
38 |
3D cutlery tray (depending on model)............................................................... |
38 |
Cutlery basket (depending on model)............................................................... |
39 |
Operation .............................................................................................................. |
40 |
Detergent ............................................................................................................... |
40 |
Adding detergent .............................................................................................. |
41 |
Turning on .............................................................................................................. |
42 |
Selecting a program............................................................................................... |
42 |
Starting a program ................................................................................................. |
43 |
Time display........................................................................................................... |
43 |
Energy management.............................................................................................. |
44 |
At the end of the program...................................................................................... |
44 |
2

|
Contents |
Turning off .............................................................................................................. |
45 |
Unloading the dishwasher ..................................................................................... |
45 |
Interrupting a program ........................................................................................... |
46 |
Changing a program .............................................................................................. |
46 |
Options.................................................................................................................. |
47 |
Options .................................................................................................................. |
47 |
FlexiTimer with EcoStart ........................................................................................ |
48 |
Program overview ................................................................................................ |
51 |
Settings menu ...................................................................................................... |
53 |
Opening the Settings menu ................................................................................... |
53 |
Language ............................................................................................................ |
54 |
Time of day ............................................................................................................ |
54 |
Water hardness ...................................................................................................... |
55 |
Rinse aid ................................................................................................................ |
56 |
EcoStart ................................................................................................................. |
56 |
AutoOpen............................................................................................................... |
58 |
Optimize Standby .................................................................................................. |
59 |
Refill indicators....................................................................................................... |
59 |
Check filters ........................................................................................................... |
60 |
Soak....................................................................................................................... |
60 |
Pre-Rinse ............................................................................................................... |
60 |
Brightness.............................................................................................................. |
60 |
Volume ................................................................................................................... |
61 |
Version info ............................................................................................................ |
61 |
Showroom program ............................................................................................... |
61 |
Factory default settings.......................................................................................... |
62 |
Closing the Settings menu..................................................................................... |
62 |
Cleaning and care ................................................................................................ |
63 |
Cleaning the wash cabinet..................................................................................... |
63 |
Cleaning the door and the door seal ..................................................................... |
63 |
Cleaning the control panel ..................................................................................... |
63 |
Cleaning the indicator reflector panel .................................................................... |
63 |
Cleaning the door front .......................................................................................... |
64 |
Filter system........................................................................................................... |
65 |
Cleaning the spray arms ........................................................................................ |
67 |
Frequently Asked Questions ............................................................................... |
68 |
Technical problems ................................................................................................ |
68 |
Water intake fault ................................................................................................... |
71 |
Water drainage fault............................................................................................... |
72 |
3

Contents |
|
General problems................................................................................................... |
73 |
Noises .................................................................................................................... |
74 |
Poor cleaning results.............................................................................................. |
75 |
Frequently asked questions ................................................................................ |
78 |
Cleaning the drain pump and non-return valve ..................................................... |
78 |
Customer service................................................................................................. |
79 |
Repairs................................................................................................................... |
79 |
Warranty................................................................................................................. |
79 |
Optional accessories........................................................................................... |
80 |
............................................................................................................................... |
82 |
Installation Instructions .......................................................................................... |
83 |
Electrical connection........................................................................................... |
84 |
Water connection................................................................................................. |
86 |
Connection to the water supply............................................................................. |
86 |
Drainage................................................................................................................. |
87 |
Sound emission testing ....................................................................................... |
88 |
4

IMPORTANT SAFETY INSTRUCTIONS
This dishwasher complies with current safety requirements. Inap propriate use can, however, lead to personal injury and damage to property.
To avoid the risk of accidents and damage to the dishwasher, please read the installation plan and the operating instructions carefully before it is installed and used for the first time. They con tain important information on its installation, safety, use and main tenance.
Keep the installation plan and the operating instructions in a safe place and pass them on to any future owner.
Miele cannot be held liable for damage caused by non-compli ance with this information.
5

IMPORTANT SAFETY INSTRUCTIONS
Correct use
This dishwasher is intended for use in domestic households and similar residential environments.
This dishwasher is not suitable for outdoor use.
It must only be used as specified in these operating instructions for cleaning domestic dishware and cutlery. Any other usage is not supported by the manufacturer and could be dangerous.
This appliance is not intended for use by persons (including chil dren) with reduced physical, sensory or mental capabilities, or lack of experience and knowledge.
6

IMPORTANT SAFETY INSTRUCTIONS
Safety with children
Children must be kept away from the appliance unless they are constantly supervised.
Children should be supervised to ensure that they do not play with the appliance. Keep small children away from the appliance at all times to avoid the risk of injury. There is the risk that children may lock themselves in the dishwasher.
If the automatic door opening mechanism (depending on model) is active keep young children away from the area in which the door opens. Danger of injury in the unlikely event of a fault with the open ing mechanism.
Danger of suffocation! Ensure that any plastic wrappings, bags, etc. are disposed of safely and kept out of the reach of children.
Keep children away from detergents. Dishwasher detergents can cause burning in the mouth, nose and throat if swallowed, or inhibit breathing. Keep children away from the dishwasher when the door is open. There could still be detergent residues in the cabinet. Seek medical attention immediately if your child has swallowed or inhaled detergent.
7

IMPORTANT SAFETY INSTRUCTIONS
Technical safety
Installation, repair, and maintenance work should only be per formed by a Miele-authorized service technician. Work by unquali fied persons could be dangerous and may void the warranty.
Before installation, check the dishwasher for visible signs of dam age. Under no circumstances should you use a damaged dishwash er. A damaged dishwasher could be dangerous.
The electrical safety of this appliance can only be guaranteed when continuity is complete between it and an effective grounding system. It is most important that this basic safety requirement is present and regularly tested and, where there is any doubt, the elec trical system in the house should be checked by a qualified electri cian.
Miele cannot be held liable for the consequences of an inadequate grounding system (e.g. electric shock).
Reliable and safe operation of this dishwasher can only be assur ed if it has been connected to the electrical supply.
The dishwasher must only be plugged into the electricity supply via a suitable switched socket using a 3-pin plug with a grounding contact (it must not be hard-wired). The electrical socket must be easily accessible after the dishwasher is installed so that it can be disconnected from the electricity supply at any time.
There must be no electrical sockets behind the dishwasher. There is a danger of overheating and fire risk if the dishwasher is pushed up against a plug.
The dishwasher must not be installed under a cooktop. The high radiant temperatures which are sometimes generated by a cooktop could damage the dishwasher. For the same reason, it should not be installed next to open fires or other appliances which give off heat, such as heaters, etc.
8

IMPORTANT SAFETY INSTRUCTIONS
To avoid the risk of damage to the dishwasher, make sure that the connection data on the data plate (fuse rating, voltage, and frequen cy) matches the electrical supply before connecting the dishwasher to the mains. Consult a qualified electrician if in any doubt.
Do not connect the dishwasher to the electrical supply until it has been fully installed and any adjustment has been made to the door springs.
The dishwasher may only be operated if the door opening mecha nism is working correctly. Otherwise there could be a risk of danger while the automatic door opening mechanism (depending on model) is active.
To check that the door opening mechanism is working correctly:
–The door springs must be adjusted equally on both sides. They are correctly adjusted when the door remains stationary when left half open (approx. 45° opening angle). It is also important that the door cannot fall open.
–The door locking pins automatically retract when the door opens at the end of the drying phase.
Do not connect the appliance to the electrical supply by a multisocket adapter or an extension lead. These do not guarantee the re quired safety of the appliance (e.g. danger of overheating).
This appliance must not be installed and operated in a non-sta tionary location (e.g., on a ship).
Do not install the dishwasher in a room where there is a risk of frost. Frozen hoses may burst or split. The reliability of the electronic module may be impaired at temperatures below freezing point.
The water pressure (flow pressure at the connection point) must be between 4.35 - 145 psi.
A damaged appliance could be dangerous. If the dishwasher gets damaged, turn off the electrical supply and contact Miele.
9

IMPORTANT SAFETY INSTRUCTIONS
The manufacturer's warranty will be invalidated if the appliance is not repaired by a Miele-authorized service technician.
Defective components should be replaced by Miele original parts only. Only with these parts can the manufacturer guarantee the safe ty of the appliance.
During installation, maintenance and repair work, the appliance must be disconnected from the electrical supply (turn it off and with draw the plug from the socket).
If the connection cable is damaged, it must be replaced with a special cable of the same type (available from Miele) by a Miele-au thorized service technician only.
10
IMPORTANT SAFETY INSTRUCTIONS
Proper installation
The dishwasher must be installed and connected in compliance with the installation plan.
Be careful when installing the dishwasher. Wear protective gloves to avoid injury on any sharp metal components.
The dishwasher must be correctly aligned horizontally to ensure problem-free operation.
In order to ensure stability, built-under and integrated dishwash ers must only be installed under a continuous counter which is se cured to adjacent cabinetry.
If you want to convert your freestanding dishwasher to a built-un der ("U") model, you will need to order the appropriate conversion kit. If you remove the existing toe-kick, you must replace it with a U- model plinth. This is necessary to avoid the risk of injury caused by protruding metal parts.
The door springs must be adjusted equally on both sides. They are correctly adjusted when the door remains stationary when left half open (approx. 45° opening angle). It is also important that the door cannot fall open.
The appliance may only be used with correctly adjusted door springs.
11

IMPORTANT SAFETY INSTRUCTIONS
Proper use
Do not use solvents in the dishwasher. Danger of explosion!
Do not inhale or ingest powder detergent. Dishwasher detergents contain irritant or corrosive ingredients which can cause burning in the nose, mouth, and throat if swallowed, or inhibit breathing. Seek medical attention immediately if detergent has been swallowed or in haled.
Avoid leaving the door open unnecessarily as someone could trip over it and be injured by it.
Do not sit or lean on the opened door. This could cause the dish washer to tip and be damaged, and you could get injured.
Dishes can be very hot at the end of a program. Allow them to cool until they are comfortable enough to handle before unloading.
Only use detergent and rinse aid formulated for domestic dish washers. Do not use dishwashing liquid.
Do not use commercial or industrial detergents as these may cause damage, and there is a risk of a severe explosive chemical re action (such as an explosive oxyhydrogen gas reaction).
Do not fill the rinse aid reservoir with powder or liquid detergent. This will cause serious damage to the reservoir.
Inadvertently filling the salt reservoir with powder or liquid dish washer detergent will damage the water softener. Make sure you have picked up the correct packet of dishwasher salt before filling the salt reservoir!
Only use special coarse grained dishwasher salt for reactivation. Do not use other salts such as cooking salt, agricultural grade or gritting salt. These may contain insoluble additives which can impair the functioning of the water softener.
12

IMPORTANT SAFETY INSTRUCTIONS
In an appliance with a cutlery basket (depending on model), cut lery is cleaned and dried more efficiently if placed in the basket with the handles downwards. However, to avoid the risk of injury, place knives and forks with the handles upwards.
Plastic items which cannot withstand being washed in hot water, such as disposable plastic containers or plastic cutlery should not be cleaned in the dishwasher. The high temperatures in the dish washer may cause them to melt or lose shape.
If you use the "FlexiTimer/Delay Start" option (depending on mod el), make sure that the dispenser is dry before adding detergent. Wipe dry if necessary. Detergent will clog if poured into a damp dis penser and may not be thoroughly dispersed.
Please observe the information given in "Technical data" regard ing the capacity of the dishwasher.
Accessories
Use only genuine original Miele parts. If spare parts or accesso ries from other manufacturers are used, the warranty may become invalid.
Disposal of your old dishwasher
Make the door lock inoperative so that children cannot acciden tally shut themselves in. Remove or destroy the locking bracket of the door lock, and make appropriate arrangements for the disposal of the appliance.
SAVE THESE INSTRUCTIONS AND PASS THEM ON TO ANY FUTURE USER
13

Guide to the dishwasher
Appliance overview
a Upper spray arm (not visible)
b Cutlery tray (depending on model) c Upper basket
d Middle spray arm
eAir intake for drying (depending on model)
f Lower spray arm
g Filter system h Data plate
i Rinse aid reservoir
jDual compartment detergent dis penser
k Optical Interface
l Reservoir for dishwasher salt
14

Guide to the dishwasher
Control panel
a Optical Interface b Program selection
cShort and Extra Economical option buttons with indicator lights
d Arrow buttons
e button - FlexiTimer with indicator light
f OK button g Display
h Program selection button i (On/Off) Button
These operating instructions apply to several different dishwasher models with different heights.
The specific dishwasher models are referred to as follows: Standard = 31 11/16" (80.5 cm) high dishwashers (integrated) and 33 1/4" (84.5 cm) high dishwashers (freestanding)
XXL = 33 1/4" (84.5 cm) high dishwashers (integrated)
15

Guide to the dishwasher
Display functions
General information
The display is used to select or set the following:
–The program
–The FlexiTimer (Delay Start)
–The Settings menu
The display can show the following:
–The program stage
–The estimated time left for the pro gram to run
–Any relevant fault messages and in formation
To save energy, the dishwasher switches off after a few minutes if you do not press any buttons during this time.
To switch the dishwasher back on again, press the button.
Settings menu
The Settings menu is used to adapt the electronic module of the dishwasher to changing requirements. See the "Set tings menu" chapter for more informa tion on accessing the settings menu.
The arrows in the display indicate addi tional options. You can use the ar row buttons next to the display, as ap propriate, to select these additional op tions.
The OK button is used to confirm a message or setting and also to move to the next menu or another level.
The option which is selected will have a check next to it.
To exit a sub-menu, use the arrow buttons to select the Back option in the display and confirm your choice with OK.
If you do not press any of the buttons for several seconds, the display with re turn to the previous level. You may need to enter your settings again.
16

Caring for the environment
Disposal of packaging material
The cardboard box and packaging pro tect the appliance during shipping. These materials are biodegradable and recyclable. Please recycle.
Disposal of your old appliance
Old appliances may contain materials that can be recycled. Please contact your local recycling authority about the possibility of recycling these materials.
Please be sure that your old appliance does not pose a danger to children while being stored for disposal.
Energy-saving dishwashing
This dishwasher is economical in the use of water and electricity. For best re sults follow these tips:
–For most economical dishwashing, make full use of the baskets without overloading the dishwasher.
–Choose a program that best suits the degree of soiling and the type of dishes being washed.
–Select the Economy program (de pending on model) for energy-saving dishwashing. This program is the most efficient in terms of its com bined energy and water consumption at cleaning normally soiled dishware.
–Follow the detergent manufacturer's recommendations on detergent dos age.
–When using powder or liquid deter
gent, you can use 1/3 less detergent if baskets are only half full.
–The dishwasher can be connected to a hot water supply for further econo mies. If the water is heated by for ex ample, solar panels, this would be energy efficient.
However, if your water is heated by electricity we would recommend con nection to cold water.
You can find additional tips on energysaving dishwashing in "Miele's guide to dishwashing".
17
Before using for the first time
Opening the door
At the end of programs with a drying phase (see "Program overview"), the door will open automatically a little in order to help the drying process.
This function can be deactivated if pre ferred (see "Settings menu - AutoOpen").
Pull the handle to open the door.
Open the door fully so that the door catch rail retracts again.
If the door is opened during operation, all functions are automatically interrupt ed.
Water in the dishwasher may be hot. Danger of scalding!
Only open the door during operation if absolutely necessary and exercise extreme caution when doing so.
Keep the area around the door free of obstructions.
Closing the door
Push the baskets in.
Then lift the door upwards and push until it clicks into position.
Danger of crushing injuries!
Do not put your hand inside the door as it is closing.
18

Before using for the first time
Basic settings
Open the door.
Turn the dishwasher on with the button.
The welcome screen will appear when the dishwasher is turned on for the first time.
Language
The display will change automatically to the screen for setting the language.
Use the arrow sensors to select the language you want and also the country, if appropriate, and confirm your selection with OK.
To learn about the display, read the section with the same name.
A check will appear next to the lan guage that has been set.
Time of day
The display will then change to the screen for setting the time.
The current time of day must be set be fore you can use the "FlexiTimer" pro gram option.
Use the arrow buttons to set the hour and confirm with OK.
Then set the minutes and confirm with OK.
Keeping the arrow buttons press ed will increase or decrease the time automatically.
19

Before using for the first time
Water hardness
The display changes to the water hard ness setting.
–The dishwasher must be program med for the water hardness in your area.
–Your local water supplier can tell you the water hardness level in your area.
–Where the water hardness fluctuates e.g. between 10 - 16 gr/gal (10 - 15 °d), always program the dishwasher to the higher value (16 gr/gal or 15 °d in this example).
It is useful to know your water hardness so that you can provide the service technician with this information in the event of any service calls.
Enter the water hardness below:
____________ gr/gal (°d)
The dishwasher is programmed at the factory for a water hardness level of 1 gr/gal (1 °d).
Use the arrow buttons to select the hardness of your water supply and confirm with OK.
See "Settings menu - Water hardness" for more information.
The message Set-up successfully com-
pleted will then appear in the display.
After confirming this with OK, the
prompts Refill salt and Refill rinse aid
may appear.
Add salt and rinse aid if necessary (see "Before using for the first time - Dishwasher salt" and "Rinse aid").
Confirm the messages with OK.
The program selected will appear briefly in the display and the appropriate indi cator light will come on.
Then, the display will show the estimat ed program duration for the program selected.
These basic settings will be saved in memory after the dishwasher has been through one complete program.
20
Before using for the first time
Before using the appliance for the first time, you require:
–Approx. 2 qt (2 l) of water
–Approx. 2 kg (4 lbs) of dishwasher salt
–Domestic dishwasher detergent
–Rinse aid formulated for domestic dishwashers
Every dishwasher is tested at the fac tory. There will be residual water in the appliance from this test. It is not an in dication that it has been used previ ously.
Dishwasher salt
In order to achieve good cleaning re sults, the dishwasher needs to operate with soft water. Hard water results in a build-up of calcium deposits on dish ware and in the dishwasher.
Water supplies with a hardness level higher than 4 gr/gal (4 °d) needs to be softened. This takes place automatical ly in the integrated water softener. The water softener in the dishwasher is suit able for a water hardness level of up to 73 gr/gal (70 °d).
The water softener requires dishwasher salt.
Depending on the water hardness level (< 22 gr/gal or 21 °d), dishwasher salt is not required if combination tablets are being used (see "Operation - Deter gent").
If the water in your area is very soft and constantly lower than 5 gr/gal (5 °d) you do not have to add dish washer salt. The prompt to add salt will be switched off automatically.
Dishwasher detergent will de stroy the water softener.
Do not fill the salt container with dishwasher detergent (even liquid detergent).
Use only special, coarse-grained dishwasher salt or other pure kitchen salt.
Other types of salt may contain in soluble components which can dam age the water softener.
21

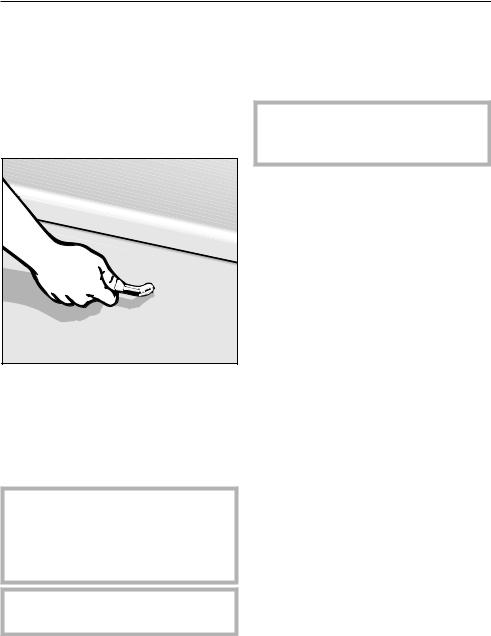
Before using for the first time
Filling the salt reservoir
Important! Before filling the salt res ervoir with dishwasher salt for the first time, you must fill it with approx. 2 qt (2 l) of water to enable the salt to dissolve.
Once the dishwasher has been used for the first time, there is always suf ficient water in the reservoir.
Remove the lower basket and un screw the salt reservoir cap.
Water will run out of the reservoir when the cap is removed.
It should therefore only be removed in order to refill the salt reservoir.
Fill the reservoir with approx. 2 qt (2 l) of water (first use only).
Place the funnel provided over the salt reservoir and carefully fill with salt until the reservoir is full. The salt reservoir holds approx. 4 lbs (2 kg) of salt depending on the brand used.
Clean any excess salt from around the reservoir opening and then screw the cap on again firmly.
Immediately after filling the salt reser voir, run the Express program with the Short program option selected and without any dishware in the dish washer to remove any traces of salt from the cabinet.
22

Before using for the first time
Salt refill indicator
Fill the salt reservoir with dishwasher salt for reactivation when Refill salt appears in the display (If it appears during a program, wait until the end of the program).
Confirm with OK.
The salt refill indicator will go out.
Risk of corrosion!
Immediately after filling the salt res ervoir, run the Express program with the Short program option selected and without any dishware in the dishwasher to remove any traces of salt from the cabinet.
After the salt reservoir has been filled, the refill indicator may still appear in the display if the salt concentration has not yet reached the correct level. If this is the case, confirm again with OK.
The salt refill indicator will be switched off if you have programmed the dish washer for a water hardness below 5 gr/gal (5 °d).
If you only ever use Tab products in your dishwasher, you can switch off both refill indicators for salt and rinse aid if you wish (see "Settings menu - Switching off the refill indicators").
If you switch to using detergent that does not contain salt or rinse aid, it is important to remember to add dishwasher salt and rinse aid and to switch the indicators back on.
23

Before using for the first time
Rinse aid
Rinse aid is needed to prevent spotting on dishes and glassware. The rinse aid is filled in the reservoir and the set amount will be automatically dosed.
Filling the rinse aid reservoir with detergent will damage the reservoir. Only pour rinse aid formulated for residential dishwashers into the res ervoir.
When using "Tab" detergents rinse aid is not needed.
Adding rinse aid
Press the button on the lid of the rinse aid reservoir in the direction of the arrow until the flap springs open.
24

Before using for the first time
Add rinse aid only until it is visible in the opening.
The rinse aid reservoir holds approx.
3.7oz. (110 ml).
Close the flap firmly so that it clicks into place. Otherwise water can enter the rinse aid reservoir during a pro gram.
Wipe up any spilled rinse aid. This prevents over-foaming occurring dur ing the next program.
You can adjust the rinse aid dosage for best results (see "Settings menu - Rinse aid").
Rinse aid indicator
When the Refill rinse aid message ap pears in the display, the reservoir con tains sufficient rinse aid for 2 - 3 pro grams only.
Add rinse aid.
Confirm with OK.
The rinse aid refill indicator will go out.
If you only ever use Tab products in your dishwasher, you can turn off both refill indicators for salt and rinse aid if you wish (see "Settings menu - Turn ing off the refill indicators").
25

Loading the dishwasher
Tips
Remove coarse food residues from the dishware.
There is no need to rinse items under running water!
Do not wash items soiled with ash, sand, wax, grease, or paint in the dishwasher. These will damage the dishwasher.
Dishware can be loaded anywhere in the baskets, but the following notes should be observed:
–Do not place dishes or cutlery inside other pieces. They will cover each other.
–Load the dishware so that water can access all surfaces. This ensures that they get properly cleaned.
–Make sure that all items are securely positioned.
–Hollow items such as cups, glasses, pans, etc. must be inverted in the basket.
–Tall, narrow, hollow items, e.g., champagne glasses, should be placed in the center of the basket to ensure better water coverage.
–Concave items such as mugs or bowls should be placed at an angle so that the water can run off.
–The spray arms must not be blocked by items which are too tall or hang through the baskets. If in doubt, test for free movement by manually rotat ing the spray arms.
–Make sure that small items cannot fall through the holders in the bas kets.
Small items, e.g., lids, should there fore be placed in the cutlery tray or cutlery basket (depending on model).
Some foods may contain natural dyes, e.g., carrots, tomatoes or to mato sauce. Plastic items in the dishwasher may discolor if large quantities of these foodstuffs find their way into the dishwasher on the dishware. The stability of plastic items is not affected by this discolor ation.
Cleaning silver cutlery in the dish washer may also cause plastic items to discolor.
26

Loading the dishwasher
Items not recommended for dish washing
–Wooden cutlery, cutting boards and dishware or items with wooden parts
–Craft items, antiques, valuable vases, and decorative glassware
–Plastic items which are not heat-re sistant: the high temperatures in the dishwasher may cause them to melt or lose shape.
–Copper, brass, tin and aluminum items may discolor or become matt.
–Colors painted over a glaze may fade after a number of washes.
–Delicate glassware and glassware containing lead crystal: clouding may occur over time.
Please note:
Silverware previously cleaned with a silver polish may still be damp or spot ted at the end of a program, where wa ter has not run off smoothly. It may need to be rubbed dry with a soft cloth.
Silver which has been in contact with foods containing sulphur can discolor. These include egg yolk, onions, mayon naise, mustard, fish, and marinades.
Aluminum components (e.g., range hood grease filters) must not be cleaned with a commercial or in dustrial cleaning agent.
These may damage the material.
Tip: When purchasing new dishware and cutlery, make sure they are dish washer-safe.
Glass care
–Clouding may occur on glasses after frequent washing. If delicate glass ware is washed in the dishwasher, ensure that only very low tempera tures are used (see program chart), or a special glass-care program is used (depending on model). This will re duce the risk of clouding.
–Purchase glassware which is dish washer-safe (e.g., Riedel glassware).
–Use detergents with glass protective additives (e.g., Miele CareCollection tabs).
–Visit "http://www.mieleglass care.com/international/en/glasscare/ english" for more information on glass care.
27

Loading the dishwasher
Loading examples
Loading for 10 standard place settings with cutlery tray
|
|
|
|
|
|
|
|
|
|
|
|
|
|
|
Upper basket |
Lower basket |
|||
|
|
|
|
|
|
|
|
|
|
Cutlery tray (depending on model)
28
Loading...