


Nokia 6822 User Guide
1

LEGAL INFORMATION
We, NOKIA CORPORATION declare under our sole responsibility that the product RM-68 is in conformity with the provisions of the following Council Directive: 1999/5/EC.
A copy of the Declaration of Conformity can be found at http://www.nokia.com/phones/ declaration_of_conformity/.
PART NO. 9236281, ISSUE NO. 1
Copyright ©2004 Nokia. All rights reserved.
Reproduction, transfer, distribution or storage of part or all of the contents in this document in any form without the prior written permission of Nokia is prohibited.
Nokia, Nokia Connecting People, Nokia 6822b, Pop-Port, and the Nokia Original Enhancements logos are trademarks or registered trademarks of Nokia Corporation. Other company and product names mentioned herein may be trademarks or trade names of their respective owners.
Nokia tune is a sound mark of Nokia Corporation.
Printed in Canada 02/2005
US Patent No 5818437 and other pending patents. T9 text input software Copyright ©19992004. Tegic Communications, Inc. All rights reserved.
Includes RSA BSAFE cryptographic or security protocol software from RSA Security.
Java is a trademark of Sun Microsystems, Inc.
The information contained in this user guide was written for the Nokia 6822b product. Nokia operates a policy of ongoing development. Nokia reserves the right to make changes to any of the products described in this document without prior notice.
UNDER NO CIRCUMSTANCES SHALL NOKIA BE RESPONSIBLE FOR ANY LOSS OF DATA OR INCOME OR ANY SPECIAL, INCIDENTAL, AND CONSEQUENTIAL OR INDIRECT DAMAGES HOWSOEVER CAUSED.
THE CONTENTS OF THIS DOCUMENT ARE PROVIDED “AS IS.” EXCEPT AS REQUIRED BY APPLICABLE LAW, NO WARRANTIES OF ANY KIND, EITHER EXPRESS OR IMPLIED, INCLUDING, BUT NOT LIMITED TO, THE IMPLIED WARRANTIES OF MERCHANTABILITY AND FITNESS FOR A PARTICULAR PURPOSE, ARE MADE IN RELATION TO THE ACCURACY AND RELIABILITY OR CONTENTS OF THIS DOCUMENT. NOKIA RESERVES THE RIGHT TO REVISE THIS DOCUMENT OR WITHDRAW IT AT ANY TIME WITHOUT PRIOR NOTICE.
2
Export Controls
This device may contain commodities, technology or software subject to export laws and regulations from the US and other countries. Diversion contrary to law is prohibited.
FCC/Industry Canada Notice
Your phone may cause TV or radio interference (for example, when using a telephone in close proximity to receiving equipment). The FCC or Industry Canada can require you to stop using your telephone if such interference cannot be eliminated. If you require assistance, contact your local service facility. This device complies with part 15 of the FCC rules. Operation is subject to the condition that this device does not cause harmful interference.
Manufactured or sold under one or more of the following US Patents. Pending patent numbers are shown with an asterisk (*).
3

Q u i c k g u i d e
Quick guide
■ Actions
Press
Press a key briefly and release it.
Press and hold
Press a key, hold it for two to three seconds, and release it.
Make a call
Enter a phone number, and press Call.
Answer a call
Press Call, or select Answer.
Answer call during call
Press Call.
End a call
Press End or select Options > End call.
Decline a call
Press End to send the call to voice mail.
Mute a call
Select Options > Mute during a call.
Redial
Press Call twice.
Adjust call volume
Move the Five-way joystick to the left or right during a call.
Use in-call menu
Select Options during a call.
Save name and number
Enter a number. Select Save. Enter a name. Select OK.
Use 1-touch dialing
Press and hold a key (2–8). You must assign a key to a number in the phone book.
4
Q u i c k g u i d e
Look up a name
Select Contacts > Find.
Check voice mail
Press and hold the 1 key (contact your service provider for details).
Write text messages
Select Menu > Messages > Text messages > Create message or move the Fiveway joystick to the right. Write the message.
Send text messages
In the message entry screen, select Send. Enter the recipient’s phone number or search for it in contacts, and select OK. The message service is dependent on the service provider.
Read new message
If Messages received appears on the display, select Show; then select the message you want to read.
Reply to a message
Select Options > Reply. Write a reply. Select Options > Send.
5

C o n t e n t s |
|
|
Contents |
|
|
1. |
Phone at a glance......................................................................................................... |
13 |
2. |
SIM card and battery................................................................................................... |
14 |
3. |
About your phone......................................................................................................... |
17 |
4. |
Basic operations ........................................................................................................... |
24 |
5. |
Phone menu................................................................................................................... |
26 |
6. |
Phone security............................................................................................................... |
28 |
7. |
Writing text ................................................................................................................... |
30 |
8. |
Messages ........................................................................................................................ |
34 |
9. |
Instant messages.......................................................................................................... |
45 |
10. |
Call log ............................................................................................................................ |
51 |
11. Contacts.......................................................................................................................... |
52 |
|
12. |
Settings........................................................................................................................... |
60 |
13. |
Gallery ............................................................................................................................. |
66 |
14. Camera............................................................................................................................ |
67 |
|
15. Organizer ........................................................................................................................ |
69 |
|
16. |
Applications................................................................................................................... |
73 |
17. |
Services ........................................................................................................................... |
78 |
18. |
Connectivity................................................................................................................... |
85 |
19. PC connectivity ............................................................................................................. |
90 |
|
20. Reference information................................................................................................ |
92 |
|
6
F o r y o u r s a f e t y
For your safety
Read these simple guidelines. Not following them may be dangerous or illegal. Read the complete user guide for further information.
SWITCH ON SAFELY
Do not switch the phone on when wireless phone use is prohibited or when it may cause interference or danger.
ROAD SAFETY COMES FIRST
Obey all local laws. Always keep your hands free to operate the vehicle while driving. Your first consideration while driving should be road safety.
INTERFERENCE
All wireless phones may be susceptible to interference, which could affect performance.
SWITCH OFF IN HOSPITALS
Follow any restrictions. Switch the phone off near medical equipment.
SWITCH OFF IN AIRCRAFT
Follow any restrictions. Wireless devices can cause interference in aircraft.
SWITCH OFF WHEN REFUELING
Don't use the phone at a refueling point. Don't use near fuel or chemicals.
SWITCH OFF NEAR BLASTING
Follow any restrictions. Don't use the phone where blasting is in progress.
USE SENSIBLY
Use only in the normal position as explained in the product documentation. Don't touch the antenna unnecessarily.
QUALIFIED SERVICE
Only qualified personnel may install or repair this product.
ENHANCEMENTS AND BATTERIES
Use only approved enhancements and batteries. Do not connect incompatible products.
7

F o r y o u r s a f e t y
WATER-RESISTANCE
Your phone is not water-resistant. Keep it dry.
BACKUP COPIES
Remember to make backup copies or keep a written record of all important information stored in your phone.
CONNECTING TO OTHER DEVICES
When connecting to any other device, read its user guide for detailed safety instructions. Do not connect incompatible products.
EMERGENCY CALLS
Ensure the phone is switched on and in service. Press End as many times as needed to clear the display and return to the start screen. Enter the emergency number, then press Call. Give your location.
Do not end the call until given permission to do so.
■ About your device
The wireless device described in this guide comes in two models. The
Nokia 6822b phone is approved for use on the GSM 850, 1800, and GSM 1900 networks. See ”Phone information” on page 12 , to identify your specific phone model. Contact your service provider for more information about networks.
When using the features in this device, obey all laws and respect privacy and legitimate rights of others.
Warning: To use any features in this device, other than the alarm clock, the phone must be switched on. Do not switch the device on when wireless phone use may cause interference or danger.
Note: Your device and its enhancements may contain small parts. Keep them out of the reach of small children.
■ Network Services
To use the phone you must have service from a wireless service provider. Many of the features in this device depend on features in the wireless network to function. These Network Services may not be available on all networks or you may have to make specific arrangements with your service provider before you can utilize Network Services. Your service provider may need to give you additional instructions for their use and explain what charges will apply. Some networks may have limitations that affect how you can use Network Services. For
8
F o r y o u r s a f e t y
instance, some networks may not support all language-dependent characters and services.
Your service provider may have requested that certain features be disabled or not activated in your device. If so, they will not appear on your device menu. Contact your service provider for more information.
This wireless device is a 3GPP GSM Release 99 terminal supporting GPRS service, and is designed to support Release 4 GPRS networks. However, there may be some compatibility issues when used in some Release 97 GPRS networks. For more information contact your service provider.
This device supports WAP 2.0 protocols [HTTP and SSL] that run TCP/IP protocols. Some features of this device require network support for these technologies.
■ Shared memory
The phone has three different memories. Contacts, text messages, SMS e-mail, voice tags, calendar, and notes may share the first memory. The second shared memory is used by multimedia messages, files stored in Gallery, and configuration settings. The third shared memory is used by the e-mail application and Java games and applications. Using one or more of these features may reduce the memory available for the remaining features sharing the same memory. For example, saving many Gallery items may use all of the available memory in the second memory. Your device may display a message that the memory is full when you try to use a shared memory feature. In this case, delete some of the information or entries stored in the corresponding shared memory before continuing.
9

W e l c o m e
Welcome
Congratulations on your purchase of the Nokia 6822b mobile phone. Your phone provides many functions that are practical for daily use, such as a calendar, a clock, an alarm clock, and a built-in camera. The camera can be used for recording video clips and taking pictures that you can attach as wallpaper in the standby mode or as thumbnail pictures in Contacts. For more information, see ”Camera” on page 67 .
Other features on your phone are:
•Multimedia messaging, see ”Multimedia messages (MMS) (network service)” on page 36 .
•Instant messages, see ”Instant messages” on page 45 .
•Presence-enhanced contacts, see ”My presence” on page 54 .
•E-mail application, see ”E-mail (network service)” on page 39 .
•EDGE (enhanced data rates for GSM evolution), see ”GPRS and EGPRS” on page 88 .
•J2ME™ Java 2 Micro Edition, see ”Applications” on page 73 .
•XHTML browser, see ”Services” on page 78 .
•Bluetooth connectivity, see ”Set up a Bluetooth connection” on page 85 .
■ Access alternate formats
This user guide is available in alternate formats, contact Nokia at www.nokiaaccessibility.com or call 1-888-665-4228 for more information.
■ Register your phone
Make sure to register your phone at www.warranty.nokiausa.com or 1-888-NOKIA-2U (1-888-665-4228) so that we can serve your needs better if you should need to call the center or have your phone repaired.
■ Copyright protection
Copyright protections may prevent some images, ringing tones, and other content from being copied, modified, transferred, or forwarded.
10
W e l c o m e
■ Contact Nokia
If you ever need to call Nokia Customer Care or your service provider, you must provide specific information about your phone (see ”Phone information” on page 12 ).
Whether you call about your phone or an enhancement, have the equipment with you when you call. If a Nokia representative asks a specific question about the enhancement, you will have it available for quick reference.
Nokia support on the web
Check www.nokia.com/support or your local Nokia web site for the latest version of this user guide, additional information, downloads, and services related to your Nokia product.
Contact Nokia
Please have your product with you when contacting either of the numbers below:
Nokia Customer Care Center, USA
Nokia Inc.
7725 Woodland Center Boulevard, Suite #150 Tampa, Florida 33614
Tel: 1-888-NOKIA-2U (1-888-665-4228) Fax: 1-813-249-9619
TTY (hearing impaired only): 1-800-24-NOKIA
Customer Care Center, Canada
Nokia Products Ltd.
601 Westney Road South
Ajax, Ontario L1S 4N7
Tel: 1-888-22-NOKIA (1-888-226-6542)
Fax: 1-905-427-1070
11
W e l c o m e
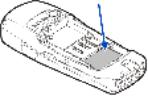
Phone information
Information about your phone is provided on the phone label on the back of the phone under the battery (see ”Remove the back cover” on page 14 ). The label contains the model and serial numbers, as well as the following:
•Phone type (such as RM-68)
•Phone model (such as Nokia 6822b)
•International Mobile Equipment Identity (IMEI)
•FCC ID number
Contact your service provider
In many cases, the service provider will make available descriptions of its services and instructions for using features, such as:
•Voice mail and voice privacy
•Call waiting, call forwarding, and caller ID
•Messaging
•News and information services
•Selected Internet services
Service providers may differ in their support of features. Before you sign up with a service provider, make sure that the service provider supports the features that you need.
12
P h o n e a t a g l a n c e
1. Phone at a glance
Power key
(1)
Right selection key (2)
End key (3)
Keypad (4)
Microphon e (5)
Pop-Port connector
(6)
Charger port (7)
Call key (8)
Left selection key (9)
Five-way joystick
(10)
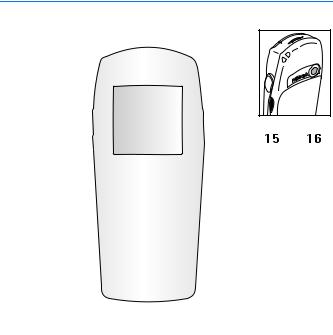
Display screen (11)
Loudspeaker (12)
Left selection key (keyboard open) (13)
Earpiece (14)
Infrared port (15)
Camera lens (16)
13
S I M c a r d a n d b a t t e r y
2. SIM card and battery
The SIM card and its contacts can easily be damaged by scratches or bending, so be careful when handling, inserting, or removing the card.
Your device and its enhancements may contain small parts. Keep them out of the reach of small children.
For availability and information on using SIM card services, contact your SIM card vendor. This may be the service provider or another vendor.
Always switch the device off and disconnect the charger before removing the battery.
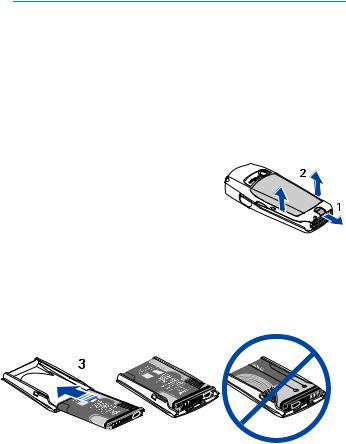
■ Remove the back cover
Push the back cover release button toward the bottom of the phone (1) and at the same time, lift the back cover away from the phone (2).
■ Insert the SIM card and battery
Important: Insert the battery exactly as shown in the diagram. The contacts on the battery must be aligned with the contacts on the phone for the phone to operate.
14

S I M c a r d a n d b a t t e r y
To release the SIM card holder, slide the card holder to the right (4), and open it by lifting it up (5).
Insert the SIM card into the SIM card holder (6).
Make sure that the SIM card is properly inserted and that the golden contact area on the card is facing downward. Close the SIM card holder (7), and slide it back into place (8).
Direct the back cover toward the locking catches on the front cover (9), and slide the back cover until it locks into place (10).
15
S I M c a r d a n d b a t t e r y
■ Charge the battery
Warning: Use only batteries, chargers, and enhancements approved by Nokia for use with this particular model. The use of any other types may invalidate any approval or warranty, and may be dangerous.
Your phone is powered by a rechargeable battery. To charge the battery:
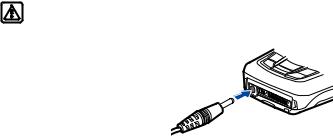
1. Plug the charger transformer into a standard ac outlet.
2. Insert the charger output plug into the round connector at the bottom end of the phone.
After a few seconds, the battery indicator in the display starts to scroll from bottom to top. If the battery is completely discharged, it may take a few minutes before the charging indicator appears on the display or any calls can be made.
You can use the phone while the charger is connected.
The BL-5C battery provides up to 3.5 hours of talk time and up to 14 days of standby time. Operation times are estimates and may vary depending on network conditions, charging, and phone use. Charging the battery with the ACP-12 charger takes approximately 1 hour and 30 minutes while the phone is in the standby mode.
For availability of approved enhancements, please check with your dealer. When you disconnect the power cord of any enhancement, grasp and pull the plug, not the cord.
16
A b o u t y o u r p h o n e
3. About your phone
■ In-phone help
Many features have brief descriptions (help text) which can be viewed on the display. To view the help text, scroll to a feature and wait for about 15 seconds. Select More to view all of the description (if necessary) or select Back to exit. For instructions on how to turn the help text feature on and off, see ”Phone settings” on page 63 .
■ Start screen (standby mode)
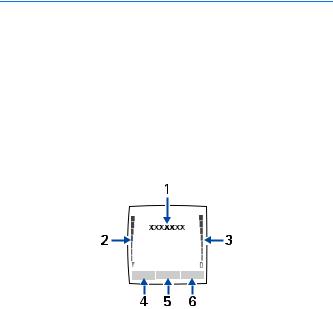
The start screen is home base and indicates that the phone is in the standby mode.
(1)The name of your service provider may appear here.
(2)Audible signal bar—A higher bar indicates a stronger network signal.
(3)Audible battery bar—A higher bar indicates more power in the battery.
(4)Left selection key—The Left selection key in the standby mode opens the Go to menu. For more information, see ”Go to options” on page 61 .
(5)Menu—Press the Five-way joystick to select the item displayed in the bottom center (middle selection area) of the display screen. In the standby mode, press the joystick to open the Menu.
(6)Right selection key—The Right selection key in the standby mode opens either the Contacts menu (default), a service provider’s home page, or a user-specified function. For more information, see ”Personal shortcuts” on page 61 .
17
A b o u t y o u r p h o n e
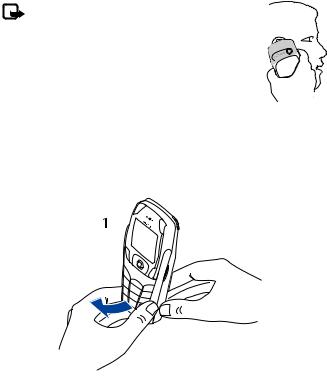
■ Antenna
Your device has an internal antenna. Hold the phone as shown with the antenna area pointing up.
Note: As with any other radio transmitting device, do not touch the antenna unnecessarily when the device is switched on. Contact with the antenna affects call quality and may cause the phone to operate at a higher power level than otherwise needed. Avoiding contact with the antenna area when operating the phone optimizes the antenna performance and the battery life.
■ Phone basics
Your phone can be used with the keyboard open or closed.
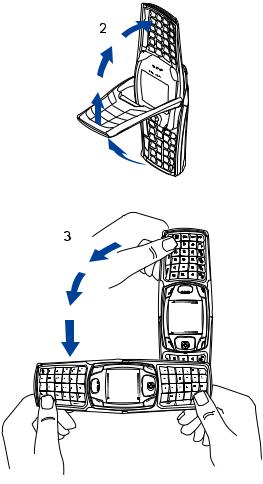
To open the keyboard, do the following:
1. Hold the phone with both hands, and open the keyboard as shown.
18
A b o u t y o u r p h o n e
2. Extend the keyboard until you hear it click into place.
3. Turn the phone to a horizontal position and hold it as shown.
19

A b o u t y o u r p h o n e
■ Key functions (keyboard closed)
Power key (1) switches the phone on and off. When the keypad is locked, it turns the phone display lights on for about 15 seconds.
Selection key (2) has no function when the keyboard is closed.
Left selection key (3) and Right selection key (3) provide a variety of functions depending on the display text above the keys.
Five-way joystick (4) moves in four directions and selects the active menu option when pressed. For details, see ”The five-way joystick” on page 22 .
Call key (5) dials a phone number and answers a call. In the standby mode it accesses the list of most recently called numbers.
End key (6) ends an active call or exits from the current function.
Keypad (7) enters numbers and characters.
Note: Some phones may not display the mobile Internet symbol on the 0 key.
20
A b o u t y o u r p h o n e
■ Key functions (keyboard open)
When the keyboard is opened, the display graphics rotate 90 degrees and the Left and Right selection keys change positions. The guiding text near the Left and Right selection keys does not change.
Keyboard light key (1) switches the keyboard light on or off.
Power key (2) switches the phone on and off.
Five-way joystick (3) moves in four directions and selects the displayed menu option when pressed.
Backspace key (4) deletes characters.
Character key (5) opens a set of characters and symbols during text writing.
Shift keys (6) enters upper case letters and symbols. You can press the Shift key first,
then the desired key; or press both keys at the same time.
Space bar keys (7) enters a space.
Call key (8) dials a phone number and answers a call. In the standby mode it accesses the list of most recently called numbers.
Left selection key (9) and Right selection key (9) selects the menu option shown by the text displayed above the key.
End key (10) ends an active call or exits from a function.
Enter key (11) starts a new line when writing text.
21

A b o u t y o u r p h o n e
■ The five-way joystick
The Five-way joystick provides a variety of functions:
•Allows you to scroll through lists
•Moves the cursor up, down, right and left when writing text, using the calendar, and in some game applications
•Selects the active menu item when pressed briefly (or confirms a selection)
•Adjusts the volume when moved to the left (to decrease volume) or to the right (to increase volume) during a call
•Activates the camera when moved up in the standby mode
•Opens the text editing screen to write a text message when moved to the left in the standby mode
•Opens the calendar when moved to the right in the standby mode
•Opens the contacts list when moved down in the standby mode
■ Indicators and icons
The following icons may be displayed in the standby mode:
 –You have one or more text or picture messages. See ”Text messages (SMS) (network service)” on page 34 .
–The phone has logged a missed call. See ”Call log” on page 51 .
 or
or  – Your phone is connected to the instant messaging service, and the availability status is online or offline, respectively. See ”Instant messages” on page 45 .
 – You have received one or several instant messages, and you are connected to the instant messages service. See ”Instant messages” on page 45 .
 – You have one or more multimedia messages. See ”Text messages (SMS) (network service)” on page 34 .
 – You have one or more voice messages. See ”Voice messages” on page 41 .
 – Your phone keypad is locked. See ”Lock the keypad (keyguard)” on page 28 .
 – Your phone is set to the Silent profile. See ”Profiles” on page 60 .
 – The alarm clock is set to On. See ”Alarm clock” on page 69 .
22
A b o u t y o u r p h o n e
 – The GPRS connection mode Always online is selected and the GPRS services is available.
 – You have an incoming or outgoing call during a GPRS dialup connection. GPRS is suspended.
 – There is an active GPRS connection.
 – Forward all voice calls. All calls are forwarded to another number. If you have two phone lines, the indicator for line 1 is
  and
and  for line 2.
 – If you have two phone lines, this indicates that you are on the second phone line. See ”Call settings” on page 62 .
 – Calls are limited to a closed group. See ”Security settings” on page 64 .
 – The timed profile is selected. See ”Profiles” on page 60 .
 – Integrated handsfree is active. See ”Loudspeaker” on page 25 .
 ,
,  , or
, or  – A headset, handsfree, or Nokia Loopset enhancement is connected to the phone.
 – Bluetooth connection indicator. See ”Set up a Bluetooth connection” on page 85 .
23

B a s i c o p e r a t i o n s
4. Basic operations
■ Switch the phone on or off
1. To switch your phone on or off, press and hold the power key as shown.
If the phone displays Insert SIM card or SIM card not supported, even though the SIM card is properly inserted, contact your service provider.
2.If the phone asks for a PIN code, enter the PIN code (displayed as ****), and select OK.
3.If the phone asks for a security code, enter the security code, and select OK. See ”Access codes” on page 28 for more information.
■ Set the time
Select Menu > Settings > Time and date settings > Clock > Set the time. Enter the time (in hh:mm format), and select OK >am or pm.
■ Make and answer calls
Use the keypad—Enter the phone number (including the area code), and press Call. To delete a character to the left of the cursor, select Clear. To end the call or to cancel the call attempt, press End.
Use contacts—At the start screen, move the Five-way joystick downward to view your contacts, scroll to the entry you want to call, and press Call to make the call.
Redial the last number—At the start screen, press Call twice.
Make an international call—Press* twice to enter the international prefix [a plus
(+) sign] in place of the international access code. Then enter the country code, the area code without a leading zero (if necessary), and the phone number.
Answer or reject a call—Press Call to answer the call, or press End to reject the call. If Forward if busy is activated to your voice mailbox, the call is forwarded to your voice mail. If not, the call is rejected.
If you select Silence, only the ringing tone is muted. You can then either answer or reject the incoming call.
24

B a s i c o p e r a t i o n s
Answer a call with the keypad locked—See ”Lock the keypad (keyguard)” on page 28 .
1-touch dialing—See ”1-touch dialing” on page 58 .
Call waiting—See ”Call settings” on page 62 .
■ Adjust the earpiece volume
To increase the volume of a call, move the Five-way joystick to the right. To decrease the volume of a call, move the Five-way joystick to the left.
When adjusting the volume, a bar chart appears in the display indicating the volume level. See volume control information in ”Call settings” on page 62 .
You can only adjust the earpiece volume during an active call.
■ Loudspeaker
Warning: Do not hold the device near your ear when the loudspeaker is in use, because the volume may be extremely loud.
You can use your phone as a loudspeaker during a call.
To activate the loudspeaker during a call, select Loudspeaker.
To deactivate the loudspeaker during a call, select Normal.
25
P h o n e m e n u
5. Phone menu
Phone features are accessed through the main menu of your phone. Use the menus and submenus to select or view items and customize phone features.
Note: Some service providers order the phones specially programmed for their network. Some features may not be shown on the menu.
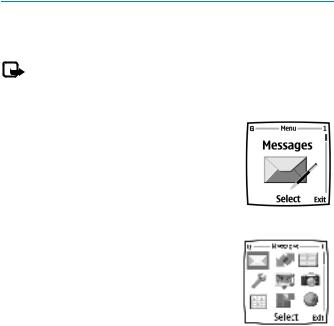
In the standby mode, press the joystick to select Menu. The first menu item is displayed.
You can view the menu as a list or as a grid:
List view—List view is the default view for the main menu. Scroll up and down to view main menu selections one at a time.
Grid view—To switch between List and Grid view, see ”Display settings” on page 62 . In Grid view, scroll up, down, right, and left to navigate through the main menu icons.
In the Grid view, the icon for the selected menu is outlined, and the name of the menu appears at the top of the display.
As you scroll through the menus, the menu number appears in the upper right corner of the display. Below the menu number is a scroll bar with a tab.
The tab moves up or down as you scroll through the
menus, providing a visual representation of your current position in the menu structure.
Open a menu item—Scroll to it, and select it.
Open a submenu—If the menu contains submenus, use the scroll keys to highlight the desired menu; then select it.
Return to the previous menu—Select Back to return to the previous menu or submenu.
Return to the start screen—Press End from any menu screen.
26

P h o n e m e n u
■ Operator menu
This menu lets you access a portal to services provided by your service provider. This menu is operator specific. The name and the icon depend on the operator. For more information, contact your service provider.
The operator can update this menu with a service message. For more information, refer to ”Service inbox” on page 81 .
■ SIM services
In addition to the functions available on the phone, your SIM card may provide services that you can access in this menu
item, which is shown only if it is supported by your SIM card. The name and contents of the menu depend on the SIM card.
For availability, rates, and information on using SIM services, contact your SIM card vendor, for example, the service provider or other vendor.
Depending on the operator, you can set the phone to show you the confirmation messages sent between your phone and the network when you are using the SIM services. Select Menu > Settings > Phone settings > Confirm SIM service actions > Yes.
Accessing these services may involve sending messages or making a phone call for which you may be charged.
27

P h o n e s e c u r i t y
6. Phone security
■ Lock the keypad (keyguard)
You can lock the keypad to prevent accidental key presses. To answer a call with keyguard on, press Call. During the call, all features function as normal. When you end or reject a call, the keypad automatically relocks.
•To lock the keypad, select Menu > #.
•To unlock the keypad, select Unlock > #.
When the keypad is locked, calls may be possible to the official emergency number programmed into your phone. Enter the emergency number, and press
Call.
■ Automatic keyguard
You can set your phone to lock the keys automatically after a time you specify. See ”Phone settings” on page 63 to activate this feature.
■ The security keyguard
The security keyguard locks the keypad of the phone with a security code. The keypad lock remains active, if you open the flip. Select Menu > Settings > Phone settings > Security keyguard.
Enter the security code. To set the security keyguard, select On.
To activate the security keyguard when the phone is closed, select Menu > # within 1.5 seconds.
To deactivate the keyguard when the flip is open, select Unlock > OK, and enter the security code. If the phone is closed, select Unlock > # within 1.5 seconds, and enter the security code.If you receive a Bluetooth connection request from another device while the security keyguard is activated, you have to deactivate the keyguard before you can accept the connection.
■ Access codes
The following access codes allow you to secure your phone from unauthorized use. To change access codes, see ”Security settings” on page 64 . Keep the new codes secret and in a safe place, separate from your phone.
28
P h o n e s e c u r i t y
Security code—This code, supplied with the phone, protects your phone against unauthorized use. The preset code is 12345.
PIN code—This code, supplied with the SIM card, protects the card against unauthorized use. Turn the PIN code request on so that the code is requested each time the phone is switched on. If you enter an incorrect PIN code three times in succession, the SIM card is blocked. You must enter the PUK code to unblock the SIM card and set a new PIN code.
PIN2 code—This code is supplied with some SIM cards and is required to access certain services, such as charging unit counters. If you enter an incorrect PIN2 code three times in succession, PIN2 code blocked appears in the display, and you are asked for the PUK2 code.
PUK code and PUK2 code—These unblocking codes may be supplied with the SIM card. For more information, contact your service provider.
Restriction password:—This password is needed with Call restrictions. You can obtain the password from your service provider.
29

W r i t i n g t e x t
7. Writing text
You can enter text and numbers with the keypad open or closed.
■ Write with the keyboard open
When the keyboard is open, you can start to write a message in several ways.
•Select Menu > Messages > Text messages > Create message.
•Move the joystick to the left in standby mode.
•Press any of the letter keys in the standby mode to open Notes.
Available functions
The following functions are available when writing text with the keyboard open:
•To insert a number, press a number key. (If you press a number key in the standby mode, it initiates a normal call procedure.)
•To switch between the lower and upper case, indicated by  ,
,  , or
, or
 on the top left of the display, or to insert symbols, press the Shift keys on the keyboard. You can either press a Shift key and the desired character
consecutively; or press and hold a Shift key and the desired letter at the same time.
•To write in upper case only, press one of the Shift keys twice.
•To delete characters from the display, press the Backspace key, or select
Clear. Press the Backspace key briefly to clear one character at a time. Use a longer keypress to delete characters more quickly.
•To add a space, press one of the Space keys at the bottom of the keyboard.
•To create a line break, press the Enter key.
Typing accented characters
The characters available depend on the language selected in the Phone language menu. To type accented characters or symbols that are not printed on the keyboard, do one of the following:
30
 Loading...