


User Guide
English ( 2 – 17 )
Manual del usuario
Español ( 18 – 33 )
Manuel d'utilisation
Français ( 34 – 49 )
Guida per l'uso
Italiano ( 50 – 65 )
Benutzerhandbuch
Deutsch ( 66 – 82 )
Appendix
English ( 83 – 87 )

User Guide (English)
Box Contents
Oxygen 49
USB Cable
Software Download Cards
Quickstart Guide
Safety & Warranty Manual
Support
For the latest information about this product (system requirements, compatibility information, etc.) and product registration, visit m-audio.com/oxygen49.
For additional product support, visit m-audio.com/support.
Setup
Connecting Your Keyboard
Computer*
*not included
Sustain Pedal* 
1.Plug the USB cable provided with your Oxygen 49 to a free USB port on your computer.
2.Plug the other end of the USB cable into the USB input on the Oxygen 49.
The single USB cable not only powers the keyboard but also sends MIDI data to and from your computer system. If you intend to use your Oxygen 49 with a USB hub, make sure the USB hub uses an external power supply. Using a passive USB hub which does not use a power supply may not provide enough power if other devices are connected to the hub. We do not recommend connecting an audio interface to the same USB hub as the Oxygen 49.
You can also use Oxygen 49 with your iPad Camera Connection Kit to control supported music creation apps. The iPad Camera Connection Kit is available from the Apple Store.
Recommended Installation
Software: We've included Pro Tools | First M-Audio Edition and Ableton Live Lite with your Oxygen 49 so you can get started making music with professional software right out of the box. For Pro Tools | First M-Audio Edition, register your Oxygen 49 on m-audio.com, and follow the Pro Tools | First M-Audio Edition install instructions in your User Account. For installing Ableton Live Lite, follow the instructions on the included Ableton Live Lite software download card. Also, visit ableton.com to check for any available software updates.
Virtual Instruments: Follow the instructions on the software download card for installing the included virtual instrument plugins. After installation, most DAWs will not load virtual instrument plugins automatically.
2

In order to access the virtual instrument plugins with Pro Tools | First M-Audio Edition and Ableton Live Lite, you will need to choose the plugin folder for the software to scan:
Pro Tools | First M-Audio Edition /AAX plugin folders:
Windows (32-bit):
C:\Program Files (x86)\Common Files\Avid\Audio\Plug-Ins
Windows (64-bit):
C:\Program Files\Common Files\Avid\Audio\Plug-Ins
Mac:
Macintosh HD/Library/Application Support/Avid/Audio/Plug-Ins
Ableton/VST Plugins:
Windows (32-bit):
C:\Program Files (x86)\VSTplugins
Windows (64-bit):
C:\Program Files\VSTplugins
MacOS:
Macintosh HD\Library\Audio\Plugins\VST
To set your plugin folder in Ableton Live Lite:
1.Go to the Preferences menu.
2.Select the File Folder tab. Under Plug-In Sources click Browse and select the appropriate plugin folder.
3.After making your selection, the Use VST Custom Plug-In Folder button should be ON. If it is not, click the button to turn it on.
Exit the Preferences menu.
Ableton Live Lite Setup
1.First, connect Oxygen 49 to an available USB port on your computer using the supplied USB cable, and launch Ableton Live Lite.
2.Next, open the Ableton Live Lite Preferences window. Choose your Audio Device in the Audio tab. This will be dependent upon the audio interface that you are using.
MAC: Select Live > Preferences
PC: Select Options > Preferences
3.Select the MIDI / Sync tab. Within the MIDI Ports section, adjust the settings as seen below: Next to Input: Oxygen 49, toggle the On button in the Track and Remote columns.
Next to Output: Oxygen 49, toggle the On button in the Track and Remote columns.
4.Close the Preferences window.
5. |
To add an instrument or plugin to Ableton Live Lite in order to generate sound, |
|
in the Categories column, choose Instruments or Plug-ins. |
6.In the Name column just to the right of the Categories column, locate the Instrument or Plug-in of your choice. Click-and-drag the instrument to a MIDI track in Ableton Live Lite to load the instrument.
The Instrument can now be triggered with Oxygen 49.
3

Pro Tools | First M-Audio Edition Setup
1.Connect Oxygen 49 to an available USB port on your computer using the supplied USB cable, and launch Pro Tools | First M-Audio Edition.
2.Open or Create a Project.
3.Select the Setup pulldown menu and open MIDI Input Devices. Enable MIDI Input from the Oxygen 49 by clicking the box next to the Oxygen 49.
4.Select the Setup pulldown menu and open Playback Engine. Choose your audio device from the Playback Engine pulldown menu.
5.To create a new Instrument track, select the Track pulldown menu and select New.
6.In the New pulldown menu, select Stereo, and then Instrument Track.
7.In the newly created track, add an Insert to your track by clicking in your track's Inserts A-E and selecting Multichannel Plugin > Instrument and select the instrument you would like to use, such as Xpand!2 (Stereo). The plugin can now be triggered with Oxygen 49.
Note: Windows users will need either an external soundcard (such as the M-Track 2X2) or a lowlatency ASIO driver.
DirectLink Installations
Rather than assigning parameters one by one, DirectLink automatically maps Oxygen 49’s controls to many of the most frequently used digital audio workstation (DAW) features and settings. When used with a supported DAW, you can control the transport, mixing controls (faders and panning) and virtual instrument or signal processing plug-in parameters. You can also switch between DirectLink and custom MIDI operation on the fly to match your particular needs.
To enable DirectLink with your Oxygen 49, you may need to install some additional software, including the DirectLink "personality" for your specific DAW. Visit m-audio.com/directlink for a current list of DAWs that support DirectLink and to download any necessary profiles.
VIP Setup
VIP (Virtual Instrument Player) is an application that lets you control multiple VST plugins simultaneously. Use the Oxygen 49 keyboard to control VIP. To do this, first register your Oxygen 49 keyboard at m-audio.com, download VIP from your M-Audio account, and install it. Then select the VIP preset on your Oxygen 49 keyboard.
Getting Started
Connect the Oxygen 49 to your computer and then open your software. In your software’s
Preferences, Options, or Device Set-Up menu, select Oxygen 49.
For further information about configuring your software to receive MIDI data from your Oxygen 49, and using software instruments with the application, refer to the documentation provided with that product.
4

Features |
|
|
|
|
|
Front Panel |
|
|
|
|
|
|
1 |
3 |
4 |
5 |
|
8 |
2 |
||||
11 |
6 |
||||
|
9 |
10 |
7 |
|
1.LED Screen: The Oxygen 49 features a 3-digit LED display providing visual information regarding current operation, programing and controller status.
2.Function Buttons: The Oxygen 49 features function buttons for programming, access to settings and advanced features.
DirectLink Operation: In Auto mode, < and > will scroll through the tracks. See your specific DAW's DirectLink documentation which can be downloaded at m-audio.com/directlink.
Standard Operation: The < and > buttons do not send MIDI. In performance mode they will cycle the currently selected LCD parameter (Global Channel, Program, or Preset). In Edit Mode, they will cycle through the currently selected editable control.
3.Faders: These send different types of standard MIDI CC messages or advanced MIDI messages based on the parameter they are assigned to or the active preset. The fader can be individually assigned to a different MIDI parameter. For DirectLink operation, please see the DirectLink User Guide available at m-audio.com/directlink.
4.Knobs: These knobs send different types of standard MIDI CC messages or advanced MIDI messages based on the parameter they are assigned to or the active preset. Sends different types of standard MIDI CC messages or advanced MIDI messages based on the assigned parameter or the active preset. Each knob can be individually assigned to a different MIDI parameter. For DirectLink operation, please see the DirectLink User Guide available at m-audio.com/directlink.
5.Pads: Press these velocity-sensitive pads to send Note On/Off and velocity data when performing. To change the pad octave assignment, hold down the Shift and the + or - octave button. These changes affect all eight pads globally. To transpose from the default pad assignments, hold down the Shift and Select button and press the + or - octave buttons. To reset the pads to the default factory assignments, hold down the Shift and both octave buttons. The pads will only send on MIDI channel 10.
6.Transport Buttons: Sends standard MIDI CC, MIDI note, MMC (MIDI Machine Control) or other advanced MIDI messages based on the parameter they are assigned to or the active preset. Each Transport Button can be individually assigned to a different MIDI parameter.
DirectLink Operation: These buttons map to the Transport Buttons in supported DAW applications to control playback, record, start/stop, as well as enabling (or disabling) of the loop function.
Standard Operation: These buttons send standard MIDI CC, MIDI note, MMC (MIDI Machine Control) or other advanced MIDI messages based on the parameter they are assigned to, or the active preset. Each button can be reassigned to control various parameters in your DAW, including the transport controls, by using your recording application’s MIDI Learn function.
7.Velocity-Sensitive Keyboard: The velocity-sensitive keyboard is not only the primary method of sending Note On/Off and velocity data when performing, it is also used to access extended programing functions listed along its upper edge.
8.Octave Buttons: The Octave buttons are used to shift the keyboard’s octave range up or down in one octave increments, extending the octave range of the pads or keys.
5
9.Pitch Bend Wheel: This wheel creates expressive changes in performances by raising and lowering pitch. Rolling the Pitch Bend wheel upward will raise an instrument’s pitch whereas rolling it downward will lower the pitch. The upper and lower pitch bend limit is determined by settings on your hardware or software synthesizer, not by the Pitch Bend wheel on the Oxygen 49 keyboard itself. Typically, this can be either a half note or an octave up/down. This wheel is spring mounted and will return to the center detent position when released. The Pitch Bend wheel is an assignable controller capable of sending a variety of MIDI messages other than pitch bend data.
10.Modulation Wheel: This wheel is used to add expression to performances by changing the intensity of certain effects. By default, most synthesizers assign this wheel to control vibrato (change in intonation) or tremolo (change in volume) although it is usually possible to reassign the function of this wheel through the instrument’s control panel. Rolling the Modulation Wheel upward will increase the modulation effect, while rolling downward will reduce the effect. The Modulation Wheel is an assignable controller capable of sending a variety of MIDI messages other than Modulation data.
11.Control Buttons: These mapable buttons can be assigned to send Note, CC, and other MIDI messages. For DirectLink operation, please see the DirectLink User Guide Available at m-audio.com/directlink.
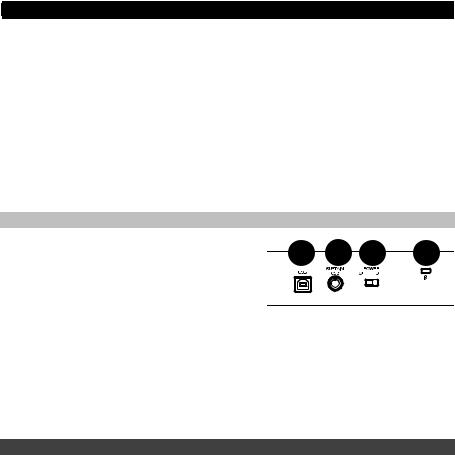
Rear Panel
1. |
USB Port: The USB 2.0 port (backward-compatible with |
1 |
2 |
3 |
4 |
|
USB 1.1) delivers power to the keyboard and transmits |
||||
|
MIDI data when connected to a computer. |
||||
2. |
Sustain Pedal Input: This input accepts a momentary- |
|
|
|
|
|
contact foot pedal (not included). When pressed, this |
|
|
|
|
|
pedal will sustain the sound you are playing without having |
|
|
|
|
|
to keep your fingers pressing down on the keys. The |
|
|
|
|
|
sustain pedal input can be assigned to send Note, CC, and other MIDI messages. |
|
|
||
|
NOTE: The polarity of the sustain pedal is determined by the keyboard upon startup. When an Oxygen 49 |
||||
|
keyboard is powering up, the sustain pedal is assumed to be in the "up" (Off) position. It is important that the |
||||
|
sustain pedal is not pressed during startup, otherwise the pedal will reverse its operation, and notes will |
||||
|
sustain when the pedal is not pressed. |
|
|
|
|
3.On/Off Switch: Use this switch to power the device on or off. When this switch is set to the “on” position, Oxygen 49 is powered through the USB connection to your computer.
4.Kensington Lock Connector: This connector is compatible with standard laptop-style Kensington security cables for theft protection.
Advanced Keyboard Functions
Edit Button: The Edit button is used to access the advanced Oxygen 49 functions located on the keybed. Pressing the Edit button switches your keyboard into Edit Mode. You can use the keys to select various advanced functions and enter data.
To change the functionality of a fader, button, knob, etc.:
1.Press the Edit button.
2.Press the Select button or Control Select (Ctrl Sel) key.
3.Move or press the control corresponding to the control you would like to change or using the keys, enter the numerical value of the control number.
4.Press the corresponding key of the parameter you would like to change (Ctrl Asgn, Data 1, Data 2, etc.)
5.Use the numeric keys to enter the value of the parameter.
Snapshot: Press the Shift button and the Auto button simultaneously to engage the Snapshot function. The Snapshot function sends out the assigned MIDI Message and current value of all controls on the MIDI channel that a control is set to. This feature lets you record current settings of the controls into your sequencer.
DirectLink Mode: Press the Auto button to go into DirectLink Mode. Knobs, buttons, “<” and “>”, and faders will send pre-programmed automapped messages. None of these parameters can be edited while in DirectLink Mode. For some DAWs and programs, you may need to download DirectLink profiles from m-audio.com/directlink.
Control Assign, Data 1, Data 2, Data 3: The Control Assign function (Ctrl Asgn) assigns a MIDI continuous control number (MIDI CC) or other MIDI parameter to the selected knob, button, fader, wheel, or to the sustain pedal. The Data 1, Data 2, and Data 3 keys define various related aspects of the parameter or function assigned to a control.
6

Channel Assign: The Channel Assign function (Chan Asgn) assigns a knob, fader, button, wheel, or the sustain pedal to a specific MIDI channel.
1.Press the Edit button.
2.Press the Select button or Control Select (Ctrl Sel) key.
3.Select a control as described earlier in this guide.
4.Press the Channel Assign key. The LED display will show the currently assigned MIDI channel for the active control (for example, "c.0.2.").
5.Enter the new MIDI channel number using the number keys.
6.Press the Enter key.
When assigned to channel "0", the control (knob, fader, button, wheel, or sustain pedal) will transmit on the Global MIDI Channel. See the next section, "Global Channel" for more information.
NOTE: When a control is assigned to send SysEx messages, the displayed number represents the SysEx Device ID instead of the MIDI transmit channel number.
Global Channel: The Global Channel function (Global Chan) sets the default MIDI channel for the keyboard and all MIDI controls, except for those that have a specific MIDI channel assigned to them.
1.Press the Edit button.
2.Press the Global Channel key. The LED display will show the current Global channel. For example, if channel 1 is the current Global channel, it will appear as "c.0.1".
3.Enter the new channel number using the number keys.
4.Press the Enter key.
The Global Channel can also be changed by using the following method:
1.Press the Select button until the lower edge of the LED displays a red dot above "Global".
2.Scroll through the MIDI channels using the "<" or ">" buttons to select the new channel number.
Program: This function sends Program Change MIDI messages on the Global Channel and can be used to select different sound presets contained within your virtual instrument or sound module.
1.Press the Edit button.
2.Press the Program key. The LED display will show the last sent program number (for example, ".0.1.").
3.Enter the Program number.
4.Press the Enter key to send the program change message.
Program Change messages can also be sent using the following method:
1.Press the Select button until the lower edge of the LED shows a red dot above "PGM".
2.Scroll through the Program numbers using the "<" or ">" buttons.
Bank LSB: The Bank LSB function sends bank change messages on the Global MIDI channel. These messages are used to access additional banks of sound presets on virtual instruments or sound modules (if additional banks are available). Refer to the documentation for the virtual instrument or synthesizer to confirm it will respond to these messages.
1.Press the Edit button.
2.Press the Bank LSB key. The LED display will show the last sent Bank LSB number (for example, ".0.1.").
3.Enter the new Bank LSB number using the number keys.
4.Press the Enter key.
NOTE: Bank LSB messages will not have any effect until they are followed by a Program Change message.
Bank MSB: The Bank MSB function sends bank change messages on the Global MIDI channel. These messages are used to access additional banks of sound presets on virtual instruments or sound modules (if additional banks are available). Refer to the documentation for the virtual instrument or synthesizer to confirm it will respond to these messages.
1.Press the Edit button.
2.Press the Bank MSB key. The LED display will show the last sent Bank MSB number (for example, ".0.1.").
3.Enter the new Bank MSB number using the number keys.
4.Press the Enter key.
NOTE: Bank MSB messages will not have any effect until they are followed by a Program Change message.
Panic: Press the Edit button followed by the Panic key to send an "All Notes Off" message on all 16 MIDI channels. This stops any stuck notes that continue to play even after their keys have been released.
7

Velocity Curve: The Velocity Curve Select key (Vel Curve) is used to change the touch sensitivity of the keyboard or pads. This setting lets you decide how the force with which you hit a key affects the volume at which a note plays.
Oxygen 49 keyboards provide 7 different sensitivity options:
1:C1 generates lower velocity values for the same force. This setting is useful for playing more quietly, even if you tend to strike the keys harder.
2:C2 is the default setting, and is designed to be useful for most players with an "average" touch (people who play with an average amount of force).
3:C3 generates higher velocity values for the same force. This setting is useful for playing more loudly, even if you tend to strike the keys with less force.
4:C4 generates an equal velocity value for a given amount of force, resulting in a linear (or neutral) keyboard response.
5:F1 is a setting that effectively disables sensitivity, meaning the keyboard will generate a fixed velocity value of 64 (on a scale of 0-127) regardless of how hard or soft the keys are struck.
6:F2 is a setting that effectively disables sensitivity, meaning the keyboard will generate a fixed velocity value of 100 (on a scale of 0-127) regardless of how hard or soft the keys are struck.
7:F3 is a setting that effectively disables sensitivity, meaning the keyboard will generate a fixed velocity value of 127 (on a scale of 0-127) regardless of how hard or soft the keys are struck.
1.Press the Edit button.
2.Press the Velocity Curve (Vel Curve) key (press Velocity Curve key twice to edit pad velocity settings). The LED display will show the current velocity curve (for example, ".C.0.2").
3.Type the Velocity Curve number (1 through 7) using the number keys.
4.Press the Enter key.
- or –
1.Press the Edit button.
2.Press the Velocity Curve (Vel Curve) key (press Velocity Curve key twice to edit pad velocity settings). The LED display will show the current velocity curve (for example, ".C.0.2").
3.Use the "<" or ">" buttons to scroll through the Velocity Curves (C1 through F3).
4.Press the Enter key.
Drawbar Mode: This parameter switches all 9 faders to Drawbar Mode. In this mode, the operation of the faders is reversed, so that the maximum value (127) is at the bottom and the minimum value (0) is at the top. This feature is intended for use with Organ presets that utilize drawbars.
1.Press the Edit button.
2.Press the Drawbar key. The LED screen will momentarily display "On". Drawbar Mode becomes active immediately and Edit mode exits automatically. Repeat steps 1 and 2 to disable Drawbar Mode. The LED screen will momentarily display "OFF".
Memory Dump: The SysEx Memory Dump function (Mem Dump) will send the contents of all 10 Preset memory locations for storage in a DAW application. Please refer to the documentation provided with your DAW software for information on how to record SysEx MIDI data.
1.Prepare a MIDI track within your DAW software to record from your Oxygen 49 keyboard.
2.Press the Edit button on your Oxygen 49 keyboard.
3.Start the MIDI recording in your DAW software.
4.Press the Memory Dump key on your Oxygen 49 keyboard. The SysEx memory dump will begin immediately and the LED screen will display "SYS" to indicate that data is being sent. The SysEx file will appear as a new MIDI recording in your DAW software.
Restoring a Memory Dump:
IMPORTANT: Restoring a saved Memory Dump will permanently overwrite all current presets on your Oxygen 49 keyboard. Restored settings will not become active until a new preset is loaded on your Oxygen 49 keyboard, or the device has been powered off and on.
Play back a MIDI track that contains a previously recorded Oxygen 49 SysEx Memory Dump. The SysEx data is sent back to the Oxygen 49 keyboard. The Oxygen 49 LED screen will display "SYS" while receiving the SysEx data.
Device ID: The Device ID function (DEV ID) allows the assignment of a unique SysEx Device ID to differentiate between multiple MIDI devices of the same model, when sending or receiving SysEx data.
The default setting of 127 lets the keyboard respond to all incoming SysEx messages compatible with the same type of Oxygen 49 keyboard controllers. However, if the Device ID is changed to any other value, the keyboard will only respond to SysEx messages that contain the same Device ID number. This is useful in situations where multiple Oxygen 49 controller keyboards are connected to the same DAW software and SysEx information needs to be sent to a specific keyboard controller with a unique Device ID number.
8

1.Press Edit.
2.Press the Device ID key. The LED screen will show the current Device ID (for example, "1.2.7.").
3.Enter the new Device ID number using the number keys.
4.Press the Enter key.
NOTE: If the Device ID number of an Oxygen 49 keyboard is changed after a Memory Dump was recorded into a DAW application, any attempts to restore it will be ignored because the numbers do not match. If you do not remember the Device ID number used when the Memory Dump was recorded, set your Oxygen 49 keyboard to Device ID 127 to ensure all Memory Dumps will be recognized.
Store: The Store function saves control assignment settings to one of 10 memory locations.
IMPORTANT: Storing new assignment settings will overwrite the contents of the selected memory location.
1.Press the Edit button.
2.Press the Store key. The LED screen will show the number of the last selected memory location (for example, P.0.1).
3.Enter the number of the memory location you want to store the new settings to by using the number keys or the “<” or “>” buttons.
4.Press the Enter key to save the changes and overwrite the previous settings of the memory location.
NOTE: The Oxygen 49 factory presets can be restored by holding down the "-" and "+" buttons during power up. This will permanently erase all customized user settings.
Number Keys: This section of the keyboard is used to type in numerical parameter values while in Edit mode.
Enter Key: The Enter key confirms changes made and exits Edit mode.
NOTE: The Panic, Drawbar and Memory Dump functions take immediate effect when the corresponding key is pressed. Edit mode will exit automatically.
Advanced Programming Functions
The MIDI CC (continuous controller) numbers from 0 to 127 are part of the General MIDI specification, and are typically used for real-time control of parameters in MIDI compatible music equipment. For example, an Oxygen 49 knob may be assigned to MIDI CC number 10, which controls the Pan setting of a connected synthesizer or DAW software track. Many of the controls on Oxygen 49 keyboards are fully programmable, and can be assigned to any of these standard MIDI CCs. However, to simplify assignment of other, more complex MIDI message types (for example, SysEx or RPN/NRPN), M-Audio has appended such additional MIDI message types to the end of the MIDI CC number list, extending its range beyond 127.
These additional messages can be assigned to Oxygen 49 controls, just as if they were standard MIDI CCs, but using numbers in the range from 128 to 255. Generally, this is achieved by selecting the control for editing and assigning a 3-digit number.
This section provides examples of the typical control assignment procedure for knobs, faders, buttons, wheels, and the sustain pedal. Assigning MIDI messages that are not explicitly mentioned in this section is done by using the same basic principle as given in the examples.
NOTE: Your Oxygen 49 keyboard never transmits values outside the range specified by the MIDI protocol (0-127). The controller numbers from 128-255 are only used internally by your Oxygen 49 keyboard. This simplifies configuration of the knobs, buttons and faders when assigning advanced MIDI messages, and allows additional configuration options for the controls (for example, setting the Trigger or Toggle operation of a button).
9

Setting Trigger Values for the Buttons or the Sustain Pedal
When standard MIDI CC numbers are assigned to buttons or the Sustain pedal, they will trigger between two values. The sustain pedal is already configured to send trigger values by default, ensuring it activates the sustain effect when pressed and deactivates it when the pedal is released. Buttons can also be configured to operate this way, which requires three values to be specified.
Key |
Parameter |
Value |
Control Assign (example) |
MIDI CC number |
10 (Pan) |
|
|
|
Data 2 (example) |
Release |
0 (minimum) |
|
|
|
Data 3 (example) |
Press |
127 (maximum) |
|
|
|
1.Press the Edit button.
2.Press the Select button or Control Select (Ctrl Sel) key.
3.Select a button as described earlier in this guide.
4.Press the Control Assign (Ctrl Asgn) key.
5.Type 10 using the number keys. This assigns MIDI CC number 10 (Pan) to the button.
6.Press the Data 2 key.
7.Type 0 using the number keys to assign the "release" (minimum) value.
8.Press the Data 3 key.
9.Type 127 using the number keys to assign the "pressed" (maximum) value.
10.Press the Enter key.
TIP: It can be useful to transmit two other specific values instead of sending minimum (zero) and maximum (127) values as in the above example. When assigning a button to control Pan (MIDI CC 10), you can, for example, configure Data 2 to send Value 38, and Data 3 to send Value 93, effectively causing pan to switch between the approximate "ten o’clock" and "two o’clock" positions when pressing the button, and releasing the button.
10
Setting Toggle Values (Min/Max) for Buttons or the Sustain Pedal
It is possible to set a Toggle Value for a button or the sustain pedal, causing it to send one value when first pressed and another value when pressed again. This means that one value is sent the first time it is pressed, and another value is sent the next time it is pressed. When configuring a button or the sustain pedal to operate in Toggle Mode, the following four values need to be specified:
Key |
Parameter |
Value |
|
|
|
Control Assign |
Toggle On/Off operation |
146 |
|
|
|
Data 1 (example) |
MIDI CC number |
10 (Pan) |
|
|
|
Data 2 (example) |
Second press |
0 (minimum) |
|
|
|
Data 3 (example) |
First press |
127 (maximum) |
|
|
|
Note: When working with proprietary M-Audio parameters from the 128-255 range, the Control Assign setting is used to configure a button or the sustain pedal for this special mode of operation. This means that certain values that are usually specified through the Control Assign setting must instead be specified via the "Data 1" parameter (such as the standard MIDI CC parameter in the example below).
The following example will configure a button to "hard pan" the sound to the right speaker when it is pressed for the first time, and "hard pan" to the left speaker when it is pressed for the second time. This involves configuring the button to operate as a toggle, while controlling the Pan parameter (MIDI CC 10):
1.Press the Edit button.
2.Press the Select button or Control Select (Ctrl Sel) key.
3.Select a button as described earlier in this guide.
4.Press the Control Assign (Ctrl Asgn) key.
5.Type 146 using the number keys. This configures the button to operate as a toggle.
6.Press the Data 1 key.
7.Type 10 using the number keys. This specifies which parameter the button will toggle “on and off”. In this example, MIDI CC 10 (Pan).
8.Press the Data 2 key.
9.Type 0 using the number keys. This sets the second button press value to zero. In other words, sound will be panned "hard left" when the button is pressed a second time.
10.Press the Data 3 key.
11.Type 127 using the number keys. This sets the first button press value to the maximum value, so that the sound is panned “hard right” when the button is pressed the first time.
12.Press the Enter key.
TIP: It can be useful to transmit two other specific values instead of sending minimum (zero) and maximum (127) values as in the above example. When assigning a button to control Pan (MIDI CC 10), you can, for example, configure Data 2 to send value 38, and Data 3 to send value 93, effectively causing pan to switch between the approximate "ten o’clock" and "two o’clock" positions when pressing the button the first time, and pressing the button the second time.
11

Assigning MMC Control to Buttons
The transport functions of some hardware recording devices and DAW applications can be remotely operated via MMC (MIDI Machine Control) commands. MMC is a specialized transport control protocol and requires a somewhat different configuration method. The following values need to be specified:
Key |
Parameter |
Value |
|
|
|
Control Assign |
MMC control |
149 |
|
|
|
Channel Assign (example) |
Device ID |
127 |
|
|
|
Data 2 (example) |
MMC function |
2 (Play) |
|
|
|
The following example will configure a button to send the MMC command "Play". Select an assignable button as described earlier in this guide.
1.Press the Edit button.
2.Press the Select button or Control Select (Ctrl Sel) key.
3.Select a button as described earlier in this guide.
4.Press the Control Assign (Ctrl Asgn) key.
5.Type 149 using the number keys. This sets the button to send MMC (MIDI Machine Control).
6.Press the Channel Assign (Chan Asgn) key.
7.Enter 127 (Poly On) using the number keys. This ensures all receiving devices will respond to the MMC messages.
8.Press the Data 2 key.
9.Enter a number from the chart on the side to select the MMC command for the button. This determines which transport function will be controlled by this button. For example, enter 2 for the Play command.
10.Press the Enter key.
|
Number |
MMC Command |
|
|
|
|
01 |
Stop |
|
|
|
|
02 |
Play |
|
|
|
|
03 |
Deferred Play |
|
|
|
|
04 |
Fast Forward |
|
|
|
|
05 |
Rewind |
|
|
|
|
06 |
Record Strobe |
|
|
|
|
07 |
Record Exit |
|
|
|
|
08 |
Record Pause |
|
|
|
|
09 |
Pause |
|
|
|
|
09 |
Eject |
|
|
|
|
10 |
Chase |
11Command Error Reset
12MMC Reset
12

Assigning a Note to a Button
It is possible to configure a Button to send a Note On message when it is held down, and a Note Off message when it is released. This requires four values to be specified (values given are examples):
The following example configures a button to play MIDI note E4 while it is being held down and stop the note when the button is released.
Key |
Parameter |
|
Value |
|
|
|
|
|
|
Control Assign |
Trigger Note On/Off |
147 |
|
|
|
|
|
|
|
Data 1 (example) |
Note pitch |
64 |
|
|
|
|
|
|
|
Data 2 (example) |
Note-Off velocity |
0 |
|
|
|
|
|
|
|
Data 3 (example) |
Note-On velocity |
100 |
|
|
|
|
|
|
|
1.Press the Edit button.
2.Press the Select button or Control Select (Ctrl Sel) key.
3.Select a button as described earlier in this guide.
4.Press the Control Assign (Ctrl Asgn) key.
5.Enter 147 using the number keys. This sets the button to trigger MIDI Notes.
6.Press the Data 1 key (Pitch/Note parameter).
7.Enter 64 using the number keys. This sets the button to play MIDI note 64.
8.Press the Data 2 key (Velocity Off).
9.Enter 0 using the number keys. This sets the button to transmit a Note Off message with a release velocity value of 0.
10.Press the Data 3 key (Velocity On).
11.Enter 100 using the number keys. This sets the button to transmit a Note On message with a velocity of 100 when pressed.
12.Press the Enter key.
NOTE: It is also possible to configure a button to send a Note On message when it is pressed and a Note Off message when it is pressed a second time. To do this, follow the above configuration steps, but enter 148 for the "Control Assign" parameter.
13

Setting Buttons and Sustain Pedal to Send Combined Program Change, Bank LSB and Bank MSB Messages
The assignable buttons and the sustain pedal can be configured to send a multi-part message, consisting of a Program Change, Bank LSB and Bank MSB message when pressed. This is useful for specific preset/sound selection from a specific bank of a connected synthesizer or virtual instrument. This requires four values to be specified (values given are examples):
Key |
Parameter |
Value |
|
|
|
Control Assign |
Program/Bank Preset select |
145 |
|
|
|
Data 1 (example) |
Program Change Number |
42 |
|
|
|
Data 2 (example) |
Bank LSB number |
8 |
|
|
|
Data 3 (example) |
Bank MSB number |
32 |
|
|
|
The following example configures a button to send a total of 3 MIDI messages each time the button is pressed (Bank LSB, Bank MSB and Program Change), allowing you to recall any sound in any bank of a connected software or hardware synthesizer that supports this:
1.Press the Edit button.
2.Press the Select button or Control Select (Ctrl Sel) key.
3.Select the Control as described earlier in this guide.
4.Press the Control Assign (Ctrl Asgn) key.
5.Enter 145 using the number keys. This sets the button or the pedal to send a combined Bank Select/Program Change message.
6.Press the Data 1 key.
7.Enter the Program Change number, for example, 42.
8.Press the Data 2 key.
9.Enter the Bank LSB number, for example, 8.
10.Press the Data 3 key.
11.Enter the Bank MSB number, for example, 32.
12.Press the Enter key.
Programming a Button or Sustain Pedal to Increment/Decrement a MIDI CC Value
It is possible to configure a button to increase or decrease a value each time it is pressed. This is useful if you want to step through values one by one each time a button is pressed. To configure a button to increment a MIDI CC between a minimum and maximum value, assign the button to number 154. The minimum and maximum values are set using the Data 2 and Data 3 parameters respectively. This requires four values to be specified (values given are examples):
Key |
Parameter |
Value |
|
|
|
Control Assign |
Increment MIDI CC |
154 |
|
|
|
Data 1 (example) |
MIDI CC number |
72 (Release Time) |
|
|
|
Data 2 (example) |
Low limit |
0 |
|
|
|
Data 3 (example) |
High limit |
127 |
|
|
|
14

The following example configures a button to increment the release time of the currently active MIDI instrument sound preset every time the button is pressed (you may have to push the button several times while playing notes to hear a difference).
1.Press the Edit button.
2.Press the Select button or Control Select (Ctrl Sel) key.
3.Select the Control as described earlier in this guide (button or pedal).
4.Press the Control Assign (Control Asgn) key.
5.Enter 154 using the number keys. This sets the button or the pedal to increment the MIDI CC value.
6.Press the Data 1 key.
7.Enter 72 using the number keys. This specifies the MIDI CC for which values will be incremented.
8.Press the Data 2 key.
9.Enter 0 using the number keys. This specifies the minimum value.
10.Press the Data 3 key.
11.Enter 127 using the number keys. This specifies the maximum value.
12.Press the Enter key.
To configure a button to decrement (decrease) a MIDI CC value, assign the button to number 153. The minimum and maximum value (range) for each button is set using the Data 2 and Data 3 parameters respectively.
NOTE: Each button will only increment or decrement its own parameter value and this value is independent of any other button. In other words, assigning one button to increment a parameter and another button to decrement the same parameter will cause the first button to send values such as 1, 2, 3, etc., each time the button is pressed. Pressing the second button will send values such as 127, 126, 125 (as opposed to starting to decrement where the first button left off; for example, 2, 1, 0).
Programming a Button or Sustain Pedal to Increment/Decrement a Program Change
It is possible to configure a button or the sustain pedal to send an Increment (increase) or Decrement (decrease) Program Change message each time it is pressed. To configure a button to increment a Program Change between a minimum and maximum value, assign the button to number 156. The minimum and maximum values are set using the Data 2 and Data 3 parameters respectively. This requires three values to be specified (values given are examples):
Key |
Parameter |
|
Value |
|
|
|
|
Control Assign |
Program Increment |
156 |
|
|
|
|
|
Data 2 (example) |
Program Number (minimum) |
0 |
|
|
|
|
|
Data 3 (example) |
Program Number (maximum) |
127 |
|
|
|
|
|
The following example configures a button to increment through the sound presets on a connected software or hardware synthesizer:
1.Press the Edit button.
2.Press the Select button or Control Select (Ctrl Sel) key.
3.Select the Control as described earlier in this guide.
4.Press the Control Assign (Ctrl Asgn) key.
5.Enter 156 using the number keys. This configures the button or sustain pedal to increment the Program number.
6.Press the Data 2 key.
7.Enter 0 using the number keys. This specifies the lowest Program number.
8.Press the Data 3 key.
9.Enter 127 using the number keys. This specifies the highest Program number.
10.Press the Enter key.
To configure a button or the sustain pedal to decrement a Program Change between a maximum and minimum value, assign the button to number 155. The minimum and maximum values are set using the Data 2 and Data 3 parameters respectively.
NOTE: Each button or the sustain pedal will only increment or decrement its own parameter value and this value is independent of any other button. In other words, assigning one button to increment through sound presets and another button to decrement through sound presets will cause the first button to recall programs 1, 2, 3, etc., each time the button is pressed. Pressing the second button will recall programs such as 127, 126, 125 (as opposed to starting to decrement where the first button left off for example, 2, 1, 0).
15

Reversing the Operation of Knobs, Wheels, or Faders
Most MIDI parameters assignable to knobs, wheels, or faders can be configured so that the control’s operation is reversed. Once a control is assigned to a MIDI parameter, by default the Data 2 parameter defines the minimum value (for example, 0) while the Data 3 parameter defines the maximum value to be transmitted (for example, 127).
Reversing the operation of knobs, wheels, or faders is achieved by entering a higher value for the Data 2 parameter (usually minimum) and a lower value for the Data 3 parameter (usually maximum). This is useful when a single Fader needs to be configured to work as a drawbar when controlling with an organ-based virtual instrument, or if a knob needs to be configured in reverse when controlling a particular parameter. This requires two values to be specified (values given are examples):
Key |
Parameter |
Value |
|
|
|
Data 2 (example) |
Minimum value |
127 |
|
|
|
Data 3 (example) |
Maximum value |
0 |
|
|
|
The following example configures a Knob, Wheel, or Fader to reverse its operation:
1.Press the Edit button.
2.Press the Select button or Control Select (Ctrl Sel) key.
3.Select a knob, wheel, or fader as detailed earlier in this guide.
4.Press the Data 2 key.
5.Enter 127 using the number keys. This configures the control to reach its maximum value when it is all the way down.
6.Press the Data 3 key.
7.Enter 0 using the number keys. This configures the control to reach its minimum value when it is all the way up.
8.Press the Enter Key.
The knob, wheel, or fader now operates reversed. What was originally the maximum position is now the minimum position, and vice versa.
Limiting the Range of a Knob, Wheel, or Fader
The MIDI protocol allows for a maximum range of transmitted values between 0 and 127. The effective range of values transmitted by knobs, wheels, and faders can be limited by entering values other than 0 and 127 (default) for the Data 2 and Data 3 parameters. For example, with the Data 2 parameter set to 38 and Data 3 set to 93, if a knob is set fully counter-clockwise, the lowest value it transmits is 38. If the knob is turned fully clockwise, the highest value it transmits is 93. This can be useful in a variety of scenarios, for example, to keep a knob within the "sweet spot" of a synthesizer parameter (for example, filter cutoff), or to quickly recall a specific minimum or maximum volume setting for a track.
The following example configures a knob, wheel, or fader to operate within a limited range (38 to 93):
Key |
Parameter |
Value |
|
|
|
Control Assign (example) |
MIDI CC number |
07 (Volume) |
|
|
|
Data 2 (example) |
Minimum value |
38 |
|
|
|
Data 3 (example) |
Maximum value |
93 |
|
|
|
16

1.Press the Edit button.
2.Press the Select button or Control Select (Ctrl Sel) key.
3.Select a control as described earlier in this guide.
4.Press the Control Assign (Ctrl Asgn) key.
5.Type 7 using the number keys. This assigns MIDI CC number 7 (Volume) to the wheel, knob or fader.
6.Press the Data 2 key.
7.Type 38 using the number keys.
8.Press the Data 3 key.
9.Type 93 using the number keys.
10.Press the Enter key.
NOTE: The operation of knobs, wheels, and faders can be reversed, even if the range of operation is limited. This is achieved by entering a higher value for the Data 2 parameter and a lower value for the Data 3 parameter.
Assigning RPN/NRPN Messages to a Knob, Fader, Button, Wheel, or Pedal
Oxygen 49 allows transmission of all three necessary MIDI CC messages for RPNs and NRPNs by simply moving a knob or fader or wheel or by pressing a button or the sustain pedal.
•The Control Assign setting allows assignment for control of the RPN Coarse (132) and RPN Fine (133), as well as NRPN Coarse (134) and NRPN Fine (135) parameters.
•The Data 1 setting lets you specify which MIDI CC number is sent to alter values (usually: Coarse=CC 6; Fine=CC 38).
•The Data 2 setting defines what value is sent for LSB (RPN: CC 100, NRPN: CC 98) while the Data 3 setting defines which value is sent for MSB (RPN: CC 101, NRPN: CC 99). Together, the LSB and MSB values specify the RPN/NRPN parameter to be edited.
•Assigning a knob, wheel, or fader to control an RPN/NRPN on a connected hardware or software device requires four values to be specified.
•Assigning a button or the sustain pedal to control an RPN/NRPN on a connected hardware or software device requires three values to be specified.
The following example assigns a manufacturer specific NRPN coarse (134) message to a control on your Oxygen 49 keyboard:
Key |
Parameter |
Value |
|
|
|
Control Assign |
NRPN Coarse |
134 |
|
|
|
Data 1 (example) |
CC for Value Change |
6 |
|
|
|
Data 2 (example) |
CC 98 / LSB |
51 |
|
|
|
Data 3 (example) |
CC 99 / MSB |
3 |
|
|
|
1.Press the Edit button.
2.Press the Select button or Control Select (Ctrl Sel) key.
3.Select a knob, fader, wheel, button or the sustain pedal as described earlier in this guide.
4.Press the Control Assign (Ctrl Asgn) key.
5.Enter 134 (NRPN Coarse) using the number keys.
6.Press the Data 1 key.
7.Enter 6 using the number keys (or the MIDI CC).
8.Press the Data 2 key.
9.Enter the value to be transmitted via MIDI CC 98 (LSB) using the number keys.
10.Press the Data 3 key.
11.Enter the value to be transmitted via MIDI CC 99 (MSB) using the number keys.
12.Press the Enter key.
Restoring the Factory Settings
Factory default settings can be restored by holding down the - and + buttons during power-up. At this point all previously saved data will be erased.
17

Manual del usuario (Español)
Contenido de la caja
Oxygen 49
Cable USB
Tarjetas de descarga de software
Guía de inicio rápido
Manual sobre la seguridad y garantía
Soporte
Para obtener la información más completa acerca de este product (los requisitos del sistema, compatibilidad, etc) y registro del producto, visite m-audio.com/oxygen49.
Para soporte adicional del producto, visite m-audio.com/support.
Instalación
Conexión del teclado
Computadora*
* Se vende por separado
Pedal de sostenido*
1.Enchufa el cable USB provisto con tu teclado Oxygen 49 a un puerto USB libre en tu ordenador.
2.Enchufa el otro extremo del cable USB en la entrada USB del teclado Oxygen 49.
El cable USB no solo alimenta el teclado, sino que también envía y recibe datos MIDI del ordenador. Si intentas usar tu Oxygen 49 con un hub USB, verifica que este utilice una fuente de alimentación externa. Un hub USB pasivo sin fuente de alimentación puede no suministrar la energía suficiente si tiene otros dispositivos conectados. No recomendamos conectar un interface de audio al mismo hub USB que el Oxygen 49.
También puede utilizar el Oxygen 49 con su iPad Camera Connection Kit (Kit de conexión de cámara para iPad) para controlar las aplicaciones de creación de música compatibles. El iPad Camera Connection Kit está disponible en Apple Store.
18

Instalación recomendada
Software: Hemos incluido Pro Tools | First M-Audio Edition y Ableton Live Lite con su Oxygen 49 de modo que puede comenzar a hacer música con software profesional en cuanto lo saca de la caja. Para Pro Tools | First M-Audio Edition, registre su Oxygen 49 en m-audio.com y siga las instrucciones de instalación de Pro Tools | First M-Audio Edition en su Cuenta de usuario. Para la instalación del Ableton Live Lite, siga las instrucciones incluidas en la tarjeta de descarga de software del Ableton Live Lite. Visite también ableton.com para comprobar si hay actualizaciones de software disponibles.
Instrumentos virtuales: Siga las instrucciones de la tarjeta de descarga de software para instalar los plugins de instrumentos virtuales incluidos. Tras la instalación, muchos DAW no cargarán plugins de instrumentos virtuales de forma automática.
A fin de acceder a los plugins de instrumentos virtuales con Pro Tools | First M-Audio Edition, deberá seleccionar la carpeta con plugins para que el software explore:
Carpetas de plugins de Pro Tools | First M-Audio Edition/AAX:
Windows (32-bit):
C:\Program Files (x86)\Common Files\Avid\Audio\Plug-Ins
Windows (64-bit):
C:\Program Files\Common Files\Avid\Audio\Plug-Ins
Mac:
Macintosh HD/Library/Application Support/Avid/Audio/Plug-Ins
Plugins de Ableton/VST:
Windows (32-bit):
C:\Program Files (x86)\VSTplugins
Windows (64-bit):
C:\Program Files\VSTplugins
Mac:
Macintosh HD\Library\Audio\Plugins\VST
Para establecer su carpeta de plugins en Ableton Live Lite:
1.Vaya al menú Preferences (Preferencias).
2.Seleccione la pestaña File Folder (Carpeta de archivos). Bajo Plug-In Sources (Fuentes de plugin) haga clic en Browse (Explorar) y seleccione la carpeta de plugins apropiada.
3.Después de hacer su selección, el botón Use VST Custom Plug-In Folder (Usar carpeta de plugins personalizada) debe estar en ON (encendido). Si no lo está, haga clic en el botón para encenderlo.
4.Salga del menú Preferences (Preferencias).
Configuración de Ableton Live Lite
1.Primero, conecte el Oxygen 49 a un puerto USB disponible en su ordenador utilizando el cable USB suministrado y ejecute Ableton Live Lite.
2.A continuación, abra la ventana Preferences (Preferencias) de su Ableton Live Lite. Seleccione su dispositivo de audio en la pestaña Audio. Esto dependerá de la interfaz de audio que esté utilizando.
MAC: Seleccione Live > Preferences
PC: Seleccione Options > Preferences
3.Seleccione la pestaña MIDI / Sync (MIDI / Sincronización). Dentro de la sección MIDI Ports (puertos MIDI), ajuste la configuración como se muestra a continuación:
Junto a Input: (Entrada) Oxygen 49, conmute el botón On en las columnas Track y Remote (pista y remoto). Junto a Output: (Salida) Oxygen 49, conmute el botón On en las columnas Track y Remote (pista y remoto).
4.Cierre la ventana Preferences (Preferencias).
5.Para agregar un instrumento o plugin a Ableton Live Lite a fin de generar sonido, en la columna Categories (Categorías), seleccione Instruments (Instrumentos) Plug-ins.
6.En la columna Name (Nombre) justo a la derecha de la columna Categorías, localice el Instrumento o Plugin de su elección. Haga clic y arrastre el instrumento sobre una pista MIDI en Ableton Live Lite para cargarlo. El instrumento ahora puede dispararse desde Oxygen 49.
19

Configuración del Pro Tools | First M-Audio Edition
1.Conecte el Oxygen 49 a un puerto USB disponible en su ordenador utilizando el cable USB suministrado y abra Pro Tools | First M-Audio Edition.
2.Abra o cree un proyecto.
3.Seleccione el menú desplegable Setup y abra MIDI Input Devices. Active MIDI Input desde el Oxygen 49 haciendo clic en la casilla junto al Oxygen 49.
4.Seleccione el menú desplegable Setup y abra Playback Engine. Seleccione su dispositivo de audio en el menú desplegable Playback Engine.
5.Para crear una pista de un instrumento nuevo, seleccione el menú desplegable Track y seleccione
New.
6.En el menú desplegable New, seleccione Stereo y luego Instrument Track.
7.En la pista recientemente creada, añada un inserto en su pista haciendo clic en los insertos A-E de su pista y seleccionando Multichannel Plugin > Instrument y seleccione el instrumento que desea utilizar, como por ejemplo Xpand!2 (Stereo). El plugin ahora puede dispararse desde del Oxygen 49.
Nota: Los usuarios de Windows necesitarán una tarjeta de sonido externa (como por ejemplo la M-Track 2X2) o un controlador ASIO de baja latencia.
Instalaciones de DirectLink
En lugar de asignar los parámetros uno por uno, al activarse el modo DirectLink de Oxygen 49, se mapean automáticamente sus controles a muchas de las características y ajustes de uso más frecuente de la estación de trabajo de audio digital (DAW). Cuando lo usa con una DAW compatible, es posible controlar el transporte, los controles de mezcla (faders y balanceo) y los parámetros de plug-in de procesamiento de señales o instrumentos virtuales. Además, es posible conmutar entre DirectLink y la operación MIDI personalizada sobre la marcha, a fin de satisfacer sus necesidades particulares.
Para habilitar DirectLink con su Oxygen 49, es necesario instalar software adicional, incluida la "personalidad" de DirectLink correspondiente a su DAW específica. Visite m-audio.com/directlink para obtener una lista actualizada de las DAW compatibles con DirectLink y para descargar los perfiles necesarios.
Instalación de VIP
El VIP (Reproductor de Instrumentos Virtuales) es una aplicación que le permite controlar múltiples plugins VST simultáneamente. Utilice el teclado Oxygen 49 para controlar el VIP. Para hacer esto, primero registre su teclado Oxygen 49 en m-audio.com, descargue el VIP desde su cuenta de M-Audio e instálelo. Luego seleccione el preset VIP en su teclado Oxygen 49.
Primeros pasos
Conéctelo a su computadora y luego abra su software. En los menús de Preferences (Preferencias), Options (Opciones) o Device Set-Up (Configuración de dispositivo) de su software, seleccione el Oxygen 49.
Para más datos sobre cómo configurar tu software para recibir datos MIDI de Oxygen 49, y el uso de instrumentos en software con la aplicación, consulta la documentación provista con ese producto.
20
Características |
|
|
|
||
Panel frontal |
|
|
|
|
|
|
1 |
3 |
4 |
5 |
|
8 |
2 |
||||
11 |
6 |
||||
|
|||||
9 |
10 |
7 |
|
1.Pantalla LED: El Oxygen 49 presenta una pantalla LED de 3 dígitos que brinda información visual acerca de la operación, programación y estado del controlador actuales.
2.Botones de función: El Oxygen 49 presenta botones de función para programación, acceso a los ajustes y características avanzadas.
Funcionamiento de DirectLink: En modo Auto, < y > sirven para recorrer las pistas. Consulte la documentación de DirectLink de su DAW específica que puede descargarse de m-audio.com/directlink.
Funcionamiento estándar: Los botones < y > no envían MIDI. En modo Ejecución, alternarán el parámetro actualmente seleccionado en el LCD (canal global, programa o preset). En modo Edición, alternarán el control editable actualmente seleccionado.
3.Faderes: Estos faderes envían diferentes tipos de mensajes MIDI CC estándar dependiendo del parámetro al que están asignados o del preset activo. El fader se puede asignar individualmente a un parámetro MIDI diferente. Para operar DirectLink, consulte la Guía del usuario de DirectLink en m-audio.com/directlink.
4.Perillas: Envía diferentes tipos de mensajes de CC MIDI o de MIDI avanzado basado en el parámetro asignado o el preset activo. Cada perilla se puede asignar individualmente a un parámetro MIDI diferente. Para operar DirectLink, consulte la Guía del usuario de DirectLink en m-audio.com/directlink.
5.Pads: Pulse los pads sensibles a la velocidad para enviar datos de velocidad y Note On/Off (Nota activada/desactivada) cuando interpreta un tema. Para modificar la asignación de octava del pad, mantenga pulsada la tecla Shift y el botón Octave + ó - (subir o bajar octava). Estos cambios afectan a los ocho pads de manera global. Para transponer las asignaciones por defecto de los pads, mantenga pulsado los botones Shift y Select y pulse los botones Octave + ó -. Para restablecer las asignaciones por defecto de fábrica de los pads, mantenga pulsado Shift y ambos botones Octave. Los pads solo envían a través del canal de MIDI 10.
6.Botones de transporte: Estos botones envían diferentes tipos de mensajes MIDI CC estándar, MMC (MIDI Machine Control) u otros mensajes MIDI avanzados dependiendo del parámetro al que están asignados o del preset activo. Cada botón de transporte se puede asignar individualmente a un parámetro MIDI diferente.
Funcionamiento de DirectLink: Estos botones se mapean a los botones de transporte en las aplicaciones de audio soportadas para controlar la reproducción, grabación, inicio/fin, así como la activación (o desactivación) de la función de loop.
Funcionamiento estándar: Estos botones envían diferentes tipos de mensajes MIDI CC estándar, MMC (MIDI Machine Control) u otros mensajes MIDI avanzados dependiendo del parámetro al que están asignados o del preset activo. Cada botón puede ser reasignado para que controle varios parámetros en la aplicación de audio, controles de transporte incluidos, usando la función MIDI Learn.
7.Teclado sensible a la dinámica: El teclado sensible a la dinámica no sólo es el método principal para enviar datos de Velocidad y Note On/Off durante la ejecución, sino que además se utiliza para acceder a funciones de programación ampliadas listadas en su borde superior.
8.Botones Octave (Octava): Los botones Octave se utilizan para desplazar el rango de octavas del teclado hacia arriba o abajo en incrementos de una octava, extendiendo el rango de octavas de los pads o teclas. Para más información acerca de las características adicionales, consulte la Guía del usuario completa, disponible en m-audio.com/oxygen49.
21
9.Rueda de pitch bend: Esta rueda permite realizar cambios expresivos en las interpretaciones a partir de variaciones en el tono (pitch.) Si gira la rueda de pitch bend hacia arriba, el tono del instrumento aumentará y si la gira hacia abajo, el tono disminuirá. Los límites superior e inferior del pitch bend vienen determinados por los ajustes de su sintetizador hardware o software, y no por la rueda de pitch bend del teclado Oxygen 49. Normalmente, suele ser media nota o una octava arriba/abajo. Esta rueda dispone de un muelle que hace que vuelva a la posición central una vez liberada. La rueda de pitch bend es un control asignable capaz de enviar mensajes MIDI distintos a los de pitch bend.
10.Rueda de modulación: Esta rueda se usa para agregar expresión a las interpretaciones a partir de variaciones en la intensidad de algunos efectos en particular. Por defecto, la mayoría de sintetizadores asignan esta rueda al efecto de vibrato (cambio de entonación) o tremolo (cambio de volumen), aunque también es posible reasignar la función de esta rueda a través del panel de control del instrumento. Si gira la rueda de modulación hacia arriba, aumentará el efecto de modulación; si la gira hacia abajo, lo reducirá. La rueda de modulación es un control asignable capaz de enviar una serie de mensajes MIDI distintos a los de modulación.
11.Botones de control: Estos botones mapeables pueden asignarse para enviar la nota, CC y otros mensajes MIDI. Para operar DirectLink, consulte la Guía del usuario de DirectLink en m-audio.com/directlink.
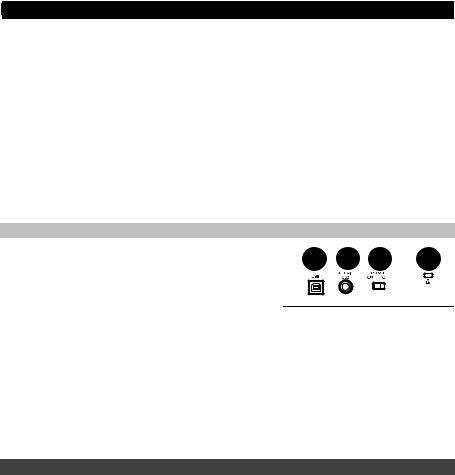
Panel trasero
1. Puerto USB: El puerto USB 2.0 (compatible con la versión |
1 |
2 |
3 |
4 |
|
|
|
|
precedente USB 1.1) proporciona alimentación al teclado y envía datos MIDI cuando está conectado a la computadora.
ATENCIÓN: El teclado detecta la polaridad del pedal de sustain en el momento de su puesta en marcha. Al poner en
marcha un teclado Oxygen 49, se asume que el pedal de
sustain está en posición "inactiva" (Off). Es importante no pulsar el pedal de sustain durante el arranque de la unidad; de lo contrario, el pedal invertirá su funcionamiento y las notas se reproducirán en sostenido cuando no se pulse el pedal.
2.Entrada para pedal de sustain: Esta entrada permite conectar un pedal (no suministrado). El pedal se usa normalmente para sostener el sonido con el pie en lugar de mantener las manos sobre el teclado. Esta entrada para pedal de sostenido puede asignarse para enviar la nota, CC y otros mensajes MIDI.
3.Conmutador On/Off: Este conmutador enciende y apaga la unidad. En la posición “On”, Oxygen 49 se alimenta a través de la conexión USB con la computadora.
4.Conector de bloqueo Kensington: Este conector es compatible con cables de seguridad Kensington tipo laptop estándar para protección antirrobo.
Funciones avanzadas del teclado
Botón Edit: El botón Edit se usa para acceder a las funciones avanzadas de Oxygen 49 en el teclado mismo. Pulsar el botón Edit conmuta el teclado al “Modo de edición”. Puedes usar las teclas para seleccionar varias funciones avanzadas e introducir datos.
Para cambiar la funcionalidad de un cursor, botón, perilla, etc.:
1.Pulse el botón Edit.
2.Pulse el botón Select (Seleccionar) o la tecla Control Select (Selección de control) (Ctrl Sel).
3.Mueva o pulse el control correspondiente al control que desea modificar o mediante las teclas, introduzca el valor numérico del número de control.
4.Pulse la tecla correspondiente del parámetro que desea modificar (CTRL ASGN, DATA 1, DATA 2, etc.)
5.Utilice las teclas numéricas para introducir el valor de este parámetro.
Instantánea: Pulse los botones Shift y Auto simultáneamente para activar la función de instantánea. La función de instantánea envía el mensaje MIDI asignado y el valor actual de todos los controles en el canal MIDI que tiene configurado un control. Esta función le permite grabar los ajustes actuales de sus controles en su secuenciador.
Modo DirectLink: Pulse el botón Auto para entrar al modo DirectLink. Las perillas, botones, Pista Izquierdo y Pista Derecho, y el cursor enviarán mensajes automapeados preprogramados. Ninguno de estos parámetros puede editarse en modo DirectLink. Para algunas DAW y programas, puede necesitar descargar los perfiles de DirectLink desde m-audio.com/directlink.
22

Control Assign (Asignación de controles), Data 1, Data 2, Data 3: La función Control Assign (Asignar control) (Ctrl Asgn) asigna un número de control MIDI continuo (CC MIDI) u otro parámetro a la perilla, botón o fader seleccionado o al pedal de sostenido. Las teclas Data 1, Data 2 y Data 3 definen varios aspectos del parámetro o función asignados a un control. Por ejemplo, es posible configurar un botón para enviar datos MIDI de Note On/Off asignándolo al número de controlador 147. La tecla Data 1 se utiliza para especificar la altura tonal (o número de nota) de la nota MIDI para el botón. La tecla Data 2 se utiliza para ajustar la velocidad Note Off (Velocity Off), y la Data 3 para ajustar la velocidad Note On (Velocity On) (define el volumen de la nota.)
Channel Assign (Asignación de canal): La función Channel Assign (CHAN ASGN) se utiliza para asignar un control MIDI (control rotatorio, fader, botón, rueda, o pedal de sustain) antes de su edición.
1.Pulse el botón Edit.
2.Pulse el botón Select (Seleccionar) o la tecla Control Select (Selección de control) (Ctrl Sel).
3.Seleccione un control como se describe anteriormente en esta guía.
4.Pulse la tecla Channel Assign - el visor LED mostrará el canal MIDI asignado en ese momento para el control activo (por ejemplo, "c.0.2.").
5.Introduzca el nuevo número de canal MIDI usando las teclas numéricas.
6.Pulse la tecla Enter.
Si asigna el controlador al canal "0", el control (control rotatorio, fader, botón, rueda, o pedal de sustain) transmitirá sus datos por el canal MIDI global.
ATENCIÓN: Cuando un controlador está ajustado para enviar mensajes SysEx, el número en la pantalla define la ID de dispositivo SysEx en lugar del número de canal de transmisión MIDI.
Global Channel (Canal Global): La función Global Channel (GLOBAL CHAN) define todos los controles MIDI y el canal MIDI predeterminado para el teclado, excepto cuando ya hay un canal MIDI específico asignado.
1.Pulse el botón Edit.
2.Pulse la tecla Global Channel - El LED mostrará el canal Global seleccionado. Por ejemplo, si el canal Global está asignado al canal 1, aparecerá como "c.0.1.".
3.Introduzca el nuevo número de canal usando las teclas numéricas.
4.Pulse la tecla Enter.
El Canal Global también se puede modificar a través del siguiente procedimiento:
1.Pulse el botón Select hasta que el borde inferior del visor LED muestre un punto rojo encima de "GLOBAL".
2.Recorra los números de canales MIDI usando los botones "<" o ">" para seleccionar el nuevo número de canal Oxygen 49 Manual del usuario.
Program (Programa): Este parámetro envía mensajes MIDI de cambio de programa en el canal Global seleccionado y puede usarse para seleccionar los diferentes sonidos incluidos en el módulo de sonido (o instrumento virtual.
1.Pulse el botón Edit.
2.Pulse el botón Program - el visor LED mostrará el último número de programa enviado (por ejemplo, ".0.1.").
3.Introduzca el número de programa.
4.Pulse la tecla Enter para enviar un mensaje de cambio de programa.
También es posible enviar mensajes de cambio de programa a través del siguiente procedimiento:
1.Pulse el botón Select hasta que el borde inferior del visor LED muestre un punto rojo encima de "PGM".
2.Recorra los números de Programa usando los botones "<" o ">".
Bank LSB (LSB de banco): La función Bank LSB envía mensajes de cambio de banco a través del canal Global MIDI. Estos mensajes se utilizan para acceder a bancos adicionales de presets de sonido en instrumentos virtuales o módulos de sonido (si los bancos adicionales están disponibles).
Consulte la documentación de su instrumento virtual o módulo de sonido para cerciorarse de que es capaz de responder a este tipo de mensajes.
1.Pulse el botón Edit.
2.Pulse la tecla Bank LSB - el visor LSB mostrará el último número Bank LSB enviado (por ejemplo, ".0.1.").
3.Introduzca el nuevo número Bank LSB usando las teclas numéricas.
4.Pulse la tecla Enter.
ATENCIÓN: Los mensajes LSB de banco no tendrán ningún efecto mientras no se envíe un mensaje de cambio de programa.
23

Bank MSB (MSB de banco): La función Bank MSB envía mensajes de cambio de banco a través del canal Global MIDI. Estos mensajes se utilizan para acceder a bancos adicionales de presets de sonido en instrumentos virtuales o módulos de sonido (si los bancos adicionales están disponibles). Consulte la documentación de su instrumento virtual o módulo de sonido para cerciorarse de que es capaz de responder a este tipo de mensajes.
1.Pulse el botón Edit.
2.Pulse la tecla Bank MSB - el visor MSB mostrará el último número Bank MSB enviado (por ejemplo, ".0.1.").
3.Introduzca el nuevo número Bank MSB usando las teclas numéricas.
4.Pulse la tecla Enter.
ATENCIÓN: Los mensajes MSB de banco no tendrán ningún efecto mientras no se envíe un mensaje de cambio de programa.
Pulse el botón Edit seguido por la tecla Panic para enviar un mensaje "All Notes Off" en los 16 canales MIDI. Esto evita que la notas colgadas sigan reproduciéndose incluso después de haber liberado las teclas.
Curva de velocidad: La tecla de selección de curva de velocidad (Vel Curve) se utiliza para modificar la sensibilidad del teclado o pads al tacto. Este ajuste le permite decidir cómo la fuerza con la que toca las teclas o pads afecta al volumen al que se reproduce la nota.
Los teclados Oxygen 49 proporcionan 7 opciones de sensibilidad diferentes:
1:C1 genera valores de velocidad más bajos usando la misma fuerza de pulsación. Resulta útil cuando no se quiere elevar demasiado el volumen de reproducción aunque se pulse la tecla con fuerza.
2:C2 es el ajuste predeterminado y se recomienda a los intérpretes con sensibilidad "estándar" (es decir, grado de pulsación normal).
3:C3 es un ajuste de sensibilidad que genera valores de velocidad más altos usando la misma fuerza de pulsación. Resulta útil cuando se quiere obtener un volumen de reproducción elevado aunque se pulse la tecla con poca fuerza.
4:C4 genera el mismo valor de velocidad dada una fuerza de pulsación determinada; como resultado, se obtiene una respuesta lineal (o neutral) del teclado.
5:F1 es un ajuste que deshabilita la sensibilidad; es decir, el teclado genera un valor de velocidad fijo de 64 (en una escala de 0-127) independientemente del grado de pulsación de las teclas.
6:F2 es un ajuste que deshabilita la sensibilidad; es decir, el teclado genera un valor de velocidad fijo de 100 (en una escala de 0-127) independientemente del grado de pulsación de las teclas.
7:F3 es un ajuste que deshabilita la sensibilidad; es decir, el teclado genera un valor de velocidad fijo de 127 (en una escala de 0-127) independientemente del grado de pulsación de las teclas.
1.Pulse el botón Edit.
2.Pulse la tecla Velocity Curve (Vel Curve) - (pulse la tecla de selección de curva de velocidad dos veces para editar los ajustes de velocidad del pad) el visor LED mostrará la curva de velocidad actual (por ejemplo, ".C.2").
3.Introduzca el número Velocity Curve (1-7) usando las teclas numéricas.
4.Pulse la tecla Enter.
- o –
1.Pulse el botón Edit.
2.Pulse la tecla Velocity Curve (Vel Curve) - (pulse la tecla de selección de curva de velocidad dos veces para editar los ajustes de velocidad del pad) el visor LED mostrará la curva de velocidad actual (por ejemplo, ".C.2").
3.Utilice los botones "<" y ">" para recorrer las curvas de velocidad (C1-F3).
4.Pulse la tecla Enter.
Modo Drawbar (Tirador): Este parámetro conmuta los faderes al Modo Drawbar. En este modo se invierte el funcionamiento de los faderes; es decir, el valor máximo (127) se encuentra en la parte inferior y el mínimo (0) en la parte superior. Esta función resulta especialmente útil para controlar los presets de órganos de tiradores.
1.Pulse el botón Edit.
2.Pulse la tecla Drawbar - el visor LED mostrará "On" durante unos instantes.
El modo Drawbar se activará de inmediato y el modo Edit se cerrará automáticamente Repita los pasos 1 y 2 para deshabilitar el modo Drawbar. El visor LED mostrará "Off" durante unos instantes
24

Memory Dump (Volcado de memoria): La función SysEx Memory Dump (MEM DUMP) envía los contenidos de las 10 ubicaciones de memoria de los presets para su almacenamiento en la aplicación de audio. Consulte la documentación de la aplicación de audio para más información sobre cómo grabar los mensaje MIDI SysEx.
1.Prepare una pista MIDI dentro de la aplicación de audio para grabar los datos procedentes del teclado Oxygen 49.
2.Pulse el botón Edit en el teclado Oxygen 49.
3.Inicie la grabación MIDI en la aplicación de audio.
4.Pulse la tecla Memory Dump en el teclado Oxygen 49. El volcado de memoria SysEx comenzará de inmediato y el visor LED mostrará el mensaje "SYS" para indicar que se está produciendo el envío de datos.
El archivo SysEx aparecerá como una nueva grabación MIDI dentro de la aplicación de audio.
Restauración de un volcado de memoria:
IMPORTANTE: Restaurar un volcado de memoria sobrescribirá permanentemente todos los presets actuales de su teclado Oxygen 49. Los ajustes recuperados no se activarán hasta que se cargue un nuevo preset en su teclado Oxygen 49, o hasta que se apague y encienda el dispositivo.
Reproduzca una pista MIDI que contenga un volcado de memoria SysEx del Oxygen 49 previamente grabado. Los datos SysEx se envían de vuelta al teclado Oxygen 49. La pantalla de LED del Oxygen 49 LED mostrará "SYS" mientras recibe los datos SysEx.
ATENCIÓN: Los ajustes recuperados no se activarán mientras no cargue un nuevo preset en el teclado Oxygen 49, o desconecte/conecte el dispositivo.
Device ID (ID de dispositivo): La función Device ID (DEV ID) permite asignar una ID de dispositivo SysEx exclusiva para diferenciar entre multiples teclados del mismo modelo al enviar o recibir datos SysEx. El valor predeterminado de 127 permite que el teclado responda a todos los mensajes SysEx entrantes que son compatibles con el mismo tipo de teclados controladores Oxygen 49. No obstante, si asigna un valor distinto a la ID de dispositivo, el teclado sólo responderá a mensajes SysEx que contengan el mismo número ID de dispositivo. Esto resulta útil en situaciones en las que varios controladores Oxygen 49 están conectados a la misma aplicación de audio pero el usuario desea enviar información SysEx a un controlador específico con una ID de dispositivo única.
1.Pulse Edit.
2.Pulse la tecla Device ID - el visor LED mostrará la ID de dispositivo actual (por ejemplo, "1.2.7.").
3.Introduzca el nuevo número Device ID usando las teclas numéricas.
4.Pulse la tecla Enter.
ATENCIÓN: Si el número de la ID de dispositivo de un teclado Oxygen 49 se modifica después de haber grabado un volcado de memoria en la aplicación de audio, la recuperación no será posible porque los números no concuerdan. Si no recuerda el número de la ID de dispositivo usado cuando grabó el volcado de memoria, configure su teclado Oxygen 49 con el valor Device ID 127 para garantizar que se reconozcan todos los volcados.
Store (Guardar): La función Store guarda los ajustes de las asignaciones de controles en una de las 10 ubicaciones de memoria.
IMPORTANTE: Al guardar los nuevos ajustes de las asignaciones, se sobrescribirá el contenido de la ubicación de memoria seleccionada.
1.Pulse el botón Edit.
2.Pulse la tecla Store - El visor LED mostrará el número de la última ubicación de memoria seleccionada (por ejemplo, P. 0.1.).
3.Introduzca el número de la ubicación de memoria en la que desee guardar los nuevos ajustes usando las teclas numéricas o los botones “<” y “>”.
4.Pulse la tecla Enter para guardar los cambios y sobrescribir los ajustes anteriores de la ubicación de memoria.
NOTE: Para recuperar los ajustes de fábrica de Oxygen 49, mantenga pulsados los botones "<" y ">" durante el encendido de la unidad. Esto borrará permanentemente todos los ajustes de usuario personalizados.
Teclas numéricas
Esta sección del teclado se utiliza para introducir datos numéricos de parámetro en modo Edit.
Tecla Enter
La tecla Enter confirma los cambios realizados y desactiva el modo Edit.
ATENCIÓN: Las funciones Panic, Drawbar y Memory Dump tienen efecto inmediato cuando se pulsa la tecla correspondiente de activación de la función. El modo Edit se desactiva automáticamente.
25

Funciones de programación avanzadas
Los números MIDI CC (0-127) forman parte del protocolo General MIDI y suelen utilizarse para el control, en tiempo real, de los parámetros de los dispositivos musicales compatibles con MIDI. Por ejemplo, si se asigna un control rotatorio del Oxygen 49 al MIDI CC 10, este controlará el ajuste de Pan de la aplicación de audio o sintetizador conectado.
Muchos de los controles en los teclados de la gama Oxygen 49 son totalmente programables y pueden ser asignados a cualquiera de los MIDI CC estándar. No obstante, para simplificar la asignación de otros tipos de mensajes MIDI más complejos (por ejemplo, SysEx o RPN/NRPN), M-Audio ha agregado esos tipos de mensajes al final de la lista MIDI CC, ampliando el intervalo habitual de 0-127. Por regla general, esto se consigue seleccionando el controlador que desea programar y asignándole un número de 3 dígitos.
Este capítulo proporciona varios ejemplos de asignación de controles típicos para controles rotatorios, faderes, botones, ruedas, o de pedal de sustain. La asignación de mensajes MIDI no descritos en este capítulo se realiza usando el mismo principio básico que el dado en los ejemplos.
ATENCIÓN: El teclado Oxygen 49 nunca envía datos fuera del intervalo especificado por el protocolo MIDI (0-127). El teclado Oxygen 49 utiliza los números de controlador 128-255 internamente. Esto simplifica la configuración de los controles rotatorios, botones, ruedas, y faderes durante la asignación de mensajes MIDI avanzados, permitiendo opciones de configuración adicionales para los controles (por ejemplo, estableciendo el Trigger o Toggle operación de un botón.)
Ajuste de los parámetros de disparo (Trigger) en los botones o pedal de sustain
Cuando se asignan números de CC MIDI estándar a los botones o al pedal de sostenido, se dispararán entre dos valores. Por defecto, el pedal de sustain ya está configurado para enviar valores de disparo, garantizando la activación del efecto de sustain cada vez que pulse el pedal, y su desactivación cada vez que lo suelte. Los botones también pueden configurarse para que operen de este modo tras especificar tres valores. En el ejemplo del pedal de sustain, los cuatro valores son:
Tecla |
Parámetro |
Valor |
|
|
|
Asignación de control |
Número de CC MIDI |
10 (Pan) |
(ejemplo) |
|
|
|
|
|
Datos 2 (ejemplo) |
Liberación |
0 (mínimo) |
|
|
|
Datos 3 (ejemplo) |
Pulse |
127 (máximo) |
|
|
|
1.Pulse el botón Edit.
2.Pulse el botón Select (Seleccionar) o la tecla Control Select (Selección de control) (Ctrl Sel).
3.Seleccione el botón deseado tal y como se ha descrito anteriormente.
4.Pulse la tecla Control Assign (Ctrl Asgn).
5.Introduzca el valor 10 usando las teclas numéricas. Esto asigna el MIDI CC 10 (Pan) al botón.
6.Pulse la tecla Data 2.
7.Introduzca 0 utilizando las teclas numéricas para asignar el valor de "liberación" (mínimo).
8.Pulse la tecla Data 3.
9.Introduzca 127 utilizando las teclas numéricas para asignar el valor de "pulsación" (máximo).
10.Pulse la tecla Enter.
CONSEJO: Puede resultar útil transmitir otros dos valores específicos en lugar de enviar los valores mínimo (cero) y máximo (127) como en el ejemplo anterior. Al asignar un botón para controlar el pan (CC MIDI 10), usted puede, por ejemplo, configurar Datos 2 para enviar el valor 38 y el Datos 3 para enviar el valor 93, haciendo que el pan se alterne eficazmente entre las posiciones aproximadas de las "diez en punto" y las "dos en punto" al pulsar y luego liberar el botón.
26

Ajuste de los parámetros de conmutación (Toggle) (Min/Max) en los botones o pedales de sustain
Es posible establecer un valor de Toggle para un botón o pedal de sostenido, haciendo que envíe un valor la primera vez que se pulsa y otro valor al pulsarse nuevamente. Esto significa que al pulsar el botón o pedal por primera vez se envía un valor, y al pulsar por segunda vez se envía otro valor. Por defecto, los botones de los teclados de la gama Oxygen 49 ya integran la configuración de conmutación. Cuando se configura un botón o pedal de sustain para que opere en modo de conmutación, es necesario definir los cuatro valores siguientes:
Tecla |
Parámetro |
|
Valor |
|
|
|
|
|
|
Asignación de control |
Operación de encendido/apagado |
146 |
|
|
|
de Toggle |
|
|
|
|
|
|
|
|
Datos 1 (ejemplo) |
Número de CC MIDI |
|
10 (Pan) |
|
|
|
|
|
|
Datos 2 (ejemplo) |
Segunda pulsación |
|
0 (mínimo) |
|
|
|
|
|
|
Datos 3 (ejemplo) |
Primera pulsación |
|
127 (máximo) |
|
|
|
|
|
|
Nota: Cuando se trabaja con parámetros propietarios de M-Audio dentro del rango 128-255, el ajuste de asignación de control se utiliza para configurar un botón o el pedal de sostenido para este modo especial de operación. Esto significa que ciertos valores que se especifican usualmente mediante el ajuste de asignación de control, ahora en cambio deben especificarse mediante el parámetro "Datos 1" (al igual que el parámetro de CC MIDI en el ejemplo a continuación).
En el siguiente ejemplo se configurará un botón para realizar un pan del sonido completamente hacia el altavoz derecho cuando se pulsa por primera vez, y un pan del sonido completamente hacia el altavoz derecho izquierdo cuando se pulsa por segunda vez. Esto implica configurar el botón para que funcione como un conmutador, mientras que se controla el parámetro de pan (CC MIDI 10):
1.Pulse el botón Edit.
2.Pulse el botón Select (Seleccionar) o la tecla Control Select (Selección de control) (Ctrl Sel).
3.Seleccione el botón deseado tal y como se ha descrito anteriormente.
4.Pulse la tecla Control Assign (Ctrl Asgn).
5.Introduzca el valor 146 usando las teclas numéricas El botón funcionará como botón de disparo (pulsar/soltar). Esto configura el botón a utilizarse como conmutador.
6.Pulse la tecla Data 1.
7.Introduzca el valor 10 usando las teclas numéricas. Esto especifica qué parámetro conmutará el botón entre encendido/apagado. Esto especifica el parámetro afectado por el botón de disparo. En este ejemplo, MIDI CC 10 (Pan).
8.Pulse la tecla Data 2.
9.Introduzca el valor 0 usando las teclas numéricas Esto ajusta a cero el valor tras "soltar" el botón. Esto configura en cero el valor de la segunda pulsación del botón. En otras palabras, se realizará un pan completo del sonido a la izquierda cuando el botón se pulse por segunda vez.
10.Pulse la tecla Data 3.
11.Introduzca el valor 127 usando las teclas numéricas Esto ajusta el valor de "pulsación" al valor máximo, de manera que el sonido queda panoramizado totalmente a la derecha tras pulsar el botón. Esto configura el valor de la primera pulsación del botón al valor máximo, de manera de realizar un pan completo del sonido a la derecha al pulsar el botón la primera vez.
12.Pulse la tecla Enter.
CONSEJO: Puede resultar útil transmitir otros dos valores específicos en lugar de enviar los valores mínimo (cero) y máximo (127) como en el ejemplo anterior. Al asignar un botón para controlar el pan (CC MIDI 10), usted puede, por ejemplo, configurar Datos 2 para enviar el valor 38 y el Datos 3 para enviar el valor 93, haciendo que el pan se alterne eficazmente entre las posiciones aproximadas de las "diez en punto" y las "dos en punto" al pulsar el botón por primera y segunda vez.
27
 Loading...