

Livarno Z31858-BS, Z31410B-BS User Manual
LED UNDER CABINET LIGHT
LED UNDER CABINET LIGHT
Assembly, operating and
safety instructions
IAN 106723
Z31858-BS
1
3
2 x
8
2 x
9
5
10
2 x
7
2
2 x
Z31410B-BS
approx.140°
A
Z31410B-BS
approx.140°
2 x
2
10
3
2 x
4
7
1
2 x
8
2 x
9
6
5
64
LED under-cabinet light
Q
Proper use
The under-unit lights are intended
for providing illumination and
for mounting on furniture. The
under-unit lights can also be
mounted on walls. The product
may only be used indoors in dry
rooms. The lamps cannot be
placed. The lights can be mounted
on all normally flammable surfaces. This device is intended for
indoor use only in a domestic,
private household environment.
Q
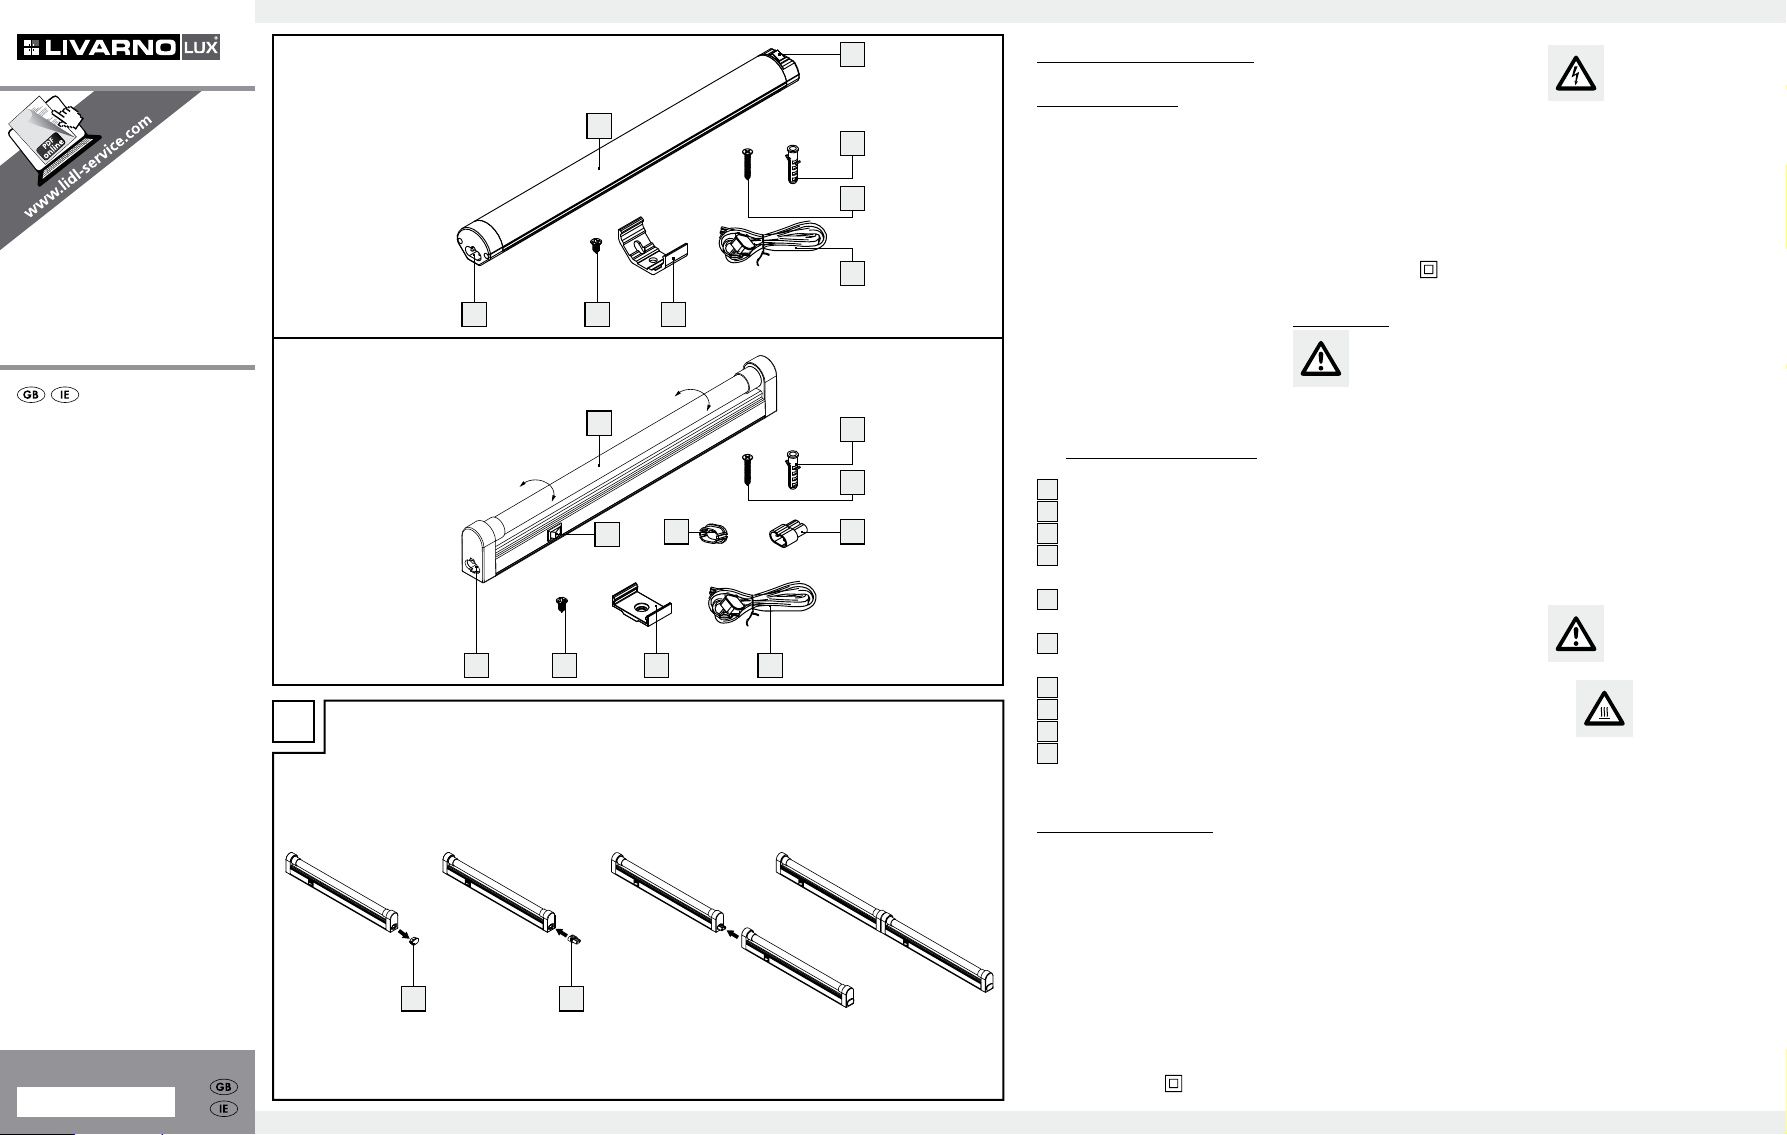
Description of
parts and features
1
ON/OFF switch
2
Socket for connecting lead
3
LED
4
Protective cap (for Model
Z31410B-BS only)
5
Connecting lead with mains
plug
6
Extension connector (for
Model Z31410B-BS only)
7
Mounting bracket
8
Dowel ø 6 x 30 mm
9
Screw for wall mounting
10
Screw for under cabinet
installation
Q
Technical data
Model Z31858-BS
Operating voltage:
Lamps: 18
LED: 18 x 0.3 W
Nominal power: max. 7 W
Protection
category:
230 V~
50 Hz
power
LED (LED
cannot be
replaced)
Model Z31410B-BS
Operating voltage:
Lamps: 40
LED: 40 x 0.1 W
Nominal power: max. 5 W
Protection
category:
re-
Q
Safety
Safety advice
YOU SHOULD STORE ALL
SAFETY INFORMATION AND
INSTRUCTIONS IN A SAFE
PLACE IN CASE YOU NEED
TO REFER TO THEM AGAIN
IN THE FUTURE!
J This appliance can be used
by children aged from 8 years
and above and persons
with reduced physical, sensory or mental capabilities
or lack of experience and
knowledge if they have
been given supervision or
instruction concerning use
of the appliance in a safe
way and understand the
hazards involved. Children
shall not play with the appliance. Cleaning and user
maintenance shall not be
made by children without
supervision.
J Do not attach the light to
damp or conductive substrates.
J The product may only be
used with the bulit- in LED
control gear.
230 V~
50 Hz
power
LED (LED
cannot be
replaced)
To avoid danger
to life from
electric shock
J Never use your lamp if you
discover that it is damaged
in any way.
J If the external flexible cable
or cord of this luminary is
damaged, it shall be replaced
by a special cord or cord
exclusively available from
the manufacturer or his
service agent.
J For installation, please con-
tact qualified electrician if
you have any doubt.
J Never let the lamp come
into contact with water or
other liquids.
J Before assembly, ensure that
the mains voltage (230 V~
50 Hz) available corresponds
to the operating voltage
necessary of the light.
To avoid danger
of fire and injury
J
the lamp has been switched
J Do not use this light for dim-
RISK OF IN-
JURY FROM
BURNS! Ensure
off and allowed to cool before
you touch it. In this way you
will avoid the danger of burns.
Bulbs give off a lot of heat
around the top of the lamp.
mers or electronic switches.
It is not suitable for these
purposes.
GB/IEGB/IEGB/IE

Working safely
J Install the lamp so that it is
protected from moisture
and dirt.
Q
Installation and
operation
Q
Installing light
j Use the mounting brackets
7
and the screws 10 for
under cabinet installation.
j Mark the distance of
200mm for the two fixing
holes. Drill the holes: ø approx. 2mm, approx. 15mm
deep.
j Position the mounting brack-
7
ets
according to the
drilled holes and tighten the
10
screws
j Attach the light to the secured
mounting brackets
j Plug the connection cable
with mains plug
socket for the connection
cable
j Plug the connection cable
with mains plug
mains socket. Your light is
now ready for operation.
Q
Mounting
j Use the mounting brackets
7
8
lation.
j Measure up the wall or
mounting surface for drilling
the holes. Use a spirit level
to improve accuracy.
j Mark the two mounting
holes a distance of approx.
200 mm apart.
.
7
.
5
into the
2
.
5
into the
on a wall
, screws 9 and dowels
for wall mounting instal-
j Now drill the mounting
holes (ø approx. 6 mm,
depth approx. 30 mm).
CAUTION! Make sure that
you do not damage any
electrical cables during this
operation.
j Insert the supplied dowels
8
into the drilled holes.
j Position the mounting bracket
7
according to the dowel
8
, then insert the supplied
9
screws
8
into the dowels
and tighten them.
j Attach the light to the secured
mounting brackets
7
.
j Plug the connection cable
with mains plug
5
into the
socket for the connection
2
cable
.
j Plug the connection cable
with mains plug
5
into the
mains socket. Your light is
now ready for operation.
Extensions (See Fig. A)
j Note: Ensure that no more
than 3 under-unit lights of
the same type (for model
Z31410B-BS only) are connected together in series.
Connect only same type of
lamp only. Don’t connect
other type of lamp with this
lamp.
j Remove the protective cap
4
. Connect the two under-
unit lights to the socket
2
using the extension connec-
6
tor
. Then you only need
one connection lead
5
for
the power supply.
j CAUTION! First ensure
that all the under-unit lights
are connected by an extension connector
6
before
you insert the mains lead
into the mains socket.
Q
Operation
j Press the ON / OFF switch
1
to turn the light on / off.
NOTE: Model Z31410BBS has a rotatable shade
(approx. 140°) for direct or
indirect lighting.
Q
Maintenance and
Cleaning
Allow the lamp to cool down
completely.
DANGER
TO LIFE FROM
SHOCK! Before carrying out
any tasks on the lamp, switch off
the lamp and disconnect the
plug from the mains socket.
TO LIFE FROM
SHOCK! For reasons of electri-
cal safety, the light must never be
cleaned with water or other fluids or be immersed in water.
When cleaning, only use a dry,
lint-free cloth.
Q
Disposal
vironmentally-friendly materials.
They can be disposed of at your
local recycling facility.
that, in the European Union, the
product has to be disposed of in
a separate refuse collection. This
applies to the product and to all
components bearing this symbol.
Products marked in this way may
not be disposed of along with
ELECTRIC
DANGER
ELECTRIC
The packaging and
ancillary packing
consist entirely of en-
The symbol of the
wheelie bin with the
line through it means
normal domestic waste but have
to be handed in at a recycling
collection point for electrical and
electronic appliances. Recycling
helps to reduce the consumption
of raw materials and to ease the
burden on the environment.
Warranty
The device has been manufactured to strict quality guidelines
and meticulously examined before delivery. In the event of
product defects you have legal
rights against the retailer of this
product. Your legal rights are
not limited in any way by our
warranty detailed below.
The warranty for this device is 3
years from the date of purchase.
Should this device show any
fault in materials or manufacture
within three years from the date
of purchase, we will repair or
replace it - at our choice - free
of charge to you.
The warranty period begins on
the date of purchase. Please
keep the original sales receipt in
a safe location. This document is
required as your proof of purchase. This warranty becomes
void if the device has been
damaged or improperly used or
maintained.
The warranty applies to faults in
material or manufacture. This
warranty does not cover product parts subject to normal
wear, thus possibly considered
consumables (e.g. batteries) or
for damage to fragile parts, e.g.
switches, rechargeable batteries
or glass parts.
6
OWIM GmbH & Co. KG
Stiftsbergstraße 1
D-74167 Neckarsulm
Model-No.: Z31858-BS/
Z31410B-BS
Version: 11 / 2014
Last Information Update:
10 / 2014 ·
Ident no.: Z31858-
BS/Z31410B-BS102014-6
GB/IE GB/IE GB/IE GB/IE
 Loading...