


Operating and installation instructions
Combined fridge-freezer with BioFresh compartment
231110 7084570 - 00
CBN(P)gw/gb ... 6

Appliance at a glance
Contents |
|
|
1 |
Appliance at a glance............................................ |
2 |
1.1 |
Description of appliance and equipment.................. |
2 |
1.2 |
Range of appliance use............................................ |
2 |
1.3 |
Conformity................................................................ |
3 |
1.4 |
External dimensions of the appliance....................... |
3 |
1.5 |
Saving energy.......................................................... |
3 |
1.6 |
HomeDialog............................................................. |
3 |
2 |
General safety information................................... |
3 |
3 |
Controls and displays........................................... |
4 |
3.1 |
Operating and control elements............................... |
4 |
3.2 |
Temperature display................................................. |
4 |
4 |
Putting into operation............................................ |
4 |
4.1 |
Transporting the appliance....................................... |
4 |
4.2 |
Installing the appliance............................................. |
4 |
4.3 |
Changing over the door hinges................................ |
5 |
4.4 |
Insertion into a row of kitchen units........................... |
8 |
4.5 |
Disposing of packaging............................................ |
9 |
4.6 |
Connecting the appliance......................................... |
9 |
4.7 |
Switching on the appliance....................................... |
9 |
5 |
Control.................................................................... |
9 |
5.1 |
Brightness of the temperature display...................... |
9 |
5.2 |
Child proofing........................................................... |
9 |
5.3 |
Door alarm................................................................ |
9 |
5.4 |
Temperature alarm................................................... |
10 |
5.5 |
Refrigerator compartment........................................ |
10 |
5.6 |
BioFresh compartment............................................. |
11 |
5.7 |
Freezer compartment............................................... |
13 |
6 |
Maintenance........................................................... |
14 |
6.1 |
Defrosting with NoFrost............................................ |
14 |
6.2 |
Cleaning the appliance............................................. |
14 |
6.3 |
Changing the interior light with bulb.......................... |
14 |
6.4 |
Customer service..................................................... |
15 |
7 |
Malfunction............................................................. |
15 |
8 |
Decommissioning.................................................. |
16 |
8.1 |
Switching off the appliance....................................... |
16 |
8.2 |
Taking the appliance out of service.......................... |
16 |
9 |
Disposing of the appliance................................... |
16 |
The manufacturer works constantly on the further development of all the types and models. Therefore please understand that we have to reserve the right to make design, equipment and technical modifications.
To get to know all the benefits of your new appliance, please read the information contained in these instructions carefully.
The instructions apply to several models. Differences may occur. Text relating only to specific appliances is marked with an asterisk (*).
Instructions for action are marked with a  , the results of action are marked with a
  .
.
1 Appliance at a glance
1.1 Description of appliance and equipment
Note
u Place food inside the appliance as shown in the diagram. This allows the appliance to save energy during operation.
u Shelves, drawers and baskets are arranged for optimum energy efficiency on delivery.
Fig. 1 |
(10) BioFresh compartment, |
|
(1) |
Interior light |
|
(2) |
Fan |
regulable |
(11) BioFresh compartment, |
||
(3) |
Glass shelf, relocatable |
regulable |
(12) Type plate |
||
(4) |
Boxes, removable |
(13) Freezer compartment |
(5) |
Rack for tinned food, |
(14) Cold storage accumula- |
(6) |
relocatable |
tors |
Sectioned glass shelf, |
(15) VarioSpace |
|
(7) |
relocatable |
(16) Information system |
Separating plate with |
||
(8) |
bottle shelf |
(17) Adjustable-height feet, |
Bottle rack, relocatable |
||
|
|
transport grips at front, |
(9) |
Bottle holder |
transport castors at back |
|
||
1.2 Range of appliance use
The appliance is suitable solely for cooling food in a domestic environment or similar. This includes use in, for example
-in staff kitchenettes, bed and breakfast establishments,
-by guests in country homes, hotels, motels and other forms of accommodation,
-in catering and similar services in the wholesale trade
Use the appliance solely as is customary within a domestic environment. All other types of use are inadmissible. The appli-
2
General safety information
ance is not suitable for storing and cooling medicines, blood plasma, laboratory preparations or similar substances and products covered by the 2007/47/EC Medical Devices Directive. Misuse of the appliance can result in the stored products suffering harm or perishing. Furthermore, the appliance is not suitable for operation in potentially explosive atmospheres.
The appliance is set to operate within specific ambient temperature limits according to its climate rating. The correct climate rating for your appliance is indicated on the type plate.
Note
u Compliance with the ambient temperatures indicated is required, otherwise the cooling performance is reduced.
Climate |
for ambient temperatures of |
rating |
|
SN |
10 °C to 32 °C |
N |
16 °C to 32 °C |
ST |
16 °C to 38 °C |
T |
16 °C to 43 °C |
1.3 Conformity
The refrigerant circuit has been tested for leaks. The appliance complies with current safety regulations and EC directives 2006/95/EC and 2004/108/EC.
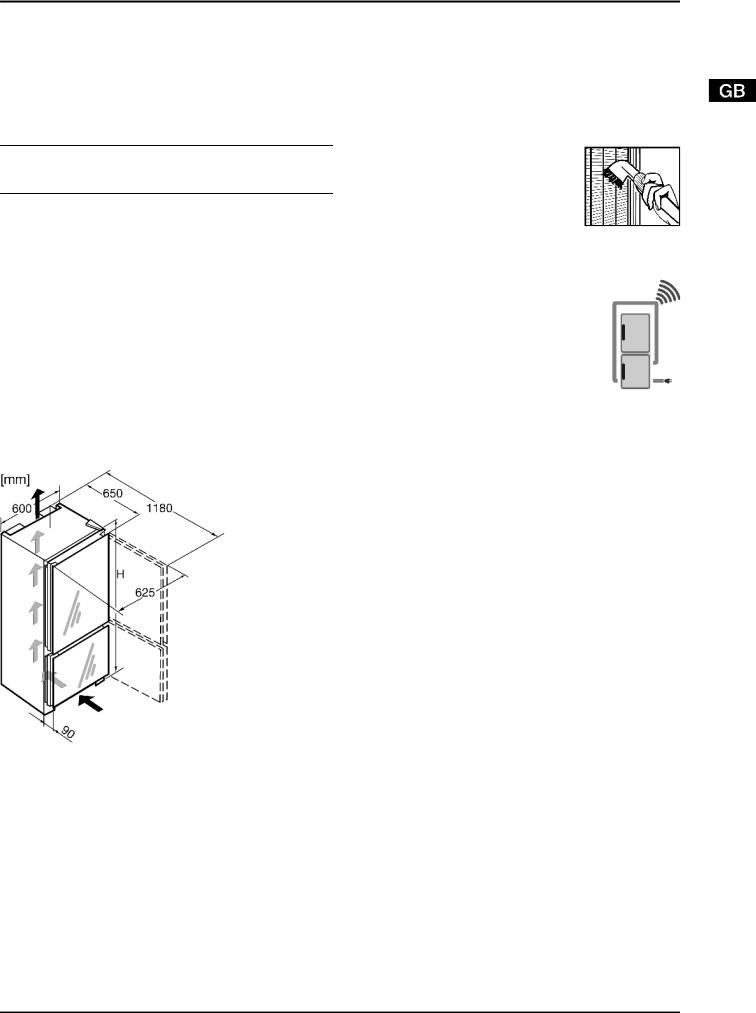
1.4 External dimensions of the appliance
|
Fig. 2 |
|
|
Model |
Height of appliance H |
|
(mm) |
CBNg. 39, CBNPg. 39 |
2011 |
1.5 Saving energy
-Always ensure good ventilation. Do not cover ventilation openings or grille.
-Always keep fan louvres clear.
-Do not place appliance in areas of direct sunlight or next to a stove, heater or similar object.
-The energy consumption depends on the installation conditions, e.g. the ambient temperature (see 1.2) .
-Keep the time the appliance is open to a minimum.
-The lower the temperature setting, the higher the power consumption.
- |
Store food logically. (see Appliance at a glance). |
- |
Ensure that all food is well packed and covered for storage. |
- |
This will prevent frost from forming. |
Remove food as needed in order that it does not warm too |
|
- |
much. |
First cool warm food to room temperature before storing it . |
|
- |
Defrost frozen food in the refrigerator. |
- |
Use the vacation function for longer vacation periods |
(see 5.5.4) .
Accumulated dust increases the energy consumption:
-Once a year, dust the refrigerating unit together with the metal grille of the heat exchanger at the back of the appliance.
1.6 HomeDialog
Depending on model and options, the HomeDialog system can be used to network a number of Liebherr appliances (situated, for example, in the basement) with a main appliance (sited, for example, in the kitchen) and control them via the latter. You will find more information on the benefits, requirements and principle of operation on the internet at www. liebherr.com.
2 General safety information
Danger for the user:
-This appliance is not designed for persons (including children) with physical, sensory or mental impairment or persons not having sufficient experience and knowledge, unless they are instructed in the use of the appliance and are initially supervised by a person responsible for their safety. Keep children under supervision to ensure they do not play with the appliance.
-In case of a fault, pull out the mains plug (not by pulling the connecting cable) or switch off the fuse.
-Have any repairs to or intervention in the appliance, and any change of the mains power cable, carried out by the customer service only or by other specialised personnel trained for the purpose.
-When disconnecting the appliance from the supply, always take hold of the plug. Do not pull the cable.
-Install and connect the appliance only as instructed.
-Please keep these instructions in a safe place and pass them on to any subsequent owners.
-Special-purpose lamps (incandescent lamps, LEDs, fluorescent tubes) in the appliance serve to illuminate the appliance interior and are not suited for room illumination.
Fire hazard:
-The refrigerant R 600a is environmentally friendly but flammable. Escaping refrigerant may ignite.
•Do not damage the refrigerant circuit pipes.
•Do not allow naked flames or ignition sources to enter the appliance.
•Do not use any electrical appliances in the interior (e.g. steam cleaners, heaters, ice cream maker etc.).
•If refrigerant escapes: eliminate naked flames or sources of ignition from the vicinity. Pull out the power plug. Ventilate the area well. Notify customer service.
-Do not store explosives or sprays using combustible propellants such as butane, propane, pentane, etc. in the appliance. Respective spray cans can be identified by reference to the contents printed on the can or by a flame symbol. Gases possibly escaping may ignite due to electrical components.
3

Controls and displays
-Do not place any burning candles, lamps or other items with naked flames on or in the appliance.
-Only store high-percentage alcohol in tightly sealed, upright containers. Alcohol possibly escaping may ignite due to electrical components.
Danger of tipping and falling:
-Do not misuse the plinth, drawers, doors etc. as a step or for support. This applies particularly to children.
Danger of food poisoning:
- Do not consume food which has been stored too long.
Danger of frostbite, numbness and pain:
-Avoid lasting skin contact with cold surfaces or refrigerated/ frozen food or take protective steps, e.g. wear gloves. Do not consume ice cream, water ice or ice cubes immediately and do not consume them too cold.
Please observe the specific information in the other sections:
|
DANGER |
identifies a situation involving direct |
|
|
danger which, if not obviated, may |
|
|
result in death or severe bodily |
|
|
injury. |
|
WARNING |
identifies a dangerous situation |
|
|
which, if not obviated, may result in |
|
|
death or severe bodily injury. |
|
CAUTION |
identifies a dangerous situation |
|
|
which, if not obviated, may result in |
|
|
minor or medium bodily injury. |
|
NOTICE |
identifies a dangerous situation |
|
|
which, if not obviated, may result in |
|
|
damage to property. |
|
|
|
|
Note |
identifies useful information and tips. |
3 Controls and displays
3.1 Operating and control elements
Fig. 3 |
(11) HomeDialog symbol |
|
(1) |
Holiday button |
|
(2) |
SuperCool button |
(12) Freezer compartment |
(3) |
On/Off button, refriger- |
temperature display |
(13) SuperFrost symbol |
||
(4) |
ator compartment |
(14) Alarm symbol |
Up setting button, refrig- |
||
(5) |
erator compartment |
(15) Up setting button, freezer |
Down setting button, |
||
|
refrigerator compart- |
compartment |
(6) |
ment |
(16) Down setting button, |
Power failure symbol |
||
(7) |
SuperCool symbol |
freezer compartment |
(17) On/Off button, freezer |
||
(8) |
Refrigerator compart- |
compartment |
(18) SuperFrost button |
||
|
ment temperature |
|
(9) |
display |
(19) Alarm button |
Child lock symbol |
||
(10) Menu symbol |
|
|
3.2 Temperature display
The following are displayed in normal operation:
-the warmest freezing temperature
-the average cooling temperature
The freezer compartment temperature display flashes:
-the temperature setting is being changed
-after switch-on the temperature is not yet cold enough
-the temperature has risen several degrees
Dashes flash in the display:
- the freezer temperature is above 0 °C.
The following displays indicate malfunction. Possible causes and corrective action (see Malfunction).
-F0 to F9
-The power failure symbol  shines.
4 Putting into operation
4.1 Transporting the appliance
 CAUTION
Risk of injury and danger of damage as a result of incorrect transport!
u Transport the appliance in a packed condition. u Transport the appliance upright.
u Do not transport the appliance without assistance.
4.2 Installing the appliance
In the event that the appliance is damaged, contact the supplier immediately before connecting to the mains.
The floor at the site must be flat and level.
Do not install the appliance in a location where it is exposed to direct radiation of the sun, next to a cooker, heater and similar.
Always install the appliance with the back directly against the wall.
Do not install the appliance without assistance.
Standard EN 378 specifies that the room in which you install your appliance must have a volume of 1 m2 per 8 g of R 600a refrigerant used in the appliance. If the room in which the appliance is installed is too small, a flammable gas-air mixture may form in the event of a leakage in the refrigeration circuit. The quantity of refrigerant used in your appliance is indicated on the type plate on the inside of the appliance.
The appliance may be moved only when it is empty.
 CAUTION
Risk of injury and damage!
The glass door may strike against the wall and be damaged as a result. The fractured glass may lead to injury!
u Protect the glass door from striking against the wall. Fit a door stop, e.g. one made of felt, to the wall.
u A limiter restricting door opening to 90° can be ordered from the aftersales service.
4
Putting into operation
 WARNING
Fire hazard due to dampness!
If live parts or the mains lead become damp this may cause short circuits.
u The appliance is designed for use in enclosed areas. Do not operate the appliance outdoors or in areas where it is exposed to splash water or damp conditions.
 WARNING
Fire hazard due to refrigerant!
The refrigerant R 600a is environmentally friendly but flammable. Escaping refrigerant may ignite.
u Do not damage the piping of the refrigeration circuit.
 WARNING
Fire hazard and danger of damage!
u Do not place appliances emitting heat e.g. microwaves, toasters etc. on the appliance!
 WARNING
Blocked ventilation openings pose a risk of fire and damage!
u Always keep the ventilation openings clear. Always ensure that the appliance is properly ventilated!
u Detach the connecting cable from the rear of the appliance, removing the cable holder at the same time because otherwise there will be vibratory noise!
u Remove the protective film from the decorative trims and drawer fronts.
u Remove all transit supports.
u Dispose of packaging material (see 4.5) .
NOTICE
Risk of damage due to condensate!
u Do not install the appliance directly alongside a further refrigerator/freezer.
u Align the appliance so that it stands firmly and on a level by applying the accompanying spanner to the adjustableheight feet (A) and using a spirit level.
u Then support the door: Extend the adjustable foot at the turn hinge (B) until it rests on the floor and then make a further 90° turn.
Note
u Clean the appliance (see 6.2) .
If the appliance is installed in a very damp environment, condensate may form on the outside of the appliance.
u Always see to good ventilation at the installation site.
4.3 Changing over the door hinges
 WARNING
Risk of injury and damage due to pieces of broken glass!
The glass door is heavy. If it falls or there is impact on the glass edges, the glass pane may shatter.
u Protect the door properly when detaching it!
u Detach the glass door working in a team of two. u Put the door down on a soft mat.
Ensure that the following tools are to hand:
q Torx® 25
q Torx® 15 q Screwdriver
q Cordless screwdriver, if necessary q A soft mat
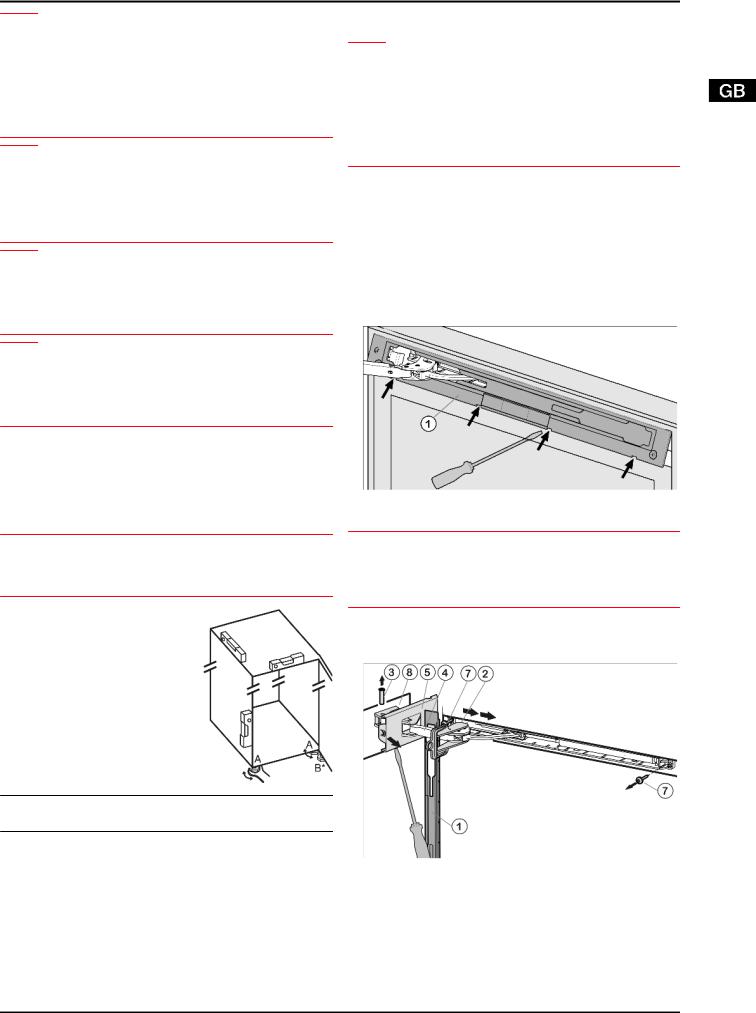
4.3.1 Detaching the upper soft stop mechanism
Fig. 4
u Open the upper door.
NOTICE
Risk of damage!
If the door seal is damaged, the door may fail to close properly and the cooling will be inadequate.
u Do not damage the door seal with the screwdriver!
u Disengage and remove the faceplate Fig. 4 (1) using a flatblade screwdriver.
w The faceplate is attached over the soft stop bracket.
Fig. 5
u Slide the faceplate forwards over the soft stop bracket Fig. 5 (4) in the direction of the appliance.
u Snap the accompanying safety lock Fig. 5 (2) into the oblong hole.
w The safety lock prevents the hinge from snap-closing.
u Using a screwdriver, detach the cover Fig. 5 (5) on the hinge side as far as the first detent.
w The pin becomes visible.
u Press the pin Fig. 5 (3) out from underneath.
5
 Loading...