


HB954WA_BAUSLL_ENG_6407 4/21/09 7:00 PM Page 1
HB954WA (HB954WA / SB94WA-C/F/L/R/W)
As an ENERGY STAR® Partner, LG has determined that this product or product models meet the ENERGY STAR® guidelines for energy efficiency.
ENERGY STAR® is a U.S. registered mark.
P/NO : MFL62426407
HB954WA_BAUSLL_ENG_6407 4/21/09 7:00 PM
CAUTION
RISK OF ELECTRIC SHOCK
DO NOT OPEN
CAUTION: TO REDUCE THE RISK OF ELECTRIC SHOCK DO NOT REMOVE COVER (OR BACK) NO USER-SERVICEABLE PARTS INSIDE REFER SERVICING TO QUALIFIED SERVICE PERSONNEL.
This lightning flash with arrowhead symbol within an equilateral triangle is intended to alert the user to the presence of uninsulated dangerous voltage within the product’s enclosure that may be of sufficient magnitude to constitute a risk of electric shock to persons.
The exclamation point within an equilateral triangle is intended to alert the user to the presence of important operating and maintenance (servicing) instructions in the literature accompanying the product.
WARNING: TO PREVENT FIRE OR ELECTRIC SHOCK HAZARD, DO NOT EXPOSE THIS PRODUCT TO RAIN OR MOISTURE.
WARNING: Do not install this equipment in a confined space such as a book case or similar unit.
CAUTION: Do not block any ventilation openings. Install in accordance with the manufacturer's instructions.
Slots and openings in the cabinet are provided for ventilation and to ensure reliable operation of the product and to protect it from over heating. The openings shall be never be blocked by placing the product on a bed, sofa, rug or other similar surface. This product shall not be placed in a built-in installation such as a bookcase or rack unless
Page 2
proper ventilation is provided or the manufacturer's instruction has been adhered to.
CAUTION: This product employs a Laser System. To ensure proper use of this product, please read this owner’s manual carefully and retain it for future reference. Shall the unit require maintenance, contact an authorized service center.
Use of controls, adjustments or the performance of procedures other than those specified herein may result in hazardous radiation exposure.
To prevent direct exposure to laser beam, do not try to open the enclosure. Visible laser radiation when open. DO NOT STARE INTO BEAM.
CAUTION: The apparatus shall not be exposed to water (dripping or splashing) and no objects filled with liquids, such as vases, shall be placed on the apparatus.
CAUTION concerning the Power Cord
Most appliances recommend they be placed upon a dedicated circuit;
That is, a single outlet circuit which powers only that appliance and has no additional outlets or branch circuits. Check the specification page of this owner's manual to be certain. Do not overload wall outlets. Overloaded wall outlets, loose or damaged wall outlets, extension cords, frayed power cords, or damaged or cracked wire insulation are dangerous. Any of these conditions could result in electric shock or fire. Periodically examine the cord of your appliance, and if its appearance indicates damage or deterioration, unplug it, discontinue use of the appliance, and have the cord replaced with an exact replacement part by an authorized service center. Protect the power cord from physical or mechanical abuse, such as being twisted, kinked, pinched, closed in a door, or walked upon. Pay particular attention to plugs, wall outlets, and the point where the cord exits the appliance. To disconnect power from the mains, pull out the mains cord plug. When installing the product, ensure that the plug is easily accessible.
The appliance is not intended for use by young children or infirm persons without supervision.
Young Children should be supervised to ensure that they do not play with appliance.
If the appliance is supplied from a cord extension set or an electrical portable outlet device, the cord extension set on electrical portable outlet device must be positioned so that it is not subject to splashing or ingress of moisture.
2
HB954WA_BAUSLL_ENG_6407 4/21/09 7:00 PM
Notes on Copyrights
Because AACS (Advanced Access Content System) is approved as content protection system for BD format, similar to use of CSS (Content Scramble System) for DVD format, certain restrictions are imposed on playback, analog signal output, etc., of AACS protected contents. The operation of this product and restrictions on this product may vary depending on your time of purchase as those restrictions may be adopted and/or changed by AACS after the production of this product.
Furthermore, BD-ROM Mark and BD+ are additionally used as content protection systems for BD format, which imposes certain restrictions including playback restrictions for BD-ROM Mark and/or BD+ protected contents. To obtain additional information on AACS, BD-ROM Mark, BD+, or this product, please contact an authorized Customer Service Center.
Many BD-ROM/DVD discs are encoded with copy protection. Because of this, you should only connect your player directly to your TV, not to a VCR. Connecting to a VCR results in a distorted picture from copy-protected discs.
This product incorporates copyright protection technologies that are protected by certain U.S. patents and other intellectual property rights owned by Macrovision Corporation and other rights owners. Use of this copyright protection technology must be authorized by Macrovision Corporation and is intended for home and other limited viewing uses only, unless otherwise authorized by Macrovision Corporation. Reverse engineering or disassembly is prohibited.
Under the U.S. Copyright laws and Copyright laws of other countries, unauthorized recording, use, display, distribution, or revision of television programs, videotapes, BD-ROM discs, DVDs, CDs and other materials may subject you to civil and/or criminal liability.
To use BD-Live functionality
You must attach an external USB device using the USB port (see page 21).
Page 3
What is SIMPLINK?
Some functions of this unit are controlled by the TV’s remote control when this unit and LG TV’s with SIMPLINK are connected through HDMI connection.
Controllable functions by LG TV’s remote control; Play, Pause, Scan, Skip, Stop, Power Off, etc.
Refer to the TV owner’s manual for the details of SIMPLINK function.
LG TV’s with SIMPLINK function have the logo as shown above.
Notes:
Depending on the disc type or playing status, some SIMPLINK operation may differ from your purpose
or not work.
If “SIMPLINK” function does not work, check that your HDMI cable supports by CEC (Consumer Electronics Control) for HDMI.
If the sound is output from both the system’s speakers and TV speaker or not output from both them during SIMPLINK operation, reset speaker setting of LG TV’s SIMPLINK menu.
Licenses
Java and all Java-based trademarks and logos are trademarks or registered trademarks of Sun Microsystems, Inc. in the United States and other countries.
Manufactured under license from Dolby Laboratories. Dolby, Pro Logic, and the double-D symbol are trademarks of Dolby Laboratories.
Manufactured under license under U.S. Patent #’s: 5,451,942; 5,956,674; 5,974,380; 5,978,762; 6,226,616; 6,487,535; 7,392,195; 7,272,567; 7,333,929; 7,212,872 & other U.S. and worldwide patents issued & pending. DTS is a registered trademark and the DTS logos, Symbol, DTS-HD and DTS-HD Master Audio I Essential are trademarks of DTS, Inc. © 1996-2008 DTS, Inc. All Rights Reserved.
HDMI, the HDMI logo and High-Definition Multimedia Interface are trademarks or registered trademarks of HDMI licensing LLC.
“BD-LIVE” logo is trademark of Blu-ray Disc association.
“DVD Logo” is trademark of DVD Format/Logo Licensing Corporation.
“x.v.Colour” is a trademark of Sony Corporation.
“Blu-ray Disc” is a trademark.
“BONUSVIEW” is trademark of Blu-ray Disc Association.
This product is licensed under the AVC patent portfolio license and VC-1 patent portfolio license for the personal and non-commercial use of a consumer to (i) encode video in compliance with the AVC Standard and VC-1 Standard (“AVC/VC-1 Video”) and/or (ii) decode AVC/VC-1 Video that was encoded by a consumer engaged in a personal and non-commercial activity and/or was obtained from a video provider licensed to provide AVC/VC-1 Video. No license is granted or shall be implied for any other use. Additional information may be obtained from MPEG LA, LLC. See http://www.mpegla.com.
“AVCHD” and the AVCHD logo are trademarks of Panasonic and Sony Corporation.
iPod is a trademark of Apple Inc., registered in the U.S. and other countries.
iPhone is a trademark of Apple Inc. YouTube is a trademark of Google Inc.
“Made for iPod” means that an electronic accessory has been designed to connect specifically to iPod and has been certified by the developer to meet Apple performance standards.
“Works with iPhone” means that an electronic accessory has been designed to connect specifically to iPhone and has been certified by the developer to meet Apple performance standards.
Apple is not responsible for the operation of this device or its compliance with safety and regulatory standards.
3

HB954WA_BAUSLL_ENG_6407 4/21/09 7:00 PM Page 4
Contents
Introduction . . . . . . . . . . . . . . . . . . . . . . . . . . . . . . . . . . . . . .5-8 Remote control . . . . . . . . . . . . . . . . . . . . . . . . . . . . . . . . . . . .9 Front panel . . . . . . . . . . . . . . . . . . . . . . . . . . . . . . . . . . . . . .10 Rear panel . . . . . . . . . . . . . . . . . . . . . . . . . . . . . . . . . . . . . . .11 Assembling the Speakers . . . . . . . . . . . . . . . . . . . . . . . . . . .12 Speaker connection . . . . . . . . . . . . . . . . . . . . . . . . . . . . .12-13 Positioning the system . . . . . . . . . . . . . . . . . . . . . . . . . . . . .13 Initial setting an ID of transmitter (built-in the unit) . . . . . . .14 Setting an ID of Wireless transmitter (built-in the unit) . . . .14 Connections to your TV . . . . . . . . . . . . . . . . . . . . . . . . . .15-16 Resolution Setting . . . . . . . . . . . . . . . . . . . . . . . . . . . . . . .17-18 Internet connection . . . . . . . . . . . . . . . . . . . . . . . . . . . . . .19-20 Setting the sound mode . . . . . . . . . . . . . . . . . . . . . . . . . . . . .20 Adjust the speaker level settings . . . . . . . . . . . . . . . . . . . . .20 Using the late night function . . . . . . . . . . . . . . . . . . . . . . . . .20 Using the sleep timer . . . . . . . . . . . . . . . . . . . . . . . . . . . . . . .20 Using USB devices . . . . . . . . . . . . . . . . . . . . . . . . . . . . . . . . .21 Using the Home Menu . . . . . . . . . . . . . . . . . . . . . . . . . . . . . .22 Adjust the Setup settings . . . . . . . . . . . . . . . . . . . . . . . . .22-28 Play a disc . . . . . . . . . . . . . . . . . . . . . . . . . . . . . . . . . . . .29-31 Displaying disc Information . . . . . . . . . . . . . . . . . . . . . . . . . .32 Enjoying BD-LIVE™ . . . . . . . . . . . . . . . . . . . . . . . . . . . . .33-34
Before connecting, operating or adjusting this product, please read this instruction booklet carefully and completely.
Playing a movie . . . . . . . . . . . . . . . . . . . . . . . . . . . . . . . .34-35 Listening to a music . . . . . . . . . . . . . . . . . . . . . . . . . . . . .36-37 Viewing a photo . . . . . . . . . . . . . . . . . . . . . . . . . . . . . . . .37-38 Playing YouTube videos . . . . . . . . . . . . . . . . . . . . . . . . . .39-41 Listening to the radio . . . . . . . . . . . . . . . . . . . . . . . . . . . . . . .42 Playing the iPod . . . . . . . . . . . . . . . . . . . . . . . . . . . . . . . .42-43 Listening to music from your portable audio player . . . . . .44 Listening to the sound from your component . . . . . . . . . . .44 Using HDMI IN jacks . . . . . . . . . . . . . . . . . . . . . . . . . . . . . . .45 Using DIGITAL AUDIO IN jacks . . . . . . . . . . . . . . . . . . . . . . .45 Reference . . . . . . . . . . . . . . . . . . . . . . . . . . . . . . . . . . . . . . . .46 Language Codes . . . . . . . . . . . . . . . . . . . . . . . . . . . . . . . . . .47 Area Codes . . . . . . . . . . . . . . . . . . . . . . . . . . . . . . . . . . . . . .47 Troubleshooting . . . . . . . . . . . . . . . . . . . . . . . . . . . . . . . .48-49 Specifications . . . . . . . . . . . . . . . . . . . . . . . . . . . . . . . . . . . .50 Open source software notice . . . . . . . . . . . . . . . . . . . . . . . .51
4
HB954WA_BAUSLL_ENG_6407 4/21/09 7:00 PM Page 5
Introduction
To ensure proper use of this product, please read this owner’s manual carefully and retain for future reference.
This manual provides information on the operation and maintenance of your player. Should the unit require service, contact an authorized service location.
About the  Symbol Display
“ “ may appear on your TV display during operation and indicates that the function explained in this owner’s manual is not available on that specific media.
Symbols Used in this Manual
Note:
Indicates special notes and operating features.
Tip:
Indicates tips and hints for making the task easier.
A section whose title has one of the following symbols are applicable only to the disc represented by the symbol.
ALL |
All discs listed below |
|
BD-ROM disc |
|
|
|
DVD-Video, DVD±R/RW in Video mode or VR |
|
mode and finalized |
|
|
|
DVD±R/RW in AVCHD format |
|
|
|
DivX files |
|
|
|
Audio CDs |
|
|
|
MP3 files |
|
|
|
|
Handling the Unit
When shipping the unit
Please save the original shipping carton and packing materials. If you need to ship the unit, for maximum protection, re-pack the unit as it was originally packed at the factory.
Keeping the exterior surfaces clean
Do not use volatile liquids such as insecticide spray near the unit.
Wiping with strong pressure may damage the surface.
Do not leave rubber or plastic products in contact with the unit for a long period of time.
Cleaning the unit
To clean the player, use a soft, dry cloth. If the surfaces are extremely dirty, use a soft cloth lightly moistened with a mild detergent solution.
Do not use strong solvents such as alcohol, benzine, or thinner, as these might damage the surface of the unit.
Maintaining the Unit
The unit is a high-tech, precision device. If the optical pick-up lens and disc drive parts are dirty or worn, the picture quality could be diminished.
For details, please contact your nearest authorized service center.
Notes on Discs
Handling Discs
Do not touch the playback side of the disc. Hold the disc by the edges so that fingerprints do not get on the surface. Never stick paper or tape on the disc.
Storing Discs
After playing, store the disc in its case. Do not expose the disc to direct sunlight or sources of heat and never leave it in a parked car exposed to direct sunlight.
Cleaning Discs
Fingerprints and dust on the disc can cause poor picture quality and sound distortion. Before playing, clean the disc with a clean cloth. Wipe the disc from the center out.
Do not use strong solvents such as alcohol, benzine, thinner, commercially
5
HB954WA_BAUSLL_ENG_6407 4/21/09 7:00 PM Page 6
Playable Discs
Blu-ray Disc
- Discs such as movies that can be purchased or rented
- BD-R/RE discs that contain audio titles, DivX, MP3, WMA, or Photo files.
DVD-VIDEO (8 cm / 12 cm disc)
Discs such as movies that can be purchased or rented
DVD-R (8 cm / 12 cm disc)
- Video mode and finalized only
- Supports the dual layer disc also
-AVCHD format
-DVD-R discs that contain audio titles, DivX, MP3, WMA, or Photo files.
DVD-RW (8 cm / 12 cm disc)
- VR mode, Video mode and finalized only
-AVCHD format
-DVD-RW discs that contain audio titles, DivX, MP3, WMA, or Photo files.
DVD+R (8 cm / 12 cm disc)
- Finalized disc only
- Supports the dual layer disc also
-AVCHD format
-DVD+R discs that contain audio titles, DivX, MP3, WMA, or Photo files.
DVD+RW (8 cm / 12 cm disc)
- Video mode and finalized only - AVCHD format
-DVD+RW discs that contain audio titles, DivX, MP3, WMA, or Photo files.
Audio CD (8 cm / 12 cm disc)
Audio CDs or CD-Rs/CD-RWs in audio CD format that can be purchased
CD-R/CD-RW (8 cm / 12 cm disc)
CD-R/CD-RW discs that contain audio titles, DivX, MP3, WMA, or Photo files.
Notes:
Depending on the conditions of the recording equipment or the CD- R/RW (or DVD±R/RW) disc itself, some CD-R/RW (or DVD±R/RW) discs cannot be played on the unit.
Do not attach any seal or label to either side (the labeled side or the recorded side) of a disc.
Do not use irregularly shaped CDs (e.g., heart-shaped or octagonal). Doing so may result in malfunctions.
Depending on the recording software & the finalization, some recorded discs (CD-R/RW or DVD±R/RW) may not be playable.
DVD±R/RW and CD-R/RW discs recorded using a personal computer or a DVD or CD Recorder may not play if the disc is damaged or dirty, or if there is dirt or condensation on the player’s lens.
If you record a disc using a personal computer, even if it is recorded in a compatible format, there are cases in which it may not play because of the settings of the application software used to create the disc. (Check with the software publisher for more detailed information.)
This player requires discs and recordings to meet certain technical standards in order to achieve optimal playback quality. Pre-recorded DVDs are automatically set to these standards. There are many different types of recordable disc formats (including CD-R containing MP3 or WMA files) and these require certain pre-existing conditions to ensure compatible playback.
Customers should note that permission is required in order to download
MP3 / WMA files and music from the Internet. Our company has no right to grant such permission. Permission should always be sought from the copyright owner.
You have to set the disc format option to [Mastered] in order to make the discs compatible with the LG players when formatting rewritable discs. When setting the option to Live System, you cannot use it on LG player. (Mastered/Live File System : Disc format system for windows Vista)
6
HB954WA_BAUSLL_ENG_6407 4/21/09 7:00 PM Page 7
BD-ROM Disc Features
BD-ROM Discs can store 25 GB (single layer) or 50 GB (dual layer) on a single sided disc - about 5 to 10 times the capacity of a DVD.
BD-ROM Discs also support the highest quality HD video available in the industry (up to 1920 x 1080) - Large capacity means no compromise on video quality. Furthermore, a BD-ROM disc has the same familiar size and look as DVD.
The following BD-ROM disc features are disc dependent and will vary.
Appearance and navigation of features will also vary from disc to disc.
Not all discs will have the features described below.
BD-ROM, Hybrid disc have both BD-ROM and DVD (or CD) layers on one side. On such discs, BD-ROM layer will be only played back in this player.
Video highlights
The BD-ROM format for movie distribution supports three highly advanced video codecs, including MPEG-2, MPEG4 AVC (H.264), and SMPTE VC1. HD video resolutions are also available:
1920 x 1080 HD
1280 x 720 HD
Graphic planes
Two individual, full HD resolution (1920x1080) graphic planes (layers) are available, on top of the HD video layer. One plane is assigned to videorelated, frame accurate graphics (like subtitles), and the other plane is assigned to interactive graphic elements, such as buttons or menus.
For both planes, various wipes, fades and scroll effects may be available.
For High-Definition Playback
To view high-definition contents from BD-ROM discs, an HDTV is required.
Some discs may require HDMI OUT for viewing of high-definition contents.
Ability to view high-definition contents in BD-ROM discs may be limited depending on the resolution of your TV.
Menu sounds
When you highlight or select a menu option, sounds can be heard such as button clicks or a voice-over explaining the highlighted menu choice.
Multi-page/PopUp Menus
With DVD-Video, playback is interrupted each time a new menu screen is accessed. Due to BD-ROM disc’s ability to preload data from the disc without interrupting playback, a menu can consist of several pages.
You can browse through the menu pages or select different menu paths, while the audio and video remain playing in the background.
Interactivity
Certain BD-ROM Discs may contain animated menus and/or trivia games.
User Browsable Slideshows
With BD-ROM Discs, you can browse through various still pictures while the audio remains playing.
Subtitles
Depending on what is contained on the BD-ROM disc, you may be able to select different font styles, sizes and colours for some subtitles. Subtitles may also be animated, scrolled or faded in and out.
BD-J Interactive Capability
The BD-ROM format supports Java for interactive functions. “BD-J” offers content providers almost unlimited functionality when creating interactive BD-ROM titles.
BD-ROM Disc Compatibility
This player supports BD-ROM Profile 2.
•Discs supporting BD-Live (BD-ROM version 2 Profile 2) that allows interactive functions to be used when this unit is connected to the Internet in addition to the BONUSVIEW function.
•Discs supporting BONUSVIEW (BD-ROM version 2 Profile 1 version 1.1/Final Standard Profile) that allows Virtual packages or Picture-in- Picture functions to be used.
7

HB954WA_BAUSLL_ENG_6407 4/21/09 7:00 PM Page 8
Regional Code
This unit has a regional code printed on the rear of the unit. This unit can play only BD-ROM or DVD discs labeled same as the rear of the unit or “ALL”.
AVCHD (Advanced Video Codec High Definition)
•This player can playback AVCHD format discs. These discs are normally recorded and used in camcorders.
•The AVCHD format is a high definition digital video camera format.
•The MPEG-4 AVC/H.264 format is capable of compressing images at higher efficiency than that of the conventional image compressing format.
•Some AVCHD discs use the “x.v.Colour” format.
•This player can playback AVCHD discs using “x.v.Colour” format.
•“x.v.Colour” is a trademark of Sony Corporation.
•Some AVCHD format discs may not play, depending on the recording condition.
•AVCHD format discs need to be finalized.
•“x.v.Colour” offers a wider colour range than normal DVD camcorder discs.
Compatibility Notes
•Because BD-ROM is a new format, certain disc, digital connection and other compatibility issues are possible. If you experience compatibility
problems, please contact an authorized Customer Service Center.
•Viewing high-definition content and up-converting standard DVD content may require a HDMI-capable input or HDCP-capable DVI input on your display device.
•Some BD-ROM and DVD discs may restrict the use of some operation commands or features.
•Dolby Digital EX, DTS-ES and DTS 96/24 are output as Dolby Digital 5.1 or DTS 5.1.
•You can use the USB device that is used to store some disc related information, including downloaded on-line content. The disc you are using will control how long this information is retained.
Certain System Requirements
For high definition video playback:
•High definition display that has COMPONENT or HDMI input jacks.
•BD-ROM disc with high definition content.
•HDMI or HDCP capable DVI input on your display device is required for some content (as specified by disc authors).
•For up-conversion of standard definition DVD, a HDMI or HDCP capable DVI input on your display device is required for copy protected content.
Important Notice for TV colour system
The colour system of this player differs according to currently playing discs or video contents (YouTube, etc.).
For example, when the player plays back the disc recorded in the NTSC colour system, the image is outputted as a NTSC signal.
Only the multi system colour TV can receive all signals outputted from the player.
Notes:
•If you have a PAL colour system TV, you will see just distorted images when using discs recorded in NTSC.
•The multi system colour TV changes the colour system automatically according to input signals. In case that the colour system is not changed automatically, turn it off and then on to see normal images on screen.
•Even if the disc and video contents (YouTube, etc.) recorded in NTSC colour system are well displayed on your TV, these may not be recorded correctly on your recorder.
8
HB954WA_BAUSLL_ENG_6407 4/21/09 7:00 PM Page 9
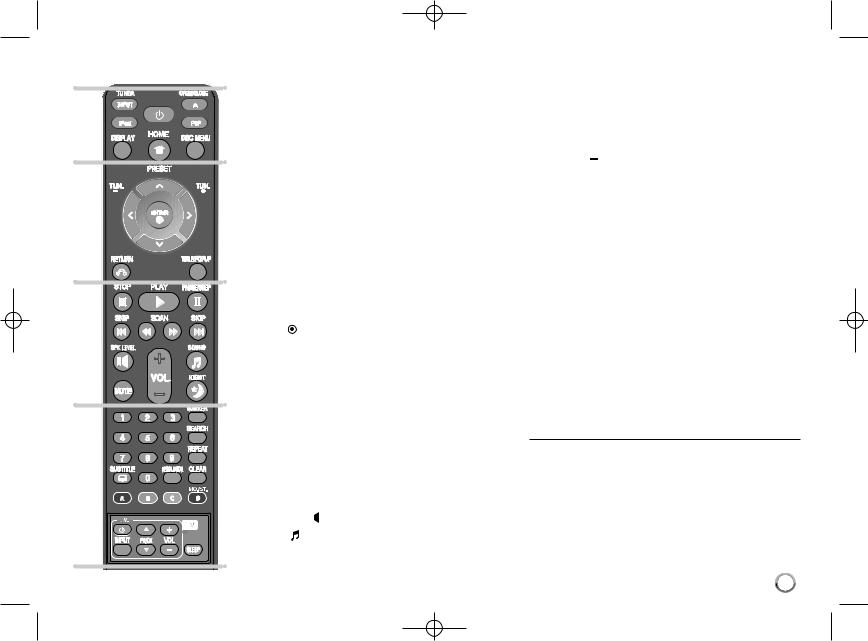
Remote control
|
|
|
|
|
|
a |
|||
|
|
POWER |
|
|
|
||||
|
|
|
|
|
|
INPUT (TUNER): Changes the input source |
|||
a |
|
|
|
|
|
(FM, AM, AUX, PORTABLE, OPTICAL, COAXIAL, |
|||
|
|
|
|
|
|||||
|
|
|
|
|
HDMI IN 1, HDMI IN 2) |
||||
|
|
|
|
|
|
POWER: Switches the player ON or OFF. |
|||
|
|
|
|
|
|
OPEN/CLOSE (Z): Opens and closes the disc tray. |
|||
|
|
|
|
|
|
iPod: Selects REMOTE IPOD or OSD IPOD mode. |
|||
|
|
|
|
|
|
PIP*: Switches on/off Secondary Video (Picture-in-pic- |
|||
|
|
|
|
|
|
ture) (BD-ROM only). |
|||
b |
|
|
|
|
|
DISPLAY: Displays or exits the On-Screen Display. |
|||
|
|
|
|
|
|
HOME: Displays or exits the [Home Menu]. |
|||
|
|
|
|
|
|
DISC MENU: Accesses the menu on a disc. |
|||
|
|
|
|
|
|
b |
|||
|
|
|
|
|
|
Direction buttons: Selects an option in the menu. |
|||
|
|
|
|
|
|
PRESET (v/V): Selects a preset radio programme. |
|||
|
|
|
|
|
|
TUN. (+/-): Tunes in the desired radio station. |
|||
|
|
|
|
|
|
ENTER ( |
): Acknowledges menu selection. |
||
c |
|
|
|
|
|
RETURN (O): Exits the menu or resumes playback. |
|||
|
|
|
|
|
|
The resume play function may not work depending on |
|||
|
|
|
|
|
|
the BD-ROM disc. |
|||
|
|
|
|
|
|
TITLE/POPUP: Displays the DVD title menu or |
|||
|
|
|
|
|
|
BD-ROM’s popup menu, if available. |
|||
|
|
|
|
|
|
c |
|||
|
|
|
|
|
|
STOP (x): Stops playback. |
|||
|
|
|
|
|
|
PLAY (N): Starts playback. |
|||
d |
|
|
|
|
|
PAUSE/STEP (X): Pauses playback. |
|||
|
|
|
|
|
|
SKIP (. / >): Go to next or previous chapter / |
|||
|
|
|
|
|
|
track / file. |
|
|
|
|
|
|
|
|
|
SCAN (m / M): Searches backward or forward. |
|||
|
|
|
|
|
|
SPK LEVEL ( |
|
): Sets the sound level of desired speaker. |
|
|
|
||||||||
|
|
|
|
|
|
||||
|
|
|
|
|
|
SOUND ( |
): Selects a sound mode. |
||
MUTE: Press MUTE to mute your unit. You can mute your unit in order, for example, to answer the telephone.
VOL. (+/-): Adjusts speaker volume.
NIGHT (  ): Sets the late night function.
d
0-9 numerical buttons: Select numbered options in a menu.
SUBTITLE ( ): Selects a subtitle language.
RESOLUTION: Sets the output resolution for HDMI and
COMPONENT VIDEO OUT jacks. MARKER: Marks any point during playback. SEARCH: Displays or exits the search menu.
REPEAT: Repeat a desired section.
CLEAR: Removes a mark on the search menu or a number when setting the password.
Coloured (A, B, C, D) buttons: Use to navigate BDROM menus. They are also used for [MOVIE], [PHOTO], [MUSIC] and [YouTube] menu.
- D button: Selects MONO or STEREO in FM mode.
TV Control Buttons: See page 46.
SLEEP: Sets a certain period of time after which the unit will switch to standby.
*Depending on the disc type or the pre-recorded contents of the BD-ROM disc, different functions may be executed or there may be no response when pressing some buttons (depending on media used).
Remote Control Operation
Point the Remote Control at the remote sensor and press the buttons.
Remote Control Battery Installation
Remove the battery cover on the rear of the Remote Control, and insert a R03 (size AAA) battery with  and
and
 matched correctly.
9

HB954WA_BAUSLL_ENG_6407 4/21/09 7:00 PM Page 10
Front panel
a b c d e f
g h
a1/} (POWER) Button
Switches the unit ON or OFF.
bDisc Tray
Insert a disc here.
ciPOD Dock
Connect your iPod here.
Push Z to open the iPod Dock.
dRemote Sensor
Point the remote control here.
eTouch Buttons
-Z (OPEN/CLOSE)
Opens or closes the disc tray.
-(N/X)PLAY / PAUSE
Starts playback.
Pause playback temporarily, press again to exit pause mode.
-x (STOP)
Stops playback.
-. / > (SKIP)
Go to next or previous file/track/chapter.
Searches backward or forward if you press and hold it.
-FUNC.
Changes the input source (FM, AM, OSD IPOD, REMOTE IPOD, AUX, PORTABLE, OPTICAL, COAXIAL, HDMI IN 1, HDMI IN 2) or displays On-Screen Display.
fUSB Port
Connect a USB device.
gDisplay Window
Shows the current status of the player.
hVOLUME
Adjusts speaker volume.
Precautions in using the touch buttons
•Use the touch buttons with clean and dry hands.
-In a humid environment, wipe out any moisture on the touch buttons before using.
•Do not press the touch buttons hard to make it work.
-If you apply too much pressure, it can damage the sensor of the touch buttons.
•Touch the button that you want to work in order to operate the function correctly.
•Be careful not to have any conductive material such as metallic object on the touch buttons. It can cause malfunctions.
10
HB954WA_BAUSLL_ENG_6407 4/21/09 7:00 PM Page 11
Rear panel
a |
b |
c |
d e |
h i j
f g
k l m n
aAC Power Cord
Plug into the power source.
bSPEAKER Connectors
Connect the speakers.
cCooling Fan
dFM ANTENNA Connector
Connect the FM antenna.
eDIGITAL AUDIO IN (COAXIAL)
Connect to digital (coaxial) audio equipment.
fVIDEO OUT
Connect to a TV with a composite (AV) video input.
gAUX (L/R) INPUT
Connect to an external source with 2 channel audio outputs.
hAM ANTENNA Connector
Connect the AM antenna.
iDIGITAL AUDIO IN (OPTICAL)
Connect to digital (optical) audio equipment.
jPORT. IN
Connect to a portable player with audio outputs.
kCOMPONENT VIDEO (Y PB PR) OUTPUT (PROGRESSIVE SCAN)
Connect to a TV with Y Pb Pr inputs.
lLAN port
Connect a network with an always-on broadband connection.
mHDMI IN (Type A) 1/2
Connect to an external source with HDMI outputs.
nHDMI OUT (Type A)
Connect to TV with HDMI inputs. (Interface for digital audio and video)
11
HB954WA_BAUSLL_ENG_6407 4/21/09 7:00 PM Page 12
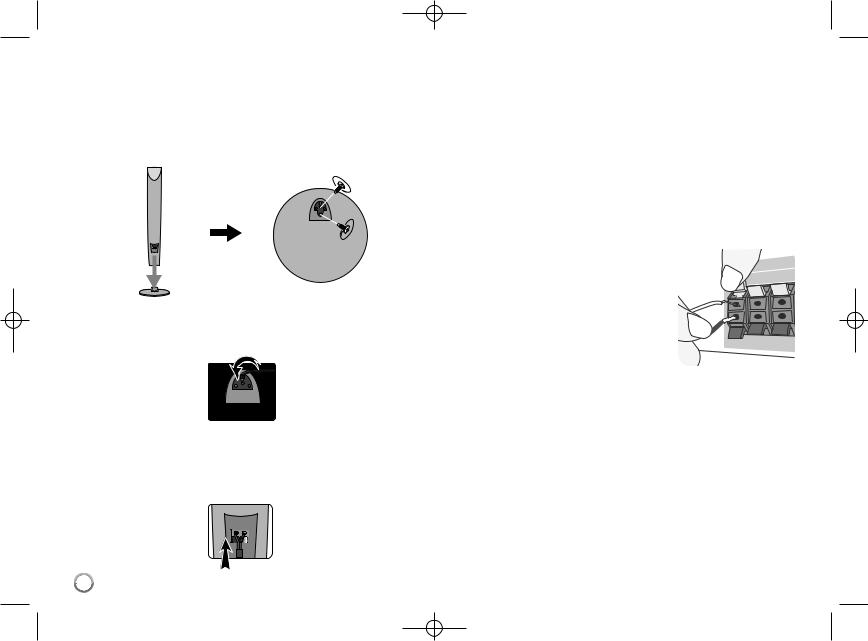
Assembling the Speakers
Before connecting the speakers, assemble the speakers.
aAttach the speaker to the desktop stand.
Secure the speaker with the screws.
Speaker Connection
Attaching the speakers to the player
aYou will have received four speaker cables.
Each one is color-coded by a band near each end and connects one of the four speakers to the player.
bConnect the wires to the player.
Match each wire’s colored band to the same colored connection terminal on the rear of the player. To connect the cable to the player, press each plastic finger pad to open the connection terminal. Insert the wire and release the finger pad.
bThread the speaker cable through the hole in the bottom of the desktop stand. (Front speakers only)
Connect the black end of each wire to the terminals marked -(minus) and the other end to the terminals marked + (plus).
c Connect the wires to the speakers.
Connect the other end of each wire to the correct speaker according to the color coding:
cConnect the speaker cables to the speaker. (Front speakers only)
Use the speaker cable of the red and white tube. Connect the black end of each wire to the terminal marked - (minus) and the other end to the terminal marked + (plus).
12
HB954WA_BAUSLL_ENG_6407 4/21/09 7:00 PM Page 13
COLOR |
SPEAKER |
POSITION |
Green |
Center |
Above or below screen, directly in front |
|
|
of you. |
Orange |
Sub Woofer |
This can be placed in any front |
|
|
position. |
Red |
Front |
In front of you, to the right of |
|
|
the screen. |
White |
Front |
In front of you, to the left of |
|
|
the screen. |
|
|
|
To connect the cable to the speakers, press each plastic finger pad to open the connection terminals on the base of each speaker. Insert the wire and release the finger pad.
Be careful of the following
Be careful to make sure children do not put their hands or any objects into the *speaker duct.
*Speaker duct: A hole to allow for plentiful bass sound on speaker cabinet(enclosure).
FM/AM Antenna connection
AM - Connect the AM loop antenna to the player. FM - Connect the FM antenna to the player.
The reception will be its best when the two loose ends of the antenna are in a straight and horizontal line.
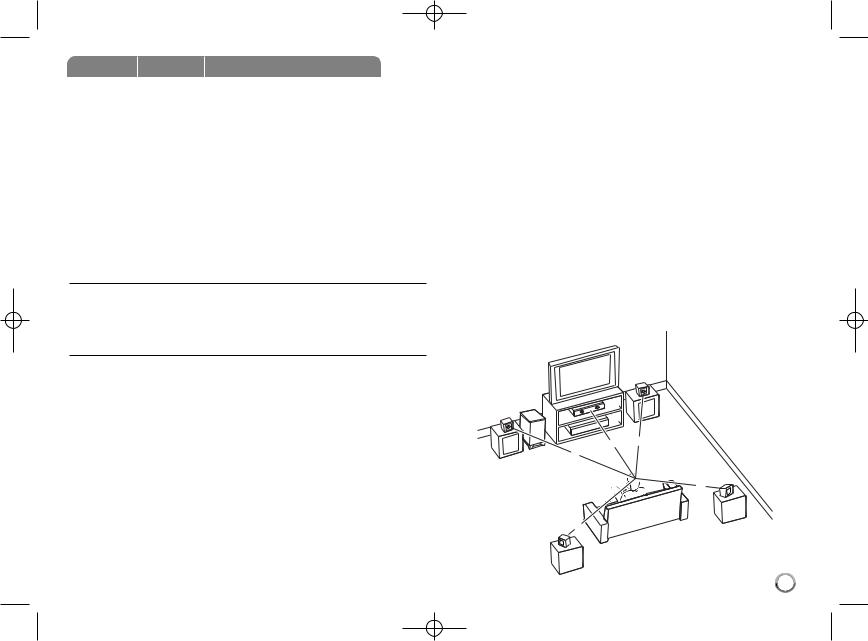
Positioning the System
The following illustration shows an example of positioning the system.
Note that the illustrations in these instructions differ from the actual unit for explanation purposes.
For the best possible surround sound, all the speakers other than the subwoofer should be placed at the same distance from the listening position (A).
AFront left speaker (L)/ B Front right speaker (R):
Place the front speakers to the sides of the monitor or screen and as flush with the screen surface as possible.
CCenter speaker: Place the center speaker above or below the monitor or screen.
DSurround left speaker (L)/ E Surround right speaker (R):
Place these speakers behind your listening position, facing slightly inwards.
FSubwoofer: The position of the subwoofer is not so critical, because low bass sounds are not highly directional. But it is better to place the subwoofer near the front speakers. Turn it slightly toward the center of the room to reduce the wall reflections.
G Unit
B
C
A G
F
AA
A
A E
DA
13

HB954WA_BAUSLL_ENG_6407 4/21/09 7:00 PM Page 14
Initial setting an ID of transmitter (built-in the unit)
|
|
ON REMOTE |
1 |
Connect the power cords of each wireless |
|
|
speakers to the wall power outlet.: |
- |
|
|
|
2 |
Turn the main unit On.: |
POWER |
|
Blue LEDs of wireless speakers will flicker, |
|
|
then the Blue LEDs of wireless |
|
|
speakers will stay on when the wireless system |
|
|
works normally. “z ” appears in display |
|
|
window. |
|
|
|
|
Setting an ID of Wireless transmitter (built-in the unit)
When the unit is manufactured, the ID is already set. If an interference occurs or you use the new wireless speakers, an ID should be set again.
|
|
|
|
ON REMOTE |
|
|
|
|
|
|
|
1 |
Disconnect the power cords of wireless |
|
|
- |
|
|
|
||||
|
speakers: |
|
|
|
|
|
|
|
|
|
|
2 |
Press and hold x (STOP) on the front of |
|
|
|
|
|
unit and MUTE on the remote control. |
|
|
|
|
|
“REMATE” appears in display window. |
|
|
MUTE |
|
|
|
|
|
|
|
3 |
Connect the power cords of wireless speakers.: |
|
|
|
|
|
A new ID is set. |
|
|
- |
|
LED indicator of wireless speakers (rear speakers)
Blue : The wireless speakers are receiving the signal of the unit.
Off (No display) : The wireless speakers are switched to standby mode or the power cords of wireless speakers are not conneced.
Be careful of the following
•If there is a strong electromagnetic wave product nearby, interference may occur. Put the unit (wireless speakers and main unit) away from there.(Ex: Microwave oven)
•If there is no audio signal for longer than 10 minutes, the wireless speakers will be automatically switched to standby mode. LEDs will turn blue when there is any audio signal back.
•If you operate main unit then wireless speakers sound within a few seconds in standby mode.
•Set the distance between this unit and wireless speakers within 10m.
•Optimum performance can be implemented only when the unit and the wireless speakers within distance of 10m is used since communication failure may occur if longer distance is used.
•It takes a few seconds (and may take longer) for the wireless speakers to communicate with each other.
•When the unit is turned off, the wireless speakers are in standby mode (off) automatically after about 10 seconds.
14
HB954WA_BAUSLL_ENG_6407 4/21/09 7:00 PM Page 15
Connections to Your TV
Make one of the following connections, depending on the capabilities of your existing equipment.
Tips:
•Depending on your TV and other equipment you wish to connect, there are various ways you could connect the player. Use only one of the connections described below.
•Please refer to the manuals of your TV or other devices as necessary to make the best connections.
Cautions:
•Make sure the player is connected directly to the TV. Tune the TV to the correct video input channel.
•Do not connect your player via your VCR. The image could be distorted by the copy protection system.
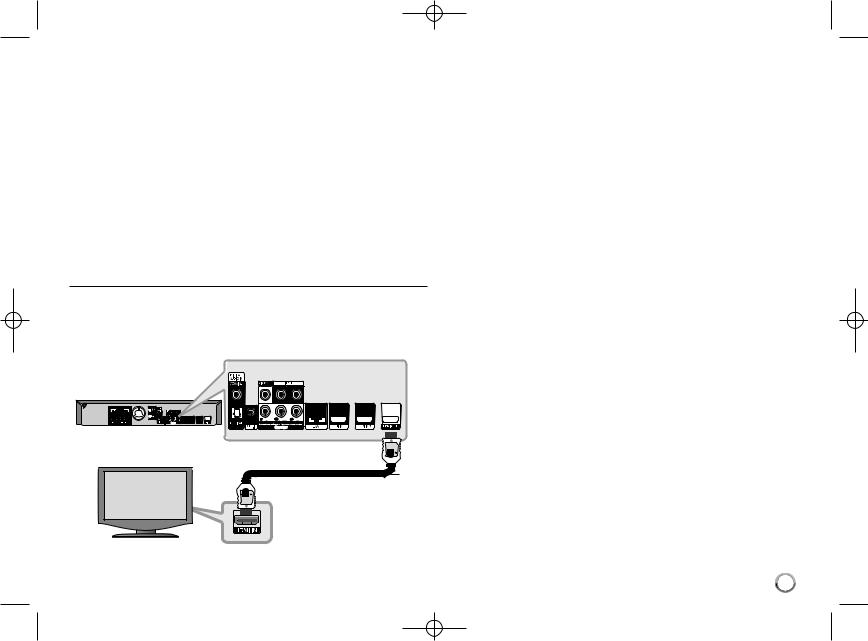
HDMI Connection
If you have a HDMI TV or monitor, you can connect it to this player using a HDMI cable.
Connect the HDMI OUT jack on the player to the HDMI IN jack on a HDMI compatible TV or monitor (H).
BD player
H
TV
Set the TV’s source to HDMI (refer to TV’s Owner’s manual).
Notes:
•You must select a HDMI audio output that your TV accepts using [HDMI Audio] options on the [Setup] menu (see page 25).
•If a connected HDMI device does not accept the audio output of the unit, the HDMI device’s audio sound may be distorted or may not output.
Tips:
•You can fully enjoy digital audio and video signals together with this HDMI connection.
•When you use HDMI connection, you can change the resolution for the
HDMI output. (Refer to “Resolution Setting” on page 17-18.)
•Select the type of video output from the HDMI OUT jack using [HDMI Color Setting] option on the [Setup] menu (see page 23).
Cautions:
•Changing the resolution when the connection has already been established may result in malfunctions. To solve the problem, turn off the player and then turn it on again.
•When the HDMI connection with HDCP is not verified, TV screen is changed to black or green screen or the snow noise may occur on the screen. In this case, check the the HDMI connection, or disconnect the HDMI cable.
•If there is noise or lines on the screen, please check the HDMI cable
(length is generally limited to 4.5 m) and use a High Speed HDMI cable
(Version 1.3).
15
HB954WA_BAUSLL_ENG_6407 4/21/09 7:00 PM Page 16
Additional Information for HDMI
•When you connect a HDMI or DVI compatible device make sure of the following:
-Try switching off the HDMI/DVI device and this player. Next, switch on the HDMI/DVI device and leave it for around 30 seconds, then switch on this player.
-The connected device’s video input is set correctly for this unit.
-The connected device is compatible with 720x576p, 1280x720p, 1920x1080i or 1920x1080p video input.
•Not all HDCP-compatible HDMI or DVI devices will work with this player.
-The picture will not be displayed properly with non-HDCP device.
-This player does not playback and TV screen is changed to black or green screen or the snow noise may occur on the screen.
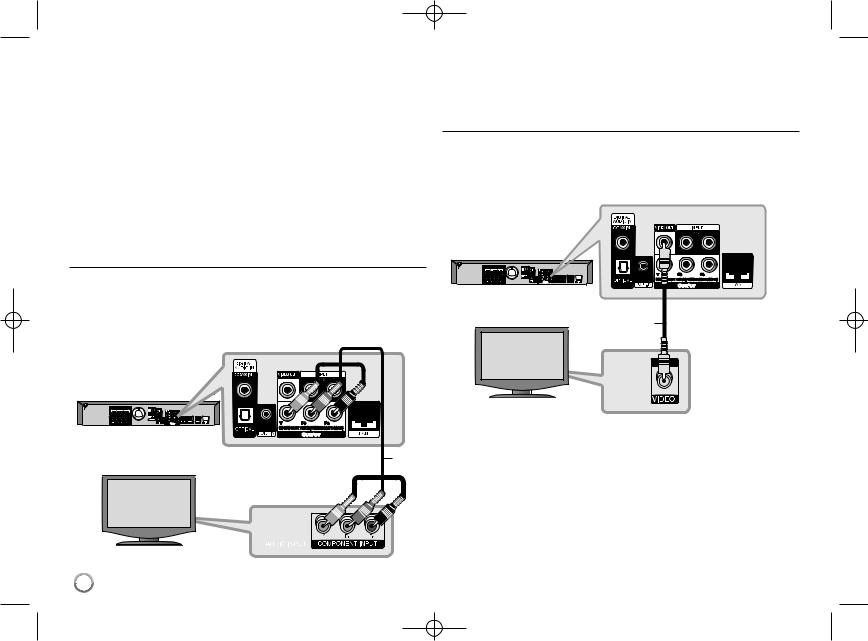
Component Video Connection
Connect the COMPONENT VIDEO OUT jacks on the player to the corresponding input jacks on the TV using Y Pb Pr cables (C).
You can hear the sound through the system’s speakers.
BD player
C
TV
Tip:
When you use COMPONENT VIDEO OUT connection, you can change
the resolution for the output. (Refer to “Resolution setting” on page 17-18.)
Video Connection
Connect the VIDEO OUT jack on the player to the video in jack on the TV using a video cable (V).
You can hear the sound through the system’s speakers.
BD player
V
TV
16
 Loading...