


http://au.lge.com (Australia)
http://nz.lge.com (New Zealand)
Built-In Gas Cooktops
Installation and Operating Instructions
HB6422A
To avoid the risk of accidents or damage to the Gas Cooktops, it is essential to read these operating instructions
before it is installed or used for the first time. And please keep this manual for later reference.
P/No.: MFL62060303

Contents |
|
|
Introduction ................................................................................. |
3 |
|
1. |
Instructions for safe and proper use ....................................... |
3 |
Instructions for the installer ...................................................... |
5 |
|
2. |
Positioning of the hob ............................................................. |
5 |
3. |
Electrical connection .............................................................. |
9 |
4. |
Gas connection .................................................................... |
10 |
5. |
Adaptation to different types of gas ...................................... |
12 |
6. |
Final operations .................................................................... |
15 |
Instructions for the user .......................................................... |
17 |
|
7. |
Using the hob ....................................................................... |
17 |
8. |
Cleaning and maintenance .................................................. |
19 |
These instructions are valid only for end user countries whose identification symbols appear on the cover of this manual.
INSTRUCTIONS FOR THE INSTALLER: these are for the authorised person who must carry out a suitable check of the gas system, install the appliance, set it functioning and carry out an inspection test.
INSTRUCTIONS FOR THE USER: these contain user advice, description of the commands and the correct procedures for cleaning and maintenance of the appliance.
2

Introduction
1. Instructions for safe and proper use
This manual is an integral part of the appliance and therefore must be kept in its entirety and in an accessible place for the whole working life of the cooking hob. We advise reading this manual and all the instructions therein before using the cooking hob. Also keep the series of nozzles supplied. Installation
must be carried out by qualified personnel in accordance with the regulations in force. This appliance is intended for domestic uses and conforms to current regulations in force. The appliance has been built to carry out the following functions: Cooking and heating-up of food. All other uses are considered improper.
The manufacturer declines all responsibility for improper use.
Do not leave the packing in the home environment. Separate the various waste materials and take them to the nearest special garbage collection centre.
It is obligatory for the electrical system to be grounded according to the methods required by safety rules.
The plug to be connected to the power cable and the socket must be the same type and must conform to current regulations.
Never unplug by pulling on the cable.
 Immediately after installation carry out a brief inspection test of the cooking hob, following the instructions below. Should the appliance not function, disconnect it from the supply and call the nearest technical assistance centre.
Never attempt to repair the appliance.
Always check that the control knobs are in the position “ZERO”(OFF) when you finish using the hob.
3

Introduction
The identification plate, with technical data, serial number and marking is clearly visible under the casing.
The plate on the casing must not be removed.
Before connecting the device, make sure that it has been regulated for the type of gas that will feed it, checking the label under the casing.
Do not put pans without perfectly smooth and flat bottoms on the cooking hob grids.
Do not use recipients or griddle plates that extend beyond the external perimeter of the hob.
The hob is to be used by adults only. Do not let unsupervised children play with the hob.
This appliance is designed for cooking food and it shall not be used as a space heater.
Do not spray aerosols in the vicinity of this appliance while it is in operation.
 WHERE THIS APPLIANCE IS INSTALLED IN MARINE CRAFT OR IN CARAVANS, IT SHALL NOT BE USED AS A SPACE HEATER.
 The manufacturer declines all responsibility for damage to persons or things caused by non-observance of the above prescriptions or by interference with any part of the appliance or by the use of non-original spares.
 DO NOT USE OR STORE FLAMMABLE MATERIALS IN THE APPLIANCE STORAGE DRAWER OR NEAR THIS APPLIANCE.
 DO NOT MODIFY THIS APPLIANCE
4
Instructions for the installer
2. Positioning of hob
This appliance shall be installed only by authorized persons in accordance with AS5601 - Gas Installations, any statutory regulations, local gas regulations, municipal building codes, electrical wiring regulations, and the manufacturer's installation instructions.
Clearance around the appliance must comply with the requirements of AS5601.
The following operation requires building and/or carpentry work so must be carried out by a competent tradesman. Installation can be carried out on various materials such as masonry, metal, solid wood or plastic laminated wood as long as they are heat resistant
(T 90°C). Never use silicone or other insulating products when installing the appliance; use only the rubber gasket provided.
2.1 Attachment to support structure
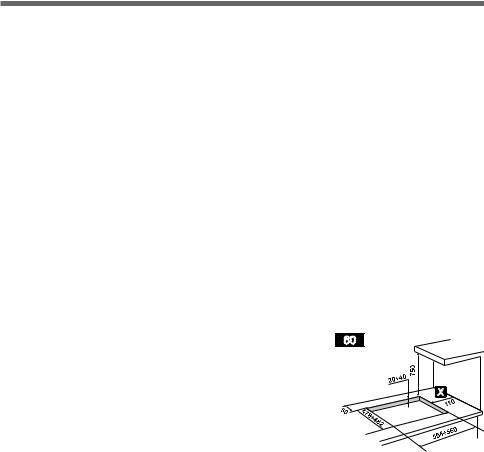
Create an opening with the dimensions shown in the figure in the top surface of the counter,
keeping a minimum distance of 50 mm from the rear border. This appliance can therefore be mounted against walls higher than the
work surface on condition that a certain
distance “X” be kept between the appliance and the wall as shown in the figure so as to avoid damage from overheating. Make sure there is a minimum of 750 mm between the hot plate flames and any shelf that may be installed directly above them. Accurately position the gasket provided all around the outer edge of the hole in the top surface as shown in the figures below, pressing it down so as to make it adhere properly. For measurements, refer to the figure depending on the hob model to be installed, bearing in mind that in both models the front and rear sides must skim the hole. Secure the hob to the counter with brackets A (supplied). Carefully trim any excess from border B of the gasket. The distances in the following
5
Instructions for the installer
drawing refer to the hole on the inner side of the gasket.
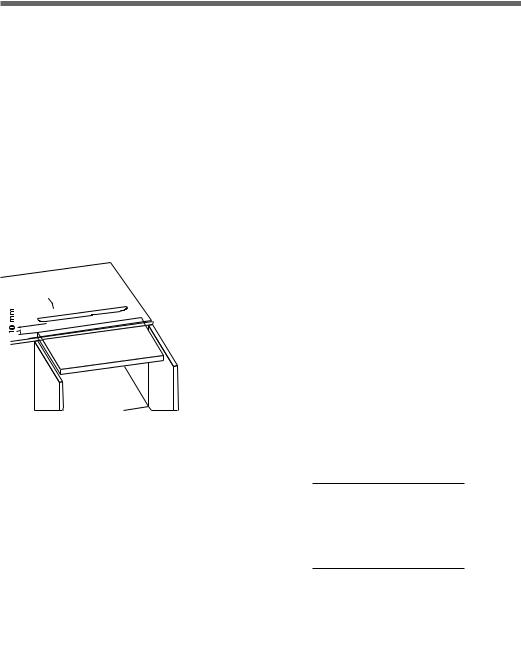
In case of installation on a hollow compartment with doors, a separating panel has to be placed under the hob. Keep a minimum distance of 10 mm between the bottom of the unit and the panel surface. The panel has to be easily removable to allow access in the event of technical service.
Overall dimensions: location of gas and electrical connection points (all measures in mm).
A |
85 |
B |
405 |
C |
35 |
D |
35 |
* Dimension A, C : Clearances are these for the hose assembly
6

2.2 Clearance above and around domestic appliances
Extract from AS5601
REQUIREMENTS
1Overhead clearances – (Measurement A)
Range hoods and exhaust fans shall be installed in accordance with the manufacturer’s instructions. However, in no case shall the clearance between the highest part of the hob of the cooking appliance and a range hood be less than 600 mm or, for an overhead exhaust fan, 750 mm.
Any other downward facing combustible surface less than 600 mm above the highest part of the hob shall be protected for the full width and depth of the cooking surface area in accordance with Clause
5.12.1.2.However, in no case shall this clearance to any surface be less than 450 mm.
2Side clearances – (Measurements B & C)
7
 Loading...