


LEICA V-LUX 5
INSTRUCTIONS
Finding the information you need
In this “Operating Instructions for Advanced Features”, you can find the information you need from the following pages.
Search “Table of Content” |
4 - |
|
|
|
|
Search the list of function |
|
names |
9 - |
“Table of Content by Function”
Search “Names and functions |
14 - |
|
of main parts” |
||
|
||
|
|
|
Search “List of monitor/ |
247 - |
|
viewfinder displays” |
||
|
Search the list of on-screen
messages 254 -
“Message displays”
Search the menu list |
169 - |
Search “Q&A Troubleshooting”  256 -
256 -
See the next page for details on how to use this manual.
2

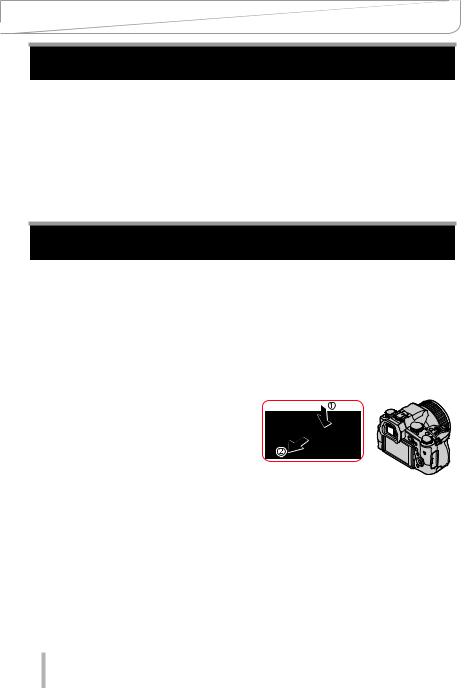
How to use this manual
Icons in picture/recording mode
Recording mode: 


The menus and functions offered in picture/recording modes, in which the icons are displayed in black, can be selected and executed.
(Custom mode) The functions offered in custom mode may vary depending on the selected picture/recording mode.
■■About the icons in the text
The menu can be selected or configured via the [MENU/SET] button.
 Helpful hints for operation and recording. (→00) Indicates the reference page.
How to configure a menu item:
Example: Changing the [Quality] setting to [ ] in the [Rec] menu
 →
→  [Rec] → [Quality] → [
  ]
]
••The directional arrows ( ,
,  ,
,  ,
,  ) are used for illustration purposes.
••Dial and lever movements are illustrated with the following icons:
Turn the front dial at the front to the left/right
Turn the rear dial at the back to the left/right
Move the zoom lever left/right
3

Table of Content
■■Finding the information you need...... |
2 |
■■Table of Content by Function............. |
9 |
■■How to use this manual...................... |
3 |
|
|
General information |
|
|
|
■■General information.......................... |
11 |
■■Names and functions |
|
■■Scope of delivery............................... |
13 |
of main parts...................................... |
14 |
■■Replacement parts/Accessories...... |
13 |
|
|
Preparation
■■Attaching the Lens Cap/ |
|
Shoulder Strap................................... |
16 |
Attaching the Lens Cap.............................. |
16 |
Attaching the Shoulder Strap..................... |
17 |
■■Charging the Battery......................... |
18 |
Inserting the battery.................................... |
19 |
Charging the battery................................... |
20 |
■■Inserting and removing the |
|
memory card...................................... |
24 |
■■About the Memory Card.................... |
25 |
Formatting the Memory Card |
|
(initialization).............................................. |
26 |
Estimated recording capacity |
|
(number of pictures/recording time)........... |
26 |
■■Attaching the Lens Hood.................. |
28 |
■■Opening out the monitor................... |
30 |
■■Setting the Date and Time................ |
31 |
Basics
■■Handling the camera correctly......... |
33 |
■■Basic operation.................................. |
34 |
[EVF] button |
|
(Taking pictures via the viewfinder)............ |
34 |
Zoom Lever (Use Zoom)............................ |
35 |
[Zoom Compose Assist] button |
|
(Using the Zoom Compose |
|
Assist function) .......................................... |
36 |
Shutter button (Taking pictures)................. |
37 |
Video button (recording video)................... |
38 |
Mode dial (recording mode selection)........ |
38 |
Front Dial/Rear Dial.................................... |
39 |
Control ring................................................. |
41 |
Cursor button / [MENU/SET] button |
|
(Selecting/setting items)............................. |
42 |
[DISP] button |
|
(Switching the display information)............. |
42 |
Touch screen (touch functions).................. |
45 |
Taking pictures using the touch function.... |
46 |
■■Menu Settings.................................... |
48 |
■■Accessing frequently |
|
used menu items |
|
(Quick Menu)...................................... |
50 |
Configuring the Quick Menu....................... |
51 |
■■Assigning frequently |
|
used button functions |
|
(Function buttons)............................. |
52 |
Using the function buttons during |
|
recording.................................................... |
53 |
Using the function buttons during |
|
playback..................................................... |
55 |
■■Entering text....................................... |
56 |
4

Table of Content
Recording mode
■■Taking pictures |
|
with automatic settings |
|
(Snapshot Modes)............................. |
57 |
[Snapshot Mode] menu.............................. |
59 |
Taking pictures with custom |
|
color saturation, focus and brightness |
|
settings....................................................... |
61 |
■■Taking pictures with |
|
automatic aperture value and |
|
shutter speed settings |
|
(Program AE Mode)........................... |
62 |
■■Taking pictures with manual |
|
settings for aperture value and |
|
shutter speed..................................... |
63 |
Taking pictures with only the |
|
aperture value set manually |
|
(Aperture-Priority AE Mode)....................... |
63 |
Taking pictures with only the |
|
shutter speed set manually |
|
(Shutter-Priority AE Mode)......................... |
64 |
Taking pictures with manual settings |
|
for aperture value and shutter speed |
|
(Manual Exposure Mode)........................... |
65 |
Checking the effects of the aperture value |
|
and shutter speed (Preview Mode)............ |
67 |
Setting the aperture value / shutter speed |
|
for suitable exposure (One Push AE)......... |
68 |
■■Recording panorama pictures |
|
(Panorama Shot Mode)..................... |
69 |
■■Taking scene pictures |
|
(Scene Guide Mode).......................... |
72 |
■■Taking pictures |
|
with creative effects |
|
(Creative Control Mode).................... |
75 |
■■Recording video |
|
by setting the aperture/ |
|
shutter speed/ISO sensitivity |
|
(Creative Video Mode)....................... |
81 |
Recording slow motion video |
|
([High Speed Video]).................................. |
82 |
Pan or zoom while recording |
|
with the camera in a fixed position |
|
([4K Live Cropping])................................... |
83 |
■■Configuring custom |
|
recording settings |
|
(Custom Mode).................................. |
85 |
Configuring custom recording settings |
|
([Cust.Set Mem.])....................................... |
85 |
Recording with profiles............................... |
86 |
5

|
|
Table of Content |
|
Focus, Brightness (Exposure) and Color Settings |
|
||
■■Taking Pictures with Auto Focus |
..... 87 |
■■Taking pictures with |
|
Selecting a Focus Mode |
|
Manual Focus................................... |
102 |
(AFS, AFF, AFC)......................................... |
88 |
■■Taking pictures by locking |
|
Switching [AF Mode].................................. |
90 |
the focus and/or exposure |
105 |
Changing the position and size |
|
(AF/AE Lock).................................... |
|
of the AF area............................................. |
96 |
■■Taking pictures with |
106 |
Setting the AF area position |
99 |
Exposure Compensation................ |
|
with the touch pad...................................... |
■■Setting the ISO Sensitivity |
107 |
|
Optimizing the focus and brightness |
|
||
for a touched position............................... |
100 |
■■Adjusting the White Balance.......... |
109 |
■■Taking close-up pictures |
101 |
|
|
(Macro recording)............................ |
|
|
|
4K Photo and Drive Settings
■■Selecting a Drive Mode................... |
113 |
■■Burst function.................................. |
114 |
■■Recording with the 4K Photo |
|
function and selecting pictures to |
|
save................................................... |
116 |
Recording with the 4K Photo function...... |
116 |
Selecting pictures from 4K burst file and |
|
saving....................................................... |
119 |
Notes on the 4K Photo function............... |
124 |
■■Adjusting the focus after recording |
|
([Post Focus]/[Focus Stacking]).... |
127 |
Recording using [Post Focus].................. |
127 |
Select the focus point and save the |
|
picture ([Post Focus])............................... |
129 |
Select the focus range to combine |
|
and create a single picture |
|
([Focus Stacking]).................................... |
130 |
Notes on the [Post Focus]/ |
|
[Focus Stacking]....................................... |
131 |
■■Taking pictures with Time Lapse |
|
Shot/Stop Motion Animation.......... |
132 |
Taking pictures automatically at set |
|
intervals [Time Lapse Shot]...................... |
132 |
Creating stop motion animation |
|
[Stop Motion Animation]........................... |
135 |
■■Taking pictures with self-timer....... |
137 |
■■Taking pictures while |
|
adjusting a setting automatically |
|
(Bracket Recording)........................ |
138 |
Exposure Bracket..................................... |
139 |
Aperture Bracket...................................... |
140 |
Focus Bracket.......................................... |
140 |
6

Table of Content
Stabilizer, Zoom and Flash
■■Correcting jitter................................ |
141 |
■■Using Zoom...................................... |
143 |
Zoom types and use................................. |
143 |
Using the zoom by performing touch |
|
operations (Touch zoom).......................... |
146 |
■■Taking pictures with flash............... |
147 |
■■Setting the flash functions............. |
148 |
Changing the firing mode |
|
(Manual flash)........................................... |
148 |
Changing Flash Mode.............................. |
149 |
Setting the 2nd curtain sync..................... |
151 |
Adjusting the flash output......................... |
152 |
Synchronizing the flash output |
|
with the camera during Exposure |
|
Compensation.......................................... |
152 |
Recording video
■■Recording Video/4K Video.............. |
153 |
■■Taking stills while recording |
|
Setting the resolution and the |
|
video................................................. |
157 |
frame rate................................................. |
155 |
■■Recording Snap Movies.................. |
158 |
Adjusting the focus while recording |
|
|
|
video ([Continuous AF])............................ |
156 |
|
|
Playing Back and Editing Pictures
■■Viewing your pictures..................... |
161 |
■■Viewing video................................... |
162 |
Capturing stills from video........................ |
163 |
■■Switching the playback method..... |
164 |
Zooming in and viewing |
|
“Playback Zoom”...................................... |
164 |
Viewing a list of pictures |
|
“Multi Playback”........................................ |
165 |
Viewing pictures by their recording date |
|
“Calendar Playback”................................. |
165 |
■■Viewing group pictures................... |
166 |
■■Deleting pictures............................. |
168 |
7

|
|
Table of Content |
|
Using Menu Functions |
|
|
|
■■Menu list........................................... |
169 |
[Setup]...................................................... |
204 |
[Rec]......................................................... |
170 |
[My Menu]................................................. |
214 |
[Motion Picture]........................................ |
185 |
[Playback]................................................. |
215 |
[Custom]................................................... |
189 |
|
|
Wi-Fi/Bluetooth |
|
|
|
■■The Wi-Fi®/Bluetooth® function...... |
232 |
■■Connecting the camera to a |
233 |
|
|
smartphone...................................... |
|
|
|
Installing the smartphone/tablet app |
|
|
|
“Leica FOTOS”......................................... |
233 |
|
|
Connection............................................... |
234 |
Connecting with other devices |
|
|
|
■■4K video............................................ |
237 |
■■Storing recorded stills and |
|
Storing 4K video....................................... |
237 |
video in the recorder....................... |
243 |
■■Viewing on a TV screen.................. |
238 |
■■Printing............................................. |
244 |
Recording while monitoring camera |
|
Printing with date and text........................ |
246 |
images...................................................... |
239 |
|
|
HDTV Link (HDMI)................................... |
240 |
|
|
■■Copying the recorded image |
241 |
|
|
data to a computer.......................... |
|
|
|
Copying stills and video............................ |
241 |
|
|
Others |
|
|
|
■■List of monitor/viewfinder |
247 |
■■Restrictions on use and |
264 |
displays............................................ |
additional notes............................... |
||
■■Message displays............................ |
254 |
■■Leica service addresses................. |
272 |
■■Q&A |
256 |
|
|
Troubleshooting.............................. |
|
|
|
8

Table of Content by Function
Recording |
|
Recording |
|
[Zoom Compose Assist]................................ |
36 |
Recording mode............................................ |
38 |
[Preview]....................................................... |
67 |
Panorama Shot Mode................................... |
69 |
Macro recording.......................................... |
101 |
[Time Lapse Shot]....................................... |
132 |
[Stop Motion Animation].............................. |
135 |
Bracket recording........................................ |
138 |
[Silent Mode]............................................... |
181 |
[Multi Exp.].................................................. |
184 |
4K Photo |
|
[4K PHOTO]................................................ |
116 |
[Post Focus] recording................................ |
127 |
Focus (AF/MF) |
|
Auto Focus.................................................... |
87 |
Focus mode.......................................... |
88, 102 |
AF Mode........................................................ |
90 |
[AF Sensitivity(Photo)]................................... |
89 |
Adjusting the AF area position...................... |
96 |
Manual Focus.............................................. |
102 |
AF/AE Lock................................................. |
105 |
Drive |
|
Drive Mode.................................................. |
113 |
Burst function.............................................. |
114 |
[Self Timer].................................................. |
137 |
Exposure |
|
[Touch AE]..................................................... |
47 |
[One Push AE]............................................... |
68 |
AF/AE Lock................................................. |
105 |
Exposure Compensation............................. |
106 |
ISO sensitivity............................................. |
107 |
Exposure Bracket........................................ |
139 |
[Metering Mode].......................................... |
177 |
Picture Quality and Color Tone |
|
White Balance............................................. |
109 |
[Picture Size]............................................... |
171 |
[Quality]....................................................... |
171 |
[Photo Style]................................................ |
173 |
[Filter Settings]............................................ |
175 |
[Color Space].............................................. |
177 |
[Highlight Shadow]...................................... |
178 |
[i.Dynamic].................................................. |
179 |
[i.Resolution]............................................... |
179 |
[Long Shtr NR]............................................ |
180 |
[Diffraction Compensation].......................... |
181 |
[HDR].......................................................... |
183 |
Flash |
|
[Flash Mode]............................................... |
149 |
2nd curtain synchro..................................... |
151 |
[Flash Adjust.].............................................. |
152 |
Monitoring |
|
Recording while monitoring camera |
|
images......................................................... |
239 |
Recording Video |
|
Recording Video |
|
Creative Video Mode..................................... |
81 |
[High Speed Video]....................................... |
82 |
[4K Live Cropping]......................................... |
83 |
[Rec Quality]................................................ |
155 |
Taking stills while recording video............... |
157 |
[Snap Movie]............................................... |
158 |
Audio |
|
[Sound Rec Level Adj.]................................ |
186 |
[Sound Rec Level Limiter]........................... |
187 |
[Wind Noise Canceller]................................ |
187 |
[Wind Cut]................................................... |
187 |
Screen settings |
|
[Sound Rec Level Disp.].............................. |
186 |
[Monochrome Live View]............................. |
196 |
[Center Marker]........................................... |
197 |
[Zebra Pattern]............................................ |
198 |
9

Table of Content by Function
Setup/Custom |
|
Basic settings |
|
[Format]......................................................... |
26 |
[Clock Set]..................................................... |
31 |
Diopter adjustment........................................ |
34 |
Quick Menu................................................... |
50 |
[Beep].......................................................... |
206 |
[Economy]................................................... |
207 |
[Reset] (initialization)................................... |
213 |
Customization |
|
Function buttons |
............................................52 |
Custom Mode................................................ |
85 |
[Custom] menu............................................ |
189 |
Playback |
|
Playback |
|
Picture playback.......................................... |
161 |
Viewing video.............................................. |
162 |
Playback Zoom........................................... |
164 |
Multi Playback............................................. |
165 |
Delete.......................................................... |
168 |
[Auto Review].............................................. |
195 |
[Slide Show]................................................ |
216 |
[Rotate]/[Rotate Disp.]......................... |
228, 230 |
Edit |
|
[Post Focus]................................................ |
129 |
[Focus Stacking].......................................... |
130 |
[Title Edit].................................................... |
219 |
[RAW Processing]....................................... |
220 |
[4K PHOTO Bulk Saving]............................ |
222 |
[Light Composition]..................................... |
223 |
[Sequence Composition]............................. |
224 |
[Clear Retouch]........................................... |
225 |
[Text Stamp]................................................ |
226 |
[Resize]....................................................... |
227 |
[Cropping].................................................... |
228 |
Image settings |
|
[Protect]....................................................... |
218 |
[Rating]........................................................ |
218 |
Wi-Fi/Bluetooth |
|
Leica FOTOS |
|
Leica FOTOS.............................................. |
233 |
Connecting with other devices
PC |
|
Copying the recorded image data to a |
|
computer..................................................... |
241 |
TV |
|
Playing back pictures on a TV screen......... |
238 |
[HDTV Link]................................................. |
240 |
Recorder |
|
Dubbing....................................................... |
243 |
Printer |
|
PictBridge.................................................... |
244 |
10
 General information
General information
■■Camera handling
Protect the camera against vibration, impact or pressure.
●●Avoid using the camera under the following conditions, which may damage the lens, monitor, viewfinder, or camera body.
This may also cause the camera to malfunction or prevent recording. ••Dropping or hitting the camera against a hard surface
••Using excessive force when handling the lens or monitor
The camera is not dust resistant, splash resistant, or waterproof.
Avoid using the camera in places with excessive dust or sand, or where water can come into contact with the camera.
●●Avoid using the camera under the following conditions, which present a risk that sand, water, or foreign material may enter the camera through the lens or openings around buttons. The following conditions are particularly hazardous to the camera and may result in irreparable damage:
••In extremely dusty or sandy places
••In the rain or close to the sea, where the camera could be exposed to high humidity or splash water
If sand, dust, or liquids such as water droplets adhere to the monitor, wipe them off with a dry soft cloth.
●●Not doing so may cause the monitor to respond incorrectly to touch operations.
■■Condensation (When the lens, the monitor, or viewfinder, is fogged up)
●●Condensation may occur when the camera is exposed to sudden changes in temperature or humidity. Avoid these conditions, which may make the lens, monitor, or viewfinder dirty, cause mold, or damage the camera.
●●Turn off the camera and wait about two hours before using it if condensation occurs. Once the camera adjusts to the surrounding temperature, the fogging will clear naturally.
11

General information
General information
■■Always take test shots
Take some test pictures/video recordings before an important event (e.g. wedding) to make sure all picture and sound settings function correctly.
■■No compensation for missed shots
Leica Camera AG shall not accept any liability for missed shots due to technical or memory card malfunctions.
■■Copyright
Unauthorized use of recordings that contain works with copyright for purposes other than personal use is prohibited under copyright law. The use of some such works may also be prohibited for personal use.
■■Please also read the section “Restrictions on use and additional notes” (→264)
12
General information
Scope of delivery
Before using your camera for the first time, please check that the accessories supplied are complete.
Rechargeable battery pack |
Battery charger/AC adaptor |
USB cable |
Shoulder strap |
Lens cap |
Lens cap string |
Hot shoe cover |
Lens hood |
Short instructions |
|
Replacement parts/Accessories
Please visit the Leica Camera AG website for information on the extensive range of Leica replacement parts/accessories:
www.leica-camera.com
Only the accessories specified and described in this manual or by Leica Camera AG must be used with the camera (battery, AC adaptor, etc.). These accessories should only be used with this product. Third-party accessories may result in malfunctions or damage to the product.
■■Removing the Hot Shoe Cover
Remove the hot shoe cover by pulling it in the direction indicated by arrow  while pressing it in the direction indicated by arrow
  .
.
Notes:
••Memory cards are optional.
••The battery pack is referred to as “battery pack” or “battery” in this manual.
••SD, SDHC and SDXC memory cards are also referred to as “cards” in this manual.
••Depending on the country or area where the camera was purchased, the items and their shape may differ from the descriptions and illustrations in these instructions.
••Always keep small parts in a safe place out of the reach of children. ••Please dispose of all packaging appropriately.
13

General information
Names and functions of main parts
1 |
17 |
|
|
2 |
12 |
13 |
14 15 |
16 |
|
18 |
|
|
3 |
|
|
|
|
|
19 |
|
|
4 |
|
|
|
|
|
|
|
|
5 |
|
|
|
|
|
20 |
|
|
6 |
|
|
|
|
21 |
|
|
|
|
|
|
|
|
||
|
|
7 |
|
|
|
|
|
22 |
|
|
|
|
|
|
|
|
|
10 |
9 |
8 |
|
|
|
|
|
11 |
|
|
|
|
|
|
|
|
23 |
|
|
29 |
|
|
|
|
|
|
28
27 |
26 |
25 |
24 |
1Zoom lever (→35, 143, 195)
2Shutter button (→37)
3Front dial (→39)
4Video button (→38, 153)
5[FN4] button (→52) /
[  ] (Exposure Compensation) button
(→106)
6Battery charge indicator (→21) / WIRELESS connection lamp (→206)
7Rear dial (→39)
8[FN5] button (→52)
9Camera [ON/OFF] switch (→31)
10 Mode dial (→38)
11 Shoulder strap eyelet (→17)
12 Self-timer indicator (→137) / AF Assist Lamp (→33, 191)
13 Flash (→147)
14 Stereo microphone (→33, 186)
Be careful not to cover the microphone with your finger. Doing so may make sound difficult to record.
15 Hot shoe (Hot shoe cover)
Keep the hot shoe cover out of reach of children to prevent swallowing.
16 Flash open lever (→147)
17 Eye sensor (→34)
18 Eyecup (→265)
19 Viewfinder (→34, 247)
20 Diopter adjustment dial (→34)
21 [FN8] button (→52) / [EVF] button (→34)
22 Drive mode dial (→113)
23 Microphone jack
Do not use the Stereo microphone cables with the length of 3 m (9.8 feet) or more.
24[FN1] button (→52)
25[FN2] button (→52)
26[FN3] button (→52) /
[ 
 ] ([Zoom Compose Assist]) button
(→36)
27Control ring (→41)
28Lens
29Focal distance indication (as with a 35 mm film camera)
Values assume an aspect ratio of [3:2]. (Check the focal length value displayed when recording video.)
14

General information
Names and functions of main parts
30 31 32 33
39 |
34 |
40 |
35 |
36 |
|
41 |
37 |
38 |
45 |
44 |
43 |
42 |
30 |
[AE/AF LOCK] button (→105) |
||
31 |
Focus mode lever (→87, 88, 102) |
||
32 |
[FN6] button (→52) / |
|
|
[Q MENU] button (→50) |
|
||
33 |
Speaker (→33, 206) |
|
|
34 |
[ |
] (Playback) button (→161) |
|
35 |
[DISP] button (→42) |
|
|
36 |
[MENU/SET] button (→42, 48) |
||
37 |
Cursor button (→42) |
|
|
[ |
] (ISO sensitivity) ( |
) (→107) |
|
|
[ |
] (White balance) ( |
) (→109) |
|
[ |
] ([Macro Mode]) ( |
) (→101) |
|
[ |
] ([AF Mode]) ( ) (→90) |
|
38[FN7] button (→52) /
[  ] (Delete) button (→168) / [
  ] (Cancel) button (→49)
39 [REMOTE] jack
40 [HDMI] jack (→238)
41 [USB/CHARGE] jack (→20, 241, 244)
42 Card/Battery door (→19, 24)
43 Release lever (→19, 24)
44 Tripod mount (→267)
Do not attach this unit to tripods that have screws with a length of 5.5 mm
(0.22 inches) or longer. Doing so could damage the camera and result in an insecure connection.
45 Touch screen (→45) / monitor (→247)
Function buttons [FN9] to [FN13] are touch icons.
They can be displayed by touching the [  ] tab on the recording screen.
15

 Preparation
Attaching the Lens Cap/Shoulder Strap
 Attaching the Lens Cap
Cover the lens with the lens cap to protect it when you are not taking pictures. We recommend attaching the lens cap to the camera using the lens cap string to prevent loss of the lens cap.
••Do not hang or swing around the camera with the lens cap string. ••Make sure to detach the lens cap when turning this unit on.
••Be careful that the lens cap string does not become entangled with the shoulder strap.
1 Use the lens cap string (supplied) to attach the lens cap to the camera
2 Attaching the lens cap
 Pinch here to attach or detach the cap.
●●Keep the lens cap string out of reach of children to prevent swallowing.
16
Preparation
Attaching the Lens Cap/Shoulder Strap
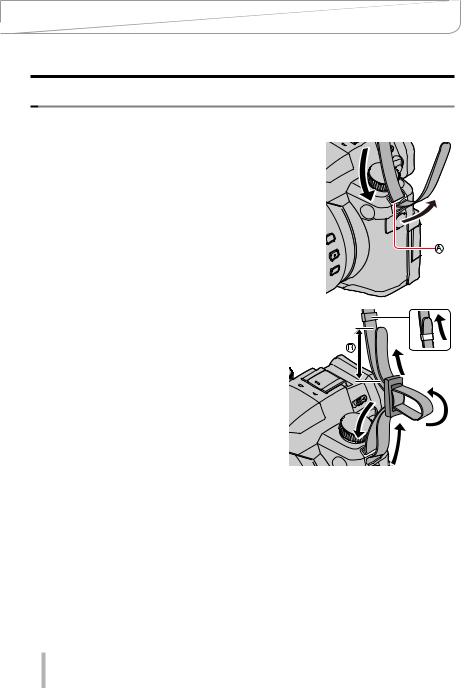
 Attaching the Shoulder Strap
We recommend attaching the shoulder strap when using the camera to prevent it from dropping.
1 Pass the shoulder strap through the shoulder strap eyelet
 Shoulder strap eyelet
2 Pass the shoulder strap through the stopper and fasten the shoulder strap
 Pull the shoulder strap 2 cm (0.8 inches) or more.
3 Pull on the shoulder strap to check that it is fastened securely
••Perform steps 1 to 3 and then attach the other side of the shoulder strap. ••Use the shoulder strap around your shoulder.
–– Do not wrap the strap around your neck. It may result in injury or accident.
••Keep the shoulder strap out of the reach of children as it poses a choking hazard.
17

Preparation
Charging the Battery
Always use the dedicated AC adaptor (supplied), USB cable (supplied), and battery for this camera.
••Always charge before first use! (battery is shipped uncharged)
••Charge the battery while it is in the camera.
Camera status |
Charge |
Off |
Yes |
On |
No |
Batteries to be used with this camera
Third-party batteries that look similar to the Leica battery BP-DC12 are available in some markets. Some of these third-party products may not comply with safety standards and may pose a fire or explosion hazard. Leica Camera AG shall not accept liability for damages or accidents caused by the use of thirdparty batteries. We urgently recommend using only genuine BP-DC12 Leica batteries.
18
Preparation
Charging the Battery
 Inserting the battery
Insert the battery into the camera for charging.
1 |
Slide the release lever to the [OPEN] |
[OPEN] [LOCK] |
|
position and open the card/battery |
|
|
compartment |
|
|
Release lever |
|
2 |
Inserting the battery |
|
|
••Insert the battery fully and lock it in place by |
|
|
closing and locking the battery compartment. |
|
3 |
Close the card/battery compartment |
|
and then slide the release lever to the [LOCK] position
 Ensure the correct polarization of the battery.
  Lever
Lever
■■Removing the battery
Move the lever in the card/battery compartment in the direction of the arrow.
●●Use only the Leica battery BP-DC12.
●●Leica Camera AG cannot guarantee the quality of any third-party battery.
●●To remove the battery, turn the camera off and wait until the Leica indicator on the screen goes off. (Failure to wait may cause the camera to malfunction and may damage the card or recorded data.)
●●Remove battery from camera after use.
19

Preparation
Charging the Battery
 Charging the battery
We recommend charging the battery in ambient temperatures between +10 °C and +30 °C (+50 °F to +86 °F) and with the battery at the same temperature.
Insert the battery into the camera.
Make sure that the camera is turned off when inserting the battery.
The battery can be charged via a mains power outlet or via PC.
 USB cable (supplied)
 AC adaptor (supplied)
 To the mains power socket
Computer
Getting ready: Turn on the computer.
When charging the camera, connect the USB cable (supplied) to the [USB/CHARGE] jack.
 [USB/CHARGE] jack
••This terminal is located at the bottom when the camera is in
an upright position.
••Always check the direction of the jack, and hold the plug
straight to insert or remove it. (If the cable is inserted in the
wrong direction, the jack could become deformed and cause faulty operation.)
Also, do not insert into the wrong jack. Doing so may cause damage to this unit.
20
Preparation
Charging the Battery
●●The charging process may be interrupted when the PC switches to Sleep mode.
●●If a notebook computer that is not connected to an electrical outlet is connected to the camera, the battery of the notebook computer will be depleted. Do not leave the camera and notebook connected for a long period of time.
●●Always connect the USB cable to the USB connector on your computer. Do not connect the USB cable to the USB connector of the monitor, keyboard, printer, or USB hub.
Charging indicators
Charge indicator (Red)
On: Charging in progress Off: Charging complete
(Disconnect the camera from the USB jack of your PC when
charging is complete.)
Flashing: Charging error
(Refer to (→256) for troubleshooting instructions.)
21

Preparation
Charging the Battery
Notes on charging time
When using the AC adaptor (supplied)
Charging time |
Approx. 180 min. |
••The charging time indicated above is the time required for charging in case when the battery is completely used up. Charging times may vary depending on the discharge state of the battery and other conditions. Charging may take longer
in extreme temperatures or if the battery has not been used for a long period of time.
••The time required for charging through the computer varies depending on the power supply capacity of the computer.
●●Do not use any other USB cables except the supplied one. Doing so may cause malfunction of the camera.
●●Do not use any other AC adaptors except the supplied one. ●●Do not use a USB extension cable.
●●The AC adaptor (supplied) and the USB cable (supplied) are dedicated accessories of this camera. Do not use them for other devices.
●●Remove the battery after use. (The battery will be exhausted if left for a long period of time after being charged.)
●●If there is any trouble related to the electrical outlet (i.e. power failure), charging may not complete properly. Disconnect the USB cable (supplied) and reconnect it to the camera.
Remaining battery charge
|
|
|
|
|
|
|
|
|
|
|
75% or more |
|
|
|
|
|
|
|
|
|
|
|
|
|
|
|
|
|
|
|
|
|
|
|
74% to 50% |
|
|
|
|
|
|
|
|
|
|
|
|
|
|
|
|
|
|
|
|
|
|
|
49% to 25% |
|
|
|
|
|
|
|
|
|
|
|
|
|
|
|
|
|
|
|
|
|
|
|
24% or less |
|
|
|
|
|
|
|
|
|
|
|
|
|
|
|
|
|
|
|
|
|
|
|
Low battery |
|
|
|
|
|
|
|
|
|
|
|
|
|
|
|
|
|
|
|
|
|
|
|
••Recharge the battery or replace it with a fully charged battery. |
|
|
|
|
|
Flashing red |
||||||
|
|
|
|
|
|||||||
|
|
|
|
|
|
||||||
••The battery level indicated on the screen is approximate. The exact level varies depending on the environment and the operating conditions.
22

Preparation
Charging the Battery
Estimated number of recordable pictures and operating time
The number of recordable stills is based on CIPA (Camera & Imaging Products Association) standards.
When an SDHC memory card and the supplied battery are used.
■■Recording stills (using the monitor)
Number of recordable pictures |
Approx. 440 pictures |
Recording time |
Approx. 220 min. |
■■Recording stills (using the viewfinder (EVF))
The values in parentheses apply when [EVF Display Speed] is set to [ECO 30fps].
Number of recordable pictures |
Approx. 290 pictures (Approx. 430 pictures) |
Recording time |
Approx. 145 min. |
■■Video recording (using the monitor)
[Rec Quality] |
[FHD/28M/60p] |
[4K/100M/30p] |
Available recording time |
Approx. 130 min. |
Approx. 120 min. |
Actual available recording time* |
Approx. 65 min. |
Approx. 60 min. |
*The actual recording time when repeating actions such as turning the camera on/off and starting/ stopping recording.
■■Picture review (via the monitor)
Playback time |
Approx. 350 min. |
●●The operating times and number of recordable pictures will differ depending on environmental and operating conditions.
For example, in the following cases, the operating times shorten and the number of recordable pictures is reduced.
••In low-temperature environments, e.g. on ski slopes
••With repeated use of flash and zoom
●●The battery may be reaching the end of its life span if the charge depletes comparatively quickly. Please purchase a new battery.
23
Preparation
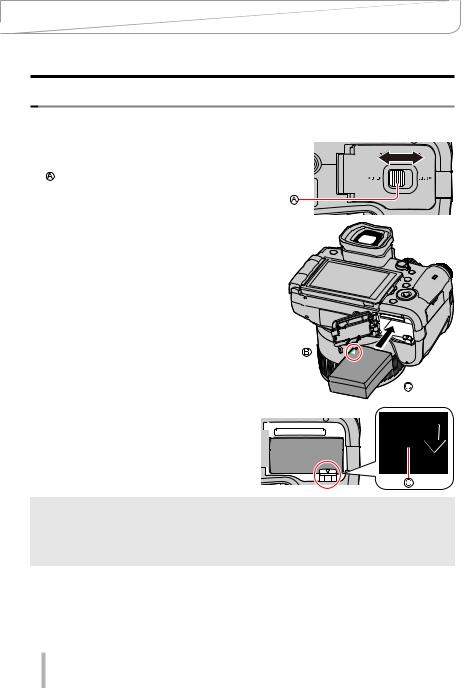
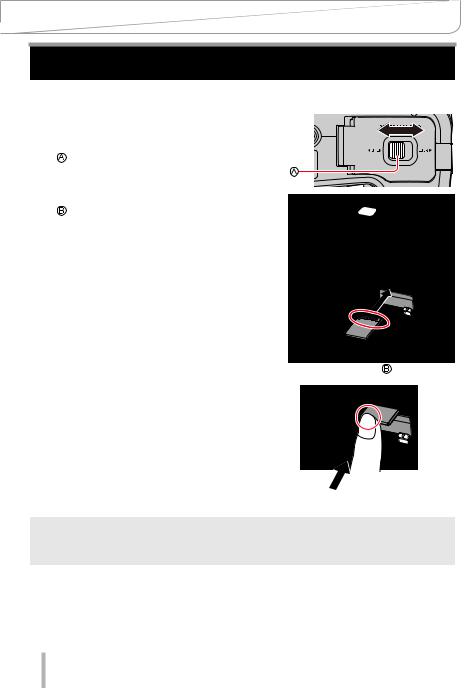
Inserting and removing the memory card
••Make sure that the camera is turned off.
1 |
Slide the release lever to the |
[OPEN] [LOCK] |
[OPEN] position and open the |
|
|
|
card/battery compartment |
|
|
Release lever |
|
2 |
Insert the memory card fully |
|
|
Do not touch the terminal |
|
|
••Check the orientation of the card. |
|
|
••Insert the card all the way firmly until |
|
|
it clicks audibly into place. |
|
3 |
Close the card/battery |
|
compartment and slide the |
|
|
|
release lever to the [LOCK] |
|
|
position |
|
■■Removing the memory card
Press down gently on the center of the card.
Press 
 Pull out
●●Keep the memory card out of reach of children to prevent swallowing.
●●To remove the card, turn the camera off and wait until the Leica indicator on the screen goes off. (Failure to wait may cause the camera to malfunction and may damage the card or recorded data.)
24

Preparation
About the Memory Card
The following SD standard cards can be used.
Type of Card |
Capacity |
Notes |
|
SD Memory Cards |
512 MB – 2 GB |
This camera is compatible with UHS-ΙUHS Speed |
|
SDHC Memory Cards |
4 GB – 32 GB |
||
Class 3 standard SDHC/SDXC memory cards. |
|||
SDXC Memory Cards |
48 GB – 128 GB |
■■About video/4K photo recording and speed class ratings
Use a card that meets the following ratings of the SD Speed Class or UHS Speed Class. ••SD Speed Class and UHS Speed Class are the speed standards regarding continuous
writing. Confirm the SD speed by checking the card label or other card related materials.
[Rec Quality] |
Speed class |
Label example |
[FHD]/[HD] |
Class 4 or higher |
|
|
|
|
[4K]/[High Speed Video] |
UHS Speed Class 3 |
|
|
|
|
|
|
|
When recording in 4K Photo / |
UHS Speed Class 3 |
|
[Post Focus] |
|
|
|
|
Accessing the memory card
The card access indicator lights up in red when pictures are being recorded on the memory card.
●●Do not turn off the camera or remove the memory card while the camera is accessing the card (for data read/writes, deletions or formatting). Do not subject the camera to vibrations, impact, or static electricity. The card or the data on the card may be damaged, and the camera may no longer operate normally. If operation fails due to vibration, impact or static electricity, perform the operation again.
●●The memory card is locked against read/write operations, as well as deletion or formatting when the lever on the card is set to “LOCK”.
●●We recommend copying your pictures/videos to your computer regularly, as electromagnetic waves, static electricity or other faults may damage the data stored on a memory card.
25

Preparation
About the Memory Card
 Formatting the Memory Card (initialization)
Please format memory cards before use in this camera.
Data cannot be recovered after formatting. When reformatting a previously used card, make sure to create a backup of any information on the card you wish to keep.

 →
→  [Setup] → [Format]
●●The formatting process requires a sufficiently charged battery.
●●Do not turn off the camera or perform other operations during formatting.
●●Please format any memory card to be used with this camera even if it was previously formatted on a computer or in another device.
 Estimated recording capacity (number of pictures/recording time)
The number of pictures you can take and the recording time vary depending on the memory card size and type, as well as recording conditions.
Still image capacity
With [Aspect Ratio] at [3:2] and [Quality] at [ |
]. |
|
||||||
|
|
|
|
|
|
|
|
|
[Picture Size] |
16 GB |
32 GB |
|
64 GB |
128 GB |
|||
|
L (20M) |
1450 |
2910 |
|
5810 |
11510 |
||
|
|
M (10M) |
2650 |
5310 |
|
10510 |
20810 |
|
|
|
|
||||||
|
|
|
|
|
|
|
|
|
|
|
|
S (5M) |
4600 |
9220 |
|
17640 |
34940 |
|
|
|
|
|||||
|
|
|
|
|
|
|
|
|
With [Aspect Ratio] at [3:2] and [Quality] at [  ].
].
[Picture Size] |
16 GB |
32 GB |
64 GB |
128 GB |
|||
|
L (20M) |
450 |
920 |
1840 |
3650 |
||
|
|
M (10M) |
530 |
1070 |
2140 |
4250 |
|
|
|
||||||
|
|
|
|
|
|
|
|
|
|
|
S (5M) |
580 |
1170 |
2340 |
4630 |
|
|
|
|||||
|
|
|
|
|
|
|
|
●●“9999+” will be displayed, once the number of images surpasses 9999.
26

Preparation
About the Memory Card
Recording time capacity (Video)
••Recordable time refers to the total video time recorded. ([h], [m] and [s] stands for “hour”, “minute” and “second”.)
[Rec Quality] |
16 GB |
32 GB |
64 GB |
128 GB |
|
[4K/100M/30p] |
20m00s |
41m00s |
1h25m |
2h45m |
|
[4K/100M/24p] |
|||||
|
|
|
|
||
[FHD/28M/60p] |
1h10m |
2h25m |
5h00m |
9h55m |
|
[FHD/20M/30p] |
1h35m |
3h15m |
6h40m |
13h15m |
|
[HD/10M/30p] |
3h05m |
6h20m |
12h45m |
25h20m |
●●MP4 video recording with a [Rec Quality] of [FHD] or [HD]: Max. continuous video recording time is 29 minutes.
Once the file size of a video recording exceeds 4GB, it is split into smaller video files for playback. (You can continue to record video without interruption.)
●●MP4 video recording with a [Rec Quality] of [4K]: Max. continuous video recording time is 29 minutes.
Once the file size of a video recording exceeds 4GB, it is split into smaller video files for playback when an SDHC memory card is used. (You can continue to record video without interruption.) Video recordings with file sizes greater than 4GB can be created if an SDXC memory card is in use.
●●The maximum continuous recording time is displayed on the screen.
27

Preparation
Attaching the Lens Hood
When recording into strong backlight, irregular reflection may occur within the lens. Attaching the lens hood will reduce unwanted reflections and improve contrast.
••Avoid mechanical pressure on the lens hood that might cause deformation.
••Make sure that the camera is turned off.
••Fold in the flash unit before attaching the lens hood.
1 |
Align the index point on the lens |
hood with the index point on the lens |
|
|
with a slight offset as shown in the |
|
illustration |
|
Index point on the lens |
|
Alignment point on the lens hood |
2 |
Turn the lens hood in clockwise |
direction |
3 |
Keep turning the lens hood (there will |
be a little resistance at the locking |
point) until it audibly clicks into place. Make sure the index point on the lens hood is aligned with the index point on the camera
 Rotate the lens hood until the index points are aligned.
••Make sure the lens hood is secured properly and its reflection does not fall on images.
28

Preparation
Attaching the Lens Hood
●●Attaching the lens hood with the flash unit in use would impede the light of the flash and cause parts of the image taken to be darker than the rest (vignetting). We therefore recommend removing the lens hood before using the flash.
●●Storing the lens hood
29

Preparation
Opening out the monitor
1 |
Place your finger in the cleft on the |
right side of the monitor and open |
|
|
the monitor toward the left (maximum |
|
180°) |
2 |
The monitor can be rotated 180° |
upward to a horizontal position |
|
3 |
Return the monitor to its original |
position |
••Only rotate the monitor after opening it wide enough, and be careful not to use excessive force. Doing so may cause damage to this unit.
Free angle shooting
The monitor can be adjusted to any angle for convenient shooting.
High angle shooting |
Low angle shooting |
●●When not using the monitor it is recommended that you close it with the screen facing inward to prevent dirt and scratches.
30
 Loading...