

Page 1
Operators and Safety Manual
ANSI
MODEL
15ELI
3120778
August 5, 2002
Page 2

CALIFORNIAN PROPOSITION 65
BATTERY WARNING
Battery posts,
terminals and related
accessories contain
lead and lead compounds,
chemical known to the
State of Califormia
to cause cancer and
reproductive harm.
WASH HANDS
AFTER HANDLING!
Page 3
FOREWORD
The purpose of this manual is to provide users with the operating procedures essential for the promotion of
proper machine operation for its intended purpose. It is important to over-stress proper machine usage. All
information in this manual should be READ and UNDERSTOOD before any attempt is made to operate the
machine. YOUR OPERATING MANUAL IS YOUR MOST IMPORTANT TOOL - Keep it with the machine.
REMEMBER ANY EQUIPMENT IS ONLY AS SAFE AS THE OPERATOR.
BECAUSE THE MANUFACTURER HAS NO DIRECT CONTROL OVER MACHINE APPLICATION AND
OPERATION, PROPER SAFETY PRACTICES ARE THE RESPONSIBILITY OF THE USER AND HIS OPERATING PERSONNEL.
ALL INSTRUCTIONS IN THIS MANUAL ARE BASED ON THE USE OF THE MACHINE UNDER PROPER
OPERATING CONDITIONS, WITH NO DEVIATIONS FROM THE ORIGINAL DESIGN. ALTERATION AND/
OR MODIFICATION OF THE MACHINE IS STRICTLY FORBIDDEN, WITHOUT WRITTEN APPROVAL
FROM JLG INDUSTRIES, PER OSHA REGULATIONS.
THIS "SAFETY ALERT SYMBOL" IS USED TO CALL ATTENTION TO POTENTIAL HAZARDS
WHICH MAY LEAD TO SERIOUS INJURY OR DEATH IF IGNORED.
Safety of personnel and proper use of the machine are of primary concern, DANGER, WARNING, CAUTION,
IMPORTANT, INSTRUCTIONS and NOTE are inserted throughout this manual to emphasize these areas.
They are defined as follows:
DANGER INDICATES AN IMMINENTLY HAZARDOUS SITUATION WHICH, IF NOT AVOIDED WILL RESULT IN SERIOUS
INJURY OR DEATH.
CAUTION INDICATES A POTENTIALLY HAZARDOUS SITUATION WHICH, IF NOT AVOIDED, MAY RESULT IN MINOR OR
MODERATE INJURY. IT MAY ALSO BE USED TO ALERT
AGAINST UNSAFE PRACTICES.
Also in this Manual "Notes:" are used to provide information of special interest.
JLG INDUSTRIES, INC. MAY HAVE ISSUED SAFETY RELATED BULLETINS FOR YOUR JLG PRODUCT. CONTACT JLG INDUSTRIES, INC. OR THE LOCAL AUTHORIZED JLG DISTRIBUTOR FOR INFORMATION CONCERNING SAFETY RELATED BULLETINS WHICH MAY HAVE BEEN ISSUED FOR YOUR JLG PRODUCT. ALL ITEMS REQUIRED BY THE SAFETY RELATED
BULLETINS MUST BE COMPLETED ON THE AFFECTED JLG PRODUCT.
WARNING INDICATES A POTENTIALLY HAZARDOUS SITUATION WHICH, IF NOT AVOIDED COULD RESULT IN SERIOUS INJURY OR DEATH.
IMPORTANT OR INSTRUCTIONS PROCEDURES ESSENTIAL
FOR SAFE OPERATION AND WHICH, IF NOT FOLLOWED
MAY RESULT IN A MALFUNCTION OR DAMAGE TO THE
MACHINE.
Due to the continuous product improvements, JLG Industries, Inc. reserves the right to make specification changes without
prior notification. Contact JLG Industries, Inc. for updated information.
Page 4

This page left intentionally blank.
Page 5

INTRODUCTION - OPERATION/SAFETY PRECAUTIONS
INTRODUCTION - OPERATION/SAFETY PRECAUTIONS
All procedures herein are based on the use of the
machine under proper operating conditions, with no deviations from original design intent ... as per OSHA regulations.
READ & HEED!
The ownership, use, service, and/or maintenance of this
machine is subject to various federal, state and local laws
and regulations. It is the responsibility of the owner/user to
be knowledgeable of these laws and regulations and to
comply with them. The most prevalent regulations of this
type are the Federal OSHA Safety Regulations*. Listed
below, in abbreviated form are some of the requirements
of Federal OSHA regulations in effect as of the date of
publication of this handbook.
The listing of these requirements shall not relieve the
owner/user of the responsibility and obligation to determine all applicable laws and regulations and their exact
wording and requirements, and to comply with the
requirements. Nor shall the listing of these requirements
constitute an assumption of responsibility of liability on the
part of JLG Industries, Inc.
1. Only trained and authorized operators shall be permitted to operate the aerial lift.
2. A malfunctioning lift shall be shut down until
repaired.
3. The controls shall be plainly marked as to their function.
4. The controls shall be tested each day prior to use to
determine that they are in safe operating condition.
5. Load limits specified by the manufacturer shall not
be exceeded.
6. Instruction and warning placards must be legible.
7. Aerial lifts may be "field modified" for uses other than
those intended by the manufacturer only if certified
in writing by the manufacturer or an equivalent
entity, such as a nationally recognized testing lab, to
be in conformity to applicable OSHA safety regulations and to be at least as safe as it was prior to
modification.
8. Aerial lifts shall not be used near electric power lines
unless the lines have been deenergized or adequate
clearance is maintained (see OSHA 29 CFR 1910.67
and 1926.400).
9. Employees using aerial lifts shall be instructed how
to recognize and avoid unsafe conditions and hazards.
10. Ground controls shall not be operated unless permission has been obtained from personnel in the
platform, except in case of an emergency.
11. Regular inspection of the job site and aerial lift shall
be performed by competent persons.
12. Personnel shall always stand on the floor of the platform, not on boxes, planks, railing or other devices
for work positioning.
*Applicable Federal OSHA regulations, as of the date of
publication of this manual include, but are not limited to,
29 CFR 1910.67, 29 CFR 1926.20, 29 CFR 1926.21, 29
CFR 1926.28, 29 CFR 1926.400 and 29 CFR 1926.453.
Consult the current regulations for the exact wording and
full text of the requirements and contact the closest Federal OSHA office for specific interpretations.
3120778 – JLG Lift – a
Page 6
INTRODUCTION - MAINTENANCE SAFETY PRECAUTIONS
INTRODUCTION - MAINTENANCE SAFETY PRECAUTIONS
A. GENERAL
This section contains the general safety precautions
which must be observed during maintenance of the aerial
platform. It is of utmost importance that maintenance personnel pay strict attention to these warnings and precautions to avoid possible injury to themselves or others or
damage to the equipment. A maintenance program must
be established by a qualified person and must be followed
to ensure that the machine is safe to operate.
MODIFICATION OF THE MACHINE WITHOUT CERTIFICATION BY
A RESPONSIBLE AUTHORITY THAT THE MACHINE IS AT LEAST
AS SAFE AS ORIGINALLY MANUFACTURED IS A SAFETY VIOLATION.
The specific precautions to be observed during machine
maintenance are inserted at the appropriate point in the
manual. These precautions are, for the most part, those
that apply when servicing hydraulic and larger machine
component parts.
Your safety, and that of others, is the first consideration
when engaging in the maintenance of equipment. Always
be conscious of component weight and never attempt to
move heavy parts without the aid of a mechanical device.
Do not allow heavy objects to rest in an unstable position.
When raising a portion of the equipment, ensure that adequate support is provided.
SINCE THE MACHINE MANUFACTURER HAS NO DIRECT CONTROL OVER THE FIELD INSPECTION AND MAINTENANCE,
SAFETY IN THIS AREA IS THE RESPONSIBILITY OF THE OWNER/
OPERATOR.
C. MAINTENANCE
FAILURE TO COMPLY WITH SAFETY PRECAUTIONS LISTED IN
THIS SECTION COULD RESULT IN MACHINE DAMAGE, PERSONNEL INJURY OR DEATH AND IS A SAFETY VIOLATION.
• REMOVE ALL RINGS, WATCHES, AND JEWELRY
WHEN PERFORMING ANY MAINTENANCE.
• DO NOT WEAR LONG HAIR UNRESTRAINED, OR
LOOSE FITTING CLOTHING AND NECKTIES WHICH
ARE APT TO BECOME CAUGHT ON OR ENTANGLED
IN EQUIPMENT.
• OBSERVE AND OBEY ALL DANGER, WARNING, CAUTION AND OTHER INSTRUCTIONS ON MACHINE
AND IN SERVICE MANUAL.
• KEEP STANDING SURFACES AND HAND HOLDS
FREE OF OIL, GREASE, WATER, ETC.
• NEVER WORK UNDER AN ELEVATED PLATFORM
UNTIL PLATFORM HAS BEEN SAFELY RESTRAINED
FROM ANY MOVEMENT BY BLOCKING OR OVERHEAD SLING.
• BEFORE MAKING ADJUSTMENTS, LUBRICATING OR
PERFORMING ANY OTHER MAINTENANCE, SHUT
OFF ALL POWER CONTROLS.
•BATTERY SHOULD ALWAYS BE DISCONNECTED
DURING REPLACEMENT OF ELECTRICAL COMPONENTS.
• KEEP ALL SUPPORT EQUIPMENT AND ATTACHMENTS STOWED IN THEIR PROPER PLACE.
• USE ONLY APPROVED, NONFLAMMABLE CLEANING
SOLVENTS.
B. HYDRAULIC SYSTEM SAFETY
1. It should be particularly noted that the machines
hydraulic systems operate at extremely high and
potentially dangerous pressures. Every effort should
be made to relieve any system pressure prior to disconnecting or removing any portion of the system.
2. Relieve system pressure by activating the lift DOWN
control with the platform completely lowered to
direct any line pressure back into the return line to
the reservoir. Pressure feed lines to system components can then be disconnected with minimal fluid
loss.
b – JLG Lift – 3120778
Page 7

EFFECTIVITY CHANGES
February 1, 1999 - Original Issue of Manual
April 20, 2000 – Revised – Added Proposition 65 to front of manual.
August 5, 2002 – Manual Revised
EFFECTIVITY PAGE
3120778 – JLG Lift – c
Page 8

EFFECTIVITY PAGE
This page left intentionally blank
d – JLG Lift – 3120778
Page 9

TABLE OF CONTENTS
TABLE OF CONTENTS
SUBJECT - SECTION, PARAGRAPH PAGE NO.
INTRODUCTION -- OPERATION/SAFETY PRECAUTIONS . . . . . . . . . . . . . . . . . . . . . . . . . . . . . . . . . . . . A
INTRODUCTION -- MAINTENANCE SAFETY PRECAUTIONS. . . . . . . . . . . . . . . . . . . . . . . . . . . . . . . . . . B
A GENERAL . . . . . . . . . . . . . . . . . . . . . . . . . . . . . . . . . . . . . . . . . . . . . . . . . . . . . . . . . . . . . . . . . . . . . . B
B HYDRAULIC SYSTEM SAFETY . . . . . . . . . . . . . . . . . . . . . . . . . . . . . . . . . . . . . . . . . . . . . . . . . . . . . B
C MAINTENANCE . . . . . . . . . . . . . . . . . . . . . . . . . . . . . . . . . . . . . . . . . . . . . . . . . . . . . . . . . . . . . . . . . B
EFFECTIVITY CHANGES . . . . . . . . . . . . . . . . . . . . . . . . . . . . . . . . . . . . . . . . . . . . . . . . . . . . . . . . . . . . . . D
SECTION 1 - SAFETY PRECAUTIONS
1.1 GENERAL . . . . . . . . . . . . . . . . . . . . . . . . . . . . . . . . . . . . . . . . . . . . . . . . . . . . . . . . . . . . . . . . . . . . .1-1
1.2 ELECTROCUTION HAZARD . . . . . . . . . . . . . . . . . . . . . . . . . . . . . . . . . . . . . . . . . . . . . . . . . . . . . .1-1
1.3 TRANSPORTING . . . . . . . . . . . . . . . . . . . . . . . . . . . . . . . . . . . . . . . . . . . . . . . . . . . . . . . . . . . . . . .1-1
1.4 TRANSPORT SAFETY . . . . . . . . . . . . . . . . . . . . . . . . . . . . . . . . . . . . . . . . . . . . . . . . . . . . . . . . . . . 1-2
1.5 PRE-OPERATIONAL SAFETY . . . . . . . . . . . . . . . . . . . . . . . . . . . . . . . . . . . . . . . . . . . . . . . . . . . . .1-3
1.6 OPERATING SAFETY. . . . . . . . . . . . . . . . . . . . . . . . . . . . . . . . . . . . . . . . . . . . . . . . . . . . . . . . . . . . 1-4
SECTION 2 - PREPARATION AND INSPECTION
2.1 GENERAL . . . . . . . . . . . . . . . . . . . . . . . . . . . . . . . . . . . . . . . . . . . . . . . . . . . . . . . . . . . . . . . . . . . . .2-1
2.2 PREPARATION FOR USE . . . . . . . . . . . . . . . . . . . . . . . . . . . . . . . . . . . . . . . . . . . . . . . . . . . . . . . .2-1
2.3 DELIVERY AND FREQUENT INSPECTION . . . . . . . . . . . . . . . . . . . . . . . . . . . . . . . . . . . . . . . . . . .2-1
Platform Guard Rail Assemblies . . . . . . . . . . . . . . . . . . . . . . . . . . . . . . . . . . . . . . . . . . . . . . .2-1
Platform Assembly. . . . . . . . . . . . . . . . . . . . . . . . . . . . . . . . . . . . . . . . . . . . . . . . . . . . . . . . . . 2-1
Mast . . . . . . . . . . . . . . . . . . . . . . . . . . . . . . . . . . . . . . . . . . . . . . . . . . . . . . . . . . . . . . . . . . . . . 2-1
Mast Chains & Cables . . . . . . . . . . . . . . . . . . . . . . . . . . . . . . . . . . . . . . . . . . . . . . . . . . . . . . .2-1
Control/(Power) Cable(s) for Platform . . . . . . . . . . . . . . . . . . . . . . . . . . . . . . . . . . . . . . . . . . . 2-1
Lift Cylinder . . . . . . . . . . . . . . . . . . . . . . . . . . . . . . . . . . . . . . . . . . . . . . . . . . . . . . . . . . . . . . .2-1
Frame. . . . . . . . . . . . . . . . . . . . . . . . . . . . . . . . . . . . . . . . . . . . . . . . . . . . . . . . . . . . . . . . . . . .2-1
Wheels and Casters. . . . . . . . . . . . . . . . . . . . . . . . . . . . . . . . . . . . . . . . . . . . . . . . . . . . . . . . .2-1
Hydraulic Oil Supply . . . . . . . . . . . . . . . . . . . . . . . . . . . . . . . . . . . . . . . . . . . . . . . . . . . . . . . .2-1
Machine Controls - (Platform and Ground). . . . . . . . . . . . . . . . . . . . . . . . . . . . . . . . . . . . . . . 2-2
Batteries - (DC Models) . . . . . . . . . . . . . . . . . . . . . . . . . . . . . . . . . . . . . . . . . . . . . . . . . . . . . .2-2
Power Cord - (AC Models). . . . . . . . . . . . . . . . . . . . . . . . . . . . . . . . . . . . . . . . . . . . . . . . . . . . 2-2
Electric Motor/Hydraulic Pump and Valve. . . . . . . . . . . . . . . . . . . . . . . . . . . . . . . . . . . . . . . . 2-2
Placards . . . . . . . . . . . . . . . . . . . . . . . . . . . . . . . . . . . . . . . . . . . . . . . . . . . . . . . . . . . . . . . . . .2-2
2.4 DAILY WALK-AROUND INSPECTION . . . . . . . . . . . . . . . . . . . . . . . . . . . . . . . . . . . . . . . . . . . . . . .2-2
General. . . . . . . . . . . . . . . . . . . . . . . . . . . . . . . . . . . . . . . . . . . . . . . . . . . . . . . . . . . . . . . . . . .2-2
Batteries Charged (DC Models) . . . . . . . . . . . . . . . . . . . . . . . . . . . . . . . . . . . . . . . . . . . . . . . 2-2
Overall Cleanliness . . . . . . . . . . . . . . . . . . . . . . . . . . . . . . . . . . . . . . . . . . . . . . . . . . . . . . . . . 2-3
Placards . . . . . . . . . . . . . . . . . . . . . . . . . . . . . . . . . . . . . . . . . . . . . . . . . . . . . . . . . . . . . . . . . .2-3
Operators & Safety and ANSI Responsibilities Manual . . . . . . . . . . . . . . . . . . . . . . . . . . . . . 2-3
Lubrication . . . . . . . . . . . . . . . . . . . . . . . . . . . . . . . . . . . . . . . . . . . . . . . . . . . . . . . . . . . . . . . .2-3
2.5 DAILY FUNCTIONAL CHECK. . . . . . . . . . . . . . . . . . . . . . . . . . . . . . . . . . . . . . . . . . . . . . . . . . . . . .2-4
2.6 TORQUE REQUIREMENTS . . . . . . . . . . . . . . . . . . . . . . . . . . . . . . . . . . . . . . . . . . . . . . . . . . . . . . . 2-4
2.7 BATTERY CHARGING & MAINTENANCE (ELI-DC MODELS ONLY) . . . . . . . . . . . . . . . . . . . . . . . 2-4
Battery Maintenance and Safety Practices . . . . . . . . . . . . . . . . . . . . . . . . . . . . . . . . . . . . . . .2-4
Battery Charger Operation . . . . . . . . . . . . . . . . . . . . . . . . . . . . . . . . . . . . . . . . . . . . . . . . . . .2-4
Abnormal Cycle Indicator LED . . . . . . . . . . . . . . . . . . . . . . . . . . . . . . . . . . . . . . . . . . . . . . . .2-5
3120778 – JLG Lift – i
Page 10

TABLE OF CONTENTS
SECTION 3 - USER RESPONSIBILITIES & MACHINE CONTROLS
3.1 GENERAL . . . . . . . . . . . . . . . . . . . . . . . . . . . . . . . . . . . . . . . . . . . . . . . . . . . . . . . . . . . . . . . . . . . . . 3-1
3.2 PERSONNEL TRAINING . . . . . . . . . . . . . . . . . . . . . . . . . . . . . . . . . . . . . . . . . . . . . . . . . . . . . . . . .3-1
Operator Training. . . . . . . . . . . . . . . . . . . . . . . . . . . . . . . . . . . . . . . . . . . . . . . . . . . . . . . . . . .3-1
Training Supervision . . . . . . . . . . . . . . . . . . . . . . . . . . . . . . . . . . . . . . . . . . . . . . . . . . . . . . . . 3-1
Operator Responsibility . . . . . . . . . . . . . . . . . . . . . . . . . . . . . . . . . . . . . . . . . . . . . . . . . . . . . .3-1
3.3 OPERATING CHARACTERISTICS AND LIMITATIONS . . . . . . . . . . . . . . . . . . . . . . . . . . . . . . . . . . 3-2
General . . . . . . . . . . . . . . . . . . . . . . . . . . . . . . . . . . . . . . . . . . . . . . . . . . . . . . . . . . . . . . . . . . 3-2
Placards. . . . . . . . . . . . . . . . . . . . . . . . . . . . . . . . . . . . . . . . . . . . . . . . . . . . . . . . . . . . . . . . . .3-2
Capacities . . . . . . . . . . . . . . . . . . . . . . . . . . . . . . . . . . . . . . . . . . . . . . . . . . . . . . . . . . . . . . . . 3-2
Stability . . . . . . . . . . . . . . . . . . . . . . . . . . . . . . . . . . . . . . . . . . . . . . . . . . . . . . . . . . . . . . . . . . 3-2
3.4 CONTROLS AND INDICATORS . . . . . . . . . . . . . . . . . . . . . . . . . . . . . . . . . . . . . . . . . . . . . . . . . . . .3-2
Ground Control Station (See Figure 3-1.) . . . . . . . . . . . . . . . . . . . . . . . . . . . . . . . . . . . . . . . .3-2
Platform Control Station . . . . . . . . . . . . . . . . . . . . . . . . . . . . . . . . . . . . . . . . . . . . . . . . . . . . . 3-3
SECTION 4 - MACHINE OPERATION
4.1 MACHINE DESCRIPTION . . . . . . . . . . . . . . . . . . . . . . . . . . . . . . . . . . . . . . . . . . . . . . . . . . . . . . . . 4-1
4.2 GENERAL . . . . . . . . . . . . . . . . . . . . . . . . . . . . . . . . . . . . . . . . . . . . . . . . . . . . . . . . . . . . . . . . . . . . . 4-1
4.3 MACHINE SET-UP AND OPERATION . . . . . . . . . . . . . . . . . . . . . . . . . . . . . . . . . . . . . . . . . . . . . . .4-2
Floor Brake Operation . . . . . . . . . . . . . . . . . . . . . . . . . . . . . . . . . . . . . . . . . . . . . . . . . . . . . . .4-2
Platform Loading . . . . . . . . . . . . . . . . . . . . . . . . . . . . . . . . . . . . . . . . . . . . . . . . . . . . . . . . . . . 4-2
Platform Operation. . . . . . . . . . . . . . . . . . . . . . . . . . . . . . . . . . . . . . . . . . . . . . . . . . . . . . . . . . 4-2
4.4 QUICK-CHANGE PLATFORM . . . . . . . . . . . . . . . . . . . . . . . . . . . . . . . . . . . . . . . . . . . . . . . . . . . . .4-3
Platform Removal. . . . . . . . . . . . . . . . . . . . . . . . . . . . . . . . . . . . . . . . . . . . . . . . . . . . . . . . . . . 4-3
Platform Installation . . . . . . . . . . . . . . . . . . . . . . . . . . . . . . . . . . . . . . . . . . . . . . . . . . . . . . . . . 4-3
4.5 STOWING MACHINE . . . . . . . . . . . . . . . . . . . . . . . . . . . . . . . . . . . . . . . . . . . . . . . . . . . . . . . . . . . .4-3
4.6 TRANSPORTING, LIFTING AND TIE DOWN . . . . . . . . . . . . . . . . . . . . . . . . . . . . . . . . . . . . . . . . . . 4-4
General . . . . . . . . . . . . . . . . . . . . . . . . . . . . . . . . . . . . . . . . . . . . . . . . . . . . . . . . . . . . . . . . . . 4-4
Transporting by Pushing . . . . . . . . . . . . . . . . . . . . . . . . . . . . . . . . . . . . . . . . . . . . . . . . . . . . .4-4
Lifting . . . . . . . . . . . . . . . . . . . . . . . . . . . . . . . . . . . . . . . . . . . . . . . . . . . . . . . . . . . . . . . . . . . . 4-4
Transport Vehicle Tie Down . . . . . . . . . . . . . . . . . . . . . . . . . . . . . . . . . . . . . . . . . . . . . . . . . .4-4
SECTION 5 - OPTIONAL EQUIPMENT
5.1 OPTIONAL EQUIPMENT . . . . . . . . . . . . . . . . . . . . . . . . . . . . . . . . . . . . . . . . . . . . . . . . . . . . . . . . .5-1
22" x 25" Quick-Change Platform . . . . . . . . . . . . . . . . . . . . . . . . . . . . . . . . . . . . . . . . . . . . . .5-1
26" x 26" Quick-Change Platform . . . . . . . . . . . . . . . . . . . . . . . . . . . . . . . . . . . . . . . . . . . . . .5-1
28" x 26" Quick-Change Platform . . . . . . . . . . . . . . . . . . . . . . . . . . . . . . . . . . . . . . . . . . . . . .5-1
25" x 26" Step-in Molded Platform w/Swing-up Gate . . . . . . . . . . . . . . . . . . . . . . . . . . . . . . . 5-1
26" x 50" Quick-Change - ExtendiblePlatform . . . . . . . . . . . . . . . . . . . . . . . . . . . . . . . . . . . . . 5-1
Tool Tray . . . . . . . . . . . . . . . . . . . . . . . . . . . . . . . . . . . . . . . . . . . . . . . . . . . . . . . . . . . . . . . . . 5-1
Fluorescent Tube Caddy. . . . . . . . . . . . . . . . . . . . . . . . . . . . . . . . . . . . . . . . . . . . . . . . . . . . .5-1
Extra Power Pack (DC Battery, Charger & Case) . . . . . . . . . . . . . . . . . . . . . . . . . . . . . . . . . .5-1
Lifting Hook . . . . . . . . . . . . . . . . . . . . . . . . . . . . . . . . . . . . . . . . . . . . . . . . . . . . . . . . . . . . . . . 5-1
Platform Auxiliary Power Lowering Device . . . . . . . . . . . . . . . . . . . . . . . . . . . . . . . . . . . . . . .5-1
Laser Positioning Device . . . . . . . . . . . . . . . . . . . . . . . . . . . . . . . . . . . . . . . . . . . . . . . . . . . . .5-1
5.2 EXTENDIBLE PLATFORM OPERATION . . . . . . . . . . . . . . . . . . . . . . . . . . . . . . . . . . . . . . . . . . . . . 5-2
Mounting to Mast . . . . . . . . . . . . . . . . . . . . . . . . . . . . . . . . . . . . . . . . . . . . . . . . . . . . . . . . . . . 5-2
Entering/Exiting Platform . . . . . . . . . . . . . . . . . . . . . . . . . . . . . . . . . . . . . . . . . . . . . . . . . . . . .5-2
Extending Platform . . . . . . . . . . . . . . . . . . . . . . . . . . . . . . . . . . . . . . . . . . . . . . . . . . . . . . . . .5-2
Retracting Platform . . . . . . . . . . . . . . . . . . . . . . . . . . . . . . . . . . . . . . . . . . . . . . . . . . . . . . . . .5-2
SECTION 6 - EMERGENCY PROCEDURES
6.1 GENERAL INFORMATION . . . . . . . . . . . . . . . . . . . . . . . . . . . . . . . . . . . . . . . . . . . . . . . . . . . . . . . .6-1
ii – JLG Lift – 3120778
Page 11

6.2 EMERGENCY CONTROLS AND THEIR LOCATIONS. . . . . . . . . . . . . . . . . . . . . . . . . . . . . . . . . . . 6-1
Platform Emergency Stop Switch . . . . . . . . . . . . . . . . . . . . . . . . . . . . . . . . . . . . . . . . . . . . . .6-1
Ground Emergency Stop Switch. . . . . . . . . . . . . . . . . . . . . . . . . . . . . . . . . . . . . . . . . . . . . . .6-1
Manual Descent Control Valve . . . . . . . . . . . . . . . . . . . . . . . . . . . . . . . . . . . . . . . . . . . . . . . .6-1
6.3 EMERGENCY OPERATION . . . . . . . . . . . . . . . . . . . . . . . . . . . . . . . . . . . . . . . . . . . . . . . . . . . . . . . 6-1
Use of Ground Controls. . . . . . . . . . . . . . . . . . . . . . . . . . . . . . . . . . . . . . . . . . . . . . . . . . . . . .6-1
Operator Unable to Control Machine . . . . . . . . . . . . . . . . . . . . . . . . . . . . . . . . . . . . . . . . . . . 6-1
Platform Caught Overhead . . . . . . . . . . . . . . . . . . . . . . . . . . . . . . . . . . . . . . . . . . . . . . . . . . .6-2
Righting of Tipped Machine . . . . . . . . . . . . . . . . . . . . . . . . . . . . . . . . . . . . . . . . . . . . . . . . . .6-2
Post-Incident Inspection . . . . . . . . . . . . . . . . . . . . . . . . . . . . . . . . . . . . . . . . . . . . . . . . . . . . . 6-2
6.4 INCIDENT NOTIFICATION . . . . . . . . . . . . . . . . . . . . . . . . . . . . . . . . . . . . . . . . . . . . . . . . . . . . . . . .6-2
SECTION 7 - INSPECTION AND REPAIR LOG
LIST OF FIGURES
1-1. Electrocution Hazard. . . . . . . . . . . . . . . . . . . . . . . . . . . . . . . . . . . . . . . . . . . . . . . . . . . . . . . . . . . .1-1
1-2. Use Handles Provided On Mast Crossbar To Move Machine.. . . . . . . . . . . . . . . . . . . . . . . . . . . .1-2
1-3. Do Not Move Unit on Soft or Uneven Surfaces or Over Obstructions, Bumps, Debris, Etc. . . . . .1-2
1-4. Two People May Be Required on Slopes Up To Five Degrees. Also Always Travel
With Platform End On The Low Side of Slope.. . . . . . . . . . . . . . . . . . . . . . . . . . . . . . . . . . . . . . . . 1-3
1-5. Read Your Manual. . . . . . . . . . . . . . . . . . . . . . . . . . . . . . . . . . . . . . . . . . . . . . . . . . . . . . . . . . . . . .1-3
1-6. Always Look in the Direction of Movement. Watch for Overhead and Other Obstructions. . . . . .1-4
1-7. Death or Serious Injury Could Occur from a Tip Over . . . . . . . . . . . . . . . . . . . . . . . . . . . . . . . . . .1-4
1-8. All Personnel Must Stand Clear When Platform Is Being Raised Or Lowered. . . . . . . . . . . . . . . .1-5
1-9. Falling from Platform could cause Death or Serious Injury.. . . . . . . . . . . . . . . . . . . . . . . . . . . . . .1-5
2-1. Daily Walk-Around Inspection. . . . . . . . . . . . . . . . . . . . . . . . . . . . . . . . . . . . . . . . . . . . . . . . . . . . .2-3
2-2. Battery Fluid Level. . . . . . . . . . . . . . . . . . . . . . . . . . . . . . . . . . . . . . . . . . . . . . . . . . . . . . . . . . . . . .2-5
2-3. Battery Box and Charger Assembly. (D.C. Model Only) . . . . . . . . . . . . . . . . . . . . . . . . . . . . . . . .2-5
2-4. Dual Voltage Battery Charger - Front Panel.. . . . . . . . . . . . . . . . . . . . . . . . . . . . . . . . . . . . . . . . . . 2-6
2-5. Lubrication Locations . . . . . . . . . . . . . . . . . . . . . . . . . . . . . . . . . . . . . . . . . . . . . . . . . . . . . . . . . . .2-7
2-6. Torque Chart. . . . . . . . . . . . . . . . . . . . . . . . . . . . . . . . . . . . . . . . . . . . . . . . . . . . . . . . . . . . . . . . . .2-8
3-1. Ground Control Station. . . . . . . . . . . . . . . . . . . . . . . . . . . . . . . . . . . . . . . . . . . . . . . . . . . . . . . . . .3-2
3-2. Manual Descent Control Valve Location - Machines Since S/N-0900019526 . . . . . . . . . . . . . . . .3-3
3-3. Platform Control Station.. . . . . . . . . . . . . . . . . . . . . . . . . . . . . . . . . . . . . . . . . . . . . . . . . . . . . . . . .3-3
3-4. Decal Locations (Front View) . . . . . . . . . . . . . . . . . . . . . . . . . . . . . . . . . . . . . . . . . . . . . . . . . . . . .3-4
3-5. Decal Locations (3124221 decal from Front View). . . . . . . . . . . . . . . . . . . . . . . . . . . . . . . . . . . . .3-5
3-6. Decal Locations (Rear View) . . . . . . . . . . . . . . . . . . . . . . . . . . . . . . . . . . . . . . . . . . . . . . . . . . . . . .3-6
3-7. Decal Locations (Top View) . . . . . . . . . . . . . . . . . . . . . . . . . . . . . . . . . . . . . . . . . . . . . . . . . . . . . .3-7
3-8. Decal Locations (Right/Left View) . . . . . . . . . . . . . . . . . . . . . . . . . . . . . . . . . . . . . . . . . . . . . . . . . .3-8
4-1. Setting & Releasing Floor Brake. . . . . . . . . . . . . . . . . . . . . . . . . . . . . . . . . . . . . . . . . . . . . . . . . . . 4-2
4-2. Quick Change Platform Mount.. . . . . . . . . . . . . . . . . . . . . . . . . . . . . . . . . . . . . . . . . . . . . . . . . . . .4-3
4-3. 15ELI Tie Down Pockets. . . . . . . . . . . . . . . . . . . . . . . . . . . . . . . . . . . . . . . . . . . . . . . . . . . . . . . . .4-4
5-1. Extendible Platform. . . . . . . . . . . . . . . . . . . . . . . . . . . . . . . . . . . . . . . . . . . . . . . . . . . . . . . . . . . . .5-3
TABLE OF CONTENTS
LIST OF TABLES
1-1 Minimum Safe Approach Distance (to energized power lines or parts) . . . . . . . . . . . . . . . . . . . .1-1
2-1 Lubrication Intervals for Various Components . . . . . . . . . . . . . . . . . . . . . . . . . . . . . . . . . . . . . . . .2-7
4-1 Maximum Platform Capacity. . . . . . . . . . . . . . . . . . . . . . . . . . . . . . . . . . . . . . . . . . . . . . . . . . . . . .4-2
4-2 ELI Machine Gross Weights . . . . . . . . . . . . . . . . . . . . . . . . . . . . . . . . . . . . . . . . . . . . . . . . . . . . . .4-4
7-1 Inspection and Repair Log . . . . . . . . . . . . . . . . . . . . . . . . . . . . . . . . . . . . . . . . . . . . . . . . . . . . . . . 7-1
3120778 – JLG Lift – iii
Page 12

TABLE OF CONTENTS
This page intentionally left blank.
iv – JLG Lift – 3120778
Page 13
SECTION 1 - SAFETY PRECAUTIONS
SECTION 1. SAFETY PRECAUTIONS
1.1 GENERAL
This section prescribes the proper and safe practices for
major areas of machine usage which have been divided
into three basic categories: Transporting, Pre-Operation
and Operation. In order to promote proper usage of the
machine, it is mandatory that a daily routine be established based on instruction given in this section. A maintenance program must also be established by a qualified
person and must be followed to ensure that the machine
is safe to operate.
The user/operator of the machine should not accept operating responsibility until this manual has been READ and
UNDERSTOOD, and operating instructions of the machine
under the supervision of an experienced and qualified
operator, has been completed. If there is a question on
application and/or operation, JLG Industries Product
Safety and Reliability Department should be consulted.
MODIFICATION OF THE MACHINE WITHOUT APPROVAL OF JLG
INDUSTRIES INC., OR CERTIFICATION BY A NATIONALLY RECOGNIZED TESTING LAB TO BE IN CONFORMITY WITH APPLICABLE OSHA REGULATIONS, AND TO BE AT LEAST AS SAFE AS
BEFORE MODIFICATION, IS PROHIBITED AND IS A VIOLATION
OF OSHA RULES.
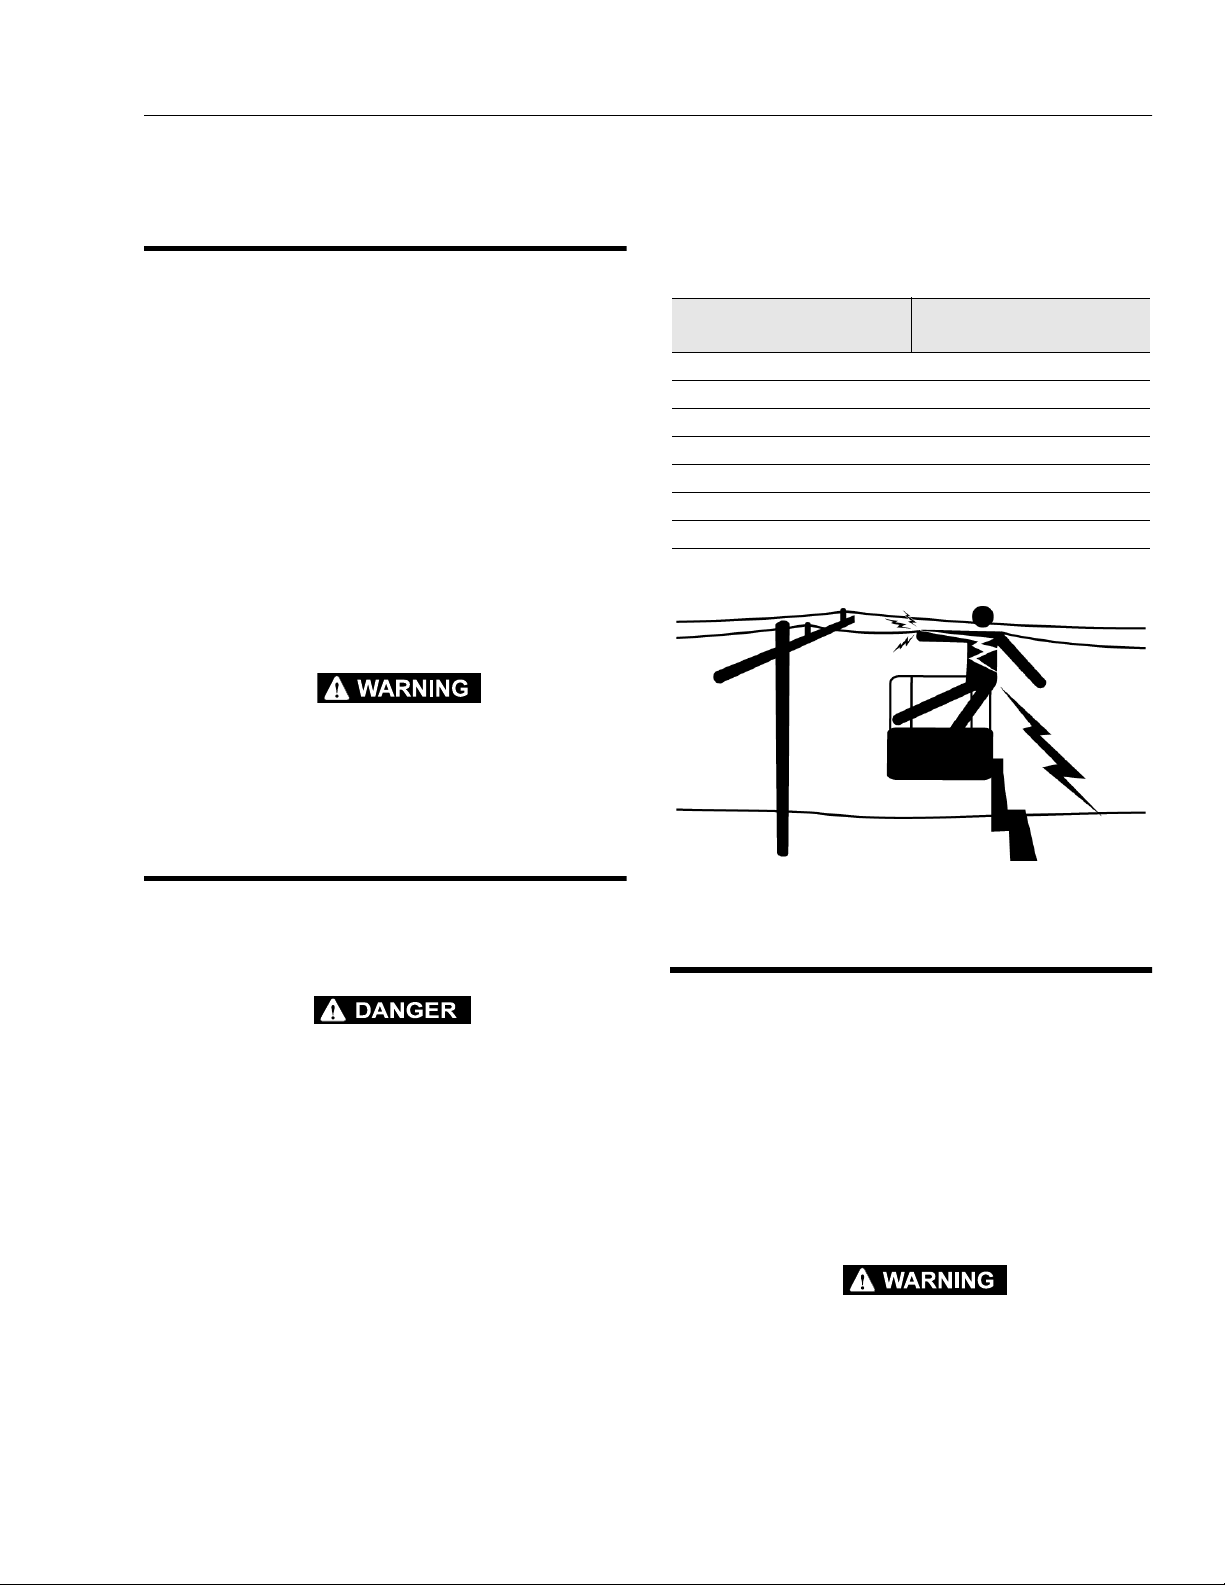
Table 1-1. Minimum Safe Approach Distance
(to energized power lines or parts)
VOLTAGE RANGE
(PHASE TO PHASE)
0-300V – Avoid Contact
Over 300V to 50KV – 10 f t. [3 m]
Over 50KV to 200KV – 15 f t. [4.6 m]
Over 200KV to 350KV – 20 f t. [6 m]
Over 350KV to 500KV – 25 f t. [7.6 m]
Over 500KV to 750KV – 35 ft. [10.6 m]
Over 750KV to 1000KV – 45 ft. [13.7 m]
MINIMUM SAFE DISTANCE -
Feet [m]
1.2 ELECTROCUTION HAZARD
Minimum safe approach distances (M.S.A.D.) to energized (exposed or insulated) power lines and parts.
DO NOT MANEUVER MACHINE OR PERSONNEL TO DISTANCE
LESS THAN M.S.A.D (SEE TABLE 1-1.). ASSUME ALL ELECTRICAL PARTS AND WIRING ARE ENERGIZED UNLESS KNOWN
OTHERWISE.
THIS MACHINE DOES NOT PROVIDE PROTECTION FROM CONTACT WITH OR PROXIMITY TO AN ELECTRICALLY CHARGED
CONDUCTOR. MAINTAIN A CLEARANCE OF AT LEAST 10 FT.
(3M) BETWEEN ANY PART OF THE MACHINE AND ANY ELECTRICAL LINE OR APPARATUS CARRYING UP TO 50,000 VOLTS. 1
FT. (0.3M) ADDITIONAL CLEARANCE IS REQUIRED FOR EVERY
ADDITIONAL 30,000 VOLTS OR LESS. ALLOW FOR PLATFORM
SWAY, ROCK OR SAG AND ELECTRICAL LINE SWAYING, (SEE
FOLLOWING TABLE).
Figure 1-1. Electrocution Hazard.
1.3 TRANSPORTING
Before transporting the machine the user/operator must
be familiar with the proper procedures for transporting the
machine, as well as the weight and size of the machine.
The user/operator should be familiar with the surrounding
work area and surface before transporting the machine.
The work area must be a smooth, firm surface on which
machine is capable of being leveled.
NOTE: Remember that the key to safe and proper usage is
common sense and its careful application.
FAILURE TO COMPLY WITH SAFETY PRECAUTIONS LISTED IN
THIS SECTION AND ON MACHINE MAY RESULT IN MACHINE
DAMAGE, PERSONNEL INJURY OR DEATH AND IS A SAFETY
VIOLATION.
3120778 – JLG Lift – 1-1
Page 14
SECTION 1 - SAFETY PRECAUTIONS
1.4 TRANSPORT SAFETY
• FULLY LOWER AND COMPLETELY EMPTY PLATFORM
OF TOOLS AND DEBRIS BEFORE MOVING MACHINE.
• NEVER ALLOW PERSONNEL IN PLATFORM WHILE
MOVING MACHINE.
FAILURE TO OBSERVE THE FOLLOWING TIPPING HAZARD
INSTRUCTIONS COULD CAUSE THE UNIT TO TIP OVER OR BE
HARD TO CONTROL WHEN BEING MOVED, WHICH COULD
RESULT IN SERIOUS INJURY OR DEATH DUE TO BEING PINNED
OR CRUSHED BY THE UNIT.
• ON A LEVEL SURFACE, ALWAYS TRAVEL WITH THE
PLATFORM END LEADING THE WAY.
• WATCH FOR OBSTRUCTIONS AROUND MACHINE
AND OVERHEAD WHEN MOVING.
• CHECK TRAVEL PATH FOR PERSONS, HOLES,
BUMPS, DROP-OFFS, OBSTRUCTIONS, DEBRIS, AND
COVERINGS WHICH MAY CONCEAL HOLES AND
OTHER HAZARDS, AS TIPPING COULD OCCUR.
• BEFORE MOVING MACHINE ON FLOORS, TRUCKS
AND OTHER SURFACES, CHECK ALLOWABLE
CAPACITY OF SURFACES.
• TWO PEOPLE ARE REQUIRED ON SLOPES UP TO 5
DEGREES. A FORKLIFT MUST BE USED WHEN MOVING UNITS ON SLOPES GREATER THAN 5 DEGREES.
Figure 1-3. Do Not Move Unit on Soft or Uneven Sur-
faces or Over Obstructions, Bumps, Debris, Etc.
• ALWAYS TRAVEL UP OR DOWN A SLOPE WITH THE
PLATFORM END OF THE MACHINE POSITIONED
TOWARDS THE LOW SIDE OF THE SLOPE. THE
OPERATOR AND ASSISTANT MUST WALK BESIDE
AND GUIDE THE MACHINE WITH THE HANDLES ON
THE MAST CROSSBAR.
• NEVER POSITION THE UNIT SIDEWAYS ON A SLOPE.
• USE CAUTION AND CHECK CLEARANCES WHEN
MOVING MACHINE IN RESTRICTED OR CLOSE QUARTERS.
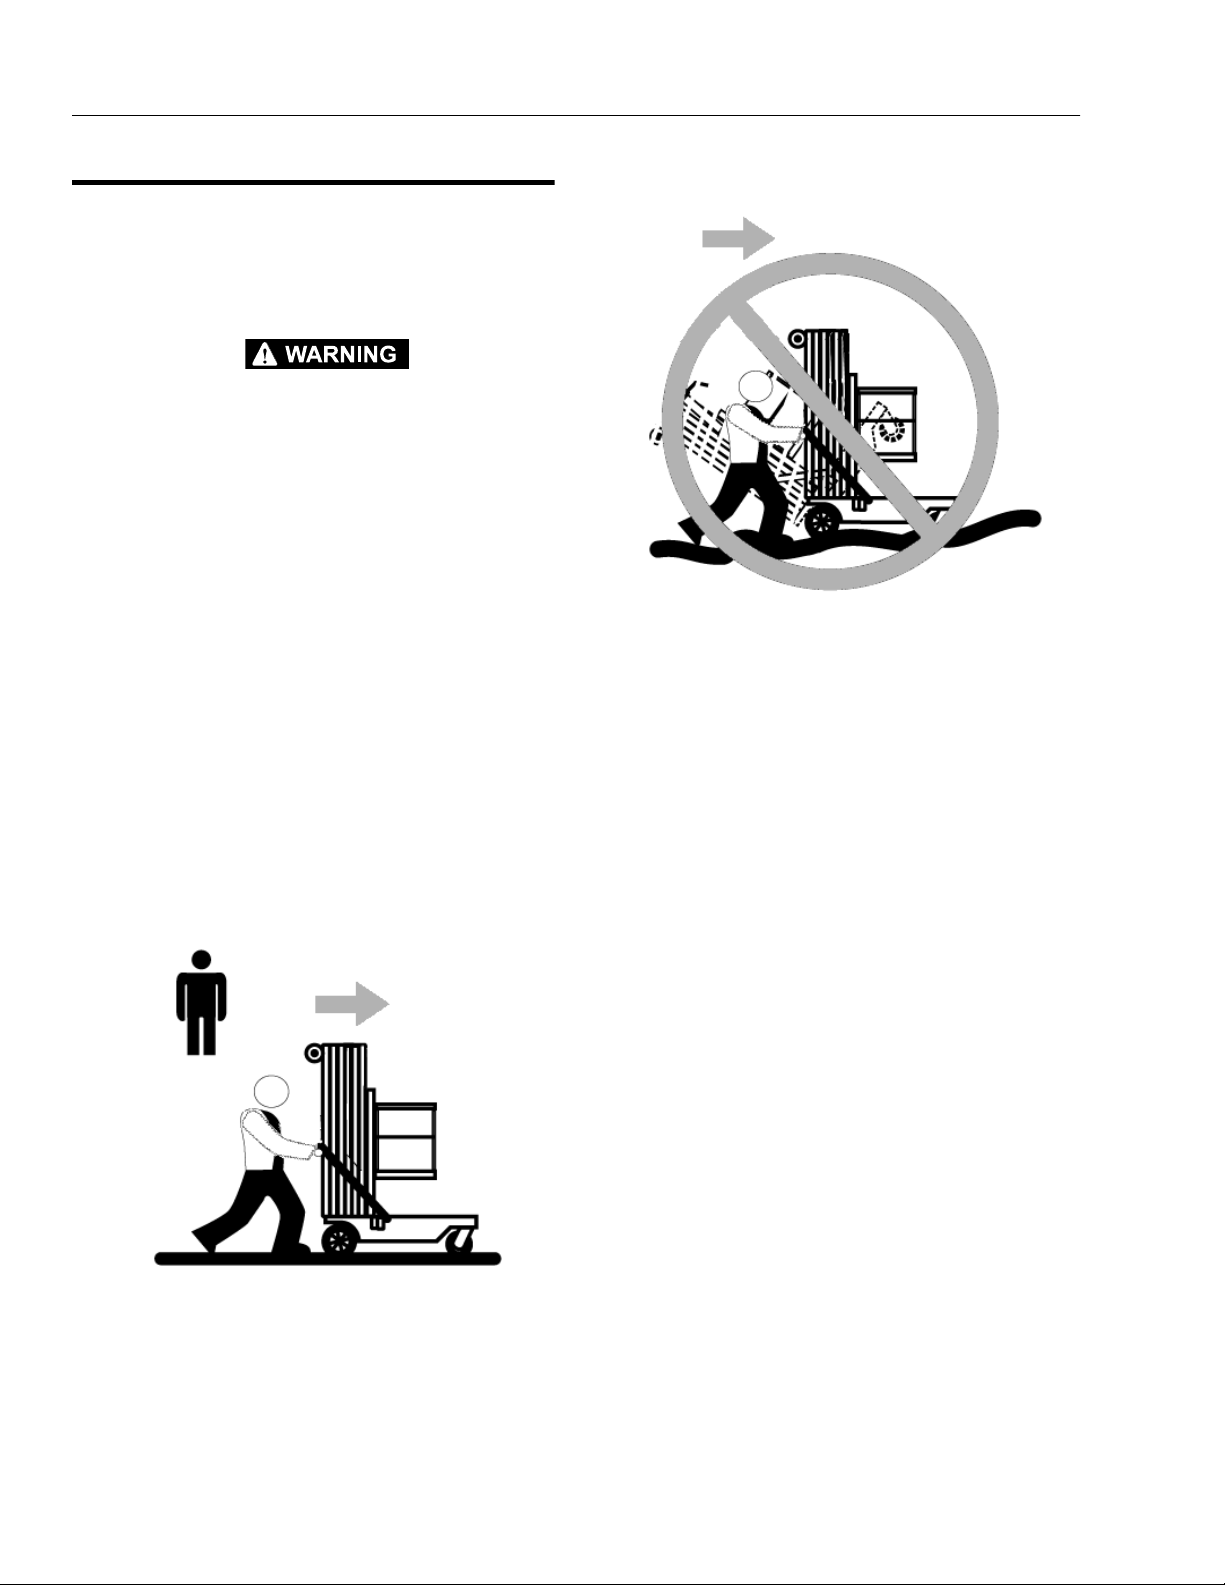
• ALWAYS USE AN ASSISTANT WHEN MOVING
MACHINE IN AREAS WHERE VISION IS
OBSTRUCTED.
• KEEP NON-OPERATING PERSONNEL AT LEAST 6
FEET (1.8 M) AWAY FROM MACHINE DURING TRANSPORTING OPERATIONS.
Figure 1-2. Use Handles Provided On Mast Crossbar
To Move Machine.
•
1-2 – JLG Lift – 3120778
Page 15

SECTION 1 - SAFETY PRECAUTIONS
Figure 1-4. Two People May Be Required on Slopes Up To Five Degrees.
Also Always Travel With Platform End On The Low Side of Slope.
1.5 PRE-OPERATIONAL SAFETY
Figure 1-5. Read Your Manual.
• READ YOUR MANUAL. UNDERSTAND WHAT YOU’VE
READ - THEN BEGIN OPERATIONS.
• ALLOW ONLY THOSE AUTHORIZED AND QUALIFIED
PERSONNEL TO OPERATE MACHINE WHO HAVE
DEMONSTRATED THAT THEY UNDERSTAND SAFE
AND PROPER OPERATION AND MAINTENANCE OF
THE UNIT.
• AN OPERATOR MUST NOT ACCEPT OPERATING
RESPONSIBILITIES UNTIL ADEQUATE TRAINING HAS
BEEN GIVEN BY COMPETENT AND AUTHORIZED
PERSONS.
• BEFORE OPERATION CHECK WORK AREA FOR
OVERHEAD ELECTRIC LINES. (SEE ELECTROCUTION
HAZARD, SECTION 1-2.)
• BEFORE OPERATION CHECK WORK AREA FOR
MACHINE TRAFFIC SUCH AS FORKLIFTS, CRANES,
AND OTHER CONSTRUCTION EQUIPMENT.
• SET-UP MACHINE FOR OPERATION ONLY ON A
SMOOTH, FIRM LEVEL SURFACE.
• ENSURE THAT OPERATORS OF OTHER OVERHEAD
AND FLOOR LEVEL MACHINES ARE AWARE OF THE
AERIAL PLATFORMS PRESENCE. DISCONNECT
POWER TO OVERHEAD CRANES. BARRICADE FLOOR
AREA IF NECESSARY.
• PRECAUTIONS TO AVOID ALL KNOWN HAZARDS IN
THE WORK AREA MUST BE TAKEN BY THE OPERATOR AND HIS SUPERVISOR BEFORE STARTING THE
WORK.
• DO NOT OPERATE THIS MACHINE UNLESS IT HAS
BEEN SERVICED AND MAINTAINED ACCORDING TO
THE MANUFACTURERS SPECIFICATIONS AND
SCHEDULE.
• ENSURE DAILY INSPECTION AND FUNCTION CHECK
IS PERFORMED PRIOR TO PLACING MACHINE INTO
OPERATION. HAVE AUTHORIZED PERSONNEL TAKE
ANY NECESSARY CORRECTIVE ACTION BEFORE
PLACING MACHINE INTO OPERATION.
• NEVER DISABLE OR MODIFY ANY SAFETY DEVICE.
ANY MODIFICATION OF THE MACHINE IS A SAFETY
VIOLATION AND IS A VIOLATION OF OSHA AND ANSI
RULES.
• DO NOT OPERATE MACHINE WHEN EXPOSED TO
HIGH WIND, RAIN OR SNOW.
3120778 – JLG Lift – 1-3
Page 16

SECTION 1 - SAFETY PRECAUTIONS
• NEVER OPERATE OR RAISE PLATFORM WHEN
MACHINE IS ON A TRUCK OR OTHER VEHICLE.
• APPROVED HEAD GEAR (I.E. HARD HAT, ETC.) MUST
BE WORN WHEN REQUIRED BY ALL OPERATING AND
GROUND PERSONNEL.
• READ AND OBEY ALL DANGER, WARNINGS, CAUTIONS AND OPERATING INSTRUCTIONS ON
MACHINE AND IN THIS MANUAL.
• BE FAMILIAR WITH LOCATION AND OPERATION OF
GROUND STATION AND EMERGENCY CONTROLS.
1.6 OPERATING SAFETY
• DO NOT OPERATE ANY MACHINE ON WHICH DANGER, WARNING, CAUTION OR INSTRUCTION PLACARDS OR DECALS ARE MISSING OR ILLEGIBLE.
• NEVER EXCEED MANUFACTURERS RATED PLATFORM CAPACITY - REFER TO CAPACITY DECAL ON
MACHINE.
• OPERATE AC UNITS WITH AN EXTENSION CORD
WIRE RATED AT A MINIMUM OF 15 AMPS.
Figure 1-7. Death or Serious Injury Could Occur from a
Tip Over
MACHINE, REMOVE IT FROM SERVICE, AND NOTIFY
PROPER AUTHORITIES.
• WHEN APPLICABLE BY REASON OF LOCAL REGULATIONS OR JOBSITE/EMPLOYER SAFETY RULES,
PERSONNEL IN THE PLATFORM SHALL AT ALL TIMES
Figure 1-6. Always Look in the Direction of Movement.
Watch for Overhead and Other Obstructions.
• DO NOT ENTER PLATFORM UNTIL THE FLOOR
BRAKE HAS BEEN PROPERLY ADJUSTED AND THE
UNIT’S BASE FRAME IS LEVEL ACCORDING TO THE
BUBBLE LEVEL INDICATOR ON BASE FRAME.
• DO NOT OPERATE MACHINE ON SOFT FOOTING
THAT WILL ALLOW THE FLOOR BRAKE TO SETTLE
INTO OR BREAK THROUGH SURFACE.
• NEVER OPERATE A MALFUNCTIONING MACHINE. IF
A MALFUNCTION OCCURS, SHUT DOWN THE
WEAR APPROVED FALL PROTECTION DEVICES AND
OTHER SAFETY GEAR AS REQUIRED. A LANYARD
ATTACHMENT IS SUPPLIED ON THE SIDE OF THE
MACHINE’S MAST.
• CHECK CLEARANCES ABOVE, ON SIDES AND BOTTOM OF PLATFORM WHEN RAISING AND LOWERING
PLATFORM.
• NEVER USE THE MAST TO GAIN ACCESS TO OR
LEAVE PLATFORM.
• DO NOT ATTACH OVERHANGING LOADS TO THE
PLATFORM OR INCREASE THE PLATFORM SIZE WITH
1-4 – JLG Lift – 3120778
Page 17

SECTION 1 - SAFETY PRECAUTIONS
Figure 1-8. All Personnel Must Stand Clear When Plat-
form Is Being Raised Or Lowered.
UNAUTHORIZED DECK EXTENSIONS OR ATTACHMENTS.
• DO NOT TIE OFF MACHINE TO ANY ADJACENT
STRUCTURE. NEVER ATTACH WIRE, CABLE OR ANY
SIMILAR ITEMS TO PLATFORM.
• TRANSFERS BETWEEN A STRUCTURE AND THE
PLATFORM EXPOSE OPERATORS TO FALL POTENTIALS. THIS PRACTICE SHOULD BE DISCOURAGED
WHEREVER POSSIBLE. WHERE TRANSFER MUST BE
ACCOMPLISHED TO PERFORM THE JOB, TWO LANYARDS WILL BE USED AND THE PLATFORM MUST BE
WITHIN 1 FOOT (0.3 M) OF THE ADJACENT - SAFE
AND SECURE - STRUCTURE. ONE LANYARD SHOULD
BE ATTACHED TO THE PLATFORM, THE OTHER TO
THE STRUCTURE. THE SAFETY LANYARD THAT IS
ATTACHED TO THE PLATFORM SHOULD NOT BE DISCONNECTED UNTIL SUCH TIME AS THE TRANSFER
TO THE STRUCTURE IS COMPLETE.
• NO HORSEPLAY IS PERMITTED IN PLATFORM.
• DO NOT ALLOW PERSONNEL TO TAMPER WITH,
SERVICE, OR OPERATE THIS MACHINE FROM THE
GROUND WITH PERSONNEL IN PLATFORM EXCEPT
IN AN EMERGENCY.
• DURING PLATFORM OPERATION KEEP ALL BODY
PARTS INSIDE PLATFORM RAILINGS.
Figure 1-9. Falling from Platform could cause
Death or Serious Injury.
• NEVER POSITION LADDERS, STEPS, OR SIMILAR
ITEMS ON UNIT TO PROVIDE ADDITIONAL REACH
FOR ANY PURPOSE.
• WHEN WORKING FROM PLATFORM BOTH FEET
MUST BE FIRMLY POSITIONED ON DECK.
• DO NOT EXTEND REACH LIMITS OF THIS MACHINE
WITH ADDITIONAL EQUIPMENT SUCH AS PLANKS,
BOXES, ETC.
• DO NOT USE LADDERS ON OR AGAINST MACHINE.
DO NOT PERFORM WORK THAT WILL SUBJECT UNIT
TO A HORIZONTAL FORCE OR CREATE A ROCKING
MOTION OF THE PLATFORM.
• DO NOT OPERATE MACHINE FROM PLATFORM
WITHOUT THE PLATFORM GATE IN PLACE AND
PROPERLY CLOSED. THIS IS A SAFETY VIOLATION.
• ALWAYS ENSURE THAT POWER TOOLS ARE PROPERLY STOWED AND NEVER LEFT HANGING BY THEIR
CORD FROM THE PLATFORM WORK AREA.
• AVOID ACCUMULATION OF DEBRIS ON PLATFORM
WORK AREA. KEEP MUD, OIL, GREASE AND OTHER
SLIPPERY SUBSTANCES FROM FOOTWEAR AND
PLATFORM DECK.
3120778 – JLG Lift – 1-5
Page 18

SECTION 1 - SAFETY PRECAUTIONS
This page intentionally left blank.
1-6 – JLG Lift – 3120778
Page 19

SECTION 2 - PREPARATION AND INSPECTION
SECTION 2. PREPARATION AND INSPECTION
2.1 GENERAL
This section provides the necessary information needed
by those personnel that are responsible to place the
machine in operation readiness, and lists checks that are
performed prior to use of the machine. It is important that
the information contained in this section be read and
understood before any attempt is made to operate the
machine. Ensure that all the necessary inspections have
been completed successfully before placing the machine
into service. These procedures will aid in obtaining maximum service life and safe operation.
SINCE THE MACHINE MANUFACTURER HAS NO DIRECT CONTROL OVER THE FIELD INSPECTION AND MAINTENANCE, THIS
IS THE RESPONSIBILITY OF THE OWNER/OPERATOR.
2.2 PREPARATION FOR USE
Before a new machine is put into operation it must be
carefully inspected for any evidence of damage resulting
from shipment and inspected periodically thereafter, as
outlined in Section 2-3, Delivery and Periodic Inspection.
The unit should be thoroughly checked for hydraulic leaks
during initial start-up and run. A check of all components
should be made to assure their security.
All preparation necessary to place the machine in operation readiness status are the responsibility of management personnel. Preparation requires good common
sense, (i.e. lift works smoothly) coupled with a series of
visual inspections. The mandatory requirements are given
in Section 2-4, Daily Walk Around Inspection.
It should be assured that the items appearing in the Delivery and Frequent Inspection and Functional Check are
complied with prior to putting the machine into service.
2.3 DELIVERY AND FREQUENT INSPECTION
The following check list provides a systematic inspection
to assist in detecting defective, damaged, or improperly
installed parts. The check list denotes the items to be
inspected and conditions to examine. Frequent inspection
shall be performed every three (3) months or more often
when required by environment, severity, and frequency of
usage.
Platform Guard Rail Assemblies
Properly installed; no loose or missing parts; no visible
damage.
Platform Assembly
No visible damage; free of dirt and debris. Platform gate
or slide bar functions properly on machines so equipped.
Mast
No visible damage, abrasions and/or distortions; no binding; mast sections free of dirt or other foreign material.
Sequencing cables properly secured; no visible damage;
proper cable tension.
Mast Chains & Cables
No visible damage; proper chain/cable tension; evidence
of proper lubrication. Chain/cable sheaves and sheave
pins properly secured; no visible damage.
Control/(Power) Cable(s) for Platform
No visible damage; cable properly tensioned and seated
in control cable sheaves; control cable sheaves not damaged and rotating freely.
Lift Cylinder
No rust, nicks, scratches or foreign material on piston rod.
No leakage. Manual Descent Valve secure; no visible
damage.
NOTE: This machine requires periodic safety and mainte-
nance inspections by an authorized JLG Dealer. An
annual inspection shall be performed on the aerial
platform no later than thirteen (13) months from the
date of the new machine inspection or prior annual
inspection. The inspection shall be performed by
person(s) qualified as a mechanic on the specific
make and model of the aerial platform.
Frame
No visible damage; loose or missing hardware (top and
underside); floor brake assembly working properly,
secured and undamaged.
Wheels and Casters
Free rolling; no loose or missing parts; no visible damage.
Hydraulic Oil Supply
Check the hydraulic oil level at the hydraulic fluid reservoir
through the access hole on the side of the ground control
panel. Maintain an oil level to the "Fill to Line" indicator on
the side of the reservoir. If fluid level is low, add a hydraulic
oil with a minimum Service Classification of GL-3, and has
3120778 – JLG Lift – 2-1
Page 20

SECTION 2 - PREPARATION AND INSPECTION
an SAE viscocity of 10W-30 or 10W-20 and a viscosity
index of 152. See Section 1 of the Service Manual for
more details about hydraulic oil for this machine.
Machine Controls - (Platform and Ground)
Switches operable; no visible damage; placards secure
and legible.
Batteries - (DC Models)
Proper electrolyte level; cable connections tight; no visible
damage; no corrosion at battery cable connections.
Power Cord - (AC Models)
No visible damage; connector and cable properly
secured.
Electric Motor/Hydraulic Pump and Valve
No leakage; unit secure.
Placards
No visible damage; placards secure and legible.
2.4 DAILY WALK-AROUND INSPECTION
It is the user/operator’s responsibility to inspect the
machine before the start of each workday. It is recommended that each user/operator inspect the machine
before operation, even if the machine has already been
put into service under another user/operator. This Daily
Walk-Around Inspection is the preferred method of inspection.
General
Begin the “Walk-Around Inspection” (See Figure 2-1.) at
item 1 listed following. Continue around machine checking each item in sequence for the conditions listed in the
“Walk-Around Inspection Check list”.
TO AVOID INJURY DO NOT OPERATE MACHINE UNTIL ALL MALFUNCTIONS HAVE BEEN CORRECTED. USE OF A MALFUNCTIONING MACHINE IS A SAFETY VIOLATION.
TO AVOID POSSIBLE INJURY, BE SURE MACHINE POWER IS
“OFF” DURING “WALK-AROUND INSPECTION”.
NOTE: Do not overlook visual inspection of chassis under-
side. Checking this area often results in discovery of
conditions which could cause extensive machine
damage.
1. Wheels and Casters - Properly secured, wheels
and casters turn freely and are properly lubricated.
Check for any visible damage.
2. Floor Brake - Properly secured to frame, no visible
damage (cracks, distortion, etc.) and is functioning
properly.
3. Base Frame - No visible damage; components
properly secured, no loose wires dangling below
base; bubble level in place and functioning properly.
4. Battery/Battery Charger Installation - (DC
Machines)
secure, no damage or corrosion.
5. Motor/Pump/Reservoir Unit - All properly secured,
no visible damage, no evidence of hydraulic leaks.
Check that hydraulic reservoir fluid level is filled to
the "Fill to Line" mark on the side of the reservoir.
6. Manual Descent Control Valve - Properly secured,
no loose or missing parts, no visible damage.
7. Ground Controls - Key switch operable, no visible
damage; placards secure and legible; emergency
stop switch, no visible damage and properly set for
operation.
8. Mast Installation - Mast sections properly secured,
no visible damage to mast sections, no loose or
missing parts, slide pads properly secured. Mast
chains and cables properly secured, lubricated and
undamaged. Sequencing cables properly secured
and undamaged. Sheaves and pins are properly
secured, have no visible damage, no loose or missing parts and are lubricated.
9. Platform Controls - Up/Down and Function Enable
buttons properly secured, no loose or missing parts,
no visible damage. Placards secure and legible,
emergency shut-off button set for operation. Control
markings legible; Operators manual enclosed in
manual storage tube.
10. Guard Rail Installation - All railings securely
attached, no visible damage, no missing parts; sliding entry bar in proper working order. Platform gate/
slide bar working properly, no visible sign of damage (if so equipped).
11. Platform Assembly - Secure to mast; no loose or
missing parts, no visible damage. Control and
power cables, no visible damage; cables properly
tensioned and seated in control cable sheaves; control cable sheaves not damaged and rotate freely.
In addition to the Daily Walk-Around Inspection, be sure to
include the following as part of the daily inspection:
Proper battery electrolyte level, cables
Batteries Charged (DC Models)
Start each day with fully charged batteries. (See Section
2.7 “Battery Charging and Maintenance.”)
2-2 – JLG Lift – 3120778
Page 21

SECTION 2 - PREPARATION AND INSPECTION
Daily Walk-Around
Inspection Items
1. Wheels & Casters
2. Floor Brake
3. Base Frame
4. Battery Box/Charger
5. Motor/Pump/Reservoir Unit
Manual Descent Con trol
Valve Location
6a.
Prior to S/N- 090001952 6
6b.
Since S/N- 0900019526
7. Ground Controls
8. Mast Installation
9. Platform Control s
10. Guard Rail Installation
11. Plat form Assembly
6a
8
9
0
1
7
1
1
5
4
6b
1
Figure 2-1. Daily Walk-Around Inspection.
Overall Cleanliness
Keep oil, grease, water, etc. wiped from standing surfaces
and hand holds.
Placards
Keep all information and operating placards clean and
unobstructed. Cover areas where placards are present
when using the machine for spraying paint or any material
which could cover these surfaces and reduce legibility.
3
2
1
Operators & Safety and ANSI Responsibilities Manual
Ensure a copy of the Operators and Safety and ANSI
Responsibilities manual is enclosed in the manual storage
box.
Lubrication
For those parts pointed out in the Walk-Around Inspection
requiring lubrication, (refer to the Lubrication Chart, Table
2-1., this Section), for specific time interval requirements.
3120778 – JLG Lift – 2-3
Page 22

SECTION 2 - PREPARATION AND INSPECTION
2.5 DAILY FUNCTIONAL CHECK
TO AVOID INJURY DO NOT OPERATE A MACHINE UNTIL ALL
MALFUNCTIONS HAVE BEEN CORRECTED. USE OF A MALFUNCTIONING MACHINE IS A SAFETY VIOLATION.
Once the walk-around inspection is complete, a functional
check of all systems should be performed in an area free
of overhead and ground level obstructions. Perform a
functional check in accordance with the following procedures:
1. Set-up machine for operation according to instructions in Section 4-3, “Machine Set-Up & Operation”,
(i.e.. smooth, firm level surface, set floor brake and
make sure castor wheels are off ground, etc.)
2. Enter platform, raise and lower platform 2 ft. to 3 ft.
(.61m to .92m) several times. Check for smooth elevation and lowering of platform.
3. With platform completely lowered, check hydraulic
oil level in reservoir at ground control station. Maintain an oil level to the "Fill to Line" indicator on the
side of the reservoir. NEVER USE HYDRAULIC
BRAKE FLUID.
NOTE: If oil level is low, add hydraulic oil with a minimum
Service Classification of GL-3, and an SAE viscocity
of 10W-30 or 10W-20 and a viscosity index of 152.
See Section 1 of the Service Manual for more details
about hydraulic oil for this machine.
2.7 BATTERY CHARGING & MAINTENANCE
(ELI-DC MODELS ONLY)
ELI-DC Models are equipped with 12 volt, 10 amp output
battery chargers (U.S.A. - 120V-AC/60Hz input). The bat-
tery charger has a microprocessor controlled automatic
charge sensing circuit which can determine cell voltage
and regulate charger output as required. The charger
automatically terminates charging when a full battery
charge is acheived.
Battery Maintenance and Safety Practices
(See Figure 2-2.)
ENSURE THAT BATTERY ACID DOES NOT COME INTO CONTACT
WITH SKIN OR CLOTHING. WEAR PROTECTIVE CLOTHING AND
EYEWEAR WHEN WORKING WITH BATTERIES. NEUTRALIZE ANY
BATTERY ACID SPILLS WITH BAKING SODA AND WATER.
BATTERY ACID RELEASES AN EXPLOSIVE GAS WHILE CHARGING, ALLOW NO OPEN FLAMES, SPARKS OR LIGHTED TOBACCO
PRODUCTS IN THE AREA WHILE CHARGING BATTERIES.
CHARGE BATTERIES ONLY IN A WELL VENTILATED AREA.
ADD ONLY DISTILLED WATER TO BATTERIES. WHEN ADDING
DISTILLED WATER TO THE BATTERIES, A NON-METALLIC CONTAINER AND/OR FUNNEL MUST BE USED.
Check the electrolyte level of the batteries often, adding
only distilled water when required. When fully charged,
battery fluid level should be 1/8" below vent tubes. (See
Figure 2-2.).
2.6 TORQUE REQUIREMENTS
The Torque Chart, Figure 2-6., consists of standard torque
values based on bolt diameter and grade, it also specifies
dry and wet torque values in accordance with recommended shop practices. This chart is provided as an aid
to the user/operator in the event the user/operator notices
a condition that requires prompt attention during the walkaround inspection or during operation until the proper service personnel can be notified. Utilizing this Torque Chart
in conjunction with the Preventive Maintenance table in
Section 2 of the Service and Maintenance Manual, will
enhance the safety, reliability and performance of this
machine.
• DO NOT fill to bottom of vent tubes.
• DO NOT allow fluid level to go below the top of the
plates when charging or operating.
Battery Charger Operation
(See Figure 2-3. & 2-4.)
Position machine in well ventilated area near an AC electrical outlet and set the Ground Control-PLAT/OFF/GRND
key switch to the OFF position.
ALWAYS CHECK THE VOLTAGE SELECT SWITCH ON THE FACE
OF THE BATTERY CHARGER BEFORE OPERATION. IF NOT SET
TO THE PROPER AC POWER INPUT VOLTAGE DAMAGE WILL
OCCUR TO THE CHARGER.
1. Set the AC voltage switch on the face of the charger
for the local AC line voltage.
2. Remove the battery charger AC power cable stowed
inside the battery/charger carrier (beside charger).
2-4 – JLG Lift – 3120778
Page 23

Figure 2-2. Battery Fluid Level.
SECTION 2 - PREPARATION AND INSPECTION
a. First all five (5) LED’s on the face of the charger
flash three (3) times.
b. Then each LED lights in sequence.
c. Then all five (5) LED’s flash three (3) times
again.
4. When ready to charge, the CHARGER ON LED and
the INCOMPLETE CHARGE (25%) LED on the front
panel of the charger will light up, the charger will
then begin to charge the batteries.
NOTE: If the ABNORMAL CYCLE LED comes on and stays
on at any time during the charge cycle, see sub-section following about the ABNORMAL CYCLE indicator LED.
5. When the battery cell voltage reaches 2.37 V/cell the
80% CHARGE LED on the front panel of the charger
will light up. The charger then continues to monitor
the increase in charge until it sees no increase, and
then terminates the charging process.
6. The CHARGE COMPLETE (100%) LED will come on
when the charging process is finished.
7. Unplug the charger AC power cord and stow the
cord in the opening in the battery/charger carrier
(beside charger).
DC BATTERY
CHARGER
AC POWER
CORD
(Shown Stowed)
BATTERY BOX &
CHARGER ASSY.
DC MAIN
POWER
CONNECTOR
(from battery to machine)
Figure 2-3. Battery Box and Charger Assembly.
(D.C. Model Only)
Connect the battery charger AC power cable to a
properly grounded receptacle, use a suitable extension cord, if necessary.
3. When plugged in, the charger runs through a selfdiagnostic check. The LED’s on the front panel of
the battery charger flash in the sequence noted following;
Abnormal Cycle Indicator LED
If the ABNORMAL CYCLE indicator LED should come on
during the normal charging cycle of the batteries, it could
indicate any of the following conditions;
• The AC input to the charger was interrupted, i.e. local
power failure or charger cable was unplugged or
bumped and power was interrupted intermittently.
• A dead cell or cells in the battery would prevent the
charger from sensing enough voltage to complete the
battery charge.
• One or more of the battery terminal connections loose
or corroded resulting in an intermittent incomplete circuit.
3120778 – JLG Lift – 2-5
Page 24

SECTION 2 - PREPARATION AND INSPECTION
%OFCHARGE
IN PROGRESS
(GREEN LED’S)
CHARGER ON
(GREEN LED)
ABNORMAL CYCLE
(YELLOW LED)
CIRCUIT
BREAKERS
A/C VOLTAGE
SELECT SWITCH
Figure 2-4. Dual Voltage Battery Charger - Front Panel.
2-6 – JLG Lift – 3120778
Page 25

SECTION 2 - PREPARATION AND INSPECTION
3
1
2
Figure 2-5. Lubrication Locations (See Table below).
Table 2-1. Lubrication Intervals for Various Components
INTERVAL HOURS
ITEM COMPONENT
1 Hydraul ic Oil Fill To Line
NO/TYPE
LUBE POINTS
on Reservoir
5 Qt. Reservoir
LUBE/METHOD
HO - Check Hyd.
Oil Level
HO - Change
Hyd. Oil
2 Swivel Raceways 2 - Front Casters MPG - Pressure Gun
3 Mast Chains * 2 - Per Section Chain Lube - Brush
or Spray
3
MONTHS
150 Hrs.
✔
6
MONTHS
300 Hrs.
✔
1
YEAR
600 Hrs.
2
YEARS
1200 Hrs.
✔
COMMENTS
Check Hydraulic Oil
every 10 hrs.
Change Hydrauli c Oil
every 1200 hrs.
* Applies Only to Mas t Sections with Chains.
Key to Lubricants: MPG - Multipurpose Grease
HO - Hydraulic Oil - See Table 1-1 in Service Manual. (JLG recommen ds Mobil 424 hydraulic oil.)
Notes: 1. Lubricate like items on each side of the ma chine.
2. Recommended lubric ating intervals are based on nor mal use. If machine is subjected to severe operating conditions,
such as a high numbe r of cycles, location, corrosive/d irty environment, etc., user must ad just lubricating requirements accordingly.
3. Lubricating interv als are calculated on 50 hours of machine operation a week.
4. Prior to checking hydraulic oil level, operate m achine through one complete cycl e of lift function (full up and down). Failure to do so will
result in incorr ect oil level reading on the hydraulic reservoir.
3120778 – JLG Lift – 2-7
Page 26

SECTION 2 - PREPARATION AND INSPECTION
Figure 2-6. Torque Chart.
2-8 – JLG Lift – 3120778
Page 27

SECTION 3 - USER RESPONSIBILITIES & MACHINE CONTROLS
SECTION 3. USER RESPONSIBILITIES & MACHINE CONTROLS
3.1 GENERAL
SINCE THE MANUFACTURER HAS NO DIRECT CONTROL OVER
MACHINE APPLICATION AND OPERATION, CONFORMANCE WITH
GOOD SAFETY PRACTICES IN THESE AREAS IS THE RESPONSIBILITY OF THE USER AND HIS OPERATING PERSONNEL.
This section provides the necessary information needed
to understand control functions. Included in this section
are the operating characteristics and limitations, and functions and purposes of controls and indicators. It is important that the user/operator read and understand the
proper procedures before operating the machine. These
procedures will aid in optimizing service life and safe
operation.
3.2 PERSONNEL TRAINING
The aerial lift is a personnel handling device; therefore, it
is essential that it be operated and maintained only by
authorized personnel who have demonstrated that they
understand the proper operation and maintenance of the
machine. It is important that all personnel who are
assigned to and responsible for the operation and maintenance of the machine undergo a thorough training program and check out period in order to become familiar
with the characteristics prior to operating the machine.
In addition, personnel operating the machine should be
familiar with the ANSI A92.3-1990 Manual of Responsibilities supplied with this machine. This standard contains
sections outlining the responsibilities of the owners, users,
operators, lessors and lessees concerning safety, training,
inspection, maintenance, application and operation.
Persons under the influence of drugs or alcohol or who
are subject to seizures, dizziness or loss of physical control must not be permitted to operate the machine.
Statutes, including training in the recognition and
avoidance of potential hazards in the work place;
with particular attention to the work to be performed.
4. Proper use of all required personnel safety equipment.
5. Sufficient knowledge of the mechanical operation of
the machine to recognize a malfunction or potential
malfunction.
6. The safest means to operate near overhead obstructions, other moving equipment, obstacles, depressions, holes, drop-offs, etc. on the supporting
surface.
7. Means to avoid the hazards of unprotected electrical
conductors.
8. Any other requirements of a specific job or machine
application.
The operator of a JLG manually propelled aerial work platform must not accept operating responsibility until
instructed by a qualified person, the Operators and Safety
Manual has been read and understood, as well as having
operated the JLG manually propelled aerial work platform
under the supervision of a qualified person. A qualified
operator must have reviewed and understood the video,
the Operators and Safety Manual, and all warning placards and operating instructions on the machine, and contacted JLG with any questions regarding safe operation of
the manually propelled aerial work platform. In addition,
the operator and employer are responsible for complying
with federal, state, local or provincial rules and regulations
covering the proper use and operation of this product. If
there is a question on application and/or operation, or to
inquire about operator training, contact the Product Safety
and Reliability Department at JLG Industries, Inc. at (877)
JLG-SAFE (877-554-7233).
Operator Training
Operator training must include instruction in the following:
1. Use and limitations of the platform controls, ground
controls and emergency controls.
2. Knowledge and understanding of this manual, the
control markings, instructions and warnings on the
machine itself and the "JLG Manually Propelled
Aerial Work Platform Safety" video supplied with this
machine.
3. Knowledge and understanding of all safety work
rules of the employer and Federal, State and Local
Operator Responsibility
The operator must be instructed that he has the responsibility and authority to shut down the machine in case of a
malfunction or other unsafe condition of either the
machine or the job site and to request further information
from his supervisor or JLG Industries, Inc.
NOTE: If you require further operator and service training, in
addition to the information supplied with your aerial
work platform, please contact JLG Industries, Inc., 1
JLG Drive, McConnellsburg, PA. 17233 or telephone
toll free at (877) 554-7233.
3120778 – JLG Lift – 3-1
Page 28

SECTION 3 - USER RESPONSIBILITIES & MACHINE CONTROLS
EMERGENCY
STOP BUTTON
3.3 OPERATING CHARACTERISTICS AND LIMITATIONS
General
A thorough knowledge of the operating characteristics
and limitations of the machine is always the first requirement for any user, regardless of user’s experience with
similar types of equipment.
Placards
(See Figures 3-4., 3-5., 3-6., 3-7. & 3-8.)
Important points to remember during operation are provided at the control stations by DANGER, WARNING,
CAUTION, IMPORTANT and INSTRUCTION placards. This
information is placed at various locations on the machine
for the express purpose of alerting personnel of potential
hazards constituted by the operating characteristics and
load limitations of the machine. See Foreword at the start
of this manual for a definition of the seriousness of each of
the above placard types. See Decal Location Figures in
this section for decals which apply to this machine.
Capacities
Raising the platform above the stowed position is based
on the following criteria:
• The machine is positioned on a smooth, firm level surface.
• The load is within manufacturer’s rated capacity.
• All machine systems are functioning properly.
• The machine floor brake on the base frame is properly
set and locked in place.
tion. When left unattended removing key will prevent
unauthorized machine use.
2. EMERGENCY STOP Button
An emergency stop (RED button) is mounted on
both the ground control station and the platform
control panel. When the button is depressed, all
machine functions will stop. To re-activate power to
the machine, turn emergency stop button clockwise
until button is reset.
POWER ON/OFF
KEY SWITCH
MANUAL
DESCENT
CONTROL
VALVE
(MACHINES PRIOR
TO S/N- 0900019526)
HYDRAULIC
OIL
RESERVOIR
Stability
This machine, as originally manufactured by JLG and
operated within its rated capacity on a smooth, firm and
level supporting surface, provides a stable aerial platform
for all platform positions.
3.4 CONTROLS AND INDICATORS
Ground Control Station (See Figure 3-1.)
NOTE: When the machine is shut down for overnight park-
ing or battery charging, be sure the POWER ON/
OFF KEY SWITCH is positioned to OFF to prevent
draining the batteries.
1. POWER ON/OFF Key Switch
A key operated power on/off switch located on the
ground control station panel controls power to all
functions on the unit. The machine will not operate
without the key inserted and turned to the ON posi-
Figure 3-1. Ground Control Station.
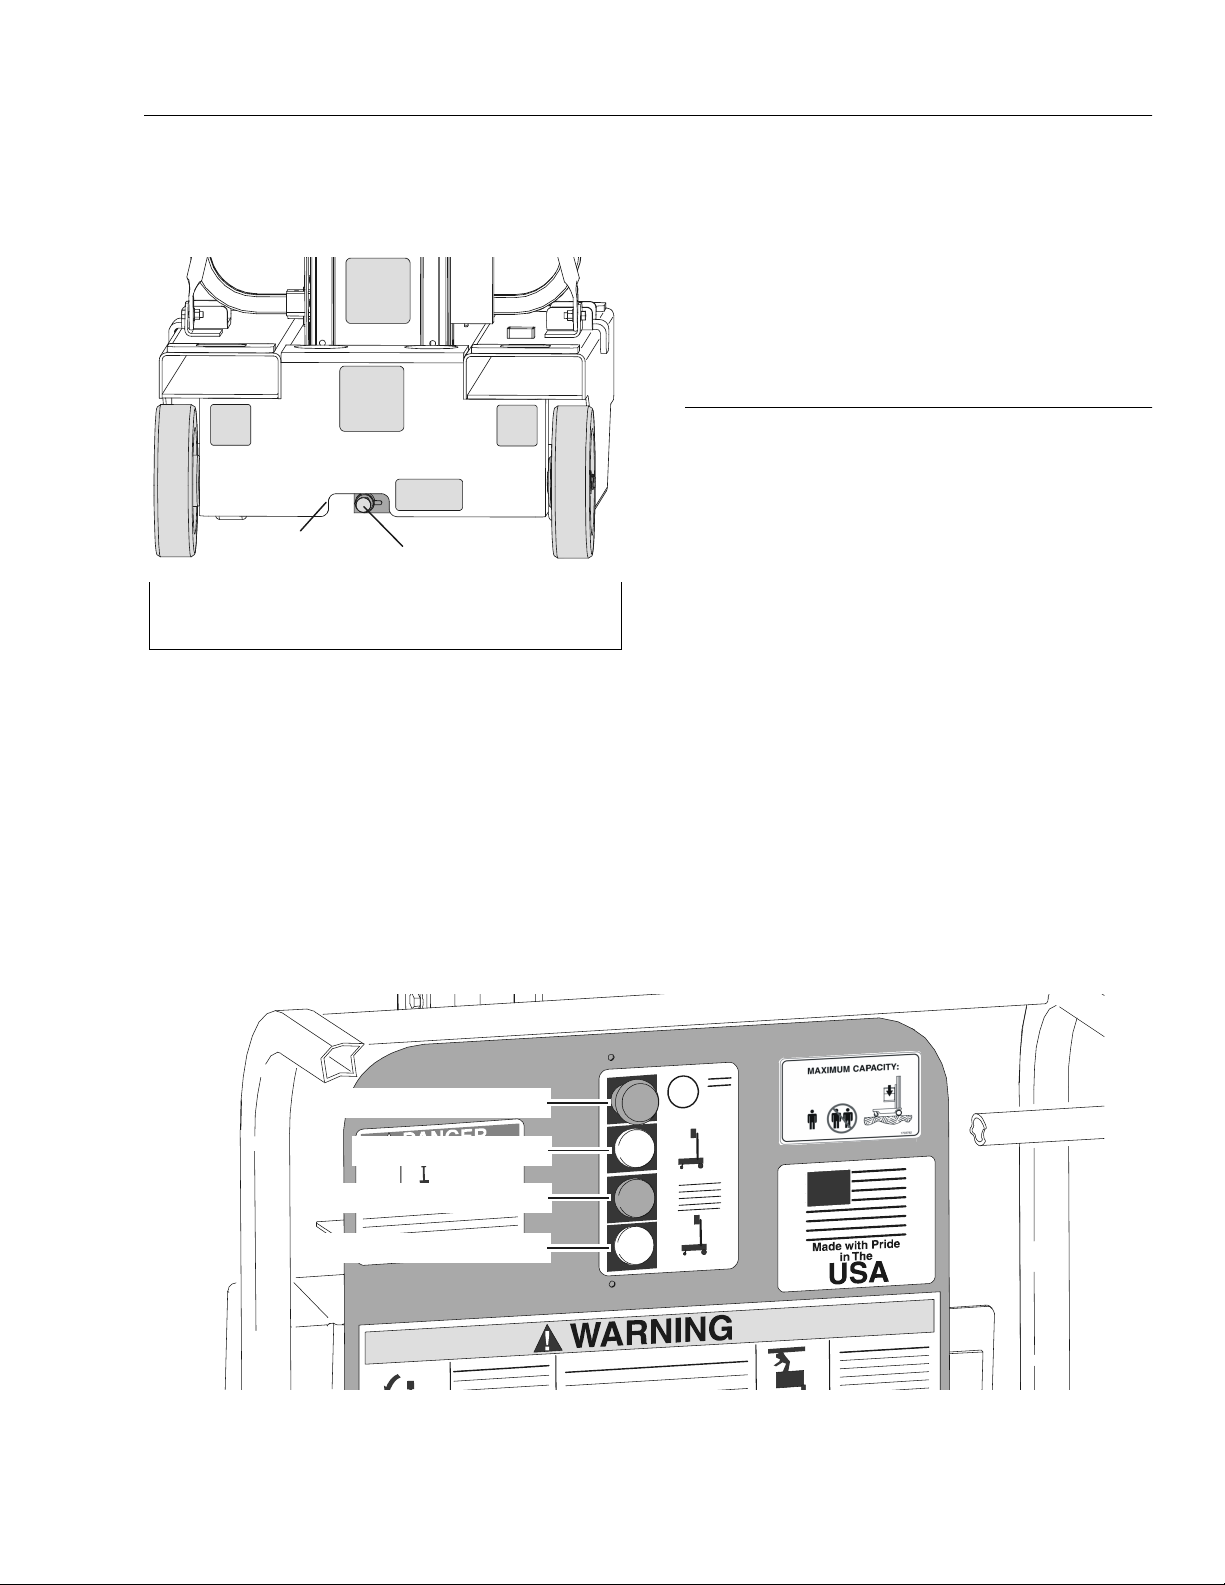
3. MANUAL DESCENT CONTROL VALVE
Machines Built Prior to S/N - 0900019526 -
(See Figure 3-1.)
This (RED knurled) knob, located on the electric/
hydraulic pump-motor unit on the ground control
station panel provides for lowering of the platform in
the event of an emergency or power failure. Turning
the valve knob to the left (counterclockwise) opens
the valve, turning the valve back to the right (clock-
wise) closes the valve.
Machines Built Since S/N- 0900019526 -
(See Figure 3-2.)
The control knob is located in the recess under the
base frame at the rear of the machine. To open the
valve (lower the platform) pull the (RED) knob on the
3-2 – JLG Lift – 3120778
Page 29
SECTION 3 - USER RESPONSIBILITIES & MACHINE CONTROLS
control, to close the valve (stop platform lowering)
release the valve knob (spring loaded).
2
1. Manual Descent Control Valve
2. Cut-Out at Rear of Base Frame
Figure 3-2. Manual Descent Control Valve Location -
Machines Built Since S/N- 0900019526.
1. HYDRAULIC RESERVOIR / CIRCUIT BREAKER /
FUSE (located inside ground control station housing)
The hydraulic reservoir is housed inside the ground
control station, the hydraulic oil level can be
checked through an access hole in the side of the
cover. Maintain an oil level to the "Fill to Line" indicator on the side of the reservoir.
1
NOTE: Check hydraulic oil only when platform is completely
lowered and after cycling platform up/down a few
times.
A 20 amp reset type circuit breaker is located on the
cover of the electrical box on ELI-AC Models.
On ELI-DC Models, a 5 Amp fuse is located inside
the ground control station.
Platform Control Station
(See Figure 3-3.)
1. EMERGENCY STOP/SHUT-OFF Button.
An EMERGENCY STOP (RED) button is provided in
order to turn machine power on and off in the platform and also to turn off machine power in the event
of an emergency. Power is on when the switch is in
the reset position (turned completely clockwise out). Power is off and all machine functions will stop,
when button is depressed.
2. FUNCTION ENABLE Button.
This (GREEN) button must be depressed simultaneously with either the UP or DOWN platform function buttons in order to operate the platform.
3. PLATFORM UP Button.
When depressed simultaneously with ENABLE button raises the platform to a higher level.
4. PLATFORM DOWN Button.
When depressed simultaneously with ENABLE button lowers the platform to a lower level.
EMERGENCY STOP BUTTON
PLATFORM UP BUTTON
FUNCTION ENABLE BUTTON
PLATFORM DOWN BUTTON
Figure 3-3. Platform Control Station.
3120778 – JLG Lift – 3-3
Page 30

SECTION 3 - USER RESPONSIBILITIES & MACHINE CONTROLS
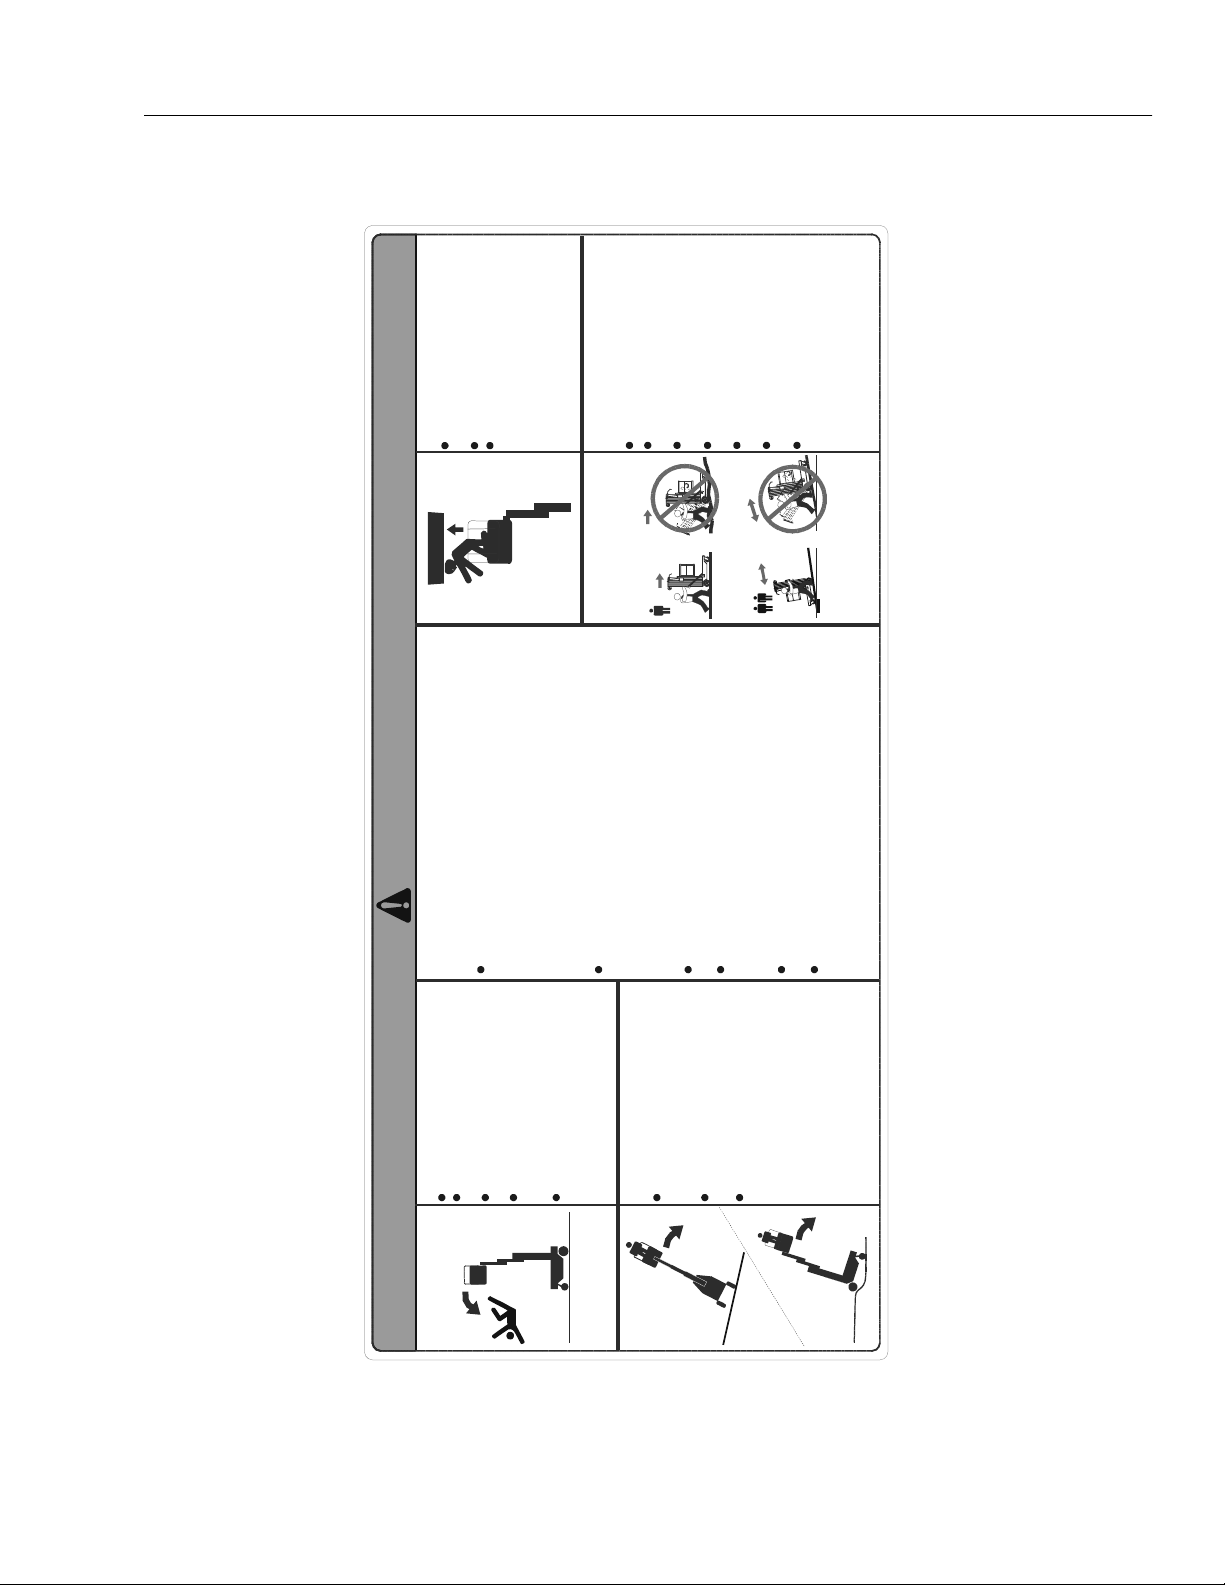
Figure 3-4. Decal Locations (Front View)
3-4 – JLG Lift – 3120778
Page 31
Always look in the direction of
CRUSHING HAZARD
SECTION 3 - USER RESPONSIBILITIES & MACHINE CONTROLS
o
Keep clear of obstructions.
movement.
Keep all body parts inside
platform during operation.
.
o
.
platform end leading way.
Use handles provided to move unit.
platform end on low side of slope.
On a level surface, always travel with
On a slope, always travel with
CRUSHING/TIPPING
Failure to follow instructions
could result in death or
HAZARD
serious injury.
Two people may be required on
Never turn unit sideways on a
surfaces, or over obstructions,
slopes up to 5
Do not move unit on soft or uneven
A forklift must be used when moving
units on slopes greater than 5
slope.
bumps, debris, etc.
Failure to follow these instructions
could result in death or serious
1704221 A
injury.
WARNING
THIS MACHINE MUST NOT BE USED
UNTIL IT IS INSPECTED AND OPERATING
Keep both feet on platform floor.
FALLING HAZARD
PROPERLY:
Do not climb, sit or stand on
properly trained as described in the JLG Operation and
Safety Manual by a qualified person and authorized to
operate this machine. Your training includes reading
and understanding the safety, operating and
Do not operate this machine unless you have been
Ensure entrance area is properly
platform guard rails.
maintenance instructions in manufacturerÕs manuals,
Do not use planks, ladders or
closed.
similar items in platform to get
added reach.
Sections 6, 7, and 8 of ANSI A92.3-1990 Manually
knowing your employers work rules and applicable
governmental regulations.
Propelled Elevating Aerial Platforms for daily, frequent,
and annual inspections. These may be obtained from
your authorized JLG Industries, Inc. equipment dealer
or JLG Industries, Inc.
floor stop has been set.
Follow the instructions in the Operating Manual and
All guard rails must be properly
installed during operation.
Falling from platform could
cause death or serious injury.
TIP-OVER HAZARD
capacity or rated number of
Do not exceed platform rated
Check that unit is properly set up, level, and that the
people.
Do not expose platform to high
winds or horizontal forces.
counterweight, etc.) with items of different weight or
Do not replace items (i.e., batteries, wheels,
Figure 3-5. Decal Locations (3124221 decal from Front View)
specification because this will affect stability of
machine.
and level surface before elevating
Machine must be on smooth, firm
platform. Set floor stop. Check
approval from manufacturer.
operation if malfunction occurs.
Do not modify or change machine without written
Operate this machine with extreme caution. STOP all
Improper use of this machine could cause death
or serious injury.
bubble level provided on machine
to ensure base is level before
elevating platform.
Death or serious injury could
occur from a tip-over.
3120778 – JLG Lift – 3-5
Page 32

SECTION 3 - USER RESPONSIBILITIES & MACHINE CONTROLS
Figure 3-6. Decal Locations (Rear View)
3-6 – JLG Lift – 3120778
Page 33

SECTION 3 - USER RESPONSIBILITIES & MACHINE CONTROLS
Figure 3-7. Decal Locations (Top View)
3120778 – JLG Lift – 3-7
Page 34

SECTION 3 - USER RESPONSIBILITIES & MACHINE CONTROLS
ATTACH LANYARD HERE
P/N - 1703815
P/N - 1703681
1703815A
Figure 3-8. Decal Locations (Right/Left View)
3-8 – JLG Lift – 3120778
Page 35

SECTION 4 - MACHINE OPERATION
SECTION 4. MACHINE OPERATION
4.1 MACHINE DESCRIPTION
ELI machines are manually propelled machines, with a
platform mounted to an elevating aluminum mast mechanism. The mast is raised and lowered by a hydraulic cylinder extending between mast section-1 and -2, the
remaining mast sections are proportionally extended and
retracted using steel chains and cables. Hydraulic pressure is supplied to the lift cylinder by an electrically powered hydraulic pump. The platform may be raised only
when lift is positioned on smooth, firm, level surface with
the floor brake set. The ELI personnel lift’s intended purpose is to provide personnel (with their tools and supplies)
access to areas above ground level.
The ELI personnel lift has a primary operator control station in the platform. From this control station the operator
can raise and lower the platform. A ground control station
is also provided. This station contains a keyed power on/
off switch, an emergency stop button and an emergency/
manual decent valve which enables the platform to be
lowered to the ground in an emergency, if the operator in
the platform is unable to do so, or if a power failure should
occur.
Instructions and warnings are posted adjacent to both
operator control stations and at other places on the
machine. It is extremely important that the user/operator
know what instructions and warnings are placed on the
machine and in the manual. And that these instructions
and warning’s be reviewed periodically. The JLG personnel lift is designed to provide efficient and safe operation
when maintained and operated in accordance with
instructions and warnings on the machine, in the Operating, Safety and Maintenance Manual and all jobsite and
government rules and regulations.
As with any type of machinery, the operator is very
important to efficient and safe operation. It is absolutely
necessary that the JLG lift be regularly maintained in
accordance with this manual.
Any evidence of lack of maintenance, malfunction, excessive wear, damage or modification to the machine must be
reported immediately to the machine owner, the jobsite
supervisor or safety manager and the machine must be
taken out of service until all discrepancies are corrected.
The JLG personnel lift is not intended to be used to lift
material other than supplies which personnel in the platform require to do their job. Supplies or tools which
extend outside the platform are prohibited except for JLG
approved recepticals. The personnel lift must not be used
as a forklift, crane, or support for overhead structure.
The total platform capacity is to be uniformly distributed in
the center of the platform. This means that the total combined weight of personnel, tools and supplies loaded into
the platform must not exceed the total platform capacity.
4.2 GENERAL
This section provides the necessary information needed
to operate the machine. Included in this section are the
procedures for set-up, raising, lowering, platform loading
and transporting. It is important that the user read and
understand the proper procedures before operating the
machine. Although some of the more important operating
safety precautions will be listed in the following paragraph
sections, it is extremely important all safety precautions in
Section 1 - Safety Precautions be read and understood
before operating machine. If a “Daily Walk-Around Inspection”, (see Section 2-4.) has not been completed, perform
this inspection before starting set-up and operation. The
operator must also be familiar with all machine controls as
described in Section 3 - User/Operator Responsibilities
and Machine Controls.
3120778 – JLG Lift – 4-1
Page 36

SECTION 4 - MACHINE OPERATION
4.3 MACHINE SET-UP AND OPERATION
The following sequence of set-up procedures must be followed to safely operate this machine.
1. Position machine in work area. Work area must be a
smooth, firm, level surface.
NOTE: If AC powered machine, connect machine to a
grounded AC receptacle with a heavy duty extension
cord equipped with an equipment grounding conductor. Also, the cord must be capable of handling the
maximum amperage draw of the machine’s electric
pump motor.
If DC powered machine, be sure battery box assembly is installed, battery is charged and connected to
the machine’s DC input receptacle.
2. Set power on/off key switch to the ON position at the
ground control station.
3. Check both emergency stop switches, one on platform control station and one on ground control station that they are in the reset position for operation.
4. Check if manual descent control valve is closed.
5. Set floor brake, see steps following.
Floor Brake Operation
(See Figure 4-1.)
1. At the front of the machine under the base frame,
engage and lock the floor brake down into position
THE FRONT CASTER WHEELS SHOULD BE RELIEVED OF THE
MACHINES WEIGHT ENOUGH SO THE MACHINE DOES NOT ROLL
IN ANY DIRECTION. IF THIS IS NOT THE CASE DO NOT ATTEMPT
TO ELEVATE THE PLATFORM UNTIL THE FLOOR BRAKE IS
OPERATING PROPERLY.
2. To disengage the floor brake, lift up on the floor
brake pedal or apply pressure to the release rod.
Platform Loading
The platform maximum rated load capacity is shown on a
placard located on the platform control panel and is
based upon the following criteria.
Maximum capacity for each model is as follows:
Table 4-1. Maximum Platform Capacity.
Model Platform Capacity
15ELI-AC 350 lb.(159 kg)
15ELI-DC 350 lb.(159 kg)
Figure 4-1. Setting & Releasing Floor Brake.
Platform Operation
DO NOT ATTEMPT TO RAISE THE PLATFORM UNLESS THE
FLOOR BRAKE IS PROPERLY SET AND MACHINE IS ON A
SMOOTH, FIRM, LEVEL SURFACE.
BEFORE AND WHILE RAISING THE PLATFORM, CHECK CLEARANCES ABOVE AND AROUND PLATFORM AND MAST TO
ENSURE ADEQUATE CLEARANCE OF SURROUNDING OBJECTS
AND PERSONNEL.
1. Enter platform and close the gate/slide bar.
NOTE: On platform control box the FUNCTION ENABLE
(green button) must be depressed simultaneously
with either the PLATFORM UP or PLATFORM DOWN
button in order for these functions to work.
2. To raise the platform up, depress the FUNCTION
ENABLE BUTTON (green) and PLATFORM UP button (top, white button) on the platform control panel
simultaneously. Upon reaching desired elevation
level release PLATFORM UP and FUNCTION
ENABLE buttons.
ENSURE AREA BENEATH PLATFORM IS FREE OF PERSONNEL
AND OBSTRUCTIONS PRIOR TO LOWERING PLATFORM.
3. To lower platform, depress FUNCTION ENABLE
BUTTON (green) and PLATFORM DOWN button
(bottom, white button) on control panel simultaneously. Upon reaching desired elevation level
release PLATFORM DOWN and FUNCTION
ENABLE buttons.
4-2 – JLG Lift – 3120778
Page 37

PLATFORM
UPPER MOUNT
UPPER MOUNT
PINS
SECTION 4 - MACHINE OPERATION
Platform Installation
1. Using either two people or suitable lifting equipment
capable of lifting the weight of the unmounted platform, lift the platform and set the platforms’ upper
support rail into the upper platform mount on the
mast.
2. Swing the platform lower support rail into the lower
platform mount on the mast.
3. Secure the platform support rails with the two (2)
platform upper mount pins, and the two (2) lower
platform mount pins.
The platform is now ready for operation.
4.5 STOWING MACHINE
PLATFORM
LOWER MOUNT
LOWER MOUNT
PINS
Figure 4-2. Quick Change Platform Mount.
4.4 QUICK-CHANGE PLATFORM
(See Figure 4-2.)
The ELI model is equipped with quick-change platform
mounts which will allow quick removal and installation of
the currently available quick-change platforms. The following procedures describe platform removal and installation:
Platform Removal
1. Remove both pins securing the lower platform sup-
port rail to the platform lower mount.
2. Remove both pins securing the upper platform support rail to the platform upper mount.
1. Ensure that platform is fully lowered, turn POWER
ON/OFF key switch (on the Ground Control Station)
to the OFF position.
WHEN MOVING MACHINE PLEASE FOLLOW ALL SAFETY PRECAU-
TIONS DESCRIBED IN SECTION 1-5, “TRANSPORT SAFETY” OF
THIS MANUAL. ALSO SEE SECTION 4-6, “TRANSPORTING AND
LIFTING” FOR PROPER PROCEDURES FOR TRANSPORTING.
2. Move machine to a well-protected and well-ventilated area. If necessary, cover the machine so it will
be protected if in a hostile environment.
3. Set the floor brake when parking machine for an
extended period of time.
4. If necessary remove key from Ground Control Panel
POWER ON/OFF key switch to disable machine
from unauthorized use.
NOTE: If required, DC machine batteries should be charged
in preparation for next work day in accordance with
Section 2-7, “Battery Charging” (DC Machines).
3. Using either suitable liftting equipment capable of
lifting the weight of the mounted platform, or another
person, swing the lower platform support rail forward, away from the mast to clear the platform lower
mount, then lift the upper platform support rail up
and out of the platform upper mount. Move the platform clear of the machine and carefully set the platform on its base out of the way.
3120778 – JLG Lift – 4-3
Page 38

SECTION 4 - MACHINE OPERATION
4.6 TRANSPORTING, LIFTING AND TIE DOWN
General
The ELI machine may be transported from worksite to
worksite using any of the following methods:
• Pushing the machine around on its base wheels.
• Transport with a forklift truck using the forklift pockets
in the baseframe or to lift onto a transport vehicle.
Transporting by Pushing
CAREFULLY REVIEW ALL SAFETY PRECAUTIONS NOTED IN SECTIONS 1-3 & 1-4, “TRANSPORT SAFETY”, BEFORE ATTEMPTING TO
MOVE MACHINE.
The 15ELI machine’s base frame is equipped with load
bearing wheels mounted on a straight axle at the mast
end of the machine; and a pair of heavy duty swivel caster
wheels mounted on the frame at the platform end of the
machine. It is important to closely follow the instructions
mentioned in the following WARNING note to ensure safe
transport of unit when pushing.
FAILURE TO HEED THE FOLLOWING INSTRUCTIONS COULD
CAUSE THE UNIT TO TIP OVER OR BE HARD TO CONTROL
WHEN BEING MOVED WHICH COULD RESULT IN SERIOUS
INJURY OR DEATH DUE TO BEING PINNED OR CRUSHED BY
UNIT.
• WALK BEHIND THE UNIT TO PUSH AND STEER
USING THE HANDLES ON THE MAST CROSSBAR.
• ON A LEVEL SURFACE, ALWAYS TRAVEL WITH THE
PLATFORM END LEADING THE WAY.
• ON A SLOPE, ALWAYS TRAVEL WITH THE PLATFORM
END ON THE LOW SIDE OF THE SLOPE.
• TWO PEOPLE ARE REQUIRED ON SLOPES UP TO 5
DEGREES, A FORKLIFT MUST BE USED WHEN MOVING UNITS ON SLOPES GREATER THAN 5 DEGREES.
• NEVER POSITION THE UNIT SIDEWAYS ON A SLOPE.
• DO NOT MOVE UNIT ON SOFT OR UNEVEN SUR-
FACES, OR OVER OBSTRUCTIONS, BUMPS, DEBRIS,
ETC.
Lifting
If it becomes necessary to lift the machine, use suitable
lifting equipment capable of handling the weight of the
machine, see below.
NOTE: Fork lifts, cranes, chains, slings, etc. must be capa-
ble of handling the following weights:
Table 4-2. ELI Machine Gross Weights
AM Model Gross Weight
15ELI-AC 900 lb. (408 kg)
15ELI-DC 9 70 lb. (440 kg)
NOTE: All ELI models are equipped with forklift pockets at
the mast end of the frame for transporting the unit.
An optional crane hook is available. Do not attempt
to lift with a crane without the optional crane hook.
Transport Vehicle Tie Down
(See Figure 4-3.)
When placing the 15ELI machine onto a transport vehicle
for transport to another worksite, always tie machine
securely to the transport vehicle using the tie down pockets provided on the machine. There are four tie down
pockets, one on each corner of the machine. There are
also two cross strap saddles at the center on each side of
the base frame. Use corner tie down pockets and cross
strap saddles as needed. Tie down method shown is for
illustrative purposes only.
CORNER
TIE DOWN
POCKETS
CROSS STRAP
SADDLES
CORNER
TIE DOWN
POCKETS
BEFORE MOVING A MACHINE BY PUSHING, SECURE ANY TOOLS
OR OBJECTS WHICH MAY OTHERWISE FALL OFF AND CAUSE
INJURY OR BE DAMAGED DURING TRANSPORT.
Figure 4-3. 15ELI Tie Down Pockets.
4-4 – JLG Lift – 3120778
Page 39

SECTION 5 - OPTIONAL EQUIPMENT
SECTION 5. OPTIONAL EQUIPMENT
5.1 OPTIONAL EQUIPMENT
The following optional equipment is available for ELI models:
22" x 25" Quick-Change Platform
The 25" long by 22" wide platform features a gull wing
gate opening and is attached to the mast using the quickchange mount.
26" x 26" Quick-Change Platform
The 26" long by 26" wide platform features a side entry
gate opening and is attached to the mast using the quickchange mount.
28" x 26" Quick-Change Platform
The 28" long by 22" wide platform features a gull wing
gate opening and is attached to the mast using the quickchange mount.
25" x 26" Step-in Molded Platform w/Swing-up Gate
The 25" long by 26" wide Step-in Molded Platform features
a tough molded shell base and sides mounted to a
welded steel frame. This step-in platform features a swingup gate for easy entry.
Fluorescent Tube Caddy
The fluorescent tube caddy is attached to the top rail of
the platform allowing for convenient handling when
replacing fluorescent tubes.
Extra Power Pack (DC Battery, Charger & Case)
An extra power pack which includes the battery, charger
and molded case allows for extended use of an AM
machine under high cycle conditions. One power pack
can be charging while the other is in use.
Lifting Hook
The optional lifting hook is mounted at the top rear of the
first mast section. The hook is used to lift the machine up
or down to another level.
Platform Auxiliary Power Lowering Device
The Platform Auxiliary Power Lowering device is a switch
activated battery backed electrical circuit designed to provide power to the platform control box in the event of loss
of the machines power supply. This can be useful to the
operator if the main battery on a DC model becomes
depleted or the AC power supply of an AC model is interrupted while the platform is raised. Also if the on/off key
switch on the ground control station is turned to the off
position while the platform is still raised.
26" x 50" Quick-Change - ExtendiblePlatform
(See Section 5-2, Extendible Platform Operation)
The 26" long x 50" wide extendible platform features a gull
wing gate and is attached to the mast using the quick
change mount.
Too l Tr a y
The tool tray is attached to the top rail of the platform
allowing for quick access to hand tools or other small
items placed in the tray.
Laser Positioning Device
The laser positioning device attaches to the platform railing and when powered on projects a laser dot on any surface above the machine. This allows the operator to more
accurately position the machine under a work area before
raising the platform in position.
3120778 – JLG Lift – 5-1
Page 40
SECTION 5 - OPTIONAL EQUIPMENT
5.2 EXTENDIBLE PLATFORM OPERATION
The optional extendible platform is designed to increase
operator reach over the front of the machine, this allows
the operator access to work areas which may otherwise
be unreachable from the standard platform. The following
procedures describe proper use of the Extendible Platform.
Mounting to Mast
The Extendible Platform uses the same quick-mount hardware as the standard platform, see Section 4-4. QuickChange Platform in the Operators and Safety manual for
procedures to mount and remove the platform on the
mast.
Once the platform is mounted re-check that all mounting
pins on upper and lower platform mast mounts, two (2)
pins on upper mount and two (2) pins on lower mount are
installed and secure.
Entering/Exiting Platform
(Refer to Figure 5-1.)
The Extendible Platform is equpped with a swing-up gullwing gate for entrance into the platform.
Extending Platform
(Refer to Figure 5-1.)
1. Locate the two (2) platform extend handles, one (1)
located each side of platform on the vertical rails at
the back of the platform.
2. Grasp each extend handle and pull the handle up to
a horizontal position releasing it from the spring
clamp. Face the mast and pull the extend handles to
extend the platform extension forward away from
mast.
3. Slide the platform extension forward until it’s com-
pletely extended, and the extend handles line up
with the spring clamps on the vertical rail at the
opposite end of the platform.
4. Next fold the extend handles down until they lock
into the spring clamps on the vertical rail, this will
lock the platform extension in place.
Retracting Platform
(Refer to Figure 5-1.)
1. To retract the platform grasp the extend handles
now located at the middle of the extended platform
on the vertical rail. Pull up on each handle to a horizontal position to clear the handle spring clamps.
THE TOTAL WEIGHT CAPACITY FOR THE EXTENDIBLE PLATFORM ASSEMBLY IS 300 LB. (136 KG) U.S.A.
To enter the platform:
1. Raise the swing up gate by grasping the front mid
rail with one hand and pull up on the gate lock-pin
release cable on the front of the platform assembly.
2. Next lift the gate high enough to enter the platform.
Step into the platform, when completely inside platform, lower the gate until it’s closed and the gate
lock-pin is engaged and locked.
To e x i t p l a t f o r m :
1. Repeat the above steps and exit the platform.
2. Retract the platform extension by standing on the
rear (mast) platform section and pulling the extend
handles toward the mast, (you may need to pull the
handles halfway then turn and push them the rest of
the way to fully retract the platform extension).
3. When both extend handles line up with the handle
spring clamps on the vertical rail at the rear of the
platform, fold the handles down locking them into
the spring clamps.
5-2 – JLG Lift – 3120778
Page 41
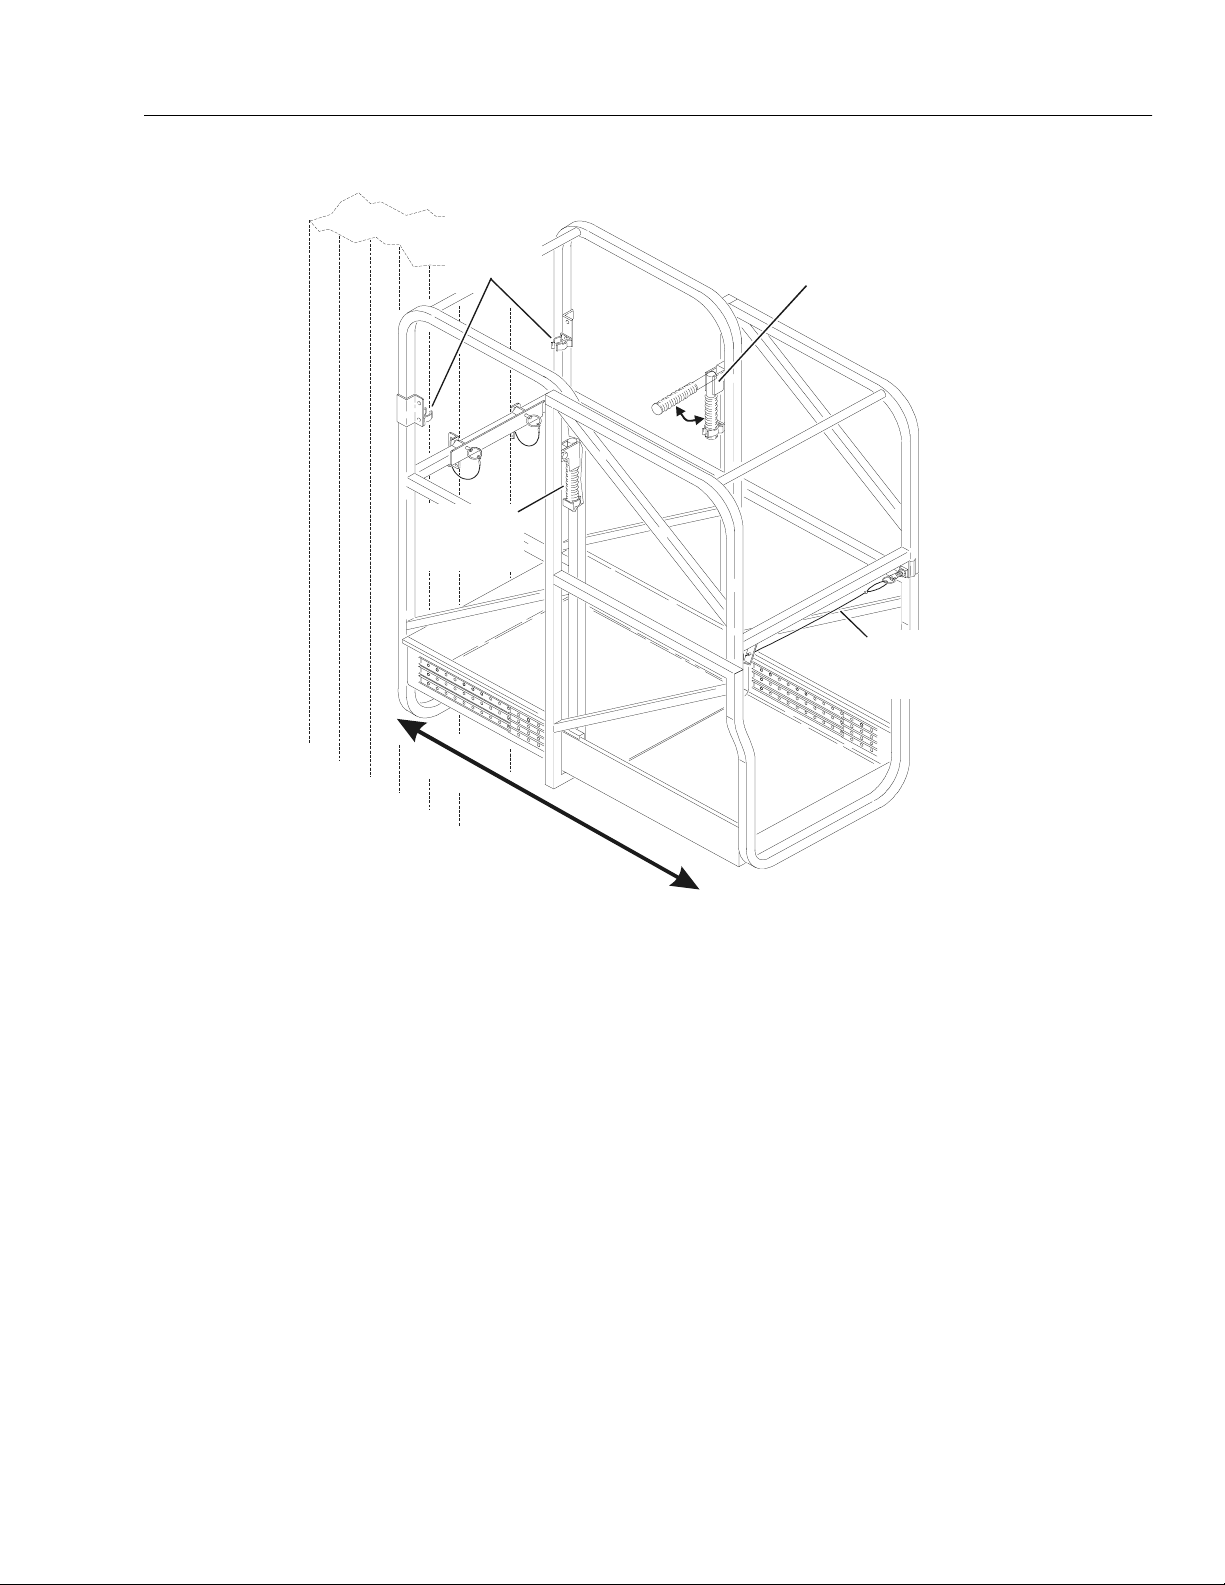
HANDLE
D
SPRING
CLAMP
PLATFORM
EXTEND
HANDLE
SECTION 5 - OPTIONAL EQUIPMENT
PLATFORM EXTEND HANDLE
(SHOWN BOTH LOCKED IN
HANDLE SPRING CLAMP
AND RAISED FOR
EXTENDING PLATFORM.)
GATE LOCK PIN
RELEASE
CABLE
R
E
T
R
A
C
T
E
X
T
E
N
Figure 5-1. Extendible Platform.
3120778 – JLG Lift – 5-3
Page 42

SECTION 5 - OPTIONAL EQUIPMENT
This page intentionally left blank.
5-4 – JLG Lift – 3120778
Page 43

SECTION 6 - EMERGENCY PROCEDURES
SECTION 6. EMERGENCY PROCEDURES
6.1 GENERAL INFORMATION
This section provides information on procedures to be followed, and systems and controls to be used in the event
an emergency situation is encountered during machine
operation. Prior to operation of the machine and periodically thereafter, the entire operating manual, including this
section, should be reviewed by all personnel whose
responsibilities include any work or contact with the
machine.
6.2 EMERGENCY CONTROLS AND THEIR LOCATIONS
CHECK MACHINE DAILY TO MAKE SURE EMERGENCY STOP
SWITCHES ARE IN PLACE AND OPERATIONAL. AND THAT
APPLICABLE INSTRUCTIONS ARE IN PLACE AND LEGIBLE.
Platform Emergency Stop Switch
This large red button is located on the platform control
station and, when depressed, will immediately stop the
machine from the platform.
Ground Emergency Stop Switch
The ground Emergency Stop switch (RED button) is
located on the Ground Control Station beside the Power
On/OFF Key switch. When depressed, will immediately
stop the machine.
Manual Descent Control Valve
The manual descent valve is used in the event of either a
total power failure, or if the operator in the platform cannot
lower the platform himself. To lower the platform, open the
manual descent valve, to stop descent close the valve.
6.3 EMERGENCY OPERATION
Use of Ground Controls.
KNOW HOW TO USE THE GROUND CONTROLS IN AN EMERGENCY SITUATION.
BEFORE TOUCHING ANY PART OF THE MACHINE IN AN EMERGENCY SITUATION, FIRST DETERMINE IF MACHINE IS IN CONTACT WITH OR CLOSE PROXIMITY TO AN ELECTRICALLY
CHARGED CONDUCTOR. THIS MACHINE DOES NOT PROVIDE
PROTECTION FROM CONTACT WITH OR PROXIMITY TO AN
ELECTRICALLY CHARGED CONDUCTOR. (SEE ELECTROCUTION
HAZARD, SECTION 1-3.)
Ground personnel must be thoroughly familiar with the
machine operating characteristics and the ground control
functions. Training should include operation of the
machine, review and understanding of this section and
hands-on operation of the controls in simulated emergencies.
Operator Unable to Control Machine
IF THE PLATFORM OPERATOR IS PINNED, TRAPPED OR UNABLE
TO OPERATE OR CONTROL THE MACHINE, USE THE FOLLOWING INSTRUCTIONS AS A GUIDELINE.
1. Operate the machine from the ground controls
ONLY with the assistance of other personnel and
equipment (cranes, overhead hoists, etc.) as may be
required to safely remove the danger or emergency
condition.
2. Only qualified personnel in the platform may use the
platform controls. [DO NOT CONTINUE OPERATION IF CONTROLS DO NOT FUNCTION NORMALLY].
3. Cranes, forklift trucks or other equipment which may
be available are to be used to help remove the platform occupant and stabilize motion of the machine
in case machine controls are inoperable or platform
cannot be lowered with the manual decent control
valve.
(continued next page)
3120778 – JLG Lift – 6-1
Page 44

SECTION 6 - EMERGENCY PROCEDURES
Platform Caught Overhead
If the platform becomes jammed or snagged in overhead
structures or equipment, do not continue operation of the
machine from either the platform or the ground until the
operator and all personnel are safely moved to a secure
location. Only then should an attempt be made to free the
platform using any necessary equipment and personnel.
Do not remove outriggers or attempt to move machine
unless a crane, forklift or other suitable equipment is available to safely lower machine to ground.
Righting of Tipped Machine
Before righting a tipped machine, check machine for any
damage which may prevent it from setting properly on its
base wheels once in a vertical position, (i.e. base wheels
damaged, base frame distorted, etc.). Use a crane, forklift
or other suitable lifting equipment and carefully lift the
machine to an upright postion.
Post-Incident Inspection
Following any incident, thoroughly inspect the machine
and test all functions. Do not lift platform above 10 feet (3
meters) until you are sure that all damage has been
repaired and that all controls and machine components
are operating correctly.
6.4 INCIDENT NOTIFICATION
It is imperative that JLG Industries, Inc. be notified immediately of any incident involving a JLG product. Even if no
injury or property damage is evident, the Product Safety
and Reliability Department at the factory should be contacted by telephone and provided with all necessary
details.
JLG Phone: 877-JLG-SAFE (554-7233)
(8am till 4:45pm EST)
Email: productsafety@jlg.com
It should be noted that failure to notify the Manufacturer of
an incident involving a JLG Industries product within 48
hours of such an occurrence may void any warranty consideration on that particular machine.
6-2 – JLG Lift – 3120778
Page 45

SECTION 7 - INSPECTION AND REPAIR LOG
SECTION 7. INSPECTION AND REPAIR LOG
Machine Serial Number: _________________________
Table 7-1. Inspection and Repair Log
Date Comments
3120778 – JLG Lift – 7-1
Page 46

SECTION 7 - INSPECTION AND REPAIR LOG
Table 7-1. Inspection and Repair Log
Date Comments
Machine Serial Number: _________________________
7-2 – JLG Lift – 3120778
Page 47

To: JLG, Gradall, Lull and Sky Trak product owner:
If you now own, but ARE NOT the original purchaser of the product covered by this manual, we would like
to know who you are. For the purpose of receiving safety-related bulletins, it is very important to keep JLG
Industries, Inc. updated with the current ownership of all JLG products. JLG maintains owner information for each
JLG product and uses this information in cases where owner notification is necessary.
Please use this form to provide JLG with updated information with regard to the current ownership of JLG
Products. Please return completed form to the JLG Product Safety & Reliability Department via facsimile (717) 4856573 or mail to address as specified on the back of this form.
NOTE: Leased or rented units should not be included on this form.
Mfg. Model:
Serial Number:
Previous Owner:
Address:
City: State:
Zip: Telephone: ( )
Date Of Transfer:
Current Owner:
Address:
City: State:
Zip: Telephone: ( )
Who in your organization should we notify?
Name:
Title:
JLG Industries, Inc.
TRANSFER OF OWNERSHIP
Thank you,
Product Safety & Reliability Department
JLG IIndustries, IInc.
1 JLG Drive
McConnellsburg, PA 17233-9533
Telephone: (717) 485-5161
Fax: (717) 485-6573
Please cut on the dotted line and fax to 717-485-6573
Page 48

Page 49

Page 50
McConnellsburg PA. 17233-9533
JLG Worldwide Locations
Corporate Office
JLG Industries, Inc.
1 JLG Drive
USA
Phone: (717) 485-5161
Fax: (717) 485-6417
JLG Industries (Australia)
P.O. Box 5119
11 Bolwarra Road
Port Macquarie
N.S.W. 2444
Australia
Phone: (61) 2 65 811111
Fax: (61) 2 65 810122
JLG Latino Americana Ltda.
Rua Eng. Carlos Stevenson,
80-Suite 71
13092-310 Campinas-SP
Brazil
Phone: (55) 19 3295 0407
Fax: (55) 19 3295 1025
JLG Industries (Europe)
Kilmartin Place,
Tannochside Park
Uddingston G71 5PH
Scotland
Phone: (44) 1 698 811005
Fax: (44) 1 698 811055
JLG Industries (UK)
Unit 12, Southside
Bredbury Park Industrial Estate
Bredbury
Stockport
SK6 2sP
England
Phone: (44) 870 200 7700
Fax: (44) 870 200 7711
JLG Europe B.V.
Jupiterstraat 234
2132 HJ Foofddorp
The Netherlands
Phone: (31) 23 565 5665
Fax: (31) 23 557 2493
JLG Industries (Pty) Ltd.
Unit 1, 24 Industrial Complex
Herman Street
Meadowdale
Germiston
South Africa
Phone: (27) 11 453 1334
Fax: (27) 11 453 1342
JLG Deutschland GmbH
Max Planck Strasse 21
D-27721 Ritterhude/lhlpohl
Bei Bremen
Germany
Phone: (49) 421 693 500
Fax: (49) 421 693 5035
JLG Industries (Norge AS)
Sofeimyrveien 12
N-1412 Sofienyr
Norway
Phone: (47) 6682 2000
Fax: (47) 6682 2001
Plataformas Elevadoras
JLG Iberica, S.L.
Trapadella, 2
P.I. Castellbisbal Sur
08755Castellbisbal
Spain
Phone: (34) 93 77 24700
Fax: (34) 93 77 11762
JLG Industries (Italia)
Via Po. 22
20010 Pregnana Milanese - MI
Italy
Phone: (39) 02 9359 5210
Fax: (39) 02 9359 5845
JLG Polska
UI. Krolewska
00-060 Warsawa
Pol an d
Phone: (48) 91 4320 245
Fax: (48) 91 4358 200
JLG Industries (Sweden)
Enkopingsvagen 150
Box 704
SE - 175 27 Jarfalla
Sweden
Phone: (46) 8 506 59500
Fax: (46) 8 506 59534
 Loading...