


 Loading...
BASIC INSTRUCTIONS
VHF/UHF TRANSCEIVER
ID-51A
VHF/UHF TRANSCEIVER
ID-51E
This device complies with Part 15 of the FCC Rules. Operation is subject to the following two conditions: (1) this device may not cause harmful interference, and (2) this device must accept any interference received, including interference that may cause undesired operation.
|
|
|
|
|
|
|
TA |
R! |
|
|
|
|
|
|
-S |
|
|
|
|
|
|
|
g |
D |
|
|
|
|
|
|
in |
|
|
|
|
|
|
|
s |
|
|
|
|
|
|
|
u |
|
|
|
|
|
|
|
|
in |
|
|
|
|
|
|
|
g |
|
|
|
|
|
|
|
|
e |
|
|
|
|
|
|
|
|
b |
|
|
|
|
|
|
|
|
’s |
|
|
|
|
|
|
|
|
t |
|
|
|
|
|
|
|
L |
e |
|
|
|
|
|
|
|
|
|
|
|
|
|
|
|
|
You can easily begin using D-STAR repeaters!
WARNING: MODIFICATION OF THIS DEVICE TO RECEIVE CELLULAR RADIOTELEPHONE SERVICE SIGNALS IS PROHIBITED UNDER FCC RULES AND FEDERAL LAW.

 UNIQUE FEATURES OF D-STAR
●● Easy to QSO to the world
Worldwide communication!!
●● Easy call sign entry with the Repeater list or TX/RX History
●● Call Sign Capture key makes call sign capture easy.
Easy Destination (To) setting!
This key makes call sign capture easy!
1

PREPARATION 
Before starting D-STAR, entering and registering your call sign (MY) are needed, as described below. IMPORTANT! STEP 1 Entering your call sign (MY) into the transceiver.  STEP 2 Registering your call sign (MY) to a
gateway repeater. You have completed the steps!!
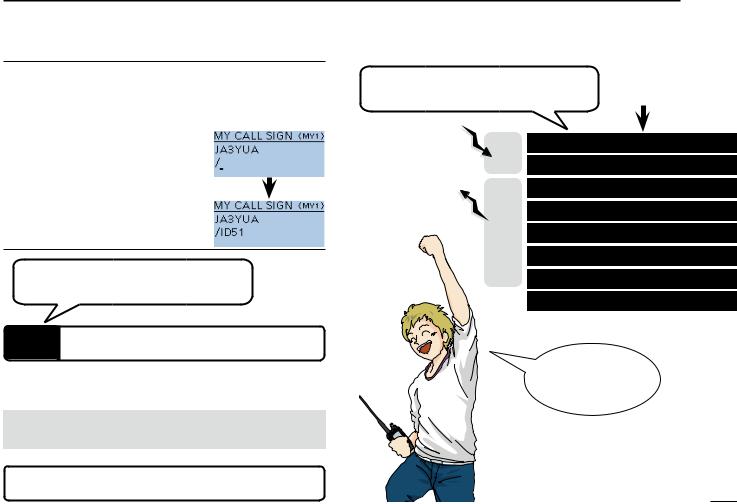
STEP 1 Enter your call sign into the transceiver
Example: Enter “JA3YUA” as your own call sign into the MY call sign memory [MY1].
qqHold down  ] for 1 second to turn ON the power.
•Hold down  ] for 1 second to turn OFF power.
•After the opening message and power source voltage are displayed, the operating frequency appears.
 ]
]

wwPush [MENU] |
. |
• The MENU screen is displayed.
MENU screen
eePush D-pad() to select the root item (“My Station”), and then push D-pad(Ent).
D-pad
(Ent)
( )
rrPush D-pad() to select “My Call Sign,” and then push D- pad(Ent).
•The MY CALL SIGN screen is displayed.
Go to step t
Continued on the next page
PREPARATION
This is page 2.

PREPARATION
ttPush D-pad() to select MY call sign memory channel “1” ([MY1]).
D-pad
(Ent)
( )
yyPush [QUICK] , and then push D-pad() to select “Edit.” Then, push D-pad(Ent) to enter the call sign edit mode.
•A cursor appears and blinks. uuRotate [DIAL] to select the
first digit. (Example: J)
•A to Z, 0 to 9, / and (Space) are selectable.
•Cursor move: Push D-pad().
•Delete: Push [CLR] .
.
•Insert: Move cursor, then rotate [DIAL].
•Rotate [DIAL] counterclockwise to enter a space.
Edit mode
Go to step o
Keys used for input |
[DIAL] Selects |
|
Selects/exitsthe |
Deletes |
|
MENU screen |
||
|
||
Moves the |
Shows the |
|
cursor |
||
|
QUICK MENU |
iiPush D-pad() to move the cursor to the second digit.
 NOTE: Your call sign must
  match the call sign registered
  to your gateway repeater. (p. 4)
ooRepeat steps u and i to enter your own call sign of up to 8 characters, including spaces.
(For example: First J, then A, then 3, then Y, then U, then A)
!0Push D-pad(Ent) to set the call sign.
•See next page if you enter a note.
!1Push D-pad(Ent) again to save and return to the MY CALL SIGN screen.
• Two beeps sound.
!2Push [MENU] to exit the MENU screen.
 Beeps
Beeps
Completed
3
Convenient!
If necessary, enter a note of up to 4 characters, such as the model of the transceiver, name, area name, and so on, after your call sign.
qqPush D-pad() until the cursor moves to the right of the “/”.
wwRepeat steps uand ito the left to enter a desired 4 character note. (Example: ID51)
In the next step, register your call sign to a gateway repeater.
STEP 2 Register your call sign to a gateway repeater
To use a repeater gateway, you must register your call sign with a gateway repeater, usually one near your home location.
If needed, ask the gateway repeater administrator for call sign registration instructions.
Completed!!
|
PREPARATION |
|
|
Now, you can begin using D-STAR! |
New users |
|
|
start here! |
|
||
|
|
|
|
RX |
Access the repeater |
p. 17 |
|
How to use the RX History |
p. 21 |
||
|
Capturing a call sign |
p. 25 |
|
|
Making a Local area call |
p. 27 |
|
TX |
Making a Gateway call |
p. 29 |
|
|
Calling a destination station |
p. 31 |
|
|
Making a Simplex call |
p. 33 |
|
|
Troubleshooting |
p. 35 |
|
I can begin using
D-STAR!!
4
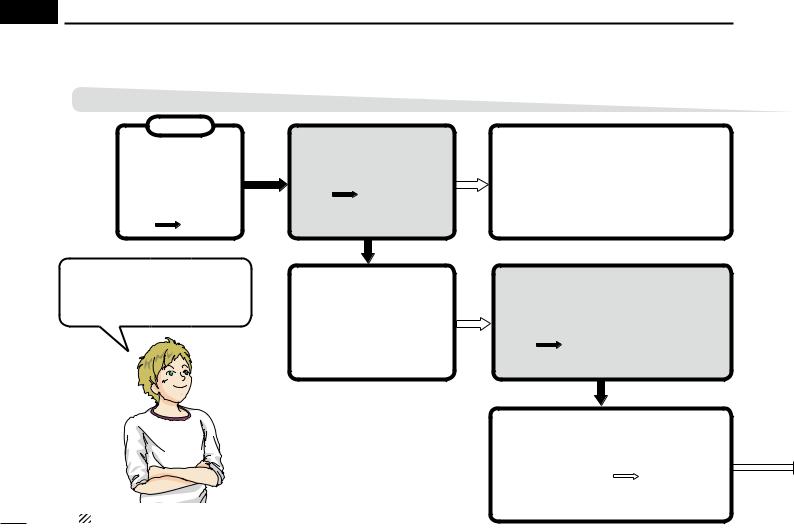
 TABLE OF CONTENTS
D-STAR Operation
Start
Confirm you can access your local repeater?
YES Go to page 17
NO
Answer the questions, and figure out your operating steps!
Reply to a call?
YES 
NO
Use a repeater?
YES 
NO Go to page 33
NOTE: This chart may not apply to your specific environment.
5
How to easily reply using the calling station’s call sign?
Call Sign Capture key |
Go to page 25 |
RX History |
Go to page 21 |
Making a call in your local area? (Local area call)
YES Go to page 27
NO
Making a call to another area? (Gateway call)
To a specific station |
|
To anyone |
Go to page 29 |

The destination call sign is already programmed?
YES Go to page 31
NO Go to section 9 of the CD Advanced Instruction PDF for call sign programming. Then, Go to page 31 of this manual.
•If you have received a call from the station before, the call sign may be in RX History. (p. 21)
TABLE OF CONTENTS
D-STAR Operation |
Other functions |
Saving settings |
Recording a QSO |
Go to page 37 |
conversation |
|
|
|
Go to page 39 |
Troubleshooting |
Checking your |
Go to page 35 |
position using |
GPS |
|
|
Go to page 43 |
Learn about |
Checking your |
the new built |
route using the |
in functions |
GPS logger |
Go to page 47 |
function |
|
|
|
Go to page 45 |
6

TABLE OF CONTENTS |
|
UNIQUE FEATURES OF D-STAR...................... |
1 |
PREPARATION............................................. |
2–16 |
Enter your call sign into the transceiver................................ |
2 |
Register your call sign to a gateway repeater....................... |
4 |
TABLE OF CONTENTS........................................................ |
5 |
FOREWORD......................................................................... |
9 |
FEATURES........................................................................... |
9 |
EXPLICIT DEFINITIONS.................................................... |
10 |
IMPORTANT........................................................................ |
10 |
SUPPLIED ACCESSORIES............................................... |
10 |
ABOUT THE SUPPLIED CD............................................... |
11 |
DDStarting the CD....................................................... |
11 |
PRECAUTIONS.................................................................. |
12 |
BATTERY CAUTIONS......................................................... |
14 |
DDBattery caution........................................................ |
14 |
DDCharging caution..................................................... |
15 |
DDCharging time......................................................... |
15 |
IMPORTANT NOTES.......................................................... |
16 |
DDWhen using the GPS receiver................................ |
16 |
DDSpurious signals..................................................... |
16 |
DDAbout charging at power ON.................................. |
16 |
1 |
access the repeater..................... |
17–20 |
|
|
STEP1 Select the DR mode.......................................... |
|
17 |
|
STEP2 Select your Access repeater (“FROM”)............. |
|
17 |
|
STEP3 Select the Destination repeater (“TO”).............. |
|
19 |
|
STEP4 Check whether you can access the repeater.... |
20 |
|
2 |
HOW TO USE the RX history........... |
21–24 |
|
|
STEP1 View the received call sign................................ |
|
21 |
|
STEP2 Save the destination call sign into |
|
|
|
your call sign memory from the RX History....... |
22 |
|
3 |
CAPTURING A CALL SIGN.................. |
25–26 |
|
|
STEP1 Set the received call sign to the destination...... |
26 |
|
|
STEP2 Hold down [PTT] to transmit.............................. |
|
26 |
4 |
Making a Local area call.......... |
27–28 |
|
|
STEP1 Set “FROM” (Access repeater).......................... |
|
27 |
|
STEP2 Set “TO” (Destination)....................................... |
|
28 |
|
STEP3 Hold down [PTT] to transmit.............................. |
|
28 |
5 |
Making a Gateway call................ |
29–30 |
|
|
STEP1 Set “FROM” (Access repeater).......................... |
|
29 |
|
STEP2 Set “TO” (Destination)....................................... |
|
30 |
|
STEP3 Hold down [PTT] to transmit.............................. |
|
30 |
7

6 |
calling a destination station... |
31–32 |
|
STEP1 Set “FROM” (Access repeater).......................... |
31 |
|
STEP2 Set “TO” (Destination)....................................... |
32 |
|
STEP3 Hold down [PTT] to transmit.............................. |
32 |
7 |
Making a Simplex call.................. |
33–34 |
|
STEP1 Set “FROM” (Simplex channel)......................... |
33 |
|
STEP2 Hold down [PTT] to transmit.............................. |
34 |
8 |
troubleshooting........................... |
35–36 |
9 |
Saving settings............................... |
37–38 |
|
STEP1 Saving settings into memory............................. |
37 |
|
STEP2 View the saved contents................................... |
38 |
10 Recording a QSO onto a |
|
|
|
microSD card................................... |
39–42 |
|
■■About using a microSD card...................................... |
39 |
|
STEP1 Inserting the microSD card............................... |
39 |
|
STEP2 Format the microSD card.................................. |
40 |
|
STEP3 Recording a QSO audio.................................... |
41 |
|
STEP4 Playing back the recorded audio....................... |
42 |
TABLE OF CONTENTS |
|
11 GPS operation.................................. |
43–44 |
STEP1 Receiving GPS data from the internal |
|
GPS receiver..................................................... |
43 |
STEP2 Displaying your position.................................... |
44 |
12 GPS Logger function.................... |
45–46 |
STEP1 Receiving GPS data from the internal |
|
GPS receiver..................................................... |
45 |
STEP2 Turning ON the GPS Logger function............... |
46 |
13 Introducing New functions....... |
47–48 |
Voice Recorder function................................................ |
47 |
Two bands monitoring plus BC Radio............................ |
47 |
Auto Position Reply function.......................................... |
48 |
Voice TX function........................................................... |
48 |
Speech function............................................................. |
48 |
Temporary Skip function................................................ |
48 |
14 RESETTING........................................... |
49–50 |
■■Resetting................................................................... |
49 |
15 information............................................ |
51 |
COUNTRY CODE LIST................................................. |
51 |
FCC INFORMATION..................................................... |
51 |
inDEX......................................................... |
52–54 |
8

FOREWORD
Thank you for purchasing this fine Icom product. The ID-51A or ID-51E vhf/uhf transceiver is designed and build with Icom’s superior technology and craftsmanship combining traditional analog technologies with the new digital technology, Digital Smart Technologies for Amateur Radio (D-STAR), for a balanced package.
With proper care, this product should provide you with years of trouble-free operation.
We thank you for making your ID-51A or ID-51E your radio of choice, and hope you agree with Icom’s philosophy of “technology first.” Many hours or research and development went into the design of your ID-51A or ID-51E.
Icom, Icom Inc. and the Icom logo are registered trademarks of Icom
Incorporated (Japan) in Japan, the United States, the United Kingdom, Germany, France, Spain, Russia and/or other countries.
Adobe and Adobe Reader are either registered trademarks or trademarks of Adobe Systems Incorporated, in the United States and/or other countries.
Microsoft, Windows and Windows Vista are registered trademarks of
Microsoft Corporation in the United States and/or other countries.
FEATURES
Dual independent receivers in one radio; receives two bands simultaneously
Two band monitoring plus the Broadcast (BC) Radio
•Depending on the selected operating mode, Dualwatch or Triple-watch cannot be made.
Rapid charging is possible, and the charging time period is approximately 3 hours with the supplied battery pack. (Half periods of the ID-31A/E)
Built-in GPS receiver allows you to check your current position, or automatically send a reply with your position to the called ID-51A/E
Voice recorder records your QSO conversation, voice audio for TX and microphone voice audio
microSD card slot that can accept different cards to backup settings, various memories, the GPS log and so on
9
EXPLICIT DEFINITIONS
WORD |
DEFINITION |
|
R DANGER! |
Personal death, serious injury or an ex- |
|
plosion may occur. |
||
|
||
RWARNING! |
Personal injury, fire hazard or electric |
|
shock may occur. |
||
CAUTION |
Equipment damage may occur. |
|
NOTE |
Recommended for optimum use. No risk |
|
of personal injury, fire or electric shock. |
||
|
||
|
|
IMPORTANT
READ ALL INSTRUCTIONS carefully and completely before using the transceiver.
SAVE THIS INSTRUCTION MANUAL— This instruction manual contains basic operating instructions for the ID-51A/ID-51E.
SUPPLIED ACCESSORIES
The following accessories are supplied with the transceiver. q Antenna 1 w Hand strap 1 e Battery charger (BC-167SA/SD/SV)* 1 r Belt clip 1 t Battery pack (BP-271) 1 y CD (Including the CS-51 cloning software) 1
*Not supplied, or the shape is different, depending on the transceiver version.
q w e
r t y
10

ABOUT THE SUPPLIED CD
The following instructions and installers are included on the CD.
•Basic instructions
Instructions for the basic operations, the same as this manual
•Advanced Instructions
Instructions for the advanced operations and more details are described than in this manual
•HAM radioTerms
A glossary of HAM radio terms
•CS-51 Instruction manual
Instructions for the CS-51 cloning software installation and use
•CS-51 Installer
Installer for the CS-51 cloning software
•Adobe® Reader® Installer
Installer for Adobe® Reader®
A PC with the following Operating System is required.
•Microsoft® Windows® 8, Microsoft® Windows® 7 , Microsoft® Windows Vista® or Microsoft® Windows® XP
DDStarting the CD
qqInsert the CD into the CD drive.
•Double click “Autorun.exe” on the CD.
•Depending on the PC setting, the Menu screen shown below is automatically displayed.
wwClick the desired button to open the file.
• To close the Menu screen, click [Quit].
Opens the |
|
|
|
Opens the |
Basic |
|
|
|
Advanced |
Instructions |
|
|
|
Instructions |
(this manual) |
|
|
|
|
Installs the |
|
|
|
Opens the |
|
|
|||
CS-51 |
|
|
|
CS-51 |
|
|
|
|
Instructions |
|
|
|
|
Opens the |
|
|
|
|
|
Glossary |
|
|
|
|
|
||
|
|
|
|
|
|
|
|
|
|
|
|
Installs the Adobe® Reader® |
Quits the menu screen |
||||
To read the guide or instructions, Adobe® Reader® is required. If you have not installed it, please install the Adobe® Reader® on the CD or downloaded it from Adobe Systems Incorporated’s website.
11

PRECAUTIONS
R DANGER! NEVER short the terminals of the battery pack.
RDANGER! Use and charge only specified Icom battery packs with Icom radios or Icom chargers. Only Icom battery packs are tested and approved for use with Icom radios or charged with Icom chargers. Using third-party or counterfeit battery packs or chargers may cause smoke, fire, or cause the battery to burst.
R WARNING RF EXPOSURE! This device emits
Radio Frequency (RF) energy. Caution should be observed when operating this device. If you have any questions regarding RF exposure and safety standards, please refer to the Federal Communications Commission Office of Engineering and Technology’s report on Evaluating Compliance with FCC Guidelines for Human Radio Frequency Electromagnetic Fields (OET Bulletin 65).
R WARNING! NEVER hold the transceiver so that the antenna is very close to, or touching exposed parts of the body, especially the face or eyes, while transmitting. The transceiver will perform best if the microphone is 5 to 10 cm (2 to 4 inches) away from the lips and the transceiver is vertical.
R WARNING! NEVER operate or touch the transceiver with wet hands. This may result in an electric shock or may damage the transceiver.
R WARNING! NEVER operate the transceiver with an earphone, headphones or other audio accessories at high volume levels. Hearing experts advise against continuous high volume operation. If you experience a ringing in your ears, reduce the volume level or discontinue use.
R WARNING! NEVER operate the transceiver while driving a vehicle. Safe driving requires your full attention— anything less may result in an accident.
R WARNING! NEVER connect the transceiver to a power source of more than 16 V DC or use reverse polarity. This could cause a fire or damage the transceiver.
CAUTION: MAKE SURE the flexible antenna and battery pack are securely attached to the transceiver, and that the antenna and battery pack are dry before attachment.
Exposing the inside of the transceiver to water will result in serious damage to the transceiver.
After exposure to water, clean the battery contacts thoroughly with fresh water and dry them completely to remove any water or salt residue.
1
2
3
4
5
6
7
8
9
10
11
12
13
14
15
16
17
18
19
12

PRECAUTIONS
CAUTION: DO NOT use harsh solvents such as benzine or alcohol to clean the transceiver, because they can damage the transceiver’s surfaces.
DO NOT push the PTT unless you actually intend to transmit.
DO NOT operate the transceiver near unshielded electrical blasting caps or in an explosive atmosphere.
DO NOT use or place the transceiver in direct sunlight or in areas with temperatures below –20°C (–4˚F) or above +60°C (+140˚F).
BE CAREFUL! The transceiver will become hot when operating it continuously for long periods of time.
BE CAREFUL! The transceiver meets IPX7* requirements for waterproof protection. However, once the transceiver has been dropped, waterproof protection cannot be guaranteed because of possible damage to the transceiver's case or waterproof seal.
*Only when the BP-271 or BP-272 (option), flexible antenna, [MIC/SP] cap, [DATA/DC IN] cap and [micro SD] slot cap are attached.
Place the unit in a secure place to avoid inadvertent use by children.
The BP-273 meets IPX4 requirements for splash resistance. When it is connected, the transceiver corresponds to IPX4. Even when the transceiver power is OFF, a slight current still flows in the circuits.Remove the battery pack or batteries from the transceiver when not using it for a long time. Otherwise, the installed battery pack or batteries will become exhausted, and will need to be recharged or replaced.
13

BATTERY CAUTIONS
R DANGER! NEVER short the terminals (or charging terminals) of the battery pack. Also, current may flow into nearby metal objects such as a key, so be careful when placing battery packs (or the transceiver) in bags, etc.
Simply carrying with or placing near metal objects such as a necklace, etc. may cause shorting.This may damage not only the battery pack, but also the transceiver.
R DANGER! Use and charge only specified Icom battery packs with Icom radios or Icom chargers. Only Icom battery packs are tested and approved for use with Icom radios or charged with Icom chargers. Using third-party or counterfeit battery packs may cause smoke, fire, or cause the battery to burst.
DDBattery caution
R DANGER! DO NOT hammer or otherwise impact the battery. Do not use the battery if it has been severely impacted or dropped, or if the battery has been subjected to heavy pressure. Battery damage may not be visible on the outside of the case. Even if the surface of the battery does not show cracks or any other damage, the cells inside the battery may rupture or catch fire.
R DANGER! NEVER use or leave battery pack in areas with temperatures above +60˚C (+140˚F). High temperature buildup in the battery, such as could occur near fires or stoves, inside a sun heated car, or in direct sunlight may cause the battery to rupture or catch fire. Excessive temperatures may
also degrade battery performance or shorten battery life.
R DANGER! DO NOT expose the battery to rain, snow, seawater, or any other liquids. Do not charge or use a wet battery. If the battery gets wet, be sure to wipe it dry before using.
R DANGER! NEVER incinerate a used battery pack since internal battery gas may cause it to rupture, or may cause an explosion.
R DANGER! NEVER solder the battery terminals, or NEVER modify the battery pack.This may cause heat generation, and the battery may burst, emit smoke or catch fire.
R DANGER! Use the battery only with the transceiver for which it is specified. Never use a battery with any other equipment, or for any purpose that is not specified in this instruction manual.
R DANGER! If fluid from inside the battery gets in your eyes, blindness can result. Rinse your eyes with clean water, without rubbing them, and see a doctor immediately.
R WARNING! Immediately stop using the battery if it emits an abnormal odor, heats up, or is discolored or deformed. If any of these conditions occur, contact your Icom dealer or distributor.
RWARNING! Immediately wash, using clean water, any part of the body that comes into contact with fluid from inside the battery.
14

BATTERY CAUTIONS
R WARNING! NEVER put the battery in a microwave oven, high-pressure container, or in an induction heating cooker.
This could cause a fire, overheating, or cause the battery to rupture.
CAUTION: Always use the battery within the specified temperature range, –20˚C to +60˚C (–4˚F to +140˚F). Using the battery out of its specified temperature range will reduce the battery’s performance and battery life.
CAUTION: Shorter battery life could occur if the battery is left fully charged, completely discharged, or in an excessive temperature environment (above +50˚C; +122˚F) for an extended period of time. If the battery must be left unused for a long time, it must be detached from the radio after discharging. You may use the battery until the battery indicator shows halfcapacity, then keep it safely in a cool dry place at the following temperature range:
–20˚C (–4˚F) to +50˚C (+122˚F) (within a month).
–20˚C (–4˚F) to +35˚C (+95˚F) (within three months).
–20˚C (–4˚F) to +20˚C (+68˚F) (within a year).
DDCharging caution
R DANGER! NEVER charge the battery pack in areas with extremely high temperatures, such as near fires or stoves, inside a sun-heated vehicle, or in direct sunlight. In such environments, the safety/protection circuit in the battery will activate, causing the battery to stop charging.
15
R WARNING! DO NOT charge or leave the battery in the battery charger beyond the specified time for charging. If the battery is not completely charged by the specified time, stop charging and remove the battery from the battery charger. Continuing to charge the battery beyond the specified time limit may cause a fire, overheating, or the battery may rupture.
R WARNING! NEVER insert the transceiver (battery attached to the transceiver) into the charger if it is wet or soiled. This could corrode the battery charger terminals or damage the charger. The charger is not waterproof.
CAUTION: DO NOT charge the battery outside of the specified temperature range: 0˚C to +40˚C (+32˚F to +104˚F). Icom recommends charging the battery at +25˚C (+77˚F).The battery may heat up or rupture if charged out of the specified temperature range. Additionally, battery performance or battery life may be reduced.
BE SURE to turn the transceiver power OFF while charging with the supplied BC-167S battery charger. The battery pack cannot be charged with the supplied BC-167S when the transceiver’s power is ON.
DDCharging time
Charger |
BC-167S |
BC-202 |
Battery pack |
(Supplied) |
(Optional) |
BP-271 (Supplied) |
Approx. 3 hours |
Approx. 2 hours |
BP-272 (Optional) |
Approx. 4.5 hours |
Approx. 3.5 hours |

IMPORTANT NOTES
DDWhen using the GPS receiver
•GPS signals cannot pass through metal objects. When using the ID-51A or ID-51E inside a vehicle, you may not receive GPS signals. We recommend you use it near a window. Please avoid the areas shown in the following:
1.DO NOT use where it will block the driver’s view.
2.DO NOT use where the air bags could deploy.
3.DO NOT use where it becomes a driving obstacle.
•The Global Positioning System (GPS) is built and operated by the U.S. Department of Defence. The Department is responsible for accuracy and maintenance of the system. Any changes by the Department may affect the accuracy and function of the GPS system.
•When the GPS receiver is activated, please do not cover the ID-51A or ID-51E with anything that will block the satellite signals.
•The GPS receiver may not work if used in the following locations:
1.Tunnels or high-rise buildings
2.Underground parking lots
3.Under a bridge or viaduct
4.In remote forested areas
5.Under bad weather conditions (rainy or cloudy day)
•The GPS receiver may not work if the transceiver operates near the 440.205 MHz. This is due to signals made in the internal circuit and does not indicate a transceiver malfunction.
DDSpurious signals
Depending on the combination of the operating band and mode, the Dualwatch or Triple-watch operation may generate certain spurious signals, or noise may be heard. These do not indicate a transceiver malfunction.
DDAbout charging at power ON
ID-51A/E’s charging circuit charges the supplied battery pack in approximately 3 hours. But with this rapid circuit, the battery pack cannot be charged at power ON, by default. So, be sure to turn OFF the power before charging.
When “Charging (Power ON)”* is set to ON in the MENU screen, the battery pack can be charged even if the power is ON. (Only when the battery pack is attached, and the optional CP-12L, CP-19R or OPC-254L external DC power cable is connected to [DC IN].) But this operation may generate certain spurious signals; the S-meter appears, or noise may be heard.
*MENU > Function > Charging (Power ON) (Default: OFF)
•Charging time period at power ON may differ, depending on the operating condition.
•The external DC power supply voltage must be between 10–16 V, and the current capacity must be more than 2.5 A to charge the battery pack when operating.
•When you operate the transceiver while charging, and if you cannot receive signals correctly, set “Charging (Power ON)”* to OFF, and disconnect the external DC power cable from [DC IN].
16
Loading...