


AP6010SN-GN Wireless LAN Access Point
Quick Start Guide
HUAWEI TECHNOLOGIES CO., LTD.

Copyright © Huawei Technologies Co., Ltd. 2012. All rights reserved.
No part of this document may be reproduced or transmitted in any form or by any means without prior written consent of Huawei Technologies Co., Ltd.
Trademarks and Permissions
and other Huawei trademarks are trademarks of Huawei Technologies Co., Ltd.
All other trademarks and trade names mentioned in this document are the property of their respective holders.
Notice
The purchased products, services and features are stipulated by the contract made between Huawei and the customer. All or part of the products, services and features described in this document may not be within the purchase scope or the usage scope. Unless otherwise specified in the contract, all statements, information, and recommendations in this document are provided "AS IS" without warranties, guarantees or representations of any kind, either express or implied.
The information in this document is subject to change without notice. Every effort has been made in the preparation
of this document to ensure accuracy of the contents, but all statements, information, and recommendations in this document do not constitute the warranty of any kind, express or implied.
Huawei Technologies Co., Ltd.
Address: Administration Building,Huawei Technologies Co.,
Ltd.,Bantian,Longgang District,Shenzhen,People’s Republic of China
Postcode: 518129
Website: http://www.huawei.com
Email: support@huawei.com
1

Symbol Conventions
The symbols that may be found in this document are defined as follows.
Symbol |
Description |
|
|
Indicates a potentially hazardous situation, which if not avoided, could CAUTION result in equipment damage, data loss, performance degradation, or
unexpected results.
|
Provides additional information to emphasize or supplement important |
NOTE |
points of the main text. |
Change History
Changes between document issues are cumulative. Therefore the latest document issue contains all the
Changes in previous issues.
Change in Issue 01 (2012-05-30)
Initial commercial release.
2
AP6010SN-GN
Quick Start Guide
Please download the detailed product documents from "http://support.huawei.com/support/".
The dEtaIled path is as follows: Technical Support->Documentation->Access Network -> WLAN ->WLAN -> Product Documentation ->AP6010SN.
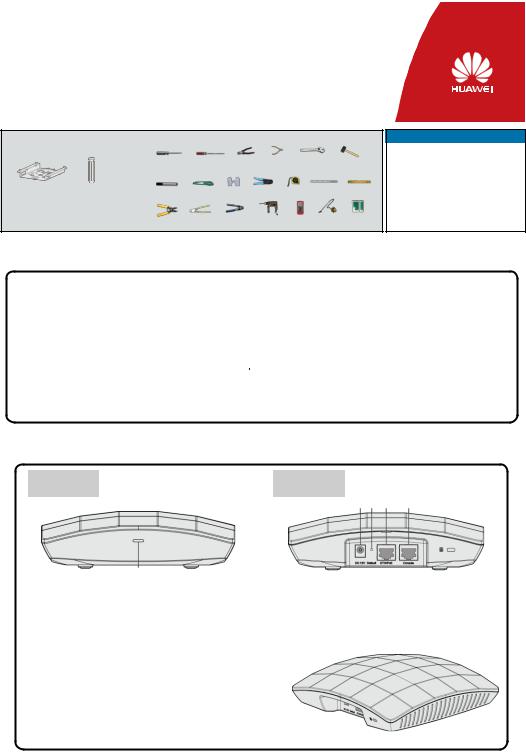
Before performing Installation, confirm that the installation accessories and tools are available.
Installation accessories: |
|
Installation tools: |
|
|
|
|
|
|
|
|
|
Flat-head |
Phillips |
Combination Diagonal Adjustable |
Hammer |
||||
|
|
screwdriver |
screwdriver |
pliers |
pliers |
wrench |
|
|
|
Sheetmetal |
Expansion |
Maker Utility knife |
ESD |
COAX Measuring 6mm drill |
Level |
||||
gloves crimping tool |
tape |
bit |
|
|
|||||
wall-mounting |
bolt |
|
|
|
|
||||
|
|
|
|
|
|
|
|
||
bracket |
|
|
|
|
|
|
|
|
|
|
|
Wire |
Cable |
RJ45 |
Hammer Multimeter Vacuum |
Network |
|||
|
|
stripper |
cutter Crimping tool |
drill |
|
cleaner Cable tester |
|||
Technical Support
Huawei Technologies Co., Ltd.
Address:Administration Building,Huawei
Technologies Co., Ltd.,Bantian,Longgang
District,Shenzhen,People’s Republic of
China
Postcode:518129
Email:support@huawei.com
Website:http://www.huawei.com
 Packing List
Unpack the equipment. Ensure that all items listed in the package list are included in the shipment. If any item is missing, contact the supplier.
|
Item |
Quantity |
Unit |
|
1 |
AP device |
1 |
PCS |
|
|
|
|
|
|
2 |
Power adapter Optional |
1 |
PCS |
|
|
|
|
|
|
3 |
Sheetmetal wall-mounting bracket |
1 |
PCS |
|
|
||||
|
|
|
|
|
4 |
Expansion bolt |
3 |
PCS |
|
|
|
|
|
|
5 |
Quick Start Guide (including the printed |
1 |
PCS |
|
packing list) |
||||
|
|
|
||
6 |
Toxic or Hazardous Substance & Elements |
1 |
PCS |
|
Declaration |
||||
|
|
|
|
Item |
Quantity |
Unit |
7 |
Warranty card |
1 |
PCS |
|
|
|
|
8 |
Certificate of Conformance |
1 |
PCS |
|
|
|
|
|
|
|
|
|
|
|
|
|
|
|
|
|
|
|
|
 Device Overview
Indicators |
Front view |
2 3 |
4 |
5 |
|
|
1 |
|
|
|
|
|
|
|
|
|
Indicator and Interfaces |
|
|
Perspective |
||
|
|
|
|
|
|
|
|
|
|
|
|
No. |
Name |
Description |
|
|
|
1 |
Indicator |
For details about indicator, see the Power-on. |
|
|
|
|
|
|
|
|
|
2 |
DC 12V |
Connected to the power adapter. |
|
|
|
3 |
Default |
Press and hold down the Reset button for 3 seconds |
|
|
|
to restore the factory settings and restart the AP. |
|
|
|||
|
|
|
|
||
|
|
|
|
|
|
4 |
ETH/PoE |
Connected to a PoE power supply or switch, or |
|
|
|
connected to the Ethernet. |
|
|
|||
|
|
|
|
||
5 |
Console |
Connected to the maintenance terminal. |
|
|
|
|
|
|
|
|
|
3
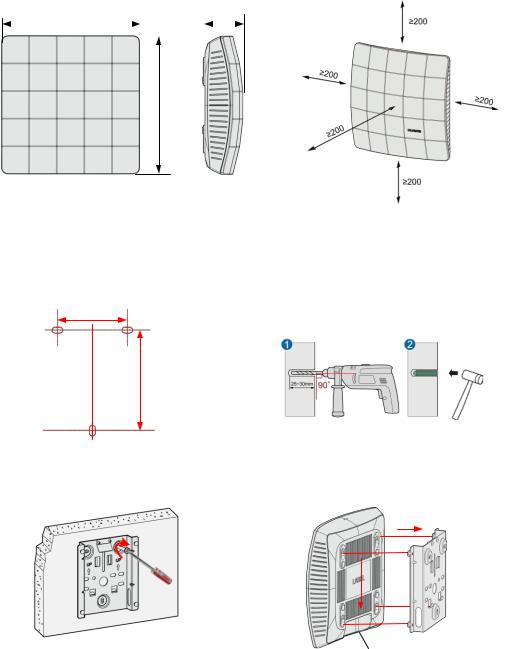
 Installing the AP
Select an appropriate installation position and leave 20 cm space above and around the device for cooling air circulation.
AP6010SN dimensions (unit: mm) without a backplane support Recommended AP6010SN installation space (unit: mm)
180 |
|
|
|
|
|
50 |
||
|
|
|
|
|||||
|
||||||||
|
|
|
|
|
|
|
|
|
|
|
|
|
|
|
|
|
|
|
|
|
|
|
|
|
|
|
180
The AP6010SN can be installed onto a workbench or mounted against a wall. In addition, the AP6010SN can be mounted to a T-rail and mounted against the ceiling.
Wall-mount the AP6010SN using the plastic wall-mounting bracket:
1. Fix the wall-mounting bracket to the wall, adjust the installation position, and use the marker to mark the drilling positions where expansion bolts are installed.
59mm
85mm
2. Use #6 drill bit to drill 25-30 mm deep holes in the drilling positions. Hammer the expansion tubes into the holes until the expansion tubes are embedded into the wall.
3. Fix the wall-mounting bracket to the wall, use the Phillips screwdriver to fasten three self-tapping screws into the expansion tube.
4. Align the holes at the rear side of the AP with the hooks on the bracket and hang the AP on the bracket. Hold the AP with one hand and press the AP downwards with another hand to secure the AP on the wall.
Underfloor
cabling
4

 Installing the AP
Ceiling-mount the AP6010SN using the sheetmetal wall-mounting bracket:
1. Remove the ceiling, determine locations of mounting holes based on the distance between two installation holes, use the hammer drill to drill holes, and fix the wall-mounting bracket to the ceiling.
|
Adjustable |
Ceiling |
buckle |
35mm
M4*30 screw 
2. Align the cucurbit holes at the rear side of the AP with four screws on the wall-mounting bracket and secure the AP.
Ceiling |
Adjustable buckle |
|
Wall-mounting bracket
Mounting the AP6010SN to the T-rail using the sheetmetal wall-mounting bracket:
1. Use screws to fix the adjustable buckle to the wallmounting bracket, hook the adjustable buckle to the T- rail, and secure the screw on the adjustable buckle to fasten the wall-mounting bracket and T-rail.
T-rail
Adjustable buckle
M3*6 screw
CAUTION
2. Align the cucurbit holes at the rear side of the AP with four screws on the wall-mounting bracket and secure the AP.
Ensure that the AP is correctly installed on the wall-mounting bracket and there must be 20 cm space above and around the AP for cooling air circulation.
 NOTE
NOTE
To prevent unauthorized personnel from moving the AP, lock the AP using the security lock and determine the position for installing the security lock. When the sheetmetal wall-mounting bracket is used, fasten the security lock to the wallmounting bracket or other immovable object. The following figure shows the security lock. The carrier should purchase the security lock.
Security lock
Lock hole
5
 Loading...