


 Loading...
Wonderful Communication, Mobile Life.
Welcome to HUAWEI B260 Series Wireless Gateway
HUAWEI B260 Series Wireless Gateway
User Guide
 Notice
Copyright © Huawei Technologies Co., Ltd. 2009. All rights reserved.
No part of this document may be reproduced or transmitted in any form or by any means without prior written consent of Huawei Technologies Co., Ltd.
The product described in this manual may include copyrighted software of Huawei Technologies Co., Ltd and possible licensors. Customers shall not in any manner reproduce, distribute, modify, decompile, disassemble, decrypt, extract, reverse engineer, lease, assign, or sublicense the said software, unless such restrictions are prohibited by applicable laws or such actions are approved by respective copyright holders under licenses.
Trademarks and Permissions
 HUAWEI, and
  are trademarks or registered trademarks of Huawei Technologies Co., Ltd.
Other trademarks, product, service and company names mentioned are the property of their respective owners.
Notice
Some features of the product and its accessories described herein rely on the software installed, capacities and settings of local network, and may not be activated or may be limited by local network operators or network service providers, thus the descriptions herein may not exactly match the product or its accessories you purchase.
Huawei Technologies Co., Ltd reserves the right to change or modify any information or specifications contained in this manual without prior notice or obligation.
NO WARRANTY
THE CONTENTS OF THIS MANUAL ARE PROVIDED “AS IS”. EXCEPT AS REQUIRED BY APPLICABLE LAWS, NO WARRANTIES OF ANY KIND, EITHER EXPRESS OR IMPLIED, INCLUDING BUT NOT LIMITED TO, THE IMPLIED WARRANTIES OF MERCHANTABILITY AND FITNESS FOR A PARTICULAR PURPOSE, ARE MADE IN RELATION TO THE ACCURACY, RELIABILITY OR CONTENTS OF THIS MANUAL.
TO THE MAXIMUM EXTENT PERMITTED BY APPLICABLE LAW, IN NO CASE SHALL HUAWEI TECHNOLOGIES CO., LTD BE LIABLE FOR ANY SPECIAL, INCIDENTAL, INDIRECT, OR CONSEQUENTIAL DAMAGES, OR LOST PROFITS, BUSINESS, REVENUE, DATA, GOODWILL OR ANTICIPATED SAVINGS.
Import and Export Regulations
Customers shall comply with all applicable export or import laws and regulations and will obtain all necessary governmental permits and licenses in order to export, re-export or import the product mentioned in this manual including the software and technical data therein.
 Safety Precautions
Read the safety precautions carefully to ensure the correct and safe use of your wireless device.
Do not switch on your device when the device use is prohibited or when the device use may cause interference or danger. Do not use your device while driving.
Follow the rules or regulations in hospitals and health care facilities. Switch off your device near medical apparatus.
Switch off your device in an aircraft. The device may cause interference to control signals of the aircraft.
Switch off your device near high-precision electronic devices. The device may affect the performance of these devices.
Do not attempt to disassemble your device or its accessories. Only qualified personnel are allowed to service or repair the device.
Do not place your device or its accessories in containers with strong electromagnetic field.
Do not place magnetic storage media near your device. Radiation from the device may erase the information stored on them.
Do not put your device in a hightemperature place or use it in a place with flammable gas such as a gas station. Keep your device and its accessories away from children. Do not allow children to use your device without guidance.
Use approved accessories only to avoid explosion.
Observe the laws or regulations on device use. Respect others’privacy and legal rights when using your device.

Table of Contents |
|
Table of Contents 1 |
|
Quick Start 1 |
|
Appearance ................................................ |
1 |
PC Configuration Requirements................. |
2 |
Installation .................................................. |
2 |
Making a Call.............................................. |
4 |
Dial-up Access ........................................... |
4 |
Restoring the Factory Defaults................... |
5 |
Using the Management Page 6 |
|
Management Page Overview ..................... |
6 |
Viewing Configuration Info ......................... |
6 |
Quick Setup................................................ |
7 |
Configuring Your Computer 10 |
|
Wireless Configuration ............................. |
10 |
Configuring the PC Network..................... |
11 |
Advanced Settings 12 |
|
Overview .................................................. |
12 |
System Management ............................... |
12 |
SIM Settings ............................................. |
13 |
Mobile Network Settings........................... |
14 |
Dial-up Settings ........................................ |
15 |
DHCP Settings ........................................ |
16 |
Clip Settings ............................................. |
17 |
WLAN Settings ......................................... |
17 |
Security Settings 21 |
|
LAN IP Filter............................................. |
21 |
Virtual Server ........................................... |
22 |
DMZ Settings ........................................... |
23 |
UPnP Settings.......................................... |
23 |
Remote Management .............................. |
23 |
Troubleshooting 25
Safety Information 28
Abbreviations 32
Firewall Switch ......................................... |
21 |
LAN MAC Filter ........................................ |
21 |

1Quick Start
Note |
The supported functions and actual |
|
appearance are subject to your product |
|
purchased. The following pictures are displayed |
|
for illustration purpose only. For details of your |
|
product selection, consult your service provider. |
Appearance
On/Off

 Power indicator
WLAN indicator Signal indicator
Mode indicator
Antenna

Charger
Ethernet
Phone
Indicator |
Status |
Power • Steady on and in yellow: The device is switched on successfully
Indicator |
Status |
WLAN • Steady on and in yellow: The WLAN is enabled
• Blinking: Data is being transmitted
Signal • Steady on and in green: Signal strength is strong
•Steady on and in yellow: Signal strength is medium
•Steady on and in red: Signal strength is weak
•Fast blinking in red: The SIM card does not exist or the PIN code is not verified
Mode • Double blinking in green: Searching for the network
•Blinking in green: Registering with the 2G network
•Steady on and in green: 2G data service connected
•Fast blinking in green: Downloading the upgrade mode
•Blinking in blue: Registering with the 3G network
•Steady on and in blue: WCDMA data service connected
•Steady on and in cyan: HSPA data service connected
1

 PC Configuration Requirements
PC Configuration Requirements
The recommended PC configurations for using the gateway are as follows:
•CPU: Pentium 500 MHz or above
•Memory: 128 MB RAM or above
•Hard disk: 100 MB or above available space
•Operating System: Windows 2000, Windows XP, or Windows Vista
•LCD resolution: 800*600 pixel or above, recommended 1024*768 pixel.
•Interface: standard USB interface
•Internet Browser: Internet Explorer 6.0 or Internet Explorer 7.0, Firefox 1.5 or Firefox 2.0, Safari 3.0.
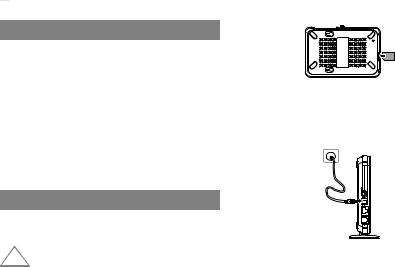
Installation
Step 1: Insert the SIM card
Before inserting or removing the SIM card, you ! must disconnect the device from the power
Warning adapter.
Insert the card into the slot completely, as shown in the following figure.
To remove the card, press the card gently. Now the card will pop up automatically.
Step 2: Connect to the power adapter
Use a power adapter that is compatible with the device; otherwise, the device may be damaged.
Step 3: Connect to a PC
If the indicator of the Ethernet interface connecting with a network cable is on, the connection is successful. The Ethernet cable cannot be longer than 100 meters (328 feet). To achieve better effect, use the shielded cable.
2
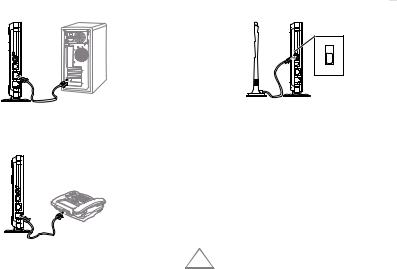
Step 4: Connect to a telephone set
The communication quality of the telephone set can be interfered by the wireless signal. Place the telephone set one meter away from the device.
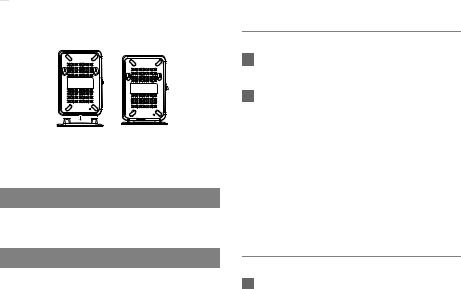
Step 5: Connect the external antenna (optional)
Connect the external antenna cable with the antenna jack on the main unit. Screw the cable to make sure that the antenna is tightly connected with the antenna jack.
Installation 
Internal
External
Note |
You can choose whether to use the external |
|
antenna. In the area covered with strong signal, |
|
you can switch to the antenna internal and |
|
uninstall the external antenna. In the area |
|
covered with weak signal, you can install the |
|
external antenna and switch to the antenna |
|
external. For details of antenna selection, |
|
consult your local dealer. |
Step 6: Place the device
To prevent electrical devices from being
! interfered by wireless signals, place electrical Warning devices one meter away from the device.
The device can be placed horizontally on a table, hanging against the wall, or standing against the
3

 Making a Call
pedestal. Place the device on a higher place or near the window, so it can receive stronger signals.
Step 7: Power On/Off
Press and hold the On/ Off button to power on or off the device.
Making a Call
When you hear the dial tone after picking up the handset, you can make a call.
Dial-up Access
By default, the device dials up to access the Internet as required. You can directly use the network services such as web browsing, and receiving or sending emails.
Logging In to the Management Page
1Start the Internet browser and enter the address http://192.168.1.1 in the address bar.
2Select a user type, enter the password, and then click Login.
•Admin: This user type is authorized to view and change configurations. The default password is admin.
•User: This user type is authorized to view only the basic status information. The default password is user.
Note |
To avoid the configuration conflict, only one |
|
user is allowed to log in to the management |
|
page at a time. |
Accessing the Internet
1 Click Connection.
4
Note |
• |
If you are required to enter the PIN code, |
|
|
enter the correct one. If you fail to enter the |
|
|
correct PIN or PUK code, the network-related |
|
|
functions are unavailable. |
|
• The SIM card is supplied by the service |
|
|
|
provider. For details, contact your service |
|
|
provider. |
|
• When the Save PIN Code check box is |
|
|
|
selected, the Auto validation is enabled. |
|
• |
If Auto validation is enabled, the PIN code is |
|
|
recorded and automatically validated after |
|
|
each restart. |
2If PPP Connection is Manual, click Connect / Disconnect to connect to or disconnect from the network.
Note |
If PPP Connection is Auto or On |
|
Demand, refresh the page to view the |
|
current network connection status. |
3Wait for several minutes. If you are notified that the connection is successful, you can start the browser and enter the website address to access the Internet.
Restoring the Factory Defaults 
Restoring the Factory Defaults
If you need to reconstruct the network or you forget the changes of some parameters, you can choose to restore factory defaults and reconfigure the device.
Reset
Reset: Press and hold it to restore the factory defaults.
Note |
After this operation, all configurations are |
|
restored to the defaults. |
|
|
5

2Using the Management Page
Management Page Overview
Operation Functions
The following table shows the main operations in the management page.
Item |
Description |
Basic Status |
Displays the parameter configuration |
|
status of the device. |
|
|
Quick Setup |
Quickly configures the device. |
|
|
Connection |
Displays the network connection status |
|
and connects to the network. |
|
|
Advanced |
Configures the advanced settings. |
Settings |
|
|
|
Security |
Configures the security settings. |
|
|
Logout |
Log out of the management page. |
|
|
Item |
|
Green icon |
Red icon |
|||
SIM |
The card is valid. |
The card is not |
||||
|
|
|
|
|
|
inserted or is invalid. |
|
|
|
|
|
|
|
WAN |
The PPP dial-up |
The PPP dial-up |
||||
|
|
connection is |
connection is not |
|||
|
|
established. |
established. |
|||
|
|
|
|
|
||
WCDMA The WCDMA |
The WCDMA network |
|||||
|
|
network is |
is unavailable. |
|||
|
|
available. |
|
|||
|
|
|
|
|
If the device is registered with |
|
|
|
Note |
||||
|
|
|
|
|
other network modes, the |
|
|
|
|
|
|
corresponding network connection |
|
|
|
|
|
|
status is displayed. |
|
SIG |
The signal strength from weak to strong |
|||||
|
|
is shown as follows: |
||||
|
|
|
|
|
|
|
|
|
|
|
|
|
|
|
|
|
|
|
|
|
Device Status
The following table shows the status information of the device.
Viewing Configuration Info
On the configuration page, you can view the current parameter configuration information and the network connection status.
6
Click Basic Status.
2Click Advanced on the right part of the page to view the advanced status.
Click Refresh to view the current status on the advanced status page.
Quick Setup
You can use the quick setup wizard to configure and maintain the basic parameters of the device. Click Quick Setup to access the welcome page. Click Next to configure the PPP profile settings.
Configuring PPP Profile Settings
•Profile Name: Enter a profile name when the text box is empty.
•Dial-up Number/PPP User Name/PPP Password: Enter these three parameters provided by the internet service provider (ISP). The dial-up number is used to initiate the network call; the PPP user name and PPP password is used to obtain the service authorization provided by the ISP.
•APN/IP Address: Select the mode for obtaining the access point name (APN) and IP address. If the service
Quick Setup 
provider provides the relevant parameters, select Static and enter their values. Otherwise, select Dynamic and the device automatically obtains them.
Configuring PPP Dial-up Settings
PPP Connection: Select the dial-up access mode.
•Auto: The device automatically connects to the Internet and does not disconnect when no data is transmitted.
•On Demand: The device automatically connects to the Internet when data transmission exists. When the duration of no data transmission exceeds the maximum idle time, the device disconnects the Internet connection.
•Manual: The device connects to the Internet after you click Connect on the connection page. For details, see "Accessing the Internet".
PPP Authentication: This service is provided by your ISP. For details, consult your ISP.
Configuring WLAN Settings
(Name) SSID: Enter a name for your wireless local area network (WLAN).
•The service set identifier (SSID) is used to identify a WLAN. A PC and the wireless device can perform normal data communication only when they have the same SSIDs. To ensure the WLAN security, do not use the default SSID. You can enter a character string as the SSID, such as MyHome.
7
Loading...