


 Loading...
HP Firebird
with VoodooDNA
Desktop Essentials
The only warranties for Hewlett-Packard products and services are set forth in the express statements accompanying such products and services. Nothing herein should be construed as constituting an additional warranty. HP shall not be liable for technical or editorial errors or omissions contained herein.
HP assumes no responsibility for the use or reliability of its software on equipment that is not furnished by HP.
This document contains proprietary information that is protected by copyright. No part of this document may be photocopied, reproduced, or translated to another language without the prior written consent of HP.
Hewlett-Packard Company P.O. Box 4010
Cupertino, CA 95015-4010 USA
Copyright © 2008 Hewlett-Packard Development Company, L.P.
This product incorporates copyright protection technology that is protected by U.S. patents and other intellectual property rights. Use of this copyright protection technology must be authorized by Macrovision, and is intended for home and other limited pay-per-view viewing uses only unless otherwise authorized by Macrovision. Reverse engineering or disassembly is prohibited.
Microsoft and Windows Vista are U.S. registered trademarks of Microsoft Corporation.
The Windows logo and Windows Vista are trademarks or registered trademarks of Microsoft Corporation in the United States and/or other countries/regions.
HP supports lawful use of technology and does not endorse or encourage the use of our products for purposes other than those permitted by copyright law.
The information in this document is subject to change without notice.
Table of Contents |
|
Setting Up Your HP Firebird ........................................................................ |
1 |
Get It Together ......................................................................................................... |
1 |
Storing documentation and recovery discs .............................................................. |
1 |
Connecting to the HP Firebird ............................................................................... |
2 |
Placing the HP Firebird in the proper location ......................................................... |
4 |
Using surge protection ......................................................................................... |
5 |
Using SLI Technology ................................................................................................ |
6 |
To disable SLI ..................................................................................................... |
6 |
Re-enabling SLI ................................................................................................... |
6 |
Selecting HDMI as the default video output ............................................................ |
7 |
Adjusting the screen mode by using Windows Vista ................................................ |
7 |
Adjusting the screen resolution by using Windows Vista .......................................... |
8 |
Adjusting the screen resolution by using the NVIDIA Control Panel ............................ |
8 |
Setting Up a Local Area Network ................................................................................ |
8 |
Setting Up a Wired (Ethernet) Connection .................................................................... |
9 |
Turning On Your HP Firebird for the First Time .......................................... |
11 |
Finding More Information ........................................................................................ |
11 |
Finding information on the Web ......................................................................... |
11 |
Finding onscreen Help and Support Center .......................................................... |
11 |
Turning On the HP Firebird ...................................................................................... |
11 |
Turning Off the HP Firebird ...................................................................................... |
12 |
Using Shut Down .............................................................................................. |
12 |
Restarting the HP Firebird ........................................................................................ |
12 |
Using the Power button to restart your HP Firebird ................................................. |
13 |
Using Lock ............................................................................................................. |
13 |
Using Sleep Mode .................................................................................................. |
13 |
Using Hibernate mode ....................................................................................... |
14 |
Automatic Sleep, Hibernate, or Away mode ......................................................... |
15 |
Connecting to the Internet ........................................................................................ |
15 |
Using the HP Firebird with Safety and Comfort ........................................................... |
16 |
Setting Up User Accounts ......................................................................................... |
16 |
Protecting the HP Firebird ........................................................................................ |
17 |
Using passwords ............................................................................................... |
18 |
Configuring for automatic Microsoft software updates ........................................... |
19 |
Installing critical security updates ........................................................................ |
20 |
Guidelines for Installing Software and Hardware Devices ............................................ |
20 |
Transferring Files and Settings from an Old Computer to Your HP Firebird ..................... |
21 |
Table of Contents |
iii |
Using the Norton Internet Security Antivirus Software .................................................. |
21 |
Configuring and registering Norton Internet Security software ................................ |
21 |
Manually running a scan ................................................................................... |
22 |
Setting a Full System Scan time ........................................................................... |
22 |
Setting up a Custom Scan time ........................................................................... |
23 |
Using DVD Media Drives .......................................................................... |
25 |
Handling CDs and DVDs ................................................................................... |
25 |
Inserting and removing CDs and DVDs ................................................................ |
26 |
Compatibility Information ......................................................................................... |
26 |
Disc Features and Compatibility Table ....................................................................... |
27 |
Optical Drive Quick Reference Table ......................................................................... |
28 |
Using Blu-ray Disc Drives ......................................................................................... |
29 |
Caring for Your HP Firebird ...................................................................... |
31 |
Maintenance ............................................................................................ |
33 |
Creating System Recovery Discs ............................................................................... |
33 |
Creating Data Backup Discs ..................................................................................... |
33 |
Security Updates ..................................................................................................... |
33 |
Reviewing programs that run automatically at startup ............................................ |
34 |
Running the Disk Cleanup Program ........................................................................... |
34 |
Manual Disk Cleanup ........................................................................................ |
34 |
Automatic Disk Cleanup ..................................................................................... |
34 |
Running the Disk Defragmenter Program .................................................................... |
35 |
Checking for Hard Disk Drive Errors .......................................................................... |
36 |
Keeping the HP Firebird Free of Dust and Dirt ............................................................ |
36 |
Cleaning the HP Firebird .................................................................................... |
37 |
Cleaning fans, heat sink, and inside the HP Firebird .............................................. |
38 |
Cleaning the keyboard and mouse ...................................................................... |
38 |
Troubleshooting Computer Problems ........................................................ |
39 |
Audio .................................................................................................................... |
39 |
CD and DVD Drives ................................................................................................ |
41 |
Video .................................................................................................................... |
43 |
Display (Monitor) .................................................................................................... |
44 |
Hard Disk Drive ...................................................................................................... |
45 |
Hardware Installation .............................................................................................. |
46 |
Internet Access ....................................................................................................... |
48 |
Keyboard and Mouse .............................................................................................. |
50 |
Power ................................................................................................................... |
51 |
Performance ........................................................................................................... |
53 |
Miscellaneous ........................................................................................................ |
56 |
Updating Drivers ..................................................................................... |
57 |
System Recovery ..................................................................................... |
59 |
Making a System Recovery Disc ............................................................................... |
59 |
System Recovery ..................................................................................................... |
60 |
Recovery from the recovery partition on your hard disk drive .................................. |
61 |
Recovery from the recovery disc .......................................................................... |
63 |
Recovery from the Microsoft Windows Vista OS recovery disc ................................ |
64 |
Post-recovery Procedure ........................................................................................... |
66 |
Index ....................................................................................................... |
67 |
iv HP Firebird Desktop Essentials (Features may vary by model)

Setting Up Your HP Firebird
WARNING: The power supply is preset for the country/region in which you purchased your computer. If you move, please check the voltage requirements for your new location before plugging the computer into an AC power outlet.
WARNING: Please read “Safety Information” in the Limited Warranty and Support Guide before installing and connecting the computer to the electrical power system.
Get It Together
The information you need is available from several sources:
The setup poster shows how to set up the HP Firebird.
This section shows the location of components and connectors on the system.
The computer box contains printed details or updates regarding the HP Firebird.
Storing documentation and recovery discs
Store all user manuals and warranty information in an easy-to-find, safe location. Hewlett-Packard recommends that you store the system recovery discs with the documentation. This allows easy access to all important system documents and files.
Setting Up Your HP Firebird 1

Connecting to the HP Firebird
Connect the main hardware devices, such as the monitor, keyboard, and mouse to the back of the HP Firebird. Other peripheral devices, such as a printer, scanner, or camera, also plug into connectors on the back of the HP Firebird. The following table shows some, but not all, connectors:
A |
|
|
B |
|
|
C |
M |
|
D |
||
|
||
E |
|
F
G
H
I
J
K
N
L
NOTE: The location, availability, and number of connectors on the system may vary.
2 HP Firebird Desktop Essentials (Features may vary by model)

Connector/LED/Button |
Description and function |
|
|
(A)Audio Out connector for audio to powered speakers or headphones.
(B)Mic In connector.
(C)Optical Out connector. Optical S/PDIF output provides
a digital audio signal to connect to the Optical In on a set of digital speakers. The digital speakers split up the audio signal to the correct speaker (select models only).
(D) IEEE 1394 connector. This 6-pin connector provides high-speed connectivity for audio/video devices, storage peripherals, PCs, or portable devices with very fast transfer rates.
(E) External Serial Advanced Technology Attachment (eSATA) connectors for connecting external SATA hard disk drives.
NOTE: An eSATA connection requires that the drive have its own power connector.
(F)4-pin Universal Serial Bus (USB) connectors for connecting USB 2.0 devices, such as a mouse, keyboard, or digital camera.
(G)Ethernet LAN (RJ-45) connector. This connector allows
connection to a local area network (LAN).
(H) High definition multimedia interface (HDMI) connector to connect a TV or monitor. You may need to use an adapter (VGA-to-DVI or HDMI-to-DVI) to connect the display to the system.
See the documentation that came with your display device.
(I) DVI (Digital video output) connector to connect a TV or monitor. You may need to use an adapter (VGA-to-DVI or HDMI-to-DVI) to connect the display to the system.
See the documentation that came with your display device.
(J) Power connector to connect the external power supply provided with the computer.
(K) ExpressCard/54 expansion slot for attaching optional accessories.
Setting Up Your HP Firebird 3

Connector/LED/Button |
Description and function (continued) |
|
|
|
(L) Computer locking slot for use with a computer lock |
|
mechanism. When in use the left panel will not open. |
|
|
|
(M) A 5-in-1 media reader slot with a sliding cover located |
|
on the top of the computer. Supported formats: SD, MMC, |
|
MS, MS Pro, XD. |
|
|
|
(N) Power button, located on the front of the computer. To |
|
start your HP Firebird, press the On (left) side of the badge. |
|
|
Placing the HP Firebird in the proper location
When setting up your new HP Firebird, consider the best location for it. The small size and low noise rating of the computer mean that you might consider setting it on the desktop. That location will reduce the amount of dust the computer is exposed to.
When setting up your new HP Firebird, place it where the ventilation openings, located on the top and back of the unit (A), are unobstructed. Make sure that all connections are secure and that all cabling is out of the way. Do not place cabling in walkways or where it can be stepped on or damaged from placing furniture on it. Keep the grill on the top of the system free of dust, and do not rest objects or allow pets to sit on top of the system.
A
4 HP Firebird Desktop Essentials (Features may vary by model)

Using surge protection
Help protect the monitor, computer, and accessories by connecting all power cords for the computer and peripheral devices (such as a monitor, printer, or scanner) to a surge protection device, such as a power strip with surge protection or an uninterruptible power supply (UPS). Many surge protection devices have surge protection inputs and outputs for modem or telephone lines. Telephone lines are a common path for lightning spikes to get into the system. Some surge protection devices have surge protection for television cable connections as well. Use those if the computer has a television tuner installed.
Not all power strips provide surge protection; the power strip must be specifically labeled as having this capability. Use a power strip whose manufacturer offers a damage replacement policy that replaces the equipment if surge protection fails.
Opening the HP Firebird
Press the latch on the bottom of the computer and pull the left side cover open by holding the upper right corner.
Closing the HP Firebird
Place both hands over the latches on the left side cover and press to close.
Setting Up Your HP Firebird 5

Using SLI Technology
The HP Firebird configurations that include dual graphics cards come configured with Scalable Link Interface (SLI) enabled. Dual graphics cards with SLI technology work together to render 3D applications to create a better performance experience.
NOTE: Disabling SLI results in significant graphical performance loss, which means that games and other 3D applications may no longer run at full potential.
To disable SLI
1Click the Windows Vista start button™  , and then click Control Panel.
2Click the link in the top left to switch to Classic View. Double-click NVIDIA Control Panel, then click the Set SLI Configuration link on the top left.
3On the right side of this window, click Do not use SLI technology, and then click the Apply button at the bottom.
If prompted to restart the computer, do so immediately.
Re-enabling SLI
If you have disabled SLI (or your system does not support it), simply connect all monitors to the ports on the back of your system while it is powered off.
1Turn on the computer.
2Click the Windows Vista start button, and then click Control Panel.
3Click the link in the top left to switch to Classic View. Double-click Personalization inside the control panel and then click Display Settings.
This window shows you the number of supported monitors connected to your system, and which ones are connected.
4Click your second monitor to select it, and if it is connected properly, you will be able to check the box labeled Extend my Windows desktop onto this monitor.
5Check this box and click OK.
Repeat this process for additional monitors.
6 HP Firebird Desktop Essentials (Features may vary by model)
Selecting HDMI as the default video output
If DVI is the default video output for your HP Firebird computer and you want to use HDMI, you will need to change the default.
To identify and change the installed optical drive:
1Select Start > Computer > Control Panel > System > Hardware > Device Manager.
2Then click the plus (+) sign next to DVD/CD-ROM drives. The default optical drive will be displayed.
3Change the default to HDMI if you are using HDMI as your video output.
Adjusting the screen mode by using Windows Vista
To change the screen mode by using Windows Vista®:
1Right-click an empty area of the desktop, and then click Personalize.
2Click Display Settings.
NOTE: Click the Identify Monitors button to display the icon number on each screen.
3Select the monitor, and then click a check mark in the box for Extend the desktop onto this monitor. (When the box is not checked, the monitor displays a duplicate desktop.)
4Click Apply.
5To change the direction that the desktop extends (left or right, to match how the displays are physically set up), click a monitor and drag it to the desired position.
6Click OK.
NOTE: You can connect more than one display device (CRT monitor, flat panel monitor, TV, and so on) to the system at a time (select models only). You can quickly change which device displays the desktop by pressing Alt+F5. Each time you press Alt+F5, the desktop appears on the next device. If pressing Alt+F5 does not work, restart the system and try again.
Setting Up Your HP Firebird 7
Adjusting the screen resolution by using
Windows Vista
To change the screen resolution by using Windows Vista:
1Right-click an empty area of the desktop, and then click Personalize.
2Click Display Settings.
3If necessary, select the monitor, and then adjust the screen resolution by using the slider under Resolution.
4Click Apply.
5Click Yes, if it is present.
6Click OK.
Adjusting the screen resolution by using the NVIDIA Control Panel
To change the screen resolution by using the NVIDIA Control Panel:
1Right-click an empty area of the desktop, and then click NVIDIA Control Panel.
2Select Standard or Advanced and then click OK.
3Under Display, click Change resolution.
4If necessary, select the display, and then adjust the screen resolution by using the slider under Display resolution.
5Click Apply, and then click Yes if you want to apply that resolution.
Or
Click No, and change the resolution by using the slider under Display resolution again, click Apply and then click Yes.
Setting Up a Local Area Network
A home local area network (LAN) may consist of either a wired or a wireless network that you can use to connect the computer to other devices on the network, including other computers. The network components may include a hub or a switch, which can connect multiple devices to the network, or a router, which can connect computers or a broadband Internet connection to the network. This network connection also enables you to share data and printers or other devices among your computers. The network connection to the Internet is usually through a dial-up or cable modem.
A wired network uses Ethernet cables to connect the devices on the network. For example, the Ethernet cable plugs into the computer network interface adapter and the router.
A wireless network uses radio waves to connect the devices on the network. For example, both the computer and the router have an antenna and adapter that use the same
Wi-Fi industry standard: 802.11n, 802.11b, 802.11g, or 802.11a.
8 HP Firebird Desktop Essentials (Features may vary by model)
Setting Up a Wired (Ethernet) Connection
The Ethernet connection, which may be called network interface adapter, Network Interface Card, or NIC, provides a high-speed or broadband connection to an Ethernet network. After you connect this interface to a network, such as a LAN, you can connect to the Internet through the network.
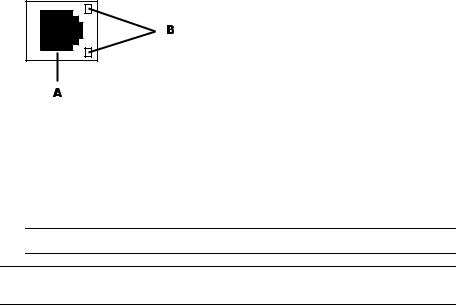
1Connect an Ethernet cable to the Ethernet connector (A) on the back of the computer, and to the network router or LAN device.
AEthernet connector (RJ-45 port)
BEthernet indicator lights
2With the computer turned on, check the indicator lights (B) next to the Ethernet connector for the status:
ACTIVITY — Lit yellow during network data transfer activity
LINK — Lit green when there is a valid network connection
NOTE: Your Ethernet connector may have only one indicator light.
NOTE: For optimum performance, all of your network connections—computer, wiring, and router—must support the maximum speed of your network.
Setting Up Your HP Firebird 9
10 HP Firebird Desktop Essentials (Features may vary by model)
Turning On Your HP Firebird
for the First Time
Finding More Information
Finding information on the Web
You can find guides and information for your HP Firebird by using the Internet to access the Support Web site.
To access support, go to http://www.hp.com/support in your Web browser.
Finding onscreen Help and Support Center
Information about your computer is in the onscreen Help and Support Center. You can find links to driver updates, access to technical support options, and information about commonly asked questions.
To open the Help and Support Center, click Start > Help and Support.
Turning On the HP Firebird
After you have connected hardware devices and peripherals to your computer (see “Connecting to the HP Firebird”), you are ready to turn on the computer:
1Connect the external power source to the Power connector at the back of the system.
2Connect the external power source to a power outlet that is equipped with a surge protector.
3Turn on the devices in the following order:
aPress the Power button on the external monitor.
bPress the Power button to the left side of the badge.
After applying power, the system power LED on the system front panel case lights up. The computer runs the power-on self tests (POST). While the tests are running, the BIOS beeps.
cIf you do not see anything within 30 seconds from the time you turned on the power, the system may have failed a power-on test. Check your connections and repeat these steps before calling HP Support for assistance.
4Turn on the speakers, if they are present.
5Set up HP Firebird by following the onscreen instructions. If prompted, select the country/region where you are physically located, and wait while the computer makes preparations.
6Set up Microsoft® Windows Vista by following the onscreen instructions.
Turning On Your HP Firebird for the First Time 11

Turning Off the HP Firebird
For best results, when using Microsoft Windows Vista, do not shut down the system, except when you must turn off the power for safety reasons, such as to make repairs, install new hardware or cards, or change a battery.
As an alternative to shutting down the system, you can lock it or put it into either Sleep or Hibernate mode, if it is available. You can set the power management timers to put the computer automatically into Sleep or Hibernate mode.
Sleep and Hibernate modes are power states. Sleep mode saves your work to memory, so you can resume quickly, and saves your work to the hard disk. The computer then goes to a reduced-power state. During Sleep mode, the computer hardware light remains on, and the system is ready to wake quickly and resume your work where you left off. Hibernate mode saves the system memory to a temporary file on the hard disk and then turns off the hardware.
Some computers also have a reduced-power state called Away mode. Away mode turns off the display and mutes the audio, but otherwise keeps the computer operational. During Away mode, the computer can continue to perform tasks such as recording a scheduled TV program or streaming video and music files to a remote location.
Using Shut Down
For best results, when using Windows Vista, turn off the system without pressing the power rocker switch on the front of the computer.
1Close any open software programs by clicking the X at the upper-right corner of each program window.
2Click the Windows Vista start button on the taskbar.
3Click the Arrow button next to the Lock button.
4Click Shut Down.
5Turn off the monitor.
Restarting the HP Firebird
When you restart the HP Firebird, the system clears some settings and starts over using the operating system and software in its memory. Restarting is the easiest and most effective way to solve many software issues for the system.
Also, you may want to install additional software programs or hardware devices onto the computer, and doing so may require that you restart the system after installation.
To restart the HP Firebird:
1Click the Windows Vista start button on the taskbar.
2Click the Arrow button next to the Lock button.
3Click Restart.
Or
Press the Power button on the left side of the badge on the front of the system. Press the Power button on the left side of the badge to restart.
12 HP Firebird Desktop Essentials (Features may vary by model)

Using the Power button to restart your HP Firebird
During normal operation, if you cannot restart the operating system using the software, press and hold for five seconds (A) the Power button on the left side of the badge to shut the system down. Press the Power button again to restart.
 A
A
Using Lock
If you lock the system, only you or the administrator can log on to it. For more information, see “Setting Up User Accounts.”
1Click the Windows Vista start button on the taskbar.
2Click the Lock button.
To unlock the system, you must enter your password.
Using Sleep Mode
When the HP Firebird is in Sleep mode, it goes into a reduced-power state. The monitor is blank, as if it were turned off. By using Sleep mode:
You save time, because you do not have to wait for the system to go through the normal startup routine when you wake it again. The next time that you use the computer, any programs, folders, and documents that were open before you put the computer into Sleep mode are available.
The computer can receive faxes, if you set it to do so.
The computer can retrieve e-mail messages and download information from the Internet automatically, if you set it to do so.
Turning On Your HP Firebird for the First Time 13

To put the HP Firebird into Sleep mode manually:
Press the Sleep button on the keyboard, if it is present.
Or
1Click the Windows Vista start button on the taskbar.
2Click the Arrow button next to the Lock button.
3Click Sleep.
To wake from Sleep mode:
Press the Sleep button on the keyboard.
Or
Quickly press the Power button on the left side of the badge on the front of the HP Firebird.
If the system does not work properly when you wake it from Sleep mode, restart the computer.
Using Hibernate mode
Hibernate mode is available as an advanced power setting. When the system is in Hibernate mode, it saves to the hard disk drive everything that is in computer memory, turns off the monitor and the hard disk drive, and then turns itself off. When you turn on the system again, your programs, folders, and documents are restored to the screen.
To put the HP Firebird into Hibernate mode manually:
1Click the Windows Vista start button on the taskbar.
2Click the Arrow button next to the Lock button.
3Click Hibernate, if it is present.
NOTE: If Hibernate is not present, you can set up the computer to go into Hibernate mode automatically; see “Automatic Sleep, Hibernate, or Away mode.”
To wake the HP Firebird from Hibernate mode, press the Power button on the left side of the badge on the front of the system. If the system does not work properly when you wake it from Hibernate mode, restart the computer.
14 HP Firebird Desktop Essentials (Features may vary by model)

Automatic Sleep, Hibernate, or Away mode
You can set the HP Firebird to go into Sleep, Hibernate, or Away modes automatically when it is idle for a specified number of minutes. To put the system into a mode automatically, modify the power management settings.
1Click the Windows Vista start button on the taskbar.
2Click Control Panel.
3Click System and Maintenance.
4Click Power Options.
5Click Change when the computer sleeps.
6For Sleep or Away mode, select an option from the Put the computer to sleep drop-down menu, and click Save changes.
Or
For Hibernate or Away mode:
a Click Change advanced power settings. b Click the plus sign (+) next to Sleep.
c Click an item and make selections, and then click Apply. d Click OK.
Connecting to the Internet
The HP Firebird can connect to the Internet through a cable or telephone (DSL) modem, or using a local area network (LAN). Check with your Internet Service Provider (ISP) for specific information on the connection. To make the hardware connections, see “Setting Up Your HP Firebird.”
To connect to the Internet:
1Sign up with an ISP. If you already have an account with an ISP, skip this step and follow the instructions provided by the ISP.
2Connect to the Internet. You must connect through your ISP. Usually, the ISP provides an icon on the desktop after installation.
Double-click the ISP-provided icon on the desktop, and log in.
3Open your Web browser and browse the Internet.
NOTE: If you have questions, contact your ISP directly.
Turning On Your HP Firebird for the First Time 15

Using the HP Firebird with Safety and Comfort
WARNING: To reduce the risk of serious injury, read the Safety & Comfort Guide. It describes proper workstation setup, posture, and health and work habits for computer users. It also provides important electrical and mechanical safety information.
Before you begin using the HP Firebird, arrange the system and your work area to maintain your comfort and productivity. Refer to the Safety & Comfort Guide for important ergonomic information:
Click the Windows Vista start button on the taskbar, click All Programs, click User Guides, and then click Safety & Comfort Guide.
Or
Type the following into a Web browser address box, and then press Enter: http://www.hp.com/ergo
Setting Up User Accounts
User accounts enable you to set the privileges for each user of the HP Firebird. For example, you can set the software programs that each user is allowed to access.
Windows Vista provides three types of user accounts:
Administrator:
Is allowed to change account types for other users, change passwords, change system-wide settings, access all files on the computer, and install software and drivers that are compatible with Windows Vista.
Limited - Standard User:
Is not allowed to change other user settings or passwords. A Limited account may not be able to install or run some software.
Is allowed to change the limited account picture, and to create, edit, or delete the account password.
Guest:
Is allowed to use most software and change system settings that do not affect other users or the security of the system.
Is not allowed to change other user settings or passwords, or install software.
Does not have access to password-protected files, folders, and settings.
16 HP Firebird Desktop Essentials (Features may vary by model)
Creating multiple user accounts on the same system has certain advantages, as well as some drawbacks.
Advantages to multiple user accounts:
Ability to create individual user settings
Ability to limit access to software for certain users
Drawbacks to multiple user accounts:
More memory (RAM) usage
Multiple Temporary Internet Files folders to remove during Disk Cleanup
More data to back up
Longer time to complete virus scan
Protecting the HP Firebird
Protect the HP Firebird, personal settings, and data from a variety of risks by using:
Passwords.
Antivirus software.
Firewall software.
Critical security updates.
NOTE: Security solutions are designed to act as deterrents, but they may not be able to prevent software attacks or to prevent the system from being mishandled or stolen.
Computer risk |
Security feature |
|
|
Unauthorized use of the computer or user account |
User password |
|
|
Computer viruses |
Norton Internet Security software |
|
(antivirus and firewall program) |
|
|
Unauthorized access to data |
Norton Internet Security software |
|
Windows Vista updates |
|
|
Unauthorized access to Setup Utility, BIOS settings, and |
Administrator password |
other system identification information |
|
|
|
Ongoing or future threats to the computer |
Critical security updates from |
|
Microsoft |
|
|
Turning On Your HP Firebird for the First Time 17

Using passwords
A password is a group of characters that you choose to secure the computer information. Several types of passwords can be set, depending on how you want to control access to your information. Passwords can be set in the Microsoft Windows Vista operating system on the computer.
CAUTION: To avoid being locked out of the computer, record each password you set. Because passwords are not displayed as they are set, changed, or deleted, it is essential to record each password immediately and store it in a secure place.
Use the following list as a basic guide when choosing a password:
Choose a password that is easy for you to remember but difficult for others to guess.
Choose a long password (minimum of six characters).
Use a combination of uppercase and lowercase letters, numbers, and symbols.
Do not use personal information that others can easily figure out, such as your birthday, child’s name, or phone number.
Do not write down passwords unless you store them in a secure place away from the computer. Do not store passwords in a file on the computer.
You can use the same password for more than one Windows Vista security feature.
A password can have any combination of up to eight letters and numbers, and it is not case sensitive.
A password must be set and entered with the same keys. For example, if you set the password with number keys on the keyboard, the password is not recognized if you subsequently try to enter it with the embedded numeric keypad.
NOTE: Select models include a separate numeric keypad, which functions exactly like the keyboard number keys, except in the case of passwords.
A password set in Windows Vista must be entered at a Windows Vista prompt.
18 HP Firebird Desktop Essentials (Features may vary by model)
Loading...