


AX-M84
Micro HiFi System With Bluetooth ,USB SD/MMC& Wireless Docking for iPod
*iPod not included
INSTRUCTION MANUAL

SOME DOS AND DON'TS ON THE SAFE USE OF EQUIPMENT
This equipment has been designed and manufactured to meet international safety standards but, like any electrical equipment, care must be taken if you are to obtain the best results and safety is to be assured.
**************
DO read the operating instructions before you attempt to use the equipment.
DO ensure that all electrical connections (including the mains plug, extension leads and inter-connections between the pieces of equipment) are properly made and in accordance with the manufacturer's instructions. Switch off and withdraw the mains plug before making or changing connections.
DO consult your dealer if you are ever in doubt about the installation, operation or safety of your equipment. DO be careful with glass panels or doors on equipment.
DO route the mains lead so that it is not likely to be walked on, crushed, chafed, or subjected to excessive wear and tear or heat.
**************
DON'T remove any fixed cover as this may expose dangerous voltages.
DON'T obstruct the ventilation openings of the equipment with items such as newspapers, tablecloths, curtains, etc. Overheating will cause damage and shorten the life of the equipment.
DON'T allow electrical equipment to be exposed to dripping or splashing, or objects filled with liquids, such as vases, to be placed on the equipment.
DON'T place hot objects or naked flame sources such as lighted candles or nightlights on, or close to equipment. High temperatures can melt plastic and lead to fires.
DON'T use makeshift stands and NEVER fix legs with wood screws - to ensure complete safety always fit the manufacturer's approved stand or legs with the fixings provided according to the instructions.
DON'T use equipment such as personal stereos or radios so that you are distracted from the requirements of traffic safety. It is illegal to watch television whilst driving.
DON'T listen to headphones at high volume, as such use can permanently damage your hearing.
DON'T leave equipment switched on when it is unattended unless it is specifically stated that it is designed for unattended operation or has a stand-by mode. Switch off using the switch on the equipment and make sure that your family know how to do this. Special arrangements may need to be made for infirm or handicapped people.
DON'T continue to operate the equipment if you are in any doubt about it working normally, or if it is damaged in any way - switch off, withdraw the mains plug and consult your dealer.
ABOVE ALL
---NEVER let anyone especially children push anything into holes, slots or any other opening in the case - this could result in a fatal electrical shock;
---NEVER guess or take chances with electrical equipment of any kind
---it is better to be safe than sorry!
*************
IMPORTANT
The mains lead on this equipment may be supplied with a moulded plug incorporating a fuse, the value of which is indicated on the pin face of the plug. Should the fuse need to be replaced, an ASTA or BSI approved BS 1362 fuse must be used of the same rating. If the fuse cover is detachable never use the plug with the cover omitted. If a replacement fuse cover is required, ensure it is of the same colour as that visible on the pin face of the plug. Fuse covers are available from your dealer.
DO NOT cut off the mains plug from this equipment. If the plug fitted is not suitable for the power points in your home or the cable is too short to reach a power point, then obtain an appropriate safety approved extension lead or consult your dealer.
Should it be necessary to change the mains plug, this must be carried out by a competent person, preferably a qualified electrician.
If there is no alternative to cutting off the mains plug, ensure that you dispose of it immediately, having first removed the fuse, to avoid a possible shock hazard by inadvertent connection to the mains supply.
IMPORTANT
The wires in this mains lead are coloured in accordance with the following code:
Blue : NEUTRAL
Brown : LIVE
As these colours may not correspond to the coloured markings identifying the terminals in your plug, proceed as follows: The wire coloured BLUE must be connected to the terminal marked with the letter N or coloured BLUE or BLACK. The wire coloured BROWN must be connected to the terminal marked with the letter L or coloured BROWN or RED.
On no account connect either of these wires to the terminal marked E or by the earth symbol  E or coloured green or green and yellow.
Alternatively, this equipment may be supplied with a rewireable plug already fitted, which may be removed if not suitable and an alternative fitted in accordance with the preceding instructions.
UK-1
This symbol on the product or in the instructions means that your electrical and electronic equipment should be disposed at the end of its life separately from your household waste. There are separate collection systems for recycling in the EU. For more information, please contact the local authority or your retailer where you purchased the product.
Please read this manual carefully before attempting to operate the unit in order to became familiar with its features.
Iportant Notes
* Keep the safety and operating instructions for future reference. * Avoid installing the unit in locations described below:
Places exposed to direct sunlight or close to heat radiating appliances such as electric heaters. On top of other stereo equipment that radiates heat.
Places lacking ventilation or dusty places. Places subject to constant vibration. Humid or moist places.
* Make sure not to obstruct the ventilation openings.
Operate turning controls and switches as instructed in the manual.
* Before turning on the power for the first time, make certain the power cord is properly installed. * Store your tapes or CD's in a cool area to avoid damage from heat.
*To disconnect the product switch off and remove the plug from the mains supply.
*When the unit is disconnected from the mains supply the LED will not light up.
*Minimum distances around the apparatus for sufficient ventilation is 5cm.
*Attention should be drawn to the environmental aspects of battery disposal.
*This apparatus has been designed for use in moderate climates.
For safety reasons, do not remove any covers or attempt to gain access to the inside of the product.
Do not attempt to remove any screws, or open the casing of the unit; there are no user serviceable parts inside, refer all servicing to qualified service personnel.
CAUTION : TO REDUCE THE RISK OF ELECTRIC SHOCK DO NOT REMOVE COVER ( OR BACK ) , NO USER SERVICEABLE PARTS INSIDE, REFER SERVICING TO QUALIFIED SERVICE PERSONNEL.
ATTENTION
The owners manual contains important operating and maintenance instructions, for your safety, it is necessary to refer to the manual.
ARNING : TO PREVENT FIRE OR SHOCK HAZARD, DO NOT EXPOSE THIS APPLIANCE TO DRIPPING OR SPLASHING. DISCONNECT FROM THE MAINS SUPPLY WHEN NOT IN USE.
Note:
This unit will become warm when used for a long period of time. This is normal and does not indicate a problem with the unit.
The CD player includes micro-processors which may malfunction as a result of external electrical interference or noise. If the CD player is not working properly, disconnect the power source and then reconnect it.
Before connecting the unit to the PC, make sure the power supply from mains is disconnected, otherwise, the unit may not work properly with the PC.
UK-2

PACKAGE CONTENTS
Speakers cover(2 pcs) |
CD unit(1 pc) |
Power Unit(1 pc )
Remote(1pc)
Control cable cord(1 pc)
Transformer(1 pc)
No.5
Instruction manual(1 pc)
No.4
AX-M84
Micro HiFi System With Bluetooth ,USB SD/MMC&
Wireless Docking for iPod
*iPod not included
INSTRUCTION MANUAL
Speakers(2 pcs)
iPod Docking(1 pc)
AM antenna(1 pc)
Dock adapter(7 pcs)
No.6
No.7
No.3 |
No.2 |
No.1
UK-3
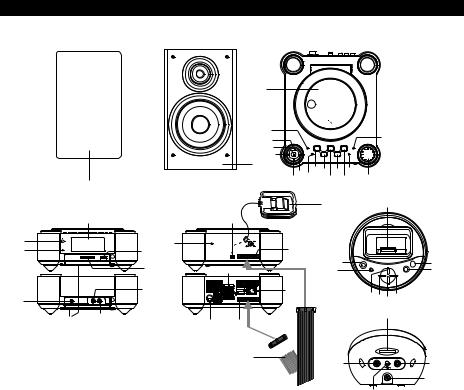
FEATURES AND CONTROLS
|
Speakers cover |
Speakers |
Top View |
|
|
|
|
|
|
||
|
|
|
|
2 |
|
|
|
|
|
|
|
|
|
|
|
3 |
|
|
|
|
17 |
|
|
|
|
|
|
4 |
|
|
|
|
|
||
|
|
|
|
5 |
|
|
|
|
|
|
|
|
|
|
|
6 |
|
|
|
|
|
|
|
|
|
|
|
1 |
10 |
11 |
13 |
15 |
|
|
|
|
|
|
|
8 |
|
|
|
||||
|
|
|
|
9 |
12 |
14 |
16 |
|
|
||
|
50 |
|
|
7 |
|
|
|
||||
|
|
|
|
|
|
|
|
|
|
|
|
|
|
|
|
|
|
49 |
|
|
31 |
|
|
|
Front View 18 |
|
Back View |
27 |
|
|
|
|
|
|
|
19 |
|
|
26 |
30 |
|
|
|
|
|
|
|
20 |
|
25 |
|
|
|
|
|
|
|
|
|
|
|
24 |
|
|
|
|
32 |
|
|
|
38 |
|
|
|
47 |
|
|
33 |
|
|
|
39 |
|
|
|
23 |
|
46 |
|
|
|
|
3435 |
|
37 |
21 |
|
|
|
|
|
|
|
|
36 |
||
|
|
|
|
|
|
|
|
|
|
||
|
45 |
22 |
28 |
29 |
|
|
|
|
|
41 |
|
|
|
|
|
|
|
|
|
|
|||
|
|
|
|
|
|
|
|
|
|
||
|
|
|
|
48 |
|
|
40 |
|
|
42 |
|
|
|
|
|
|
|
|
|
|
|||
|
|
|
|
|
|
|
|
|
|
|
43 |
|
|
|
|
|
|
|
|
|
44 |
|
|
1. |
SPEAKERS |
|
|
27. MWANTENNA JACK |
|
|
|
||||
2. |
CD DOOR |
|
|
28. AC POWER CORD |
|
|
|
|
|||
3. |
ERASE/MEMORY BUTTON |
|
29. CONTROL CABLE OUT SLOT |
|
|||||||
4. |
PLAY/PAUSE BUTTON |
|
30. CONTROL CABLE IN SLOT |
|
|
||||||
5. CD DOOR OPEN/CLOSE BUTTON |
31. iPod CONNECTOR |
|
|
|
|
||||||
6. |
SKIP/TUNER/SEARCH DOWN BUTTON |
32. STANDBY/SIGNAL LED INDICATOR BUTTON |
|||||||||
7. |
STOP/BAND BUTTON |
|
33. SOURCE LED INDICATOR |
|
|
||||||
8. |
SKIP/TUNER/SEARCH UP BUTTON |
34. PLAY/PAUSE BUTTON |
|
|
|
||||||
9. |
CLOCK BUTTON |
|
35. SKIP/SEARCH DOWN BUTTON |
||||||||
10. STANDBY/ON BUTTON |
|
36. SOURCE BUTTON |
|
|
|
|
|||||
11. BLUETOOTH SEARCH BUTTON |
37. SKIP/SEARCH UP BUTTON |
|
|
||||||||
12. MENU BUTTON |
|
38. RANDOM BUTTON |
|
|
|
|
|||||
13. ENCODING BUTTON |
|
39. REPEAT BUTTON |
|
|
|
|
|||||
14. FUNCTION BUTTON |
|
40. LINE IN JACK |
|
|
|
|
|
|
|||
15. RANDOM/MEM-DOWN BUTTON |
41. 30-PIN PORT (Connect the Dock to your |
||||||||||
16. VOLUME HIGH/LOW KNOB |
|
computer) |
|
|
|
|
|
|
|
||
17. REPEAT/MEM-UP BUTTON |
|
42. LINE OUT JACK |
|
|
|
|
|
||||
18. VFD DISPLAY |
|
43. VIDEO OUT JACK |
|
|
|
|
|||||
19. IR SENSOR |
|
|
44. DC JACK |
|
|
|
|
|
|
|
|
20. STANDBY LED INDICATOR |
|
45. AUDIO DEVICE IN COVER |
|
|
|||||||
21. EARPHONE OUTPUT JACK |
|
46.AC POWER SWITCH |
|
|
|
||||||
22. AUX IN JACK “R” |
|
47. SPEAKER TERMINALS |
|
|
|||||||
23. AUX IN JACK “L” |
|
48. CONTROL CABLE CORD |
|
|
|||||||
24. SD/MMC CARD IN SLOT |
|
49. AM ANTENNA |
|
|
|
|
|
|
|||
25. USB DEVICE IN PORT |
|
50. SPEAKERS COVER |
|
|
|
||||||
26. FM ANTENNA |
|
|
|
|
|
|
|
|
|
||
UK-4
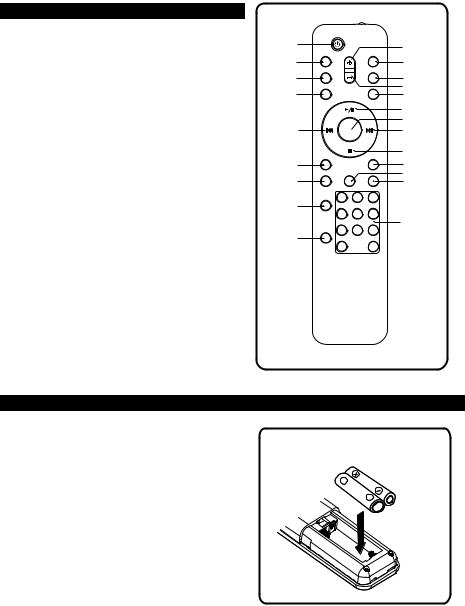
REMOTE CONTROL
1. |
STANDBY BUTTON |
1 |
10 |
|
2. |
MUTE BUTTON |
|||
|
||||
2 |
11 |
|||
3. |
ID3 BUTTON |
|||
4. |
EQ BUTTON |
3 |
12 |
|
5. |
SKIP/TUNING/SEARCH DOWN BUTTON |
4 |
13 |
|
14 |
||||
6. |
CLOCK BUTTON |
|
15 |
|
7. |
INTRO/MONO/ST. BUTTON |
|
16 |
|
8. |
REPEAT/MEM-UP BUTTON |
5 |
17 |
|
9. |
RANDOM/MEM-DOWN BUTTON |
|
18 |
|
10.VOLUME UP BUTTON |
|
|||
6 |
19 |
|||
11.DOOR OPEN/CLOSE BUTTON |
||||
7 |
20 |
|||
12.FUNCTION BUTTON |
21 |
|||
|
|
|||
13.VOLUME DOWN BUTTON |
8 |
|
||
14.MENU BUTTON |
|
|||
|
22 |
|||
15.PLAY/PAUSE/ENTER BUTTON |
|
|||
|
|
|||
16.ERASE/MEMORY BUTTON |
9 |
|
||
17.SKIP/TUNING/SEARCH UP BUTTON |
|
|
||
18.STOP/BAND BUTTON |
|
|
||
19.TIMER BUTTON 20.ENCODING BUTTON 21.SLEEP BUTTON 22.NUMBER SEARCH BUTTON
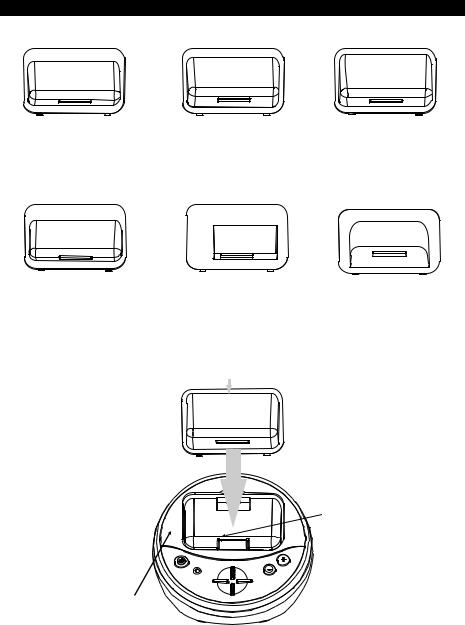
PUTTING THE BATTERIES INTO THE REMOTE CONTROL UNIT
Press down the compartment cover, and slide the |
**BATTERIES NOT INCLUDED** |
cover off to open the compartment. Place two |
|
(UM4), (AAA), (R03) batteries in the remote |
|
control according to the polarity markings ("+" and |
|
" - ") inside the compartment and on the batteries. |
|
Place the cover over the compartment, press down |
|
lightly, and push it upward until it snaps on. |
|
NOTE : Remove the batteries from the remote control if not in use for long period of time.
Do not mix normal batteries with rechargeable batteries. When the batteries become weak, remote control will not function. Replace them with new batteries in this case.
UK-5
iPod Dock and Adapters
No.3 |
No.2 |
No.4 |
|
Made for iPod |
Made for iPod with video |
(4th generation)20GB only |
(5th generation)60GB,80GB only |
Made for iPod with |
|
colour display |
|
(4th generation)20GB, 30GB only |
|
U2 Special Edition |
|
|
No.6 |
No.5 |
|
Made for iPod with video |
Made for iPod nano |
(5th generation)30GB only |
(1st generation)1GB, 2GB, 4GB only |
|
(2nd generation)2GB, 4GB,8GB only |
|
Made for iPod with |
|
colour display |
|
(4th generation)40GB, 60GB only |
|
No.1 |
Made for iPod
(4th generation)40GB only
No.7
Made for iPod mini
 Dock adaptor
Connector dock
iPod Wireless Dock
UK-6
 Loading...