


AX-M131U
Operating Instructions
SYSTEM COMPONENT FI-HI

Table of Contents |
|
Important Cautions .............................................................................................................................. |
2 |
For your safety ........................................................................................................................................... |
2 |
Precautions ................................................................................................................................................. |
2 |
Connections ........................................................................................................................................ |
3 |
Connecting the Antenna .............................................................................................................................. |
3 |
Connecting the Speakers ............................................................................................................................ |
4 |
Connecting Auxiliary Equipment (AUX IN) .................................................................................................. |
4 |
Connecting Auxiliary Equipment (LINE OUT) ............................................................................................. |
4 |
Connecting Control Cable ........................................................................................................................... |
4 |
Connecting the AC Power Cord .................................................................................................................. |
4 |
Connecting the Headphones ....................................................................................................................... |
4 |
Control Locations ............................................................................................................................... |
5 |
The CD/DAB ................................................................................................................................................ |
5 |
The Amplifier ............................................................................................................................................... |
5 |
The Remote Control .................................................................................................................................... |
6 |
Installation of Batteries ....................................................................................................................... |
7 |
Turning the Power On and Off .......................................................................................................... |
7 |
Sound Quality ..................................................................................................................................... |
7 |
Adjusting the Volume .................................................................................................................................. |
7 |
Adjusting the super bass ............................................................................................................................. |
7 |
Control the Loudness .................................................................................................................................. |
7 |
Preset Equalizer ........................................................................................................................................... |
8 |
Listening to Radio Broadcasts ........................................................................................................... |
8 |
DAB Radio ................................................................................................................................................... |
8 |
FM Radio ................................................................................................................................................... |
10 |
RDS (Radio Data System) Reception ............................................................................................... |
11 |
CD Operation .................................................................................................................................... |
12 |
CD Playing ................................................................................................................................................ |
12 |
Direct Select track .................................................................................................................................... |
12 |
To Skip Search and Play ........................................................................................................................... |
12 |
To Search................................................................................................................................................... |
12 |
Program Play ............................................................................................................................................ |
12 |
Random Play (CD and MP3 discs) ........................................................................................................... |
12 |
Playing the Beginning (Intro) of each Track ............................................................................................. |
12 |
Playing Repeatedly ................................................................................................................................... |
13 |
MP3 Disc Playing .............................................................................................................................. |
13 |
Playing Repeatedly ................................................................................................................................... |
13 |
Setting the Clock Automatically ........................................................................................................ |
13 |
Use the USB ..................................................................................................................................... |
14 |
Setting the Clock Manually ............................................................................................................... |
14 |
Clock Dimmer ........................................................................................................................................... |
14 |
Setting the Sleep Timer..................................................................................................................... |
14 |
Setting the Daily on Timer ................................................................................................................. |
15 |
Disc Handling .................................................................................................................................... |
15 |
Troubleshooting ................................................................................................................................ |
16 |
Specifications ................................................................................................................................... |
17 |
|
- 1 - |
Important Cautions
Thank you for purchasing this system. Please read these operating instructions before operating the unit. The operating instructions should be retained for future reference.
For your safety
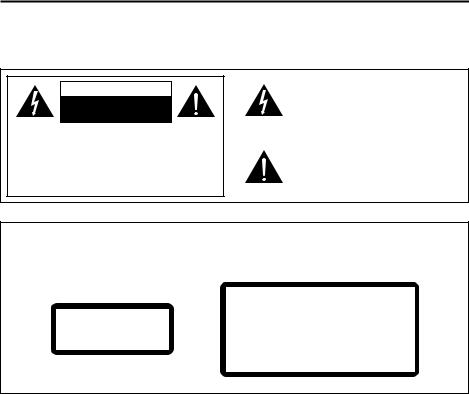
CAUTION
RISK OF ELECTRIC SHOCK
DO NOT OPEN
CAUTION: TO REDUCE THE RISK OF ELECTRIC SHOCK, DO NOT REMOVE COVER. NO USER SERVICEABLE PARTS INSIDE REFER SERVICING TO QUALIFIED SERVICE PERSONNEL.
This symbol indicates that dangerous voltage constituting a risk of electric shock is present within this unit.
This symbol indicates that there are important operating and maintenance instructions in the literature accompanying this unit.
Laser Product
This product is equipped with low power laser equipment. For your own safety do not remove any covers or take the product apart. Repair work must be carried out by qualified personnel.
CLASS 1
LASER PRODUCT
Caution:
This product is equipped with low power laser equipment inside, for your safety, don’t open the laser radiation protective equipment. Don’t look at the laser radiation district when the equipment is operating.
Precautions
This equipment has been designed and manufactured to meet international safety standards but, like any electrical equipment, care must be taken if you are to obtain the best results and safety is to be assured.
…………………………….
DO read the operating instructions before you attempt to use the equipment.
DO ensure that all electrical connections (including the mains plug, extension leads and interconnections between the pieces of equipment) are properly made and in accordance with the manufacturer’s instructions. Switch off and withdraw the mains plug before making or changing connections.
DO consult your dealer if you are ever in doubt about the installation, operation or safety of your equipment.
DO be careful with glass panels or doors on equipment
…………………………….
DON’T remove any fixed cover as this may expose dangerous voltages.
DON’T obstruct the ventilation openings of the equipment with items such as newspapers, tablecloths, curtains, etc. Overheating will cause damage and shorten the life of the equipment.
- 2 -
DON’T allow electrical equipment to be exposed to dripping or splashing, or objects filled with liquids, such as vases, to be placed on the equipment and don’t handle the power cord with wet hands.
DON’T place hot objects or naked flame sources such as lighted candles or nightlights on, or close to equipment. High temperatures can melt plastic and lead to fires.
DON’T use makeshift stands and NEVER fix legs with wood screws - to ensure complete safety always fit the manufacturer’s approved stand or legs with the fixings provided according to the instructions.
DON’T listen to headphones at high volume, as such use can permanently damage your hearing. DON’T leave equipment switched on when it is unattended unless it is specifically stated
that it is designed for unattended operation or has a stand-by mode. Switch off using the switch on the equipment and make sure that your family knows how to do this. Special arrangements may need to be made for infirm or handicapped people.
DON’T continue to operate the equipment if you are in any doubt about it working normally, or if it is damaged in any way - switch off, withdraw the mains plug and consult your dealer.
…………………………….
ABOVE ALL,
NEVER let anyone especially children push anything into holes, slots or any other opening in the case - this could result in a fatal electrical shock.
NEVER guess or take chances with electrical equipment of any kind…it is better to be safe than sorry!
Connections
Caution: Make all connections before plugging the system into an AC power outlet.
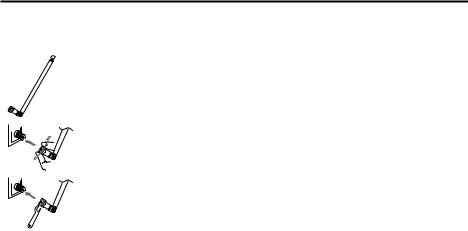
Connecting the Antenna
Using the supplied wire Antenna
A antenna connector should be connected to the antenna socket, tighten the antenna by hand or tool.
Adjust the antenna length and direction to optimise reception.
- 3 -

Connecting the Speakers
Connect the speaker cords between the terminals as shown below.
Connect the cords with a silver line to the (-) (G) terminals and cords with a gold line to the (+) (L)
(R) terminals.
Connecting Auxiliary Equipment (AUX IN)
This unit also has one group of audio input terminals, you can use signal line to connect this unit’s audio input terminals and assistance equipment’s audio output terminals respectively, then you can hear the sound sources.
Connecting Auxiliary Equipment (LINE OUT)
This unit also has one group of audio output terminals, you can use signal line to connect this unit’s audio output terminal and assistance equipment’s audio input terminal respectively, then you can output the outer sound sauces to other assistance equipment.
Connecting Control Cable
Connect the control cable between the CD player and the amplifier.
Connecting the AC Power Cord
Insert the AC power cord into a wall outlet, and your system is at your command!
Caution: Be sure to unplug the power cord from the outlet when going out or when the system is not in use for an extended period of time.
Connecting the Headphones
Connect a pair of headphones to the phones jack. No sound comes out of the speakers. Note: Be sure to turn down the volume before connecting or putting on headphones.
- 4 -
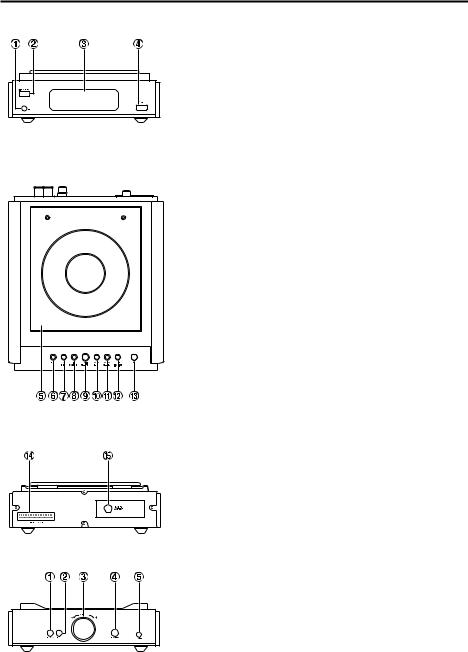
Control Locations
The CD/DAB
1. Remote Sensor
2. Standby Button
3. VFD Display Lens
4. USB Port
5. Disc Door
6. Clock Button
7. Program Button
Memory Button
8. Stop Button
Cancel Button
Channel Select Backward
9. Play/Pause Button
Select Button
Channel Select Forward
10. Previous/Search Backward Button
Select Down Button
Tuning Backward Button
11. Next/Search Forward Button
Select Up Button
Tuning Forward Button
12. OSD Button
Information Button
RDS Display
13. Open/Close Button
14. Control Cable Connector
15. FM/DAB Antenna
The Amplifier
1. Loudness Button
2. Preset Equalizer Button
3. Volume Control Knob
4. Function Button
5. Headphone Jack
- 5 -
 Loading...