

Instruction Manuals
AX-M717
HI-FI MICRO SYSTEM

SOME DOS AND DON'TS ON THE SAFE USE OF EQUIPMENT
This equipment has been designed and manufactured to meet international safety
standards but, like any electrical equipment, care must be taken if you are to obtain the
best results and safety is to be assured.
**************
DO read the operating instructions before you attempt to use the equipment.
DO ensure that all electrical connections (including the mains plug, extension leads and
interconnections between the pieces of equipment) are properly made and in
accordance with the manufacturer's instructions. Switch off and withdraw the mains
plug before making or changing connections.
DO consult your dealer if you are ever in doubt about the installation, operation or
safety of your equipment.
**************
DON'T remove any fixed cover as this may expose dangerous voltages.
DON'T obstruct the ventilation openings of the equipment with items such as
newspapers, tablecloths, curtains, etc. Overheating will cause damage and shorten the
life of the equipment.
DON'T allow electrical equipment to be exposed to dripping or splashing, or objects
filled with liquids, such as vases, to be placed on the equipment.
DON'T place hot objects or naked flame sources such as lighted candles or nightlights
on, or close to equipment. High temperatures can melt plastic and lead to fires.
DON'T listen to headphones at high volume; as such use can permanently damage
your hearing.
DON'T leave equipment switched on when it is unattended unless it is specifically
stated that it is designed for unattended operation or has a stand-by mode. Switch off
using the switch on the equipment and make sure that your family know how to do this.
Special arrangements may need to be made for infirm or handicapped people.
DON'T continue to operate the equipment if you are in any doubt about it working
normally, or if it is damaged in any way - switch off, withdraw the mains plug and
consult your dealer.
**************
ABOVE ALL
NEVER let anyone especially children push anything into holes, slots or any other
opening in the case - this could result in a fatal electrical shock;
NEVER guess or take chances with electrical equipment of any kind…it is better to be
safe than sorry!
1

IMPORTANT
The mains lead on this equipment may be supplied with a moulded plug incorporating a
fuse, the value of which is indicated on the pin face of the plug. Should the fuse need to
be replaced, an ASTA or BSI approved BS 1362 fuse must be used of the same rating.
If the fuse cover is detachable never use the plug with the cover omitted. If a
replacement fuse cover is required, ensure it is of the same colour as that visible on the
pin face of the plug. Fuse covers are available from your dealer.
DO NOT cut off the mains plug from this equipment. If the plug fitted is not suitable for
the power points in your home or the cable is too short to reach a power point, then
obtain an appropriate safety approved extension lead or consult your dealer.
Should it be necessary to change the mains plug, this must be carried out by a
competent person, preferably a qualified electrician.
If there is no alternative to cutting off the mains plug, ensure that you dispose of it
immediately, having first removed the fuse, to avoid a possible shock hazard by
inadvertent connection to the mains supply.
IMPORTANT
The wires in this mains lead are coloured in accordance with the following code:
Blue : NEUTRAL
Brown : LIVE
As these colours may not correspond to the coloured markings identifying the terminals
in your plug, proceed as follows:
The wire coloured BLUE must be connected to the terminal marked with the letter N or
coloured BLUE or BLACK. The wire coloured BROWN must be connected to the
terminal marked with the letter L or coloured BROWN or RED.
On no account connect either of these wires to the terminal marked E or by the earth
symbol
Alternatively, this equipment may be supplied with a rewireable plug already fitted,
which may be removed if not suitable and an alternative fitted in accordance with the
preceding instructions.
E or coloured green or green and yellow.
2

WARNING
• The apparatus shall not be exposed to dripping or splashing and that no objects
filled with liquids, such as vases, shall be placed on the apparatus.
• To be completely disconnect the power input, the mains plug of apparatus shall
be disconnected from the mains.
• The mains plug of apparatus should not be obstructed or should be easily
accessed during intended use.
• Excessive sound pressure from earphones and headphones can cause hearing
loss.
• Battery shall not be exposed to excessive heat such as sunshine, fire or the like.
Minimum distances 10 cm around the apparatus for sufficient ventilations.
The ventilation should not be impeded by covering the ventilation openings
with items such as newspaper, table-cloths, curtains etc.
No naked flame sources such as lighted candles should be placed on the
apparatus.
Attention should be drawn to the environmental aspects of battery disposal.
The use of apparatus in moderate climates.
3
• Main unit
• 2 x Speakers
• Remote control
• User manual
Package contents
Features
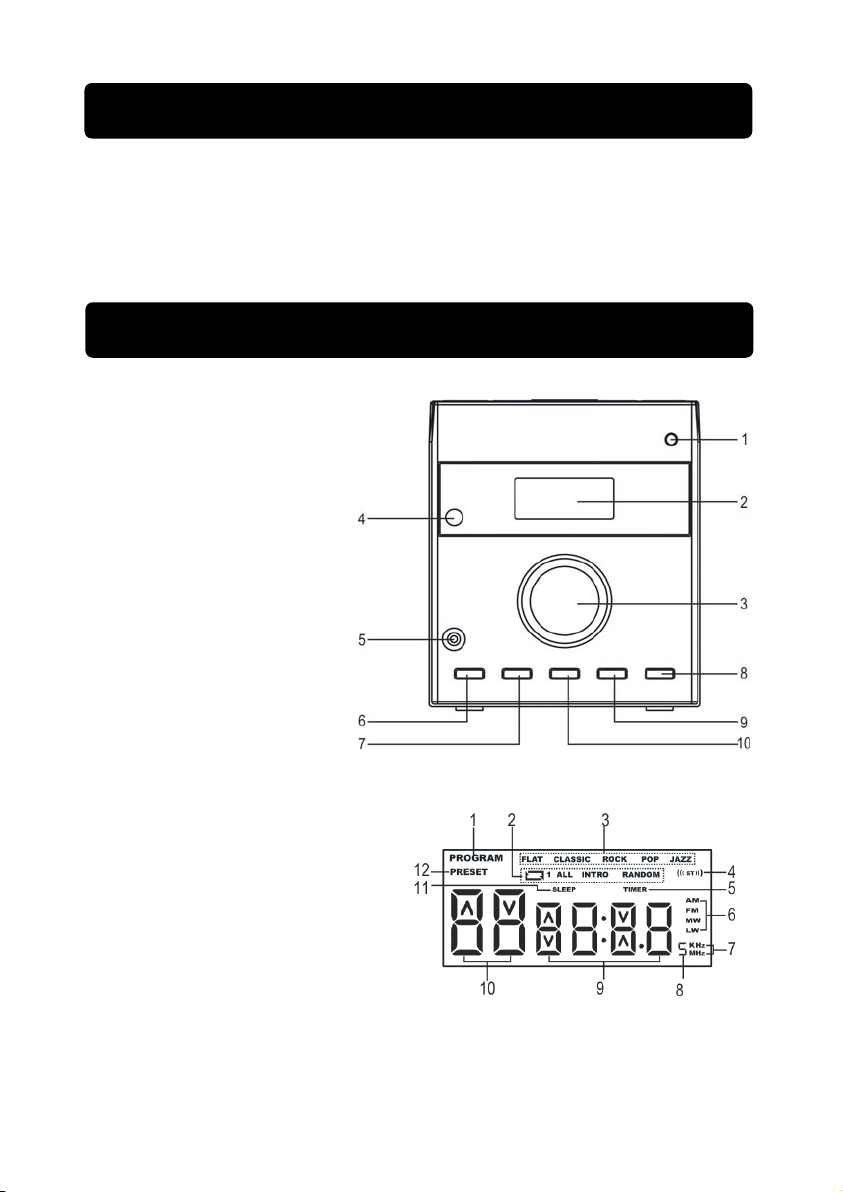
Front view
1. Standby/On button
2. Display
3. Volume control
4. Remote sensor
5. Headphone socket
6. Mode/Band button
7. Clock/Display button
8. Source button
9. EQ button
10. Timer/Sleep button
Display
1. CD Program indicator
2. CD play mode indicator
3. EQ setting indicator
4. FM stereo indicator
5. Timer on indicator
6. FM/MW band indicator
7. kHz/MHz indicator
8. FM 50kHz tune step
9. CD/Clock time and tuner frequency
10. Preset no./program no. and clock AM/PM indicator
11. Sleep timer indicator
12. Tuner preset indicator
4

Top view
1. CD door
2. Skip Back/Tune - button
3. Skip Forward/Tune + button
4. Play/Pause/Preset + button
5. Stop/Preset - button
6. Program button
Rear view
1. Aux In L/R sockets
2. Audio Out L/R sockets
3. FM antenna wire
4. L / R speaker terminals
Note: The marking plate is located on the bottom of the unit.
2
5
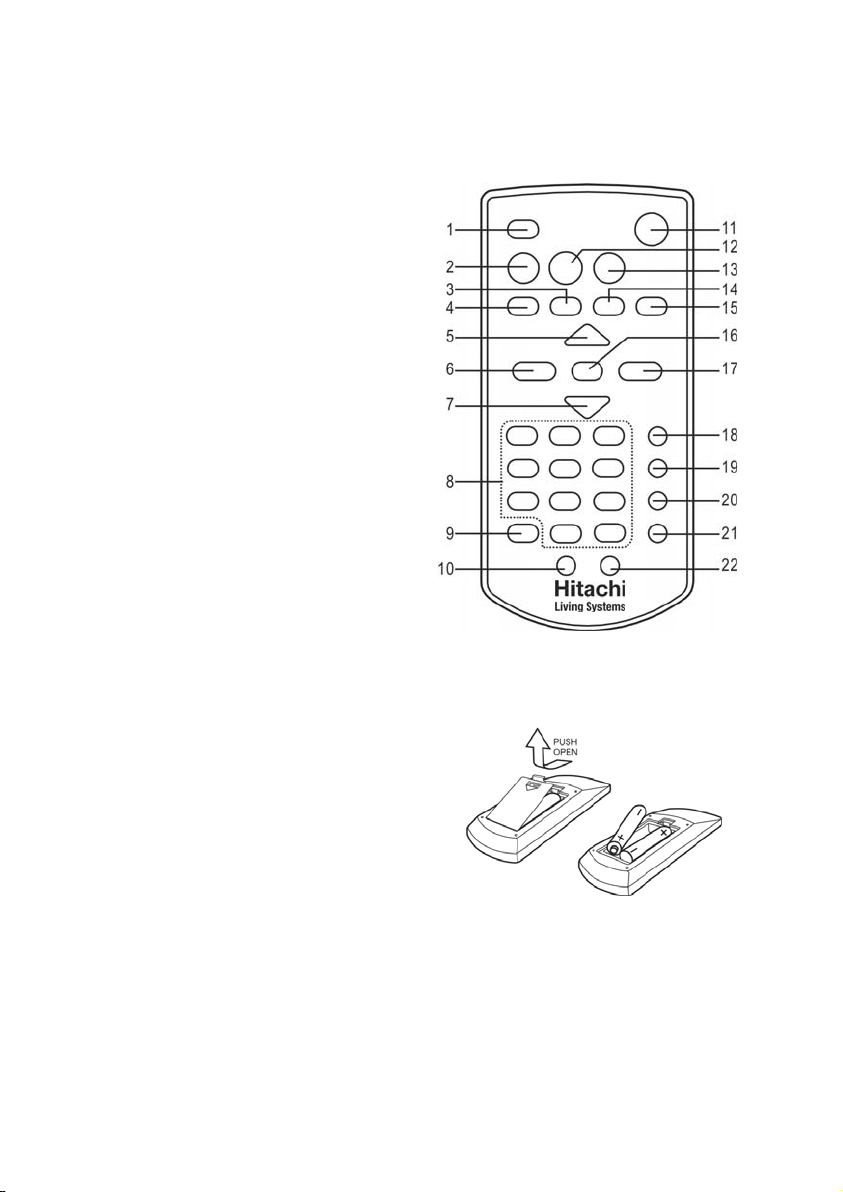
Remote control
1. Mute button
2. CD button
3. Mode button (CD playback)
4. Band button (FM/MW)
5. Volume + button
6. Skip Back /Reverse/Tune - button
7. Volume - button
Numeric keypad
8.
9. Program button
10. Preset - button
11. Standby/On button
12. Tuner button
13. Aux button
14. EQ button
15. Stop button
16. Play/Pause button
17. Skip Forward/Fast Forward/
Tune + button
18. Clock/Display button
19. Timer button
20. Sleep button
21. Stereo/Mono button
22. Preset + button
Insert batteries in the remote control
• Open the battery compartment cover and
insert two “AAA” alkaline batteries (not
supplied), following the polarity indicators
in the battery compartment.
• Replace the battery compartment cover.
Notes:
• Do not mix old and new batteries. Do not mix different battery types.
• Remove batteries if the unit will not be used for a long time.
6
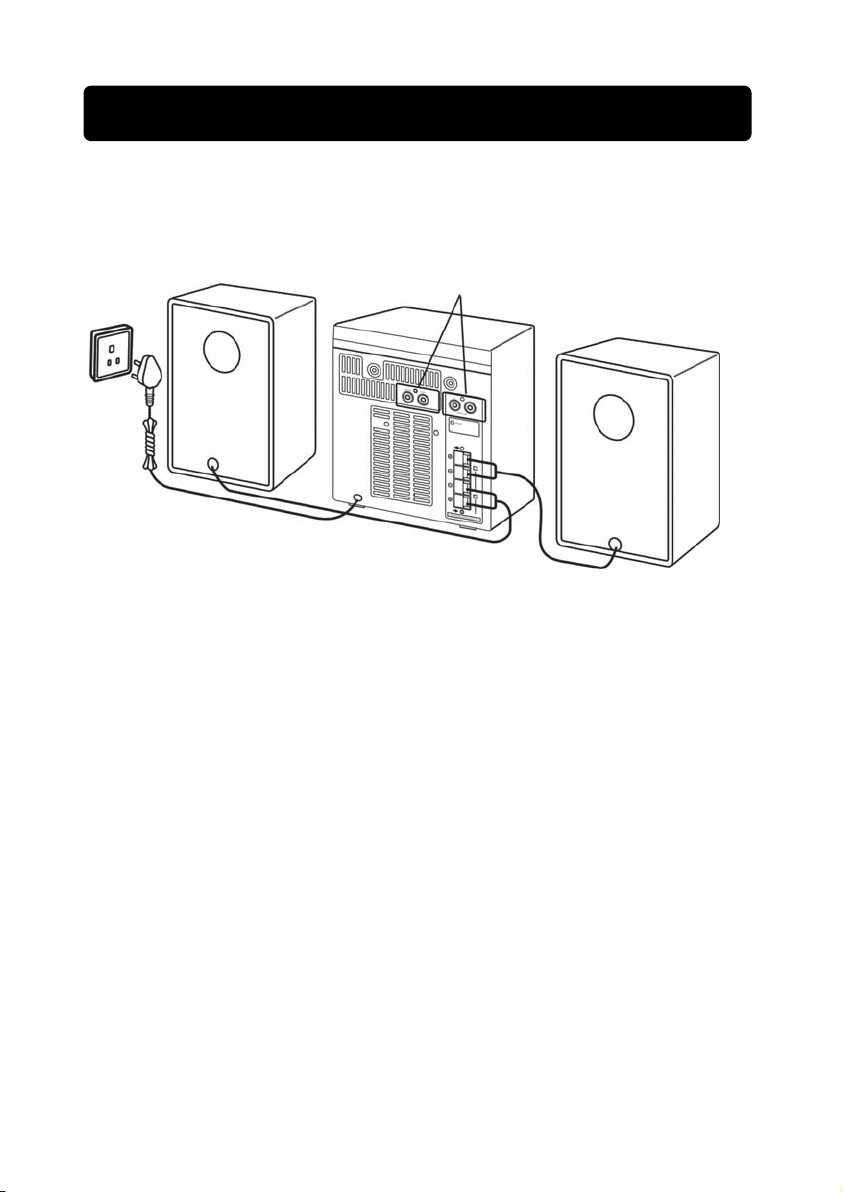
Making the connections
Grounded
AC outlet
Right Speaker
Left Speaker
Connect the red speaker wires to the red (+) terminals and the black speaker wires to
the black (-) terminals.
Connect external hi-fi units (e.g.,
MP3 player) to these sockets
using standard phono cables (not
included)
7

•
z Press the Standby button to turn on the
unit.
z To choose the desired source, press the
Source button on main unit to cycle
through the option or press the CD, Tuner
or Aux buttons on the remote control.
z Turn the volume control or press the Volume +/- button to adjust the volume level.
Using your micro system
Playing a CD
z Press the CD button on the remote control.
If there is no CD in the player, the unit
shows “no disc”.
z Open the CD door by pressing the lower
right corner of the door. Place a CD onto
the spindle with the label facing up.
z Press the CD door down until it closes.
The unit will then display the number of
tracks on the CD and the total playing
time.
z Press the Play/Pause button to start
playing the CD. The display shows the
current track number and elapsed time.
z To pause the CD, press the Play/Pause
button. Press Play/Pause again to resume
playback.
z To skip to the next or previous track, press the or buttons.
z To fast-forward or reverse through the CD, press and hold the or
buttons.
z To stop playback, press the Stop button.
8
Using repeat and random playback
z To repeat tracks or play tracks in random
order, press the Mode button to cycle
through the options:
1 (repeat current track) -> All (repeat all
tracks) -> Intro (play the first 10 seconds
of each track) -> Random -> off (normal
play).
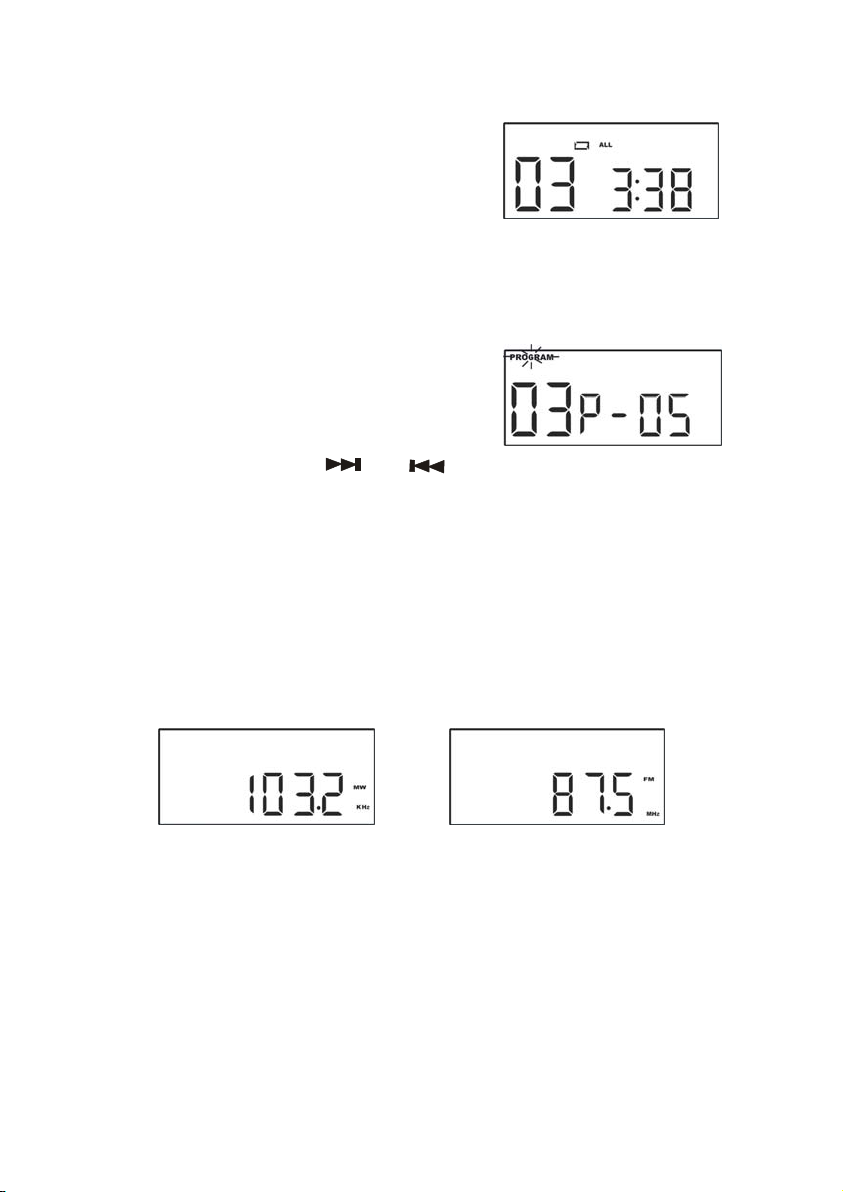
Programming CD playback
To play the CD tracks in a particular order:
1. While the CD is stopped, press the
Program button. "Program" flashes on the
display.
2. To add tracks to the programme, press
the number buttons or the and
buttons to select a track, then press the
Program button to store it. You can store
up to 20 tracks.
3. Press the Play/Pause button to play the programme.
Listening to the radio
z Extent the FM antenna wire from the back of the unit.
z Press the Tuner button on the remote control.
z Press the Band button to select FM or MW.
z Select a station using the Tune+/- buttons.
z To step up or down the radio frequencies, press the Tune+/- buttons briefly. To
scan for the next station, press and hold the Tune+/- buttons until the radio starts
scanning.
z To switch between mono and stereo sound while listening to a stereo FM station,
press the ST/Mono button. The display shows "((ST))" when in stereo mode.
9
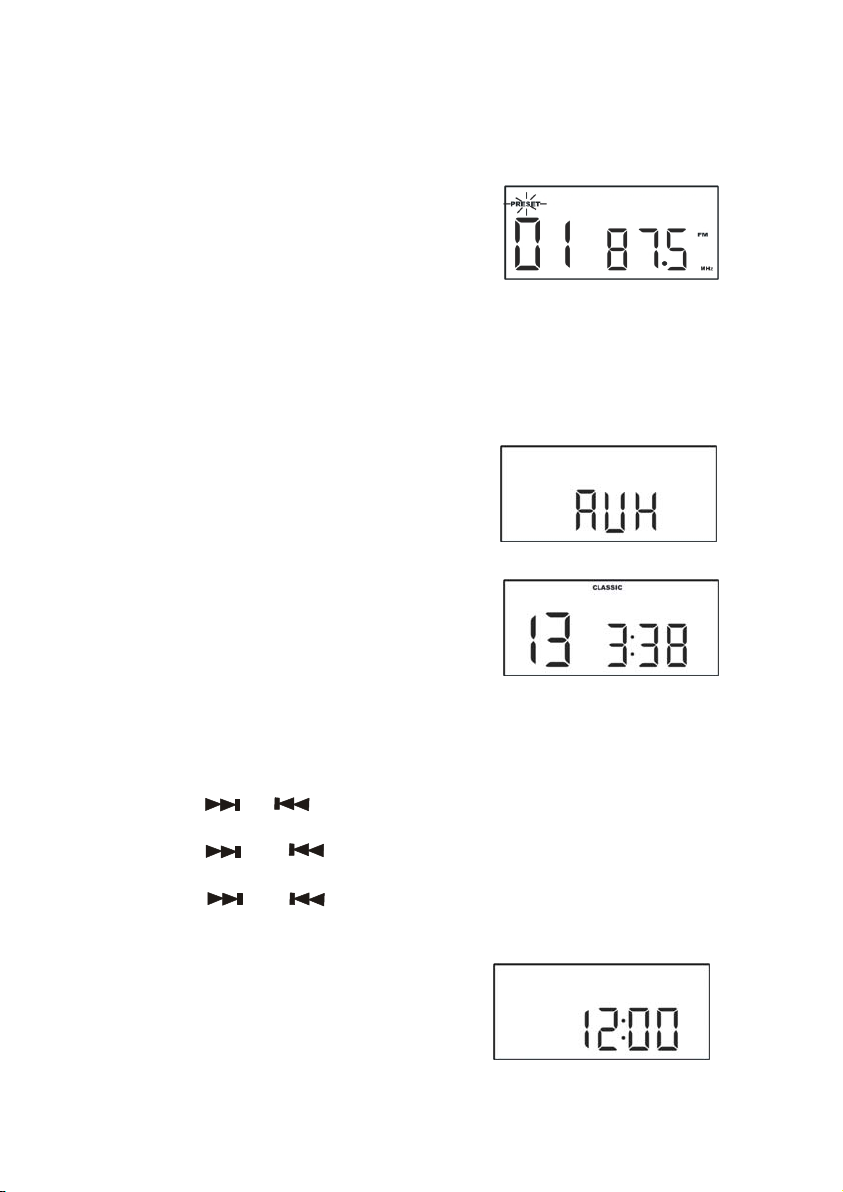
Storing station presets
z The radio can store up to 10 preset stations.
z To store a station:
1. Tune the radio to the desired station.
2. Press the Program button. "Preset"
flashes on the display.
3. Press the Preset+/- buttons to select
the desired preset number.
4. Press the Program button to save the
preset.
z To listen to a stored station, press the Preset+/- buttons to select the desired
preset number.
Listening to external hi-fi equipment
z Connect the external source, such as an
MP3 player, to the Aux In sockets.
z Press the Aux button on the remote
control.
Adjusting the sound balance
z To adjust the sound balance, press the
EQ button to cycle through the options:
Flat -> Classic -> Rock -> Pop-> Jazz ->
Flat.
Setting the clock
z In standby mode, press and hold the Clock/Display button until "12H or 24H"
flashes on the display.
z Press the or buttons to choose 12-hour or 24-hour time, then press
the Clock/Display button. The hour will flash.
z Press the and buttons to set the hour, then press the Clock/Display
button. The minutes will flash.
z Press the and buttons to set the minute, then press the Clock/Display
button to save the setting.
z To display the clock while the unit is
switched on, press the Clock/Display
button.
z Press the Clock/Display button again or
wait 5 seconds to return to the previous
display.
10
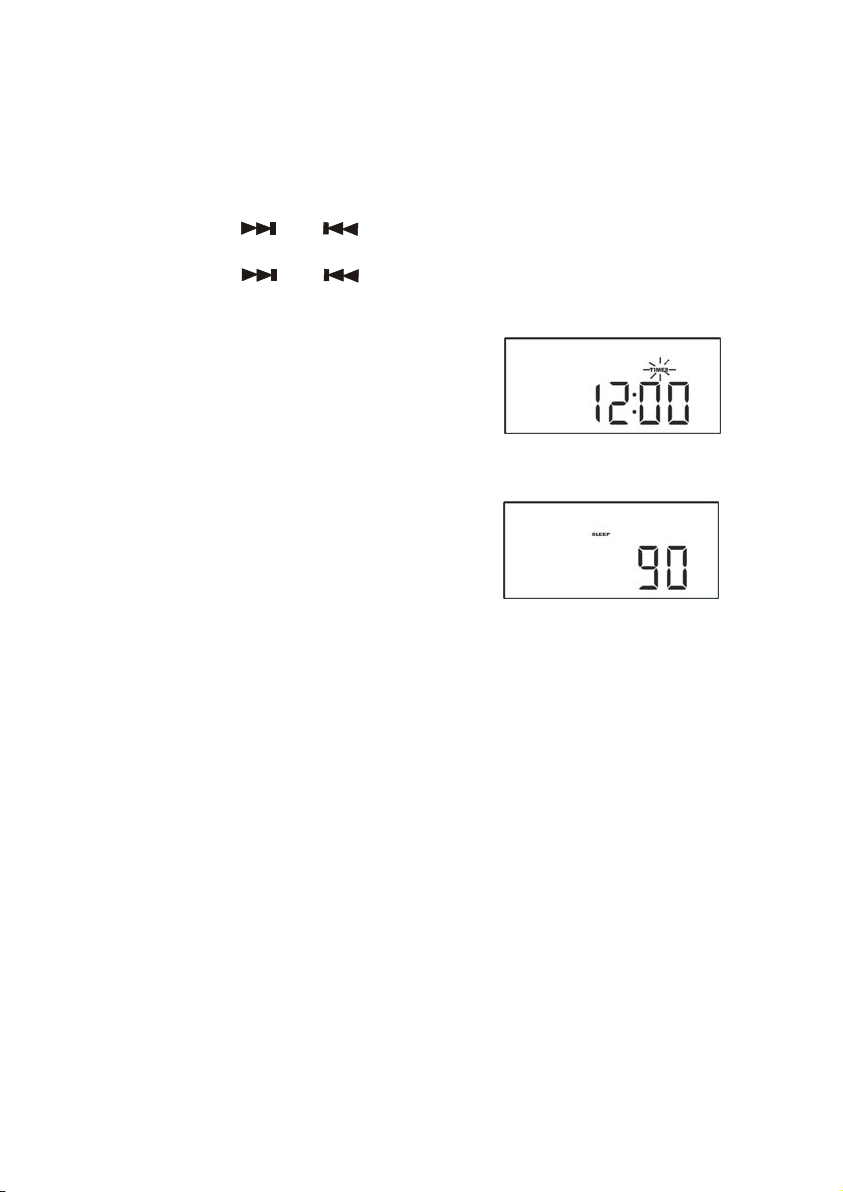
Setting the Timer
z You can set up the system to turn on at a chosen time.
z To set the timer:
1. In standby mode, press and hold the Timer button until the hour starts
flashing.
2. Press the and buttons to set the hour, then press the Timer
button. The minutes will flash.
3. Press the and buttons to set the minute, then press the Timer
button. The Timer indicator will flash for a few seconds, then remain on the
display to show that the timer is set.
z To turn the timer off, press the Timer
button. The timer indicator on the display
will disappear.
Setting the sleep timer
z You can set up the unit to turn off
automatically after a chosen number of
minutes.
z While the unit is switched on, press the
Sleep button to cycle through the sleep
times: 90 -> 75 -> 60 -> 45 -> 30 -> 15 ->
Off.
z Wait 5 seconds to return to the previous display. The Sleep indicator will also
appear on the display.
11

CD section
z Disc support : 3” & 5” with CD-R / CD-RW compatible
z DAC : 1bit with 8 times oversampling
z Program memory: up to 20 tracks
TUNER section
z System : Digital Tuning System
z Frequency Band Range :
MW band --Æ 522 –
FM band --Æ 87.5 – 108 MHz (50-kHz steps)
z Preset memory : up to 10 FM and 10 MW stations
External connections
z Headphone output : 3.5mm stereo
z Aux Input : RCA ( L-CH / R-CH )
z Audio output : RCA ( L-CH / R-CH )
z Speaker output : Speaker Wire Terminal type
Others
z Volume control : Encoder type max 32 step control
z Display : Full Digit display LCD
z Audio output : 2 x 5W RMS ( 4 ohm speakers)
z External 2 speaker system L / R-Channel
General Characteristics
z Power Supply : AC 230V ~ 50Hz
z Power Consumption: Standby: 1.7W / Power on: 24W
z Operati on Temperature: Ta= -5˚C Tb=60˚C
z Storage Temperature: Ta= -20˚C Tb=80˚C
z Humidity: 60%
z Dimensions:
Main unit: 145 (W) x 167.5 (H) x 208 (D) mm
Speaker box: 135(W) x 167.5 (H) x 147 (D) mm for each
z Weight: 4Kg
We continually strive to improve our products; specifications may change without prior
notice.
Specifications
1620 kHz (9-kHz steps)
Hitachi Europe Ltd.
12

g
y
Troubleshooting guide
Should you experience difficulties in the use of this player please refer to the following
chart.
Troubleshooting Guide
Problem Points to Check
CD does not play
• Disc may be inserted upside down
• Disc not mounted correctly on spindle
• Dirty or defective disc
• Dirty pick up lens
• Player lid not closed
• Moisture/condensation, allow the player to
warm up to room temperature for 60
minutes
• Source not set to “CD”
No sound from Headphones
AUX Out no sound when played through
an external amplifier
Intermittent sound
• Headphone plu
the headphone socket on the unit.
• Connection is incorrect
• The external amplifier is not switched on
• Dirty or defective disc
• Dirty pick up lens
• Pla
er is subject to excessive vibration or
is not firmly inserted into
shock
• Poor Headphone connection
Noise or sound distorted on MW or FM
broadcast
• Station not tuned properly
• MW: Rotate the unit for best reception
• FM: Extend the antenna wire
Note: This product is exclusively available through Dixons Stores Group. In the unlikely event of a
problem with your product please return to the store where the purchase was made.
This symbol on the product or in the instructions means that your electrical and
electronic equipment should be disposed at the end of its life separately from your
household waste. There are separate collection systems for recycling in the EU.
For more information, please contact the local authority or your retailer where you
purchased the product.
Visit Partmaster.co.uk today for the easiest way to buy electrical spares and accessories.
With over 1 million spares and accessories in stock we can deliver direct to your door the very next day.
Visit www.partmaster.co.uk
Calls charged at National Rate.
or call
0870 6001 338
(UK customers only)
13
 Loading...