


AX-M68D
Operating Instructions
SYSTEM COMPONENT FI-HI

Table of Contents |
|
Important Cautions .......................................................................................................................................... |
2 |
For your safety .................................................................................................................................................................... |
2 |
Precautions ......................................................................................................................................................................... |
3 |
Connections ...................................................................................................................................................... |
3 |
Connecting the Aerial ........................................................................................................................................................ |
3 |
Connecting the Speakers .................................................................................................................................................... |
4 |
Connecting Auxiliary Equipment ...................................................................................................................................... |
4 |
Connecting Control Cable .................................................................................................................................................. |
4 |
Connecting the AC Power Cord ......................................................................................................................................... |
4 |
Installation of Batteries ................................................................................................................................... |
5 |
Turn the Power On and Off ............................................................................................................................ |
5 |
Control Locations ............................................................................................................................................ |
6 |
The CD Player ..................................................................................................................................................................... |
6 |
The DAB ............................................................................................................................................................................. |
7 |
The Amplifier ....................................................................................................................................................................... |
7 |
The Remote Control ............................................................................................................................................................ |
8 |
Sound Quality/Field ........................................................................................................................................... |
9 |
Adjusting the Volume ......................................................................................................................................................... |
9 |
Adjusting the Super Bass ................................................................................................................................................... |
9 |
Control the Loudness ......................................................................................................................................................... |
9 |
Preset Equalizer .................................................................................................................................................................. |
9 |
Listening to Radio Broadcasts ...................................................................................................................... |
10 |
DAB Radio ........................................................................................................................................................................ |
10 |
FM Radio ........................................................................................................................................................................... |
13 |
CD Operation ................................................................................................................................................. |
16 |
CD Playing ....................................................................................................................................................................... |
16 |
Direct Select track ............................................................................................................................................................. |
16 |
To Skip Search and Play ................................................................................................................................................... |
16 |
To Search ........................................................................................................................................................................... |
16 |
Program Play ..................................................................................................................................................................... |
16 |
Random Play ..................................................................................................................................................................... |
16 |
Playing the Beginning of Each Selection ........................................................................................................................ |
17 |
Playing Repeatedly .......................................................................................................................................................... |
17 |
Setting the Sleep Timer ................................................................................................................................ |
17 |
Protecting the Disc ....................................................................................................................................... |
18 |
Troubleshooting ............................................................................................................................................ |
18 |
Specifications ................................................................................................................................................. |
19 |
Please note: Because DAB digital radio is a developing technology, station availability can change without notice. As new multiplexes and transmitters are turned on, new stations will begin transmitting and new post codes will be able to receive DAB digital radio. Conversely, some DAB radio stations may disappear without notice.
- 1 -
Important Cautions
Thank you for purchasing this system. Please read these operating instructions before operating the
unit. The operating instructions should be retained for future reference.
For your safety
CAUTION
RISK OF ELECTRIC
S H O C K
DO NOT OPEN
CAUTION: TO REDUCE THE RISK OF ELECTRIC SHOCK, DO NOT REMOVE COVER. NO USER SERVICEABLE PARTS INSIDE REFER SERVICING TO QUALIFIED SERVICE PERSONNEL.
This symbol indicates that dangerous voltage constituting a risk of electric shock is present within this unit.
This symbol indicates that there are important operating and maintenance instructions in the literature accompanying this unit.
Caution:
To prevent fire or shock hazard, do not expose this equipment to rain or moisture.
CLASS 1
LASER PRODUCT
Caution:
This product uses a visible laser beam which could cause hazardous radiation exposure.
Be sure to operate the player correctly as instructed.
- 2 -
Precautions
This equipment has been designed and manufactured to meet international safety standards but, like any electrical equipment, care must be taken if you are to obtain the best results and safety is to be assured.
…………………………….
DO read the operating instructions before you attempt to use the equipment.
DO ensure that all electrical connections (including the mains plug, extension leads and inter-connections between the pieces of equipment) are properly made and in accordance with the manufacturer’s instructions. Switch off and withdraw the mains plug before making or changing connections.
DO consult your dealer if you are ever in doubt about the installation, operation or safety of your equipment. DO be careful with glass panels or doors on equipment
…………………………….
DON’T remove any fixed cover as this may expose dangerous voltages.
DON’T obstruct the ventilation openings of the equipment with items such as newspapers, tablecloths, curtains, etc. Overheating will cause damage and shorten the life of the equipment.
DON’T allow electrical equipment to be exposed to dripping or splashing, or objects filled with liquids, such as vases, to be placed on the equipment and don’t handle the power cord with wet hands.
DON’T place hot objects or naked flame sources such as lighted candles or nightlights on, or close to equipment. High temperatures can melt plastic and lead to fires.
DON’T use makeshift stands and NEVER fix legs with wood screws - to ensure complete safety always fit the manufacturer’s approved stand or legs with the fixings provided according to the instructions.
DON’T listen to headphones at high volume, as such use can permanently damage your hearing.
DON’T leave equipment switched on when it is unattended unless it is specifically stated
that it is designed for unattended operation or has a stand-by mode. Switch off using the switch on the equipment and make sure that your family knows how to do this. Special arrangements may need to be made for infirm or handicapped people.
DON’T continue to operate the equipment if you are in any doubt about it working
normally, or if it is damaged in any way - switch off, withdraw the mains plug and consult your dealer.
…………………………….
ABOVE ALL,
NEVER let anyone especially children push anything into holes, slots or any other opening in the case - this could result in a fatal electrical shock;
NEVER guess or take chances with electrical equipment of any kind…it is better to be safe than sorry!
Connections
Caution: Turn off all of the unit power sources before connection.
Make all connections before plugging the system into an AC power outlet.
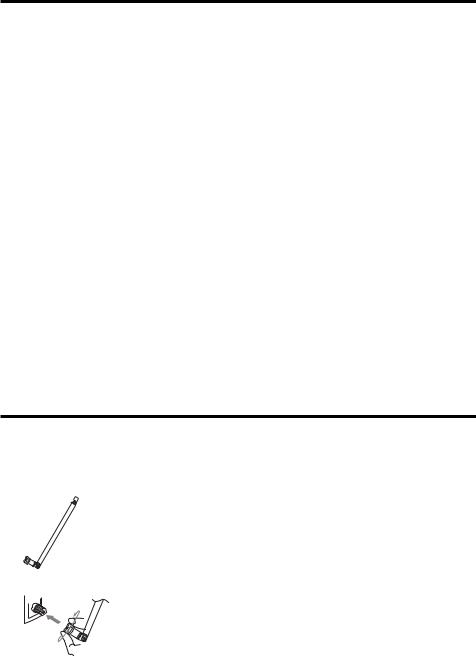
Connecting the Aerial
z Using the supplied telescopic aerial
zAn aerial connector should be connected to the aerial socket, tighten the aerial by hand or spanner provided.
zAdjust the aerial length and direction for best reception.
- 3 -

Connecting the Speakers
Connect the speaker cords between the terminals as shown below.
Connect the cords with a silver line to the (-) (L) (R) terminals and cords with a gold line to the (+) (G) terminals.
|
|
|
|
|
|
|
|
|
|
|
|
|
|
|
Connect the cords to (-) terminals |
|||||||||||||||||||
Right Speaker Box |
|
|
|
|
|
|
|
|
|
|
|
|
|
|
|
|
|
|
|
|
|
|
|
|
Left Speaker Box |
|||||||||
Back View |
|
|
|
|
|
|
|
|
|
|
|
|
|
|
|
|
|
|
|
|
|
|
|
|
Back View |
|||||||||
|
|
|
|
|
|
|
|
|
|
|
|
|
|
|
|
|
|
|
|
|
|
|
|
|
|
|
|
|
|
|
|
|
|
|
|
|
|
|
|
|
|
|
|
|
|
|
|
|
|
|
|
|
|
|
|
|
|
|
|
|
|
|
|
|
|
|
|
|
|
|
|
|
|
|
|
|
|
|
|
|
|
|
|
|
|
|
|
|
|
|
|
|
|
|
|
|
|
|
|
|
|
|
|
|
|
|
|
|
|
|
|
|
|
|
|
|
|
|
|
|
|
|
|
|
|
|
|
|
|
|
|
|
|
|
|
|
|
|
|
|
|
|
|
|
|
|
|
|
|
|
|
|
|
|
|
|
|
|
|
|
|
|
|
|
|
|
|
|
|
|
|
|
|
|
|
|
|
|
|
|
|
|
|
|
|
|
|
|
|
|
|
|
|
|
|
|
|
|
|
|
|
|
|
|
|
|
|
|
|
Connecting Auxiliary Equipment
Connect signal cords between the AUX input terminals on the amplifier and the output terminals of your auxiliary equipment.
Auxiliary equipment
Connecting Control Cable
Connect the power control cable to the CD player, the amplifier and the radio via connection on the rear of the units as shown below:
DAB Terminals Board
CD Terminals Board |
|
Amplifier Terminals Board |
||||||
|
|
|
|
|
|
|
|
|
|
|
|
|
|
|
|
|
|
|
|
|
|
|
|
|
|
|
|
|
|
|
|
|
|
|
|
|
|
|
|
|
|
|
|
|
|
|
|
|
|
|
|
|
|
Connecting the AC Power Cord
Insert the AC power cord into a wall outlet, and your system is at your command!
Caution: Be sure to unplug the power cord from the outlet when going out or when the system is not in use for an extended period of time.
- 4 -

Installation of Batteries in the Remote Control
1.Remove the battery compartment cover.
2.Insert two batteries (size AAA) correctly so that the + and - polarities match the polarity diagrams in the battery compartment.
*About half a year of normal operation can be expected when using batteries.
*When the batteries are exhausted, the remote will no longer operate the system. Replace both batteries at the same time with new ones.
*Don’t use an old battery with a new one.
*Don’t use different types of batteries together.
*When the remote is not to be used for a long time period of time, remove the batteries to avoid damage caused by battery leakage and corrosion.
Turning the Power On and Off
Turning the System On
Press the standby button (STANDBY) to turn the system on from standby mode. The display comes on.
Caution: When turning the system on, the system comes on ready to continue in the mode it was in when last turned off.
Turning the System Off
Press the standby button (STANDBY) again to turning the system off (called Standby Mode).
Caution: Be sure to unplug the system from the wall output when going out or when the system is not in use for an extended period of time.
- 5 -
 Loading...