


Table of Contents |
|
Before Connection .................................................................................................................. |
2 |
Control Section ........................................................................................................................ |
4 |
Main Set .................................................................................................................................................. |
4 |
Sub-Woofer .............................................................................................................................................. |
4 |
Video-Box ................................................................................................................................................ |
5 |
Remote Control ....................................................................................................................................... |
5 |
Wall Mounting Instructions ..................................................................................................... |
6 |
Main Set .................................................................................................................................................. |
6 |
Speakers ................................................................................................................................................... |
7 |
Video-Box ................................................................................................................................................ |
7 |
Connection .............................................................................................................................. |
8 |
Connect to the TV ................................................................................................................................... |
8 |
Connecting the Antenna ......................................................................................................................... |
9 |
Connecting Sub-Woofer ......................................................................................................................... |
9 |
Connecting AUX ...................................................................................................................................... |
9 |
Connecting the Speakers ..................................................................................................................... |
10 |
Connecting the Video-Box ................................................................................................................... |
10 |
Connect to an Amplifier With Digital Signal Input Terminal ............................................................ |
11 |
Connecting the AC Power Cord ........................................................................................................... |
11 |
Installation of Batteries in the Remote Control .................................................................. |
12 |
Turning the Power On and Off ............................................................................................. |
12 |
Normal playing ..................................................................................................................... |
12 |
Use the discs .......................................................................................................................................... |
12 |
Playing picture CD disc ........................................................................................................................ |
16 |
Playing a DivX disc ............................................................................................................................... |
16 |
DAB/FM Radio ....................................................................................................................................... |
17 |
Use the USB ........................................................................................................................................... |
22 |
Setting the Clock ................................................................................................................................... |
22 |
Setting the Daily Timer ........................................................................................................................ |
23 |
Setting the Sleep Timer ....................................................................................................................... |
23 |
Function Menu Setting List .................................................................................................. |
24 |
Menu function setup ............................................................................................................................. |
24 |
System Setup ........................................................................................................................................ |
24 |
Video Setup ........................................................................................................................................... |
25 |
Audio Setup ........................................................................................................................................... |
25 |
Protect the Disc .................................................................................................................... |
26 |
Troubleshooting ................................................................................................................... |
26 |
Specification ......................................................................................................................... |
27 |
Manufactured under license from Dolby Laboratories.
“Dolby”, “Pro Logic” and the double-D symbol are trademarks of Dolby Laboratories.
- 1 -
Before Connection
For your safety
CAUTION
RISK OF ELECTRIC SHOCK
DO NOT OPEN
CAUTION:
TO REDUCE THE RISK OF ELECTRIC SHOCK, DO NOT REMOVE COVER. NO USER SERVICEABLE PARTS INSIDE, REFER SERVICING TO QUALIFIED SERVICE PERSONNEL.
This symbol indicates that dangerous voltage constituting a risk of electric shock is present within this unit.
This symbol indicates that there are important operating and maintenance instructions in the literature accompanying this unit.
Caution:
To prevent fire or shock hazard, do not expose this equipment to rain or moisture.
Power Requirement
Because the power requirement of electrical products is different in various places, before you use this product, make sure that the power requirement of the product matches your household power.
Laser Product
This product is equipped with low power laser equipment inside. For your safety, don’t take apart any covers or try to take apart the product inside. Please contact an authorized service person for repairing.
CLASS 1
LASER PRODUCT
Caution:
This product is equipped with low power laser equipment inside, for your safety, don’t open the laser radiation protective equipment. Don’t look at the laser radiation when the equipment is operating.
SOME DOS AND DON’TS ON THE SAFE OF EQUIPMENT
This equipment has been designed and manufactured to meet international safety standards but, like any electrical equipment, care must be taken if you are to obtain the best results and safety is to be assured.
…………………………….
DO read the operating instructions before you attempt to use the equipment.
DO ensure that all electrical connections (including the mains plug, extension leads and interconnections between the pieces of equipment) are properly made and in accordance with the manufacturer’s instructions. Switch off and withdraw the mains plug before making or changing connections.
DO consult your dealer if you are ever in doubt about the installation, operation or safety of your equipment. DO be careful with glass panels or doors on equipment
…………………………….
DON’T remove any fixed cover as this may expose dangerous voltages.
- 2 -
DON’T obstruct the ventilation openings of the equipment with items such as newspapers, tablecloths, curtains, etc. Overheating will cause damage and shorten the life of the equipment.
DON’T allow electrical equipment to be exposed to dripping or splashing, or objects filled with liquids, such as vases, to be placed on the equipment and don’t handle the power cord with wet hands.
DON’T place hot objects or naked flame sources such as lighted candles or nightlights on, or close to equipment. High temperatures can melt plastic and lead to fires.
DON’T use makeshift stands and NEVER fix legs with wood screws - to ensure complete safety always fit the manufacturer’s approved stand or legs with the fixings provided according to the instructions.
DON’T listen to headphones at high volume, as such use can permanently damage your hearing. DON’T leave equipment switched on when it is unattended unless it is specifically stated that it is
designed for unattended operation or has a stand-by mode. Switch off using the switch on the equipment and make sure that your family knows how to do this. Special arrangements may need to be made for infirm or handicapped people.
DON’T continue to operate the equipment if you are in any doubt about it working normally, or if it is damaged in any way - switch off, withdraw the mains plug and consult your dealer.
…………………………….
ABOVEALL,
NEVER let anyone especially children push anything into holes, slots or any other opening in the case - this could result in a fatal electrical shock;
NEVER guess or take chances with electrical equipment of any kind…it is better to be safe than sorry!
…………………………….
*Before operating this system, check the voltage of this system to see if it is identical with the voltage of your local power supply.
*Unplug the system from the wall outlet if it is not used for a long time. To disconnect the cord, pull it out by grasping the plug
*To avoid electric shock, do not open the cabinet.
*There are no user serviceable parts inside. In case of system failure, unplug the power cord and consult your dealer
*Do not place this unit on an unstable or sloping surface. Ensure good ventilation surrounding the product. To prevent fire, do not cover the ventilation of the apparatus with news papers, table-cloths, curtains, etc.
*Do not place this unit close to strong magnetic field.
*Don’t place this unit close to dampness, or the moisture will affect the life of the laser head.
*If the system is brought directly from a cold to a warm location, or is placed in a very damp room, moisture may condense on the lens inside the player. Should this occur, the system will not operate properly. Remove the disc and leave the system turned on for about an hour until the moisture evaporates.
*Should any solid object or liquid fall into the system, unplug the system and have it checked by qualified personnel before operating it again.
*Do not use attachments not recommended by the product manufacturer as they may cause hazards.
- 3 -
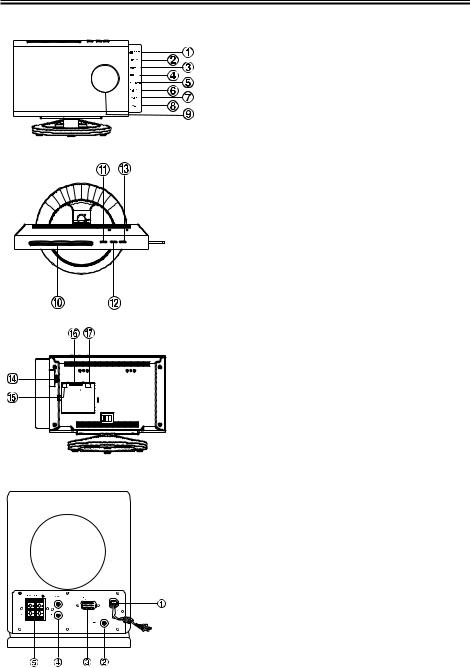
Control Section
Main Set
1. |
Play/Pause /Select |
2. |
Stop/Auto Scan |
3. |
Next /Search Forward |
|
Select Up |
4. |
Previous/Search Backward |
|
Select Down |
5. |
Repeat |
|
Information |
6. |
S-Bass |
7. |
Volume Up |
8. |
Volume Down |
9. |
VFD Display Lens |
10. |
Disc Tray |
11. |
Eject |
12. |
Function |
13. |
Standby |
14. |
USB Jack |
15. |
A / V Out |
16. |
Connect to Sub-Woofer |
17. |
Connect To Video Box |
Sub-Woofer
1. AC Power Cord
2. DAB/FM Antenna
3. Power Control Cable Socket
4. AUX Input Terminal
5. L&R Speaker Output Terminals
- 4 -

Video-Box
1. Coaxial Output Terminal
2. Component Video Output Terminal
3. Scart Socket
4. Connect To The Main Set
Remote Control
1. |
Volume Up Button |
|
|
|
|
|
|
28. PBC Button |
|
15. OSD Button |
|
||||||||
2. |
Tuner Function Button |
16. Time Search Button |
Menu Button |
|
|||||
3. |
Mute Button |
17. Vocal Mode Select Button |
29. AUX Function Button |
||||||
4. |
Preset Equalizer Button |
Language Select Button |
30. Title Button |
|
|||||
5. |
Super Bass Button |
18. Previous Button |
31. Fast Forward Button |
||||||
6. |
Sleep Button |
Select Down Button |
Preset Up Button |
|
|||||
|
Timer Button |
19. Subtitle Button |
32. Program Button |
|
|||||
7. |
Loudness Button |
20. Zoom Button |
Memory Button |
|
|||||
8. |
Clock Button |
21. Direction Button ( ) |
33. Direction Button ( |
) |
|||||
9. |
USB Function Button |
22. Play/Pause Button |
34. Number Buttons |
|
|||||
10. Clock Dim Button |
Select Button |
35. Fast Reverse Button |
|||||||
11. Slow Display Button |
23. Stop Button |
Preset Down Button |
|||||||
12. Next Button |
Auto Scan Button |
36. Direction Button ( |
) |
||||||
|
Select Up Button |
24. DVD Function Button |
37. OK Button |
|
|||||
13. Angle Button |
25. Volume Down Button |
38. Direction Button ( |
) |
||||||
14. Repeat Button |
26. Function Setting Button |
|
|
||||||
|
Information Button |
27. Standby Button |
|
|
|||||
- 5 -

Wall Mounting Instructions
Main Set
1.Connect all cables and secure into place using the clips on the back of the unit.
2.Fix the wall bracket in place using two screws ensuring the locking pin hole is facing upwards.
3.Screw the second part of the bracket in place using the two screws, ensuring the locking pin hole is facing upwards.
4.Slide the unit onto the wall bracket and secure in place using the locking pin.
5.The unit can also be mounted on a stand. Place the unit on the stand and secure into place using the screws provided.
- 6 -
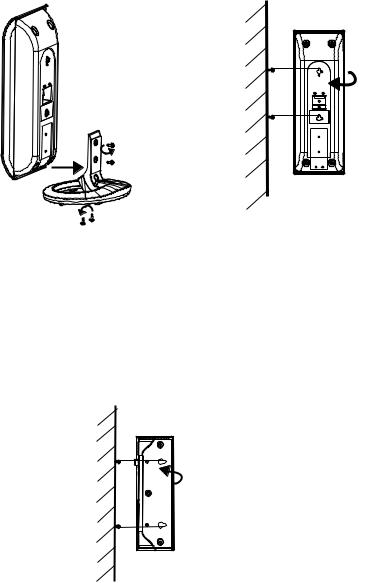
Speakers
1.Fix the two screws to the wall ensuring they are equal distance to the holes in the back of the speaker. Hang the speaker from the screws.
2.You can also attach the speakers to a stand by securing the screws underneath and at the back of the speaker.
Video-Box
1.Fix the two screws to the wall ensuring they are equal distance to the holes in the back of the video box. Hang the video box from the screws.
-7 -
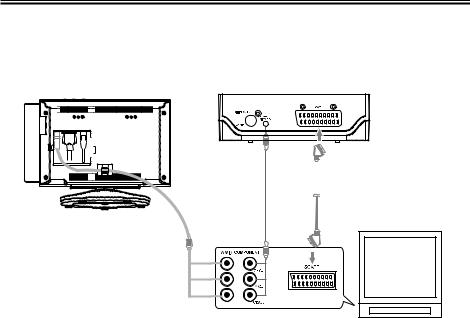
Connection
Caution: Please turn off the power before connecting.
Connect to the TV
Terminal board for the DVD player |
Terminal board for Video -Box |
|||||||||||
|
|
|||||||||||
|
|
|
|
|
|
|
|
|
|
|
|
|
|
|
|
|
|
|
|
|
|
|
|
|
|
|
|
|
|
|
|
|
|
|
|
|
|
|
|
|
|
|
|
|
|
|
|
|
|
|
|
|
|
|
|
|
|
|
|
|
|
|
|
|
|
|
|
|
|
|
|
|
|
|
|
|
|
|
|
|
|
|
|
|
|
|
|
|
|
|
|
|
|
|
|
|
|
|
|
|
|
|
|
|
|
|
|
|
|
|
|
|
|
|
|
|
|
|
|
|
|
|
|
|
|
|
|
|
|
|
|
|
|
|
|
|
|
|
|
|
|
|
|
|
|
|
|
|
|
|
|
|
|
|
|
Connections to TV
TV
Safety precautions
1.This DVD player has video output mode, you can choose it to connect with the TV terminal.
2.If your TV has component input terminal, then you can use the signal connecting cable to connect with the DVD player’s component output terminal. By doing so, the picture will be more clear.
3.To avoid affecting the picture output, don’t connect video, SCART, component at the same time.
4.DVD Player setting
*According to the colour system setting of theTV, select the colour system in the “TV MODE” function setting.
*If the DVD player is connected to wide screen TV, then set “TV TYPE” to “16:9” in the system setup item.
*If the DVD player is connected to normal TV, then set “TV TYPE” to “4:3PS” or “4:3LB” in the system setup item.
- 8 -
 Loading...