


QUICK START GUIDE
HI 903
KARL FISCHER
VOLUMETRIC TITRATOR
Revision 1.11
www.hannainst.com
1

QUICK START GUIDE
Dear customer,
Congratulations on choosing a Hanna Instruments Product.
This guide has been written for the HI 903 Karl Fischer Volumetric Titrator.
Please read this Quick Start Guide carefully before using the instrument. This guide will provide you with the necessary information for the correct use of the instrument.
The purpose of this guide is to present a quick overview of setting up and using the instrument.
For detailed information illustrating the extensive capabilities of your titrator, please refer to the Instruction Manual.
© 2013 Hanna Instruments
All rights are reserved. Reproduction in whole or in part is prohibited without the written consent of the copyright owner, Hanna Instruments Inc., 584 Park East Drive, Woonsocket, Rhode Island, 02895, USA.
2

|
QUICK START GUIDE |
Contents |
|
INTRODUCTION .......................................................................................................... |
3 |
SAFETY MEASURES..................................................................................................... |
4 |
TITRATOR CONNECTIONS ......................................................................................... |
5 |
USER INTERFACE ......................................................................................................... |
6 |
HOW TO SELECT YOUR LANGUAGE ............................................................................ |
7 |
HOW TO USE THE CONTEXTUAL HELP ....................................................................... |
7 |
METHODS .................................................................................................................... |
7 |
BEFORE PERFORMING THE FIRST TITRATION......................................................... |
8 |
HOW TO PERFORM THE FIRST TITRATION .............................................................. |
9 |
3

QUICK START GUIDE
4

QUICK START GUIDE
INTRODUCTION
The HI 903 Karl Fischer volumetric titrator is extremely flexible, capable of performing a wide variety of highly accurate and precise water content titration methods.
The HI 903 finds a titration endpoint using a polarized electrode and an advanced detection algorithm. A constant flow of current is maintained between the two platinum pins of the titrator’s electrode. When the solution in the titration vessel contains water, a relatively large voltage is required to maintain the flow of current between the pins. As the titration proceeds, the water in the sample is consumed by the titrant. At the end point, all of the water has been reacted and the cell contains excess iodine. The presence of excess iodine within the titration cell results in a reduction in the amount of voltage required to maintain the constant current between the pins of the electrode. The endpoint detection algorithm incorporated in the HI 903 analyzes both the electrode response to individual additions of titrant and the shape of the entire titration curve in order to determine the endpoint of the titration.
Titration reports and methods can be transferred to a PC via a USB interface, saved to a USB flash drive or printed directly from the titrator. An external monitor and keyboard can be attached for added convenience.
How can I find certain information?
1.This Quick Start Guide will help the user learn how to operate the titrator within a short period of time. The first analysis will be performed with the aid of the factory stored methods.
2.The Instruction Manual provides a complete description of the operating principles (user interface, general options, methods, titration mode, maintenance, etc.).
3.The contextual Help screens contain detailed explanations about what kind of data can be set or viewed in every displayed screen.
4.The Titration Theory booklet outlines the basic concepts of titration.
5

QUICK START GUIDE
SAFETY MEASURES
The following safety measures must be followed:
1.Never connect or disconnect the pump assemblies with the titrator turned on.
2.Verify that the burette and the attached tubing are as described in this guide.
3.Always check that the titrant, solvent and waste bottles, as well as the titration beaker are properly assembled.
4.Always wipe up spills and splashes immediately.
5.Avoid the following environmental working conditions:
•Severe vibrations
•Direct sunlight
•Atmospheric relative humidity above 80% non-condensing
•Environment temperatures below 10°C and above 40°C.
•Near heating or cooling sources
•Explosion hazards
6.Have the titrator serviced by qualified service personnel only.
7.Avoid inhalation of titrant/solvent vapors. Avoid contact with chemicals.
6

QUICK START GUIDE
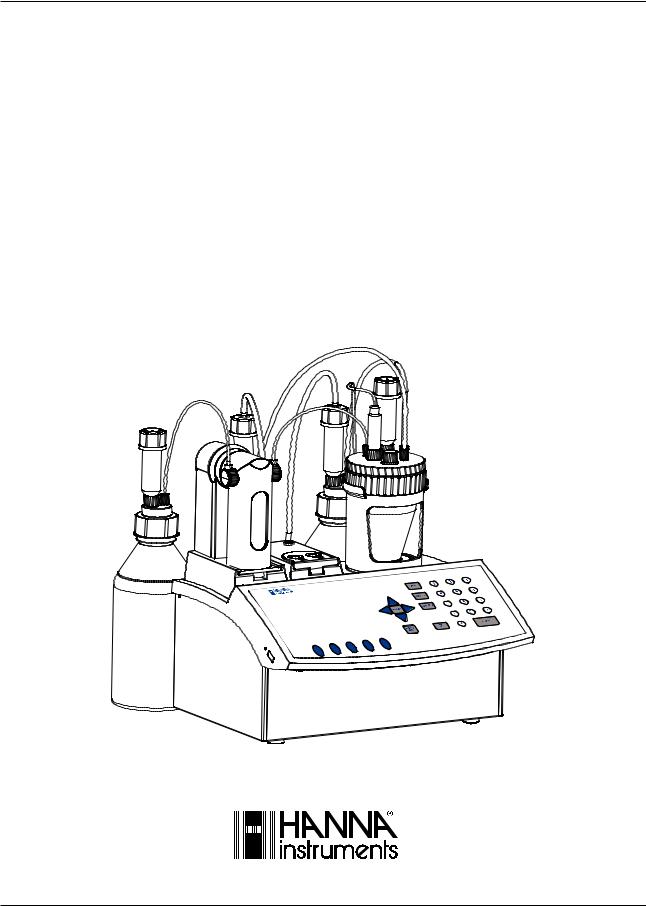
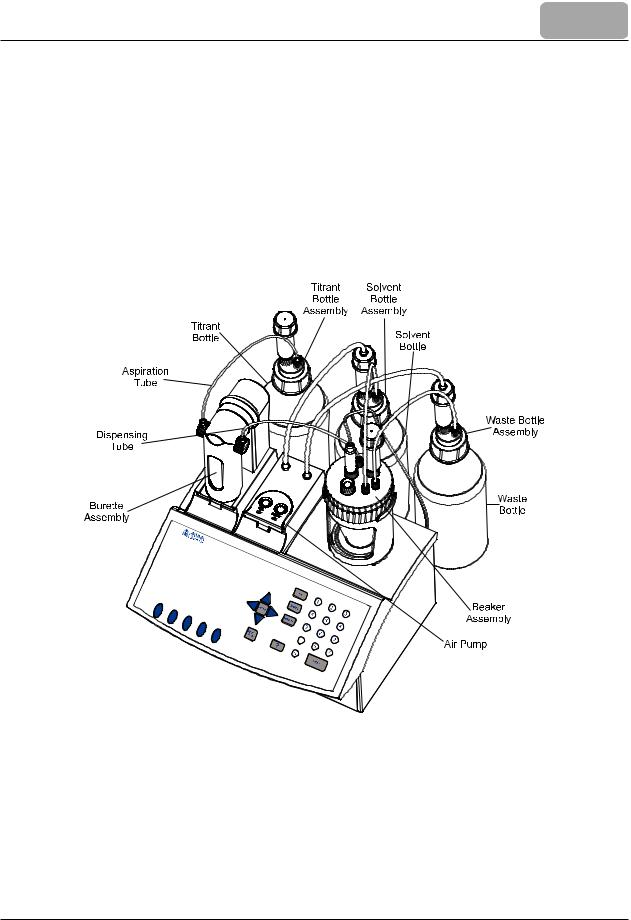
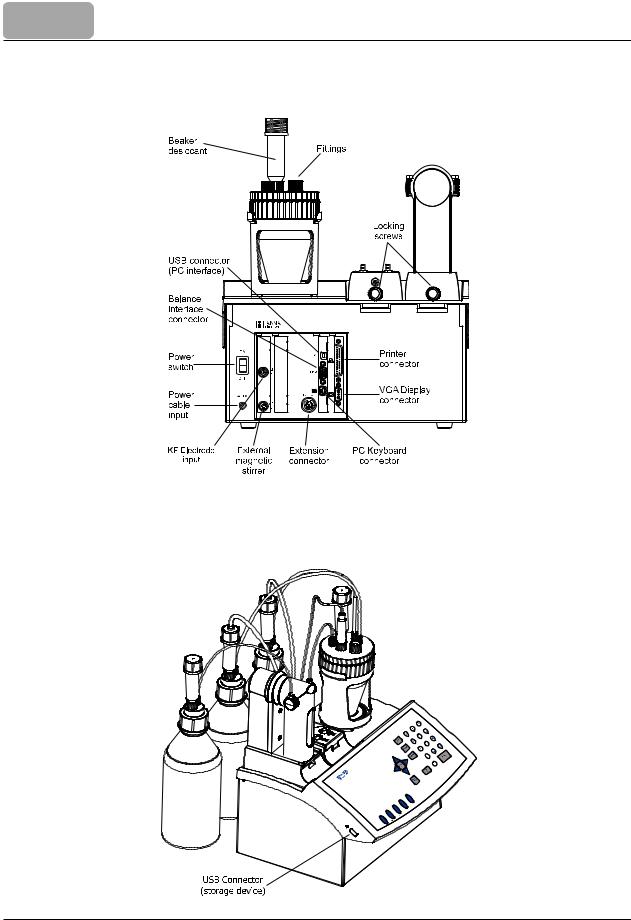
TITRATOR CONNECTIONS
Front View
Rear View
7
QUICK START GUIDE
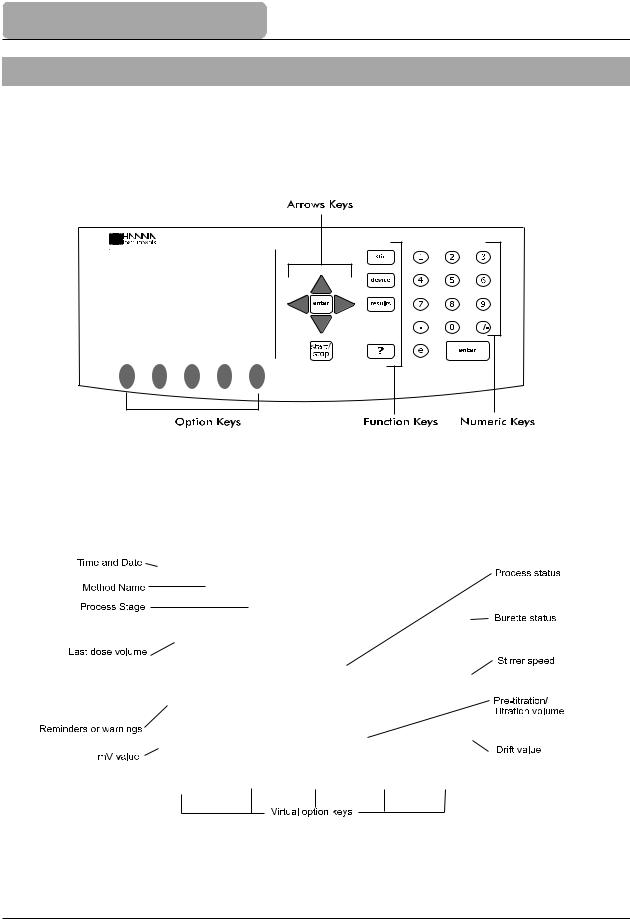
USER INTERFACE
Keypad
The titrators have their own keypad with 29 keys grouped in four categories, as follows:
Display
The titrators have a 5.7” graphical backlit color display. The Standby Mode screen is shown below with short explanations.
The user interface contains several screens. In each screen, many information fields are present at the same time. The information is displayed in an easy-to-read manner, using different size fonts.
Virtual option keys describe the function performed when the corresponding soft key is pressed.
8
QUICK START GUIDE
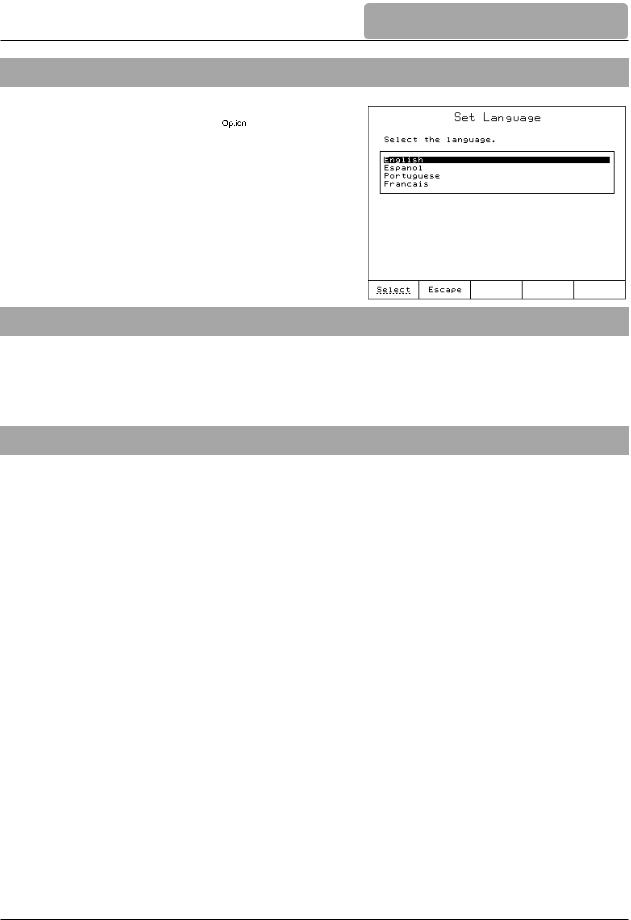
HOW TO SELECT YOUR LANGUAGE
To change the language, press  from the main screen. Highlight the Language option and then press
  . Using the
  and
and  keys select the language from the options listed in the Set Language screen and press
  .
.
Restart the titrator in order to apply the new language setting.
HOW TO USE THE CONTEXTUAL HELP
Any information about the titrator can be easily accessed by pressing  . The contextual help can be accesed at any time and it provides useful information about the current screen.
METHODS
The HI 903 Karl Fischer titrator can store up to 100 methods: these include up to 90 standard methods.
Standard Methods
Each titrator is supplied with a customized package of standard methods. Standard method packs are developed at Hanna Instruments laboratories to meet analysis requirements of specific industries.
User-Defined Methods
User-defined methods allow the user to create and save their own methods. Each new method is typically based on an existing method which is altered to suit a specific application.
9

QUICK START GUIDE
BEFORE PERFORMING THE FIRST TITRATION
Setup the Titrator
•Make sure that all of the titrator assemblies are properly installed (see Instruction Manual, Setup section).
•Make sure that the beaker system is properly sealed against atmospheric moisture (the fittings and tubes are correctly mounted).
•The desiccant had been properly dried.
Obtaining the Reagents
•The reagents (titrant and solvent) have to be suitable to the analysis requirements (see Instruction Manual, Appendix 2 for list of preferred titrants and solvents).
Priming the Burette
•Remove the dispensing tube from titration beaker (unscrew the fitting and remove the tube) and insert it in the waste bottle or separate waste container.
•From the Idle screen press  .
.
•Highlight the Prime Burette option and then press  .
.
•Enter the number of burette rinses. At least 3 rinses with the solution used for titration are recommended (allowing air bubbles to be evacuated).
•Press  to start.
•The message “Executing...” will be displayed.
Note: Make sure you have continuous liquid flow inside the burette. Do not use 
during normal filling of the burette if you are not sure that air bubbles have been completely evacuated. For accurate results, the aspiration tube, the dispensing tube and the syringe must be free of air bubbles.
•Carefully wipe the end of the dispensing tube to remove excess titrant.
•Insert the dispensing tube in the corresponding hole of the titration beaker and screw the fitting to seal the beaker.
10
QUICK START GUIDE
HOW TO PERFORM THE FIRST TITRATION
Method Selection
For this analysis we will use the HI8301EN Solvent with 5mg/ml 1-component Titrant standard method.
To select this method:
•Press  from the Idle screen. Use the
  and
and  keys to highlight the
HI8301EN Solvent with 5mg/ml 1-component Titrant method.
•Press  .
.
After accomplishing these operations, the method’s name will be displayed on the top line of the Idle screen.
Setting Method Parameters
To display the method parameters, press  . The View/Modify Method screen will be displayed.
Only certain parameters from the standard methods can be changed.
For this titration, only the KF titrant concentration value and the size of the solvent sample need to be entered as in the screen shown below.
To accomplish this:
•Highlight Titrant option from the View/Modify Method screen and then press  .
.
•The Karl Fischer Titrants screen will be displayed.
•Press  .
.
•Highlight “Standardized Titrant Concentration” and press  .
.
•Input the correct value, then press  .
.
•Press  three times to return to the Idle screen.
Setup Titration Report
Users can select the information that is stored for each titration that is performed.
To obtain proper information at the end of the titration, perform the following operations:
• From the main screen, press  and the Data Parameters screen will be displayed.
11

QUICK START GUIDE
•Highlight the Setup Titration Report option and press  .
.
•Mark the fields to be included with the “*” symbol using the  and
and  keys and press
  to toggle the selection.
•Press  and then press
  to return to the main screen.
Fill Titration Beaker with Solvent
The titration beaker must be filled with 1-component up to the MIN marker (about 50 mL of solvent):
•From the Idle screen, press  .
.
•Push and hold the FILL button located on the top of the air pump.
•Wait until the beaker is filled up to the MIN marker with solvent.
•Stop the air pump by pressing  and then confirm the approximate amount of solvent in the beaker.
Prepare the Solvent for Samples
Before beginning a titration, residual moisture inside the titration beaker and solvent must be reacted:
•From the Idle screen, press  . The titrator will enter Pre-Titration mode, start the magnetic stirrer, and begin dosing titrant into the titration beaker. If no titrant can be
seen moving through the anti-diffusion tip after several doses, press  and verify that no titrant is leaking from the burette housing or from the dispensing tube fittings.
•Once all residual moisture has been reacted (endpoint potential is reached), the titrator will enter Drift Analysis mode (assuming Automatic Drift Entry is selected). The titrator calculates the rate of atmospheric moisture seeping into the titration beaker for the next minute and displays the result in the lower right corner of the display.
•If the Drift Rate is stable and the endpoint potential is maintained, the titrator will enter Standby mode. The titrator continues to maintain the endpoint potential and update the background drift rate.
Preparing and Introducing the Sample
Sample Mass Preparation
Measuring the sample size by mass using an analytical balance will give the most reproducible results.
12

QUICK START GUIDE
Solid Samples:
•Solid samples with larger pieces may need to be pulverized or ground in an analytical mill. These samples can be added with a weighing boat by removing the sample port plug.
•Semisolid samples with non-homogeneous water content may need to be homogenized before addition. The sample can be added using a syringe without the needle by removing the sample port plug.
Liquid Samples:
•Samples with low viscosity will be added using a syringe with needle (injection through the septum).
Weigh the syringe before and after injection in order to increase precision.
Sample Volume Preparation
Liquid samples with low viscosity can be added by volume.
Samples should be added using a class A pipette.
Note: When adding samples using the weighing boat, pipette or syringe without needle, the septum has to be removed. Therefore the adding operation should be performed quickly in order to avoid the prolonged exposure of the beaker to atmospheric moisture.
Performing a Titration
•From the main screen press  for analyzing a sample or
  for titrant standardization. You will be prompted to enter the analyte size. Add a prepared sample according to a preparation method outlined above. Enter the analyte size
and press  or
or  . The titrator will start the analysis according to the selected method.
•At the end of the titration, the message “Titration Completed” will appear on the titration status, together with the final concentration of the moisture in the sample, the end point volume, and other relevant information. The titrator re-enters Standby mode (if active) in the background.
13

QUICK START GUIDE
Understanding the Displayed Information
During a titration, the following screen is displayed:
Viewing Graph During Titration
Press  to display the real time titration graph.
The curve displayed is a plot of Electrode Potential vs. Titrant Volume. A dashed horizontal line represents the user selected end point potential.
Titration Termination
The titration is terminated when the conditions of the Termination Criteria have been met. The default Termination Criterion is a mV value, in which the titration is terminated after the mV value remains below the end point potential for the selected stability time.
When the titration has ended, the titrator will display the final concentration of the moisture together with the basic titration information.
To view the custom report or titration graph, press  . To view statistics of multiple analyses, press
  .
.
For titrant standardizations, press  to update the active titrant with the displayed standardization result.
When done, press  to return to standby mode (if active).
Results
The results obtained from titration are stored in a report file that can be displayed, transferred to a USB storage device or a PC, or printed.
Viewing the last titration data
•Press  (while no titration is being performed).
•The Data Parameters screen will be displayed.
•From the Data Parameters screen highlight the
Review Last Titration Report option and press  .
.
14
QUICK START GUIDE
•The Review Result screen will be displayed.
•Use the  and
and  keys to display information related to the last titration performed. See titration report on page 15.
Printing the titration report
Connect a DOS / Windows compatible printer directly to the DB 25 connector (parallel port) located on the back of the titrator.
Note: To connect the printer, please turn off the titrator and the printer.
Printing out the report:
•From the Review Report screen, press  .
.
•During the information transfer to the printer, the message “Printing” will be displayed on the screen.
•Press  to return to the Data Parameters screen.
•Press  again to return to the main screen.
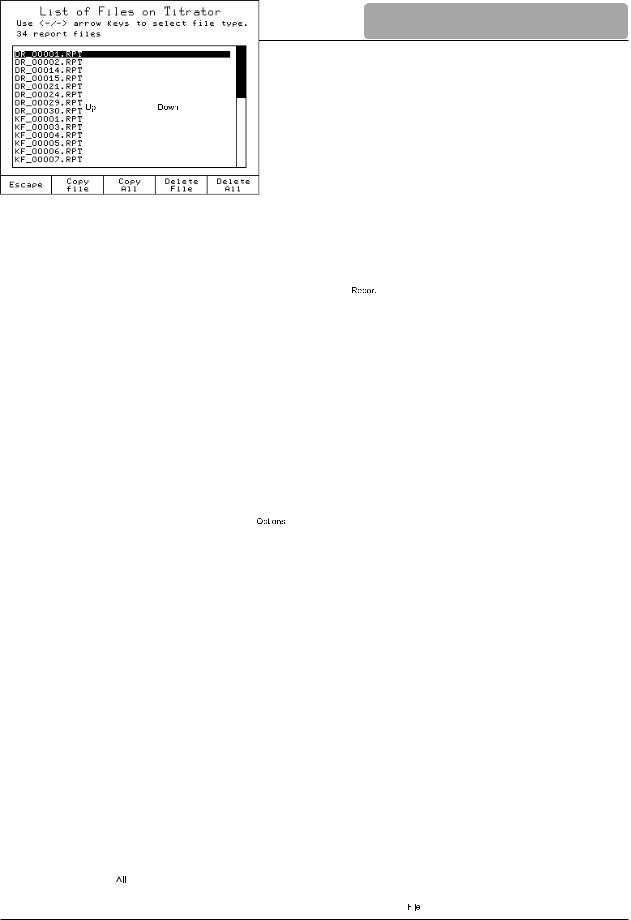
Saving the data on a USB storage device
This feature allows saving the results of titrations or drift logging sessions on a USB storage device.
•Insert the USB storage device into the USB socket.
•From the Idle screen, press  . The General Options screen will be displayed.
•Highlight the Save Files to USB Storage Device option using the  and
and  keys.
keys.
•Press  . The List of Files on Titrator screen will be displayed.
•Use the  or
or  keys to select the file type: “report files”.
•Press  to transfer all available reports to USB storage device, or highlight the name of the report file to be transferred and press
  .
.
15

QUICK START GUIDE
•Transferring a report file will automatically transfer the corresponding log file and titration graph BMP file (if applicable).
•Press  , to return to the General Options screen.
•Press  again, to return to the Idle screen.
Titration report
While scrolling with the  and
and  keys, the fields below can be seen on the titrator
display or printed. The same information is available on the saved report file (KF_00003.rpt in this example, with all report fields selected).
|
|
|
|
HI903 |
- |
Titration |
Report |
|
|
|
|||
Method |
Name: |
|
|
|
Moisture |
in |
Oil |
||||||
Time |
& |
Date: |
|
|
12:00 |
Jan |
01, |
2011 |
|||||
Titration |
ID: |
|
|
|
|
|
KF_00003 |
||||||
Company |
Name: |
|
Hanna |
Instruments |
|||||||||
Operator |
Name: |
|
|
KF |
Technician |
||||||||
Electrode |
Name: |
|
|
|
|
Probe 1 |
|||||||
Field |
1: |
|
Any |
text |
|
|
|
|
|
|
|||
Field |
2: |
|
|
|
|
|
|
|
Any |
text |
|||
Field |
3: |
|
|
|
|
|
|
|
Any |
text |
|||
Titrator |
Software |
Version: |
|
|
|
|
|
v1.0 |
|||||
Base |
Board |
Software |
Version: |
|
|
|
|
v2.6 |
|||||
Pump |
Software |
Version: |
|
|
|
|
|
v1.4 |
|||||
Titrator |
Serial Number: |
|
|
12345678 |
|||||||||
Analog |
Board |
Serial |
Number: |
|
12345678 |
||||||||
Pump |
Serial |
Number: |
|
|
|
12345678 |
|||||||
Analog |
Calibration |
Date: |
Aug |
22, |
2010 |
||||||||
|
|
|
|
|
Method Parameters |
|
|
|
|
||||
Name: |
|
|
|
|
|
|
|
Moisture |
in |
Oil |
|||
Method |
Revision: |
|
|
|
|
|
|
|
1.0 |
||||
Type: |
|
|
|
|
|
|
|
Sample Analysis |
|||||
Predispensing |
Rate |
|
|
|
|
|
|
|
None |
||||
Pre-Analysis Stir Time: |
|
|
|
|
0 |
Sec |
|||||||
Stirring |
Speed: |
|
|
|
|
900 |
RPM |
||||||
Stirbar |
Type: |
|
|
|
|
|
|
|
Medium |
||||
Drift |
Entry: |
|
|
|
|
|
|
Automatic |
|||||
Solvent: |
|
|
|
|
|
|
|
KF |
Solvent |
||||
Sample |
|
Parameters: |
|
|
|
|
|
|
|
||||
|
Sample |
Determ.: |
|
|
|
|
|
Normal |
|||||
|
Sample |
Name: |
|
|
|
|
|
|
|
Oil |
|||
|
Sample |
Type: |
|
|
|
|
|
|
|
Mass |
|||
Sample |
Size: |
|
|
|
|
|
|
0.5000 g |
|||||
Titrant: |
|
|
|
|
|
|
|
KF |
Titrant |
||||
|
Titrant |
Type: |
|
|
One |
Component |
|||||||
|
Nominal Titrant Conc.: 2.0000 mg/mL |
|
|
||||||||||
|
Stdz. |
Titrant |
Conc.: |
2.0000 |
|
mg/mL |
|||||||
|
Date/Time: |
|
Jan |
01, 2011 |
12:00 |
||||||||
|
Titrant |
Age |
Reminder: |
|
2d:00h:00m |
||||||||
Control |
Parameters: |
|
|
|
|
|
|
||||||
|
Start Mode: |
|
|
|
|
|
|
Normal |
|||||
|
Standby |
|
Mode: |
|
|
|
|
|
Enabled |
||||
16

QUICK START GUIDE
Standby |
|
Duration: |
|
720 |
minutes |
|
||||||
Imposed |
|
Current: |
|
|
|
|
20 |
uA |
||||
Minimum |
Dose: |
|
0.5000 |
uL |
|
|||||||
Maximum |
|
Dose: |
|
|
30.0000 |
uL |
||||||
Timed |
Increment: |
|
|
|
1 |
second |
||||||
End |
Point |
Value: |
|
|
|
180.0 |
mV |
|||||
Signal |
Averaging: |
|
3 |
Readings |
||||||||
Flow |
Rate: |
|
|
|
10.0 |
mL/min |
||||||
Termination |
Parameters: |
|
|
|
|
|||||||
Maximum |
Duration: |
|
|
3600 |
sec |
|||||||
Maximum |
Titrant |
Volume: |
20.0000 mL |
|||||||||
Term. |
|
Criterion: |
|
|
mV End |
Point |
||||||
mV End |
|
Point: |
|
|
|
|
4 |
sec |
||||
Result |
Unit: |
|
|
|
|
|
|
|
|
|
% |
|
Nr |
|
Volume[ml] |
|
mV |
|
|
Time |
|||||
0 |
|
|
|
|
0.0000 |
|
403.6 |
|
00:00:00 |
|||
1 |
|
|
|
|
0.0000 |
|
403.5 |
|
00:00:01 |
|||
2 |
|
|
|
|
0.0028 |
|
403.1 |
|
00:00:03 |
|||
3 |
|
|
|
|
0.0078 |
|
402.3 |
|
00:00:05 |
|||
4 |
|
|
|
|
0.0128 |
|
402.6 |
|
00:00:06 |
|||
5 |
|
|
|
|
0.0178 |
|
403.0 |
|
00:00:08 |
|||
6 |
|
|
|
|
0.0228 |
|
402.5 |
|
00:00:09 |
|||
7 |
|
|
|
|
0.0278 |
|
402.4 |
|
00:00:11 |
|||
8 |
|
|
|
|
0.0328 |
|
402.7 |
|
00:00:12 |
|||
9 |
|
|
|
|
0.0378 |
|
402.5 |
|
00:00:14 |
|||
10 |
|
|
|
|
0.0428 |
|
402.9 |
|
00:00:16 |
|||
|
|
|
|
|
|
|
|
. |
|
|
|
|
|
|
|
|
|
|
|
|
. |
|
|
|
|
|
|
|
|
|
|
|
|
. |
|
|
|
|
256 |
|
|
|
|
0.9904 |
|
169.7 |
|
00:06:45 |
|||
257 |
|
|
|
|
0.9904 |
|
177.4 |
|
00:06:47 |
|||
258 |
|
|
|
|
0.9904 |
|
173.7 |
|
00:06:48 |
|||
259 |
|
|
|
|
0.9904 |
|
171.1 |
|
00:06:50 |
|||
260 |
|
|
|
|
0.9904 |
|
173.4 |
|
00:06:52 |
|||
261 |
|
|
|
|
0.9904 |
|
181.1 |
|
00:06:53 |
|||
262 |
|
|
|
|
0.9904 |
|
175.5 |
|
00:06:55 |
|||
263 |
|
|
|
|
0.9904 |
|
178.2 |
|
00:06:56 |
|||
264 |
|
|
|
|
0.9904 |
|
177.6 |
|
00:06:58 |
|||
|
|
|
|
|
|
Titration Results |
|
|
|
|||
Method |
Name: |
|
|
|
|
Moisture |
in |
Oil |
||||
Time & |
Date: |
|
|
|
12:00 |
Jan |
01, 2011 |
|||||
Sample |
Size: |
|
|
|
|
|
|
|
0.5291 g |
|||
Titrant |
Conc.: |
|
|
|
2.0000 |
mg/mL |
||||||
Drift Value: |
|
|
|
|
|
1.0 |
ug/min |
|||||
End Point |
Volume: |
|
|
0.9904 |
mL |
|||||||
Result: |
|
|
|
|
|
|
|
|
|
0.3730 % |
||
Titration |
Duration: |
|
06:58 |
[mm:ss] |
||||||||
Estimated |
Cell |
Volume: |
|
|
50.8 |
mL |
||||||
Titration |
went |
to Completion |
|
|
|
|||||||
Operator Name: |
|
|
|
|
Any text |
|||||||
Analyst |
Signature: |
____________________ |
||||||||||
17

QUICK START GUIDE
903 QS 10/13
18
INSTRUCTION MANUAL
HI 903
KARL FISCHER
VOLUMETRIC TITRATOR
Revision 1.11
WWW.HANNAINST.COM
1

Dear customer,
Congratulations on choosing a Hanna Instruments product.
Please read this instruction manual carefully before using the instrument. This manual will provide you with the necessary information for the correct use of the instrument.
© 2013 Hanna Instruments
All rights are reserved. Reproduction in whole or in part is prohibited without the written consent of the copyright owner, Hanna Instruments Inc., 584 Park East Drive, Woonsocket, Rhode Island 02895, USA.
2
|
TABLE OF CONTENTS |
Chapter 1. |
INTRODUCTION |
Chapter 2. |
SETUP |
Chapter 3. |
USER INTERFACE |
Chapter 4. |
GENERAL OPTIONS |
Chapter 5. |
METHODS |
Chapter 6. |
TITRATION |
Chapter 7. |
AUXILIARY FUNCTIONS |
Chapter 8. |
MAINTENANCE, PERIPHERALS |
Chapter 9. |
OPTIMIZATION |
Appendix 1. |
TECHNICAL SPECIFICATIONS |
Appendix 2. |
RECOMMENDED REAGENTS |
Appendix 3. |
TITRATOR COMPONENTS |
3
4

INTRODUCTION
1INTRODUCTION
The HI 903 is an automatic volumetric Karl Fischer titrator with high accuracy, great flexibility and repeatability.
The titrator is designed to perform titrations for a variety of sample types. The main attributes of this titrator are:
Flexibility |
Support up to 100 titration methods (standard and user defined). |
|
User defined titrant and standard database. |
High accuracy |
Precise dosing system, capable of delivering as little as 0.125 L of titrant with a single |
|
dose. |
|
Precise mV measurement and current ( A) control. |
Repeatability |
Powerful built-in algorithms for termination criteria based on fixed mV endpoint or |
|
absolute/relative drift. |
Quick results |
Pre-defined titration methods. |
|
Pre-dispensing feature. |
|
Dynamic dosing feature. |
|
Balance interface for automatic weighing. |
Complete report |
Results are displayed directly in the selected units along with the titration information. |
|
Titration graph can be displayed on the LCD and saved as a bitmap. |
|
Customizable titration reports and drift analysis reports can be printed, saved on a USB |
|
storage device or transferred to a PC via the USB interface. |
Result history |
Titrant standardization and sample analysis results averaging. |
GLP features |
Titrant age reminder. |
|
Fields for specific annotations. |
Conditioning phase |
Automatic pre-titration for drying the solvent and titration beaker. |
|
Drift analysis adjusted titration results for improved accuracy. |
Sealed solvent |
Allows full operation in a completely sealed system, minimizing water vapor entry. |
system |
|
Self diagnosis and |
Integrated help screens are available. |
integrated help |
Self diagnosis features for peripheral devices including pump, valve, burette and stirrer. |
|
Error management with warning and error messages. |
Large graphical display |
5.7” (320 x 240 pixels) graphical color display with backlight. |
|
Easy to view text and graphs. |
|
User friendly interface. |
This manual provides information regarding installation and functionality of the titrator and refined operation suggestions.
Before using the titrator it is recommended you become familiar with its various features and functionality.
1-1

INTRODUCTION
1-2

SETUP
Chapter 2. Contents
2 |
SETUP ................................................................................................... |
2 - 3 |
|||
2.1 |
Unpacking ............................................................................................. |
2 - 3 |
|||
2.2 |
Safety Measures ..................................................................................... |
2 - 4 |
|||
2.3 |
Installation ........................................................................................... |
2 - 5 |
|||
2.3.1 |
Titrator Top View........................................................................................ |
2 |
- |
5 |
|
2.3.2 |
Titrator Rear View ...................................................................................... |
2 |
- |
6 |
|
2.3.3 |
Titrator Left-side View ................................................................................. |
2 |
- |
6 |
|
2.3.4 |
Titrator Assembly ....................................................................................... |
2 |
- |
7 |
|
2.3.4.1 |
Connecting the Pumps ................................................................................. |
2 |
- |
7 |
|
2.3.4.2 |
Attaching the Burette ................................................................................... |
2 |
- |
9 |
|
2.3.4.3 Attaching the Beaker and Dispensing Tip ....................................................... |
2 - 1 0 |
||||
|
2.3.4.3.1 Beaker Top ............................................................................................. |
2 - 1 1 |
|||
2.3.4.4 |
Electrical Connections ................................................................................... |
2 - 1 3 |
|||
2.3.5 |
Titrant, Solvent, Waste Bottle Assembly ........................................................ |
2 - 1 4 |
|||
2.3.5.1 |
Titrant Bottle Assembly ................................................................................ |
2 - 1 4 |
|||
2.3.5.2 Solvent / Waste Bottle Assembly .................................................................. |
2 - 1 5 |
||||
2-1

SETUP
2-2

SETUP
2SETUP
2.1Unpacking
The titrator and the accessories are shipped in a single box containing:
|
|
ITEM |
QUANTITY |
1 |
Titrator ................................................................... |
1 pc. |
|
2 |
Dosing Pump Assembly ........................................... |
1 pc. |
|
3 |
Burette Assembly ..................................................... |
1 pc. |
|
|
• Burette (with 5 mL syringe) |
|
|
|
• |
Aspiration Tube with Fittings and Protection Tube |
|
|
• |
Dispensing Tube with Anti-Diffusion Tip, Fittings, |
|
|
|
and Protection Tube |
|
|
• |
Tube Locks |
|
|
• |
Tool for Burette Cap Removal |
|
|
• |
Light Protection Screen |
|
4 |
Air Pump Assembly ................................................. |
1 pc. |
|
5 |
Beaker Assembly ..................................................... |
1 pc. |
|
•Glass Beaker
•Beaker Ring
•Beaker Cap
•Stir Bar
•Desiccant
•Desiccant Cartridge
•Fittings, O-rings
6 |
Beaker Support ........................................................ |
1 pc. |
|
7 |
Pump Locking Screws with Plastic Head ..................... |
2 pcs. |
|
8 |
Titrant Bottle Assembly ............................................ |
1 pc. |
|
|
• |
Bottle Cap |
|
|
• |
Desiccant |
|
|
• |
Desiccant Cartridge |
|
|
• |
Fittings, O-rings |
|
9 |
Solvent Bottle Assembly ........................................... |
1 pc. |
|
•Bottle Cap
•Desiccant
•Desiccant Cartridge
•Fittings, O-rings
•Tubes (Silicone and PTFE Tubing)
2-3

SETUP
10 |
Waste Bottle Assembly ............................................. |
1 pc. |
|
|
• |
Bottle Cap |
|
|
• |
Desiccant |
|
|
• |
Desiccant Cartridge |
|
|
• |
Fittings, O-rings |
|
|
• |
Tubes (Silicone and PTFE Tubing) |
|
11 |
Calibration Key ........................................................ |
1 pc. |
|
12 |
Power Supply .......................................................... |
1 pc. |
|
13 |
USB Cable ............................................................... |
1 pc. |
|
14 |
Instruction Manual Binder ......................................... |
1 pc. |
|
15 |
USB Storage Device ................................................. |
1 pc. |
|
16 |
HI 900 PC Application (Install Kit on USB Stick) ......... |
1 pc. |
|
17 |
Quality Certificate .................................................... |
1 pc. |
|
18 |
ISO 8655 Burette Compliance Report ........................ |
1 pc. |
|
19 |
Karl Fischer Dual Platinum Pin Electrode .................... |
1 pc. |
|
See Appendix 3 section A 3 Titrator components for pictures.
If any of the items are missing or damaged, please contact your sales representative.
Note: Save all packing materials until you are sure that the instrument functions correctly. Any damaged or defective items must be returned in their original packing materials together with the supplied accessories.
2.2Safety Measures
The following safety measures must be followed:
1.Never connect or disconnect the pump assembly with the titrator turned on.
2.Verify that the burette and the attached tubing are assembled correctly (see Section 8.1 Burette Maintenance for more details).
3.Always check that the titrant, solvent, waste bottles and the titration beaker are properly assembled.
4.Always wipe up spills and splashes immediately.
5.Avoid the following environmental working conditions:
•Severe vibrations
•Direct sunlight
•Atmospheric relative humidity above 95% non-condensing
2-4
SETUP
•Environment temperatures below 10°C and above 40°C
•Explosion hazards
6.Have the titrator serviced only by qualified service personnel.
2.3Installation
2.3.1Titrator Top View
2-5
SETUP
2.3.2Titrator Rear View
2.3.3Titrator Left-side View
2-6
 Loading...